6.2 layers of the earth - sbsciencematters.com · lesson 6.2: layers of the earth lesson concept...
TRANSCRIPT

6.2 Layers on Earth: Plate Tectonics Science Matters 1
Grade Six Plate Tectonics Unit Lesson 6.2: Layers of the Earth
Lesson Concept The Earth has different layers with different densities and temperatures. Direct and Indirect evidence is used to explain the layers.
Link Lesson 6.1 established that relative density of materials are layered from most dense to least dense. This lesson uses direct and indirect evidence to explore properties of different layers of the Earth. Lesson 3 explores the role of convection in moving earth materials between and within layers.
Time 2 weeks (approximately 8 class periods). The lesson includes six
individual sessions. Each session has an engage, explore and explain. The final extend and evaluation is in session 6. Session 1: (50 min.) The Earth’s interior has many layers Session 2: (50 min) Earth’s layers can be represented using a variety of models. Session 3: (60 min.) Indirect evidence is used to explain Earth layers. Session 4: (50 min.) Direct evidence is used to explain the top layer of the crust. Session 5: (50 min.) Research Project: Earth has different layers with different densities and temperatures. Session 6: (200-250 min) Culminating student product: Earth has different layers with different densities and temperatures.
Materials Each session (1-6) has materials and advanced preparation in the
following boxes. Session 1: Materials and Advanced Preparation Materials: Whole class
• Globe • Bill Nye video “Earth’s Crust” SBCEO Portal, CA Streaming • Chart paper/white board • Word Wall

6.2 Layers on Earth: Plate Tectonics Science Matters 2
Individual • Student Journals
Advance Preparation:
1. Gather Materials 2. Preview Video 3. Prepare cards for word wall
Session 2: Materials and Advanced Preparation Materials Whole Class
• 1 Meter Wheel (digital preferred available at Garden Centers)
• Journey to Center of the Earth Teacher packet (download from internet http://web.ics.purdue.edu/~braile/edumod/journey/journey.htm
• Location Markers (Teacher Packet) Individual • Student brochure ( Teacher Packet) • Student journal • 4-5 Peanut M&Ms per student
Advance Preparation: 1. Download “Journey to the Center of the Earth” teacher packet.
Read information prior to lesson. http://web.ics.purdue.edu/~braile/edumod/journey/journey.htm 2. Read teacher narrative and highlight important facts to share
with students as you walk the “Journey to the Center of the Earth”
3. Duplicate student brochure from the “Journey to the Center of the Earth” teacher packet for each student.
4. Prepare location markers in label section of the teacher packet.

6.2 Layers on Earth: Plate Tectonics Science Matters 3
Session 3: Materials and Advanced Preparation Materials Small Group: (groups of 3-4)
• 3 opaque film canisters filled with mystery contents per pair of students (contents may include: cotton balls, sand, rice, marbles, brads, paper clips, rubber-bands, broken crayons, etc). Make sure are sealed shut and students can’t open them
• 3 empty film canisters per pair of students • 1 tub per table group of miscellaneous materials used to fill sealed
canisters plus some extra materials that were not used as detractors.
• Scales available in the room for weighing canisters • 1 rock per pair
Individuals:
• Student lab sheet (H1a & b -Inferring Lab)
Advance Preparation 1. Gather Materials
2. Duplicate Lab sheets (H1a and H1b) 3. Prepare canisters (3 for pair of students) with mystery contents
and number them. Keep a key of number and its contents. 4. Prepare empty canisters (3 per pair of students) and tub of
materials that includes all contents of original canisters. Session 4: Materials and Advanced Preparation Materials Whole Class • Several Road Cut photos (alternative visual) Individual
• One layered cupcake per student • 5 clear straws per student cut in half (10 total) • scissors • paper towel or napkin • Student lab sheet per student (H3)
6.2 Layers on Earth: Plate Tectonics Science Matters 4
Advanced Preparation 1. Print parent baking guideline sheet (H2) and arrange for parents
to make cupcakes. 2. Gather materials 3. Print Student lab sheet
Session 5: Materials and Advanced Preparation Materials Whole Class
• 7 pages Chart Paper Individual • Textbook section on earth’s layers • 1 Marker per table group (different color for each table)
Advanced Preparation 1. Gather materials
2. Select section of textbook for reading. 3. Prepare charts (7) with labels: Crust, Lithosphere,
Asthenosphere, Mantle, Outer Core, Inner Core, Magnetic Alignment
Session 6: Materials and Advanced Preparation
Materials Whole class Multiple staplers Groups Colored Pencils/Markers Individual
Layer booklet requirement sheets (H4 and H5) Outline sheets (Layers of the Earth: note-taking guide) (H6a-c)
4 (6x18”) construction sheet pages per student Advanced Preparation 1. Cut white construction paper for book pages: need 4 6x18” per
student

6.2 Layers on Earth: Plate Tectonics Science Matters 5
Procedures for each of the sessions (1-6) for lesson 6.2 follow in order of session: Session 1: The Earth’s interior has many layers. Procedures Engage 1 (10 minutes) The inside of the Earth is not visible. 1. Hold up a globe and remind students the globe is a model for the earth. Ask
students to use notebooks to record what they think the inside of the earth looks like, may draw it. Ask students to include a brief description of how they know.
2. Ask student to share ideas with a partner. Compare how your ideas are the same or different. Underline ideas different from your partner. The underlined activities are ideas we need to gather evidence to prove.
Explore/Explain I (40 minutes) The Earth’s Interior has many layers. 3. Ask students to guess whether anyone has ever been to the center of the Earth?
Explain to students that models are often used to understand what is inside the earth since we have not “journeyed to the center of the earth”.
4. Explain one way to learn about the layers on Earth is to use videos to explain ideas. Review your ideas from step #2 and think about any underlined ideas. The video “Earth’s Crust” might clarify underlined ideas.
5. Ask students to divide a notebook page into four sections or a “4 Square” grid. Explain the grid is used to take notes on four self-selected topics in the video. Ask students to select 4 topics of interest as the video plays.
6. Ask students to watch the Bill Nye “Earth’s Crust” video recording ideas (pictures or words) from the video on the “4 Square” grid in notebooks.
7. Ask students to share ideas recorded with a partner. Discuss notes and how scientists might have found out the information.
8. Display the following words on a word wall: crust, mantle, outer core and inner core. Ask students to share information about each of the layers. Record on a chart under the each word.
9. Ask students to review notebook drawing from steps 1 & 2 and redraw the model of the earth adding labels and any new information gained in the video.

6.2 Layers on Earth: Plate Tectonics Science Matters 6
Session 2: Earth’s layers can be represented using a variety of models Procedures Engage 2 (10 minutes) Models can be used to label layers.
1. Hold up a peanut M & M and ask students to explain how the “peanut” model of the earth can represent earth’s layers? Chart ideas.
2. Distribute 3 or 4 peanut M & M’s per student. Ask students to bite one peanut M & M in half. Describe what you see.
3. Ask students to look at one cross section of an M & M. Ask students to talk to a partner and decide what is representing the inner core, out core, mantle, and crust. Draw M & M peanut with earth labels in notebooks.
Teacher Note: Candy coating = crust, White of candy coating = Lithosphere, chocolate = Mantle, Peanut = core, inside part of peanut = inner core. 4. Explain to students that the larger earth layers include two sections where
most of the movement occurs. The crust is rigid like stone. What do you know about the mantle? Chart ideas.
5. Explain the rigid crust meets the liquid mantle and forms two small “transition” layers. One is called lithosphere meaning “stone” sphere. …the bottom of the crust. The other is called asthenosphere (weak sphere) the top of the mantle. This is where most movement takes place.
6. Ask students to bite another M&M and discuss what might represent the lithosphere…stone-sphere bottom of the crust. Is there any part of the M & M model to represent the weak sphere or soft part of the upper mantle called asthenosphere?
7. Discuss model: What is correct/not correct about the M&M model compared to the real earth?
Teacher Note: The upper mantle or asthenosphere is not represented. We need to add that to our mantle diagram.
Explore 2 (30 minutes) Earth layers are very large scale and take a large space to represent.
Teacher Note: Use the procedures from the Teacher Packet to pace off the scale model of the earth (specifically pages 5 and 19). The radius of 1:1,000,000 meters is paced off as the teacher reads pre-highlighted parts of the narrative. Use the meter wheel for marking off the meters.
8. Ask the students to go outside and pace off the scale of the universe. 9. Return to the classroom and debrief using the following questions: How was
the journey to the center of the earth model different or the same as the M & M model? What surprised you? Why would it take 53 days of walking 24 hours a day? How do temperatures change? Can we travel to the center of the earth yet?

6.2 Layers on Earth: Plate Tectonics Science Matters 7
10. How do models like the M & M or Journey to the Center of the Earth help you understand the layers of the earth or confuse you? Chart responses.
Explain 2 (10 minutes) Earth’s layers can be represented using a variety of models
11. Ask students to review the original drawing of the center of the earth from step 1 and step 9 from Session 1. Edit your original drawing adding information from M & M model and Journey to the Center of the Earth model.
12. Ask students to glue the “brochure” into notebook. Ask students to write reflection about what they know so far about the layers of the Earth. Use the prompts: “I Used to Think… I Now Know”

6.2 Layers on Earth: Plate Tectonics Science Matters 8
Session 3: Indirect Evidence is used to explain Earth layers. (Inferring Lab) Procedure: Engage 3 (10 minutes) Direct evidence means direct use of five senses to explore.
1. Ask partner students to observe a rock on their desk. Use five senses to make observations. Chart on left side of large paper.
2. Ask students how the center of the rock could be directly observed? Add ideas to chart. Label the chart Direct Evidence since we can use our five senses to make observations.
3. Ask students to think about how scientists know or observe the center of the Earth without direct observations? Chart ideas on the right side of the chart and label it In-Direct Evidence.
Explore 3: (20 minutes) Explore how indirect evidence is used in models. 4. Distribute 3 film canisters to each set of partners. Ask students to make
observations about each canister without opening the canister. Students will use a variety of methods to determine contents (tap, roll, shake, weigh, etc)
Explain 3: (10 minutes) Indirect Evidence is used to explain the Earth Model.
5. Distribute handout for Inferring Lab and record initial observations and prediction of contents. Explain the evidence you have for your prediction.
6. Lead a discussion using the following questions: a. What is different about the canisters? b. What is alike about the canisters? c. How did you obtain your evidence? d. How could you prove your idea without opening the canister?
Extend 3: (20 min. ) Indirect Evidence is used to explain the Earth Model 7. Distribute three empty canisters and content materials to each partner group.
Explain the challenge is to use your senses to create 3 duplicate canisters without opening the canisters.
Teacher Note: Duplicate only one canister if time is an issue.
8. Ask students to record how they know on the handout for Inferring Lab. 9. Ask partner groups to exchange model canisters with a second partner group.
Ask the second group to use senses to determine if they agree with partner groups models. Discuss use of inference or indirect evidence.
10. Lead a discussion using the following questions:

6.2 Layers on Earth: Plate Tectonics Science Matters 9
a. How did you determine which materials matched your containers? b. How do you know that your new canister matches the sealed canister? c. How is this lab similar to how scientists determine the Earth’s interior
layers? d. What is the evidence scientists use to know about the center of the earth?
Teacher Note: Scientists build models to explain materials that might be in the center of the earth. Seismic waves are used to determine new information based on what we know directly about properties of different materials. (Rocks both molten and hard)

6.2 Layers on Earth: Plate Tectonics Science Matters 10
Session 4: Direct evidence is used to explain layers of the crust. Procedures: Engage 4 (15 minutes) Models are used to represent the earth’s crust.
1. Distribute cupcakes and clear straws to students and explain the cupcake represents the earth’s crust. Ask students to think, pair, and share how the cupcake might represent the crust of the earth and how it might not represent the crust of the earth.
2. Ask students to predict what is under the top crust of the cupcake without touching the cupcake? What could be done to figure out what is under the crust?
3. Show a road cut photo of layers of rock in the crust of the Earth. Explain one way to find out what is under the crust is to cut away part of a hill. Another way is to drill a hole in the surface. We will show how this is done with the cupcake model.
Explore 4 (15 minutes) Direct evidence exploration of core samples in a model.
4. Ask students how the straw might be used to figure out what the inside of the cupcake looks like?
5. Explain that “miners” used metal tubes (straws in the model) to drill out one section of the earth as direct evidence. The advantage of this method is less of the earth needs to be removed to figure out what is under the crust.
6. Distribute the handout for “Geology Lab” and ask students to select 10 spots in the cupcake crust to drill a core sample with a straw. Drill the ten spots and record on the handout by drawing the layers.
Explain 4 (20 minutes) Core samples are direct evidence to determine types of rock in the crust.
7. Lead a discussion using the following questions: What did you observe from your core samples? Which layer is the oldest? How do you know? Which layer is the youngest? How do you know?
8. Ask students to use the core samples to infer and draw what the interior of the cupcake looks like?
9. Ask students to bite into the cupcake to determine if you were correct on your inference. Discuss accuracy of drawings with a partner.
10. How could scientists use this method (core samples) with rock in the crust to figure out what is under the crust? Why is this method called direct evidence? How is this different from indirect evidence?
6.2 Layers on Earth: Plate Tectonics Science Matters 11
Session 5: Earth has different layers with different densities and
temperatures. Procedures Engage 5 (10 minutes) Resources can be used to collect information about different layers of the Earth.
1. Ask students to turn to the pages in the textbook on earth’s composition. Predict what information might be presented in this section. Chart.
Explore/Explain 5 (40 minutes) Earth has different layers with different densities
and temperatures
2. Ask students to read the section thinking to find out if predictions are correct. 3. Show the 7 posters with titles of crust, lithosphere, asthenosphere, mantle, outer
core, inner core, magnetic alignment and then distribute a poster to each table group. Explain to students the process for sharing the reading is a carousel.
4. Ask each table group to start at a different poster. The table group brainstorms information about the title from the reading. Chart information directly on the chart. Record as many ideas as possible in 2-3 minutes at the chart.
5. Give a signal to the table groups that it is time to move to the next chart. Ask each group to pass their poster to the next table. Read the previous groups information and add your own.
6. The process is repeated until each group has had all charts. 7. Ask the last group to read the chart aloud. Ask students to listen carefully for any
ideas that need to be expanded or changed for clarity. 8. Explain the charts will provide data for our individual books to be developed
tomorrow about the interior of the earth.
6.2 Layers on Earth: Plate Tectonics Science Matters 12
Session 6: Earth has different layers with different densities and
temperatures Procedures:
Teacher Note: Layer booklets will be developed based on information of the entire set of sessions. (1-6) Resource page explains how to fold the paper. Optional is whether teacher or students folds the 4 sheets of paper.
Engage 6 (50 minutes) Information can be gathered from a variety of sources.
1. Distribute outline handout to students. Ask students to complete the outline based on the information from the previous lessons.
2. Share outlines with tablemates. Make changes based on feedback from tablemates.
Extend 6 (Multiple Days and/or Homework ) Earth has different layers with different densities and temperatures.
3. Distribute construction paper (4 sheets 6” X 18” folded to make booklet with layers) and ask students to combine sheets into the layer book.
4. Ask students to label each layer of the book on the bottom of each page as follows:
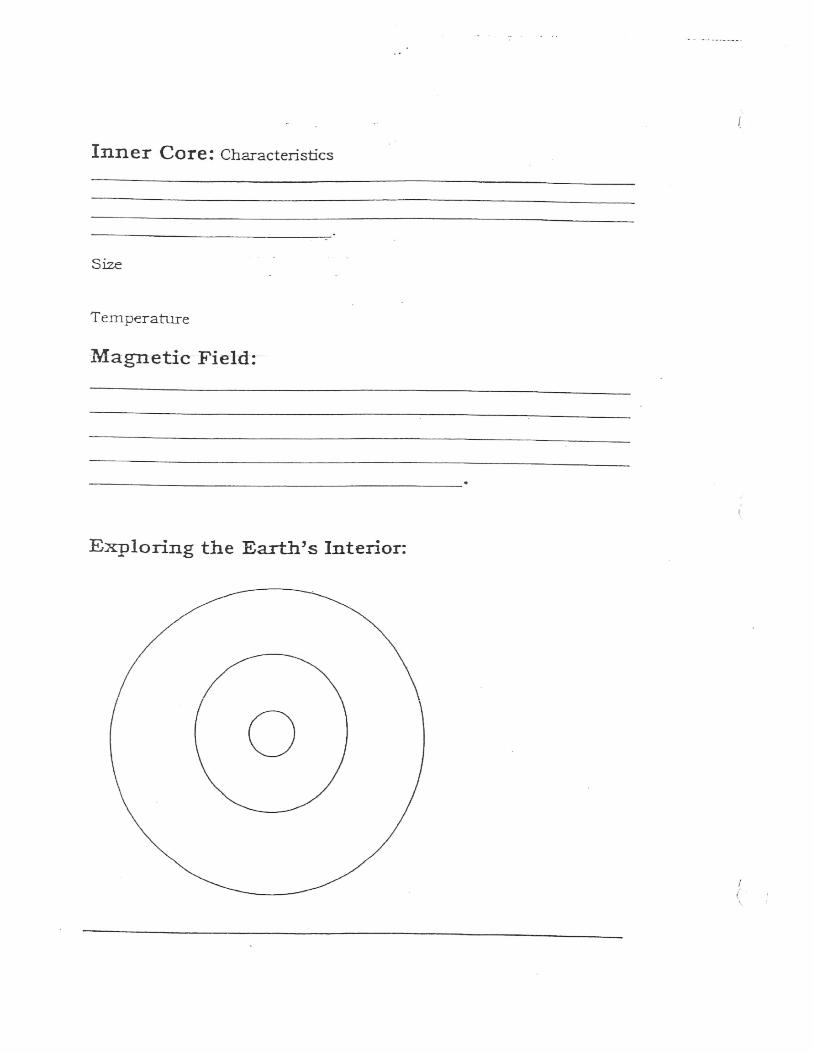
a. Top: Title page b. Crust c. Lithosphere d. Asthenosphere e. Mantle f. Outer Crust g. Inner Core h. Magnetic Field
5. Ask students to develop the information for each page using posters, notes from Sections 1-6 and outline.
Evaluate 6 (20 minutes) Earth has different layers with different densities and temperatures
6. Ask students to use the rubric to analyze the information in the layer book.
Teacher note: Rubric separate file in 6.2 folder.

6.2 Layers on Earth: Plate Tectonics Science Matters 13
Inferring Lab
How do scientists know what the Earth’s interior looks like? It is possible to dig for direct evidence. But, this direct evidence can only be gathered for a short distance through the top of the crust. Going to the center of the Earth is only possible in fantasy. So, how have the layers been determined? Scientists are able to determine and learn about the Earth’s interior through inferring. This is called indirect evidence. They use many clues to learn about what isn’t possible to actually see. Today you will use inferring to determine the contents of sealed film canisters. Objective: To investigate how scientists gather evidence about the Earth’s interior. Part I Materials: 3 opaque sealed film canisters filled with a mystery substance Procedures:
1. Pick one of the canisters. 2. Gather evidence about what is in the canister. You may tap, roll, shake, or weigh them. DO NOT OPEN
YOUR CANISTER! 3. Record the number on top of the canister and your observations below. 4. Repeat with the other two canisters.
Observations:
Canister #____ Canister #_____ Canister #____
Based on your observations, what do you think is in each canister? #_____ -‐ #_____ -‐ #_____ -‐ What differences were noticed between each canister?
H1a

6.2 Layers on Earth: Plate Tectonics Science Matters 14
Apart from their outside appearance, are the canisters similar in any way? How did you obtain your evidence? Part II Procedures:
1. Get a bucket with all the possible contents for each sealed opaque canister and three empty canisters 2. With your table partner, use your previous observations and the original canister to create your own
duplicate canister. 3. Record your content theories below.
Content Theory for each canister:
Canister #____ Canister #_____ Canister #____
How did you determine which materials matched your original containers? How do you know that your new canister matches the sealed canister? Exchange your model canisters and the original sealed canisters with your tablemates. Do they agree with your content selections? Why or why not? Conclusion: How is a canister like Earth? How is this lab similar to how scientists determine the Earth’s interior layers?
H1b

6.2 Layers on Earth: Plate Tectonics Science Matters 15
Parent directions for making
Layered Cupcakes
First of all… THANK YOU! You will be making 15 or so cupcakes. Use white cake mix. Once mixed, divide into 5 bowls or Ziploc bags and color each mix differently with food coloring. (ie: green, red, yellow, blue and leave one white) Fill foil lined cupcake papers with the layers. The easiest way I have found is to use the Ziploc bags and cut the corner. Squeeze into cups like a pastry bag. Mix up the layer order, so each cupcake is different from the rest. Bake as directed. Frost the top so none of the cupcake can be seen below the frosting. The project idea is to make core samples of the cupcakes (like geologists do with the earth) to determine what the layers will look like. Send all cupcakes to school, Monday, January 25th. Please have them delivered to my classroom before school starts. Thank you again!
H2

6.2 Layers on Earth: Plate Tectonics Science Matters 16
H3

6.2 Layers on Earth: Plate Tectonics Science Matters 17
H4 H4

6.2 Layers on Earth: Plate Tectonics Draft Aug. 2010 18
H5

6.2 Layers on Earth: Plate Tectonics Draft Aug. 2010 19
H6a
6.2 Layers on Earth: Plate Tectonics Draft Aug. 2010 20
H6b

6.2 Layers on Earth: Plate Tectonics Draft Aug. 2010 21
H6c