63-2685 b - intelligent control systems · spyder® lon programmable, vav/unitary controllers...
TRANSCRIPT

63-2685—01
PRODUCT DATA
Spyder® Lon Programmable, VAV/Unitary Controllers
PRODUCT DESCRIPTIONThe PUL1012S, PUL4024S, PUL6438S, PVL0000AS, PVL4022AS, PVL4024NS, PVL6436AS, and PVL6438NS controllers are part of the Excel 10 product line family. The eight controllers are Free Topology Transceiver (FTT) LONMARK®-compliant devices designed to control HVAC equipment. These controllers provide many options and advanced system features that allow state-of-the-art commercial building control. Each controller is programmable and configurable through software.
These controllers are for use in VAV (Variable Air Volume) and Unitary HVAC control applications. Each controller contains a host micro controller to run the main HVAC application and a second micro controller for LONWORKS® network communications. Each controller has flexible, universal inputs for external sensors, digital inputs, and a combination of analog and digital Triac outputs. The eight models are described in Table 1. The photo to the left is the model PVL6436AS, which includes the actuator.
Table 1. Controller configurations.
a One Universal Input (UI-1*) is user selectable as a fast digital pulse meter.Each controller communicates via the 78 kbps Echelon® LONWORKS® Network, using the FTT-10A LONWORKS® interface, and is LONMARK® compliant.Controllers are field-mountable to either a panel or a DIN rail.
ControllerModel
ProgrammableType
UniversalInputs
(UI)
DigitalInputs
(DI)
AnalogOutputs
(AO)
DigitalOutputs
(DO)
VelocityPressureSensor
(Microbridge)
Series 60FloatingActuator
PUL1012S Unitary 1a 0 1 2 NO NO
PUL4024S Unitary 4a 0 2 4 NO NO
PUL6438S Unitary 6 4 3 8 NO NOPVL0000AS VAV 0 0 0 0 YES YESPVL4022AS VAV 4a 0 2 2 YES YES
PVL4024NS VAV 4a 0 2 4 YES NO
PVL6436AS VAV 6 4 3 6 YES YESPVL6438NS VAV 6 4 3 8 YES NO
ContentsProduct Description 1Specifications 2Installation 3Checkout 21Controller Replacement 22
SPYDER® LON PROGRAMMABLE, VAV/UNITARY CONTROLLERS
63-2685—01 2
ORDERING INFORMATIONWhen purchasing replacement and modernization products from your TRADELINE® wholesaler or distributor, refer to the TRADELINE® Catalog or price sheets for complete ordering number.
If you have additional questions, need further information, or would like to comment on our products or services, please write or phone:
1. Your local Honeywell Automation and Control Products Sales Office (check white pages of your phone directory).2. Honeywell Customer Care
1885 Douglas Drive NorthMinneapolis, Minnesota 55422-4386
In Canada—Honeywell Limited/Honeywell Limitée, 35 Dynamic Drive, Toronto, Ontario M1V 4Z9.International Sales and Service Offices in all principal cities of the world. Manufacturing in Australia, Canada, Finland, France, Germany, Japan, Mexico, Netherlands, Spain, Taiwan, United Kingdom, U.S.A.
SPECIFICATIONSGeneral SpecificationsRated Voltage: 20–30 Vac; 50/60 HzPower Consumption:
100 VA for controller and all connected loads (including the actuator on models PVL0000AS, PVL4022AS, and PVL6436AS)
Controller Only Load: 20 VA maximum; models PUL1012S, PUL4024S, PUL6438S, PVL4024NS, and PVL6438NS.
Controller and Actuator Load: 21 VA maximum; models PVL0000AS, PVL4022AS, and PVL6436AS
External Sensors Power Output: 20 Vdc ±10% @ 75 mA maximum
VAV Operating & Storage Temperature Ambient Rating (models PVL0000AS, PVL4022AS, PVL4024NS, PVL6436AS, and PVL6438NS):Minimum 32 F (0 C); Maximum 122 F (50 C)
Unitary Operating & Storage Temperature Ambient Rating (models PUL1012S, PUL4024S, and PUL6438S):Minimum -40 F (-40 C); Maximum 150 F (65.5 C)
Relative Humidity: 5% to 95% non-condensingLED: Provides status for normal operation, controller down-
load process, alarms, manual mode, and error conditions
Velocity Pressure Sensor (models PVL0000AS, PVL4022AS, PVL4024NS, PVL6436AS, and PVL6438NS only)Operating Range: 0 to 1.5 in. H2O (0 to 374 Pa)Accuracy: ±2% of full scale at 32 F to 122 F (0 to 50 C); ±1%
of full scale at null pressure
Series 60 Floating Actuator (PVL0000AS, PVL4022AS, and PVL6436AS)Rotation Stroke: 95° ± 3° for CW or CCW opening dampersTorque Rating: 44 lb-in. (5 Nm)Run Time for 90° rotation: 90 seconds at 60 HzOperating Temperature: -4 F to 140 F (-20 to 60 C)
Real Time ClockOperating Range: 24 hour, 365 day, multi-year calendar
including day of week and configuration for automatic day-light savings time adjustment to occur at 2:00 a.m. local time on configured start and stop dates
Power Failure Backup: 24 hours at 32 F to 122 F (0 C to 50 C)Accuracy: ±1 minute per month at 77 F (25 C)
Digital Input (DI) CircuitsVoltage Rating: 0 to 30 Vdc open circuitInput Type: Dry contact to detect open and closed circuitOperating Range: Open circuit = False; Closed circuit = TrueResistance: Open circuit > 3,000 Ohms; Closed circuit < 500
Ohms
Digital Triac Output (DO) CircuitsVoltage Rating: 20 to 30 Vac @ 50/60HzCurrent Rating: 25 mA to 500 mA continuous, and
800 mA (AC rms) for 60 milliseconds
Analog Output (AO) CircuitsAll three analog outputs must be configured for either current or voltage. Configuring analog outputs individually for current or voltage is not possible.
ANALOG CURRENT OUTPUTS:Current Output Range: 4.0 to 20.0 mAOutput Load Resistance: 550 Ohms maximum
ANALOG VOLTAGE OUTPUTS:Voltage Output Range: 2.0 to 10.0 VdcMaximum Output Current: 10.0 mA
Analog outputs may be configured as digital outputs and operate as follows:
– False (0%) produces 0 Vdc, (0 mA)– True (100%) produces the maximum 11 Vdc, (22 mA)
Universal Input (UI) CircuitsSee Table 2 for the UI circuit specifications.

SPYDER® LON PROGRAMMABLE, VAV/UNITARY CONTROLLERS
3 63-2685—01
Table 2. Universal input circuit specifications.
BEFORE INSTALLATIONThe controller is available in eight models (see Table 1).
Review the power, input, and output specifications on page 2 before installing the controller.— Hardware driven by Triac outputs must have a minimum
current draw, when energized, of 25 mA and a maximum current draw of 500 mA.
— Hardware driven by the analog current outputs must have a maximum resistance of 550 Ohms, resulting in a maximum voltage of 11 volts when driven at 20 mA.If resistance exceeds 550 Ohms, voltages up to 18 Vdc are possible at the analog output terminal.
WARNINGElectrical Shock Hazard.Can cause severe injury, death or property damage.Disconnect power supply before beginning wiring or making wiring connections to prevent electrical shock or equipment damage.
INSTALLATIONThe controller must be mounted in a position that allows clearance for wiring, servicing, removal, connection of the LonWorks® Bus Jack, and access to the Neuron® Service Pin (see Fig. 16 and Fig. 17 on page 14).
The controller may be mounted in any orientation.
IMPORTANTAvoid mounting in areas where acid fumes or other deteriorating vapors can attack the metal parts of the controller, or in areas where escaping gas or other explosive vapors are present. Fig. 4–Fig. 7 on page 6 for mounting dimensions.
For PVL0000AS, PVL4022AS, and PVL6436AS models, the actuator is mounted first and then the controller is mounted. For the other models, go to “Mount Controller” on page 5 to begin the installation.
Mount Actuator onto Damper Shaft (PVL0000AS, PVL4022AS, and PVL6436AS)PVL0000AS, PVL4022AS, and PVL6436AS controllers include the direct-coupled actuator with Declutch mechanism, which is shipped hard-wired to the controller.
The actuator mounts directly onto the VAV box damper shaft and has up to 44 lb-in. (5 Nm) torque, 90-degree stroke, and 90 second timing at 60 Hz. The actuator is suitable for mounting onto a 3/8 to 1/2 in. (10 to 13 mm) square or round VAV box damper shaft. The minimum VAV box damper shaft length is 1-9/16 in. (40 mm).
The two mechanical end-limit set screws control the amount of rotation from 12° to 95°. These set screws must be securely fastened in place. To ensure tight closing of the damper, the shaft adapter has a total rotation stroke of 95° (see Fig. 1).
NOTES:1. The actuator is shipped with the mechanical end-
limit set screws set to 95 degrees of rotation. Adjust the two set screws closer together to reduce the rotation travel. Each “hash mark” indi-cator on the bracket represents approximately 6.5° of rotation per side.
2. The Declutch button, when pressed, allows you to rotate the universal shaft adapter (see Fig. 1).
IMPORTANTDetermine the damper rotation and opening angle prior to installation. See Fig. 2 below and Fig. 3 on page 4 for examples.
InputType
SensorType
OperatingRange
Room/Zone Discharge AirOutdoor AirTemperature
20K OhmNTC
-40 F to 199 F(-40 C to 93 C)
Outdoor AirTemperature
C7031Ga
a C7031G and C7041F are recommended for use with these controllers, due to improved resolution and accuracy when compared to the PT1000.
b One Universal Input (UI-1*) on the PUL1012S, PUL4024S, PVL4022AS, and PVL4024NS is user selectable as a fast digital pulse meter.
-40 F to 120 F (-40 C to 49 C)
C7041Fa -40 F to 250 F(-40 C to 121 C)
PT1000(IEC751 3850)
-40 F to 199 F(-40 C to 93 C)
T7770SetpointPotentiometer
500 Ohmto10,500 Ohm
-4° DDC to +4° DDC(-8° DDF to +7° DDF)or50 F to 90 F (10 C to 32 C)
Resistive Input Generic 100 Ohms to 100K OhmsVoltageInput
Transducer,Controller
0–10 Vdc
Discrete Input Dry Contact closure
Open Circuit > 3000 OhmsClosed Circuit < 3000 Ohms
Pulse Inputb Counter/Meter Max. frequency: 15 HzMin. pulse width: 20 msMax. chatter 5 ms
SPYDER® LON PROGRAMMABLE, VAV/UNITARY CONTROLLERS
63-2685—01 4
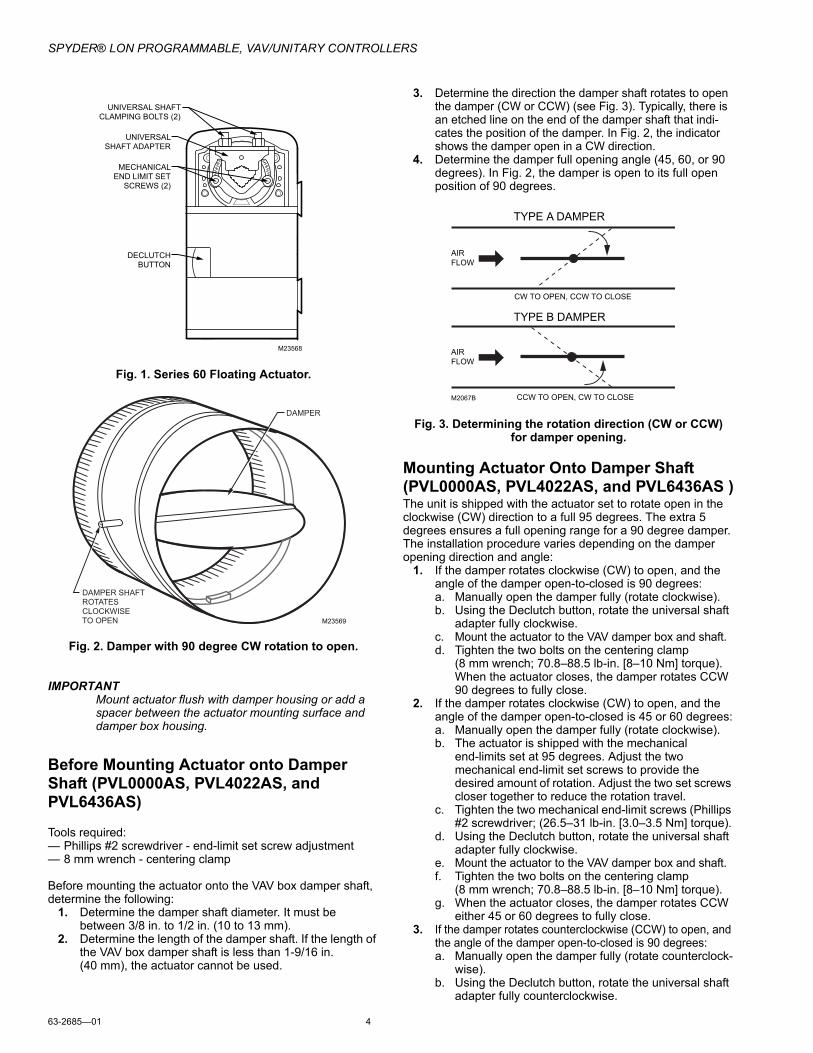
Fig. 1. Series 60 Floating Actuator.
Fig. 2. Damper with 90 degree CW rotation to open.
IMPORTANTMount actuator flush with damper housing or add a spacer between the actuator mounting surface and damper box housing.
Before Mounting Actuator onto Damper Shaft (PVL0000AS, PVL4022AS, and PVL6436AS)
Tools required:— Phillips #2 screwdriver - end-limit set screw adjustment— 8 mm wrench - centering clamp
Before mounting the actuator onto the VAV box damper shaft, determine the following:
1. Determine the damper shaft diameter. It must be between 3/8 in. to 1/2 in. (10 to 13 mm).
2. Determine the length of the damper shaft. If the length of the VAV box damper shaft is less than 1-9/16 in. (40 mm), the actuator cannot be used.
3. Determine the direction the damper shaft rotates to open the damper (CW or CCW) (see Fig. 3). Typically, there is an etched line on the end of the damper shaft that indi-cates the position of the damper. In Fig. 2, the indicator shows the damper open in a CW direction.
4. Determine the damper full opening angle (45, 60, or 90 degrees). In Fig. 2, the damper is open to its full open position of 90 degrees.
Fig. 3. Determining the rotation direction (CW or CCW) for damper opening.
Mounting Actuator Onto Damper Shaft (PVL0000AS, PVL4022AS, and PVL6436AS )The unit is shipped with the actuator set to rotate open in the clockwise (CW) direction to a full 95 degrees. The extra 5 degrees ensures a full opening range for a 90 degree damper. The installation procedure varies depending on the damper opening direction and angle:
1. If the damper rotates clockwise (CW) to open, and the angle of the damper open-to-closed is 90 degrees:a. Manually open the damper fully (rotate clockwise). b. Using the Declutch button, rotate the universal shaft
adapter fully clockwise. c. Mount the actuator to the VAV damper box and shaft. d. Tighten the two bolts on the centering clamp
(8 mm wrench; 70.8–88.5 lb-in. [8–10 Nm] torque). When the actuator closes, the damper rotates CCW 90 degrees to fully close.
2. If the damper rotates clockwise (CW) to open, and the angle of the damper open-to-closed is 45 or 60 degrees:a. Manually open the damper fully (rotate clockwise).b. The actuator is shipped with the mechanical
end-limits set at 95 degrees. Adjust the two mechanical end-limit set screws to provide the desired amount of rotation. Adjust the two set screws closer together to reduce the rotation travel.
c. Tighten the two mechanical end-limit screws (Phillips #2 screwdriver; (26.5–31 lb-in. [3.0–3.5 Nm] torque).
d. Using the Declutch button, rotate the universal shaft adapter fully clockwise.
e. Mount the actuator to the VAV damper box and shaft. f. Tighten the two bolts on the centering clamp
(8 mm wrench; 70.8–88.5 lb-in. [8–10 Nm] torque).g. When the actuator closes, the damper rotates CCW
either 45 or 60 degrees to fully close.3. If the damper rotates counterclockwise (CCW) to open, and
the angle of the damper open-to-closed is 90 degrees:a. Manually open the damper fully (rotate counterclock-
wise).b. Using the Declutch button, rotate the universal shaft
adapter fully counterclockwise.
UNIVERSAL SHAFT
CLAMPING BOLTS (2)
M23568
UNIVERSAL
SHAFT ADAPTER
MECHANICAL
END LIMIT SET
SCREWS (2)
DECLUTCH
BUTTON
M23569
DAMPER SHAFT
ROTATES
CLOCKWISE
TO OPEN
DAMPER
AIR
FLOW
AIR
FLOW
CW TO OPEN, CCW TO CLOSE
CCW TO OPEN, CW TO CLOSEM2067B
TYPE A DAMPER
TYPE B DAMPER

SPYDER® LON PROGRAMMABLE, VAV/UNITARY CONTROLLERS
5 63-2685—01
c. Mount the actuator to the damper box and shaft. d. Tighten the two bolts on the centering clamp (8 mm
wrench; 70.8–88.5 lb-in. [8–10 Nm] torque). When the actuator closes, the damper rotates CW 90 degrees to fully close.
4. If the damper rotates counterclockwise to open, and the angle of the damper open-to-closed is 45 or 60 degrees:a. Manually open the damper fully (rotate counterclock-
wise).b. The actuator is shipped with the mechanical
end-limits set at 95 degrees. Adjust the two mechanical end-limit set screws to provide the desired amount of rotation. Adjust the two set screws closer together to reduce the rotation travel.
c. Tighten the two mechanical end-limit screws (Phillips #2 screwdriver; (26.5–31 lb-in. [3.0–3.5 Nm] torque).
d. Using the Declutch button, rotate the universal shaft adapter fully counter-clockwise.
e. Mount the actuator to the VAV damper box and shaft. f. Tighten the two bolts on the centering clamp
(8 mm wrench; 70.8–88.5 lb-in. [8–10 Nm] torque).g. When the actuator closes, the damper rotates CW
either 45 or 60 degrees to fully close.
IMPORTANTSpecial precautions must be taken for dampers that open in a CCW direction. The actuator is shipped with its rotation direction set to CW to Open, which applies to the damper direction in steps 1 and 2 above. If the damper shaft rotates in the CCW direction to open, the controller software must be programmed to change the rotation to “Reverse to Open,” which applies to the damper direction in steps 3 and 4 above.
IMPORTANTIt is advisable to leave the dampers in an open position after installation to avoid the possibility of over-pressurizing the duct work on fan startup. Use the Declutch button (see Fig. 1 on page 4) to open the box damper on controllers that are powered down, to prevent over-pressurization in the duct work on fan startup. To Declutch, press and hold the button to disengage the motor. Turn the damper shaft until the damper is open and release the button. When power is restored to the controller, the controller synchronizes the damper actuator, so that the damper is in the correct position upon startup.
Mount ControllerNOTE: The controller may be wired before mounting to a
panel or DIN rail.
Terminal blocks are used to make all wiring connections to the controller. Attach all wiring to the appropriate terminal blocks (see “Wiring” on page 9).
See Fig. 4–Fig. 7 for panel mounting dimensions. See Fig. 8 on page 6 for DIN rail mounting.
Fig. 4. Panel mounting - controller and actuator dimensions in inches (mm) for PVL0000AS and
PVL4022AS only (PVL4022AS shown).
Fig. 5. Panel mounting - controller and actuator dimensions in inches (mm) for PVL6436AS only.
Fig. 6. Panel mounting - controller dimensions in inches (mm) for PUL1012S, PUL4024S, and PVL4024NS only
(PUL4024S and PVL4024NS shown).
NOTE: CONTROLLER CAN BE MOUNTED IN ANY ORIENTATION.M28648
8-9/32
(211) 1-15/16
(49)
6-9/32
(159)
3/16 (4.5) PANEL
MOUNTING HOLE (4X)
27/32(21)
4-1/8
(105)
6-1/4
(159)5-7/8
(149)
DEPTH IS
2-1/4 (57)
1 2 3 4 5 6 7 8
1 1 1 1 1 1 1 1 1 1 29 0 1 2 3 4 5 6 7 8 9 0
1 2 3 4 5 6 7 8 109 2 3 4 5 6 711 1 1 1 1 1 1
1 2 3 4 5 6 7 8 0922 2 2 2 2 2 2 2 33
1 2 3 4 5 6 7 8 0933 33 33 33 4
5-3/4
(146)
10-5/16 (262)
NOTE: CONTROLLER CAN BE MOUNTED IN ANY ORIENTATION.
PANEL MOUNTING HOLE
(4X) 3/16 IN. (4.5)
M28647
5-3/64
(128)
8-5/16 (211)
6-29/64 (164)1-55/64
(47)
6-17/64
(159)
7/16
(11)
DEPTH IS
2-1/4 (57)
M28649NOTE: CONTROLLER CAN BE MOUNTED IN ANY ORIENTATION.
3/16 (4.5) PANEL MOUNTING HOLE (4X)
1 1 1 1 1 1 1 2 2 2 2 23 4 5 6 7 8 9 0 1 2 3 4
1 1 1 1 1 1 1 2 2 2 2 23 4 5 6 7 8 9 0 1 2 3 4
1 1
1 2 3 4 5 6 7 8 9 0 1 2
1 1
1 2 3 4 5 6 7 8 9 0 1 2
DEPTH IS 2-1/4 (57)
4-13/16 (122)
4-1/8 (105)
6-1/4
(159)
5-7/8
(149)
4-13/16 (122)4-1/8 (105)
6-1/4
(159)
5-7/8
(149)
SPYDER® LON PROGRAMMABLE, VAV/UNITARY CONTROLLERS
63-2685—01 6
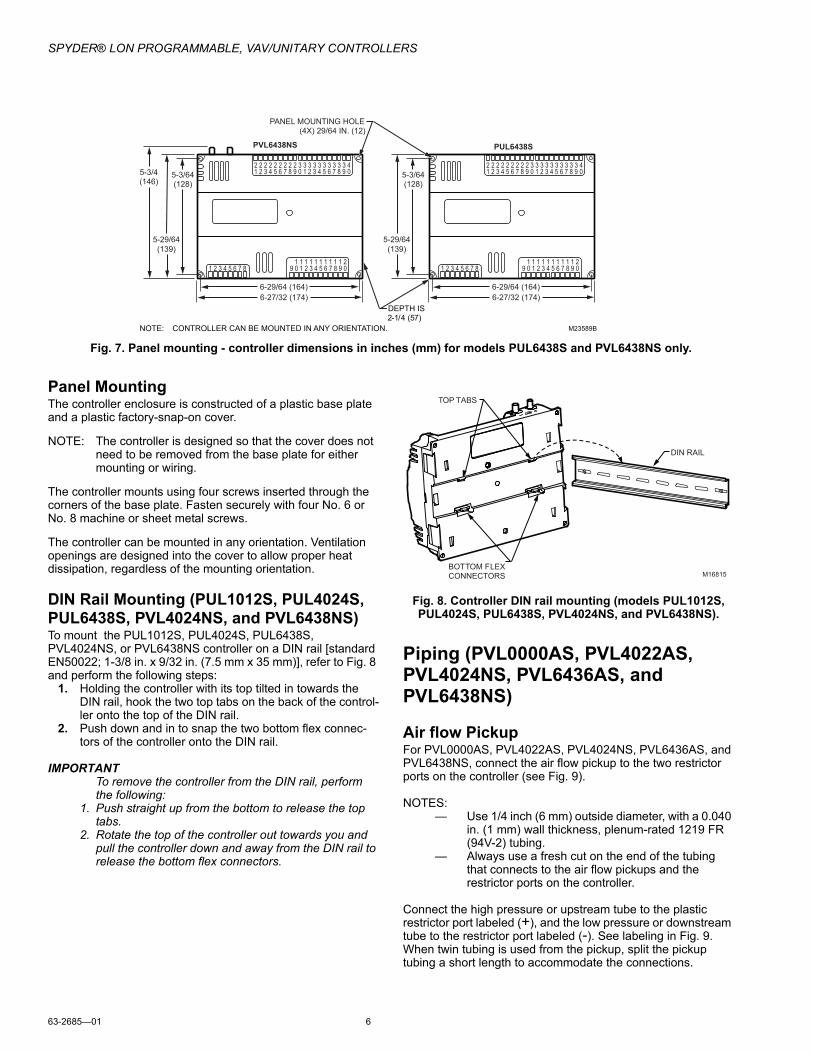
Fig. 7. Panel mounting - controller dimensions in inches (mm) for models PUL6438S and PVL6438NS only.
Panel MountingThe controller enclosure is constructed of a plastic base plate and a plastic factory-snap-on cover.
NOTE: The controller is designed so that the cover does not need to be removed from the base plate for either mounting or wiring.
The controller mounts using four screws inserted through the corners of the base plate. Fasten securely with four No. 6 or No. 8 machine or sheet metal screws.
The controller can be mounted in any orientation. Ventilation openings are designed into the cover to allow proper heat dissipation, regardless of the mounting orientation.
DIN Rail Mounting (PUL1012S, PUL4024S, PUL6438S, PVL4024NS, and PVL6438NS)To mount the PUL1012S, PUL4024S, PUL6438S, PVL4024NS, or PVL6438NS controller on a DIN rail [standard EN50022; 1-3/8 in. x 9/32 in. (7.5 mm x 35 mm)], refer to Fig. 8 and perform the following steps:
1. Holding the controller with its top tilted in towards the DIN rail, hook the two top tabs on the back of the control-ler onto the top of the DIN rail.
2. Push down and in to snap the two bottom flex connec-tors of the controller onto the DIN rail.
IMPORTANTTo remove the controller from the DIN rail, perform the following:
1. Push straight up from the bottom to release the top tabs.
2. Rotate the top of the controller out towards you and pull the controller down and away from the DIN rail to release the bottom flex connectors.
Fig. 8. Controller DIN rail mounting (models PUL1012S, PUL4024S, PUL6438S, PVL4024NS, and PVL6438NS).
Piping (PVL0000AS, PVL4022AS, PVL4024NS, PVL6436AS, and PVL6438NS)
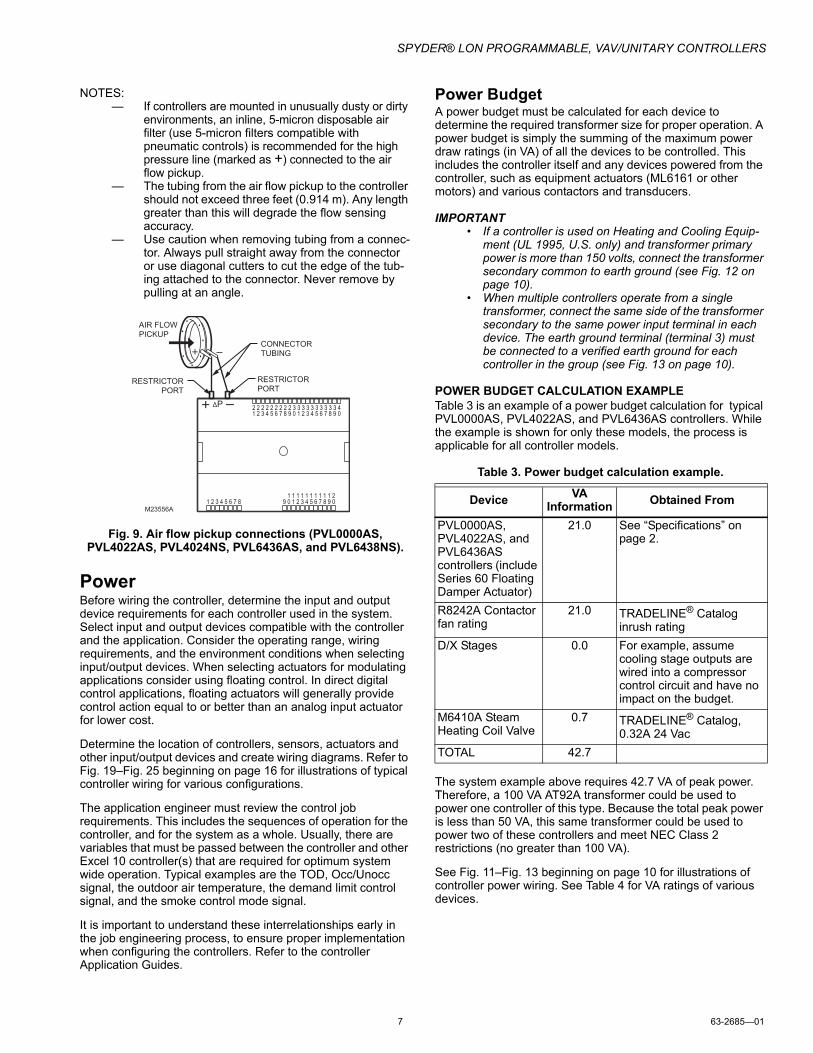
Air flow PickupFor PVL0000AS, PVL4022AS, PVL4024NS, PVL6436AS, and PVL6438NS, connect the air flow pickup to the two restrictor ports on the controller (see Fig. 9).
NOTES:— Use 1/4 inch (6 mm) outside diameter, with a 0.040
in. (1 mm) wall thickness, plenum-rated 1219 FR (94V-2) tubing.
— Always use a fresh cut on the end of the tubing that connects to the air flow pickups and the restrictor ports on the controller.
Connect the high pressure or upstream tube to the plastic restrictor port labeled (+), and the low pressure or downstream tube to the restrictor port labeled (-). See labeling in Fig. 9. When twin tubing is used from the pickup, split the pickup tubing a short length to accommodate the connections.
1 2 3 4 5 6 7 8 1 0 9 2 3 4 5 6 7 8 0 9 1 1 1 1 1 1 1 1 1 2 1
1 2 3 4 5 6 7 8 0 9 2 2 2 2 2 2 2 2 2 3 3
1 2 3 4 5 6 7 8 0 9 3 3 3 3 3 3 3 3 4
5-3/4
(146)
6-27/32 (174)
NOTE: CONTROLLER CAN BE MOUNTED IN ANY ORIENTATION.
PANEL MOUNTING HOLE
(4X) 29/64 IN. (12)
M23589B
5-3/64
(128)
6-29/64 (164)
5-29/64
(139)
1 2 3 4 5 6 7 8 1 0 9 2 3 4 5 6 7 8 0 9 1 1 1 1 1 1 1 1 1 2 1
1 2 3 4 5 6 7 8 0 9 2 2 2 2 2 2 2 2 2 3 3
1 2 3 4 5 6 7 8 0 9 3 3 3 3 3 3 3 3 4
6-27/32 (174)
5-3/64
(128)
6-29/64 (164)
5-29/64
(139)
PVL6438NS PUL6438S
DEPTH IS
2-1/4 (57)
DIN RAIL
TOP TABS
BOTTOM FLEX
CONNECTORS M16815
SPYDER® LON PROGRAMMABLE, VAV/UNITARY CONTROLLERS
7 63-2685—01
NOTES:— If controllers are mounted in unusually dusty or dirty
environments, an inline, 5-micron disposable air filter (use 5-micron filters compatible with pneumatic controls) is recommended for the high pressure line (marked as +) connected to the air flow pickup.
— The tubing from the air flow pickup to the controller should not exceed three feet (0.914 m). Any length greater than this will degrade the flow sensing accuracy.
— Use caution when removing tubing from a connec-tor. Always pull straight away from the connector or use diagonal cutters to cut the edge of the tub-ing attached to the connector. Never remove by pulling at an angle.
Fig. 9. Air flow pickup connections (PVL0000AS, PVL4022AS, PVL4024NS, PVL6436AS, and PVL6438NS).
PowerBefore wiring the controller, determine the input and output device requirements for each controller used in the system. Select input and output devices compatible with the controller and the application. Consider the operating range, wiring requirements, and the environment conditions when selecting input/output devices. When selecting actuators for modulating applications consider using floating control. In direct digital control applications, floating actuators will generally provide control action equal to or better than an analog input actuator for lower cost.
Determine the location of controllers, sensors, actuators and other input/output devices and create wiring diagrams. Refer to Fig. 19–Fig. 25 beginning on page 16 for illustrations of typical controller wiring for various configurations.
The application engineer must review the control job requirements. This includes the sequences of operation for the controller, and for the system as a whole. Usually, there are variables that must be passed between the controller and other Excel 10 controller(s) that are required for optimum system wide operation. Typical examples are the TOD, Occ/Unocc signal, the outdoor air temperature, the demand limit control signal, and the smoke control mode signal.
It is important to understand these interrelationships early in the job engineering process, to ensure proper implementation when configuring the controllers. Refer to the controller Application Guides.
Power BudgetA power budget must be calculated for each device to determine the required transformer size for proper operation. A power budget is simply the summing of the maximum power draw ratings (in VA) of all the devices to be controlled. This includes the controller itself and any devices powered from the controller, such as equipment actuators (ML6161 or other motors) and various contactors and transducers.
IMPORTANT• If a controller is used on Heating and Cooling Equip-
ment (UL 1995, U.S. only) and transformer primary power is more than 150 volts, connect the transformer secondary common to earth ground (see Fig. 12 on page 10).
• When multiple controllers operate from a single transformer, connect the same side of the transformer secondary to the same power input terminal in each device. The earth ground terminal (terminal 3) must be connected to a verified earth ground for each controller in the group (see Fig. 13 on page 10).
POWER BUDGET CALCULATION EXAMPLETable 3 is an example of a power budget calculation for typical PVL0000AS, PVL4022AS, and PVL6436AS controllers. While the example is shown for only these models, the process is applicable for all controller models.
Table 3. Power budget calculation example.
The system example above requires 42.7 VA of peak power. Therefore, a 100 VA AT92A transformer could be used to power one controller of this type. Because the total peak power is less than 50 VA, this same transformer could be used to power two of these controllers and meet NEC Class 2 restrictions (no greater than 100 VA).
See Fig. 11–Fig. 13 beginning on page 10 for illustrations of controller power wiring. See Table 4 for VA ratings of various devices.
M23556A
AIR FLOW
PICKUP
ΔP
1 2 3 4 5 6 7 8 1 0 9 2 3 4 5 6 7 8 0 9 1 1 1 1 1 1 1 1 1 2 1
1 2 3 4 5 6 7 8 0 9 2 2 2 2 2 2 2 2 2 3 3
1 2 3 4 5 6 7 8 0 9 3 3 3 3 3 3 3 3 4
RESTRICTOR
PORT RESTRICTOR
PORT
CONNECTOR
TUBING
Device VAInformation Obtained From
PVL0000AS, PVL4022AS, and PVL6436AS controllers (include Series 60 Floating Damper Actuator)
21.0 See “Specifications” on page 2.
R8242A Contactor fan rating
21.0 TRADELINE® Catalog inrush rating
D/X Stages 0.0 For example, assume cooling stage outputs are wired into a compressor control circuit and have no impact on the budget.
M6410A Steam Heating Coil Valve
0.7 TRADELINE® Catalog, 0.32A 24 Vac
TOTAL 42.7
SPYDER® LON PROGRAMMABLE, VAV/UNITARY CONTROLLERS
63-2685—01 8
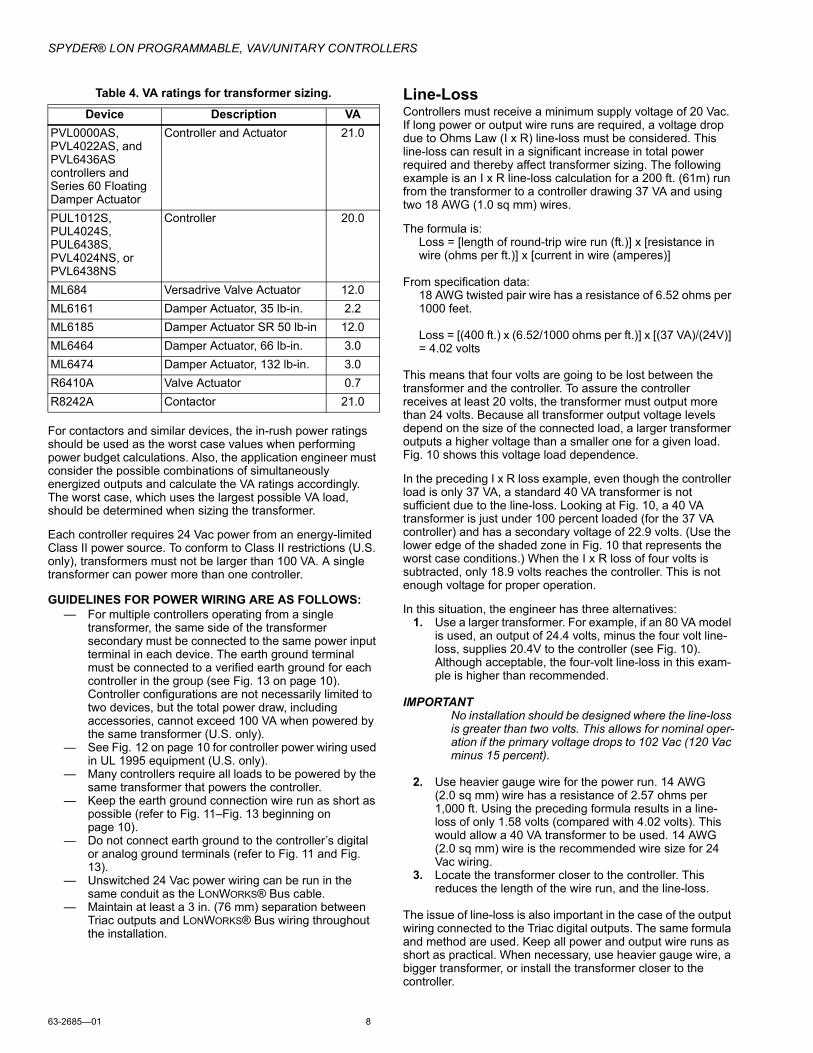
Table 4. VA ratings for transformer sizing.
For contactors and similar devices, the in-rush power ratings should be used as the worst case values when performing power budget calculations. Also, the application engineer must consider the possible combinations of simultaneously energized outputs and calculate the VA ratings accordingly. The worst case, which uses the largest possible VA load, should be determined when sizing the transformer.
Each controller requires 24 Vac power from an energy-limited Class II power source. To conform to Class II restrictions (U.S. only), transformers must not be larger than 100 VA. A single transformer can power more than one controller.
GUIDELINES FOR POWER WIRING ARE AS FOLLOWS:— For multiple controllers operating from a single
transformer, the same side of the transformer secondary must be connected to the same power input terminal in each device. The earth ground terminal must be connected to a verified earth ground for each controller in the group (see Fig. 13 on page 10). Controller configurations are not necessarily limited to two devices, but the total power draw, including accessories, cannot exceed 100 VA when powered by the same transformer (U.S. only).
— See Fig. 12 on page 10 for controller power wiring used in UL 1995 equipment (U.S. only).
— Many controllers require all loads to be powered by the same transformer that powers the controller.
— Keep the earth ground connection wire run as short as possible (refer to Fig. 11–Fig. 13 beginning on page 10).
— Do not connect earth ground to the controller’s digital or analog ground terminals (refer to Fig. 11 and Fig. 13).
— Unswitched 24 Vac power wiring can be run in the same conduit as the LONWORKS® Bus cable.
— Maintain at least a 3 in. (76 mm) separation between Triac outputs and LONWORKS® Bus wiring throughout the installation.
Line-LossControllers must receive a minimum supply voltage of 20 Vac. If long power or output wire runs are required, a voltage drop due to Ohms Law (I x R) line-loss must be considered. This line-loss can result in a significant increase in total power required and thereby affect transformer sizing. The following example is an I x R line-loss calculation for a 200 ft. (61m) run from the transformer to a controller drawing 37 VA and using two 18 AWG (1.0 sq mm) wires.
The formula is:Loss = [length of round-trip wire run (ft.)] x [resistance in wire (ohms per ft.)] x [current in wire (amperes)]
From specification data:18 AWG twisted pair wire has a resistance of 6.52 ohms per 1000 feet.
Loss = [(400 ft.) x (6.52/1000 ohms per ft.)] x [(37 VA)/(24V)] = 4.02 volts
This means that four volts are going to be lost between the transformer and the controller. To assure the controller receives at least 20 volts, the transformer must output more than 24 volts. Because all transformer output voltage levels depend on the size of the connected load, a larger transformer outputs a higher voltage than a smaller one for a given load. Fig. 10 shows this voltage load dependence.
In the preceding I x R loss example, even though the controller load is only 37 VA, a standard 40 VA transformer is not sufficient due to the line-loss. Looking at Fig. 10, a 40 VA transformer is just under 100 percent loaded (for the 37 VA controller) and has a secondary voltage of 22.9 volts. (Use the lower edge of the shaded zone in Fig. 10 that represents the worst case conditions.) When the I x R loss of four volts is subtracted, only 18.9 volts reaches the controller. This is not enough voltage for proper operation.
In this situation, the engineer has three alternatives:1. Use a larger transformer. For example, if an 80 VA model
is used, an output of 24.4 volts, minus the four volt line-loss, supplies 20.4V to the controller (see Fig. 10). Although acceptable, the four-volt line-loss in this exam-ple is higher than recommended.
IMPORTANTNo installation should be designed where the line-loss is greater than two volts. This allows for nominal oper-ation if the primary voltage drops to 102 Vac (120 Vac minus 15 percent).
2. Use heavier gauge wire for the power run. 14 AWG (2.0 sq mm) wire has a resistance of 2.57 ohms per 1,000 ft. Using the preceding formula results in a line-loss of only 1.58 volts (compared with 4.02 volts). This would allow a 40 VA transformer to be used. 14 AWG (2.0 sq mm) wire is the recommended wire size for 24 Vac wiring.
3. Locate the transformer closer to the controller. This reduces the length of the wire run, and the line-loss.
The issue of line-loss is also important in the case of the output wiring connected to the Triac digital outputs. The same formula and method are used. Keep all power and output wire runs as short as practical. When necessary, use heavier gauge wire, a bigger transformer, or install the transformer closer to the controller.
Device Description VAPVL0000AS, PVL4022AS, and PVL6436AS controllers and Series 60 Floating Damper Actuator
Controller and Actuator 21.0
PUL1012S, PUL4024S, PUL6438S, PVL4024NS, or PVL6438NS
Controller 20.0
ML684 Versadrive Valve Actuator 12.0ML6161 Damper Actuator, 35 lb-in. 2.2ML6185 Damper Actuator SR 50 lb-in 12.0ML6464 Damper Actuator, 66 lb-in. 3.0ML6474 Damper Actuator, 132 lb-in. 3.0R6410A Valve Actuator 0.7R8242A Contactor 21.0
SPYDER® LON PROGRAMMABLE, VAV/UNITARY CONTROLLERS
9 63-2685—01
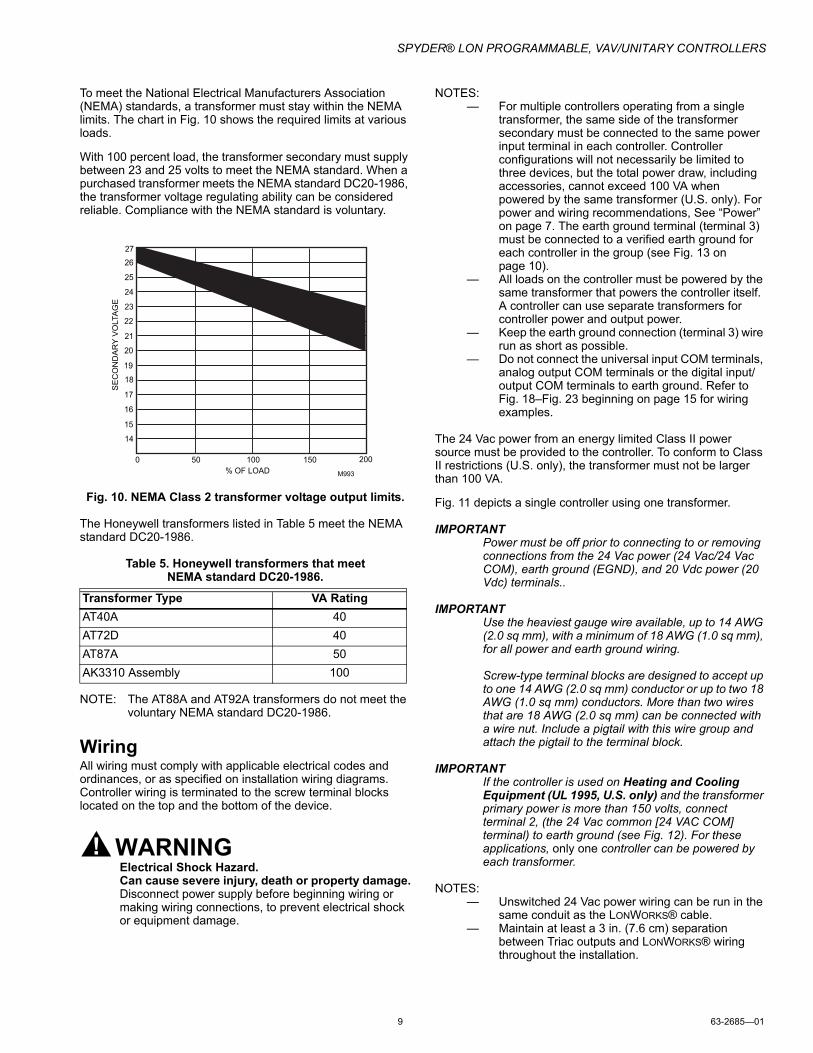
To meet the National Electrical Manufacturers Association (NEMA) standards, a transformer must stay within the NEMA limits. The chart in Fig. 10 shows the required limits at various loads.
With 100 percent load, the transformer secondary must supply between 23 and 25 volts to meet the NEMA standard. When a purchased transformer meets the NEMA standard DC20-1986, the transformer voltage regulating ability can be considered reliable. Compliance with the NEMA standard is voluntary.
Fig. 10. NEMA Class 2 transformer voltage output limits.
The Honeywell transformers listed in Table 5 meet the NEMA standard DC20-1986.
Table 5. Honeywell transformers that meet NEMA standard DC20-1986.
NOTE: The AT88A and AT92A transformers do not meet the voluntary NEMA standard DC20-1986.
WiringAll wiring must comply with applicable electrical codes and ordinances, or as specified on installation wiring diagrams. Controller wiring is terminated to the screw terminal blocks located on the top and the bottom of the device.
WARNINGElectrical Shock Hazard.Can cause severe injury, death or property damage.Disconnect power supply before beginning wiring or making wiring connections, to prevent electrical shock or equipment damage.
NOTES:— For multiple controllers operating from a single
transformer, the same side of the transformer secondary must be connected to the same power input terminal in each controller. Controller configurations will not necessarily be limited to three devices, but the total power draw, including accessories, cannot exceed 100 VA when powered by the same transformer (U.S. only). For power and wiring recommendations, See “Power” on page 7. The earth ground terminal (terminal 3) must be connected to a verified earth ground for each controller in the group (see Fig. 13 on page 10).
— All loads on the controller must be powered by the same transformer that powers the controller itself. A controller can use separate transformers for controller power and output power.
— Keep the earth ground connection (terminal 3) wire run as short as possible.
— Do not connect the universal input COM terminals, analog output COM terminals or the digital input/output COM terminals to earth ground. Refer to Fig. 18–Fig. 23 beginning on page 15 for wiring examples.
The 24 Vac power from an energy limited Class II power source must be provided to the controller. To conform to Class II restrictions (U.S. only), the transformer must not be larger than 100 VA.
Fig. 11 depicts a single controller using one transformer.
IMPORTANTPower must be off prior to connecting to or removing connections from the 24 Vac power (24 Vac/24 Vac COM), earth ground (EGND), and 20 Vdc power (20 Vdc) terminals..
IMPORTANTUse the heaviest gauge wire available, up to 14 AWG (2.0 sq mm), with a minimum of 18 AWG (1.0 sq mm), for all power and earth ground wiring.
Screw-type terminal blocks are designed to accept up to one 14 AWG (2.0 sq mm) conductor or up to two 18 AWG (1.0 sq mm) conductors. More than two wires that are 18 AWG (2.0 sq mm) can be connected with a wire nut. Include a pigtail with this wire group and attach the pigtail to the terminal block.
IMPORTANTIf the controller is used on Heating and Cooling Equipment (UL 1995, U.S. only) and the transformer primary power is more than 150 volts, connect terminal 2, (the 24 Vac common [24 VAC COM] terminal) to earth ground (see Fig. 12). For these applications, only one controller can be powered by each transformer.
NOTES:— Unswitched 24 Vac power wiring can be run in the
same conduit as the LONWORKS® cable.— Maintain at least a 3 in. (7.6 cm) separation
between Triac outputs and LONWORKS® wiring throughout the installation.
Transformer Type VA RatingAT40A 40AT72D 40AT87A 50AK3310 Assembly 100
27
26
25
24
23
22
21
20
19
18
17
16
15
14
0 50 100 150
% OF LOAD
SE
CO
ND
AR
Y V
OLTA
GE
200
M993
SPYDER® LON PROGRAMMABLE, VAV/UNITARY CONTROLLERS
63-2685—01 10
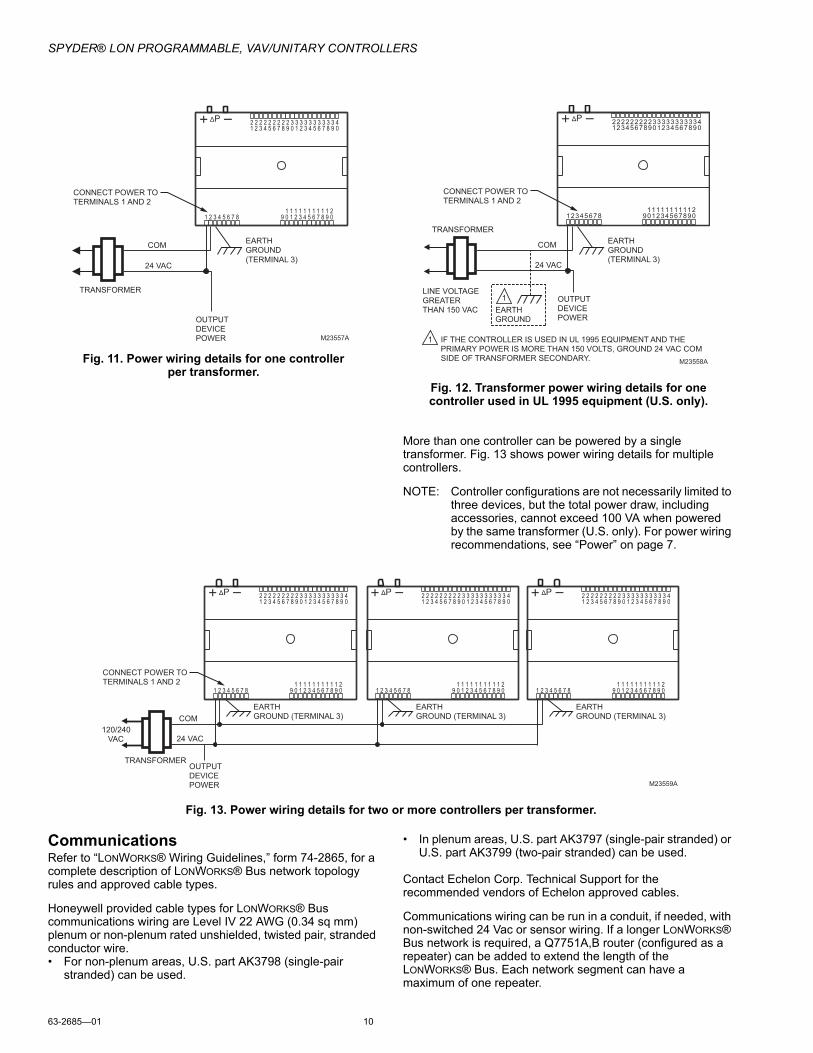
Fig. 11. Power wiring details for one controller per transformer.
Fig. 12. Transformer power wiring details for one controller used in UL 1995 equipment (U.S. only).
More than one controller can be powered by a single transformer. Fig. 13 shows power wiring details for multiple controllers.
NOTE: Controller configurations are not necessarily limited to three devices, but the total power draw, including accessories, cannot exceed 100 VA when powered by the same transformer (U.S. only). For power wiring recommendations, see “Power” on page 7.
Fig. 13. Power wiring details for two or more controllers per transformer.
CommunicationsRefer to “LONWORKS® Wiring Guidelines,” form 74-2865, for a complete description of LONWORKS® Bus network topology rules and approved cable types.
Honeywell provided cable types for LONWORKS® Bus communications wiring are Level IV 22 AWG (0.34 sq mm) plenum or non-plenum rated unshielded, twisted pair, stranded conductor wire.• For non-plenum areas, U.S. part AK3798 (single-pair
stranded) can be used.
• In plenum areas, U.S. part AK3797 (single-pair stranded) or U.S. part AK3799 (two-pair stranded) can be used.
Contact Echelon Corp. Technical Support for the recommended vendors of Echelon approved cables.
Communications wiring can be run in a conduit, if needed, with non-switched 24 Vac or sensor wiring. If a longer LONWORKS® Bus network is required, a Q7751A,B router (configured as a repeater) can be added to extend the length of the LONWORKS® Bus. Each network segment can have a maximum of one repeater.
CONNECT POWER TO
TERMINALS 1 AND 2
EARTH
GROUND
(TERMINAL 3)
TRANSFORMER
OUTPUT
DEVICE
POWER M23557A
ΔP
1 2 3 4 5 6 7 8 1 0 9 2 3 4 5 6 7 8 0 9 1 1 1 1 1 1 1 1 1 2 1
1 2 3 4 5 6 7 8 0 9 2 2 2 2 2 2 2 2 2 3 3
1 2 3 4 5 6 7 8 0 9 3 3 3 3 3 3 3 3 4
COM
24 VAC
M23558A
EARTH
GROUND
(TERMINAL 3)
TRANSFORMER
OUTPUT
DEVICE
POWER
ΔP
1 2 3 4 5 6 7 8 1 0 9 2 3 4 5 6 7 8 0 9 1 1 1 1 1 1 1 1 1 2 1
1 2 3 4 5 6 7 8 0 9 2 2 2 2 2 2 2 2 2 3 3
1 2 3 4 5 6 7 8 0 9 3 3 3 3 3 3 3 3 4
EARTH
GROUND
1 LINE VOLTAGE
GREATER
THAN 150 VAC
IF THE CONTROLLER IS USED IN UL 1995 EQUIPMENT AND THE
PRIMARY POWER IS MORE THAN 150 VOLTS, GROUND 24 VAC COM
SIDE OF TRANSFORMER SECONDARY.
1
COM
24 VAC
CONNECT POWER TO
TERMINALS 1 AND 2
M23559A
120/240
VAC
TRANSFORMER OUTPUT
DEVICE
POWER
ΔP
1 2 3 4 5 6 7 8 1 0 9 2 3 4 5 6 7 8 0 9 1 1 1 1 1 1 1 1 1 2 1
1 2 3 4 5 6 7 8 0 9 2 2 2 2 2 2 2 2 2 3 3
1 2 3 4 5 6 7 8 0 9 3 3 3 3 3 3 3 3 4
COM
24 VAC
ΔP
1 2 3 4 5 6 7 8 1 0 9 2 3 4 5 6 7 8 0 9 1 1 1 1 1 1 1 1 1 2 1
1 2 3 4 5 6 7 8 0 9 2 2 2 2 2 2 2 2 2 3 3
1 2 3 4 5 6 7 8 0 9 3 3 3 3 3 3 3 3 4
EARTH
GROUND (TERMINAL 3)
ΔP
1 2 3 4 5 6 7 8 1 0 9 2 3 4 5 6 7 8 0 9 1 1 1 1 1 1 1 1 1 2 1
1 2 3 4 5 6 7 8 0 9 2 2 2 2 2 2 2 2 2 3 3
1 2 3 4 5 6 7 8 0 9 3 3 3 3 3 3 3 3 4
EARTH
GROUND (TERMINAL 3)
EARTH
GROUND (TERMINAL 3)
CONNECT POWER TO
TERMINALS 1 AND 2
SPYDER® LON PROGRAMMABLE, VAV/UNITARY CONTROLLERS
11 63-2685—01
Pull the cable to each controller on the LONWORKS® Bus and connect to the controller’s communication terminals 7 and 8. (See Table 6 on page 12 and Table 7 on page 13, and Fig. 16 on page 13 for location of terminals 7 and 8.)
NOTE: Connection for operator access to the LONWORKS® Bus is provided by plugging the Serial LONTALK® Adapter (SLTA) connector into the LONWORKS® Bus jack (see Fig. 16 on page 13).
IMPORTANTNotes on communications wiring:
• All field wiring must conform to local codes and ordinances (or as specified on installation drawings).
• Do not bundle device output wires with sensor, digital input or communications LONWORKS® Bus wires.
• Do not use different wire types or gauges on the same LONWORKS Bus segment. The step change in line impedance characteristics causes unpredictable reflections on the LONWORKS® Bus.
• In noisy (high EMI) environments, avoid wire runs parallel to noisy power cables, motor control centers, or lines containing lighting dimmer switches. Keep at least 3 in. (76 mm) of separation between noisy lines and the LONWORKS® Bus cable.
• The theoretical limit for each LONWORKS® Bus seg-ment is 60 controllers. Up to 120 controllers can be configured when a repeater is used, and the bus must be either singly or doubly terminated. Actual installa-tions may have a lower limit depending on the devices connected.
• The singly terminated bus must have one 209541B Excel 10 FTT Termination Module for T tap or Star configurations.
• The doubly terminated bus must have two 209541B Excel 10 FTT Termination Modules, one at each end of the daisy chain (Bus style) wiring run. Note that the Q7751A,B router (configured as a repeater) has onboard terminating networks that can be jumper- selected on each segment.
• Make sure that neither of the LONWORKS® Bus wires are grounded.
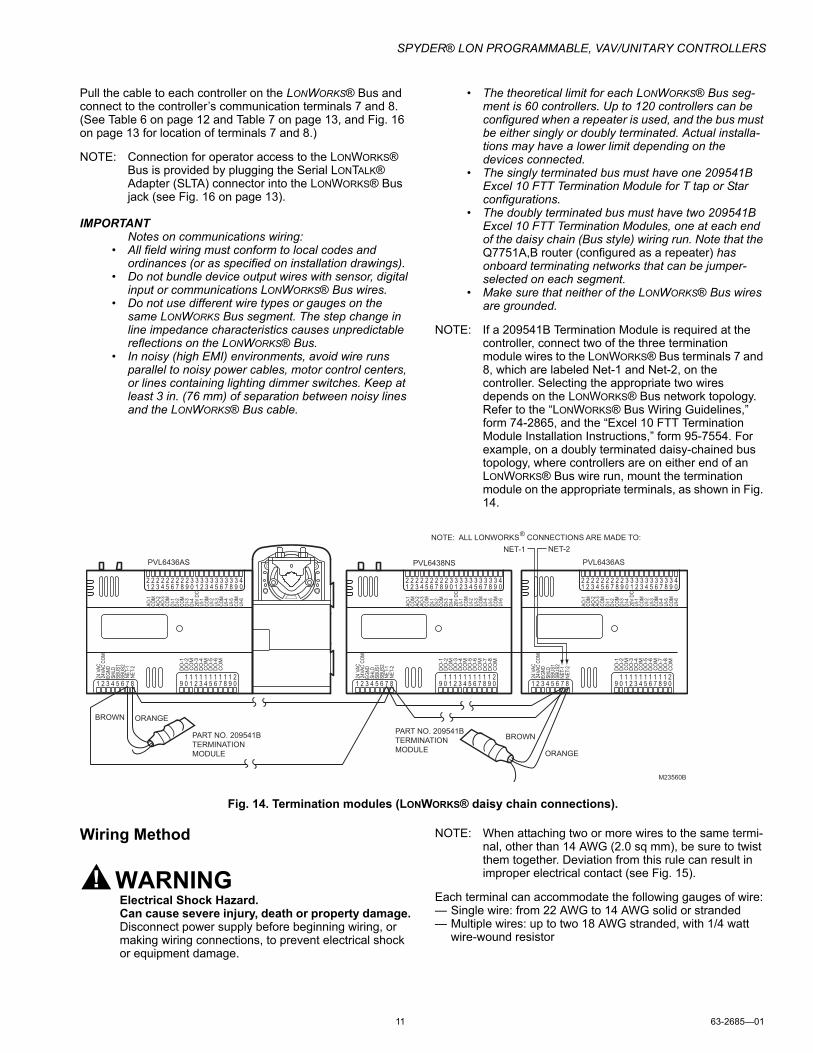
NOTE: If a 209541B Termination Module is required at the controller, connect two of the three termination module wires to the LONWORKS® Bus terminals 7 and 8, which are labeled Net-1 and Net-2, on the controller. Selecting the appropriate two wires depends on the LONWORKS® Bus network topology. Refer to the “LONWORKS® Bus Wiring Guidelines,” form 74-2865, and the “Excel 10 FTT Termination Module Installation Instructions,” form 95-7554. For example, on a doubly terminated daisy-chained bus topology, where controllers are on either end of an LONWORKS® Bus wire run, mount the termination module on the appropriate terminals, as shown in Fig. 14.
Fig. 14. Termination modules (LONWORKS® daisy chain connections).
Wiring Method
WARNINGElectrical Shock Hazard.Can cause severe injury, death or property damage.Disconnect power supply before beginning wiring, or making wiring connections, to prevent electrical shock or equipment damage.
NOTE: When attaching two or more wires to the same termi-nal, other than 14 AWG (2.0 sq mm), be sure to twist them together. Deviation from this rule can result in improper electrical contact (see Fig. 15).
Each terminal can accommodate the following gauges of wire:— Single wire: from 22 AWG to 14 AWG solid or stranded— Multiple wires: up to two 18 AWG stranded, with 1/4 watt
wire-wound resistor
AO-1
COM
AO-2
AO-3
COM
UI-1
COM
UI-2
UI-3
COM
UI-4
UI-5
COM
UI-6
DI-1
DI-2
COM
DI-3
20V
DCDI
-4
NET-
2NE
T-1
SHLD
EGND
24 V
AC24
VAC
COM
DO
-1
CO
MD
O-2
DO
-3D
O-4
DO
-5C
OM
DO
-6C
OM
M23560B
PVL6436AS PVL6438NS
PART NO. 209541B
TERMINATION
MODULE
PART NO. 209541B
TERMINATION
MODULE
BROWN
BROWN
ORANGE
ORANGE
NET-1 NET-2
NOTE: ALL LONWORKS®
CONNECTIONS ARE MADE TO:
1 2 3 4 5 6 7 8 1 0 9 2 3 4 5 6 7 8 0 9 1 1 1 1 1 1 1 1 1 2 1
1 2 3 4 5 6 7 8 0 9 2 2 2 2 2 2 2 2 2 3 3
1 2 3 4 5 6 7 8 0 9 3 3 3 3 3 3 3 3 4
AO-1
COM
AO-2
AO-3
COM
UI-1
COM
UI-2
UI-3
COM
UI-4
UI-5
COM
UI-6
DI-1
DI-2
COM
DI-3
20V
DCDI
-4
NET-
2NE
T-1
SHLD
EGND
24 V
AC24
VAC
COM
DO
-1
CO
MD
O-2
DO
-3D
O-4
DO
-5C
OM
DO
-6C
OM
PVL6436AS
1 2 3 4 5 6 7 8 1 0 9 2 3 4 5 6 7 8 0 9 1 1 1 1 1 1 1 1 1 2 1
1 2 3 4 5 6 7 8 0 9 2 2 2 2 2 2 2 2 2 3 3
1 2 3 4 5 6 7 8 0 9 3 3 3 3 3 3 3 3 4
DO
-7D
O-8
CO
M
DO
-7D
O-8
CO
M
SBUS
1SB
US2
SBUS
1SB
US2
SBUS
1SB
US2
SPYDER® LON PROGRAMMABLE, VAV/UNITARY CONTROLLERS
63-2685—01 12
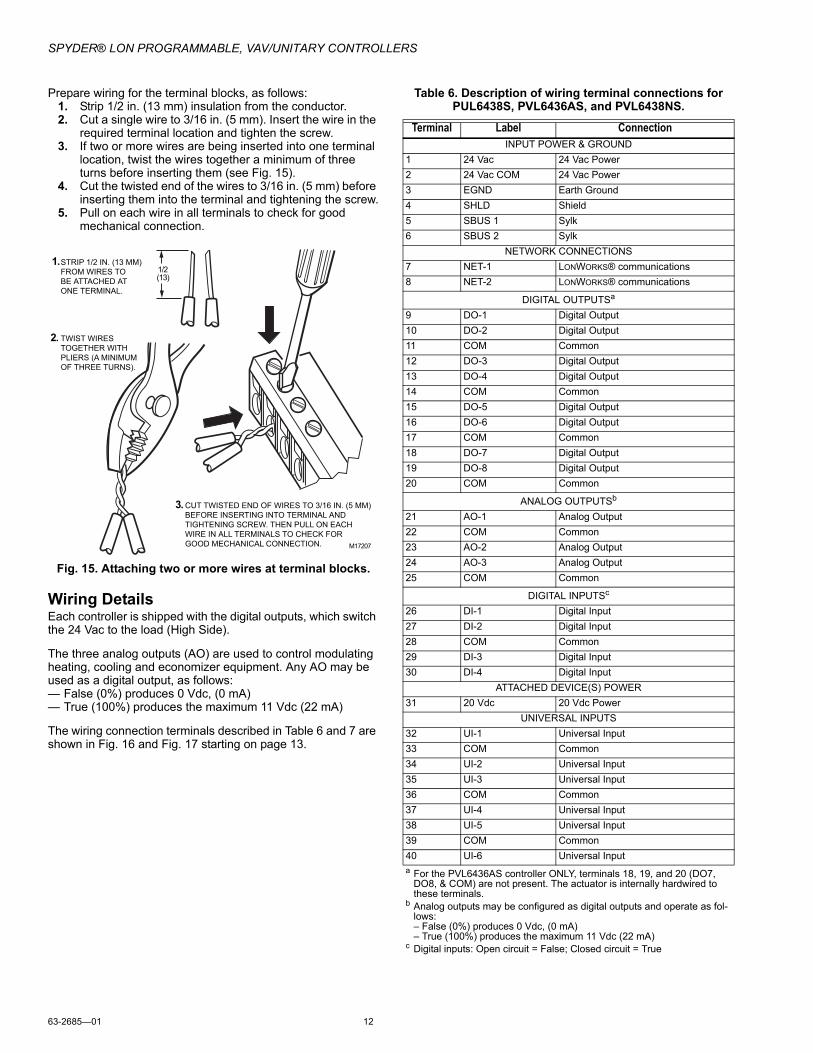
Prepare wiring for the terminal blocks, as follows:1. Strip 1/2 in. (13 mm) insulation from the conductor.2. Cut a single wire to 3/16 in. (5 mm). Insert the wire in the
required terminal location and tighten the screw.3. If two or more wires are being inserted into one terminal
location, twist the wires together a minimum of three turns before inserting them (see Fig. 15).
4. Cut the twisted end of the wires to 3/16 in. (5 mm) before inserting them into the terminal and tightening the screw.
5. Pull on each wire in all terminals to check for good mechanical connection.
Fig. 15. Attaching two or more wires at terminal blocks.
Wiring DetailsEach controller is shipped with the digital outputs, which switch the 24 Vac to the load (High Side).
The three analog outputs (AO) are used to control modulating heating, cooling and economizer equipment. Any AO may be used as a digital output, as follows:— False (0%) produces 0 Vdc, (0 mA)— True (100%) produces the maximum 11 Vdc (22 mA)
The wiring connection terminals described in Table 6 and 7 are shown in Fig. 16 and Fig. 17 starting on page 13.
Table 6. Description of wiring terminal connections for PUL6438S, PVL6436AS, and PVL6438NS.
1/2(13)
STRIP 1/2 IN. (13 MM)
FROM WIRES TO
BE ATTACHED AT
ONE TERMINAL.
1.
2. TWIST WIRES
TOGETHER WITH
PLIERS (A MINIMUM
OF THREE TURNS).
3.CUT TWISTED END OF WIRES TO 3/16 IN. (5 MM)
BEFORE INSERTING INTO TERMINAL AND
TIGHTENING SCREW. THEN PULL ON EACH
WIRE IN ALL TERMINALS TO CHECK FOR
GOOD MECHANICAL CONNECTION. M17207
Terminal Label ConnectionINPUT POWER & GROUND
1 24 Vac 24 Vac Power2 24 Vac COM 24 Vac Power3 EGND Earth Ground4 SHLD Shield5 SBUS 1 Sylk6 SBUS 2 Sylk
NETWORK CONNECTIONS7 NET-1 LONWORKS® communications8 NET-2 LONWORKS® communications
DIGITAL OUTPUTSa
9 DO-1 Digital Output10 DO-2 Digital Output11 COM Common12 DO-3 Digital Output13 DO-4 Digital Output14 COM Common15 DO-5 Digital Output16 DO-6 Digital Output17 COM Common18 DO-7 Digital Output19 DO-8 Digital Output20 COM Common
ANALOG OUTPUTSb
21 AO-1 Analog Output22 COM Common23 AO-2 Analog Output24 AO-3 Analog Output25 COM Common
DIGITAL INPUTSc
26 DI-1 Digital Input27 DI-2 Digital Input28 COM Common29 DI-3 Digital Input30 DI-4 Digital Input
ATTACHED DEVICE(S) POWER31 20 Vdc 20 Vdc Power
UNIVERSAL INPUTS32 UI-1 Universal Input33 COM Common34 UI-2 Universal Input35 UI-3 Universal Input36 COM Common37 UI-4 Universal Input38 UI-5 Universal Input39 COM Common40 UI-6 Universal Inputa For the PVL6436AS controller ONLY, terminals 18, 19, and 20 (DO7,
DO8, & COM) are not present. The actuator is internally hardwired to these terminals.
b Analog outputs may be configured as digital outputs and operate as fol-lows:– False (0%) produces 0 Vdc, (0 mA)– True (100%) produces the maximum 11 Vdc (22 mA)
c Digital inputs: Open circuit = False; Closed circuit = True
SPYDER® LON PROGRAMMABLE, VAV/UNITARY CONTROLLERS
13 63-2685—01
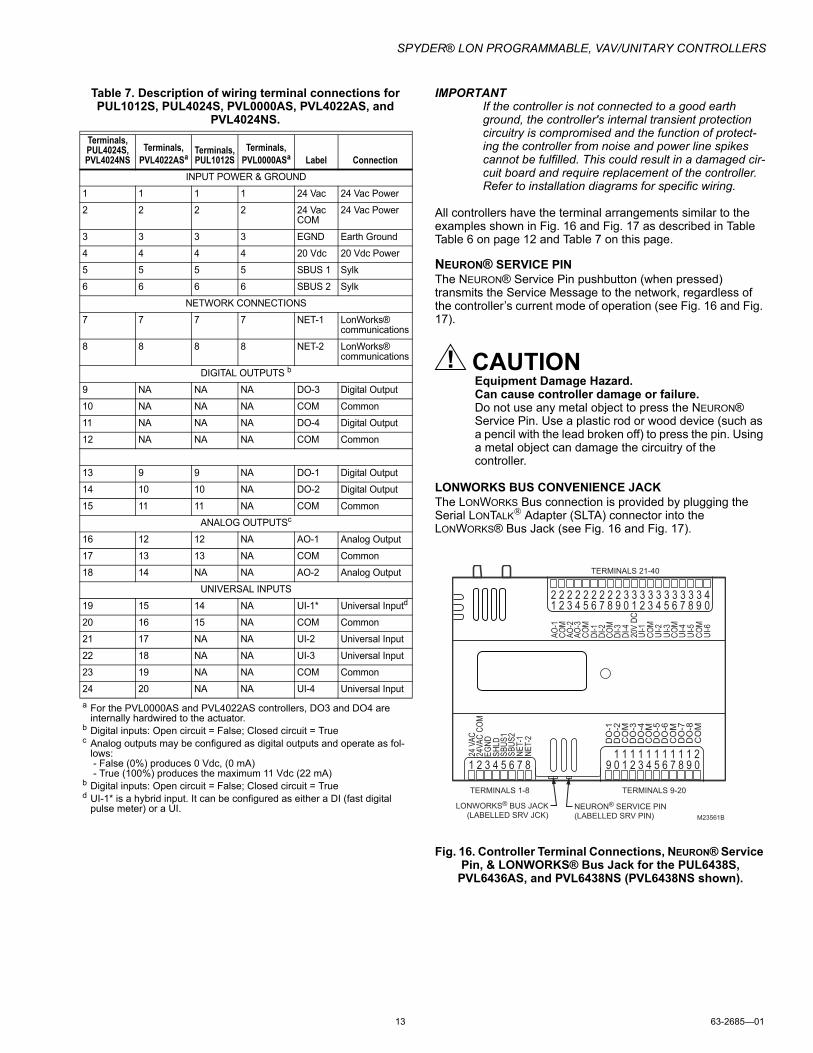
Table 7. Description of wiring terminal connections for PUL1012S, PUL4024S, PVL0000AS, PVL4022AS, and
PVL4024NS.
IMPORTANTIf the controller is not connected to a good earth ground, the controller's internal transient protection circuitry is compromised and the function of protect-ing the controller from noise and power line spikes cannot be fulfilled. This could result in a damaged cir-cuit board and require replacement of the controller. Refer to installation diagrams for specific wiring.
All controllers have the terminal arrangements similar to the examples shown in Fig. 16 and Fig. 17 as described in Table Table 6 on page 12 and Table 7 on this page.
NEURON® SERVICE PINThe NEURON® Service Pin pushbutton (when pressed) transmits the Service Message to the network, regardless of the controller’s current mode of operation (see Fig. 16 and Fig. 17).
CAUTIONEquipment Damage Hazard.Can cause controller damage or failure.Do not use any metal object to press the NEURON® Service Pin. Use a plastic rod or wood device (such as a pencil with the lead broken off) to press the pin. Using a metal object can damage the circuitry of the controller.
LONWORKS BUS CONVENIENCE JACKThe LONWORKS Bus connection is provided by plugging the Serial LONTALK® Adapter (SLTA) connector into the LONWORKS® Bus Jack (see Fig. 16 and Fig. 17).
Fig. 16. Controller Terminal Connections, NEURON® Service Pin, & LONWORKS® Bus Jack for the PUL6438S,
PVL6436AS, and PVL6438NS (PVL6438NS shown).
Terminals, PUL4024S, PVL4024NS
Terminals, PVL4022ASa
Terminals, PUL1012S
Terminals, PVL0000ASa Label Connection
INPUT POWER & GROUND
1 1 1 1 24 Vac 24 Vac Power
2 2 2 2 24 Vac COM
24 Vac Power
3 3 3 3 EGND Earth Ground
4 4 4 4 20 Vdc 20 Vdc Power
5 5 5 5 SBUS 1 Sylk
6 6 6 6 SBUS 2 Sylk
NETWORK CONNECTIONS
7 7 7 7 NET-1 LonWorks® communications
8 8 8 8 NET-2 LonWorks® communications
DIGITAL OUTPUTS b
9 NA NA NA DO-3 Digital Output
10 NA NA NA COM Common
11 NA NA NA DO-4 Digital Output
12 NA NA NA COM Common
13 9 9 NA DO-1 Digital Output
14 10 10 NA DO-2 Digital Output
15 11 11 NA COM Common
ANALOG OUTPUTSc
16 12 12 NA AO-1 Analog Output
17 13 13 NA COM Common
18 14 NA NA AO-2 Analog Output
UNIVERSAL INPUTS
19 15 14 NA UI-1* Universal Inputd
20 16 15 NA COM Common
21 17 NA NA UI-2 Universal Input
22 18 NA NA UI-3 Universal Input
23 19 NA NA COM Common
24 20 NA NA UI-4 Universal Inputa For the PVL0000AS and PVL4022AS controllers, DO3 and DO4 are
internally hardwired to the actuator.b Digital inputs: Open circuit = False; Closed circuit = Truec Analog outputs may be configured as digital outputs and operate as fol-
lows: - False (0%) produces 0 Vdc, (0 mA) - True (100%) produces the maximum 11 Vdc (22 mA)
b Digital inputs: Open circuit = False; Closed circuit = Trued UI-1* is a hybrid input. It can be configured as either a DI (fast digital
pulse meter) or a UI. LONWORKS® BUS JACK
(LABELLED SRV JCK) NEURON® SERVICE PIN
(LABELLED SRV PIN)
TERMINALS 1-8 TERMINALS 9-20
TERMINALS 21-40
AO-1
CO
M AO
-2
AO-3
CO
M
UI-1
CO
M UI
-2
UI-3
CO
M UI
-4
UI-5
CO
M UI
-6
DI-1
DI
-2
COM
DI-3
20V
DC
DI-4
NET-
2NE
T-1
SHLD
EG
ND
24 V
AC
24VA
C CO
M
DO
-1
CO
M
DO
-2
DO
-3
DO
-4
DO
-5
CO
M
DO
-6
CO
M
1 2 3 4 5 6 7 8 1 0 9 2 3 4 5 6 7 8 0 9 1 1 1 1 1 1 1 1 1 2 1
1 2 3 4 5 6 7 8 0 9 2 2 2 2 2 2 2 2 2 3 3
1 2 3 4 5 6 7 8 0 9 3 3 3 3 3 3 3 3 4
M23561B
DO
-7
DO
-8
CO
M
SBUS
1SB
US2

SPYDER® LON PROGRAMMABLE, VAV/UNITARY CONTROLLERS
63-2685—01 14
Fig. 17. Controller terminal connections, NEURON® Service Pin and LONWORKS® Bus Jack for the PUL1012S,
PUL4024S, PVL0000AS, PVL4022AS, and PVL4024NS (PVL4024NS shown).
Wiring Applications (Examples)Fig. 18–Fig. 24, beginning on page 15, illustrate controller wiring for the following configurations.• Typical controller wiring for VAV application using the
T7770C Wall Module and a C7770A Air Temperature Sensor (see Fig. 18 on page 15).
• Typical controller wiring for VAV application with staged reheat (see Fig. 19 on page 16).
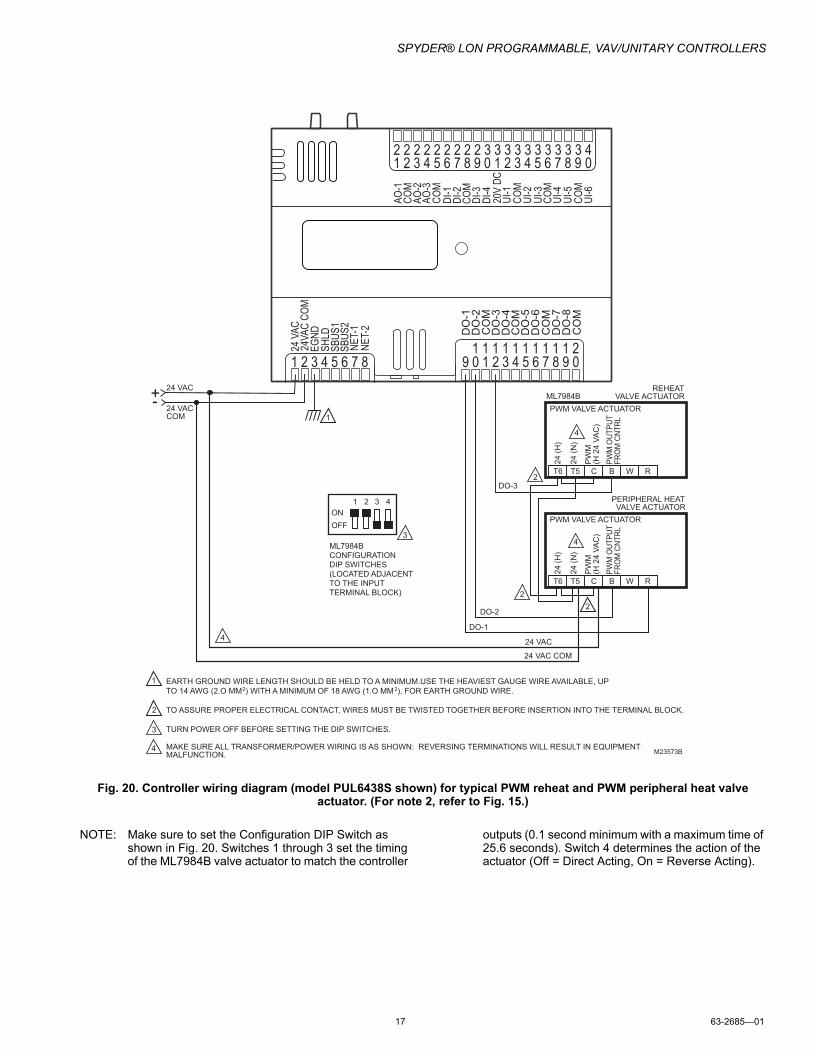
• Typical controller wiring for PWM reheat and PWM peripheral heat valve actuator (see Fig. 20 on page 17).
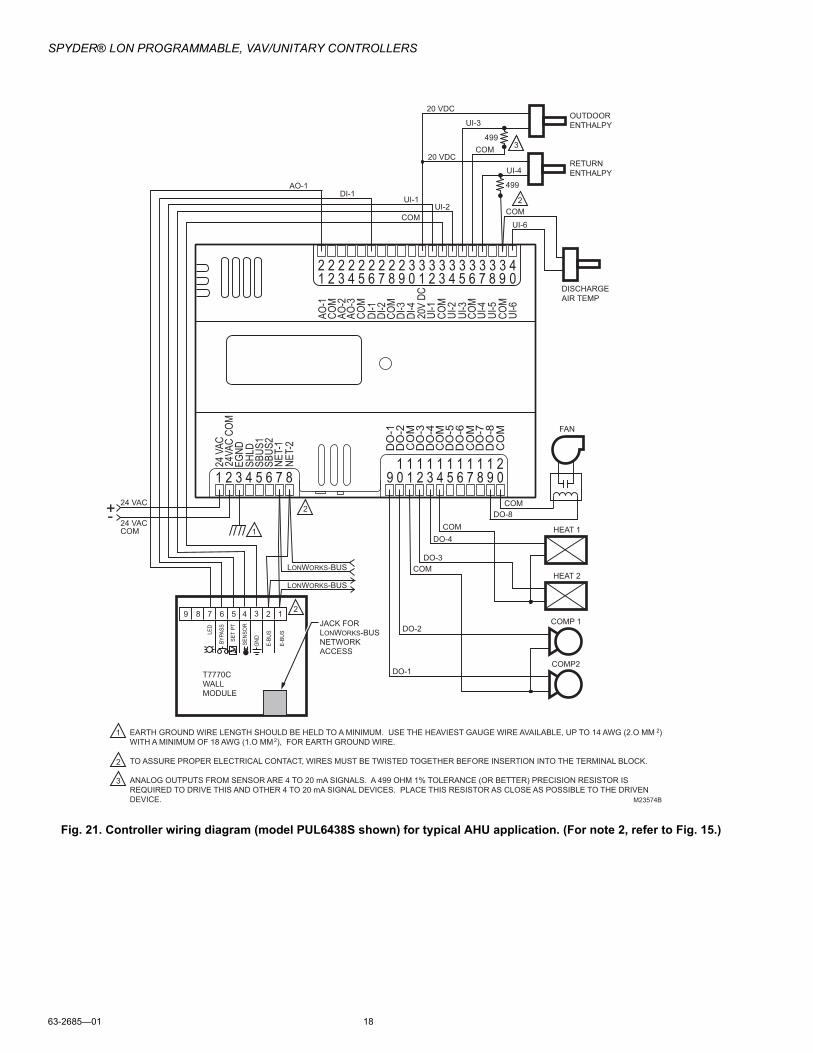
• Typical controller wiring for AHU application (see Fig. 21 on page 18).
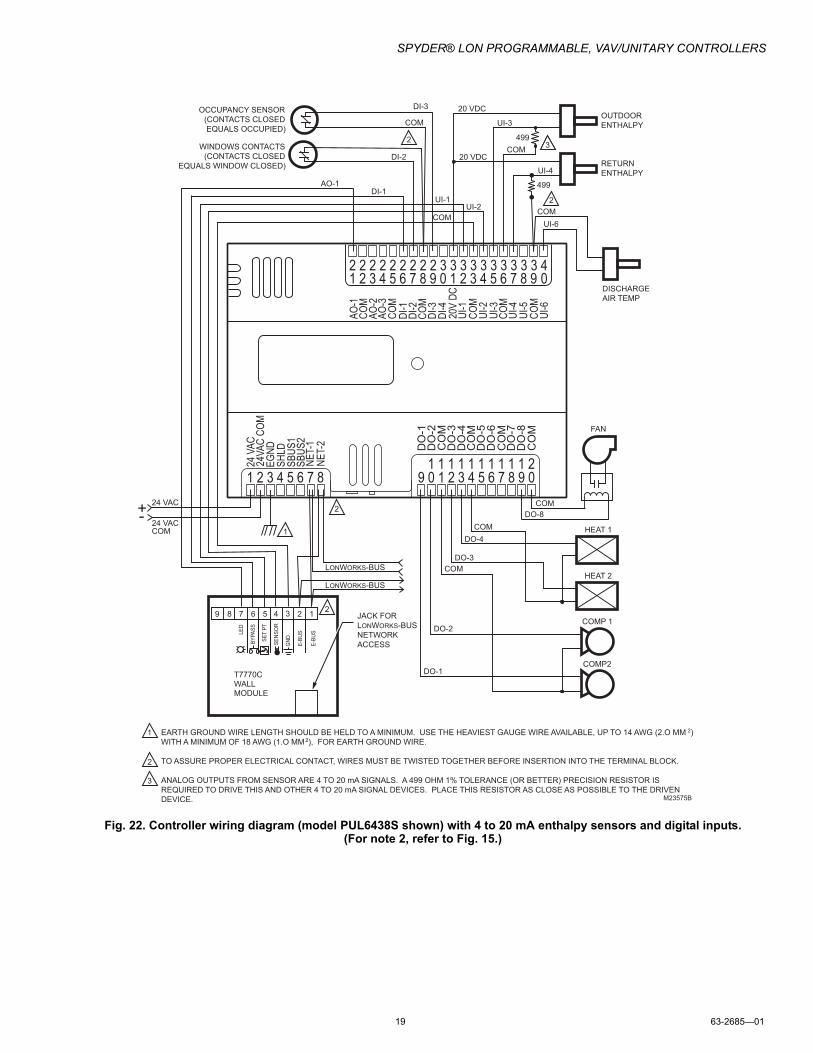
• Typical controller wiring for 4 to 20 mA enthalpy sensors and digital inputs (see Fig. 22 on page 19).
• Typical controller wiring for 4 to 20 mA heating, cooling, and model ML6161 floating motor control (see Fig. 23 on page 20).
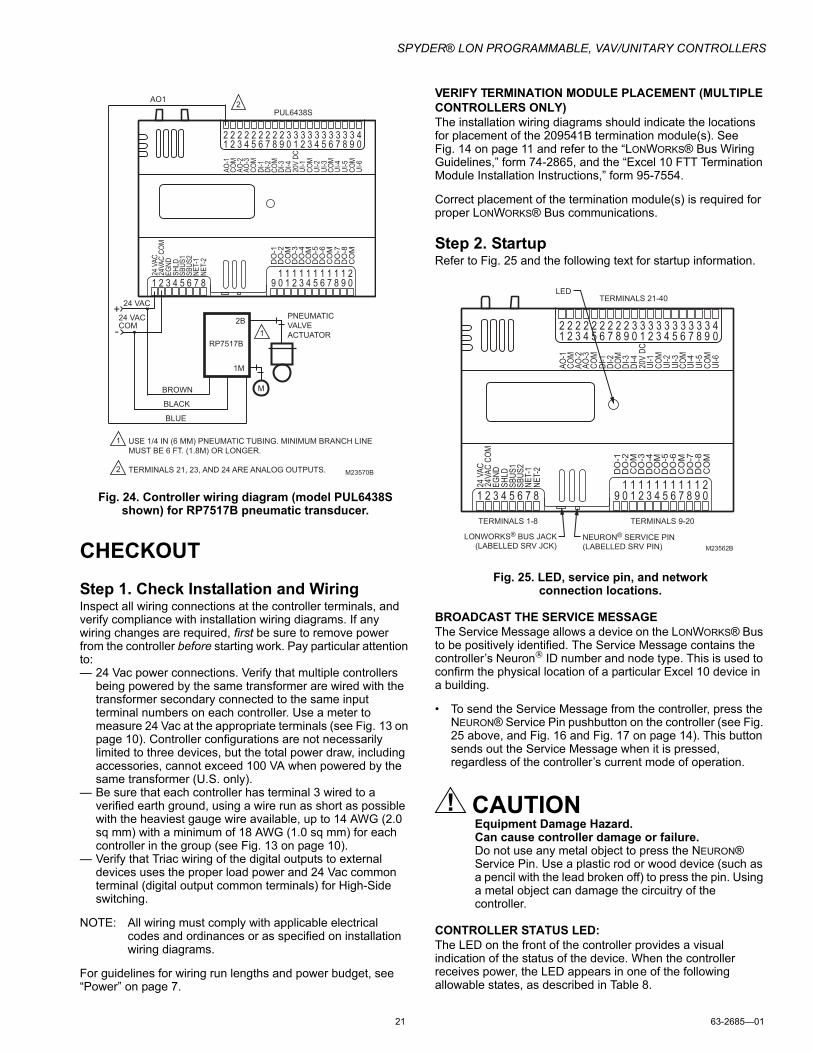
• Typical controller wiring for a pneumatic transducer, model RP7517B (see Fig. 24 on page 21).
M28650
1 1 1 1 1 1 1 2 2 2 2 2
3 4 5 6 7 8 9 0 1 2 3 4UI-4
CO
MU
I-3U
I-2C
OM
UI-1
*A
O-2
CO
MA
O-1
CO
MD
O-2
DO
-1
1 1
1 2 3 4 5 6 7 8 9 0 1 2
CO
MD
O-4
CO
MD
O-3
NE
T-2
NE
1-2
S-B
US
2S
-BU
S 1
20V
DC
EG
ND
24VA
C C
OM
24VA
C
TERMINALS 13-24
TERMINALS 1-12
LONWORKS ® BUS JACK (LABELLED SRV JACK)
NEURON® SERVICE PIN (LABELLED SRV PIN)
SPYDER® LON PROGRAMMABLE, VAV/UNITARY CONTROLLERS
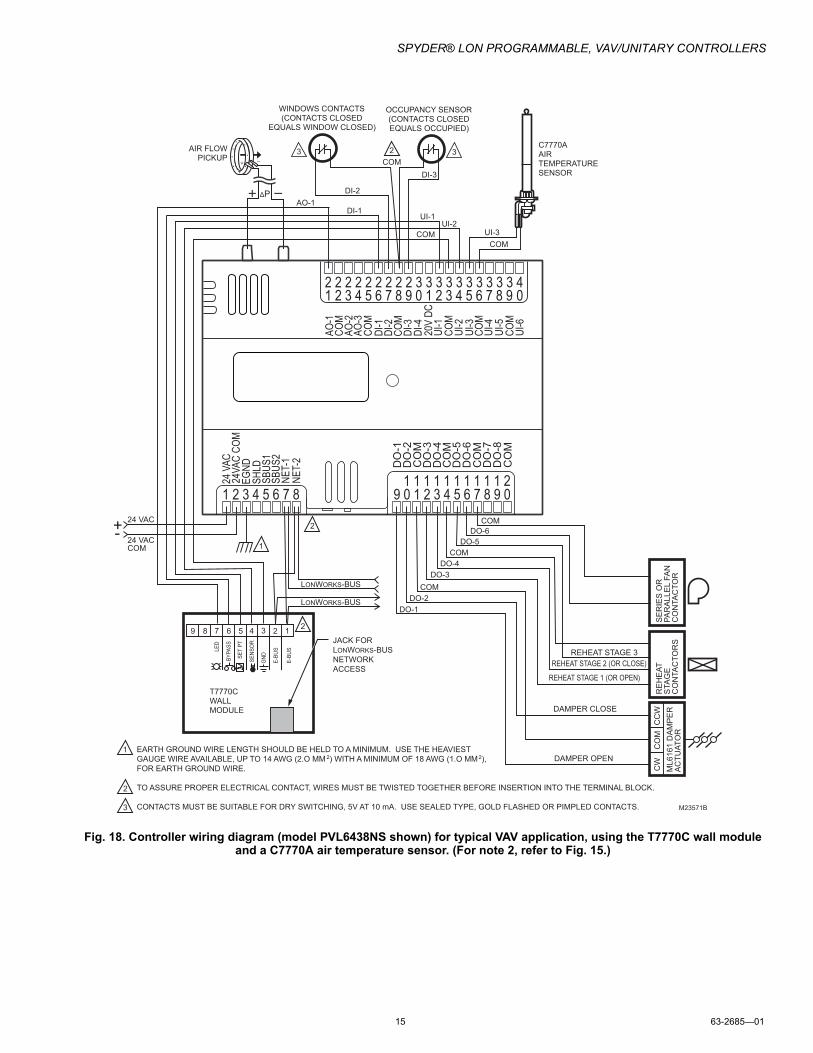
15 63-2685—01
Fig. 18. Controller wiring diagram (model PVL6438NS shown) for typical VAV application, using the T7770C wall module and a C7770A air temperature sensor. (For note 2, refer to Fig. 15.)
1
2
1
2
EARTH GROUND WIRE LENGTH SHOULD BE HELD TO A MINIMUM. USE THE HEAVIEST
GAUGE WIRE AVAILABLE, UP TO 14 AWG (2.O MM 2) WITH A MINIMUM OF 18 AWG (1.O MM2),
FOR EARTH GROUND WIRE.
TO ASSURE PROPER ELECTRICAL CONTACT, WIRES MUST BE TWISTED TOGETHER BEFORE INSERTION INTO THE TERMINAL BLOCK.
CONTACTS MUST BE SUITABLE FOR DRY SWITCHING, 5V AT 10 mA. USE SEALED TYPE, GOLD FLASHED OR PIMPLED CONTACTS. M23571B
2
JACK FOR
LONWORKS-BUS
NETWORK
ACCESS
7 6 9 8 5 4 3 2 1
T7770C
WALL
MODULE
SE
T P
T
GN
D
SE
NS
OR
BY
PA
SS
LE
D
E-B
US
E-B
US
LONWORKS-BUS
AO-1 DI-1
UI-1 UI-2
COM
24 VAC
24 VAC COM
+ -
DO-1
DO-2
DO-3
DO-4
LONWORKS-BUS
SE
RIE
S O
R
PA
RA
LL
EL F
AN
C
ON
TA
CT
OR
RE
HE
AT
S
TA
GE
C
ON
TA
CT
OR
S
ML
61
61
DA
MP
ER
A
CT
UA
TO
R
CW
C
OM
C
CW
OCCUPANCY SENSOR
(CONTACTS CLOSED
EQUALS OCCUPIED)
WINDOWS CONTACTS
(CONTACTS CLOSED
EQUALS WINDOW CLOSED)
DI-2
COM
2
DO-5
DO-6
C7770A
AIR
TEMPERATURE
SENSOR
UI-3
COM
AIR FLOW
PICKUP
ΔP
3 3
3
DAMPER OPEN
DAMPER CLOSE
REHEAT STAGE 1 (OR OPEN)
REHEAT STAGE 2 (OR CLOSE)
COM
REHEAT STAGE 3
DI-3
COM
COM
SBUS
1SB
US2
AO-1
CO
M AO
-2
AO-3
CO
M
UI-1
CO
M UI
-2
UI-3
CO
M UI
-4
UI-5
CO
M UI
-6
DI-1
DI
-2
COM
DI-3
20V
DC
DI-4
NET-
2 NE
T-1
SHLD
EG
ND
24 V
AC
24VA
C CO
M
DO
-1
CO
M
DO
-2
DO
-3
DO
-4
DO
-5
CO
M
DO
-6
CO
M
1 2 3 4 5 6 7 8 1 0 9 2 3 4 5 6 7 8 0 9 1 1 1 1 1 1 1 1 1 2 1
1 2 3 4 5 6 7 8 0 9 2 2 2 2 2 2 2 2 2 3 3
1 2 3 4 5 6 7 8 0 9 3 3 3 3 3 3 3 3 4
DO
-7
DO
-8
CO
M
SPYDER® LON PROGRAMMABLE, VAV/UNITARY CONTROLLERS
63-2685—01 16
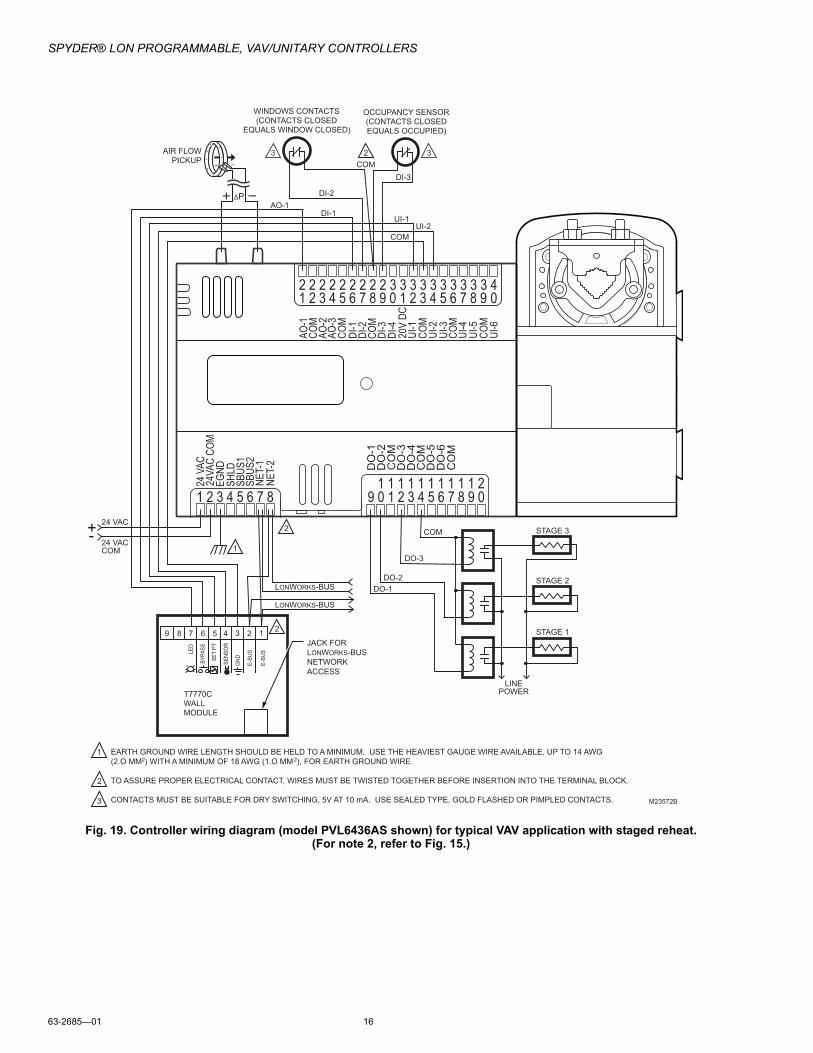
Fig. 19. Controller wiring diagram (model PVL6436AS shown) for typical VAV application with staged reheat. (For note 2, refer to Fig. 15.)
1
2
1
2
EARTH GROUND WIRE LENGTH SHOULD BE HELD TO A MINIMUM. USE THE HEAVIEST GAUGE WIRE AVAILABLE, UP TO 14 AWG
(2.O MM2) WITH A MINIMUM OF 18 AWG (1.O MM2), FOR EARTH GROUND WIRE.
TO ASSURE PROPER ELECTRICAL CONTACT, WIRES MUST BE TWISTED TOGETHER BEFORE INSERTION INTO THE TERMINAL BLOCK.
CONTACTS MUST BE SUITABLE FOR DRY SWITCHING, 5V AT 10 mA. USE SEALED TYPE, GOLD FLASHED OR PIMPLED CONTACTS. M23572B
2
JACK FOR
LONWORKS-BUS
NETWORK
ACCESS
7 6 9 8 5 4 3 2 1
T7770C
WALL
MODULE
SE
T P
T
GN
D
SE
NS
OR
BY
PA
SS
LE
D
E-B
US
E-B
US
LONWORKS-BUS
AO-1 DI-1
UI-1 UI-2
COM
24 VAC
24 VAC COM
+ -
DO-1
DO-2
DO-3
LONWORKS-BUS
OCCUPANCY SENSOR
(CONTACTS CLOSED
EQUALS OCCUPIED)
WINDOWS CONTACTS
(CONTACTS CLOSED
EQUALS WINDOW CLOSED)
DI-2
COM
2 AIR FLOW
PICKUP
ΔP
3 3
3
DI-3
COM
LINE POWER
STAGE 1
STAGE 2
STAGE 3
AO-1
CO
M AO
-2
AO-3
CO
M
UI-1
CO
M UI
-2
UI-3
CO
M UI
-4
UI-5
CO
M UI
-6
DI-1
DI
-2
COM
DI-3
20V
DC
DI-4
NET-
2 NE
T-1
SHLD
EG
ND
24 V
AC
24VA
C CO
M
DO
-1
CO
M
DO
-2
DO
-3
DO
-4
DO
-5
CO
M
DO
-6
CO
M
1 2 3 4 5 6 7 8 1 0 9 2 3 4 5 6 7 8 0 9 1 1 1 1 1 1 1 1 1 2 1
1 2 3 4 5 6 7 8 0 9 2 2 2 2 2 2 2 2 2 3 3
1 2 3 4 5 6 7 8 0 9 3 3 3 3 3 3 3 3 4
SBUS
1SB
US2
SPYDER® LON PROGRAMMABLE, VAV/UNITARY CONTROLLERS
17 63-2685—01
Fig. 20. Controller wiring diagram (model PUL6438S shown) for typical PWM reheat and PWM peripheral heat valve actuator. (For note 2, refer to Fig. 15.)
NOTE: Make sure to set the Configuration DIP Switch as shown in Fig. 20. Switches 1 through 3 set the timing of the ML7984B valve actuator to match the controller
outputs (0.1 second minimum with a maximum time of 25.6 seconds). Switch 4 determines the action of the actuator (Off = Direct Acting, On = Reverse Acting).
1 2 3 4
3
ON
OFF
ML7984B
CONFIGURATION
DIP SWITCHES
(LOCATED ADJACENT
TO THE INPUT
TERMINAL BLOCK)
1
2
1
2
EARTH GROUND WIRE LENGTH SHOULD BE HELD TO A MINIMUM.USE THE HEAVIEST GAUGE WIRE AVAILABLE, UP
TO 14 AWG (2.O MM2) WITH A MINIMUM OF 18 AWG (1.O MM2), FOR EARTH GROUND WIRE.
TO ASSURE PROPER ELECTRICAL CONTACT, WIRES MUST BE TWISTED TOGETHER BEFORE INSERTION INTO THE TERMINAL BLOCK.
TURN POWER OFF BEFORE SETTING THE DIP SWITCHES.
MAKE SURE ALL TRANSFORMER/POWER WIRING IS AS SHOWN: REVERSING TERMINATIONS WILL RESULT IN EQUIPMENT MALFUNCTION.
M23573B
24 VAC
24 VAC COM
+ -
DO-1
DO-2
DO-3
3
4
4
24 VAC COM
2
2
24
(H
)
24
(N
)
PW
M
(H 2
4 V
AC
)
PW
M O
UT
PU
T
FR
OM
CN
TR
L
PWM VALVE ACTUATOR
ML7984B
T6 T5 C B W R
REHEAT VALVE ACTUATOR
24
(H
)
24
(N
)
PW
M
(H 2
4 V
AC
)
PW
M O
UT
PU
T
FR
OM
CN
TR
L
PWM VALVE ACTUATOR
T6 T5 C B W R
PERIPHERAL HEAT VALVE ACTUATOR
24 VAC
4
4
AO-1
CO
M AO
-2
AO-3
CO
M
UI-1
CO
M UI
-2
UI-3
CO
M UI
-4
UI-5
CO
M UI
-6
DI-1
DI
-2
COM
DI-3
20V
DC
DI-4
NET-
2 NE
T-1
SHLD
EG
ND
24 V
AC
24VA
C CO
M
DO
-1
CO
M
DO
-2
DO
-3
DO
-4
DO
-5
CO
M
DO
-6
CO
M
1 2 3 4 5 6 7 8 1 0 9 2 3 4 5 6 7 8 0 9 1 1 1 1 1 1 1 1 1 2 1
1 2 3 4 5 6 7 8 0 9 2 2 2 2 2 2 2 2 2 3 3
1 2 3 4 5 6 7 8 0 9 3 3 3 3 3 3 3 3 4
DO
-7
DO
-8
CO
M
SBUS
1SB
US2
SPYDER® LON PROGRAMMABLE, VAV/UNITARY CONTROLLERS
63-2685—01 18
Fig. 21. Controller wiring diagram (model PUL6438S shown) for typical AHU application. (For note 2, refer to Fig. 15.)
1
2
1
2
EARTH GROUND WIRE LENGTH SHOULD BE HELD TO A MINIMUM. USE THE HEAVIEST GAUGE WIRE AVAILABLE, UP TO 14 AWG (2.O MM 2)
WITH A MINIMUM OF 18 AWG (1.O MM2), FOR EARTH GROUND WIRE.
TO ASSURE PROPER ELECTRICAL CONTACT, WIRES MUST BE TWISTED TOGETHER BEFORE INSERTION INTO THE TERMINAL BLOCK.
ANALOG OUTPUTS FROM SENSOR ARE 4 TO 20 mA SIGNALS. A 499 OHM 1% TOLERANCE (OR BETTER) PRECISION RESISTOR IS
REQUIRED TO DRIVE THIS AND OTHER 4 TO 20 mA SIGNAL DEVICES. PLACE THIS RESISTOR AS CLOSE AS POSSIBLE TO THE DRIVEN
DEVICE. M23574B
2
JACK FOR
LONWORKS-BUS
NETWORK
ACCESS
7 6 9 8 5 4 3 2 1
T7770C
WALL
MODULE
SE
T P
T
GN
D
SE
NS
OR
BY
PA
SS
LE
D
E-B
US
E-B
US
LONWORKS-BUS
AO-1 DI-1
UI-1 UI-2
COM
24 VAC
24 VAC COM
+ -
DO-1
DO-2
DO-3
DO-4
LONWORKS-BUS
DO-8
UI-3
COM
3
COM
COM
COM
DISCHARGE
AIR TEMP
COM
UI-6
OUTDOOR
ENTHALPY
RETURN
ENTHALPY
20 VDC
20 VDC
3 499
2
COMP2
COMP 1
HEAT 2
HEAT 1
FAN
UI-4
499
SBUS
1SB
US2
AO-1
COM
AO-2
AO-3
COM
UI-1
COM
UI-2
UI-3
COM
UI-4
UI-5
COM
UI-6
DI-1
DI-2
COM
DI-3
20V
DCDI
-4
NET-
2NE
T-1
SHLD
EGND
24 V
AC24
VAC
COM
DO
-1
CO
MD
O-2
DO
-3D
O-4
DO
-5C
OM
DO
-6C
OM
1 2 3 4 5 6 7 8 1 0 9 2 3 4 5 6 7 8 0 9 1 1 1 1 1 1 1 1 1 2 1
1 2 3 4 5 6 7 8 0 9 2 2 2 2 2 2 2 2 2 3 3
1 2 3 4 5 6 7 8 0 9 3 3 3 3 3 3 3 3 4
DO
-7D
O-8
CO
M
SPYDER® LON PROGRAMMABLE, VAV/UNITARY CONTROLLERS
19 63-2685—01
Fig. 22. Controller wiring diagram (model PUL6438S shown) with 4 to 20 mA enthalpy sensors and digital inputs. (For note 2, refer to Fig. 15.)
1
2
1
2
EARTH GROUND WIRE LENGTH SHOULD BE HELD TO A MINIMUM. USE THE HEAVIEST GAUGE WIRE AVAILABLE, UP TO 14 AWG (2.O MM 2)
WITH A MINIMUM OF 18 AWG (1.O MM2), FOR EARTH GROUND WIRE.
TO ASSURE PROPER ELECTRICAL CONTACT, WIRES MUST BE TWISTED TOGETHER BEFORE INSERTION INTO THE TERMINAL BLOCK.
ANALOG OUTPUTS FROM SENSOR ARE 4 TO 20 mA SIGNALS. A 499 OHM 1% TOLERANCE (OR BETTER) PRECISION RESISTOR IS
REQUIRED TO DRIVE THIS AND OTHER 4 TO 20 mA SIGNAL DEVICES. PLACE THIS RESISTOR AS CLOSE AS POSSIBLE TO THE DRIVEN
DEVICE. M23575B
2 JACK FOR
LONWORKS-BUS
NETWORK
ACCESS
7 6 9 8 5 4 3 2 1
T7770C
WALL
MODULE
SE
T P
T
GN
D
SE
NS
OR
BY
PA
SS
LE
D
E-B
US
E-B
US
LONWORKS-BUS
AO-1 DI-1
UI-1 UI-2
COM
24 VAC
24 VAC COM
+ -
DO-1
DO-2
DO-3
DO-4
LONWORKS-BUS
DO-8
UI-3
COM
3
COM
COM
COM
DISCHARGE
AIR TEMP
COM
UI-6
OUTDOOR
ENTHALPY
RETURN
ENTHALPY
20 VDC
20 VDC
3 499
2
COMP2
COMP 1
HEAT 2
HEAT 1
FAN
UI-4
499
OCCUPANCY SENSOR
(CONTACTS CLOSED
EQUALS OCCUPIED)
WINDOWS CONTACTS
(CONTACTS CLOSED
EQUALS WINDOW CLOSED)
2
DI-2
COM
DI-3
AO-1
COM
AO-2
AO-3
COM
UI-1
COM
UI-2
UI-3
COM
UI-4
UI-5
COM
UI-6
DI-1
DI-2
COM
DI-3
20V
DCDI
-4
NET-
2NE
T-1
SHLD
EGND
24 V
AC24
VAC
COM
DO
-1
CO
MD
O-2
DO
-3D
O-4
DO
-5C
OM
DO
-6C
OM
1 2 3 4 5 6 7 8 1 0 9 2 3 4 5 6 7 8 0 9 1 1 1 1 1 1 1 1 1 2 1
1 2 3 4 5 6 7 8 0 9 2 2 2 2 2 2 2 2 2 3 3
1 2 3 4 5 6 7 8 0 9 3 3 3 3 3 3 3 3 4
DO
-7D
O-8
CO
M
SBUS
1SB
US2

SPYDER® LON PROGRAMMABLE, VAV/UNITARY CONTROLLERS
63-2685—01 20
Fig. 23. Controller wiring diagram (model PUL6438S shown) with 4 to 20 mA heating, cooling, and model ML6161 damper actuator. (For note 2, refer to Fig. 15.)
COM
COM
UI-6
FAN
SERIES 70
VALVE
ACTUATOR
24
VAC
IN-
PUT COM
TWO - OR THREE-WAY
CHILLER WATER VALVE
SERIES 70
VALVE
ACTUATOR
24
VAC
IN-
PUT COM
TWO - OR THREE-WAY HOT WATER/
STEAM VALVE
AO-3
3 M
L6
16
1 D
AM
PE
R
AC
TU
AT
OR
CW
C
OM
C
CW
DAMPER OPEN
DAMPER CLOSED
1
2
1
2
EARTH GROUND WIRE LENGTH SHOULD BE HELD TO A MINIMUM. USE THE HEAVIEST GAUGE WIRE AVAILABLE, UP TO 14 AWG (2.O MM 2)
WITH A MINIMUM OF 18 AWG (1.O MM2), FOR EARTH GROUND WIRE.
TO ASSURE PROPER ELECTRICAL CONTACT, WIRES MUST BE TWISTED TOGETHER BEFORE INSERTION INTO THE TERMINAL BLOCK.
MAKE SURE ALL TRANSFORMER/POWER WIRING IS AS SHOWN: REVERSING TERMINATIONS WILL RESULT IN EQUIPMENT MALFUNCTION.
M23576B
2 JACK FOR
LONWORKS-BUS
NETWORK
ACCESS
7 6 9 8 5 4 3 2 1
T7770C
WALL
MODULE
SE
T P
T
GN
D
SE
NS
OR
BY
PA
SS
LE
D
E-B
US
E-B
US
LONWORKS-BUS
AO-1 DI-1
UI-1 UI-2
COM
24 VAC
24 VAC COM
+ -
DO-1
DO-2
LONWORKS-BUS DO-4
3
COM
DISCHARGE
AIR TEMP AO-2
AO-1
CO
M AO
-2
AO-3
CO
M
UI-1
CO
M UI
-2
UI-3
CO
M UI
-4
UI-5
CO
M UI
-6
DI-1
DI
-2
COM
DI-3
20V
DC
DI-4
NET-
2 NE
T-1
SHLD
EG
ND
24 V
AC
24VA
C CO
M
DO
-1
CO
M
DO
-2
DO
-3
DO
-4
DO
-5
CO
M
DO
-6
CO
M
1 2 3 4 5 6 7 8 1 0 9 2 3 4 5 6 7 8 0 9 1 1 1 1 1 1 1 1 1 2 1
1 2 3 4 5 6 7 8 0 9 2 2 2 2 2 2 2 2 2 3 3
1 2 3 4 5 6 7 8 0 9 3 3 3 3 3 3 3 3 4
DO
-7
DO
-8
CO
M
SBUS
1SB
US2
SPYDER® LON PROGRAMMABLE, VAV/UNITARY CONTROLLERS
21 63-2685—01
Fig. 24. Controller wiring diagram (model PUL6438S shown) for RP7517B pneumatic transducer.
CHECKOUTStep 1. Check Installation and WiringInspect all wiring connections at the controller terminals, and verify compliance with installation wiring diagrams. If any wiring changes are required, first be sure to remove power from the controller before starting work. Pay particular attention to:— 24 Vac power connections. Verify that multiple controllers
being powered by the same transformer are wired with the transformer secondary connected to the same input terminal numbers on each controller. Use a meter to measure 24 Vac at the appropriate terminals (see Fig. 13 on page 10). Controller configurations are not necessarily limited to three devices, but the total power draw, including accessories, cannot exceed 100 VA when powered by the same transformer (U.S. only).
— Be sure that each controller has terminal 3 wired to a verified earth ground, using a wire run as short as possible with the heaviest gauge wire available, up to 14 AWG (2.0 sq mm) with a minimum of 18 AWG (1.0 sq mm) for each controller in the group (see Fig. 13 on page 10).
— Verify that Triac wiring of the digital outputs to external devices uses the proper load power and 24 Vac common terminal (digital output common terminals) for High-Side switching.
NOTE: All wiring must comply with applicable electrical codes and ordinances or as specified on installation wiring diagrams.
For guidelines for wiring run lengths and power budget, see “Power” on page 7.
VERIFY TERMINATION MODULE PLACEMENT (MULTIPLE CONTROLLERS ONLY)The installation wiring diagrams should indicate the locations for placement of the 209541B termination module(s). See Fig. 14 on page 11 and refer to the “LONWORKS® Bus Wiring Guidelines,” form 74-2865, and the “Excel 10 FTT Termination Module Installation Instructions,” form 95-7554.
Correct placement of the termination module(s) is required for proper LONWORKS® Bus communications.
Step 2. StartupRefer to Fig. 25 and the following text for startup information.
Fig. 25. LED, service pin, and network connection locations.
BROADCAST THE SERVICE MESSAGEThe Service Message allows a device on the LONWORKS® Bus to be positively identified. The Service Message contains the controller’s Neuron® ID number and node type. This is used to confirm the physical location of a particular Excel 10 device in a building.
• To send the Service Message from the controller, press the NEURON® Service Pin pushbutton on the controller (see Fig. 25 above, and Fig. 16 and Fig. 17 on page 14). This button sends out the Service Message when it is pressed, regardless of the controller’s current mode of operation.
CAUTIONEquipment Damage Hazard.Can cause controller damage or failure.Do not use any metal object to press the NEURON® Service Pin. Use a plastic rod or wood device (such as a pencil with the lead broken off) to press the pin. Using a metal object can damage the circuitry of the controller.
CONTROLLER STATUS LED:The LED on the front of the controller provides a visual indication of the status of the device. When the controller receives power, the LED appears in one of the following allowable states, as described in Table 8.
AO-1
COM
AO-2
AO-3
COM
UI-1
COM
UI-2
UI-3
COM
UI-4
UI-5
COM
UI-6
DI-1
DI-2
COM
DI-3
20V
DCDI
-4
NET-
2NE
T-1
SHLD
EGND
24 V
AC24
VAC
COM
DO
-1
CO
MD
O-2
DO
-3D
O-4
DO
-5C
OM
DO
-6C
OM
1 2 3 4 5 6 7 8 1 0 9 2 3 4 5 6 7 8 0 9 1 1 1 1 1 1 1 1 1 2 1
1 2 3 4 5 6 7 8 0 9 2 2 2 2 2 2 2 2 2 3 3
1 2 3 4 5 6 7 8 0 9 3 3 3 3 3 3 3 3 4
M23570B
24 VAC
AO1
24 VAC COM
PUL6438S
1
2
USE 1/4 IN (6 MM) PNEUMATIC TUBING. MINIMUM BRANCH LINE
MUST BE 6 FT. (1.8M) OR LONGER.
TERMINALS 21, 23, AND 24 ARE ANALOG OUTPUTS.
+
-
BLUE
BLACK
BROWN
PNEUMATIC
VALVE
ACTUATOR RP7517B
1M
2B
M
2
1 D
O-7
DO
-8C
OM
SBUS
1SB
US2
LONWORKS® BUS JACK
(LABELLED SRV JCK) NEURON® SERVICE PIN
(LABELLED SRV PIN)
TERMINALS 1-8 TERMINALS 9-20
TERMINALS 21-40
AO-1
COM
AO-2
AO-3
COM
UI-1
COM
UI-2
UI-3
COM
UI-4
UI-5
COM
UI-6
DI-1
DI-2
COM
DI-3
20V
DCDI
-4
NET-
2NE
T-1
SHLD
EGND
24 V
AC24
VAC
COM
DO
-1
CO
MD
O-2
DO
-3D
O-4
DO
-5C
OM
DO
-6C
OM
1 2 3 4 5 6 7 8 1 0 9 2 3 4 5 6 7 8 0 9 1 1 1 1 1 1 1 1 1 2 1
1 2 3 4 5 6 7 8 0 9 2 2 2 2 2 2 2 2 2 3 3
1 2 3 4 5 6 7 8 0 9 3 3 3 3 3 3 3 3 4
M23562B
LED
DO
-7D
O-8
CO
M
SBUS
1SB
US2
SPYDER® LON PROGRAMMABLE, VAV/UNITARY CONTROLLERS
63-2685—01 22
Table 8. Status LED states.
Step 3. Checkout CompletionAt this point the controller is installed and powered. To complete the checkout, the NIAGARA FRAMEWORK® application (run on a PC) is used to configure the I/O and functions of the controller. Refer to the Programming Tool User Guide, form no. 63-2662, for controller configuration and programming details.
CONTROLLER REPLACEMENTThere are no serviceable or repairable parts inside the controller.
WARNINGFire, Explosion, or Electrical Shock Hazard.Can cause severe injury, death or property damage.Do not attempt to modify the physical or electrical characteristics of this device in any way. Replace the controller if troubleshooting indicates a malfunction.
WARNINGElectrical Shock Hazard.Can cause severe injury, death or property damage.Disconnect power supply before beginning controller replacement to prevent electrical shock or equipment damage.
Terminal Block RemovalTo simplify controller replacement, all terminal blocks are designed to be removed with the wiring connections intact and then re-installed on the new controller. See Fig. 26 and refer to the following procedure:
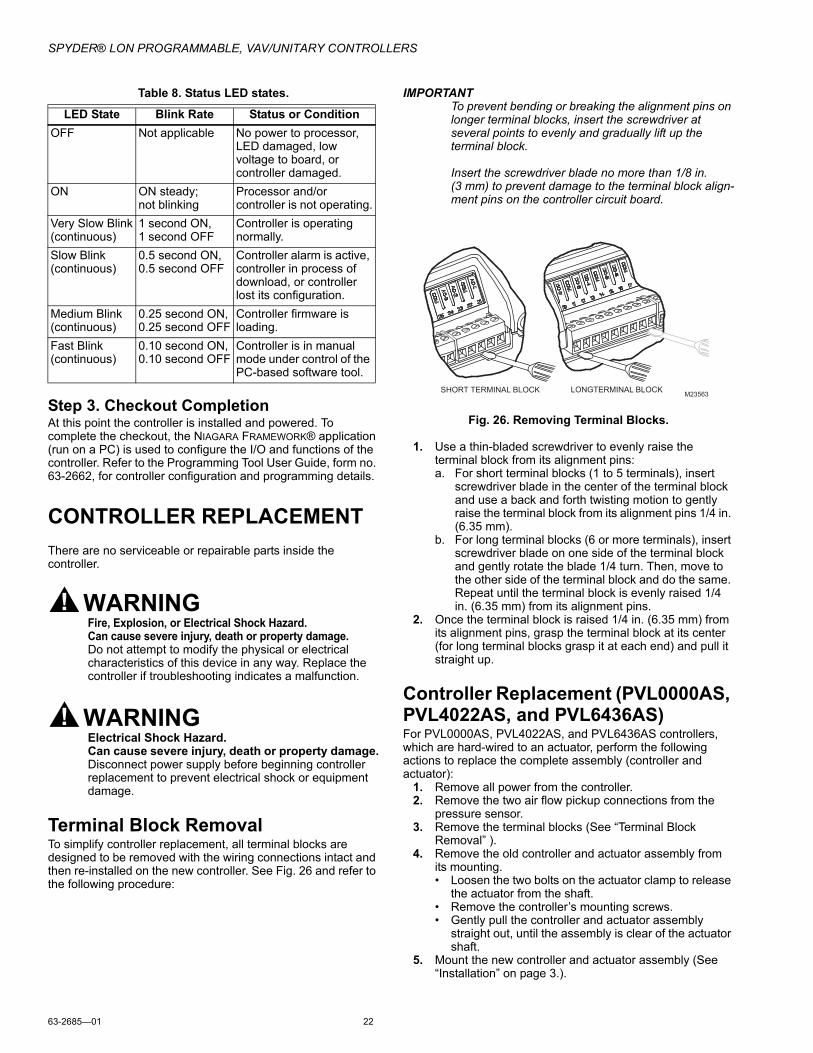
IMPORTANTTo prevent bending or breaking the alignment pins on longer terminal blocks, insert the screwdriver at several points to evenly and gradually lift up the terminal block.
Insert the screwdriver blade no more than 1/8 in. (3 mm) to prevent damage to the terminal block align-ment pins on the controller circuit board.
Fig. 26. Removing Terminal Blocks.
1. Use a thin-bladed screwdriver to evenly raise the terminal block from its alignment pins:a. For short terminal blocks (1 to 5 terminals), insert
screwdriver blade in the center of the terminal block and use a back and forth twisting motion to gently raise the terminal block from its alignment pins 1/4 in. (6.35 mm).
b. For long terminal blocks (6 or more terminals), insert screwdriver blade on one side of the terminal block and gently rotate the blade 1/4 turn. Then, move to the other side of the terminal block and do the same. Repeat until the terminal block is evenly raised 1/4 in. (6.35 mm) from its alignment pins.
2. Once the terminal block is raised 1/4 in. (6.35 mm) from its alignment pins, grasp the terminal block at its center (for long terminal blocks grasp it at each end) and pull it straight up.
Controller Replacement (PVL0000AS, PVL4022AS, and PVL6436AS)For PVL0000AS, PVL4022AS, and PVL6436AS controllers, which are hard-wired to an actuator, perform the following actions to replace the complete assembly (controller and actuator):
1. Remove all power from the controller.2. Remove the two air flow pickup connections from the
pressure sensor.3. Remove the terminal blocks (See “Terminal Block
Removal” ).4. Remove the old controller and actuator assembly from
its mounting.• Loosen the two bolts on the actuator clamp to release
the actuator from the shaft.• Remove the controller’s mounting screws.• Gently pull the controller and actuator assembly
straight out, until the assembly is clear of the actuator shaft.
5. Mount the new controller and actuator assembly (See “Installation” on page 3.).
LED State Blink Rate Status or ConditionOFF Not applicable No power to processor,
LED damaged, low voltage to board, or controller damaged.
ON ON steady; not blinking
Processor and/or controller is not operating.
Very Slow Blink(continuous)
1 second ON,1 second OFF
Controller is operating normally.
Slow Blink(continuous)
0.5 second ON,0.5 second OFF
Controller alarm is active, controller in process of download, or controller lost its configuration.
Medium Blink(continuous)
0.25 second ON,0.25 second OFF
Controller firmware is loading.
Fast Blink(continuous)
0.10 second ON,0.10 second OFF
Controller is in manual mode under control of the PC-based software tool.
SHORT TERMINAL BLOCK LONGTERMINAL BLOCKM23563
SPYDER® LON PROGRAMMABLE, VAV/UNITARY CONTROLLERS
23 63-2685—01
6. Reconnect the two air flow pickup tubes to the pressure sensor (See “Piping (PVL0000AS, PVL4022AS, PVL4024NS, PVL6436AS, and PVL6438NS)” on page 6.).
7. Replace the terminal blocks:• Insert each terminal block onto its alignment pins.• Press straight down to firmly seat it. • Repeat for each terminal block.
8. Restore power to the controller.9. Perform “Checkout” on page 21.
Controller Replacement (PVL4024NS and PVL6438NS)Perform the following to replace the PVL4024NS and PVL6438NS controllers:
1. Remove all power from the controller.2. Remove the two air flow pickup connections from the
pressure sensor.3. Remove the terminal blocks.
• See “Terminal Block Removal” on page 22..4. Remove the old controller from its mounting.
IMPORTANT (FOR CONTROLLERS MOUNTED TO A DIN RAIL):
1. Push straight up from the bottom to release the top pins.
2. Rotate the top of the controller outwards to release the bottom flex connectors (see Fig. 8 on page 6).
5. Mount the new controller. • See “Installation” on page 3.
6. Reconnect the two air flow pickup tubes to the pressure sensor (See “Piping (PVL0000AS, PVL4022AS, PVL4024NS, PVL6436AS, and PVL6438NS)” on page 6.).
7. Replace the terminal blocks:• Insert each terminal block onto its alignment pins.• Press straight down to firmly seat it. • Repeat for each terminal block.
8. Restore power to the controller.9. Perform “Checkout” on page 21.
Controller Replacement (PUL1012S, PUL4024S, and PUL6438S)Perform the following to replace the PUL1012S, PUL4024S, and PUL6438S controllers:
1. Remove all power from the controller.2. Remove the terminal blocks (See “Terminal Block
Removal” on page 22.).3. Remove the old controller from its mounting.
IMPORTANT (FOR CONTROLLERS MOUNTED TO A DIN RAIL):
1. Push straight up from the bottom to release the top pins.
2. Rotate the top of the controller outwards to release the bottom flex connectors (see Fig. 8 on page 6).
4. Mount the new controller (See “Installation” on page 3.).5. Replace the terminal blocks:
• Insert each terminal block onto its alignment pins.• Press straight down to firmly seat it. • Repeat for each terminal block.
6. Restore power to the controller.7. Perform “Checkout” on page 21.

Automation and Control SolutionsHoneywell International Inc. Honeywell Limited-Honeywell Limitée1985 Douglas Drive North 35 Dynamic DriveGolden Valley, MN 55422 Toronto, Ontario M1V 4Z9customer.honeywell.com
SPYDER® LON PROGRAMMABLE, VAV/UNITARY CONTROLLERS
® U.S. Registered Trademark© 2009 Honeywell International Inc.63-2685—01 K.K. Rev. 02-09
LON®, LONTALK®, LONWORKS®, and NEURON® are registered trademarks of Echelon® Corporation.
LONMARK® and the LonMark Logo are trademarks of the LonMark Association.
NIAGARA FRAMEWORK® and the Niagara framework logo are registered trademarks of Tridium, Inc.