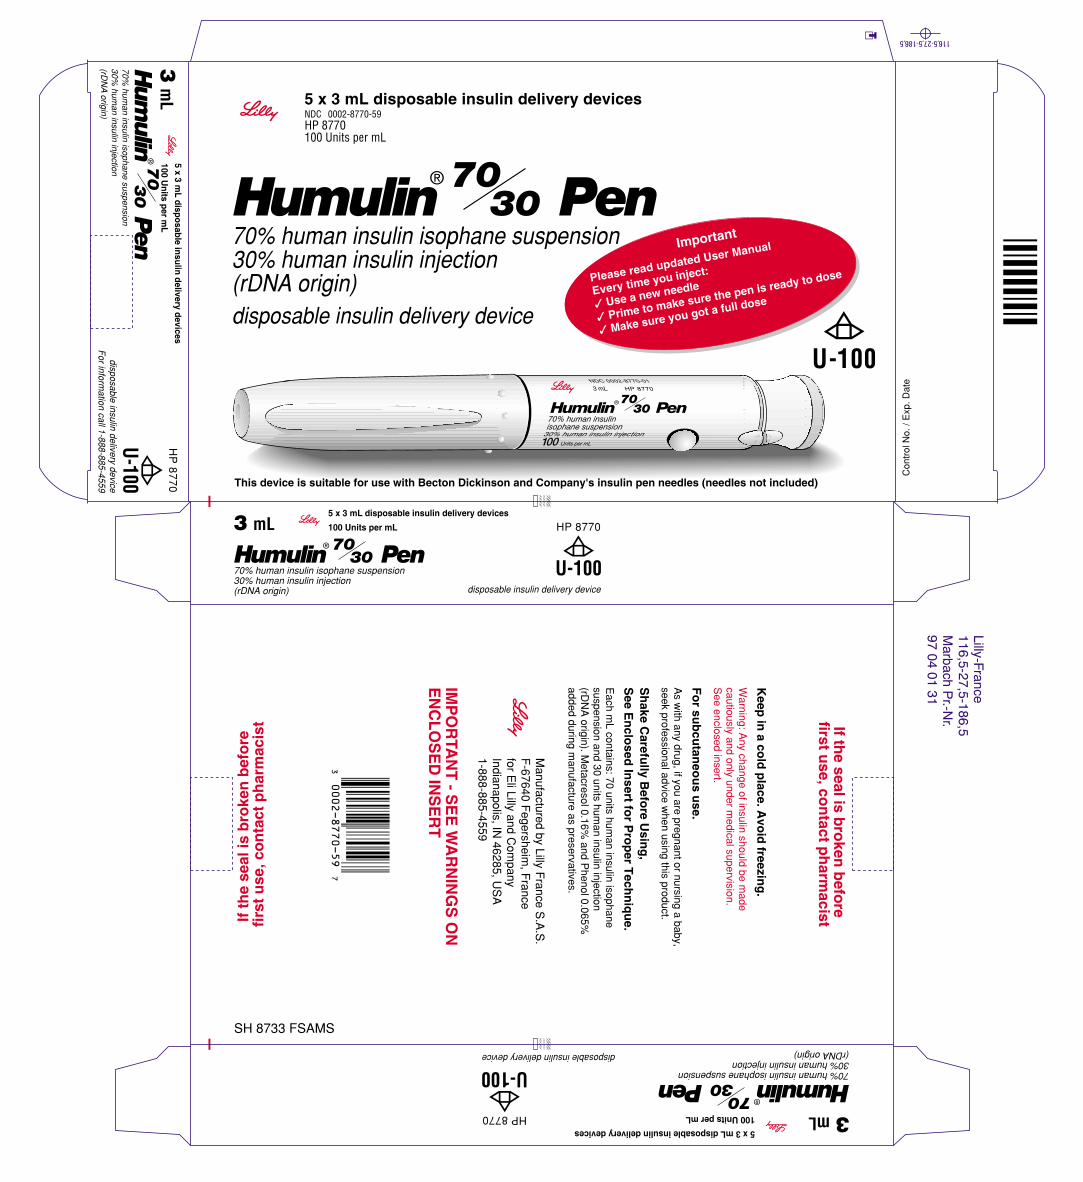
70% human insulin isophane suspension and … · humulin® 70/30 is a mixture of 70% human insulin...
TRANSCRIPT
1
5.01 PA 9145 FSAMP 1 INFORMATION FOR THE PATIENT 2
3 ML DISPOSABLE INSULIN DELIVERY DEVICE 3
HUMULIN® 70/30 Pen 4 70% HUMAN INSULIN 5
ISOPHANE SUSPENSION 6 AND 7
30% HUMAN INSULIN INJECTION 8 (rDNA ORIGIN) 9
100 UNITS PER ML (U-100) 10 WARNINGS 11
THIS LILLY HUMAN INSULIN PRODUCT DIFFERS FROM ANIMAL-12 SOURCE INSULINS BECAUSE IT IS STRUCTURALLY IDENTICAL TO THE 13 INSULIN PRODUCED BY YOUR BODY’S PANCREAS AND BECAUSE OF 14 ITS UNIQUE MANUFACTURING PROCESS. 15
ANY CHANGE OF INSULIN SHOULD BE MADE CAUTIOUSLY AND 16 ONLY UNDER MEDICAL SUPERVISION. CHANGES IN STRENGTH, 17 MANUFACTURER, TYPE (E.G., REGULAR, NPH, LENTE, ETC), SPECIES 18 (BEEF, PORK, BEEF-PORK, HUMAN), OR METHOD OF MANUFACTURE 19 (rDNA VERSUS ANIMAL-SOURCE INSULIN) MAY RESULT IN THE NEED 20 FOR A CHANGE IN DOSAGE. 21
SOME PATIENTS TAKING HUMULIN® (HUMAN INSULIN, rDNA ORIGIN) 22 MAY REQUIRE A CHANGE IN DOSAGE FROM THAT USED WITH 23 ANIMAL-SOURCE INSULINS. IF AN ADJUSTMENT IS NEEDED, IT MAY 24 OCCUR WITH THE FIRST DOSE OR DURING THE FIRST SEVERAL 25 WEEKS OR MONTHS. 26
TO OBTAIN AN ACCURATE DOSE, CAREFULLY READ AND FOLLOW 27 THE “DISPOSABLE INSULIN DELIVERY DEVICE USER MANUAL” AND 28 THIS “INFORMATION FOR THE PATIENT” INSERT BEFORE USING THIS 29 PRODUCT. 30
BEFORE EACH INJECTION, YOU SHOULD PRIME THE PEN, A 31 NECESSARY STEP TO MAKE SURE THE PEN IS READY TO DOSE. 32 PRIMING THE PEN IS IMPORTANT TO CONFIRM THAT INSULIN COMES 33 OUT WHEN YOU PUSH THE INJECTION BUTTON AND TO REMOVE AIR 34 THAT MAY COLLECT IN THE INSULIN CARTRIDGE DURING NORMAL 35 USE. IF YOU DO NOT PRIME, YOU MAY RECEIVE TOO MUCH OR TOO 36 LITTLE INSULIN (see also INSTRUCTIONS FOR INSULIN PEN USE section). 37
DIABETES 38 Insulin is a hormone produced by the pancreas, a large gland that lies near the stomach. This 39
hormone is necessary for the body’s correct use of food, especially sugar. Diabetes occurs when 40 the pancreas does not make enough insulin to meet your body’s needs. 41
To control your diabetes, your doctor has prescribed injections of insulin products to keep your 42 blood glucose at a near-normal level. You have been instructed to test your blood and/or your 43 urine regularly for glucose. Studies have shown that some chronic complications of diabetes such 44 as eye disease, kidney disease, and nerve disease can be significantly reduced if the blood sugar 45
2
is maintained as close to normal as possible. The American Diabetes Association recommends 46 that if your pre-meal glucose levels are consistently above 130 mg/dL or your hemoglobin A1c 47 (HbA1c) is more than 7%, consult your doctor. A change in your diabetes therapy may be needed. 48 If your blood tests consistently show below-normal glucose levels, you should also let your 49 doctor know. Proper control of your diabetes requires close and constant cooperation with your 50 doctor. Despite diabetes, you can lead an active and healthy life if you eat a balanced diet, 51 exercise regularly, and take your insulin injections as prescribed. 52
Always keep an extra supply of insulin as well as a spare syringe and needle on hand. Always 53 wear diabetic identification so that appropriate treatment can be given if complications occur 54 away from home. 55
70/30 HUMAN INSULIN 56 Description 57
Humulin is synthesized in a non-disease-producing special laboratory strain of Escherichia coli 58 bacteria that has been genetically altered by the addition of the human gene for insulin 59 production. Humulin® 70/30 is a mixture of 70% Human Insulin Isophane Suspension and 30% 60 Human Insulin Injection, (rDNA origin). It is an intermediate-acting insulin combined with the 61 more rapid onset of action of regular insulin. The duration of activity may last up to 24 hours 62 following injection. The time course of action of any insulin may vary considerably in different 63 individuals or at different times in the same individual. As with all insulin preparations, the 64 duration of action of Humulin 70/30 is dependent on dose, site of injection, blood supply, 65 temperature, and physical activity. Humulin 70/30 is a sterile suspension and is for subcutaneous 66 injection only. It should not be used intravenously or intramuscularly. The concentration of 67 Humulin 70/30 in the Humulin 70/30 Pen is 100 units/mL (U-100). 68 Identification 69
Humulin disposable insulin delivery devices, by Eli Lilly and Company, are available in 70 2 formulations — NPH and 70/30. 71
Your doctor has prescribed the type of insulin that he/she believes is best for you. DO NOT 72 USE ANY OTHER INSULIN EXCEPT ON HIS/HER ADVICE AND DIRECTION. 73
The Humulin 70/30 Pen is available in boxes of 5 disposable insulin delivery devices (“insulin 74 Pens”). The Humulin 70/30 Pen is not designed to allow any other insulin to be mixed in its 75 cartridge, or for the cartridge to be removed. 76
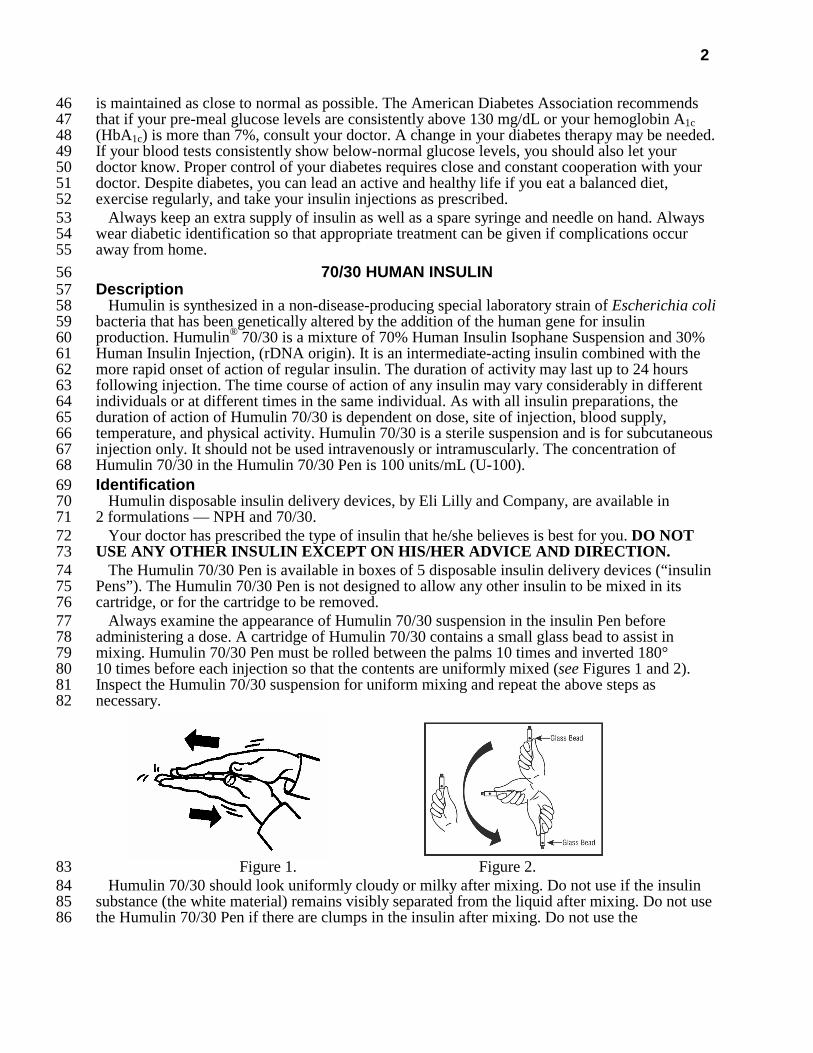
Always examine the appearance of Humulin 70/30 suspension in the insulin Pen before 77 administering a dose. A cartridge of Humulin 70/30 contains a small glass bead to assist in 78 mixing. Humulin 70/30 Pen must be rolled between the palms 10 times and inverted 180° 79 10 times before each injection so that the contents are uniformly mixed (see Figures 1 and 2). 80 Inspect the Humulin 70/30 suspension for uniform mixing and repeat the above steps as 81 necessary. 82
Figure 1. Figure 2. 83 Humulin 70/30 should look uniformly cloudy or milky after mixing. Do not use if the insulin 84
substance (the white material) remains visibly separated from the liquid after mixing. Do not use 85 the Humulin 70/30 Pen if there are clumps in the insulin after mixing. Do not use the 86

3
Humulin 70/30 Pen if solid white particles stick to the walls of the cartridge, giving it a frosted 87 appearance. 88
Always check the appearance of the Humulin 70/30 suspension in the insulin Pen before using, 89 and if you note anything unusual in the appearance of Humulin 70/30 suspension or notice your 90 insulin requirements changing markedly, consult your doctor. 91
Never attempt to remove the cartridge from the Humulin 70/30 Pen. Inspect the cartridge 92 through the clear cartridge holder. 93 Storage 94
Not in-use (unopened): Humulin 70/30 Pens not in-use should be stored in a refrigerator but 95 not in the freezer. Do not use a Humulin 70/30 Pen if it has been frozen. 96
In-use: Humulin 70/30 Pens in-use should NOT be refrigerated but should be kept at room 97 temperature (below 86°F [30°C]) away from direct heat and light. Humulin 70/30 Pens in-use 98 must be discarded after 10 days, even if they still contain Humulin 70/30. 99
Do not use Humulin 70/30 Pens after the expiration date stamped on the label. 100 INSTRUCTIONS FOR INSULIN PEN USE 101
It is important to read, understand, and follow the instructions in the “Disposable Insulin 102 Delivery Device User Manual” before using. Failure to follow instructions may result in 103 getting too much or too little insulin. The needle must be changed and the Pen must be 104 primed before each injection to make sure the Pen is ready to dose. Performing these steps 105 before each injection is important to confirm that insulin comes out when you push the 106 injection button, and to remove air that may collect in the insulin cartridge during normal 107 use. 108
Every time you inject: 109 • Use a new needle. 110 • Prime to make sure the Pen is ready to dose. 111 • Make sure you got your full dose. 112 NEVER SHARE INSULIN PENS, CARTRIDGES, OR NEEDLES. 113
PREPARING THE INSULIN PEN FOR INJECTION 114 1. Always check the appearance of the Humulin 70/30 suspension in the insulin Pen before 115
using. 116 2. Roll the Humulin 70/30 Pen between the palms 10 times (see Figure 1). 117 3. Holding the Humulin 70/30 Pen by one end, invert it 180° slowly 10 times to allow the 118
small glass bead to travel the full length of the cartridge with each inversion (see 119 Figure 2). The cartridge is contained in the clear cartridge holder of the Humulin 70/30 120 Pen. 121
4. Inspect the appearance of the Humulin 70/30 suspension to make sure the contents look 122 uniformly cloudy or milky. If not, repeat the above steps until the contents are mixed. Do 123 not use a Humulin 70/30 Pen if there are clumps in the insulin or if solid white particles 124 stick to the walls of the cartridge. 125
5. Follow the instructions in the “Disposable Insulin Delivery Device User Manual” for these 126 steps: 127 • Preparing the Pen 128 • Attaching the Needle. Use a new needle for each injection. 129 • Priming the Pen. The Pen must be primed before each injection to make sure the 130
Pen is ready to dose. Performing the priming step is important to confirm that insulin 131 comes out when you push the injection button, and to remove air that may collect in the 132 insulin cartridge during normal use. 133
• Setting a Dose 134 • Injecting a Dose. To make sure you have received your full dose, you must push the 135
injection button all the way down until you see a diamond (◆ ) or an arrow (→) in 136 the center of the dose window. 137
4
• Following an Injection 138 PREPARING FOR INJECTION 139
1. Wash your hands. 140 2. To avoid tissue damage, choose a site for each injection that is at least 1/2 inch from the 141
previous injection site. The usual sites of injection are abdomen, thighs, and arms. 142 3. Cleanse the skin with alcohol where the injection is to be made. 143 4. With one hand, stabilize the skin by spreading it or pinching up a large area. 144 5. Inject the dose as instructed by your doctor. Hold the needle under the skin for at least 145
5 seconds after injecting. 146 6. After injecting a dose, pull the needle out and apply gentle pressure over the injection site 147
for several seconds. Do not rub the area. 148 7. Immediately after an injection, remove the needle from the Humulin 70/30 Pen. Doing so 149
will guard against contamination, leakage, reentry of air, and needle clogs. Do not reuse 150 needles. Place the used needle in a puncture-resistant disposable container and properly 151 dispose of it as directed by your Health Care Professional. 152
DOSAGE 153 Your doctor has told you which insulin to use, how much, and when and how often to inject it. 154
Because each patient’s case of diabetes is different, this schedule has been individualized for you. 155 Your usual Humulin 70/30 dose may be affected by changes in your food, activity, or work 156
schedule. Carefully follow your doctor’s instructions to allow for these changes. Other things that 157 may affect your Humulin 70/30 dose are: 158 Illness 159
Illness, especially with nausea and vomiting, may cause your insulin requirements to change. 160 Even if you are not eating, you will still require insulin. You and your doctor should establish a 161 sick day plan for you to use in case of illness. When you are sick, test your blood glucose/urine 162 glucose and ketones frequently and call your doctor as instructed. 163 Pregnancy 164
Good control of diabetes is especially important for you and your unborn baby. Pregnancy may 165 make managing your diabetes more difficult. If you are planning to have a baby, are pregnant, or 166 are nursing a baby, consult your doctor. 167 Medication 168
Insulin requirements may be increased if you are taking other drugs with hyperglycemic 169 activity, such as oral contraceptives, corticosteroids, or thyroid replacement therapy. Insulin 170 requirements may be reduced in the presence of drugs with blood-glucose-lowering activity, such 171 as oral antidiabetic agents, salicylates (for example, aspirin), sulfa antibiotics, alcohol, and 172 certain antidepressants. Always discuss any medications you are taking with your doctor. 173 Exercise 174
Exercise may lower your body’s need for insulin during and for some time after the physical 175 activity. Exercise may also speed up the effect of a Humulin 70/30 dose, especially if the exercise 176 involves the area of injection site (for example, the leg should not be used for injection just prior 177 to running). Discuss with your doctor how you should adjust your regimen to accommodate 178 exercise. 179 Travel 180
Persons traveling across more than 2 time zones should consult their doctor concerning 181 adjustments in their insulin schedule. 182
COMMON PROBLEMS OF DIABETES 183 Hypoglycemia (Low Blood Sugar) 184
Hypoglycemia (too little glucose in the blood) is one of the most frequent adverse events 185 experienced by insulin users. It can be brought about by: 186
1. Taking too much insulin. 187
5
2. Missing or delaying meals. 188 3. Exercising or working more than usual. 189 4. An infection or illness (especially with diarrhea or vomiting). 190 5. A change in the body’s need for insulin. 191 6. Diseases of the adrenal, pituitary or thyroid gland, or progression of kidney or liver 192
disease. 193 7. Interactions with other drugs that lower blood glucose, such as oral antidiabetic agents, 194
salicylates (for example, aspirin), sulfa antibiotics, and certain antidepressants. 195 8. Consumption of alcoholic beverages. 196 Symptoms of mild to moderate hypoglycemia may occur suddenly and can include: 197 • sweating • drowsiness 198 • dizziness • sleep disturbances 199 • palpitation • anxiety 200 • tremor • blurred vision 201 • hunger • slurred speech 202 • restlessness • depressed mood 203 • tingling in the hands, feet, lips, or tongue • irritability 204 • lightheadedness • abnormal behavior 205 • inability to concentrate • unsteady movement 206 • headache • personality changes 207 Signs of severe hypoglycemia can include: 208 • disorientation • seizures 209 • unconsciousness • death 210
Therefore, it is important that assistance be obtained immediately. 211 Early warning symptoms of hypoglycemia may be different or less pronounced under certain 212
conditions, such as long duration of diabetes, diabetic nerve disease, medications such as beta-213 blockers, change in insulin preparations, or intensified control (3 or more insulin injections per 214 day) of diabetes. 215
A few patients who have experienced hypoglycemic reactions after transfer from animal-216 source insulin to human insulin have reported that the early warning symptoms of 217 hypoglycemia were less pronounced or different from those experienced with their 218 previous insulin. 219
Without recognition of early warning symptoms, you may not be able to take steps to avoid 220 more serious hypoglycemia. Be alert for all of the various types of symptoms that may indicate 221 hypoglycemia. Patients who experience hypoglycemia without early warning symptoms should 222 monitor their blood glucose frequently, especially prior to activities such as driving. If the blood 223 glucose is below your normal fasting glucose, you should consider eating or drinking sugar-224 containing foods to treat your hypoglycemia. 225
Mild to moderate hypoglycemia may be treated by eating foods or drinks that contain sugar. 226 Patients should always carry a quick source of sugar, such as candy mints or glucose tablets. 227 More severe hypoglycemia may require the assistance of another person. Patients who are unable 228 to take sugar orally or who are unconscious require an injection of glucagon or should be treated 229 with intravenous administration of glucose at a medical facility. 230
You should learn to recognize your own symptoms of hypoglycemia. If you are uncertain about 231 these symptoms, you should monitor your blood glucose frequently to help you learn to recognize 232 the symptoms that you experience with hypoglycemia. 233
If you have frequent episodes of hypoglycemia or experience difficulty in recognizing the 234 symptoms, you should consult your doctor to discuss possible changes in therapy, meal plans, 235 and/or exercise programs to help you avoid hypoglycemia. 236
6
Hyperglycemia and Diabetic Ketoacidosis (DKA) 237 Hyperglycemia (too much glucose in the blood) may develop if your body has too little insulin. 238
Hyperglycemia can be brought about by: 239 1. Omitting your insulin or taking less than the doctor has prescribed. 240 2. Eating significantly more than your meal plan suggests. 241 3. Developing a fever, infection, or other significant stressful situation. 242 In patients with type 1 or insulin-dependent diabetes, prolonged hyperglycemia can result in 243
DKA. The first symptoms of DKA usually come on gradually, over a period of hours or days, 244 and include a drowsy feeling, flushed face, thirst, loss of appetite, and fruity odor on the breath. 245 With DKA, urine tests show large amounts of glucose and ketones. Heavy breathing and a rapid 246 pulse are more severe symptoms. If uncorrected, prolonged hyperglycemia or DKA can lead to 247 nausea, vomiting, stomach pains, dehydration, loss of consciousness or death. Therefore, it is 248 important that you obtain medical assistance immediately. 249 Lipodystrophy 250
Rarely, administration of insulin subcutaneously can result in lipoatrophy (depression in the 251 skin) or lipohypertrophy (enlargement or thickening of tissue). If you notice either of these 252 conditions, consult your doctor. A change in your injection technique may help alleviate the 253 problem. 254 Allergy to Insulin 255
Local Allergy — Patients occasionally experience redness, swelling, and itching at the site of 256 injection of insulin. This condition, called local allergy, usually clears up in a few days to a few 257 weeks. In some instances, this condition may be related to factors other than insulin, such as 258 irritants in the skin cleansing agent or poor injection technique. If you have local reactions, 259 contact your doctor. 260
Systemic Allergy — Less common, but potentially more serious, is generalized allergy to 261 insulin, which may cause rash over the whole body, shortness of breath, wheezing, reduction in 262 blood pressure, fast pulse, or sweating. Severe cases of generalized allergy may be life 263 threatening. If you think you are having a generalized allergic reaction to insulin, notify a doctor 264 immediately. 265
ADDITIONAL INFORMATION 266 Additional information about diabetes may be obtained from your diabetes educator. 267 DIABETES FORECAST is a magazine designed especially for people with diabetes and their 268
families. It is available by subscription from the American Diabetes Association (ADA), P.O. 269 Box 363, Mt. Morris, IL 61054-0363, 1-800-DIABETES (1-800-342-2383). 270
Another publication, COUNTDOWN, is available from the Juvenile Diabetes Research 271 Foundation International (JDRFI), 120 Wall Street 19th Floor, New York, NY 10005, 272 1-800-533-CURE (1-800-533-2873). 273
Additional information about Humulin and Humulin 70/30 Pens can be obtained by calling The 274 Lilly Answers Center at 1-800-LillyRx (1-800-545-5979). 275
Literature revised XXX, 2004 276 Manufactured by Lilly France S.A.S. 277
F-67640 Fegersheim, France 278 for Eli Lilly and Company 279
Indianapolis, IN 46285, USA 280 Copyright © 1998, 2004, Eli Lilly and Company. All rights reserved. 281
5.01 PA 9145 FSAMP 282
1
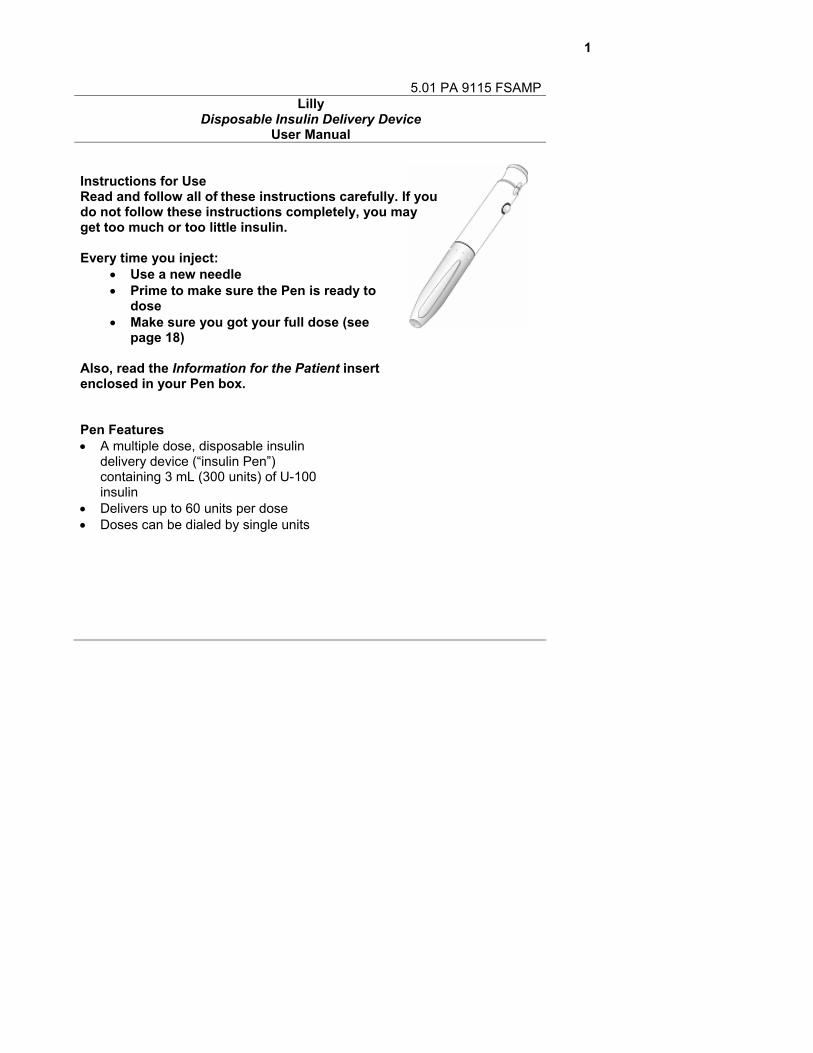
5.01 PA 9115 FSAMP Lilly
Disposable Insulin Delivery Device User Manual
Instructions for Use Read and follow all of these instructions carefully. If you do not follow these instructions completely, you may get too much or too little insulin. Every time you inject:
• Use a new needle • Prime to make sure the Pen is ready to
dose • Make sure you got your full dose (see
page 18)
Also, read the Information for the Patient insert enclosed in your Pen box. Pen Features • A multiple dose, disposable insulin
delivery device (“insulin Pen”) containing 3 mL (300 units) of U-100 insulin
• Delivers up to 60 units per dose • Doses can be dialed by single units

2
Table of Contents
_______________________________________________________________ Pen Parts............................................................................................................ 3 Important Notes..................................................................................................4 Preparing the Pen ..............................................................................................6 Attaching the Needle ..........................................................................................8 Priming the Pen................................................................................................ 10 Setting a Dose.................................................................................................. 14 Injecting a Dose................................................................................................ 16 Following an Injection....................................................................................... 18 Questions and Answers ................................................................................... 20 _______________________________________________________________
2

3
3
Pen Parts
Injection Button Dose Knob
Raised Notch
Raised Notch
Dose Window
Label
Insulin Cartridge
Clear Cartridge Holder
Rubber Seal
Paper Tab
Outer Needle ShieldInner Needle Shield
Needle
Pen Cap
4
Important Notes
• Read and follow all of these instructions carefully. If you do not follow these
instructions completely, you may get too much or too little insulin. • Use a new needle for each injection.
• Be sure a needle is completely attached to the Pen before priming, setting the dose and injecting your insulin.
• Prime every time.
• The Pen must be primed before each injection to make sure the Pen is ready to dose. Performing the priming step is important to confirm that insulin comes out when you push the injection button, and to remove air that may collect in the insulin cartridge during normal use. See Section III. “Priming the Pen”, pages 10-13.
• If you do not prime, you may get too much or too little insulin.
• Make sure you get your full dose.
• To make sure you get your full dose, you must push the injection button all the
way down until you see a diamond (♦) or an arrow (→) in the center of the dose window. See “Following an Injection”, page 18.
• The numbers on the clear cartridge holder give an estimate of the amount of insulin
remaining in the cartridge. Do not use these numbers for measuring an insulin dose. • Do not share your Pen. • Keep your Pen out of the reach of children. • Pens that have not been used (unopened) should be stored in a refrigerator but not
in a freezer. Do not use a Pen if it has been frozen. Refer to the INFORMATION FOR THE PATIENT insert for complete storage instructions.
4
5
Important Notes
(Continued) • After a Pen is used for the first time, it should NOT be refrigerated but should be
kept at room temperature [below 86°F (30°C)] and away from direct heat and light. • An unrefrigerated Pen should be discarded according to the time specified in the
Information for the Patient insert, even if it still contains insulin. • Never use a Pen after the expiration date stamped on the label. • Do not store your Pen with the needle attached. Doing so may allow insulin to leak
from the Pen and air bubbles to form in the cartridge. Additionally, with suspension (cloudy) insulins, crystals may clog the needle.
• Always carry an extra Pen in case yours is lost or damaged. • Dispose of empty Pens as instructed by your Health Care Professional and without
the needle attached. • This Pen is not recommended for use by blind or visually impaired persons without
the assistance of a person trained in the proper use of the product. • The directions regarding needle handling are not intended to replace local, Health
Care Professional, or institutional policies. • Any changes in insulin should be made cautiously and only under medical
supervision.
5
6
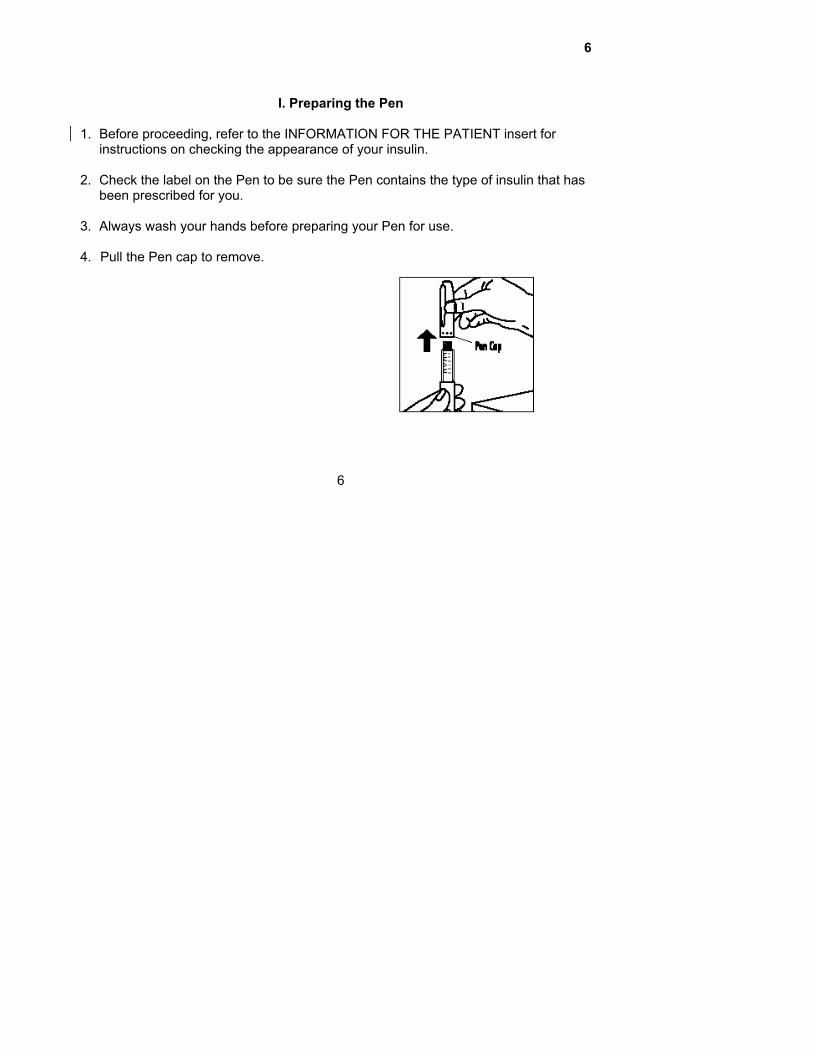
I. Preparing the Pen
1. Before proceeding, refer to the INFORMATION FOR THE PATIENT insert for
instructions on checking the appearance of your insulin. 2. Check the label on the Pen to be sure the Pen contains the type of insulin that has
been prescribed for you. 3. Always wash your hands before preparing your Pen for use. 4. Pull the Pen cap to remove.
6
7
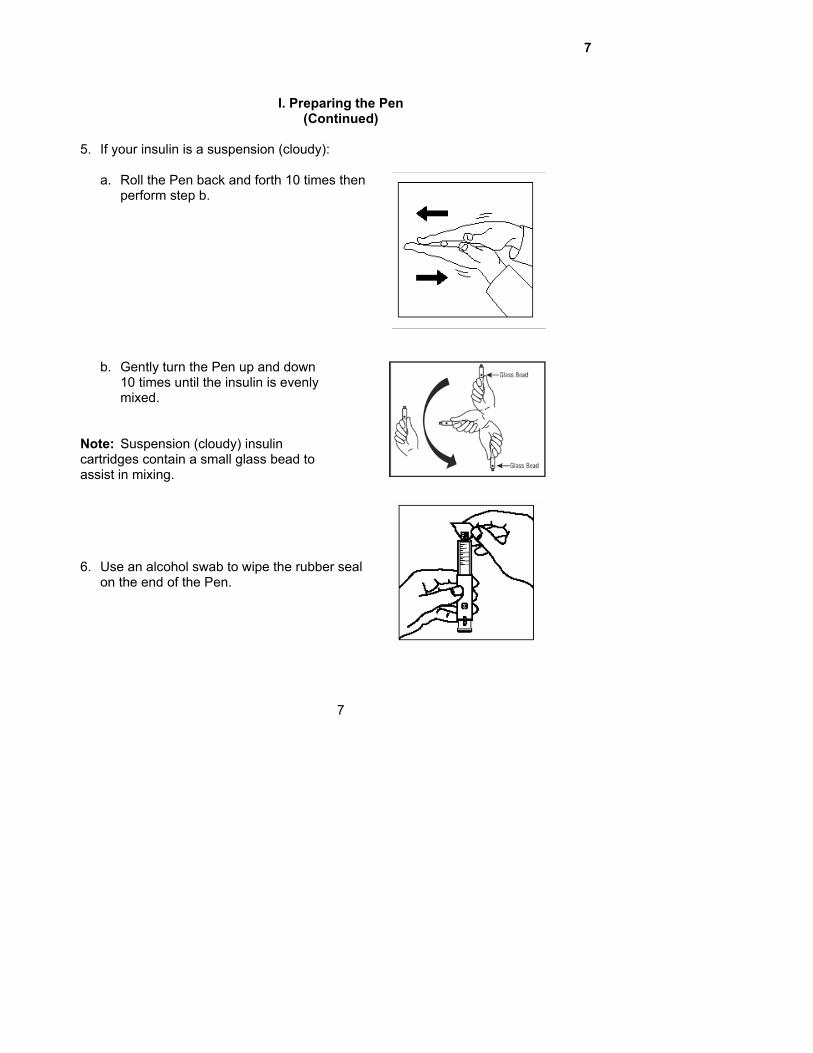
I. Preparing the Pen
(Continued) 5. If your insulin is a suspension (cloudy):
a. Roll the Pen back and forth 10 times then perform step b.
b. Gently turn the Pen up and down 10 times until the insulin is evenly mixed.
Note: Suspension (cloudy) insulin cartridges contain a small glass bead to assist in mixing.
6. Use an alcohol swab to wipe the rubber seal
on the end of the Pen.
7
8
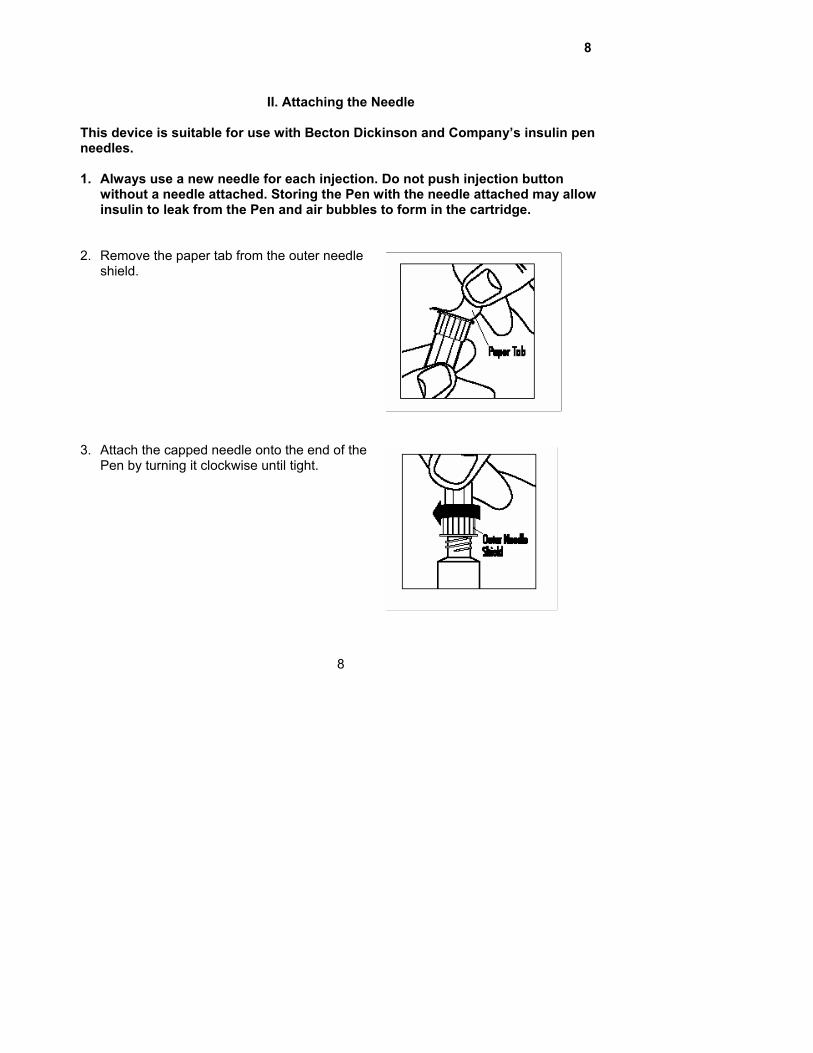
II. Attaching the Needle
This device is suitable for use with Becton Dickinson and Company’s insulin pen needles. 1. Always use a new needle for each injection. Do not push injection button
without a needle attached. Storing the Pen with the needle attached may allow insulin to leak from the Pen and air bubbles to form in the cartridge.
2. Remove the paper tab from the outer needle
shield.
3. Attach the capped needle onto the end of the
Pen by turning it clockwise until tight.
8
9
II. Attaching the Needle
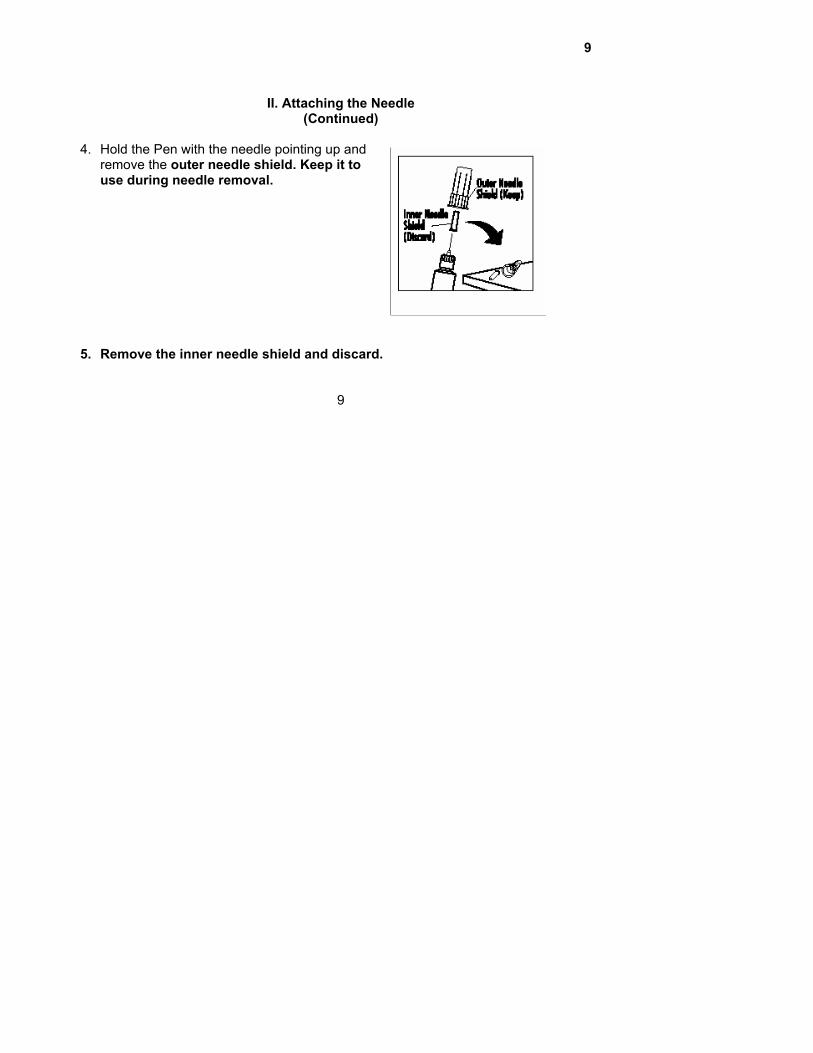
(Continued) 4. Hold the Pen with the needle pointing up and
remove the outer needle shield. Keep it to use during needle removal.
5. Remove the inner needle shield and discard.
9
10
III. Priming the Pen
• The Pen must be primed before each injection to make sure the Pen is ready
to dose. Performing the priming step is important to confirm that insulin comes out when you push the injection button, and to remove air that may collect in the insulin cartridge during normal use.
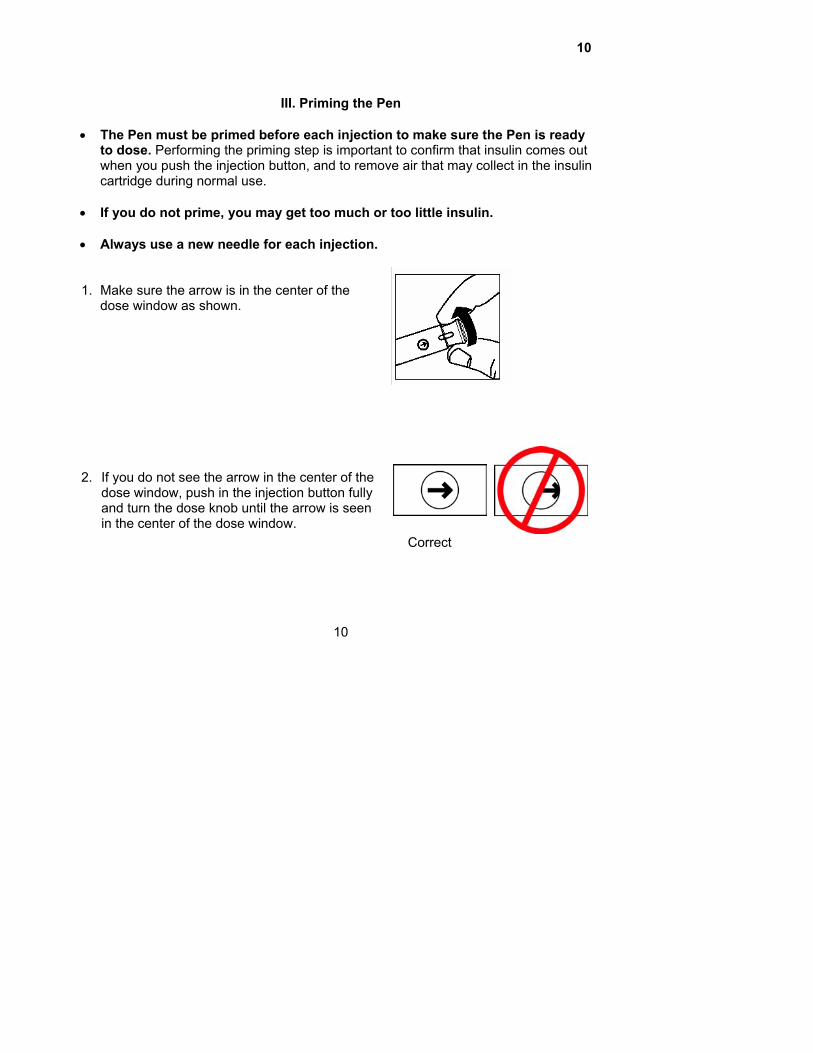
• If you do not prime, you may get too much or too little insulin. • Always use a new needle for each injection. 1. Make sure the arrow is in the center of the
dose window as shown. 2. If you do not see the arrow in the center of the
dose window, push in the injection button fully and turn the dose knob until the arrow is seen in the center of the dose window.
Correct
10

11
III. Priming the Pen
(Continued) 3. With the arrow in the center of the dose
window, pull the dose knob out in the direction of the arrow until a “0” is seen in the dose window.
4. Turn the dose knob clockwise until the number
“2” is seen in the dose window. If the number you have dialed is too high, simply turn the dose knob backward until the number 2 is seen in the dose window.
11
12
III. Priming the Pen
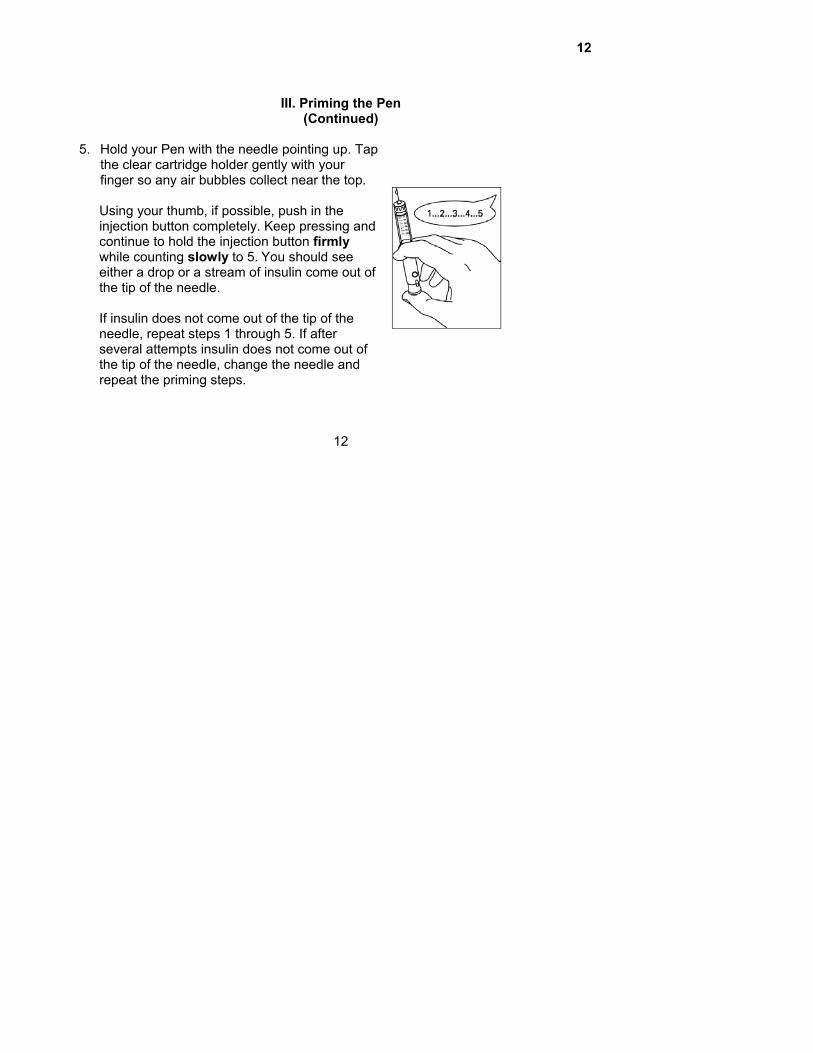
(Continued) 5. Hold your Pen with the needle pointing up. Tap
the clear cartridge holder gently with your finger so any air bubbles collect near the top.
Using your thumb, if possible, push in the
injection button completely. Keep pressing and continue to hold the injection button firmly while counting slowly to 5. You should see either a drop or a stream of insulin come out of the tip of the needle.
If insulin does not come out of the tip of the
needle, repeat steps 1 through 5. If after several attempts insulin does not come out of the tip of the needle, change the needle and repeat the priming steps.
12
13
III. Priming the Pen
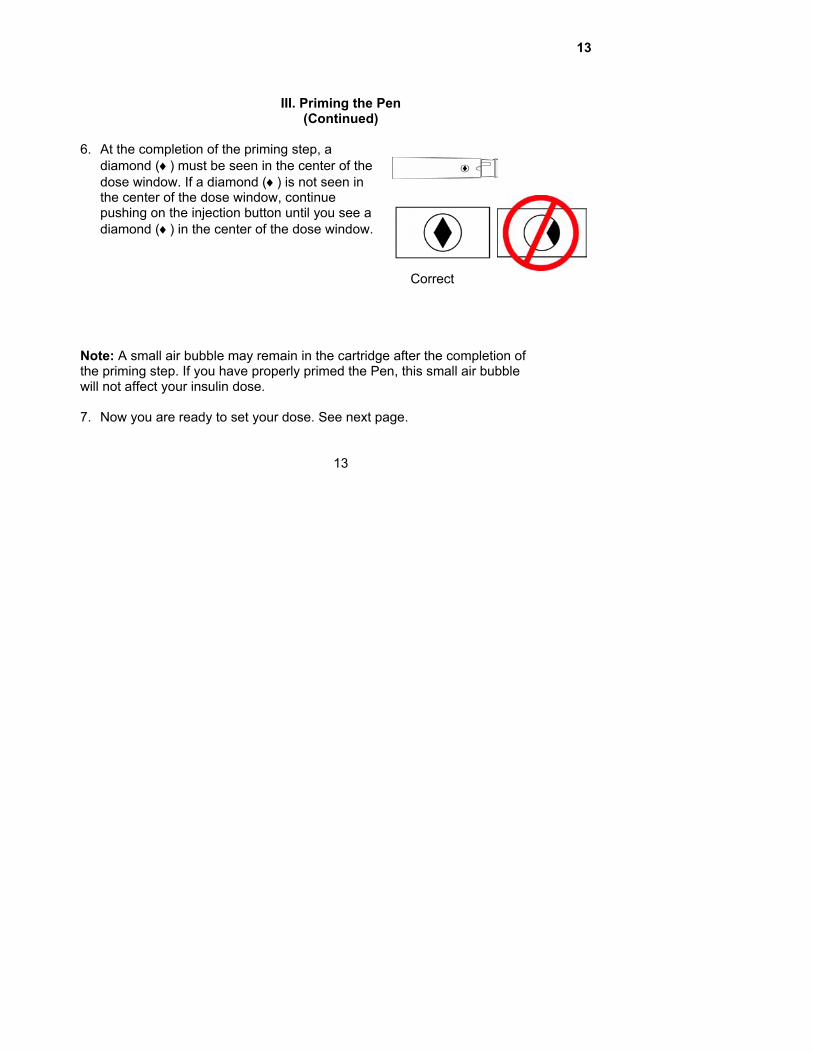
(Continued) 6. At the completion of the priming step, a
diamond (♦) must be seen in the center of the dose window. If a diamond (♦) is not seen in the center of the dose window, continue pushing on the injection button until you see a diamond (♦) in the center of the dose window.
Correct
Note: A small air bubble may remain in the cartridge after the completion of the priming step. If you have properly primed the Pen, this small air bubble will not affect your insulin dose. 7. Now you are ready to set your dose. See next page.
13

14
IV. Setting a Dose
• Always use a new needle for each injection. Storing the Pen with the needle
attached may allow insulin to leak from the Pen and air bubbles to form in the cartridge.
• Caution: Do not push in the injection button while setting your dose. Failure to
follow these instructions carefully may result in getting too much or too little insulin. If you accidentally push the injection button while setting your dose, you must prime the Pen again before injecting your dose. See Section III. “Priming the Pen”, pages 10-13.
1. A diamond must be seen in the center of the dose window before setting your dose.
If you do not see a diamond in the center of the dose window, the Pen has not been primed correctly and you are not ready to set your dose. Before continuing, repeat the priming steps. Correct
2. Turn the dose knob clockwise until the arrow
(→) is seen in the center of the dose window and the notches on the Pen and dose knob are in line.
14
15
IV. Setting a Dose
(Continued)
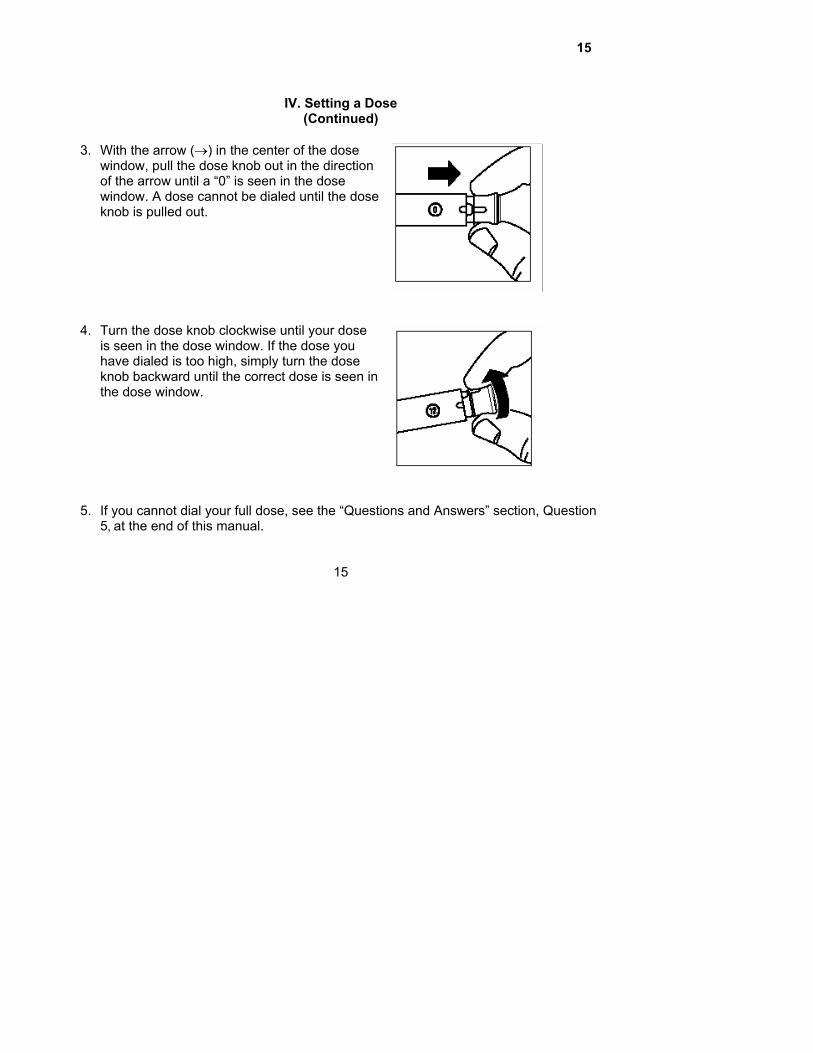
3. With the arrow (→) in the center of the dose window, pull the dose knob out in the direction of the arrow until a “0” is seen in the dose window. A dose cannot be dialed until the dose knob is pulled out.
4. Turn the dose knob clockwise until your dose
is seen in the dose window. If the dose you have dialed is too high, simply turn the dose knob backward until the correct dose is seen in the dose window.
5. If you cannot dial your full dose, see the “Questions and Answers” section, Question
5, at the end of this manual.
15
16
V. Injecting a Dose
• Always use a new needle for each injection. Storing the Pen with the needle
attached may allow insulin to leak from the Pen and air bubbles to form in the cartridge.
• Caution: Do not attempt to change the dose after you begin to push in the
injection button. Failure to follow these instructions carefully may result in getting too much or too little insulin.
• The effort needed to push in the injection button may increase while you are
injecting your insulin dose. If you cannot completely push in the injection button, refer to the “Questions and Answers” section, Question 7, at the end of this manual.
• Do not inject a dose unless the Pen is primed, just before injection, or you may get
too much or too little insulin. • If you have set a dose and pushed in the injection button without a needle attached
or if no insulin comes out of the needle, see the “Questions and Answers” section, Questions 1 and 2.
16
17
V. Injecting a Dose
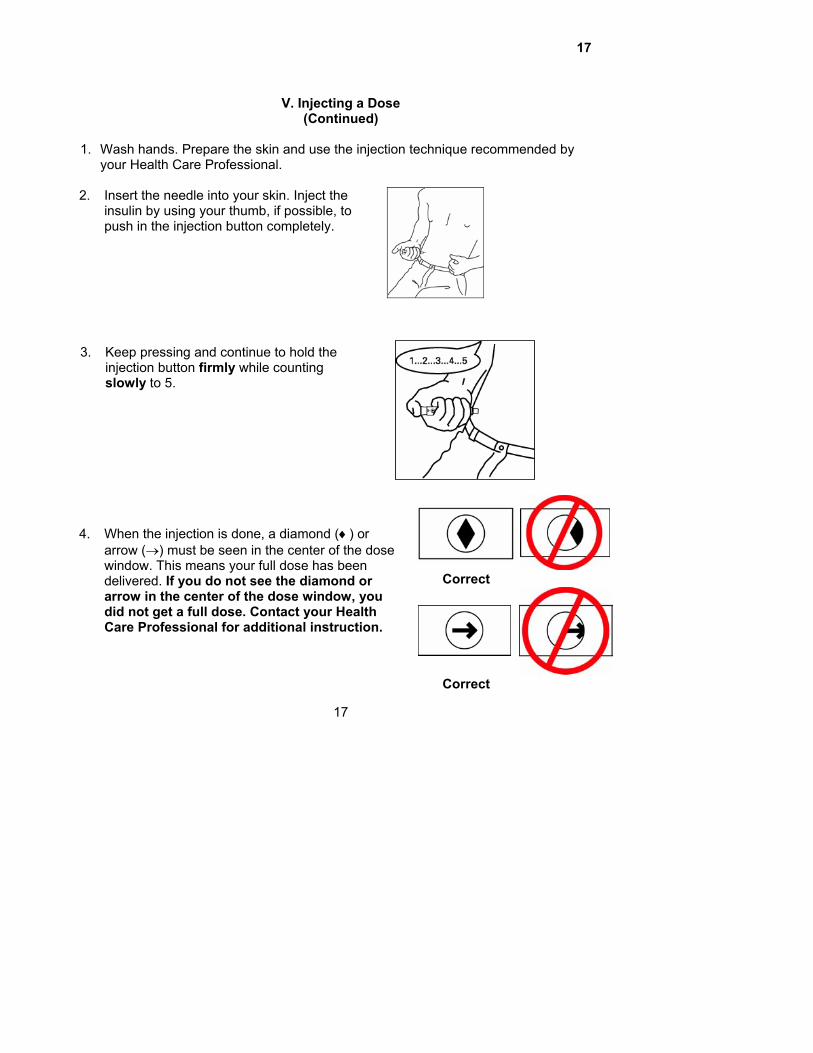
(Continued) 1. Wash hands. Prepare the skin and use the injection technique recommended by
your Health Care Professional. 2. Insert the needle into your skin. Inject the
insulin by using your thumb, if possible, to push in the injection button completely.
3. Keep pressing and continue to hold the
injection button firmly while counting slowly to 5.
4. When the injection is done, a diamond (♦) or
arrow (→) must be seen in the center of the dose window. This means your full dose has been delivered. If you do not see the diamond or arrow in the center of the dose window, you did not get a full dose. Contact your Health Care Professional for additional instruction.
Correct
Correct
17

18
VI. Following an Injection
1. Make sure you got your full dose by checking
that the injection button has been completely pushed in and you can see a diamond (♦) or arrow (→) in the center of the dose window. If you do not see the diamond (♦) or arrow (→) in the center of the dose window, you have not received your full dose. Contact your Health Care Professional for additional instructions.
2. Carefully replace the outer needle shield as
instructed by your Health Care Professional.
18
Outer Needle Shield
19
VI. Following an Injection
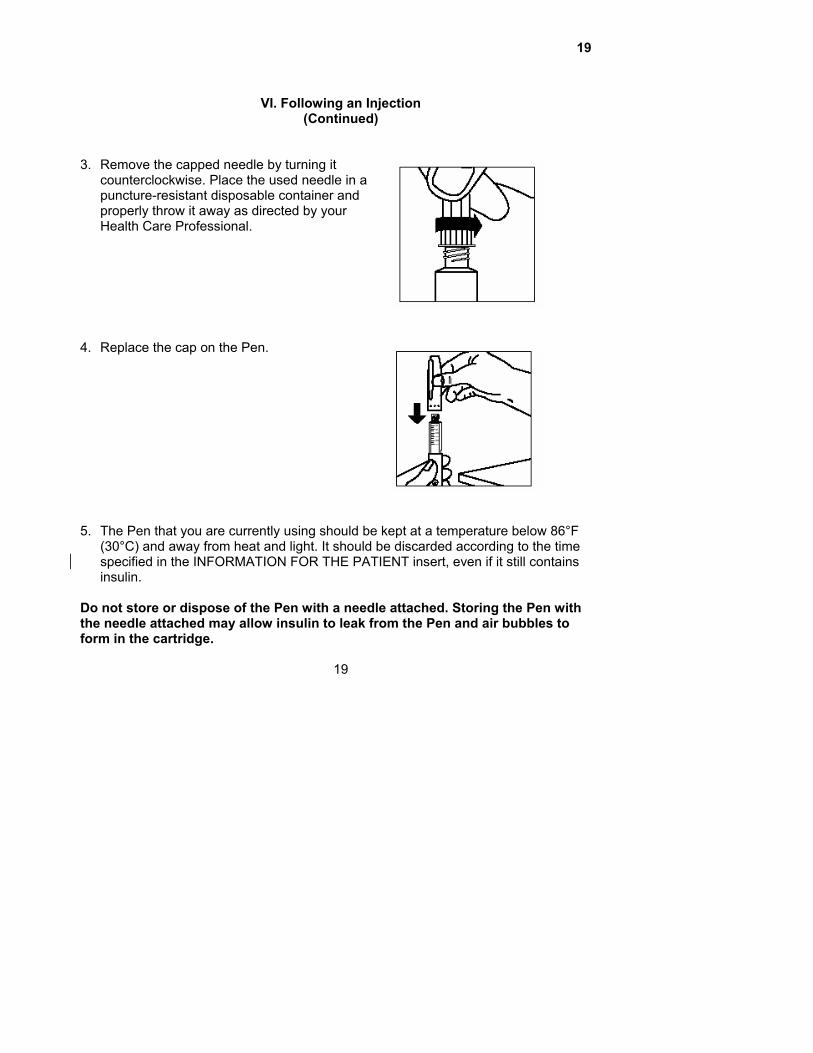
(Continued) 3. Remove the capped needle by turning it
counterclockwise. Place the used needle in a puncture-resistant disposable container and properly throw it away as directed by your Health Care Professional.
4. Replace the cap on the Pen.
5. The Pen that you are currently using should be kept at a temperature below 86°F
(30°C) and away from heat and light. It should be discarded according to the time specified in the INFORMATION FOR THE PATIENT insert, even if it still contains insulin.
Do not store or dispose of the Pen with a needle attached. Storing the Pen with the needle attached may allow insulin to leak from the Pen and air bubbles to form in the cartridge.
19
20
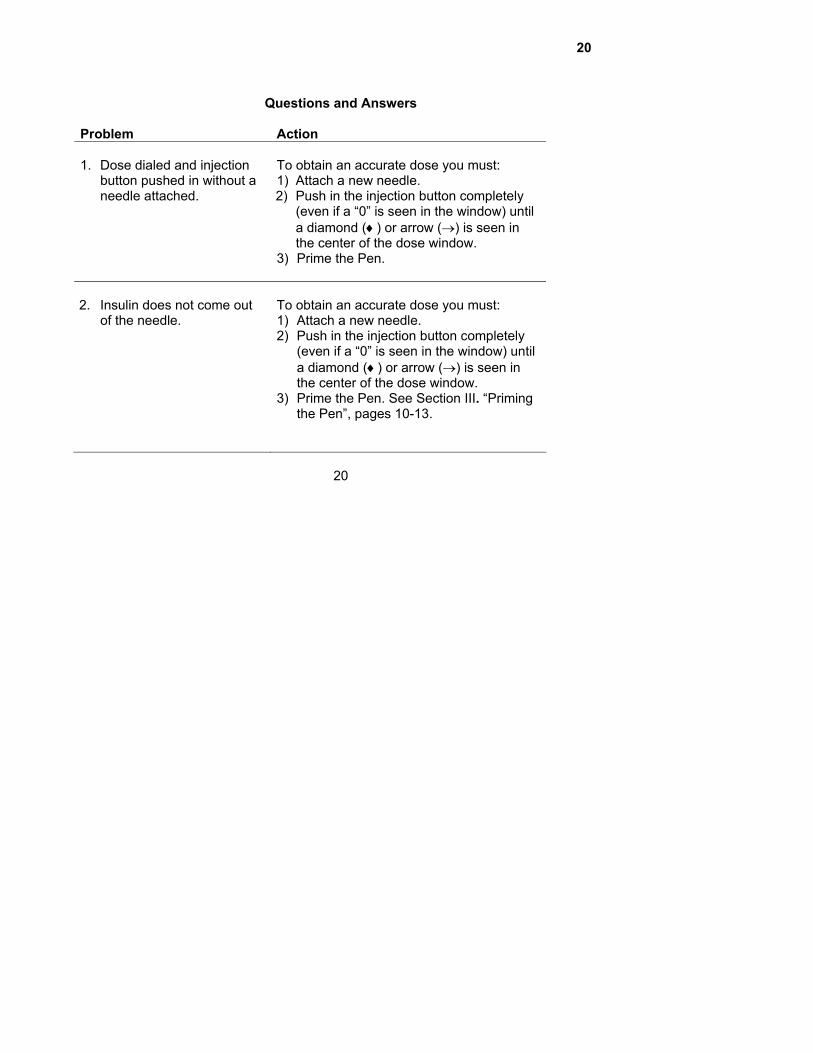
Questions and Answers
Problem Action 1. Dose dialed and injection
button pushed in without a needle attached.
To obtain an accurate dose you must: 1) Attach a new needle. 2) Push in the injection button completely
(even if a “0” is seen in the window) until a diamond (♦) or arrow (→) is seen in the center of the dose window.
3) Prime the Pen.
2. Insulin does not come out
of the needle.
To obtain an accurate dose you must: 1) Attach a new needle. 2) Push in the injection button completely
(even if a “0” is seen in the window) until a diamond (♦) or arrow (→) is seen in the center of the dose window.
3) Prime the Pen. See Section III. “Priming the Pen”, pages 10-13.
20
21
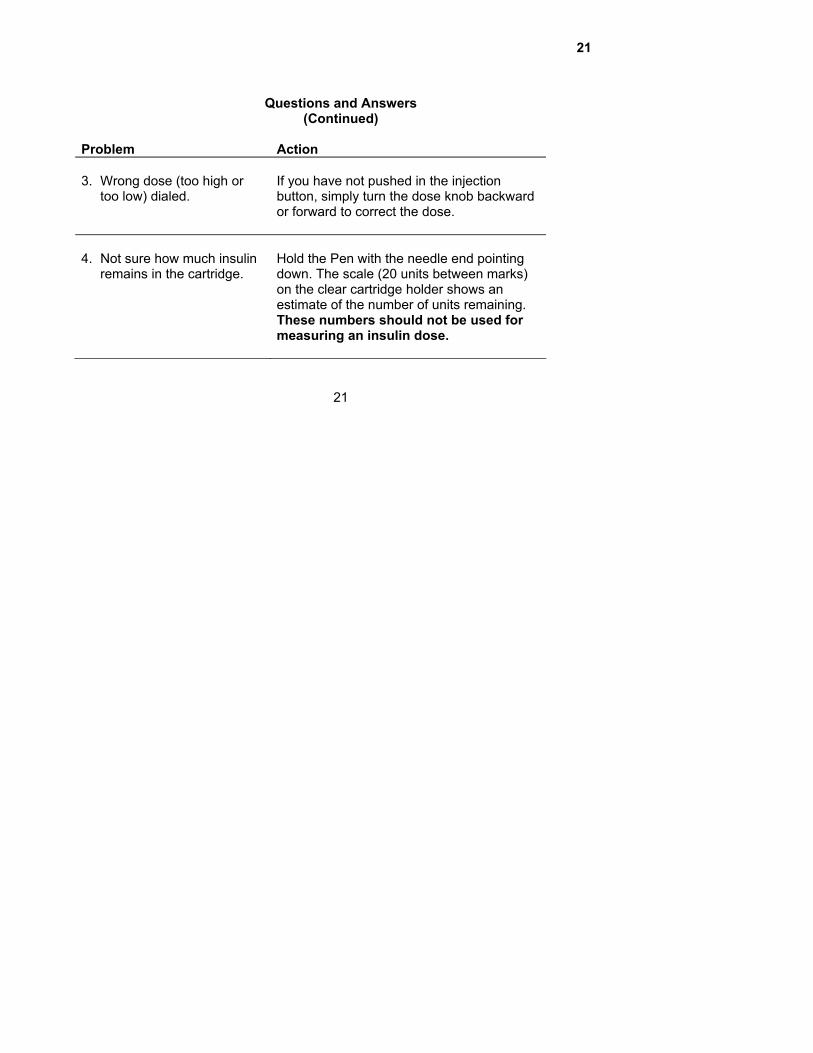
Questions and Answers
(Continued) Problem Action 3. Wrong dose (too high or
too low) dialed.
If you have not pushed in the injection button, simply turn the dose knob backward or forward to correct the dose.
4. Not sure how much insulin
remains in the cartridge.
Hold the Pen with the needle end pointing down. The scale (20 units between marks) on the clear cartridge holder shows an estimate of the number of units remaining. These numbers should not be used for measuring an insulin dose.
21

22
Questions and Answers
(Continued)
Problem Action 5. Full dose cannot be dialed.
The Pen will not allow you to dial a dose greater than the number of insulin units remaining in the cartridge. For example, if you need 31 units and only 25 units remain in the Pen you will not be able to dial past 25. Do not attempt to dial past this point. (The insulin that remains is unusable and not part of the 300 units.) If a partial dose remains in the Pen you may either: 1) Give the partial dose and then give the
remaining dose using a new Pen, or 2) Give the full dose with a new Pen.
6. A small amount of insulin
remains in the cartridge but a dose cannot be dialed.
The Pen design prevents the cartridge from being completely emptied. The Pen has delivered 300 units of usable insulin.
22
23
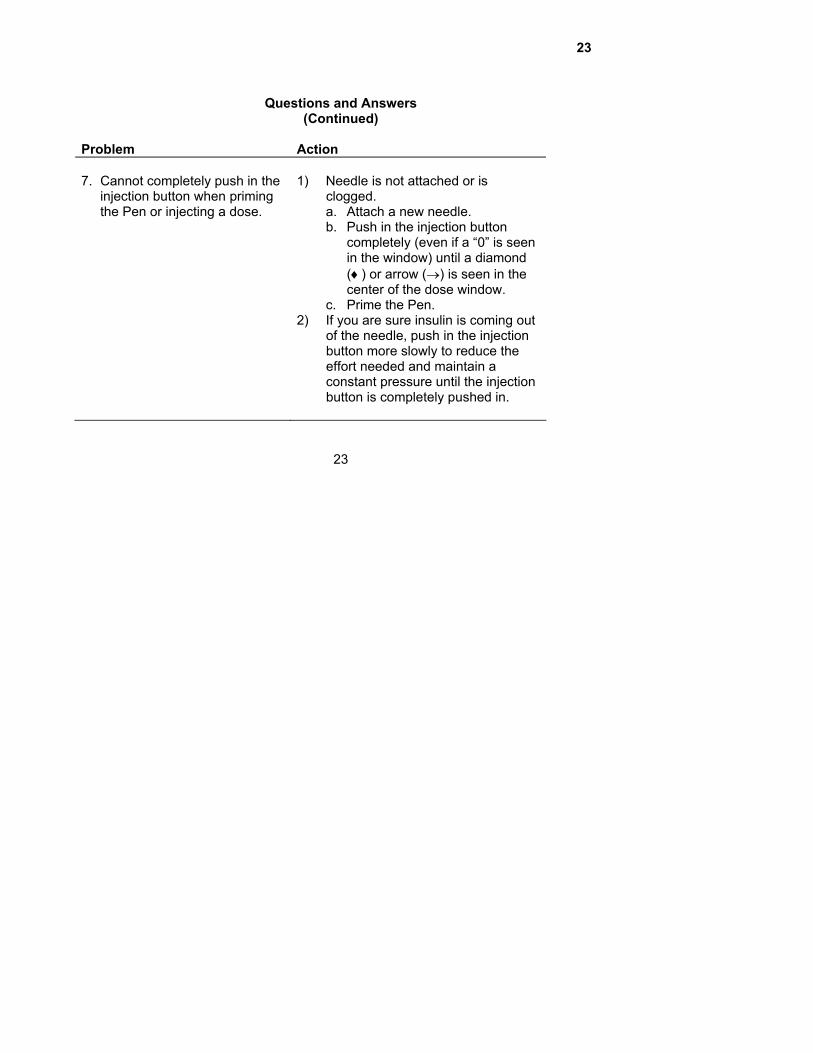
Questions and Answers
(Continued) Problem Action 7. Cannot completely push in the
injection button when priming the Pen or injecting a dose.
1) Needle is not attached or is
clogged. a. Attach a new needle. b. Push in the injection button
completely (even if a “0” is seen in the window) until a diamond (♦) or arrow (→) is seen in the center of the dose window.
c. Prime the Pen. 2) If you are sure insulin is coming out
of the needle, push in the injection button more slowly to reduce the effort needed and maintain a constant pressure until the injection button is completely pushed in.
23

24
For additional information call, 1-800-LILLY-RX (1-800-545-5979)
Revised XX, 2004
Manufactured by Lilly France S.A.S. F-67640 Fegersheim, France
for Eli Lilly and Company Indianapolis, IN 46285, USA
PA 9115 FSAMP
24