70702522 michelangelo f uso en - cuppone
TRANSCRIPT

ML435
ML635
ML635L
ML935
MichelangeloOVEN
Use and maintenance manual

2

3Ed. 0121 - 70702522 REV02 Michelangelo - Use and maintenance
Contents
We congratulate you for choosing a product designed and
manufactured with cutting-edge technology.
The oven is checked and tested in the Manufacturer’s plant before being delivered to the customer.
The “production process check sheet” enclosed with it
guarantees that each step in the production process, from
assembly to packaging, was carefully checked from both the
operating and safety standpoints.
Before the installation, read the content of this manual
carefully: it contains important information regarding product
assembly and safety regulations.
Technical service
Your Dealer can solve any technical problem regarding use and
maintenance.
Do not hesitate to contact him in case of doubt.
Introduction
Introduction ................................................................. 3
The foundation ............................................................................................3
Technical service.........................................................................................3
Safety instructions ...................................................... 4
Symbols used in the manual and on the labels
applied to the machine ..........................................................................5
Basic notions ................................................................ 6
Knowing your oven ..................................................................................6
Preparing to use the oven ....................................................................6
Some piece of advice... ...........................................................................7
Using CD models .......................................................... 9
Using TS models ........................................................... 13
Maintenance and cleaning ......................................... 28
Warnings ..........................................................................................................28
Oven cleaning ..............................................................................................28
Replacing components ..........................................................................30
Oven downtime for prolonged periods ......................................32
Disposal at end of life ..............................................................................32
Warranty ....................................................................... 33
Something is not working... ........................................ 34
What to do in case of any malfunction ........................................34
The foundation
Our company was founded in 1963 by the Lorenzo, Luigi and
Paolo Cuppone brothers. It immediately specialized in the
production of ovens and equipment to prepare and cook pizza.
The constant research and experimentation of new equipment
that are even now the strength of our company, have led us
to design and patent the machinery and ovens that have
revolutionized the way pizza is made.
CUPPONE 1963
Cuppone F.lli S.r.l.
Via Sile, 36
31057 Silea (TV) - ITALY
T +39 0422 361143
F +39 0422 360993
[email protected] - www.cuppone.com

4
• Read this guide carefully before usingand maintaining the appliance, and keep it with care in an accessible place for any future consultation by
the various operators.•Moreover, the manual must always accompany
the product through its life, even in case of transfer.•Before performing any maintenance, disconnect
the electricity supply.•Unauthorised actions, tampering or modifications
that do not follow the information provided in this manual can cause damages, injuries or fatal accidents and null and void the warranty.
•Use or maintenance that fail to comply with the instructions in this manual may cause damage, injury or fatal accidents.
•The serial plate provides important technical information. This is vital in case of a request for maintenance or repair of the equipment: please do not remove, damage or modify it.
•Some parts of the equipment can reach high temperatures. We advise you to avoid touching surfaces and not to get materials either flammable or sensitive to heat near the appliance.
•Do not rest objects on the oven, above all if built in material sensitive to heat.
•These appliances are intended to be used for commercial applications, for example in restaurant kitchens, canteens, hospitals and commercial companies such as bakeries, butcher shops, etc., but not for the continuous and mass production of food. A use other than the stated one is considered improper, potentially dangerous for people and animals and might permanently damage the appliance . The improper use of the equipment shall void the warranty.
•This appliance can be used by children aged from
8 years and above and persons with reduced physical, sensory or mental capabilities or lack of experience and knowledge if they have been given supervision and instruction concerning use of the appliance in a safe way and understand the hazard involved. Children must not play with the appliance. Cleaning and user maintenance shall not be made by children without supervision.
•To clean the appliance, any of its components or accessories and the sub-structure DO NOT use:- aggressive, abrasive, powder or corrosive
detergents (e.g. hydrochloric or sulphuric acid, caustic soda, etc.).
- abrasive or sharp tools (e.g. abrasive sponges, scrapers, steel brushes, etc.);
- steamed or pressurised water jets.•The staff using the appliance must be professionally
prepared and periodically trained on its use, as well as the safety and accident prevention regulations.
•Children must be supervised to make sure they do not play with the appliance or parts of it.
•Always use tools resistant to heat (e.g. In steel). Cooking utensils in plastic or similar material might not withstand the oven high temperatures.
•Check regularly that fumes can be discharged safely. Do not obstruct the duct for any reason.
•FIRE RISK: leave the area around the appliance free and clean from fuels. Do not store flammable materials near this appliance.
•WARNING: RISK OF EXPLOSION! It is forbidden to use the oven in environments at risk of explosion.
•WARNING: always switch off the main switch when you finish using the appliance, above all during cleaning or in cases of prolonged downtime.
• If you notice any anomaly (e.g. damaged power cable, etc.), malfunction or fault, do not use the appliance and contact a Service Centre authorized
Safety instructions
by the Manufacturer. Demand original spare parts, or the Warranty will be null and void.
•Place the emergency phone numbers in a visible location.
•WARNING: it is forbidden to place flammable solids or liquids (spirits for instance) in the cooking chamber during the operation.
•Monitor the appliance during its entire operation, do not leave dishes in the oven unattended!
•Failure to follow these regulations may cause damage or even fatal injury, subsequently invalidating the guarantee and relieving the Manufacturer of all liability.
•We recommend you have the appliance checked by an Authorized Service Centre at least once a year.

5Ed. 0121 - 70702522 REV02 Michelangelo - Use and maintenance
The company cannot be held liable for any print or transcription
errors, reserving the right to make changes where deemed
suitable without prior notice.
Partial reproduction without the Manufacturer's consent
is prohibited. Measurements are purely indicative and not
binding.
The original language used to prepare this manual is English:
the Manufacturer is not responsible for any translation/
interpretation or print errors.
Symbols used in the manual and on
the labels applied to the machine
Indicates that caution is required when performing
an operation described in a paragraph that bears this
symbol. The symbol also indicates that maximum
operator awareness is required in order to avoid
unwanted or dangerous consequences
Reference to another chapter where the subject is
dealt with in more detail.
Manufacturer’s tip
Indicates that the surfaces marked with this symbol
may be hot and must therefore be touched carefully
Dangerous voltage
The symbol identifies the terminals which, connected
to each other, carry the various parts of a device or
system to the same potential (not necessarily the
earth potential)
Indicates that it is necessary to read carefully the
paragraph marked with this symbol before installing,
using and maintaining the equipment

6
4ECO
ECO
1 2
3
5
6
7
Fig. 1
Knowing your oven
Fig. 1
Your oven can be used only to bake pizzas or similar dishes,
such as bread or focaccia and to grill vegetables.
Its main parts are:
1 Cooking chamber in stainless steel
2 Chimney to vent any cooking fumes
3 Cooking surface in refractory bricks
4 Power cable inlet
5 Face in stainless steel
6 Control display
7 Electrical compartment ventilation slots: keep them always
clean and clear.
The temperature in the chamber is controlled by boards
that switch the heating elements on and off to keep the set
temperature constant.
The oven can manage separately the powers:
• of the bottom part of the oven chamber;
• of the top part of the oven chamber.
Preparing to use the oven
Clean the oven and any accessories accurately, both externally
and internally, following the instructions in the dedicated
chapter rigorously.
Maintenance and cleaning - page 28.
On the first use, we recommend you set the temperature at
a value of 150°C - 302 °F for model “TS” top percentage 80%
bottom 20%, for model “CD” set Max at the top and Min at the
bottom, for at least 8 hours, without any food inside. During
this time, keep the bleed valve open. If a hood is fitted, we rec-
ommend it is kept ON. In this first phase, because of the humid-
ity evaporating from the insulating materials, the oven will give
out unpleasant smells and fumes that will gradually disappear
during the following operating cycles.
To switch the oven on and set its parameters, refer to:
Using CD models - page 9
Using TS models - page 13
Basic notions
The first day of use is considered as a running-in period: during this time the refractory bricks and insulating material keep releasing
humidity until they dry out completely.
Some parts of the equipment can reach high temperatures. We advise you to avoid touching surfaces and not to get
materials either flammable or sensitive to heat near the appliance.
Do not rest objects on the oven, above all if built in material sensitive to heat.
Take care and use personal protection equipment (i.e. gloves) when putting food into the cooking chamber or getting it out.

7
Fig. 2
Fig. 3
Ed. 0121 - 70702522 REV02 Michelangelo - Use and maintenance
Some piece of advice...
• Before starting cooking, always preheat the oven: this is vital
to get good food. Preheating the oven must last at least an
hour, it is therefore always preferable to use the programmed
switch-on function so that the oven is already hot when the
place opens and ready to cook the desired food.
Programmed switch-on mod. CD: page 12
Programmed switch-on mod. TS: page 22
• During work, keep the refractory surfaces clean using a stiff
bristle brush.
• Passing from a type of pizza to another, wait for the oven to
stabilize.
• Take your time when adjusting the cooking parameters
according to the increase and/or decrease in the workload.
• An excess of flour in the cooking chamber can create smoke,
smell and give the pizza an unpleasant taste.
• Clean the oven at the end of service.
Fig. 2
In ovens, products cook thanks to the combined action of:
• radiation: the heat and infrared rays produced by the top
elements make products crunchy and golden
this parameter is controlled by the percentage (mod. TS) /
setting (mod. CD) of the TOP.
• convection: the hot air that circulates in the chamber cooks
the product evenly
his parameter is controlled by the temperature setting in
the chamber
• conduction: the bottom elements heat the refractory
surfaces on which the products lie
this parameter is controlled by the percentage (mod. TS) /
setting (mod. CD) of the BOTTOM.
Unsatisfactory cooking results
If the cooking results are not as expected, try and check the
following:
• incorrect oven parameters:
• temperature in the chamber either too high or too low
• percentages/settings of the BOTTOM or TOP either too
high or too low
• incorrect preheating:
• preheating is vital to get superb results right from the first
pizza
• in preheating, the percentage (mod. TS) / setting (mod. CD)
of the TOP has been set too high: the refractory surfaces
(without pizzas) have become too hot and burnt the first
pizzas
• incorrect use of the steam holes in the chamber:
• in the back of the cooking chamber, there are some steam
holes that must be opened or closed according to the type
of product to cook: for instance, if they are not opened, there
may be too much humidity in the chamber that prevents
the infrared rays of the top elements from browning the
surface of the products.
What is Pizzaform?
Pizzaform is a manufacturer’s
patent. It is a special press, produced
in five models, to make pizza dough
discs up to Ø52cm [Ø20.47 in.].
Its main features are:
- high hourly output, up to 400 pizzas
an hour, without using specialized
labour;
- consistent shape and thickness of the
disc of dough, without giving up the
traditional edge, obtained thanks
to the special shape of the chrome
plates;
- possibility of changing the thick-
ness of the dough discs easily.
RADIATION
CONDUCTION
CO
NV
EC
TIO
N
Opening/closing of the steam holes: refer to page 10 and 18
steam holes

8
COOKING TABLES
The parameters in the tables are just indicative, since they can vary according to the temperature of the room where the oven is installed and the type of dough to bake (e.g. type of flour, hydration, etc.).
CONTROL
TS
Manual stretching
Stretching with Pizzaform
Preheating for both types
(Manual stretching or stretching with Pizzaform)
TYPECOOKING COOKING
TIME TEMP. % TOP % BOTTOM TIME TEMP. % TOP % BOTTOM
CLASSIC 3 min 320°C - 608°F 85% 5% 3 min 290°C - 554°F 85% 0%time: 1 hour (can vary according to the set %)
temperature / %: the same as the type of pizza
During preheating, the steam holes in the back of the cooking chamber must be kept always closed, to prevent the elements from being on too long and warming the refractory surfaces too much,
causing the first pizzas to burn.
PAN 3 - 4 min 320°C - 608°F 40% 100% 3 - 4 min / / /
NEAPOLITAN 1 - 2 min 370°C - 698°F 80% 0% 1 - 2 min / / /
BAKING-TIN 7 - 8 min 280°C - 536°F 30% 100% 7 - 8 min / / /
PADDLEPRECOOKING 5 min 270°C - 518°F 40% 60% 5 min / / /
FINISHING 3 min 270°C - 518°F 40% 60% 3 min / / /
CONTROL
CD
Manual stretching
Stretching with Pizzaform
Preheating for both types
(Manual stretching or stretching with Pizzaform)
TYPECOOKING COOKING
TIME TEMP. TOP BOTTOM TIME TEMP. TOP BOTTOM
CLASSIC 3 min 320°C - 608°F MAX OFF/MIN 3 min 290°C - 554°F MAX OFF
time: 1 hour (can vary according to the selected function)
temperature / selection: the same as the type of pizza
During preheating, the steam holes in the back of the cooking chamber must be kept always closed, to prevent the elements from being on too long and warming the refractory surfaces too much,
causing the first pizzas to burn.
PAN 3 - 4 min 320°C - 608°F MIN MAX 3 - 4 min / / /
NEAPOLITAN 1 - 2 min 370°C - 698°F MAX OFF 1 - 2 min / / /
BAKING-TIN 7 - 8 min 280°C - 536°F MIN MAX 7 - 8 min / / /
PADDLEPRECOOKING 5 min 270°C - 518°F MIN MAX 5 min / / /
FINISHING 3 min 270°C - 518°F MIN MAX 3 min / / /
Basic notions

9
1
2
7
9
4
4A
5A
3
5
6
8
Fig. 4
Ed. 0121 - 70702522 REV02 Michelangelo - Use and maintenance
Knowing the control panel
Fig. 4
1 Main display
Displays alternatively:
• the current temperature in the chamber
• the set temperature
• the intervention time of the end-of-cooking sound warning
• the countdown time (time to the oven switching on if
programmed switch-on is used)
2 Keys + and -
Allow increasing or decreasing:
• the temperature values in the chamber,
• the intervention time of the end-of-cooking sound warning
• the countdown time (time to the oven switching on if
programmed switch-on is used)
3 Element LED: with the oven running, if on, this indicates
that the elements are heating; with the oven off, if flashing, it
indicates a countdown (timed switch-on)
4 Top power check
Allows checking the power of the elements in the top,
offering three adjustments:
• OFF
• MIN = 33%
• MAX = 100%
4A top LEDs: highlight the selection made
5 Bottom power check
Allows checking the power of the elements in the bottom,
offering three adjustments:
• OFF,
• MIN = 33%
• MAX = 100%
5A bottom LEDs: highlight the selection made
6 ON/OFF switch
Switches the display on and off
7 Light key
Switches the light in the cooking chamber on and off
8 Clock key
With the oven on: activates an end-of-cooking acoustic signal
With the oven off: sets the programmed switch-on
9 Chimney key
Opens and closes the steam holes in the back of the
cooking chamber
Using CD models
The control panel must be used only with dry and
clean fingers.
Continuous and prolonged pressing of the 2 “+”
and “-” keys increases or decreases the value quicker.
CD MODELSContents of CD modelsKnowing the control panel ............................................................9
Use guided procedure ......................................................................10
A - Turning the oven on manually .......................................10
B - Setting the preheating ........................................................10
C - Starting cooking ......................................................................10
D - Switching the light on (optional) .................................10
E - Adjusting the steam holes .................................................10
F - Activating an end-of-cooking signal (buzzer) .......11
G - Switching the oven off ........................................................11
Programmed switch-on ...................................................................12

10
Fig. 5
Fig. 6
Fig. 7
Use guided procedure
The oven can be switched on:
• manually: switching the oven on when it must be used it
is necessary to wait at least an hour for the oven to preheat
and get the right temperature.
Check the following use procedure (points A, B, C, D, etc.)
• programming it: setting the number of hours missing to
the next switch-on the oven will switch on automatically.
See page 12
• automatically:: using a clock or SMS (with external modules
not supplied by the Manufacturer).
A - Turning the oven on manually
Fig. 5
Pressing the ON/OFF key, the display lights up and shows the
current temperature of the cooking chamber (e.g. 25°C - 77°F).
B - Setting the preheating
Pre-heating must have the same cooking parameters as
the recipe to be used (see table on page 8, pre-heating
information). It must be carried out without products in the
cooking chamber and takes about an hour for the oven to be
ready for cooking.
During preheating, the flue gas discharge valve must
always be kept closed to prevent heat escaping from
the chamber and the heating elements being turned
on with the consequent overheating of the refractory surfaces
which would cause the products to burn.
Fig. 6
Set the pre-heating temperature using the “+” o “-” keys, until
the desired value is displayed.
Fig. 7
Set the top and bottom power acting on the keys shown in
the figure.
After setting these three parameters, the oven starts heating
straight away.
The “heating element” LED will switch off after about an hour:
this means the oven has reached the temperature set for
pre-heating and is ready to cook.
C - Starting cooking
Fig. 8
Once preheating is complete, you can start cooking and bake
the products using personal protection equipment (e.g. gloves)
and tools suitable for contact with food and made of material
resistant to high temperatures (e.g. steel).
For optimal results, always adhere to the oven capacity
declared by the Manufacturer and position the prod-
ucts to be cooked evenly in the cooking chamber.
During cooking, it is always possible to change any value by
acting as usual.
During cooking, the heating element LED may switch back
on; this means the elements have come back on to keep the
set temperature constant.
D - Switching the light on (optional)
Fig. 9
When necessary, it is possible to switch on the oven light to
check the cooking, acting on the light key .
Press the same key to switch it off.
E - Adjusting the steam holes
Fig. 12
In the back of the cooking chamber there are some steam
holes: they can be more or less open to keep the degree of
humidity more suited to the type of product to bake in the
cooking chamber.
To open the holes, keep the button indicated in the figure pressed
continuously: they begin to open progressively. To block them
in the desired position, just release the key.
top
po
we
rb
ott
om
po
we
r
Using CD models

11
ECO
ECO
Fig. 8
Fig. 9
Fig. 12
2 sec.
Fig. 10
Fig. 11
Ed. 0121 - 70702522 REV02 Michelangelo - Use and maintenance
F - Activating an end-of-cooking signal (buzzer)
Fig. 10
If you wish, you can enable a buzzer that will go off when the
set time expires, warning that cooking is complete.
To activate it, with the oven on, press the “clock” key.
The display will show after how long the acoustic signal
will sound (e.g. 3.3 that is three minutes and thirty seconds):
if you want to change this default time, use the "+" or "-" keys
until the display shows the desired time (e.g. 5.2 that is five min-
utes and twenty seconds).
After setting it, the countdown starts, at the end of which a
buzzer will sound to highlight the end of cooking.
To stop the buzzer, press the “clock” key.
Warning! the oven continues heating when the
buzzer goes off!
G - Switching the oven off
Fig. 11
To switch the oven off, keep the ON/OFF key pressed for about
2 seconds.

12
Fig. 13
Programmed switch-on
The programmed switch-on function is very useful be-
cause the oven can be already hot, and therefore ready to
bake, when the restaurant is opened.
Fig. 13
To activate it, with the oven off, press the “clock” key.
The display will show the time to switch-on: if you wish to
change this default time, use the “+” or “-” keys until the display
shows the desired time (maximum time 99.5 that is 99 hours
and 50 minutes).
Once set, the countdown starts, at the end of which the oven
will switch on automatically with the temperature and power
parameters used for the last cooking.
If you wish to change them:
• exit programmed switch-on pressing the “clock” key,
• switch the oven on with the ON/OFF key,
• set a cooking cycle with the desired parameters ( Fig. 6 -
Fig. 7)
• switch the oven off with the ON/OFF key,
• set the programmed switch-on as explained above.
To exit the function and cancel programmed switch-on, touch
the “clock” key again.
Using CD models

13
ECO1
4
7
10
3
6
9
11
25
8
Ven 27/04/2018 13:00
Ven 27/04/2018 13:00
A B C D E
Fig. 14
Ed. 0121 - 70702522 REV02 Michelangelo - Use and maintenance
Using TS models
Knowing the control panel
Fig. 14
1 Pyrolysis program key
Starts the pyrolysis program to clean the oven
2 ECO program key
Starts the ECO program (page 15)
3 MAX program key
Starts the MAX program (page 19)
4 TIMER key
Stand-by screen: enables the holiday mode;
Work screen: enables/disables the weekly switch-on timer
function.
5 Buzzer key
Activates an end-of-cooking acoustic signal
6 Program key
Allows viewing and using the programs saved by the user
7 Chimney key
Opens and closes the steam holes in the back of the
cooking chamber
8 Light key
switches the light in the cooking chamber on and off
9 DIARY key
Gives access to the diary page
10 SERVICE key (settings)
Gives access to the user’s settings
11 ON/OFF switch
Powering the oven on and off
FUNCTION BAR
A Current date
B Chamber light
Shows the state of the light in the chamber (on or off )
C Vent
If on, it shows the chimney is opening (the user is acting on
the chimney key 7 )
D Warning
Highlights a warning to read (e.g. maintenance)
E Current time
Contents of TS models
Knowing the control panel ............................................................13
Entering the values .............................................................................14
Use guided procedure ......................................................................15
A - Turning the oven on manually .......................................15
B - Setting the preheating ........................................................16
C - Starting cooking ......................................................................17
D - Activating an end-of-cooking signal (buzzer) ......17
E - Switching the light on (optional) ..................................18
F - Adjusting the steam holes .................................................18
G - Switching the oven off ........................................................18
Creating a recipe ..................................................................................20
How to create a recipe ................................................................21
Programmed switch-on ...................................................................22
Setting an event ...................................................................................22
Setting a Diary ........................................................................................24
Setting a Holiday ..................................................................................25
User settings ............................................................................................26
The control panel must be used only with dry and
clean fingers.
TS MODELS
CUPPONE

14
Ven 27/04/2018 13:00
Ven 27/04/2018 13:00
A B C D E
120°C
56
27/04/2018 13:00
300
20
57”
Program 01
temp
1 2 3 4 5
6 7 8 9 0
x OK
01:10 +-
Imposta valore tempo X
FUNCTION BAR
ST
AN
D-B
Y p
ag
e
Entering the valuesTo enter the values with the keypad:
• A) enter the desired value using the number keys (e.g. if 1-1-0 is pressed in sequence, 01:10
is displayed, that is one minute and 10 seconds)
or, alternatively
• B) use the “+” or “-” keys: pressing once increases/decreases the value by one unit at a time,
prolonged pressing increases/decreases the value very quickly.
In both cases, confirm with OK or delete with x .
PROGRAMMED SWITCH-ON key
Gives access to the Weekly programmed switch-on page: it is possible
to program the oven automatically switching on and off for the whole
week.
HOLIDAY keyGives access to the Holiday page: this function allows interrupting for a certain period of time the oven switching on and off every week, without having to cancel it.
DIARY keyGives access to the Diary page, where it is possible to set up to 10 notes that will be displayed at the set time on the set day. Every note can also be repeated cyclically.
Is the oven time or date wrong?
On first switch-on or after a sudden or prolonged switch-off
period, the oven date or time may be wrong: go to “Settings”
to enter the correct values.
See page 26
Using TS models
CUPPONE

15
ECO
Ven 27/04/2018 13:00
ECO
CUPPONE
Ven 27/04/2018 13:00
25 °C
80
27/04/2018 13:00
370
0
NAPOLETANA
-:-
25 °C
56
27/04/2018 13:00
300
20
57”
Program 01
1 2 3 4 5
6 7 8 9 0
x OK
300 +-
Impostare valore temperaturaz X
25 °C
80
27/04/2018 13:00
300
0
57”
Program 01
B
A
C
Fig. 15
Fig. 16
Ed. 0121 - 70702522 REV02 Michelangelo - Use and maintenance
Use guided procedure
The oven can be switched on:
• manually: switching the oven on when it must be used it
is necessary to wait at least an hour for the oven to preheat
and get the right temperature.
Check the following use procedure (points A, B, C, D, etc.)
• programmed: programming the oven switching on and off
automatically for the whole week.
See page 22
• automatically: using a clock or SMS (with external modules
not supplied by the Manufacturer).
A - Turning the oven on manually
Fig. 15
After powering the oven, the display lights up and shows the
STAND-BY page. Pressing the ON/OFF key, the display shows
the cooking page.
preheating or cooking temperature
top power
bottom power
end-of-cooking signal (optional)
See page 17
What needs to be set for every
manual preheating or cooking
cycle:
During cooking or preheating,
if the current temperature in
the chamber is:
• lower than the one set (so
the elements are active),
the icons identifying the
top and bottom are red
• equal to or higher than
the set one (so the ele-
ments are off ), the icons
identifying the top and
bottom are white
A special program
ECOECO program: The ECO program is used to preserve the
functionality of the oven when it is not working.
Default values of the ECO program
• duration according to requirements
• temperature 280°C -536°F
• top power 45% and bottom 5%
These values can be changed temporarily, acting as normal
(see Fig. 16) or permanently modifying its parameters as
explained on page 21.
The program is interrupted when a different program is selected,
the oven is turned off or the ECO key is pressed again.
25 °C
45
27/04/2018 13:00
280
5
-:-
ECO
ECO
CUPPONE

16
300°C
80
27/04/2018 13:00
300
0
MANUAL
-:-
310°C
56
27/04/2018 13:00
300
20
MANUAL
1 2 3 4 5
6 7 8 9 0
x OK
310 +-
Impostare valore temperaturaz X
-:-
BA
C
300°C
80
27/04/2018 13:00
300
0
MANUAL
310°C
80
27/04/2018 13:00
370
0
-:--:-
NAPOLETANA
27/04/2018 13:00
Selezione programma
CLASSICA
NAPOLETANA
TEGLIA
PADELLINO
FOCACCIA
NAPOLETANA
PRE. CLASSICA
EXIT
B
310°C
56
27/04/2018 13:00
300
20
MANUAL
1 2 3 4 5
6 7 8 9 0
x OK
370 +-
Impostare valore temperaturaz X
-:-
D
EC
A3
A1
ECOA2
Fig. 17
Fig. 18
B - Setting the preheating
Pre-heating must have the same cooking parameters as the
recipe to be used. It must be carried out without products in
the cooking chamber and takes about an hour for the oven to
be ready for cooking.
It is possible to set the pre-heating in two ways:
• Fig. 17 entering manually the preheating temperature
and the desired top and bottom power (see table on page
8, cooking information).
The entered parameters cannot be stored, so they need to be
reset every time. To avoid this operation, you need to create a
recipe, as explained on page 20.
• Fig. 18 starting a recipe (program) already stored,
previously saved by the user.
Entering the recipe parameters manually Fig. 17 A Touching the corresponding field, set:
• pre-heating temperature;
• top power;
• bottom power.B an alphanumeric keypad will appear on which the desired
valued can be set (see table on page 8, cooking
information);C confirm with “OK”. After setting these three parameters, the
oven starts heating straight away in compliance with the
set parameters.
Using an already stored recipe Fig. 16
A press the program key A1 in the display or keypad A2 or
touch A3 ;B touch the name of the recipe you wish to use: the oven
starts to heat straight away according to the parameters of
the recipe; C ... E if you wish, you can change the parameters of the
selected recipe (e.g. the temperature) the usual way: the
changes will affect only the pre-heating in progress and
will not affect the original recipe (temporary effect).
To modify the original recipe permanently, see page 20.
“MANUAL” means you are
working with parameters set
manually.
The name shows which recipe you are using (e.g.
NEAPOLITAN). If you change a parameter manually (e.g.
the temperature), the wording changes to “MANUAL” to
show the user’s intervention.
The name of the programs in the
figure are just an example (they
depend on the names given by the
user to his/her recipes)
Using TS models
During preheating, the
steam holes in the back
of the cooking chamber
must be kept always closed, to
prevent the elements from
being on too long and warming
the refractory surfaces too
much, causing the first pizzas to
burn.

17
ECO
ECO
Fig. 20
300°C
56
27/04/2018 13:00
300
20
MANUAL
1 2 3 4 5
6 7 8 9 0
x OK
03:10 +-
Imposta valore tempo X
300°C
56
27/04/2018 13:00
310
20
MANUAL
-:-
D
300°C
56
27/04/2018 13:00
310
20
MANUAL
-:-
E
F
03:10
Fig. 19
Ed. 0121 - 70702522 REV02 Michelangelo - Use and maintenance
C - Starting cooking
Fig. 19
Once preheating is complete, you can start cooking and bake
the products using personal protection equipment (e.g. gloves)
and tools suitable for contact with food and made of material
resistant to high temperatures (e.g. steel).
For optimal results, always adhere to the oven capacity
declared by the Manufacturer and position the prod-
ucts to be cooked evenly in the cooking chamber.
During cooking, it is always possible to change any value by
(e.g. The temperature) acting as usual.
D - Activating an end-of-cooking signal (buzzer)
Fig. 20
If you wish, you can enable a buzzer that will go off when the
set time expires, warning that cooking is complete. D To activate it, press the key on the display or the
dedicated key on the keypad;E an alphanumeric keypad will appear on which the desired
value can be entered (in minutes: seconds);F confirm with “OK”.
The display shows after how much time the buzzer will go
off (e.g. 3:10 that is three minutes and ten seconds).
After setting it, the countdown starts, at the end of which a
buzzer will sound to highlight the end of cooking.
To stop the buzzer, press the buzzer key.
Warning! the oven continues heating when the
buzzer goes off!When the set time expires
(e.g. 3 minutes and 10 sec-
onds), a buzzer will sound to
show cooking has complet-
ed but the oven keeps heat-
ing until the ON/OFF key is
pressed 11

18
ECO
Ven 27/04/2018 13:00
CUPPONE
300°C
56
27/04/2018 13:00
310
20
MANUAL
03:10
ECO
Ven 27/04/2018 13:00
310°C
70
27/04/2018 13:00
310
20
NAPOLETANA
-:-
ECO
Ven 27/04/2018 13:00
ECO
Ven 27/04/2018 13:00
310°C
70
27/04/2018 13:00
310
20
NAPOLETANA
-:-
Fig. 21
Fig. 22
Fig. 23
D - Switching the light on (optional)
Fig. 21
When necessary, it is possible to switch on the oven light to
check the cooking, acting on the light key .
Press the same key to switch it off.
G - Adjusting the steam holes
Fig. 22
In the back of the cooking chamber there are some steam
holes: they can be more or less open to keep the degree of
humidity more suited to the type of product to bake in the
cooking chamber.
To open the holes, keep the dedicated key pressed continuously:
they begin to open progressively. To block them in the desired
position, just release the same key.
H - Switching the oven off
Fig. 23
To stop cooking, press the ON/OFF key: the oven goes into
stand-by mode.
Using TS models
CUPPONE

19Ed. 0121 - 70702522 REV02 Michelangelo - Use and maintenance
25 °C
56
27/04/2018 13:00
300
20
1:00
MAX
1 2 3 4 5
6 7 8 9 0
x OK
01:00 +-
Imposta durata MAX X
25 °C
56
27/04/2018 13:00
300
20
1:00
MAX
1 2 3 4 5
6 7 8 9 0
x OK
04:00+-
Imposta durata MAX X
25 °C
100
27/04/2018 13:00
330
100
4:00
MAX
MAX
100
0
C
ECO
CUPPONE
-:-
2580
370
0
NAPOLETANA
A
B1
B2
B3
A special program
MAX program: The MAX program is used to quickly raise the temperature of the cooking
chamber and the refractory surface when the user realizes that they are too low for his needs.
A To start the program, touch its symbol. B A screen appears that allows you to:
• B1 start the program by pressing “OK”: in this case the program will last 1 minute (default
duration) or
• B2 set the duration of the program by entering the desired time (e.g. four minutes) and
then start it by pressing “OK” B3 .C A summary screen appears: by touching the “top” or “bottom” field it is possible to set the power
to 100% or 0% (it is not possible to set powers other than these two values).
set time
top/bottom power 100% or 0%
Default values of the MAX program
• duration 1 minute
• offset temperature 30°C - 86°F higher than the temperature in
the chamber
• top and bottom power at 100%
To modify the values permanently, act as explained on page 21.
The program ends pressing the MAX key, when a different program is selected or when the set time
expires: the buzzer goes off and you are back to the program that was active before the MAX program
started.
20
300°C
80
27/04/2018 13:00
300
0
NAPOLETANA
310°C
80
27/04/2018 13:00
370
0
-:--:-
NAPOLETANA
27/04/2018 13:00
Selezione programma
EXIT
A3
A1
310°C
56
27/04/2018 13:00
300
20
MANUAL
1 2 3 4 5
6 7 8 9 0
x OK
320 +-
Impostare valore temperaturaz X
-:-
D
EC
ECOA2
CLASSICA
NAPOLETANA
TEGLIA
PADELLINO
FOCACCIA
PRE. NAPOLETANA
PRE. CLASSICA
B
Fig. 24
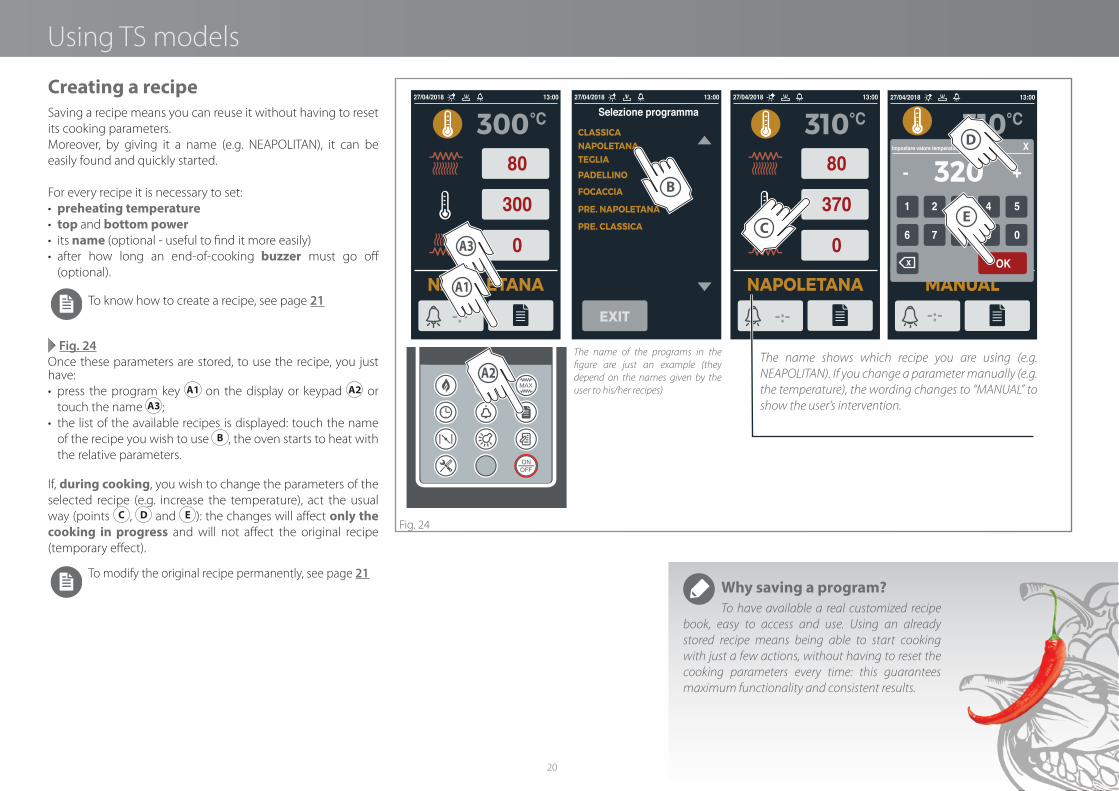
Creating a recipe
Saving a recipe means you can reuse it without having to reset
its cooking parameters.
Moreover, by giving it a name (e.g. NEAPOLITAN), it can be
easily found and quickly started.
For every recipe it is necessary to set:
• preheating temperature
• top and bottom power
• its name (optional - useful to find it more easily)
• after how long an end-of-cooking buzzer must go off
(optional).
To know how to create a recipe, see page 21
Fig. 24
Once these parameters are stored, to use the recipe, you just have:
• press the program key A1 on the display or keypad A2 or
touch the name A3 ;
• the list of the available recipes is displayed: touch the name
of the recipe you wish to use B , the oven starts to heat with
the relative parameters.
If, during cooking, you wish to change the parameters of the
selected recipe (e.g. increase the temperature), act the usual
way (points C , D and E ): the changes will affect only the
cooking in progress and will not affect the original recipe
(temporary effect).
To modify the original recipe permanently, see page 21Why saving a program?
To have available a real customized recipe
book, easy to access and use. Using an already
stored recipe means being able to start cooking
with just a few actions, without having to reset the
cooking parameters every time: this guarantees
maximum functionality and consistent results.
The name of the programs in the
figure are just an example (they
depend on the names given by the
user to his/her recipes)
The name shows which recipe you are using (e.g.
NEAPOLITAN). If you change a parameter manually (e.g.
the temperature), the wording changes to “MANUAL” to
show the user’s intervention.
Using TS models

21
ECO
27/04/2018 13:00
Data e ora
Gestione
Programmi
HACCP
Versioni
firmware
Ore di
lavoro
Lingua
27/04/2018 13:00
Gestione programmi
EXIT
P00 ECO
P01 MAX
P02 Program02
P03 Program03
P04 Program04
P08 Program08
P07 Program07
P06 Program06
P05 Program05
P09 Program09A
B
C
27/04/2018 13:00
Gestione programmi
EXIT
P00 ECO
P01 Program01
P02 Program02
P03 Program03
P07 Program07
P06 Program06
P05 Program05
P04 Program04
P08 Program08
70
Gestione programmi
310
20
Program 01
-:- OK
D1
D2
D4
D3
27/04/2018 13:00
Gestione programmi
EXIT
P00 ECO
P01 Program01
P02 Program02
P03 Program03
P07 Program07
P06 Program06
P05 Program05
P04 Program04
P08 Program08
Gestione programmi
Inserisci il nuovo nome
Napol
1 2 3 4 5 6
q w e r t y
u i o p a s
d f g h j k
l z
n m
x
x
c v
OK
b
7 8 9 0 _
E
27/04/2018 13:00
Gestione programmi
EXIT
P00 ECO
P01 Program01
P02 Program02
P03 Program03
P07 Program07
P06 Program06
P05 Program05
P04 Program04
P08 Program08
80
Gestione programmi
350
20
Napoletana
03:10 OK
G
HF I
27/04/2018 13:00
Gestione programmi
EXIT
P02 Napoletana
P00 ECO
P01 MAX
P03 Program03
P04 Program04
P08 Program08
P07 Program07
P06 Program06
P05 Program05
P09 Program09
USCITA
Fig. 25
Ed. 0121 - 70702522 REV02 Michelangelo - Use and maintenance
Positions P00 and P01 are
reserved for the ECO and MAX
programs, we advise you not to
use it for your own recipes.
Program P01 has changed
name and parameters,
taking on those set by the
user
With the alphanumeric
keypad it is easy to assign
a name to the program:
this way it will be easy to
recognize the recipe you
need
The temperature in the
chamber, the top and
bottom power and the
buzzer are set as usual (see
Fig. 16)
How to create a recipe
Fig. 25
A Touch the “Service” icon (with the oven in stand-by),
B touch the “Program management” icon,
C touch the name of a program,
D Set:
• D1 the cooking temperature (touch the corresponding
field, an alphanumeric keypad will be displayed on which
the desired value can be set: confirm with “OK”.
• D2 D3 the top and bottom power (touch the
corresponding field, an alphanumeric keypad will be
displayed on which the desired value can be set;
• D4 if you wish, you can enable a buzzer that will go
off when the set time expires, warning that cooking is
complete (see Fig. 19). E ... H touch “Program 01”; an alphanumeric keypad will be
displayed on which you can enter the name of the recipe
(e.g. NEAPOLITAN); confirm with “OK”,
I confirm with “OK”.
Modifying a stored recipe
If, later on, an already stored recipe needs to be modified,
for instance varying the temperature, repeat the procedure
described above, selecting the recipe you wish to modify at
point C .
CUPPONE

22
27/04/2018 13:00
Settimanale
evento 1 evento 2 evento 3 evento 4
Mer
Mar
Lun
Ven
Gio
Sab
Dom
EXIT
27/04/2018 13:00
Settimanale
evento 1 evento 2 evento 3 evento 4
Mer
Mar
Lun
Ven
Gio
Sab
Dom
EXIT
27/04/2018 13:00
Settimanale
evento 1 evento 2 evento 3 evento 4
Mer
Mar
Lun
Ven
Gio
Sab
Dom
EXIT
27/04/2018 13:00
Settimanale
evento 1 evento 2 evento 3 evento 4
Mer
Mar
Lun
Ven
Gio
Sab
Dom
EXIT
13:00
Settimanale
evento 1 evento 2 evento 3 evento 4
11.00/14.30
CLASSICA
CLASSICA
11.00/14.30
11.00/14.30
CLASSICA
11.00/14.30
CLASSICA
11.00/14.30
CLASSICA
11.00/14.30
CLASSICA
EXIT
Mer
Mar
Lun
Ven
Gio
Sab
Dom
27/04/2018
B E
Imposta evento
Ora inizio evento
Ora fine evento
Programma
x
Lun
Mer
Ven
Dom
Mar
Gio
Sab
Tutti igiorni
CLASSICA
14:30
11:00
DELETE
OK
C
D
Imposta evento
Ora inizio evento
Ora fine evento
Programma
x
Lun
Mer
Ven
Dom
Mar
Gio
Sab
Tutti igiorni
NAPOLETANA
22:30
19:00
DELETE
OK
Imposta evento
Ora inizio evento
Ora fine evento
Programma
x
Lun
Mer
Ven
Dom
Mar
Gio
Sab
Tutti igiorni
CLASSICA
24:00
19:00
DELETE
OK
27/04/2018 13:00
Settimanale
evento 1 evento 2 evento 3 evento 4
11.00/14.30 19.00/22.30
CLASSICA
CLASSICA
NAPOLETANA
11.00/14.30 19.00/22.30
NAPOLETANA
11.00/14.30 19.00/22.30
CLASSICA NAPOLETANA
11.00/14.30 19.00/22.30
CLASSICA
11.00/14.30
CLASSICA
11.00/14.30
CLASSICA
NAPOLETANA
19.00/22.30
NAPOLETANA
EXIT
Mer
Mar
Lun
Ven
Gio
Sab
Dom
27/04/2018 13:00
Settimanale
evento 1 evento 2 evento 3 evento 4
11.00/14.30 19.00/22.30
CLASSICA
CLASSICA
NAPOLETANA
11.00/14.30 19.00/22.30
NAPOLETANA
11.00/14.30 19.00/22.30
CLASSICA NAPOLETANA
11.00/14.30 19.00/22.30
CLASSICA
11.00/14.30
CLASSICA
11.00/14.30
CLASSICA
NAPOLETANA
19.00/24.00
CLASSICA
19.00/22.30
NAPOLETANA
EXIT
Mer
Mar
Lun
Ven
Gio
Sab
Dom
M
ECO
CUPPONE
Ven 27/04/2018 13:00
F
G
I
L
H
A
Fig. 26 Programmed switch-on
The programmed switch-on function is very useful because
the oven can be already hot, and therefore ready to bake,
when the restaurant is opened.
With this function, you can program the oven switching on
and off automatically for the whole week.
It is possible to program up to a maximum of 4 events a day
(that is 4 daily switch-ons and switch-offs).
Setting an event
Fig. 26
A Touch the “Programmed switch-on” icon,
B touch a white rectangle
C set the details, choosing:
27/04/2018 13:00
Settimanale
evento 1 evento 2 evento 3 evento 4
Mer
Mar
Lun
Ven
Gio
Sab
Dom
EXIT
Imposta evento
Ora inizio evento
Ora fine evento
Programma
x
Lun
Merc
Ven
Dom
Mar
Gio
Sab
Tutti igiorni
CLASSICA
14:30
11:00
DELETE
OK
the oven switch-
on time
the oven switch-
off time
the programme
the oven has to
start with
the days the pro-
grammed event must
take place
orange day= an
event is planned (pro-
grammed switch-on
or switch-off )
grey day=
no event is pro-
grammed
D Confirm the entered details pressing “OK”.
E ..... L If necessary, program the following events repeating
the same procedure.
Event 1: the oven will switch on at 11:00 in the morning and
off at 2:30 p.m. every day but on Wednesdays, the restaurant’s
closing day, with the “CLASSIC” program
Event 2: the oven will switch on at 7:00 in the evening and off
at 10:30 p.m. on Mondays, Tuesdays, Thursdays, Fridays and
Sundays with the “NEAPOLITAN” program.
Event 3: on Saturdays, the oven will switch on at 7:00 in the
evening and switch off at 12:00 (midnight) with the “CLASSIC”
program.
Using TS models
CUPPONE

23
27/04/2018 13:00
Settimanale
evento 1 evento 2 evento 3 evento 4
Mer
Mar
Lun
Ven
Gio
Sab
Dom
EXIT
27/04/2018 13:00
Settimanale
evento 1 evento 2 evento 3 evento 4
Mer
Mar
Lun
Ven
Gio
Sab
Dom
EXIT
Imposta evento
Ora inizio evento
Ora fine evento
Programma
x
Lun
Mer
Ven
Dom
Mar
Gio
Sab
Tutti igiorni
NAPOLETANA
22:30
19:30
DELETE
OK
27/04/2018 13:00
Settimanale
evento 1 evento 2 evento 3 evento 4
11.00/14.30 19.00/22.30
CLASSICA
CLASSICA
NAPOLETANA
11.00/14.30 19.00/22.30
NAPOLETANA
11.00/14.30 19.00/22.30
CLASSICA NAPOLETANA
11.00/14.30 19.00/22.30
CLASSICA
11.00/14.30
CLASSICA
11.00/14.30
CLASSICA
NAPOLETANA
19.00/22.30
NAPOLETANA
EXIT
Mer
Mar
Lun
Ven
Gio
Sab
Dom
19.00/24.00
CLASSICA
B
A
E
F
Imposta evento
Ora inizio evento
Ora fine evento
Programma
x
Lun
Mer
Ven
Dom
Mar
Gio
Sab
Tutti igiorni
NAPOLETANA
22:30
19:30
DELETE
OK
1 2 3 4 5
6 7 8 9 0
x OK
19:00 +-
Ora inizioevento X
C
D
Prossimo evento:Mar 11.00
Napoletana
Prossimo evento:Mar 11.00
Napoletana
x2
x1
x2
x1
27/04/2018 13:00
Settimanale
evento 1 evento 2 evento 3 evento 4
Mer
Mar
Lun
Ven
Gio
Sab
Dom
EXIT
Imposta evento
Ora inizio evento
Ora fine evento
Programma
x
Lun
Mer
Ven
Dom
Mar
Gio
Sab
Tutti igiorni
NAPOLETANA
22:30
19:30
DELETE
OK
27/04/2018 13:00
Settimanale
evento 1 evento 2 evento 3 evento 4
11.00/14.30 19.00/22.30
CLASSICA
CLASSICA
NAPOLETANA
11.00/14.30 19.00/22.30
NAPOLETANA
11.00/14.30 19.00/22.30
CLASSICA NAPOLETANA
11.00/14.30 19.00/22.30
CLASSICA
11.00/14.30
CLASSICA
11.00/14.30
CLASSICA
NAPOLETANA
19.00/22.30
NAPOLETANA
EXIT
Mer
Mar
Lun
Ven
Gio
Sab
Dom
27/04/2018 13:00
Settimanale
evento 1 evento 2 evento 3 evento 4
11.00/14.30 19.00/22.30
CLASSICA
CLASSICA
NAPOLETANA
11.00/14.30 19.00/22.30
NAPOLETANA
11.00/14.30 19.00/22.30
CLASSICA NAPOLETANA
11.00/14.30 19.00/22.30
CLASSICA
11.00/14.30
CLASSICA
11.00/14.30
CLASSICA
NAPOLETANA
19.00/24.00
CLASSICA
19.00/24.00
CLASSICA
EXIT
Mer
Mar
Lun
Ven
Gio
Sab
Dom
B
A
D
C
Fig. 27
Fig. 28
Ed. 0121 - 70702522 REV02 Michelangelo - Use and maintenance
Fig. 26M At the end, make the weekly function operational touching
the icon in the bottom RH corner. If it is:
white= the weekly function is programmed but is not
active (user’s manual switch-on/switch-off
and no longer automatic)
orange= the weekly function is active (switch-on/
switch-off programmed as per the details
entered).
Fig. 27
When a weekly programmed switch-on is active, the STAND-BY
page shows the time and the program of the next automatic
switch-on and the icon turns orange.
If you touch this icon:
once= you go back to the setting page; this is useful
to view all the programmed events or change
them, if required (points from A to F )
twice= the icon becomes white, the weekly function
is still programmed but is not active (user’s
manual switch-on/switch-off ).
How to cancel or modify a programmed
event
To cancel the whole program (user’s manual and no longer
automatic switch-on and switch-off ) see the figure Fig. 27 x2
To modify an event, see the figure Fig. 27 x1
To cancel an event, see figure Fig. 28
The weekly function is still programmed but is no longer
active (user’s manual and no longer automatic switch-on/
switch-off )
Modifying a programmed event
(in the example we show how to change switch-on time from 19:30 to 19:00)

24
27/04/2018 13:00
LISTA NOTE
2 -
3 -
4 -
5 -
6 -
7 -
8 -
9 -
10 -
1 - --/--/------:--
--/--/------:--
--/--/------:--
--/--/------:--
--/--/------:--
--/--/------:--
--/--/------:--
--/--/------:--
03/05/201815:30
01/05/201815:00
Comprare le mozzarelle
Effettuare pirolisi
EXIT
27/04/2018 13:00
LISTA NOTE
2 -
3 -
4 -
5 -
6 -
7 -
8 -
9 -
10 -
1 -
--/--/------:--
--/--/------:--
--/--/------:--
--/--/------:--
--/--/------:--
--/--/------:--
--/--/------:--
03/05/201815:30
03/05/201811:30
Comprare le mozzarelle
Preparare le melanzanearrostite
EXIT
27/04/2018 13:00
1 -
Preparare le melanz
27/04/2018 13:00
ORA PROGRAMMATA
03 05 2018
11 30
Ripeti
Non ripetere
Ogni giorno
Ogni mese
Ogni anno
01/05/201815:00
Effettuare pirolisi
ECO
CUPPONE
Ven 27/04/2018 13:00
A
B
EXIT OK
G
F
X
1 2 3 4 5 6
q w e r t y
u i o p a s
d f g h j k
l z
n m
x
x
c v
OK
b
7 8 9 0 _C
E
D
CUPPONE
AVVISO
Preparare le melanzane arrostite
W06
USCITA
USCITA
121
2
3
4567
8
9
1011
Fig. 29 Setting a Diary
The Diary function allows setting up up to 10 notes that will
be displayed at the set time and on the set days. Each note
can have up to 200 text characters and it is possible to
program when the note will expire or has to be repeated (e.g. “Buy
mozzarella” to be repeated every month).
Fig. 29
To create a new note (or modify an existing one):
• enter the text (that is what must be displayed)
• enter its expiry date (that is when it must be displayed)
• enter when it has to be repeated (that is how often it must
be displayed):
• do not repeat: the note is displayed on the expiry date
and not repeated,
• every day: the note is displayed and then repeated the
following day,
• every month: the note is displayed and then repeated
the following month. If the following day of the month
does not exist (e.g. 29 February), it is reproposed the first
month when that day exists (e.g. the note is reproposed
on 29 March),
• every year: the note is displayed and then repeated the
following year.
If the oven is switched off, when it is switched back on all the
expired notes will be displayed.
By selecting a note, you can modify it or delete it with the two
keys shown.
--/--/------:--
--/--/------:--
03/05/201815:30
--/--/------:--
deletes the note
modifies the note
Entering the note text
Entering the expiry (date and
time) and note repetition
To make the pop-up warning
disappear, just touch it.
The colour of the icon shows
the note status:
Green= note not
programmed
Red= note programmed
and not yet expired
Orange= note programmed
and expired.
Using TS models
CUPPONE

25
ECO
CUPPONE
Ven 27/04/2018 13:00
A
13:00
Fine vacanza
DATA E ORA
EXIT
27/04/2018
21/08/2017
10.30
13:00
Vacanza
DATA E ORA
EXIT
27/04/2018
28/08/2018
08.34
B
21 08 2017
10 30
EXIT OK
B
13:00
Fine vacanza
DATA E ORA
EXIT
27/04/2018
28/08/2018
10.30
13:00
Fine vacanza
Imposta Data e Ora X
27/04/2018
C
D
E
Modalità vacanza attiva fino al28/08/2018
10.30
13:00
Fine vacanza
DATA E ORA
EXIT
27/04/2018
28/08/2018
10.30
A1
ECO
Modo Vacanza attivo, andare
in ON e disabilitare il modo
vacanza?
x
EXIT OK
B1C1
A2
B2
Fig. 30
Ed. 0121 - 70702522 REV02 Michelangelo - Use and maintenance
Setting a Holiday
If enabled, the function:
• stops the weekly switch-on and -off program
(page 22), if present, until the set time and date, without
having to delete it: this is useful if the restaurant is closed for
holidays and therefore the oven must not switch on during that
period;
• displays a message if you try and switch the oven on manually
with the ON/OFF key: this prevents accidental switch-ons, for
instance during cleaning carried out during the closure period.
Fig. 30
A Touch the “Holiday” icon,
B touch a white rectangle,
C set the details, choosing:
• the end date of the holiday (e.g. 28/08/2018)
• the end time of the holiday (e.g.10:30).D Confirm the entered details pressing “OK”.
E At the end, make the weekly function operational touching
the icon in the bottom RH corner.
If it is:
white= the holiday function is not active but is
programmed
orange= the holiday function is active (oven in stand-
by until the set time/date).
The main screen displays the message “Holiday mode active
until” with the set time/date.
From now until the set time/date
(e.g. until 10:30 on 28 August 2018):
• the weekly switch on/off function is disabled;
• a message warns if you try and switch the oven on manually
with the ON/OFF key.
At 10:31 on 28 August 2018, the function is disabled
automatically, weekly programming is resumed, if any, and the
manual switch-on of the oven is always allowed.
Entering the date and time of
the end of the holiday
Cancelling the holiday function
It may happen that you have to cancel the holiday function, for
instance due to an early return from holiday.
To disable the function, you can use two methods:
METHOD 1:
A1 B1 Touch the orange icon,
C1 press “EXIT”.
METHOD 2:
A2 Press the ON/OFF key: you are warned that the holiday function is
active,
B2 Touch the “OK” key.
After either procedure, the function is disabled: the oven can be switched
on again and, if the automatic switch-on function is active, it will restart is
the set days and at the set times of the weekly calendar.
CUPPONE
26
ECO
27/04/2018 13:00
Data e ora
Gestione
Programmi
HACCP
Versioni
firmware
Ore di
lavoro
Lingua
Parametri Test I/O
27/04/2018 13:00
Data e ora
Gestione
Programmi
HACCP
Versioni
firmware
Ore di
lavoro
Lingua
Imposta data e ora x
03 05 2018
11
Ora solare/legale
Stati Uniti
30
EXIT OK
Fig. 31
Fig. 32
User settings
The “settings” section is dedicated to three different persons:
the use, installer and maintenance technician.
To prevent unauthorized people from accessing the
programming of the parameters that, if incorrectly set, may affect
the use of the oven, some menus are protected with a password
supplied specially by the Manufacturer.
Fig. 31
To access the “Settings” section, touch the “Service” icon.
Date and time Fig. 32
In this section, the current date and time can be set pressing
on the arrows .
In the bottom part of the page, you can set the automatic
change to summer time, choosing the Europe or United States
version.
• Europe: summer time starts the last Sunday in March at 2:00
a.m., winter time starts the last Sunday in October at 3:00 a.m.
• United States: summer time starts the second Sunday
in March at 2:00 a.m.; winter time starts the first Sunday in
November at 2:00 a.m.
version automatic change Europe
version automatic change U.S.A.
At the end of the settings, confirm with “OK” or delete with
“EXIT”.
Language Fig. 33
In this section you can set the language used in the menu
displays: the active language is highlighted in red.
At the end of the setting, confirm with “OK” or delete with “EXIT”.
Program managementIn this section you can save a recipe: this means you can reuse
it without having to reset its cooking parameters. Moreover, by
giving it a name, it can be easily found and quickly started.
See page 20
HACCPSection not accessible to the user, reserved to qualified
personnel.
Firmware versionsIn this section you can come to know the firmware version
installed on the oven and other data about it.
Work hours Fig. 34
In this section you can discover how many hours the oven
has worked: this helps to understand if it is used at its best to
guarantee maximum productivity.
The same page shows the hours passed since the last
maintenance.
Parameters / Test 0/1These menus are dedicated to Service, they are therefore
protected with a password supplied by the Manufacturer to
authorized and qualified technicians.
current date
current time
automatic summer timeEurope/United States
Using TS models
CUPPONE

27
27/04/2018 13:00
Data e ora
Gestione
Programmi
HACCP
Versioni
firmware
Ore di
lavoro
Lingua
Parametri Test I/O
Lingua
Seleziona nuova lingua x
EXIT OK
English
Italiano
Ore di
lavoro
27/04/2018 13:00
Data e ora
Gestione
Programmi
HACCP
Versioni
firmware
Ore di
lavoro
Lingua
Parametri Test I/O
Ore di lavoro
Ore funzionamento: 91 (h)
Ore da ultima manutenzione: 170 (h)
Ore lavoro 2: 00 (h)
Ore lavoro 3: 00 (h)
Ore lavoro 4: 00 (h)
x
EXIT
Fig. 33
Fig. 34
Ed. 0121 - 70702522 REV02 Michelangelo - Use and maintenance

28
ECO
ECO
OFF
A
B
D
E
C
x3
Fig. 36
ECO
ECO
Fig. 35
Warnings
Before any cleaning, it is necessary to switch off the
power to the appliance (acting on the system switch)
and wear suitable personal protection equipment (e.g.
gloves, etc.). The user must carry out only routine maintenance,
for extraordinary maintenance, contact a Service Centre re-
questing service from an authorised technician. The Manufac-
turer warranty does not cover damages due to negligent or
incorrect maintenance or cleaning (e.g. use of unsuitable de-
tergents).
Any cleaning must be carried out with the oven
completely cold and wearing adequate personal
protection devices (e.g. gloves, etc.).
When cleaning any part or accessory do NOT use:
• abrasive or powder detergents;
• aggressive or corrosive detergents (e.g. hydrochloric
or sulphuric acid, caustic soda, etc,). Caution! Never use these
substances also when cleaning the substructure/floor under
the appliance or its base;
• abrasive or sharp tools (e.g. abrasive sponges, scrapers, steel
brushes, etc.);
• steamed or pressurised water jets.
It is best to have a service centre perform maintenance
and inspection on the appliance at least once a year to
ensure top working and safety conditions.
Keep the vents of the electrical compartment clean and clear.
Oven cleaning
Cleaning the external steel parts
Use a cloth dampened with hot soapy water and end with
rinsing and drying.
Cleaning the glass
Clean any glass with a soft cloth and special glass detergent.
Cleaning the display
Clean the display with a soft cloth and a little detergent for
delicate surfaces. Avoid using considerable quantities of
product since any infiltration may damage the display.
Avoid also using very aggressive detergents that may damage
the material the display is made of (polycarbonate).
Cleaning the refractory surface
On the refractory surface, there are normally some food
residues (e.g. fat, food residues, etc.) that must be removed
frequently for health and safety reasons.
Remove the coarser food residues with a natural fibre brush;
then, if necessary, remove the refractory bricks of the cooking
surface as shown in the figure and suck the carbonized resi-
dues accumulated under them on the bottom of the oven with
an ash extraction bin.
Never use liquids to clean the refractory surface.
While reinserting the bricks, be careful not to pinch your
fingers.
Replacement refractory bricks can be obtained from the
Manufacturer.
If manual cleaning is not enough, use the PYROLYSIS function
see page 29
Maintenance and cleaning

29
A
B
DC
B
ECO
ECO
25 °C
56
27/04/2018 13:00
300
20
NAPOLETANA
25°C
100
27/04/2018 13:00
400
100
PYR
okexit
Conferma avvio pirolisi?
-:- -:-
C
ECO
CUPPONE
Ven 27/04/2018 13:00
ECO
CUPPONE
Ven 27/04/2018 13:00
25 °C
80
27/04/2018 13:00
150
5
NAPOLETANA
-:-
A
B
Fig. 37
Fig. 39 Fig. 38
Ed. 0121 - 70702522 REV02 Michelangelo - Use and maintenance
Cleaning with Pyrolysis
Pyrolysis is a thermochemical crystallization process of food
residues that have deposited in the cooking chamber, which takes
place by bringing the oven up to 400°C - 752°F
Before starting the pyrolysis, remove the coarser food
residues with a natural fibre brush.
CD model ovens Fig. 37
A Set the chamber temperature to 400°C - 752°F,B Acting on the “MIN” e “MAX” keys, set the top and bottom
power to MAX, C switch the lights in the cooking chamber off;D when the temperature is reached, switch the oven off with
the ON/OFF key and let it cool down with the door closed;E in a cold oven, clean the chamber from the crystallized
food residues using a natural fibre brush and then vacuum
with an ash extraction bin . Fig. 39
TS model ovens Fig. 38
A Touch the ON/OFF key 11 ;B touch the pyrolysis key 1 ;C confirm pressing “OK”: the heating of the cooking chamber
starts until the temperature of 400°C - 752°F is reached,
when the function stops (to stop the function early, press
the pyrolysis key 1 again); D in a cold oven, clean the chamber from the crystallized
food residues using a natural fibre brush and then vacuum
with an ash extraction bin . Fig. 39
In the "TS" models, during pyrolysis, the light switches off
automatically to preserve the bulbs, on the other hand, in
the "CD" models it is necessary to turn it off manually.
CUPPONE

30
ECO
ECO
OFF
C
A
B
D
OFF
ECO
ECO
C
A
D
F
G
E
B
Fig. 40
Fig. 41
Replacing components
The user must replace only the stated components: in
case of a fault or for extraordinary maintenance, contact
the Retailer requesting service from an authorised tech-
nician. As replacements, always use original spare parts to be
requested from the Manufacturer: using non original parts
might cause injuries to people, non optimal performance and
even serious damage of the appliance itself.
Before any replacement, it is necessary to switch off
the power to the appliance (acting on the system
switch) and wear suitable personal protection equip-
ment (e.g. gloves, etc.).
Any replacement must be carried out with the oven
completely cold and wearing adequate personal
protection devices (e.g. gloves, etc.).
Replacing the door glass
Fig. 40
Replacing the internal bulb and glass
Fig. 41
Before replacing the bulb, switch off the power to the
appliance (acting on the system switch); it is not enough to use
the ON/OFF key, because bulbs can still be live.
Never tough the bulb glass with your bare hands; always
wear gloves.
Never switch the oven on without having refitted the bulb
protective glass; replace it straight away if it breaks.
Maintenance and cleaning

31
ECO
ECO
OFF
A
B
D
E
C
x3
ECO
ECO
A
B
Fig. 42 Fig. 43
Ed. 0121 - 70702522 REV02 Michelangelo - Use and maintenance
Replacing the refractory bricks
Fig. 42
Replacing the door handle
Fig. 43

32
ECO
ECO
Fig. 44
Disposal at end of life
To avoid any unauthorised use and associated risks, be-
fore discarding the machine make sure it cannot be
used; for this purpose, cut and remove the power cord
(once the equipment is unplugged).
Make sure no child can accidentally remain trapped inside the
cooking chamber, locking the door (for example, with adhesive
tape or locks).
Equipment disposalPursuant to art. 13 of Legislative Decree no. 49 of 2014
“Implementation of WEEE directive 2012/19/EU on
electric and electronic waste”, the barred bin symbol
specifies that the product was introduced on the
market after August 13, 2005 and that it must not be discarded
with other waste at the end of its working life but disposed of
separately. All the equipment has been made with recyclable
metal materials (stainless steel, iron, aluminium, zinc plate,
copper, etc.) that as a percentage make up more than 90% of
the weight. Attention must be paid to the management of this
product at the end of its life, reducing any negative impact on
the environment and improving the efficiency of resources,
applying the principles of “who pollutes pays”, prevention,
preparation for re-use, recycling and recovery. Please remember
that illicit or incorrect product disposal is punishable by law.
Information on disposal in Italy
WEEE equipment in Italy must be delivered to:
• to Collection Centres (also named eco-islands or eco-
platforms)
• the dealer where new equipment is purchased who must
withdraw it free of charge ("one to one" withdrawal).
Information on disposal in European Union countries
The EU Directives on WEEE equipment has been adopted
in different ways by different countries, therefore in order to
dispose of this equipment correctly we suggest that you
contact your local authority or your dealer in order to ask the
correct method of disposal.
Disposing of ashes and food residues
The ash and food residues removed with cleaning must
be disposed of according to the regulations in force in
the country where the oven is used.
If in doubt, we suggest contacting the local authorities to ask
for the correct method of disposal.
While waiting for disposal, the ash and food residues must be
stored in fireproof metal cans, resistant to high temperatures
and provided with a lid that must always remain closed.
Keep the latter away from the elements and in a place inacces-
sible to children and animals.
Do not approach materials that can be flammable, explosive or
heat-sensitive.
Oven downtime for prolonged periods
During any downtime, switch the power off. Protect the steel
outside surfaces passing over them with a soft cloth slightly
damp with Vaseline oil.
Leave the door ajar to guarantee correct ventilation.
Before resuming operations:
• accurately clean the equipment and accessories;
• reconnect the equipment to the power;
• inspect the equipment before using it.
Maintenance and cleaning

33Ed. 0121 - 70702522 REV02 Michelangelo - Use and maintenance
Warranty
• 8.1 Each Product sold is to be considered compliant when delivered in the quantity, quality and type indicated in the written Confirmation. Please refer to the provisions of art. 1.1.
• 8.2 The Seller warranties:• (a) that the Products are free from defects in material and
workmanship, and• (b) that (except in the case of defects known or to be
known by the Buyer) the Products are of merchantable quality.
• 8.3 Any hidden defects of the Products must be reported in writing by the Buyer within 8 days of discovery, under penal-ty of forfeiture. Packaging defects are excluded - even if they have caused defects or damage to the internal Products; in fact, packaging defects have to be reported at the time of delivery, pursuant to art. 5.8 of the present General Condi-tions of Sale.
• Written notices by the Buyer for the Products defective shall contain a full description of the defects and faults as well as the mention of the delivery date and that of defect discovery of the Products.
• Warranty is excluded if the defect derives from the Buyer’s ac-tions, such as (and not limited to) incorrect installation of the Product, use of the Product in a manner that does not comply with the normal method of use, failure to comply with the instructions contained in the “user and installation manual”, tampering with the Product. Warranty does not cover normal wear and tear of the Product due to use.
• The seller is responsible for defects that occur within one year from the activation of the warranty as provided for in art. 8.12 of the present General Conditions of Sale.
• 8.4 The Seller shall have the right to examine, or have a rep-resentative examine, the defective Product and, should the existence of the defect be ascertained, the Buyer shall be en-titled to repair or replacement, at the sole final decision of the Seller.
• Once the defect is reported, the Buyer must not use the Prod-uct until it is examined by the Seller or by their deputy. In case the Seller realises that the Product was used after the notifi-cation of the complaint, the Buyer loses the right to obtain replacement or repair.
• 8.5 Replacement or repair will take place under the following terms:• a) The Seller may repair the defective Products by going - or
sending a deputy - to the place where such Products are located;
• b) Alternatively, the Seller may repair the defective Product at its own factory, or other place chosen by the Seller;
• c) Or alternatively, the Seller may opt for the replacement of the defective Products.
• In case the repair / replacement of the Products is not pos-sible, the Seller will pay the Buyer a refund. Such refund shall be subjected to quantification, yet must not exceed the price paid for the Products. Any compenation for damage is ex-cluded.
• 8.6 In case of repair of the Products at a place chosen by the Seller or in case of replacement of the defective Products, the shipment of the Product will be charged to the Buyer who must send them, at his own expense and risk, to the place indicated by the Seller.
• 8.7 In no case shall the Seller be held liable for any indirect or consequential damages and/or loss of profit that the Buy-er may suffer arising out of or caused by defective or faulty Products such as (but not limited to) cancellation of orders by customers, penalties for late deliveries, forfeitures or indemni-fications of whatsoever nature.
• 8.8 The Seller shall indemnify and hold the Buyer harmless from any liability or prejudices arising out of defective or faulty Products, unless the alleged liability arises from any negligent act or’ omission by the Buyer or any failure by the Buyer to perform its obligations.
• 8.9 The Seller shall not be liable for damage to persons and / or property that may derive from improper use of the Prod-ucts and / or from any use, processing or transformation of the Products that do not comply with their intended use and / or with the instructions provided by the Seller, except the case of gross negligence or wilful misconduct by the Seller.
• The Seller will also not be liable in the event of damage to persons or property or in the case of malfunction or damage or deterioration of the Product deriving from the fact that the Product has been connected to a non-compliant electrical system.
• 8.10 The Buyer shall not be able to raise any claim for personal injury or damage to property other than those which are the subject of the contract, or for loss of profit, unless it is clear from the circumstances of the case that the Seller committed “gross negligence” .
• 8.11 “Gross negligence” shall not include any and all lack of adequate care and expertise, but it is to be intended as an act or omission by the Seller which implies either a failure to consider any serious risk that a conscientious supplier would
normally have foreseen as likely to occur, or a deliberate ne-glect of any risk deriving from such act or omission.
• 8.12 The validity of the Warranty hereto referred is subject to activation on the website www.cuppone.com within 48 hours after the time the Product is installed.
Spare parts
• 9.1 Until and within 10 years as of the delivery of the Prod-uct, the Seller undertakes to assist the Buyer in identifying the spare parts for the maintenance of the Product (if it is so requested by the Buyer). In any case, the Seller is in no way responsible for the failure to identify such sources.
Applicable law and multi-step clause
• 11.1 The Italian law, as the law of the Seller, shall govern the sale under the present Terms and Conditions of sale.
• 11.2 Both the Seller and the Buyer exclude the application of the Vienna Convention.
• 11.3 The parties shall defer the disputes arising out of the present contract to a mediation attempt managed by the Service of Mediation of the Chamber of Arbitration of Milan.
• If the mediation attempt fails, all disputes - included those of not contractual nature - arising out of, related or connected to the present General Conditions of Sale shall be settled by arbitration under the Rules of the Chamber of Arbitration of Milan (the Rules), by a sole arbitrator / three arbitrators, ap-pointed in accordance with the Rules, which are deemed to be incorporated by reference into this clause. The Arbitral Tri-bunal will judge according to the Italian law. The seat of the arbitration will be in Milan (Italy). The language of the arbitra-tion will be Italian.

34
Fig. 45
ECO
ECO
MADE IN ITALY
Mod. ML935/2TS-C5-CP
VOLTAC KW
2019
S/N ML9352TC5CP 19020527
VOLTAC 3 - 400V, 50Hz KW 25,14
What to do in case of any malfunction
• Try and check the table on this page. If none of the proposed
solutions solves the problem, continue reading the following
procedure.
• Check if any error messages are displayed.
Message ................................................................................................................
• Note the oven data (rating plate) and the date and number of
the appliance purchase invoice.
Serial number.....................................................................................................
Model ......................................................................................................................
Invoice date.........................................................................................................
Invoice number ................................................................................................
• Read the chapter on warranty carefully.
Warranty - page 33.
• Call an authorised Service Centre of call the dealer directly
stating the appliance data. While waiting for Technical ser-
vice, disconnect the appliance from the mains.
Something is not working...
Problem Solution
The oven does not turn on
• Make sure the oven is correctly connected to the mains (plug correctly inserted into the socket) and
that the mains are working.
• Make sure the main switch is ON.
The oven turns on but cooking does not start
• Make sure you set the cooking parameters correctly.
Setting the
cooking
parameters:
see page 7
The oven does not cook evenly
• Make sure you set the cooking parameters correctly.
• In case of incomplete baking cycles, change the positions of the pizzas.
The first pizzas are burnt
• In preheating, the percentage (mod. TS) / setting (mod. CD) of the BOTTOM
has been set too high: the refractory surfaces (without pizzas) have become
too hot and burnt the first pizzas.
Products not very brown on the surface
• In the back of the cooking chamber, there are some steam holes that must be opened or closed according to the type of product to cook: for instance, if they are not opened, there may be too much humidity in the chamber that prevents the infrared rays of the top elements from browning the surface of the products.
Opening/clos-ing of the steam holes:
refer to page 10 and 18Excessive humidity
is coming out of the oven door
• The products baked normally release humidity: if the steam holes are not opened correctly, the steam gets out from the door.
ModelVoltage
Absorption
Year of production
Serial number
CUPPONE 1963
Cuppone F.lli S.r.l.
Via Sile, 36
31057 Silea (TV) - ITALY
T +39 0422 361143
F +39 0422 360993
[email protected] - www.cuppone.com

35Ed. 0121 - 70702522 REV02 Michelangelo - Use and maintenance

CUPPONE 1963Cuppone F.lli S.r.l.
Via Sile, 36
31057 Silea (TV) - ITALY
T +39 0422 361143
F +39 0422 360993
[email protected] - www.cuppone.com