7083 099-00
TRANSCRIPT

7083 099-00LKexv
Operating instructions Page 10Refrigerator with explosion-proof interior containerRead the operating instructions before switching on for the first time
GB

10
Description of the appliance
Noise emissions from the applianceThe noise level while the appliance is operating is below 70 dB(A) (relative noise level 1 pW).
Disposal notesThe appliance contains reusable materials and should be disposed of properly - not simply with unsorted household refuse. Appliances which are no longer needed must be disposed of in a professional and appropriate way, in accordance with the current local regulations and laws. When disposing of the appliance, ensure that the refrigerant circuit is not damaged to prevent uncontrolled escape of the refrigerant it contains (data on type plate) and oil. •Disabletheappliance.• Pulloutthemainsplug.•Cutthroughtheconnectioncable.
WARNINGDangerofsuffocationduetopackingmaterialandplasticfilm!
Donotallowchildrentoplaywithpackagingma-terial.
Takethepackagingmaterialtoanofficialcollec-tion point.
Range of appliance useThe interior, which is free from sources of ignition, isusedforstoringflammablesubstancesinclosedcontainersandisthereforeclassifiedasaZone2hazardous area. The appliance is not suitable for storing and cooling medicines, blood plasma, laboratory preparations or similar substances and productscoveredbythe2007/47/ECMedicalDevicesDirective.Any misuse of the appliance may result in damage to or spoilage of stored goods.
Furthermore, the appliance is not suitable for operation in poten-tially explosive atmospheres.
Temperature control
Type plate
Adjustable shelves
Important
The maximum load per shelfis40kg
Adjustable-height feet
A container can be placed under the drain opening in the defrost water collection tray.
WARNINGDangerofsparksproducedbyfrictiondue to dust on the fan blades.
Donotstoredustyobjectsintheap-pliance.
Cleantheventilationslotsonthere-circulated air fan every month using a vacuum cleaner.
Temperature display

11
GBSafety instructions and warnings•Topreventinjuryordamagetotheunit,theap-plianceshouldbeunpackedandsetupbytwopeople.•Intheeventthattheapplianceisdamagedon
delivery, contact the supplier immediately before connecting to the mains.•Toguaranteesafeoperation,ensurethattheap-
pliance is set up and connected as described in these operating instructions.•Disconnecttheappliancefromthemainsifanyfaultoccurs.Pullouttheplug,switchofforremovethe fuse.•Whendisconnectingtheappliance,pullonthe
plug, not on the cable.•Anyrepairsandworkontheapplianceshould
only be carried out by the customer service department,asunauthorisedworkcouldprovehighly dangerous for the user. The same applies to changing the mains power cable.•Donotallownakedflamesor ignitionsources
to enter the appliance. When transporting and cleaning the appliance, ensure that the refrigerant circuitisnotdamaged.Intheeventofdamage,make sure that there are no ignition sourcesnearbyandkeeptheroomwellventilated.•Donotstandontheplinth,drawersordoorsor
use them to support anything else.•Thisappliancecanbeusedbychildrenof8years
old and over, and also by persons with restricted physical,sensoryormentalcapacityorlackofexperienceandknowledge,iftheyaresupervisedor have been instructed on safe use of the appli-anceandunderstandtheresultingrisks.Childrenmust not be allowed to play with the appliance. Cleaning and user maintenancemust not becarried out by children without supervision.•Avoidprolongedskincontactwithcoldsurfacesorchilled/frozenfood.Thiscouldcausepain,numb-nessandfrostbite.Inthecaseofprolongedskincontact,protectivemeasuresshouldbetaken,e.g. gloves should be worn.•Donotuseelectricalappliancesinsidetheap-
pliance. •Ifyouhavealockableappliance,donotkeepthekeyneartheapplianceorwithinreachofchildren.
•Theapplianceisdesignedforuseinenclosedareas.Donotoperatetheapplianceoutdoorsorin areas where it is exposed to splash water or damp conditions.•Theapplianceisnot suitable for storing drugs pursuanttoDIN58345.•Theapplianceisnot suitable for storing blood bottlespursuanttoDIN58371.
Climate ratingThe climate rating indicates the room temperature at which the appliance may be operated in order to achieve full refrig-eration performance.
The climate rating is indicated on the type plate.
The position of the type plate is shown in the section entitled Description of the appliance.
Climate rating Room temperature4 (SN) +10°Cto+32°C4 (N) +16°Cto+32°C4+ (ST) +16°Cto+38°C4+ (SN-ST) +10°Cto+38°C5 (T) +16°Cto+43°C5 (SN-T) +10°Cto+43°C
Do not operate the appliance outside the specified room temperature range.

12
Setting up•Donotplacetheapplianceindirectsunlightornearcookers,
radiators and similar sources of heat.• Theflooronwhichtheappliancestandsshouldbehorizontalandlevel.Compensateforunevenfloorswiththeadjustablefeet.
•Donotcoverventilationopeningsorgrille.
• StandardEN378specifiesthattheroominwhichyou install your appliance must have a volume of 1 m3 per 8g of R600a refrigerant used inthe appliance, so as to avoid the formation of inflammablegas/airmixturesintheroomwheretheapplianceislocatedintheeventofaleakinthe refrigerant circuit. The quantity of refrigerant used in your appliance is indicated on the type plate on the inside of the appliance.
• Alwaysinstalltheappliancedirectlyagainstthewall.
Electrical connectionOnly operate the appliance with alternating current (AC).
The permissible voltage and frequency are indicated on the type plate. The position of the type plate is shown in the section entitled Description of the appliance.
Thesocketmustbeproperlyearthedandprotectedbyafuse.
Thetrippingcurrentofthefusemustbebetween10Aand16A.
Thesocketmustnotbesituatedbehindtheappli-ance and must be easily accessible.Donotconnecttheapplianceusinganexten-sioncableorextensionsocket.
Donotusestand-aloneinverters(conversionofdirectcurrenttoalternatingcurrent/three-phasecurrent)orenergy-savingplugs.Riskofdamagetotheelectroniccontrolsystem!
Switching the appliance on and offYou are recommended to clean the interior of the appliance before switchingitonforthefirsttime(seeCleaning).
Switching the appliance onConnecttheappliancetothemains-theappli-ance is switched on.
Switching the appliance offPullout themainsplugorset the temperaturecontrol to 0.
ImportantWhen the temperature control is turned to "0", the refrig-eration system is switched off, but the appliance is not completely disconnected from the mains.
Before cleaning, always disconnect the appliance from the mains. Remove the plug.
Setting the temperatureSetthetemperatureinsidetheappli-ance using the temperature control.
The nearer the temperature control is to the max. setting, the colder the interior temperature.
Setthecontrolbetween"0"and"max."as required.
Appliance dimensions (mm)
A B C D E LKexv 2600 1250 600 610 650 1180
LKexv 3600 1640 600 610 650 1180
LKexv 5400 1640 750 730 850 1410
Temperature displayThe temperature display is powered by a battery which is avail-able from your specialist dealer.
Changing the battery•Openthebatterycompartment
using a small screwdriver.•Replacethebattery.•Closethebatterycompartment.IfEr or HH appears in the dis-play, the appliance has a fault. Consult the customer servicedepartment indicating the fault number displayed.
Safety lockThelockintheappliancedoorisequippedwithasafetymecha-nism.
Locking the appliance• Insertthekeyasshownbyarrow1.• Turnthekey90°.
Tounlocktheappliance,thesameproce-dure must be repeated in the same order.

13
GB
CleaningClean the appliance at least twice per year.
Before cleaning always switch off the appliance. Pull out the mains plug or switch off or unscrew the fuse.
•Cleantheinside,equipmentandouterwallswithlukewarmwaterandalittledetergent.Donotuseabrasiveoracidcleanersorchemical solvents.
• Ensure that no cleaning water penetrates into the electricalcomponents or ventilation grille.
• Thedustshouldberemovedfromtherefrigerationunitandheatexchanger-metalgridatthebackoftheappliance-onceayear.
•Donotdamageorremovethetypeplateonthe insideof theappliance.Itisveryimportantforservicingpurposes.
WARNINGOnly clean plastic parts with a damp cloth!Risk of electrostatic discharge.
Do not use steam cleaners because of the risk of injury and damage.
Shutting your appliance downIfyourapplianceistobeshutdownforanylengthoftime,switchitoffanddisconnecttheplugorswitchofforunscrewthefuse.
Cleantheapplianceandleavethedooropeninordertopreventunpleasant smells.
The appliance complies with the relevant safety regulations and EC Directives 2004/108/EC, 2006/95/EC and ATEX 94/9/EC (EN/IEC60079-15,IEC60079-0,EN1127-1).
MalfunctionsIfamalfunctionoccursduringoperation,checkwhetheritisdueto an operating error. You may be able to rectify the following faults yourself:
•Appliance does not function:–Istheapplianceswitchedon?–Istheplugcorrectlyfittedinthemainssocket?–Isthefuseintact?
•Loud running noise:–Istheappliancesetupfirmlyonthefloor?–Doestheappliancecausenearbyitemsoffurnitureorobjectstovibrate?Pleasenotethatnoisescausedbytherefrigerantcircuitcannot be avoided.
•The temperature is not low enough:–Isthetemperaturesettingcorrect(see"Settingthetemperature")?–Does the separately installed thermometer show the correctreading?
–Istheventilationsystemworkingproperly?–Istheappliancesetuptooclosetoaheatsource?
If none of the above causesapply and you cannot rectify the fault yourself, contact the nearest customer service department stating the type designation 1, service num-ber 2 and appliance num-ber 3 as indicated on the type plate.
The position of the type plate is shown in the section entitled Description of the appliance.
DefrostingThe refrigerator compartment defrosts automatically.
1 The defrost water drains into a tray situ-ated below the evapo-rator. This tray must be emptied from time to time.
Pull the tray out to-wards you and empty.
2 To avoid having to empty the defrost water collection tray frequently, you can place a container under the drain opening in the tray.
When operating at a very cold thermostat setting, the interior rear wall may ice up.Inthiscase,theappliancemustbedefrostedmanually.
•Pull out the mains plug!• Transferitemstootherappliances.• Leave the door of the appliance openwhile defrosting.After
defrosting mop up the remaining water and clean the appliance.
Do not use any mechanical devices or other artificial aids for defrosting other than those recommended by the manufactur er.

14
7
5
1
2
3
4
8
9
10
11
12. Turn the lock 90° clock-wise.
6
Changing over door hingesDoorhingesshouldonlybechangedbyatrainedexpert.Changingthedoorhingesmustbedonebytwopeople.
2. Open thedoorapprox.45°andlift upwards.
ImportantAs a result of its heavy weight, the door must be held secure by one person.
3. Pushthepinupwardsusingyourfingertip.
4. Pull the door to the front and
remove it downwards.
1. Remove screw from lower hingebracket.
7.Insertthekey.
Turnthekey90°.
8. Remove cover.
9. Remove screw.
10. Turnthelockapprox.3°clockwise.
11. Remove pin.
5. Transfer door handle and plugs to the other side.
6. Insertkey. 12
15
GB
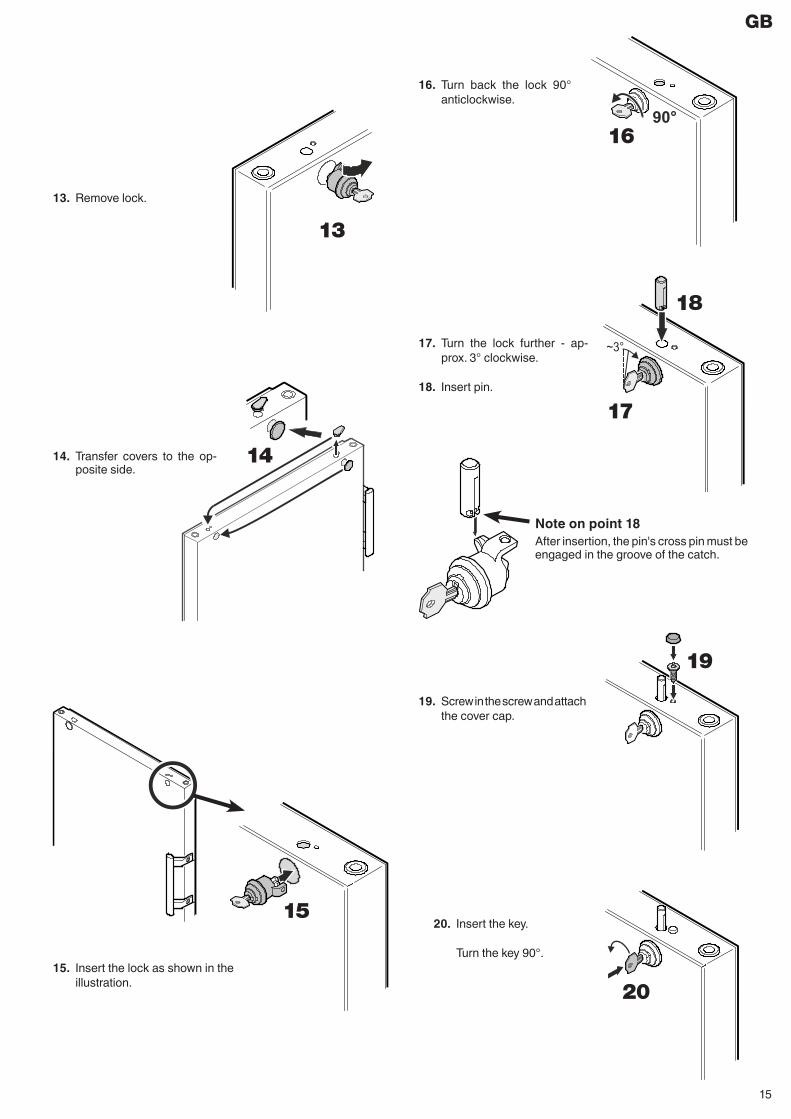
13. Removelock.
14. Transfer covers to the op-posite side.
15. Insertthelockasshownintheillustration.
13
15
14
19
20
16. Turn back the lock 90°anticlockwise.
17. Turn the lock further - ap-prox.3°clockwise.
18. Insertpin.
Note on point 18After insertion, the pin's cross pin must be engaged in the groove of the catch.
19. Screwinthescrewandattachthe cover cap.
20. Insertthekey.
Turnthekey90°.
16
17
18

16
26
27
28
26. Insertthepinintotheleft-handdoormounting. Use your index finger to hold the pin while you are
assembling the door.
27. Locate the door on the upper pin as shown in the illustration and guide it tothelowerhingebracket.
ImportantAs a result of its heavy weight, the door must be held secure by one person.
28. Lift the door upwards and turn the pin until it fits into the bore hole of the hinge bracket.
Slowly lower the door downwards.The lower part of the pin must be fully engaged in the bore hole of the hinge bracket.
29. Screwthescrewintothepin again and tighten.
25. Screwhingebracketintoplace.
24. Remotethecover,turnitthrough180°and re-fit it on the opposite side.
23. Unscrewhingebracket.
21. Unscrew the pin. Use the spanner provided.22. Screwinthepinontheoppositeside.
23
24
25
29
21
22

17
Adjusting the lateral tilt of the doorIfthedoorisatanangle,adjusttheangle.
31. Undoscrewsandslidehingebracketto the right or left.
Tighten screws.
31
30. Removemiddlescrewfromhingebracket. This screw is no longer needed.
30
GB