722/6 1(('('tarheelwoodtreatingcompany.com/img-adv/products/trexseclusions/... · 722/6...
TRANSCRIPT

Apply for local permit as directed by local code.
Check local zoning laws, which may regulate the size and placement of your fence. If you live in a historic district or subdivision, check with the neighborhood association before proceeding with the plan.
Confirm location of underground utilities with local providers before you dig.
3.
2.
1.
BEFORE YOU BEGIN
1 Bottom Rail Insert
2 Bottom Rails
19 Pickets
1 Top Rail
4 Brackets
1 Post
1 Post Cap
ITEMS USED PER 8’ SECTION
PencilSpray PaintWheel BarrelHammerDrillLevel
Shovel or Post Hole Digger
Circular SawMiter BoxTape MeasureString LineStakes
TOOLS NEEDED
1
This fence was designed to create any fencing up to eight feet high by eight feet on center wide per section. Measurements in the following instructions are for six feet high. Measurements will require recalculation for different heights.
PRIVACY FENCING SYSTEMS
®
78”
3
30
2
1
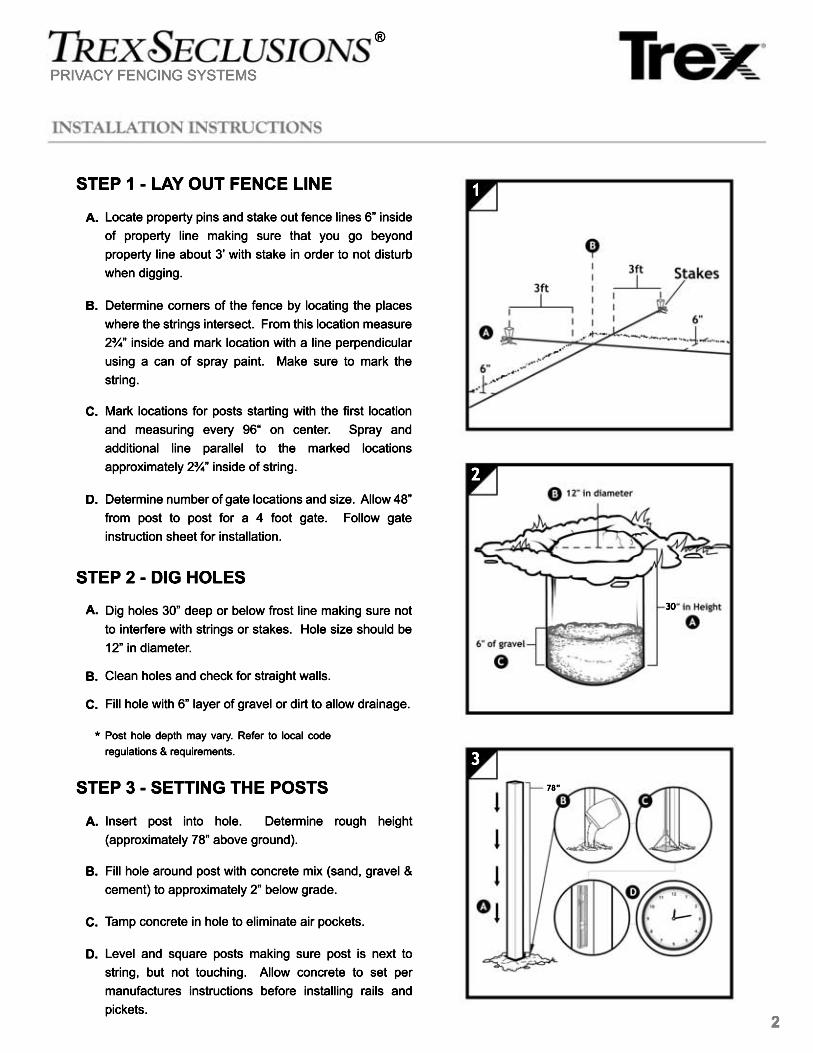
Level and square posts making sure post is next to string, but not touching. Allow concrete to set per manufactures instructions before installing rails and pickets.
Tamp concrete in hole to eliminate air pockets.
Fill hole around post with concrete mix (sand, gravel & cement) to approximately 2” below grade.
Insert post into hole. Determine rough height (approximately 78” above ground).
D.
C.
B.
A.
STEP 3 - SETTING THE POSTS
Post hole depth may vary. Refer to local code regulations & requirements.*
Fill hole with 6” layer of gravel or dirt to allow drainage.
Clean holes and check for straight walls.
Dig holes 30” deep or below frost line making sure not to interfere with strings or stakes. Hole size should be 12” in diameter.
C.
B.
A.
STEP 2 - DIG HOLES
Determine number of gate locations and size. Allow 48” from post to post for a 4 foot gate. Follow gate instruction sheet for installation.
Mark locations for posts starting with the first location and measuring every 96“ on center. Spray and additional line parallel to the marked locations approximately 2¾” inside of string.
Determine corners of the fence by locating the places where the strings intersect. From this location measure 2¾” inside and mark location with a line perpendicular using a can of spray paint. Make sure to mark the string.
Locate property pins and stake out fence lines 6” inside of property line making sure that you go beyond property line about 3’ with stake in order to not disturb when digging.
D.
C.
B.
A.
STEP 1 - LAY OUT FENCE LINE
2
PRIVACY FENCING SYSTEMS
®

Transition
Sloping Method
Step Method
4
Fence can be seamlessly transitioned to a different height. A six foot section may be transitioned continuously to a four foot section by using the metal insert as a measuring stick and mitre cutting the top and bottom rail. Pickets will require cutting and they can be installed, marked and then cut with reciprocating or hand saw.
TRANSITION
This fence follows the grade or slope with it’s bottom rails parallel to the ground. Another term for this type of installation is "racking." Grade may add length required for material span. Use metal insert as measuring stick to set distance between posts and ensure proper spanning. Continue this measuring method for the rest of the slope until the ground levels out. Mitre cut top & bottom rails to fit grade. On very steep grades pickets may require cutting.pickets may require cutting.
SLOPING METHOD
This fence gradually “steps” up the slope so that each section is the same length and the rails are level instead of parallel to the slope. When staking out line posts on a slope for the step method installation, you will need a true horizontal measurement for post placement. Do not measure parallel to the ground slope. To obtain the proper layout, measure from the previous stake while holding the tape horizontally. Use a 2x42x4 to extend from the proper tape placement to the ground to locate the placement of the stake. Properly executed, the tape will form a right angle with the 2x4. Use metal insert as measuring stick between posts on a flat grade.
STEP METHOD (for sloped surfaces)
Determine the next post bracket location using one of the following methods:
Measure 68” up from the bottom of the lower bracket. This point will mark the bottom of the upper bracket. Using the Trex Express installation tool, attach the top bracket using the fasteners provided.
Using the Trex Express installation tool, position the tool flush to the bottom of the post. Attach the bottom bracket using the fasteners provided.
Determine how much space is needed at the bottom of the fence line. Typically you should not exceed 2“ from the ground.
D.
C.
B.
A.
STEP 4 - INSTALL BRACKETS
3
PRIVACY FENCING SYSTEMS
®

Designed to attach to the back of a fence bracket is a bracket adapter in order to create different angles. Engineered in 22.5 degree increments. It takes two fence bracket adaptors to make a 45 degree angle.
FOR SECTIONS NOT IN-LINE OR AT RIGHT ANGLES
6
5
Secure the Bottom Rail / Insert with 1 5/8” screw.
Place the Bottom Rail / Insert onto the lower brackets.
B.
A.
Place fence bracket on the angle bracket.
Attach angle bracket to post at the 2 center holes using a 1 5/8” screw.
Attach bracket with 2.5” screws.3.
2.
1.
STEP 6 - INSERT BOTTOM RAILS
Cut Bottom Rails to same length as the metal insert.
Slide the Bottom Rails over the aluminum Bottom Rail insert.
A.
B.
STEP 5 - INSTALL BOTTOM RAILS
Custom Angles
4
PRIVACY FENCING SYSTEMS
®
9
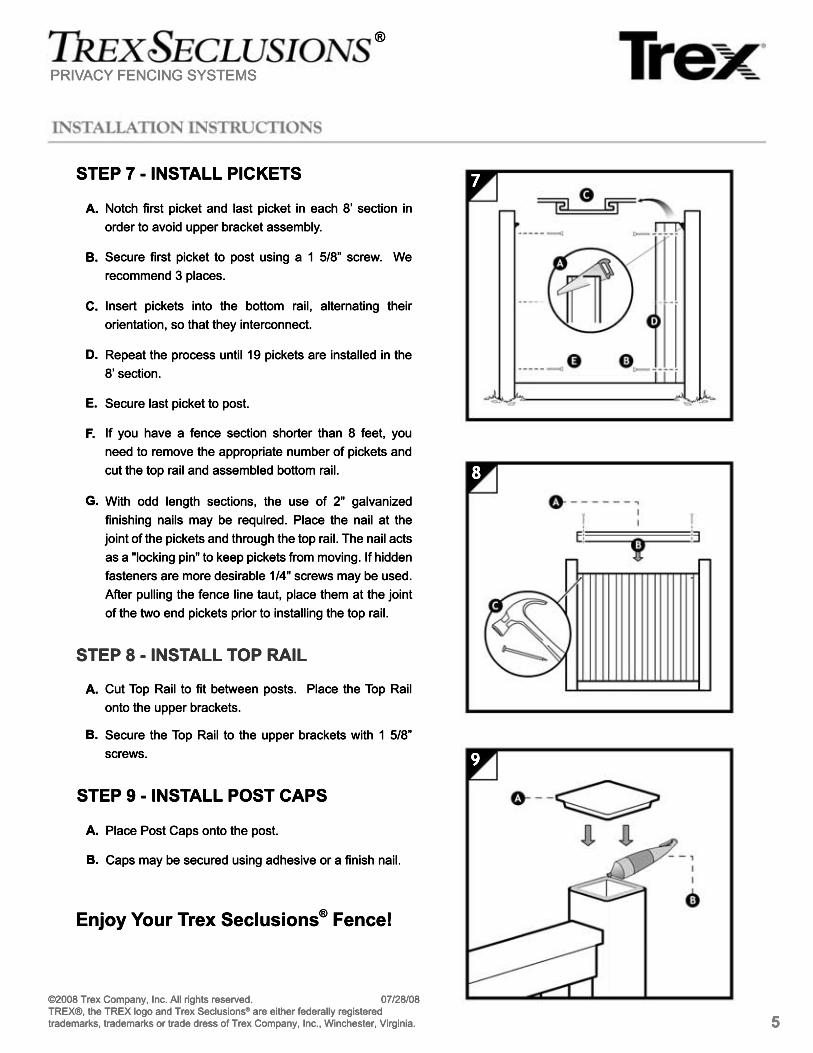
Caps may be secured using adhesive or a finish nail.B.
Place Post Caps onto the post.A.
STEP 9 - INSTALL POST CAPS
8
Secure the Top Rail to the upper brackets with 1 5/8” screws.
B.
Cut Top Rail to fit between posts. Place the Top Rail onto the upper brackets.
A.
STEP 8 - INSTALL TOP RAIL
Enjoy Your Trex Seclusions® Fence!
5©2008 Trex Company, Inc. All rights reserved. 07/28/08 TREX®, the TREX logo and Trex Seclusions® are either federally registeredtrademarks, trademarks or trade dress of Trex Company, Inc., Winchester, Virginia.
7
With odd length sections, the use of 2" galvanized finishing nails may be required. Place the nail at the joint of the pickets and through the top rail. The nail acts as a "locking pin" to keep pickets from moving. If hidden fasteners are more desirable 1/4" screws may be used. After pulling the fence line taut, place them at the joint of the two end pickets prior to installing the top rail.
G.
If you have a fence section shorter than 8 feet, you need to remove the appropriate number of pickets and cut the top rail and assembled bottom rail.
F.
Secure last picket to post.E.
Repeat the process until 19 pickets are installed in the 8’ section.
D.
Insert pickets into the bottom rail, alternating their orientation, so that they interconnect.
C.
Secure first picket to post using a 1 5/8” screw. We recommend 3 places.
B.
Notch first picket and last picket in each 8’ section in order to avoid upper bracket assembly.
A.
STEP 7 - INSTALL PICKETS
PRIVACY FENCING SYSTEMS
®