7.5 ft pre-lit 12-function show tree · function 11: warm white steady-on, multi random twinkle...
TRANSCRIPT

1
Holiday Living & Design® is a registered trademark of LF, LLC. All Rights Reserved.
ITEM #0476153
7.5 FT PRE-LIT
12-FUNCTION SHOW TREE
MODEL #W14L0244
ATTACH YOUR RECEIPT HERE Serial Number _______________ Purchase Date _______________
AB13462
Lowes.com
Questions, problems, missing parts? Before returning to your retailer, call our customer
service department at 1-800-643-0067, 8 a.m. - 6 p.m., EST, Monday - Thursday, 8 a.m. - 5 p.m., EST,
Friday.
Español p. 12

2
PACKAGE CONTENTS
Lowes.com
PART DESCRIPTION QUANTITY
A Top Section 1
B Middle Section 1
C Bottom Section 1
D Base with Speaker and Control Box 1
E Screw 1
F Pink Connector 1
G Remote Control 1
3
SAFETY INSTRUCTIONS Please read and understand this entire manual before attempting to assemble, operate or install the product.
WARNINGTo reduce the risk of electric shock or injury:
Do not plug in the unit before assembly.
Keep electric wires clear of being pinched or cut during assembly or installation. Discard sets with cut or damaged insulation.
For indoor use.
RISK OF FIRE Do not replace attachment plug. Discard product if the attachment plug is damaged.
CAUTION To reduce the risk of overheating, replace burned-out bulbs promptly. Use 3 volt LED bulbs only.
These lightings are rated 10 watts (0.14 amps). Do not overload.
To reduce the risk of electric shock, do not remove cover (or back). No user serviceable parts inside. Refer servicing to qualified personnel.
When using electrical products, basic precautions should always be followed including the following:
READ AND FOLLOW ALL SAFETY INSTRUCTIONS Do not use seasonal products outdoors unless marked suitable for indoor and outdoor use. When products are
used in outdoor applications, connect the product to a Ground Fault Circuit Interrupting (GFCI) outlet. If one is not provided, contact a qualified electrician for proper installation.
This seasonal-use product is not intended for permanent installation or use.
Do not mount or place near gas or electric heaters, fireplaces, candles or other similar sources of heat.
Do not secure the wiring of the product with staples or nails, or place on sharp hooks or nails.
Do not let lamps rest on the supply cord or on any wire.
Unplug the product when leaving the house, when retiring for the night, or if left unattended.
This is an electric product – not a toy! To avoid risk of fire, burns, personal injury and electric shock it should not be played with or placed where small children can reach it.
Do not use this product for other than its intended use.
Do not hang ornaments or other objects from cord, wire or light string.
Do not close doors or windows on the product or extension cords as this may damage the wire insulation.
Do not cover the product with cloth, paper or any material not part of the product when in use.
This product is equipped with push-in type bulbs. Do not twist bulb.
This product has a polarized plug (one blade is wider than the other) as a feature to reduce the risk of electric shock. This plug will fit in a polarized outlet only one way. If the plug does not fit fully in the outlet, reverse the plug. If it still does not fit, contact a qualified electrician. Do not use with an extension cord unless plug can be fully inserted. Do not alter or replace the plug.
For connection to a supply not in the U.S.A., use an attachment plug adaptor of the proper configuration for the power outlet, if needed.
Do not use a cracked, frayed, or damaged cord. Inspect the cord periodically.
Do not abuse cord. Do not carry product by the cord or yank or pull it to disconnect from the outlet.
Disconnect the product from the outlet when not in use.
Lowes.com

4
CAUTION – If the connector of this lighting string does not properly fit into the connector of the driver, do
not modify the product and discard product if the connector is damaged.
Do not use this apparatus near water.
Do not install near any heat sources such as radiators, heat registers, stoves, or other apparatus (including amplifiers) that produce heat.
Clean only with dry cloth.
Do not block any ventilation openings. Install in accordance with the manufacturer’s instructions.
Protect the power cord from being walked on or pinched particularly at plugs, convenience receptacles, and the point where they exit from the apparatus.
Only use attachments/accessories specified by the manufacturer.
The apparatus shall not be exposed to dripping or splashing and no objects filled with liquids, such as vases, shall be placed on the apparatus.
The main plug is used as the disconnect device, which shall remain readily operable.
WARNING: To reduce the risk of fire or electric shock, do not expose this apparatus to rain or moisture.
Heed all warnings.
Read and follow all instructions that are on the product or provided with the product.
SAVE THESE INSTRUCTIONS
PREPARATION Before beginning assembly of product, make sure all parts are present. Compare parts with package contents list. If any part is missing or damaged, do not attempt to assemble, install or operate the product.
Estimated Assembly Time: 20 minutes
This tree assembles with Quick Connect™ technology for a faster, easier, and safer convenience.
No tools required for assembly.
ASSEMBLY INSTRUCTIONS 1. Place the base (D) on a level surface. Unfold the base (D) and insert the screw (E) into the hole.
Lowes.com
1
5
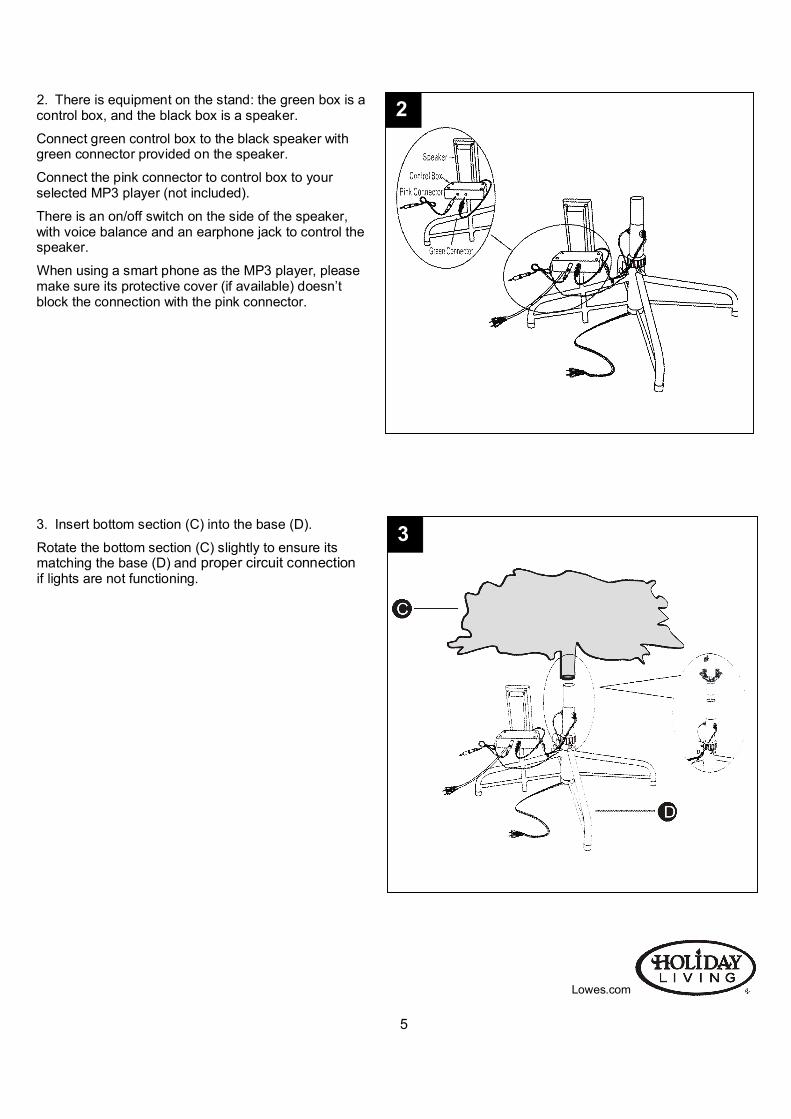
2. There is equipment on the stand: the green box is a control box, and the black box is a speaker.
Connect green control box to the black speaker with green connector provided on the speaker.
Connect the pink connector to control box to your selected MP3 player (not included).
There is an on/off switch on the side of the speaker, with voice balance and an earphone jack to control the speaker.
When using a smart phone as the MP3 player, please make sure its protective cover (if available) doesn’t block the connection with the pink connector.
3. Insert bottom section (C) into the base (D).
Rotate the bottom section (C) slightly to ensure its matching the base (D) and proper circuit connection if lights are not functioning.
Lowes.com
3
2

6
4. Insert middle section (B) into bottom section (C).
Rotate the middle section (B) slightly to ensure its matching the bottom section (C) and proper circuit connection if lights are not functioning.
5. Insert top section (A) into middle section (B).
Rotate the top section (A) slightly to ensure its matching the middle section (B) and proper circuit connection if lights are not functioning. Plug the speaker power cord and the tree power cord into properly grounded outlets. If you play songs on your selected MP3 player (not included) and turn on the remote control, the lights will dance to the music and there are another 11 lighting functions for selection. If you play songs on your smart phone, please follow the instructions on Page 8 to control Show Tree® by your cell phone.
Lowes.com
5
4

7
Insulating tape
REMOTE CONTROL Please note this tree has a remote control.
Please pull out the insulating tape from the remote control, before starting to use it.
1. The first button is for the on/off power switch for the lights and the second button is for choosing different
functions. 2. Connect the MP3 player (not included) to the pink connector and press /Fn button. Select from the following
lighting functions: Function 1: Music Dancing Function 2: Auto Combination Function 3: Warm White Steady-on, Multi Cascade Function 4: Warm White Steady-on, Multi Fade-in & Fade-out Function 5: Warm White Fade-in & Fade-out, Multi Steady-on Function 6: Steady-on Function 7: Warm White Steady-on Function 8: Multi Steady-on Function 9: Warm White Steady-on, Multi Twinkle Function 10: Warm White Twinkle, Multi Steady-on Function 11: Warm White Steady-on, Multi Random Twinkle Function 12: Fade-in & Fade-out
If the remote control does not work, check whether the battery of the remote control is out of power.
To replace the remote control battery: 1. Use Phillips screwdriver to open the back cover of the remote control.
2. Replace with a new alkaline “A27S” (12 volt) battery into the compartment.
WARNING: This is not a toy and is not intended for use by children.
(A) Do not dispose of the battery in fire as the battery may leak and explode.
(B) Do not mix old and new batteries and do not mix alkaline, standard (carbon-zinc),
or rechargeable (nickel-cadmium) batteries.
(C) Exhausted batteries are to be removed from the product.
(D) Use type “A27S” (12 volt) batteries.
Safe for indoor use.
Lowes.com

8
SHOW TREE® INSTRUCTIONS 1. Download application named Show Tree® on your smart phone.
2. Go to phone setting for WiFi setting. Look for “Show Tree” and select it to get connected. 3. Start “Show Tree” App.
4. The opening screen of application Show Tree® is shown on Fig. 1.
5. Main Menu is shown on Fig. 2. Fig. 1 Fig. 2
MAIN MENU FUNCTIONS
1 2 3 4
1. POWER SWITCH (for Tree Lights)
This is to turn on/off the tree lights. 2. TREE LIGHT FUNCTIONS SELECTION
12 functions can be selected sequentially by each pressing. The color of this icon changes after each pressing. 3. MUSIC PLAYER 4. TIMER FUNCTION
Lowes.com

9
MUSIC PLAYER FUNCTION
1. Music Selection
2. Player Functions (from left to right): Random Play Back Play Forward Stop
3. Current Music Playing Position
Lowes.com
10
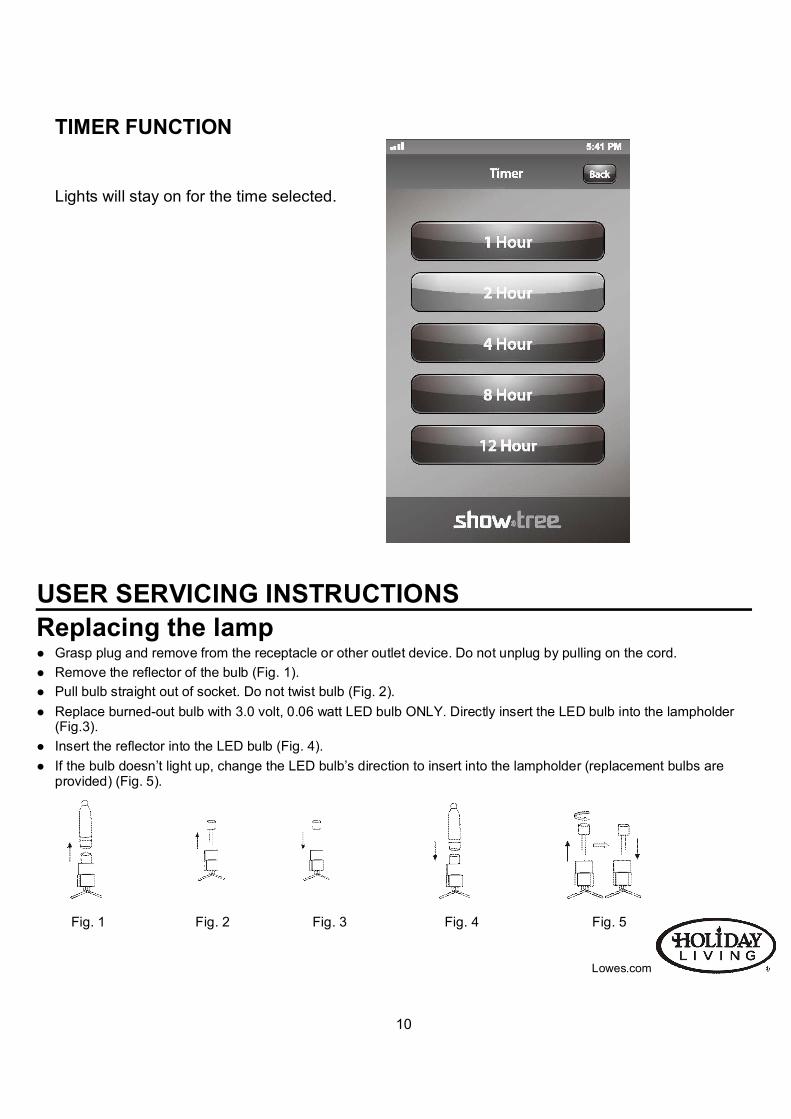
TIMER FUNCTION
Lights will stay on for the time selected.
USER SERVICING INSTRUCTIONS
Replacing the lamp Grasp plug and remove from the receptacle or other outlet device. Do not unplug by pulling on the cord.
Remove the reflector of the bulb (Fig. 1).
Pull bulb straight out of socket. Do not twist bulb (Fig. 2).
Replace burned-out bulb with 3.0 volt, 0.06 watt LED bulb ONLY. Directly insert the LED bulb into the lampholder (Fig.3).
Insert the reflector into the LED bulb (Fig. 4).
If the bulb doesn’t light up, change the LED bulb’s direction to insert into the lampholder (replacement bulbs are provided) (Fig. 5).
Fig. 1 Fig. 2 Fig. 3 Fig. 4 Fig. 5
Lowes.com

11
CARE AND MAINTENANCE Before using or reusing, inspect product carefully. Discard any products that have cut, damaged or frayed wire
insulation or cords, cracks in the lampholders or enclosures, loose connections, or exposed copper wire.
When storing the product, carefully remove the product from wherever it is placed to avoid any undue strain or stress on the product conductors, connections, and wires.
When not in use, store neatly in a cool, dry location protected from sunlight.
TROUBLESHOOTING
For replacement parts, call our customer service department at 1-800-643-0067, 8 a.m. - 6 p.m., EST, Monday - Thursday, 8 a.m. - 5 p.m., EST, Friday.
H
Printed in China
Holiday Living & Design® is a registered trademark
of LF, LLC. All Rights Reserved.
Lowes.com
PROBLEM POSSIBLE CAUSE CORRECTIVE ACTION
The product does not light. 1. One or more of the bulbs are loose or out of the sockets.
1. Unplug the product. Starting with the first unlit bulb, gently push (don’t twist) each bulb firmly into the socket. At the same time, look and feel for a broken bulb in the socket or an empty socket where a bulb has fallen out.
A bulb is broken. 1. The bulb was impacted or shifted during transport.
1. Mark the bulb with a piece of tape and unplug the product before removing the bulb socket and any fragments. Replace the broken bulb. Should a light flicker while doing this, you have probably found the faulty bulb. Replace with a new bulb.
A bulb is burned out. 1. Incorrect bulb or voltage is too high.
1. The remaining bulbs will stay lit; however, it is best to replace any burned out bulbs as soon as you find them.
REPLACEMENT PARTS LIST
PART DESCRIPTION PART #
H BULB W14L0244-B

12
Holiday Living & Design® es una marca registrada de LF, LLC. Todos los derechos reservados.
ARTÍCULO #0476153
ÁRBOL PREILUMINADO
DE 12 FUNCIONESDE 2,3M
MODELO #W14L0244
ADJUNTE SU RECIBO AQUÍ Número de serie _______________ Fecha de compra _______________
Lowes.com
¿Preguntas, problemas, piezas faltantes? Antes de volver a la tienda, llame a nuestro
Departamento de Servicio al Cliente al 1-800-643-0067, de lunes a jueves de 8 a.m. a 6 p.m., y los viernes de 8 a.m. a 5 p.m., hora estándar del Este.

13
CONTENIDO DEL PAQUETE
Lowes.com
PIEZA DESCRIPCIÓN CANTIDAD
A Sección superior 1
B Sección media 1
C Sección inferior 1
D Base con altavoz y caja de control 1
E Tornillo 1
F Conector rosado 1
G Control remoto 1

14
INSTRUCCIONES DE SEGURIDAD Lea y comprenda completamente este manual antes de intentar ensamblar, usar o instalar el producto.
ADVERTENCIAPara reducir el riesgo de descargas eléctricas o lesiones:
No enchufe la unidad antes de ensamblarla.
Evite aplastar o cortar los cables durante el ensamblaje o la instalación. Deseche los juegos que presenten cortes o daños en el aislamiento del cable.
Para uso en interiores.
RIESGO DE INCENDIO No reemplace el enchufe. Deseche el producto si el enchufe está dañado.
PRECAUCIÓN Para reducir el riesgo de sobrecalentamiento, reemplace las bombillas quemadas de inmediato. Use solo bombillas
LED de 3 voltios.
Estos juegos de luces están clasificados para 10 vatios (0,14 amperios). No lo sobrecargue.
Para disminuir el riesgo de descarga eléctrica, no retire la cubierta (o la parte posterior). En el interior, no hay piezas que sean de utilidad para el usuario. Solicite los trabajos de reparación a personal calificado.
Al usar productos eléctricos, siempre se deben respetar las siguientes medidas de precaución básicas:
LEA Y SIGA TODAS LAS INSTRUCCIONES DE SEGURIDAD No use productos de uso por temporada en exteriores a menos que se indique que son para uso en interiores y
exteriores. Al usar los productos en aplicaciones en exteriores, conéctelos a un tomacorriente con interruptor de circuito de falla de puesta a tierra (GFCI, por sus siglas en inglés). Si no se le proporcionó uno de estos, póngase en contacto con un electricista calificado para que realice la instalación adecuada.
Este producto de uso por temporada no está diseñado para su uso o instalación permanente.
No lo ensamble o coloque cerca de calentadores eléctricos o a gas, chimeneas, velas ni otra fuente de calor similar.
No sujete el cableado del producto con grapas o clavos, ni lo coloque sobre ganchos o clavos afilados.
No permita que las lámparas se apoyen sobre el cable de alimentación o cualquier otro cable.
Desenchufe el producto cuando salga de la casa, cuando se vaya a dormir o cuando esté sin supervisión.
Éste es un producto eléctrico, no un juguete. Para evitar el riesgo de incendios, quemaduras, lesiones personales y descargas eléctricas, no se debe jugar con este producto ni dejarlo al alcance de niños pequeños.
No utilice este producto para otro uso que no sea el especificado.
No cuelgue adornos u otros objetos del cable o el juego de luces.
No cierre puertas o ventanas sobre el producto o las extensiones eléctricas ya que puede dañar el aislamiento del
cable.
No cubra el producto con paños, papeles ni cualquier material que no sea parte del producto durante su uso.
Este producto cuenta con bombillas a presión. No las tuerza.
Este producto tiene un enchufe polarizado (una clavija es más ancha que la otra) como característica de seguridad para reducir el riesgo de descargas eléctricas. Este enchufe se inserta en un tomacorriente polarizado de una sola manera. Si el enchufe no encaja por completo en el tomacorriente, inviértalo. Si aún no encaja, póngase en contacto con un electricista calificado. No utilice con una extensión eléctrica a menos que el enchufe pueda insertarse completamente. No modifique ni reemplace el enchufe.
Para conectar en un suministro distinto al de los EE. UU., use un adaptador de enchufe de la configuración correspondiente al tomacorriente, si es necesario.
No lo utilice si el cable está rasgado, deshilachado o dañado. Inspecciónelo periódicamente.
No maltrate el cable. No transporte el producto tomándolo del cable ni tironee o jale para desconectar del tomacorriente.
Desconecte el producto del tomacorriente cuando no esté en uso. Lowes.com

15
PRECAUCIÓN: Si el conector de esta cadena de luces no encaja correctamente en el conector del
conductor, no modifique el producto y deséchelo si el conector está dañado.
No utilice este equipo cerca de agua.
No instale cerca de ninguna fuente de calor como radiadores, salidas de calefacción, estufas u otros equipos (incluidos amplificadores) que produzcan calor.
Limpie sólo con un paño seco.
No bloquee ninguna abertura de ventilación. Instale de acuerdo con las instrucciones del fabricante.
Proteja el cable eléctrico situándolo en un lugar fuera del paso o donde pueda ser aplastado, especialmente en los enchufes, los receptáculos y el punto en que sale del equipo.
Use sólo fijaciones/accesorios especificados por el fabricante.
El equipo no debe exponerse a derrames ni a salpicaduras ni deben colocarse sobre él objetos llenos de líquidos, tales como floreros.
El enchufe principal se utiliza como dispositivo de desconexión y debe permanecer en condición operativa.
ADVERTENCIA: Para reducir el riesgo de incendios o descargas eléctricas, no exponga este equipo a
la lluvia o a la humedad.
Preste atención a todas las advertencias.
Lea y siga todas las instrucciones que están en el producto o que se proporcionan junto a este.
GUARDE ESTAS INSTRUCCIONES
PREPARACIÓN Antes de comenzar a ensamblar el producto, asegúrese de tener todas las piezas. Compare las piezas con la lista del contenido del paquete. No intente ensamblar, instalar ni usar el producto si falta alguna pieza o si estas están dañadas.
Tiempo estimado de ensamblaje: 20 minutos
Este árbol cuenta con la tecnología Quick Connect™, la que permite realizar un ensamblaje más rápido, fácil y seguro.
No se necesitan herramientas para el ensamblaje.
INSTRUCCIONES DE ENSAMBLAJE 1. Coloque la base (D) sobre una superficie nivelada. Despliegue la base (D) e inserte el tornillo (E) en el orificio.
Lowes.com
1
16
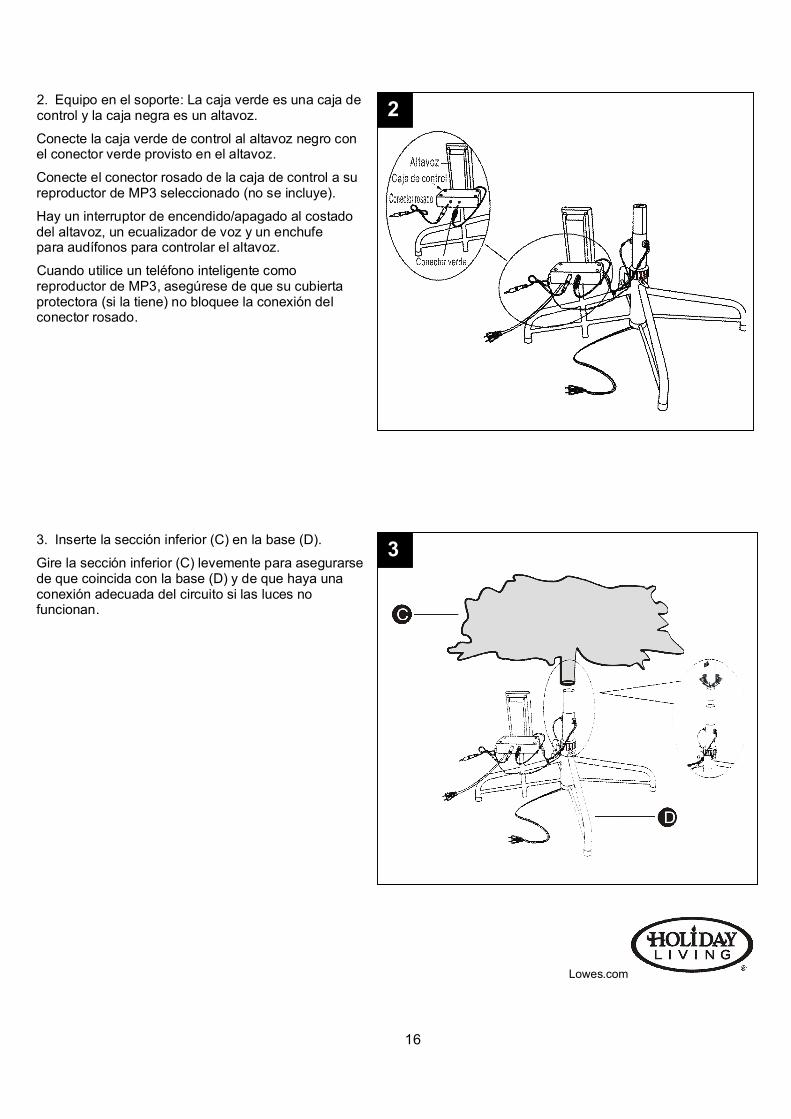
2. Equipo en el soporte: La caja verde es una caja de control y la caja negra es un altavoz.
Conecte la caja verde de control al altavoz negro con el conector verde provisto en el altavoz.
Conecte el conector rosado de la caja de control a su reproductor de MP3 seleccionado (no se incluye).
Hay un interruptor de encendido/apagado al costado del altavoz, un ecualizador de voz y un enchufe para audífonos para controlar el altavoz.
Cuando utilice un teléfono inteligente como reproductor de MP3, asegúrese de que su cubierta protectora (si la tiene) no bloquee la conexión del conector rosado.
3. Inserte la sección inferior (C) en la base (D).
Gire la sección inferior (C) levemente para asegurarse de que coincida con la base (D) y de que haya una conexión adecuada del circuito si las luces no funcionan.
Lowes.com
3
2

17
4. Inserte la sección media (B) en la sección inferior (C).
Gire la sección media (B) levemente para asegurarse de que coincida con la inferior (C) y de que haya una conexión adecuada del circuito si las luces no funcionan.
5. Inserte la sección superior (A) en la sección media
(B).
Gire la sección superior (A) levemente para asegurarse de que coincida con la media (B) y de que haya una conexión adecuada del circuito si las luces no funcionan. Enchufe el cable de alimentación del altavoz y el cable de alimentación del árbol en tomacorrientes con la puesta a tierra adecuada. Si reproduce canciones de su reproductor de MP3 seleccionado (no se incluye) y enciende el control remoto, las luces bailarán al ritmo de la música y hay otras 11 funciones de las luces para elegir. Si reproduce canciones en su teléfono inteligente, siga las instrucciones en la Página 8 para controlar el Show Tree® con su celular.
Lowes.com
5
4
18
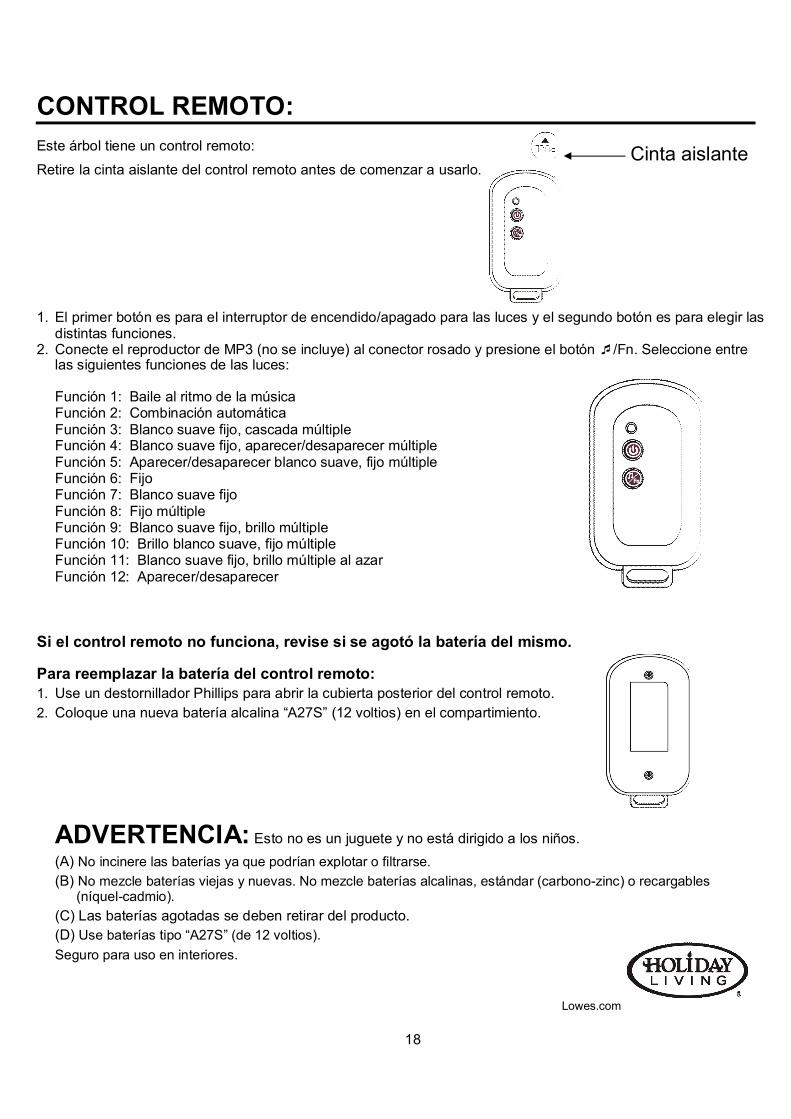
Cinta aislante
CONTROL REMOTO: Este árbol tiene un control remoto:
Retire la cinta aislante del control remoto antes de comenzar a usarlo. 1. El primer botón es para el interruptor de encendido/apagado para las luces y el segundo botón es para elegir las
distintas funciones. 2. Conecte el reproductor de MP3 (no se incluye) al conector rosado y presione el botón /Fn. Seleccione entre
las siguientes funciones de las luces: Función 1: Baile al ritmo de la música Función 2: Combinación automática Función 3: Blanco suave fijo, cascada múltiple Función 4: Blanco suave fijo, aparecer/desaparecer múltiple Función 5: Aparecer/desaparecer blanco suave, fijo múltiple Función 6: Fijo Función 7: Blanco suave fijo Función 8: Fijo múltiple Función 9: Blanco suave fijo, brillo múltiple Función 10: Brillo blanco suave, fijo múltiple Función 11: Blanco suave fijo, brillo múltiple al azar Función 12: Aparecer/desaparecer
Si el control remoto no funciona, revise si se agotó la batería del mismo.
Para reemplazar la batería del control remoto: 1. Use un destornillador Phillips para abrir la cubierta posterior del control remoto.
2. Coloque una nueva batería alcalina “A27S” (12 voltios) en el compartimiento.
ADVERTENCIA: Esto no es un juguete y no está dirigido a los niños.
(A) No incinere las baterías ya que podrían explotar o filtrarse.
(B) No mezcle baterías viejas y nuevas. No mezcle baterías alcalinas, estándar (carbono-zinc) o recargables (níquel-cadmio).
(C) Las baterías agotadas se deben retirar del producto.
(D) Use baterías tipo “A27S” (de 12 voltios).
Seguro para uso en interiores.
Lowes.com

19
INSTRUCCIONES DE SHOW TREE® 1. Descargue la aplicación Show Tree® en su teléfono inteligente.
2. Vaya a configuración del teléfono para configurar el WiFi. Busque “Show Tree” y selecciónela para
conectarse.
3. Inicie la aplicación “Show Tree”.
4. La pantalla inicial de la aplicación Show Tree® se muestra en la Fig. 1.
5. El menú principal se muestra en la Fig. 2. Fig. 1 Fig. 2
FUNCIONES DEL MENÚ PRINCIPAL
1 2 3 4 1. INTERRUPTOR DE ENCENDIDO (para las luces para árbol)
Sirve para encender o apagar las luces para árbol. 2. SELECCIÓN DE LAS FUNCIONES DE LAS LUCES PARA ÁRBOL
Se pueden seleccionar 12 funciones de manera secuencial con cada vez que se presiona. El color de este icono cambia después de cada vez que se presiona. 3. REPRODUCCIÓN DE MÚSICA 4. FUNCIÓN DE TEMPORIZADOR
Lowes.com
20
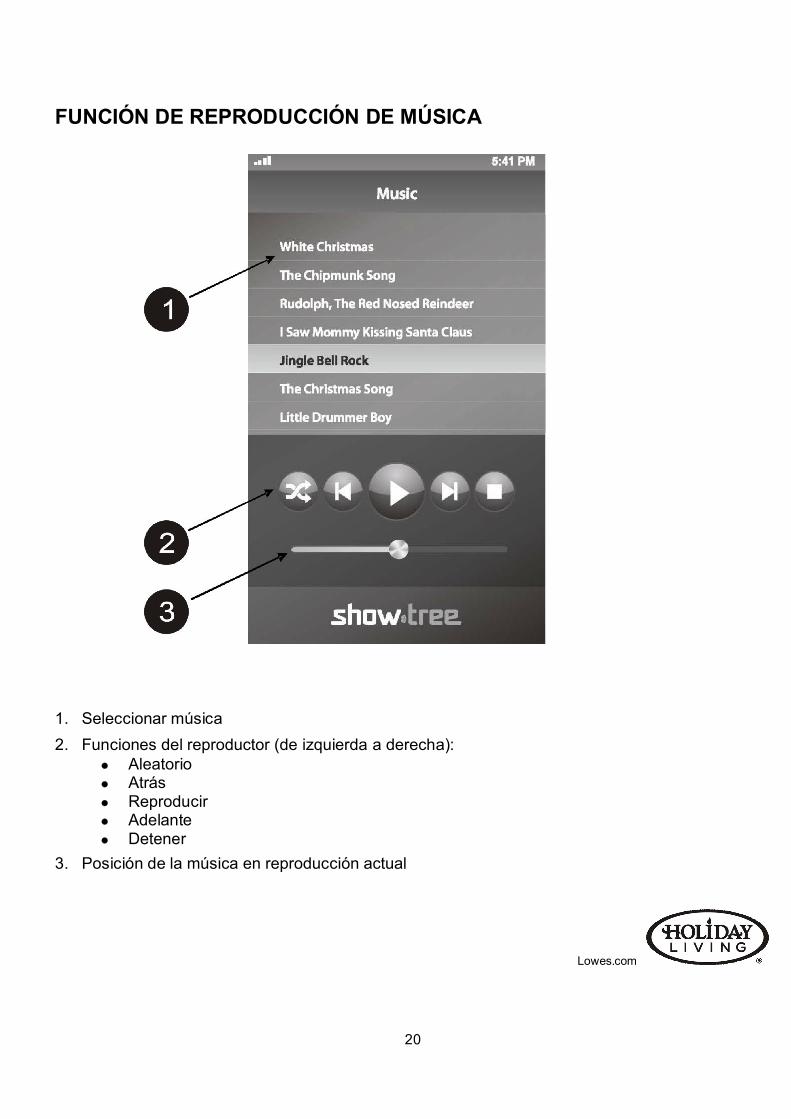
FUNCIÓN DE REPRODUCCIÓN DE MÚSICA
1. Seleccionar música
2. Funciones del reproductor (de izquierda a derecha): Aleatorio Atrás Reproducir Adelante Detener
3. Posición de la música en reproducción actual
Lowes.com

21
FUNCIÓN DE TEMPORIZADOR
Las luces permanecerán encendidas por el tiempo seleccionado.
INSTRUCCIONES DE MANTENIMIENTO PARA EL USUARIO
Reemplazo de la bombilla Tome el enchufe y retírelo del receptáculo o de cualquier otro tomacorriente. No jale del cable para desenchufarlo.
Retire el reflector de la bombilla (Fig. 1).
Jale la bombilla del portalámpara en posición recta. No las tuerza (Fig. 2).
Reemplace la bombilla quemada SOLO por una bombilla LED de 3,0 voltios y 0,06 vatios. Inserte la bombilla LED directamente en el portalámpara (Fig. 3).
Inserte el reflector en la bombilla LED (Fig. 4).
Si la bombilla no se enciende, cambie la dirección de la bombilla LED al insertarla en el portalámpara (se incluyen bombillas de repuesto) (Fig. 5).
Fig. 1 Fig. 2 Fig. 3 Fig. 4 Fig. 5
Lowes.com

22
CUIDADO Y MANTENIMIENTO Antes de usar el producto por primera vez o al volver a usarlo, inspecciónelo cuidadosamente. Deseche cualquier
producto que tenga aislante de cable o cables cortados, dañados o quemados; portalámparas o alojamientos agrietados; conexiones flojas o cable de cobre expuesto.
Cuando almacene el producto, extráigalo cuidadosamente de cualquier objeto sobre el que esté colocado para evitar estirar o tensionar los conductores, las conexiones y los cables del producto.
Cuando no lo utilice, almacénelo en un lugar fresco y seco protegido de la luz solar.
SOLUCIÓN DE PROBLEMAS
Lowes.com
PROBLEMA CAUSA POSIBLE ACCIÓN CORRECTIVA
El producto no enciende. 1. Una o más bombillas están sueltas o fuera de los portalámpara.
1. Desenchufe el producto. Presione suavemente y de forma firme desde la primera bombilla (sin girar) en el portalámpara, repita el procedimiento para las otras bombillas. Al mismo tiempo, busque bombillas rotas en el portalámpara o portalámparas vacíos, de donde se haya caído una bombilla.
Una bombilla está rota. 1. La bombilla fue impactada o se inclinó durante el transporte.
1. Márquelo con un trozo de cinta adhesiva y desenchufe el producto antes de retirar el portalámpara y los fragmentos. Reemplace la bombilla rota. Si alguna luz parpadea durante esta tarea, probablemente haya encontrado la bombilla defectuosa. Remplace la bombilla por una nueva.
Una bombilla está quemada. 1. Bombilla incorrecta o el voltaje es muy alto.
1. Las demás bombillas permanecerán encendidas; sin embargo, es mejor reemplazar las bombillas apenas se quemen.

23
Para obtener piezas de repuesto, llame a nuestro Departamento de Servicio al Cliente al 1-800-643-0067, de lunes a jueves de 8 a.m. a 6 p.m., y los viernes de 8 a.m. a 5 p.m., hora estándar del Este.
H
Impreso en China
Holiday Living & Design® es una marca registrada
de LF, LLC. Todos los derechos reservados.
Lowes.com
LISTA DE PIEZAS DE REPUESTO
PIEZA DESCRIPCIÓN PIEZA #
H BOMBILLA W14L0244-B

Warning: Any changes or modifications to this device not explicitly approved by manufacturer could void
your authority to operate this equipment.”
FCC STATEMENT
This device complies with Part 15 of the FCC rules. Operation is subject to the following two conditions: 1) This
device may not cause harmful interference, and 2) this device must accept any interference received, including
interference that may cause undesired operation.
NOTE: This equipment has been tested and found to comply with the limits for a Class B digital device,
pursuant to Part 15 of the FCC Rules. These limits are designed to provide reasonable protection against harmful
interference in a residential installation. This equipment generates, uses and can radiate radio frequency energy
and, if not installed and used in accordance with the instructions, may cause harmful interference to radio
communications.
However, there is no guarantee that interference will not occur in a particular installation. If this equipment does
cause harmful interference to radio or television reception, which can be determined by turning the equipment off
and on, the user is encouraged to try to correct the interference by one or more of the following measures:
Reorient or relocate the receiving antenna.
Increase the separation between the equipment and receiver.
Connect the equipment into an outlet on a circuit different from that to which the receiver is connected.
Consult the dealer or an experienced radio/TV technician for help.”
CAUTION
RISK OF ELECTRIC SHOCK
DO NOT OPEN
CAUTION: TO REDUCE THE RISK OF ELECTRIC SHOCK, DO NOT REMOVE COVER (OR BACK).
NO USER-SERVICEABLE PARTS INSIDE. REFER SERVICING TO QUALIFIED PERSONNEL.
The lighting flash with arrowhead symbol inside an equilateral triangle is intended to alert User that
the presence of uninsulated “hazardous voltage” within the product’s enclosure, which may be of
sufficient magnitude to induce a risk of electric shock to persons.
The exclamation mark inside an equilateral triangle is intended to alert user that the presence of important operating and maintenance (servicing) instructions in the literature accompanying the
product.
FCC WARNING

Advertencia: Todos los cambios o modificaciones a este dispositivo que no estén explícitamente aprobados por el
fabricante podrían anular su autorización para utilizar este equipo.
Este dispositivo cumple con la parte 15 de las reglas de la FCC. El funcionamiento está sujeto a las siguientes dos
condiciones: 1) Este dispositivo no debe causar interferencia perjudicial, y 2) debe aceptar cualquier interferencia
recibida, incluida la interferencia que pudiese causar un funcionamiento no deseado.
NOTA: Este equipo ha sido probado y se ha verificado que cumple los límites para un dispositivo digital clase
B, conforme a la sección 15 de las reglas de la FCC. Estos límites se han diseñado para proporcionar una protección
razonable contra la interferencia perjudicial en una instalación residencial. Este equipo genera, utiliza y puede
irradiar energía de radiofrecuencia y, si no se instala y usa de acuerdo con las instrucciones, puede causar
interferencia perjudicial a las comunicaciones de radio.
Sin embargo, no se garantiza que no se producirán interferencias en una instalación en especial. Si este equipo
genera una interferencia perjudicial para la recepción de radio o televisión, lo que se puede determinar apagando y
encendiendo el equipo, se recomienda al usuario que intente corregir la interferencia con una o más de las siguientes
medidas:
Reoriente o reubique la antena de recepción.
Aumente la separación entre el equipo y el receptor.
Conecte el equipo a un tomacorriente de un circuito distinto al que usa el receptor.
Solicite ayuda al concesionario o a un técnico con experiencia en radio/TV.”
PRECAUCIÓN
RIESGO DE DESCARGA ELÉCTRICA
NO LO ABRA
PRECAUCIÓN: PARA DISMINUIR EL RIESGO DE DESCARGA ELÉCTRICA, NO RETIRE LA CUBIERTA
(O LA PARTE POSTERIOR). EN EL INTERIOR, NO HAY PIEZAS QUE SEAN DE UTILIDAD PARA EL USUARIO.
SOLICITE LOS TRABAJOS DE REPARACIÓN A PERSONAL CALIFICADO.
El símbolo del rayo con la cabeza de flecha dentro de un triángulo equilátero tiene como objetivo alertar al usuario
sobre la presencia de “voltaje peligroso” sin aislar dentro del alojamiento del producto, el cual puede ser de magnitud
suficiente para constituir un riesgo de descarga eléctrica para las personas.
El símbolo de exclamación dentro de un triángulo equilátero tiene como objetivo alertar al usuario sobre la presencia
de instrucciones importantes de funcionamiento y mantenimiento (reparación) en la literatura adjunta al producto.
ADVERTENCIA DE LA FCC
DECLARACIÓN DE FCC