7530b chrysler 1-wire current gen2 - tuff stuff performance

1
7530B REPLACEMENT 1-WIRE VOLTAGE REGULATOR FOR 8509 & 9509 CHRYSLER ALTERNATORS CAREFULLY READ THESE INSTRUCTIONS BEFORE ATTEMPTING ANY MODIFICATIONS! Proper modification of this alternator is the responsibility of the installer. Improper modification or installation will void your warranty and may result in vehicle damage or personal injury. If you have any installation questions, call our Tech Service personnel at 216-961-1800 from 7am to 4pm EDT. DISASSEMBLY Disconnect both battery cables and remove alternator from vehicle. Scribe or mark a line across the case sides to note the case index position. Remove the brush holders. Remove the three bolts securing the cases. The stator must remain in the rear case and the rotor will remain in the front case. ASSEMBLY Mount the voltage regulator as shown in the photo. Connect the BLACK ground wire to the case as shown. Connect the RED wire to the positive battery terminal as shown. Route the YELLOW wire through the alternator case and attach it to any one of the rectifier/stator terminals. Make sure that there is no excess wire inside the case. It needs to exit the case as shown below. Attach the GREEN wire to Brush holder #1, the one closest to the battery terminal as shown below. Reassemble the cases. Verify that the cases are indexed properly and that the rotor spins freely. Reinstall the case bolts - do not over tighten the bolts. Reinstall the brush holders. Reinstall alternator, reattach the wiring and tension the belt, then check that the alternator is charging. Using a VOM meter, verify that the alternator is charging 13.8 volts at 1,000 RPM. ©2016 Tuff Stuff Performance Accessories, 9004 Madison Ave., Cleveland, Ohio 44102 216-961-1800 www.tuffstuffperformance.com BLACK ground wire to case MOUNT regulator to case Inside Case YELLOW wire to any stator/rectifier terminal RED wire to battery terminal GREEN wire to brush holder #1 YELLOW wire to any stator/ rectifier terminal Current 2nd Gen

Upload: others

Post on 16-Oct-2021

1 views

Category:

Documents


0 download

TRANSCRIPT

7530B REPLACEMENT 1-WIRE VOLTAGE REGULATORFOR 8509 & 9509 CHRYSLER ALTERNATORS

CAREFULLY READ THESE INSTRUCTIONS BEFORE ATTEMPTING ANY MODIFICATIONS!Proper modification of this alternator is the responsibility of the installer. Improper modification or installation will void your warranty and may result in vehicle damage or personal injury. If you have any installation questions, call our Tech Service personnel at 216-961-1800 from 7am to 4pm EDT.

DISASSEMBLYDisconnect both battery cables and remove alternator from vehicle.Scribe or mark a line across the case sides to note the case index position.Remove the brush holders.Remove the three bolts securing the cases. The stator must remain in the rear case and the rotor will remain in the front case.

••

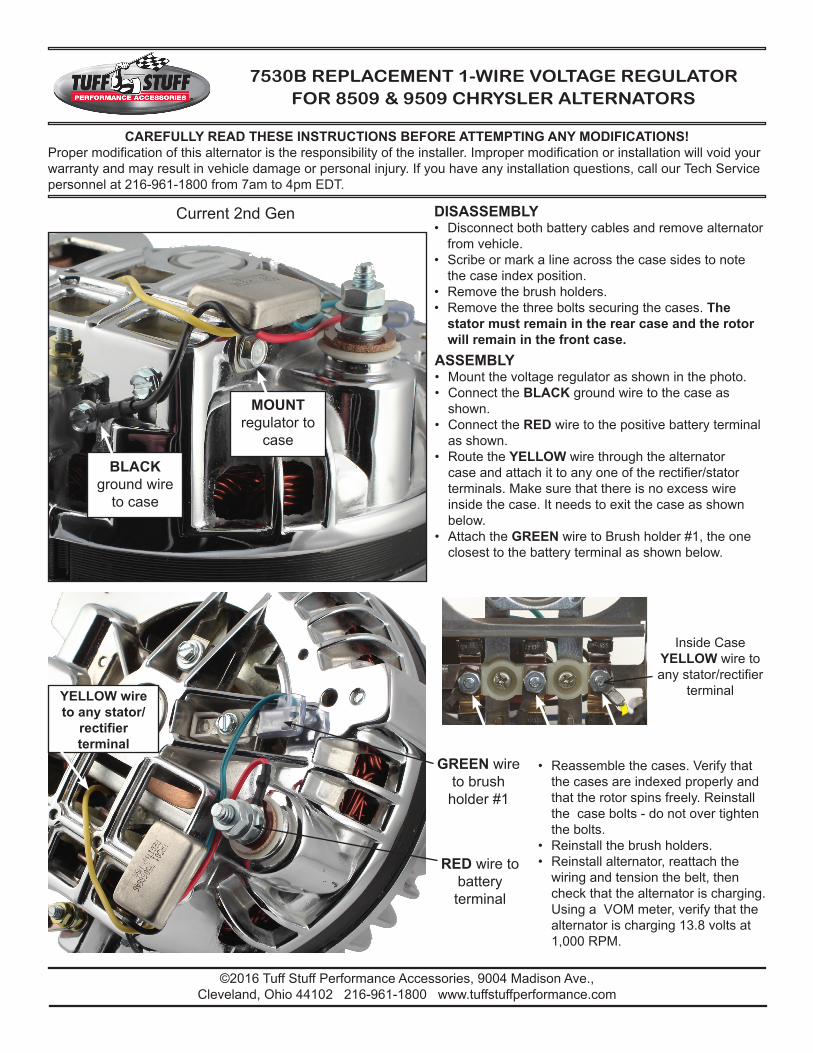
ASSEMBLYMount the voltage regulator as shown in the photo.Connect the BLACK ground wire to the case as shown.Connect the RED wire to the positive battery terminal as shown.Route the YELLOW wire through the alternator case and attach it to any one of the rectifier/stator terminals. Make sure that there is no excess wire inside the case. It needs to exit the case as shown below.Attach the GREEN wire to Brush holder #1, the one closest to the battery terminal as shown below.

••

Reassemble the cases. Verify that the cases are indexed properly and that the rotor spins freely. Reinstall the case bolts - do not over tighten the bolts.Reinstall the brush holders. Reinstall alternator, reattach the wiring and tension the belt, then check that the alternator is charging. Using a VOM meter, verify that the alternator is charging 13.8 volts at 1,000 RPM.

••

©2016 Tuff Stuff Performance Accessories, 9004 Madison Ave.,Cleveland, Ohio 44102 216-961-1800 www.tuffstuffperformance.com

BLACK ground wire

to case

MOUNT regulator to

case

Inside CaseYELLOW wire to any stator/rectifier

terminal

RED wire to batteryterminal

GREEN wire to brush

holder #1

YELLOW wire to any stator/

rectifierterminal

Current 2nd Gen