8 lesson 8: grading a pond - quareative co....
TRANSCRIPT

Lesson 8: Grading a Pond
Grading a Pond © 2005 Bentley Systems, Incorporated Do Not Duplicate
8-1
8
WELCOME! This lesson is about grading a pond. Now that you have designed the roadways, PowerCivil has a multitude of tools that allow you to automatically grade ponds. In this lesson you will learn how to grade and contour the pond and how to analyze different aspects of the pond.
LESSON OBJECTIVES In this lesson, the topics covered include:
• Topic 1 PowerCivil Pond Tool – create the pond contours • Topic 2 PowerCivil DTM Analysis – analyze the pond volume and themes Be sure to have a look at the context sensitive help for PowerCivil. Either while using the tutorial or in general practice with the software, you will find the help system not only includes program documentation but it also is equipped with links to online video clips (internet connection is required). Access the help from the menu bar under Help>Civil Help.
INTRODUCTION This Lesson will show you how to grade the pond with the PowerCivil Pond tools. With the Pond tools you automatically design ponds based on various design constraints, you can design to achieve selected volumes, water surface elevations, and much more. You will also learn how to use the Volume tool as well as numerous Analysis tools to assist with interrogation of the pond design.
To view this portion of the lesson, press the play button.
POND TOOL With the GSF model created, the Pond Tool options provide you with many ways to design and automatically grade the ponds.
From the Windows Explorer, open the folder for Lesson 8 and then open the file “LAYOUT.DGN”.
The “LAYOUT.DGN” file contains the base planimetrics required for pond design initiation.
Once in the file, you will want to follow these steps:

Pond Tool
1. Open the Civil Tools (Civil>Civil Tools). 2. Invoke the Site Modeler Tool (Civil>Modeler).
3. Select the GSF File from the Lesson 8 folder “LAYOUT.GSF”. At the Project
wizard window, click “Browse” and select the project file "LAYOUT.GSF" from the lesson 8 folder.
4. Select the Pond Design tool (Tools >Pond Design) from the main toolbox:
The Pond Design Tool opens as shown below:
Grading a Pond © 2005 Bentley Systems, Incorporated Do Not Duplicate
8-2

Pond Tool
5. Select “Next” and define the Pond Name:
6. Click "New" from the "Define Pond Name" group box to create a new Object. 7. Add “Pond 1” : Select the Object type "Pond" and Click OK to accept the new
Object name "Pond 1".
8. Return to the Pond Tool to set the Design Constraints, and click “Next” to
access the next step in the Pond Tool.
Set the dialog as shown above.
Design Bottom-Up To Volume 1,000 cubic yards Use Freeboard 1 foot
Grading a Pond © 2005 Bentley Systems, Incorporated Do Not Duplicate
8-3

Pond Tool
9. Click “Next”
Define the Pond Elements:
Set the dialog as shown above.
Offset Height: -2.0 ft Drape On Model: Minimum Elevation
10. Click “Select Elements” and select the pond bottom. 11. Click “Next”
Define pond slopes and berm:
Grading a Pond © 2005 Bentley Systems, Incorporated Do Not Duplicate
8-4
DTM Analysis
Set the dialog as shown above.
Pond Side Slope: Slope: 33% Berm Details: Create Berm Width: 5 feet, Fill Only Relative to: Object: Ground 1 Slope: 5% Side Slopes: Cut: 33% Fill: 33%
12. Click “Finish”
DTM ANALYSIS
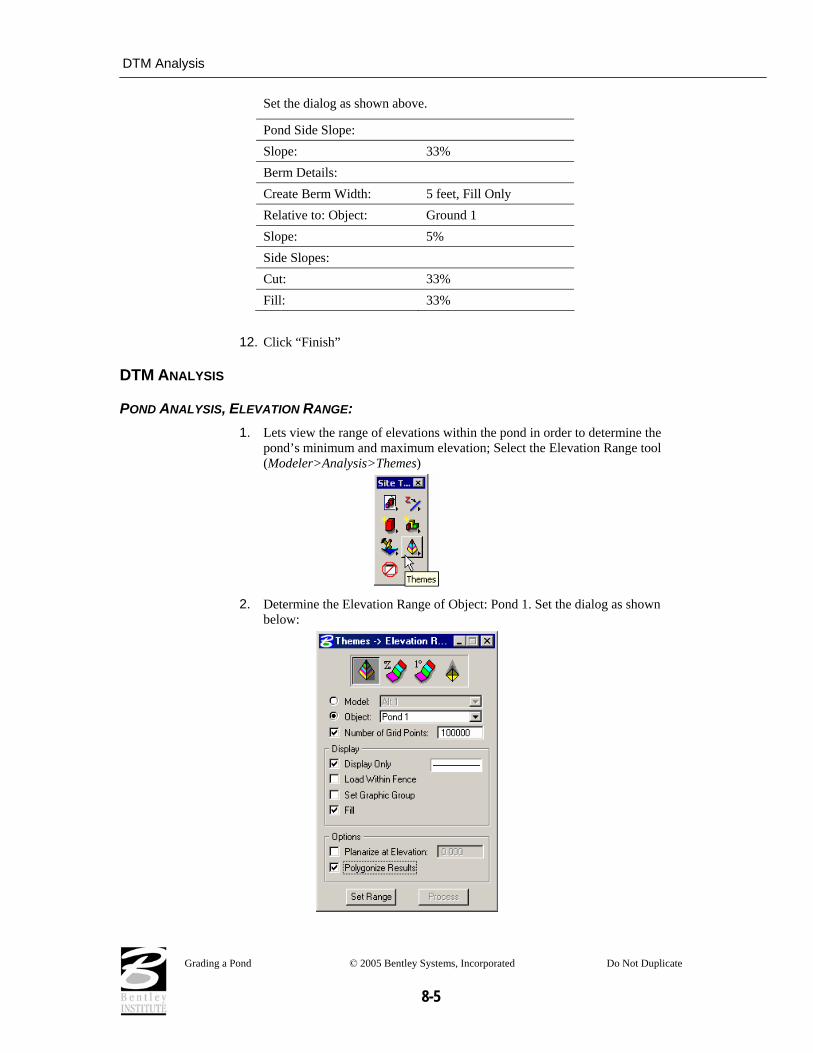
POND ANALYSIS, ELEVATION RANGE: 1. Lets view the range of elevations within the pond in order to determine the
pond’s minimum and maximum elevation; Select the Elevation Range tool (Modeler>Analysis>Themes)
2. Determine the Elevation Range of Object: Pond 1. Set the dialog as shown
below:
Grading a Pond © 2005 Bentley Systems, Incorporated Do Not Duplicate
8-5

DTM Analysis
Number of Grid Points 100,000 Display Only ON Fill ON Polygonize Results ON
3. Click “Set Range”:
The Elevation Range dialog opens as shown below:
4. Click the “Minimum Elevation” & “Maximum Elevation” buttons to extrapolate
the elevations automatically. 5. Select File > Open and open the file from the “Standards” directory:
Grading a Pond © 2005 Bentley Systems, Incorporated Do Not Duplicate
8-6

DTM Analysis
6. Click “Process” to process the Elevation Range:
7. Save the Model.
POND ANALYSIS, HEIGHT TOOL: 1. Let’s interrogate the contours to determine direction of drainage flow and slope
characteristics of the proposed design; Select the “Height Model/Object” tool (Modeler>Analysis > Height).
2. Set the tool to the Model “Alt1”. Set the dialog as shown below:
Grading a Pond © 2005 Bentley Systems, Incorporated Do Not Duplicate
8-7

DTM Analysis
Mode Elevation Display Only Toggle ON Show Contour Toggle ON Show Flow Arrow Toggle ON
3. Click the “Start” button to initiate display of the contours and flow arrow, then scroll the cursor over the proposed design to view the display:
POND ANALYSIS, VOLUME: 1. Lets compute the volume within the pond; Select the “Volume Analysis” tool
(Modeler>Analysis>Volumes)
Grading a Pond © 2005 Bentley Systems, Incorporated Do Not Duplicate
8-8

DTM Analysis
2. Compute the volume between the existing ground object and the pond object.
Set the dialog as shown below:
Calculation Method Prismoidal From Object Ground 1 To Object Pond 1
3. Click the “Process” button to initiate the calculations, which are displayed in the
Volume Calculations groupbox and may also be output to an ASCII text file.
POND ANALYSIS, PROFILES: 1. Lets cut a profile view through the pond; Select the “Create Profiles” tool.
(Modeler>Analysis>Create Profiles)
Grading a Pond © 2005 Bentley Systems, Incorporated Do Not Duplicate
8-9

DTM Analysis
2. Add the Model “Alt1” and Object “Ground1” to the Selection list using the
“Add List Item” button:
3. Select the “Profile” Tab and click the “Place Element” button:
Grading a Pond © 2005 Bentley Systems, Incorporated Do Not Duplicate
8-10

DTM Analysis
4. Data point twice through the pond in the region of the profile cut:
5. The cut profile should now appear in the Profile Tab:
Grading a Pond © 2005 Bentley Systems, Incorporated Do Not Duplicate
8-11

DTM Analysis
6. Select the “Preferences” Tab and set the Grid and Labels preferences as
required, then return to the “Profile” Tab so that the completed profile may be placed in the design plane using the “Place Profile” button:
SUMMARY The main points to remember are:
• PowerCivil allows you to interactively design ponds using the Pond Tool. You can edit and revise the grading with a variety of tools.
• Surface interrogation is achieved using the DTM Analysis tools. • You can create profiles, thematic maps, site line analysis and analyze drainage
features with this flexible set of tools.
For more video instruction please visit the following web page… http://65.217.17.142/downloads/sitemodeler/GEOPAK%20Site%20Modeler%20Training%20Videos.htm
Grading a Pond © 2005 Bentley Systems, Incorporated Do Not Duplicate
8-12