81905905590 b clikcontrol user manual · pdf file · 2015-02-28no part of this...
TRANSCRIPT

PESA QuStream Corporation 103 Quality Circle, Suite 210
Huntsville, AL 35806 http://www.pesa.com
(256) 726-9200 Document No. 81-9059-0559-0 Revision B
Operations Manual
Clikcontrol Controller
Service and Ordering Assistance PESA QuStream Corporation 103 Quality Circle, Suite 210 Huntsville, AL 35806 USA http://www.pesa.com Main Office (256) 726-9200 (Voice) (256) 726-9271 (Fax) Service Department (256) 726-9222 (Voice) (24 hours/day, 7 days/week) (256) 726-9268 (Fax) [email protected] © 2001, 2002, 2003, 2007 PESA Switching Systems, Inc. All Rights Reserved. 2400E, 3300, 3500, 3500PRO, 3500PRO-LE, 3500 Excelerate!, 3500Plus, 6600E, 6600EX, ADA 3001, ADA 3002, ADA-3100, Alliance, Bobcat, Clikcontrol, Cheetah, Cougar, Cougar Combo, Cougar HD/SD, CP5, CP5H, CP5-40X, CP-HOR, CPU Link, DA 3000, DA-3100, DCS4000, Clikcontrol, Jaguar, LNS-8, Load3500, Lynx, Lynx Plus, Lynx SD, Lynx WB, Lynx 200, MVDA 2416, Ocelot, PCI-5000, PESA, PVC-3000, PVC-5000, RC5000, RC5500, RCP-241, RCP-2416, RCP-242, RCP-248, RCP-48X, RCP-64X, RCP-128X, RCP-CSD, RCP-DLCXY, RCP-GPIO, RCP-LCXY, RCP-MB, RCP-MB2, RCP-MLDT, RCP-MLDT2, RCP-MLTP2, RCP-MP32, RCP-SLCXY, RCP-STAT, RCP-STAT1, RCP-STAT2, RCP-TP, RCP-XY, RM4000, RM5000, RM5488A, Route 66, RS422 Port Switcher, SDVDA 3001, System 5, System V, Tiger, Truck Link, UCI2000, VDA 3001, VDA 3002, VDA 3003, VDA 3005, VDA 3006, VDA-3100, VDARS422, Virtual Panel, VP, VPNet, Win3300, Win3500, and Win3500Plus are trademarks of PESA Switching Systems, Inc. in the United States and/or other countries. Microsoft, Windows, Windows NT, Windows XP are either registered trademarks or trademarks of Microsoft Corporation in the United States and/or other countries. Sun, Sun Microsystems, the Sun Logo, and Java are trademarks or registered trademarks of Sun Microsystems, Inc. in the United States and other countries. UNIX is a registered trademark and The Open Group is a trademark of The Open Group in the US and other countries. No part of this publication may be reproduced, stored in any retrieval system, or transmitted in any form or by any means, including but not limited to electronic, mechanical, photocopying, recording or otherwise, without the prior written permission of PESA Switching Systems, Inc. This includes text, illustrations, tables, and charts. All information, illustrations, and specifications contained in this publication are based on the latest product information available at the time of publication approval. The right is reserved to make changes at any time without notice.

Clikcontrol
iii
Table of Contents CHAPTER 1.0 SOFTWARE SETUP AND INSTALLATION INSTRUCTIONS ............ ................................. 1
Clikcontrol Installation ....................................................................................................................................... 1 Clikcontrol CD Contents..................................................................................................................................... 1
Clikcontrol Server Install.EXE ........................................................................................................................ 1 Clikcontrol Configuration Install.EXE............................................................................................................. 1 JAVA Plug-ins ................................................................................................................................................ 1
Installing Microsoft IIS (5.0) or higher Internet Information Server ..................................................................... 2 Installing IIS....................................................................................................................................................... 3 Clikcontrol Server Installation ............................................................................................................................ 7 Clikcontrol Remote Configuration Installation .................................................................................................. 11
CHAPTER 2 – PRODUCT INTRODUCTION AND GENERAL INFORM ATION....................................... 13
General ............................................................................................................................................................ 13 Product Description .......................................................................................................................................... 13 Specifications................................................................................................................................................... 13
General ........................................................................................................................................................ 13 Minimum Hardware Requirements..............................................................................................................................13
CHAPTER 3 – RECEIPT OF CLIKCONTROL AND HARDWARE REQ UIREMENTS............................. 14
Shipping Damage Inspection ............................................................................................................................ 14 Unpacking........................................................................................................................................................ 14 Installation Location ......................................................................................................................................... 14 Interface Connections ....................................................................................................................................... 14
Network Connector (LAN)............................................................................................................................. 14 CPU Link Connector..................................................................................................................................... 15
CHAPTER 4 – OPERATIONS.......................................................................................................................... 16
Clikcontrol Software Installation....................................................................................................................... 16 Clikcontrol Remote Configuration Installation .............................................................................................. 16 Clikcontrol Server Setup ............................................................................................................................... 16
Main Setup Window...................................................................................................................................................17 Registry Parameters................................................................................................................................................17 Service State ..........................................................................................................................................................18
Log File Window .......................................................................................................................................................18 Log Files................................................................................................................................................................19
Clikcontrol Remote Configuration Setup ....................................................................................................... 19 Clikcontrol Java Applet Setup ....................................................................................................................... 19
Clikcontrol Remote Configuration Operation (Ocelot, Bobcat, LNS-8).............................................................. 20 Menu Bar ..................................................................................................................................................... 21
File Menu...................................................................................................................................................................21 Help Menu.................................................................................................................................................................21
Shortcut Buttons ........................................................................................................................................... 21 Controller Tab.............................................................................................................................................. 22
Controller Type ..........................................................................................................................................................22 Users Licensed...........................................................................................................................................................22 Levels ........................................................................................................................................................................23
Sources Tab.................................................................................................................................................. 23 Destinations Tab........................................................................................................................................... 24 Users Tab ..................................................................................................................................................... 25 Transfer Configuration to the Clikcontrol Controller from the Clikcontrol Remote Configuration.................. 26
Clikcontrol Java Applet Operation .................................................................................................................... 27 Web Browser Version Verification/Upgrade.................................................................................................. 27 Virtual Machine Version Verification/Upgrade.............................................................................................. 27 Connecting to the Clikcontrol Controller....................................................................................................... 27

Clikcontrol Controller
iv
Logging In to the Clikcontrol Controller ....................................................................................................... 28 Java Applet Main Window Operation............................................................................................................ 29
The Status Block ........................................................................................................................................................31 The Destination Block ................................................................................................................................................32 The Source Block.......................................................................................................................................................32 The Take Block..........................................................................................................................................................33 The Salvo Block.........................................................................................................................................................34 The Alert Block..........................................................................................................................................................34 The Exit Block ...........................................................................................................................................................35
Java Applet Salvo Window Operation............................................................................................................ 35 The Name Block ........................................................................................................................................................36 The Salvo Destination Block.......................................................................................................................................37 The Source Block.......................................................................................................................................................37 The Privileges Block ..................................................................................................................................................38 The Edit Controls Block .............................................................................................................................................39
Step-by-Step Instructions for Taking a Source to a Destination Using the Clikcontrol Java Applet User Interface ....................................................................................................................................................... 40
Step 1: Select the Desired Source................................................................................................................................40 Step 2: Select the Desired Destination(s). ....................................................................................................................41 Step 3: Press the "Take" Button...................................................................................................................................42 Step 4: The Destinations Are Updated by the Clikcontrol.............................................................................................43
Step-by-Step Instructions for Taking a Salvo Using the Clikcontrol Java Applet Interface .............................. 43 Step 1: Select the Desired Salvo..................................................................................................................................44 Step 2: Press the "Take" Button in the Salvo Block......................................................................................................45
Clikcontrol Remote Reset Operation ................................................................................................................. 46

Clikcontrol
v
Figures Figure 1- Main Screen Personal Web Manager........................................................................................................ 2 Figure 2 - Control Panel Selection for Add/Remove Program.................................................................................. 3 Figure 3 - Selection Screen Add or Remove Programs ............................................................................................ 3 Figure 4. -Windows Components Wizard Screen .................................................................................................... 4 Figure 5 -Internet Information Services (IIS) Screen ............................................................................................... 4 Figure 6 -Personal Web Manager Screen—Click on Advanced Options................................................................... 5 Figure 7 -Personal Web Manager Advanced Option Screen..................................................................................... 5 Figure 8 - Inetpub Folders Screen ........................................................................................................................... 6 Figure 9 -Test Page-Microsoft Internet Explorer ..................................................................................................... 6 Figure 10 -Clikcontrol Server Welcome Screen....................................................................................................... 7 Figure 11 -Clikcontrol System License Agreement Screen ...................................................................................... 8 Figure 12 -Clikcontrol Program File Destination Folder Screen............................................................................... 8 Figure 13 -Clikcontrol HTML Destination Folder ................................................................................................... 9 Figure 14 -Clikcontrol ASP Remote Reset Installation Screen............................................................................... 10 Figure 15 -Clikcontrol Remote Configuration Installation Confirm Screen ............................................................ 10 Figure 16 -Clikcontrol Configuration Utility Opening Screen................................................................................ 11 Figure 17 -Clikcontrol Configuration Utility License Agreement Screen ............................................................... 12 Figure 18 -Clikcontrol Configuration Folder Destination Screen ........................................................................... 12 Figure 19 -RS-232 CPU Link Connector (COM 1)................................................................................................ 15 Figure 20 -RS-232 CPU Link (Null Modem) Cable............................................................................................... 15 Figure 21 -Clikcontrol PC Setup Utility Window .................................................................................................. 17 Figure 22 -Clikcontrol Log File Window .............................................................................................................. 19 Figure 23 -Clikcontrol Remote Configuration Main Window ................................................................................ 20 Figure 24 -Clikcontrol Remote Configuration Controller Tab................................................................................ 22 Figure 25 -Clikcontrol Remote Configuration Sources Tab ................................................................................... 23 Figure 26 -Clikcontrol Remote Configuration Destinations Tab............................................................................. 24 Figure 27 -Clikcontrol Remote Configuration Users Tab....................................................................................... 25 Figure 28 -Clikcontrol Remote Configuration Send Log On Window .................................................................... 26 Figure 30 -Clikcontrol Java Applet Opening Window ........................................................................................... 28 Figure 31 -Clikcontrol Java Applet User Login ..................................................................................................... 29 Figure 32 -Clikcontrol Java Applet Main Window ................................................................................................ 30 Figure 33 -Clikcontrol Main Window – Status Block ............................................................................................ 31 Figure 34-Clikcontrol Main Window – Destination Block ..................................................................................... 32 Figure 35-Clikcontrol Main Window – Source Block ............................................................................................ 33 Figure 36-Clikcontrol Main Window – Take Block............................................................................................... 33 Figure 37-Clikcontrol Main Window – Salvo Block.............................................................................................. 34 Figure 38-Clikcontrol Main Window – Alert Block............................................................................................... 35 Figure 39-Clikcontrol Main Window – Exit Block ................................................................................................ 35 Figure 40-Clikcontrol Java Applet Salvo Window................................................................................................. 36 Figure 41-Clikcontrol Salvo Window – Name Block............................................................................................. 36 Figure 42-Clikcontrol Salvo Window – Salvo Destination Block........................................................................... 37 Figure 43-Clikcontrol Salvo Window – Source Block ........................................................................................... 38 Figure 44-Clikcontrol Salvo Window – Privileges Block....................................................................................... 38 Figure 45-Clikcontrol Salvo Window – Edit Controls Block ................................................................................. 39 Figure 46-Clikcontrol Take Switch – Select Source............................................................................................... 40 Figure 47-Clikcontrol Take Switch – Select Destination(s).................................................................................... 41 Figure 48-Clikcontrol Take Switch – Press Take................................................................................................... 42 Figure 49-Clikcontrol Take Switch – Destinations Updated................................................................................... 43 Figure 50-Clikcontrol Take Salvo – Select Salvo .................................................................................................. 44 Figure 51-Clikcontrol Take Salvo – Press Salvo Take........................................................................................... 45 Figure 52-Clikcontrol Remote Reset – Windows Login......................................................................................... 46 Figure 53-Clikcontrol Remote Reset – Services ASP Page .................................................................................... 47


Clikcontrol
1
Chapter 1.0 Software Setup and Installation Instruc tions
Clikcontrol Installation PESA Clikcontrol is a program that makes PESA routing switches available for control via a TCP/IP network. The program runs on a standard PC running either Microsoft Windows2000 Professional or Microsoft Windows XP professional. The Clikcontrol utilizes a web-based interface to allow remote clients to access the controller. Most commonly, the Clikcontrol is installed in conjunction with Microsoft’s IIS HTTP server. (IIS comes standard with Windows 2000 Professional and Windows XP Professional) However, it is not a requirement that IIS be installed as Clikcontrol can run with other HTTP servers such as Apache. Before installing the Clikcontrol server, the HTTP server should already be installed and operational. This assists in setting up the appropriate directory structure from which the web pages are served.
Clikcontrol CD Contents
The Clikcontrol Installation CD contains all the program modules for installing and configuring the Clikcontrol server program. Among the files on the CD are:
Clikcontrol Server Install.EXE The installation program that installs the actual server software onto the PC. It installs the program as a Windows Service and defaults its operation to interfacing to the 3500Pro controller. (As a service, the program runs whether a user is logged into the PC or not. When a user logs in, they will not see an icon for the program. Its running status can be verified via the Windows service manager or the Clikcontrol PC Setup Utility.) The program installs the web pages that are served out to client machines and in turn are served out the JAVA applet that is run on the client machine. It is the JAVA applet that allows the client to take switches and read status from the router. In addition to the server and the applet, the software installs the PC setup utility and the optional remote service reset utility.
Clikcontrol Configuration Install.EXE
The installation program that installs the remote configuration program. This program can set the configuration of the server when it is interfacing to a non-3500Pro controller. This program can be installed and run from the same machine on which the server resides or may be installed on a machine that can access the Clikcontrol server via the network.
JAVA Plug-ins
In order to run the JAVA applet, a client machine’s web browser must have the JAVA2 V1.4.2 plug-in installed. If the client machine has access to the Sun Microsystems web site, this installation occurs automatically. If not, then the plug-in is available on this CD for machines running Windows, Linux, or Solaris. To install the plug in, find the file that matches the client machine’s operating system and execute it.

Clikcontrol Controller
2
Installing Microsoft IIS (5.0) or higher Internet I nformation Server Installing IIS version 5.0 which comes with Windows 2000 professional or XP Professional is straightforward and relatively easy. The following setup process must be completed prior to installing Clikcontrol. By default, IIS must be manually installed; however the PC you are using may already have it installed. It is advisable to check to see if it has already been installed before proceeding. To test if you have MS IIS Information server up and running
Figure 1 - Main Screen Personal Web Manager
Navigate your mouse to click on Start>Control Panel>Administrative tools. Then double click on Personal web manager if you see the window above you has the program installed and running. To install Microsoft IIS, select Add Remove Programs>Add Windows components, select IIS from the check box – OK – you will probably need the Windows CD unless the files have been installed on your computer. See screen shots below. Note if you are installing IIS, you should be logged on as Administrator

Clikcontrol
3
Installing IIS Installing IIS – Go to control panel select Add\Remove Programs and you will see the box
Figure 2 - Control Panel Selection for Add/Remove Program
From the control panel the following box will open. Click on the left menu button Add/Remove Programs.
Figure 3 - Selection Screen Add or Remove Programs
Clikcontrol Controller
4
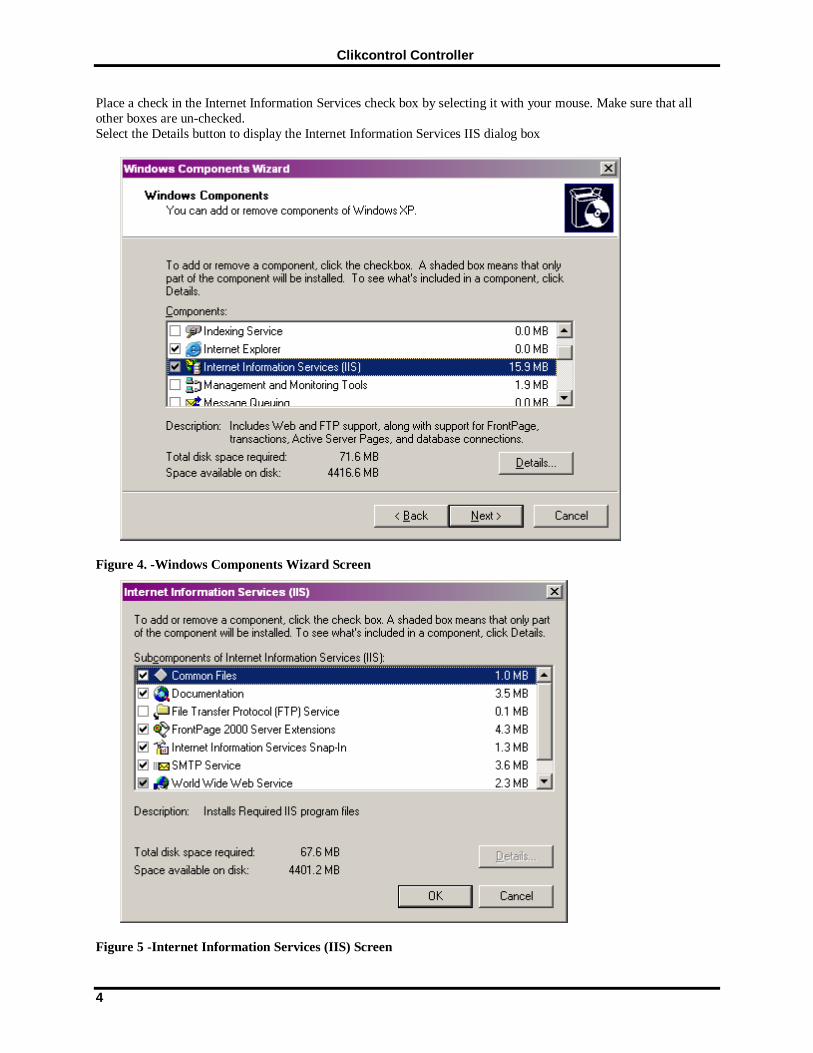
Place a check in the Internet Information Services check box by selecting it with your mouse. Make sure that all other boxes are un-checked. Select the Details button to display the Internet Information Services IIS dialog box
Figure 4. -Windows Components Wizard Screen
Figure 5 -Internet Information Services (IIS) Screen
Clikcontrol
5
This Dialog box above allows you select or eliminate certain features. Click the box beside the following services to support Clikcontrol. • Common Files • Documentation • World Wide Web Service
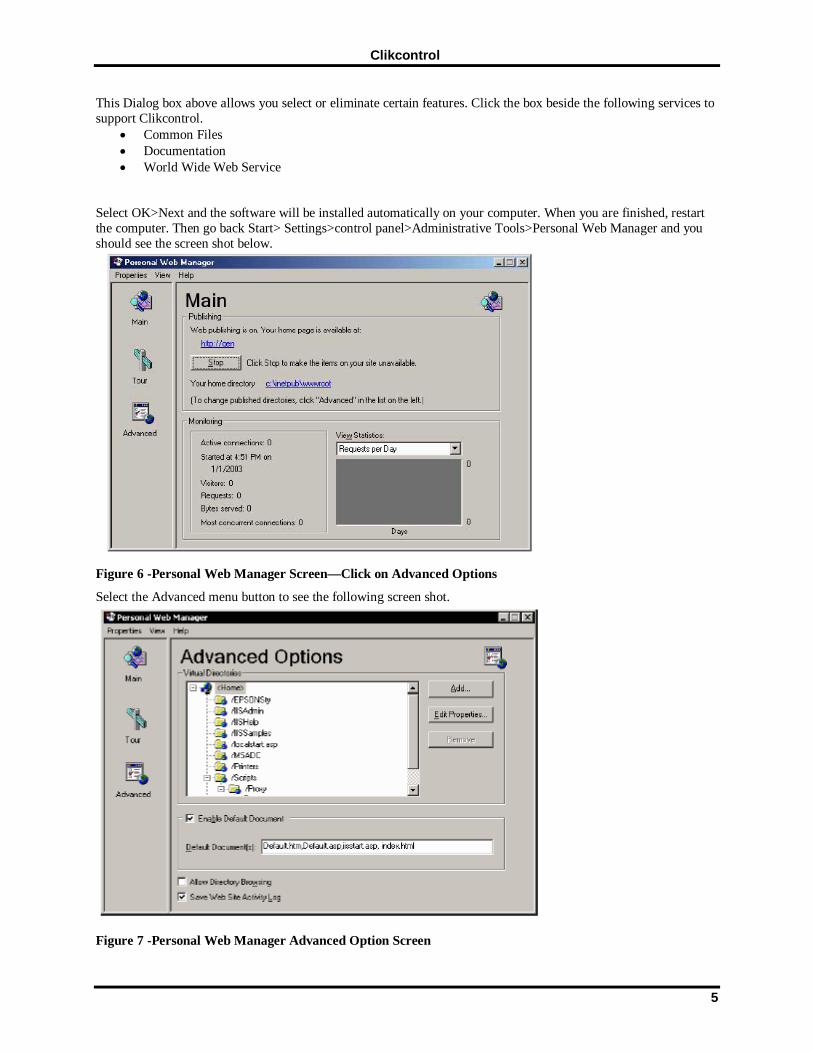
Select OK>Next and the software will be installed automatically on your computer. When you are finished, restart the computer. Then go back Start> Settings>control panel>Administrative Tools>Personal Web Manager and you should see the screen shot below.
Figure 6 -Personal Web Manager Screen—Click on Advanced Options
Select the Advanced menu button to see the following screen shot.
Figure 7 -Personal Web Manager Advanced Option Screen

Clikcontrol Controller
6
In the Default Documents window type after iistart.asp, index.html To Test if the server is working you can go into your C: drive and look for Inetpub folder, go inside this folder and you will see the following folders.
Figure 8 - Inetpub Folders Screen
The wwwroot folder is the folder where you place you HTML pages for testing. To determine if the web server is working properly you can create a simple HTML web page and save it as index.html into the wwwroot folder. By using a word processor such as Wordpad, type the following lines: <html> <head> <title>Test Page</title> </head> <body> <center> <h1>Your web server is working!</h1> </center> </body> </html> Save this text as “index.html” into the wwwroot directory. Then open up your web browser and in the URL type: http://localhost/index.html or c:\Inetpub\wwwroot\index.html and you should see a web page with Text displayed.
Figure 9 -Test Page-Microsoft Internet Explorer

Clikcontrol
7
Clikcontrol Server Installation Before installing the Clikcontrol server, the HTTP server should already be installed and operational. This assists in setting up the appropriate directory structure from which the web pages are served. To install the Server program, you must execute the Clikcontrol Server Install.EXE program on the installation CD. The installation program prompts as follows:
Figure 10 -Clikcontrol Server Welcome Screen
The installation program welcomes you into the installation program and indicates that it is advisable to shut down any unnecessary programs that may currently be running.

Clikcontrol Controller
8
Figure 11 -Clikcontrol System License Agreement Screen
You are next presented with the license agreement for the software. After carefully reading the agreement, click on the “NEXT” button to continue the installation.
Figure 12 -Clikcontrol Program File Destination Folder Screen

Clikcontrol
9
Next, you are prompted to provide a directory into which the server is installed. In addition to the server executable, the installation software installs the Clikcontrol PC setup utility, a configuration file that contains settings that are not contained within the registry, a copy of the VB script used to virtual directories in the IIS HTTP server, and a copy of the ASP page that can be used to provide a means of remote reset of the Clikcontrol service into this directory.
Figure 13 -Clikcontrol HTML Destination Folder
After prompting for the executable directory, you are prompted to supply the directory in which the HTTP server serves out web pages. The installation program creates a Clikcontrol directory off this directory into which all the Clikcontrol HTML pages are stored.

Clikcontrol Controller
10
Figure 14 -Clikcontrol ASP Remote Reset Installation Screen
In addition to the standard web pages, the Clikcontrol server can install an ASP page that allows the user to remotely reset the Clikcontrol service on the host machine. The ASP page is installed in the clikAdmin directory off the HTTP directory specified previously. NOTE: The installation program only installs this ASP page if the host machine is configured with the Microsoft IIS HTTP server. The IIS server must already be installed and running on the host machine. (IIS comes standard as part of Windows 2000 Professional or Windows XP professional.) The ASP pages must be manually installed if you are using a HTTP server such as Apache. See your HTTP server documentation on instructions for installing ASP pages.
Figure 15 -Clikcontrol Remote Configuration Installation Confirm Screen
After installing the Clikcontrol server, the Clikcontrol PC Setup utility and the optional ASP page, Clikcontrol asks if you want to install the remote configuration utility. The remote configuration utility allows you to configure the Clikcontrol server for use with controllers other than the 3500Pro. (The remote configuration utility is also required if you are going to increase the number of simultaneous users beyond the default of 10.) The installation of the remote configuration utility is described below. The installation of the Clikcontrol server is now complete. The server must now be configured as to what PC resources it will use in its operation. The Clikcontrol PC Setup Utility sets up these parameters.

Clikcontrol
11
Clikcontrol Remote Configuration Installation The remote configuration tool allows you to configure the Clikcontrol server when it is used to interface to controllers such as the PESA Ocelot or Bobcat. The software can be run on the Clikcontrol host machine or may be installed on a remote Windows machine that has network access to the Clikcontrol server.
To install the Configuration program, you must execute the Clikcontrol Configuration Install.EXE program on the installation CD. The installation program prompts as follows:
Figure 16 -Clikcontrol Configuration Utility Openin g Screen
The installation program welcomes you and indicates that it is advisable to shut down any unnecessary programs.

Clikcontrol Controller
12
Figure 17 -Clikcontrol Configuration Utility Licens e Agreement Screen
You are next presented with the license agreement for the software. After carefully reading the license agreement, click on the “NEXT” button to continue the installation.
Figure 18 -Clikcontrol Configuration Folder Destination Screen
You are next prompted to provide a directory into which the configuration program is installed. The installation continues by installing the files required for the configuration program’s operation. Once installed, the program is ready to operate and does not require any pre-configuration.

Clikcontrol
13
Chapter 2 – Product Introduction and General Inform ation
General This section provides general information about Clikcontrol and the components necessary to allow proper operation of the PESA Clikcontrol software programs.
Product Description Clikcontrol is a TCP/IP-based controller that allows a routing switcher system to be controlled over a LAN or WAN (including the Internet). The Clikcontrol server software resides on a PC running Windows 2000 or XP and utilizes the Microsoft IIS HTTP Server software that comes standard as part of the Windows OS operating system.
Clikcontrol can be used with all PESA equipment employing the CPU Link interface, including:
• 3500PRO or 3500PRO-LE
• Bobcat Routing Switcher System
• LNS-8 Routing Switcher System
• Ocelot Routing Switcher System
Specifications
General
Minimum Hardware Requirements OS .......................................................................................Windows 2000, XP Hard drive Space................................................................................min 50Mb Memory...........................................................................................min 128Mb Ports ........................................................................................................RS232 Network........................................................................... TCP/IP Ethernet Card Disk....................................................................................................CD Drive

Clikcontrol Controller
14
Chapter 3 – Receipt of Clikcontrol and Hardware Req uirements
Shipping Damage Inspection Immediately upon receipt, all shipping containers should be inspected for damage caused in transit. If any damage is noted, save all packing material and contact both PESA and the carrier as soon as possible.
Unpacking Carefully unpack the equipment and compare the parts received against the packing list and Table 1. If any parts appear to be missing, please contact PESA immediately.
Table 1. Equipment List
Part No. Description
Quantity Required
CD, Clikcontrol Software 1 ea Manual, Clikcontrol 1 ea
Installation Location Clikcontrol must be installed on a PC that is connected to the house network that provides external connectivity through TCP/IP and supports HTTP communications. It is beyond the scope of this document to completely define the full implementation of network connections. Setup and configuration of a network should be completed by a qualified network systems administrator who understands web server setup as well as security issues.
Interface Connections For reasons of personal safety, and to prevent damage to the equipment or cables, the following guidelines should be followed when connecting cables to the server and PESA control hardware.
1. Install the equipment in the area it will reside before connecting cables.
2. All cables should be carefully strain relieved to prevent connector separation.
3. The liberal use of nylon cable ties to secure cables to the rack is encouraged. This will minimize the amount of force transmitted to the equipment and help route cables away from hazardous areas.
4. Route cables away from walk areas to avoid creating a safety hazard.
Network Connector (LAN) On the back of your server box, locate the connector for Ethernet connections. In most cases, this will be an RJ-45 connector that provides an IEEE 802.3 Ethernet network interface. LAN connections to the network should be installed with a customer-supplied, 100 Ω Unshielded Twisted Pair (UTP) patch cable conforming to ANSI/TIA/EIA-568A (Commercial Building Telecommunications Cabling Standard) Category 3 or higher.
NOTE The Network System Administrator should be consulted prior to connecting any equipment to the network.

Clikcontrol
15
For a typical star-topology Ethernet network, LAN will generally be connected to a multiport repeater (sometimes referred to as a hub or concentrator).
Additional information about computer networks is available on the following web pages:
• Novell’s Networking Primer (http://www.novell.com/info/primer/primer.html)
• Novell’s Glossary of Networking Terms (http://www.novell.com/info/glossary/glossary.html)
CPU Link Connector
NOTE The PESA controller is configured to operate at either 9600 or 38400 baud. The Clikcontrol server settings for the serial port on the PC must also be configured to operate at the appropriate speed.
The PC Server you use must have at least one RS-232 connector.
RS-232 Interface: The serial port is connected to the CPU Link connector on the PESA controller with a null modem cable (Part No. 81-9028-0393-0). If necessary, a cable up to 50 feet in length may be fabricated in the field as shown in Figure 20 -RS-232 CPU Link (Null Modem) Cable.
Figure 19 -RS-232 CPU Link Connector (COM 1)
Figure 20 -RS-232 CPU Link (Null Modem) Cable

Clikcontrol Controller
16
Chapter 4 – Operations
Clikcontrol Software Installation The Clikcontrol system has four main software components:
• Clikcontrol Server to be installed customer provided PC.
• The Clikcontrol PC Setup Utility to be installed on the same PC as the Clikcontrol Server,
• Clikcontrol Remote Configuration utility located on one or more Administrator PCs.
• The Clikcontrol Java applet is served from the Clikcontrol controller, and executed by the web browser on one or more Remote Client PCs.
NOTE The password for the remote client Administrator is set to pesa prior to shipment. For security purposes, this password should be changed as soon as possible.
NOTE The PESA Internet Remote Control (PIRC) communications protocol is used between the Clikcontrol PC Server, and the Remote Client executing the Clikcontrol Java applet. This protocol is described in document number 81-9062-0448-0.
The communications protocol used between the Clikcontrol PC Server and the system controller is PESA CPU Link No. 1 with Extensions (P1E). This protocol is described in document number 81-9062-0408-0.
Clikcontrol Remote Configuration Installation
One or more computers attached to the network may be designated as Administrator PCs. (This may be the same PC used for the Clikcontrol Server.) Clikcontrol Remote Configuration is installed on these computers from the included CD as follows:
• Insert the CD in a CD-ROM drive on the Administrator PC, and follow the instructions displayed.
NOTE
All commands are case sensitive and must be entered exactly as shown.
Clikcontrol Server Setup The Clikcontrol PC Setup Utility allows the user to set the operating parameters of the Clikcontrol server, monitor its operation as a service, and to inspect the log file information.

Clikcontrol
17
Main Setup Window
Figure 21 -Clikcontrol PC Setup Utility Window
The main window provides a majority of the information concerning the operation of the Clikcontrol server. The main window consists of two different frames of information.
Registry Parameters The Registry Parameters indicates to the Clikcontrol server what COM port it uses to communicate to the PESA controller as well as where it expects to find different files.
After the parameters have been committed to the Registry, the Clikcontrol server must be restarted for the parameters to take effect.
Serial Port
This is the COM port that is used to communicate to the PESA routing switch controller.
Baud Rate
This is the baud rate used on the serial link to the controller. Most 3500Pro systems default to 38400 baud. Other controllers like the Ocelot default to 9600 baud.

Clikcontrol Controller
18
3500Pro Controller Interface
This indicates to the Clikcontrol server whether or not it is interfacing to a 3500 Pro controller. This indicates what protocol commands the Clikcontrol server will use and whether it will pull the configuration from the controller or expect it to be set via the Clikcontrol Remote Configuration Utility.
HTTP Page Location
This is the location of the directory that is used to store the Clikcontrol HTML pages as well as serve out the JAVA applet to the client PC’s. The server stores many of the configuration files that are read by the applet at this location. This should be set to a directory within HTTP server public access.
Security File Location
This is the location of those files that store password and user restriction information for the Clikcontrol Server. This directory defaults to the directory holding the Clikcontrol server executable.
Log File Location
This is the location that Clikcontrol stores its runtime log files. These log files may be helpful in troubleshooting problems that may arise in using the Clikcontrol. This directory defaults to the directory holding the Clikcontrol server executable.
Restart Log Files on Start Up
The Clikcontrol continually writes information out to its log files as events occur in the server. This option allows you to choose to keep the log information over successive restarts or to clean out the log files every time the Clikcontrol service starts up.
Commit to Registry Button
As you change the information in the Registry Parameters frame, the information is not actually committed to the registry. To commit the data, you must activate the Commit to Registry pushbutton.
Service State The Clikcontrol server runs as a service under the Windows operating system. This frame provides you with the current running state of the service. It also allows you to start or stop the service.
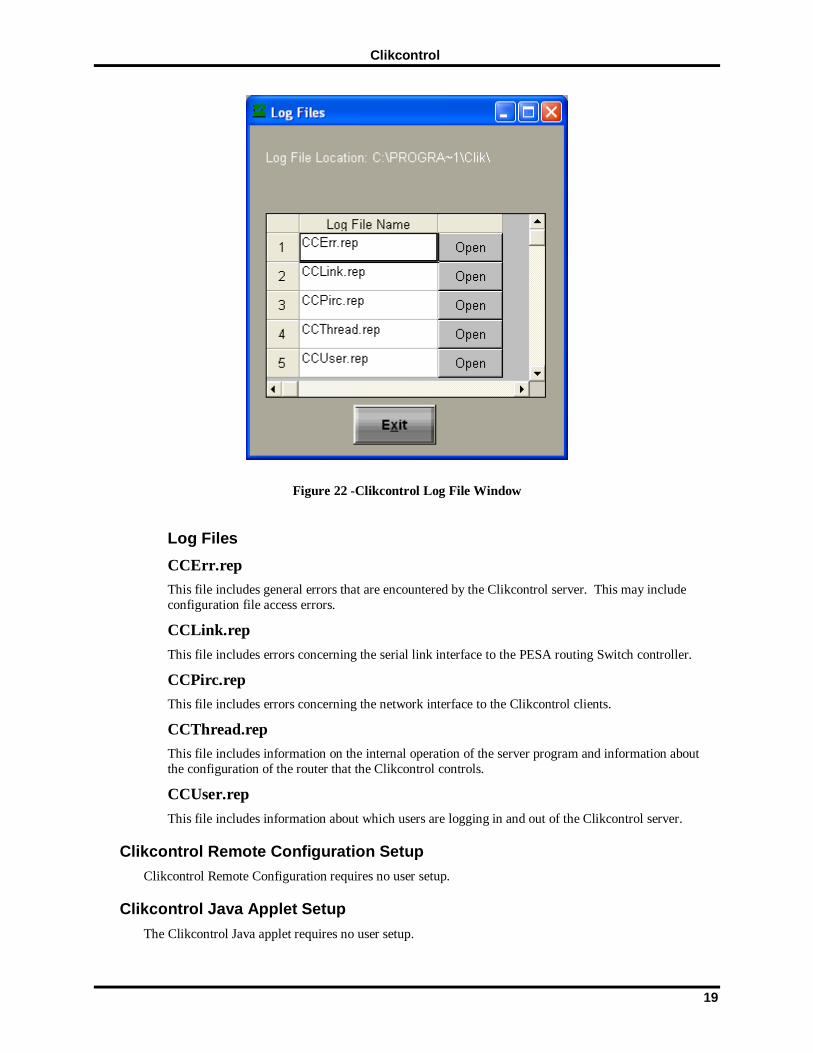
Log File Window The Log File window shows the different Clikcontrol log files generated by the Clikcontrol server. It is accessible under the File menu of the main window.
The log files generated by the Clikcontrol server are rather cryptic. However, they contain information that can assist you in troubleshooting Clikcontrol problems.
To open the log files, simply click on the open button next to the desired log file.
NOTE: This opens a copy of the current log file in a default text editor. You must close out the file and reopen the log file to get the latest information.
Clikcontrol
19
Figure 22 -Clikcontrol Log File Window
Log Files
CCErr.rep
This file includes general errors that are encountered by the Clikcontrol server. This may include configuration file access errors.
CCLink.rep
This file includes errors concerning the serial link interface to the PESA routing Switch controller.
CCPirc.rep
This file includes errors concerning the network interface to the Clikcontrol clients.
CCThread.rep
This file includes information on the internal operation of the server program and information about the configuration of the router that the Clikcontrol controls.
CCUser.rep
This file includes information about which users are logging in and out of the Clikcontrol server.
Clikcontrol Remote Configuration Setup Clikcontrol Remote Configuration requires no user setup.
Clikcontrol Java Applet Setup
The Clikcontrol Java applet requires no user setup.

Clikcontrol Controller
20
Clikcontrol Remote Configuration Operation (Ocelot, Bobcat, LNS-8)
NOTE
THE REMOTE CONFIGURATION PROGRAM IS NOT REQUIRED FOR THE 3500PRO OR 3500PRO-LE SYSTEMS.
Ocelot, Bobcat, LNS-8: These system controllers do not utilize a configuration such as the one used by the 3500PRO. Because of this, Clikcontrol Remote Configuration must be used to manage remote client information. In addition, the source numbers, destination numbers, and level numbers used by Clikcontrol Remote Configuration must correspond to the same numbers used by the system controller.
Clikcontrol Remote Configuration is used to create and modify switching system configurations, and to transfer these configurations between the Administrator PC and the Router controller. When first launched, it will appear as shown in Figure 23
Figure 23 -Clikcontrol Remote Configuration Main Window

Clikcontrol
21
Menu Bar The menu bar presents the following options:
File Menu
• New configuration – Creates a new configuration file.
• Open configuration file – Opens an existing configuration file.
• Save changes – Saves the configuration being edited. If a file name has not been assigned to the current configuration, one will be solicited.
• Save changes as – Allows the current configuration to be saved with a different file name, or saved to a different location.
• Send to Clikcontrol – Uploads the current configuration from the Administrator PC to the Clikcontrol controller.
• Receive from Clikcontrol – Downloads the configuration from a Clikcontrol controller to the Administrator PC.
• Read 3500 Configuration – Imports an existing configuration file created for use with a 3300, 3500 or 3500Plus system controller (*.dat or *.txt).
• Exit – Exits the program. If any changes have been made during the current session, an opportunity will be given to save them.
Help Menu
• Send License Key – This is used to input a new license key in order to authorize additional remote clients. Each Clikcontrol controller is initially supplied with ten licenses. If more are needed, please contact PESA Customer Service.
• About – Gives the Clikcontrol Remote Configuration version number, and pertinent system information.
Shortcut Buttons These buttons provide shortcuts to the most frequently used menu options.
• Send to Clikcontrol – Uploads the current configuration, along with any changes that have been made, to the Clikcontrol controller.
• Receive from Clikcontrol – Downloads the configuration from a Clikcontrol controller to the Administrator PC.
• Save changes – Saves the configuration being edited. If a file name has not been assigned to the current configuration, one will be solicited.
• Cancel and Exit – Exits the program. If any changes have been made during the current session, an opportunity will be given to save them.

Clikcontrol Controller
22
Controller Tab Under the controller tab, the user can select the controller type and setup the number of levels required. In most cases, the user should only select Ocelot, Bobcat, or LNS8
Figure 24 -Clikcontrol Remote Configuration Controller Tab
Controller Type The Controller Type can be set to one of five classes:
• 3500PRO (Not used when 3500PRO is primary controller)
• Ocelot
• Bobcat
• LNS8
Most PESA equipment compatible with the Clikcontrol controller may be selected from the drop box. However, other equipment may be specified by typing an entry directly in the data field if necessary.
Users Licensed
When a configuration is pulled from a Clikcontrol server, the number of licensed simultaneous users is listed here. (This works with 3500Pro systems even though the configuration is pulled directly from the controller.)

Clikcontrol
23
Each Clikcontrol server initially supplied with ten licenses. If more are needed, please contact PESA Customer Service.
Levels The switching system levels are specified here. These associate with the different matrices configured in a system.
Sources Tab
See Figure 25 for the Sources Tab window. This tab is used to manage sources that are input into the routing matrices. The green check indicates that the source has a signal present on the associated level.
Figure 25 -Clikcontrol Remote Configuration Sources Tab
Clikcontrol Controller
24
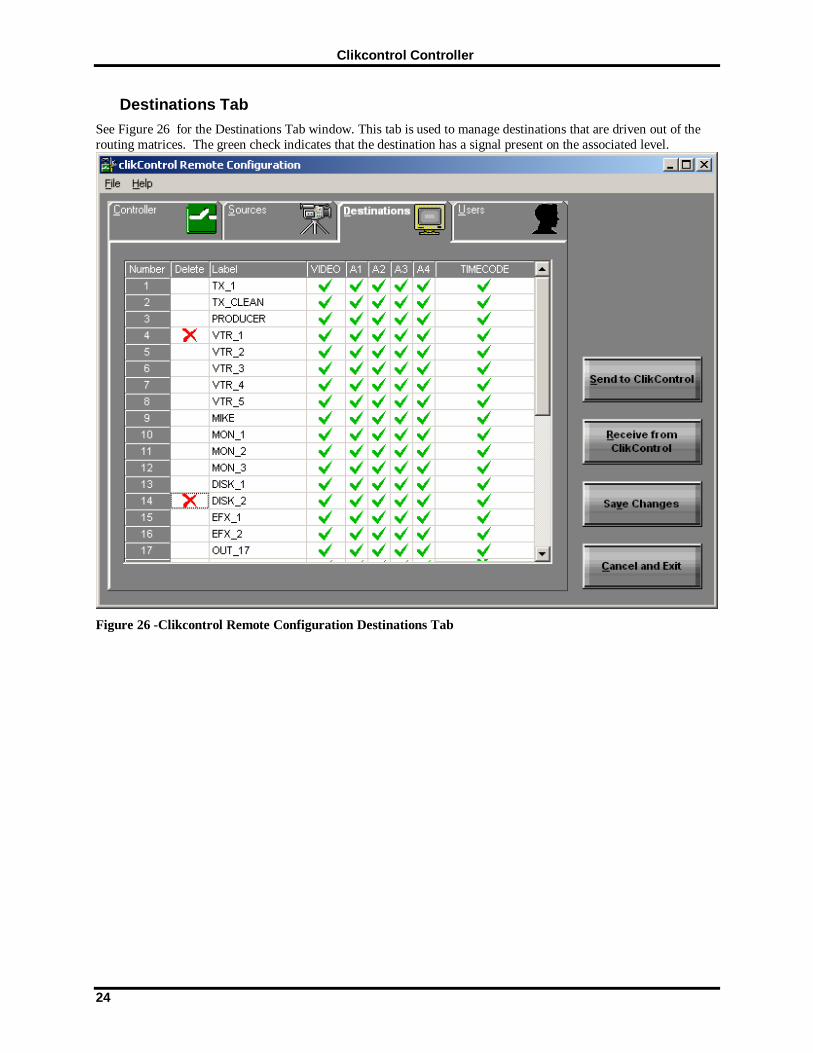
Destinations Tab See Figure 26 for the Destinations Tab window. This tab is used to manage destinations that are driven out of the routing matrices. The green check indicates that the destination has a signal present on the associated level.
Figure 26 -Clikcontrol Remote Configuration Destinations Tab
Clikcontrol
25
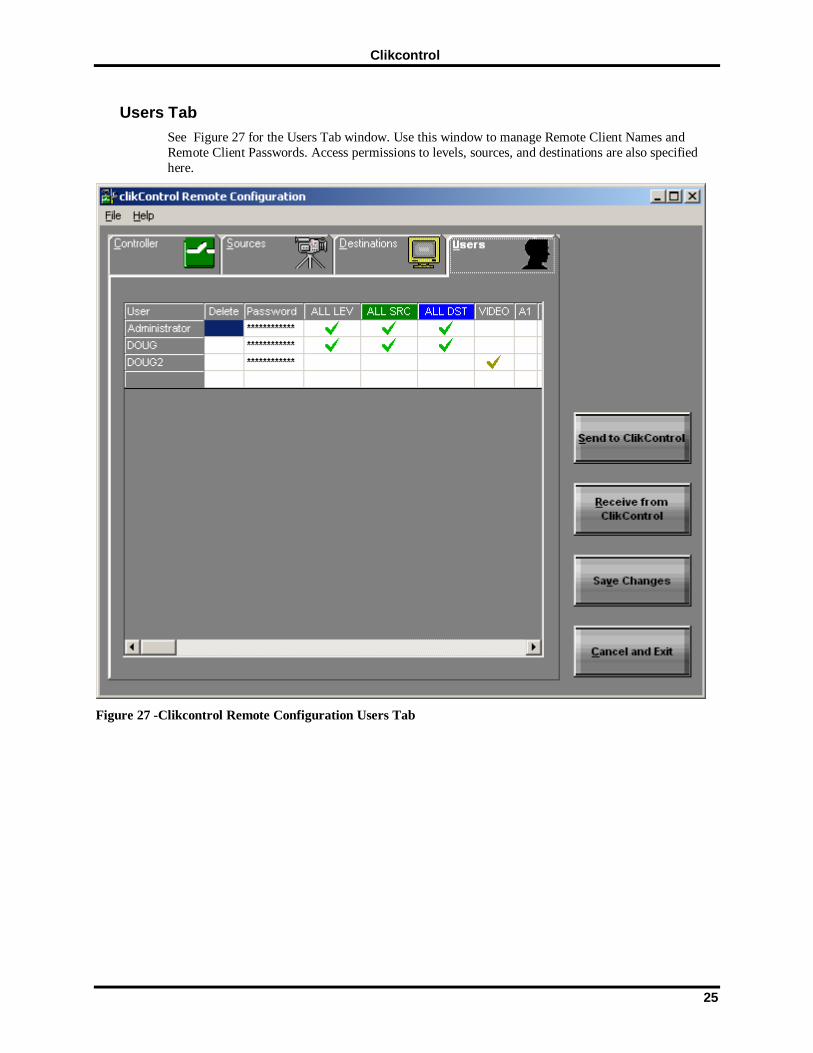
Users Tab See Figure 27 for the Users Tab window. Use this window to manage Remote Client Names and Remote Client Passwords. Access permissions to levels, sources, and destinations are also specified here.
Figure 27 -Clikcontrol Remote Configuration Users Tab

Clikcontrol Controller
26
Transfer Configuration to the Clikcontrol Controlle r from the Clikcontrol Remote Configuration
The configuration currently on the Clikcontrol controller may be transferred to Clikcontrol Remote Configuration as follows:
Open the File menu and select Send to Clikcontrol to display the log on window shown in Figure 28
Figure 28 -Clikcontrol Remote Configuration Send Log On Window
1. Enter one of the following in the Clikcontrol IP or DNS box:
NOTE
Some networks may be configured so that IP addresses assigned by a DHCP server may expire after a period of inactivity. A new IP address will be assigned when the Clikcontrol controller becomes active again. If you are unsure of whiter your network uses static IP or DHCP, consult your IT representative for assistance. PESA recommends static IP addresses whenever possible.
• The DHCP IP Address _______________________
• The Static IP Address ________________________
• The DNS Name _____________________________
2. Clikcontrol Remote Configuration connects with the Clikcontrol controller by using the Remote Client name Administrator . Enter the current password for the remote client Administrator in the Password box.
NOTE
All remote client names and passwords are case sensitive.
3. Click the Send Data button. The configuration is then transferred to the Clikcontrol Server.

Clikcontrol
27
4. Click the Receive Data button. The configuration on the Clikcontrol controller will then be transferred to Clikcontrol Remote Configuration.
Clikcontrol Java Applet Operation
NOTE The following Microsoft software must be installed on windows based Client PC’s:
Microsoft Internet Explorer v5.0 or higher
Microsoft Virtual Machine v5.00.3802 or higher
Sun Microsystems JAVA2 Plugin V1.4.2 or higher
Web Browser Version Verification/Upgrade
Clikcontrol requires the use of Microsoft Internet Explorer v5.0 or higher. To obtain the latest version, direct your browser to http://www.microsoft.com/windows/IE/.
Virtual Machine Version Verification/Upgrade Clikcontrol requires the use of Microsoft Virtual Machine v5.00.3802 or higher. To determine the version currently in use, check the properties of the file named jit.dll. To obtain the latest version, direct your browser to http://www.microsoft.com/java/.
Connecting to the Clikcontrol Controller The Remote Client PC is connected to the Clikcontrol controller by pointing a web browser to the URL of the Clikcontrol controller.
The web page shown in Figure 29 will be displayed.

Clikcontrol Controller
28
Figure 29 -Clikcontrol Java Applet Opening Window
NOTE
All remote client names and passwords are case sensitive.
Logging In to the Clikcontrol Controller Click on the “Clikcontrol Server” hyperlink shown in Figure 29 to display the login window shown in Figure 30

Clikcontrol
29
Figure 30 -Clikcontrol Java Applet User Login
Name and Password must be one of those created by Clikcontrol Administrator (see “Users Tab” in Figure 27 -Clikcontrol Remote Configuration Users Tab” and transferred to the Clikcontrol controller.
Java Applet Main Window Operation Most users will need to install the Java 2 plugin in order to run applets that include Swing components. The Java 2 plugin has been included on the Clikcontrol Utilities CDROM. It can also be downloaded from the canonical java website, http://sun.java.com.
Clikcontrol Controller
30
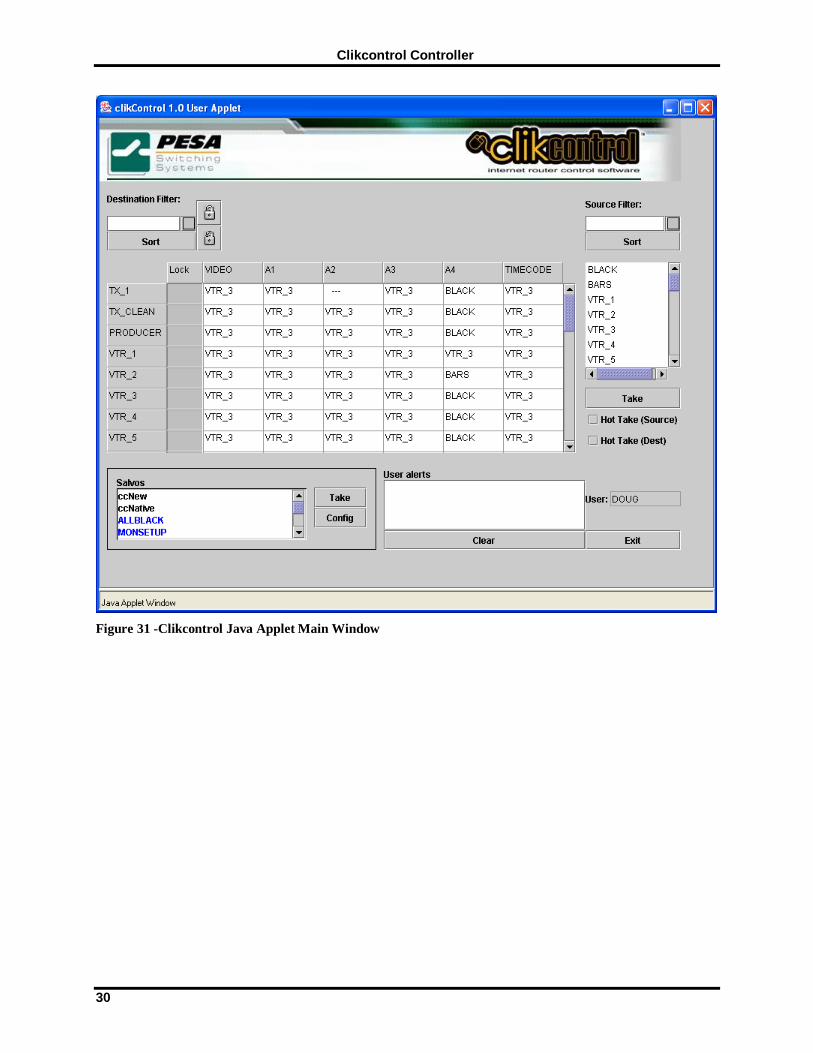
Figure 31 -Clikcontrol Java Applet Main Window

Clikcontrol
31
The Status Block The status block displays which sources are switched to the displayed destinations and levels. Here is a screen shot of the status block with an explanation of its major features:
Figure 32 -Clikcontrol Main Window – Status Block
1. Destination Column
This column shows which destinations are displayed in the status window. Only destinations which the user has privileges to see will be displayed.
2. Lock Column
This column shows the lock status of the destinations, which are displayed.
3. Locked Destination
If a destination is locked, this icon appears in the Lock column
4. Level Status Columns
The source switched to each level on a destination is displayed in these columns. Only levels which the user has privileges to see will be displayed.
5. Source On A Destination And Level
This block shows the source IN_10 switched to level LEVEL1 on destination OUT_2. Only sources which the user has privileges to see will be displayed.
6. Destination Scroll Bar
This scroll bar allows the user to scroll up and down the destinations column and display different destinations. The scroll bar may or may not be displayed, depending on the number of destinations on the system, or the size of the screen.
7. Level Scroll Bar

Clikcontrol Controller
32
This scroll bar allows the user to scroll the level columns back and forth, displaying different levels. The scroll bar may or may not be displayed, depending on the number of levels on the system, or the size of the screen.
The Destination Block The Destination block contains controls that can be used to sort, filter, and lock destinations. Here is a screen shot of the Destination block with explanations of its major features:
Figure 33-Clikcontrol Main Window – Destination Block
1. Filter Text Field
Only destinations containing or starting with the text entered in the filter box will be displayed when the Filter Toggle button is selected.
2. Filter Toggle Button
Filters the destinations displayed using the text in the Filter text field. If no text is entered in the Filter text field, all destinations are filtered out (i.e. no destinations will be displayed). When selected, the filter button icon changes from an empty square to a crosshatched square.
3. Lock Destination Button
Selecting this button will cause all selected destinations to be locked.
4. Unlock Destination Button
Selecting this button causes all selected destinations to be unlocked.
5. Sort Button
This sorts the destination rows in alphabetical order of the destination names. The button darkens when it is depressed. When not depressed, destinations are displayed in router order.
The Source Block
The Source block contains controls that can be used to sort, filter, and select a source to be switched to a destination. Here is a screen shot of the Source block with explanations of its major features:

Clikcontrol
33
Figure 34-Clikcontrol Main Window – Source Block
1. Filter Text Field
Only sources containing or starting with the text entered in the filter box will be displayed when the Filter Toggle button is selected.
2. Filter Toggle Button
Filters the sources displayed using the text in the Filter text field. If no text is entered in the Filter text field, all sources are filtered out (i.e. no sources will be displayed). When selected, the filter button icon changes from an empty square to a crosshatched square.
3. Sort Button
This sorts the source rows in alphabetical order of the source names. The button darkens when it is depressed. When not depressed, sources are displayed in router order.
4. Source List
This is the list of sources a user may access. Only one source may be selected at a time.
5. Source List Scroll Bar
This scroll bar allows the user to scroll the list of sources up and down, exposing more of the sources on the list.
The Take Block
The Take block contains controls that allow the user to switch sources to destinations. Here is a screen shot of the take block with explanations of its major features:
Figure 35-Clikcontrol Main Window – Take Block

Clikcontrol Controller
34
1. Take Button
This button switches the selected source to the selected destination(s).
2. Hot Take (Source) Checkbox
This checkbox, when selected, causes the selected destinations to be switched every time a new source is selected, without the "Take" button being pressed.
3. Hot Take (Dest) Checkbox
This checkbox, when selected, causes the current source to be switched to the selected destination(s) every time a new destination(s) are selected, without the "Take" button being pressed.
The Salvo Block
The Salvo Block contains controls that allow the user to create, modify, display, and take salvoes. Salvoes that are read from a 3500Pro controller are available for display and execution only. Clikcontrol salvoes may be displayed, modified, and executed if the user has privileges to do so. Here is a screen shot of the Salvo block with explanations of its major features:
Figure 36-Clikcontrol Main Window – Salvo Block
1. Salvo List
The salvo that the user wishes to take or configure can be selected from this list. The names of salvoes displayed in black are the names of Clikcontrol salvoes; the names of salvoes displayed in blue are 3500Pro salvoes.
2. Salvo List Scroll Bar
This scroll bar allows the user to scroll up and down the salvo list, exposing more of the salvoes on the list.
3. Salvo Take Button
This button takes the selected salvo.
4. Salvo Config Button
This button displays the Salvo Configuration screen with the selected salvo displayed for configuration.
The Alert Block The Alert block contains controls that display warning and alert messages to the user. Here is a screen shot of the Alert block with explanations of its major features:

Clikcontrol
35
Figure 37-Clikcontrol Main Window – Alert Block
1. Alert Text Area
This text area displays the alert messages logged by the Clikcontrol applet.
2. Alert Text Area Scroll Bar
This scroll bar allows the user to scroll the text area up and down, exposing all alerts logged by the Clikcontrol applet.
3. Clear Button
This button clears all alerts from the text area. Once cleared, the alerts cannot be retrieved.
The Exit Block The Exit block contains the Exit button, and the Username text field. Here is a screen shot of the Exit block:
Figure 38-Clikcontrol Main Window – Exit Block
Pressing the Exit button causes the user to be logged off the Clikcontrol, and the Clikcontrol applet to exit. The text field titled "User:" contains the username of the current user.
Java Applet Salvo Window Operation
Configuration and creation of Clikcontrol salvoes is made possible by the Salvo Configuration Interface. This interface is accessed through the "Config" button in the Salvo Block of the Clikcontrol interface window. To configure an existing salvo, the user simply selects the desired salvo, then presses the "Config" button. To create a new Salvo, the user may press the "Config" button with no salvo selected. A small dialog will appear, prompting the user to key in the name of the new salvo. This will create a new, empty salvo, which the user may then configure. To create a salvo that already contains destinations, the user simply highlights the desired destinations and then presses the "Config" button. The salvo name dialog will appear, and after a new unique name is chosen for the salvo, the new salvo will appear in the salvo configuration window with the chosen destinations in the same state as they were in when chosen.

Clikcontrol Controller
36
Figure 39-Clikcontrol Java Applet Salvo Window
The Name Block
The Name block contains the name of the salvo being configured, and the name of the owner of the salvo. The salvo name is in a pull-down selection box that will display all of the salvoes the user has privileges to see. The active salvo may be changed by selecting any of the salvoes from this pull-down. Below is a screen shot of the Name Block with descriptions of its major components:
Figure 40-Clikcontrol Salvo Window – Name Block
1. Salvo Selection Pull down
This control displays the name of the active salvo. The active salvo displayed in the Salvo Configuration screen may be changed by selecting a different salvo from this control.

Clikcontrol
37
2. Salvo Owner Name
This text field contains the name of the salvo's owner. The owner of a salvo always has privileges to view and edit the salvo.
The Salvo Destination Block The Salvo Destination Block shows the destinations that are to be switched when the salvo is taken, and what sources are to be switched to what levels on each destination. It also shows whether the destination is to be locked after the salvo is taken. Below is a screen shot of the Salvo Destination block with descriptions of its major components:
Figure 41-Clikcontrol Salvo Window – Salvo Destination Block
1. Destination Column
This column displays the names of the destinations to be switched when the salvo is taken.
2. Lock After Column
This column displays the lock state of the destination after the salvo has been taken. Clicking in this column will toggle the state for a destination.
3. Level Columns
These columns display which sources will be switched to each level on a destination. The source named "<none>" denotes no switch is to be made on a destination and level.
4. Destination Scroll Bar
This scroll bar allows the user to scroll up and down the destinations column and display different destinations. The scroll bar may or may not be displayed, depending on the number of destinations in the salvo, or the size of the screen.
5. Level Column Scroll Bar
This scroll bar allows the user to scroll the level columns back and forth, displaying different levels. The scroll bar may or may not be displayed, depending on the number of levels on the system, or the size of the screen.
The Source Block The Source Block contains the list of sources that the user has permission to use, and the Commit button, which will update the selected destinations and levels of the current salvo with the selected source. Below is a screen shot of the Source Block with and explanation of its major components:
Clikcontrol Controller
38
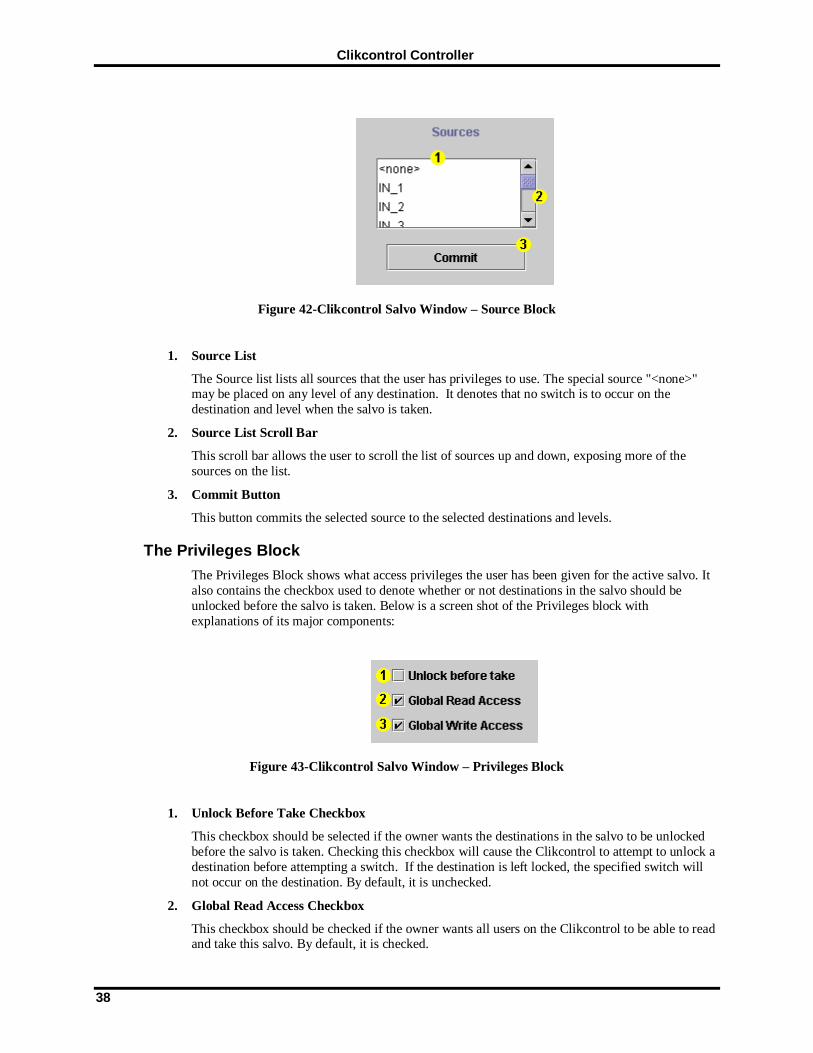
Figure 42-Clikcontrol Salvo Window – Source Block
1. Source List
The Source list lists all sources that the user has privileges to use. The special source "<none>" may be placed on any level of any destination. It denotes that no switch is to occur on the destination and level when the salvo is taken.
2. Source List Scroll Bar
This scroll bar allows the user to scroll the list of sources up and down, exposing more of the sources on the list.
3. Commit Button
This button commits the selected source to the selected destinations and levels.
The Privileges Block The Privileges Block shows what access privileges the user has been given for the active salvo. It also contains the checkbox used to denote whether or not destinations in the salvo should be unlocked before the salvo is taken. Below is a screen shot of the Privileges block with explanations of its major components:
Figure 43-Clikcontrol Salvo Window – Privileges Block
1. Unlock Before Take Checkbox
This checkbox should be selected if the owner wants the destinations in the salvo to be unlocked before the salvo is taken. Checking this checkbox will cause the Clikcontrol to attempt to unlock a destination before attempting a switch. If the destination is left locked, the specified switch will not occur on the destination. By default, it is unchecked.
2. Global Read Access Checkbox
This checkbox should be checked if the owner wants all users on the Clikcontrol to be able to read and take this salvo. By default, it is checked.

Clikcontrol
39
3. Global Write Access Checkbox
This checkbox should be checked if the owner wants all users on the Clikcontrol to be able to change this salvo. By default, it is checked.
The Edit Controls Block This block contains all the controls used to create, delete, and edit salvoes. Below is a screen shot of the Edit Controls Block, with explanations of its major components:
Figure 44-Clikcontrol Salvo Window – Edit Controls Block
1. Remove Destination Button
Pressing this button will remove the selected destinations from the salvo.
2. Add Destination Button
Pressing this button will cause a small popup menu to appear. The user may select the desired destinations, and they will be added to the salvo with the source "<none>" on each level.
3. Remove Errors Button
If changes are made to names of sources or destinations on the controller that is being controlled by the Clikcontrol, salvoes defined for the previous controller configuration can have errors. These errors will be highlighted in red. Pressing the Remove Errors button will cause all erroneous destinations to be removed, and all erroneous sources to be changed to "<none>".
4. New Button
Pressing this button will clear the salvo configuration window and prompt for the name of the new salvo. When a new unique salvo name is entered, the new salvo will be displayed in the window. The user may then configure the new salvo.
5. Save As Button
Pressing this button will cause a prompt for a new salvo name to appear. After the user enters a new unique salvo name, the current salvo will be copied and displayed on the salvo configuration screen. The user may then change the salvo's configuration. It is important to note that the new salvo will not be saved until the user presses the "OK" or "Apply" buttons.
6. Delete Button
Pressing this button will cause the current salvo to be deleted.
7. OK Button
Pressing this button will cause any changes that have been made to a salvo to be committed, and the salvo configuration window to close. Edits to existing salvoes, as well as newly created salvoes, will be saved.
8. Apply Button

Clikcontrol Controller
40
This button also causes changes to salvoes to be committed, but does not close the salvo configuration window.
9. Cancel Button
Pressing this button will cause any current changes to a salvo to be discarded, and the salvo configuration window to close.
Step-by-Step Instructions for Taking a Source to a Destination Using the Clikcontrol Java Applet User Interface
The following is a quick demonstration of how to use the Clikcontrol Java Applet User Interface to take a selected source to a selected destination.
Step 1: Select the Desired Source
Position the mouse pointer over the desired source and click once. Use the scroll bar to locate the desired source if necessary. The selected source will become highlighted.
Figure 45-Clikcontrol Take Switch – Select Source

Clikcontrol
41
Step 2: Select the Desired Destination(s). Position the mouse pointer over the desired destination and click once. Clicking on the destination name will highlight all levels on the destination, regardless of whether they are visible or not. Levels the user does not have privileges to view will not be changed. Holding the "Ctrl" key down will allow the addition of more destinations. In the example pictured below, the destination VTR_1 has been selected, as well as levels VIDEO, A1, A2, A3, and A4 on the destination VTR_3.
Figure 46-Clikcontrol Take Switch – Select Destination(s)

Clikcontrol Controller
42
Step 3: Press the "Take" Button. Position the mouse pointer over the "Take" button and click once.
Figure 47-Clikcontrol Take Switch – Press Take

Clikcontrol
43
Step 4: The Destinations Are Updated by the Clikcon trol. As seen the example pictured below, the selected destinations are updated to the new source by the Clikcontrol applet.
Figure 48-Clikcontrol Take Switch – Destinations Updated
Step-by-Step Instructions for Taking a Salvo Using the Clikcontrol Java Applet Interface
The following is a quick demonstration of how to use the Clikcontrol Java Applet User Interface to take a selected source to a selected destination.

Clikcontrol Controller
44
Step 1: Select the Desired Salvo Position the mouse pointer over the desired salvo and click once. The selected salvo will become highlighted.
Figure 49-Clikcontrol Take Salvo – Select Salvo
Clikcontrol
45
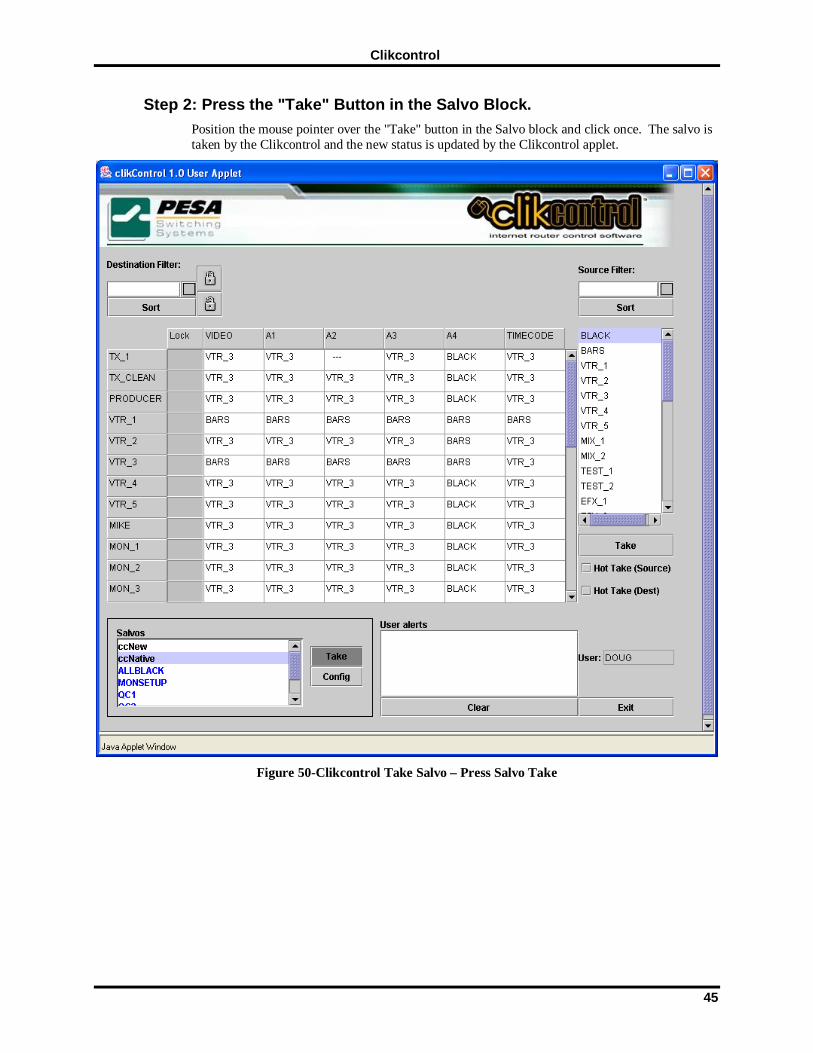
Step 2: Press the "Take" Button in the Salvo Block. Position the mouse pointer over the "Take" button in the Salvo block and click once. The salvo is taken by the Clikcontrol and the new status is updated by the Clikcontrol applet.
Figure 50-Clikcontrol Take Salvo – Press Salvo Take

Clikcontrol Controller
46
Clikcontrol Remote Reset Operation If installed, the remote reset page provides the means of stopping and starting the Clikcontrol service. The service is available via web browser equipped to handle ASP pages.
The page is installed in the clikAdmin virtual directory configured on an IIS HHTP server. The page is accessed by typing the URL:
<machine name>/clikAdmin/services.asp
Before the page is accessed, the user is prompted to enter their Windows account name and password. (This is a Windows related feature and does not have anything to do with the Clikcontrol user accounts.)
Figure 51-Clikcontrol Remote Reset – Windows Login
After successfully logging into the ASP page, the user is provided with the status of the Clikcontrol service. By clicking on the operating state, the user can toggle the running state of the Clikcontrol service.

Clikcontrol
47
Figure 52-Clikcontrol Remote Reset – Services ASP Page


Clikcontrol Controller