85-03-00904 fv41 grace kit- slim or narrow- arch or … · when all of the guides have been...
TRANSCRIPT

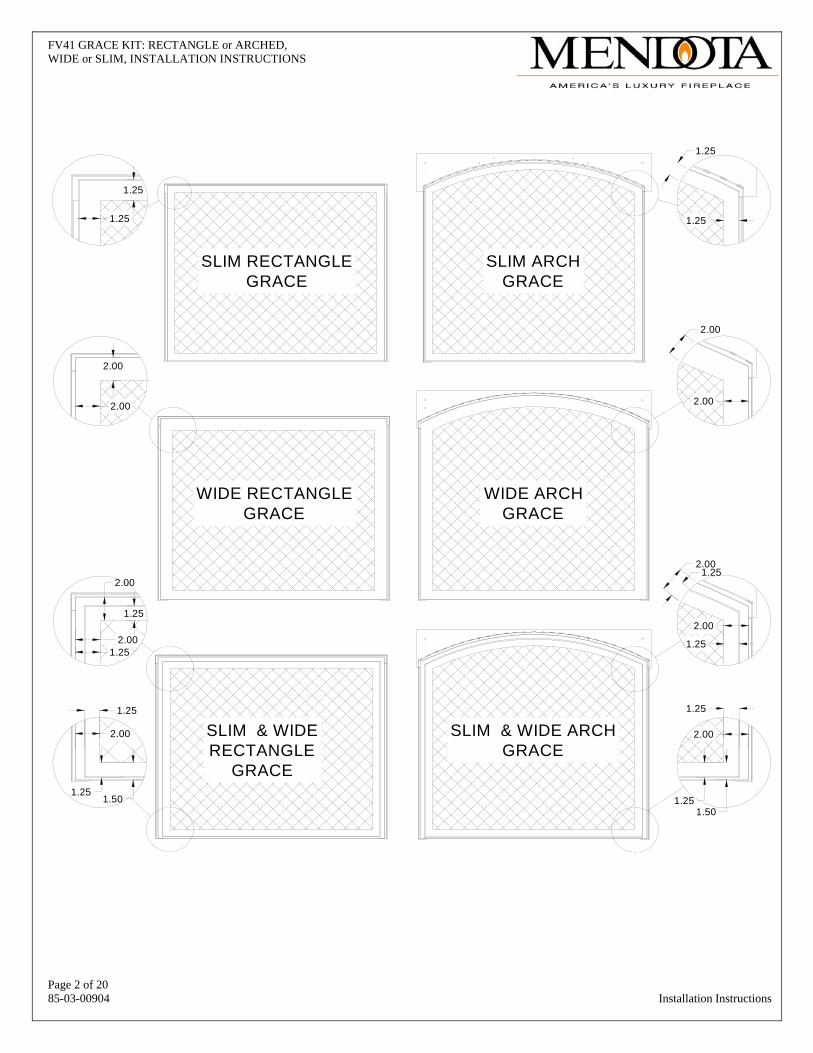
FV 41 GRACE KITS RECTANGLE or ARCHED
WIDE or SLIM INSTALLATION INSTRUCTIONS
FV41 GRACE KIT: RECTANGLE or ARCHED, WIDE or SLIM, INSTALLATION INSTRUCTIONS
Page 2 of 20 85-03-00904 Installation Instructions
SLIM ARCHGRACE
WIDE ARCHGRACE
SLIM & WIDE ARCHGRACE
SLIM RECTANGLEGRACE
WIDE RECTANGLEGRACE
SLIM & WIDERECTANGLE
GRACE
1.25
1.25
2.00
2.00
1.25
1.25
1.25
2.00
2.00
1.252.00
2.00
1.25
2.00
1.251.50
1.25
2.00
1.251.50
1.25
2.00
2.001.25
FV41 GRACE KIT: RECTANGLE or ARCHED, WIDE or SLIM, INSTALLATION INSTRUCTIONS
Page 3 of 20 85-03-00904 Installation Instructions
General Cleaning & Maintenance: Spray a glass cleaner solution on a dry soft cloth and wipe the Grace to remove any dirt and finger prints from the surface. DO NOT use any abrasive cleaner or a cleaner that contains ammonia as an ingredient. For Antique Copper coated Grace, follow Mendota Copper Cleaning Procedures only!
CAUTION Mendota recommends that clean cloth gloves be worn when assembling or
mounting any decorative front to prevent finger prints from damaging the surfaces
and to minimize the cleaning effort.
TableofContents
1. LIST OF PARTS IN EACH GRACE KIT………………………………………………………….. 1.1 FV41 GRACE KIT- RECTANGLE SLIM …………………………..……………...PG. 4 1.2 FV41 GRACE KIT- RECTANGLE WIDE ………………………………...……….PG. 5 1.3 FV41 GRACE KIT- ARCH SLIM ……………………….…………………..……...PG. 6 1.4 FV41 GRACE KIT- ARCH WIDE ………..………………………………………...PG. 7
2. INSTALLING THE GRACE ON THE FIREPLACE ………………………….……………PG. 8
3. INSTALLING GRACE FINISHING GUIDES ………………………………………...…………..
3.1 FV41 GRACE KIT- RECTANGLE SLIM …………………...……………………..PG. 9 3.2 FV41 GRACE KIT- RECTANGLE WIDE …………………………………………PG. 9 3.3 FV41 GRACE KIT- ARCH SLIM ……..……………………………………….....PG. 10 3.4 FV41 GRACE KIT- ARCH WIDE ……………….…………………………..…...PG. 10
4. PLACEMENT FOR GRACE FRAMING GUIDES …………………..……..……………………
4.1 FV41 GRACE KIT- RECTANGLE SLIM ………………………………..…..…...PG. 11 4.2 FV41 GRACE KIT- RECTANGLE WIDE …………………………….…….……PG. 12 4.3 FV41 GRACE KIT- ARCH SLIM ……..…………………………………………..PG. 13 4.4 FV41 GRACE KIT- ARCH WIDE ……………….……………………………......PG. 14
5. MOUNTING TO THE FIRE PLACE BODY ……….………………………………………PG. 15
6. CONNECTING SLIM GRACE ON TOP OF WIDE GRACE ……………..…………...…PG. 17
7. CLEANING INSTRUCTIONS …………………………………………………..……..……PG. 20

FV41 GRACE KIT: RECTANGLE or ARCHED, WIDE or SLIM, INSTALLATION INSTRUCTIONS
Page 4 of 20 85-03-00904 Installation Instructions
4
6
5
1
4
6
A
2
8
3
FV41GRACEKIT‐RECTANGLESLIM
Unwrap the Grace Slim Rectangle Kit carefully and inspect for any shipping damage. If damage is evident, contact your Mendota Dealer. Identify the parts included with the GRACE SLIM RECTANGLE. If any parts are missing, contact your Mendota Dealer before proceeding with this installation and obtain the missing parts.
LIST OF PARTS INCLUDED KEY QTY DESCRIPTION
GRACE KIT
1 1 RECTANGLE GRACE
BAG ASSEMBLY, HANGING GRACE
2 4 SPACER #10 STUD X 1/4”
3 4 SCREW, 10‐24 X ½”
GUIDES
4 1 TOP FINISH GUIDE
5 1 FINISH GUIDE, LH
6 1 FINISH GUIDE, RH
7 1 BOTTOM GUIDE, SLIM ARCH/RECT
8 16 TEKS, HEX #8 X ½” BLACK ZINC
AA‐11‐01461 BLACK
AA‐11‐01462 VINTAGE IRON
AA‐11‐01463 ANTIQUE COPPER
AA‐11‐01464 SWEDISH NICKEL
AA‐11‐01465 BRUSHED CHROME
TOOLS REQUIRED
Screw Driver Door Removal Tool
(Supplied with fireplace)

FV41 GRACE KIT: RECTANGLE or ARCHED, WIDE or SLIM, INSTALLATION INSTRUCTIONS
Page 5 of 20 85-03-00904 Installation Instructions
5
7
6
1
5
7
A
8
FV41GRACEKIT‐RECTANGLEWIDE
Unwrap the Grace Wide Rectangle Kit carefully and inspect for any shipping damage. If damage is evident, contact your Mendota Dealer. Identify the parts included with the GRACE WIDE RECTANGLE KIT. If any parts are missing, contact your Mendota Dealer before proceeding with this installation and obtain the missing parts.
LIST OF PARTS INCLUDED KEY QTY DESCRIPTION
GRACE KIT
1 1 RECTANGLE GRACE
BAG ASSEMBLY, HANGING GRACE
2 4 SPACER #10 STUD X 1/4”
3 4 SCREW, 10‐24 X ½”
BAG ASSEMBLY, CONNECTING GRACES
4 4 SCREW, 10‐32 X ½” * WIDE ONLY*
GUIDES
5 1 TOP FINISH GUIDE
6 1 FINISH GUIDE, LH
7 1 FINISH GUIDE, RH
8 1 BOTTOM GUIDE, WIDE ARCH/RECT
9 16 TEKS, HEX #8 X ½” BLACK ZINC
Kit # Color Scheme
AA‐11‐01456 BLACK
AA‐11‐01457 VINTAGE IRON
AA‐11‐01458 SWEDISH NICKEL
AA‐11‐01459 ANTIQUE COPPER
AA‐11‐01460 BRUSHED CHROME
TOOLS REQUIRED
Screw Driver Door Removal Tool
(Supplied with fireplace)
4
3
2
9

FV41 GRACE KIT: RECTANGLE or ARCHED, WIDE or SLIM, INSTALLATION INSTRUCTIONS
Page 6 of 20 85-03-00904 Installation Instructions
A
4
6
5
1
4
6
7
2
3
8
FV41GRACEKIT‐ARCHSLIM
Unwrap the Grace Slim Arch Kit carefully and inspect for any shipping damage. If damage is evident, contact your Mendota Dealer. Identify the parts included with the GRACE SLIM ARCH KIT. If any parts are missing, contact your Mendota Dealer before proceeding with this installation and obtain the missing parts.
LIST OF PARTS INCLUDED KEY QTY DESCRIPTION
GRACE KIT
1 1 ARCH GRACE
BAG ASSEMBLY, HANGING GRACE
2 4 SPACER #10 STUD X 1/4”
3 4 SCREW, 10‐24 X ½”
GUIDES
4 1 TOP ARCH FINISHING GUIDE
5 1 FINISH GUIDE, LH
6 1 FINISH GUIDE, RH
7 1 BOTTOM GUIDE, SLIM ARCH/RECT
8 16 TEKS, HEX #8 X ½” BLACK ZINC
Kit # Color Scheme
AA‐11‐01491 BLACK
AA‐11‐01492 VINTAGE IRON
AA‐11‐01493 ANTIQUE COPPER
AA‐11‐01494 SWEDISH NICKEL
AA‐11‐01495 BRUSHED CHROME
TOOLS REQUIRED
Screw Driver Door Removal Tool
(Supplied with fireplace)

FV41 GRACE KIT: RECTANGLE or ARCHED, WIDE or SLIM, INSTALLATION INSTRUCTIONS
Page 7 of 20 85-03-00904 Installation Instructions
A
5
7
6
15
7
8
FV41GRACEKIT‐ARCHWIDE
Unwrap the Grace Wide Arch Kit carefully and inspect for any shipping damage. If damage is evident, contact your Mendota Dealer. Identify the parts included with the GRACE WIDE ARCH KIT. If any parts are missing, contact your Mendota Dealer before proceeding with this installation and obtain the missing parts.
LIST OF PARTS INCLUDED KEY QTY DESCRIPTION
GRACE KIT
1 1 RECTANGLE GRACE
BAG ASSEMBLY, HANGING GRACE
2 4 SPACER #10 STUD X 1/4”
3 4 SCREW, 10‐24 X ½”
BAG ASSEMBLY, CONNECTING GRACES
4 4 SCREW, 10‐32 X ½” * WIDE ONLY*
GUIDES
5 1 TOP FINISH GUIDE
6 1 FINISH GUIDE, LH
7 1 FINISH GUIDE, RH
8 1 BOTTOM GUIDE, WIDE ARCH/RECT
9 16 TEKS, HEX #8 X ½” BLACK ZINC
Kit # Color Scheme
AA‐11‐01486 BLACK
AA‐11‐01487 VINTAGE IRON
AA‐11‐01488 SWEDISH NICKEL
AA‐11‐01489 ANTIQUE COPPER
AA‐11‐01490 BRUSHED CHROME
TOOLS REQUIRED
Screw Driver Door Removal Tool
(Supplied with fireplace)
4
3
2
8

FV41 GRACE KIT: RECTANGLE or ARCHED, WIDE or SLIM, INSTALLATION INSTRUCTIONS
Page 8 of 20 85-03-00904 Installation Instructions
2.) PULL
3.) ROTATE
4.) RELEASE
1.) INSERT
OUTERGUIDE
OUTERGUIDE
INNERGUIDE
OUTERGUIDE
INNERGUIDE
INSTALLING THE GRACE ON THE FIREPLACE The Grace Kit for the FV41 quickly hangs directly on Spacers installed to the Fireplace body. The Grace hangs using the spacers and screws, which are provided. This design allows for easy removal and replacement for cleaning and maintenance purposes.
1. Identify the Mounting Brackets which are bolted to the Grace Kit.
2. Remove Glass Frame. Follow the directions that are supplied with the fireplace, use the tool to disconnect the spring latches from the glass frame. Insert tool into hole in latch, pull towards you, rotate clockwise 90° and release to disengage the latch. Perform this operation on both latches. Rotate top of Glass Frame out towards you and pull up to remove.
3. Remove the (3) Outer and (3) Inner Guide Plates and all the hardware that secures the Guide Plates to the unit. Once removed these guides they may be disregarded.

FV41 GRACE KIT: RECTANGLE or ARCHED, WIDE or SLIM, INSTALLATION INSTRUCTIONS
Page 9 of 20 85-03-00904 Installation Instructions
INSTALLING GRACE FINISHING GUIDES
Grace Slim Rectangle Finishing Guides
Grace Wide Rectangle Finishing Guides
LEFT FINISHING GUIDERIGHT FINISHING GUIDE
TOP FINISHING GUIDE
BOTTOM FINISHING GUIDE
3534
2934
2934
35 716
301316
301316
LEFT FINISHING GUIDERIGHT FINISHING GUIDE
TOP FINISHING GUIDE
361516
BOTTOM FINISHING GUIDE
3718

FV41 GRACE KIT: RECTANGLE or ARCHED, WIDE or SLIM, INSTALLATION INSTRUCTIONS
Page 10 of 20 85-03-00904 Installation Instructions
Grace Slim Arch Finishing Guides
Grace Wide Arch Finishing Guides
RIGHT FINISHING GUIDE
516
TOP FINISHING GUIDE
LEFT FINISHING GUIDE
BOTTOM FINISHING GUIDE
30
303615
16
LEFT FINISHING GUIDERIGHT FINISHING GUIDE
TOP ARCH FINISHING GUIDE
BOTTOM FINISHING GUIDE
1 116
2912
2912
35 716

FV41 GRACE KIT: RECTANGLE or ARCHED, WIDE or SLIM, INSTALLATION INSTRUCTIONS
Page 11 of 20 85-03-00904 Installation Instructions
PLACEMENT FOR GRACE SLIM RECTANGLE FINISIHNG GUIDES Attach all finishing guides by using the Sheet Metal Screws that are provided (16) each.
214
1258
BOTTOMFINISHING GUIDE
TEKS, HEX #8 X 1/2"
LEFTFINISHINGGUIDE
RIGHTFINISHING
GUIDE
TOP FINISHING GUIDE
1 316
214
351116
30 116

FV41 GRACE KIT: RECTANGLE or ARCHED, WIDE or SLIM, INSTALLATION INSTRUCTIONS
Page 12 of 20 85-03-00904 Installation Instructions
PLACEMENT FOR GRACE WIDE RECTANGLE FINISHING GUIDES
Attach all finishing guides by using the Sheet Metal Screws that are provided (16) each.
112 11
2
111116
1 316
TOP FINISHING GUIDE
BOTTOM FINISHINGGUIDE
TEKS, HEX #8 X 1/2"
RIGHTFINISHING
GUIDE3013
16
3718
LEFTFINISHINGGUIDE

FV41 GRACE KIT: RECTANGLE or ARCHED, WIDE or SLIM, INSTALLATION INSTRUCTIONS
Page 13 of 20 85-03-00904 Installation Instructions
PLACEMENT FOR GRACE SLIM ARCH FINISHING GUIDES
Attach all finishing guides by using the Sheet Metal Screws that are provided (16) each.
7 3169 3
16
1 916
9 116
214 21
4
1 316
TOP FINISHING GUIDE
RIGHTFINISHING
GUIDE
LEFTFINISHINGGUIDE
BOTTOM FINISHINGGUIDE
TEKS, HEX #8 X 1/2"
34
3512

FV41 GRACE KIT: RECTANGLE or ARCHED, WIDE or SLIM, INSTALLATION INSTRUCTIONS
Page 14 of 20 85-03-00904 Installation Instructions
PLACEMENT FOR GRACE SLIM ARCH FINISHING GUIDES
Attach all finishing guides by using the Sheet Metal Screws that are provided (16) each.
1 916
9 316
111116
9 116
7 316
112
1 316
112
LEFTFINISHINGGUIDE
RIGHTFINISHING
GUIDE
BOTTOM FINISHINGGUIDE
TEKS, HEX #8 X 1/2"
TOP FINISHING GUIDE
37
3434

FV41 GRACE KIT: RECTANGLE or ARCHED, WIDE or SLIM, INSTALLATION INSTRUCTIONS
Page 15 of 20 85-03-00904 Installation Instructions
SPACER,#10 STUD X 1/4"
SCREW,10-24 X 12"
SPACER,# 10 STUD X1/4"
SCREW,10-24 X 12"
MOUNTING TO THE FIREPLACE BODY
1. Attach the #10 Spacer Stud x 1/4”, 10-24 x ½” Screw to the Fire Place Body Sides adjacent to the glass frame side edges in 4 places. Locate surround mounting holes per drawing (shown here). The screw and spacer are attached to the outside of the fire place body sides.
2. When all of the Guides have been attached, reattach the Glass Frame to the Fireplace. Line up tabs
on Glass Frame with slots on Glass Frame Retainer in (3) places. Position the tabs into the slots.
MOUNT TO FIREPLACE BODY SIDES ADJACENT TO GLASS
FRAME SIDE EDGES 10-24 X 12"
SCREW
SPACER#10 STUD X 1/4"
TAB ONGLASS FRAME
SLOT ON GLASSFRAME RETAINER

FV41 GRACE KIT: RECTANGLE or ARCHED, WIDE or SLIM, INSTALLATION INSTRUCTIONS
Page 16 of 20 85-03-00904 Installation Instructions
3. Rotate the frame up towards the unit.
4. Hang the Grace Kit by hooking the Open Slots in the Grace’s Mounting Bracket to the Screw and
Spacer on the Surround. Once in position, the Grace will drop into place in the slots, holding the Grace on the Fireplace Glass Frame.
5. To remove the
Grace (when necessary), simply lift the Grace assembly up until the slots in the Mounting Bracket disengage, and carefully pull the Grace assembly off the surround.
SLOT IN MOUNTINGBRACKET
SLOT INMOUNTINGBRACKET
10-24 X 12" SCREWAND #10 SPACERSTUD
10-24 X 12" SCREWAND #10 SPACER
STUD

FV41 GRACE KIT: RECTANGLE or ARCHED, WIDE or SLIM, INSTALLATION INSTRUCTIONS
Page 17 of 20 85-03-00904 Installation Instructions
CONNECTING SLIM GRACE ON TOP OF WIDE GRACE
The following pictures show both a Wide and Slim Grace connected together in both a Rectangle and Arch version. Use the dimensions in the tables below to correctly identify the Grace(s) and ensure you possess the correct parts.
FV41
WIDTH HEIGHT
Slim, Rect. A - 35” C - 39-1/2”
Wide, Rect. B- 36-1/2” D - 30-1/2”
Slim, Arch E - 35” F - 33-5/16”
Wide, Arch G - 36-1/2” H - 36-1/2”
B- WIDE RECT.
DWIDERECT.
CSLIM
RECT.
A - SLIM RECT.
1.25 SLIM2.00 WIDE
RECTANGLEVERSION
G - WIDE ARCH
1.25 SLIM2.00 WIDE
E - SLIM ARCH
FSLIM
ARCHH
WIDEARCH
ARCHVERSION
ONLY USED WHEN ATTACHING A SLIM GRACE ON TOP OF A
WIDE GRACE
10-32 x 12"SCREW

FV41 GRACE KIT: RECTANGLE or ARCHED, WIDE or SLIM, INSTALLATION INSTRUCTIONS
Page 18 of 20 85-03-00904 Installation Instructions
FV41 Arch - Wide Overlay Only FV41 Arch - Slim and WideOverlay together
ASSEMBLING THE WIDE AND SLIM GRACE KITS TOGETHER There are many color choices for the Grace. They can either be used individually or a Wide and Slim Grace can be assembled together to give a layered look.
1. Identify the Wide and Slim Graces, the Slim Grace is 1-1/4” wide and the Wide Grace is 2” wide. Both kits come assembled with the mounting brackets and screens on the Graces. Set aside the Wide Grace with the brackets assembled. DO NOT disassemble the Wide Grace!
2. Identify the Slim Grace. Remove the Screens, Mounting Brackets, and all hardware from the Slim Grace. The hardware, screen, & brackets removed from the Slim Grace will NOT be used. Set the Slim Grace aside.
SLIM OVERLAY
REMOVE SCREENS, BRACKETS AND ALLHARDWARE FROM FROM SLIM OVERLAY

FV41 GRACE KIT: RECTANGLE or ARCHED, WIDE or SLIM, INSTALLATION INSTRUCTIONS
Page 19 of 20 85-03-00904 Installation Instructions
SLIMOVERLAY
WIDEOVERLAY
10-32 TAPPED &THREADED HOLES
10-32 TAPPED &THREADED HOLES
CL
3. Identify the Wide Grace. On the Top and Bottom Screen Retainers, there are (4) places to drill through. Partially drilled ¼” holes are provided at these locations. Drill ¼” holes through these (4) holes on the Wide Grace ONLY.
4. Lay the Slim Grace face down. Place the Wide Grace over the Slim Grace and screw together with the (4) Screws provided with the Wide Grace Kit.
DRILL THROUGH1/4"
HOLES IN 4PLACES
20"20"
DRILL Ø14 THRU (4X)
DRILL Ø14
THRU (4X)FV41
DRILL THROUGH1/4"
HOLES IN 4PLACES
WIDE OVERLAY- RECT.

FV41 GRACE KIT: RECTANGLE or ARCHED, WIDE or SLIM, INSTALLATION INSTRUCTIONS
Page 20 of 20 85-03-00904 Installation Instructions
CLEANING INSTRUCTIONS
1. Grace Kits for the FV41 fireplace may be removed for cleaning purposes or prior to removing the Fireplace Glass Door for maintenance purposes.
2. If painted, simply wipe with a dry soft cloth. If a plated finish, use denatured alcohol, Isopropyl alcohol or glass cleaner solution and a soft cloth to remove any dirt and finger prints from the plated surface. DO NOT USE AN ABRASIVE PAPER TOWEL OR OTHER ABRASIVE MEDIA TO WIPE.
ANTIQUE COPPER KITS HANDLING AND MAINTENANCE INSTRUCTIONS
These Instructions are applicable to ALL Mendota Antique Copper Plated Decorative Products produced and released for use after August 10, 2010. HANDLING DURING ASSEMBLY This new Antique Copper Kit has been thoroughly redesigned for ease of cleaning and handling and for long term use without change in color or the formation of oxidation. While the new Antique Copper Plating is resistant to tarnish, oxidation and discoloration, it is susceptible to surface scratches and marring and must be handled with extreme care during installation and normal use.
ALWAYS WEAR SOFT & CLEAN CLOTH GLOVES DURING INSTALLATION It is mandated by Mendota that all installers wear soft and clean cloth gloves to handle ALL Antique Copper Plated parts during assembly to the main Fireplace body.
CLEAN UP AFTER INSTALLATION Prior to firing the appliance with the Antique Copper Kit installed, Mendota mandates that the entire visible surface of the Antique Copper Kit be wiped down using a soft cotton cloth rag and common household glass cleaner solution. DO NOT USE PAPER TOWELS AND DO NOT APPLY PRESSURE on the Antique Copper Surface when wiping. Doing so may mar the Copper Finish. Use gentle sweeps in the direction of the brush marks to remove any dirt or finger prints.
NORMAL MAINTENANCE This new Antique Copper Plated Decorative Kit requires minimal maintenance. Wipe off any finger prints using normal household glass cleaner solution and a soft cotton cloth rag. DO NOT apply pressure on the Antique Copper Kit when wiping. Doing so may mar the Copper Finish. Use gentle sweeps in the direction of the brush marks to remove any dirt or finger prints.
ALWAYS WEAR SOFT CLEAN CLOTH GLOVES!
DO NOT USE ANY ABRASIVE MEDIA!
DO NOT USE PAPER TOWELS TO WIPE THE SURFACE!
DO NOT APPLY ANY PRESSURE WHILE CLEANING!
DO NOT SAND ANY ANTIQUE COPPER FINISH!