8.5a electric cultivatorpdf.lowes.com/operatingguides/841821031695_oper.pdf3 read and understand all...
TRANSCRIPT

Read all safety rules and instructions carefully before operating this tool.
Owner’s ManualTOLL-FREE HELPLINE: 1-888-90WORKS (888.909.6757)
8.5A ELECTRIC CULTIVATOR�������

2
Contents .............................................................................................................................. 2 ...................................................................................................................... 2
Important Safety Instructions ............................................................................................3 -4Specific Safety Rules ........................................................................................................5 -6Symbols ............................................................................................................................ 7-8Electrical ......................................................................................................................... 9-10Know Your Electric Cultivator..............................................................................................11Assembly .......................................................................................................................12-16Operation ...................................................................................................................... 17-18Maintenance .......................................................................................................................19Troubleshooting ..................................................................................................................20Warranty ............................................................................................................................ 21Exploded View ................................................................................................................ 2........ 2Parts List...................................................................................................................... 2........ 3
SPECIFICATIONS
8.5 A ELECTRIC CULTIVATOR Motor ..................................................................................120V, AC only, 60Hz, 8.5Amps Speed
.................................................................................................. 16,000 RPMMotor Speed.................................................................................................................320 RPM
Wheel Size .................................................................................................................... 6 ”Tilling Width .................................................................................................................. Max 11” Cultivating Depth ............................................................................................................5 ”Tine Diameter ...............................................................................................8-1/2 ”(21.6cm)Unit Weight ........................................................................................................... 27.8Ibs.
CONTENTS

3
READ AND UNDERSTAND ALL INSTRUCTIONS.
personal injury. READ THESE INSTRUCTIONS BEFORE USING THE ELECTRIC CULTIVATOR • Read the operator’s manual carefully. Be thoroughly familiar with the controls and the proper
use of the equipment. Know how to stop the unit and disengage the controls quickly.•
liquids, gases, or dust. Cultivators create sparks which may ignite the dust or fumes.• Avoid body contact with grounded surfaces such as pipes, radiators, ranges, and refrigerators.
There is an increased risk of electric shock if your body is grounded. • Avoid Dangerous Environment — Don’t expose to rain or use cultivator in damp or wet
locations. Water entering a cultivator will increase the risk of electric shock. • Do not abuse the cord —Never use the cord to carry the tools or pull the plug from an outlet.
Keep cord away from heat, oil, sharp edges, or moving parts. Replace damaged cords immediately. Damaged cords increase the risk of electric shock.
• WARNING — To reduce the risk of electric shock, use only with an extension cord intended for outdoor use, such as an extension cord of cord type SW-A, SOW-A, STW-A, STOW-A, SJW-A, SJOW-A, SJTW-A. or SJTOW-A. These cords are rated for outdoor use and reduce the risk of electric shock.
• Never allow children to operate the equipment. Never allow adults to operate the equipment without proper instruction.
• Always wear safety glasses with side shields that comply with ANSI Z87.1— Everyday glasses have only impact resistant lenses. They are NOT safety glasses. Following this rule will reduce the risk of eye injury. Use face mask if operation is dusty.
• Dress Properly — Do not wear loose clothing or jewelry. They can be caught in moving parts. Use of rubber gloves and substantial footwear is recommended when working outdoors. Wear protective hair covering to contain long hair. Wear heavy long pants, long sleeves, boots, and gloves. Avoid loose garments or jewelry that could get caught in moving parts of the machine or its motor. Secure long hair so it is above shoulder level to prevent entanglement in any moving parts.
• Do not force cultivator — Use the correct tool for your application. The correct tool will do the job better and safer at the rate for which it is designed.
• Do not operate the equipment while barefoot or when wearing sandals or similar lightweight footwear. Wear protective footwear that will protect your feet and improve your footing on slippery surfaces.
• • Keep hands and feet away from tines. •
•
Do not overreach
To reduce the risk of electric shock, this appliance has a polarized plug (one blade is widerthan the other) and will require the use of a polarized extension cord. The appliance plug willfit into a polarized extension cord only one way. If the plug does not fit fully into the extensioncord, reverse the plug. If the plug still does not fit, obtain a correct polarized extension cord, A polarized extension cord will require the use of a polarized wall outlet. This plug will fit intothe polarized wall outlet only one way. If the plug does not fit fully into the wall outlet, reverse
—of balance.
IMPORTANT SAFETY INSTRUCTIONSWARNING: when using electric gardening appliances,basic safty precautions should always be followed to reduce the risk of fire, elctric shock and personal injury including the following.

4
SAVE THESE INSTRUCTIONS
IMPORTANT SAFETY INSTRUCTIONS
� switch is off when plugging in.
� Never pick up or carry the cultivator while the tines are turning or the motor is running. � Keep cultivator in good working condition. Check all nuts, bolts, and screws at frequent intervals
for proper tightness to be sure the equipment is in safe working condition.� � Do not use cultivator if switch does not turn it on or off. Any tool that cannot be controlled with
the switch is dangerous and must be repaired. � Disconnect appliance — Disconnect the appliance from the power supply when not in use,
before servicing, when changing accessories such as blades, and the like. Such preventive safety measures reduce the risk of starting the cultivator accidentally.
� Before cleaning, repairing, or inspecting, unplug the cultivator and make certain all moving parts have stopped.
� Never spray water directly into the motor compartment of the cultivator. �
the product. � Use only identical replacement parts when servicing the cultivator. Use of unauthorized parts
may create a risk of serious injury to the user, or damage to the product.
W A R N I N G (PROPOSITION 65)Some dust created by power sanding, sawing, grinding, drilling, and other construction activities contains chemicals known to cause cancer, birth defects or other reproductive harm. Some examples of these chemicals are:
� Lead from lead-based paints� Crystalline silica from bricks and cement and other masonry products, and� Arsenic and chromium from chemically treated lumber.
Your risk of exposure to these chemicals varies depending on how often you do this type of work. To reduce your exposure to these chemicals, work in a well-ventilated area, and work with
particles.
CHILD SAFETYTragic accidents can occur if the operator is not aware of the presence of children.
� Keep children out of the working area and under the watchful care of a responsible adult.� Do not allow children under the age of 14 to operate this hedger. Children who are 14
years of age and older must read and understand the operating instructions and safety rules in this manual and must be trained and supervised by a parent.
� Stay alert, and turn the cultivator off if a child or any other person enters the working area.� Look behind and down for small children before and while cutting backwards.� Use extreme care when approaching blind corners, doorways, shrubs, trees, or other
objects that may obscure your view of a child who may run into the path of the cultivator.
the plug. If the plug still does not fit, contact a qualified electrician to install the proper wall outlet. Do not change the equipment plug, extension cord receptacle, or extension cord plugin any way.

5
SAVE THESE INSTRUCTIONS
SPECIFIC SAFETY RULES
��Do not use near underground electric cables, telephone, lines, pipes, or hoses. If in doubt, contact your utility or telephone company to locate underground services.
��If the unit strikes a foreign object, stop the motor, disconnect the extension cord, thoroughly inspect the machine for any damage, and repair the damage before restarting and operating the machine.
��Do not overload the machine capacity by cultivating too deep in a single pass or at too fast a rate.
��Stay alert. Watch what you are doing. Use common sense. Do not operate cultivator when you are tired, ill, or upset.
��Be aware that the equipment may unexpectedly bounce upward or jump forward if the tines should strike buried obstacles such as large stones, roots, or stumps.
��Extension Cord – To reduce the risk of disconnection of appliance cord from the extension cord during operating, it is possible to tie the extension cord and power cord in a knot to ������������ ����� ��������� ���������������������������� ����� ���������������then connect the plug end of the power cord into the receptacle end of the extension cord. This method can also be used to tie two extension cords together.
Fig. 1
��Make sure your extension cord is in good condition. When using an extension cord, be sure to use one heavy enough to carry the current your product will draw. A wire gauge size (A.W.G.) of at least 14 is recommended for an extension cord 50 feet or less in length. A cord exceeding 100 feet is not recommended. If in doubt, use the next heavier gauge. The smaller the gauge number, the heavier the cord. An undersized cord will cause a drop in line voltage resulting in loss of power and overheating.
��Wear hearing protection.��Ensure that people and pets are at least 50’ (15 m) away from cultivator while in use.
6
SAVE THESE INSTRUCTIONS
SPECIFIC SAFETY RULES
��Replace worn or damaged parts only with identical replacement parts.��Ensure that work area is free of slippery spots or excessive quantities of stone.��Start the cultivator carefully according to instructions from a normal operating position and
with feet well away from the tines. Do not force cultivator. It will do the job better and with less likelihood of a risk of injury at the rate for which it was designed.
��Unplug the unit before unclogging the tines and when making any repairs, adjustments, or inspections.
��Never operate the equipment on a slope.��Use extreme caution when pulling the machine towards you.��Store Idle Appliances Indoors — When not in use, appliances should be stored indoors in dry,
and high or locked-up place – out of reach of children.��Maintain Appliance with Care — Keep tines clean for best performance and reduce the risk
of injury. Follow instructions for lubrication and changing accessories. Inspect cultivator cord periodically and, if damaged, have it replaced. Keep handles dry, clean, and free from grease and oil.
��Keep Children Away — All visitors and bystanders should be kept at a distance of at least 50 feet from work area.
��Use Right Appliance — Do not use appliance for any job except that for which it is intended.��Ground Fault Circuit Interrupter (GFCI) protection should be provided on the circuit (s) or outlet
(s) to be used for the gardening appliance. Receptacles are available having built-in GFCI protection and may be used for this measure of safety.
��Don’t grasp the exposed cutting blades or cutting edges when picking up or holding the appliance.
��Check damaged parts. Before further use of this cultivator, a guard or other part that is damaged should be carefully checked to determine that it will operate properly and perform its intended function. Check for alignment of moving parts, binding of moving parts, breakage of parts, mounting, and any other condition that may affect its operation. A guard or other part that is damaged should be properly repaired or replaced by an authorized service center unless otherwise indicated elsewhere in this manual.
��Save these instructions. Refer to them frequently and use them to instruct others who may use this cultivator. If you loan someone this unit, loan them these instructions also.

7
SYMBOLS
SYMBOL NAME DESIGNATION/EXPLANATION
V Volts Voltage
A Amperes Current
Hz Hertz Frequency (cycles per second)
W Watt Power
min Minutes Time
Alternating Current Type of current
Direct Current Type or a characteristic of current
Class II Construction Double-insulated construction
Wet Conditions Alert Do not expose to rain or use in damp locations
Read The Operator’s Manual To reduce the risk of injury user must read and
understand operator’s manual before using this product.
Safety Alert Precautions that involve your safety.
Keep Bystanders Away Keep all bystanders at least 50 ft. away.
Eye Protection Always wear safety goggles or safety glasses
with side shields and, as necessary, a full face shield when operating this product.
Long Hair Failure to keep long hair away from the air inlet could result in personal injury.
Loose Clothing Failure to keep loose clothing from being drawn into air intake could result in personal injury.
Ricochet Thrown objects can ricochet and result in personal injury or property damage.
Cutting Hazard Keep feet and hands away from rotating tines.
No Hand Symbol Failure to keep your hands away from the blade will result in serious personal injury.
Some of the following symbols may be used on this product. Please study them and learn their meaning. Proper inter-pretation of these symbols will allow you to operate the product better and safer.

8
The following signal words and meanings are intended to explain the levels of risk associated with this product.
SERVICE
service technician. For service we suggest you return the product to your nearest AUTHORIZED SERVICE CENTER for repair. When servicing, use only identical replacement parts.
W A R N I N GTo avoid serious personal injury, do not attempt to use this product until you read thoroughly and understand completely the operator’s manual. If you do not understand the warnings and instructions in the operator’s manual, do not use this product. Call GREENWORKS (1-888-909-6757) customer service for assistance.
W A R N I N GThe operation of any power tool can result in foreign objects being thrown into your eyes, which can result in severe eye damage. Before beginning power tool operation, always wear safety goggles or safety glasses with side shields and, when needed, a full face shield. We recommend Wide Vision Safety Mask for use over eyeglasses or standard safety glasses with side shields. Always use eye protection which is marked to comply with ANSI Z87.1.
SYMBOL SIGNAL MEANING
DANGER Indicates an imminently hazardous situation, which, if not avoided, will result in death or serious injury.
WARNING Indicates a potentially hazardous situation, which, if not avoided, could result in death or serious injury.
CAUTION Indicates a potentially hazardous situation, which, if not avoided, may result in minor or moderate injury.
CAUTION (Without Safety Alert Symbol) Indicates a situation that may result in property damage.
SYMBOLS
SAVE THESE INSTRUCTIONS

9
ELECTRICAL
W A R N I N GKEEP THE EXTENSION CORD CLEAR OF THE TINES AND WORKING AREA. POSITION THE CORD SO THAT IT WILL NOT GET CAUGHT ON LUMBER, TOOLS OR OTHER OBSTRUCTIONS WHILE YOU ARE WORKING WITH A CULTIVATOR. FAILURE TO DO SO CAN RESULT IN SERIOUS PERSONAL INJURY.
W A R N I N GTHIS CULTIVATOR IS FOR OUTDOOR USE ONLY. DO NOT EXPOSE TO RAIN OR USE IN DAMP LOCATIONS.
GUIDELINES FOR USING EXTENSION CORDS USE THE PROPER EXTENSION CORD. Make sure your extension cord is in good condition. When using an extension cord, be sure to use one of heavy enough gauge to carry the current your product will draw. An undersized cord will cause overheating. The table below shows the correct size to use depending on cord length and nameplate ampere rating. If in doubt, use the next heavier gauge.The smaller the gauge number, the heavier the cord.
Make sure your extension cord is properly wired and in good electrical condition.��������������������������!���� ��� ��� ����������������������"����������������before use. Keep extension cords away from sharp objects, excessive heat anddamp or wet areas.Use a separate electrical circuit for tools. This circuit should not be less than #12 wireand should be protected with a 15 A time delayed fuse. Before connecting the motorto the power line, make sure the switch is in the OFF position and the electric currentis rated the same as the current stamped on the motor nameplate. Running at alower voltage will damage the motor.
MINIMUM GAUGE FOR EXTENSION CORDS (AWG) (WHEN USING 120V ONLY)
Amp Rating Total Length of Cord in Feet (meters) More Than Not More Than 25' (7.6 m) 50' (15 m) 100' (30.4 m) 150' (45.7 m) 0 6 18 16 16 14 6 10 18 16 14 12 10 12 16 16 14 12 12 16 14 12 Not Recommended
**Ampere rating (on tool faceplate)

10
ELECTRICAL
W A R N I N GCHECK EXTENSION CORDS BEFORE EACH USE. IF DAMAGED REPLACE IMMEDIATELY. NEVER USE TOOL WITH A DAMAGED CORD SINCE TOUCHING THE DAMAGED AREA COULD CAUSE ELECTRICAL SHOCK RESULTING IN SERIOUS INJURY.
ELECTRICAL CONNECTION This tool is powered by a precision built electric motor. It should be connected to a power sup-ply that is 120 volts, 60 Hz, AC only (normal household current). Do not operate this tool on direct current (DC). A substantial voltage drop will cause a loss of power and the motor will overheat. If the product does not operate when plugged into an outlet, double check the power supply.
SPEED AND WIRING The speed is not constant and decreases under a load or with lower voltage. For voltage, the wiring in a shop is as important as the motor’s horsepower rating. A line intended only for lights cannot properly carry a cultivator motor. Wire that is heavy enough for a short distance will be too light for a greater distance. A line that can support one cultivator may not be able to support two or three tools.
FOR ALL DOUBLE-INSULATED APPLIANCESReplacement Parts — When servicing use only identical replacement parts.Polarized Appliance Connections — To reduce the risk of electric shock, this appliance has a polarized plug (one blade is wider than the other) and will require the use of a polarized exten-�� ��� ����$�������������������������� ���� ����%����!���� ��� ��� ���� ��������&���������� ���� ����������� ����!���� ��� ��������������������&���������������� ���� ���� �������correct polarized extension cord. A polarized extension cord will require the use of a polarized ����� �����$����������������� ���� ����%�������� ���� ���� ��������&���������� ���� ����������� �������� ���������������������&��������������� ���� ����� ������"������������������� �install the proper wall outlet. Do not change the equipment plug, extension cord receptacle, or extension cord plug in any way. ������ �������������������������������������� �!�"�����������!� ��������#$��%�"��������#&�����������������#�����'���#!����#�(������!!�#�'��������%%(��������������"����(�"����)������#!���#!���*�#&�&�$��%����!����#���������"����)�+�#����,%�������+������������-��#!���*�#&�&�$���

11
KNOW YOUR CULTIVATOR
Read this operator’s manual and safety rules before operating your cultivator. Compare the illutration in Fig.2 to your cultivator in order to familiarize yourself with the location of various controls and adjustments. Save this manual for future reference.
Fig. 2
SAFETY LOCK BUTTON
HANDLE
TINE SHIELD
RING PIN
OUTER TINES
WHEEL ASSEMBLY
INNER TINES
BAIL SWITCH
PLUG CONNECTOR
BOLT
HITCH PIN
12
UNPACKINGThis product requires assembly.• Carefully remove the product and any accessories from the box. Make sure that all items
listed in the packing list are included.
• Inspect the tool carefully to verify no breakage or damage occurred during shipping.
• Do not discard the packing material until you have carefully inspected and satisfactorily operated.
• If any parts are damaged or missing, please call 1-888- 909-6757 for assistance.
PACKING LIST• Cultivator
• Hitch Pins (2)
• Bolt
+ Ring Pins(2)
• Inner Tines (2)
• Outer Tines (2)
• Felts (2)
• Wheel Assembly Hitch Pin
• Operator’s Manual• Wing nuts (4)
W A R N I N GIf any parts are damaged or missing, do not operate this product until the parts are replaced. Failure to heed this warning could result in serious personal injury.
W A R N I N GDo not attempt to modify this tool or create accessories that are not recommended for use with
condition that may lead to serious personal injury.
W A R N I N GDo not plug the tiller into the outlet until assembly is complete. Failure to comply could result in accidental starting, and possible serious personal injury.
ASSEMBLY

13
ASSEMBLY
ASSEMBLING THE HANDLE (See Figure. 3)
• Align the holes on the upper handle with the holes on the middle handle. Insert the bolts, and tighten them using the wing nuts provided.
•
Fig. 3
MIDDLE HANDLE
LOWER HANDLE
UPPERHANDLE
WING NUT
WING NUT
Align the holes on the middle handle with the holes on the lower handle. Insert the bolts, and tighten them using the wing nuts provided.
14
ASSEMBLY
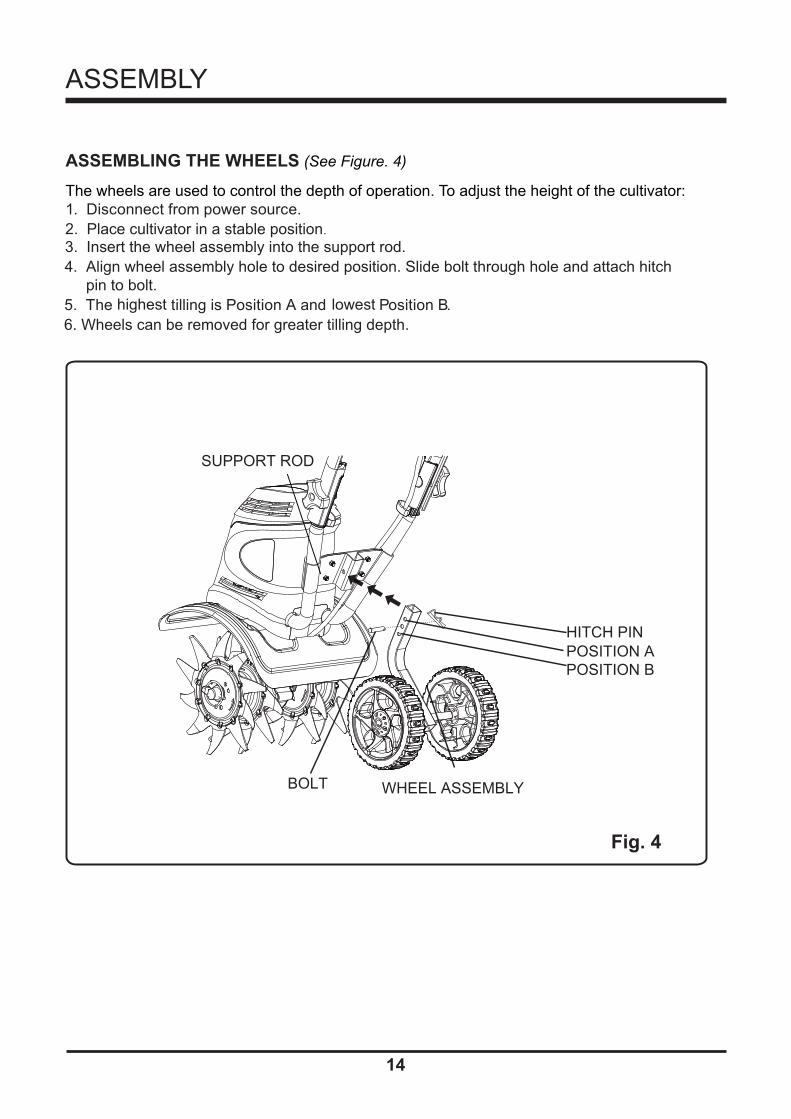
ASSEMBLING THE WHEELS (See Figure. 4)
The wheels are used to control the depth of operation. To adjust the height of the cultivator: 1. Disconnect from power source.2. Place cultivator in a stable position.3. Insert the wheel assembly into the support rod. 4. Align wheel assembly hole to desired position. Slide bolt through hole and attach hitch pin to bolt.5. The tilling is Position A and Position B.6. Wheels can be removed for greater tilling depth.
Fig. 4
highest lowest
POSITION AHITCH PIN
BOLT
SUPPORT ROD
POSITION B
WHEEL ASSEMBLY
15
ASSEMBLY
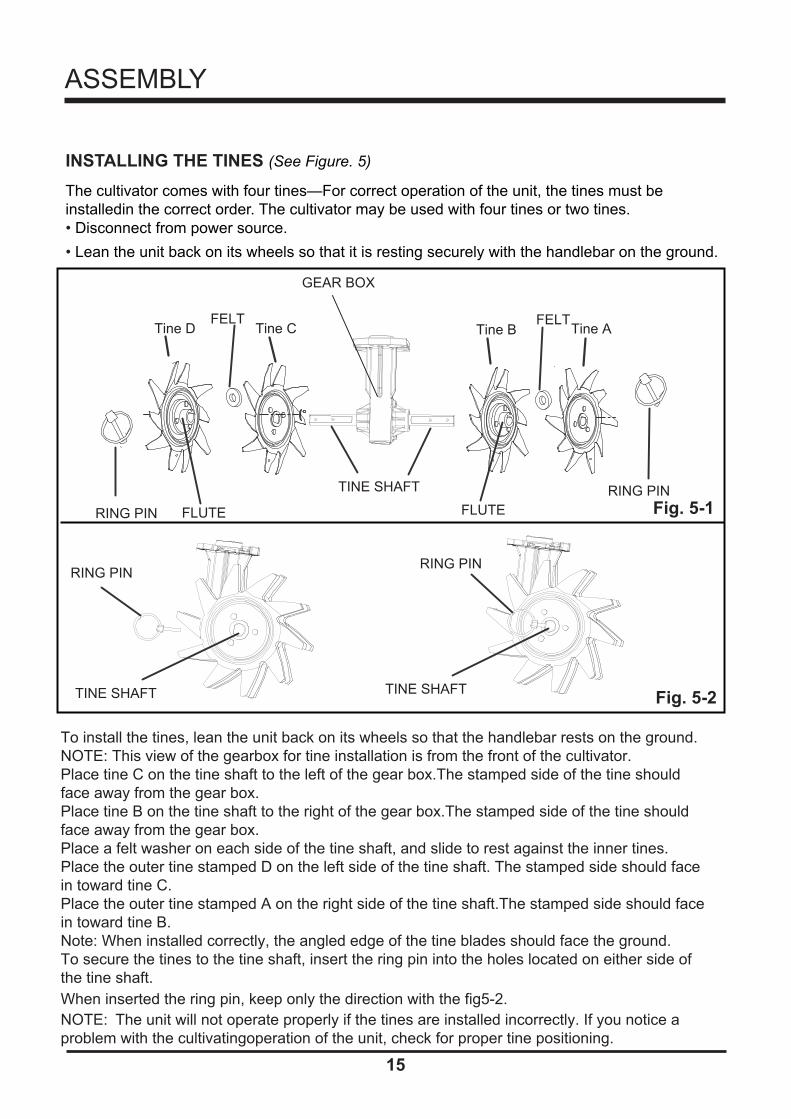
INSTALLING THE TINES (See Figure. 5)
The cultivator comes with four tines—For correct operation of the unit, the tines must be installedin the correct order. The cultivator may be used with four tines or two tines.• Disconnect from power source.• Lean the unit back on its wheels so that it is resting securely with the handlebar on the ground.
Fig. 5-1
Fig. 5-2
TINE SHAFT
TINE SHAFT
GEAR BOX
FLUTEFLUTE
FELTFELTTine D Tine C Tine B Tine A
RING PIN
RING PIN
RING PIN
To install the tines, lean the unit back on its wheels so that the handlebar rests on the ground. NOTE: This view of the gearbox for tine installation is from the front of the cultivator.Place tine C on the tine shaft to the left of the gear box.The stamped side of the tine should face away from the gear box.Place tine B on the tine shaft to the right of the gear box.The stamped side of the tine should face away from the gear box.Place a felt washer on each side of the tine shaft, and slide to rest against the inner tines.Place the outer tine stamped D on the left side of the tine shaft. The stamped side should face in toward tine C.Place the outer tine stamped A on the right side of the tine shaft.The stamped side should facein toward tine B.Note: When installed correctly, the angled edge of the tine blades should face the ground.To secure the tines to the tine shaft, insert the ring pin into the holes located on either side of
When inserted the ring pin, keep only the direction with the fig5-2. the tine shaft.
NOTE: The unit will not operate properly if the tines are installed incorrectly. If you notice a problem with the cultivatingoperation of the unit, check for proper tine positioning.
RING PIN
TINE SHAFT
16
ASSEMBLY
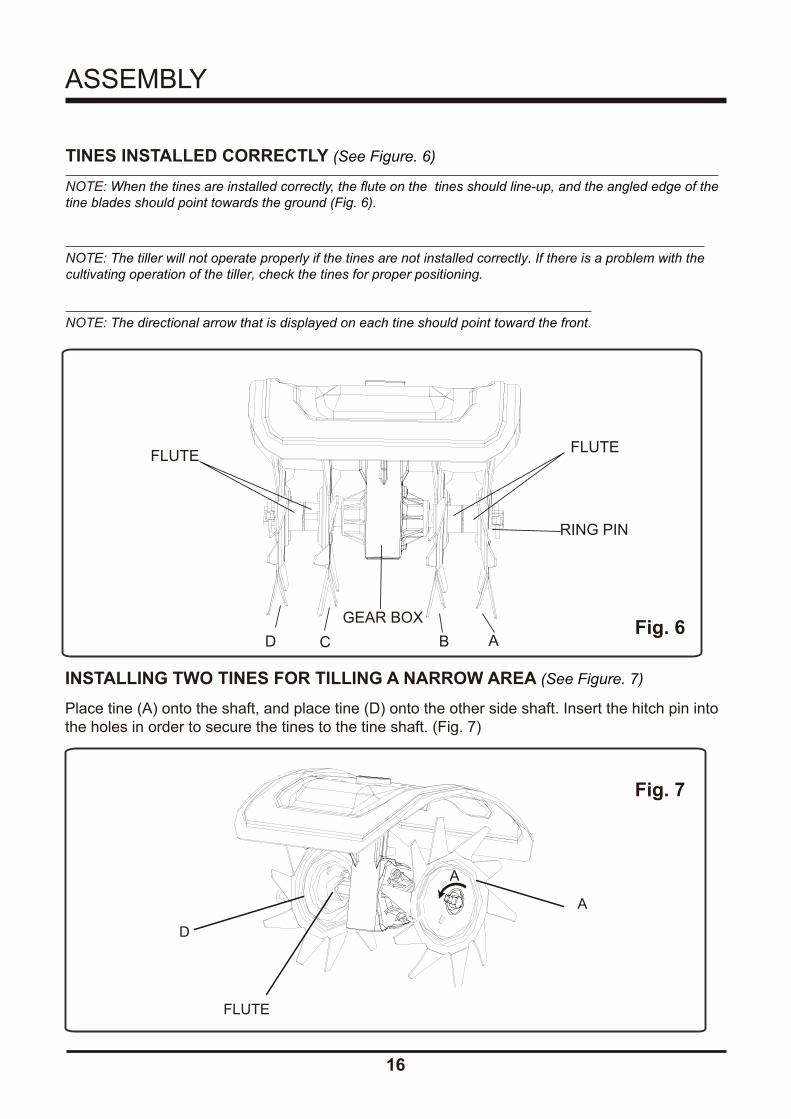
TINES INSTALLED CORRECTLY (See Figure. 6)
NOTE: tine blades should point towards the ground (Fig. 6).
NOTE: The tiller will not operate properly if the tines are not installed correctly. If there is a problem with the cultivating operation of the tiller, check the tines for proper positioning.
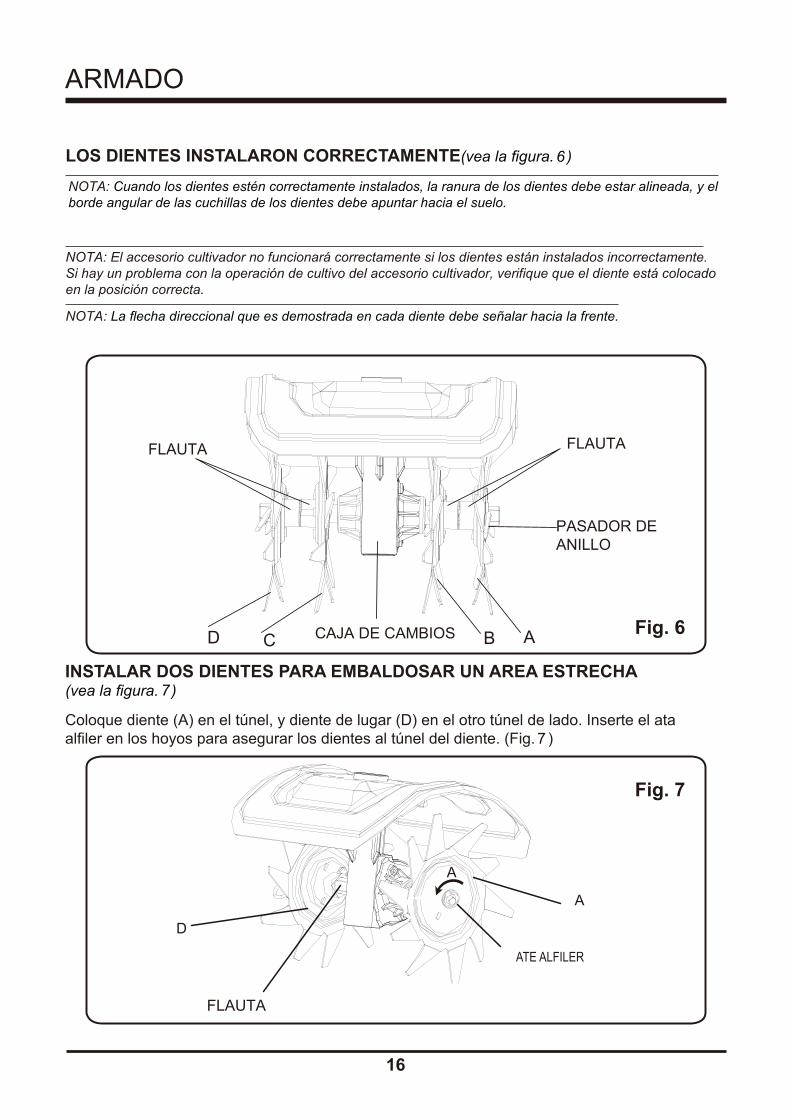
NOTE: The directional arrow that is displayed on each tine should point toward the front.
INSTALLING TWO TINES FOR TILLING A NARROW AREA (See Figure. 7)
Place tine (A) onto the shaft, and place tine (D) onto the other side shaft. Insert the hitch pin into the holes in order to secure the tines to the tine shaft. (Fig. 7)
Fig. 6
Fig. 7
RING PIN
ABCD
FLUTEFLUTE
GEAR BOX
A
A
D
FLUTE

17
OPERATION
W A R N I N G
Do not allow familiarity with tools to make you care-less. Remember that a careless fraction of a
W A R N I N G
Always wear safety goggles or safety glasses with side shields when operating tools. Failure to do so could result in objects being thrown into your eyes, resulting in possible serious injury.
W A R N I N G
Do not use any attachments or accessories not recommended by the manufacturer of this tool. The use of attachments or accessories not recommended can result in serious personal injury.
W A R N I N G
Do not allow hands, feet, or any other part of the body or clothing near the rotating tines or any other moving part. The tines begin to rotate forward once the switch trigger is depressed. The tines continue to rotate until the switch trigger is released. Failure to avoid contact could cause serious personal injury.
STARTING THE CULTIVATOR (See Figure. 8.)1. Plug the cultivator into an approved outdoor extension cord.2. Press the safety lock button and pull the bail switch to the handle to begin the rotation. Release safety lock button while continuing to hold upward on bail switch to continue use.
STOPPING THE TILLER/CULTIVATOR Release bail switch to stop the cultivator.
Fig. 8
SAFETY LOCK BUTTON
BAIL SWITCH

18
OPERATION
PREPARING THE SEED BED The cultivator can be used to break up garden soil and prepare a seedbed for planting. Plan ahead to leave enough room between the seed rows to allow for machine cultivating after the plants have grown.TILLING SOD:Tilling sod into the soil is not recommended. If sod must be removed to perform application then it is suggested to do as follows:
1. Map out the area of sod required to be removed.
2. Cut into 16 x 36” sections using a spade shovel or edger at a depth of 3 inches.
3. Lift the sod from the edges using a shovel sliding below at the roots.
4. Remove the sod. Carry sod to compost or other pile turned grass down to allow grass to decompose.
5. Once sod layer is removed, begin to till the soil to desired depth.
GENERAL TILLING/CULTIVATINGShallow cultivating (less than 2” [5 cm] deep) can be used to disrupt weeds and aerate soil with-out injuring nearby plant roots. It should be done often so that weeds do not grow large and get tangled in the tines of the tiller.
The two inner blades can be removed from the unit to allow a narrower cultivating width. See pages 15 for correct tine installation process.
1. With the wheel assembly installed to the desired depth position as described on page 14, roll the tiller to the work area.
2. Route the extension cord through the extension cord retainer.
3. Plug the tiller into an approved extension cord.
4. Stand behind tiller, with tines on ground and the work area clean and free of obstructions.5. Start the tiller using directions from page 17.
NOTE: It may take several passes over the same path in order to reach the desired depth. Do not try to dig too
dig more deeply, lift up on the handlebar pushing the front harder into the ground. Apply downward pressure on the handlebar, pulling unit down towards you for more shallow cultivating. If the tiller stays and digs in at one spot, try rocking it from side to side in order to start it moving forward again. If the soil is very hard, water it a few days before cultivating. Avoid working soil that is soggy or wet. Wait a day or two after heavy rain for the ground to dry.
IMPORTANT: If weeds, roots, vines or other growth gets collected around the bottom of the tiller it is important to stop tiller. Disconnect from power source and clean tines using a screwdriver or other object which can help remove debris. If necessary, removes tines to untangle debris from shaft and tines. QUICK TIPS:Remove rocks and roots before tilling in order to prevent damage to the tiller. Work the soilwhen it is neither too wet nor too dry. To test the moisture level of the soil, take a handful of soil and squeeze it. If it remains in a tight ball when you release your grip, it is too wet. If itcrumbles, it is
a windy day. Fall tilling presents many advantages over spring tilling. Iteliminates the need to till in the spring, and it allows for earlier planting. Soil moisture andtemperature conditions are favor-able for decomposition of the organic matter that is turnedunder in the fall. Furthermore, disease organisms, insects, and perennial weeds can bereduced by tilling in the fall.

��
MAINTENANCE
W A R N I N GWHEN SERVICING, USE ONLY IDENTICAL REPLACEMENT PARTS. USE OF ANY OTHER PARTS MAY CREATE A HAZARD OR CAUSE PRODUCT DAMAGE.
W A R N I N GALWAYS WEAR SAFETY GOGGLES OR SAFETY GLASSES WITH SIDE SHIELDS DURING PRODUCT OPERATION. IF OPERATION IS DUSTY, ALSO WEAR A DUST MASK.
W A R N I N GBEFORE INSPECTING, CLEANING, OR SERVICING THE MACHINE, DISCONNECT THE PLUG FROM POWER SOURCE AND WAIT FOR ALL MOVING PARTS TO STOP. FAILURE TO FOLLOW THESE INSTRUCTIONS CAN RESULT IN SERIOUS PERSONAL INJURY OR PROPERTY DAMAGE.
GENERAL MAINTENANCE Avoid using solvents when cleaning plastic parts. Most plastics are susceptible to damage from various types of commercial solvents and may be damaged by their use. Use clean cloths to remove dirt, dust, oil, grease, etc.
W A R N I N GDO NOT AT ANY TIME LET BRAKE FLUIDS, GASOLINE, PETROLEUM-BASED PRODUCTS, PENETRATING OILS, ETC., COME IN CONTACT WITH PLASTIC PARTS. CHEMICALS CAN DAMAGE, WEAKEN, OR DESTROY PLASTIC WHICH MAY RESULT IN SERIOUS PERSONAL INJURY. ONLY THE PARTS SHOWN ON THE PARTS LIST ARE INTENDED TO BE REPAIRED OR REPLACED BY THE CUSTOMER. ALL OTHER PARTS SHOULD BE REPLACED AT AN AUTHORIZED SERVICE CENTER.
STORING THE CULTIVATOR The following steps should be taken before storing the cultivator for the season.��Clean dirt, grass, and other materials from the entire unit.��Wipe the tines with oil or spray them with silicone lubricant to prevent rusting.��Oil the switch trigger cable and all visible moving parts. Do not remove the motor cover.��Order new parts to replace any that are badly worn or broken.��Store in an upright position in a clean, dry place. Store with the handles in the extended
position, or loosen handle knobs and fold handles down. Do not allow switch trigger cable to become pinched when lowering the handlebar.
PREPARING FOR USE AFTER STORAGEThe following steps should be taken before using the cultivator after it has been stored.��Unfold the handles into the upright position and secure by tightening handlebar knobs. Do not
allow the switch trigger cable to become pinched when raising the handlebar.��Follow the steps to restart the cultivator.

20
TROUBLESHOOTING
PROBLEM
Motor fails to start when switch trigger is depressed.
Motor runs but tines do not move.
CAUSE
��"������! is not ��&&�! in or connection is loose.
Household circuit breaker is
Cultivator circuit overloadprotection is tripped.
Let unit rest for 4 minutes,then repeat steps to start.
tripped.
Gear train failure.
REMEDY
���&��#����� �"������!.
Check circuit breaker.
Take unit to authorized ser-vice center.

21
LIMITED FOUR-YEAR WARRANTY
GREENWORKS® hereby warranties this product, to the original purchaser with proof of purchase, for a period of four (4) years against defects in materials, parts or workmanship. GREENWORKS®, at its own discretion will repair or replace any and all parts found to be defective, through normal use, free of charge to the customer. This warranty is valid only for units which have been used for personal use that have not been hired or rented for industrial/commercial use, and that have been maintained in accordance with the instructions in the owners’ manual supplied with the product from new.
ITEMS NOT COVERED BY WARRANTY: 1. Any part that has become inoperative due to misuse, commercial use, abuse, neglect,
accident, improper maintenance, or alteration; or
2. The unit, if it has not been operated and/or maintained in accordance with the owner's manual; or
3. Normal wear, except as noted below;
4. Routine maintenance items such as lubricants, blade sharpening;
5.
GREENWORKS HELPLINE (1-888-90WORKS): Warranty service is available by calling our toll-free helpline, 9am to 5pm EST. Monday – Friday at 1-888-909-6757 (1-888-90WORKS).
TRANSPORTATION CHARGES: Transportation charges for the movement of any power equipment unit or attachment are the responsibility of the purchaser. It is the purchaser’s responsibility to pay transportation charges for any part submitted for replacement under this warranty unless such return is requested in writing by GREENWORKS.

22
.��� ��/

23
PARTS LIST
ITEM # PART NO. DESCRIPTION QTY 1 311021059 UPPER HANDLE ASSEMBLY 12 333021059 MIDDLE HANDLE 13 32204283 BOLT 44 3410835-8 WING NUT 45 311041059 LOWER HANDLE ASSEMBLY 16 311051059 WHEEL ASSEMBLY 17 311101059 TINE A
TINE B1
8 311111059 19 31102289A GEAR BOX 110 32203289AB BOLT 411 311121059 TINE C 112 311131059 TINE D 113 33210289 RING PIN 214 34901282-1 FELT 215 32208261 NUT 416 33301289 GUARD 117 34113288 FIXED PLATE 118 3220436 BOLT 419 311061059 POWER HEAD ASSEMBLY 1

TOLL-FREE HELPLINE: 1-888-90WORKS (888.909.6757)
Greenworks ToolsPO Box 1238
Mooresville, NC 28115

Antes de hacer funcionar esta herramienta, lea cuidadosamente todas las reglas de seguridad y las instrucciones.
Manual del PropietarioLÍNEA TELEFÓNICA GRATIS PARA AYUDA: 1-888-90WORKS (888.909.6757)
8A MOTOBECHE ELECTRIQUETL08B00
2
Índice ................................................................................................................................... 2 .............................................................................................. 2
Reglas de seguridad generales .........................................................................................3 -4Reglas de seguridad específicas .......................................................................................5 -6Símbolos ............................................................................................................................ 7-8
Familiarícese con su cultivadora ...........................................................................................11Armado ...........................................................................................................................12-16Funcionamiento ...............................................................................................................17-18Mantenimiento ......................................................................................................................19Solución de problemas ........................................................................................................ 20Garantía ................................................................................................................................21Diagrama de componentes .................................................................................... ....... 22Lista de piezas ..................................................................................................... ......... 23
ESPECIFICACIONES DEL PRODUCTO
CULTIVATORA 8.5A
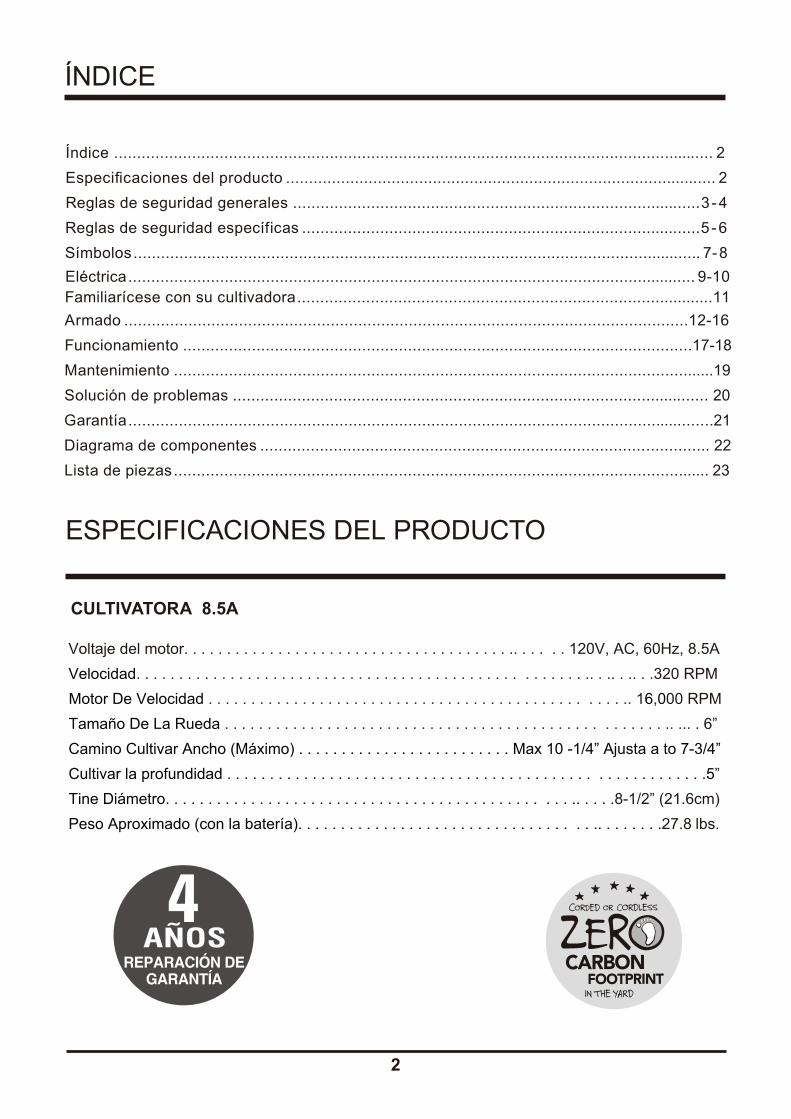
ÍNDICE
Voltaje del motor. . . . . . . . . . . . . . . . . . . . . . . . . . . . . . . . . . . . . . .. . . . . . 120V, AC, 60Hz, 8.5A Velocidad. . . . . . . . . . . . . . . . . . . . . . . . . . . . . . . . . . . . . . . . . . . . . . . . . . . . .. . .. . .. . .320 RPM
Camino Cultivar Ancho (Máximo) . . . . . . . . . . . . . . . . . . . . . . . . . Max 10 -1/4” Ajusta a to 7-3/4”
Peso Aproximado (con la batería). . . . . . . . . . . . . . . . . . . . . . . . . . . . . . . . . . .. . . . . . . .27.8 lbs.
Cultivar la profundidad . . . . . . . . . . . . . . . . . . . . . . . . . . . . . . . . . . . . . . . . . . . . . . . . . . . . . . . .5” Tine Diámetro. . . . . . . . . . . . . . . . . . . . . . . . . . . . . . . . . . . . . . . . . . . . . . . .. . . . .8-1/2” (21.6cm)
Tamaño De La Rueda . . . . . . . . . . . . . . . . . . . . . . . . . . . . . . . . . . . . . . . . . . . . . . . . . . . .. ... . 6”Motor De Velocidad . . . . . . . . . . . . . . . . . . . . . . . . . . . . . . . . . . . . . . . . . . . . . . . . .. 16,000 RPM
Eléctrica ............................................................................................................................ 9-10

3
LEA Y COMPRENDA TODAS LAS INSTRUCCIONES. El incumplimiento de las instrucciones señaladas abajo puede causar descargas eléctricas, incendios y lesiones serias. LEA ESTAS INSTRUCCIONES
• Lea cuidadosamente el manual del operador. Familiarícese completamente con los controles y la forma correcta de utilizar el equipo. Aprenda la forma de apagar la unidad y de desactivar los controles con rapidez.
• No utilice la cultivadora en atmósferas explosivas, como las existentes alrededor de líquidos,
• Evite el contacto del cuerpo con objetos conectados a tierra, como las tuberías, radiadores, estufas y refrigeradores. Existe un mayor riesgo de descargas eléctricas si el cuerpo está en contacto con tierra.
• Evite entornos peligroso — No exponga No exponga la cultivadora a la lluvia ni la coloque en lugares húmedos o mojados. La introducción de agua en una cultivadora eléctrica aumenta el riesgo de descargas eléctricas.
REGLAS DE SEGURIDAD GENERALESADVERTENCIA: Cuando use herramientas eléctricas para jardinería, las precauciones básicas safty siempre se deben seguir para reducir el riesgo de incendio, descarga elctric y lesiones personales incluyendo las siguientes.
• ADVERTENCIA — Reducir el riesgo de la descarga eléctrica, Sólo utilice el artefacto con un cordón de extensión para exteriores, como SW-A, SOW-A, STW-A, STOW-A, SJW-A, SJOW-A, SJTW-A o SJTOW-A. Estos cordones están diseñados para utilizarse al aire libre y reducen el riesgo de descarga eléctrica.
• Nunca permita utilizar el equipo a ningún niño. Nunca permita que adultos utilicen el equipo sin el debido aprendizaje.
• Siempre use gafas de seguridad con protección lateral. Los anteojos comunes sólo tienen lentes resistentes a los impactos. NO son anteojos de seguridad. Con el cumplimiento de esta regla se reduce el riesgo de posibles lesiones oculares. Si el proceso es polvoriento, utilice una careta.
• No fuerce la cultivadora — Utilice la herramienta adecuada para cada tarea. El uso de la herramienta adecuada a la velocidad para la que está diseñada, efectuará el trabajo de mejor y más segura manera.
• No accione el equipo cuando esté descalzo o al llevar puestas sandalias o calzado liviano
resbaladizas.
N’utilisez pas le cordon de façon abusive. N’utilisez pas le cordon pour porter l’outil, et ne tirezpas sur le cordon pour débrancher la fiche de la prise. Tenez le cordon à l’écart de la chaleur,de l’huile, des arêtes vives et des pièces mobiles. Remplacez un cordon endommagéimmédiatement. Un cordon endommagé augmente le risque de choc électrique.
•
Use la vestimenta apropiada. No use ropa, guantes, collares o joyería holgados. Estos se podríanatorar y arrastrarlo hacia las piezas móviles. Al trabajar a la intemperie se recomienda usar guantes de caucho y calzado antideslizante. Además use una cubierta protectora para contener el cabellolargo. que pudieran resultar atrapadas en las piezas móviles de la máquina o en el motor de la misma. Recójase el cabello largo arriba de nivel de los hombros para evitar que se enrede en las piezas móviles. l
•
No utilice la cultivadora si se encuentra bajo los efectos del alcohol o drogas. •Mantenga los pies y las manos lejos de los dientes.•No realice sobreesfuerzos – sitúese en una superficie nivelada y mantenga el equilibrio en todo momento. Una sobreextensión puede resultar en la pérdida del equilibrio.
•
4
GUARDE ESTAS INSTRUCCIONES
REGLAS DE SEGURIDAD GENERALES
• Desconecte aparato — Desconecte la clavija de la toma de corriente antes de efectuar ajustes, cambiar accesorios o guardar el aparato. Tales medidas preventivas de seguridad reducen el riesgo de poner en marcha accidentalmente la cultivadora.
• Antes de limpiar, reparar o inspeccionar la máquina, desconecte la cultivadora y cerciórese de que se hayan detenido todas las partes en movimiento.
• Nunca rocíe agua directamente en el compartimiento del motor de la cultivadora. •
de lesiones al usuario, y de daños físicos al producto.• Al dar servicio a la cultivadora, sólo utilice piezas de repuesto idénticas. El empleo de piezas
producto.
SEGURIDAD DE NIÑOSSi el operador no se percata de la presencia de niños, se pueden generar accidentes trágicos.
• Mantenga a los niños alejados del área de trabajo y bajo el cuidado atento de un adulto responsable.
• No deje que niños menores de 14 años operen este recortador. Los niños de 14 años o más deben leer y comprender las instrucciones de funcionamiento y las reglas de seguridad de este manual y uno de sus padres les debe capacitar y supervisar.
• Manténgase alerta, y apague el recortador si un niño o cualquier otra persona ingresa al área de trabajo.
• Antes y al recortar hacia atrás, mire hacia atrás y hacia abajo para asegurarse de que no hay niños pequeños.
• Tenga extremo cuidado al acercarse a esquinas ciegas, entradas, arbustos, árboles u otros objetos que le pudieran obstruir la visión de niños, los cuales pudieran correr hacia el área de trabajo del recortador.
Si aún así no encaja, comuníquese con un electricista calificado para instalar en la pared correcta salida. No cambie el enchufe del equipo, receptáculo del cable de extensión o el enchufe del cable de extensión de ninguna manera.
Para reducir el riesgo de choque eléctrico, este aparato tiene un enchufe polarizado (una pataes más ancha que la otra) y requerirá el uso de un cable de extensión polarizado. El enchufedel aparato se encajar en un cable de extensión polarizado de una sola manera. Si el enchufeno entra completamente en la extensión cable, invierta el enchufe. Si aún así no encaja, obtengaun cable de extensión polarizado correcto, Un cable de extensión polarizado requiere el uso deuna toma de corriente polarizada. Este enchufe encajará en la toma de corriente polarizada deuna sola manera. Si el enchufe no entra completamente en el tomacorriente, invierta el enchufe.
• Evite el arranque accidental. – No acarree con el dedo en el interruptor mientras esté conectada. Asegúrese de que el interruptor esté en la posición de apagado antes de conectar la clavija.
• Nunca levante ni traslade la cultivadora cuando estén girando las aspas o esté funcionando el motor.
• Mantenga en buenas condiciones de trabajo. seguridad de las condiciones de funcionamiento del equipo. Mantenga la unidad libre de hierba, hojas o grasa para reducir las posibilidades de un posible incendio.No utilice el cultivador si no funciona el interruptor de encendido y apagado. Cualquier herramienta que no puede ser controlada con el interruptor es peligrosa y debe ser reparada.
••
•

5
GUARDE ESTAS INSTRUCCIONES
REGLAS DE SEGURIDAD ESPECífICAS
• No utilice la unidad cerca de cables eléctricos o telefónicos, o tubería subterráneos, ni de mangueras Si tiene dudas, comuníquese con la compañía de servicios públicos o de teléfonos para localizar las líneas de servicio subterráneas.
• Si la unidad le pega a un objeto extraño, apague el motor, desconecte el cordón de extensión, inspeccione a fondo la máquina para ver si tiene algún daño, y repare éste antes de volver a arrancar y utilizar la máquina.
• No sobrepase la capacidad de la máquina cultivando a demasiada profundidad en una sola pasada o a una velocidad demasiado rápida.
• Permanezca alerta. Ponga atención a lo que hace. Aplique el sentido común. No utilice la cultivadora cuando esté cansado,enfermo o molesto.
• Tenga presente que el equipo puede rebotar hacia arriba inesperadamente o saltar hacia adelante si las aspas tocan obstáculos enterrados como piedras grandes, raíces o cepas de árboles.
• Cable de extensión – Con el fin de reducir el riesgo de desconexión del cable del electrodoméstico del cable de extensión durante su funcionamiento, es posible anudar el cable de extensión y el de alimentación para evitar que se desconecten mientras se usan. Haga el nudo como se muestra en la figura 1 y a continuación conecte el extremo del cable de alimentación en el extremo receptáculo del cable de extensión. Este método también puede usarse para anudar dos cables de extensión.
Fig. 1
A D V E R T E N C I A (PROPOSICIÓN 65)El polvo creado por la arena a chorro, el aserrado, esmerilado, taladrado y otras actividades de la construcción podría contener productos químicos que se sabe provocan cáncer, defectos de nacimiento y otras lesiones reproductivas. Algunos ejemplos de estos productos químicos son:
Plomo en pintura a base de plomo Sílice cristalino en ladrillos, cemento y otros productos de mampostería, yArsénico y cromo de madera con tratamiento químico.
sotse a nóicisopxe ed ogseir uS productos químicos depende de la frecuencia en que efectúe este tipo de trabajo. Para reducir su exposición a estos productos químicos, trabaje en áreas bien ventiladas y use equipo
partículas microscópicas.
•••
6GUARDE ESTAS INSTRUCCIONES
REGLAS DE SEGURIDAD ESPECÍFICAS
• Nunca utilice el equipo en pendientes.
• Tenga suma precaución al tirar de la máquina hacia usted.• Guarde en el interior los artefactos que no esté usando. — Mientras no se esté utilizando, la
cultivadora debe almacenarse en el interior, en un sitio seco y bajo llave, lejos del alcance de los niños.
• Dé mantenimiento esmerado a la cultivadora — Mantenga limpias las aspas para maximizar
y lubricación de los accesorios. Inspeccione periódicamente el cable de la cultivadora y, si se encuentra dañado, reemplácelo. Mantenga los mangos secos y limpios, sin aceite ni grasa.
• Todos los visitantes y circunstantes deben guardar una distancia de, por lo menos, 15.3 m (50 pies) del área de trabajo..
• Utilice el aparato adecuado para la tarea — No utilice el aparato para ninguna función
• Los circuitos o las tomas de corriente donde se conecta este producto deben estar protegidos con un interruptor de circuito accionado por falla de conexión a tierra (GFCI). Hay receptáculos con la protección de un GFCI integrado, y pueden utilizarse para contar con esta característica de seguridad.
• • Inspeccione las piezas dañadas. Antes de seguir utilizando esta cultivadora, es necesario
inspeccionar cuidadosamente toda aquella protección o pieza que se encuentre dañada para determinar si funcionará correctamente y desempeñará la función para la que está destinada.
el montaje de las piezas y que no haya piezas rotas, así como cualquier otra condición que pudiera afectar su funcionamiento. Cualquier protección o pieza que esté dañada debe ser adecuadamente reparada o reemplazada en un centro de servicio autorizado, a menos que se indique otra cosa en este manual.
• Guarde estas instrucciones. Consúltelas frecuentemente y utilícelas para instruir a otros usuarios. Si presta a alguien esta herramienta, facilítele también las instrucciones.
Asegúrese de que esté en buen estado el cordón de extensión. Al utilizar un cordón deextensión, utilice uno del suficiente calibre para soportar la corriente que consume el producto.Se recomienda que los conductores sean de calibre 14 (A.W.G.) por lo menos para un cordónde extensión de 15 metros (50 pies) de largo o menos. No se recomienda utilizar un cordón conmás de 30 metros (100 pies) de largo. Si tiene dudas, utilice un cordón del calibre más gruesosiguiente. Cuanto menor es el número de calibre, mayor es el grueso del cordón. Un cordónde un grueso insuficiente causa una caída en el voltaje de línea, y produce recalentamiento ypérdida de potencia.
•
Use protección para los oídos.Asegúrese que las personas y mascotas están, por lo menos a 50 pies (15 metros) del cultivador en uso.
••
Sustituya las partes dañadas o gastadas solamente por repuestos idénticos.Asegúrese que el área de trabajo está libre de superficies resbaladizas o demasiadas piedras.Arranque el cultivador cuidadosamente según las instrucciones para una posición normal de funcionamiento y con los pies lejos de los dientes. No forzar el cultivadora. Hará un trabajo mejor y con menos probabilidad de riesgo de daños a la tasa para la que ha sido diseñada.Desconecte la unidad antes de desatascar los dientes y cuando haga reparaciones, ajustes o inspecciones.
•••
•
7
SÍMBOLOS
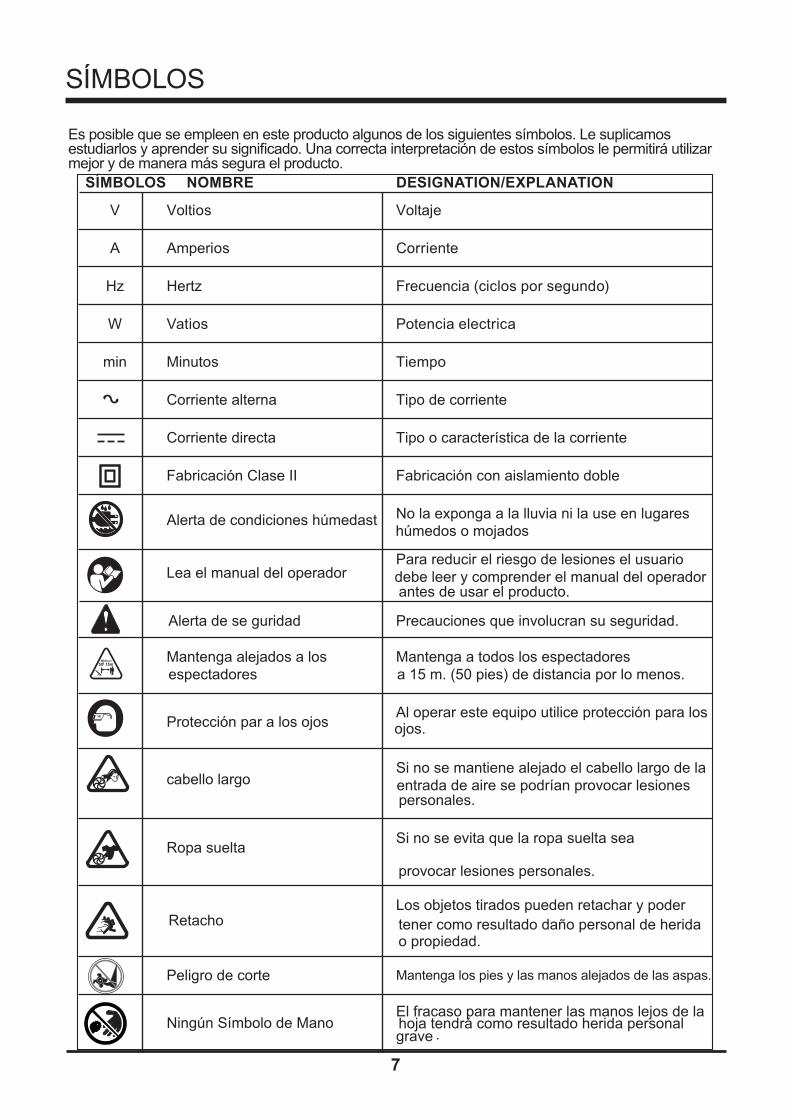
SÍMBOLOS NOMBRE DESIGNATION/EXPLANATION
V Voltios Voltaje
A Amperios Corriente
Hz Hertz Frecuencia (ciclos por segundo)
W Vatios Potencia electrica
min Minutos Tiempo
Corriente alterna Tipo de corriente
Corriente directa Tipo o característica de la corriente
Fabricación Clase II Fabricación con aislamiento doble
No la exponga a la lluvia ni la use en lugares
Lea el manual del operador Para reducir el riesgo de lesiones el usuario debe leer y comprender el manual del operador antes de usar el producto.
Alerta de se guridad Precauciones que involucran su seguridad.
Mantenga alejados a los Mantenga a todos los espectadores espectadores a 15 m. (50 pies) de distancia por lo menos.
Protección par a los ojos Al operar este equipo utilice protección para los
cabello largo
Si no se mantiene alejado el cabello largo de la
personales.
Ropa suelta Si no se evita que la ropa suelta sea
provocar lesiones personales.
Retacho
Los objetos tirados pueden retachar y poder tener como resultado daño personal de herida o propiedad.
Peligro de corte Mantenga los pies y las manos alejados de las aspas.
Ningún Símbolo de Mano El fracaso para mantener las manos lejos de la
hoja tendrá como resultado herida personal .
Es posible que se empleen en este producto algunos de los siguientes símbolos. Le suplicamos
mejor y de manera más segura el producto.
Alerta de condiciones húmedast
grave
entrada de aire se podrían provocar lesiones
ojos.
húmedos o mojados

8
de riesgo relacionados con este producto.
SÍMBOLOS
PELIGRO Indica situaciones inminentemente peligrosas que, si no se evitan, resultan en la muerte o en lesiones serias.
ADVERTENCIA Indica situaciones potencialmente peligrosas que, si no se evitan, podrían resultar en la muerte o en lesiones serias.
PRECAUCIÓN Indica situaciones potencialmente peligrosas que, si no se evitan, podrían resultar en lesiones entre mínimas y moderadas.
PRECAUCIÓN (Sin el símbolo de alerta por seguridad) indica una situación que podría resultar en daños a la propiedad.
SÍMBOLO AVISO SIGNIFICADO
GUARDE ESTAS INSTRUCCIONES
SERVICIOPara dar servicio es necesario tener extremo cuidado y conocimiento, el servicio debe ser
al producto lo regrese a su CENTRO DE SERVICIO AUTORIZADO más cercano para que lo reparen. Al dar servicio, use solamente repuestos idénticos.
A D V E R T E N C I APara evitar lesiones personales graves, no trate de usar este producto antes de haber leído completamente el presente Manual del Propietario y haberlo comprendido en su totalidad. Si no comprende las advertencias y las instrucciones que aparecen en el presente Manual del Propietario, no use el producto. Llame gratis al 1-888-909- 6757 para recibir ayuda.
A D V E R T E N C I AToda herramienta eléctrica al funcionar puede lanzar objetos extraños hacia sus ojos, lo que podría provocarles lesiones graves. Antes de comenzar el funcionamiento de una herramienta eléctrica, use siempre gafas de seguridad o gafas de seguridad con protecciones laterales y, si es necesario, una careta completa. Recomendamos usar caretas de seguridad con rango visual ancho encima de gafas de seguridad estándar, o usar gafas de seguridad estándar con protecciones laterales. Use siempre protección para los ojos con viñetas que indiquen que cumplen ANSI Z87.1

9
A D V E R T E N C I A :ESTE CULTIVADOR ES SÓLO PARA USO EN EXTERIORES. NO EXPONER A LA LLUVIA NI USAR EN LUGARES HÚMEDOS.
ELÉCTRICA
DIRECTRICES PARA EL USO DE CABLES DE EXTENSIÓNUSAR EL CABLE DE EXTENSIÓN ADECUADO. Asegúrese de que el cable extensible esté en buenas condiciones. Cuando utilice un cable extensible, asegúrese de usar uno lo suficientemente resistente para transportar la corriente que su producto pueda atraer. Un cable de menor capacidad provocará sobrecalentamiento. La siguiente tabla muestra la medida correcta que debe utilizarse según la longitud del cable y el amperaje nominal. En caso de duda, utilice el siguiente calibre más pesado. Cuanto menor sea el número de calibre, más pesado será el cable.
CALIBRE MÍNIMO PARA CABLES DE EXTENSIÓN (AWG) (SÓLO AL USAR 120V)
**Amperaje (en la placa de datos de la herramienta)
Amperaje Longitud total del cable en pies (metros) Más de No más de 25' (7.6 m) 50' (15 m) 100' (30.4 m) 150' (45.7 m) 0 6 18 16 16 14 6 10 18 16 14 12 10 12 16 16 14 12 12 16 14 12 No se recomienda
A D V E R T E N C I A :MANTENGA EL CABLE DE EXTENSIÓN LEJOS DE LOS DIENTES Y LA ZONA DE TRABAJO. COLOQUE LA PROLONGACIÓN DE FORMA QUE NO QUEDE ATRAPADA BAJO LEÑA, HERRAMIENTAS U OTROS OBSTÁCULOS MIENTRAS ESTÉ TRABAJANDO CON EL MOTOCULTOR. EL INCUMPLIMIENTO DE ESTAS INSTRUCCIONES PODRÍA RESULTAR EN LESIONES PERSONALES GRAVES.
Asegúrese de que su cable de extensión está correctamente cableado y en buen estado eléctrico. Las extensiones dañadas deben reemplazarse o hacerse repara por un técnico cualificado antes de usarlas. Mantenga las extensiones lejos de objetos cortantes, calor excesivo y zonas húmedas o mojadas.
Utilice un circuito eléctrico separado para sus herramientas. Este circuito no debe tener un calibre de cable menor de nº 12 y debe estar protegido con un fusible con retardo de 15 A. Antes de conectar el motor a la alimentación, asegúrese de que el interruptor está en posición de apagado y la corriente eléctrica se corresponde con la corriente indicada en la placa de identificación del motor. Funcionar a una tensión inferior puede dañar el motor.
1
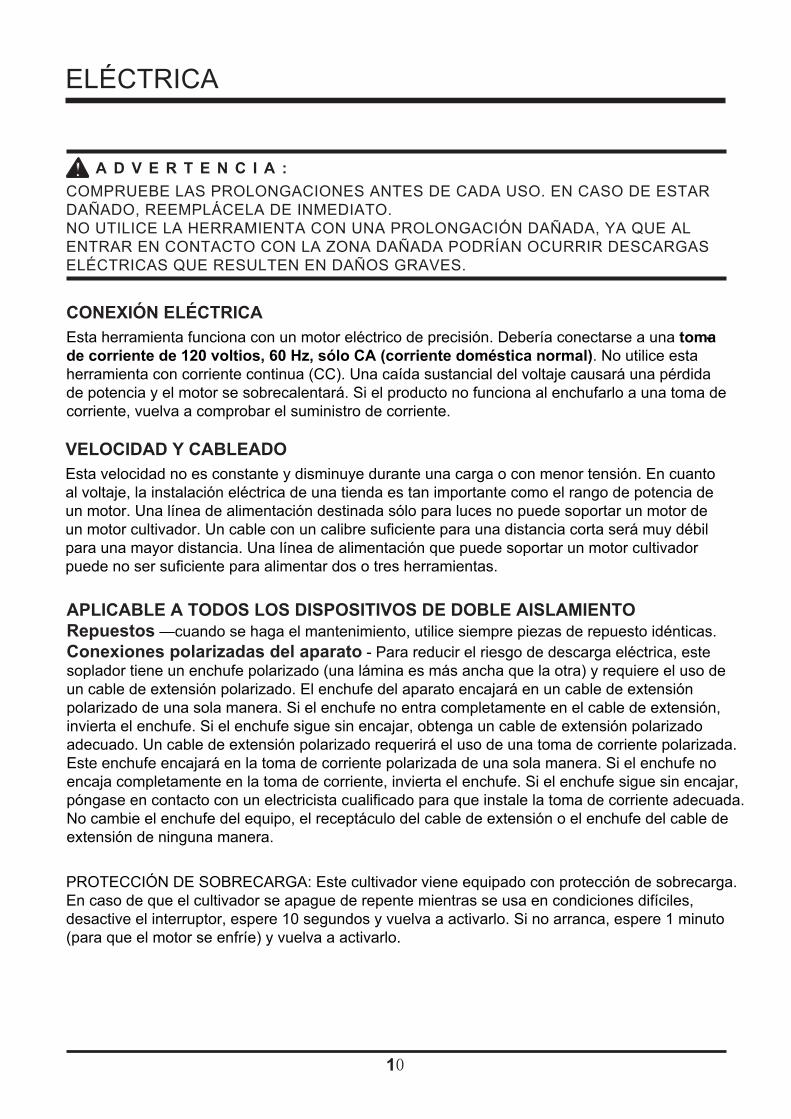
A D V E R T E N C I A :COMPRUEBE LAS PROLONGACIONES ANTES DE CADA USO. EN CASO DE ESTAR DAÑADO, REEMPLÁCELA DE INMEDIATO.NO UTILICE LA HERRAMIENTA CON UNA PROLONGACIÓN DAÑADA, YA QUE AL ENTRAR EN CONTACTO CON LA ZONA DAÑADA PODRÍAN OCURRIR DESCARGAS ELÉCTRICAS QUE RESULTEN EN DAÑOS GRAVES.
ELÉCTRICA
CONEXIÓN ELÉCTRICAEsta herramienta funciona con un motor eléctrico de precisión. Debería conectarse a una toma de corriente de 120 voltios, 60 Hz, sólo CA (corriente doméstica normal). No utilice esta herramienta con corriente continua (CC). Una caída sustancial del voltaje causará una pérdida de potencia y el motor se sobrecalentará. Si el producto no funciona al enchufarlo a una toma de corriente, vuelva a comprobar el suministro de corriente.
-
VELOCIDAD Y CABLEADOEsta velocidad no es constante y disminuye durante una carga o con menor tensión. En cuanto al voltaje, la instalación eléctrica de una tienda es tan importante como el rango de potencia de un motor. Una línea de alimentación destinada sólo para luces no puede soportar un motor de un motor cultivador. Un cable con un calibre suficiente para una distancia corta será muy débil para una mayor distancia. Una línea de alimentación que puede soportar un motor cultivador puede no ser suficiente para alimentar dos o tres herramientas.
APLICABLE A TODOS LOS DISPOSITIVOS DE DOBLE AISLAMIENTORepuestos —cuando se haga el mantenimiento, utilice siempre piezas de repuesto idénticas.Conexiones polarizadas del aparato - Para reducir el riesgo de descarga eléctrica, este soplador tiene un enchufe polarizado (una lámina es más ancha que la otra) y requiere el uso de un cable de extensión polarizado. El enchufe del aparato encajará en un cable de extensión polarizado de una sola manera. Si el enchufe no entra completamente en el cable de extensión, invierta el enchufe. Si el enchufe sigue sin encajar, obtenga un cable de extensión polarizado adecuado. Un cable de extensión polarizado requerirá el uso de una toma de corriente polarizada. Este enchufe encajará en la toma de corriente polarizada de una sola manera. Si el enchufe no encaja completamente en la toma de corriente, invierta el enchufe. Si el enchufe sigue sin encajar, póngase en contacto con un electricista cualificado para que instale la toma de corriente adecuada. No cambie el enchufe del equipo, el receptáculo del cable de extensión o el enchufe del cable de extensión de ninguna manera.
PROTECCIÓN DE SOBRECARGA: Este cultivador viene equipado con protección de sobrecarga. En caso de que el cultivador se apague de repente mientras se usa en condiciones difíciles, desactive el interruptor, espere 10 segundos y vuelva a activarlo. Si no arranca, espere 1 minuto (para que el motor se enfríe) y vuelva a activarlo.
11
FAMILIARÍCESE CON SU CULTIVADORA
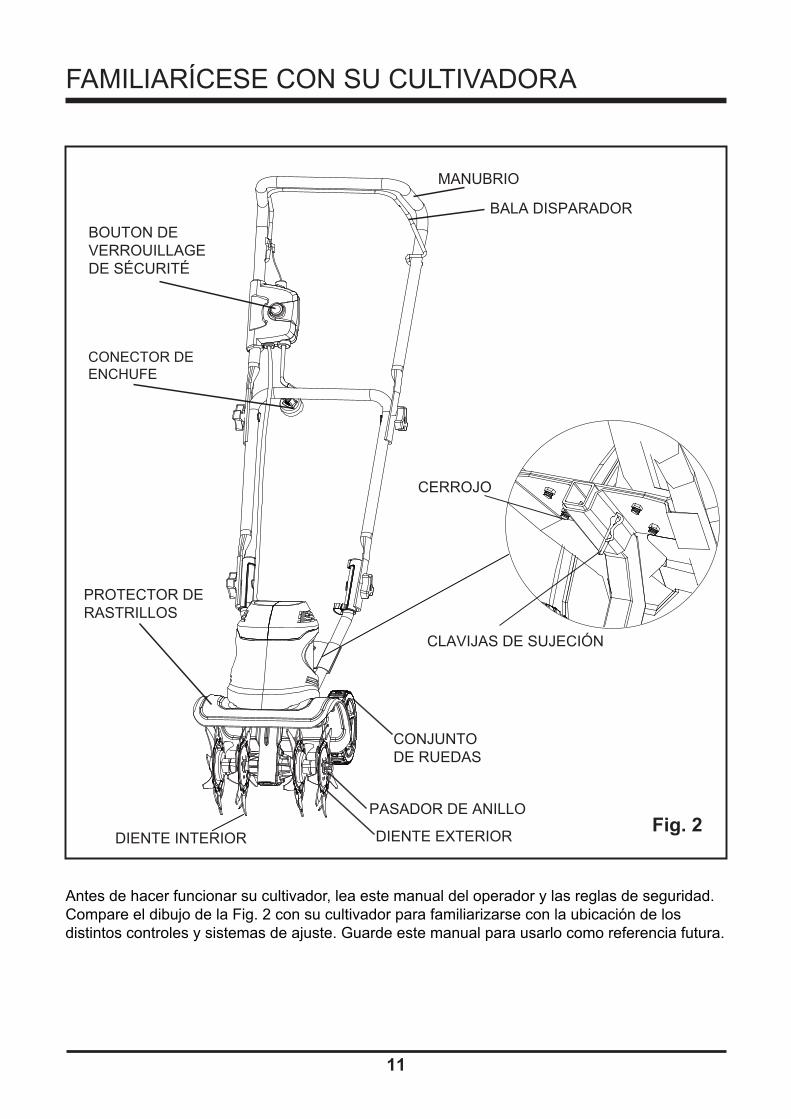
Antes de hacer funcionar su cultivador, lea este manual del operador y las reglas de seguridad. Compare el dibujo de la Fig. 2 con su cultivador para familiarizarse con la ubicación de los distintos controles y sistemas de ajuste. Guarde este manual para usarlo como referencia futura.
BOUTON DE VERROUILLAGE DE SÉCURITÉ
MANUBRIO
PROTECTOR DERASTRILLOS
PASADOR DE ANILLO
DIENTE EXTERIOR
CONJUNTODE RUEDAS
DIENTE INTERIOR
BALA DISPARADOR
CONECTOR DE ENCHUFE
CERROJO
CLAVIJAS DE SUJECIÓN
Fig. 2
12
DESEMPAQUETADOEs necesario ensamblar este producto.• Saque cuidadosamente la herramienta y los accesorios de la caja. Asegúrese de encontrar
todos los artículos mencionados en la lista de empaque.
• Revise la herramienta cuidadosamente para asegurarse de que no se quebró o dañó durante el envío.
• No deseche el material de empaque antes de inspeccionar cuidadosamente la herramienta y de hacerla funcionar satisfactoriamente.
• Si hay alguna pieza dañada o faltante, sírvase llamar al 1-888-909-6757 para obtener ayuda..LISTADO DE EMBALAJE• Cultivador
• Clavijas de sujeción (2)+ En forma de U pasador del enganche(2)
• Rastrillos interiores (2)
• Rastrillos exteriores (2)
• Fieltro (2)• Cerrojo• Alfiler de Tirón de Asamblea de Rueda• Manual del operador• Perilla de la manija (4)
A D V E R T E N C I A :Si falta alguna pieza no haga funcionar esta herramienta hasta reemplazar la pieza. No obedecer esta advertencia podría producir lesiones personales graves.
A D V E R T E N C I A :No trate de modificar esta herramienta ni de crear accesorios no recomendados para ser
condiciones peligrosas con posibles consecuencias de lesiones personales graves.
A D V E R T E N C I A :No tape el tiller en la salida hasta que la asamblea sea completa. El fracaso para obedecer podría tener como resultado comenzar accidental, y la herida personal, grave y posible.
ARMADO

13
ARMADO
INSTALACIÓN DEL MANUBRIO • Alinee los agujeros del mango superior con los agujeros del mango medio. Introduzca los pernos
y apriételos con la tuerca mariposa suministrada.
• Alinee los agujeros del mango medio con los agujeros del mango inferior. Introduzca los pernos y apriételos con la tuerca mariposa suministrada.
Fig. 3
MANGO MEDIO
MANGO INFERIOR
MANGO SUPERIOR
PERILLA DE LA MANIJA
PERILLA DE LA MANIJA

14
ARMADO
MONTAJE DEL CONJUNTO DE RUEDA
Las ruedas son utilizadas para controlar la profundidad de operación. Ajustar la altura de la cultivadora.1. Desconecte de la fuente de alimentación.
3. Inserte la asamblea de rueda en la barra de apoyo. 4. Alinee el agujero de asamblea de rueda a la posición deseada. El cerrojo de diapositiva por el agujero y ata el alfiler de tirón para escaparse.5. El embaldosar más alto es Posición � y más profundo, la Posición B.
Fig. 4
6. Las ruedas se pueden retirar para obtener mayor profundidad de arado.
4
POSICIÓN ACLAVIJAS DE SUJECIÓN
CERROJO
VARILLA DE SOPORTE
POSICIÓN B
CONJUNTO DE RUEDAS
2. Sitúe el cultivador en una posición estable.

15
ARMADO
INSTALACIÓN DE LAS ASPAS La cultivadora tiene cuatro aspas—Para obtener un funcionamiento correcto de la unidad, las aspas deben instalarse con la debida orientación. El tiller puede ser utilizado con cuatro dientes o dos dientes.• Desconecte de la fuente de alimentación. •
suelo.
Para instalar los dientes, incline la unidad de nuevo sobre sus ruedas para que el manillar se apoye en el suelo.NOTA: El punto de vista de la caja de cambios para la instalación de los dientes es desde la parte delantera del motocultor.Coloque la púa C en el eje a la izquierda de la caja de engranajes. La cara estampada de la púa debe quedar en el lado opuesto a la caja de engranajes.Coloque la púa B el eje a la derecha de la caja de engranajes. La cara estampada de la púa debe quedar en el lado opuesto a la caja de engranajes.Coloque una arandela de fieltro a cada lado del eje dentado, y deslícela hasta que entre en contacto con los dientes interiores.Coloque el diente exterior que tiene la marca D en el lado izquierdo del eje dentado. El lado marcado debe estar orientado hacia el diente C.Coloque la púa estampada exterior A en la parte derecha del eje. La cara estampada debe quedar orientada hacia la púa B.Nota: Una vez instalado todo correctamente, los bordes en ángulo de las cuchillas de las púas deben quedar orientados hacia el suelo.Para fijar las púas al eje, introduzca el pasador con anillo en los orificios situados a ambos lados del eje.Una vez introducido, mantenga únicamente la dirección que se muestra en la fig. 5-2.NOTA: La unidad no funcionará correctamente si los dientes están instalados incorrectamente. Si usted nota un problema con la operación de cultivo de la unidad, verifique que el diente está colocado en la posición correcta.
Fig. 5-1
Fig. 5-2
EJE DE DIENTE
CAJA DE MARCHA
FLAUTAFLAUTA
FLAUTA FLAUTA
FIELTRO FIELTRO DIENTE CDIENTE D DIENTE B DIENTE A
ANILLO
ANILLO ANILLO
ANILLO
5
16
ARMADO
LOS DIENTES INSTALARON CORRECTAMENTE
NOTA:
INSTALAR DOS DIENTES PARA EMBALDOSAR UN AREA ESTRECHA
Coloque diente (A) en el túnel, y diente de lugar (D) en el otro túnel de lado. Inserte el ata
Fig. 6
Fig. 7
ABCD
ATE ALFILER
FLAUTA
PASADOR DE ANILLO
FLAUTAFLAUTA
CAJA DE CAMBIOS
A
A
D
NOTA: El accesorio cultivador no funcionará correctamente si los dientes están instalados incorrectamente. Si hay un problema con la operación de cultivo del accesorio cultivador, verifique que el diente está colocado en la posición correcta.
7
7
6
NOTA: Cuando los dientes estén correctamente instalados, la ranura de los dientes debe estar alineada, y el borde angular de las cuchillas de los dientes debe apuntar hacia el suelo.
17
FUNCIONAMIENTO
A D V E R T E N C I A :
No permita que su familarización con las herramientas lo vuelva descuidado. Tenga presente
A D V E R T E N C I A :
Cuando utilice herramientas, póngase siempre gafas de seguridad o anteojos protectores con protección lateral. La inobservancia de esta advertencia puede causar el lanzamiento de objetos a los ojos, y por consecuencia posibles lesiones serias.
A D V E R T E N C I A :
No utilice ningún aditamento o accesorio no recomendado por el fabricante de esta herramienta. El empleo de aditamentos o accesorios no recomendandos podría causar lesiones serias.
A D V E R T E N C I A :
No permita que las manos, pies o ninguna otra parte del cuerpo, o la ropa, estén cerca de las aspas giratorias ni de ninguna pieza móvil. Las aspas comienzan a girar hacia adelante una vez que se oprime el gatillo del interruptor. Las aspas continúan girando hasta que se suelta el gatillo. Si no se evita tal contacto pueden producirse lesiones serias.
PARAR EL TILLER/CULTIVADOR
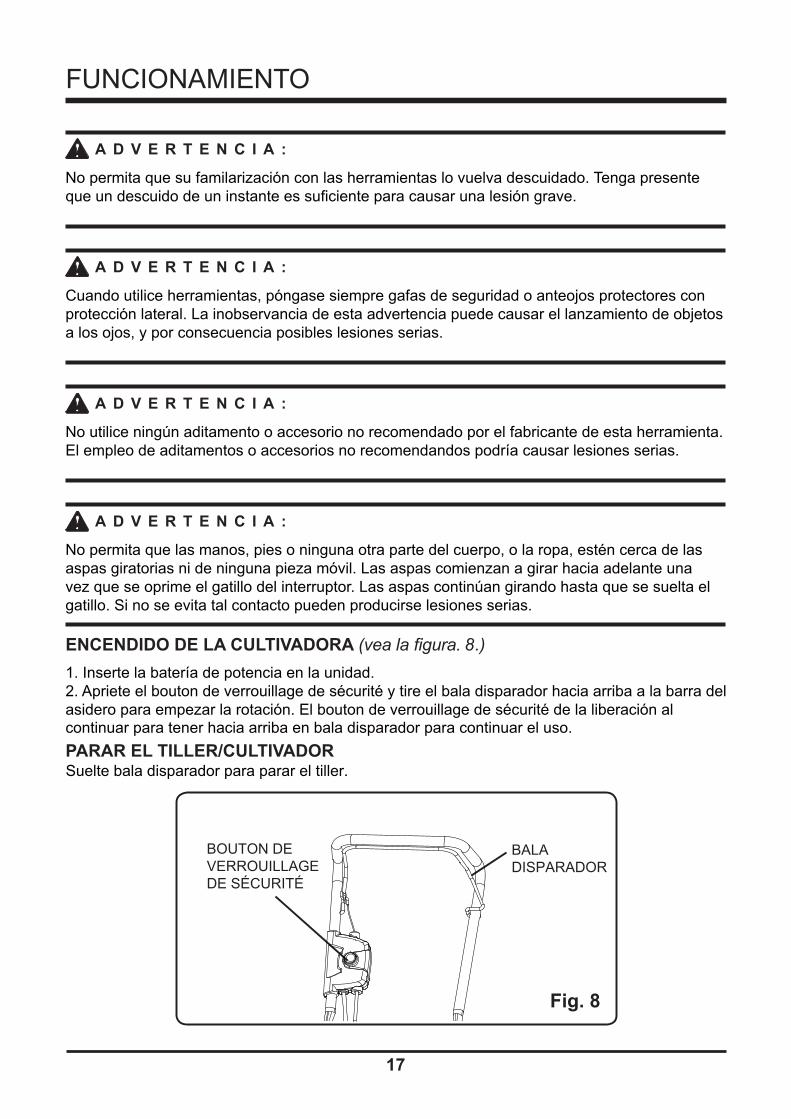
ENCENDIDO DE LA CULTIVADORA 1. Inserte la batería de potencia en la unidad.2. Apriete el bouton de verrouillage de sécurité y tire el bala disparador hacia arriba a la barra del asidero para empezar la rotación. El bouton de verrouillage de sécurité de la liberación al continuar para tener hacia arriba en bala disparador para continuar el uso.
Suelte bala disparador para parar el tiller.
8
Fig. 8
BOUTON DE VERROUILLAGE DE SÉCURITÉ
BALA DISPARADOR

18
FUNCIONAMIENTO
PREPARACIÓN DEL LECHO DE TIERRA PARA LAS SEMILLAS:El cultivador puede ser utilizado para separarse tierra de jardín y preparar un semillero para
tener en cuenta cultivar de máquina después de que las plantas hayan crecido.
El CESPED QUE EMBALDOSA: El césped que embaldosa en la tierra no es recomendado. Si césped debe ser quitado para realizar aplicación entonces es sugerida hacer como. 1. Elabore el área de césped necesario ser quitada. 2. Corte en 16 X 36” secciones que utilizan una pala de pala o edger en una profundidad de 3 pulgadas. 3. Levante el césped de las orillas que utilizan una pala que desliza abajo en las raíces. 4. Quite el césped. Lleve césped al abono u otra pila rechazó césped para permitir césped para descomponerse. 5. Una vez que capa de césped es quitada, empiece a hasta la tierra a la profundidad deseada.
CULTIVO EN GENERALSe puede cultivar a una profundidad menor a 5 cm. (2 pulgadas) para desalojar maleza y ventilar el suelo sin dañar las raíces de las plantas inmediatas. Se le debe hacer a menudo para que la maleza no crezca mucho y no se enrede en los rastrillos de la unidad.Se pueden sacar de la unidad las cuchillas de los dos rastrillos exteriores para permitir un ancho menor al cultivar1. Con la asamblea de rueda instaló a la posición deseada de la profundidad como descrito en la página 14, arrolla el tiller al área del trabajo. 2. Inserte la batería de potencia en la unidad. 3. Tape el tiller en un alargador aprobado. 4. Párese detrás del tiller, con los dientes en el suelo y el área del trabajo limpios y libres de obstrucciones. 5. Comience el tiller que utiliza direcciones de la página 17.
NOTA: Puede tomar varios pasos sobre el mismo sendero para alcanzar la profundidad deseada. No trate de cavar también hondo en el primer paso. Si el tiller salta o corcovea, lo permite adelantarse en un ritmo ligeramente más rápido. Para cavar más profundamente, levante en el manillar que empuja la frente más dura en el suelo. Aplique hacia abajo presión en el manillar, bajando la unidad hacia usted para cultivar más superficial. Si el tiller permanece y cava en en un lugar, trata mecerlo comenzarlo de un lado a otro adelantándose otra vez. Si la tierra es muy dura, lo riega unos pocos días antes de cultivar. Evite trabajar tierra que está empapada o mojado. Espere un día o dos después de que aguacero recio para el suelo para secar.
IMPORTANTE: Si hierbas, las raíces, las vides u otro crecimiento consiguen completo alrededor del fondo del tiller que es importante parar tiller. Desconecte de la fuente de alimentación y limpie dientes que utilizan un desatornillador u otro objeto que puede ayudar a quitar escombros. Si necesario, quita dientes para desenmarañar escombros del túnel y dientes. Las PUNTAS RAPIDAS: Quite piedras y raíces antes de embaldosar para prevenir daño al tiller. Trabaje el soilwhen ni es mojado seca también ni también. Para probar el nivel de humedad de la tierra, tomar un ofsoil de puñado y apretarlo. Si se queda en una pelota apretada cuando usted suelta su puño, es mojado también. Si itcrumbles, está listo a hasta. La tierra seca es
día ventoso. Cáigase embaldosar presenta muchas ventajas sobre embaldosar de primavera. Iteliminates la necesidad a hasta en la primavera, y tiene en cuenta plantar más temprano. Las condiciones de andtemperature de humedad de tierra son favorables para la descomposición de la materia orgánica que es turnedunder en la caída. Además, organismos de enfermedad, los insectos, e hierbas de planta perenne pueden bereduced embaldosando en la caída.
página 14. de la

19
MANTENIMIENTO
A D V E R T E N C I AAl dar servicio a la unidad, sólo utilice piezas de repuesto idénticas. El empleo de piezas diferentes puede causar un peligro o dañar el producto.
A D V E R T E N C I ASiempre use gafas de seguridad o anteojos protectores con protección lateral al usar herramientas eléctricas o al soplar el polvo con aire comprimido. Si la operación genera mucho polvo, también póngase una mascarilla contra el polvo.
A D V E R T E N C I AAntes de inspeccionar, limpiar o dar servicio a la máquina, desconecte el cordón de corriente y espere a que se detengan todas las piezas móviles. El incumplimiento de cualquiera de estas instrucciones puede causar lesiones serias
MANTENIMIENTO GENERALEvite el empleo de solventes al limpiar piezas de plástico. La mayoría de los plásticos son sus-ceptibles a diferentes tipos de solventes comerciales y pueden resultar dañados. Utilice paños limpios para eliminar la suciedad, el polvo, el aceite, la grasa, etc.
A D V E R T E N C I A
aceites penetrantes, etc., lleguen a tocar las piezas de plástico. Las sustancias químicas pueden dañar, debilitar o destruir el plástico, lo cual a su vez puede producir lesiones corporales serias.
CÓMO GUARDAR DE LA CULTIVADORA Deben seguirse los siguientes pasos antes de guardar la cultivadora después del trabajo de la estación.• Limpie toda la suciedad, pasto y demás materiales de toda la unidad.• Limpie las aspas con aceite o rocíelas con lubricante de silicón para impedir la oxidación de las
mismas.• Aceite el cable del gatillo del interruptor y todas las partes móviles visibles. No retire la tapa del
motor.• Pida piezas nuevas para reemplazar las que estén gastadas o rotas.• Guarde la unidad en posición vertical, en un lugar limpio y seco. Guarde la unidad con el
pellizque el cable del interruptor al bajar el mango.• PREPARACIÓN DE LA UNIDAD PARA USARLA DESPUÉS DE TENERLA GUAR-DADADeben seguirse los siguientes pasos antes de usar la cultivadora después de haberla tenido guardada.• Despliegue el mango, póngalo en la posición desplegada y asegúrelo con las perillas de
apriete de la barra del mismo. No permita que se pellizque el cable del gatillo del interruptor al subir el mango.
• Siga los pasos descritos para volver a arrancar la cultivadora.

20
SOLUCIÓN DE PROBLEMAS
PROBLEMA
El motor no arranca al opri-mir el gatillo del interruptor.
El motor funciona pero no se mueven las aspas.
CAUSA
Se disparó un disyuntor del circuito casero.
Falla del tren de engranajes.
SOLUCIÓN
Revise el disyuntor del circuito.
Lleve la unidad a un centro de servicio autorizado.
Cultivador protección de sobrecarga del circuito se dispara.
Deje reposar la unidad durante 4 minutos, luego repita los pasos para comenzar.
No está conectado el cordón de corriente o está floja laconexión.
Conecte el cordón de cor-riente.
21
GARANTÍA LIMITADA DE CUATRO AÑOS
LÍNEA TELEFÓNICA PARA AYUDA DE GREENWORKS (1 888 90WORKS) :
Por este medio y por un período de cuatro años GREENWORKS® garantiza este producto contra
defectos en materiales, piezas o mano de obra al comprador original que cuente con una prueba de compra. GREENWORKS®, a su sola discreción reparará o reemplazará, sin costo alguno para el cliente, cualquier pieza defectuosa, siempre y cuando se haya hecho uso normal de ella.
Esta garantía es válida solamente para unidades utilizadas de manera personal y que no hayan sido utilizadas o alquiladas para uso industrial o comercial, y que hayan recibido mantenimiento
de acuerdo a las instrucciones que aparecen en el manual del propietario que se suministró con el producto nuevo.
ARTÍCULOS QUE NO CUBRE LA GARANTÍA:1. Cualqui er pieza que se haya vuelto inoperante debido a mal uso, uso comercial, abuso,
descuido, accidente, mantenimiento inapropiado o alteración; o2. La unidad, si no ha sido operada o si no se le ha dado mantenimiento de acuerdo al manual del propietario; o3. Desgaste normal, excepto según se indica a continuación;4. Artículos de mantenimiento rutinario tales como lubricantes, afilado de cuchillas ;5. Deterioro normal del acabado exterior debido al uso y la exposición al entorno.
CARGOS DE TRANSPORTE:Los cargos de transporte por el traslado de cualquier unidad de equipo o accesorio eléctrico son responsabilidad del comprador. El comprador es responsable de pagar los cargos de transporte de cualquier pieza presentada para reemplazo de acuerdo a esta garantía a menos que GREENWORKS solicite por escrito tal retorno.
Se puede obtener servicio relacionado con la garantía llamando de lunes a viernes entre las 9 a.m. y las 5 p.m. hora estándar del este (EST) a nuestra línea gratis para ayuda, el 1-888-909-6757 (1-888-90WORKS).

22
DIAGRAMA DE COMPONENTES

LISTA DE PIEZAS
ARTICULO NO.
CANTIDAD
1 311021059 MANGO SUPERIOR2 333021059 MANGO MEDIO 13 32204283 CERROJO 44 3410835-8 PERILLA DELA MANIJA 45 311041059 MANGO INFERIOR 16 311051059 CONJUNTO DE RUEDAS 17 311101059 DIENTE A
DIENTE B1
8 311111059 19 31102289A CAJA DE MARCHA 110 32203289AB CERROJO 411 311121059 DIENTE C 112 311131059 DIENTE
PASADOR DE ANILLOD 1
13 33210289 214 34901282-1 FIELTRO 215 32208261 TUERCA 416 33301289 117 34113288 PLACA FIJA 118 3220436 CERROJO
CABEZA DE PODER4
19 311061059
23
PIEZA NO. DESCRIPCIÓN
1
1
PROTECTOR DE RASTRILLOS

LÍNEA TELEFÓNICA GRATIS PARA AYUDA: 1-888-90WORKS (888.909.6757)
Greenworks ToolsPO Box 1238
Mooresville, NC 28115