qtfabrics.com 8qtfabrics.com/images/projectsheets/brookeqal_fullproject_lores.pdf · brooke is a...
TRANSCRIPT
8QTfabrics.com
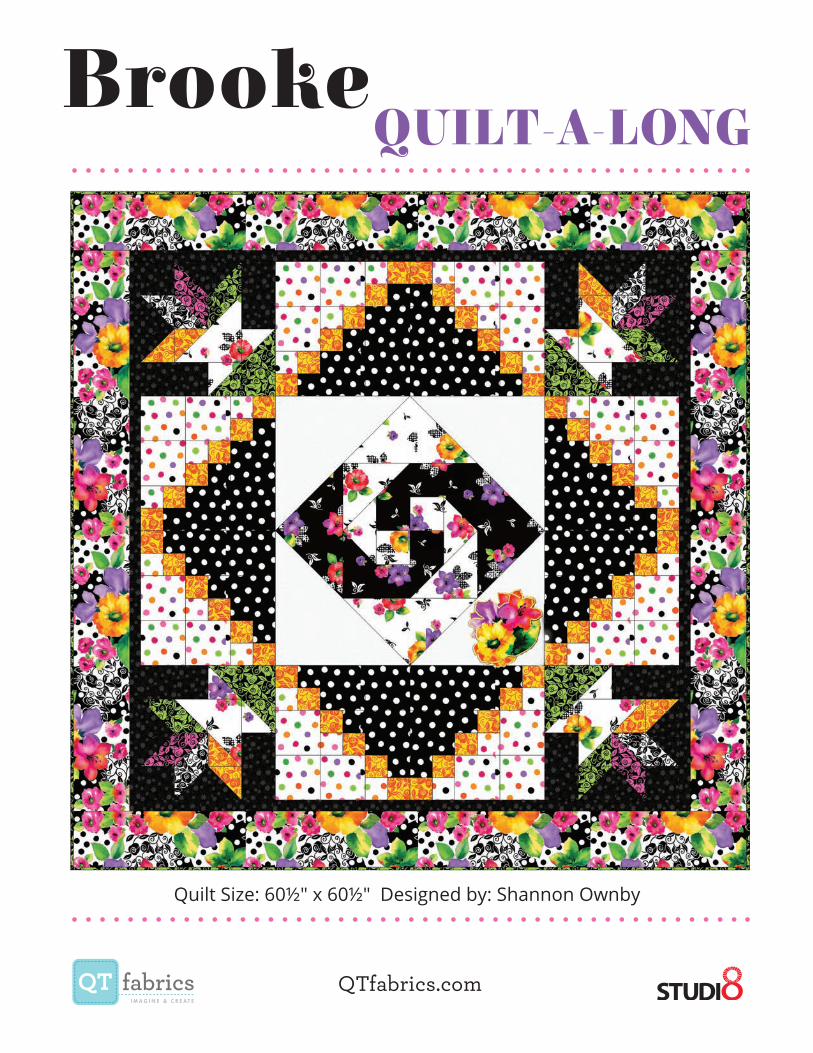
Quilt Size: 60½" x 60½" Designed by: Shannon Ownby
Week1
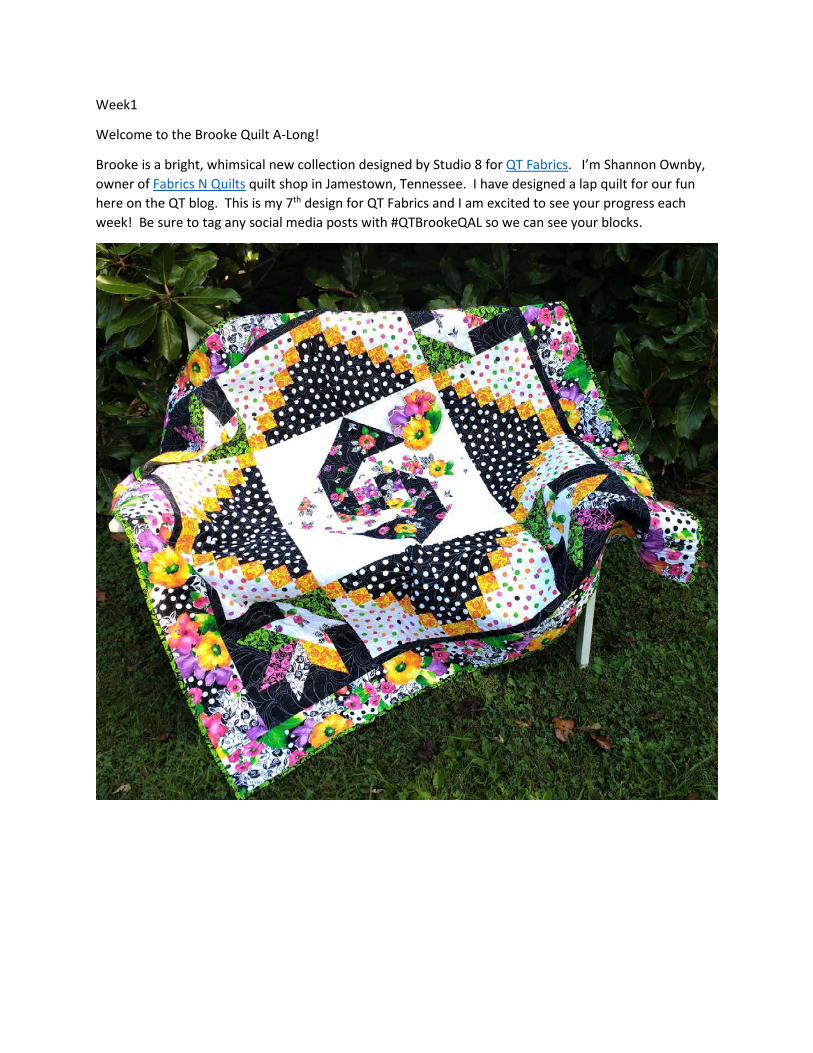
Welcome to the Brooke Quilt A-Long!
Brooke is a bright, whimsical new collection designed by Studio 8 for QT Fabrics. I’m Shannon Ownby, owner of Fabrics N Quilts quilt shop in Jamestown, Tennessee. I have designed a lap quilt for our fun here on the QT blog. This is my 7th design for QT Fabrics and I am excited to see your progress each week! Be sure to tag any social media posts with #QTBrookeQAL so we can see your blocks.

SHOPPING LIST! Fabric & Supplies
26318-J-Black Large Tossed Floral⅜ yard
26318-Z- WhiteLarge Tossed Floral⅝ yard
21517-Z-WhiteCurly Cue ½ yard
21516-J-BlackStencil Floral1 yard
26320-JH-Lime/BlackFloral Scroll⅞ yard (includes binding)
26320-SO-Yellow/OrangeFloral Scroll½ yard
26320-ZJ-White/BlackFloral Scroll¼ yard
26320-JP-Fuchsia/BlackFloral Scroll¼ yard
26321-ZX-MultiDots⅝ yard
26321-JZ-Black/WhiteDots⅝ yard
26317-X-MultiLarge Floral1 ¼ yards
26317-X-MultiLarge FloralSuggested backing3 ¼ yards
SUPPLIES:1/3 yard Fusible Web (we like Heat N Bond Lite for this project)1/3 yard Fusible Fleece (we used Pellon 987F)
Brooke Quilt-Along
WEEK 2
It’s time for our first blocks in the Brooke Q uilt A-Long!
Aren’t you excited about the bright colors & large-scale patterns in Brooke? The fabrics are going to do much of the talking in our quilt, which lets us use big blocks for a fast finish. I don’t know about you, but sometimes I like to have a quick project. On those projects, I like to add a little extra touch of something unexpected and we’ll do that with our applique in our last step.
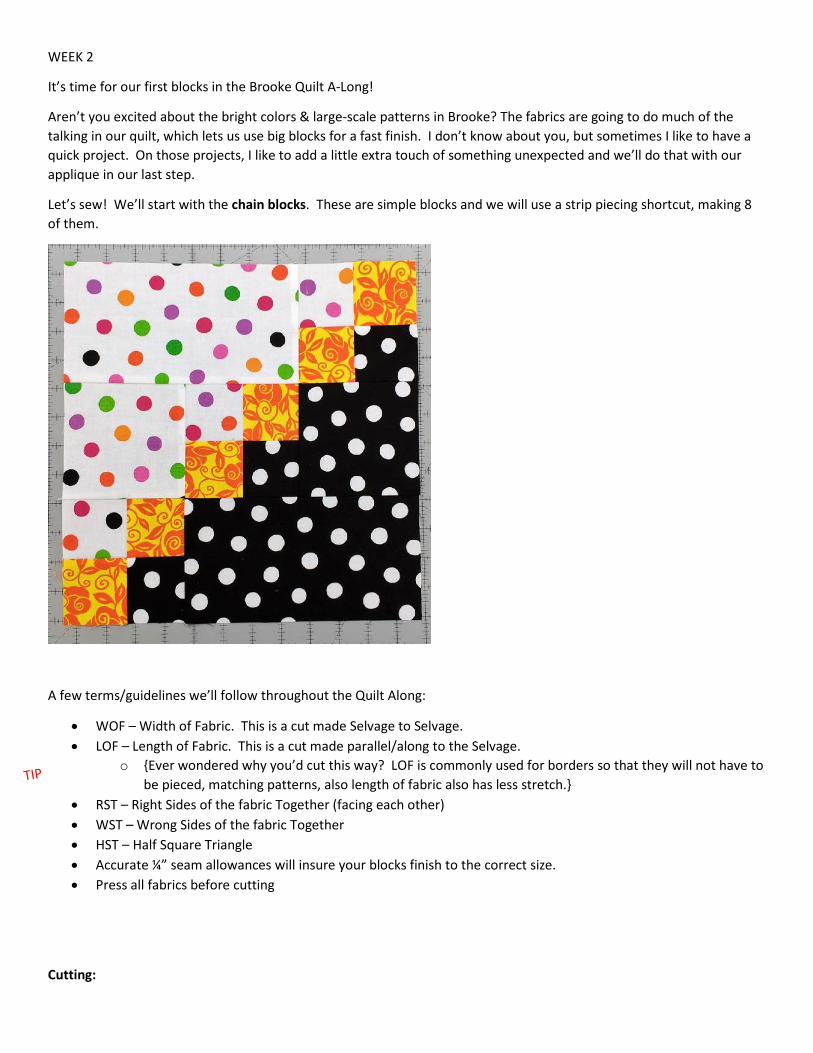
Let’s sew! We’ll start with the chain bl ock s. These are simple blocks and we will use a strip piecing shortcut, making 8 of them.
A few terms/guidelines we’ll follow throughout the Q uilt Along:
• WOF – Width of Fabric. This is a cut made Selvage to Selvage. • LOF – Length of Fabric. This is a cut made parallel/along to the Selvage.
o { Ever wondered why you’d cut this way? LOF is commonly used for borders so that they will not have to be pieced, matching patterns, also length of fabric also has less stretch.}
• RST – Right Sides of the fabric Together (facing each other) • WST – Wrong Sides of the fabric Together • HST – Half Square Triangle • Accurate ¼” seam allowances will insure your blocks finish to the correct size. • Press all fabrics before cutting
Cutting:
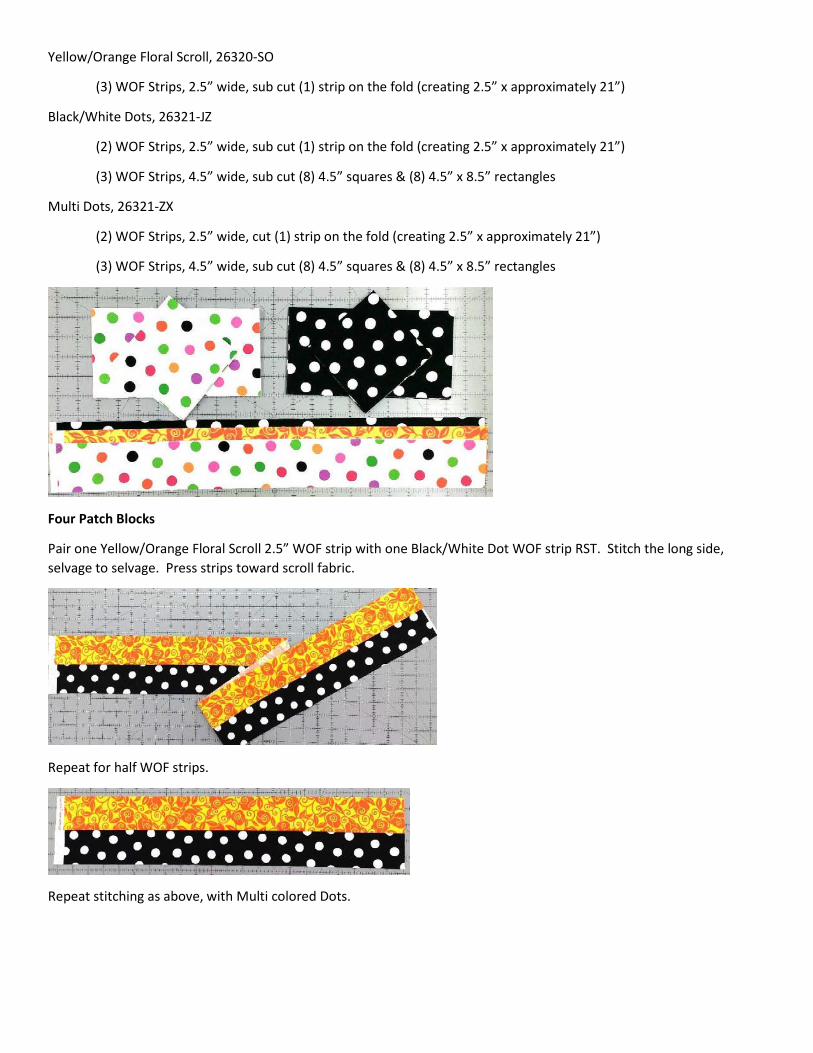
Yellow/Orange Floral Scroll, 26320 -SO
(3) WOF Strips, 2.5” wide, sub cut (1) strip on the fold (creating 2.5” x approximately 21”)
Black/White Dots, 26321-JZ
(2) WOF Strips, 2.5” wide, sub cut (1) strip on the fold (creating 2.5” x approximately 21”)
(3) WOF Strips, 4.5” wide, sub cut (8) 4.5” squares & (8) 4.5” x 8.5” rectangles
Multi Dots, 26321-ZX
(2) WOF Strips, 2.5” wide, cut (1) strip on the fold (creating 2.5” x approximately 21”)
(3) WOF Strips, 4.5” wide, sub cut (8) 4.5” squares & (8) 4.5” x 8.5” rectangles
Four Patch B l ock s
Pair one Yellow/Orange Floral Scroll 2.5” WOF strip with one Black/White Dot WOF strip RST. Stitch the long side, selvage to selvage. Press strips toward scroll fabric.
Repeat for half WOF strips.
Repeat stitching as above, with Multi colored Dots.
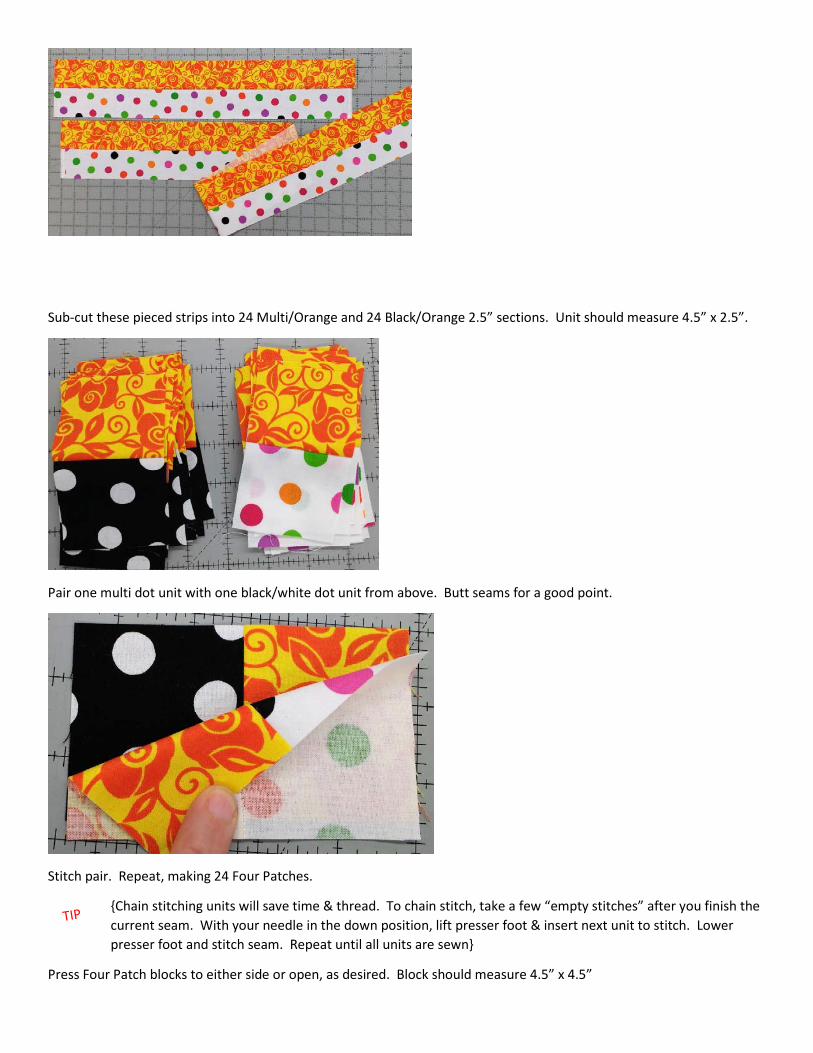
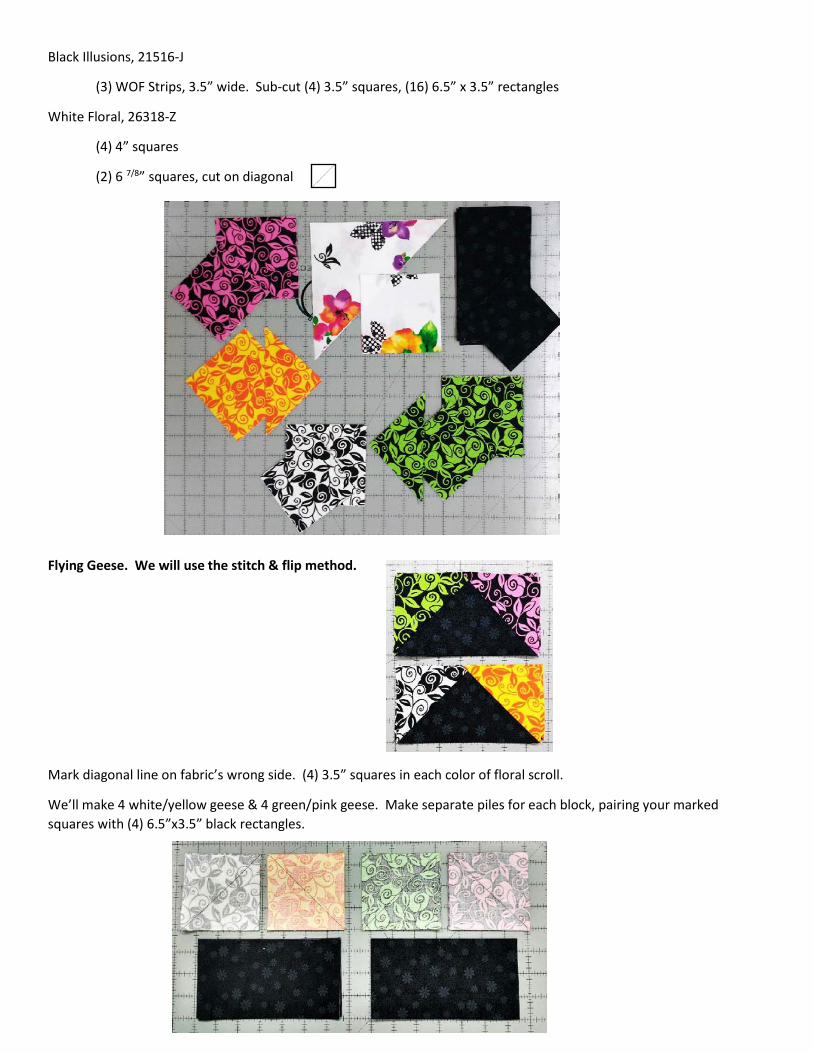
Sub-cut these pieced strips into 24 Multi/Orange and 24 Black/Orange 2.5” sections. Unit should measure 4.5” x 2.5”.
Pair one multi dot unit with one black/white dot unit from above. Butt seams for a good point.
Stitch pair. Repeat, making 24 Four Patches.
{ C hain stitching units will save time & thread. To chain stitch, take a few “empty stitches” after you finish the current seam. With your needle in the down position, lift presser foot & insert next unit to stitch. Lower presser foot and stitch seam. Repeat until all units are sewn}
Press Four Patch blocks to either side or open, as desired. Block should measure 4.5” x 4.5”

Com p l ete Chain B l ock
Lay out the components of your block near the machine. I like to make stacks (8 deep since we are making 8 blocks), this allows me to chain piece the blocks for a faster finish.
Sew each row, pressing toward the rectangle or square (away from the four patch) for a flatter block. See arrows in diagram.
Stitch rows together, butting seams, just like we did with the four patches.

WEEK 3
This week we will be making the flower basket block.
This week we’ll expand our skills by working with triangles.
A few terms/guidelines we’ll follow throughout the Q uilt Along:
• WOF – Width of Fabric. This is a cut made Selvage to Selvage. • LOF – Length of Fabric. This is a cut made parallel/along to the Selvage. • RST – Right Sides of the fabric Together (facing each other) • WST – Wrong Sides of the fabric Together • HST – Half Square Triangle • Accurate ¼” seam allowances will insure your blocks finish to the correct size. • Press all fabrics before cutting
I am using blue thread this week so you can better see my stitches on the fabric. I would normally use white or light gray thread when piecing this project.
Cutting:
Yellow/Orange Floral Scroll, 26320 -SO
(1) WOF Strip, 4” wide, Sub-cut (4) 3.5” squares, (2) 37/8” squares, cut on the diagonal
G reen/Black Floral Scroll, 26320 -JH
(2) WOF Strip, 4” wide, Sub-cut (4) 4” squares, (8) 3.5” squares, (2) 37/8” squares, cut on the diagonal
Pink/Black Floral Scroll, 26320 -JP
(1) WOF Strip, 4” wide, Sub-cut (2) 4” squares, (4) 3.5” squares
Black/White Floral Scroll, 26320 -ZJ
(1) WOF Strip, 4” wide, Sub-cut (2) 4” squares, (4) 3.5” squares
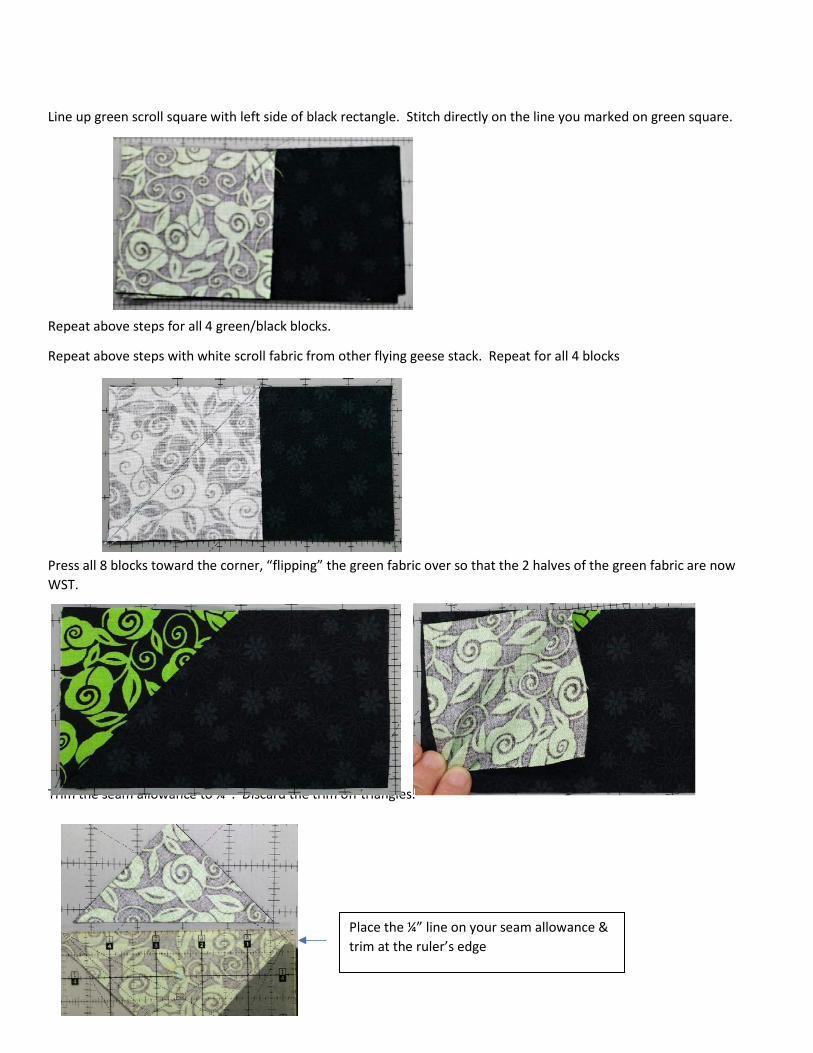
Black Illusions, 21516-J
(3) WOF Strips, 3.5” wide. Sub-cut (4) 3.5” squares, (16) 6.5” x 3.5” rectangles
White Floral, 26318-Z
(4) 4” squares
(2) 6 7/8” squares, cut on diagonal
Fl y ing G eese. W e w il l use the stitch & f l ip m ethod.
Mark diagonal line on fabric’s wrong side. (4) 3.5” squares in each color of floral scroll.
We’ll make 4 white/yellow geese & 4 green/pink geese. Make separate piles for each block, pairing your marked squares with (4) 6.5”x3.5” black rectangles.
ut on diagonal
Line up green scroll square with left side of black rectangle. Stitch directly on the line you marked on green square.
Repeat above steps for all 4 green/black blocks.
Repeat above steps with white scroll fabric from other flying geese stack. Repeat for all 4 blocks
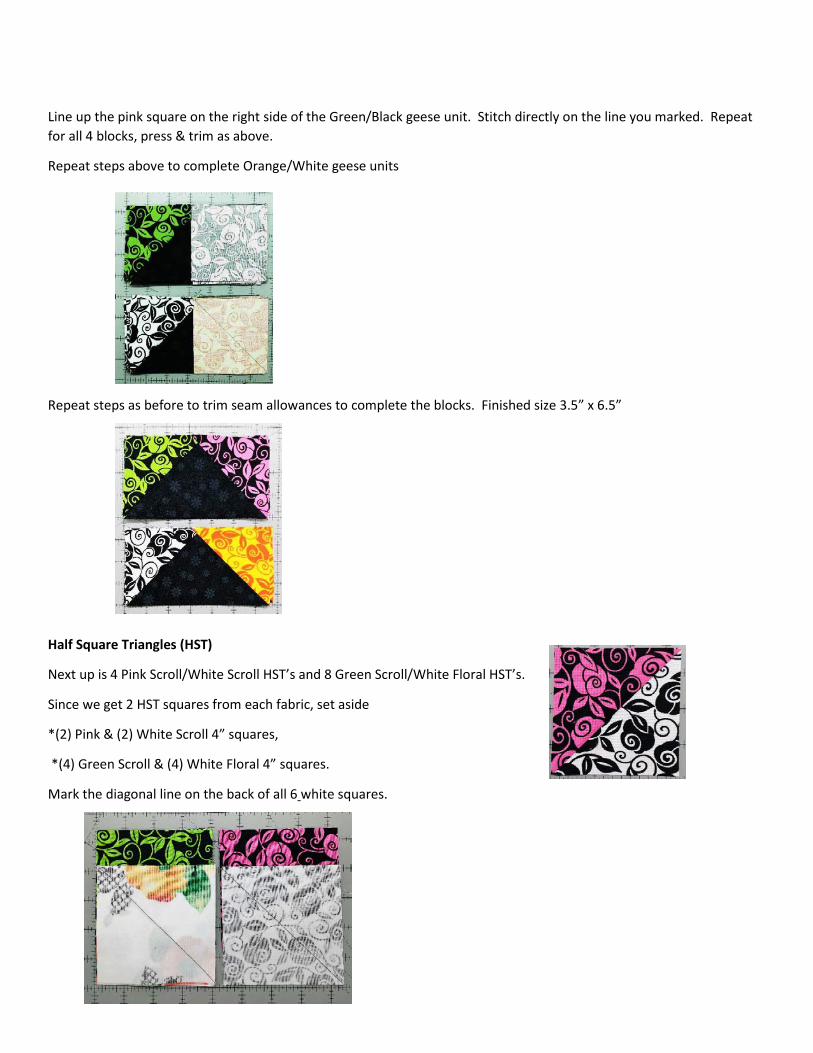
Press all 8 blocks toward the corner, “flipping” the green fabric over so that the 2 halves of the green fabric are now WST.
Trim the seam allowance to ¼”. Discard the trim off triangles.
Trim the seam allowance to ¼”. Discard the trim off triangles.Trim the seam allowance to ¼”. Discard the trim off triangles.
Place the ¼” line on your seam allowance & trim at the ruler’s edge
Line up the pink square on the right side of the G reen/Black geese unit. Stitch directly on the line you marked. Repeat for all 4 blocks, press & trim as above.
Repeat steps above to complete Orange/White geese units
Repeat steps as before to trim seam allowances to complete the blocks. Finished size 3.5” x 6.5”
Hal f Sq uare Triangl es ( HST)
N ext up is 4 Pink Scroll/White Scroll HST’s and 8 G reen Scroll/White Floral HST’s.
Since we get 2 HST squares from each fabric, set aside
* (2) Pink & (2) White Scroll 4” squares,
* (4) G reen Scroll & (4) White Floral 4” squares.
Mark the diagonal line on the back of all 6 white squares.
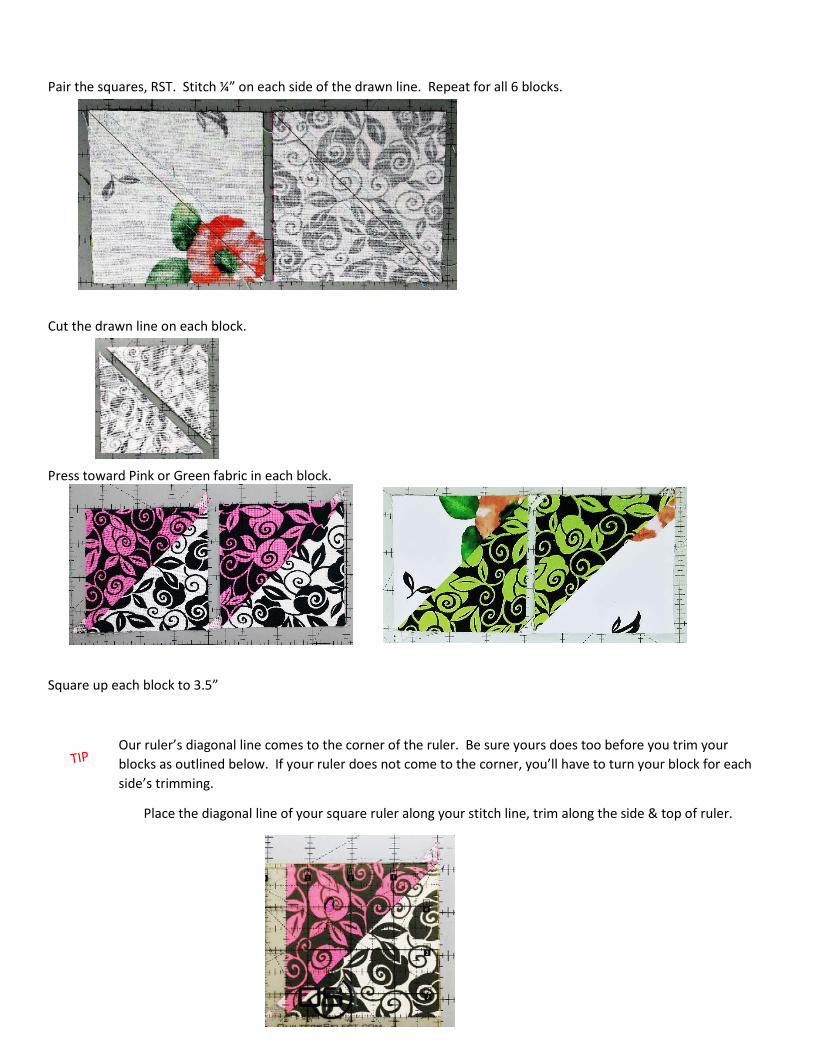
Pair the squares, RST. Stitch ¼” on each side of the drawn line. Repeat for all 6 blocks.
C ut the drawn line on each block.
Press toward Pink or G reen fabric in each block.
Square up each block to 3.5”
Our ruler’s diagonal line comes to the corner of the ruler. Be sure yours does too before you trim your blocks as outlined below. If your ruler does not come to the corner, you’ll have to turn your block for each side’s trimming.
Place the diagonal line of your square ruler along your stitch line, trim along the side & top of ruler.
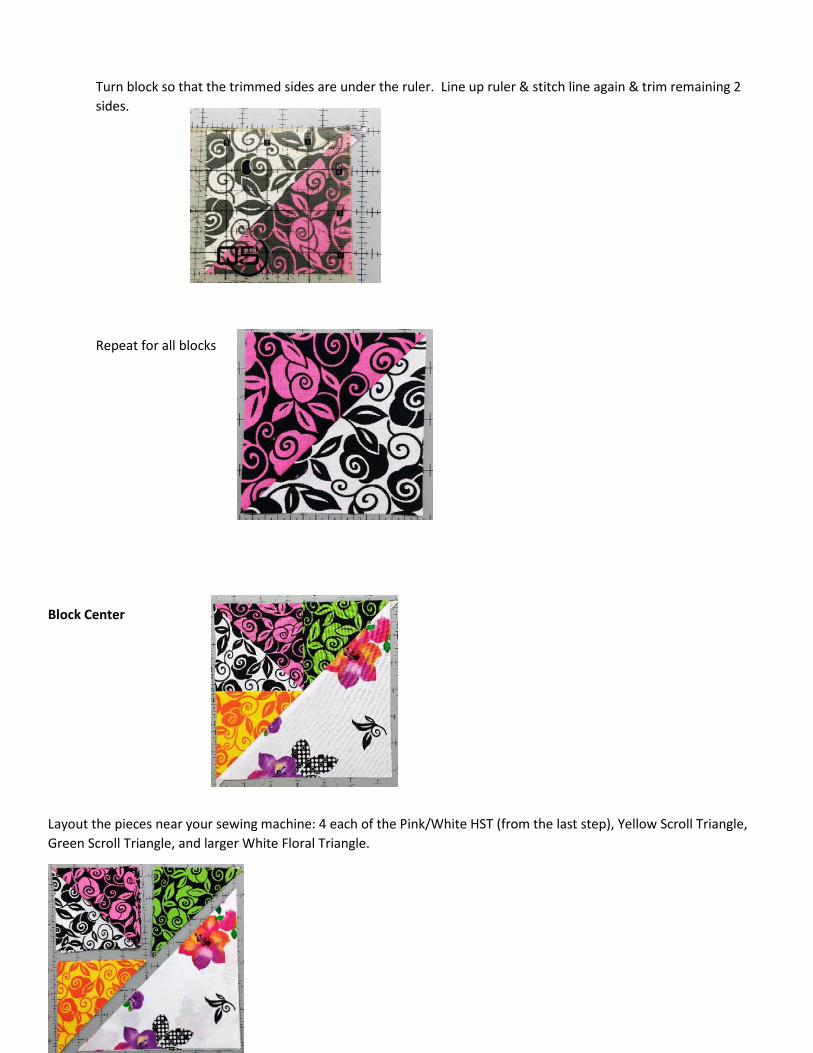
Turn block so that the trimmed sides are under the ruler. Line up ruler & stitch line again & trim remaining 2 sides.
Repeat for all blocks
B l ock Center
Layout the pieces near your sewing machine: 4 each of the Pink/White HST (from the last step), Yellow Scroll Triangle, G reen Scroll Triangle, and larger White Floral Triangle.

Watch the direction of your units so that you don’t inadvertently stitch to the wrong side. Stitch the green triangle to the right of the HST. Repeat for all 4 units. Gently press toward green fabric. You may iron or finger press this seam.
Stitch the Yellow triangle to the bottom of the HST. Repeat for all 4 units. Gently press toward yellow fabric. You may iron or finger press this seam.
Stitch the 6 7/8” White Floral triangle to create square. Repeat for all 4 units. Press toward White Floral fabric. Block should measure 6.5”
Square up if necessary.
Complete Flower Basket Block
Lay out the components of your block near the machine. I like to make stacks
(4 deep since we are making 4 blocks), this allows me to
chain piece the blocks for a faster finish.
Trim dog ears to reduce bulk
Trim dog ears to reduce bulk
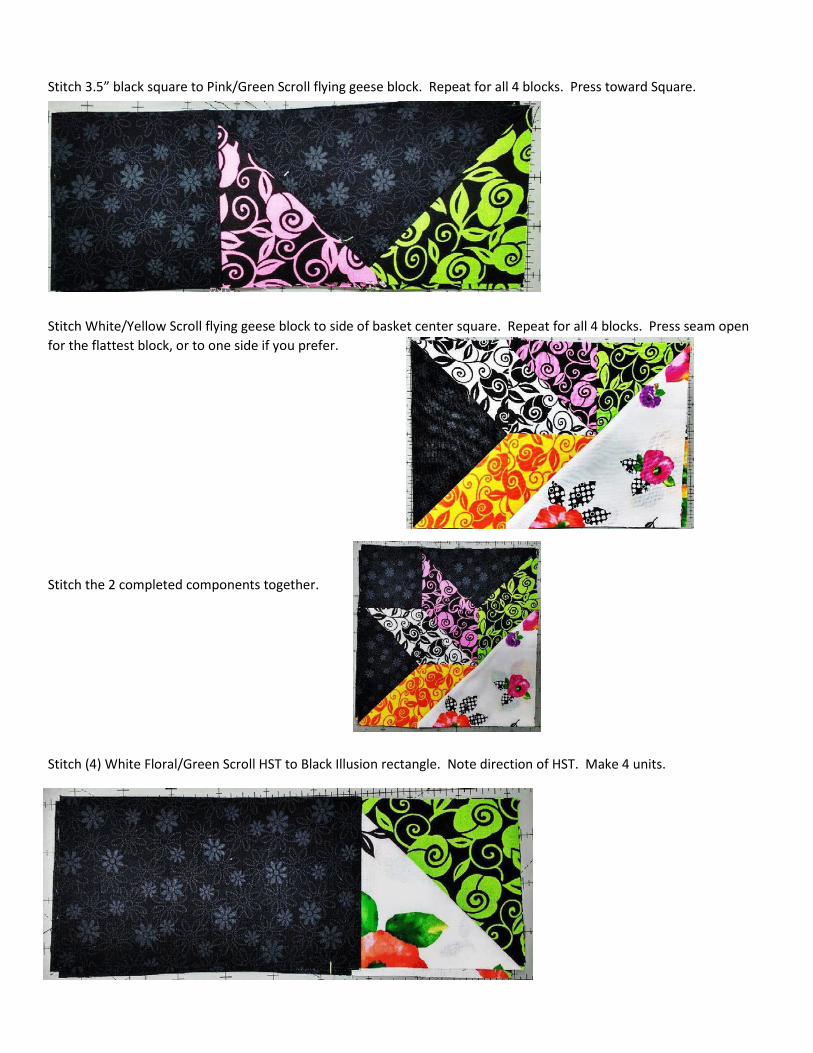
Stitch 3.5” black square to Pink/G reen Scroll flying geese block. Repeat for all 4 blocks. Press toward Square.
Stitch White/Yellow Scroll flying geese block to side of basket center square. Repeat for all 4 blocks. Press seam open for the flattest block, or to one side if you prefer.
Stitch the 2 completed components together.
Stitch (4) White Floral/G reen Scroll HST to Black Illusion rectangle. N ote direction of HST. Make 4 units.
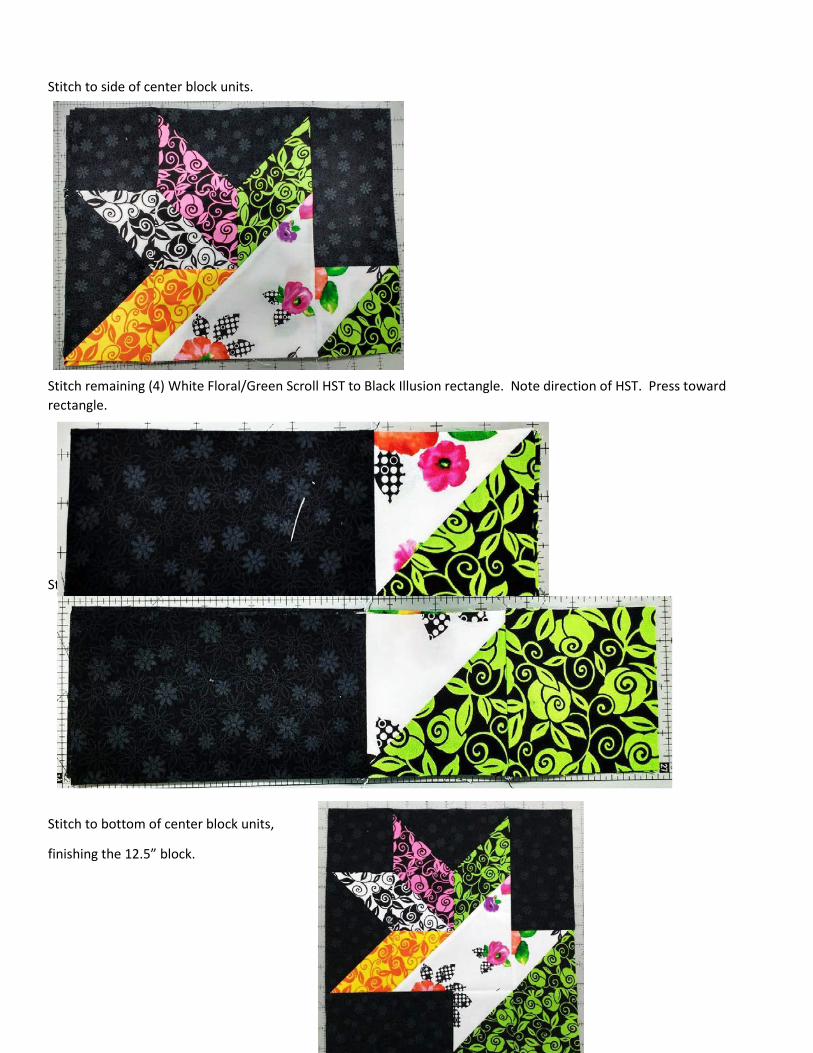
Stitch to side of center block units.
Stitch remaining (4) White Floral/G reen Scroll HST to Black Illusion rectangle. N ote direction of HST. Press toward rectangle.
Stitch G reen 3.5” square to this unit. Press toward square. Make 4 units.
Stitch to bottom of center block units,
finishing the 12.5” block.
Stitch G reen 3.5” square to this unit. Press toward square. Make 4 units.
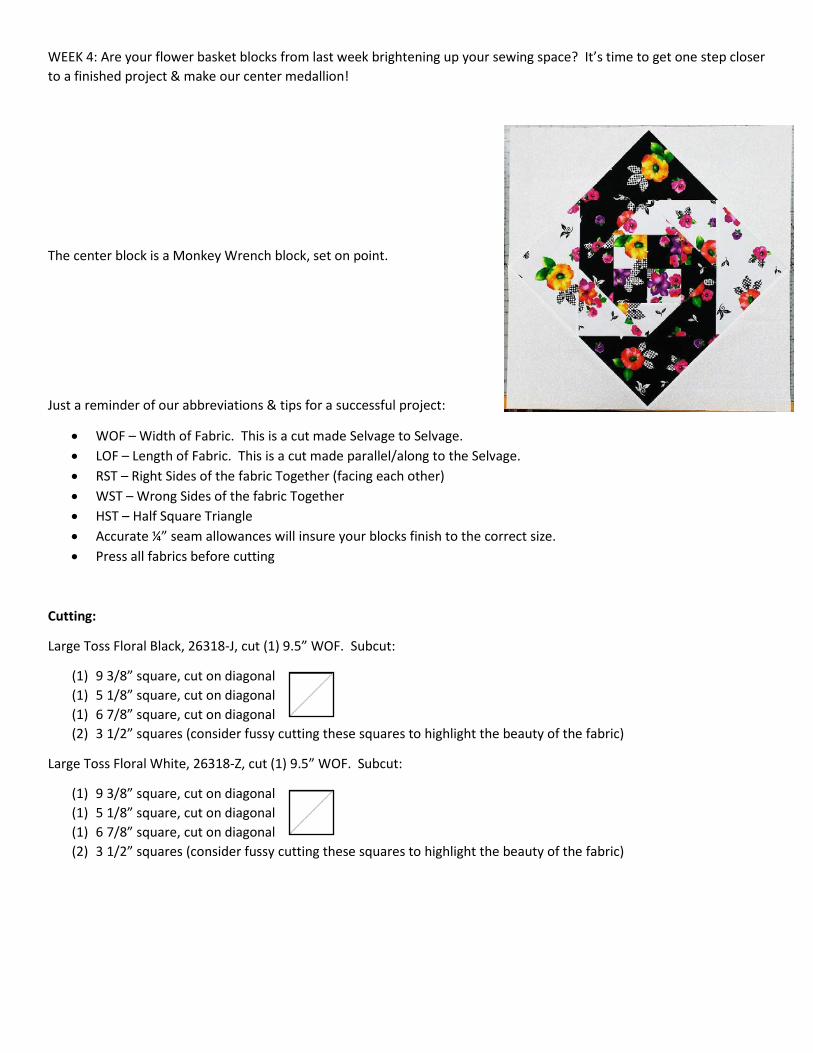
WEEK 4: Are your flower basket blocks from last week brightening up your sewing space? It’s time to get one step closer to a finished project & make our center medallion!
The center block is a Monkey Wrench block, set on point.
Just a reminder of our abbreviations & tips for a successful project:
• WOF – Width of Fabric. This is a cut made Selvage to Selvage. • LOF – Length of Fabric. This is a cut made parallel/along to the Selvage. • RST – Right Sides of the fabric Together (facing each other) • WST – Wrong Sides of the fabric Together • HST – Half Square Triangle • Accurate ¼” seam allowances will insure your blocks finish to the correct size. • Press all fabrics before cutting
Cutting:
Large Toss Floral Black, 26318-J, cut (1) 9.5” WOF. Subcut:
(1) 9 3/8” square, cut on diagonal (1) 5 1/8” square, cut on diagonal (1) 6 7/8” square, cut on diagonal (2) 3 1/2” squares (consider fussy cutting these squares to highlight the beauty of the fabric)
Large Toss Floral White, 26318-Z, cut (1) 9.5” WOF. Subcut:
(1) 9 3/8” square, cut on diagonal (1) 5 1/8” square, cut on diagonal (1) 6 7/8” square, cut on diagonal (2) 3 1/2” squares (consider fussy cutting these squares to highlight the beauty of the fabric)
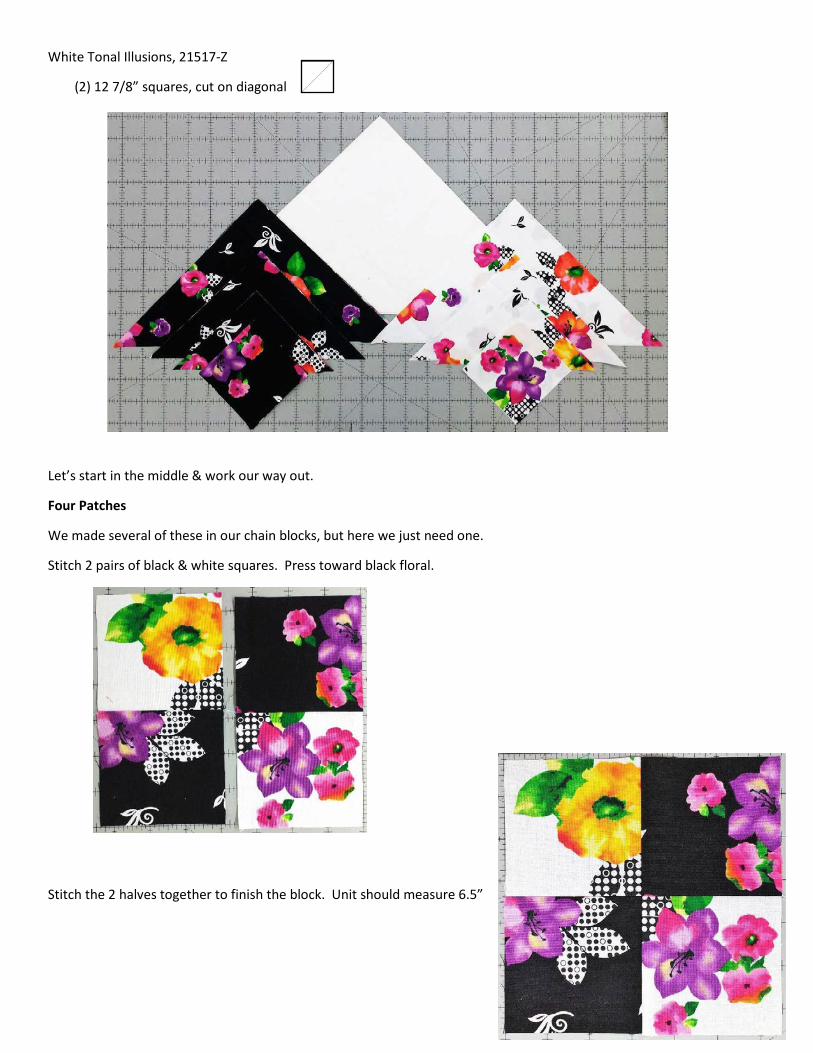
White Tonal Illusions, 21517-Z
(2) 12 7/8” squares, cut on diagonal
Let’s start in the middle & work our way out.
Four Patches
We made several of these in our chain blocks, but here we just need one.
Stitch 2 pairs of black & white squares. Press toward black floral.
Stitch the 2 halves together to finish the block. Unit should measure 6.5”
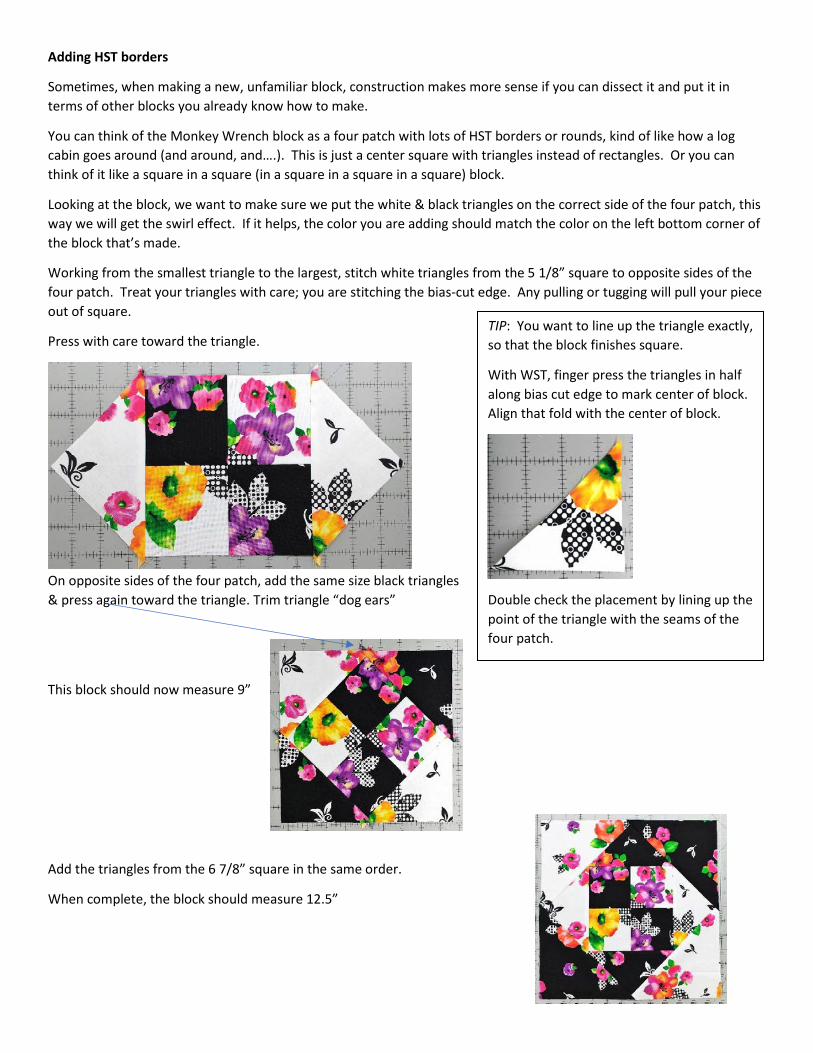
Adding HST borders
Sometimes, when making a new, unfamiliar block, construction makes more sense if you can dissect it and put it in terms of other blocks you already know how to make.
You can think of the Monkey Wrench block as a four patch with lots of HST borders or rounds, kind of like how a log cabin goes around (and around, and….). This is just a center square with triangles instead of rectangles. Or you can think of it like a square in a square (in a square in a square in a square) block.
Looking at the block, we want to make sure we put the white & black triangles on the correct side of the four patch, this way we will get the swirl effect. If it helps, the color you are adding should match the color on the left bottom corner of the block that’s made.
Working from the smallest triangle to the largest, stitch white triangles from the 5 1/8” square to opposite sides of the four patch. Treat your triangles with care; you are stitching the bias-cut edge. Any pulling or tugging will pull your piece out of square.
Press with care toward the triangle.
On opposite sides of the four patch, add the same size black triangles & press again toward the triangle. Trim triangle “dog ears”
This block should now measure 9”
Add the triangles from the 6 7/8” square in the same order.
When complete, the block should measure 12.5”
TIP: You want to line up the triangle exactly, so that the block finishes square.
With WST, finger press the triangles in half along bias cut edge to mark center of block. Align that fold with the center of block.
Double check the placement by lining up the point of the triangle with the seams of the four patch.
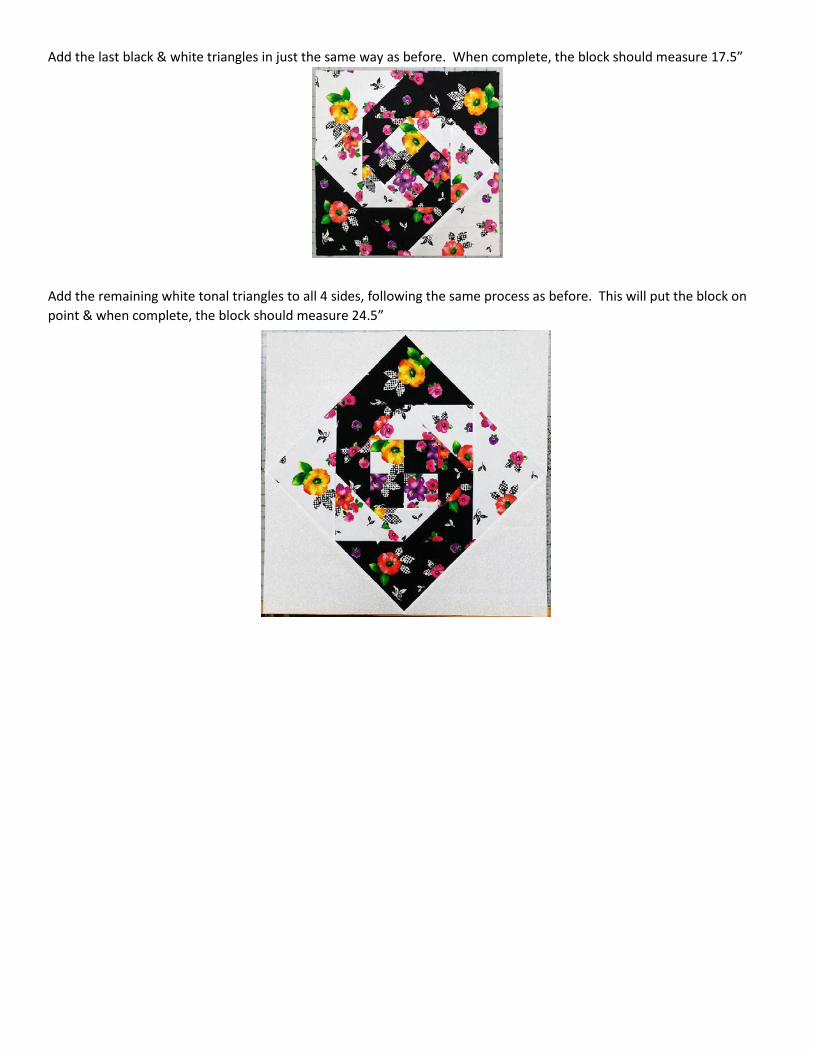
Add the last black & white triangles in just the same way as before. When complete, the block should measure 17.5”
Add the remaining white tonal triangles to all 4 sides, following the same process as before. This will put the block on point & when complete, the block should measure 24.5”
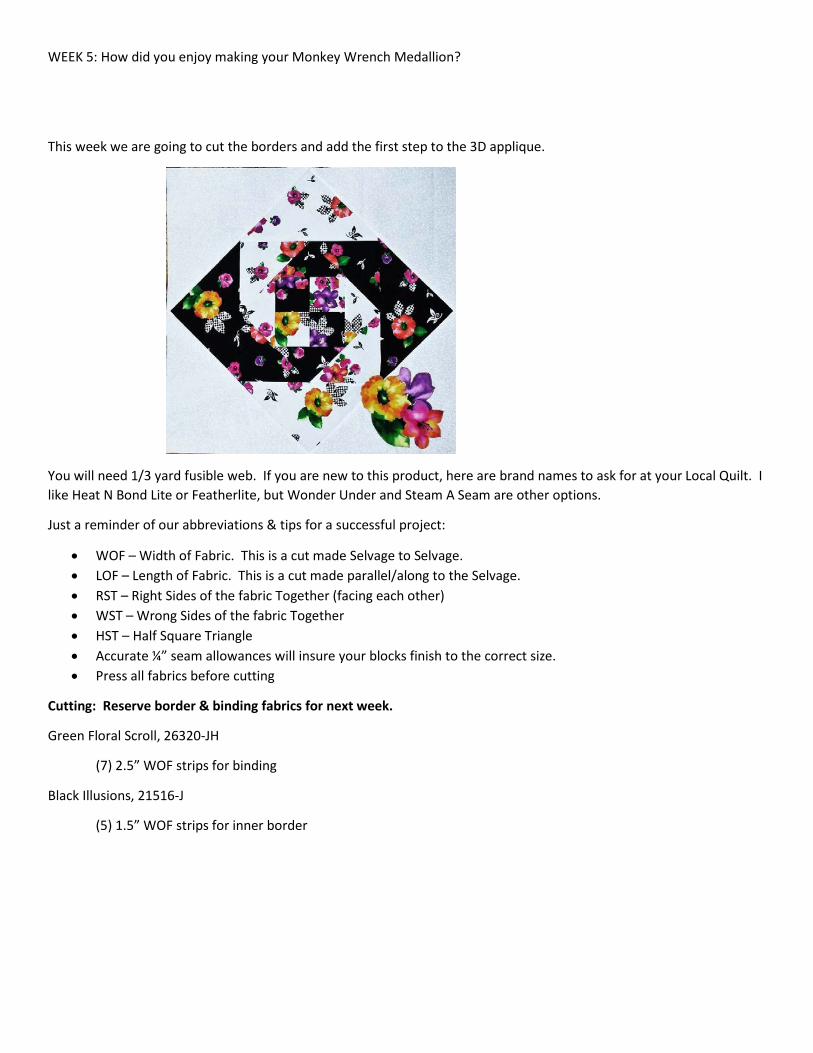
WEEK 5: How did you enjoy making your Monkey Wrench Medallion?
This week we are going to cut the borders and add the first step to the 3D applique.
You will need 1/3 yard fusible web. If you are new to this product, here are brand names to ask for at your Local Q uilt. I like Heat N Bond Lite or Featherlite, but Wonder Under and Steam A Seam are other options.
Just a reminder of our abbreviations & tips for a successful project:
• WOF – Width of Fabric. This is a cut made Selvage to Selvage. • LOF – Length of Fabric. This is a cut made parallel/along to the Selvage. • RST – Right Sides of the fabric Together (facing each other) • WST – Wrong Sides of the fabric Together • HST – Half Square Triangle • Accurate ¼” seam allowances will insure your blocks finish to the correct size. • Press all fabrics before cutting
Cutting: R eserv e border & binding f abrics f or nex t w eek .
G reen Floral Scroll, 26320 -JH
(7) 2.5” WOF strips for binding
Black Illusions, 21516-J
(5) 1.5” WOF strips for inner border
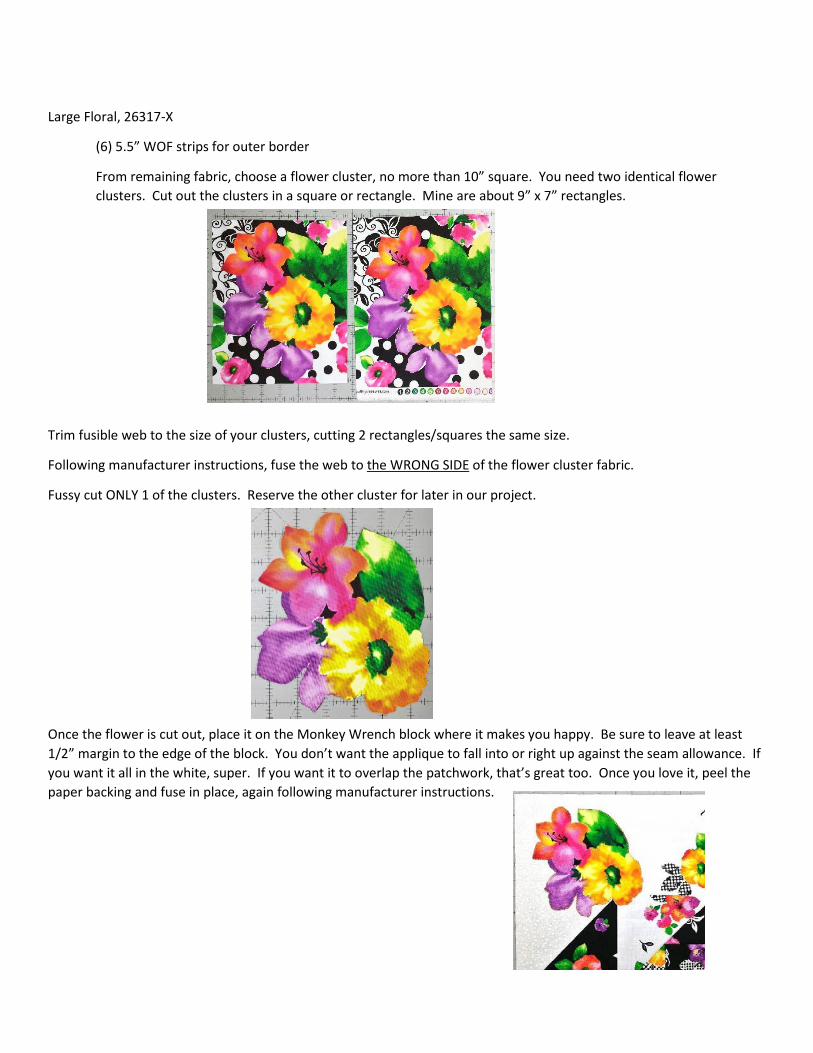
Large Floral, 26317-X
(6) 5.5” WOF strips for outer border
From remaining fabric, choose a flower cluster, no more than 10 ” square. You need two identical flower clusters. C ut out the clusters in a square or rectangle. Mine are about 9” x 7” rectangles.
Trim fusible web to the size of your clusters, cutting 2 rectangles/squares the same size.
Following manufacturer instructions, fuse the web to the WRON G SIDE of the flower cluster fabric.
Fussy cut ON LY 1 of the clusters. Reserve the other cluster for later in our project.
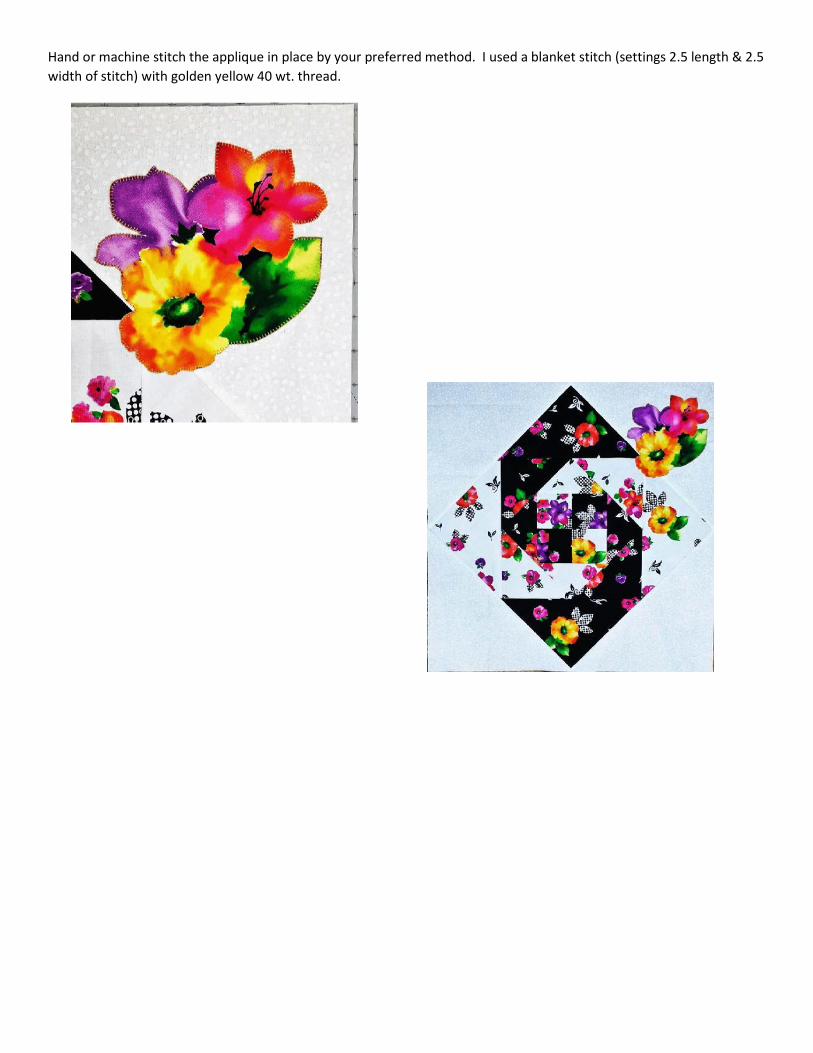
Once the flower is cut out, place it on the Monkey Wrench block where it makes you happy. Be sure to leave at least 1/2” margin to the edge of the block. You don’t want the applique to fall into or right up against the seam allowance. If you want it all in the white, super. If you want it to overlap the patchwork, that’s great too. Once you love it, peel the paper backing and fuse in place, again following manufacturer instructions.
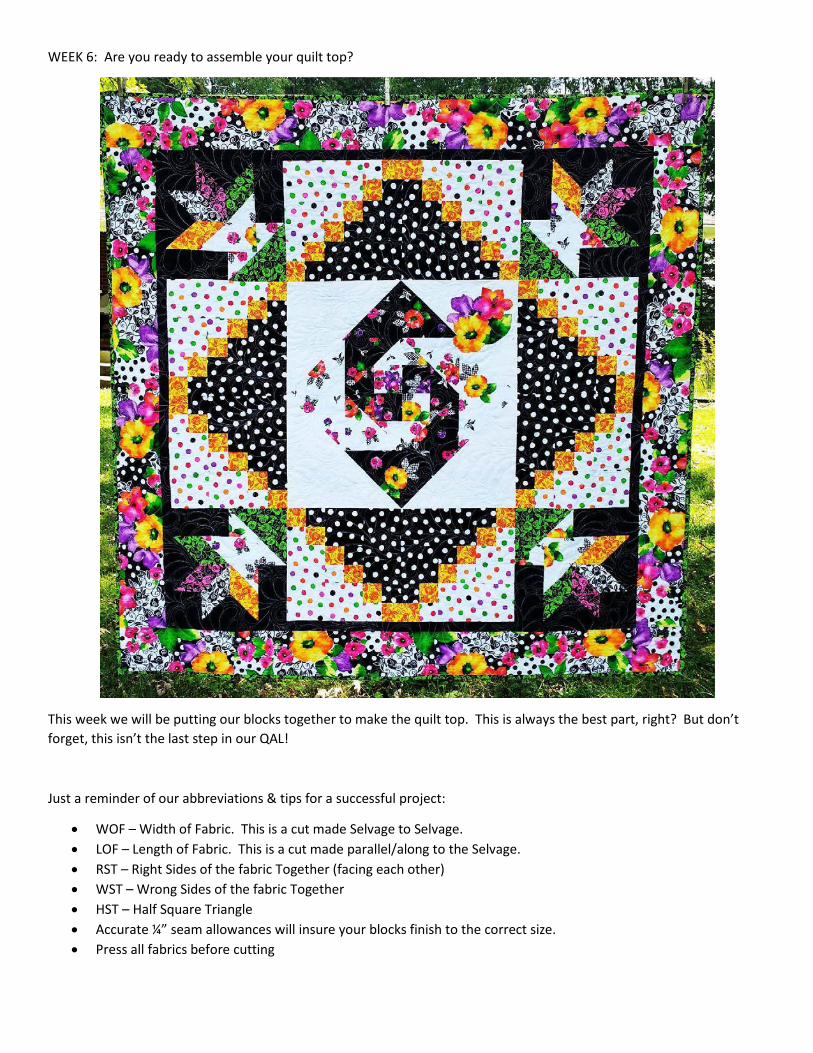
Hand or machine stitch the applique in place by your preferred method. I used a blanket stitch (settings 2.5 length & 2.5 width of stitch) with golden yellow 40 wt. thread.
WEEK 6: Are you ready to assemble your quilt top?
This week we will be putting our blocks together to make the quilt top. This is always the best part, right? But don’t forget, this isn’t the last step in our Q AL!
Just a reminder of our abbreviations & tips for a successful project:
• WOF – Width of Fabric. This is a cut made Selvage to Selvage. • LOF – Length of Fabric. This is a cut made parallel/along to the Selvage. • RST – Right Sides of the fabric Together (facing each other) • WST – Wrong Sides of the fabric Together • HST – Half Square Triangle • Accurate ¼” seam allowances will insure your blocks finish to the correct size. • Press all fabrics before cutting
Cutting:
N o cutting this week! Just grab all the border strips you cut last week and all your blocks!
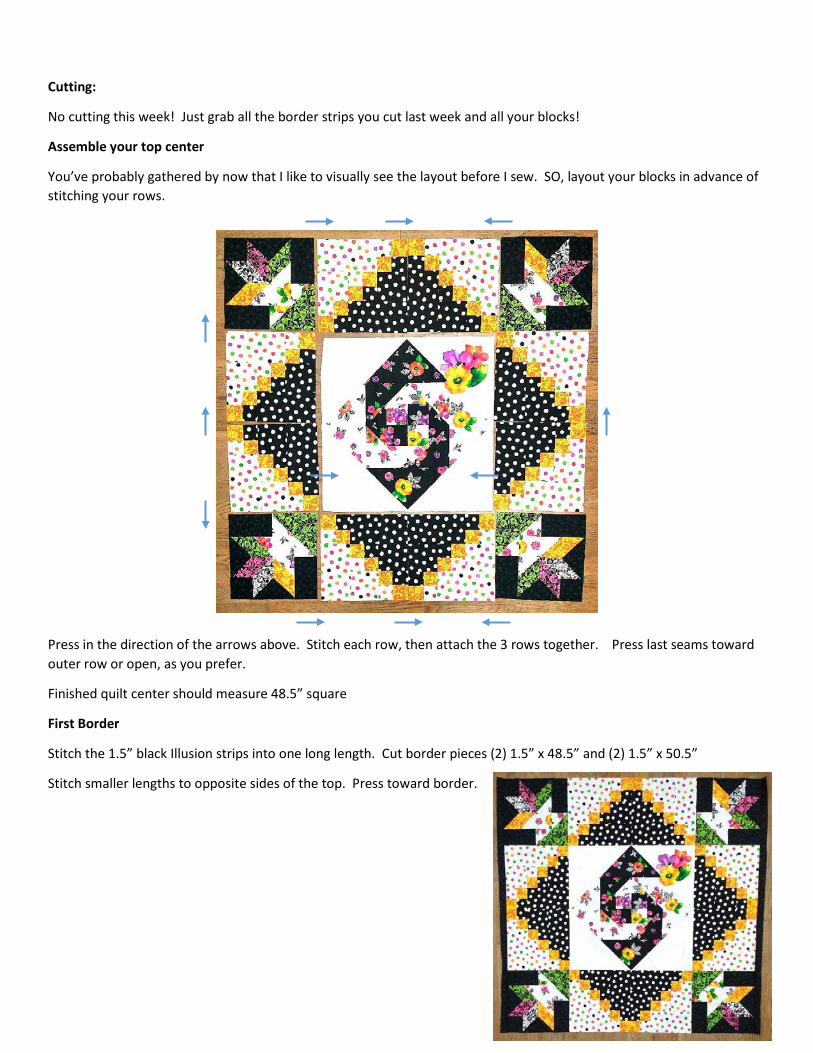
Assem bl e y our top center
You’ve probably gathered by now that I like to visually see the layout before I sew. SO, layout your blocks in advance of stitching your rows.
Press in the direction of the arrows above. Stitch each row, then attach the 3 rows together. Press last seams toward outer row or open, as you prefer.
Finished quilt center should measure 48.5” square
First B order
Stitch the 1.5” black Illusion strips into one long length. C ut border pieces (2) 1.5” x 48.5” and (2) 1.5” x 50 .5”
Stitch smaller lengths to opposite sides of the top. Press toward border.
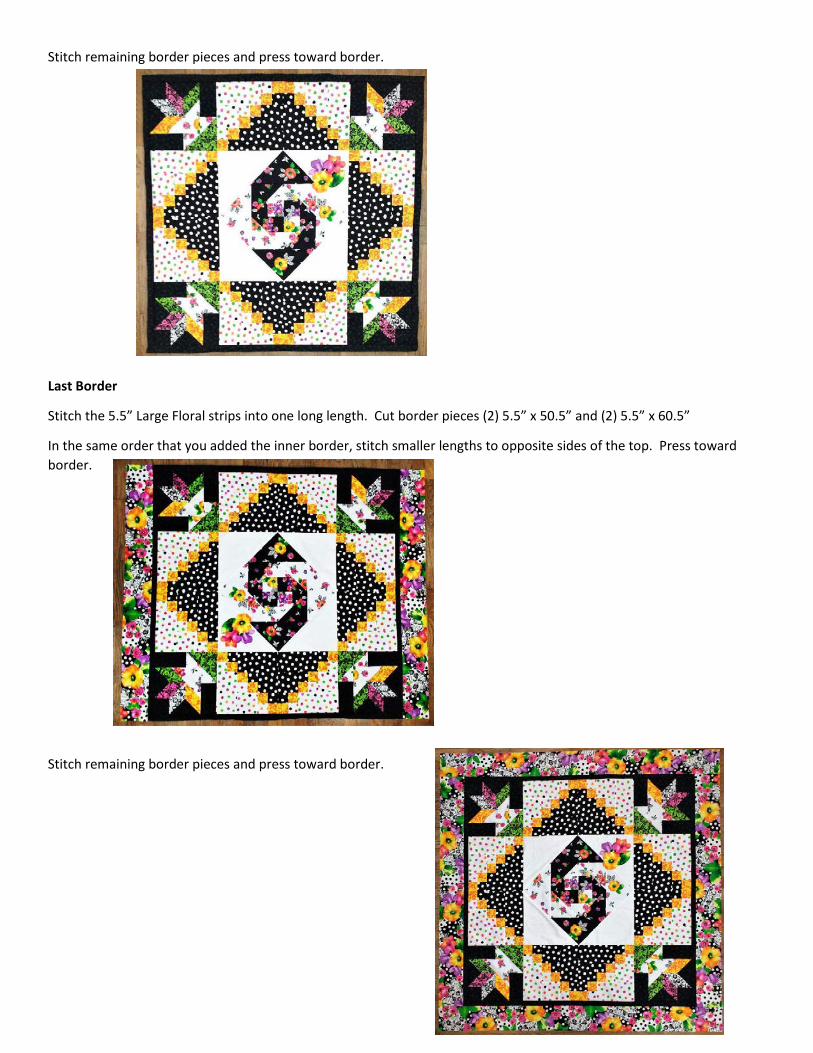
Stitch remaining border pieces and press toward border.
L ast B order
Stitch the 5.5” Large Floral strips into one long length. C ut border pieces (2) 5.5” x 50 .5” and (2) 5.5” x 60 .5”
In the same order that you added the inner border, stitch smaller lengths to opposite sides of the top. Press toward border.
Stitch remaining border pieces and press toward border.
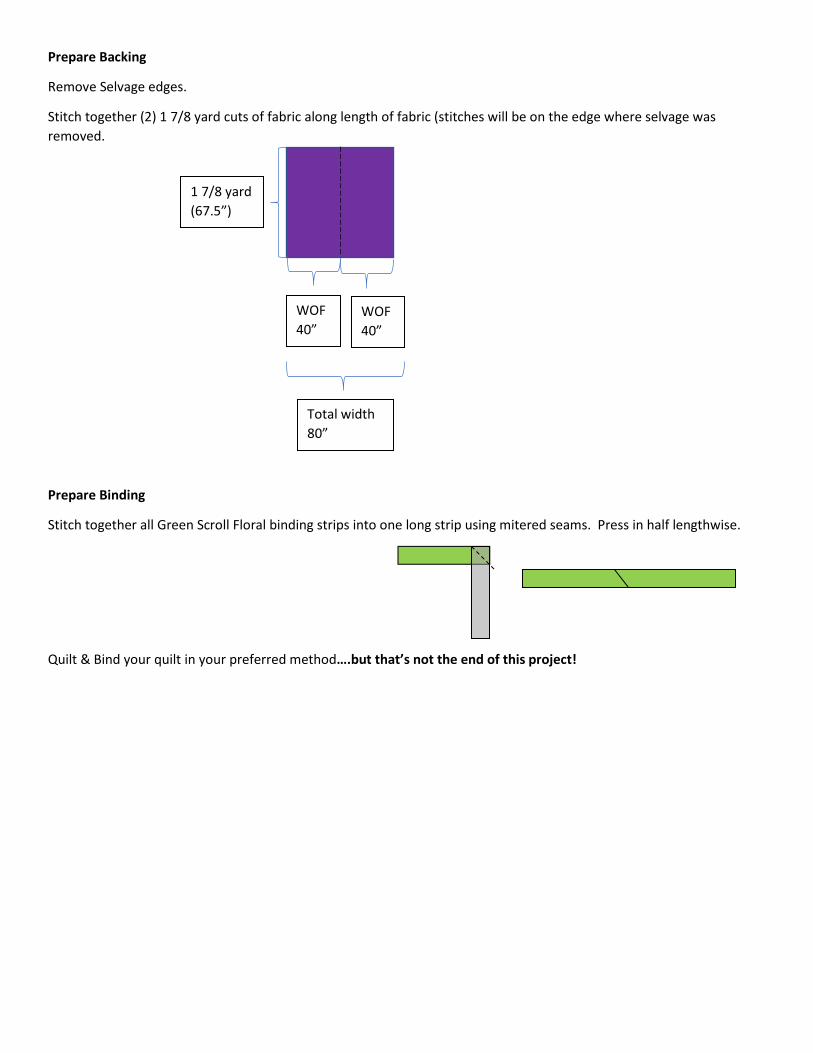
Prep are B ack ing
Remove Selvage edges.
Stitch together (2) 1 7/8 yard cuts of fabric along length of fabric (stitches will be on the edge where selvage was removed.
Prep are B inding
Stitch together all G reen Scroll Floral binding strips into one long strip using mitered seams. Press in half lengthwise.
Q uilt & Bind your quilt in your preferred method… . but that’ s not the end of this p roj ect!
1 7/8 yard (67.5”)
WOF40 ”
WOF 40 ”
Total width 80 ”
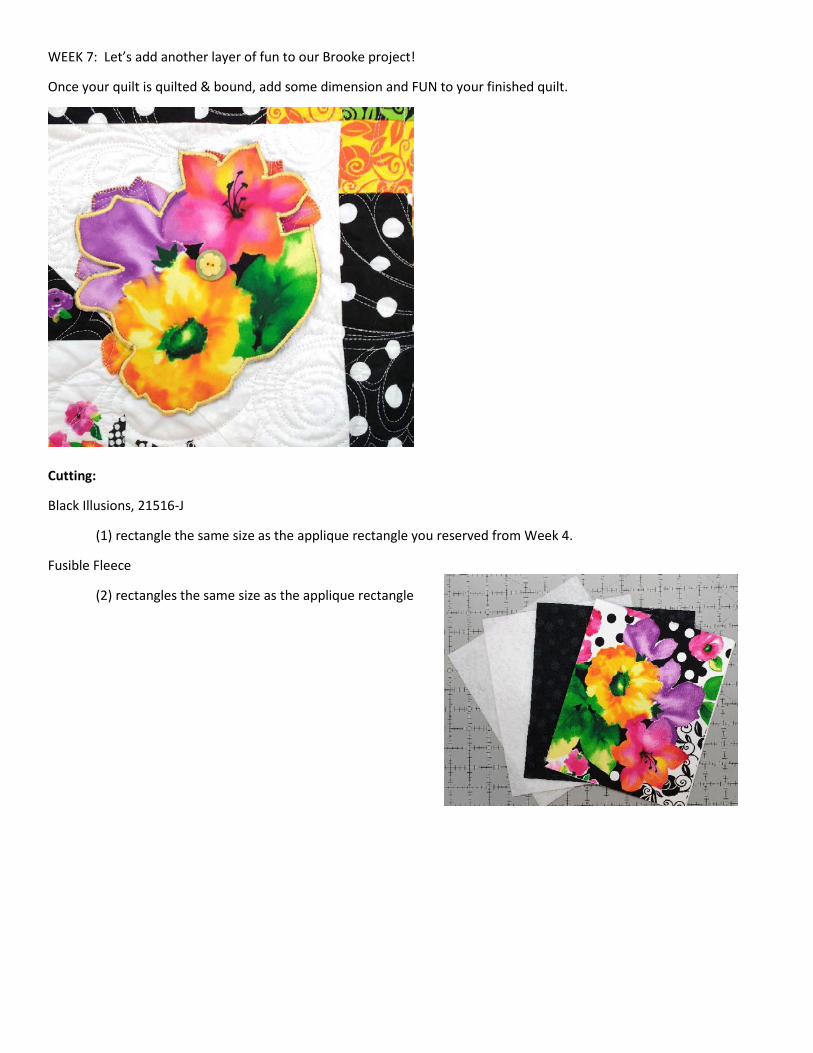
WEEK 7: Let’s add another layer of fun to our Brooke project!
Once your quilt is quilted & bound, add some dimension and FUN to your finished quilt.
Cutting:
Black Illusions, 21516-J
(1) rectangle the same size as the applique rectangle you reserved from Week 4.
Fusible Fleece
(2) rectangles the same size as the applique rectangle
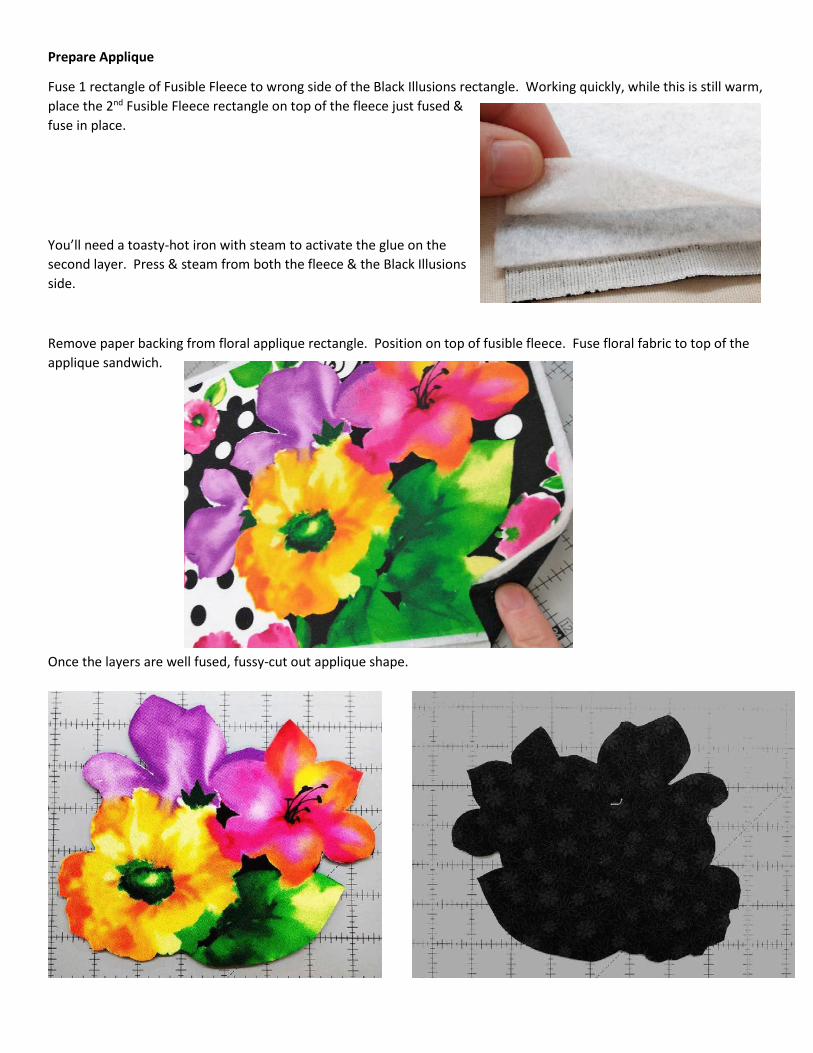
Prep are Ap p l iq ue
Fuse 1 rectangle of Fusible Fleece to wrong side of the Black Illusions rectangle. Working quickly, while this is still warm, place the 2nd Fusible Fleece rectangle on top of the fleece just fused & fuse in place.
You’ll need a toasty-hot iron with steam to activate the glue on the second layer. Press & steam from both the fleece & the Black Illusions side.
Remove paper backing from floral applique rectangle. Position on top of fusible fleece. Fuse floral fabric to top of the applique sandwich.
Once the layers are well fused, fussy-cut out applique shape.
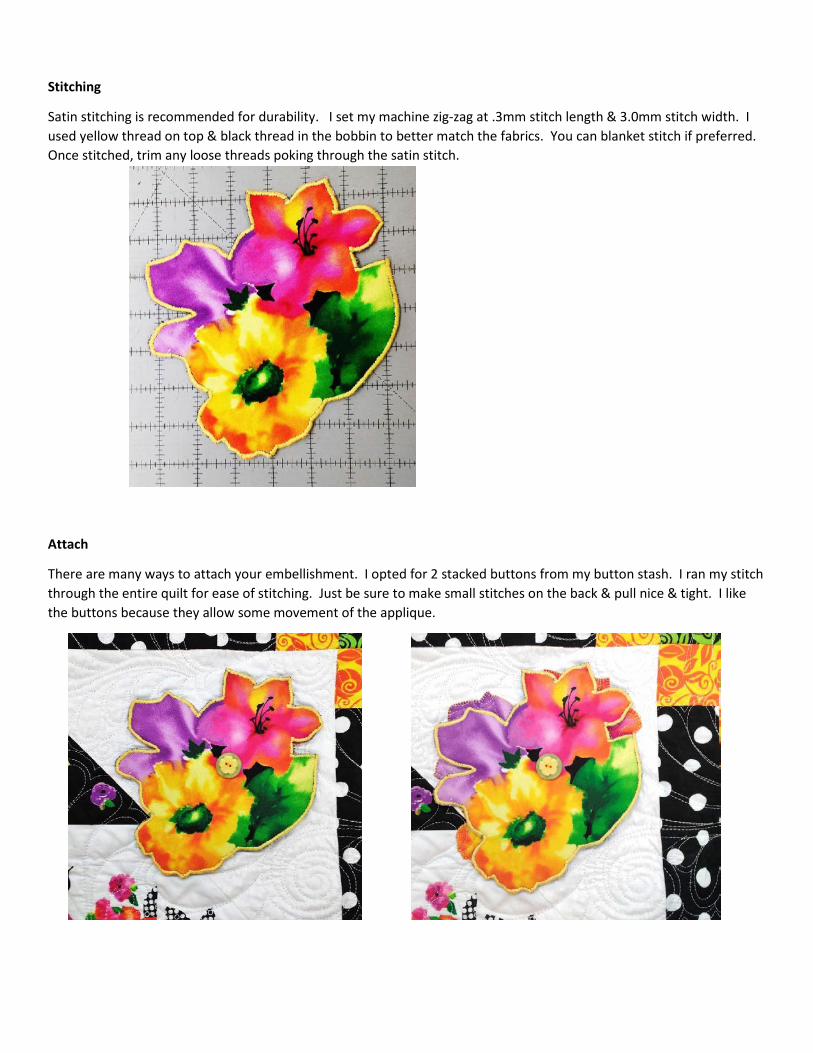
Stitching
Satin stitching is recommended for durability. I set my machine zig-zag at .3mm stitch length & 3.0 mm stitch width. I used yellow thread on top & black thread in the bobbin to better match the fabrics. You can blanket stitch if preferred. Once stitched, trim any loose threads poking through the satin stitch.
Attach
There are many ways to attach your embellishment. I opted for 2 stacked buttons from my button stash. I ran my stitch through the entire quilt for ease of stitching. Just be sure to make small stitches on the back & pull nice & tight. I like the buttons because they allow some movement of the applique.
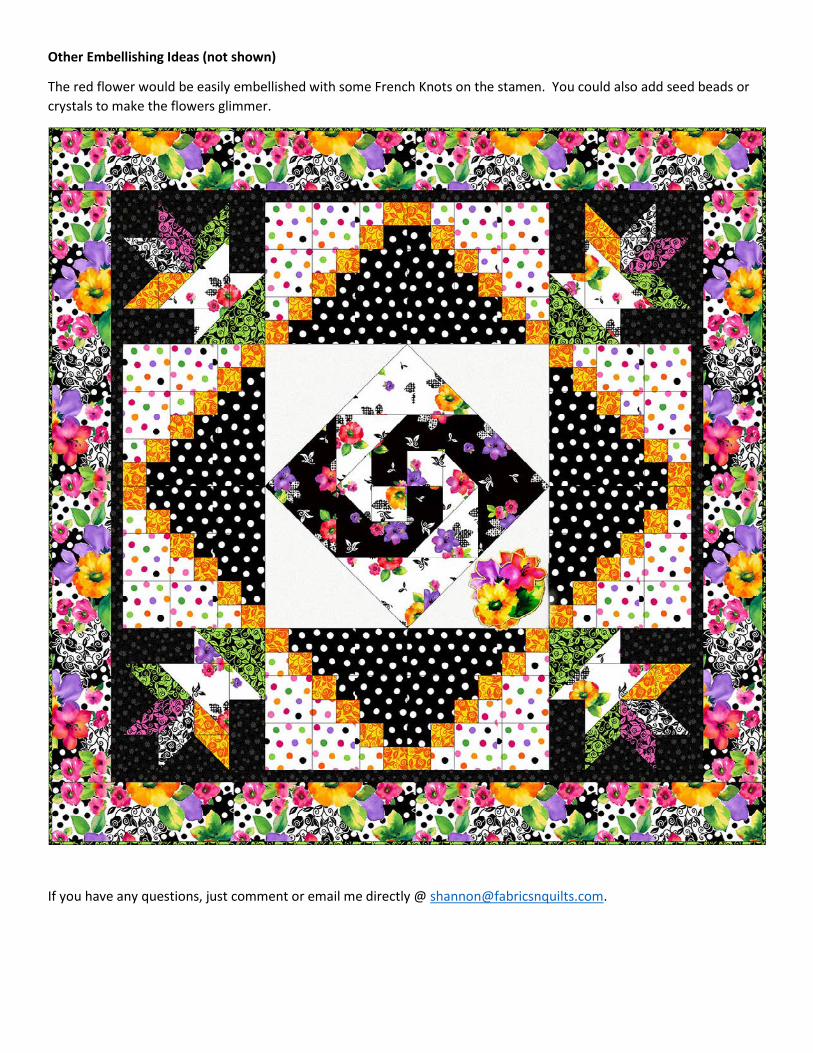
Other Embellishing Ideas (not shown)
The red flower would be easily embellished with some French Knots on the stamen. You could also add seed beads or crystals to make the flowers glimmer.
If you have any questions, just comment or email me directly @ [email protected].