90024445 t elite traduzioni en - ДЕЛОВАЯ...
TRANSCRIPT

90024445rev00
USER’S MANUAL
EN
CONVECTION OVENFOR PASTRY SHOPS
AND BAKERIESVERSION T-ELITE
Technical service


PAGE1 • GENERAL REMINDERS 32 • POINTS TO REMEMBER 43 • DESCRIPTION OF KEYS 54 • THE CUBE FUNCTIONS VOCABULARY 75 • PREHEATING THE OVEN 86 • SETTING THE OVEN MANUALLY FOR “MANUAL” COOKING 97 • SETTING THE OVEN MANUALLY FOR MANUAL COOKING WITH UP TO 9 CYCLES IN SEQUENCE 118 • SAVING A PROGRAM 149 • SELECTING AND STARTING A STORED PROGRAM 1610 • CHANGING A STORED PROGRAM TEMPORARILY 1711 • SETTING THE CORE PROBE 1812 • HUMIDITY CONTROL SYSTEM 2013 • SPECIAL PROGRAMS 21
13.1 • VENT FUNCTION 2113.2 • COOKING WITH ALTERNATING FANS 2113.3 • COOKING WITH FAN DIRECTION 22
14 • PRACTICAL ADVICE 2315 • DAILY CLEANING 2416 • WASHING KIT 2517 • ROUTINE MAINTENANCE 2718 • MAJOR SERVICING 2819 • SELF-DIAGNOSIS AND FAULT IDENTIFICATION 2820 • “PLUS” ADDITIONAL FUNCTIONS 3221 • PROGRAM MANAGEMENT SUMMARY 3722 • BRIEF DESCRIPTION OF PROGRAMMING 50
16 • DETTAGLI OPERATIVI
2
The reproduction or copying of any part of this manual by any meanswhatsoever is strictly forbidden unless authorized previously in writing bythe manufacturer.
ALI S.p.A. - 20.04.2005
T - Programmable electronics with Scroller control, twin speed, humidification, power reduction, automatic vent, lighting and
door with double glazing.
(KL automatic washing system on request)
(Core probe on request)
The manufacturer disclaims any liability for any inaccuracies in thismanual attributable to printing or copying errors.We reserve the right to modify our products as we deem fit, withoutimpairing their basic features.
CONTENTS
VERSION
90024445rev00

3
Repairs may become necessary overt ime; these and al l major servicingoperations must be entrustedexclusively to a Lainox technician or aLainox authorized service agent.
1.1 • Carefully read the directions given in thismanual; they contain important informationon safety during installation, operation andmaintenance.Keep this manual in a safe place forfuture consultation!
1.2 • This appliance must be put only to the usefor which it is specifically intended:cooking foods. Any other type of use isimproper and therefore dangerous.
1.3 • Only trained kitchen staff should be allowedto use the appliance.
1.4 • The oven must not be lef t unattendedduring operation.
1.5 • There are surfaces of the oven that becomehot during operation. Take care!
1.6 • Ask the installer for information on correctoperation and use of the water softener;incorrect or incomplete maintenance is atthe origin of the formation of scale, whichwould badly damage the oven.
1.7 • Should it become necessary to call out aser v ice technic ian, a l l essent ia lidentification details of the appliance areshown on the data plate, located at theright-hand side on the bottom.
1.8 • Each appliance is equipped with a dataplate identifying the model and its mainspecifications. An example is given below ofa dataplate for an electric oven and one fora gas oven.
1.9 • In the event of technical assistance beingrequired, the trouble must be describedin as much detail as possible, so that aservice technician will be able straight awayto understand the nature of the problem.
1.10 • In the event of breakdown or faul tyoperat ion, switch off the ovenimmediately!
1.11 • The room, in which the oven is to operate,must be well ventilated!
1.12 • Safety sticker• Maximum height for inserting containers
with liquids
1 • GENERAL REMINDERS
IPX 5 - 03
8 kW
3N AC 400 VNR xxxxxxxxxx
TYP. ME 061 "P"
kPa200 - 500
50 Hz
2003
0085
2003
AC 230 V 50 Hz
IT
IPX 5
A3 B13
Qn 18 kW
Cat.II 2H3+
B23
LX TYP. MG 101 "P" TYP.
NR xxxxxxxxxx
1.00 kW
kPa200 - 500
P mbar20; 28-30/37
90024445rev00
1600
mm
(63
inch
)

4
2.1 • Before any food is cooked in a new oven,the interior must be thoroughly cleaned(see “Daily Cleaning”).
2.2 • At the end of the working day, clean theoven thoroughly inside and out; this willensure smooth operation of the applianceand prolong its useful life.
2.3 • Do not use high pressure water jetswhen cleaning the oven!
2.4 • For daily cleaning, use non-corrosiveproducts (alkali based) suitable for thepurpose. Abrasive materials and productsshould not be used as they will damage thesurfaces. If the oven is equipped with anautomatic washing system, use SOLELYproducts recommended by themanufacturer (see “Daily Cleaning”).
2.5 • Always switch off the appliance when workis finished, and shut off all energy supplies(electricity, water, and gas if connected).
2.6 • Avoid any operat ion that might causecooking salt to be deposited on the steelsurfaces of the oven; if salt is accidentallysp i l led, r inse of f immediate ly andthoroughly.
2.7 • After s team cooking, open the doorcarefully to avoid being hit by the rush ofresidual steam escaping from the oven.Failure to observe this warning may bedangerous for the operator.
2.8 • To ensure safe operation of the oven donot obstruct the vents or any otheropening in the casing!
Fai lure to observe basic safetyguidelines may jeopardize the smoothoperation of the oven and expose theoperator to serious danger!The manufacturer wi l l disclaim anyliability if the operation of the oven asoriginally intended is altered either bytampering or through failure to observethe instruct ions contained in themanuals.
2 • POINTS TO REMEMBER
2.9 • To ensure long term efficiency andreliability of the oven, major servicingshould be carried out at least once ayear. With this in mind, customers arerecommended to sign a serviceagreement.
90024445rev00

5
ON-OFF (KEY 1)Tur ns on the cont ro l panel , act ivates se l f -diagnosis.Key light on: appliance ready for use.Key light off: appliance powered, control panel off.
ENERGY SAVING (KEY 28) Key for activating reduction of heating power.
TURNING OFF STEAM GENERATOR (KEY 29) Key for turn ing of f forced s team generatorpreheating (only on models that have this feature).
SPEED SELECTION (KEY 4)Normal ventilation speed selection key with keylight off, reduced speed key light on.
START-STOP (KEY 16)START-STOP key:to start and stop cooking in progress.• Key light on: START, cooking started.• Intermit tent key l ight : TEMPORARY STOPobtained by opening the door or pressing the keyonce. Cooking and remaining time are stopped.Closing the door or pressing key 16 again restartscooking.• Key light off: PERMANENT STOP obtained bypressing key 16 for 3 seconds: cooking stopspermanently, as if the time had expired.
3 • DESCRIPTION OF KEYS
90024445rev00
3.1 • OVEN LIGHT KEY (KEY 22)Pressing this key switches on the ovenlight, permitting the operator to check theprogress of the cooking. The light goes outautomatically when the door is opened;with the door closed, press the key again toswi tch of f (see l ight swi tch t imingchapter 23 “PARAMETERS”).
3.2 • RAPID COOLING KEY (OVEN DOOROPEN) (KEY 21)This function is activated only with the ovendoor open. Pressing the key activates thefan, which rapidly lowers the temperature inthe oven to 50 °C. “COOL” This function isparticularly useful if one cooking operationat high temperature is to be followed byanother using a much lower temperature,or when the oven needs c leaningimmediately after a cooking operation (see“Daily Cleaning”).
3.3 • OPEN OVEN VENT KEY (KEY 24)This function is activated only in convectionmode. Pressing the key opens the ovenvent , a l lowing the escape of excessmoisture that collects within the cavity. Thevent is closed manually (LED on = ventopen; LED off = vent closed, flashing LED= vent in operation).
The position of the vent can also be savedin a program (see “Cooking chamber vent”setting).
OPERATIONS

OPERATIONS
3 • DESCRIPTION OF KEYS
3.4 • OVEN MOISTURE INLET KEY(KEY 23)This function is useful for foods that requireadded humidity when cooking. Press thekey and hold for as long as it is wished tolet moisture into the oven.
Note: “COOL” The appliance is f i t tedwith an automatic system for loweringthe temperature, that operates in a l lcook ing modes. I f t he tempera tu reexceeds the display setting by 30 °C,the humidifier automatically directs coldwater into the oven and the temperatureis rapidly lowered. This precludes thepossibility that food could start cookingwith too high a temperature in the oven.In addition, the added moisture preventsfoods from drying up.
690024445rev00

7
This sect ion sums up the meaning of someimportant functions that frequently recur in thefollowing explanation.
• TIME OUT*: when setting the cooking programfunctions, especially in the early days of learningto use the appliance, after a time of 10 sec. haspassed since the last setting, the data are savedautomatically, thus avoiding any unfortunate “lossof programming”. The display stops blinking tosignal the exit due to TIME OUT. The temperaturedisplay indicates the actual oven temperature. Toreturn to setting, press the key of the requiredfunction. For programs with two or more cycles,press key 19 and search for the required cycle withthe SCROLLER.
• PROGRAM*: in the conditionof a PERMANENT STOP(START STOP key l ight o f f )key 18 is used to search for the
programs saved by the user and sor tedalphabetically automatically. Pressing key 18 andthen key 17 “PLUS” takes you to the submenusCOPY PROGRAM, RECIPES LX, EXIT.
• PLUS*: key providing accessto additional functions.
• ENTER*: conf i r ms theselected control.
• RECIPES LX*: section of memory containing theopt imized cooking recipes and added by themanufacturer who provides a series of them atyour disposal. Having the manufacturer's recipesavailable is helpful when dealing with new foodsfor which you want the cooking to be successful.
4 • THE CUBE: FUNCTIONS VOCABULARY
90024445rev00
8
OPERATIONS
5.1 • SWITCH ONPress key 1. If display 8 signals a faultcode, see “Sel f -d iagnosis and fau l tidentification”.
5.2 • SELECT PREHEATING MODEPress key 10.A s tandard set t ing is automat ica l lydisplayed with the following values:oven temperature: 130 °Ctime: Infinite “inf”
If the standard settings meet your needs,the oven is ready for starting with STARTkey 16.
5.3 • CHANGEIf the displayed temperature of 130 °Cneeds to be changed, press key 10, turnthe SCROLLER within 10 sec. (to the rightincreases, to the left decreases), until therequired value appears in the display.
Note: Approximately 10 sec. after the knob has been released (TIME OUT*)the display will revert to the actual oventemperature, in this way the set valuehas been saved.
5.4 • STARTPress key 16. The LED associated withthe key remains permanent ly a l ight(“START”).On reaching the set temperature, anintermittent beep will signal that ovenpreheating is over and “LOAD” will be shownon display 8.
5.5 • DISPLAYING AND CHANGING THEPREHEAT TEMPERATURE DURINGOPERATIONIf the setting needs to be checked duringpreheating, press key 10.If the temperature displayed is incorrect,adjust with the SCROLLER and wait for10 sec. (TIME OUT*) to save the newsetting automatically.
5 • PREHEATING THE OVEN
90024445rev00
Before cooking i t is always vi tal topreheat the oven while empty in order toshorten the cooking time and ensure agood result. The preheating temperaturedepends on the type of product, size
and quant i ty; as a rule you set apreheating temperature 15-25% greaterthan the cooking temperature.
990024445rev00
OPERATIONS
6 • SETTING THE OVEN MANUALLY FOR “MANUAL” COOKING
6.1 • SWITCH ONPress key 1. Any faults are signalled after“self-diagnosis” on display 8 see “Self-diagnosis and fault identification”.
6.2 • SET THE TEMPERATUREThe d isp lay 8 shows “MANUAL”, thetemperature displayed is the one inside theoven, press key 10 , the temperatured isp lay 5 bl inks, d isp lay 8 shows“TEMPERATURE”, within 10 seconds setthe required cooking temperature, e.g.165 °C using the SCROLLER (to the rightincreases, to the left decreases).
6.3A • SET THE TIMEThe time display 6 shows [ inf ] infinite,press key 11, the time display 6 blinks,display 8 shows “CYCLE TIME”, within10 seconds set the cooking t ime, e.g.45 minutes by turning the SCROLLER tothe right to set the cooking time.
Or
6.3B • SET CORE PROBESee “Setting the core probe”.
Note: The sett ings are saved approx.10 seconds after the last action (TIMEOUT*), you can exit programming quicklyby pressing the lit key of the last settingagain.

10
STARTING THE COOKING PROGRAM
Place the food in the oven. Refer to the“Pract ica l Adv ice” heading for moreinformation.If the core probe is to be used, refer to“Setting the core probe” and “Hints onusing the core probe”.
6.4 • STARTPress key 16 START to start cooking: thekey light stays on steady.
At this point...the temperature display 5 indicates theactual oven temperature.
The time display 6 indicates the t imeremaining to complete cooking.The luminous dot a longside the valueindicates:blinking = cooking in progress;permanently alight = cooking suspended.
Note: the first time the appliance is turnedon each day the forced steam generatorAUTOMATICALLY PREHEATS the steamgenerator.When star t ing a program that includessteam, the program is automaticallystarted as soon as the steam generatorhas reached the preheating temperatureso as to avoid starting the program withoutany steam. The message “BOILER COLD”indicates that the forced steam generatorhas not yet reached the preheat ingtemperature.
6.5 • END OF COOKINGIf infinite t ime has been selected, stopcooking by pressing key 16 PERMANENTSTOP for 3 seconds.If a cooking time or core probe temperaturehas been entered, a few minutes before theend of cooking the message “END” will bedisplayed alternating with the name of the“MANUAL” program, so as to notify theoperator before the time is up or the setcore probe temperature has been reached.An in ter mi t tent beep wi l l s ignal thatcooking has concluded.To interrupt the signal, simply open theoven door. Remove the food from the oven,fo l lowing the d i rect ions g iven underparagraph 2.7 of the “Points to remember”heading.
If you want to turn on cooking a secondtime with the same sett ings, af terputting the food in the oven, just presskey 16 (START) without having to do thesettings again.
Displaying and changing saved valuesIf, during cooking, you want to check orchange the settings of: temperature, cycletime or core probe, autoclima, on pressingthe corresponding key 10-11-12-31, thedisplay will blink for 10 sec. indicating thesetting. Use the SCROLLER to make thenew setting which will automatically besaved at the end of TIME OUT*.
6 • SETTING THE OVEN MANUALLY FOR “MANUAL” COOKING
90024445rev00
OPERATIONS
11
OPERATIONS
Manual cooking with a number of cycles insequence permits including preheating theoven with no load, thus becoming the firstcooking cycle; let's see an example:
7.1 • SWITCH ONPress key 1. Any faults are signalled after“self-diagnosis” on display 8. See “Self-diagnosis and fault identification”.
SELECT CYCLE 1 Press key 19, display 8 will show“CYCLE 1”.
SET THE TEMPERATURE The temperature display blinks with a presetvalue of “130 °C”, within 10 seconds set therequired cooking temperature, e.g. 165 °Cusing the SCROLLER (to the right increases,to the left decreases).
Note: Approximately 10 sec. (TIME OUT*)after releasing the SCROLLER, the displaywill revert to the actual oven temperature.
SET THE TIMEThe time display 6 shows [ inf ] infinite, presskey 11 to set a cooking time. In our examplewe want to leave the CYCLE TIME on [ inf ] tobe able to use cycle 1 as oven preheating. Onreaching the set temperature, an intermittentbeep will signal that oven preheating is overand “LOAD” will be shown on display 8.
7.2 • SELECT CYCLE 2Press key 19, display 8 will show“CYCLE 1” blinking, turn the SCROLLERto the right, it will show “CYCLE 2”.
Note: The data are saved automatically10 seconds after the last setting, presskey 19, display 8 will show “CYCLE 1”blinking, turn the SCROLLER to the right tosearch for the cycle you want to view, andmake any changes as customary.
SET THE TEMPERATURE The temperature display blinks with a presetvalue of “130 °C”, within 10 seconds set therequired cooking temperature, e.g. 165 °Cusing the SCROLLER (to the right increases,to the left decreases).
SET THE TIMEThe time display 6 shows [ inf ] infinite, thetime display 6 blinks, display 8 shows “CYCLETIME”, within 10 seconds set the cooking time,e.g. 45 minutes by turning the SCROLLER tothe right.
Or
SET COOKING WITH CORE PROBERefer to the “Setting the core probe” headingand so on to set the required number of cycles(9 at most).
7 • SETTING THE OVEN MANUALLY FOR MANUALCOOKING WITH UP TO 9 CYCLES IN SEQUENCE
90024445rev00
STARTING THE COOKING PROGRAM

12
Press key 17 and display 8 will show the currentvent status “VENT CLOSED”.
Turn the Scroller to the right to go to the additionalfunctions that are presented in sequence.OPEN VENT FOR THE ENTIRE COOKINGCYCLE
Turn the Scroller to the right to permit setting thevent opening before the end of the cycle. If, forinstance, using the Scroller we set OPEN 00.10,the vent will automatically open 10 minutes beforethe end of the cycle; the following cycle will beclosed.
ENTER to save the settings.(To quit the setting without saving, press keys 15or 17).
START to start the cooking program, automaticallysaving the settings.
PLUS
90024445rev00
7 • SETTING THE OVEN MANUALLY FOR MANUALCOOKING WITH UP TO 9 CYCLES IN SEQUENCE
V E N T C L O S E D
O P E N V E N T
O P E N 0 0 . 1 0
STARTSTOP

13
• STARTPress key 16 START to star t the f i rstcook ing cyc le : the key l ight s tays onsteady.
At this point...the temperature display 5 indicates theactual oven temperature.The display 8 indicates “MANUAL”The display 9 indicates the currentcycle “1”.The time display 6 indicates the t ime[ inf ] , on reaching the set preheattemperature, a cyclic beep will signal it istime to put the food into the oven.
Open the door and place the food in theoven. If the core probe is to be used, referto “Setting the core probe” and “Hints onusing the core probe”. Close the door, thecooking program will automatically switchon with CYCLE 2, the time display 6 willshow the total remaining time till the end ofcooking. The passage from cycle 2 to asubsequent cycle takes place automaticallyand is signalled by a beep.
• END OF COOKINGFive minutes before the end of cooking or5 °C before the probe temperature it isreached at the core, the message“END OF COOKING” will be displayed tonotify the operator in advance. When thet ime is up or the set core probetemperature has been reached, anintermittent beep will signal that cookinghas concluded.
To stop the beeping, simply open the ovendoor. Remove the food from the oven,fo l lowing the d i rect ions g iven underparagraph 2.7 of “Points to remember”.If you want to turn cooking back on withthe cycles in the sequence that has justended, simply press the START keywithout having to make any othersettings.
Displaying and changing saved valuesIf, during cooking, you want to check orchange the settings of: temperature, cycletime or core probe, autoclima, on pressingthe corresponding key 10-11-12-31, thedisplay will blink for 10 sec. indicating thesetting. Use the SCROLLER to make thenew setting which will automatically besaved at the end of TIME OUT*.
To use the additional functions, see underthe headings referring to the function of thePLUS key.
Note: Manual programs with one or morecycles in sequence will automatically be“DELETED” when switching off with key 1(OFF).
OPERATIONS
7 • SETTING THE OVEN MANUALLY FOR MANUALCOOKING WITH UP TO 9 CYCLES IN SEQUENCE
90024445rev00
STARTING THE COOKING PROGRAM

8.1 • Set a program according to theinstructions of chapters: 5 • SETTING THE OVEN MANUALLYFOR “MANUAL” COOKING or 6 • SETTING THE OVEN MANUALLYFOR MANUAL COOKING WITH UP TO 9CYCLES IN SEQUENCE,
Make sure that the appl iance is onPERMANENT STOP (START STOP lightoff), press key 18 PROGRAM, display 8blinks, press key 17 PLUS, the display willshow “COPY”.
14
8 • SAVING A PROGRAM
OPERAZIONI
INTRODUCTORY NOTE Saving a cooking program consists inattributing a standard name or an inventedone to the MANUAL program to then beautomatically saved in alphabetical order inthe user program list.
Keys used see page 7 vocabulary:
*PROGRAM*PLUS*ENTER
90024445rev00
8 • SAVING A PROGRAM
When the display 8 shows “COPY” blinking
press key 20.
The manual program previously set is saved in thef i rst f ree posi t ion. I t is automat ical ly named“PROG1” or “PROGN” if the memory alreadycontains “PROG1”, “PROG2”, ..., “PROG(N-1)”.Display 8 shows the name of the new program withthe first letter blinking so you can set the nameyou want . In th is example we want to wr i te“BREAD”.
Only the letter “B” will blink.
After two seconds, the next letter will start blinking.In this example it is the letter “R”. Turn the Scrolleranticlockwise to get to the letter “E”.
Wait for another 2 seconds to go onto the letter“A”.
Wait for another 2 seconds to go onto the nextletter.
C O P Y
p r o g 1
b r o g 1
b r e g 1

15
8 • SAVING A PROGRAM
90024445rev00
Turn the Scroller to get to the letter “D”.
Wait for another 2 seconds to go onto the nextone.
Turn the Scroller to get an empty space. Thefollowing letters are also deleted, if there are anymistakes in the program name wait for the cursorto go back onto the letter to change.
Press key 20 ENTER to save the name of theprogram.
The new name is saved and entered in the list inalphabetical order. The displays 5, 6, 7 will showthe settings and 8 will show the name of the newprogram. In this example “BREAD”.
The program “BREAD” star ts up on pressingkey 16 START (steady light).
b r e a d
b r e a d
2.34250 25
b r e a 1

16
OPERATIONS
9.1 • SWITCH ONPress key 1 ; d isp lay 8 wi l l show“MANUAL”. Press key 18: “MANUAL” willblink. Turn the SCROLLER to display therequired program name (e.g. BREAD);press key 16 to start cooking.
If the retrieved program has two or morecycles, display 9 will show [ 1 ], if the timeindicates [ inf ], that is the preheating cycleof the oven with no load, a beep will signalwhen the oven has reached thetemperature.Place the food in the oven (if the programincludes cooking phases with the coreprobe, insert the probe and connect to theappliance).Close the door, display 9 will show [ 2 ] toindicate switching on cycle 2.
Turning off preheatingIf you want to “skip” cycle 1 for preheatingthe oven with no load, it will be sufficient,after starting with key 16, to keep pressedfor 2 sec. key 19 , the program wi l lautomatically go onto cycle 2.
Warning: The preheat stage should beskipped only when the oven is already hotfrom previous cooking.
Viewing the settingsIf during START cooking you need to checkthe settings for the current cycle, presskey 19. If you want to view the settings ofthe following cycles, press key 19, turn theSCROLLER to search for the requiredcycle, the displays will update with thevalues assigned to the displayed cyclewithout affecting the cooking in progress,press key 19 again or wait for the end ofTIME OUT* to view the cycle in progress.
.
9 • SELECTING AND STARTING A STORED PROGRAM
90024445rev00

17
OPERATIONS
Introductory noteThe appl iance per mi ts temporar i lymodifying the saved program, that is forcooking in progress only. The programselected for editing must be on STARTkey 16 with light on. When the programis stored for a product with a different size,for which it is necessary to lengthen thecooking times, it may be necessary to raise
the temperature or change any of the otherparameters. The temporary change will besignalled on display 8 with dots under theprogram name. The change will be deletedwhen the cooking program has finished.
10 • CHANGING A STORED PROGRAM TEMPORARILY
90024445rev00
Retrieve the program and start cooking, asdescribed previously.
Changing the fan speed cooking mode. . . press the key corresponding to thecooking mode and/or the new fan speed,the change is accepted automatically.
Increase/decrease temperature and/ortime, core probe... press the relevant key 10-11-12, thecorresponding displays blink to indicateentering setting mode, turn the SCROLLERto set the new values that will be saved atthe end of the TIME OUT*.
Increase/decrease humidity setting, ventpre-opening … press key 31, the display 7 will blink tomean i t is in set t ing mode, turn theSCROLLER to set the new value.
Increase/decrease setting, vent pre-opening I f the program includes oven vent pre-opening (see chapter 13), press key 17,the display will show, for example “OPEN00.14”, use the SCROLLER to increase ordecrease the vent pre-opening time, thenew value will be saved at the end of theTIME OUT*.

11.1 • COOKING WITH THE CORE PROBEWarning: if you select a program thatneeds the core probe, display 8 signals“PROBE ERR”; connect the core probe toconnection 27, place the probe in itscylindrical housing if the first cycle is usedas preheating the oven with no load,otherwise the program cannot start.
Insert the probe into the food (see “Hints onusing the core probe”), connect the probe toconnection 27. Set the oven temperature (asdirected in the chapters on settings), presskey 12 and use the SCROLLER to set therequired core temperature.
PRACTICAL EXAMPLESetting Oven temperature: 140 °C (key 10)Core temperature: 78 °C (key 12)
What happensThe temperature in the oven reaches 140 °C,and stays at that level, the food graduallyincreases in temperature. 5 degrees Celsiusbefore reaching the set core temperature,display 8 shows the message “END”COOKING alternated with the PROGRAMNAME so as to let the operator get thedistribution organized in advance.On reaching the core temperature of 78 °C abeep signals the end of cooking.
Warning: Wait for a few seconds afterinserting the core probe in connection 27 (thetime it takes the electronic card to identify theprobe), then star t cooking with key 16START/STOP.
18
OPERATIONS
Introductory noteThe core probe a l lows cook ing to beregulated by monitoring the temperature atthe core of the product . Th is dev iceoverr ides the time setting, and cookingstops as soon as the temperature at thecore of the product reaches the selectedvalue.
Using the core probe ensures the minimumtemperature is reached at the core of theproduct; end of cooking is signalled whenthe probe's temperature has reached thesetting.
The multipoint core probe can be handilyused as a por table thermometer, byinserting the probe in connection 27 in anytime operation mode; with the oven onstand by, keeping key 12 pressed for a fewseconds, display 6 will show the probetemperature for a few seconds. The idealsystem to test the core temperature of aproduct during the various cycles of a timeprogram.
11 • SETTING THE CORE PROBE
90024445rev00

It is also recommended to insert the probewith the food at the centre of the oven.
Optional: a needle probe is available onrequest for monitoring the temperature ofvacuum-packed or small-sized products;this probe likewise is plugged into thef ron t pane l (27 ) , w i th no spec ia ladaptation required.
Advantages• Improves control over the cooking process,
eliminating the risk of loss and waste• ensures precision in cooking, regardless of
quality or mass;• saves time, as control is automatic;• guarantees hygiene; wi th prec is ion
monitoring of the core temperature, there isno need for food to be handled, poked orprodded;
• ideal for large items of food;• cooking precision to one degree Celsius
(+/-1 °C) for delicate foods.
19
11 • SETTING THE CORE PROBE
90024445rev00

INTRODUCTORY NOTEThe AUTOMATIC HUMIDITY humid i tycontrol system makes it possible to keep aconstant level of humidity in the oven whencooking by convect ion or wi th thecombination cycle. It performs a doublefunct ion, on the one hand introducingmoisture, and on the other ext ract ingmoisture from the food when a set value isexceeded.Especially advantageous for fresh products
that cannot have the same mois turecontent from one day to another, but whichwhen cooked will always have the sameaspect and consistency.This system permits obtaining the samecooking result for the same food cooked indifferent quantities.
20
OPERATIONS
12 • HUMIDITY CONTROL SYSTEM
90024445rev00
12.1 • COOKING WITH THE HUMIDITYCONTROL SYSTEM
Once the oven or core probe temperaturehas been set (as descr ibed under therelevant headings), press the keys 31 to setthe desired “HUMIDITY” value, from 1 (verydry) to 99 (very humid). Place the food in theoven and, if the core probe is being used,insert the probe (see “Hints on using thecore probe”), connect the core probe toconnection 27 and proceed according to thecooking mode selected.
AdviceDefining the UMIDITÀ value requires acertain amount of practical experience.Nonetheless, it is impossible to commit acatast rophic er ror, and th is funct ionundoubtedly enhances the appearance ofthe food.
Ideal for:foods that tend to dry up, or that need ahumid cooking climate that helps rising.
AdvantagesRepeatable results, even when foods arecooked together wi th o thers hav ingdifferent characteristics.

21
OPERATIONS
Introductory noteTheir purpose is to complete a cookingprocess to obtain the best results, withoutthe operator taking any direct action, in
terms of presentation, degree of cooking.
13 • SPECIAL PROGRAMS
90024445rev00
13.1 • VENT FUNCTION It is a “PLUS” that is combined with anycooking cycle.
How to set: Set a program as directed under theheadings:
5 • SETTING THE OVEN MANUALLY FOR“MANUAL” COOKING”; or6 • SETTING THE OVEN MANUALLY FORMANUAL COOKING WITH UP TO 9CYCLES IN SEQUENCE;
make sure that the appl iance is onPERMANENT STOP (blinking light 16 off),press key 19, select, with the SCROLLER,the required program cycle, the cycle willblink on the display 9, press key 17, thedisplay 8 will show “VENT”, press key 20,the display will show “VENT CLOSED”; youwil l go to the “OPEN VENT” or “OPEN00.01” by tur n ing the SCROLLER.See para. 7 for setting.
13.2 • Cooking with ALTERNATING FANSThis is a “PLUS” that can be turned on inany cooking cycle.The venti lation dur ing the time withoutheating works alternately on a time basisso that the heat and humidity in the ovenremain wel l mixed to ensure opt imalconditions.
How to set:Set a program as directed under theheadings:
5 • SETTING THE OVEN MANUALLY FOR“MANUAL COOKING” or
6 • SETTING THE OVEN MANUALLY FORMANUAL COOKING WITH UP TO 9CYCLES IN SEQUENCE,
make sure that the appl iance is onPERMANENT STOP (blinking light 16 off),press key 19, use the SCROLLER to selectthe required program cycle, the cycleappears blinking on the display 9, presskey 17, the display 8 shows “VENT”, turnthe SCROLLER to select ALTERNATINGFANS, “V ALT OFF”, press key 20 t confirmthe selection. If the stored program includes using the“ALTERNATING FANS” function, display 8will show the letter “A” reminding you thatthe cooking includes using the function.

2290024445rev00
14 • SPECIAL COOKING FUNCTIONS13 • SPECIAL PROGRAMS
13.3 • Cooking with FAN DIRECTION This is a “PLUS” that can be turned on inany cooking cycle.The vent i la t ion dur ing the t ime worksalternately (NORMAL), turning only to theright (RIGHT FANS) or turning only to theleft (LEFT FANS).
How to set:Set a program as directed under theheadings:
5 • SETTING THE OVEN MANUALLY FOR“MANUAL COOKING” or
6 • SETTING THE OVEN MANUALLY FORMANUAL COOKING WITH UP TO 9CYCLES IN SEQUENCE,
make sure that the appl iance is onPERMANENT STOP (blinking light 16 off),press key 19, use the SCROLLER to selectthe required program cycle, the cycleappears blinking on the display 9, presskey 17, the display 8 shows “VENT”, turnthe SCROLLER to se lect FANSDIRECTION, from “NORMAL” (functiondisabled) to “RIGHT FANS” or “LEFTFANS”, press key 20 to conf i r m theselection.
23
14.1 • PREHEATING THE OVENThe s tep of preheat ing the oven isextremely important and useful in ensuringsuccessful cooking results.As a general rule, always preheat the ovenwhen empty, set t ing the temperaturebetween approximately 15% and 25% ofthat to be utilized subsequently in cooking.
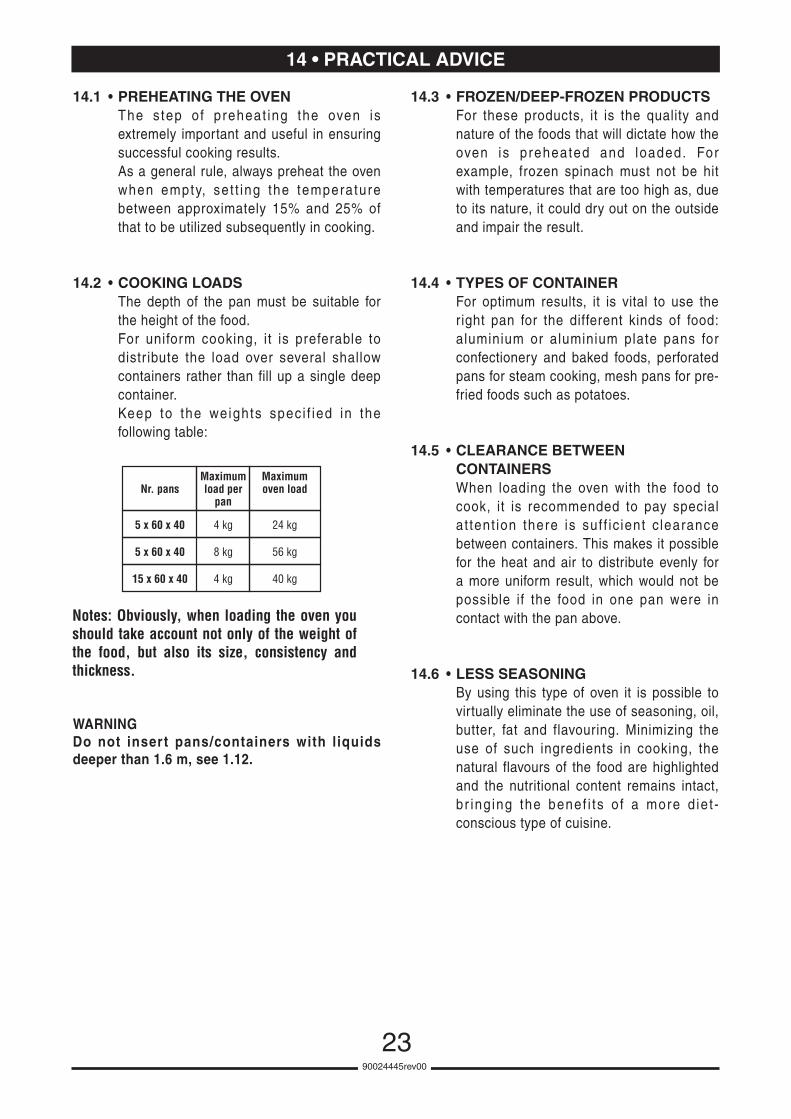
14.2 • COOKING LOADSThe depth of the pan must be suitable forthe height of the food.For uniform cooking, it is preferable todistr ibute the load over several shallowcontainers rather than fill up a single deepcontainer.Keep to the weights spec i f ied in thefollowing table:
14.3 • FROZEN/DEEP-FROZEN PRODUCTSFor these products, it is the quality andnature of the foods that will dictate how theoven is preheated and loaded. Forexample, frozen spinach must not be hitwith temperatures that are too high as, dueto its nature, it could dry out on the outsideand impair the result.
14.4 • TYPES OF CONTAINERFor optimum results, it is vital to use theright pan for the different kinds of food:aluminium or aluminium plate pans forconfectionery and baked foods, perforatedpans for steam cooking, mesh pans for pre-fried foods such as potatoes.
14.5 • CLEARANCE BETWEENCONTAINERSWhen loading the oven with the food tocook, it is recommended to pay specialat tent ion there is suf f ic ient c learancebetween containers. This makes it possiblefor the heat and air to distribute evenly fora more uniform result, which would not bepossible if the food in one pan were incontact with the pan above.
14.6 • LESS SEASONINGBy using this type of oven it is possible tovirtually eliminate the use of seasoning, oil,butter, fat and flavouring. Minimizing theuse of such ingredients in cooking, thenatural flavours of the food are highlightedand the nutritional content remains intact,br ing ing the benef i ts o f a more d ie t -conscious type of cuisine.
14 • PRACTICAL ADVICE
Notes: Obviously, when loading the oven you should take account not only of the weight of the food, but also its size, consistency and thickness.
Maximum oven load
Maximum load per
panNr. pans
24 kg4 kg5 x 60 x 40
56 kg8 kg5 x 60 x 40
40 kg4 kg15 x 60 x 40
90024445rev00
WARNINGDo not insert pans/containers with liquidsdeeper than 1.6 m, see 1.12.

24
15.1 • THOROUGH CLEANING...is a prerequisite for faultless cooking andbetter yields:
• foods retain their characteristic flavour;• no burning and smoking of residues and spills
from previous dishes during operation;• energy savings;• less maintenance work and a longer service
life;• the simplicity of the procedure means that a
thorough clean can be carried out quickly andwith minimum inconvenience to the operator:
Turn on automatic cooling with key 21 if theoven is very hot.
Turn on the “MAN WASH” oven cleaningcycle to remove day-to-day dirt.
Switch off the oven with key 1.Press key 17, the display blinks “DATE”, turnthe SCROLLER to the right to show “MANWASH”.Press key 20 to turn on the MANUAL washprogram explained below.
Cycle 1 - Cooling/preheating: the displayshows “COOL” if the oven temperature is high,“WAIT” if the oven temperature is low. Onreaching the temperature, it shows “CUBECLEAN”, the light of key 16 blinks to indicate aTEMPORARY STOP, a beep signals it is timeto open the door and spray detergent in theoven.Close the door and press key 16 to turn thewash cycle back on, after which the operatorneeds to take no other action until the end ofthe program.
Cycle 2 - Cleansing action
Cycle 3 - Steam cycle
If consistent remains of dirt deposit on theoutlet filter in the middle of the bottom of theoven, clean so as to ensure a free flow of waterand detergent.
The end of the program is defined by acyclic beep, open the door to turn it off.Switch off the appliance with key 1.
It is a good rule at the end of the washcycle to rinse the inside of the oven againwith the hand-held shower, wipe the frontseal of the oven with a sponge or cloth toprevent it from deteriorating too soon.
15.2 • WARNINGNever use direct or high-pressure jets ofwater to clean the outside of the oven.Never use corrosive and/or abrasivesubstances on steel surfaces, and avoidscouring or scrubbing with steel wool or wirebrushes, as irreparable damage could occur.Similarly, aggressive detergents, of non-alkaline formulation containing highpercentages of sodium and ammonia, cansoon damage the seals, jeopardizing ovenefficiency and operation.External surfaces should be washed downusing a sponge, and hot water with a suitableproprietary cleaner added.
15.3 • It is recommended to use a speciallyformulated detergent.
15 • DAILY CLEANING
90024445rev00
CUBECLEANAlkaline detergent
in a tank
DL 010
10 lt.
CUBECLEAN

OPERATIONS
16 • WASHING KIT - DAILY CLEANING
OPERATIONS
OPTIONAL: The appliance equipped with thewashing kit (see details shown in drawing onpage 25) permits activating two oven cleaningcycles: SOFT WASH - HARD WASH, withoutany direct action by operator during cleaning.The detergent is distributed evenly by the sprayat the right time, avoiding any possibility ofcontact with the operator; the special fast-coupling wash arm permits rinsing the oven.Using detergents other than the onerecommended by the manufacturer is notrecommended as cleaning could beimpaired and the washing system could getdamaged.
Make sure that the quick-fit coupling for thedetergent is properly inser ted (see photobelow) and the tank is supplied with enough ofthe detergent recommended by themanufacturer.Turn on automatic cooling with key 21 if theoven is very hot.Turning on the “SOFT WASH” oven cleaningcycle to remove day-to-day dirt:Switch off the oven with key 1.Press key 17, the display blinks “DATE”, turnthe SCROLLER to the right to show “SOFTWASH”.Press key 20 to turn on the SOFT washprogram explained below.
16 • WASHING KIT
Cycle 1 cooling/preheating: the display shows“COOL” if the oven temperature is high,“WAIT” i f the oven temperature is too“LOW”. On reaching the temperature, itshows “INSERT ARM”, the light of key 16blinks to indicate a TEMPORARY STOP, abeep signals it is time to open the door andhook the wash arm onto the hook on the roof;inser t the pin in the hole and turnanticlockwise to its limit stop.
Press key 16 to turn the wash cycle back on,after which the operator needs to take noother action until the end of the program.The “SOFT WASH” program is an automaticsequence of 7 cycles, lasting a total of 24minutes, to provide the best combined actionof cleansing (cycle 2-3), steam spraying(cycle 4), rinsing by rotating the wash arm(cycle 5) alternated with the steam cycle, endrinsing combined with ventilation (cycle 6) anddrying (cycle 7) to yield a shiny, dry oven.
2590024445rev00
26
OPERATIONS
If consistent remains of dirt deposit on theoutlet filter in the middle of the bottom of theoven, clean so as to ensure a free flow ofwater and detergent.
The end of the SOFT wash program isdefined by a cyclic beep, open the door toturn it off, put on the safety gloves toprotect your hands and REMOVE the washarm, turning the pin clockwise to its limitstop.Switch the appliance off with key 1ON/OFF.
Turning on the “HARD WASH” ovencleaning cycle to remove TOUGH dirt:Switch off the oven with key 1.Press key 17, the display blinks “DATE”, turnthe SCROLLER to the right to show “HARDWASH”.Press key 20 to turn on the HARD washprogram explained below:
Cycle 1 cooling / preheating: the displayshows “COOL” if the oven temperature ishigh or “WAIT” if the oven temperature is toolow. On reaching the temperature, it shows“INSERT ARM”: the light of key 16 blinks toindicate a TEMPORARY STOP. A beepsignals it is time to open the door and hookthe wash arm onto the hook on the roof;inser t the pin in the hole and turnanticlockwise to its limit stop.Press key 16 to turn the wash cycle back on,after which the operator needs to take noother action until the end of the program.The “HARD WASH” program is an automaticsequence of 11 cycles, lasting a total of38 minutes, to provide the best combinedaction of cleansing (cycle 2-3-6-7), steamspraying (cycle 4-8), rinsing by rotating thewash arm (cycle 5-9), end rinsing combinedwith venti lation (cycle 10) and drying(cycle 11) to yield a shiny, dry oven.
If consistent remains of dirt deposit on theoutlet filter in the middle of the bottom of theoven, clean so as to ensure a free flow ofwater and detergent.The end of the HARD wash program isdefined by a cyclic beep, open the door toturn it off, put on the safety gloves toprotect your hands and REMOVE the washarm, turning the pin clockwise to its limitstop.Switch the appliance off with key 1ON/OFF.
Notices!Switching off the appliance with key 1 isnot permitted during operation of theSOFT WASH and HARD WASH programs;wait for the end-of-washing signal, removethe wash arm to be able to switch off theappliance.
It is a good rule at the end of the washcycle to rinse the inside of the oven againwith the hand-held shower, wipe the frontseal of the oven with a sponge or cloth toprevent it from deteriorating too soon.
Shut off all utilities (electrical power supply,water, and gas if connected). Leave the doorslightly ajar when the appliance is not in use.
16 • WASHING KIT - DAILY CLEANING
90024445rev00

27
17 • ROUTINE MAINTENANCE
90024445rev00
17.1 • PERIODICALLY...... the deflector and the shelf grillesshould be cleaned as and whennecessary.Proceed as follows:
• shut off all utilities (electrical power supply,water, and gas if connected);
• take out the pan racks;• using a screwdriver of the right size, or a
coin, unscrew the deflector screws to beable to clean the back; it is recommendedto use the hand-held shower for thoroughrinsing
• dry with a clean cloth;• it is necessary to remove the deflector if
the dirt is particularly tough to remove; donot use abrasives or scourers that woulddamage the steel surface; size permitting,wash the deflector in a dishwasher.Secure the deflector in the oven, makingsure the two fixing screws on the right-hand side are well tightened.
17.2 • PROLONGED IDLE PERIODSIf the oven is to stand idle for any length oftime (e.g. holidays or seasonal closing) itmust be cleaned thoroughly, leaving notraces of food or d i r t . Leave the doorslightly ajar so that air can circulate insidethe oven. Be absolutely certain to shut offall utilities (electrical power supply, water,and gas if connected). For added care aftercleaning, the external surfaces can beprotected by applying a proprietary metalpolish.

2890024445rev00
18 • MAJOR SERVICING
18.1 • To ensure correct and safe operation, theoven must be serviced at least once a yearby a La inox technic ian or author izedservice agent.
18.2 • With this in mind, customers arerecommended to sign a serviceagreement.
19 • SELF-DIAGNOSIS AND FAULT IDENTIFICATION
19.1 • Whenever the appliance is powered up bypressing the main switch, an electronicdiagnostics routine is run automatically tocheck the principal functions. Assuming theappliance is in perfect working order oncompletion of the self-diagnosis routine,the display 8 shows “MANUAL”, the oventemperature d isplay shows the actualtemperature in the oven, and the LEDs ofthe cooking mode keys all blink. At thispoint the cook ing parameters can beentered.
19.2 • If any irregularities are discovered, on theother hand, these are indicated on thedisp lay 8 . Er ror codes are ext remelyimpor tant when t rouble cannot beremedied by the operator, since they givethe service technician an indication as tothe nature of the fault. The message on thedisplay is accompanied by a beep whosefrequency depends on the importance ofthe fault.

2990024445rev00
The main fault warning messages are:
MESSAGES
Message on the display 8. Oven temperature probefaulty, switch off the oven immediately and contact aLainox technician or authorized service agent.
This symbol lights up when there is no water reachingthe appliance, in which case check that the shutoff valveis open and that there is water still coming from themain. If there is no supply from the main, inform thewater company or agency. If there is no problem with themain, contact a Lainox technician or authorized serviceagent. In the meantime, the oven can still be used inconvection mode, after pressing key 15 to bypass theerror signal.
The device preventing thermal overload of the motorhas cut in. Switch off the oven immediately andcontact a Lainox technician or authorized service agent.
The oven safety thermostat has cut in. Switch off theoven immediately and contact a Lainox technician orauthorized service agent.
An abnormally high temperature rise has registered inthe compartment housing electrical components. Theoven can still be used under close observation, until thearrival of a service technician.
An excessive temperature rise registering in theelectrical components compartment could result indamage to components. Switch off the ovenimmediately and contact a Lainox technician orauthorized service agent.
19 • SELF-DIAGNOSIS AND FAULT IDENTIFICATION
C H A M B . E R R
2.34250 25
N O W A T E R
2.34250 25
M O T O R . H I
2.34250 25
C H A M B . H I
2.34250 25
H O T
2.34250 25
T O O H O T
2.34250 25

Core probe faulty. Should the message appear, itis necessary to check the connector is pluggedinto the socket (27) proper ly. The oven cancontinue to be used until the arrival of a servicetechnician, but without this accessory.
NO GAS. Check that the shutoff valve is openand that there is gas coming from the main. Ifthere is no supply from the main, inform the gascompany or agency. If there is no problem with themain, contact a Lainox technician or authorizedservice agent.
Gas appliances are fitted with ignition devicesincorporat ing an automatic reset funct ion. I foperat ion is not restored automat ical ly af terseveral attempts, display 8 will show the error code“GAS SHUTDOWN” illustrated alongside. A beepwarns the operator.Press the key 16 to reset ignition.If the fault persists, contact a Lainox technician orauthorized service agent.Note: Burner shutdown is a safety condition.Therefore, this si tuat ion is not a sign of theappliance malfunctioning..
If, after carefully carrying out these checks, theappliance still does not function properly, call aLainox technician or authorized service agent.
Note: When contact ing La inox ser v icetechnicians, try to explain the fault in as muchdetail as possible, referring all the informationindicated on the identification data plate (seepage 3).
Boiler pre-heating probe fault; oven can only beoperated in convection mode; steam and combinedmodes are d isabled. Cal l in the technica lassistance service.
30
MESSAGES
19 • SELF-DIAGNOSIS AND FAULT IDENTIFICATION
The main fault warning messages are:
90024445rev00
C O R E P B . E R R
2.34250 25
N O G A S
2.34250 25
F L A M E F A I L .
2.34250 25
B O I L E R . e r r
2.34250 25
WARNING FOR GAS MODELS

31
19 • SELF-DIAGNOSIS AND FAULT IDENTIFICATION
90024445rev00
Boiler safety thermostat trips, switch off the ovenimmediately and contact a Lainox technician orauthorized service agent.
It appears when the door is open and signals thatthe door microswitch fails to close the contact.Check that the door is closed;if the signal reappears contact a Lainox technicianor authorized service agent.
Error during the automatic wash phase.It appears when the oven temperature exceeds110 °C during the SOFT or HARD wash phase.This fault will stop the appliance, contact aLainox technician or authorized service agent.
b o i l e r . H I
2.34250 25
D O O R O P E N
E R R C L

32
The PLUS 17 key pressed in successionwith other keys provides access to furtherimportant functions:
“DELAYED STARTING”:Working condit ion: PERMANENT STOP(light of key 16 off) of any one program(MANUAL or PROGRAM WITH NAME). Thisfunction permits starting a cooking programwith a time lag, or preheating the oven withno load, so as to organize the work betterduring idle periods.
With the oven on, select the desired cookingprogram or set a manual program, presskey 20 so that the d isp lay shows theprogram name wi thout bl ink ing, presskey 17 , the d isp lay wi l l show “DELAYSTART”, press key 20, the display will blinkdd.mm.yy (day, month, year) wi th theSCROLLER set the requi red date forpostponed starting, the blinking cursor willautomatical ly move from the day to themonth and then the year, press key 20 toconfirm the setting, the display will show thehours and minutes when you want automaticstar ting, set with the SCROLLER, presskey 20 to confirm, the display will show“START”, press key 20, the display signalsalternating “WAIT” “START hh.mm” wherehh.mm is the time for automatic programstarting.
At the set date and time the appliance willautomat ica l ly swi tch on and run thepreselected program, it is not possible touse the oven at the same time.
If you want to cancel the delayed startingfunction previously activated, switch off andback on again with key 1, the appliancegoes into the standard setting, or presskey 16 to start the program immediately.
If you want to change the delayed startingtime when the “WAIT” “START hh.mm”message appears, just press key 20 andchange the setting with the SCROLLER,confirm with key 20, start with key 20.
When setting, to exit programming, presskey 15 or 17, and you exit without savingthe setting.
Warning: deferred cooking is permittedsolely for foods with no risk of bacterialproliferation; do not exceed the maximumfood wait time before starting cooking,scrupulously follow current health andhygiene requirements.
“END TIME”, “TIMER”, “PHASE STOP”:Working condition: START of the cookingprogram, light of key 16 on steady.
On pressing the key 17 during cooking, thedisplay shows the dif ferent funct ions insequence on turning the SCROLLER.
Press key 20 to act ivate the des i redfunction:
“END TIME”: For a few seconds the displayshows the exact time at which the cookingprogram ends, for example 16.57; if theprogram includes an end cycle with infinitetime or subsequent cycles controlled by thecore probe, the infinite or core probe cyclestar t t ime wi l l be shown. The funct ionpermi ts programming preparat ion forsubsequent serving to the minute.
20 • PLUS: USEFUL ADDITIONAL FUNCTIONS
90024445rev00
33
“TIMER” : the d isp lay shows the t imepassed since the start of cooking for a fewseconds, which is a useful function whencooking “new food” in manual mode forwhich we need to note down the to ta lcooking time to define a program in thefuture.
“CYCLE STOP” : the d isp lay showsSTOPCYON, press key 20 to activate thefunct ion: a t the end of each cyc le theappliance stops and a cyclic beep signalsthe stop. The operator can therefore alterthe program with cycles in sequence to addseasoning, remove a dish in the event ofdifferentiated cooking, check the state ofprogress of cooking, and on closing the doorthe program will automatically activate thefollowing cycle.
If you want to turn off the function, whenSTOPCYOFF appears press key 20, thefunction will be turned off.
When setting, to exit programming press key15 or 17, you exit without activating thefunction.
The “STOPCYCLE” function should beactivated whenever starting cooking, itcannot be saved.
PLUS: useful additional functions withthe oven off.The PLUS 17 key pressed with the ovenOFF and light of key 1 (ON/OFF) off permitsdisplaying the following functions some ofwhich are useful for the operator and othersfor the authorized installer.
With the appliance OFF, press key 17, scrollto locate the relevant function, press key 20to activate the function, key 15 or 17 or waitfor TIME OUT to exit without saving thedata, key 20 to save any settings/changes.
“DATE”: used to display or edit the date,changes are made by tur n ing theSCROLLER, the blinking cursor will moveautomatically from the day to the month,etc., press key 20 to save the new data.
“TIME”: press key 20 to display or edit theactual time, changes are made by turningthe SCROLLER, the bl inking cursor wil lmove automatically from the hours to theminutes, etc., press key 20 to save the newdata.
“LANGUAGE”: press key 20 to display theavailable languages with the SCROLLER:Italian, English, German, French, Spanish;after select ing the new language presskey 20 , a l l the messages/s ignals wi l lautomat ica l ly be updated in the newlanguage.
20 • PLUS: USEFUL ADDITIONAL FUNCTIONS WITH THE OVEN OFF
90024445rev00

34
“CARD HOURS”: press key 20 to displaythe number of hours the appliance has beenon, in order to be able to organize the“servicing”.
“MAN WASH”: manual oven wash cycle(see chapter 18).
“SOFT WASH”: “soft” automatic oven washcycle (see chapter 18).
“HARD WASH”: “hard” automatic ovenwash cycle (see chapter 18).
“CONVECTION OUTPUT”: CONVECTIONmode performance learning cycle - for thesole use of the authorized technician.
“PROBE TEST”: press key 20 to display thetemperature probes wi th which theappliance is equipped - for the sole use ofthe authorized technician.
“PARAMETERS”: on pressing key 20, thedisplay will show a series of parameters thatcan be ad justed to your needs, forcustomized management of some functions.On display 8 the parameter number blinks(36), turn the SCROLLER to display theremaining parameters; on identifying therequired parameter, press key 20 that makesthe standard setting of the parameter blink.Turn the SCROLLER to set the requiredvalue.
Press key 20 to pass from the standardparameter setting to the parameter numberand cont inue d isp lay ing the remain ingparameters if desired. Exit and save the newsetting by pressing key 20.
20 • PLUS: USEFUL ADDITIONAL FUNCTIONS WITH THE OVEN OFF
90024445rev00

35
20 • PLUS: USEFUL ADDITIONAL FUNCTIONS WITH THE OVEN OFF
90024445rev00
Parameternumber
Unit ofmeasurement
Standardvalue
Minimumvalue
Maximumvalue
Description
36 Sec. 0 0 100
54 Sec. 10 10 120
59
- 1
0
1
110 -
100
0 100
Oven light activation time, set to 0 sec. = light always on. E.g.: Set to 20 sec. = light automatically goes out after
20 seconds, therefore by setting a value other than zero the lighting is timed, permitting savings in energy and on
the component.
Duration of TIME OUT: after a time of 10 seconds you automatically exit the function "programming" phase, the displays show the time and actual temperature.
From the moment the operator believes he is sufficiently familiar with the the functions of the
appliance, this TIME OUT can be lowered so as to "exit" the programming / viewing phase more quickly.
Temperature view selection Set to 1 = ˚C Celsius Set to 0 = ˚F Fahrenheit. Depending on the operator's habits it is possible to simultaneously convert the temperature
readings into ˚F Fahrenheit or ˚C Celsius, which is useful for the American market.
Volume Set to 100 = maximum volume. To lower the volume, set values under 100, the volume will decrease
proportionally down to a minimum set by the manufacturer.
Connection with printer (HACCP):with core probe cooking,
prints out the values every 5 C at the food.
Connection with printer (HACCP):with time cooking, prints out the values every
5 minutes.
145 5 0 300 C/ F
146 5 0 300Min.

36
“TECH PARAM”: press key 20 to enter thetechnical parameter section of the electroniccard - for the sole use of the authorizedtechnician.
“SERVICE”: press key 20 to activate testingof the electronic card - for the sole use ofthe authorized technician.
“HACCP”: press key 20 to act ivate theHACCP program; software and hardwareavailable on request.
“MODEM”: press key 20 to activate themodem connection program.
“SOFTWARE”: press key 20 to display thesoftware release (Date).
20 • USEFUL ADDITIONAL FUNCTIONS
90024445rev00
37
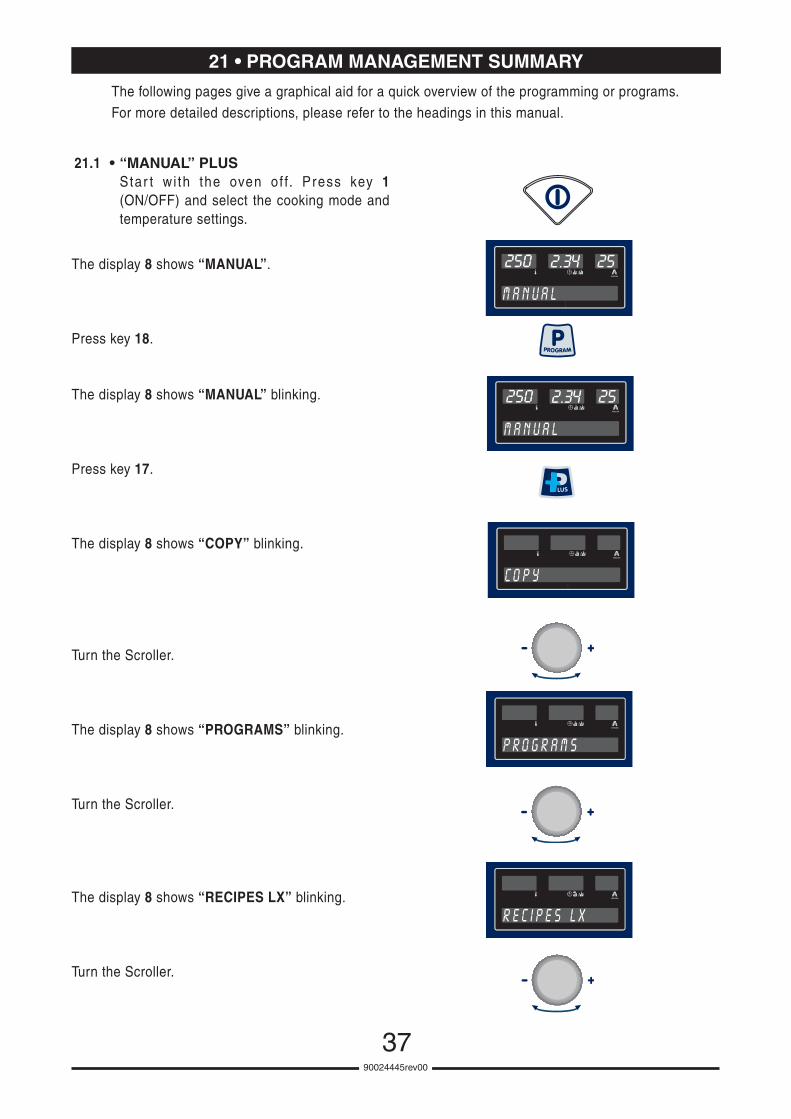
The display 8 shows “MANUAL”.
Press key 18.
The display 8 shows “MANUAL” blinking.
Press key 17.
The display 8 shows “COPY” blinking.
Turn the Scroller.
The display 8 shows “PROGRAMS” blinking.
Turn the Scroller.
The display 8 shows “RECIPES LX” blinking.
Turn the Scroller.
21 • PROGRAM MANAGEMENT SUMMARY
90024445rev00
21.1 • “MANUAL” PLUS Star t wi th the oven of f. Press key 1(ON/OFF) and select the cooking mode andtemperature settings.
M A N U A L
2.34250 25
M A N U A L
2.34250 25
C O P Y
p r o g r a m s
R E C I P E S L X
The following pages give a graphical aid for a quick overview of the programming or programs.
For more detailed descriptions, please refer to the headings in this manual.

38
21 • PROGRAM MANAGEMENT SUMMARY
90024445rev00
The display 8 shows “EXIT” blinking.
Turn the Scroller.
The following keys can be pressed for each ofthese functions:
Pressing key 15 or key 17 exits this submenu andtakes you back to the start (Manual not blinking).
Pressing key 16 starts the manual program thathas just been set.
Pressing key 18 or 19 causes nothing to happen.
E X I T
EXIT
STARTSTOP

39
When the display 8 shows “COPY” blinking
press key 20.
The manual program previously set is saved in thef i rst f ree posi t ion. I t is automat ical ly named“PROG1” or “PROGN” if the memory alreadycontains “PROG1”, “PROG2”, ..., “PROG(N)”.Display 8 shows the name of the new program withthe first letter blinking so you can set the nameyou want.In this example we want to write “BREAD”.
Only the letter “B” will blink.
After two seconds, the next letter will start blinking.In this example it is the letter “R”.Turn the Scroller anticlockwise to get to the letter“E”.
Wait for another 2 seconds to go onto the letter“A”.
Wait for another 2 seconds to go onto the nextletter.
Turn the Scroller to get to the letter “D”.
Wait for another 2 seconds to go onto the nextone.
21 • PROGRAM MANAGEMENT SUMMARY
90024445rev00
21.2 • ACCESSING THE COPY SUBMENU
C O P Y
p r o g 1
b r o g 1
b r e g 1
b r e a 1

40
21 • PROGRAM MANAGEMENT SUMMARY
90024445rev00
Turn the Scroller to get an empty space. Thefollowing letters are also deleted, if there are anymistakes in the program name wait for the cursorto go back onto the letter to change.
Press key 20 to save the name of the program.
The new name is saved and entered in the list inalphabetical order. The displays 5, 6, 7 will showthe settings and 8 will show the name of the newprogram. In this example “BREAD”.
The program “BREAD” star ts up on pressingkey 16 START (steady light).
b r e a d
b r e a d
2.34250 25
STARTSTOP

41
When the display 8 shows “PROGRAMS”
press key 20.
The display 8 shows the name of the first programbl ink ing in a lphabet ica l order, for ins tance“ROAST”.
If, for instance, you want to select the “CARROTS”program, turn the Scroller clockwise unti l theprogram appears...
Whereas if the desired program is “SPINACH”,turn the Scroller anticlockwise until the programappears...
21 • PROGRAM MANAGEMENT SUMMARY
90024445rev00
21.3 • ACCESSING THE SUBMENU“PROGRAMS”This section provides access to the userrecipe book, the recipes can be copied,renamed, edited and deleted.
p r o g r a m s
r o a s t b e e f
2.34250 25
s p i n a c h
2.34250 25
c a r r o t s
2.34250 25
42
21 • PROGRAM MANAGEMENT SUMMARY
90024445rev00
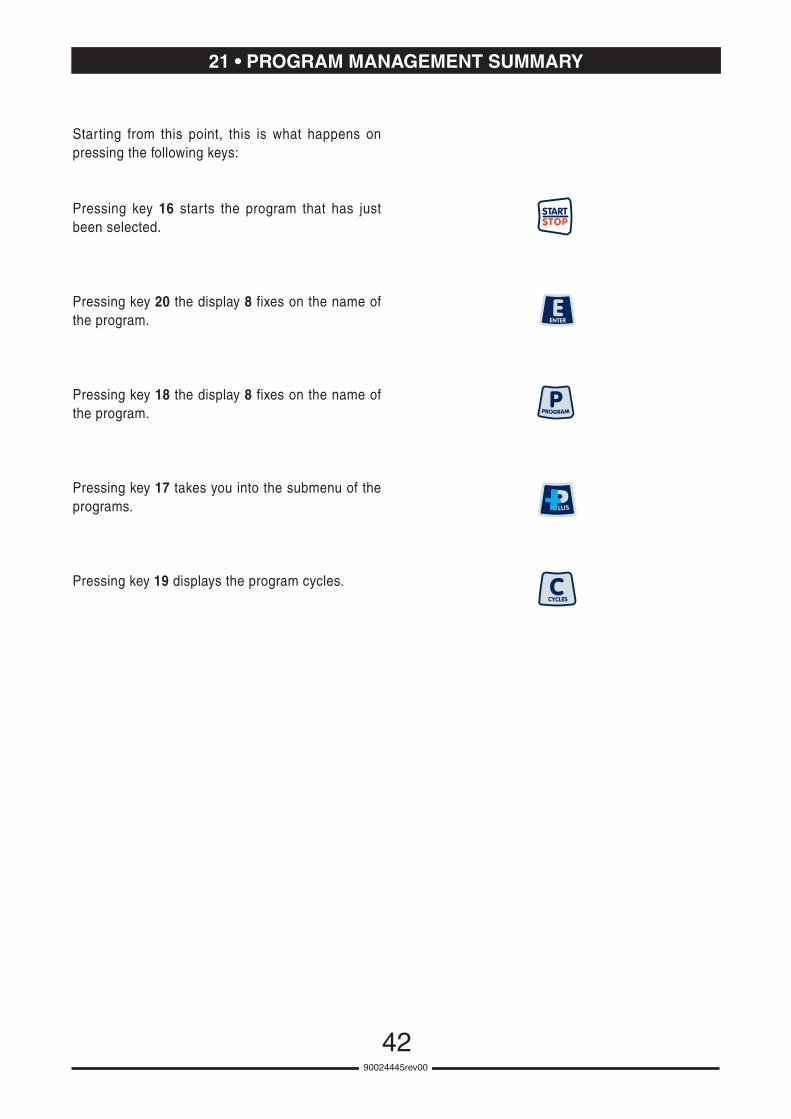
Starting from this point, this is what happens onpressing the following keys:
Pressing key 16 starts the program that has justbeen selected.
Pressing key 20 the display 8 fixes on the name ofthe program.
Pressing key 18 the display 8 fixes on the name ofthe program.
Pressing key 17 takes you into the submenu of theprograms.
Pressing key 19 displays the program cycles.
STARTSTOP

43
21.4 • ACCESSING THE SUBMENU“LX RECIPES”The “LX RICIPES” section contains thefo l lowing rec ipes, resu l t ing f rom themanufacturer's cooking tests, useful toachieve an excellent result. The recipes
can be copied, then edited, but not deleted.See RECIPE PLUS.
21 • PROGRAM MANAGEMENT SUMMARY
90024445rev00
When the display 8 shows “RECIPES LX”
press key 20.
The display 8 shows the name of the first programblinking in alphabetical order of the recipe booksupplied by the manufacturer. Using the Scrollermove onto the desired recipe (see the LX Recipeschapter, 25).After choosing one of the manufacturer's recipes,this is what happens on pressing the followingkeys:
Pressing key 16 starts the program that has justbeen selected.
Pressing key 20 the display 8 fixes on the name ofthe program
Pressing key 18 the display 8 fixes on the name ofthe program.
Pressing key 19 displays the program cycles.
21 • PROGRAM MANAGEMENT SUMMARY
When the display 8 shows “EXIT”
press key 20.
You return to the main menu where display 8 shows “MANUAL” fixed and 5, 6, 7, the previous settings.
21.5 • ACCESSING THE SUBMENU “EXIT”
R E C I P E S L X
STARTSTOP
E X I T

44
Start with the oven off. Press key 1.
The display 8 shows “MANUAL”.
Press key 18.
The display 8 shows “MANUAL” blinking.
Turn the Scroller to move onto the desired userprogram, for example “CHICKEN”.
The display 8 shows the name of the selectedprogram blinking.
Press key 17.
The display 8 shows “LOCKED” blinking.
Turn the Scroller.
The display 8 shows “RENAME” blinking.
Turn the Scroller.
21 • PROGRAM MANAGEMENT SUMMARY
90024445rev00
21.6 • PROGRAM PLUS
M A N U A L
2.34250 25
M A N U A L
2.34250 25
c h i c k e n
2.34250 25
L O C K E D
R E N A M E

45
21 • PROGRAM MANAGEMENT SUMMARY
90024445rev00
The display 8 shows “CANCEL” blinking.
Turn the Scroller.
The display 8 shows “COPY” blinking.
Turn the Scroller.
The display 8 shows “MANUAL” blinking.
Turn the Scroller.
The display 8 shows “RECIPES LX” blinking.
Turn the Scroller.
The display 8 shows “EXIT” blinking.
Turn the Scroller.
c a n c e l
C O P Y
M A N U A L
2.34250 25
R E C I P E S L X
E X I T

46
When the display 8 shows “LOCKED”
press key 20.
21 • PROGRAM MANAGEMENT SUMMARY
90024445rev00
The previously selected program is locked so it is not possible for the operator to modify it in START.The display 8 shows the name of the program that has just been locked and the other displays show theprogram settings. If the selected program had already been locked previously, press key 18 and then key 17; “MANUAL”appears. Turn the Scroller until the display shows “UNLOCKED”.
When the display 8 shows UNLOCK
press key 20.
The previously selected program is unlocked and you go back into STOP status; the display 8 shows thename of the program that has just been unlocked and the other displays show the program settings.The letter “L” (LOCKED) that appears in the cooking phase alongside the name of the program indicates itis protected/locked and so cannot be saved.
21 • PROGRAM MANAGEMENT SUMMARY
When the display 8 shows “RENAME”
press key 20.
The first letter of the name to edit starts blinking on display 8. The procedure is the one already describedfor the copy function.
21.7 • ACCESSING THE SUBMENU “LOCKED”
21.8 • ACCESSING THE SUBMENU “RENAME”
L O C K E D
U N L O C K E D
R E N A M E

47
When the display 8 shows “CANCEL”
press key 20.
21 • PROGRAM MANAGEMENT SUMMARY
90024445rev00
The previously selected program is deleted from memory and can no longer be retrieved.Afterwards the display shows the previous program, in alphabetical order, to the one that has just beendeleted.
21 • PROGRAM MANAGEMENT SUMMARY
When the display 8 shows “COPY”
press key 20 to be able to copy an existing program.
See the COPY function described on the previous pages.
21 • PROGRAM MANAGEMENT SUMMARY
When the display 8 shows “MANUAL”
press key 20.
The card goes onto the manual program.
21.9 • ACCESSING THE SUBMENU “CANCEL”
21.10• ACCESSING THE SUBMENU “COPY”
21.11• ACCESSING THE SUBMENU “MANUAL”
c a n c e l
C O P Y
M A N U A L
2.34250 25

48
When the display 8 shows “RECIPES LX”
press key 20: the display shows the first initialbl inking, in alphabetical order, of the recipessupplied by the manufacturer, see chapter 25.
See function already described.
21 • PROGRAM MANAGEMENT SUMMARY
90024445rev00
When the display 8 shows “EXIT”
press key 20.
21 • PROGRAM MANAGEMENT SUMMARY
You return to the main menu where display 8 shows the selected program name and displays 5, 6, 7 showthe previous settings.
21.12• ACCESSING THE SUBMENU “RECIPES LX”
21.13• ACCESSING THE SUBMENU “EXIT”
R E C I P E S L X
E X I T
49
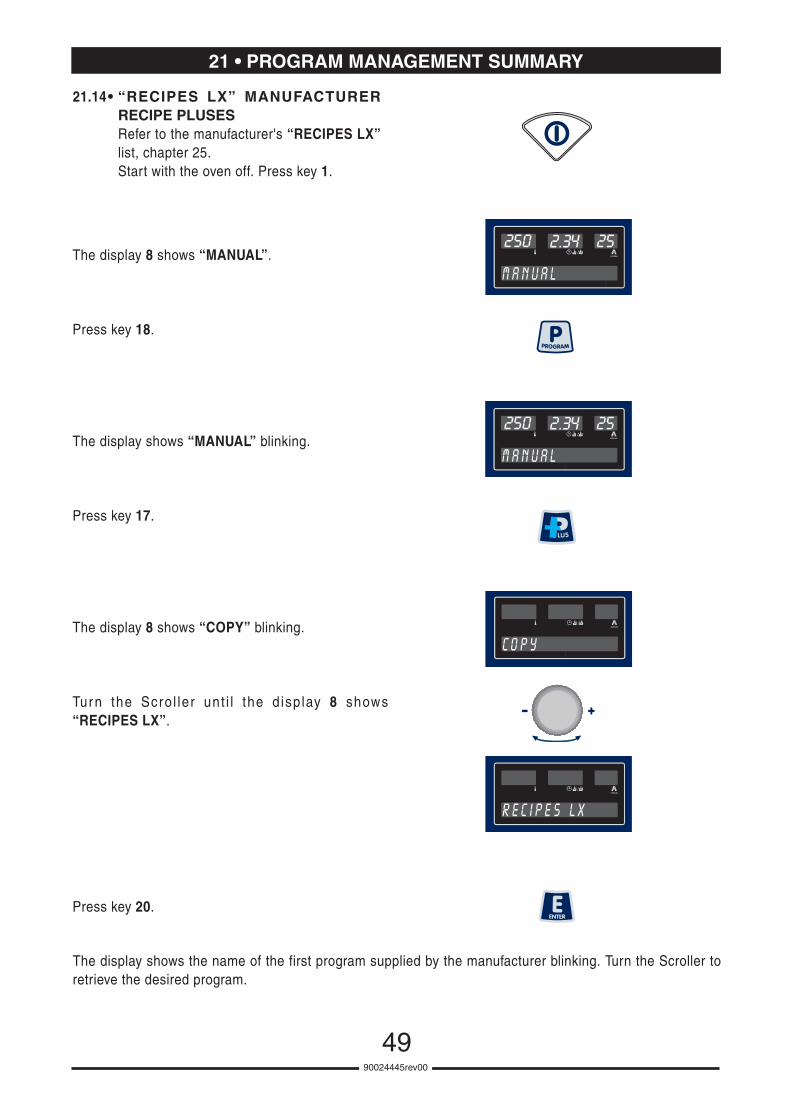
21.14• “RECIPES LX” MANUFACTURERRECIPE PLUSESRefer to the manufacturer's “RECIPES LX”list, chapter 25.Start with the oven off. Press key 1.
21 • PROGRAM MANAGEMENT SUMMARY
90024445rev00
The display 8 shows “MANUAL”.
Press key 18.
The display shows “MANUAL” blinking.
Press key 17.
The display 8 shows “COPY” blinking.
Tur n the Scro l ler unt i l the d isp lay 8 shows“RECIPES LX”.
Press key 20.
M A N U A L
2.34250 25
M A N U A L
2.34250 25
C O P Y
R E C I P E S L X
The display shows the name of the first program supplied by the manufacturer blinking. Turn the Scroller toretrieve the desired program.

5090024445rev00
24 • PROGRAM MANAGEMENT SUMMARY22 • PROGRAMMING
1 - LANGUAGE SETTING (ENGLISH)
CONTROL PANEL OFF
• PRESS : "DATE" APPEARS ON THE DISPLAY
• TURN THE SCROLLER UNTIL "LANGUAGE" APPEARS
• PRESS : THE SET LANGUAGE APPEARS ON THE DISPLAY
• TURN THE SCROLLER UNTIL "ENGLISH" APPEARS ON THE DISPLAY
• PRESS : TO CONFIRM ENGLISH

90024445rev00
NOTES

90024445rev00
NOTES

90024445rev00
NOTES


1
28
29
7
9
12
30
31
16
20
19
24
23
27
22
21
18
17
15
10
11
8
5
6
2
25
DESCRIPTION OF DISPLAY AND KEYS
DISPLAY, KNOBS AND KEYS VERSION T ELITE DISPLAY, KNOBS AND KEYS
Core probe
Display with oven temperature
Display with cooking time(remaining/set)
Display with food core temperature(real/set)
Display showing programsFault Display
Normal/low ventilation speed selection key
Rapid cooling keywith door open
Oven light key
Key for setting oven temperature
Key for setting cooking time
Key to select Programs
Key for selecting "PLUS" functions
Key to delete settings
Core probe connection
Humidity display
Cycle display
Heating power reduction activation key
Forced steam generator pre-heating off key
Main switch ON/OFF
Oven steam extraction vent key
Manual humidifier key
Start/Stop key
Humidity setting key
Key for setting forced steam inlet when cooking begins
Keys for setting food core temperature
"Enter" key (saves or displaysthe current program settings)
Key to select cooking cycles
Setting/selection knob