99 m vehicles aluminum coolant expansion tank · then slide the sensor out of the expansion tank....
TRANSCRIPT
MISHIMOTO | 18 BOULDEN CIRCLE, NEW CASTLE, DE 19720 | P 877.466.4744 | WWW.MISHIMOTO.COM
®
01
'99–'06 BMW E46 NON-M VEHICLES ALUMINUM COOLANT EXPANSION TANK PARTS LIST AND INSTALLATION GUIDE
PARTS INCLUDED
INSTALL TIME 1.5 HOURSINSTALL DIFFICULTY
DISCLAIMER• Raise vehicle only on jack stands or on a vehicle lift.
• Allow vehicle to cool completely prior to attempting installation.
• Do not run the engine or drive the vehicle while overheating; serious damage can occur.
• Please dispose of any liquids properly.
• Mishimoto is not responsible for any vehicle damage or personal injury due to installation errors, misuse, or removal of Mishimoto products.
• Mishimoto suggests that a trained professional install all Mishimoto products.
CAUTION Never work on the cooling system when it is hot. The coolant temperature in the radiator can be considerably higher than boiling, and the system may be under pressure. Opening a cooling system that is hot or under pressure can result in serious injury. Always wait until the system has cooled completely before servicing it in any way.
INSTALL PROCEDURE01. Set the vehicle on an automotive lift, or raise it with a jack and
place it securely on jack stands. Refer to your owner's manual
for safe lift points if you are unsure. For this installation, you
will need to lift only the front end of the vehicle.
02. Remove the seven screws that secure the splash panel to
the underside of the vehicle. Then remove the splash panel
completely. (7x Phillips screws)
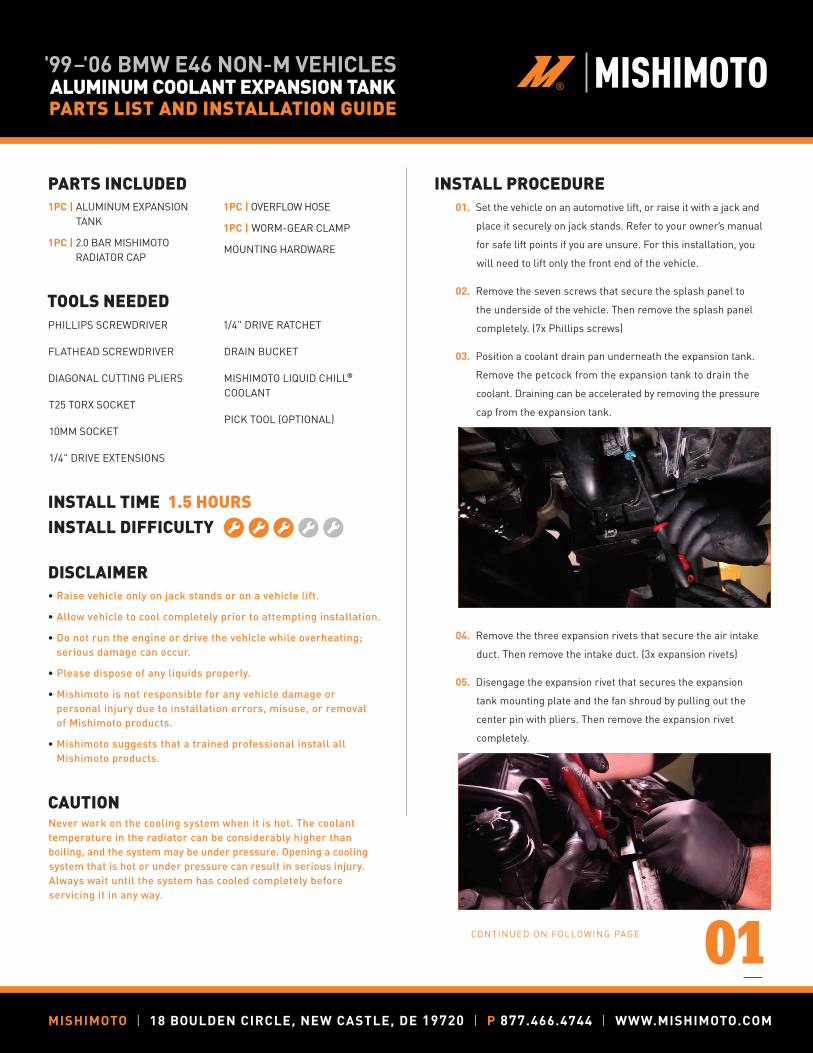
03. Position a coolant drain pan underneath the expansion tank.
Remove the petcock from the expansion tank to drain the
coolant. Draining can be accelerated by removing the pressure
cap from the expansion tank.
04. Remove the three expansion rivets that secure the air intake
duct. Then remove the intake duct. (3x expansion rivets)
05. Disengage the expansion rivet that secures the expansion
tank mounting plate and the fan shroud by pulling out the
center pin with pliers. Then remove the expansion rivet
completely.
CONTINUED ON FOLLOWING PAGE
1PC | ALUMINUM EXPANSION TANK
1PC | 2.0 BAR MISHIMOTO RADIATOR CAP
1PC | OVERFLOW HOSE
1PC | WORM-GEAR CLAMP
MOUNTING HARDWARE
PHILLIPS SCREWDRIVER
FLATHEAD SCREWDRIVER
DIAGONAL CUTTING PLIERS
T25 TORX SOCKET
10MM SOCKET
1/4" DRIVE EXTENSIONS
1/4" DRIVE RATCHET
DRAIN BUCKET
MISHIMOTO LIQUID CHILL®
COOLANT
PICK TOOL (OPTIONAL)
TOOLS NEEDED

MISHIMOTO | 18 BOULDEN CIRCLE, NEW CASTLE, DE 19720 | P 1.877.GOMISHI | WWW.MISHIMOTO.COM
®
02
06. Disconnect the two electrical harnesses for the fan and fan
controller; both are located on the top of the fan shroud.
07. Remove the screw that holds the fan shroud to the radiator
on the passenger side. (1x T25 Torx screw)
08. Remove the fan shroud from your BMW by lifting it upward.
09. Remove the stock intake airbox from your BMW. Loosen the
clamp on the intake hose where it meets the mass airfl ow
(MAF) housing, and slide the intake boot off the airbox.
Disconnect the MAF sensor by pushing in on the metal clip
and pulling the connector off the sensor. Remove the two
bolts that hold the airbox, and then remove the airbox from
the vehicle. (2x 10mm bolts)
10. Disconnect the upper radiator hose from the radiator/expansion
tank; it is held on by two quick-disconnect fi ttings. Use a pick
or similar tool to lift up the metal clips on the quick-disconnect
fi ttings, then gently pry the hose off the fi ttings with a screwdriver.
Take care when removing these hoses, as the plastic fi ttings
may be brittle.
11. Remove the hose attached to the lower section of the expansion
tank. Use a pick or similar tool to lift up the metal clip on the
quick-disconnect fi tting, then pry off the hose with a fl athead
screwdriver. Take care when removing this hose, as the plastic
components may be brittle.
12. Remove the air duct for the alternator by pulling it free on
both ends.
13. Locate and remove the hose on the bottom of the expansion
tank (near the petcock) and set it aside.
14. Disconnect the harness for the coolant-level sensor, located
on the bottom of the expansion tank.
15. Remove the screw that secures the radiator on the driver
side, near the fl at tab at the top of the expansion tank. Then
tilt the radiator back, toward the engine. (1x T25 Torx screw)
CONTINUED ON FOLLOWING PAGE
MISHIMOTO | 18 BOULDEN CIRCLE, NEW CASTLE, DE 19720 | P 877.466.4744 | WWW.MISHIMOTO.COM
'99–'06 BMW E46 NON-M VEHICLES ALUMINUM COOLANT EXPANSION TANK INSTALLATION GUIDE
MISHIMOTO | 18 BOULDEN CIRCLE, NEW CASTLE, DE 19720 | P 1.877.GOMISHI | WWW.MISHIMOTO.COM
®
03
16. Remove the two screws that secure the expansion tank
mounting bracket to the driver side of the radiator. One is
on the side of the radiator, just below the upper radiator hose
connection. The second screw is near the bottom of the
radiator. Now remove the expansion tank from the vehicle.
(2x T25 torx screws)
17. Remove the stock expansion tank from its mounting plate.
Locate and remove the metal clip that secures the tank to the
mounting plate, near the connector for the coolant-level
sensor. Then gently pry the expansion tank up and off the
two ports. (1x metal clip)
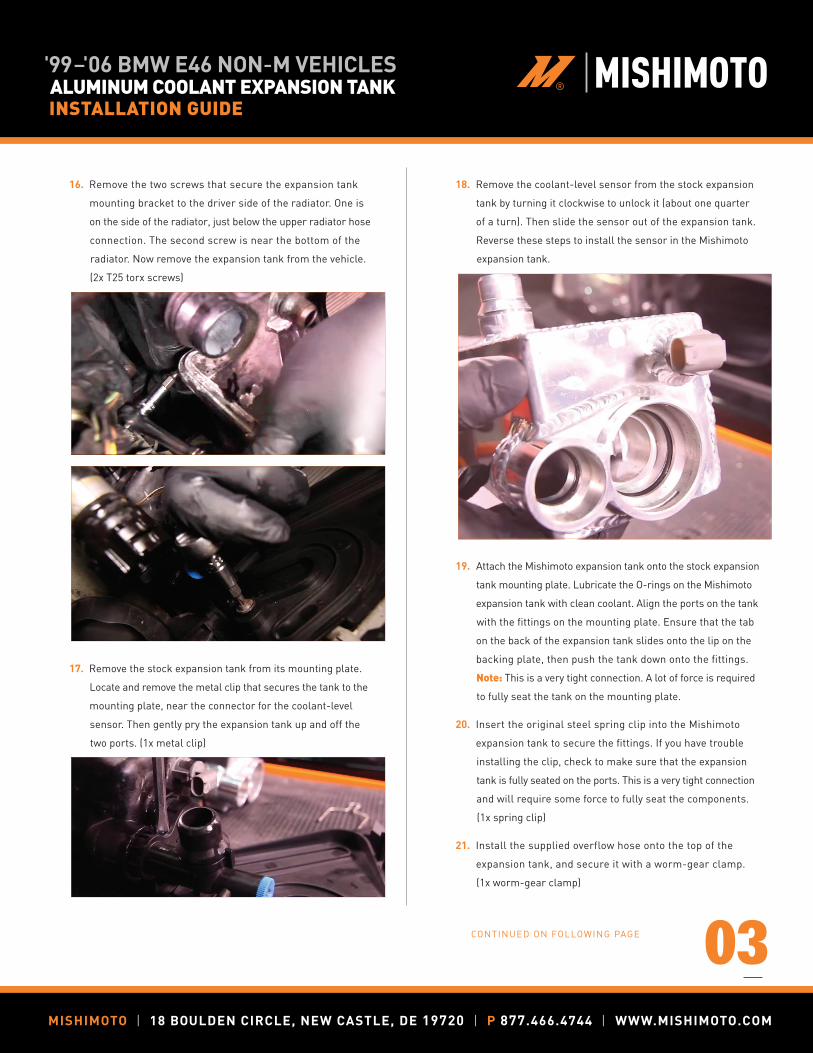
18. Remove the coolant-level sensor from the stock expansion
tank by turning it clockwise to unlock it (about one quarter
of a turn). Then slide the sensor out of the expansion tank.
Reverse these steps to install the sensor in the Mishimoto
expansion tank.
19. Attach the Mishimoto expansion tank onto the stock expansion
tank mounting plate. Lubricate the O-rings on the Mishimoto
expansion tank with clean coolant. Align the ports on the tank
with the fi ttings on the mounting plate. Ensure that the tab
on the back of the expansion tank slides onto the lip on the
backing plate, then push the tank down onto the fi ttings.
Note: This is a very tight connection. A lot of force is required
to fully seat the tank on the mounting plate.
20. Insert the original steel spring clip into the Mishimoto
expansion tank to secure the fi ttings. If you have trouble
installing the clip, check to make sure that the expansion
tank is fully seated on the ports. This is a very tight connection
and will require some force to fully seat the components.
(1x spring clip)
21. Install the supplied overflow hose onto the top of the
expansion tank, and secure it with a worm-gear clamp.
(1x worm-gear clamp)
MISHIMOTO | 18 BOULDEN CIRCLE, NEW CASTLE, DE 19720 | P 1.877.GOMISHI | WWW.MISHIMOTO.COM
CONTINUED ON FOLLOWING PAGE
MISHIMOTO | 18 BOULDEN CIRCLE, NEW CASTLE, DE 19720 | P 877.466.4744 | WWW.MISHIMOTO.COM
'99–'06 BMW E46 NON-M VEHICLES ALUMINUM COOLANT EXPANSION TANK INSTALLATION GUIDE

MISHIMOTO | 18 BOULDEN CIRCLE, NEW CASTLE, DE 19720 | P 1.877.GOMISHI | WWW.MISHIMOTO.COM
®
04
22. Install the Mishimoto expansion tank and mounting plate on
the radiator. Secure the tank with the two original screws.
(2x T25 Torx screws)
23. Slide the radiator back into position, and install the screw
that secures it to the vehicle. (1x T25 Torx screw)
24. Install the upper radiator hose onto the expansion tank and
radiator. Then secure the connections with the integrated
metal clips.
25. Connect the electrical harness for the coolant-level sensor.
26. Install the coolant hose that connects to the expansion tank
near the petcock. Then secure it with the integrated clip.
27. Install the alternator duct.
28. Install the hose that connects to the port on the center of
the expansion tank. Then secure it with the integrated clip.
29. Install and secure the airbox with two bolts. Connect the
electrical harness to the MAF sensor. Slide the air intake
hose onto the airbox, and tighten the clamp with a screwdriver.
(2x 10mm bolts)
30. Install the fan shroud. Seat the tab on the lower driver side
of the fan shroud into the radiator. Install the expansion rivet
on the upper driver side of the fan shroud. Secure the upper
passenger side of the fan shroud with the original screw.
(1x T25 Torx screw, 1x expansion rivet)
31. Connect the electrical harness to the fan and fan controller.
32. Install the intake air duct. Slip the duct onto the airbox,
then secure it with the three original expansion rivets.
(3x expansion rivets)
33. Install the splash shield underneath the vehicle.
(7x Phillips screws)
34. Fill the system with premixed, BMW-approved coolant through
the reservoir pressure cap, start the engine, and allow it to
idle with the cap off. Turn the heater control to full hot and
put the fan on low. Monitor the engine temperature and
coolant level in the reservoir. Add coolant as needed to
maintain a proper level in the reservoir, and check your
connections for leaks. If the vehicle begins to overheat or
coolant starts to overfl ow from the reservoir, shut off the
engine and allow it to cool before continuing. Once the
vehicle is fully warmed up and the coolant level has
stabilized, allow the vehicle to cool off completely, then
top off the coolant level. Coolant level should be checked
once more after putting in some miles.
35. Test drive your BMW and monitor engine temperatures. If
the vehicle begins to overheat, you may still have air trapped
in the system. Shut off the engine and wait for the vehicle to
cool off, then repeat the bleeding procedure above. Remember
that the cooling system is under pressure and should never
be opened when the vehicle is hot.
MISHIMOTO | 18 BOULDEN CIRCLE, NEW CASTLE, DE 19720 | P 1.877.GOMISHI | WWW.MISHIMOTO.COMMISHIMOTO | 18 BOULDEN CIRCLE, NEW CASTLE, DE 19720 | P 877.466.4744 | WWW.MISHIMOTO.COM
'99–'06 BMW E46 NON-M VEHICLES ALUMINUM COOLANT EXPANSION TANK INSTALLATION GUIDE
ENJOY!
Congrats! You just fi nished installing the '99–'06 BMW E46 Non-M Vehicles Aluminum Coolant Expansion Tank.