a-16r personal mixer a-16cs control surface
TRANSCRIPT

A-16R Personal Mixer
A-16CS Control Surface
User Guide
Information in this document is subject to change. All rights reserved.Copyright ©2003 Aviom, Inc.Printed in USADocument Rev. 1.01 Part Number 9301 1003 0001
For use with the A-16 Personal Monitor Mixing System™

Aviom, Inc.
1157 Phoenixville Pike - Suite 201
West Chester, PA 19380-4254
USA
610-738-9005 (voice)
610-738-9950 (fax)
www.aviom.com

READ THIS FIRST
Important Safety Instructions1. Read these instructions.2. Keep these instructions3. Heed all warnings.4. Follow all instructions.5. Do not use this apparatus near water.6. Clean only with a dry cloth.7. Do not block any ventilation openings. Install in accordance with the
manufacturer’s instructions.8. Do not install near any heat sources such as radiators, heat registers,
stoves, or other apparatus (including amplifiers) that produce heat.9. Do not defeat the safety purpose of the polarized or grounding-type
plug. A polarized plug has two blades with one wider than the other. A grounding type plug has two blades and a third grounding prong. The wide blade or third prong are provided for your safety. If the provided plug does not fit your outlet, consult an electrician for replacement of the obsolete outlet.
10. Protect the power cord from being walked on or pinched, particularly at plugs, convenience receptacles, and the point where they exit the apparatus.
11. Only use attachments/accessories specified by the manufacturer.12. Use only with the cart, stand, tripod, bracket, or table specified by
the manufacturer, or sold with the apparatus. When a cart is used, use caution when moving the cart/apparatus combination to avoid injury from tip-over.
13. Unplug this apparatus during lightning storms or when unused for long periods of time.
14. Refer all servicing to qualified personnel. Servicing is required when the apparatus has been damaged in any way, such as when the power-supply cord or plug is damaged, liquid has been spilled or objects have fallen into the apparatus, the apparatus has been exposed to rain or moisture, does not operate normally, or has been dropped.
15. No on/off power switches are included in the A-16 system. The external power supply should be used to control power to an Aviom A-16 device. This power supply should remain readily operable.
16. The solid line over dashed line symbol ( ) indicates that the input voltage must be a DC voltage.
17. The box within a box symbol ( ) indicates that the external power supply is double insulated.
!

Aviom, Inc. Limited Warranty
Aviom, Inc. warrants this product against defects in materials and workmanship for a period of one year from the date of the original retail purchase.
This warranty does not apply if the equipment has been damaged due to misuse, abuse, accident, or problems with electrical power. The warranty also does not apply if the product has been modified in any way, or if the product serial number has been damaged, modified, or removed.
If a defect is discovered, first write or call Aviom, Inc. to obtain a Return Authorization number. No service will be performed on any product returned without prior authorization. Aviom, Inc. will, at its option, repair or replace the product at no charge to you. The product must be returned during the warranty period, with transportation charges prepaid to Aviom, Inc., 1157 Phoenixville Pike, Suite 201, West Chester, PA 19380. You must use the product’s original packing materials for shipment. Shipments should be insured for the value of the product. Include your name, address, phone number, description of the problem, and copy of the original bill of sale with the shipment. The Return Authorization number should be written on the outside of the box.
THIS LIMITED WARRANTY GIVES YOU SPECIFIC LEGAL RIGHTS. YOU MAY HAVE OTHER RIGHTS, WHICH VARY FROM STATE TO STATE (OR JURISDICTION TO JURISDICTION). AVIOM’S RESPONSIBILITY FOR MALFUNCTIONS AND DEFECTS IN HARDWARE IS LIMITED TO REPAIR AND REPLACEMENT AS SET FORTH IN THIS LIMITED WARRANTY STATEMENT. ALL EXPRESS AND IMPLIED WARRANTIES FOR THE PRODUCT, INCLUDING BUT NOT LIMITED TO ANY IMPLIED WARRANTIES OF MERCHANTABILITY AND FITNESS FOR A PAR-TICULAR PURPOSE, ARE LIMITED IN DURATION TO THE WARRANTY PERIOD SET FORTH ABOVE. NO WARRANTIES, WHETHER EXPRESS OR IMPLIED, WILL APPLY AFTER SUCH PERIOD.
AVIOM, INC. DOES NOT ACCEPT LIABILITY BEYOND THE REMEDIES SET FORTH IN THIS LIMITED WARRANTY DOCUMENT. AVIOM, INC.’S LIABILITY IS LIM-ITED TO THE REPAIR OR REPLACEMENT, AT OUR OPTION, OF ANY DEFECTIVE PRODUCT, AND SHALL IN NO EVENT INCLUDE INCIDENTAL OR CONSEQUEN-TIAL DAMAGES OF ANY KIND.
SOME STATES DO NOT ALLOW EXCLUSIONS OR LIMITATION OF IMPLIED WAR-RANTIES OR LIABILITY FOR INCIDENTAL OR CONSEQUENTIAL DAMAGES, SO THE ABOVE LIMITATIONS MAY NOT APPLY TO YOU.
Aviom and the Aviom logo are trademarks of Aviom, Inc.

TO REDUCE THE DANGER OF ELECTRICAL SHOCK DO NOT REMOVE COVERS.
NO USER SERVICEABLE PARTS INSIDE
REFER SERVICING TO QUALIFIED SERVICE PERSONNEL ONLY
To reduce the risk of fire or electrical shock, do not expose this product to rain or other types of moisture.
To avoid the hazard of electrical shock, do not handle the power cord with wet hands.
Operating Temperature: 10˚C to 40˚C (50˚F to 105˚F)
WARNING!
!
C A U T I O N
Using any audio system at high volume levels can cause permanent damage to your hearing.
Set your system volume as low as possible.
Avoid prolonged exposure to excessive sound pressure levels.


Table of ContentsWelcome 1
Features 1Conventions Used in this Document 2
Button Presses 2Using A-16 Personal Mixers 2Optional Control Surface 2
Warranty Information 3The A-16R Personal Mixer Front Panel 4
A-16R Personal Mixer Components - left side 4A-16R Personal Mixer Components - right side 5
The A-16R Personal Mixer Rear Panel 6Audio Connections 6A-16R MIDI and Data Connections 7
A-16T Transmitter Components 8Front Panel 8Rear Panel 9
A-16CS Control Surface Components 10Left Side 10
A-16CS Control Surface Components 11Right Side 11
Package Contents 12AC Line Conditioning 12Installing the A-16T or A-16R in a Rack 13Channel Labels 13What is Category 5? 14
Cables Used in the Aviom System 14Cable Lengths 15
About A-Net 16Power Supplies 17Cleaning and Maintenance Information 18System Navigation 19The A-16T Transmitter 19
A-16T Front Panel 19Channel LEDs 19Input Levels 19The Link Switch 20Power and A-Net 21Connection Options 21
A-16T Rear Panel 23Power Connector 23Channel Input Jacks 23Channel Thru Jacks 23
The A-16R Personal Mixer 24Operational Modes 24Global Controls - the Master Section 25

Table of Contents Table of Contents
Tone Controls 25Master Volume 26
Button Behaviors 26Before You Start Editing 28Pan LEDs 29Using Solo Mode 29Muting a Channel 30
A-16R Personal Mixer Rear Panel 30A-Net Connectors 30DC Power Input 30Audio Outputs 31Balanced Inserts 32Signal Flow 33Mix In 33A-Control 34MIDI I/O 34A-Net In and Out 35
The A-16CS Control Surface 35Overview 35The A-16CS Front Panel 36
Global Controls 36Tone Controls 36Master Volume 36
Button Behaviors 36Volume and Pan Control 38Pan LEDs 38Using Solo Mode 39
The A-16CS Rear Panel 40A-Control 40Footswitch Jack 41
System Setup 42AC Power Connection 42System Interconnections 42Audio Connections — Inputs 42A-16T Front Panel Settings 43Audio Connections — Outputs 43Labeling the Channels 43Powering Up 44Basic Navigation 44Preparing to Make a Mix 44Mixing 44Saving Your New Preset 45
What Gets Saved 46Information Not Saved With a Preset 46
Connecting Audio 47Connections on the A-16T Rear Panel 47

Table of Contents Table of Contents
Connecting a Mixer 47Direct Output 47Bus Outputs 48Aux Sends (Effects Sends) 49Insert Send/Return Points 50
Line Level Devices 52Mixing 53
The Editing Interface 53Making Changes to a Mix 53Linking Channels 54
The Spread Control 54The Mute and Solo Functions 55
Solo a Channel 55Mute a Channel 55Unmute a Channel 55
Creating Groups 56Creating Additional Groups 57Making Changes to a Group 58
Changing Channel Settings Within a Group 58Removing Channels From a Group 58
Muting Groups 59MIDI 60
MIDI Jacks 60MIDI In 60MIDI Out 60MIDI Thru 60
Data Storage 61Saving Presets 61
Save One Mix Preset via MIDI 62Saving All Mix Presets via MIDI 62
Loading Presets via MIDI 63Loading an All Preset File via MIDI 63Exit MIDI Mode 64
Applications 65Create a Mix With Console Direct Outputs 65Using Aux Sends to Create a Monitor Mix 65Studio Cue System 66
Playback Monitoring 66Using Console Inserts 67
Y Cable Insert 68Adding Effects 68Using a Balanced TRS Cable 68Adding Effects When Using a Single Balanced Cable 69
Using a Patch Bay 69A-16T In and Thru Patching 69

Table of Contents
Adding Effects to a Monitor Mix 70Adding Live Ambience to a Monitor Mix 70Silent Jam Session 70Other Uses for the Personal Mixer Outputs 71
Record a Mix 71Troubleshooting 72Specifications 75
A-16T Transmitter Specifications 75A-16R Personal Mixer Specifications 75
MIDI Implementation Chart 76

1
WelcomeThank you for purchasing the Aviom A-16 Personal Monitor Mixing System. This User Guide is designed to familiarize you with your new product and to have you up and running in no time.
FeaturesYour Personal Monitor Mixing System provides a host of professional features designed to make the system flexible in a variety of music and audio situations.
A-16T Transmitter Features:
• Sixteen high-quality audio channels• Adjustable input gain switches per channel pair• Eight stereo channel Link switches• Signal and Peak LEDs on each channel• Sixteen 1⁄4-inch TRS jacks for audio Input connections• Sixteen 1⁄4-inch TRS jacks for Thru connections• Single-ended input accepts balanced or unbalanced signals and can
provide balanced or unbalanced signal pass-through• 1U-high rack-mountable enclosure
A-16R Personal Mixer Features:
• Sixteen Channel select buttons with dual LEDs• Dedicated Recall, Group, Solo, and Mute buttons• Sixteen user Preset memory locations • Pan/Spread control with LED readout• Channel volume control with LED level readout• Master Volume, Treble and Bass controls• Mix In with volume control• Balanced outputs on the rear panel• MIDI save and recall of user Presets• A-Control jack accepts the optional A-16CS Control Surface
A-16CS Remote Control Surface Features:
• Controls all front-panel functions on the A-16R• Sixteen Channel select buttons with dual LEDs• Dedicated Recall, Group, Solo, and Mute buttons• Controls the A-16R’s sixteen user Preset memory locations • Pan/Spread control with LED readout• Footswitch jack for Preset Up/Down control• Can be mounted on the optional MT-1 mic stand mount

2
System Options:
• A-16D A-Net Distributor• MT-1 mic stand mount for the A-16CS Control Surface and/or A-16
Personal Mixer
Conventions Used in this Document
Button Presses
When indicating a button on the front panel of the A-16R Personal Mixer or A-16CS, a special typeface is used. For example, “when selecting a Preset, press the RECALL button, followed by a numbered button”.
Using A-16 Personal Mixers
It is possible to create a personal monitor system using any combination of Aviom Personal Mixer products. In some cases the information in this document can refer to either the table-top version of the Personal Mixer, or the rack-mounted A-16R version.
When using the A-16R Personal Mixer with the optional A-16CS Control Surface, many of the same buttons and functions are available.
When referring to the use of the mixers in an A-16 System in general, the terms A-16 Mixer or Personal Mixer are used to describe a case where a standard A-16 Personal Mixer, the A-16CS remote Control Surface, or a rack mounted A-16R Personal Mixer can be used.
Optional Control Surface
When working with the A-16R, the A-16CS Control Surface can be used as an optional remote control device. This enables the A-16R to be placed at the rear of the stage or in another remote location while at the same time providing the user with complete control over their monitor mix environment.
It is important to note that the A-16R front panel has a switch that selects whether the front panel buttons and knobs or the A-16CS Control Surface will be used for editing. The Remote/Local switch must be in the LOCAL position to use the front panel controls or to send/receive MIDI SysEx. The Remote/Local switch should be in the REMOTE position when the A-16CS is being used.
When using an A-16CS Control Surface with an A-16R it is important to note that the position of the Bass, Treble, and Master Volume knobs is independent. Switching between the two devices can cause unexpected changes in volume and EQ if the settings of the knobs are not similar.

3
Warranty InformationPlease record the following information for future reference:
Your Authorized Aviom Dealer:
Name: _______________________________________
Address: _______________________________________
_______________________________________
Phone: _______________________________________
Serial Numbers of Your Aviom Products: ________________________
________________________
Date of Purchase: ____________________
Your Authorized Aviom Dealer is your primary source for service and support. The information recorded above will be helpful in communicating with your Authorized Aviom Dealer should you need to contact Aviom Customer Service. If you have any questions concerning the use of this unit, please contact your Authorized Aviom Dealer first. For additional technical support, or to find the name of the nearest Authorized Aviom Repair Station, check the Aviom web site at www.aviominc.com.
To fulfill warranty requirements, your Aviom product should be serviced only at an authorized Aviom service center. The Aviom serial number label must appear on the outside of the unit, or the Aviom warranty is void.
This manual and its contents are copyrighted by Aviom, Inc. All rights are reserved by Aviom, Inc. This document may not, in whole or in part, be copied, photocopied, reproduced, translated, or reduced to any electronic medium or machine-readable form without prior written consent from Aviom, Inc.
The software and/or firmware contained within Aviom products is copyrighted and all rights are reserved by Aviom, Inc.
Although every effort has been made to ensure the accuracy of the text and illustrations in this manual, no guarantee is made or implied as to the accuracy of the information contained within.
A-16 Personal Monitor Mixing System is a trademark of Aviom, Inc.A-Net is a trademark of Aviom, Inc. ©2003 Aviom, Inc.

Aviom A-16 Personal Monitor Mixing System
4
5
1
2 3 4
5
6
The A-16R Personal Mixer Front Panel
1 Recall button (for Save, hold RECALL and GROUP)
2 Group button
3 Channel Select LED
4 Channel Mute LED
5 Label strip
6 Channel or Preset select button (depends on mode)
A-16R Personal Mixer Components - left side

Aviom A-16 Personal Monitor Mixing System
4
5
7 Solo button
8 Mute button
9 Channel Pan control and LEDs
10 Channel Volume control and LEDs
11 A-Net Active LED
12 Mix In volume control
13 Bass tone control
14 Treble tone control
15 Master volume control
16 Remote/Local MIDI on/off switch
17 Headphone output
A-16R Personal Mixer Components - right side
7
8
9
10
12 1311 14 15 16
17

Aviom A-16 Personal Monitor Mixing System
6
7
The A-16R Personal Mixer Rear Panel
Audio Connections 1
23
4 5 6
1 XLR balanced outputs
2 TRS balanced outputs
3 Mono/Stereo output switch
4 Balanced stereo insert Return
5 Balanced stereo insert Send
6 Stereo auxiliary Mix Input
Aviom A-16 Personal Monitor Mixing System
6
7
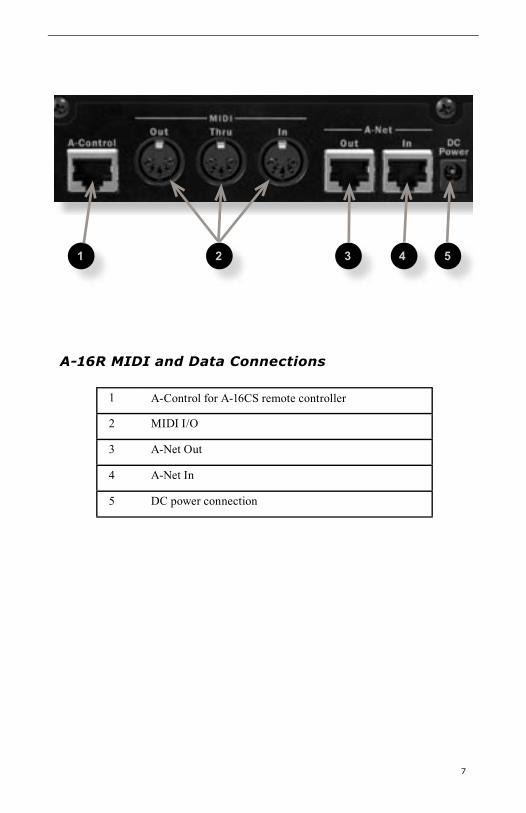
A-16R MIDI and Data Connections
1 A-Control for A-16CS remote controller
2 MIDI I/O
3 A-Net Out
4 A-Net In
5 DC power connection
1 2 3 4 5

Aviom A-16 Personal Monitor Mixing System
8
9
A-16T Transmitter Components
Front Panel
1 Clip LED
2 Signal present LED
3 Link Switch
4 Input Level switches
5 Power LED
6 A-Net output
1 2 3
4
5 6

Aviom A-16 Personal Monitor Mixing System
8
9
Rear Panel
1 2
3
1 DC power input
2 TRS Audio Inputs
3 TRS Audio Thru jacks

Aviom A-16 Personal Monitor Mixing System
10
11
A-16CS Control Surface Components
Left Side
1
2 3 4 5 6
1 A-Net Active LED
2 Recall button
3 Group button
4 Pan knob & LEDs
5 Volume knob & LEDs
6 Channel buttons
7 A-Control input (rear panel)
1
7

Aviom A-16 Personal Monitor Mixing System
10
11
A-16CS Control Surface Components
Right Side
7 8 9
10
7 Bass Tone Control
8 Treble Tone Control
9 Master Volume
10 Solo Button
11 Mute Button
12 Label Strip
13 Footswitch jack (rear panel)
11 12
13

Aviom A-16 Personal Monitor Mixing System
12 13
Package Contents The complete A-16 Personal Monitor Mixing System comes packaged in two parts, the A-16T A-Net Transmitter and the A-16R Personal Mixer. Check the contents carefully before making connections and continuing with installation.
To create a basic system you should have:
An A-16 Transmitter box with• One A-16T A-Net Transmitter• One DC Power supply for the A-16T A-Net Transmitter
An A-16R Personal Mixer box with• One A-16R Personal Mixer• Power supply for the A-16R Personal Mixer• One Category 5 interconnect cable• User Guide
Options for your system include• The A-16CS remote Control Surface for use with the A-16R• The A-16D A-Net Distributor• MT-1 mic stand mount for the A-16CS
Also included with the system is a Warranty Card. Be sure to fill out the form and return it to Aviom, Inc. as soon as possible.
AC Line ConditioningThe A-16 is a digital device and is sensitive to sudden spikes and drops in the AC line voltage. Changes in the line voltage from lightning, power outages, etc. can sometimes damage electronic equipment.
To minimize the chance of damage to your equipment from sudden changes in the AC line voltage, you may want to plug your equipment into a power source that has surge and spike protection. Power outlet strips are available with built-in surge protection circuits that may help protect your equipment.
Other options for protection of your equipment include the use of an AC line condi-tioner or a battery backup system (sometimes referred to as an uninterruptible power supply, or UPS).

Aviom A-16 Personal Monitor Mixing System
12
13
Installing the A-16T or A-16R in a RackThe A-16T Transmitter and A-16R Personal Mixer are designed to be installed in a standard 19-inch audio equipment rack. This design is both for easy transportation of the units and for protection. Each unit takes up one standard rack space (19 inches wide by 1.75 inches high). Optionally, you can place the units on a table top or other flat surface such as a shelf.
The rack ears on each side of the device are designed to support the weight of the A-16T or A-16R without additional hardware. Each rack ear contains holes for two screws per side. Always support the unit with all four screws.
To rack mount the A-16T Transmitter or A-16R Personal Mixer, position it in the equipment rack at the desired location. Use standard rack-mounting screws (10-32 size) to attach the unit to your rack hardware. Tighten all four screws firmly, but avoid overtightening.
You may want to use non-metallic washers between the rack-mounting screws and the device’s finished surface to avoid marring the painted finish on your Aviom products.
Always allow adequate ventilation for devices mounted in equipment racks. Avoid placing your A-16T and/or A-16R directly above or below other rack-mounted gear that produces high levels of heat, such as power amps.
Channel Labels For writing channel information or names on the A-16R Personal Mixer (or A-16CS) label surface or “scribble strip”, we suggest using a china marker or other easily removed marking device. A china marker is designed for marking on plastic, metal, glass, wood, and paper. These are available at most office supply outlets. Avoid the use of permanent markers.
Mixer Label Strip
To clean the label writing area on the A-16R Mixer, use a soft clean cloth to remove most types of temporary marking material. For difficult-to-remove types of marking devices, a cotton swab moistened with a drop of rubbing alcohol can be used. Use the minimum amount possible to remove the writing.

Aviom A-16 Personal Monitor Mixing System
14 15
What is Category 5?Category 5 (sometimes referred to as Cat-5) describes a commonly used type of high performance network cabling. It is used mainly for data transmission purposes to connect computers, modems and other devices. A standard Category 5 patch cable consists of four twisted pairs of copper wire terminated by RJ45 male connectors. The cable assembly is used to provide connectivity between any two Category 5 female outlet jacks. A variation, called Category 5e (or Cat-5e), uses additional twists in the cable to reduce interference in high-speed network applications.
The RJ45 connector looks similar to the connectors found on a telephone system, only larger. The twisting of the wire pairs helps to shield the cable from unwanted interference from electrical fields or radio interference (sometimes referred to as “RF”). Cat-5 cabling supports frequencies up to 100 MHz and speeds up to 1000 Mbps.
Category 5 cables
Cables Used in the Aviom SystemThe Category 5 cables used with your Aviom system are interchangeable with any standard Category 5 (or Cat-5e) cables. If you need a longer cable for a particular ap-plication, any computer store should be able to supply you with an appropriate cable. A qualified technician should be able to build custom cables to any length (up to the maximum of 500 feet (about 150 meters) between components).
For fixed or permanent installations, you have the option of running Category 5 cables inside walls and terminating them with readily available wall panel connectors that include the RJ45 jack. (Solid wire is recommended for permanent installations.)
Note: When purchasing Category 5 cables, be sure to buy only standard Cat-5 cables, not those sold as crossover cables. A crossover cable is used for file transfer between two computers. It is not compatible with your Aviom equipment.

Aviom A-16 Personal Monitor Mixing System
14
15
A-16T Transmitter
A-16 or A-16R Personal Mixers
Up to 500 feet of Cat-5 cable can be used to connect each system component
A-16T Transmitter
A-16 or A-16R Personal Mixers
Infinite number of A-Net components
Cable LengthsCategory 5 cables used with the A-16 Personal Monitor Mixing System can be up to 500 feet (approximately 150 meters) in length. The maximum cable length specifica-tion applies to the cable connected between the A-16T Transmitter and the first A-16 (or A-16R) Personal Mixer in your system as well as for cable runs between each additional A-Net compatible device in your system.
Pre-made cables in a variety of lengths and colors are available at most computer out-lets. Cables can be extended by using a simple passive device called an inline coupler to add length to existing cables (as long as you do not exceed the specified maximum cable length). If you need a longer cable on occasion, this is a simple solution. Note that it is possible that the maximum cable length specification can be compromised by using inline couplers. Inline couplers are available at most computer outlets.

Aviom A-16 Personal Monitor Mixing System
16 17
About A-NetAviom’s A-Net is a high-speed data transmission protocol. It is capable of sending and receiving high-quality audio using readily available Category 5 cables. The A-Net technology is a proprietary system developed by Aviom.
A-Net is based on Ethernet, a Local Area Network (or LAN) technology. This provides A-Net with a mature and robust base on which to build.
As used in your A-16 Personal Monitor Mixing System, the A-Net signal carries six-teen channels of digital data from the A-16T Transmitter to each and every Personal Mixer connected to the system.
Some of the benefits of using A-Net to transmit digital audio are:• Virtually no latency• No ground loops• Easy cabling using readily available components• An unlimited number of Personal Mixers can be used in a system• Ease in spanning long distances between system components
Note: While the Category 5 cables and connectors used on your Aviom products look like typical computer network connections, do not connect computers, routers, or other home and business network-ing equipment to your Aviom products.

Aviom A-16 Personal Monitor Mixing System
16 17
Power SuppliesYour Aviom product uses a DC power supply that has a two-prong power cord. The prongs on the power supply are identical, meaning that there is no need to orient the plug in a specific direction in the power outlet. Some products with two-prong power cords have polarized plugs that can only be inserted into an electrical outlet one way.
The power supply that ships with your Aviom product is a universal switching type. It is capable of working with voltages from 90 to 240 volts AC. This means that a separate power supply is not needed to use the products with the power systems found in most countries. You should always use the power supply that shipped with your product. When travelling, you may need plug adapters to use the power supply with the AC outlet plug shape variations in use throughout the world.
Should you need to replace the power supply that came with your product, we recommend using only a power supply that meets the following specifications.
Type: Switching
Input Voltage: 90-240 volts 50/60Hz 30VA
Output: 24Vdc 0.5A
Polarity Outer = negative; Inner = positive
� �Power Supply Polarity
Note that polarity of the plug found on the DC power supply needs to match that of the original power supply that came with your Aviom equipment. Aviom products use a center positive power supply. The outer contact is negative, the inner contact is positive. (See the diagram above.)

Aviom A-16 Personal Monitor Mixing System
18
Cleaning and Maintenance InformationThe exterior of your Aviom products should be cleaned with a dry, soft, lint-free cloth. For tougher dirt, you can use a cloth slightly dampened with water or with a mild detergent.
When cleaning your Aviom products, never spray cleaners directly onto the product surfaces. Instead, spray a small amount of the cleaning solution onto a clean cloth first. Then use the dampened cloth to clean the product.
Note: Never use solvents or abrasive cleaners on the finished surfaces of your Aviom products.

19
System NavigationThis section explains the basic layout of your new Aviom products. The diagrams on the previous pages can be used as a quick visual guide to the location of the basic components of the Personal Monitor Mixing System.
The A-16T Transmitter
A-16T Front Panel
The front panel of the A-16T contains the Channel information, Link switches, Signal Present LEDs, Clip LEDs, Power indicator, Input Level switches, and the A-Net output connector.
Channel LEDs
The numbered Channels on the A-16T front panel correspond to the sixteen analog inputs on the rear section of the A-16T. They are grouped together in pairs — Chan-nels 1 and 2, Channels 3 and 4, etc. Each Channel contains two LEDs, one showing that there is an audio signal present, and another used to indicate that the input to a channel is causing audio clipping. Signal and Clip LEDs appear directly beneath the Channel numbers.
The lower LED, marked Signal, will light as long as an audio signal of at least -40dB is present on the channel. It provides an easy way to confirm that audio is indeed passing into—and being processed by—the A-16T.
The upper LED is marked Clip. It will light if a signal reaches a point that is within 3 dB of full scale (0dB). In general, you want to operate the system so that the Clip LED lights only occasionally. If the LED is on constantly, you should either lower the volume of the source audio coming into the A-16T or try different Input Level settings.
Input Levels
The A-16 Personal Monitor Mixing System has been designed to accept a wide range of professional and semi-professional audio levels. There are four Input Level

Aviom A-16 Personal Monitor Mixing System
20
21
gain settings available. Changes to the input level on the A-16T front panel affect a pair of channels at a time.
The four levels are +22dB, +4dB, 0dB, and -10dB. To select the proper Input Level setting, choose the Input Level position that most closely matches the output of your audio gear. Here are some examples to be used as a guide:
• Use the +22dB setting for the hottest signals such as those coming from professional broadcast equipment, tape decks, and some digital audio workstations (DAWs).
• The +4dB setting is the best choice for most professional audio gear such as mixing boards, microphone preamps, effects processors, etc.
• Try the 0dB setting for musical instruments such as keyboards and drum machines.
• The -10dB setting is appropriate for consumer audio devices such as CD players and MP3 players. Also, semi-pro audio gear should use the -10dB setting. (In many cases those devices use RCA jacks for audio input and output.)
Check the specifications of your audio gear if you are unsure about its output level. Although you won’t harm the A-16T or your audio devices by using an incorrect level setting, you do want to avoid distorting the audio that passes through the A-16 system and eventually on to your monitors.
In general, you need to check the A-16T front panel Signal and Clip LEDs when initially setting up your audio system and choosing level settings. If your -10dB device outputs a hot level, it may be necessary to adjust the Input Level switch to avoid clipping. In this example, moving the switch to the 0dB setting should provide a strong signal without distortion.
The Link Switch
The A-16T Transmitter provides an easy solution for stereo input sources such as keyboards, mixer sub-groups, drum machines, CD players, effects device outputs, etc. The Stereo Link switch is used to turn a pair of adjacent channels into a stereo channel that can be controlled as a single source on the Personal Mixers.
There are eight Link switches on the front panel of the A-16T. They can be used in any combination, as your needs require. The Link switch is located between two channels—one odd and one even. Stereo Links always affect adjacent channels (for example, channels 1 and 2, channels 13 and 14, etc.).
The default setting, with the Link switch to the left, allows independent control of

Aviom A-16 Personal Monitor Mixing System
20
21
each input channel from the A-16 Personal Mixers. To link channels together as a stereo input, move the Link switch to the right. (Moving the switch to the Link posi-tion causes all Personal Mixers, including the A-16CS Control Surface, connected to the system to instantly update their channel status.)
Some things to keep in mind about linked channels:• Linking channels affects all A-16 Personal Mixers connected to the
system.• Any combination of stereo and mono channels can be used.• If you want to control two input channels as a stereo source, they must
be connected to an odd and even pair of channels, as indicated by the graphics on the A-16T front panel.
• Changes to the Stereo Link status can be made on the fly, with audio running through the system.
• All A-16 Personal Mixers will instantly update their channel status if the Link switch position is changed for any channel pair.
• The Link status is not saved when you create a Preset.• Changing the channel link status will affect Groups you have created
in some cases.
Power and A-Net
The right side of the A-16T Transmitter also contains the Power LED. This indicator shows that power is connected to the unit. It does not indicate, however, that a valid A-Net signal is being generated.
The A-Net output jack is used to connect the A-16T to the first A-Net compatible device in your monitor system. Use any standard Category 5 cable to make the con-nections. Remember that the maximum cable length is 500 feet (150 meters).
When a proper A-Net connection between the A-16T Transmitter and a Personal Mixer exists, the A-Net Active LED on the Personal Mixer will light.
Connection Options
In a simple system, the easiest connection method uses what is called a daisy-chain. That is, each device is connected in series. The first mixer device in the chain receives the A-Net signal from the A-16T Transmitter. Each successive Personal Mixer gets its A-Net connection from the A-Net Out jack of the Mixer preceding it in the chain.

Aviom A-16 Personal Monitor Mixing System
22
23
There is one drawback to this connection method, however. If one Personal Mixer in the chain is disconnected from the A-Net signal chain, Personal Mixers beyond this point will not get any audio until the unit is reconnected.
Series, or daisy-chain, connection of Personal Mixers
In this diagram, A-Net is connected from device to device using a cable to connect the A-Net Out port on the first mixer to the A-Net In port on the next, and so on.
A parallel A-Net connection solves that problem. By using the optional A-16D A-Net Distributor, parallel A-Net connections are possible. In fact, any combination of series and parallel connections can be used to solve even the most complex audio routing problems.
Parallel A-Net routing using an A-16D A-Net Distributor
A-16 D
A-Net from the A-16D is connected to each Personal Mixer. Removing one Personal Mixer has no effect on other Personal Mixers being used.
A-Net Out

Aviom A-16 Personal Monitor Mixing System
22
23
A-16T Rear PanelOn the rear of the A-16T Transmitter you will find the power connector, the sixteen audio inputs, and the sixteen Thru jacks.
Signal routing into and out of the A-16T Transmitter has been designed to be extremely flexible, allowing the A-16T to integrate into virtually any audio environ-ment.
Power Connector
Your A-16T Transmitter comes with a switching-type power supply. This type of power supply can be used with a wide range of AC wall current outputs, meaning that you do not need to replace the power supply if the unit will be used in different countries throughout the world where current voltages are different. (You may, however, need plug adapters to allow the power supply to be connected to wall outlets internationally since many countries use different physical plug layouts for their power systems.)
Channel Input Jacks
The rear panel of the A-16T Transmitter contains sixteen Input jacks (labelled In). These jacks can accept balanced or unbalanced signals on 1⁄4-inch plugs.
Balanced signals (sometimes referred to as TRS, for Tip, Ring, and Sleeve) are found on many professional audio devices. The 1⁄4-inch connector used for balanced audio wiring has three conductors: the tip, the ring, and the sleeve. It is the same connector found on most stereo headphones, for example. The balanced wiring system is ideal for keeping noise out of the audio signal from sources such as radio interference (sometimes called “RF”).
Unbalanced audio signals are found on many keyboards, effects processors, etc. Only two connectors are used, the tip and the sleeve. A standard musical instrument or guitar cord uses this configuration, for example.
Channel Thru Jacks
The Thru jacks on the A-16T provide the user with an exact copy of the signal plugged into the In jack just below it. This can be used as a way to insert the A-16T

Aviom A-16 Personal Monitor Mixing System
24
25
Transmitter into a signal chain without giving up audio patching flexibility.
The Thru jacks have other uses as well. While a direct output from a mixing board is the most straightforward way to connect audio from your mixer to the A-16T, some mixing boards do not have this signal routing option available. In this case, the mixer’s insert points (sometimes referred to as an effect insert send and receive) can be used instead. When using a mixing board’s insert points to get monitor signals into the A-16T, the Thru jack can be used to complete the insert send/receive loop used by most manufacturers. Additional information about patching and connecting systems appears later in this document.
The A-16R Personal MixerThis section describes the controls, modes, and functions of the A-16R rack mounted Personal Mixer. The basic components of the front panel include:
• Sixteen lighted Channel buttons (they are also the Preset select but-tons)
• Channel label strip• Recall button• Group configuration and edit button• Solo and Mute buttons• Pan and Volume knobs• Bass and Treble tone controls• Master Volume control• A-Net signal indicator• Mix In volume control• MIDI/Remote control selection switch• Headphone jack
Operational ModesWhen using the A-16R Personal Mixer, you will be in one of the following modes:
• Mix Mode — Here you can change Channel and mix settings such as volume, mute, and panning; you’ll spend most of your time in this mode.
• Recall Mode — Activated by the RECALL button, the row of sixteen Channel buttons are used to select one of the sixteen available mixes
Aviom A-16 Personal Monitor Mixing System
24
25
saved as Presets.• Group Mode — Used when creating Groups or editing existing
Groups. This is activated by pressing the GROUP button. The Channel Select buttons are used to add or delete Channels from a Group.
• Solo Mode — When the SOLO button is pressed, the selected Channel (or Group) is audible while the rest of the mix is muted.
• Mute Mode — When the MUTE button is pressed, the selected Chan-nel (or Group) is muted
• Save Mode — This mode is activated by pressing and holding both the RECALL and GROUP buttons. When both buttons are held down, the Save Mode is active. Pressing any numbered button while still holding this button combination will save your current mix to that Preset location.
• MIDI Mode — MIDI is used for saving and reloading your saved Presets. Only the A-16R is capable of sending and receiving MIDI.
Note: A Preset is saved when the numbered button is released.
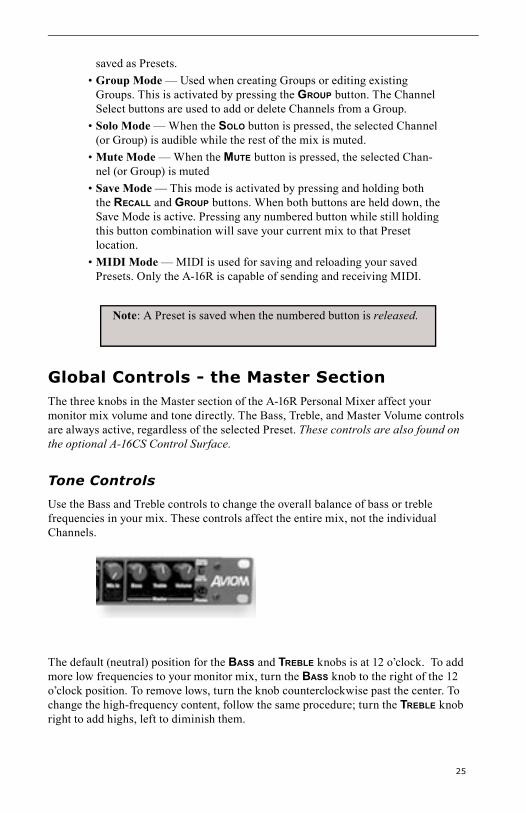
Global Controls - the Master SectionThe three knobs in the Master section of the A-16R Personal Mixer affect your monitor mix volume and tone directly. The Bass, Treble, and Master Volume controls are always active, regardless of the selected Preset. These controls are also found on the optional A-16CS Control Surface.
Tone Controls
Use the Bass and Treble controls to change the overall balance of bass or treble frequencies in your mix. These controls affect the entire mix, not the individual Channels.
The default (neutral) position for the BASS and TREBLE knobs is at 12 o’clock. To add more low frequencies to your monitor mix, turn the BASS knob to the right of the 12 o’clock position. To remove lows, turn the knob counterclockwise past the center. To change the high-frequency content, follow the same procedure; turn the TREBLE knob right to add highs, left to diminish them.

Aviom A-16 Personal Monitor Mixing System
26 27
The Bass and Treble EQs in the Personal Mixer are both shelving type. There is +/-12dB of cut or boost available for each.
Bass EQ 160Hz shelving Treble EQ 9kHz shelving
+12dB
-12dB
+12dB
-12dB
160Hz 9kHz
Master Volume
The overall system volume is controlled by the MASTER VOLUME control, not to be confused with the Channel Volume control. This is a digitally-controlled analog volume control. Turn it counterclockwise for a full off setting. As a general sugges-tion, start with the Master Volume knob at a low setting, about 9 or 10 o’clock to start. Raise the volume slowly from that point to a comfortable level.
Note: Always use caution when adjusting any audio system component to avoid potential hearing damage.
Button Behaviors
There are various combinations of lighted and unlighted buttons on the A-16R Personal Mixer. Here is an overview:
• Channel buttons have two LEDs, an upper and lower. The upper but-ton is red and indicates that the Channel is selected. The lower button is yellow; it indicates that the Channel is muted. Channel buttons will light solid or flash.
• The RECALL button has one red LED. It flashes when the RECALL but-ton is pressed, indicating that you can now select a Preset by touching any numbered button.
• There is one LED in the GROUP button. When the GROUP button is pressed, the LED flashes. This indicates that you can now build or edit a Group.
• The RECALL and GROUP buttons will both flash when held down simultaneously. This is the Save Mode, as indicated by the connecting

Aviom A-16 Personal Monitor Mixing System
26
27
graphic above the two buttons on the front panel.• When a Preset is saved, all sixteen Channel buttons will flash briefly
to confirm the Preset save operation.• The SOLO button has one LED. It will light when pressed, indicating
that the selected Channel or Group is now being auditioned with all other Channels being muted.
• The MUTE button has no LED in it. Pressing the MUTE button with a Channel selected will silence the Channel and cause the Channel’s lower ( yellow) LED to light.
There is also one special button combination, the RECALL button followed by the MUTE button. When used together this combination serves a twofold function:
• If there is a sudden change in the audio volume coming through the monitor system, this button combination silences all audio channels instantly.
• When starting from scratch to create a new mix, use this function to set all sixteen channels to zero volume and all pans to the center settings.
All Volumes Zero
Note: The text on the right side of the label strip reads “In Recall Mode All Volumes Zero” as a reminder that this function is always available.
Making Changes to Channel SettingsThe A-16R Personal Mixer behaves in a similar manner to many popular digital mix-ers. One set of common controls is used for editing. A simple convention is used: to make a change to a Channel, first select it. Then the Channel is available for editing.

Aviom A-16 Personal Monitor Mixing System
28
29
On the Personal Mixer you can change:• Volume• Panning for mono channels• Spread for stereo channels• Mute status• Grouping
In addition to these changes, you can use Solo Mode to audition your edits to a Channel while all other Channels are temporarily silenced. Groups can also be soloed.
Before You Start Editing
When using the A-16R, it is important to note that only one device can control the channel settings of the A-16R at a time. This is true even if you do not have an A-16CS Control Surface connected. Some important points to keep in mind:
Set the Remote/Local switch to the LOCAL position to use the front panel of the A-16R for editing and save/recall of Presets.Set the Remote/Local switch to the REMOTE position to use an A-16CS to remotely control the A-16R. Editing mixes and save/recall of your Presets only works from the A-16CS in this case. Only the Mix In knob on the A-16R rack will function when the Remote/Local switch is set to the REMOTE position.
When using an A-16CS with an A-16R the position of the Bass, Treble, and Master Volume knobs is independent. Switching between the two devices can cause unexpected changes in volume and EQ if the settings of the knobs are not similar.
Volume and Pan Control
When you change the volume of a Channel on the Personal Mixer, the LEDs in the Volume section of the interface will indicate the level in real time. There are twelve LEDs in the Volume indicator, each capable of displaying two levels, for a total of twenty-four visible lighted steps.

Aviom A-16 Personal Monitor Mixing System
28
29
When a Channel is selected, the current volume is instantly indicated on the LEDs. When no LEDs are lit, Channel volume is at its minimum setting.
Pan and Volume Controls
To make changes to a Channel:
• Select a Channel by pressing its numbered button—the upper LED will light.
• Rotate the VOLUME knob to the right to increase the volume; rotate to the left to lower the volume. The Volume LEDs indicate the current level.
• While the Channel is still selected, you can also change the Pan setting. Rotate the PAN knob left or right to change the position of the Channel in the stereo field.
Pan LEDs
The Pan indicator is made up of five LEDs. The center LED is green. The LEDs on either side of center are red. As you turn the PAN knob, the LEDs will light in various combinations to provide the maximum number of position indicators with the fewest number of lamps. At either end of the display only one LED will be lit to indicate that the Channel is panned full left or right.
When using linked channels ( stereo inputs), the LEDs light in different patterns, using a pair of LEDs on either side of the display to indicate the width of the stereo field. When the stereo image has been collapsed to mono, only the center green LED will be lit. In this case the stereo input will be heard as mono.
Using Solo Mode
To listen to the Channel you’re editing without hearing the rest of the current mix, press the SOLO button. Make any necessary changes to the Channel. When finished, press the SOLO button again or select any other Channel. Both methods will automati-cally exit Solo Mode and return you to your current mix.
Note: The status of Solo Mode is not saved with a Preset.

Aviom A-16 Personal Monitor Mixing System
30 31
Muting a Channel
While creating a mix, any Channel or combination of Channels can be muted. Unlike the Solo Mode, the changes you make with the MUTE button can be saved as part of a Preset.
To mute a Channel:• Select the Channel first• Press the MUTE button• The yellow LED in the Channel button lights
To unmute a Channel:• Select a muted Channel• Press the MUTE button• The yellow LED in the Channel button will go out
Additional Channels can be muted or unmuted by following the same procedure—first select the Channel, then press the MUTE button.
A-16R Personal Mixer Rear PanelOn the rear of the A-16R Personal Mixer you will find the A-Net connectors, the power supply input, insert points, auxiliary mix input jacks, MIDI I/O, A-Control connector, and the audio line-level outputs.
A-Net Connectors
There are two A-Net connectors on the rear of the Personal Mixer.
The A-Net In jack accepts• the A-Net signal coming from the A-16T Transmitter if the Personal
Mixer is the first Personal Mixer in the system, or• the A-Net signal coming from the Out jack of a Personal Mixer, or• the A-Net Out signal from an A-16D A-Net Distributor
The A-Net Out jack is used to connect another A-Net device. This will send the same sixteen audio channels being processed by the A-16T Transmitter to the nextA-Net device so that another unique monitor mix can be created. An unlimited number of A-Net devices can be connected in series using this method. Any A-Net device, including the A-16D A-Net Distributor can be connected.
DC Power Input
Connect the DC power supply to the jack on the rear of the A-16R Personal Mixer. Use only power supplies designed for your Aviom products.

Aviom A-16 Personal Monitor Mixing System
30
31
Audio Outputs
The audio outputs on the rear of the A-16R Personal Mixer can be used with any device that can accept a line level audio output, such as in-ear monitor wireless transmitters, powered speaker systems, and recording devices. Stereo and dual-mono outputs are available. Both XLR and 1/4-inch TRS jacks are available.
Both sets of audio outputs can be connected at the same time.
Stereo Operation
The XLR and TRS line outputs on the rear panel of the A-16R Personal Mixer are independent of the front-panel headphone output signal. The mix appearing at each set of outputs is the same, but the setting of the Mono/Stereo switch only affects the rear-panel outputs.
Connect the Left and Right outputs (XLR or TRS) of the A-16R to the Left/Right line-level audio inputs on the in-ear transmitter or other audio device.
Setting the gain structure properly will ensure the best audio fidelity. Rotate the Master Volume on the front panel of the A-16R to the 1-2 o’clock position for start-ers. Then, raise the input level on your audio device until the input level is loud, but not distorted. Use the on-board level meters if the receiving device has them to get maximum gain without audio clipping.
Mono Operation
As mentioned previously, only the rear-panel audio outputs are affected by the Mono/Stereo switch. The headphone output on the front panel of the A-16R is always stereo. This allows the listener to have a stereo headphone mix while at the same time using a mono subwoofer to enhance low-end response. As an example, when performing live, a drummer can connect headphones to the front panel headphone output of an A-16R while at the same time the audio signal is connected to a mono amp and crossover combination being used to create a bass shaker system in the platform he is sitting on.
To use a mono amplifier, powered speaker, subwoofer, etc., connect a standard audio interconnect cable (TRS or XLR type) from the audio output on the rear of the A-16R to the audio input on your mono device. For best results, set the Mono/Stereo switch to the Mono position.
Unbalanced audio sources can be connected by using standard guitar-type (or tip-sleeve) cables.

Aviom A-16 Personal Monitor Mixing System
32
33
Balanced Inserts
The A-16R is equipped with a stereo insert that can be used just like the insert points found in most mixing consoles. The audio signal from the A-16R can be sent out to the inputs of an audio processor (such as a compressor or limiter). The signal, once processed by the device, is then returned to the A-16R via the Return jacks.
The inserts on the A-16R are balanced. You can use either balanced or unbalanced audio processors with the A-16R.
Audio from the A-16R is sent to the effect device’s inputs. The processed sound is heard when the signal from the effect is plugged into the A-16R Insert Return jacks.
The audio signal will not be interrupted when a cable is patched into the Insert Send jack. You can use the Insert Send jacks as an additional pair of audio outputs as long as no cables are connected to the Return jacks.
Plugging a cable into the Return jack will interrupt the signal heard in the mix outputs (headphones and rear-panel line outputs) and will complete the signal path.
Note: The insert Send/Return loop includes the auxiliary Mix In signal in the processing path.
Aviom A-16 Personal Monitor Mixing System
32
33
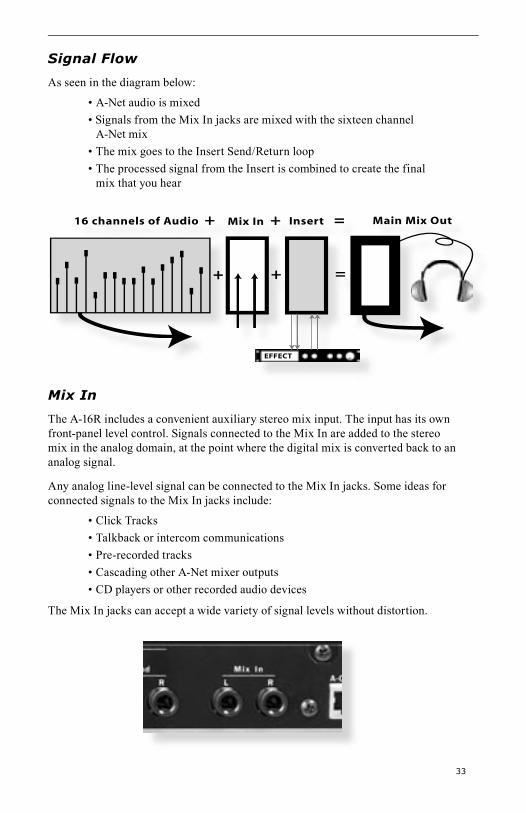
Signal Flow
As seen in the diagram below:
• A-Net audio is mixed• Signals from the Mix In jacks are mixed with the sixteen channel
A-Net mix• The mix goes to the Insert Send/Return loop• The processed signal from the Insert is combined to create the final
mix that you hear
�
�
�
�� �������� �� ����� ��� �� ������ ���� ��� ���� �
�
������
Mix In
The A-16R includes a convenient auxiliary stereo mix input. The input has its own front-panel level control. Signals connected to the Mix In are added to the stereo mix in the analog domain, at the point where the digital mix is converted back to an analog signal.
Any analog line-level signal can be connected to the Mix In jacks. Some ideas for connected signals to the Mix In jacks include:
• Click Tracks• Talkback or intercom communications• Pre-recorded tracks• Cascading other A-Net mixer outputs• CD players or other recorded audio devices
The Mix In jacks can accept a wide variety of signal levels without distortion.

Aviom A-16 Personal Monitor Mixing System
34
35
A-Control
A-Control is a special protocol developed to allow the A-16R to be controlled by a remote device. Only the optional A-16CS Control Surface should be connected to the A-Control jack.
With an A-16CS connected to the A-Control jack, the A-16R will respond to mix edits and Preset save/recall commands from as far away as 200 feet (60 meters). Note that the Local/Remote switch on the front panel of the A-16R must be in the Remote position in order for the A-16CS commands to work.
MIDI I/O
The A-16R can send its Presets to another device via system exclusive (sysex) com-mands. MIDI is used to save banks of sixteen User Presets as a single file to a remote storage device such as a computer running MIDI sequencer software. Once stored in a remote device, the User Presets can be reloaded into any A-16R that is connected via MIDI.
The MIDI Preset storage feature makes recalling setups for studios, theatres, and touring professionals fast and very easy.
There are three MIDI jacks found on the rear panel of the A-16R, labelled In, Out, and Thru.
• MIDI Out is used to send Preset data from your A-16R to another

Aviom A-16 Personal Monitor Mixing System
34
35
device capable of recording and storing the sysex data.• MIDI In is used to send recorded sysex messages from a storage
device back into the A-16R • MIDI Thru can be used to daisy-chain MIDI devices. The Thru jack
carries a copy of the data appearing at the A-16R MIDI In port.
A-Net In and Out
The A-Net connections on the rear of the A-16R connect the A-16R to your audio network. The A-Net In jack accepts signals coming from the A-16T Transmitter, another A-16R, an A-16 Personal Mixer, or from an A-16D A-Net Distributor.
The A-Net Out jack can be used to start a daisy-chain connection. By connecting a single standard Cat-5 cable from the A-Net Out jack of the A-16R to the A-Net In of another A-Net compatible device, you can expand your audio network endlessly.
The A-16CS Control Surface
OverviewThe A-16CS Control Surface is an optional accessory than can be used with the A-16R Personal Mixer. The button layout of the A-16CS is the same as found on the original Aviom Personal Mixer, the A-16.
The main differences between the A-16 Personal Mixer and the A-16CS Control Surface are on the rear panel. The A-16CS has no audio outputs. Also missing are the A-Net In and Out connections. Instead, the A-16CS rear panel contains the A-Control connection for communication with the host A-16R and a footswitch jack.
The functions of the front panel buttons and knobs are the same as on the A-16R and original A-16 Personal Mixers. For example, to recall a User Preset mix, you will still press the RECALL button, and then select one of the numbered buttons to select a saved mix.
The following descriptions detail the functions of the modes and functions of the A-16CS.
Note: Remember that the A-16R front-panel Remote/Local switch must be in the Remote position in order for button presses and knob motions on the A-16CS to be recognized by the host.

Aviom A-16 Personal Monitor Mixing System
36
37
The A-16CS Front Panel
Global Controls
The three knobs in the upper right section of the A-16CS Control Surface affect your mix volume and tone directly. The Bass, Treble, and Master volume controls are always active, regardless of the selected Preset.
Tone Controls
Use the Bass and Treble controls to change the overall balance of bass or treble frequencies in your mix. These controls affect the entire mix, not the individual Channels.
The default position for the BASS and TREBLE knobs is at 12 o’clock. To add more low frequencies to your monitor mix, turn the BASS knob to the right of the 12 o’clock position. To remove lows, turn the knob counterclockwise past the center. To change the high-frequency content, follow the same procedure; turn the TREBLE knob right to add highs, left to diminish them.
The Bass and Treble knobs on the A-16CS send control data to the host A-16R rack.
Master Volume
The overall system volume is controlled by the MASTER volume control. Turn it counterclockwise for a full off setting. As a general suggestion, start with the Master volume knob at a low setting, about 9 or 10 o’clock. Raise the volume slowly from that point to a comfortable level.
Note: Always use caution when adjusting any audio system component to avoid potential hearing damage.
Button BehaviorsThere are various combinations of lit and unlit buttons on the A-16CS Control Surface. They are the same as those found on the A-16R. Here is an overview:
• Channel buttons have two LEDs, an upper and lower. The upper but-ton is red and indicates that the Channel is selected. The lower button is yellow; it indicates that the Channel is muted. Channel buttons will

Aviom A-16 Personal Monitor Mixing System
36
37
light solid or flash.• The RECALL button has one red LED. It flashes when the RECALL but-
ton is pressed, indicating that you can now select a Preset by touching any numbered button.
• There is one LED in the GROUP button. When the GROUP button is pressed, the LED flashes. This indicates that you can now build or edit a Group.
• The RECALL and GROUP buttons will both flash when held down simultaneously. This is the Save Mode, as indicated by the connecting graphic above the two buttons on the front panel.
• When a Preset is saved, all sixteen Channel buttons will flash briefly to confirm the Preset save operation.
• The SOLO button has one LED. It will light when pressed, indicating that the selected Channel or Group is now being auditioned with all other Channels being muted.
• The MUTE button has no LED in it. Pressing the MUTE button with a Channel selected will cause the Channel’s lower (yellow) LED to light.
There is also one special button combination, the RECALL button followed by the MUTE button. When used together this combination serves a twofold function:
• If there is a sudden change in the audio volume coming through the monitor system, this button combination silences all audio channels instantly.
• When starting from scratch to create a mix, use this function to set all sixteen channels to zero volume and all pans to the center settings.
All Volumes Zero
Note: The text on the right side of the A-16CS Control Surface reads “In Recall Mode All Volumes Zero” as a reminder that this function is always available.
Making Changes to Channel SettingsA simple convention is used. To make a change to a Channel on the A-16CS Control Surface, first select a Channel by pressing a numbered button. Then the Channel is

Aviom A-16 Personal Monitor Mixing System
38
39
available for editing.
On the A-16CS Control Surface you can change
• Volume• Panning for mono channels• Spread for stereo channels• Mute status• Grouping
In addition to these changes, you can use Solo Mode to audition your edits to a Channel while all other Channels are temporarily silenced.
Volume and Pan Control
When you change the volume of a Channel on the Personal Mixer, the LEDs in the Volume section of the mixer surface will indicate the level in real time. There are twelve LEDs in the Volume indicator, each capable of displaying two levels, for a total of twenty-four visible lighted steps.
When a Channel is selected, the current volume is instantly indicated on the LEDs. When no LEDs are lit, Channel volume is at its minimum setting.
Pan and Volume Controls
To make changes to a Channel:
• Select a Channel by pressing its numbered button—the upper LED will light.
• Rotate the VOLUME knob to the right to increase the volume, to the left to lower the volume
• While the Channel is still selected, you can also change the Pan setting. Rotate the PAN knob left or right to change the position of the Channel in the stereo field.
Pan LEDs
The Pan indicator is made up of five LEDs. The center LED is green. The LEDs on either side of center are red. As you turn the PAN knob, the LEDs will light in various combinations to provide the maximum number of position indicators with the fewest number of lamps. At either end of the display only one LED will be lit to indicate that

Aviom A-16 Personal Monitor Mixing System
38 39
the Channel is panned full left or right.
When using linked channels (stereo inputs), the LEDs light in different patterns, using a pair of LEDs on either side of the display to indicate the width of the stereo field. When the stereo image has been collapsed to mono, only the center green LED will be lit. In this case the stereo input will be heard as mono.
Using Solo Mode
To listen to the Channel you’re editing without hearing the rest of the current mix, press the SOLO button. Make any necessary changes to the Channel. When finished, press the SOLO button again or select any other Channel. Both methods will automati-cally exit Solo Mode and return you to your current mix.
Note: The status of Solo Mode is not saved with a Preset.
Muting a Channel
While creating a mix, any Channel or combination of Channels can be muted. Unlike the Solo Mode, the changes you make with the MUTE button can be saved as part of a Preset.
To mute a Channel:
• Select the Channel first• Press the MUTE button• The yellow LED in the Channel button lights
To unmute a Channel:
• Select a muted Channel• Press the MUTE button• The yellow LED in the Channel button will go out
Additional Channels can be muted or unmuted by following the same procedure—first select the Channel, then press the MUTE button.
Note: Changes made from the A-16CS will be instantly reflected on the front panel of the connected A-16R Personal Mixer. Remember that the Remote/Local switch on the A-16R must be in the Remote position in order for messages from the A-16CS to be received.
Saving a Mix
When creating monitor mixes, you can save your work in a Preset remotely from the A-16CS. The Preset itself is stored in inside the A-16R, not in the A-16CS. This

Aviom A-16 Personal Monitor Mixing System
40 41
ensures that the mixes you create are always available in the device that is controlling the audio. Also, you can move the A-16CS to another A-16R for remote creation of mixes and Presets without losing any mix information in the original A-16R.
To Save a mix as a Preset:
• Create your mix by setting volume, pan, mutes, and groups as desired.• On the A-16CS hold down the RECALL and GROUP buttons simultane-
ously.• While still holding both buttons, press a numbered button.• The numbered buttons flash to indicate that the Preset is stored.
Recalling a Mix Preset
As mentioned previously, your mixes are stored as Presets inside the A-16R. You can recall a Preset remotely from the A-16CS. Or, if the A-16CS is not available, the same Presets can be recalled from the front panel of the A-16R.
To recall a Preset from the A-16CS:
• Press the RECALL button.• The Recall button will flash.• Select a numbered button (1 to 16) corresponding to the Preset mix
that you want to recall.• When the button is pressed, the mix is recalled and is now available
and can be edited if desired.
When a Preset is selected from the remote control, the same numbered LED on the front panel of the A-16R will flash briefly to indicate that the preset has been loaded.
Note: Remember that the Remote/Local button on the front panel of the A-16R must be in the REMOTE position to save or recall presets from the A-16CS.
.
The A-16CS Rear PanelOn the rear panel of the A-16CS Control Surface you will find only two jacks, one for a footswitch, the other for the A-Control input.
A-Control
Communication between the A-16CS and its host A-16R is managed by a proprietary protocol known as A-Control. This allows the remote A-16CS to send commands to the A-16R mixer from creating and editing mixes, and for storing and recalling Presets.

Aviom A-16 Personal Monitor Mixing System
40 41
All A-16R front-panel editing commands are available from the A-16CS. You cannot, however control the analog insert send and return jacks or the Mix In level from the A-16CS. These are analog controls.
A single Cat-5 cable is used to connect the A-16CS to the A-16R. Cables can be up to 200 feet in length.
Footswitch Jack
The A-16CS can use any standard dual-pedal footswitch to select Presets in the A-16R. When using a dual pedal, the right-side pedal is used to move forward through the Preset list. The left pedal is used to move backward through the Preset list from the current selection.
For example, if you have just loaded Preset 7 (by pressing the RECALL button followed by the number 7 button), pressing the right pedal once will move to Preset 8. Pressing the left pedal will move down one, returning you to Preset 7. Another press of the left pedal loads Preset 6, and so on. Changes are reflected on the A-16CS and its connected A-16R host.
As with other operations involving the A-16CS, the Remote/Local switch must be in the REMOTE position in order for the footswitch to be functional. When a preset is selected via the footswitch, the corresponding numbered button’s LED on the front panel of the A-16R will flash to indicate that the Preset has been loaded.
The Footswitch jack uses a TRS connection, designed for dual foot pedals. However, you can substitute a single footswitch (one that has only a tip-sleeve connection) if necessary. The Presets will move up only, and will wrap around from Preset 16 to Preset 1 at the end of the Preset list as described previously.
The footswitch can be either a normally open or normally closed type. The pedal is scanned by the system software to determine which type it is, and to determine what the “up” state of the switch is. The foot pedal should be connected when the system is powered up. If you change pedals while the system is in use, you may need to power cycle the unit if the type of pedal is different.
Note: When selecting Presets with a footswitch, the selections will wrap around and start over after you reach the last numbered Preset.
For example, when moving forward through the Preset list from Preset 14, after two presses of the right footswitch you will be at Preset 16. One more press of the same footswitch will select Preset 1, the first Preset in the list. Additional presses of the right footswitch continue selecting Preset 2, Preset 3, etc.

Aviom A-16 Personal Monitor Mixing System
42 43
System SetupFor those who can’t wait to try their new product (or for those who hate reading manuals) follow these quick setup instructions to get up and running in no time.
Refer to the detailed setup and usage instructions later in this document for additional information.
Start with all devices turned off. When all power and audio connections have been made, you can then power up all the components in your system.
AC Power Connection
Both component parts of your Personal Monitor Mixing System use separate external power supplies.
• Connect the power supply to the 18-24 VDC Power jack on the rear of the A-16T Transmitter unit.
• Plug the power supply into an available AC power outlet.• Connect the power supply to the A-16R Personal Mixer unit.• Plug the power supply into an available AC power outlet.
The Personal Monitor System will be in its “on” state as long as it is plugged into a working electrical outlet.
No on/off power switches are included on the A-16 System. If you would like to control the power state of your units, simply connect the power supplies to a power strip with an on/off switch. Use that as a system power switch.
System InterconnectionsA single Category 5 cable is required to connect each A-Net compatible device in your system.
Connect a Category 5 cable from the front panel A-Net jack on the A-16T Transmitter to the A-Net In jack on the first Personal Mixer.
Connect additional A-16 or A-16R Personal Mixers with a single Category 5 cable from the A-Net Out jack on the first Mixer to the A-Net In jack on the next Personal Mixer. (Repeat this process for each additional Mixer unit in your system.) As an option, you can use the A-16D A-Net Distributor for parallel connections.
Audio Connections — InputsThe Aviom A-16 Personal Monitor Mixing System is designed to work in a wide variety of audio situations. For complete setup information, refer to the detailed instructions later in this document.
For the purposes of this quick startup guide, a single audio setup example will be

Aviom A-16 Personal Monitor Mixing System
42 43
used. Since many mixing boards provide direct channel outputs, we’ll use that output for example purposes.
If you have a mixer without direct outputs, you can substitute audio coming from any available output of your mixer. That includes the main outputs, bus outputs, aux sends, or insert points.
Connect the direct outputs from your main mixing board channels to the A-16T Transmitter’s inputs. For simplicity, connect the channels in an easy to remember order. If the lead vocal is plugged into Channel 1 of your main mixing board, con-necting it to Input 1 on the A-16T makes it easy to check connections.
For illustration purposes, let’s assume that you have eight audio signals connected from your main mixing board to the A-16T, and that they are plugged into Inputs 1 through 8 on the rear panel of the A-16T.
A-16T Front Panel SettingsFor the basic setup example, set all the Input Level switches on the front panel of the A-16T to the 0dB setting. Next, check that all Link switches are in the left position (meaning that the channels are not linked). The examples will assume that you are using mono audio signals.
Audio Connections — OutputsPlug headphones or in-ear monitors into the A-16R Personal Mixer’s front panel Headphone jack. If you use powered floor monitors, spot monitors, or wireless in-ear monitors, connect the Line output jacks on the rear panel of the A-16R Personal Mixer to the inputs of your audio device.
Before powering up the system, turn the Master Volume control on the Personal Mixer to its minimum setting (full left) to ensure that unwanted high-volume audio is not accidentally sent into your monitors when the system is powered up. The Master Volume control is on the right side of the Personal Mixer, next to the Bass and Treble controls.
If you are using the A-16CS Control Surface, make sure that the A-Control cable is connected and that the Remote/Local switch on the front panel of the A-16R is in the REMOTE position.
Labeling the ChannelsThe A-16R Personal Mixer and the A-16CS Control Surface have a convenient label strip right on the front panel.
Use a china marker (sometimes called a “grease pencil”) to write the name of the instrument or audio source appearing on each Channel’s label area.
Optionally, you could also write a performer’s name on the label strip marking area to identify Channels.

Aviom A-16 Personal Monitor Mixing System
44 45
Use only non-permanent marking devices on the label surface to avoid permanently marring the surface. Do not use permanent marker to write on the label surface.
Powering UpAs when powering up any audio gear, it’s best to power up all system components in the safest possible order to minimize the risk of damage to system components and your hearing. Start by turning on devices such as mic preamps, mixers, keyboards, and effects processors. Follow this by turning on power amps, or anything that applies power to speakers, headphones, etc.
In the case of the Personal Monitor Mixing System, you should power up your main audio mixer, effects devices, and keyboards first. Follow this by powering up your A-16T A-Net Transmitter and then all connected A-16 or A-16R Personal Mixers.
Lastly, turn on any power amps, powered monitor speakers, in-ear monitors, etc. that are part of the monitor system.
Basic NavigationWhen the system is powered up, Preset 1 is automatically selected. On the Personal Mixer, one Channel is always selected for editing. You can tell that a Channel is selected because the upper LED in its button is lit.
Each of the sixteen Channel buttons have two LEDs, an upper and a lower. The red upper LED indicates that the Channel is selected; you can change its volume and pan-ning. You can also solo or mute the track using the dedicated SOLO and MUTE buttons on the Personal Mixer front panel. More on that later.
The upper LEDs will also light in combination if a track is linked or is part of one of the three available Groups. (More info on Groups appears later in this quick startup section.)
The lower yellow LED in each Channel button indicates the Channel’s mute status. A lit LED indicates that the Channel is muted. Any number of Channels can be muted.
Preparing to Make a MixSet the global tone controls—BASS and TREBLE—to about 12 o’clock. This is the default EQ setting; no boost or cut is applied to the audio mix.
Set the MASTER VOLUME knob on the Personal Mixer to a low setting, about 9 or 10 o’clock should be safe. Send audio into the system; this could be the band playing live or audio from a tape deck or other multi-track audio device. Raise the levels to a comfortable level after you have audio playing through the system.
MixingStart creating a monitor mix by selecting the first Channel you want to hear.

Aviom A-16 Personal Monitor Mixing System
44 45
Follow these steps:• Press the desired Channel button — its upper red LED will light.• Turn the VOLUME knob clockwise to raise the volume of the selected
Channel until you hear it in the monitors. You should see the volume changes you’re making reflected in the Volume LED indicators. More LEDs lit indicates higher volume.
There are twenty-four visible volume steps available in the Volume LEDs. Each LED lights at two levels—one at half brightness, the other at full brightness.
The procedure for setting the pan position for a Channel is similar. Once a Chan-nel is selected, you can turn the PAN knob left or right to move the Channel in the stereo field. Your changes will be reflected in the Pan LEDs. Changes will be heard immediately in any speakers or headphones connected to your Personal Mixer.
Note: If you have connected the output of the Personal Mixer to a mono audio system or speaker, pan position is irrelevant. Leave all Channels panned to the center.
A Channel is heard in the center of the stereo field when only the center (green) LED is lit. As you turn the PAN knob, the Pan LEDs will light in various combinations to indicate the pan position.
Continue this process of setting volume and pan until all the Channels have been added to the mix.
At this point you should have a basic mix playing in your monitors. You can continue to make changes in real time as your needs require. Remember that changes to Chan-nel volume and pan setting affect the selected Channel only. The selected Channel always has its red LED lit.
Saving Your New PresetIt’s important to remember that your mix is not saved if you should power the system down unless you store the mix as a Preset. You need to save a Preset to a memory location to be able to recall it later. The Channel buttons serve as memory location buttons when in Save mode.
To save a Preset:• Hold down the RECALL and GROUP buttons, found to the left of the
label strip on the A-16R and in the upper left side of the A-16CS. • While still holding the RECALL and GROUP buttons, press the Channel
button (1 through 16) corresponding to the memory location where you want the mix to be stored.
• Release the Channel button to store a Preset; you will see all the Channel LEDs flash in sequence as confirmation of the save
Aviom A-16 Personal Monitor Mixing System
46
operation.• Release the RECALL and GROUP buttons after selecting a location.
If you want to store the same mix to multiple memory locations, you can press memory location buttons as needed while the RECALL and GROUP buttons are being held down. A copy of the mix will be saved to each memory location.
What Gets Saved
When you save a Preset the following information is saved:• Channel volumes• Channel pan settings• The mute status of all Channels• Channel Groups (up to three) and Group volume settings• The current active Channel, linked pair, or Group
Tip: By selecting a Channel prior to saving a Preset you can always have your favorite Channel ready for real-time editing when the Preset is recalled.
Information Not Saved With a Preset
When saving a Preset the following information is not saved:• Master Volume level• Master Bass and Treble tone control settings• Auxiliary Mix In level• Remote/Local switch position on the A-16R• Setting of the rear-panel Mono/Stereo switch on the A-16R
Note also that the system does not remember if the optional A-16CS Control Surface is connected to the A-Control jack on the rear panel of the A-16R.

47
Connecting AudioThe are many ways to get audio into the A-16 Personal Monitor Mixing System for processing. Depending on your application—studio, stage, etc.—the types of signals and equipment available will vary. This section will give examples of some typical setups that you can modify to suit your individual needs.
Connections on the A-16T Rear PanelThere are two rows of TRS connectors on the rear of the A-16T Transmitter. They are marked In and Thru, but are much more flexible than the simple labels may lead you to believe.
The connections on the A-16T can accept balanced or unbalanced 1⁄4-inch cables. The system can accept a wide variety of signal levels; gain settings are changed on the front panel of the A-16T.
The audio design of the A-16T allows you to add the system at virtually any point in your existing audio system. The A-16T Transmitter can accept audio coming from:
• Mixing board direct outputs• Mixing board insert sends only• Mixing board insert send and return loops• Line output from mic preamps• Line outputs from keyboards and other music devices• CD players• Tape decks• Digital Audio Workstations (DAWs)• Effects processors• Video decks, cameras, etc.
Audio signals sent into the A-16T Transmitter can be at any level, from semi-pro-fessional and home recording gear, studio devices, and broadcast equipment.
Connecting a MixerAs mentioned above, almost any line level audio output can be used with the A-16T. Depending on the topology of your particular mixer, some or all of the following signal types could be available.
Direct Output
A direct output is typically found at the channel level. That is, each channel on the mixer has its own direct output jack. This type of output sends an exact copy of the audio signal present in each channel out of the mixer without interrupting the signal being sent to the main part of the mixer. This layout is ideal for use with the A-16.

Aviom A-16 Personal Monitor Mixing System
48 49
If your mixer has direct outputs available, then a cable from each channel that needs to be sent to the monitors is connected to the Transmitter inputs. A maxi-mum of sixteen direct outputs can be plugged into the Transmitter unit.
If you have more than sixteen direct outputs to be monitored, then some of the channels will need to be sub-mixed. This can be accomplished on most consoles by using a bus output, described below.
Bus Outputs
A bus output is typically used to route audio signals to a recording device or to control the volume of a group of channels from a single fader. Most mixers equipped with bus outputs have fewer bus outputs than channels. Four, eight, or sixteen bus outputs are common mixer configurations.
To use a bus output with the A-16T, the individual channels in your mixer need to be assigned to the desired bus output. This is usually done with a selector button located somewhere within each channel strip. Assigning a channel to a bus output does not remove the signal from the main mix. (Some mixers do allow the option, however.) Specific instructions about how to use your particular mixer in this case are beyond the scope of this document. Consult your mixer’s documentation to learn more.
With a channel assigned to a bus output, you can then control the level of the bus independent of the other levels on the mixer. In fact, if you assign multiple channels to a bus output, this acts as a sub-mixer, combining the audio from all assigned channels into one signal. The individual channel level fader is used to set the relative balance of all channels assigned to the bus.
The combined bus output is fed to an input on the A-16T Transmitter
Five mixer channels are assigned to one bus output

Aviom A-16 Personal Monitor Mixing System
48 49
Using a Bus Output
As an example, you could assign all the channels of the main mixer devoted to drums to a bus. As mentioned previously, the relative mix of all the components of the drum sound would remain the same; the levels are based on the individual channel’s level settings. By sending all the drum channels to a bus, the entire drum kit sound can be raised or lowered in volume from a single fader. (By using two bus outputs a stereo drum sub-mix with panning can be created. More on this below.)
The same theory extends to the operation of the A-16. If you send the sub-mixed drum sound in the example above from a console bus output to the A-16T Transmit-ter, then each Personal Mixer in the system has a single channel devoted to the drums. Each performer can control the amount of drums in his/her mix with a single knob. The performers cannot, however, change the relative balance of the drums that make up this mix (more snare, less cymbals, etc.). This change would need to be made at the main mixer, and would affect the balance in all connected A-16 Mixers.
Stereo Drum Mix Example
You can extend this idea further to create a stereo drum mix. This requires that the drums be assigned to two bus outputs, usually consecutive numbers such as 1 and 2, 3 and 4, etc. The pan (or left/right balance) from the drum kit is then set by using the mixer’s Pan knobs. To get the floor tom into only the right speaker, for example, its pan knob should be turned to the fully clockwise position.
The bus output idea can be combined with direct outputs as needed. This could be useful if you wanted to have individual control over the band’s instruments, but also be able to turn up or down all background vocals from four singers from a single knob.
Aux Sends (Effects Sends)
An Auxiliary Send (or Aux Send for short) is typically used on a live or recording console to send the sound from a channel into an effect device such as a reverb. Using a dedicated set of knobs found in each channel strip, each channel can have a different amount of the effect applied as needed.
An Aux Send does not have to be used exclusively with effects, though. You can think of an Aux Send as another mini mixer; it functions in a similar manner to a bus output. It is used to pass the audio signals from the console to another destination. You can use any combination of audio sources with the A-16 to create a monitor mix.
The method for using an Aux Send to create a monitor mix is similar to that de-scribed for using a bus output. Most consoles have from two to eight Aux Sends. So, the number of independent audio signals that can be sent to the A-16T Transmitter via Aux Sends will depend upon the design of the mixing console you are using.

Aviom A-16 Personal Monitor Mixing System
50 51
The output of the aux send is fed to an input on the A-16T Transmitter
Multiple mixer channels are assigned to one aux send
Insert Send/Return Points
The insert loop on an audio mixer is typically used as a means of extending the processing capabilities of the mixer on a channel-by-channel basis. An effects device such as a compressor can be added to the channel so that only that specific channel is affected.
An insert on a mixer consists of a Send and a Return. The Send is used to get the channel’s audio into the effects processor. The processed signal coming from the effects device goes back to the console via the Return path.
The physical jack layout of an effect Send/Return loop on a console varies depending on the model and manufacturer.
TRS Inserts
Some consoles use a single jack to perform both send and return functions. In this case the jack would use tip-ring-sleeve (TRS) wiring, with one of the signal wires performing the Send function, the other being used for the Return. Both Send and Return share the common ground wire. For TRS inserts, it is common to use a “Y” cable, one that has a TRS plug on one end and then a split into two mono tip-sleeve cables on the other.
Using a TRS insert, the effects device would have the Send cable plugged into its Input and the Return cable plugged into its Output. This wiring completes the loop without interrupting the audio being played though the console.

Aviom A-16 Personal Monitor Mixing System
50
51
Effect Output
Effect InputEffect Input
Effect Output
Effect InputEffect Input
Signal flows from the console into the effect device and back into the console
To use the A-16T Transmitter with this insert layout, both the In and Thru jacks on the Transmitter are used. The main console’s Insert Send should be plugged into the In jack on the Transmitter. The Thru jack on the Transmitter is used to return the signal to the console, completing the audio loop. In this case the A-16T acts like an effects device, but it has no audible effect and does not change the audio signal in any way.
A-16T Thru
A-16T In
A-16T Thru
Signal flows from the console into the A-16T and back into the console
Note: There is some variation in the send/return insert wiring on consoles. Some manufacturers use the TRS tip connection for the Send function, while others use the ring connection. Consult your console’s documentation.
Discreet Insert Send and Return Jacks
If a console uses separate jacks for Send and Return functions, the cable connections are much more obvious. The Send from the Insert point on the console is connected to the A-16T Transmitter In jack. The Thru on the A-16T is connected to the Return jack on the console to complete the loop.
A-16T Thru
A-16T In
Separate cables connect signals into the A-16T and back into the console
A-16T Thru
Insert Send
Insert Return
Console TRS Channel Insert
Console TRS Channel Insert

Aviom A-16 Personal Monitor Mixing System
52
Line Level DevicesIn addition to connecting a traditional mixing console, there are numerous other audio sources that can be used with the Personal Monitor Mixing System. There is no requirement that your audio sources be connected to a mixing console first.
Using some creative patching, you’ll find numerous uses for the Personal Monitor Mixing System. Here are a few examples:
• Connect a CD player’s stereo outputs to two inputs on the A-16T Transmitter. Singers can rehearse to a backing track while still controlling their vocal balance in the monitors
• Patch a drum machine output into the A-16T to provide a click track.• If a keyboard player has multiple keyboards being mixed by a
dedicated keyboard line mixer, that mixer’s outputs can be connected to the A-16T.
• Connect outputs from stereo guitar processors or amp simulators.• Virtual drums can be connected directly into the A-16T. Add in
outputs from keyboards and guitar amp simulators, and a band can rehearse silently without a mixer.

53
MixingThe process of creating a monitor mix using the Personal Monitor Mixing System is similar to the process used to create a front of house mix. As mentioned in the Quick System Setup tutorial section, the Personal Mixer interface makes it easy to jump right in and create your first mix within minutes of connecting the system for the first time.
Mixing involves setting pan, volume, and mute status for each Channel, and then saving this setup as a Preset so that you can recall your custom mix later.
The user interface is quite simple to understand. As with many digital mixers, the A-16 Personal Mixer has many Channels, but only one set of controls that are shared by all the Channels. A Channel is selected by pressing one of the numbered Channel buttons on the Mixer’s front surface. When a Channel is selected, the red LED in the Channel’s button will light to indicate that it has been selected and is ready to be edited.
The procedure to edit a Channel involves only two steps:• Select the Channel you want to change. • Edit the volume, panning, or mute status
That’s it. Each Channel can be edited by using the same simple steps.
The Editing InterfaceWhen you turn the VOLUME knob clockwise to raise the volume of the selected Channel, the volume is reflected in the Volume LED indicators. There are twenty-four visible volume steps available in the Volume LEDs. Each LED lights at two levels, first at half brightness, then at full brightness. More lit LEDs indicates higher volume.
The pan position for a Channel can be changed with the PAN knob. Turn it left or right to move the audio in the stereo field. Your changes will be reflected in the Pan LEDs. The Pan LEDs are used to indicate the left-center-right location of the selected Channel. The Pan LEDs have a green middle LED to indicate the center position in the stereo field with red LEDs on the sides to indicate left or right positions. Changes will be heard immediately in any speakers or headphones connected to your Personal Mixer.
Making Changes to a MixOnce you have a basic monitor mix, you may want to make changes to fine tune the settings for the individual Channels. This is as simple as selecting the Channel and then adjusting the VOLUME and PAN knobs as required.
When you select a Channel by pressing its corresponding numbered Channel button, the current settings for channel volume and panning are indicated instantly in the Volume and Pan LED readouts. When a Channel is selected, you can always make

Aviom A-16 Personal Monitor Mixing System
54 55
real-time changes to its settings.
Note: Remember to save your new mix to a memory location before turning the system off.
Linking ChannelsFor stereo input sources such as keyboards, drum machines, CD players, main mixer submixes, etc., the A-16T provides a convenient method of controlling these two-channel sources. It’s called a Link. A Link is simply two Channels working together as one to process a stereo input.
Linking two Channels is done from the front panel of the A-16T Transmitter. Each pair of inputs has a corresponding Link switch. When the switch is positioned to the left, the two Channels are independent. When the switch is moved to the right, the Channels become linked. Only adjacent Channels can be linked (Channels 1 and 2, Channels 3 and 4, etc.).
When Channels are linked, they act as one source on the A-16 Personal Mixer. When you select either of the two linked Channels on the Mixer, both LEDs will light up, indicating that they are linked. Volume changes affect both Channels simultaneously.
Channels that are linked at the A-16T Transmitter will appear linked on every Personal Mixer connected to the system. You can link or un-link Channels as needed, even while audio is running through the system. All connected Personal Mixers update immediately.
The Spread Control
When two Channels are linked, they no longer have separate pan controls. With the Channel link comes a new feature, called Spread. The Spread control varies the stereo image of the two linked Channels from full stereo to mono. This allows you to position stereo sources in your mix by controlling the width of the stereo image.
Spread changes the panning of the left and right Channels simultaneously. Instead of having two Channels panned 100% left and right, Spread allows the Channels to be panned to 60% left and right, for example.
The Effect of the Spread Control
Spread turns this:
into this, for example

Aviom A-16 Personal Monitor Mixing System
54 55
When you adjust the Pan control with a stereo-linked Channel selected, the Pan LEDs show the width of the stereo spread that is currently set. Multiple LEDs light to indicate the compression of the image from full stereo to mono.
The Mute and Solo Functions
Solo a Channel
While working with a mix, you may want to listen to a particular Channel by itself to check a part, locate or solve a problem, select a pan location, etc. To do this you can use the Solo mode. The Solo mode lets you listen to the selected Channel alone without disturbing the rest of the mix.
Solo mode works on the currently selected Channel or Group. To use Solo mode, first select the Channel you want to hear alone. Its red button LED should be lit. Now press the SOLO button, found in the pair of buttons in the upper right corner of the Personal Mixer. The Channel is now heard solo.
You can make changes to volume and panning when a Channel is in Solo mode. All changes happen immediately. Consider Solo mode as a temporary state only. You cannot save a Preset with a Channel in Solo mode.
Only one Channel, linked pair (or Group) can be in solo at a time. To exit Solo mode, simply select another Channel or press the SOLO button again to exit.
To select a different Channel for auditioning in Solo mode, remember that you must first select a Channel and then press the SOLO button to enter Solo mode.
Mute a Channel
The method used for muting Channels is similar to that used for the Solo func-tion—first select the Channel, then perform an action. There are some differences, however.
• You can mute as many Channels as necessary for your application. • Channels that are muted can be saved as part of a Preset.
To mute a Channel, first select the desired Channel on the Personal Mixer. The red Channel LED should be lit. Next, press the MUTE button to silence the Channel. The Channel’s lower (yellow) LED will light to indicate that it is muted. Select any other Channels that you want to mute and follow the same procedure to remove them from the current mix.
Unmute a Channel
Once a Channel is muted, you can follow this simple procedure to clear the mute:
• Select the muted Channel. (It should have the yellow LED in its button

Aviom A-16 Personal Monitor Mixing System
56 57
lit.)• Press the MUTE button.• The yellow LED will go out.• To clear mutes on other Channels, continue selecting Channels,
followed by pressing the MUTE button to clear the mutes.
Save the Preset with the mutes, if desired.
Note: Solo mode will temporarily override a mute. This guarantees that you will always hear the Channels you solo. When you exit Solo mode, the Channels are returned to their previous state.
Creating GroupsWhen you need control over more than just a stereo pair of Channels as described earlier using the Link function, you can use the Group function to control multiple Channels. Up to three Groups can be created per user Preset. This means that every Personal Mixer can have up to forty-eight different Groups saved by using all sixteen user Presets.
A Group can consist of any number of Channels, but Groups cannot overlap. That is, one Group cannot contain Channels that are part of another Group. Mono or linked stereo Channels can be part of a Group.
As you create a Group, the Channel volume and pan settings of each Channel added to a Group are retained. This helps to keep the overall blend of Channels that are part of a Group even while you adjust the Group’s overall volume. The VOLUME control changes the overall level of the Group.
Some examples of Groups in use: • A Group allows background vocal parts from six singers to be
adjusted together.• All the drums in a live drum kit can be combined to a single stereo
mix for easy adjustment for the guitar player, while the drummer retains individual control over each drum in his mix.
• Horns and woodwinds can be controlled together.• Multiple stereo keyboards can be combined into one source.
Creating and editing Groups is done in the Group Mode. To create your first Group: • Start by selecting a Channel that you want to be included in the
Group. • Press the dedicated GROUP button on the left side of the Personal
Mixer.• Its red Group LED will begin to flash indicating that you can now edit

Aviom A-16 Personal Monitor Mixing System
56 57
the Group. • Double-click the Channel buttons to include a Channel in the Group. • Channels that are added to the Group will flash their upper red LED
to indicate that they are now part of the Group.
To Save your Group, simply press the GROUP button again. The Group LED goes out and you are returned to your current Preset and live mix.
In the current Preset, you will now see all Channel LEDs associated with a Group light whenever you press a Channel button that is included in your saved Group. The Channels now behave as one.
Note: Remember to save the Preset if you want to be able to recall the Preset with the new Group settings later.
Creating Additional GroupsThree Groups can be created and saved in each Preset in a Personal Mixer. Each Group can be created and/or edited as needed while live audio is playing through the system.
The instructions in the previous section describe how to create and save the first Group in a mix. Creating additional Groups follows the same procedure.
Use these steps to create a second and/or third Group.• Select a Channel that is not currently part of an existing Group.• Press the GROUP button to enter Group Mode. The Group LED will
flash.• Double-click any Channels that you want to add to the Group.• To save the Group, press the GROUP button again. The flashing LED
will go out.
Shortcut: While in the Group edit mode, you can start the process of creating a new Group while editing an existing Group. To do this,
• Press a Channel button that is not already part of the current Group being edited. Its red LED will light solid.
• Double-click Channels to add them to a new Group.• Create a third Group by following the same procedure.• Exit the Group edit mode to save the Groups.• Save the Preset.
If you try to create more than three Groups, the interface will automatically select one of the existing Groups when you enter Group edit mode. You have the option at this point to edit an existing Group or clear Channels that are part of one of the other existing Groups.

Aviom A-16 Personal Monitor Mixing System
58 59
Note: A Channel that is already part of one Group cannot be part of any other Group.
Making Changes to a GroupOnce you have created a Group, you can edit it in a number of ways. You can add or delete Channels from the Group, and change individual Channel volume and pan settings.
To change a Group, start by selecting a Channel that is already part of a Group. All Channel LEDs that are part of the Group will light. Press the GROUP button to enter the editing mode. The Group LED flashes.
Changing Channel Settings Within a Group
While editing a Group, you’ll notice that one LED in each Group is lit solid while the other LEDs are flashing. This solid LED indicates the Channel currently selected for editing. You can change its volume and panning without affecting other components of the Group. The changes you make to volume and pan affect only the selected Channel, allowing you to change the relative balance of the individual components of your Group. Changes can be made in real time.
To select a different Channel in a Group for editing, press one of the flashing LEDs (don’t double-click it). The new selection will light its LED solid, while the previ-ously selected Channel will start to flash. Continue making changes as needed. Remember, volume and pan changes only affect the Channel whose LED is lit solid.
Removing Channels From a Group
To remove a Channel from a Group, simply double-click the Channel that you want to remove. The flashing LED will go out. To add other Channels to a Group, double-click them. When you have double-clicked to remove all Channels that were previously part of the Group you’re editing, the Group will no longer exist. You need at least two Channels to have a valid group.
Exit the Group edit mode by pressing the GROUP button again. The LED in the Group button will go out. This saves your changes to the Group.
Some points to note about Groups:• Up to three Groups can be created per Preset. • Groups are relative only to the Personal Mixer that they are created
on. • Groups you create on your Personal Mixer do not affect other Personal
Mixers being used in your system.
Remember that although you have edited and saved changes to your Group, you must

Aviom A-16 Personal Monitor Mixing System
58 59
still save the Preset if you want to recall the Preset with the new Group configuration intact.
Muting GroupsGroups can be muted if necessary while creating a mix or editing. The procedure is the same as for muting a single Channel.
To mute a Group: • First select one of the Channels that is part of the Group.• The upper (red) LED in each Channel button that is part of a Group
will be lit solid. • To mute the Group, simply press the MUTE button. • The lower (yellow) LEDs in all Channel buttons contained in the
Group will light, indicating that the Channels are now muted. • Unmute the Group by pressing the MUTE button again while the Group
is still selected.
Note: The mute status of your Group is saved as part of a Preset.

Aviom A-16 Personal Monitor Mixing System
60
61
MIDIThe A-16R supports MIDI communication via system exclusive (SysEx) messages. System Exclusive messages (sometimes referred to as data dumps) are designed to allow compatible devices to send and receive data, providing such functions as preset storage and/or parameter editing. System exclusive messages contain device-specifi c information that allow connected MIDI devices to identify compatible data and ignore data destined for other devices connected in a MIDI network.
MIDI Jacks
The A-16R has MIDI In, Out, and Thru jacks on the rear panel to enable the A-16R to be connected to a computer, MIDI interface, keyboard workstation, or other compatible MIDI device.
MIDI In
Connect the A-16R MIDI In jack to the MIDI output of a device in your MIDI sys-tem. The MIDI In jack is used to receive data from an external device. Data received at the MIDI In jack will be echoed to the MIDI Thru jack automatically.
MIDI Out
The MIDI Out jack carries MIDI information and commands generated by the A-16R. Connect the A-16R MIDI Out jack to the MIDI In jack on a compatible MIDI recording or storage device.
MIDI Thru
The Thru jack is used when daisy-chaining MIDI devices. Any MIDI information received at the MIDI In jack is passed on to the MIDI Thru jack without alteration. An unlimited number of devices can be connected in this manner without the need for a MIDI Interface or computer.
Note: Check that the MIDI cables between your A-16R and MIDI recording devices are properly configured before attempting data transfers.

Aviom A-16 Personal Monitor Mixing System
60
61
Data Storage
Two types of MIDI SysEx data can be generated by the A-16R, single preset fi les and fi les that contain all sixteen user Presets.
The A-16R can send the following data types from the MIDI Out jack:• Single Preset files - the current system settings including volume, pan,
mute, and group information are transmitted.• All Preset files - the sixteen saved user Presets are transmitted as a
single data dump.
The A-16R can receive the following data types:• Single Preset files - saved mix information is loaded into the current
mix state.• All Preset files - the A-16R’s current sixteen mix Presets are replaced
with the data from a set of sixteen saved Presets.
The A-16R is capable of saving and restoring Presets via MIDI only when the front panel Remote/Local switch is in the LOCAL position. In the REMOTE position, MIDI communication is disabled.
Note: The MIDI Thru jack will always echo data appearing at the MIDI In jack regardless of the position of the Remote/Local switch.
Saving PresetsThe A-16R can save Preset information to the internal memory or via MIDI SysEx any time it is in Save Mode. The A-16R Save Mode is entered by holding down the RECALL and GROUP buttons simultaneously. Holding the RECALL and GROUP button combination flashes the Recall and Group LEDs to indicate that you can save Presets.
To save a Preset to internal memory, you press a numbered Channel button to store the current mix at the selected location.
To save a Preset or group of presets via MIDI, the SOLO and MUTE buttons are used in combination with the RECALL and GROUP buttons.

Aviom A-16 Personal Monitor Mixing System
62 63
Save One Mix Preset via MIDI
To save the current mix as a Preset via MIDI SysEx:
1. Recall a Preset (or edit a Preset to create a new mix) including volume, pan, mutes and groups for up to sixteen channels of audio as required. Editing can be done from the front panel of the A-16R or from the optional A-16CS.
2. Set the A-16R front panel Remote/Local switch to the LOCAL (MIDI On) position.
3. Set up your MIDI recording device so that it is ready to receive MIDI SysEx data.
4. Hold the RECALL and GROUP buttons down to enter Save Mode.5. While still holding the RECALL and GROUP buttons, press the SOLO
button. (After pressing the SOLO button, you can release the RECALL and GROUP buttons.)
6. The current mix is sent out from the A-16R to the MIDI recording device as a data dump.
7. Save your MIDI SysEx data to disk or other storage media used by your MIDI recording device or software application.
When transmitting a single Preset, the sixteen yellow Mute LEDs will light solid for the duration of the transmission to verify the send operation. For single preset file dumps this will be relatively brief. (Note that there is no way that the A-16R can know that the MIDI Preset data file was received properly by the device that the transmission was intended for.)
Saving All Mix Presets via MIDI
To save the currently saved set of sixteen mix Presets as a single MIDI SysEx data file:
1. Make sure that the A-16R front panel Remote/Local switch is set to the LOCAL (MIDI On) position.
2. Set up your MIDI recording device so that it is ready to receive MIDI SysEx data.
3. Hold the A-16R front panel RECALL and GROUP buttons down to enter Save Mode.
4. While still holding the RECALL and GROUP buttons, press the MUTE button. (You can then release the RECALL and GROUP buttons.)
5. The contents of the internal memory of the A-16R is sent to the MIDI recording device as a single data dump.
6. Save your MIDI SysEx data to disk or other storage media as used by your MIDI recording device.
During the transmission of the Preset memory, the sixteen yellow Mute LEDs in the Channel buttons will light solid for the duration of the SysEx transmission.
Note that only the sixteen saved Presets are transmitted as MIDI data. If you have

Aviom A-16 Personal Monitor Mixing System
62 63
edited a mix and have not stored it to a memory location, this mix will not be recalled when the SysEx data is loaded into the A-16R later.
Loading Presets via MIDIThe A-16R can load Presets saved as either single Preset files or as All Preset files that include the complete set of sixteen memory locations. As when recalling a Preset from the internal memory, you must first enter Recall Mode to load a Preset. (Recall Mode on the A-16R is entered by pressing the RECALL button.)
Remember that you need to have MIDI cables properly connected between the A-16R and your MIDI recording devices to load presets. Connect MIDI Out from your storage device to MIDI In on the A-16R.
Loading One Preset via MIDI
To load a single Preset that was saved to a MIDI recording device, the A-16R must first be placed into Recall Mode. Remember that MIDI reception is activated only when the front panel Remote/Local switch is in the LOCAL position.
While waiting for valid MIDI SysEx information, the A-16R will remain in MIDI Recall until a valid A-16R MIDI message is received, or until you press another front panel button to exit MIDI mode. SysEx information for other manufacturer’s devices will pass through the A-16R and be ignored.
To load one Preset:
1. Set the A-16R Remote/Local switch to the LOCAL position.2. Press the RECALL button. The Recall button LED flashes.3. Press the SOLO button to arm the A-16R for MIDI reception. The LED
in the Solo button will blink.4. Send the single Preset SysEx data from your MIDI storage device.5. The Preset is loaded into internal memory and is ready to be used as is
and/or edited.6. Save your Preset to an internal memory location.
When a SysEx transfer is complete, the system will display a status message to confirm that the data was received properly. Two messages are possible:
• Valid Data Received - all yellow Mute LEDs will flash• Invalid Data or MIDI Error - all red Channel LEDs will flash
Press any A-16R button to acknowledge the transfer status message and return the A-16R to normal operation.
Loading an All Preset File via MIDI
As when loading a single Preset via SysEx, to load an All Preset data file the A-16R must first be placed into MIDI Recall Mode.
The A-16R will remain in MIDI Recall until a valid A-16R MIDI message is received,

Aviom A-16 Personal Monitor Mixing System
64
or until another front panel button is pressed to exit MIDI mode. MIDI SysEx infor-mation for other manufacturer’s devices will pass through the A-16R and be ignored.
To load an All Preset data file via SysEx:
1. Set the A-16R front panel Remote/Local switch to the LOCAL position.2. Press the RECALL button. The Recall button LED flashes.3. Press the SOLO button to arm the A-16R for MIDI reception. The LED
in the Solo button will blink.4. Send the All Preset SysEx data file from your MIDI storage device.5. The sixteen Presets are loaded into the A-16R internal memory
sequentially.6. The Mute LEDs will serve as a progress bar. The LEDs will light in
order from 1 to 16 as each Preset is received successfully.
When the All Preset SysEx file transfer is complete, the system will display a status message to confirm that the data was received properly. Two messages are possible:
• Valid Data Received - all yellow Mute LEDs will flash• Invalid Data or MIDI Error - all red Channel LEDs will flash
Press any A-16R button to acknowledge the transfer status message and return the A-16R to normal operation.
Exit MIDI Mode
You can exit an All Preset SysEx load operation by pressing any A-16R front panel button, or by changing the position of the Remote/Local switch. Presets that have been successfully received prior to exiting the SysEx recall mode will be preserved in the internal memory of the A-16R. The remaining internal Preset memory of the A-16R will remain unaltered.

65
ApplicationsThis section describes how to set up and use the A-16 Personal Monitor Mixing System in a variety of contexts.
Create a Mix With Console Direct OutputsThe direct output of a live or recording console allows you to take an exact copy of an input channel’s audio and patch it into the A-16T for processing. A typical console’s direct output point is right after the input, meaning that changes made on the console as far as effects, EQ, etc., do not affect the sound of the direct output.
The A-16T can accept up to sixteen direct outputs. You can use balanced or unbal-anced cables to connect audio, depending on the configuration of your mixer.
The most likely scenario involves using a multi-cable snake to connect the main mixing board’s direct outs to the A-16T. It’s not a requirement, but rather a convenient method of keeping cable mess to a minimum.
Follow these steps to create a monitor mix with direct outputs:• Connect a balanced or unbalanced cable from the direct output jack
on the main mixer to the first input on the A-16T Transmitter rear panel.
• Repeat this procedure for the other console channels you want to add to the monitor mix.
• Select an appropriate Input Level setting on the A-16T front panel.• Label the Personal Mixer with Channel names.• Begin playing audio into the Personal Monitor Mixing System.
Select a Channel and set the volume and panning for each.• Save the mix as a Preset.
At this point you can use the mix as is, or fine tune it by adding Groups, linking Channels, etc.
Using Aux Sends to Create a Monitor MixAn Aux Send (sometimes referred to as an Effects Send) can be used alone or in combination with other audio sources to create a monitor mix.
Using a fairly typical layout of a console with four Aux Sends, here is what you could do to send audio to the A-16T Transmitter to create a monitor mix. Again, remember that you can use any of the different types of audio signals available on your particular audio mixer to create a monitor mix (direct outputs, bus outputs, etc.).
The example will use a band with a rhythm section (keyboards, bass, drums, and guitar) and a lead singer. Assume that all of the instrumentalists sing background vocals. The example assumes that you do not want to use any other type of output from the mixer. With four Aux Sends available on the mixing board, four indepen-

Aviom A-16 Personal Monitor Mixing System
66 67
dent sub-mixes can be sent to the A-16 Transmitter and then on to the A-16 Mixer units.
The first task is to separate the instrumental and vocal parts into four sub-mixes. Imagine that we want a separate controllable level for the lead singer, background singers, drums, and the rest of the instruments. So, Aux Send 1 is assigned to Lead Vocals, Aux Send 2 is assigned to Background Vocals, Aux Send 3 is assigned to the drums, Aux Send 4 is assigned to the instruments. All that’s left to do is connect four cables from the mixing board’s Aux Sends to the A-16 Transmitter.
Turning up the Aux Send 1 level on the mixing console sends the lead vocal to the A-16 Transmitter. Since there is only one singer, there’s no sub-mixing or balance setting required.
The four musicians who sing background vocals will need to be blended at the main mixer. This will be done by sending audio from each of their microphones into Aux Send 2. By changing the aux send level, you control the blend of the four singers, without affecting the mix created by the faders on the main mixer.
The same concept used to create a mix of all the background singer’s microphones is used for the drum kit and the instruments. The drums are sent to Aux Send 3, while the instruments are sent to Aux Send 4. At each musician’s A-16 Mixer, a custom mix can now be created. The singer can have more instruments, the drum-mer can have less background vocals and no drums in the mix, the instrumentalists can have their own background vocal level, etc.
Studio Cue SystemIn the studio, the flexibility of the Personal Monitor Mixing System will give performers more control of their headphone cue mix. At the same time it allows the engineer to spend less time fussing with the cue mix and more time making the tracks sound great.
Making a cue mix from a recording console is essentially the same as when using a live mixing board. If your board has direct outputs or unused auxiliary sends, you can use the same techniques as described for live audio monitor mixes.
Playback Monitoring
In the studio, performers also need to listen to tracks they have just recorded. If each performer is using a different mix while recording, playback of the track will be different in each set of headphones.
If you can dedicate two inputs on the A-16T Transmitter for playback, you can easily provide the performers with a high-quality playback of the track they have just recorded.
Aviom A-16 Personal Monitor Mixing System
66 67
Here’s how to set it up:• Set aside the first fourteen Channels of the A-16T for audio tracks to
be sent to the performers as a cue mix.• The remaining two Channels are reserved for the stereo mix that the
engineer creates in the studio.• Connect cables from the console for monitoring the fourteen per-
former Channels as described previously. Use direct outputs, aux sends, etc.
• Patch the stereo mix output that you want the performers to hear into the remaining two A-16T inputs.
The idea is that you will create two Presets on the Personal Mixers for the perform-ers. The first is their standard cue mix. It uses fourteen channels; the last two are muted. They can change it as needed while they work. The other Preset is the exact opposite. The performer’s fourteen cue channels are muted and the two channels containing the engineer’s playback mix are on.
For the example, let’s assume that Channels 1 through 14 are used for performer cue playback. Channels 15 and 16 will be used to play back the recorded track.
To complete the setup:• On the A-16T front panel, set the Link switch on Channels 15 and 16
to the right, linked, position.• On each Personal Mixer create a basic mix of the fourteen channels of
audio.• Mute Channels 15 and 16.• Save the Preset (to location #1, for example).• Create another Preset that has the first fourteen channels muted.
(Shortcut: Start by recalling the All Channels Zero Preset by holding RECALL and then pressing MUTE.)
• Set a volume for the playback on Channels 15 and 16.• Save the Preset (to location #16, for example).
When the musicians are cutting tracks, have them select Preset #1. Record tracks as usual, with each musician listening to their personal customized cue mix. When you want to listen back to a recorded take, have the performers switch to Preset #16. They now hear the engineer’s mix. All players hear the same mix that the engineer can control as needed.
Of course, the players can create additional cue mixes and save them to the remaining empty Preset locations as needed.
Using Console InsertsWhen you use your console’s insert points to send audio signals to the A-16T Transmitter for processing, you have some options. The patching on the rear panel of the A-16T is designed so that you can still use the insert point on your console for its traditional use—adding an effect to a channel.

Aviom A-16 Personal Monitor Mixing System
68 69
There are some special ways that the A-16T can be used to allow this flexible processing. The exact layout of your existing main mixer will influence how many of these techniques you can use.
Y Cable Insert
The A-16T can be used with a console’s insert send/return loop just as if it were an ef-fects processor. If you have a console with a single TRS jack used for send and return of the effects loop, a “Y” cable is used to split the signal into two components. One is the Send, the other is the Return.
To use this type of insert with the A-16T, patch the Send cable into the In jack on the A-16T. Then use the Return cable plugged into the A-16T Thru jack to complete the loop back to the main mixer. The A-16T is now patched into the channel with no change to the audio signal. The console sees the A-16T as just another effects device.
Adding Effects
But what if you need to add an effect such as a compressor to the same channel? There are a couple of options. For both examples, start with the cables set up as just described for the simple insert example. You’ll need one more cable.
Monitor without the effect:
• Remove the cable from the Thru jack of the A-16T. • Plug it into the output of the effect. • Connect a cable from the A-16T Thru jack to the input of the effect.
The send/return loop is complete and now includes the effect. You do not hear the effect in the monitors.
Monitor with the effect:
• Remove the cable from the In jack of the A-16T.• Plug it into the input of the effect. • Connect a cable from the output of the effect to the A-16T In jack.• Leave the cable already connected to the A-16T Thru jack as it is. It
completes the loop.
Using a Balanced TRS Cable
A single balanced cable can be used to complete an insert send/return loop when used with the A-16T Transmitter. In this case, the send and return loop will be completed when you patch a TRS cable into the A-16T Thru jack. This is an important point to remember, and is not a typo. The upper jack on the A-16T will complete the loop when used this way.
If the same cable were to be plugged into the bottom In jack, only the Send portion of the loop would be connected. Although not an undesirable audio connection, this would not complete the signal loop.

Aviom A-16 Personal Monitor Mixing System
68 69
Adding Effects When Using a Single Balanced Cable
The setup described above completes an effect send/return loop with a single cable. To add an insert effect processor using this setup, the In jack on the A-16T Transmit-ter can be used. All that is needed is a standard insert-style Y cable (TRS on one end, with a split to two mono cables on the other). The effect Send must be on the tip of the cable for this to work. If your mixing board uses the ring for the Send, you can wire a special cable to be used for this purpose.
To add an effect, follow these steps:• Connect the balanced TRS cable from the main mixer’s insert point to
the Thru jack on the A-16T. This inserts the A-16T into the signal path and completes the loop.
• To add the effect (such as a compressor) connect an insert Y cable’s TRS plug to the A-16T In jack
• Plug the Send cable on the other end of the Y cable to the input of the effect processor.
• Plug the Return cable on the Y cable into the effect’s output. This completes the loop.
You can wire much of the same functionality described above into a patch bay for more permanent installations. Remember to use the same type of cables and patch bays.
Using a Patch BayThe A-16T Transmitter’s input and through connections can be wired into a patch bay for flexible and repeatable connections day after day. This concept can work for both studio applications and live performance.
You can use either balanced patch bays or unbalanced. One point worth mention-ing— use matched systems. That is, if you have a balanced patch bay, use balanced audio cables for interconnections. If your patch bay is unbalanced, use unbalanced cables.
A-16T In and Thru Patching
Not to be confused with patching the A-16T into a mixer’s insert send/return loop, this is a simple wiring idea for having access to the A-16T rear-panel In and Thru connections. It allows permanent installations to have access to the flexible patching options of the A-16T as needed.
In the studio this allows you to patch direct outputs to the A-16T one day, and then use a combination of aux sends, direct outputs and console bus outputs another day without reaching behind an equipment rack.
This setup is designed for a patch bay that is not normalled. A normalled patch bay is one that automatically sends the signal from one jack of the patch bay (typically the top row) to another jack (typically the lower jack).

Aviom A-16 Personal Monitor Mixing System
70 71
To connect a patch bay using this configuration:• Use balanced or unbalanced cables (depending on your patch bay) to
connect the A-16T row of Input jacks to one row of the patch bay. • Patch another set of cables from the A-16T Thru jacks to another row
of the patch bay. • Patch an audio signal into the Input row of the patch bay. • The signal is processed by the Transmitter. It will appear in the
Personal Mixers.• To send the signal elsewhere in the studio, patch a cable into the Thru
row on the patch bay.• Repeat these steps to add additional audio signals to the mix.
Adding Effects to a Monitor MixSometimes you may want to have reverb, delays, etc. sent into the monitor system. This works for studio cue systems as well as for live applications. There are two ways of accomplishing this:
• Patch the effects returns from the mixer into the A-16T via insert points if available.
• Connect the effects device outputs to the A-16T first and then use the Thru jack on the A-16T to complete the signal chain.
In either case the performers can now decide how much reverb is required in their personal mix. And, they can save up to sixteen mixes with various amounts of effects in each.
Adding Live Ambience to a Monitor MixFor performers using in-ear monitors in a live-performance situation, it may be desirable to add some room tone into the monitor system to help add a sense of space. This technique can be used with most live consoles. All you need is a way to send the signal from a pair of stage or room mics into the A-16T Transmitter.
If you are using direct outputs from channels to send instrument and mic signals into the A-16T, you need to dedicate two channels to the mics that are picking up the ambient sound. It is not necessary that the live mics be sent into the front of house mix.
Silent Jam SessionThere is no requirement that a mixer be used with the Personal Monitor Mixing System. In fact it makes a great late-night jam session environment for keyboard players, guitarists, and electronic drummers, etc.
To set up a silent headphone system for jamming:• Connect the outputs from stereo keyboards to inputs on the A-16T.• If the keyboard player uses a sub-mixer, you can optionally connect
the stereo output of the keyboard mixer to two inputs on the Transmit-

Aviom A-16 Personal Monitor Mixing System
70 71
ter.• Patch the output of a guitar amp simulator into a pair of inputs.• Connect an electronic drum kit’s outputs into the A-16T.• Set the Link switches on the A-16T for any stereo Channel pairs.
Other Uses for the Personal Mixer OutputsThe stereo audio outputs on the A-16 Personal Mixer can be used with stereo headphones, in-ear monitors, or powered speakers. But, since the outputs are at line level, they are capable of sending the current monitor mix to any audio device capable of using a line level audio signal.
Record a Mix
The output of your Personal Mixer can be used for recording. To connect the stereo TRS line output to some devices you may need to use an adapter to split the signal into two separate mono outputs—one for the left side, the other for the right.
To record the output of a Personal Mixer:• Create a mix. Use panning, mutes, Groups etc. as required.• Save the Preset to a memory location.• Connect the line outputs of the Personal Mixer to the inputs of the
recorder. (You may need a special cable to split the stereo signal into dual mono signals.)
• Play back the mix you created.• Set an appropriate audio level for recording on the device. Use the
Master volume control to set a level that does not distort the inputs of the recorder.
Using this technique you can quickly create a variety of recorded tracks for rehears-als, etc. by recording the different Preset mixes saved on your Personal Mixer.

Aviom A-16 Personal Monitor Mixing System
72 73
TroubleshootingBefore contacting Customer Service, check the following list of common problems and solutions for help.
Problem: No audio from the Personal Mixer outputs
Possible Solutions:
• No input audio from the main mixing console. Check the levels of the main mixing board that the system is connected to.
• Check the cables and connections between the main mixer and the A-16 system. The Signal LEDs on the front of the A-16T can be used to confirm that audio is being received.
• Bad cables; try a replacement.• All Channels on the Personal Mixer are at zero.• Master volume level on the Personal Mixer is at zero.• A-Net cables are not connected properly.
Problem: Can’t change Presets
Possible Solutions:
• Make sure that the RECALL button has been pressed. Its LED will flash, indicating that you should press a numbered button to recall a Preset.
Problem: Can’t hear a Channel that is part of a Group
Possible Solutions:
• The Group might be muted. Check the lower (yellow) LED in the Channel buttons. A lit yellow LED indicates the Channel is muted. To unmute it, press the MUTE button while the Group is selected. The yellow LED must be unlit in order to hear the audio on that channel.
• The Channel volume is all the way down. In Group edit mode, select the Channel and check the level for that Channel by looking at the LEDs in the Volume indicator. If no LEDs are lit, then the Channel is turned all the way down. Raise the volume by turning the Channel VOLUME knob; re-save the Group and Preset if necessary.
Problem: The A-Net LED is on, but there is no sound
Possible Solutions:
• The A-Net Active LED indicates that the input to the receiving device is properly connected to another A-Net device. It does not indicate that all devices in a system are properly connected, however. If you have

Aviom A-16 Personal Monitor Mixing System
72 73
two Personal Mixers connected together, the second Personal Mixer’s A-Net LED will light because the first Personal Mixer is correctly connected to it. Check that each device in the chain has a Category 5 cable plugged into it.
• Check that the A-Net cables are connected in the correct order. The Cat 5 cable connected to the first Personal Mixer should be connected to the A-Net In jack. The next device is connected from the Out on the first device to the In on the next.
Problem: A Preset was saved with a stereo link active but when the Preset is recalled the channels are mono. (Or, a Preset was saved with mono channels, but on recall the Channels are linked.)
Possible Solutions:
• The status of the stereo link is set by the front panel Link switches on the A-16T Transmitter. If a Preset is recalled and the position of the Link switch is different from when the Preset was saved, the Preset will be adjusted to agree with the current hardware settings on the A-16T Transmitter front panel. If this happens, simply change the position of the Link switch on the A-16T. Your current mix will be updated immediately.
Problem: A Channel was assigned to one Group and now it is suddenly part of a different Group.
Possible Solutions:
• When you link a stereo Channel pair with the Link switch on the A-16T after a Group has been created, it is possible that channel characteristics could change. This includes the volume, pan, mute status, and Group assignment. The rule to remember is that the even-numbered channel (the right side of the pair) will inherit the characteristics of the odd-numbered channel (left side of the pair).
Problem: When editing a Group that contains a large number of Channels, it seems like all of the LEDs are pulsing.
Possible Solutions
• This is a normal effect of the current-limiting circuit and is not an indication of a problem.
Problem: I don’t think my Preset was saved.
Possible Solutions:
• When saving a Preset, make sure that the RECALL and GROUP buttons are both held down before pressing a memory location button. The Preset is saved when you release your finger from the memory

Aviom A-16 Personal Monitor Mixing System
74
location button. When a Preset has been saved correctly, you will see all sixteen Channel LEDs flash momentarily to confirm the save operation.
Problem: In Group mode, I can’t select a new Channel.
Possible Solutions:
• If you already have three Groups defined and attempt to select a new Channel that is not part of an existing Group, the button press is ignored. This happens when you are trying to create a new Group which would exceed the limit of three Groups per Preset. Edit or delete an existing Group to continue.
Problem: Nothing happens when I edit from the front panel of the A-16R. Or, nothing happens when I try to edit my A-16R remotely using an A-16CS Control Surface.
Possible Solutions:
• The switch on the right side of the rack mounted A-16R labelled Remote/Local determines which device is active for editing.
• When using an A-16CS, make sure that the A-Control cable is con-nected to the A-Control jack found on the rear panel of the A-16R.
Note that only one device can edit an A-16R at a time.

75
Specifications
A-16T Transmitter Specifications
Analog to Digital Conversion:
Sampling Rate 48 kHzBit depth 24 bitsSignal to Noise Ratio (Referenced to 0dB) -93dBFrequency Response 4Hz-22kHz +0.2dB/ -3dBCrosstalk -90dBMaximum Levels - Line Inputs +22dBuImpedance - Transmitter Line Inputs 48k ohmsDimensions 1U high by 6” deepWeight 6.8 lbs.
A-16R Personal Mixer Specifications
Digital to Analog Conversion:
Bit Depth 24 bitSignal to Noise Ratio (Referenced to 0dB) -103dBTreble (shelving) +/- 12dB at 9kHzBass (shelving) +/- 12dB at 160HzHeadphone Impedance Range 30 - 600 ohm Balanced line output impedance 430 ohmsMaximum Levels Line/Headphone outputs +20dBuImpedance Headphone outputs 140 ohmsMax Level (RMS) 110 mW into 60 ohmsMax Level (RMS) 182 mW into 140 ohmsMix In Pre-EQMix In Input Impedance 55k ohmsMix In maximum input level +20 dBuInsert Send Impedance 430 ohmsInsert Return Impedance 57.4k ohmsInsert Send/Return Post-EQ, pre-master volumeMaximum Send output level +20 dBuDimensions 1U high by 7.5” deepWeight 6.5 lbs.

Aviom A-16 Personal Monitor Mixing System
76
MIDI Implementation ChartProduct: Aviom A-16R Personal Mixer
Function... Transmitted Recognized RemarksBasic Channel
DefaultChanged
n/a n/a sysex data is channel independent
Mode DefaultMessagesAltered ************
NoteNumber True Voice ************Velocity Note On
Note Offxx
xx
After-touch
Key’sChannel
xx
xx
Pitch Bend
x x
Control ChangeProgramChange
True Number x x
SystemExclusive
o o Preset DataDumps
SystemCommon
Song PositionSong SelectTune Request
xxx
xxx
SystemReal Time
ClockCommands
xx
xx
AuxMessages
Local On/OffAll Notes OffActive SensingSystem Reset
xxxx
xxxx
Notes
Mode 1: Omni On, Poly Mode 2: Omni On, Mono o: YesMode 3: Omni Off, Poly Mode 4: Omni Off, Mono x: No

IndexAA-16CS 25, 28, 34, 35, 36, 40
Control Surface 7, 10, 11A-16CS Control Surface 21, 43, 46A-16D A-Net Distributor 30A-16R
Front Panel 4Rear Panel 6
A-16R Personal Mixer 24A-16T
Front Panel 8A-16T Front Panel Settings 43A-16T Rear Panel 23, 47A-Control 7, 40, 46A-Net 16, 21A-Net Active LED 5, 10, 21A-Net Connectors 30A-Net I/O 7A-Net In jack 30A-Net Out jack 21, 30, 35AC Line Conditioning 12AC Power Connection 42Adding Effects 68, 69, 70Adding Live Ambience 70All Preset files
MIDI SysEx 61All Volumes Zero 27, 37Audio Connections 6Audio Connections — Inputs 42Audio Connections — Outputs 43audio inputs 9Audio Outputs 31Aux Send 65Aux Sends 49
BBalanced Inserts 32balanced outputs 6Balanced signals 23Balanced TRS Cable 68Basic Navigation 44Bass and Treble knobs 25, 26, 36
Index Index
Bass tone control 5, 11Bus Outputs 48Button Behaviors 26, 36
CCable Lengths 15Cat-5 14, 15Cat-5e 14Category 5 14Category 5e
Cat-5e 14Channel 10Channel buttons 26, 27Channel Input Jacks 23Channel Labels 13Channel LEDs 19, 45Channel Mute LED 4Channel select button 4, 10Channel Select LED 4Channel Settings 27, 37Channel Thru Jacks 23Cleaning and Maintenance 18clean the label writing area 13Clip LED 8, 19computer network 16Connecting Audio 47Connecting a Mixer 47Console Inserts 67Create a Mix 65creating a monitor mix 44Creating Groups 56crossover cables 14
Ddaisy-chain 21daisy-chaining MIDI 60DC Power Input 7, 9, 30DC power supply 17default EQ setting 44Direct Output 47, 65
EEditing Interface 53effects device outputs 20Effects Send 49, 65

Index Index
effect insert 24EQ 26Ethernet 16
FFootswitch 11, 41Front Panel, A-16R 24Front Panel, A-16T 19Front Panel buttons and LEDs
A-16R 4, 5A-16T 9
Ggain structure 31Global Controls 25, 36Group 56, 57, 58Group - Making Changes 58Group button 4, 10, 26, 37Group Mode 25
HHeadphone 5
Iin-ear monitors 43inline coupler 15Inputs 42Input jacks 23Input Levels 19, 20Input Level switches 8Inserts 32insert point 24
return 32send and receive 24
insert Return 6insert Send 6Insert Send/Return 50, 51Installing in a Rack 13Invalid MIDI Data 63
LLabel Strip 4, 11, 43LAN
Local Area Network 16LEDs 26, 27, 28

Index Index
Level Switch 20Line Level 52line outputs 31, 32Link 43linked channels 29Linking Channels 21, 54Link Switch 8, 20Live Ambience 70Local Area Network
16
MMaster section 25Master Volume 24, 25, 26, 36Master volume control 5
Volume 11MIDI 24, 60, 61, 62, 63, 64
Load One PresetLoad All Presets 63
Save One PresetSave All Preset 62–64
MIDI Error 63MIDI I/O 30, 34MIDI Implementation Chart 76MIDI Jacks 7, 60MIDI Messages 64MIDI Mode 64MIDI on/off 5mixer sub-groups 20Mix In 5, 6, 24, 28, 32, 33, 41Mix Mode 24Monitor with effects 68Mono 21, 29, 31Mono/Stereo output switch 6Mono/Stereo switch 31Mute 55Mute a Channel 55Mute button 11, 27, 37Mute Mode 25Muting a Channel 30, 39Muting Groups 59
Nnetwork 16

Index Index
OOutputs 43
PPackage Contents 12Pan Control 28, 38Pan knob 53Pan knob & LEDs 10
LEDs, Pan 10Pan LEDs 29, 38, 45parallel connection 22Patch Bay 69pedal 41Personal Mixer Components 4, 5Personal Mixer Rear Panel 30Playback Monitoring 66Power Connector 23Power LED 21power supply 23, 42
replacing 17power supply polarity 17Preset 46Preset select button 4
RRack mounting 13Recall button 4, 10, 26, 37Recall Mode 24, 27, 37Record a Mix 71red LED 53, 57Remote/Local switch 28, 41, 61, 62Removing Channels From a Group 58replace the power supply 17Return 6Return jack 32RJ45 connector 14
Ssave a Preset 45Save Mode 25, 26, 37Saving Presets
MIDI 61Send 6series connection 21Signal LED 19

Index Index
Signal present LED 8Single Preset files 61Solo 55Solo a Channel 55Solo button 5, 11, 27, 29, 37, 55Solo Mode 25, 28, 29, 30, 38, 39Spread Control 54stereo channel 20stereo headphones 23stereo input 20, 21, 29, 39Stereo Operation 31Studio Cue System 66subwoofer 31sysex 76System Exclusive 76
SysEx 60system exclusive
sysex 34System Interconnections 42
TThru Jacks 9, 23, 24, 68, 69, 70Thru Patching 69Tip, Ring, and Sleeve 23Tone Controls 25, 36Transmitter Components 9Treble 36Treble knob 26Treble tone control 5, 11Troubleshooting 72TRS 6, 23TRS Inputs 9TRS Inserts 50
UUnmute a Channel 30, 55
VValid Data Received
MIDI SysEx 63Volume 26Volume indicator 28Volume knob 53Volume knob & LEDs 10
Index Index
WWhat Gets Saved 46
XXLR 6XLR output
balanced outputTRS output 31
Yyellow LED 27, 44Y cable 50Y Cable Insert 68
Zzero volume 27, 37