a complete guide for installation, configuration and ...€¦ · 6.2 openam installation on windows...
TRANSCRIPT

Copyright © 2010 Cisco Systems, Inc. All rights reserved.
A complete guide for
Installation, configuration and integration of
Open Access Manager 9.0 with
Cisco Unified Communications Manager 8.5,
8.6/Cisco Unity Connection 8.6 and Active
Directory for Single Sign On.
White paper version: 1.2
Date: 29th April 2011
AUTHORS: Vijeth R. Rajoli
Krishna Chalamasandra

Copyright © 2010 Cisco Systems, Inc. All rights reserved.
Table of Contents Preface ............................................................................................................................................. 4
1 Introduction ........................................................................................................................... 5
2 Configuring Domain Controller on Windows 2003 Server .................................................. 5
3 Configuring DNS on Windows 2003 server domain controller .......................................... 18
4 Configuring Windows client desktop as domain computer of domain controller ............ 23
5 Brief history of OpenSSO and OpenAM ................................................................................ 28
6 System requirements for OpenAM installation .................................................................. 28
6.1 OpenAM installation on Linux platform ..................................................................... 28
6.2 OpenAM installation on Windows platform ............................................................... 29
7 Installation and Configuration of Apache Tomcat with HTTPS ......................................... 30
7.1 Installation and configuration of Apache Tomcat on Linux platform ....................... 30
7.2 Installation and configuration of Apache Tomcat on Windows platform ................. 31
8 Provisioning Active Directory for Single Sign-on ............................................................... 32
9 Deploying OpenSSO (OpenAM) Enterprise on Apache Tomcat .......................................... 33
9.1 Deploying OpenSSO enterprise war on Apache Tomcat over Linux platform .......... 33
9.2 Deploying OpenSSO enterprise war on Apache Tomcat over Windows platform .... 33
10 Configuring OpenSSO Enterprise Using the GUI Configurator ........................................... 34
10.1 Configuring Policies on OpenSSO server .................................................................... 38
10.1.1 Configuring Policies on OpenSSO server for Cisco Unified Communication Manager 8.5, 8.6 38
10.1.2 Configuring Policies on OpenSSO server for Cisco Unity Connection 8.6 ................... 45
10.2 Configuring Windows Desktop SSO Authentication module instance ...................... 50
10.3 Configure J2EE Agent profile on OpenSSO server ...................................................... 51
10.3.1 Configure J2EE Agent Profile on OpenSSO server for Cisco Unified Communications Manager 8.5, 8.6 ................................................................................................................................. 51
10.3.2 Configure J2EE Agent Profile on OpenSSO server for Cisco Unity Connection 8.6 .... 55
11 Undeploying/Removing OpenSSO Enterprise (OpenAM) .................................................. 61
11.1 Uninstalling OpenSSO Enterprise (OpemAM) Server deployed on Linux Platform.. 61
11.2 Uninstalling OpenSSO Enterprise (OpenAM) Server deployed on Windows Platform. 61
12 Configuring Browser’s for SSO ............................................................................................. 61
12.1 Internet Explorer ......................................................................................................... 62
12.2 Mozilla Firefox ............................................................................................................. 62
12.3 SSO Configurations test with browser ........................................................................ 63
13 Configuring SSO on Cisco Unified Communications Manager 8.5 ...................................... 64
13.1 CUCM 8.5 SSO CLI Commands: ..................................................................................... 66
13.1.1 utils sso enable ................................................................................................................ 66
13.1.2 utils sso disable ............................................................................................................... 67
13.1.3 utils sso status ................................................................................................................. 67
14 Configuring SSO on Cisco Unified Communications Manager 8.6 ...................................... 68
14.1 CUCM 8.6 SSO CLI Commands: ..................................................................................... 69
14.1.1 utils sso enable ................................................................................................................ 69
14.1.2 utils sso disable ............................................................................................................... 70
14.1.3 utils sso status ................................................................................................................. 71
14.2 CUCM 8.6 SSO GUI ........................................................................................................ 71
15 Configuring SSO on Cisco Unity Connection 8.6 .................................................................. 73
15.1 CUC 8.6 SSO CLI Commands ......................................................................................... 73
15.1.1 utils sso enable ................................................................................................................ 74
15.1.2 utils sso disable ............................................................................................................... 76
15.1.3 utils sso status ................................................................................................................. 76
15.2 Cisco Unity Connection 8.6 SSO GUI ............................................................................ 76
16 OpenSSO Enterprise Session Failover ................................................................................. 78
16.1 Requirements for AMSFO ............................................................................................ 79

Copyright © 2010 Cisco Systems, Inc. All rights reserved.
16.2 Configuration of AMSFO components ......................................................................... 79
16.2.1 Installation and configuration of Load Balancer .......................................................... 79
16.2.1.1 Installation of Load Balancer on Linux Platform. .................................................... 79
16.2.1.2 Installation of Load Balancer on Windows platform. .............................................. 82
16.2.1.3 Configuration of Load Balancer for HTTP load balancing ....................................... 89
16.2.2 Installation and configuration of session failover components................................. 108
16.2.2.1 Configuration of session failover components on Linux Platform ....................... 108
16.2.2.2 Configuration of session failover components of windows platform .................. 115
16.2.3 Installation and configuration of OpenAM Enterprise servers for session failover. 122
16.2.3.1 Installation of OpenAM Enterprise server 1 .......................................................... 122
16.2.3.2 Installation of OpenAM Enterprise server 2 .......................................................... 131
16.2.3.3 Configure OpenSSO Enterprise for Session Failover ............................................. 137
16.3 Configuring SSO on Cisco Unified Communications Manager with AMSFO setup... 138

Copyright © 2010 Cisco Systems, Inc. All rights reserved.
Preface This document will cover the installation and configuration of all the required software’s which are essential for achieving Single Sign-on solution with Cisco Unified Communications Manager 8.5. , which has been covered in respective chapters, here is the brief pictures of coverage on each chapter.
Chapter 1: This chapter covers brief introduction on the products which are installed and configured as part of this document.
Chapter 2: This chapter covers installation of Active Directory Service on Domain controller, Skip this chapter if you already have the domain controller setup in your environment.
Chapter 3: This chapter covers installation of DNS on domain controller, Skip this chapter if you already have the DNS configured on your domain controller.
Chapter 4: This chapter covers configuring the desktop as the domain computer of the above setup domain controller, Skip this chapter if your desktop is already a domain computer of the domain controller which is under test.
Chapter 5: This chapter covers brief introduction of OpenSSO and OpenAM.
Chapter 6: This chapter covers installation and configuration of Linux OS/Windows OS for OpenAM deployment.
Chapter 7: This chapter covers installation and configuration of Apache Tomcat with SSL on Linux and Windows Platform which is setup in the chapter 6.
Chapter 8: This chapter covers provisioning Active directory for Windows Desktop SSO Authentication.
Chapter 9: This chapter covers installing OpenSSO Enterprise on Linux /Windows platform.
Chapter 10: This chapter covers configuring OpenSSO with policies, agents and authentication module instance.
Chapter 11: This chapter covers un-installing OpenSSO Enterprise on Linux/Windows platform.
Chapter 12: This chapter covers configuring browsers for Single Sign-on.
Chapter 13: This chapter covers SSO Enable/Disable/Status on Cisco Unified Communications Manager 8.5
Chapter 14: This chapter covers SSO Enable/Disable/Status on Cisco Unified Communications Manager 8.6
Chapter 15: This chapter covers SSO Enable/Disable/Status on Cisco Unity Connection 8.6
Chapter 16: For the high availability of OpenSSO server, OpenSSO Enterprise session failover can be implemented. This chapter explains how to configure OpenSSO Enterprise session failover. Skip this chapter if you do not wish to have OpenSSO session failover.

Copyright © 2010 Cisco Systems, Inc. All rights reserved.
1 Introduction This document will cover the installation and configuration of all the required software components which are essential for achieving Single Sign-on solution with Cisco Unified Communications Manager 8.5.
Below is the list of products which are being installed and configured as part of this guide:
• Microsoft Windows 2003 server with SP2 � for Domain Controller and DNS configurations. For instance in this guide, the domain controller is configured for the domain vrajoli.com
• Redhat Enterprise Linux(RHEL) 5.5 � for OpenAM deployment.
• Microsoft Windows 2003 server � for OpenAM deployment.
• Windows XP with SP3 � Client Desktop
NOTE: If you are planning to in use Windows 2008 Server for configuring active directory, make sure Windows 2008 server has SP2 installed.
2 Configuring Domain Controller on Windows 2003 Server
Setting up active directory using the run command dcpromo is a straightforward procedure. To
begin, from your windows 2003 server desktop go to Start click on Run and type dcpromo and hit
Enter.
The “Welcome to the Active Directory Installation Wizard” should come up:

Copyright © 2010 Cisco Systems, Inc. All rights reserved.
Click on Next. On the following window, you will get a warning about compatibility issues with
other Operating Systems. Improve security settings in Windows Server 2003 affect older
versions of windows:

Copyright © 2010 Cisco Systems, Inc. All rights reserved.
After reading and evaluating the consequences, click Next. On the next screen, you will get two
options. The first option asks you if you want the server to become a domain controller for a new
domain or if you want the server to be an additional domain controller for for an existing
domain:

Copyright © 2010 Cisco Systems, Inc. All rights reserved.
Select the first option and click Next. On the next window, you will get three options. the first
option is to setup the domain in a new forest. Select this option if its the first domain controller
on your organization, or if you want it to be totally independent from any forest.
Option two: Child domain in an existing domain tree. select this option if you want the domain to
be a child domain from an existing domain. option three: Domain tree in an existing forest. if you
don’t want any of the above, select this option.

Copyright © 2010 Cisco Systems, Inc. All rights reserved.
In our case, choose the first option, and click Next. On the next screen, we need to type the full
DNS name for the new domain:
Type the full DNS name like vrajoli.com, and click on Next. On the next screen, we need to choose
the NETBIOS name. This is the name earlier version of windows users will be using to identify
the new domain.

Copyright © 2010 Cisco Systems, Inc. All rights reserved.
Choose the name, and click Next. On the next screen, you need to select the location of where
you want to store the database and log files. for best performance store them in separate disks.

Copyright © 2010 Cisco Systems, Inc. All rights reserved.
Choose the location where you want the active directory database and logs, and click Next.
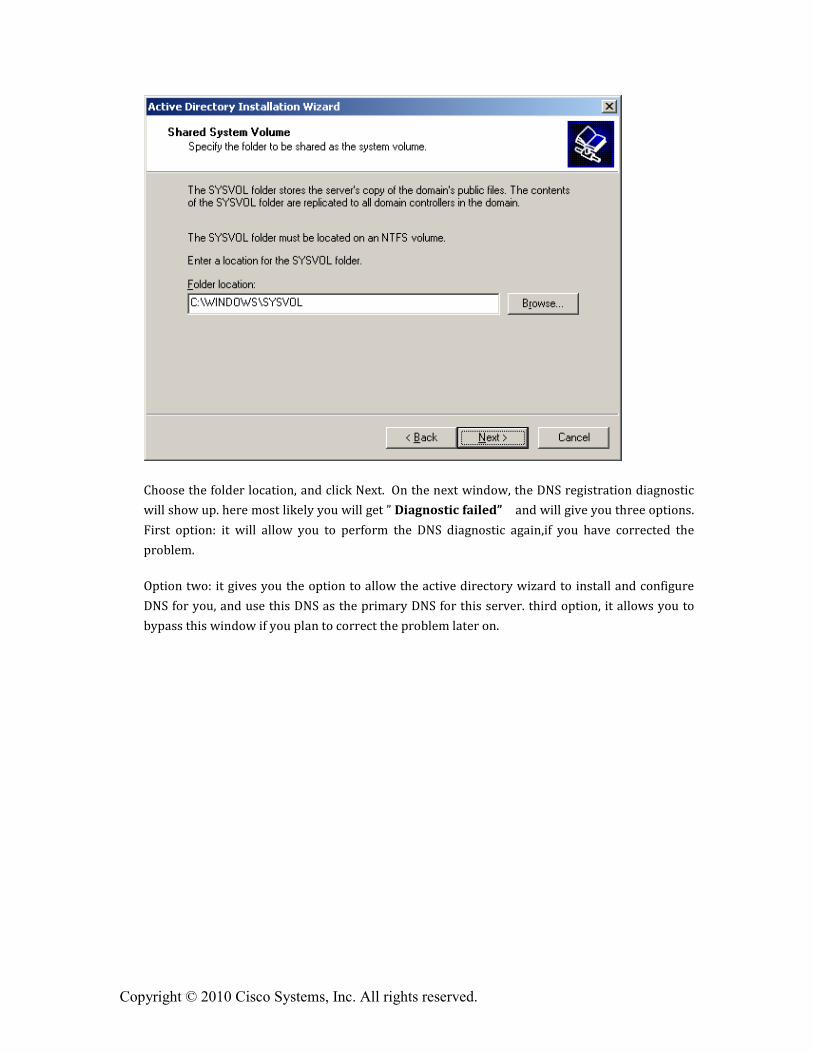
Next, the Shared system volume window will come up. here, you need to choose the location on
where you want to store the SYSVOL files. this folder contains the domain public files and are
replicated to all the domain controllers in the domain.
Copyright © 2010 Cisco Systems, Inc. All rights reserved.
Choose the folder location, and click Next. On the next window, the DNS registration diagnostic
will show up. here most likely you will get ” Diagnostic failed” and will give you three options.
First option: it will allow you to perform the DNS diagnostic again,if you have corrected the
problem.
Option two: it gives you the option to allow the active directory wizard to install and configure
DNS for you, and use this DNS as the primary DNS for this server. third option, it allows you to
bypass this window if you plan to correct the problem later on.

Copyright © 2010 Cisco Systems, Inc. All rights reserved.
We will choose the option to Install and configure DNS server on this computer and set this
computer to use this DNS server as its preferred DNS server. then click Next.
On the next window, you need to choose what type or permissions you want for users and group
objects. Here you will get two options. the first options: select this option if you run server
programs with pre-windows 2000. option two: select this option, if you only run windows
servers 2000 and windows servers 2003 on your domain.

Copyright © 2010 Cisco Systems, Inc. All rights reserved.
Select the second option, and click Next. On the next window, you need to enter the Directory
services restore mode administrator password. This password is used when you start the
computer in directory services restore mode. This account is different from the domain
administrator account.

Copyright © 2010 Cisco Systems, Inc. All rights reserved.
Type your chosen password, and click Next. Next, you will get the summary of all the options you
have chosen during the active directory wizard. remember, the domain administrator account
password is the same as the current local administrator password.
Click Next. The active directory installation should begin.

Copyright © 2010 Cisco Systems, Inc. All rights reserved.
Duirng this process, Active Directory starts installing DNS and prompts you to insert the
Windows Server 2003 CD-ROM, Please insert the CD-ROM and press OK.
Installation of DNS server and its configuration begins.

Copyright © 2010 Cisco Systems, Inc. All rights reserved.
You will see below screen.
Click on Finish and restart the computer. Active Directory should be now installed.

Copyright © 2010 Cisco Systems, Inc. All rights reserved.
3 Configuring DNS on Windows 2003 server domain controller
DNS gets installed along with AD configuration, only the configuration has to be done on DNS Server.
To configure DNS, go to Start Menu � Programs � Administrative Tools � DNS.
You will see the below screen. Under forward lookup zone, you see the domain controller configured.
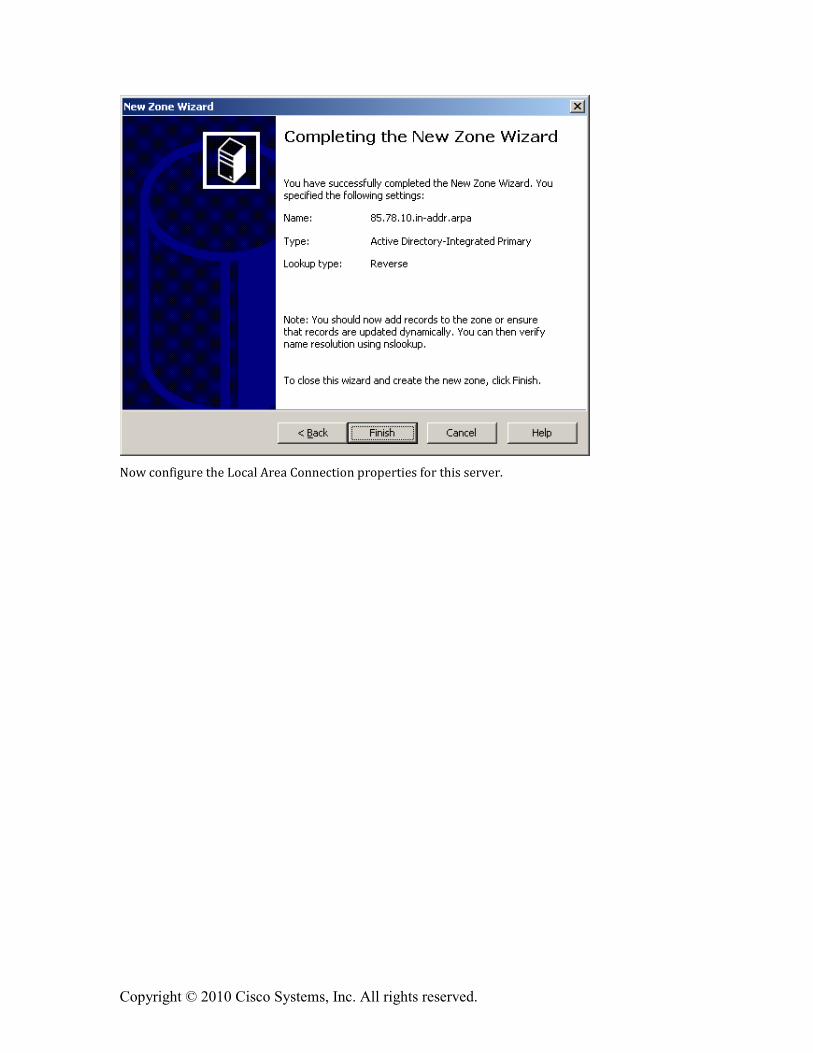
Now Reverse Lookup Zone needs to be created. Right click on Reverse Lookup Zone and click on New Zone.

Copyright © 2010 Cisco Systems, Inc. All rights reserved.
You will see below screen.

Copyright © 2010 Cisco Systems, Inc. All rights reserved.
Click on Next, you will see Zone type configuration wizard. Select Primary Zone.
Click Next, you will be asked how you wish to replicate DNS date in the network. Select “To all domain controllers in the Active Directory domain”
Click Next and then you will be asked to configure Reverse Lookup Zone name, enter the network ID and press Next.

Copyright © 2010 Cisco Systems, Inc. All rights reserved.
Select the type of dynamic updates that DNS Zone accepts. Click on “Allow only Secure dynamic updates” and press next.
With this New Zone creation is successfully completed.
Copyright © 2010 Cisco Systems, Inc. All rights reserved.
Now configure the Local Area Connection properties for this server.

Copyright © 2010 Cisco Systems, Inc. All rights reserved.
• In the Local Area Connection Properties dialog box, click Internet Protocol (TCP/IP), and then click Properties.
• In the Internet Protocols (TCP/IP) Properties dialog box, click Use the following IP address, and then type the static IP address, subnet mask, and default gateway for this server.
• In Preferred DNS, type the IP address of this server.
• In Alternate DNS, type the IP address of another internal DNS server, or leave this box blank.
• When you finish setting up the static addresses for your DNS, click OK, and then click Close.
4 Configuring Windows client desktop as domain computer of domain controller
In this example, we will be using Windows XP desktop for joining to the vrajoli.com domain.
Create a DNS entry on DNS server for this client host (windows xp)
Configuring LAN properties for this client desktop.
• In the Local Area Connection Properties dialog box, click Internet Protocol (TCP/IP), and then click Properties.
• In the Internet Protocols (TCP/IP) Properties dialog box, click Use the following IP address, and then type the static IP address, subnet mask, and default gateway for this server.
• In Preferred DNS, type the IP address of DNS server (vrajoli).
• In Alternate DNS, type the IP address of another internal DNS server, or leave this box blank.
• When you finish setting up the static addresses for your DNS, click OK, and then click Close.
Make a DNS entry for this Client desktop. Open DNS utility on domain controller (Administrative
Tools � DNS), under forward lookup zone, create a new host under domain name (vrajoli.com).
Click on checkbox to create associated reverse pointer. Verify that Client desktop host got added
to DNS.
Change the computer name to one which you wish as below. Right click on
My Computer � Properties. Go to Computer Name tab and click on Change button.

Copyright © 2010 Cisco Systems, Inc. All rights reserved.

Copyright © 2010 Cisco Systems, Inc. All rights reserved.
Click on More Button on the Computer Name Changed window, and enter Primary DNS Suffix of
this computer with the DNS name (DNS running on Domain controller). In our case the DNS
name is vrajoli.com. Press OK.

Copyright © 2010 Cisco Systems, Inc. All rights reserved.
Select the "Domain" radio button then put in your domain name, not including the . extension (in
this example we used the domain "vrajoli" but when joining the computer to a domain, we will
only type "vrajoli")
Press "OK". Then you will be presented with a user name and password prompt. Enter the user
name and password of a Domain Administrator
Press "OK" and after a minute or two you will receive a message welcoming you to the domain.

Copyright © 2010 Cisco Systems, Inc. All rights reserved.
Then you will receive a message telling you that a reboot is required; click "OK" to that, and the
properties window. Then click "Yes" when you are prompted to reboot.
And we're finished. You have just learnt how to add a Windows XP computer to a Windows
Server 2003 domain
After the XP computer boots to Control-Alt-Delete you may need to change it from logging onto
itself (which will use the local info) to logging onto the domain. To do this, press Ctrl-Alt-Del,
then the "Options >>>" button on the log on screen. Then select the domain from the drop-down
box
After that you can log on using domain credentials

Copyright © 2010 Cisco Systems, Inc. All rights reserved.
5 Brief history of OpenSSO and OpenAM
OpenSSO is an open source access management and federation server platform
originally created by Sun Microsystems. The main purpose of OpenSSO is to provide an easy and
powerful way to enable using Single Sign-On with many legacy software products. Oracle
completed the acquisition of Sun Microsystems in February 2010 and announced that OpenSSO
would no longer be their strategic product. OpenSSO will continue to be developed and
supported by ForgeRock under the name of OpenAM.
More information about OpenAM is available at http://www.forgerock.com/openam.html
6 System requirements for OpenAM installation Active directory, domain controller and DNS should be installed and configured before getting started with OpenAM.
6.1 OpenAM installation on Linux platform
• Get the compatible hardware for installing RHEL 3/4/5 version (32bit/64bit)
• Install the RHEL and make sure the installation is successful.
• After the successful installation, configure the network settings and get the machine up in the network.
• Configure the hostname for this OpenAM host machine and create DNS entry for this host on the above DNS setup.
• Configure DNS and domain name, which should point to the above configured AD and DNS setup.
• Install JAVA on this machine, Latest version of JAVA can be downloaded from http://www.oracle.com/technetwork/java/javase/downloads/index.html , Latest version of JAVA as on 13-Sep-2010 is JDK 6 Update 21.
NOTE: The latest version of java (JDK 6 Update 21) has some issue with Kerberos; please visit http://forums.sun.com/thread.jspa?threadID=5448003 to know more.
You can use JDK 6 Update 20, which can be downloaded from http://java.sun.com/products/archive/j2se/6u20/index.html
• Define JAVA_HOME, JRE_HOME environment variables in your user profile (.bash_profile) as below:
export JAVA_HOME=/usr/java/jdk1.6.0_20
export JRE_HOME=/usr/java/jdk1.6.0_20/jre
• Create java keystore which is required for enabling SSL on Tomcat which will be installed and configured in the section 7.1
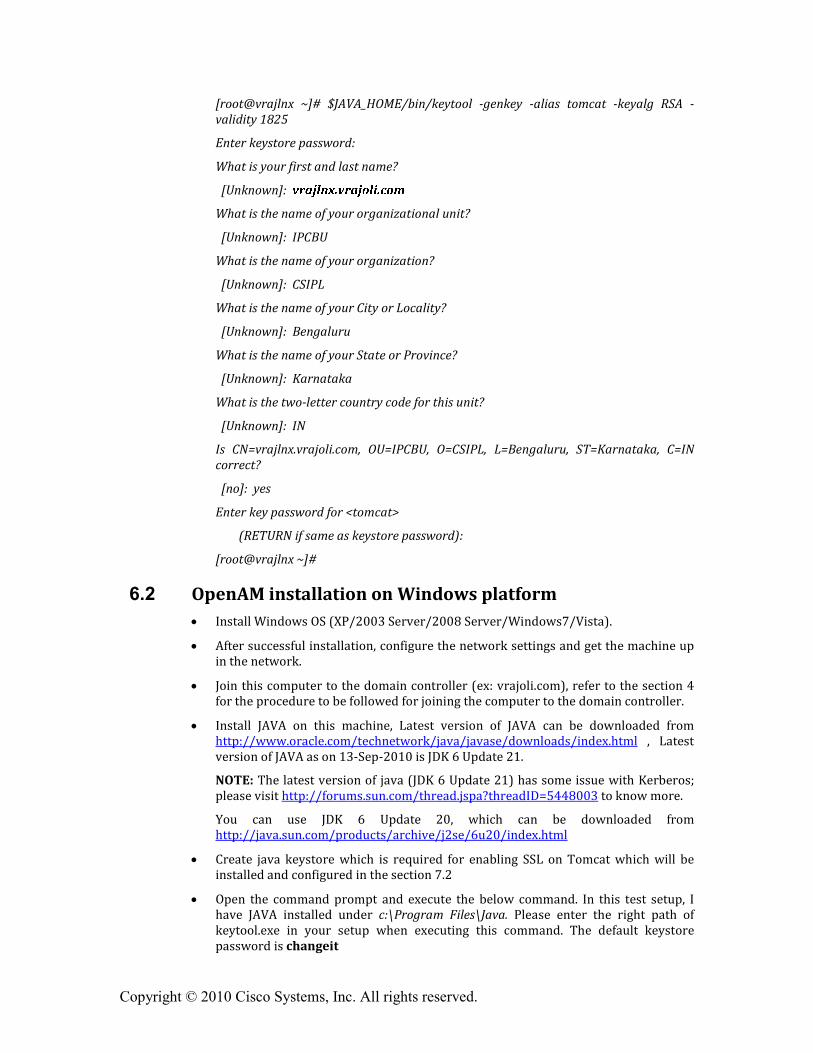
Execute ‘$JAVA_HOME/bin/keytool -genkey -alias tomcat -keyalg RSA –validity 1825’ command on the terminal, default keystore password is ‘changeit’.
Next you will be prompted to input certain requests. When prompted for ‘Enter the first name and last name’ enter the FQDN(hostname.domainname) of your OpenAM host (ex:vrajlnx.vrajoli.com). E x a m p l e :
Copyright © 2010 Cisco Systems, Inc. All rights reserved.
[root@vrajlnx ~]# $JAVA_HOME/bin/keytool -genkey -alias tomcat -keyalg RSA -validity 1825
Enter keystore password:
What is your first and last name?
[Unknown]: v r a j l n x . v r a j o l i . c o m
What is the name of your organizational unit?
[Unknown]: IPCBU
What is the name of your organization?
[Unknown]: CSIPL
What is the name of your City or Locality?
[Unknown]: Bengaluru
What is the name of your State or Province?
[Unknown]: Karnataka
What is the two-letter country code for this unit?
[Unknown]: IN
Is CN=vrajlnx.vrajoli.com, OU=IPCBU, O=CSIPL, L=Bengaluru, ST=Karnataka, C=IN correct?
[no]: yes
Enter key password for <tomcat>
(RETURN if same as keystore password):
[root@vrajlnx ~]#
6.2 OpenAM installation on Windows platform
• Install Windows OS (XP/2003 Server/2008 Server/Windows7/Vista).
• After successful installation, configure the network settings and get the machine up in the network.
• Join this computer to the domain controller (ex: vrajoli.com), refer to the section 4 for the procedure to be followed for joining the computer to the domain controller.
• Install JAVA on this machine, Latest version of JAVA can be downloaded from http://www.oracle.com/technetwork/java/javase/downloads/index.html , Latest version of JAVA as on 13-Sep-2010 is JDK 6 Update 21.
NOTE: The latest version of java (JDK 6 Update 21) has some issue with Kerberos; please visit http://forums.sun.com/thread.jspa?threadID=5448003 to know more.
You can use JDK 6 Update 20, which can be downloaded from http://java.sun.com/products/archive/j2se/6u20/index.html
• Create java keystore which is required for enabling SSL on Tomcat which will be installed and configured in the section 7.2
• Open the command prompt and execute the below command. In this test setup, I have JAVA installed under c:\Program Files\Java. Please enter the right path of keytool.exe in your setup when executing this command. The default keystore password is changeit

Copyright © 2010 Cisco Systems, Inc. All rights reserved.
C : \ > " c : \ P r o g r a m F i l e s \ J a v a \ j d k 1 . 6 . 0 _ 2 0 \ b i n \ k e y t o o l . e x e " - g e n k e y - a l i a s t o m c a t- k e y a l g R S A - v a l i d i t y 1 8 2 5 - k e y s t o r e c : \ k e y s t o r eEnter keystore password:
What is your first and last name?
[Unknown]: v r a j l n x . v r a j o l i . c o m
What is the name of your organizational unit?
[Unknown]: IPCBU
What is the name of your organization?
[Unknown]: CSIPL
What is the name of your City or Locality?
[Unknown]: Bengaluru
What is the name of your State or Province?
[Unknown]: Karnataka
What is the two-letter country code for this unit?
[Unknown]: IN
Is CN=vrajlnx.vrajoli.com, OU=IPCBU, O=CSIPL, L=Bengaluru, ST=Karnataka, C=IN corr
ect?
[no]: yes
Enter key password for <tomcat>
(RETURN if same as keystore password):
Keystore will be created under c:\>
7 Installation and Configuration of Apache Tomcat with HTTPS
7.1 Installation and configuration of Apache Tomcat on Linux platform
• Download the latest version of Apache Tomcat; refer to http://tomcat.apache.org/index.html for the latest version, download the zip/tar archives specific to your processor architecture(32bit/64bit). We use apache-tomcat-7.0.0 in this guide.
• Copy the downloaded apache-tomcat-7.0.0.tar.gz to the specific location on OpenAM server which was setup in section 6.1
• Extract the apache-tomcat-7.0.0.tar.gz archive. In this guide, we are extracting it under root home directory (/root)

Copyright © 2010 Cisco Systems, Inc. All rights reserved.
• Increase the JVM heap size on tomcat, by setting JAVA_OPTS="$JAVA_OPTS -Xmx1024m -XX:MaxPermSize=256m -Xms512m property in the catalina.sh under /root /apache-tomcat-7.0.0/bin directory.
Example: JAVA_OPTS="$JAVA_OPTS -Xmx1024m -XX:MaxPermSize=256m -Xms512m -Djava.util.logging.manager=org.apache.juli.ClassLoaderLogManager"
• Open the server.xml file under /root/apache-tomcat-7.0.0/conf directory,
� Comment the 8080 connector port: Make the code read as below < ! - - <Connector port="8080" protocol="HTTP/1.1"
connectionTimeout="20000"
redirectPort="8443" /> - - >
� Uncomment the 8443 connector port: Remove <!-- code at the beginning and --> at the end of 8443 connector, make the code read as below
<Connector port="8443" protocol="HTTP/1.1" SSLEnabled="true"
maxThreads="150" scheme="https" secure="true"
clientAuth="false" sslProtocol="TLS" />
Save the server.xml file after doing above changes.
• Start the tomcat by executing startup.sh under /root/ apache-tomcat-7.0.0/bin directory.
• Launch a browser and go to: https://localhost:8443/tomcat.gif, if your certificate is self-signed, your browser will warn you. You should tell the browser to import the certificate and proceed. You should then see the little Tomcat logo. If you do, you’re done configuring Tomcat.
7.2 Installation and configuration of Apache Tomcat on Windows platform
• Download the latest version of Apache Tomcat for windows platform; refer to http://tomcat.apache.org/index.html for the latest version, download the tomcat service installer (32-bit/64-bit Windows Service Installer - apache-tomcat-7.0.0.exe). We use apache-tomcat-7.0.0 in this guide.
• Install the apache-tomcat-7.0.0.exe. in this guide, tomcat is installed under c:\Program Files\Apache Software Foundation\Tomcat 7.0
• Set the JAVA_HOME, JRE_HOME and JAVA_OPTS environment variables by creating a file called setenv.bat under c:\Program Files\Apache Software Foundation\Tomcat 7.0\bin and set the above variables.
Content of setenv.bat in testing this guide:
set JAVA_HOME=c:\Program Files\Java\jdk1.6.0_20
set JRE_HOME=c:\Program Files\Java\jdk1.6.0_20\jre
set JAVA_OPTS=%JAVA_OPTS% -Xms512m -Xmx1024m
• Open the server.xml file under c:\Program Files\Apache Software Foundation\Tomcat 7.0\conf folder,
� Comment the 8080 connector port:
Copyright © 2010 Cisco Systems, Inc. All rights reserved.
Make the code read as below < ! - - <Connector port="8080" protocol="HTTP/1.1"
connectionTimeout="20000"
redirectPort="8443" /> - - >
� Uncomment the 8443 connector port:
Remove <!-- code at the beginning and --> at the end of 8443 connector, in this 8443 connector we have added two more attributes keystoreFile (location of the keystore file which was created in section 6.2, in this test it was created under C:\keystore) and keystoreType. Since we have keystore created with default password ‘changeit’, no need to set keystorePass attribute. Make the code read as below:
<Connector port="8443" protocol="HTTP/1.1" SSLEnabled="true"
maxThreads="150" scheme="https" secure="true"
clientAuth="false" sslProtocol="TLS" k e y s t o r e F i l e = " C : \ k e y s t o r e "k e y s t o r e T y p e = " J K S " />
Save the server.xml file after doing above changes.
• Start the tomcat service from services.msc utility or from Administrative Tools � Services � Apache Tomcat 7 � Start
• Launch a browser and go to: https://localhost:8443/tomcat.gif, if your certificate is self-signed, your browser will warn you. You should tell the browser to import the certificate and proceed. You should then see the little Tomcat logo. If you do, you’re done configuring Tomcat.
8 Provisioning Active Directory for Single Sign-on
• Login to AD Server.
• From the Start menu, go to Programs>Administration Tools. Select Active Directory Users and Computers.
• Go to Users > New > Users and create a new user with the OpenSSO Enterprise host name as the User ID (example: vrajlnx).
• The OpenSSO Enterprise host name should not include the domain name.
• Create keytab file on the AD server using below command from the command prompt.
ktpass -princ HTTP/hostname.domainname@DCDOMAIN -pass password -mapuser userName-out hostname.HTTP.keytab -ptype KRB5_NT_PRINCIPAL -target DCDOMAIN
Example:
ktpass -princ HTTP/[email protected] -pass <password> -mapuser vrajlnx -out vrajlnx.HTTP.keytab -ptype KRB5_NT_PRINCIPAL -target VRAJOLI.COM
• After successful creation of keytab file, copy the keytab file to some location on the OpenAM server, this path will later be specified in OpenAM configuration.

Copyright © 2010 Cisco Systems, Inc. All rights reserved.
For OpenAM configured on Linux, you can create a directory under root, and copy the above keytab file. Example: /root/keytab/ vrajlnx.HTTP.keytab
For OpenAM configured on Windows, you can create a directory under C:\>, and copy the above keytab file. Example: c:/keytab/ vrajlnx.HTTP.keytab
9 Deploying OpenSSO (OpenAM) Enterprise on Apache Tomcat
9.1 Deploying OpenSSO enterprise war on Apache Tomcat over Linux platform
• Visit to forgerock site http://www.forgerock.com/downloads.html and download the stable release OpenAM Release9 / February 7, 2010(20100207)
• Copy the openam_release9_20100207.zip to OpenAM server to any location and unzip it.
• Stop the tomcat service if running on this OpenAM server.
• After unzipping, copy opensso.war file under opensso/deployable-war directory and paste it under /root /apache-tomcat-7.0.0/webapps directory.
• Start the tomcat by executing startup.sh under /root/ apache-tomcat-7.0.0/bin directory.
9.2 Deploying OpenSSO enterprise war on Apache Tomcat over Windows platform
• Visit to forgerock site http://www.forgerock.com/downloads.html and download the stable release OpenAM Release9 / February 7, 2010(20100207)
• Copy the openam_release9_20100207.zip to OpenAM server to specific location and unzip it.
• Stop the tomcat service if running on this OpenAM server. (Administrative Tools � Services � Apache Tomcat 7 � Stop)
• After unzipping, copy opensso.war file under opensso\deployable-war folder and paste it under c:\Program Files\Apache Software Foundation\Tomcat 7.0\webapps folder.
• Start the tomcat from Administrative Tools � Services � Apache Tomcat 7 � Start

Copyright © 2010 Cisco Systems, Inc. All rights reserved.
10 Configuring OpenSSO Enterprise Using the GUI Configurator
OpenAM server and policy agents require FQDNs for the host name of the machines where you
will do your installations. You can NOT use a host name like "localhost" and can NOT use
numeric IP addresses like "192.168.1.2" as host names either, else it will cause problems in
installation, configuration and usage
When accessing the OpenAM for the first time, you should use FQDN of OpenAM server in the
URL (https://vrajlnx.vrajoli.com:8443/opensso). When you access OpenSSO Enterprise for the
first time, you will be directed to the Configurator, to perform the OpenSSO Enterprise initial
configuration. You will see the below screenshot when accessed the OpenSSO for the first time.
Select the configuration option:
• Default Configuration: You specify and confirm passwords for the OpenSSO Enterprise administrator (amAdmin) and the default policy agent user (UrlAccessAgent), which is the policy agent user that connects to OpenSSO Enterprise server. The Configurator uses default values for the other configuration settings.
The default policy agent user is also referred to as an application user. This user can connect to OpenSSO Enterprise server from a client such as the client SDK or a distributed authentication UI server.

Copyright © 2010 Cisco Systems, Inc. All rights reserved.
Choose Default Configuration for development environments or simple demonstration purposes when you just want to evaluate OpenSSO Enterprise features. Click Create Default Configuration and continue with Configuring OpenSSO Enterprise With the Default Configuration.
OR
• Custom Configuration: You specify the configuration settings that meet the specific requirements for your deployment (or accept the default settings). Choose Custom Configuration for production and more complex environments. For example, a multi-server installation with several OpenSSO Enterprise instances behind a load balancer. Click Create New Configuration and continue with Configuring OpenSSO Enterprise with a Custom Configuration.
For Custom configuration, refer to Chapter 14.
In this section, we will select Default Configuration and move further.
When the configuration is complete, the Configurator displays a link to the OpenSSO
Enterprise Administration Console to perform any additional configuration required for your
deployment.
If a problem occurred during the configuration, the Configurator displays an error message. If
you can, correct the error and retry the configuration.
Also, check the web container log files and the install.log, which if created, will be in the
configuration directory (default /opensso). These logs might contain information about the

Copyright © 2010 Cisco Systems, Inc. All rights reserved.
cause of a configuration problem.
By default, OpenSSO will be deployed under /root/opensso directory on Linux platform, on windows platform OpenSSO will be deployed under C:\opensso
Click on Proceed to login.
You will see the below screen. Login with amAdmin username and password you created during creating the default configuration.
Login to OpenSSO server with amAdmin username and password
Go to Access Control tab and click on / (Top Level Realm), then go to Authentication tab as shown below.

Copyright © 2010 Cisco Systems, Inc. All rights reserved.
Click on All Core Settings… button in the above screen, set the User Profile to Ignored as shown below, Click the Save button to save the configuration.

Copyright © 2010 Cisco Systems, Inc. All rights reserved.
10.1 Configuring Policies on OpenSSO server
10.1.1 Configuring Policies on OpenSSO server for Cisco Unified Communication Manager 8.5, 8.6
Login to OpenSSO server with amAdmin username and password
Go to Access Control tab and click on / (Top Level Realm). You will see the below screen after clicking on / (Top Level Realm).

Copyright © 2010 Cisco Systems, Inc. All rights reserved.
Go to policies tab and add a new policy, enter the PolicyName.
Create a new Rule from the Policy Configuration page. You will see the below screen. select service type as "URL Policy Agent (with resource name)"

Copyright © 2010 Cisco Systems, Inc. All rights reserved.
Enter the Rule Name and Resource URL as Web Application URL. In our case it will be CUCM User application URL (https://<CUCM FQDN>:8443/*).
Check GET and POST check box and press Finish button.
Create another rule for the requests involving query patterns (*?*) in Find and List pages of CUCMUser application

Copyright © 2010 Cisco Systems, Inc. All rights reserved.
From CUCM 8.6 release, SSO support is provided for RTMT application as well. To achieve SSO for RTMT, along with the above policy rules, one more new rule should be created for the requests involving RTMT query patterns (*?*?*),

Copyright © 2010 Cisco Systems, Inc. All rights reserved.
Click on New Button under Subjects on the Policy Configuration page. Select subject type as "Authenticated Users".

Copyright © 2010 Cisco Systems, Inc. All rights reserved.
Enter the Subject Name and Click Finish. Now Policy is created with defining Rules and Subjects. Click on Finish button.
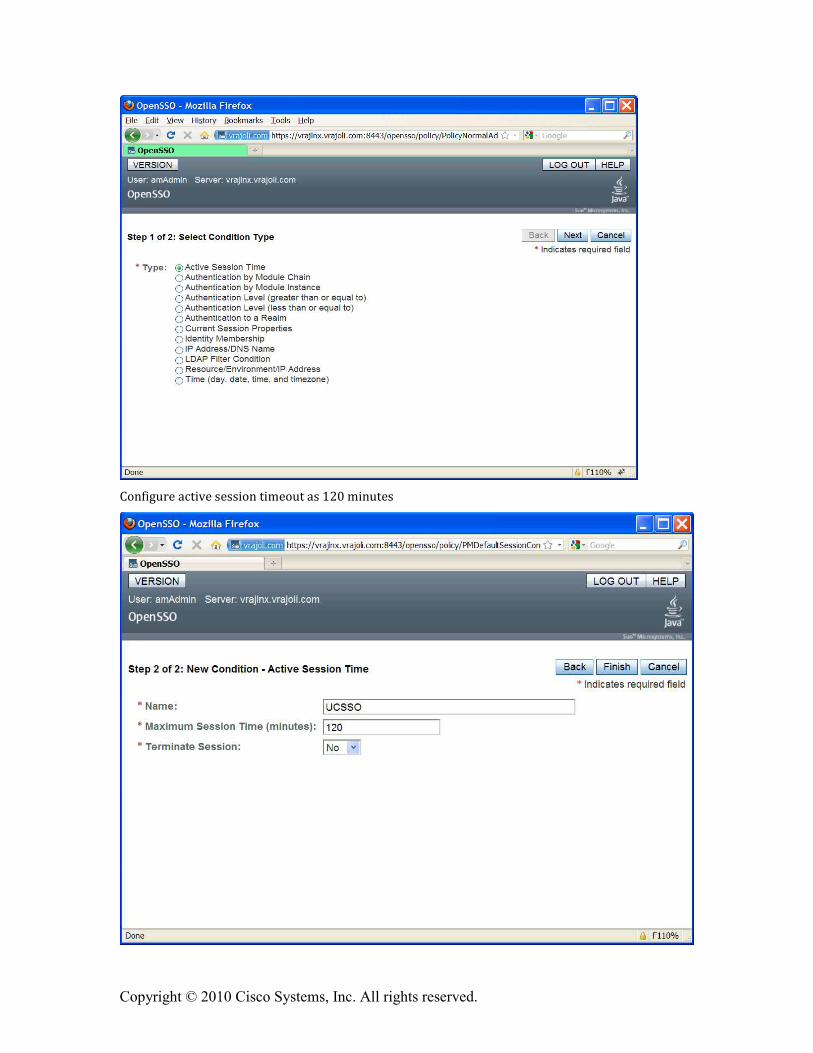
Click on New button under Conditions. Under select condition type, select Active Session Time and click next button.

Copyright © 2010 Cisco Systems, Inc. All rights reserved.
Configure active session timeout as 120 minutes.

Copyright © 2010 Cisco Systems, Inc. All rights reserved.
10.1.2 Configuring Policies on OpenSSO server for Cisco Unity Connection 8.6
Login to OpenSSO server with amAdmin username and password. Go to Access Control tab and click on / (Top Level Realm). You will see the below screen after clicking on / (Top Level Realm).
Go to policies tab and add a new policy, enter the PolicyName.

Copyright © 2010 Cisco Systems, Inc. All rights reserved.
Create a new Rule from the Policy Configuration page. You will see the below screen. select service type as "URL Policy Agent (with resource name)"
Then create rules for Cisco Unity Connection application(s) with below resource URL configured in protected resources.
• https://<FQDN>:8443/*
• https://<FQDN>:8443/*?*
• https://<FQDN>/*
• https://<FQDN>/*?*
• http:/<FQDN>/*
• http:/<FQDN>/*?*
where fqdn is the fully qualified domain name of Cisco Unity Connection server. Below is the snapshot of OpenSSO Policy configured for Unity Connection server.

Copyright © 2010 Cisco Systems, Inc. All rights reserved.
Click on New Button under Subjects on the Policy Configuration page. Select subject type as "Authenticated Users".

Copyright © 2010 Cisco Systems, Inc. All rights reserved.
Enter the Subject Name and Click Finish. Now Policy is created with defining Rules and Subjects. Click on Finish button
Click on New button under Conditions. Under select condition type, select Active Session Time and click next button
Copyright © 2010 Cisco Systems, Inc. All rights reserved.
Configure active session timeout as 120 minutes

Copyright © 2010 Cisco Systems, Inc. All rights reserved.
10.2 Configuring Windows Desktop SSO Authentication module instance
The Windows Desktop SSO Authentication Module enables OpenSSO Enterprise to work with
Kerberos tokens. The user presents the Kerberos token, previously issued by a Kerberos
Distribution Center, to OpenSSO Enterprise using the SPNEGO protocol. The client browser sends
back a SPNEGO token embedded with a Kerberos token. The OpenSSO Windows Desktop SSO
Authentication module retrieves the Kerberos token and authenticates the user using the Java
GSS API. If authentication is successful, the OpenSSO Windows Desktop SSO Authentication
module returns an SSOToken to the client.
• Copy the keytab files to OpenAM server, which was created in section 8.
• Log into the OpenSSO Enterprise administration console as amAdmin.
• Go to Access Control > Default Realm > Authentication.
• In the Module Instances page, click New.
• Enter a name for the new login module, and then select Windows Desktop SSO. Click
OK.
In this test, Module instance with name ‘CUCMUser’ is created.
• In the Module Instances page, click the name of the new login module (Example:
CUCMUser) and provide the following information:
• Service Principal: HTTP/ [email protected]
• Keytab File Name: /root/keytab/openAMhost.HTTP.keytab
• Kerberos Realm: EXAMPLE.COM
• Kerberos Server Name: Kerberos.example.com
• If multiple Kerberos Domain Controllers exist for failover purposes, all Kerberos
Domain Controllers can be set using a colon (:) as the separator.
• Return Principal with Domain Name: False
• Authentication Level: 22
• Restart the OpenSSO Enterprise server.

Copyright © 2010 Cisco Systems, Inc. All rights reserved.
10.3 Configure J2EE Agent profile on OpenSSO server
10.3.1 Configure J2EE Agent Profile on OpenSSO server for Cisco Unified Communications Manager 8.5, 8.6
Perform the following tasks in OpenSSO Enterprise Console. The key steps of this task involve creating an agent name (ID) and an agent password.
• Log in to OpenSSO Enterprise Console as a user with AgentAdmin privileges, such as amadmin.
• Click the Access Control tab.
• Click the name of the realm to which the agent will belong, such as the following: /(Top Level Realm).
• Click the Agents tab.
• Click the J2EE tab.
• Click New in the agent section.
• Enter values for the following fields:
• Name: Enter the name or identity of the agent. This is the agent profile name, which is the name the agent uses to log into OpenSSO Enterprise. Multi-byte names are not accepted.
NOTE: while enabling SSO on Cisco Unified Communications Manager or Cisco Unity Connection, when requested for “Enter the name of the profile configured for this policy agent”, the above configured agent name should be entered.

Copyright © 2010 Cisco Systems, Inc. All rights reserved.
• Password: Enter the agent password. However, it must be the same password entered in the agent profile password file that is used by the agentadmin utility to install the agent.
NOTE: while enabling SSO on Cisco Unified Communications Manager or Cisco Unity Connection, when requested for “Enter the password of the profile name”, the above configured password should be entered.
• Re-Enter Password: Confirm the password.
• In the Server URL field, enter the OpenSSO Enterprise server URL.
For example: https://<OpenAM FQDN>:8443/opensso
• In the Agent URL field, enter the URL for the agent application.
For example: https://<Cisco Unified Communications Manager FQDN>:8443/agentapp
• Click Create.
The Console creates the agent profile and displays the J2EE Agent page again with a link to the
new agent profile.

Copyright © 2010 Cisco Systems, Inc. All rights reserved.
Click on the J2EE agent created above, go to Application tab, and under Login processing enter new Login Form URIs.
• For CCMUser webapp: / c c m u s e r / W E B - I N F / p a g e s / l o g o n . j s p
• For CUCiMOC: / c u c m - u d s / W E B - I N F / p a g e s / l o g o n . j s pStarting from CUCM 8.6 release, SSO support is provided for other applications like Cisco Unified CM Administration, Cisco Unified Serviceability, Cisco Unified Reporting, Cisco Unified OS Administration, Disaster Recovery System and RTMT along with Cisco Unified CM User Options and CUCiMOC, for these new applications, you need to configure below Login Form URIs.
• For Cisco Unified CM Administration: / c c m a d m i n / W E B - I N F / p a g e s / l o g o n . j s p• For Cisco Unified Serviceability: / c c m s e r v i c e / W E B - I N F / p a g e s / l o g o n . j s p• For Cisco Unified Reporting: / c u c r e p o r t s / W E B - I N F / p a g e s / l o g o n . j s p• For Cisco Unified OS Administration: / c m p l a t f o r m / W E B - I N F / p a g e s / l o g o n . j s p• For Disaster Recovery System: / d r f / W E B - I N F / p a g e s / l o g o n . j s p• For Real Time Monitoring Tool (RTMT): / a s t / W E B - I N F / p a g e s / l o g o n . j s p

Copyright © 2010 Cisco Systems, Inc. All rights reserved.
Go to OpenSSO Services tab, Under Login URL add OpenSSO Login URL as https://<OpenSSO FQDN>:8443/opensso/UI/Login?module=<WindowsDesktopSSO_Module>
WindowsDesktopSSO_Module should be same as the one created in section 10.2
Ex: https://<OpenAM FQDN>:8443/opensso/UI/Login?module=CUCMUser

Copyright © 2010 Cisco Systems, Inc. All rights reserved.
10.3.2 Configure J2EE Agent Profile on OpenSSO server for Cisco Unity Connection 8.6
Perform the following tasks in OpenSSO Enterprise Console. The key steps of this task involve creating an agent name (ID) and an agent password.
• Log in to OpenSSO Enterprise Console as a user with AgentAdmin privileges, such as amadmin.
• Click the Access Control tab.
• Click the name of the realm to which the agent will belong, such as the following: /(Top Level Realm).
• Click the Agents tab.
• Click the J2EE tab.
• Click New in the agent section.
• Enter values for the following fields:
• Name: Enter the name or identity of the agent. This is the agent profile name, which is the name the agent uses to log into OpenSSO Enterprise. Multi-byte names are not accepted.
NOTE: while enabling SSO on Cisco Unified Communications Manager or Cisco Unity Connection, when requested for “Enter the name of the profile configured for this policy agent”, the above configured agent name should be entered.

Copyright © 2010 Cisco Systems, Inc. All rights reserved.
• Password: Enter the agent password. However, it must be the same password entered in the agent profile password file that is used by the agentadmin utility to install the agent.
NOTE: while enabling SSO on Cisco Unified Communications Manager or Cisco Unity Connection, when requested for “Enter the password of the profile name”, the above configured password should be entered.
• Re-Enter Password: Confirm the password.
• In the Server URL field, enter the OpenSSO Enterprise server URL.
• For example: https://<OpenAM FQDN>:8443/opensso
• In the Agent URL field, enter the URL for the agent application.
• For example: https://<Cisco Unity Connection FQDN>:8443/agentapp
• Click Create.
The Console creates the agent profile and displays the J2EE Agent page again with a link to the
new agent profile.

Copyright © 2010 Cisco Systems, Inc. All rights reserved.
Click on the J2EE agent created above, go to Application tab, and under Login processing enter new Login Form URIs.
• For Cisco Unity Connection Administration: / c u a d m i n / W E B - I N F / p a g e s / l o g o n . j s p• For Cisco Unity Connection Serviceability: / c u s e r v i c e / W E B - I N F / p a g e s / l o g o n . j s p• For Cisco Personal Communications Assistant: / c i s c o p c a / W E B - I N F / p a g e s / l o g o n . j s p• For Cisco Unity Connection Web Inbox: / i n b o x / W E B - I N F / p a g e s / l o g o n . j s p• For Cisco Unified CM User option: / c c m u s e r / W E B - I N F / p a g e s / l o g o n . j s p• For CUCiMOC: / c u c m - u d s / W E B - I N F / p a g e s / l o g o n . j s p• For Cisco Unified CM Administration: / c c m a d m i n / W E B - I N F / p a g e s / l o g o n . j s p• For Cisco Unified Serviceability: / c c m s e r v i c e / W E B - I N F / p a g e s / l o g o n . j s p• For Cisco Unified Reporting: / c u c r e p o r t s / W E B - I N F / p a g e s / l o g o n . j s p• For Cisco Unified OS Administration: / c m p l a t f o r m / W E B - I N F / p a g e s / l o g o n . j s p• For Disaster Recovery System: / d r f / W E B - I N F / p a g e s / l o g o n . j s p• For Real Time Monitoring Tool (RTMT): / a s t / W E B - I N F / p a g e s / l o g o n . j s p

Copyright © 2010 Cisco Systems, Inc. All rights reserved.
Under the Application tab, in the section titled “Not Enforced URI Processing” add the following URI:
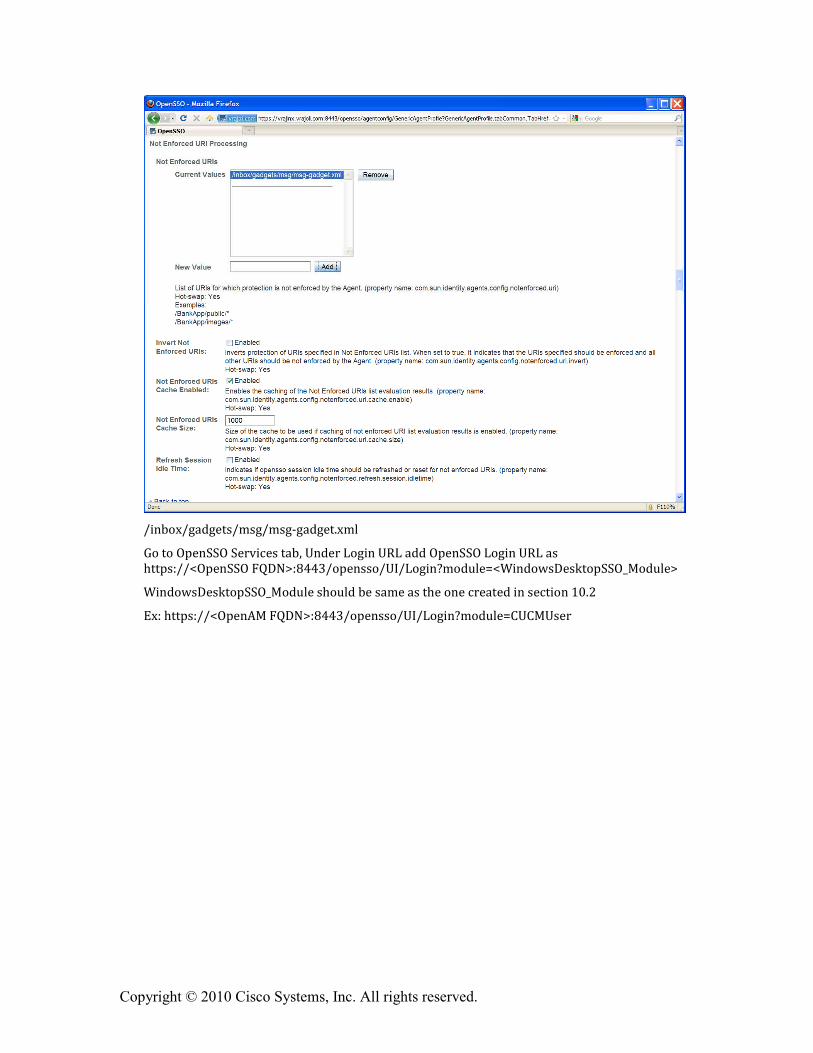
Copyright © 2010 Cisco Systems, Inc. All rights reserved.
/inbox/gadgets/msg/msg-gadget.xml
Go to OpenSSO Services tab, Under Login URL add OpenSSO Login URL as https://<OpenSSO FQDN>:8443/opensso/UI/Login?module=<WindowsDesktopSSO_Module>
WindowsDesktopSSO_Module should be same as the one created in section 10.2
Ex: https://<OpenAM FQDN>:8443/opensso/UI/Login?module=CUCMUser

Copyright © 2010 Cisco Systems, Inc. All rights reserved.

Copyright © 2010 Cisco Systems, Inc. All rights reserved.
11 Undeploying/Removing OpenSSO Enterprise (OpenAM)
11.1 Uninstalling OpenSSO Enterprise (OpemAM) Server deployed on Linux Platform.
• Stop the tomcat running on OpenAM server, by executing shutdown.sh under /root/
apache-tomcat-7.0.0/bin directory.
• Remove the following directories and all of their contents:
� ConfigurationDirectory is the directory created when the OpenSSO Enterprise
instance is initially conf.igured using the Configurator. The default directory is
opensso in the home directory of the user running the Configurator. If the
Configurator is run by root, ConfigurationDirectory is created in the root home
directory (/root).
� user-home-directory.openssocfg where user-home-directory is the home directory
of the user who deployed the opensso.war file. If this user is root, the directory is
/.openssocfg.
Remove the opensso.war file from webapps directory of the tomcat.
Example: /root/ apache-tomcat-7.0.0/webapps
• Start the tomcat on OpenAM Server, by executing startup.sh under /root/ apache-
tomcat-7.0.0/bin directory
11.2 Uninstalling OpenSSO Enterprise (OpenAM) Server deployed on Windows Platform.
• Stop the tomcat service if running on this OpenAM server. (Administrative Tools �
Services � Apache Tomcat 7 � Stop)
• Delete the opensso and .openssocfg folder from the user home directory.
• Delete the opensso.war file from the webapps folder of tomcat. Example:
c:\Program Files\Apache Software Foundation\Tomcat 7.0\webapps
• Start the tomcat from Administrative Tools � Services � Apache Tomcat 7 � Start
12 Configuring Browser’s for SSO

Copyright © 2010 Cisco Systems, Inc. All rights reserved.
Standard browser clients like Internet Explorer, Fire Fox and Safari have the capability to handle
HTTP 401: Negotiate. The steps to enable this capability for Internet Explorer 6/7/8 and Mozilla
Firefox is explained below:
12.1 Internet Explorer
Steps to setup Internet Explorer for SSO –
• Supported version 6.X onwards.
• In the Tool menu, go to Internet Options > Advanced > Security.
Select the check box for Integrated Windows Authentication option
• Go to Tools � Internet Options � Security > Local Intranet.
� Select Custom Level. In the User Authentication/Logon panel/option, select the
Automatic Logon Only in Intranet Zone option.
� Go to Sites and select all of the options.
� Click Advanced and add the OpenSSO Enterprise to the local zone (if it is not added
already).
• Additionally for IE7 and IE8 browsers, go to Tools> Internet Options> Security tab>
Uncheck the “Enable Protected Mode” check box. (requires restarting Internet Explorer)
• For windows machines(Windows7/Windows 2008 and other higher versions) with
extended Protection for Authentication enabled, disable extended Protection for
Authentication by creating registry entry Under registry key
HKEY_LOCAL_MACHINE\SYSTEM\CurrentControlSet\Control\LSA\, Add DWORD value
SuppressExtendedProtection - 0x02
12.2 Mozilla Firefox
Steps to setup FireFox for SSO –
• Supported version 3.x onwards.
• Open Firefox browser.
• At the address field, type about:config.
• In the Filter, type network.n

Copyright © 2010 Cisco Systems, Inc. All rights reserved.
• Double click on network.negotiate-auth.trusted-uris. This preference lists the sites
that are permitted to engage in SPNEGO Authentication with the browser. Enter a comma-
delimited list of trusted domains or URLs. Example:vrajoli.com
12.3 SSO Configurations test with browser
• Logon to domain computer which is member of domain controller (Example:
vrajoli.com)
• Configure the browser capable for SSO, described in section 12.1 and 12.2
• Browse for https://<OpenAM FQDN>:8443/opensso/UI/Login?module=
<WindowsDesktopSSO_Module>, WindowsDesktopSSO_Module should be same as
configured in section 10.2.
In this test, it will be: https://vrajlnx.vrajoli.com:8443/opensso/UI/Login?module=CUCMUser
• You should see You’re logged in message as shown in below screen shot, which
tells all the above configurations are correct.

Copyright © 2010 Cisco Systems, Inc. All rights reserved.
13 Configuring SSO on Cisco Unified Communications Manager 8.5
Before enabling SSO on CUCM 8.5, below configurations has to be done on CUCM.
• Logon to Cisco Unified Serviceability and activate Cisco DirSync service.
• Logon to Cisco Unified CM Administration, go to System � LDAP � LDAP System,
check the ‘Enable Synchronizing from LDAP Server’ checkbox and save. Go to System �
LDAP �LDAP Directory, create a new directory agreement with configuring LDAP
Directory information and LDAP server information, save the configuration and click on
‘Perform Full Sync’ button.
• Upon completion of directory sync, AD users are imported to CUCM.
• On Cisco Unified CM Administration page, go to User Management � End User,
verify all the AD users are available and LDAP Sync Status is Active.

Copyright © 2010 Cisco Systems, Inc. All rights reserved.
• Associate respective User Group to the end users and save.
Since we configure CUCM to talk to OpenAM over https while enabling SSO, we need to import
OpenAM server certificate into Call Manager tomcat-trust store before enabling the SSO on CUCM.
To get the OpenAM server certificate, Login to OpenAM URL (https://<OpenAM
FQDN>:8443/opensso), click on the security icon at the bottom right corner. Click on the Details
tab of Certificate Viewer window, click on export button and save it your desktop.

Copyright © 2010 Cisco Systems, Inc. All rights reserved.
After getting OpenAM server certificate, Logon to CUCM OS Administration page, go to Security
� Certificate Management, Click Upload Certificate button
In the Upload Certificate window, Select certificate name as ‘tomcat-trust’ and browse for the
saved OpenAM certificate and upload it.
Now we have OpenAM server certificate added into CUCM Tomcat-trust store.
13.1 CUCM 8.5 SSO CLI Commands:
There are three CLI command available for managing SSO on CUCM 8.5, they are.
• utils sso enable
• utils sso disable
• utils sso status
13.1.1 utils sso enable
Enables SSO based authentication
This command will start the wizard for enabling SSO on the CUCM. It will ask for
1) OpenAM server URL
2) Relative path for policy agent deployment
3) Profile name configured for this policy agent on the AM server
4) Password for the above
5) Module name configured for Windows Desktop SSO

Copyright © 2010 Cisco Systems, Inc. All rights reserved.
13.1.2 utils sso disable
Disables SSO based authentication, no parameters required.
13.1.3 utils sso status
Provides the status of SSO on this CUCM 8.5, no parameters required.
• When SSO is Disabled:

Copyright © 2010 Cisco Systems, Inc. All rights reserved.
• When SSO is Enabled:
14 Configuring SSO on Cisco Unified Communications Manager 8.6
With CUCM 8.6, SSO is extended to below CUCM Applications along with CCMUser and CUCiMOC.
• Cisco Unified CM Administration
• Cisco Unified Serviceability
• Cisco Unified Reporting
• Cisco Unified OS Administration
• Disaster Recovery System
• RTMT
Before enabling SSO on CUCM 8.6, below configurations has to be done on CUCM.
• Logon to Cisco Unified Serviceability and activate Cisco DirSync service.
• Logon to Cisco Unified CM Administration, go to System LDAP LDAP System, check the ‘Enable Synchronizing from LDAP Server’ checkbox and save. Go to System LDAP LDAP Directory, create a new directory agreement with configuring LDAP Directory information and LDAP server information, save the configuration and click on ‘Perform Full Sync’ button.
• Upon completion of directory sync, AD users are imported to CUCM.
• On Cisco Unified CM Administration page, go to User Management End User, verify all the AD users are available and LDAP Sync Status is Active.
• Associate respective User Group to the end users and save. For an end user to access the SSO enabled applications like Cisco Unified CM Administration, Cisco Unified Serviceability, Cisco Unified Reporting, Cisco Unified OS Administration and RTMT, end user should have ‘Standard Audit Users’, ‘Standard CCM Super Users’ User Groups associated.
Since we configure CUCM to talk to OpenAM over https while enabling SSO, we need to import OpenAM server certificate into Call Manager tomcat-trust store before enabling the SSO on CUCM.

Copyright © 2010 Cisco Systems, Inc. All rights reserved.
14.1 CUCM 8.6 SSO CLI Commands:
14.1.1 utils sso enable
This command will enable SSO for below options selectively.
Cisco Unified CM Administration (CUCM Admin, CU Serviceability, CU Reporting)
Cisco Unified CM User Options (CUCM End User options)
Cisco Unified Operating System Administration (CUCM OS Admin, DRF)
Cisco Unified Data Service (CUCiMOC)
RTMT
This command will start the wizard for enabling SSO on the CUCM. It will ask for
1) OpenAM server URL
2) Relative path for policy agent deployment
3) Profile name configured for this policy agent on the AM server
4) Password for the above
5) Module name configured for Windows Desktop SSO

Copyright © 2010 Cisco Systems, Inc. All rights reserved.
14.1.2 utils sso disable
Disables SSO for SSO enabled options.

Copyright © 2010 Cisco Systems, Inc. All rights reserved.
14.1.3 utils sso status
Displays the list of SSO enabled applications.
14.2 CUCM 8.6 SSO GUI
From CUCM 8.6 release, SSO configurations (SSO enable/disable/status) are supported from GUI as well.
To configure SSO from GUI, Logon to Cisco Unified OS Administration, Go to Security � Single Sign on and you will see below configuration page.

Copyright © 2010 Cisco Systems, Inc. All rights reserved.
For enabling SSO from GUI, the same parameters were requested as requested from CLI. All the inputs will be validated before enabling SSO to selected application. Check box is provided for selecting the application(s), set the check-box to select the application for enabling SSO and click on save button. After successful validation of all the inputs, a pop-up window is displayed saying ‘Enabling/Disabling SSO for the applications will cause Tomcat to restart. Do you want to continue?’ press OK button if you want to proceed else click Cancel button to cancel.
Below is the snapshot when SSO is enabled for all applications.

Copyright © 2010 Cisco Systems, Inc. All rights reserved.
To disable SSO enabled application(s), uncheck the check box of the SSO enabled application(s), then click on save button. pop-up window is displayed saying ‘Enabling/Disabling SSO for the applications will cause Tomcat to restart. Do you want to continue?’ press OK button if you want to proceed else click Cancel button to cancel.
15 Configuring SSO on Cisco Unity Connection 8.6 Before enabling SSO on CUCM 8.6, below configurations has to be done on Cisco Unity Connection.
• Import users to Unity Connection either directly from LDAP server OR from CUCM, however users imported from CUCM must first be imported from LDAP to CUCM). Users must be configured with the appropriate roles to log in to Cisco Unity Connection Administration, or Cisco Unity Connection Serviceability.
• For co-res and stand-alone Connection server, users accounts that will access Cisco Unity Connection Administration and Cisco Unity Connection Serviceability, must have the "System Administrator" role. To give a user the "System Administrator" role, select the user in Cisco Unity Connection Administration, choose Edit/Roles from the menu, then select "System Administrator" from the available roles, and add it to the user's Assigned Roles
• Since we configure CUCM to talk to OpenAM over https while enabling SSO, we need to import OpenAM server certificate into Call Manager tomcat-trust store before enabling the SSO on Unity Connection.
15.1 CUC 8.6 SSO CLI Commands
There are three CLI command available for managing SSO on CUCM 8.5, they are.
• utils sso enable

Copyright © 2010 Cisco Systems, Inc. All rights reserved.
• utils sso disable
• utils sso status
15.1.1 utils sso enable
Enables SSO based authentication. Connection offers following options for enabling SSO:
• Cisco Unified CM Administration (CUCM Admin, CU Serviceability, CU Reporting)
• Cisco Unified CM User Options (CUCM End User options)
• Cisco Unified Operating System Administration (CUCM OS Admin, DRF)
• Cisco Unity Connection PCA and Web Inbox
• Cisco Unity Connection Administration
• Cisco Unified Data Service (CUCiMOC)
• RTMT
This command will start the wizard for enabling SSO on the CUCM. It will ask for
1) OpenAM server URL
2) Relative path for policy agent deployment
3) Profile name configured for this policy agent on the AM server
4) Password for the above
5) Module name configured for Windows Desktop SSO

Copyright © 2010 Cisco Systems, Inc. All rights reserved.

Copyright © 2010 Cisco Systems, Inc. All rights reserved.
15.1.2 utils sso disable
Disables SSO based authentication, no parameters required.
15.1.3 utils sso status
Provides the status of SSO on UC 8.6, no parameters required
15.2 Cisco Unity Connection 8.6 SSO GUI
To configure SSO from GUI, Logon to Cisco Unified OS Administration, Go to Security � Single Sign on and you will see below configuration page.

Copyright © 2010 Cisco Systems, Inc. All rights reserved.
For enabling SSO from GUI, the same parameters were requested as requested from CLI. All the inputs will be validated before enabling SSO to selected application. Check box is provided for selecting the application(s), set the check-box to select the application for enabling SSO and click on save button. After successful validation of all the inputs, a pop-up window is displayed saying ‘Enabling/Disabling SSO for the applications will cause Tomcat to restart. Do you want to continue?’ press OK button if you want to proceed else click Cancel button to cancel.
Below is the snapshot when SSO is enabled for all applications.

Copyright © 2010 Cisco Systems, Inc. All rights reserved.
16 OpenSSO Enterprise Session Failover
NOTE: Refer this chapter if you wish to configure the session failover
Session failover ensures that session data remains accessible to OpenSSO Enterprise servers and OpenSSO Enterprise Policy Agents. Service requests are routed to a failover server, the user's session continues uninterrupted, and no user data is lost. The OpenSSO Enterprise Session Service maintains authenticated session states and continues processing new client requests subsequent to the failure. In most cases, without session failover, after system failure and subsequent service recovery, the user would have to re-authenticate.
Session failover is critical when end-users' transactions involve financial data or other sensitive information that is difficult to recover when a system failure occurs. With session failover, when a system failover occurs, the user's transaction can proceed uninterrupted. Session failover is less important if end-users are, for example, reading but not writing data.
When you configure OpenSSO Enterprise for session failover, the user's authenticated session state is stored in the Berkeley Database in the event of a single hardware or software failure. In session failover deployments, you configure the OpenSSO Enterprise servers to communicate with Message Queue brokers which manage session state persistence in the Berkeley Database. This configuration enables the users session to fail over to a backup OpenSSO Enterprise server without losing any session state information. The user does not have to login again. The backup OpenSSO Enterprise server is determined among the available servers in the configuration list by an internal algorithm.

Copyright © 2010 Cisco Systems, Inc. All rights reserved.
This type of deployment ensures the state availability even if one of the OpenSSO Enterprise servers is inaccessible due to scheduled maintenance, hardware failure, or software failure. However, the single load balancer can be a single point of failure. When this load balancer is inaccessible, no OpenSSO Enterprise
16.1 Requirements for AMSFO
Key components that are required for basic session failover in an OpenSSO Enterprise deployment for high availability are:
• A single load balancer distributes the workload among multiple OpenSSO Enterprise This increases transaction throughput, and ensures failover when a system failure occurs.
• Multiple OpenSSO Enterprise servers with respective embedded Directory Servers act as backups when system failure occurs. Embedded Directory Servers ensure that replicated configuration data is always available even during system failure.
• When OpenSSO Enterprise is configured for session failover, a Java Message Queue Broker Cluster replicates session data and stores it in the Berkeley Database. When a system failure occurs, the replicated session data is made available to Policy Agents so that the end-user does not lose data and does not have to re-authenticate after system recovery.
• Multiple Berkeley Databases are used to store session data, and are configured for session failover. If one Berkeley Database fails, the working Berkeley Database can provide session data to the OpenSSO Enterprise servers for session validation.
In all examples in this chapter, load balancers represent the only access points to OpenSSO Enterprise servers. An access point can be any hardware or software that acts as a load balancer, and is associated with a site, that is installed in front of OpenSSO Enterprise servers. Policy Agents interact with OpenSSO Enterprise servers through these access points.
16.2 Configuration of AMSFO components
16.2.1 Installation and configuration of Load Balancer
16.2.1.1 Installation of Load Balancer on Linux Platform.
To configure load balancer on Linux platform, install the Red Hat Enterprise Linux 5.5 (lower version of RHEL can also be used). Once RHEL is installed, configure network settings and create an entry in DNS servers for this RHEL host. Once everything is configured on this RHEL server, we will install Sun Java System Web Server application for load balancing.
In this guide we will be configuring Sun Java System Web Server as the load balancer; you can get the Sun Java System Web Server setup file from https://cds.sun.com/is-bin/INTERSHOP.enfinity/WFS/CDS-CDS_SMI-Site/en_US/-/USD/ViewProductDetail-Start?ProductRef=SJWS-7-TechPrvw-OTH-G-Beta@CDS-CDS_SMI URL.
On the above download page, select the platform as Linux and download the installation file.
Copy the installation file to the above RHEL server at any location and run the setup.

Copyright © 2010 Cisco Systems, Inc. All rights reserved.
+++++++++++++++++++++++++++++++++++++++++++++++++++++++++++++++++++++++++
[root@ssoloadbal Sun Java System Web Server]# ./setup
Welcome to the Oracle iPlanet Web Server 7.0.9 installation wizard.
Copyright (c) 2007, 2010, Oracle and/or its affiliates. All rights reserved.
Oracle and Java are registered trademarks of Oracle and/or its affiliates.
Other names may be trademarks of their respective owners.
You will be asked to specify preferences that determine how Oracle iPlanet Web
Server 7.0.9 is installed and configured.
The installation program pauses as questions are presented so you can read the
information and make your choice. When you are ready to continue, press Enter
(Return on some keyboards).
<Press ENTER to Continue>
Some questions require that you provide more detailed information. Some
questions also display default values in brackets []. For example, yes is the
default answer to the following question:
Are you sure? [yes]
To accept the default, press Enter.
To provide a different answer, type the information at the command prompt and
then press Enter.
<Press ENTER to Continue>
Oracle iPlanet Web Server components will be installed in the directory listed
below, referred to as the installation directory. To use the specified

Copyright © 2010 Cisco Systems, Inc. All rights reserved.
directory, press Enter. To use a different directory, enter the full path of
the directory and press Enter.
Oracle iPlanet Web Server Installation Directory [/opt/oracle/webserver7]
{"<" goes back, "!" exits}:
Specified directory /opt/oracle/webserver7 does not exist
Create Directory? [Yes/No] [yes] {"<" goes back, "!" exits} yes
Select the Type of Installation
1. Express
2. Custom
3. Exit
What would you like to do [1] {"<" goes back, "!" exits}? 1
Choose a user name and password. You must remember this user name and password
to administer the Web Server after installation.
Administrator User Name [admin] {"<" goes back, "!" exits}
Administrator Password:
Retype Password:
Product : Oracle iPlanet Web Server
Location : /opt/oracle/webserver7
Disk Space : 231.37 MB
------------------------------------------------------
Administration Command Line Interface

Copyright © 2010 Cisco Systems, Inc. All rights reserved.
Server Core
Start Administration Server [yes/no] [yes] {"<" goes back, "!" exits}: yes
Ready to Install
1. Install Now
2. Start Over
3. Exit Installation
What would you like to do [1] {"<" goes back, "!" exits}? 1
Installing Oracle iPlanet Web Server
|-1%--------------25%-----------------50%-----------------75%--------------100%|
Installation Successful.
Refer to the installation log file at:
/opt/oracle/webserver7/setup/install.log for more details.
Next Steps:
- You can access the Administration Console by accessing the following URL: h t t p s : / / s s o l o a d b a l . v r a j o l i . c o m : 8 9 8 9[root@ssoloadbal Sun Java System Web Server]#
+++++++++++++++++++++++++++++++++++++++++++++++++++++++++++++++++++++++++
16.2.1.2 Installation of Load Balancer on Windows platform.
To configure load balancer on windows platform, install Windows XP SP2/Windows server 2003. Once windows OS is installed, configure network settings and create an entry in DNS servers for this host. Once everything is configured on this windows machine, we will install Sun Java System Web Server application for load balancing.

Copyright © 2010 Cisco Systems, Inc. All rights reserved.
In this guide we will be configuring Sun Java System Web Server as the load balancer; you can get the Sun Java System Web Server setup file from https://cds.sun.com/is-bin/INTERSHOP.enfinity/WFS/CDS-CDS_SMI-Site/en_US/-/USD/ViewProductDetail-Start?ProductRef=SJWS-7-TechPrvw-OTH-G-Beta@CDS-CDS_SMI URL.
On the above download page, select the platform as windows xp/windows server 2003 and download the installation file.
Copy the installation file to the above windows server at any location and run the setup.
Below is the example of setup done in this guide
+++++++++++++++++++++++++++++++++++++++++++++++++++++++++++++++++++++++++
C:\Documents and Settings\Administrator\Desktop\sjsws-7_0u1-windows-i586>dir
Volume in drive C has no label.
Volume Serial Number is 1C23-BFE7
Directory of C:\Documents and Settings\Administrator\Desktop\sjsws-7_0u1-windows-i586
09/25/2010 10:35 PM <DIR> .
09/25/2010 10:35 PM <DIR> ..
09/25/2010 10:35 PM <DIR> Legal
09/25/2010 01:20 PM 751 README.txt
09/25/2010 01:22 PM 20,603 setup.exe
09/25/2010 10:34 PM <DIR> WebServer
2 File(s) 21,354 bytes
4 Dir(s) 8,806,412,288 bytes free
C:\Documents and Settings\Administrator\Desktop\sjsws-7_0u1-windows-i586>setup.exe
Copyright © 2010 Cisco Systems, Inc. All rights reserved.

Copyright © 2010 Cisco Systems, Inc. All rights reserved.

Copyright © 2010 Cisco Systems, Inc. All rights reserved.

Copyright © 2010 Cisco Systems, Inc. All rights reserved.
Copyright © 2010 Cisco Systems, Inc. All rights reserved.

Copyright © 2010 Cisco Systems, Inc. All rights reserved.
+++++++++++++++++++++++++++++++++++++++++++++++++++++++++++++++++++++++++
16.2.1.3 Configuration of Load Balancer for HTTP load balancing
Browse the Load Balancer URL, https://ssoloadbal.vrajoli.com:8989, you will be presented with below login page, Login to the admin console.

Copyright © 2010 Cisco Systems, Inc. All rights reserved.
After login, you will see below page,

Copyright © 2010 Cisco Systems, Inc. All rights reserved.
Click on Configurations tab, then click on the load balancer name (ssoloadbal.vrajoli.com) as shown below (Configurations � Load Balancer Name)

Copyright © 2010 Cisco Systems, Inc. All rights reserved.
After clicking on the load balancer name, you will see below page,

Copyright © 2010 Cisco Systems, Inc. All rights reserved.
Click on the Load Balancer Name (ssoloadbal.vrajoli.com) under Virtual Servers, you will see the below page.

Copyright © 2010 Cisco Systems, Inc. All rights reserved.
Click on HTTP Listeners, then click on http-listener-1 and set the port value to 8443 as shown below. Click on Apply button followed by Close button.

Copyright © 2010 Cisco Systems, Inc. All rights reserved.
Then Click in Content Handling tab under Configurations � ssoloadbal.vrajoli.com � Virtual Servers � ssoloadbal.vrajoli.com.
Under Content handling tab, select Reverse Proxy tab.

Copyright © 2010 Cisco Systems, Inc. All rights reserved.
Click on New button.
You will see below page.

Copyright © 2010 Cisco Systems, Inc. All rights reserved.
Under URI Prefix, enter / and under Server Names enter the OpenAM Enterprise servers hostname. In this guide, we have two OpenAM Enterprise servers namely cucmsso1.vrajoli.com and cucmsso2.vrajoli.com. Click on OK button.
URI Prefix: /
Server Names: https://cucmsso1.vrajoli.com:8443,https://cucmsso2.vrajoli.com:8443
Later you see Reverse Proxy URI Created Successfully.

Copyright © 2010 Cisco Systems, Inc. All rights reserved.
Click on / URI Prefix, modify the sticky cookie value to amlbcookie instead of JSESSIONID
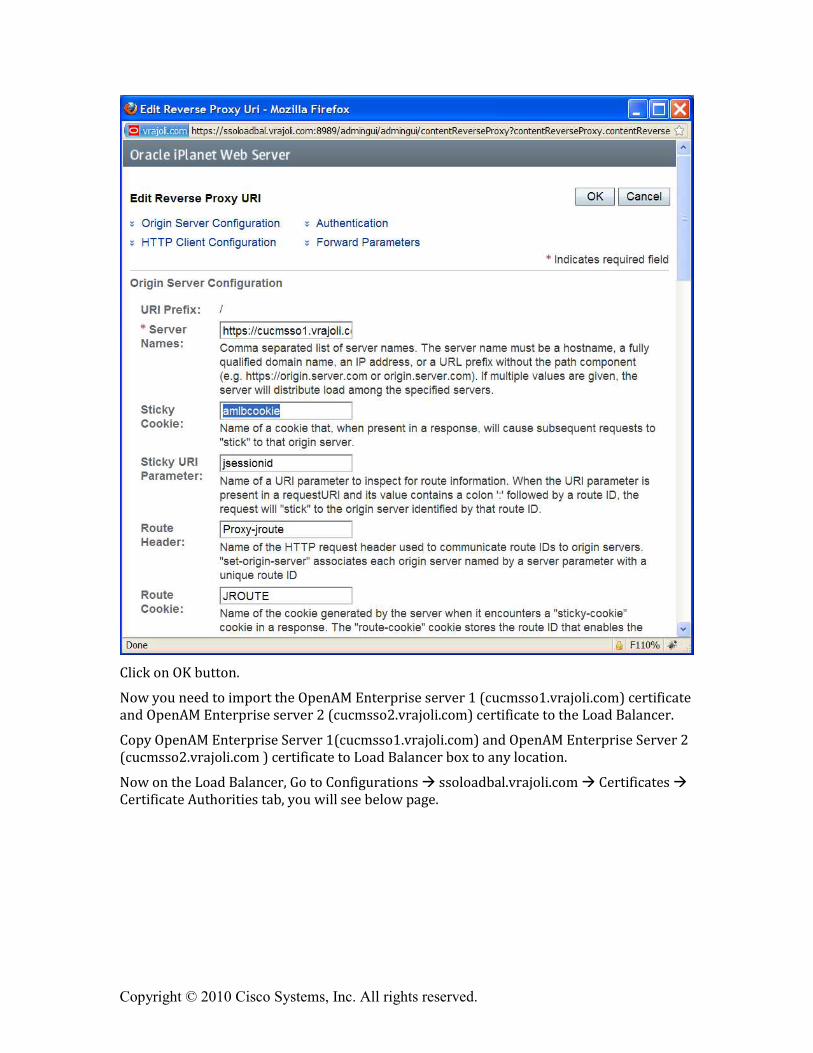
Copyright © 2010 Cisco Systems, Inc. All rights reserved.
Click on OK button.
Now you need to import the OpenAM Enterprise server 1 (cucmsso1.vrajoli.com) certificate and OpenAM Enterprise server 2 (cucmsso2.vrajoli.com) certificate to the Load Balancer.
Copy OpenAM Enterprise Server 1(cucmsso1.vrajoli.com) and OpenAM Enterprise Server 2 (cucmsso2.vrajoli.com ) certificate to Load Balancer box to any location.
Now on the Load Balancer, Go to Configurations � ssoloadbal.vrajoli.com � Certificates � Certificate Authorities tab, you will see below page.

Copyright © 2010 Cisco Systems, Inc. All rights reserved.
Click on Install button, then you will be taken to Install CA Certificate wizard.

Copyright © 2010 Cisco Systems, Inc. All rights reserved.
Click on Next,

Copyright © 2010 Cisco Systems, Inc. All rights reserved.
Select ‘Certificate File’ radio button and specify the path where you have stored the OpenAM Enterprise Server 1 certificate,.
Click Next button, you will see below page.

Copyright © 2010 Cisco Systems, Inc. All rights reserved.
Click on Next button.

Copyright © 2010 Cisco Systems, Inc. All rights reserved.
Click in Finish button and you will see below page.

Copyright © 2010 Cisco Systems, Inc. All rights reserved.
Similary, install the OpenAM Enterprise server 2 (cucmsso2.vrajoli.com) certificate.
After importing all the OpenAM Enterprise server certificates to Load Balancer, Click on Deployment Pending link on the right top corner.

Copyright © 2010 Cisco Systems, Inc. All rights reserved.
you will see below page, after clicking on Deployment Pending.

Copyright © 2010 Cisco Systems, Inc. All rights reserved.
Click on Deploy button. You will see below page after successful deployment.

Copyright © 2010 Cisco Systems, Inc. All rights reserved.
Click on Close button.
16.2.2 Installation and configuration of session failover components
16.2.2.1 Configuration of session failover components on Linux Platform
Pre-Requisites: one or more OpenAM Enterprise servers (for session failover) installed and configured on Linux platform. For installing OpenAM Enterprise on Linux platform, please refer white paper of <>
In this guide, we have two OpenAM Enterprise servers for session failover.
OpenAM Enterprise server 1 � cucmsso1.vrajoli.com
OpenAM Enterprise server 2 � cucmsso2.vrajoli.com
Install the OpenSSO Enterprise session failover components on the cucmsso1.vrajoli.com host machine and thecucmsso2.vrajoli.com host machine

Copyright © 2010 Cisco Systems, Inc. All rights reserved.
To Install Session Failover Components on cucmsso1.vrajoli.com OpenAM Enterprise server on Linux
1. As a root user, log in to the cucmsso1.vrajoli.com host machine. 2. Create a directory into which the MessageQueue and BerkeleyDatabase bits can be
downloaded and change into it.
# mkdir /export/SFO
# cd /export/SFO 3. Copy ssoSessionTools.zip to the cucmsso1.vrajoli.com host machine,
ssoSessionTools.zip is included in the openam_release9_20100207.zip file under the tools directory. (openam_release9_20100207/opensso/tools/ssoSessionTools.zip)
4. Unzip ssoSessionTools.zip.
# cd /export/SFO
# unzip ssoSessionTools.zip -d ssoSessionTools 5. Modify the permissions on the setup script and run it to initialize the session failover
tools.
# cd /export/SFO/ssoSessionTools
# chmod +x setup
# ./setup 6. When prompted, enter opensso as the Directory to install the scripts (example:
opensso).
Note – The directory location should be relative to the current directory.
When the script is finished, the following messages are displayed:
The scripts are properly setup under directory
/export/SFO/ssoSessionTools/opensso
JMQ is properly setup under directory
/export/SFO/ssoSessionTools/jmq 7. Change to the bin directory.
# cd /export/SFO/ssoSessionTools/jmq/imq/bin 8. Run the imqbrokerd command to create a new broker instance named msgqbroker.
# ./imqbrokerd -name msgqbroker -port 7777 & 9. Run netstat to verify that the newMessageQueue broker instance is up and running.
# netstat -an | grep 7777
*.7777 *.* 0 0 49152 0 LISTEN 10. Add a new user named msgquser.
This user will connect to theMessage Queue broker instance on servers whereMessage Queue is installed. This user will be used only for session failover purposes, and does not assume the privileges of the guest user. It is a good practice to create a custom user for such purposes, and not to rely on the known user accounts or default user accounts to help prevent brute force or DOS attacks.

Copyright © 2010 Cisco Systems, Inc. All rights reserved.
# ./imqusermgr add -u msgquser -g admin -p m5gqu5er -i msgqbroker
User repository for broker instance: msgqbroker
User msgquser successfully added. 11. Disable the guest user.
This step ensures that the guest user will not be able to access the OpenSSO Enterprise server.
# ./imqusermgr update -u guest -a false -i msgqbroker
User repository for broker instance: msgqbroker
Are you sure you want to update user guest? (y/n) y
User guest successfully updated. 12. Modify the amsfo.conf file.
amsfo.conf has parameters that are consumed by the OpenSSO Enterprise session failover startup script, amsfo.
• Change to the lib directory.
# cd /export/SFO/ssoSessionTools/opensso/config/lib
• Set the following properties:
CLUSTER_LIST=cucmsso1.vrajoli.com.example.com:7777,cucmsso2.vrajoli.com.example.com:7777
BROKER_INSTANCE_NAME=msgqbroker
USER_NAME=msgquser
BROKER_PORT=7777
Note – The port used for BROKER_PORT should be the same as the one used in the value of the CLUSTER_LIST.
• Save the file and close it. 13. Generate an encrypted password in a .password file with the following sub procedure.
• Change to the bin directory. # cd /export/SFO/ssoSessionTools/opensso/bin
• Run amsfopassword. This command generates an encrypted password, creates a new file named .password, and stores the encrypted password in the new file. Caution – amsfopassword creates the .password file in a default location based on where the scripts were installed. If a different location is used, the PASSWORDFILE property in amsfo.conf should be changed accordingly. # ./amsfopassword -e m5gqu5er -f /export/SFO/ssoSessionTools/opensso/.password os.name=SunOS SUCCESSFUL
• (Optional)View the encrypted password for verification. # more /export/SFO/ssoSessionTools/opensso/.password M27OGb6U4ufRu+oWAzBdWw==
14. (Optional) Modify the amsessiondb script if necessary.

Copyright © 2010 Cisco Systems, Inc. All rights reserved.
The amsessiondb script (located in the /export/SFO/ssoSessionTools/opensso/bin directory) starts the BerkeleyDatabase client, creates the database, and sets specific database values. It is called when the amsfo script is run for the first time. The amsessiondb script contains variables that specify default paths and directories. If any of the following components are not installed in their default directories, edit the amsessiondb script to set the variables to the correct locations.
IMQ_JAR_PATH=/export/SFO/ssoSessionTools/jmq/imq/lib JMS_JAR_PATH=/export/SFO/ssoSessionTools/jmq/imq/lib AM_HOME=/export/SFO/ssoSessionTools Tip – Backup amsessiondb before you modify it.
15. Restart the session failover components with the following sub procedure.
a. Change to the bin directory. # cd /export/SFO/ssoSessionTools/jmq/imq/bin b. Stop the MessageQueue instance using the product's command line interface. See theMessage Queue documentation for more information. c. Run the netstat command to verify that the cucmsso1.vrajoli.com broker instance is stopped. # netstat -an | grep 7777 If netstat returns no result, the cucmsso1.vrajoli.com broker instance is stopped. Tip – If the cucmsso1.vrajoli.com broker instance is not stopped, kill the process using the following procedure. a. Get the Java process IDs. # ps -ef | grep java b. Kill the Java process IDs that were returned. # kill -9 #### #### c. Run netstat again. d. Restart the cucmsso1.vrajoli.com broker instance. # cd /export/SFO/ssoSessionTools/opensso/bin # ./amfso start e. Run the netstat command to verify that the MessageQueue port is open and listening. # netstat -an | grep 7777 *.7777 *.* 0 0 49152 0 LISTEN
16. Log out of the cucmsso1.vrajoli.com host machine.
To Install Session Failover Components on cucmsso2.vrajoli.com
1. As a root user, log in to the mq–2 host machine. 2. Create a directory into which the MessageQueue and BerkeleyDatabase bits can be
downloaded and change into it.
# mkdir /export/SFO
# cd /export/SFO
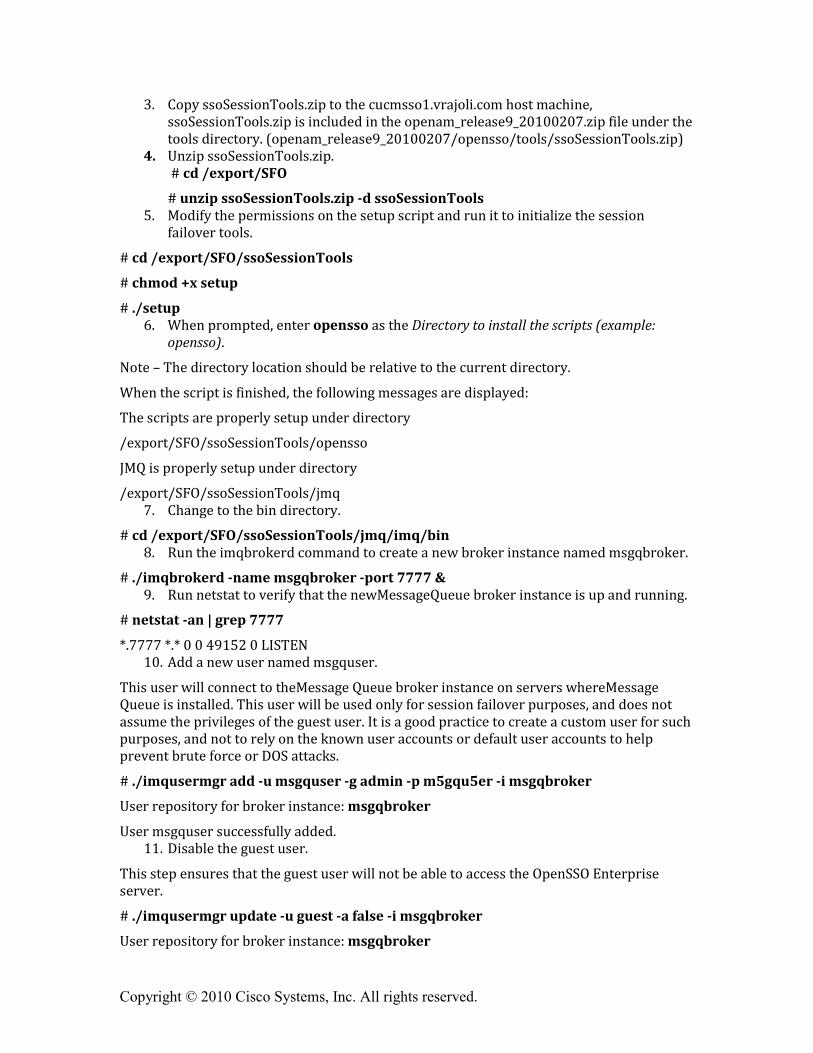
Copyright © 2010 Cisco Systems, Inc. All rights reserved.
3. Copy ssoSessionTools.zip to the cucmsso1.vrajoli.com host machine, ssoSessionTools.zip is included in the openam_release9_20100207.zip file under the tools directory. (openam_release9_20100207/opensso/tools/ssoSessionTools.zip)
4. Unzip ssoSessionTools.zip. # cd /export/SFO
# unzip ssoSessionTools.zip -d ssoSessionTools 5. Modify the permissions on the setup script and run it to initialize the session
failover tools.
# cd /export/SFO/ssoSessionTools
# chmod +x setup
# ./setup 6. When prompted, enter opensso as the Directory to install the scripts (example:
opensso).
Note – The directory location should be relative to the current directory.
When the script is finished, the following messages are displayed:
The scripts are properly setup under directory
/export/SFO/ssoSessionTools/opensso
JMQ is properly setup under directory
/export/SFO/ssoSessionTools/jmq 7. Change to the bin directory.
# cd /export/SFO/ssoSessionTools/jmq/imq/bin 8. Run the imqbrokerd command to create a new broker instance named msgqbroker.
# ./imqbrokerd -name msgqbroker -port 7777 & 9. Run netstat to verify that the newMessageQueue broker instance is up and running.
# netstat -an | grep 7777
*.7777 *.* 0 0 49152 0 LISTEN 10. Add a new user named msgquser.
This user will connect to theMessage Queue broker instance on servers whereMessage Queue is installed. This user will be used only for session failover purposes, and does not assume the privileges of the guest user. It is a good practice to create a custom user for such purposes, and not to rely on the known user accounts or default user accounts to help prevent brute force or DOS attacks.
# ./imqusermgr add -u msgquser -g admin -p m5gqu5er -i msgqbroker
User repository for broker instance: msgqbroker
User msgquser successfully added. 11. Disable the guest user.
This step ensures that the guest user will not be able to access the OpenSSO Enterprise server.
# ./imqusermgr update -u guest -a false -i msgqbroker
User repository for broker instance: msgqbroker

Copyright © 2010 Cisco Systems, Inc. All rights reserved.
Are you sure you want to update user guest? (y/n) y
User guest successfully updated. 12. Modify the amsfo.conf file with the following sub procedure.
amsfo.conf has parameters that are consumed by the OpenSSO Enterprise session failover
startup script, amsfo.
a. Change to the lib directory.
# cd /export/SFO/ssoSessionTools/opensso/config/lib
Tip – Backup amsfo.conf before you modify it.
b. Set the following properties:
CLUSTER_LIST=mq-1.example.com:7777,cucmsso2.vrajoli.com.example.com:7777
BROKER_INSTANCE_NAME=msgqbroker
USER_NAME=msgquser
BROKER_PORT=7777
Note – The port used for BROKER_PORT should be the same as the one used in the value of the
CLUSTER_LIST.
c. Save the file and close it. 13. Generate an encrypted password in a .password file with the following sub
procedure.
a. Change to the bin directory.
# cd /export/SFO/ssoSessionTools/opensso/bin
b. Run amsfopassword.
This command generates an encrypted password, creates a new file named .password, and
stores the encrypted password in the new file.
Caution – amsfopassword creates the .password file in a default location based on where the scripts were installed. If a different location is used, the PASSWORDFILE property in amsfo.conf should be changed accordingly.
# ./amsfopassword -e m5gqu5er -f /export/SFO/ssoSessionTools/opensso/.password
os.name=SunOS
SUCCESSFUL
c. (Optional)View the encrypted password for verification.
# more /export/SFO/ssoSessionTools/opensso/.password
M27OGb6U4ufRu+oWAzBdWw== 14. (Optional) Modify the amsessiondb script if necessary.
The amsessiondb script (located in the /export/SFO/ssoSessionTools/opensso/bin directory) starts the BerkeleyDatabase client, creates the database, and sets specific

Copyright © 2010 Cisco Systems, Inc. All rights reserved.
database values. It is called when the amsfo script is run for the first time. The amsessiondb script contains variables that specify default paths and directories. If any of the following components are not installed in their default directories, edit the amsessiondb script to set the variables to the correct locations.
IMQ_JAR_PATH=/export/SFO/ssoSessionTools/jmq/imq/lib
JMS_JAR_PATH=/export/SFO/ssoSessionTools/jmq/imq/lib
AM_HOME=/export/SFO/ssoSessionTools
Tip – Backup amsessiondb before you modify it. 15. Restart the session failover components.
a. Change to the bin directory.
# cd /export/SFO/ssoSessionTools/jmq/imq/bin
b. Stop the MessageQueue instance using the product's command line interface.
See theMessage Queue documentation for more information.
c. Run the netstat command to verify that the cucmsso2.vrajoli.com broker instance is stopped.
# netstat -an | grep 7777
If netstat returns no result, the cucmsso2.vrajoli.com broker instance is stopped.
Tip – If the cucmsso2.vrajoli.com broker instance is not stopped, kill the process using the following
procedure.
a. Get the Java process IDs.
# ps -ef | grep java
b. Kill the Java process IDs that were returned.
# kill -9 #### ####
c. Run netstat again.
d. Restart the cucmsso2.vrajoli.com broker instance.
# cd /export/SFO/ssoSessionTools/opensso/bin
# ./amfso start
e. Run the netstat command to verify that the MessageQueue port is open and listening.
# netstat -an | grep 7777
*.7777 *.* 0 0 49152 0 LISTEN 16. Log out of the cucmsso2.vrajoli.com host machine.

Copyright © 2010 Cisco Systems, Inc. All rights reserved.
16.2.2.2 Configuration of session failover components of windows platform
To Install Session Failover Components on cucmsso1.vrajoli.com OpenAM Enterprise server on Windows
1. Log in to the server where you want to install and configure the session failover
components (cucmsso1.vrajoli.com) 2. Copy ssoSessionTools.zip to the cucmsso1.vrajoli.com host machine,
ssoSessionTools.zip is included in the openam_release9_20100207.zip file under the tools directory. (openam_release9_20100207/opensso/tools/ssoSessionTools.zip)
3. Unzip ssoSessionTools.zip to ssoSessionTools folder and cd to ssoSessionTools folder C : \ > c d s s o S e s s i o n T o o l s
4. Run the setup.bat script to install the session tools on Windows systems. C : \ s s o S e s s i o n T o o l s > s e t u p . b a tName of the directory to install the scripts (example: sfoscripts):sfoscripts
The scripts are properly setup under directory: C:\ssoSessionTools\sfoscripts
JMQ is properly setup under directory C:\ssoSessionTools\jmq
5. Change to bin folder.
6. Run the imqbrokerd command to create a new broker instance named msgqbroker. C : \ s s o S e s s i o n T o o l s \ j m q \ i m q \ b i n > i m q b r o k e r d . e x e - n a m e m s g q b r o k e r - p o r t7 7 7 7 &[25/Sep/2010:23:38:40 IST]
================================================================================
Sun GlassFish(tm) Message Queue 4.4
Sun Microsystems, Inc.
Version: 4.4 (Build 16-a)
Compile: Thu 08/27/2009
Copyright (c) 2009 Sun Microsystems, Inc. All rights reserved. Use is
subject to license terms.
================================================================================
Java Runtime: 1.6.0_21 Sun Microsystems Inc. c:\Program Files\Java\jdk1.6.0_21\jre
[25/Sep/2010:23:38:40 IST] IMQ_HOME=C:\ssoSessionTools\jmq\imq
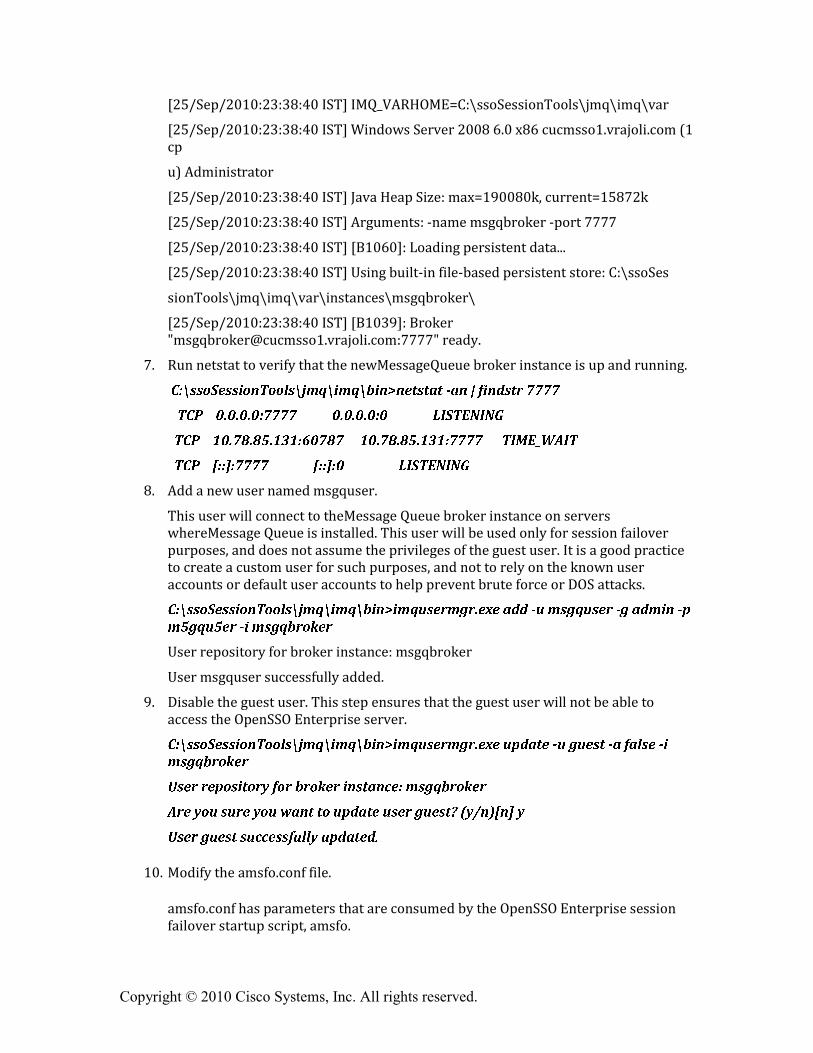
Copyright © 2010 Cisco Systems, Inc. All rights reserved.
[25/Sep/2010:23:38:40 IST] IMQ_VARHOME=C:\ssoSessionTools\jmq\imq\var
[25/Sep/2010:23:38:40 IST] Windows Server 2008 6.0 x86 cucmsso1.vrajoli.com (1 cp
u) Administrator
[25/Sep/2010:23:38:40 IST] Java Heap Size: max=190080k, current=15872k
[25/Sep/2010:23:38:40 IST] Arguments: -name msgqbroker -port 7777
[25/Sep/2010:23:38:40 IST] [B1060]: Loading persistent data...
[25/Sep/2010:23:38:40 IST] Using built-in file-based persistent store: C:\ssoSes
sionTools\jmq\imq\var\instances\msgqbroker\
[25/Sep/2010:23:38:40 IST] [B1039]: Broker "[email protected]:7777" ready.
7. Run netstat to verify that the newMessageQueue broker instance is up and running.
C : \ s s o S e s s i o n T o o l s \ j m q \ i m q \ b i n > n e t s t a t - a n | f i n d s t r 7 7 7 7T C P 0 . 0 . 0 . 0 : 7 7 7 7 0 . 0 . 0 . 0 : 0 L I S T E N I N GT C P 1 0 . 7 8 . 8 5 . 1 3 1 : 6 0 7 8 7 1 0 . 7 8 . 8 5 . 1 3 1 : 7 7 7 7 T I M E _ W A I TT C P [ : : ] : 7 7 7 7 [ : : ] : 0 L I S T E N I N G
8. Add a new user named msgquser.
This user will connect to theMessage Queue broker instance on servers whereMessage Queue is installed. This user will be used only for session failover purposes, and does not assume the privileges of the guest user. It is a good practice to create a custom user for such purposes, and not to rely on the known user accounts or default user accounts to help prevent brute force or DOS attacks. C : \ s s o S e s s i o n T o o l s \ j m q \ i m q \ b i n > i m q u s e r m g r . e x e a d d - u m s g q u s e r - g a d m i n - pm 5 g q u 5 e r - i m s g q b r o k e rUser repository for broker instance: msgqbroker
User msgquser successfully added.
9. Disable the guest user. This step ensures that the guest user will not be able to access the OpenSSO Enterprise server. C : \ s s o S e s s i o n T o o l s \ j m q \ i m q \ b i n > i m q u s e r m g r . e x e u p d a t e - u g u e s t - a f a l s e - im s g q b r o k e rU s e r r e p o s i t o r y f o r b r o k e r i n s t a n c e : m s g q b r o k e rA r e y o u s u r e y o u w a n t t o u p d a t e u s e r g u e s t ? ( y / n ) [ n ] yU s e r g u e s t s u c c e s s f u l l y u p d a t e d .
10. Modify the amsfo.conf file.
amsfo.conf has parameters that are consumed by the OpenSSO Enterprise session failover startup script, amsfo.

Copyright © 2010 Cisco Systems, Inc. All rights reserved.
• Change to the lib directory.
# cd C:\ssoSessionTools\sfoscripts\config\lib
• Set the following properties:
CLUSTER_LIST=cucmsso1.vrajoli.com.example.com:7777,cucmsso2.vrajoli.com.example.com:7777
BROKER_INSTANCE_NAME=msgqbroker
USER_NAME=msgquser
BROKER_PORT=7777
Note – The port used for BROKER_PORT should be the same as the one used in the value of the
CLUSTER_LIST.
• Save the file and close it.
11. Generate an encrypted password in a .password file with the following sub procedure.
Change to the bin directory.
# cd C:\ssoSessionTools\sfoscripts\bin
• Run amsfopassword.bat
This command generates an encrypted password, creates a new file named .password, and stores the encrypted password in the new file.
Caution – amsfopassword creates the .password file in a default location based on where the scripts were installed. If a different location is used, the PASSWORDFILE property in amsfo.conf should be changed accordingly. C : \ S S O S E S ~ 1 \ S F O S C R ~ 1 \ b i n > a m s f o p a s s w o r d . b a t - e m 5 g q u 5 e r - fc : \ s s o S e s s i o n T o o l s \ s f o s c r i p t s \ . p a s s w o r do s . n a m e = W i n d o w s S e r v e r 2 0 0 8S U C C E S S F U L

Copyright © 2010 Cisco Systems, Inc. All rights reserved.
12. start the cucmsso1.vrajoli.com broker instance. To start the amsfo.pl you need to have Perl installed on OpenAM host. In this guide ActivePerl 5.12.2 Build 1202 has been installed on Windows machine where OpenAM is installed. C : \ s s o S e s s i o n T o o l s \ s f o s c r i p t s \ b i n > a m s f o . p lc : \ s s o S e s s i o n T o o l s \ s f o s c r i p t s \ c o n f i g \ l i b \ a m s f o . c o n f s t a r t
starting JMQ Broker
C:/ssoSessionTools/jmq/imq/bin/imqbrokerd.exe -bgnd -silent -vmargs "-Xms256m -Xmx512m" -name msgqbroker -port 7777 -cluster cucmsso1.vrajoli.com:7777,cucmsso2.vrajoli.com:7777
starting amsessiondb client
c:/Program Files/Java/jdk1.6.0_21/jre/bin/java.exe -classpath "C:/ssoSessionTools/jmq/imq/lib/imq.jar;C:/ssoSessionTools/jmq/imq/lib/jms.jar;C:/ssoSession
Tools/ext/je.jar;C:/ssoSessionTools/locale;C:/ssoSessionTools/lib/am_sessiondb.jar;." com.sun.identity.ha.jmqdb.client.FAMHaDB -a cucmsso1.vrajoli.com:7777,
cucmsso2.vrajoli.com:7777 -u msgquser -f C:/ssoSessionTools/sfoscripts/.password -b /tmp/amsession/amsessiondb -m c:\ssoSessionTools\sfoscripts\config\l
ib\amsfo.conf
Initializing and connecting to the Message Queue server ...
Successfully started.
13. Run the netstat command to verify that the MessageQueue port is open and listening. C : \ s s o S e s s i o n T o o l s \ s f o s c r i p t s \ b i n > n e t s t a t - a n | f i n d s t r 7 7 7 7T C P 0 . 0 . 0 . 0 : 7 7 7 7 0 . 0 . 0 . 0 : 0 L I S T E N I N GT C P 1 0 . 7 8 . 8 5 . 1 3 1 : 6 0 7 8 7 1 0 . 7 8 . 8 5 . 1 3 1 : 7 7 7 7 T I M E _ W A I TT C P [ : : ] : 7 7 7 7 [ : : ] : 0 L I S T E N I N G
To Install Session Failover Components on cucmsso2.vrajoli.com OpenAM Enterprise server on Windows
1. Log in to the server where you want to install and configure the session failover
components (cucmsso1.vrajoli.com) 2. Copy ssoSessionTools.zip to the cucmsso1.vrajoli.com host machine,
ssoSessionTools.zip is included in the openam_release9_20100207.zip file under the tools directory. (openam_release9_20100207/opensso/tools/ssoSessionTools.zip)
3. Unzip ssoSessionTools.zip to ssoSessionTools folder and cd to ssoSessionTools folder C : \ > c d s s o S e s s i o n T o o l s
4. Run the setup.bat script to install the session tools on Windows systems.
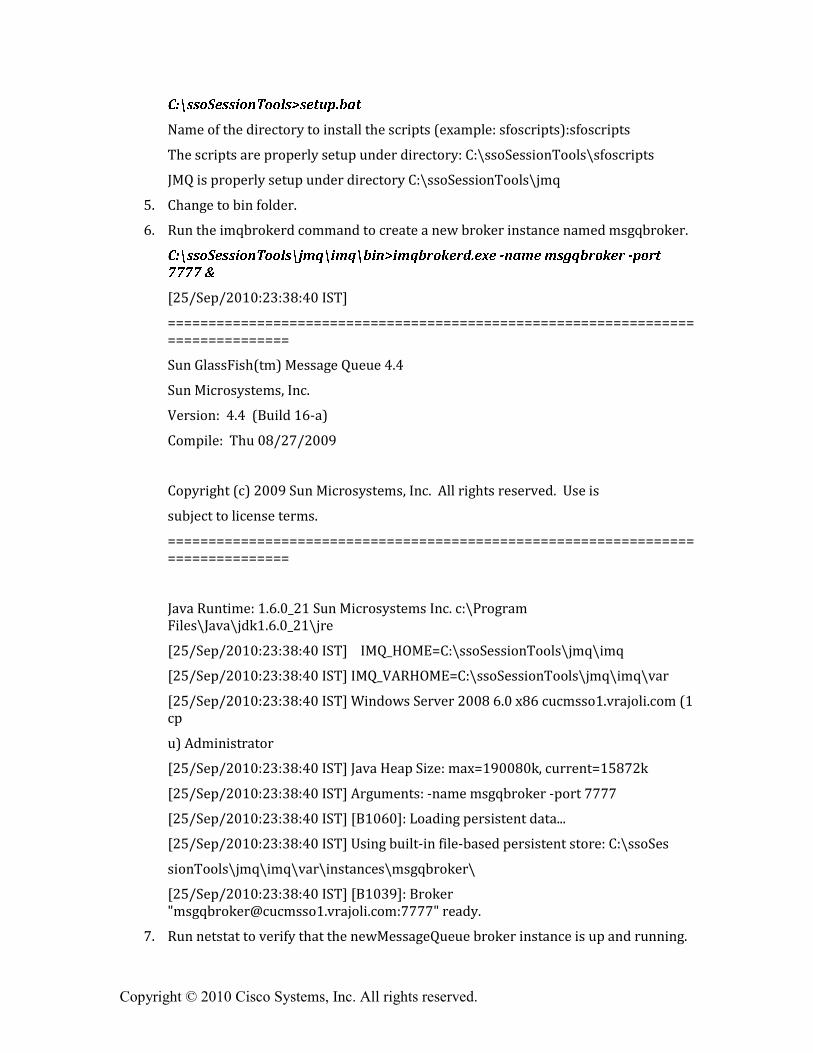
Copyright © 2010 Cisco Systems, Inc. All rights reserved.
C : \ s s o S e s s i o n T o o l s > s e t u p . b a tName of the directory to install the scripts (example: sfoscripts):sfoscripts
The scripts are properly setup under directory: C:\ssoSessionTools\sfoscripts
JMQ is properly setup under directory C:\ssoSessionTools\jmq
5. Change to bin folder.
6. Run the imqbrokerd command to create a new broker instance named msgqbroker. C : \ s s o S e s s i o n T o o l s \ j m q \ i m q \ b i n > i m q b r o k e r d . e x e - n a m e m s g q b r o k e r - p o r t7 7 7 7 &[25/Sep/2010:23:38:40 IST]
================================================================================
Sun GlassFish(tm) Message Queue 4.4
Sun Microsystems, Inc.
Version: 4.4 (Build 16-a)
Compile: Thu 08/27/2009
Copyright (c) 2009 Sun Microsystems, Inc. All rights reserved. Use is
subject to license terms.
================================================================================
Java Runtime: 1.6.0_21 Sun Microsystems Inc. c:\Program Files\Java\jdk1.6.0_21\jre
[25/Sep/2010:23:38:40 IST] IMQ_HOME=C:\ssoSessionTools\jmq\imq
[25/Sep/2010:23:38:40 IST] IMQ_VARHOME=C:\ssoSessionTools\jmq\imq\var
[25/Sep/2010:23:38:40 IST] Windows Server 2008 6.0 x86 cucmsso1.vrajoli.com (1 cp
u) Administrator
[25/Sep/2010:23:38:40 IST] Java Heap Size: max=190080k, current=15872k
[25/Sep/2010:23:38:40 IST] Arguments: -name msgqbroker -port 7777
[25/Sep/2010:23:38:40 IST] [B1060]: Loading persistent data...
[25/Sep/2010:23:38:40 IST] Using built-in file-based persistent store: C:\ssoSes
sionTools\jmq\imq\var\instances\msgqbroker\
[25/Sep/2010:23:38:40 IST] [B1039]: Broker "[email protected]:7777" ready.
7. Run netstat to verify that the newMessageQueue broker instance is up and running.

Copyright © 2010 Cisco Systems, Inc. All rights reserved.
C : \ s s o S e s s i o n T o o l s \ j m q \ i m q \ b i n > n e t s t a t - a n | f i n d s t r 7 7 7 7T C P 0 . 0 . 0 . 0 : 7 7 7 7 0 . 0 . 0 . 0 : 0 L I S T E N I N GT C P 1 0 . 7 8 . 8 5 . 1 3 1 : 6 0 7 8 7 1 0 . 7 8 . 8 5 . 1 3 1 : 7 7 7 7 T I M E _ W A I TT C P [ : : ] : 7 7 7 7 [ : : ] : 0 L I S T E N I N G8. Add a new user named msgquser.
This user will connect to theMessage Queue broker instance on servers whereMessage Queue is installed. This user will be used only for session failover purposes, and does not assume the privileges of the guest user. It is a good practice to create a custom user for such purposes, and not to rely on the known user accounts or default user accounts to help prevent brute force or DOS attacks. C : \ s s o S e s s i o n T o o l s \ j m q \ i m q \ b i n > i m q u s e r m g r . e x e a d d - u m s g q u s e r - g a d m i n - pm 5 g q u 5 e r - i m s g q b r o k e rUser repository for broker instance: msgqbroker
User msgquser successfully added.
9. Disable the guest user. This step ensures that the guest user will not be able to access the OpenSSO Enterprise server. C : \ s s o S e s s i o n T o o l s \ j m q \ i m q \ b i n > i m q u s e r m g r . e x e u p d a t e - u g u e s t - a f a l s e - im s g q b r o k e rU s e r r e p o s i t o r y f o r b r o k e r i n s t a n c e : m s g q b r o k e rA r e y o u s u r e y o u w a n t t o u p d a t e u s e r g u e s t ? ( y / n ) [ n ] yU s e r g u e s t s u c c e s s f u l l y u p d a t e d .
10. Modify the amsfo.conf file.
amsfo.conf has parameters that are consumed by the OpenSSO Enterprise session failover startup script, amsfo.
• Change to the lib directory.
# cd C:\ssoSessionTools\sfoscripts\config\lib
• Set the following properties:
CLUSTER_LIST=cucmsso1.vrajoli.com.example.com:7777,cucmsso2.vrajoli.com.example.com:7777
BROKER_INSTANCE_NAME=msgqbroker
USER_NAME=msgquser
BROKER_PORT=7777

Copyright © 2010 Cisco Systems, Inc. All rights reserved.
Note – The port used for BROKER_PORT should be the same as the one used in the value of the
CLUSTER_LIST.
• Save the file and close it. 11. Generate an encrypted password in a .password file with the following sub
procedure.
Change to the bin directory.
# cd C:\ssoSessionTools\sfoscripts\bin
• Run amsfopassword.bat
This command generates an encrypted password, creates a new file named .password, and stores the encrypted password in the new file.
Caution – amsfopassword creates the .password file in a default location based on where the scripts were installed. If a different location is used, the PASSWORDFILE property in amsfo.conf should be changed accordingly. C : \ S S O S E S ~ 1 \ S F O S C R ~ 1 \ b i n > a m s f o p a s s w o r d . b a t - e m 5 g q u 5 e r - fc : \ s s o S e s s i o n T o o l s \ s f o s c r i p t s \ . p a s s w o r do s . n a m e = W i n d o w s S e r v e r 2 0 0 8S U C C E S S F U L
12. Start the cucmsso2.vrajoli.com broker instance. To start the amsfo.pl you need to have Perl installed on OpenAM host. In this guide ActivePerl 5.12.2 Build 1202 has been installed on Windows machine where OpenAM is installed. C : \ s s o S e s s i o n T o o l s \ s f o s c r i p t s \ b i n > a m s f o . p lc : \ s s o S e s s i o n T o o l s \ s f o s c r i p t s \ c o n f i g \ l i b \ a m s f o . c o n f s t a r tstarting JMQ Broker
C:/ssoSessionTools/jmq/imq/bin/imqbrokerd.exe -bgnd -silent -vmargs "-Xms256m -Xmx512m" -name msgqbroker -port 7777 -cluster cucmsso1.vrajoli.com:7777,cucmsso2.vrajoli.com:7777
starting amsessiondb client
c:/Program Files/Java/jdk1.6.0_21/jre/bin/java.exe -classpath "C:/ssoSessionTools/jmq/imq/lib/imq.jar;C:/ssoSessionTools/jmq/imq/lib/jms.jar;C:/ssoSession
Tools/ext/je.jar;C:/ssoSessionTools/locale;C:/ssoSessionTools/lib/am_sessiondb.jar;." com.sun.identity.ha.jmqdb.client.FAMHaDB -a cucmsso1.vrajoli.com:7777,
cucmsso2.vrajoli.com:7777 -u msgquser -f C:/ssoSessionTools/sfoscripts/.password -b /tmp/amsession/amsessiondb -m c:\ssoSessionTools\sfoscripts\config\l

Copyright © 2010 Cisco Systems, Inc. All rights reserved.
ib\amsfo.conf
Initializing and connecting to the Message Queue server ...
Successfully started.
13. Run the netstat command to verify that the MessageQueue port is open and listening. C : \ s s o S e s s i o n T o o l s \ s f o s c r i p t s \ b i n > n e t s t a t - a n | f i n d s t r 7 7 7 7T C P 0 . 0 . 0 . 0 : 7 7 7 7 0 . 0 . 0 . 0 : 0 L I S T E N I N GT C P 1 0 . 7 8 . 8 5 . 1 3 1 : 6 0 7 8 7 1 0 . 7 8 . 8 5 . 1 3 1 : 7 7 7 7 T I M E _ W A I TT C P [ : : ] : 7 7 7 7 [ : : ] : 0 L I S T E N I N G
16.2.3 Installation and configuration of OpenAM Enterprise servers for session failover.
16.2.3.1 Installation of OpenAM Enterprise server 1
Browse the OpenAM URL: https://cucmsso1.vrajoli.com:8443/opensso, you will see the below Configurator. Click on Create New Configuration under Custom Configuration.

Copyright © 2010 Cisco Systems, Inc. All rights reserved.
Create a new password for default user [amAdmin]

Copyright © 2010 Cisco Systems, Inc. All rights reserved.
Click on Next button,

Copyright © 2010 Cisco Systems, Inc. All rights reserved.
Click on next button,

Copyright © 2010 Cisco Systems, Inc. All rights reserved.
Select OpenSSO User Data Store radio button and click Next,

Copyright © 2010 Cisco Systems, Inc. All rights reserved.
Under Site Configuration, check the Yes radio button and enter a name for sitename and provide the loadbalancer URL (which was setup in section 3.1) and click on Next button.
Example for Loadbalancer URL: https://ssoloadbal.vrajoli.com:8443/opensso

Copyright © 2010 Cisco Systems, Inc. All rights reserved.
Create password for Default Policy Agent and click Next button,

Copyright © 2010 Cisco Systems, Inc. All rights reserved.
Click on Create Configuration button.

Copyright © 2010 Cisco Systems, Inc. All rights reserved.
Click on Proceed to Login link.

Copyright © 2010 Cisco Systems, Inc. All rights reserved.
You will be presented with OpenAM login page.
16.2.3.2 Installation of OpenAM Enterprise server 2
Browse the OpenAM URL: https://cucmsso2.vrajoli.com:8443/opensso, you will see the below Configurator. Click on Create New Configuration under Custom Configuration.

Copyright © 2010 Cisco Systems, Inc. All rights reserved.
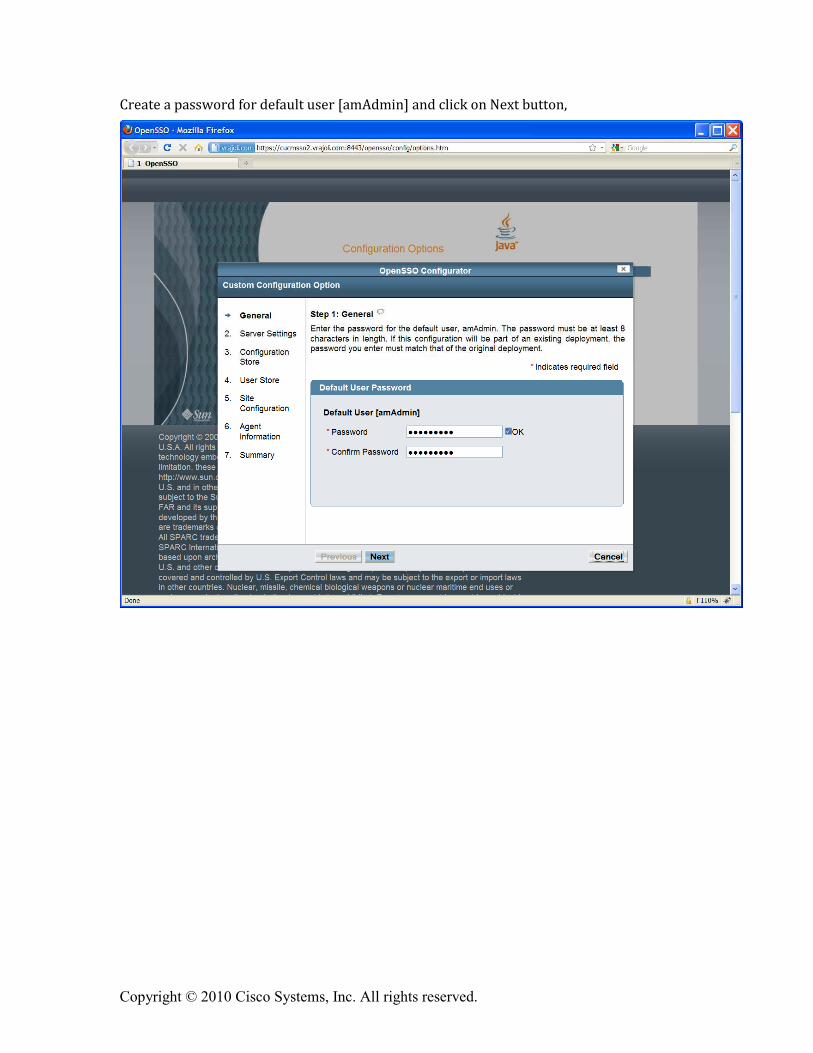
Copyright © 2010 Cisco Systems, Inc. All rights reserved.
Create a password for default user [amAdmin] and click on Next button,

Copyright © 2010 Cisco Systems, Inc. All rights reserved.
Click on Next button,

Copyright © 2010 Cisco Systems, Inc. All rights reserved.
Check ‘Add to Existing Deployment’ radio button and enter the OpenAM Enterprise server 1 URL under Server URL text box and click on Next button.
NOTE: Before this, you need to import the OpenAM Enterprise server 1 certificate to the OpenAM Enterprise Server 2’s trust store.
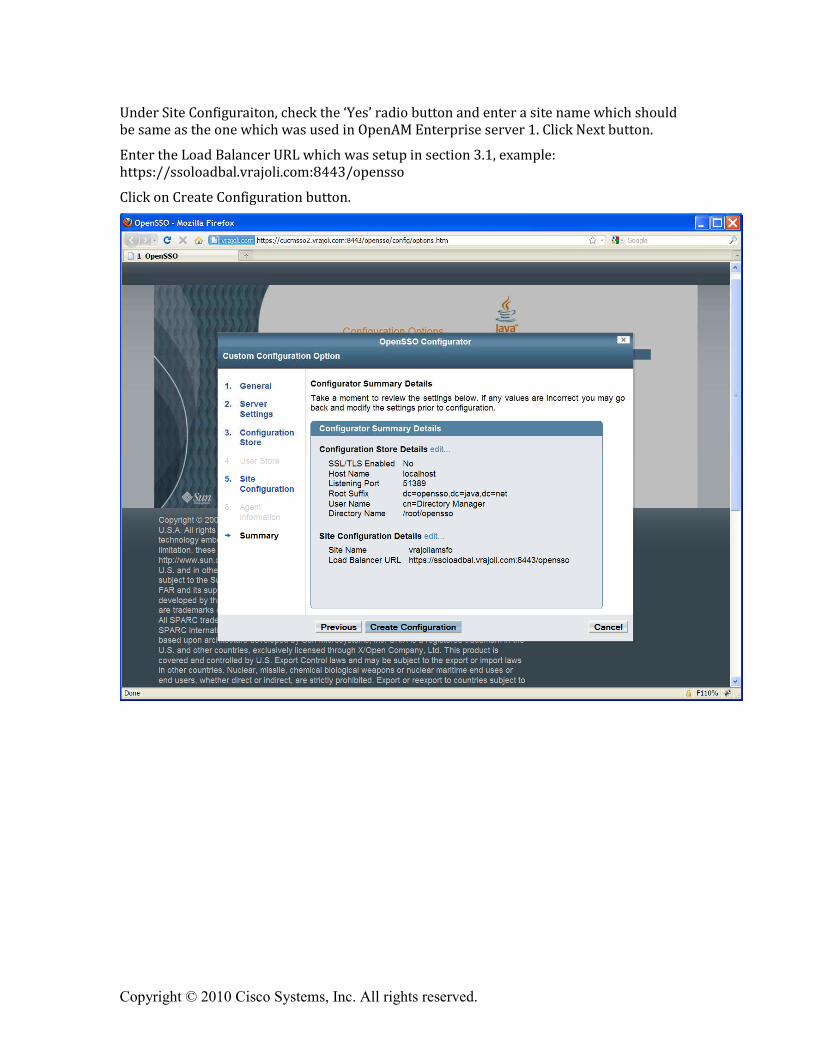
Copyright © 2010 Cisco Systems, Inc. All rights reserved.
Under Site Configuraiton, check the ‘Yes’ radio button and enter a site name which should be same as the one which was used in OpenAM Enterprise server 1. Click Next button.
Enter the Load Balancer URL which was setup in section 3.1, example: https://ssoloadbal.vrajoli.com:8443/opensso
Click on Create Configuration button.

Copyright © 2010 Cisco Systems, Inc. All rights reserved.
Click on Proceed to Login link.
16.2.3.3 Configure OpenSSO Enterprise for Session Failover
Access https://cucmsso1.vrajoli.com:8443/opensso from a web browser.
Login to OpenAM Enterprise console.
Click the Configuration tab.
Under Global properties, click Session.
Under Secondary Configuration Instance, click New.
In the Add Sub Configuration page, provide the following information. Name Select External Session Store User Enter msgquser Session Store Password Enter m5gqu5er Session Store Password (confirm) Enter m5gqu5er Maximum Wait Time Keep the default value of 5000. Database URL Enter cucmsso1.vrajoli.com:7777,cucmsso2.vrajoli.com:7777. This is theMessage Queue broker address list. Enter

Copyright © 2010 Cisco Systems, Inc. All rights reserved.
multiple values using a comma and no space. Click Add. Click Save.
Log out of the OpenSSO Enterprise console.
16.3 Configuring SSO on Cisco Unified Communications Manager with AMSFO setup
Access Load Balancer URL (https://ssoloadbal.vrajoli.com:8989) from the web browser, Click the Lock icon on the right bottom corner, click on view certificate button. Go to Details tab and export the certificate to your local machine from where you are browsing.
Since there is a replication setup running on all the OpenSSO Enterprise servers in AMSFO environment, Policies, Authentication Module instances and J2EE Agents created on one OpenSSO Enterprise server, gets replicated on rest OpenSSO Enterprise servers.
For the Authentication module instance, you need to create a keytab for load balancer host and not for the OpenSSO Enterprise server hosts. Place the load balancer keytab file on both the OpenSSO Enterprise host filesystem.
Create OpenAM Policies, Authentication Module instance and J2EE agent profile on any one of the OpenSSO Enterprise server, for creating policies, Authentication module instance and J2EE agent profile refer to section 10.1, 10.2 and 10.3
Logon to CUCM OS Administration page; go to Security � Certificate Management � Upload certificate.
Select certificate type as tomcat-trust, and browse for the above load balancer certificate which you saved in the above step, after browsing click on upload button.
Now Logon to command line interface of CUCM 8.5, and execute the command ‘utils sso enable’ with OpenSSO URL as your Load Balancer host (https://ssoloadbal.vrajoli.com:8443/opensso).