a critical anaylsis of the forth · pdf filea critical anaylsis of the forth bridge a d magee...
TRANSCRIPT

A CRITICAL ANAYLSIS OF THE FORTH BRIDGE
A D Magee
Department of Architecture & Civil Engineering
University of Bath
Abstract: This paper details the design and construction of the Forth Bridge in Scotland. Officially opened in 1890, it was by no means the first cantilever-type bridge to be built of steel; it does however remain one of the most famous cantilever bridges in the world, carrying over 200 trains a day over the Firth of Forth between North and South Queensferry. Many of the techniques used in the construction of this bridge are seldom seen in modern day bridges, having been replaced with cheaper and faster methods. While steel is still used in bridge design, it is unlikely that it will ever be used in the same way as it was in this bridge due to cost and the shear complexity of both the design and construction. Due to advances in design and construction, the development of materials and the increasing necessity to consider cost, an attempt has been made at points through this paper to suggest possible design improvements and construction techniques which may be seen in a 21st century bridge.
Keywords: cantilever, steel, railway, Firth of Forth
1 Overview of the Forth Bridge
Two railway lines cross the Forth Bridge, supported 47.8 meters above high water, linking much of Northern Scotland with Edinburgh and England to the South. The lines of track sit on a ‘bridge within a bridge;’ an internal viaduct supported within the enormous cantilever towers and arms which is often overlooked. The total length of the bridge is 2460 meters, made up of two approach viaducts, six cantilever arms supported by three towers, with two central connecting spans. At the end of each of the two outer-most cantilevers is an abutment, and the distance between the centre lines of these two towers is 1630 meters.
The centre-most section of the Forth Bridge consists of three main piers, with two cantilever arms built out from each. Two approach viaducts lead up to this central section, consisting of a pair of lattice girders each spanning over fifty-one meters, supported over forty meters above high-water level on masonry piers. Of the six cantilever arms, four are free cantilevers and two are fixed – held rigidly in position by the two granite abutments at the ends of each approach viaduct. Two ‘suspended spans’ link the two outer cantilever towers
with the central one, both just over one hundred and five meters long.
The superstructure for this bridge works as a standard truss – with some members always in tension and others always carrying compressive forces. Fig 2 illustrates how the bridge works using a simple model.
Figure 2: living model showing principle of the Forth Bridge structure
Proceedings of Bridge Engineering 2 Conference 2007 27 April 2007, University of Bath, Bath, UK
Figure 1: Elevation of the Forth Bridge

The two men sat on chairs with outstretched arms represent the main cantilever towers, in between them is a central span connecting the two. Anchorage for the cantilevers is provided by the bricks at either side. As load is applied to the central span (in this case by a third man) the outside men’s arms come into tension, and the sticks they’re holding and the men’s bodies experience compressive forces. In reality the bridge has three cantilever towers, but the principle can be applied equally to this third tower.
All compression members (struts) in this bridge are tubular sections made up of many small steel plates riveted together, while tension is carried in lattice truss members. Wind bracing is provided by further lattice trusses spanning between the main superstructure members.
The base of each of the three cantilever towers is supported five and a half meters above high-water on four separate masonry piers. Each pier varies in depth depending on the ground below, but each is almost fifteen meters in diameter at the top and larger still beneath the water. From these piers, the great cantilever towers rise, and the cantilevers themselves spring towards either shore.
2 Elements of the bridge
2.1 Foundations
Each of the four piers beneath the three towers was either built through mud underneath the Firth, down into stable ground, or as with the central tower which sits on the island of Inchgarvie, onto solid rock. The deepest of the piers continues 27 meters down below the high water level. The vast majority of each pier is made of concrete and rubble, faced nearer the top with granite blocks and a masonry cap. Large bolts are cast into each of the piers to hold down the bed plates of the steel structure above.
2.2 Cantilevers & Towers
The cantilevers are made of two bottom members (always in compression) two top members (tension) tied together vertically with cross bracing. Bracing is also present between the two bottom members of the cantilever arms, tying these two members horizontally.
Directly above the foundations the cantilevers are closed by the vertical columns of the towers and at the furthest end a vertical end post closes the section.
Each arm of the cantilevers is effectively sectioned into ‘bays’ by the cross bracing between the top and bottom member. In each arm there are six bays, decreasing in height and width as they get further from the towers. Each bay consists of one compression member which is in place to prevent the bottom cantilever member from buckling, and one tension member which ties the bottom member to the top member.
Each cantilever is exactly the same length, and while the two outermost cantilevers are fixed to the abutments and are heavier than the other four, each consists of the same structural components. By designing each of the six cantilevers to be exactly the same length the bridge is naturally balanced under its own self weight during
construction – assuming that construction progress is equal on both sides of the central tower.
Throughout the bridge, all members subject to compressive stress are of tubular section. When building this bridge steel was a relatively new material to be using in construction, detailed knowledge about how the material behaves under loading would not have been available, and yet the best section shape was chosen – tubes being the strongest and most efficient shape for a compression member. There are no sharp angles in any of the compression members, thereby eliminating positions where there may be local stress concentrations leading to fatigue and failure of the members. The curved shape of the compression members results in a shape which is far less likely to buckle than a flat surface. This perfect selection of section shape shows that while the weight of the bridge is larger when using closed sections, the bridge would be stronger and capable of sustaining large forces. It shows that there was foresight in the design of the bridge, and perhaps a knowledge that trains would become larger, heavier and faster, something that the bridge would have to withstand.
Nearly all tension members are open lattice girders, resulting in strong yet lightweight members – exploiting the excellent properties of steel in tension. There are members in the bridge structure that take both tension and compression depending on how the bridge is loaded. These members include the big cross members of the three central towers which are tube sections – as with all members which carry varying stress.
The bottom member of each cantilever arm appears to be curved in shape. It is however made up of six straight sections, each bolted together at a slight angle so as to make the curved shape. No doubt this was done to ease fabrication and construction – if they were constructed as curves each plate would be individual, with a specific angle in two directions. Structurally the use of a straight tube makes better sense also as a straight tube is stronger than a curved one, and therefore will have increased buckling resistance which is of utmost importance in these compression members.
Looking at the bridge in elevation, the main columns of the three central towers appear to be vertical, which in this plane of view they are. Take a view along the centre-line of the bridge and it becomes clear that these members are not vertical at all, but rather inclined to become very much closer at the top than at the foundations. This inclination is maintained along each of the cantilever arms including the two suspended girder spans. The tapering helps to produce a strong, stiff triangular form at the towers where the structure is at its highest, which makes tying the two sides of the tower together easier and the joint stronger. The bridge contains so many ties and struts crossing in different directions that wherever you look on the bridge there are triangular shapes to be found. The tapering of the columns towards the highest point at the tops of the towers again adds to the simple geometry, and straight lines of the bridge, as well as helping it look strong and able to resist the high wind loads it is subjected to.
Stresses in the members ultimately have to be carried by the connections between the steel structure and the foundation piers. The connection between the two is called a skewback – where five tubular members and

lattice girders bracing them meet. The steel members are fixed to a bed plate which is in turn bolted to the piers via 48 steel bolts.
As with all bridges there must be some allowance for movement of the structure due to live loading, wind and temperature effects. While expansion joints were provided in the main structure to cater for the structure expanding, a bearing was in effect created in the bases of the towers as well.
One of the skewbacks of each tower is fixed into the foundation pier while the remaining three have actually been allowed to just sit on sliding bed plates allowing movement. While it isn’t clear from photographs of the skewbacks how movement is controlled, there must be a connection in each of the three ‘free’ skewbacks which allows only a certain amount of movement – too much movement in one direction could be disastrous. This pin would probably prevent any upwards movement of the joint also – ensuring a connection to the ground is maintained.
2.3 Suspended Spans
Between the three cantilever towers sit two suspended spans, closing the gap between the four innermost cantilever arms. These two suspended sections essentially work as a simply supported truss, with the top member being in compression (under loading) and the bottom member carrying the tensile stress. Each member in the suspended span is of tubular form which is the other exception to the rule of all tension members being of lattice girder construction.
The compression member is made much like the main compression member in the cantilevers – a series of straight tubular sections connected together at an angle so as to appear to curve. On each face of the central section there are eight sets of cross bracing – struts and ties in compression and tension to create the truss system.
2.4 Approach Viaducts
The approach viaducts leading up to the central cantilever section of the bridge are of the same construction both sides of the Firth, maintaining symmetry throughout the entire structure. On each side the spans are of similar size, the height above high water is exactly the same and the components making up the two viaducts are identical, the only difference is the length of the viaduct – the South viaduct being twice as long as the North. The approach viaduct is similar in construction to the internal viaduct which carries the trains over the cantilever section of the bridge.
The span between the masonry columns holding up the viaducts is 51.2 meters in all but four of the fifteen spans. However with an expansion joint every second column, the viaduct is continuous over every second support, this continuity over the supports reduces sagging moments in the spans.
The viaduct is made of two lattice truss girders, running parallel to each other, 4.88 meters apart. The truss is made up of a top and bottom steel member with eight pairs of crossing struts and ties in each span. From the intersection of the cross bracing to the top member, a vertical strut is positioned which acts to reduce deflection
of the top member under loading, as well as stiffening the whole viaduct. This design uses a large number of identical elements resulting in simple and regular fabrication as well as fast construction.
Because it is made of steel, expansion due to heat is a problem in the whole bridge. The solution devised for the cantilever section of the bridge is discussed in greater detail in a later section. For the approach viaducts, expansion is catered for by including an expansion joint over every second column, this reduces large stresses arising in the truss as it heats up and expands. In order for these joints to work, the end of each section of continuous girder must sit on some form of sliding bed plate to allow the elements to move. There must also be regular expansion gaps in the rails themselves so as not to buckle as the viaduct expands and contracts.
Between each of the two viaducts and the central cantilevers are the two cantilever abutments, both built of granite blocks like the viaduct columns. These two abutments (represented by the piles of bricks in Fig 2) act as large weights for the cantilever arms and in effect fix the outside two cantilevers in place.
3 Construction of The Forth Bridge
Construction of the Forth Bridge continued over eight years. The contract was let on December 21st, 1882 and while completion of the suspended spans was seen in late 1889 the bridge was not officially opened until March 4th, 1890. Without the help of high-tech machines, it is easy to imagine why construction took so long when one considers the thousands of separate pieces which make up the bridge and the fact that there are more than six and a half million rivets in the structure.
From a distance the Forth Bridge may appear to be made of a series of huge tubes and lattice box trusses, but every single one of these large components of the superstructure is made out of much smaller pieces, riveted together one-by-one.
In order to manufacture so many components, a large fabrication yard was set up close to the bridge where the many thousands of steel pieces were made before being taken out to the bridge and put in place.
Many photographs exist detailing the construction of the bridge, giving an excellent record of the stages of construction and how the bridge was actually put together.
3.1 Sinking The Foundations
The foundation piers were built first. The southern-most tower was to be sited on boulder clay which was covered in a deep layer of silt, while the other two towers were situated on rock. To get through this deep layer of silt and mud down to the firmer clay, excavation was required, and because the site was always under water even at low tide excavation would have to be conducted in pressurised conditions.
Large steel caissons were sunk at the site of a number of the foundation piers. These caissons were then filled with concrete, leaving enough room underneath for excavators to work in pressurised conditions. As the material beneath was excavated the caissons gradually sunk deeper through the silt and into the clay. As the

caisson got deeper and deeper, a temporary caisson was added on top, inside which the concrete and rubble was poured and the granite facing-blocks laid. Once the masonry pier was at the required height, with the concrete and grout set, the outer shuttering was removed.
A number of the piers were built in open conditions without the need for excavation in a pressurised caisson due to suitable rock being much nearer the surface. For these piers cofferdams were used to hold back the water so excavations could be carried out. Work in these cofferdams must have been tide dependant and therefore slower, however it was cheaper and safer to build foundations in this way, even if work was compounded by the wind and waves crashing in from all directions.
3.2 Erecting The Steel
The first steel sections of the bridge seen on site were those of the two approach viaducts which were constructed next. To begin with, construction of these viaducts took place near to the ground, where the steel work was put together on top of quite short columns, founded on concrete bases. When fully assembled the steel trusses were jacked up, kept at the same height right along its length, and the masonry below was built up to the level of the steel truss.
The decision to construct the approach viaducts in this way was probably largely to do with the lack of formwork needed. Small props and supports could be used on which to build the trusses, close to the ground, where it was safe and easy for men to work. When complete, if the only work that needs to be done is jacking and building of columns, working platforms can be erected in these localised positions and moved up with the truss, rather than moving along with a half-built truss, high above the ground. The process of laying the granite blocks and jacking up the steel trusses continued until the viaducts were at the correct height.
As the twelve foundation piers were completed, work could begin on erecting the huge cantilever towers which would sit above them. This was started with the construction of the skewbacks atop of each of the foundation piers. These sections must have proved some of the hardest to construct, based on full size timber replicas being photographed in the fabrication yard. At 3.66 meters in diameter these models themselves must have taken considerable planning – time and effort well spent if it eliminated mistakes being made to these huge crucial connections – each large enough to drive a London bus through.
The skewbacks not only transferred all of the load into the foundations, but during construction had to be built very accurately so that all five of the large tubular members were started in exactly the right direction and at the right pitch. I assume that these connections were first bolted before being firmly fixed into position in case adjustments had to be made. There is evidence of this practice in photographs taken much later in construction at the tops of the towers. Fig. 3 shows one of the skewbacks. The plates making up the large columns and struts can be seen, and the picture also gives an appreciation of the number of rivets there must be in the bridge considering how many are in just one connection.
Figure 3: View of a skewback showing how many members had to be connected and started at one time.
Each of the tubular columns in the towers and
eventually the compression member of the cantilever arm, are made of many small curved plates riveted together. Roughly every two meters along the tubes there is a row of rivets right the way around – suggesting that there is a ring inside, acting not only as a tie, holding all the plates around the circumference together, but also stiffening up the whole shape.
While much of the drilling was done in the fabrication yard, each piece of curved plate and every steel truss element had to be raised into position and riveted – many at a height of over ninety meters above the water.
Once the cantilever towers were complete, work began on the construction of the cantilever arms. In order to maintain balance progress had to be kept equal on both sides of the structure.
Figure 4: A construction photograph showing how the cantilever arms were built equally on each side.
A crane was erected near the bottom of the towers,
close to the skewback, which raised the curved plates from barges below and enabled about thirty meters of tube to be constructed. Pictures show that at this point

formwork or scaffolding was built around the end of the tube and a smaller crane was positioned onto this – which then enabled the next length of tube to be constructed. Throughout the construction process this technique was used, as each previously finished part offered itself as a platform from which to build the next piece. There is really very little in the way of temporary works to be seen in many of the photos – certainly much less than is required in many bridges built today. This obviously helped to reduce cost as construction was made incredibly simple. Labourers working on the compression member had the comfort of working ‘inside’ the tubes – eliminating the risk of falling, and indeed the risk of being struck by falling tools from above as the erection of the top tension member continued overhead, where work was much more exposed and dangerous.
As the cantilever arms progressed outwards, the construction of the internal viaduct which would hold the tracks also continued. This internal bridge is supported through the superstructure on a number of trestles connected to the bottom member of the cantilever. Until the bottom member was in place the trestle could not be built and so the internal viaduct had nothing to span onto – therefore the internal viaduct was always one bay behind the progress of the cantilever arm, but could be built at the same rate as the superstructure.
The two suspended spans linking the three separate cantilevers together were the last sections to be built. One possible method of linking these cantilevers would have been to build the central sections on land, float them out on barges before hoisting them up into position by cranes. This was not the method adopted for this bridge, but rather the suspended spans were built out from the ends of the cantilever arms to meet in the middle. Although this method required rigid joints and temporary ties between the cantilevers and the spans, it was probably done to minimise risk. At this late stage of construction a problem occurring while raising the central section could prove disastrous. Raising the truss from sea level would require large cranes to be erected on the very edge of the cantilever arms, and should one of the cables break during the lift, the dead weight of the entire central span would be instantaneously applied to the very end of the opposite cantilever arm. If any member of the truss had failed it may also have lead to disaster, making the rigid construction the safest and arguably the easiest option.
Of course, to maintain balance on each of the cantilevers, the suspended spans had to be built symmetrically at all times so as not to make one arm heavier, or deflect more than the arm it is reaching out to meet. It becomes apparent here why the outer two cantilever arms are fixed to the abutment towers – to prevent over turning during construction of the central spans (and the application of live loading as will be explained in detail.)
Once the central spans were complete, the removal of the rigid joints and temporary ties would have to have been done slowly, carefully transferring the dead weight of the central span onto the permanent connections of the cantilever arms, the result being a simply supported, ‘suspended’ central span.
4 Modern Day Construction
Constructing this bridge in the twenty first century would be done in a very different manner in almost every stage of the project.
Looking firstly at components, it would be uneconomical both in terms of material and time to construct the columns out of thousands of curved plates. Indeed with the increasing cost of steel it may be uneconomical to build such a large structure from steel at all. However, if steel were to be used it is more likely that large sections of tube would be fabricated and shipped directly to site along the Firth – much like the columns for the Millennium Eye in London. Rivets are no longer used and the huge sections of steel would be bolted together internally – providing a sheltered space for those constructing and inspecting the connections. It might be the case that newer materials such as carbon fibres and polymers would be added to an existing material such as concrete to create a stiff overall structure, although with mounting pressure on designers to reduce carbon emissions from concrete production that possibility may also be ruled out.
The foundations of the bridge today would probably be made of concrete still, however it’s likely that chemicals and additives would be mixed with the cement to produce a concrete capable of setting under water, although with more sophisticated equipment available to contractors nowadays cofferdams may still be used. Excavation would no longer be conducted with a shovel and pickaxe and would be deemed unacceptable if it took as long as it did in 1884.
Whereas with the original bridge, full scale models were constructed in timber to ensure that the skewbacks could be accurately fabricated and put together, nowadays computer design software has eliminated the need for trial runs and mock-ups, ensuring confidence in each connection throughout the structure.
Safety is increasingly becoming the number one priority in construction. It would be completely unacceptable to have men working a hundred meters above the Firth with no safety lines, life jackets, helmets etc as the photos from the time suggest. Laws now prevent untrained and unqualified labourers to work on site and certainly young boys would not be permitted to work.
While it seems that consideration was made to future maintenance by the inclusion of walkways and access ladders, much of the inspection and repair to this bridge has to be conducted while exposed to the elements, many meters above the Firth. Today designers are encouraged to think about the welfare of future workers operating on the bridge, and one would expect to see sheltered access routes and safety rails all over the structure – with access almost certainly gained by steps and ladders inside the main steel tube sections.
5 Aesthetic Considerations
5.1 Function
The bridge was built to carry two railway lines across the forth – a function it still performs to this day. It is subject to heavy loads, extreme weather conditions

(including the corrosive marine environment), metal fatigue and temperature changes. It stands tall across the forth, looking stable and strong – capable of withstanding these loads. While one could be forgiven for thinking the structure is very complex, in fact it uses a very simple truss principle throughout its cantilevers and the two central suspended spans.
Built soon after the Tay Bridge collapse, this bridge had to not only be structurally safe on paper, but it had to look sturdy and strong to instil confidence in the public and reassure them that it was possible to build safe bridges across large stretches of open water.
5.2 Proportions
When looking at this bridge in two dimensions it looks balanced, slicing the bridge at the mid-point of the central support it is completely symmetrical to each abutment. It has the same number of truss elements, the same shape and each tower is the same height. The truss elements create large voids in the elevation of the structure which help to give depth to the bridge, which may otherwise seem rather shallow when compared to its length.
The fact that the bridge was able to be built utilising three large towers and six cantilevers of equal length was a great achievement given the lack of good foundation points, the poor silty soil and the huge spans over open water.
5.3 Order
Order can be difficult to achieve in truss bridges. This bridge has many hundreds of truss elements criss-crossing past each other, and one would think that so many members arranged at sharp angles and packed closely together could ruin the order of a bridge. This is however not the case. When viewed from many angles these individual elements all seem to be ordered. They are all the same, all spanning in the same direction and at the same angles. It is clear that order was carefully considered when designing this bridge, and while some may say the internal structure is a mess of elements which looks ugly and messy, in fact it is an ‘ordered mess’ and one which has been designed to look as symmetrical and neat as possible. Fig 5 shows the vast number of elements used to brace the superstructure which, if not carefully planned, could have ruined the order and regularity of the bridge.
This order is not only seen within the steel elements of this bridge. Large masonry piers stand at the end of the two approach viaducts. Fig. 6 shows the block work of these two piers was carefully planned, and skilfully crafted to be entirely symmetrical on either side of the arch which the train passes through. High up above the ground, and visible only to the driver of a train, this neat block work could be seen as unnecessary. But because these arches are the first and last thing seen as you cross over the main bridge, it neatly ties the whole structure together, and creates a completely symmetrical ordered bridge from start to finish.
Figure 5: Showing the cross bracing between the main cantilever members
Figure 6: Looking through the cantilever abutment showing the ordered brickwork and bracing.
5.4 Refinement
On either side of the main cantilever bridge, the columns supporting the approach viaduct have been tapered; a common technique used in columns to prevent the illusion that the columns get larger as they rise. The careful tapering of the granite blocks in the columns has prevented this illogical looking scenario arising. While the spacing between the piers in the viaduct section remain almost constant throughout, the spacing does not look wrong – as can be the case with steep sided valleys where supports are equally spaced. The fact that the ground down to the waters edge is very shallow in gradient is the reason why this design does not look wrong. Without a rapid change in ground level, it isn’t immediately obvious to the eye that the piers should be closer together, maintaining a constant aspect ratio between the ground, piers and deck. Altering the spacing of these piers would have achieved little aesthetically, and possibly resulted in a waste of materials and a structural inefficiency.
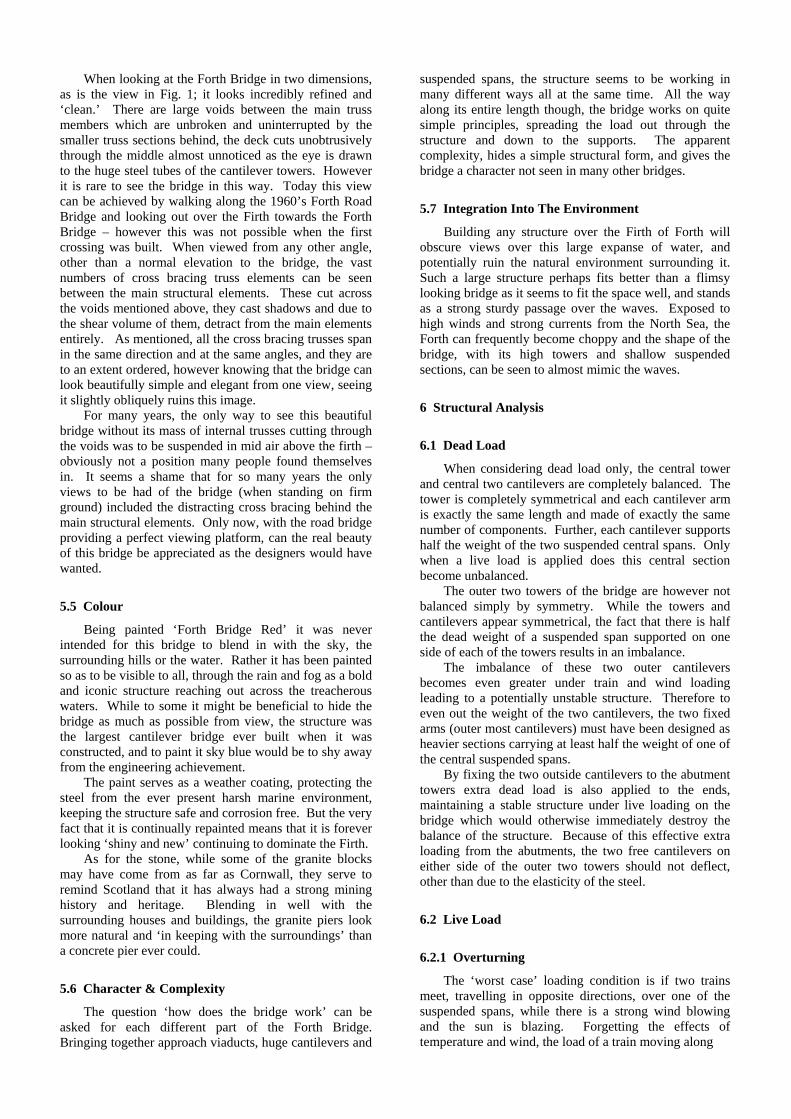
When looking at the Forth Bridge in two dimensions, as is the view in Fig. 1; it looks incredibly refined and ‘clean.’ There are large voids between the main truss members which are unbroken and uninterrupted by the smaller truss sections behind, the deck cuts unobtrusively through the middle almost unnoticed as the eye is drawn to the huge steel tubes of the cantilever towers. However it is rare to see the bridge in this way. Today this view can be achieved by walking along the 1960’s Forth Road Bridge and looking out over the Firth towards the Forth Bridge – however this was not possible when the first crossing was built. When viewed from any other angle, other than a normal elevation to the bridge, the vast numbers of cross bracing truss elements can be seen between the main structural elements. These cut across the voids mentioned above, they cast shadows and due to the shear volume of them, detract from the main elements entirely. As mentioned, all the cross bracing trusses span in the same direction and at the same angles, and they are to an extent ordered, however knowing that the bridge can look beautifully simple and elegant from one view, seeing it slightly obliquely ruins this image.
For many years, the only way to see this beautiful bridge without its mass of internal trusses cutting through the voids was to be suspended in mid air above the firth – obviously not a position many people found themselves in. It seems a shame that for so many years the only views to be had of the bridge (when standing on firm ground) included the distracting cross bracing behind the main structural elements. Only now, with the road bridge providing a perfect viewing platform, can the real beauty of this bridge be appreciated as the designers would have wanted.
5.5 Colour
Being painted ‘Forth Bridge Red’ it was never intended for this bridge to blend in with the sky, the surrounding hills or the water. Rather it has been painted so as to be visible to all, through the rain and fog as a bold and iconic structure reaching out across the treacherous waters. While to some it might be beneficial to hide the bridge as much as possible from view, the structure was the largest cantilever bridge ever built when it was constructed, and to paint it sky blue would be to shy away from the engineering achievement.
The paint serves as a weather coating, protecting the steel from the ever present harsh marine environment, keeping the structure safe and corrosion free. But the very fact that it is continually repainted means that it is forever looking ‘shiny and new’ continuing to dominate the Firth.
As for the stone, while some of the granite blocks may have come from as far as Cornwall, they serve to remind Scotland that it has always had a strong mining history and heritage. Blending in well with the surrounding houses and buildings, the granite piers look more natural and ‘in keeping with the surroundings’ than a concrete pier ever could.
5.6 Character & Complexity
The question ‘how does the bridge work’ can be asked for each different part of the Forth Bridge. Bringing together approach viaducts, huge cantilevers and
suspended spans, the structure seems to be working in many different ways all at the same time. All the way along its entire length though, the bridge works on quite simple principles, spreading the load out through the structure and down to the supports. The apparent complexity, hides a simple structural form, and gives the bridge a character not seen in many other bridges.
5.7 Integration Into The Environment
Building any structure over the Firth of Forth will obscure views over this large expanse of water, and potentially ruin the natural environment surrounding it. Such a large structure perhaps fits better than a flimsy looking bridge as it seems to fit the space well, and stands as a strong sturdy passage over the waves. Exposed to high winds and strong currents from the North Sea, the Forth can frequently become choppy and the shape of the bridge, with its high towers and shallow suspended sections, can be seen to almost mimic the waves.
6 Structural Analysis
6.1 Dead Load
When considering dead load only, the central tower and central two cantilevers are completely balanced. The tower is completely symmetrical and each cantilever arm is exactly the same length and made of exactly the same number of components. Further, each cantilever supports half the weight of the two suspended central spans. Only when a live load is applied does this central section become unbalanced.
The outer two towers of the bridge are however not balanced simply by symmetry. While the towers and cantilevers appear symmetrical, the fact that there is half the dead weight of a suspended span supported on one side of each of the towers results in an imbalance.
The imbalance of these two outer cantilevers becomes even greater under train and wind loading leading to a potentially unstable structure. Therefore to even out the weight of the two cantilevers, the two fixed arms (outer most cantilevers) must have been designed as heavier sections carrying at least half the weight of one of the central suspended spans.
By fixing the two outside cantilevers to the abutment towers extra dead load is also applied to the ends, maintaining a stable structure under live loading on the bridge which would otherwise immediately destroy the balance of the structure. Because of this effective extra loading from the abutments, the two free cantilevers on either side of the outer two towers should not deflect, other than due to the elasticity of the steel.
6.2 Live Load
6.2.1 Overturning
The ‘worst case’ loading condition is if two trains meet, travelling in opposite directions, over one of the suspended spans, while there is a strong wind blowing and the sun is blazing. Forgetting the effects of temperature and wind, the load of a train moving along

the bridge immediately upsets the balance of the structure. When over the suspended span the live load of a train acts at the point with maximum lever arm to the towers and foundations suggesting that the bridge should rotate about the nearest foundation piers and collapse. As mentioned already, the fixed cantilevers attached to the cantilever abutments are heavier and have extra dead load resisting the over turning moment – but the central tower does not have this, and can only rely on its own self weight to resist this over turning action. Fig. 7 shows the worst case loading condition (ignoring temperature and wind effects) with a train load over one of the suspended spans – assumed to act as a point load at the very end of the cantilever arm.
Considering the point in time when the tower is just about to rotate or pivot about point C, moments can be taken about this location to establish how the bridge performs:
W = dead weight of tower & cantilevers S = dead weight of suspended span T = train load (assumed to act at point) l1 = length of cantilever l2 = width of tower
)2(2)5.0(5.0
)(5.05.05.0)1()(5.05.05.0:)(
212
212
21112
21211
SlTlWllSTlWl
llSSlTlWlllSWlSlTlcM
−=⇒−+=→
+−+=→++=+
It follows that if 2Tl1 – Sl2 > l2W (3)
the bridge will rotate about point C and lead to a collapse. The designers would therefore have had to make the decision as to how to prevent this overturning – clearly by either increasing the weight of the central tower and cantilevers or widening the base, or both. There seems no evidence of the central section being made heavier – it looks no different from the other cantilevers, and perhaps concerns about deflections due to the increased weight may have ruled out this option. It is clear to see that the central tower is much wider then the outer two (Fig. 1) which suggests this was the adopted solution to prevent overturning due to train loading on the suspended spans.
The fact that the tower is wider necessitates a little
extra bracing to support the horizontal top and bottom members in the central towers, this would also have added weight to the tower, although I doubt it is considered in the above calculations as a resistance to overturning.
6.2.2 Buckling
Considering that the bridge carries huge compression forces, each of the struts must have been designed to resist buckling – most importantly the large compression members of the cantilever arms.
The cross-bracing between the top tie and this lowest strut member is in place to prevent buckling of the steel tube and to support the heavy compression tube. A simple buckling calculation is necessary to ascertain how many bracing members are required, or rather how frequently along the main strut they should be placed. As detailed information on material properties is not available, many assumptions have to be made to perform this check as well as simplifications. 1. Two trains travelling over bridge, meeting over suspended spans, with weight acting at a single point. 2. The compression member is one continuous straight member of constant section (12ft = 3.66m) 3. Compressive force is constant throughout the member. 4. At the point where cantilever meets suspended span, the compression member is at an angle of 12˚ to the horizontal. 5. Modulus of elasticity (steel) E = 200kN/mm2. 6. Thickness of the member is 25.4mm (1 inch). 7. Train dead load is 4000kN. Ref. [1] 8. Dead weight carried by member = 80000kN.
)5(64
))2((
212000
)4(24sin
8800078sin
44 tddI
kNComp
memberinncompressio
−−=
=⇒
=
π
Figure 7 : Sketch of the central Inchgarvie tower showing the simplified positions of applied loads for analysis purposes.

411
44
1079.4
64))2.3609(3660(
mmI
I
×=
−=π
ml
l
PEIl
e
e
Ee
8.6610212
1079.410200
)6(
6
1132
2
=×
××××=
=
π
π
This calculation suggests that the longest that the
compression member can be in order for it not to buckle is 66.8m. If bracing were placed at this distance on the actual structure there would need to be four sets of bracing along its length – in actual fact there are six. There are a number of reasons for this – not least the fact that this calculation is a very simplified one and makes many assumptions.
One of the main assumptions in this calculation was that the member is of uniform section, in reality this section decreases in size as it gets nearer the suspended spans – a smaller section would have less buckling resistance leading to the bracing needing to be closer as the section size decreases. The dead load of the bridge may in fact be very different, the value taken was a rough ball-park figure. While the value of train load was taken as 4000kN Ref. [1] this accounts only for a passenger train, in reality much heavier goods trains would have frequently crossed this bridge from the mines North of Edinburgh – possibly twice as heavy as the train load used in this example. The fact that there is more bracing in the bridge than this calculation suggests implies that the bridge designers built in a factor of safety – allowing for the possibility that the dead weight of the structure may exceed what they had expected. There is also the very real possibility that the bridge was ‘over designed’ to account for the lack of knowledge of the properties of steel at the time, and also in an attempt to reassure members of the public after the Tay Bridge disaster of 1879.
Due to the high degree of redundancy in this bridge, detailed calculations are beyond the scope of simple modes of analysis. There are other factors too which make analysing this bridge by hand without detailed drawings and descriptions very difficult. From the size of the superstructure members it is clear that the dead load of the bridge has a large influence, however it is incredibly difficult to estimate the dead load as there are so many hundreds of members.
Without close-up photographs it is hard to make informed guesses about the stiffness of different joints, although being a railway bridge does necessitate stiffness, and it is known to be one of the stiffest bridges in the world. I expect that one large issue the designers had to overcome was the introduction of torsion and twisting in the cantilevers as a train moved along just one of the tracks. The structure of the bridge obviously has to resist this force and the orientation of foundation fixings may well have been influenced by this. Lastly there is also the
effect of the sun to consider, and how the bridge may behave if heated on only one side.
6.3 Temperature & Wind
The bridge members are braced throughout to account for the wind forces acting on the bridge surface. As described, many of the members in this bridge are of tubular cross section. Not only does this shape provide strong sections with great load carrying capacities, but also a tube has one of the best drag coefficients of any shape, resulting in low wind forces due to good airflow over the members. Each of the compression members in the bridge (bottom member of cantilever and compression bracing in each arm) is braced against wind. This bracing consists of many open box trusses crossing between two compression members – creating the ‘ordered mess’ as mentioned in relation to aesthetics and seen in Figs. 5 & 6. There is no wind bracing applied to the members of the bridge in tension as these are all open lattice truss sections anyway, and provide little resistance to airflow compared to the large compression members. This design of wind bracing ensures that the wind forces acting on the bridge are taken to the ground, via the shortest route. Obviously the main structural members had to be designed to take this extra loading, and accommodate bracing which did not always reach to the base point of the tubes.
It is worth noting that the design of the bridge actually acts to reduce the wind pressure acting on it – at the end of the cantilever arms, where the wind acts with most leverage against the foundations, the minimum surface area is presented to the wind as the bridge is very small in profile at this point. Conversely, the point where the structure is tall and the members are large (acting as a barrier to wind) is directly over the supports, where the wind has a much less dangerous effect.
Because the bridge is made of steel the overall temperature of the structure is likely to vary considerably throughout the day, and perhaps even on one side more than the other depending on the position of the sun. The total length between the two cantilever abutments is 1630meters and considering a temperature variation of 45°C between summer and winter Ref. [2]. The expansion over this section of the bridge is calculated by:
mExpansionExpansion
TlExpansion
88.01630451012
)7(6
=×××=
Δ=−
α
giving a total movement of 0.88meters. If this expansion was not allowed for in the bridge design the stresses in the bridge members would increase quite possibly causing members to buckle and maybe resulting in a collapse. This expansion then has to be catered for and the most likely position for this is at the ends of the cantilever arms, where they meet the suspended spans. At this point, a pin between two sliding plates could easily accommodate a 0.22meter expansion at each point. Of course the railway tracks themselves have to have expansion joints, and need to be carefully designed over the gap between the cantilevers and suspended spans. Probably the easiest way, would be to have a continuous

rail over this section, sitting on sliding bed plates, and provide numerous small expansion joints along the length of the bridge to take up the required movement.
7 Serviceability & Durability
Because trains moving over the bridge require straight rails that are as close to horizontal as possible, this bridge must have been designed to allow very little deflections – a factor that would also limit large ships sailing below the bridge at high tide. The bridge has been built to be incredibly stiff with a large amount of bracing both to carry train loads and wind and temperature loads, all designed to allow minimal deflections.
While it is impossible to be certain of the exact construction of the individual members, the fact that the bridge has been painted continuously since being built suggests that no part of the bridge was designed with extra cover. Nowadays continually painting a bridge to protect its members from corrosion would present massive costs and problems for workers accessing the structure under the strict health and safety laws. Because of this, it is likely that if built now, some of the main members of the bridge would be over designed structurally – in order to provide some barrier to the harsh marine environment this bridge is located in. Also with more resilient paints and chemicals on the market, as well as corrosion resistant steels the job of maintaining the bridge should be considered thoroughly in a modern bridge.
8 Future Changes
As trains in service are updated and renewed with faster and sleeker models, there are potentially problems with new trains damaging the bridge. Each of the railway lines currently lies in a small trough, so if a train should become derailed, the wheels slip off the tracks and run along the trough – hopefully preventing both a train leaving the bridge, and also damage to the structure. This design however means that new trains, with engines, electrical equipment, heating units and fuel tanks all beneath the carriage, are getting closer and closer to the ground, running the risk of making contact with the bridge structure. Obviously the designers were not to know what the future may hold and now there is a real dilemma to be overcome. If trains continue to run lower to the ground, then perhaps the rails should be raised slightly, however in doing this, there is the real risk that the top of the trains will collide with the numerous cross bracing trusses spanning over the railway. There is simply no room to run larger trains – which prevents the use of double-deck carriages. There is also no room for over-head power lines on the bridge, severely limiting the trains which can run on this line.
A designer today should include these possible future changes into a bridge design, as history has proved that vehicles are forever improving, growing in size and running on different power sources – designing with a minimal level of clearance would be an unwise decision.
9 Conclusion
I am in no doubt that if this bridge were built in the 21st century it would be designed and constructed in a
very different manner. New building techniques, machines and materials would be used to build the bridge and far fewer labourers. However, this bridge stands as a testimony to what can be achieved by good design and a willing workforce. It has stood for one hundred and seventeen years carrying thousands of trains over the Firth, acting as an inspiration to engineers and designers the world over, and quite rightly remains one of the most famous and well recognised bridges in the world. With the right maintenance, respect and care, this bridge will still be standing in another hundred years, long after more recent buildings and bridges have collapsed or been replaced.
References
[1] First Great Western, website 2007. Travelling with us, High Speed Trains (HSTs) http://www.firstgreatwestern.co.uk/Content.aspx?id=56
[2] Ibell, T., 2007. 5.5 Temperature Effects, UK
isothermal maps. Bridge Engineering.
Picture References
Fig. 1 Modified from: http://www.gutenberg.org/files/19699/19699-
h/images/bridges_23.png Fig. 2 http://moment.mit.edu/imageLibrary/images/
Large_images/Fig74a.JPG Fig. 3 Hammond, R., 1964. The Forth Bridge and its
builders, Eyre & Spottiswoode. Fig. 4 http://www.ice.org.uk/images/ice_image_gallery/ Photo050.gif
Fig. 5 http://www.edinphoto.org.uk/0_edin_t/0_edinbur gh_transport_railways_rce058a_forth_bridge.jpg Fig. 6 Hammond, R., 1964. The Forth Bridge and its
builders, Eyre & Spottiswoode. Fig. 7 Modified from: http://www.gutenberg.org/files/19699/19699-
h/images/bridges_23.png
Bibliography
1. Westhofen, W., 1989. The centenary edition of The Forth Bridge, Copy 1098 of 2500, Moubray House.
2. Paxton, R., Shipway, J., Cox, W., Grant, D., Birse,
R., 1990. 100 Years of the Forth Bridge, Thomas Telford.
3. Hammond, R., 1964. The Forth Bridge and its
builders, Eyre & Spottiswoode.
4. Ibell, T., 2007. Bridge Engineering.