kvkalpakkamone.tn.nic.inkvkalpakkamone.tn.nic.in/class_7_full.docx · web viewthere are several...
TRANSCRIPT


Syllabus Content VII
Quarter – April to June
Sl. No.
Units Contents No. of Periods
1 1. Computer2. Security
1.1 Threats to computer1.2 Virus and its types1.3 Anti Virus software and examples1.4 Firewall and its use1.5 Cyber Crime and Computer Ethics1.6 Hackers and crackers1.7 Cyber law and importance1.8 Backup and Restore
QUR
2 3. HTML 2.1 Heading (H1 to H6)2.2 <Br>, <hr> ,<comment>2.3 Background Color ,font tag(size, face,
color)2.4 Text alignment (center, left , right)
9
Minimum level of learningChild should be able to secure his/her computer from various threatsCan tell what is cyber crime and understand the importance of cyber law
Kendriya Vidyalaya Sangathan
Chief PatronShri Santosh Kumar Mall, IAS
Commissioner, KVS
PatronShri. G.K. Shrivastava, IAS
Additional Commissioner (Admin)
Shri. U.N. KhawareAdditional Commissioner (Acad)
Regional PatronShri C. Neelap
Deputy Commissioner, KVS RO Guwahati
Co-ordination, Compilation & Guidance
Shri D. PatleAsstt. Commissioner, KVS RO Guwahati
School Co-ordinationShri . K. Alung Khumba
Principal, KV NFR, Maligaon, Guwahati
Subject ExpertDr. K. K. Motla, PGT(CS),
KV NFR, Maligaon, GuwahatiSh. Rajendra Gavahle, PGT(CS),
KV NFR, Maligaon, Guwahati
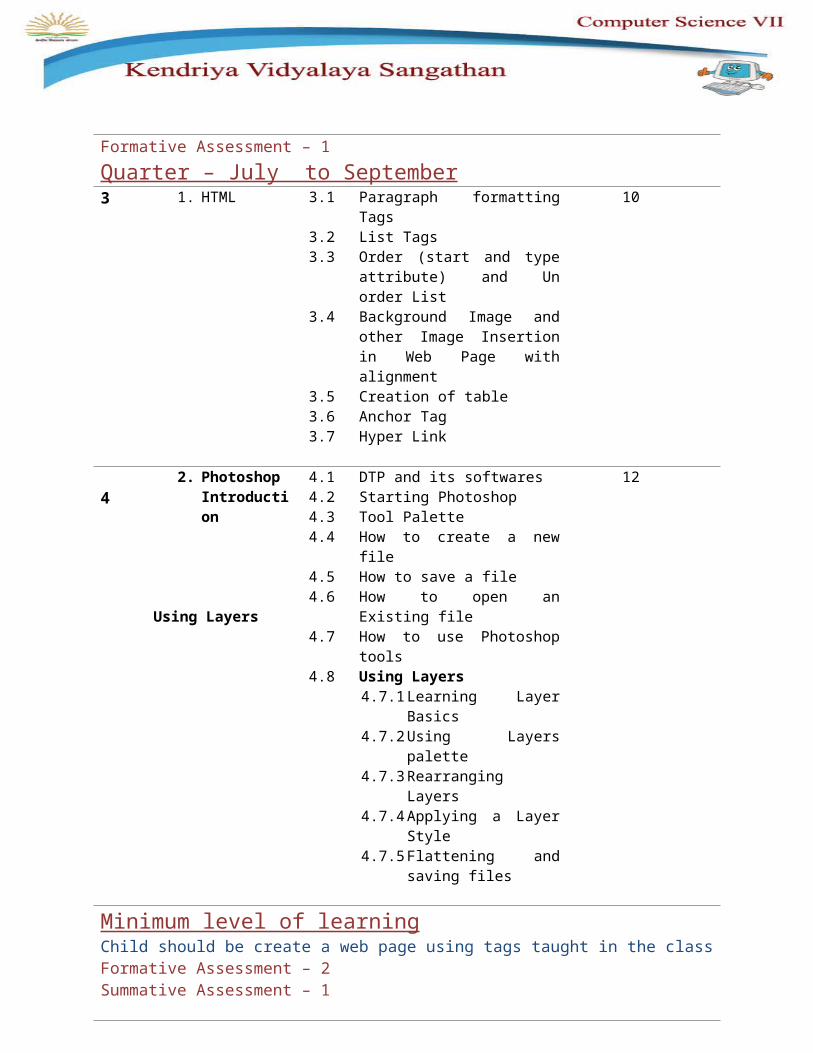
Formative Assessment – 1Quarter – July to September3 1. HTML 3.1 Paragraph formatting Tags
3.2 List Tags3.3 Order (start and type
attribute) and Un order List3.4 Background Image and
other Image Insertion in Web Page with alignment
3.5 Creation of table3.6 Anchor Tag3.7 Hyper Link
10
42. Photoshop
Introduction
Using Layers
4.1 DTP and its softwares4.2 Starting Photoshop4.3 Tool Palette4.4 How to create a new file4.5 How to save a file4.6 How to open an Existing
file4.7 How to use Photoshop
tools4.8 Using Layers
4.7.1 Learning Layer Basics
4.7.2 Using Layers palette4.7.3 Rearranging Layers4.7.4 Applying a Layer
Style4.7.5 Flattening and
saving files
12
Minimum level of learningChild should be create a web page using tags taught in the classFormative Assessment – 2Summative Assessment – 1

Quarter – October to December
5 Photoshop (continued)5.1 Rectangular
Marquee
5.2 Lasso
5.3 Crop and Slice tools
5.4 Measuring tools
5.5 Retouching tools
Rectangular Marquee5.1.1.Elliptical Marquee5.2.1.Single column Marquee5.3.1.Single Row Marquee
Lasso5.1.2. Polygonal Lasso5.2.2. Magnetic Lasso5.3.2. Quick Selection5.4.2. Magic WandCrop and Slice tools5.3.1 Crop5.3.2 slice5.3.3 Slice Select
Measuring tools5.4.1 Eyedropper5.4.2 color Sampler5.4.3 Ruler5.4.4 Note5.4.5 Count
Retouching tools5.5.1 Spot Healing Brush5.5.2 Healing Brush5.5.3 Patch5.5.4 Red Eye5.5.5 Magic Eraser5.5.6 Blur5.5.7 Sharpen5.5.8 Smudge5.5.9 Dodge
5.5.10Burn5.5.11Sponge
20
Minimum level of learningIntroduction of tool with its use to be demonstrated to studentsPractical exercise to be given to students so that they can learn the specified tool
Child should be able to understand the use of PhotoshopShould be able to identify various tools and where to use the toolShould be able to make changes in the picture using tools taught in the class
Formative Assessment – 3
Quarter – January to March6 Painting Tools in
Photoshop6.1 Brush6.2 Pencil6.3 Color Replacement6.4 Mixer Brush6.5 History Brush6.6 Art History Brush6.7 Gradient
12

Projects to be completed in the session :-
Work Experience :-1. Chicken Coop Design
Art Education:-1. Composition, Animal Poster
2. Shapes, Small Park Design
ContentsComputer Security 1
Threats to computer Virus and its typesAnti-Virus software and examplesFirewall and its use Cyber Crime and Computer EthicsHackers and crackersCyber law and importance
Html 12Heading (H1 to H6)<Br>, <hr> ,<comment>Background Color ,font tag(size, face, color)Text alignment (center, left , right)
Html 21
Photoshop 40Rectangular Marquee
Elliptical MarqueeSingle column MarqueeSingle Row Marquee
LassoPolygonal LassoMagnetic LassoQuick SelectionMagic Wand
Crop and Slice toolsCropsliceSlice Select
Measuring toolsEyedroppercolor SamplerRuler

Paragraph formatting TagsList Tags Order (start and type attribute) and Un order List Background Image and other Image Insertion in Web Page with alignment Creation of tableAnchor Tag
Hyper Link
Photoshop Introduction 31DTP and its softwaresStarting PhotoshopTool PaletteHow to create a new fileHow to save a fileHow to open an Existing fileHow to use Photoshop toolsUsing Layers
Learning Layer BasicsUsing Layers paletteRearranging LayersApplying a Layer StyleFlattening and saving file
Photoshop 40Rectangular Marquee
Elliptical MarqueeSingle column MarqueeSingle Row Marquee
LassoPolygonal LassoMagnetic LassoQuick SelectionMagic Wand
Crop and Slice toolsCropsliceSlice Select
Measuring toolsEyedroppercolor SamplerRuler

Lesson-1 Computer SecurityThreats to computer SecurityWhat do they mean by a threat?A threat, in the context of computer security,
refers to anything that has the potential to
cause serious harm to a computer system.
A threat is something that may or may not
happen, but has the potential to cause serious
damage. Threats can lead to attacks on computer systems, networks and more. A threat can be
either "intentional"(i.e., intelligent; e.g., an individual
cracker ora criminal organization) or "accidental"
(e.g., the possibility of a computer malfunctioning,
or the possibility of a natural disaster such as an
earthquake, a fire, or a tornado) or otherwise a
circumstance, capability, action, or event.
VirusComputer Virus are nothing but computer program that do unwanted things with your computer
resources e.g. you are working on PC and you are repeatedly receiving annoying message
Viruses: A virus is a small piece of software that piggybacks on real programs. For example, a virus
might attach itself to a program such as a spreadsheet program. Each time the spreadsheet program
runs, the virus runs, too, and it has the chance to reproduce (by attaching to other programs) or
wreak havoc.
E-mail viruses: An e-mail virus travels as an attachment to e-mail messages, and usually replicates
itself by automatically mailing itself to dozens of people in the victim's e-mail address book. Some e-
mail viruses don't even require a double-click -- they launch when you view the infected message in
the preview pane of your e-mail software.
P a g e | 1
You will learn
Threats to computer Virus and its types Anti Virus software
and examples Firewall and its use Cyber Crime and
Computer Ethics Hackers and crackers Cyber law and
important Backup and Restore

Trojan horses: A Trojan horse is simply a computer program. The program claims to do one thing (it
may claim to be a game) but instead does damage when you run it (it may erase your hard disk).
Trojan horses have no way to replicate automatically.
Worms: A worm is a small piece of software that uses computer networks and security holes to
replicate itself. A copy of the worm scans the network for another machine that has a specific security
hole. It copies itself to the new machine using the security hole, and then starts replicating from there,
as well.
Virus Origins (http://computer.howstuffworks.com/virus1.htm)Why they are called Virus?Computer viruses are called viruses because they share some of the traits of biological viruses. A
computer virus passes from computer to computer like a biological virus passes from person to
person.
Similar to the way a biological virus must hitch a ride on a cell, a computer virus must piggyback on
top of some other program or document in order to launch. Once a computer virus is running, it can
infect other programs or documents.
What /who make virus?who: People write computer viruses. A person has to write the code, test it to make sure it spreads
properly and then release it. A person also designs the virus's attack phase, whether it's a silly
message or the destruction of a hard disk.
Why:1. The first is the same psychology that drives vandals and arsonists. For some people, that seems to
be a thrill. If that sort of person knows computer programming, then he or she may funnel energy into
the creation of destructive viruses.
2. The second reason has to do with the thrill of watching things blow up. Some people have a
fascination with things like explosions and car wrecks. Creating a virus is a little like that -- it creates a
virtual bomb inside a computer, and the more computers that get infected, the more "fun" the
explosion.
3. The third reason involves bragging rights. Sort of like Mount Everest -- the mountain is there, so
someone is compelled to climb it. If you are a certain type of programmer who sees a security hole
that could be exploited, you might simply be compelled to exploit the hole yourself before someone
else beats you to it. P a g e | 2

4. And then there's cold, hard cash. Viruses can trick you into buying fake software, steal your
personal information and use it to get to your money, or be sold on the digital equivalent of the black
market. Powerful viruses are valuable -- and potentially lucrative -- tools.
Virus HistoryTraditional computer viruses were first widely seen in the late 1980s,
Some Virus the Melissa virus in March 1999 was spectacular in its attack. Melissa spread in Microsoft
Word documents sent via e-mail.
The ILOVEYOU virus, which appeared on May 4, 2000, was even simpler. It contained a piece of
code as an attachment. People who double-clicked on the attachment launched the code. It then sent
copies of itself to everyone in the victim's address book and started corrupting files on the victim's
machine.
Worms: A worm is similar to a virus by design and is considered to be a sub-class of a virus. Worms
spread from computer to computer, but unlike a virus, it has the capability to travel without any human
action. A worm takes advantage of file or information transport features on your system, which is what
allows it to travel unaided.
Worms use up computer processing time and network bandwidth when they replicate,
and often carry payloads that do considerable damage.
Some example of worms: A worm called Code Red made huge headlines in 2001.
The Slammer worm (which caused mayhem in January 2003) exploited a hole in Microsoft's SQL
server.
A worm called Storm, which showed up in 2007, immediately started making a name for itself. Storm
used social engineering techniques to trick users into loading the worm on their computers.
Trojan Horse: A Trojan Horse is full of as much trickery as the mythological Trojan Horse it was
named after. The Trojan Horse, at first glance will appear to be useful software but will actually do
damage once installed or run on your computer. Some Trojan are designed to be more annoying than
malicious (like changing your desktop, adding silly active desktop icons) or they can cause serious
damage by deleting files and destroying information on your system. Trojans are also known to create
P a g e | 3

a backdoor on your computer that gives malicious users access to your system, possibly allowing
confidential or personal information to be compromised. Unlike viruses and worms, Trojans do not
reproduce by infecting other files nor do they self-replicate.
How to protect your system
Keep The Operating System Updated
Use a Firewall
Anti-virus software is crucial to preventing virus attacks, but this strategy only works if users
update their software.
Know that the only way a virus spreads is either by launching an infected file or by booting an
infected disk. You cannot get a virus by simply being online or by reading e-mail.
Anti-Virus Software: vast, Avira, McAfee, Nortan and many more
Firewall
A firewall is a system designed to prevent unauthorized access to or from a private network. Firewalls
can be implemented in both hardware and software, or a combination of both. All messages entering
or leaving the intranet pass through the firewall, which examines each message and blocks those that
do not meet the specified security criteria.
Hardware and Software Firewalls:Firewalls can be either hardware or software but the ideal firewall configuration will consist of both.
Hardware firewalls can be purchased as a stand-alone product but are also typically found in
broadband routers, and should be considered an important part of your system and network set-up.
Most hardware firewalls will have a minimum of four network ports to connect other computers, but for
larger networks, business networking firewall solutions are available.
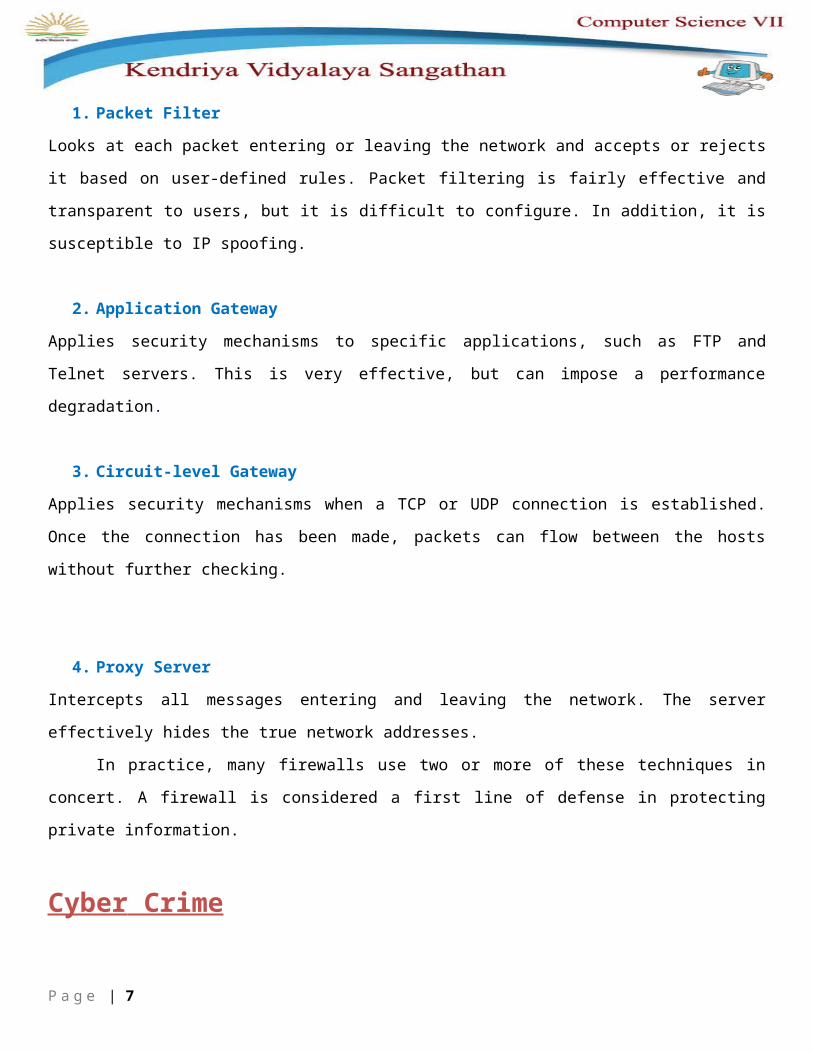
Common Firewall Techniques: P a g e | 4

There are several types of firewall techniques that will prevent potentially harmful information from
getting through:
1. Packet FilterLooks at each packet entering or leaving the network and accepts or rejects it based on user-defined
rules. Packet filtering is fairly effective and transparent to users, but it is difficult to configure. In
addition, it is susceptible to IP spoofing.
2. Application GatewayApplies security mechanisms to specific applications, such as FTP and Telnet servers. This is very
effective, but can impose a performance degradation.
3. Circuit-level GatewayApplies security mechanisms when a TCP or UDP connection is established. Once the connection
has been made, packets can flow between the hosts without further checking.
4. Proxy ServerIntercepts all messages entering and leaving the network. The server effectively hides the true
network addresses.
In practice, many firewalls use two or more of these techniques in concert. A firewall is
considered a first line of defense in protecting private information.
Cyber Crime
Cybercrime encompasses any criminal act dealing with computers and networks (called hacking).
Additionally, cybercrime also includes traditional crimes conducted through the Internet. For example;
hate crimes, telemarketing and Internet fraud, identity theft, and credit card account thefts are
considered to be cybercrimes when the illegal activities are committed through the use of a computer
and the Internet.
P a g e | 5

Computer as a targetThese crimes are committed by a selected group of criminals. Unlike crimes using the computer as a
tool, these crimes require the technical knowledge of the perpetrators. There are numerous crimes of
this nature committed daily on the internet:
Crimes that primarily target computer networks or devices include:
Computer viruses
Denial-of-service attacks
Malware (malicious code)
Computer Ethics
Computer Ethics is set of moral principles that regulate the use of computers. Some common issues
of computer ethics include intellectual property rights (such as copyrighted electronic content), privacy
concerns, and how computers affect society.
1. You shall not use a computer to harm other people.
2. You shall not interfere with other people's computer work.
3. You shall not snoop around in other people's computer files.
4. You shall not use a computer to steal.
5. You shall not use a computer to bear false witness
6. You shall not copy or use proprietary software for which you have not paid.
7. You shall not use other people's computer resources without authorization or proper
compensation.
8. You shall not appropriate other people's intellectual output.
9. You shall think about the social consequences of the program you are writing or the system
you are designing.
10.You shall always use a computer in ways that ensure consideration and respect for your fellow
humans.
P a g e | 6
Hackers and Crackers
A hacker is a person intensely interested in the arcane and recondite workings of any computer
operating system. Hackers are most often programmers. As such, hackers obtain advanced
knowledge of operating systems and programming languages. They might discover holes within
systems and the reasons for such holes. Hackers constantly seek further knowledge, freely share
what they have discovered, and never intentionally damage data.
A cracker is one who breaks into or otherwise violates the system integrity of remote machines with
malicious intent. Having gained unauthorized access, crackers destroy vital data, deny legitimate
users service, or cause problems for their targets. Crackers can easily be identified because their
actions are malicious.
1. A white hat hacker breaks security for non-malicious reasons, perhaps to test their own
security system
2. A "black hat" hacker is a hacker who "violates computer security for little reason beyond
maliciousness or for personal gain"
3. A grey hat hacker lies between a black hat and a white hat hacker. A grey hat hacker may surf
the Internet and hack into a computer system for the sole purpose of notifying the administrator
that their system has a security defect,
4. A social status among hackers, elite is used to describe the most skilled. 5. A blue hat hacker is someone outside computer security consulting firms who is used to bug-
test a system prior to its launch, looking for exploits so they can be closed
CyberLaw
Cyber means the use of Internet technologies and computers it includes computers, networks,
software, data storage devices, Internet, websites, emails, ATM machines etc. To protect the
cybercrime over Internet, this law is Passed to protect the Internet cybercrime. This law is approved
by the government.
P a g e | 7

Cyber law Includes:
1. Cybercrimes
2. Electronic and Digital Signatures
3. Intellectual Property
4. Data protection and privacy
Importance of Cyber Law: Companies now be able to carry out electronic commerce using the legal
infrastructure provided by the Act allows Government to issue notification on the web thus heralding
e-governance Protect Computer fraud and Unauthorized access. Consumers are now increasingly
using credit cards for shopping. Most people are using email, cell phones and SMS messages for
communication as well as Deal with Internet Banking Transactions.
Backup and Restore
Backup and Restore (formerly Windows Backup and Restore Center) is a component of Microsoft
Windows introduced in Windows Vista and included in later versions that allows users to create
backups and restore from backups.
There are two different types of backup supported: File backup and system image.
1. File backups are saved to ZIP files. Two methods of file backup are supported: The first,
normal backup, stores everything selected for backup. The second, incremental backup stores
only files that are changed after a previous backup.
2. System image: The image-based full system backup option, called Complete PC Backup in
Windows Vista or system image in Windows 7, allows for the imaging of the entire system
including operating system and data volumes. The backed up image can later be restored
through the Windows Recovery Environment either to the same computer or to a new
computer of different brand and type.
P a g e | 8

To back up your files
1. Open Backup and Restore by clicking the Start button , clicking Control Panel, clicking System and Maintenance, and then clicking Backup and Restore.
2. Do one of the following: If you've never used Windows Backup before, click Set up backup, and then follow the
steps in the wizard. If you've created a backup before, you can wait for your regularly scheduled backup to
occur, or you can manually create a new backup by clicking Back up now.
Restore files from a backup
1. Open Backup and Restore by clicking the Start button , clicking Control Panel, clicking System and Maintenance, and then clicking Backup and Restore.
2. Do one of the following: To restore your files, click Restore my files. To restore the files of all users, click Restore all users' files. If you're prompted for an
administrator password or confirmation, type the password or provide confirmation.
1. A threat, in the context of computer security, refers to anything that has the potential to cause
serious harm to a computer system.
2. Computer Virus are nothing but computer program that do unwanted things with your computer
resources e.g. you are working on PC and you are repeatedly receiving annoying message.
3. Viruses are of many types like Email viruses, Trojan Horse, Worm, ILOVEYOU.
4. We can protect our system by Keeping The Operating System Updated, Use a Firewall,
Anti-virus software is crucial to preventing virus attacks, but this strategy only works if users
update their software.
5. A firewall is a system designed to prevent unauthorized access to or from a private network.
Firewalls can be implemented in both hardware and software, or a combination of both.
6. Common Firewall techniques are Packet Filter, Application Gateway, Circuit-level Gateway,
Circuit-level Gateway, and Proxy Server.
7. Any criminal act dealing with computers and networks (called hacking). Additionally, cybercrime also
includes traditional crimes conducted through the Internet referred to as Cyber Crime.
8. Computer Ethics is set of moral principles that regulate the use of computers.
P a g e | 9
SUMMARY

9. A hacker is a person intensely interested in the arcane and recondite workings of any
computer operating system. Hackers are most often programmers.
10.A cracker is one who breaks into or otherwise violates the system integrity of remote
machines with malicious intent.
11.Cyber means the use of Internet technologies and computers it includes computers, networks,
software, data storage devices, Internet, websites, emails, ATM machines etc.
12.Backup and Restore (formerly Windows Backup and Restore Center) is a component of
Microsoft Windows introduced in Windows Vista and included in later versions that allows
users to create backups and restore from backups.
13.Two different types of backup supported: File backup and system image.
A. Fill in the blanks:
i. ____________ has the potential to cause serious harm to a computer system.
ii. A threat can be ____________ and ___________.
iii. ____________Uses computer networks and security holes to replicate itself.
iv. ____________program can erase your hard disk.
v. Computer viruses were first widely seen in the late___________.
vi. Crime conducted with internet called ____________.
vii. ____________ is one who breaks into or otherwise violates the system integrity of
remote machines with malicious intent.
viii. File backup and System image are two ___________________methods.
B. Find true or false:
i. Computer viruses are nothing but computer program that do unwanted things.
P a g e | 10
EXERCISES

ii. A hacker is hacking software which access in sensitive information from your
computer.
iii. Backup and Restore is a component of Microsoft Windows.
iv. Cyber means the use of internet technologies and computers.
v. We shall use a computer to harm other people is one of the ethics of computer.
C.Short answer questions:
i. What is threat in computer?
ii. Give one difference between Trojan Horse and worms?
iii. What is Firewall in windows?
iv. List two ethics of computer?
v. Give one difference between Hackers and Crackers?
vi. Why we need Backup?
vii. What are the types of Backup? Write name of each.
viii. What do you mean by Restore? How it is helpful for you?
Lesson-2 P a g e | 11

Hyper Text Markup Language (HTML)
HTML:
HTML is the building block for web pages.
Prerequisites: You will need a text editor,
such as Notepad and an Internet browser,
such as Internet Explorer or Netscape.
What is an html File? i. HTML is a format that tells a computer
how to display a web page.
ii. An HTML file is a text file containing
small markup tags
iii. The markup tags tell the Web browser
how to display the page
iv. An HTML file must have an htm or html
file extension
What are HTML tags? i. HTML tags are used to mark-up HTML elements.
ii. HTML tags are surrounded by the two characters < and >.
iii. HTML tags normally come in pairs like <b> and </b>.
iv. The first tag in a pair is the start tag, the second tag is the end tag.
v. HTML tags are not case sensitive, <b> means the same as <B>.
Tag Description
P a g e | 12
You will learn
Heading (H1 to H6) <Br>,
<hr> ,<comment> Background
Color ,font tag(size, face, color)
Text alignment (center, left , right)

<html> This tag marks the start of an html document
<head>...</head>This tag represents the document's header which can keep other HTML tags like
<title>, <link> etc.
<title> The <title>tag is used inside the <head> tag to mention the document title.
<body> This tag represents the document's body which keeps all the contents of a web page- text,
images, sound etc.
<Hn> This tag represents the heading tags of different sizes.
Where n is the number start from 1…6
Like <H1>,<H2>……..<H6>
<center> This tag is used to write a line or text in center
<p> This tag represents a paragraph.
<p align=left/right/center>This tag is used to write paragraph alignment in html.
<br> This tag is used to insert new line or insert enter in html
Bold, Italics, Underline :<b> tag is used to make a text bold in html.
<i>tag is used to make a text italics in html.
<u>tag is used to make a text underlined in html.
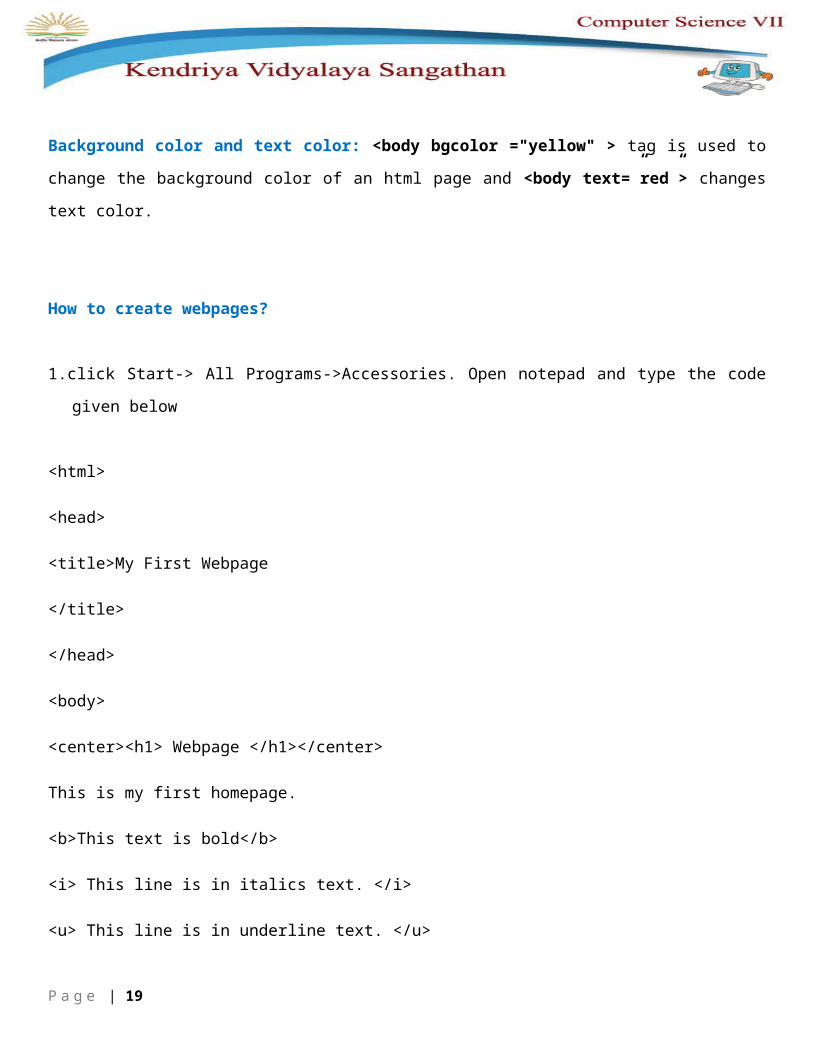
Background color and text color: <body bgcolor ="yellow" > tag is used to change the
background color of an html page and <body text=”red”> changes text color.
How to create webpages?
P a g e | 13

1.click Start-> All Programs->Accessories. Open notepad and type the code given below
<html>
<head>
<title>My First Webpage
</title>
</head>
<body>
<center><h1> Webpage </h1></center>
This is my first homepage.
<b>This text is bold</b>
<i> This line is in italics text. </i>
<u> This line is in underline text. </u>
<br>This is the 1st line.
<br>This is the 2nd line.
</body>
</html>
2. Click File, Click Save as
3.Type a Name of your webpage dot html.e.g.: -mypage.html
4. Open the Place where you saved your file. Double click on the file.
Assignment Question P a g e | 14

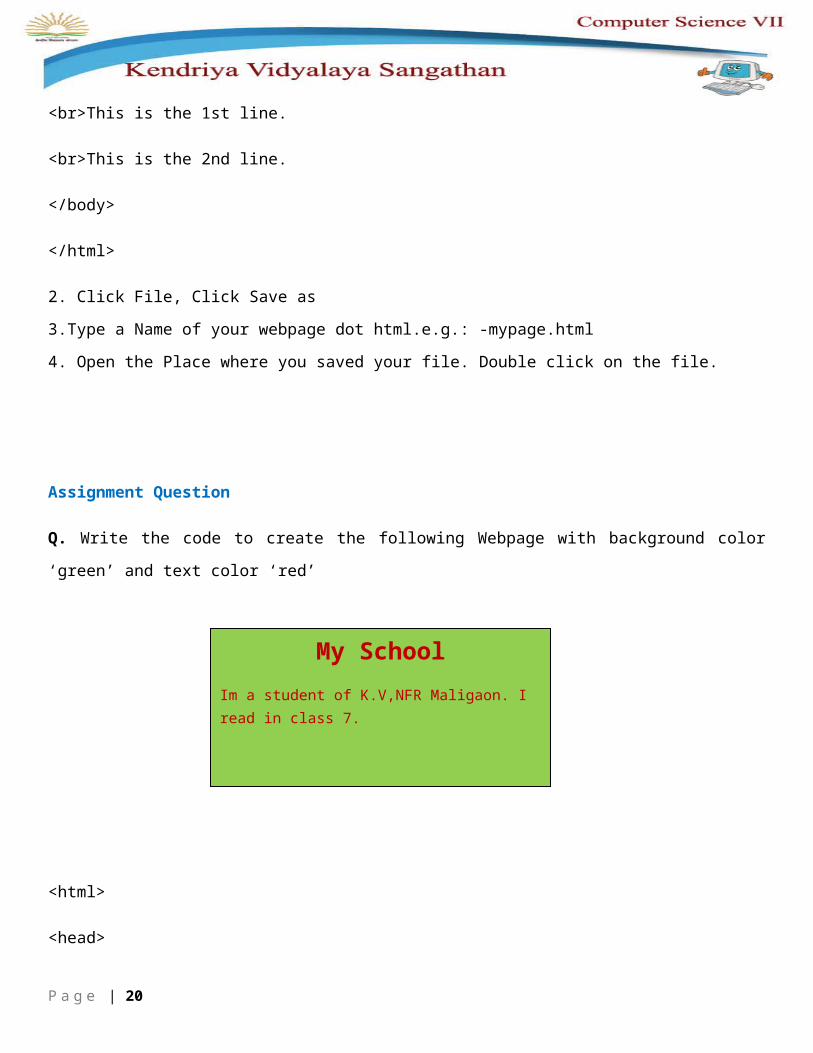
Q. Write the code to create the following Webpage with background color ‘green’ and text color ‘red’
<html>
<head>
<title>My Webpage
</title>
</head>
<body bgcolor ="yellow" text=”red”>
<center><h1> My School </h1></center>
<p align=left>Im a student of K.V,NFR Maligaon. I read in class 7. </p>
</body>
</html>
Q. Write an html code to show the working of various Paragraph alignment tags
<html>
<head>
<title>
Paragraph in html
P a g e | 15
My SchoolIm a student of K.V,NFR Maligaon. I read in class 7.

</title>
</head>
<body>
This is an html document.
<p align=left>This is a left paragraph in html </p>
<p align=right>This is a right paragraph in html </p>
<p align=center>This is a center paragraph in html </p>
</body>
</html>
Inserting Images in Webpage:
We can insert images to our Html pages to make it look more beautiful. <img> tag is used to insert
images in webpage. There are two ways to insert images in a webpage:
1. Internal:
Steps: 1. Open My Pictures or Sample Pictures or any folder containing pictures Copy the
picture you want
2. Create a folder on the Desktop or in My Documents
3.Open the Folder, and paste the Picture.
4.Right click, and click new and click text document.
5.Open the text document and type the code given below.
<html>
<head>
<title>
P a g e | 16

Webpage with Pictures
</title>
</head>
<body bgcolor="yellow">
<img src=Name of image.jpg>
</body></html>
4.Save the file giving a name with dot html(mypage.html).
5.Open the webpage using browser
2. External: Here we type the location or address of the picture where it is, instead of simply
writing the name of the picture.
Steps:
1.Open a text document and type the code given below.
<html>
<head>
<title>
Webpage with Pictures
</title>
</head>
P a g e | 17
<body bgcolor="yellow">
<img src=c:\Windows\Web\Wallpaper\Name of image.jpg>
</body>
</html>
2.Save the file giving a name with dot html(mypage.html).
3.Open the webpage using browser
To insert images with adjusted height and width: We can change the width and height of the
inserted image in our webpage by simply writing the ‘width’ and ‘height’ options inside the <img> tag
<img src=Name of image.jpg width=50 height=50>
1. HTML is a format that tells a computer how to display a web page; it is the building block for
web pages.
2. HTML tags normally come in pairs like <b> and </b>.
3. <html> This tag marks the start of an html document
4. <head>...</head>This tag represents the document's header which can keep other HTML tags
like <title>, <link> etc.
5. <title> The <title>tag is used inside the <head> tag to mention the document title.
6. <body> This tag represents the document's body which keeps all the contents of a web page-
text, images, sound etc.
7. <h1> ,<h2>,……<h6>This tag represents the heading tags of different sizes.
8. <center> This tag is used to write a line or text in center
9. <p> This tag represents a paragraph.
10.<img> tag is used to insert images in webpage
P a g e | 18
SUMMARY
EXERCISES
A. Fill in the blanks
i. _____________ is the building block of HTML
ii. HTML document must have .html or ___________ extensions.
iii. _____________tag is used to write line or text in center.
iv. _____________tag is used to set paragraph.
v. To insert image ___________tag is used.
B. Find true or false
i. HTML tags are case sensitive.
ii. <h1><h2>……..<h6> tags represent heading tags of different size.
iii. <p> tag is used to insert new line or insert enter in HTML.
iv. <img> tag is used to insert images in webpage.
v. <B> tag is used to make text italics.
C. Short answer question
i. What is HTML?
ii. Name any two attributes used with the BODY tag.?
iii. Write the HTML code to set the background color to yellow.?
iv. How would you insert image in an Html document?
v. What does the ‘n’ in the <Hn> tag indicate?
P a g e | 19
In the lab
1. Ankita has made the HTML document shown below, which displays headings in differentSizes. Write the HTML code for creating a similar document.
2. Anita wants to create simple Web page on Input devices. Help her by listing the steps required for creating the web page.
Lesson-3 P a g e | 20
You will learn
Paragraph formatting Tags

HTML LISTSLists in HTML
1. Unordered Lists - An unordered list has no specific numbering or ordering. It starts with the <ul> tag. Each list item starts with the <li> tag.Example: Create the following List in HTML
<html>
<head>
<title>
Unordered list
</title>
<head>
<body>
<h2><b>Unordered List with Bullets</b></h2>
<ul>
<li>Coffee</li>
<li>Tea</li>
<li>Milk</li>
</ul>
</body>
</html>
Unordered list styling- <ul style="list-style-type:circle"> OR <ul style="list-style-type:square">
11.Ordered Lists - An ordered list can be numerical or alphabetical in a specific order.
Example: Create the following List in HTML P a g e | 21
Unordered List with Bullets
I like to drink the following:
Coffee Tea Milk
Ordered List with Numbers
I like to drink the following:
Paragraph formatting Tags

<html>
<head>
<title>
Ordered list
</title>
</head>
<body>
<h2><b>Ordered List with Numbers</b></h2>
<ol>
<li>Coffee</li>
<li>Tea</li>
<li>Milk</li>
</ol>
</body>
</html>
Ordered list styling- To change the starting number from default 1 to any number we use the ‘start’ option.
To Change from numbers to alphabet or to roman numbers we use the ‘type’ option.
Example: <ol start="10” type=i >
<li>Coffee</li>
<li>Milk</li>
</ol>
TABLES IN HTML:
P a g e | 22
Ordered List with Numbers
I like to drink the following:
x. Coffeexi. Tea
xii. Milk

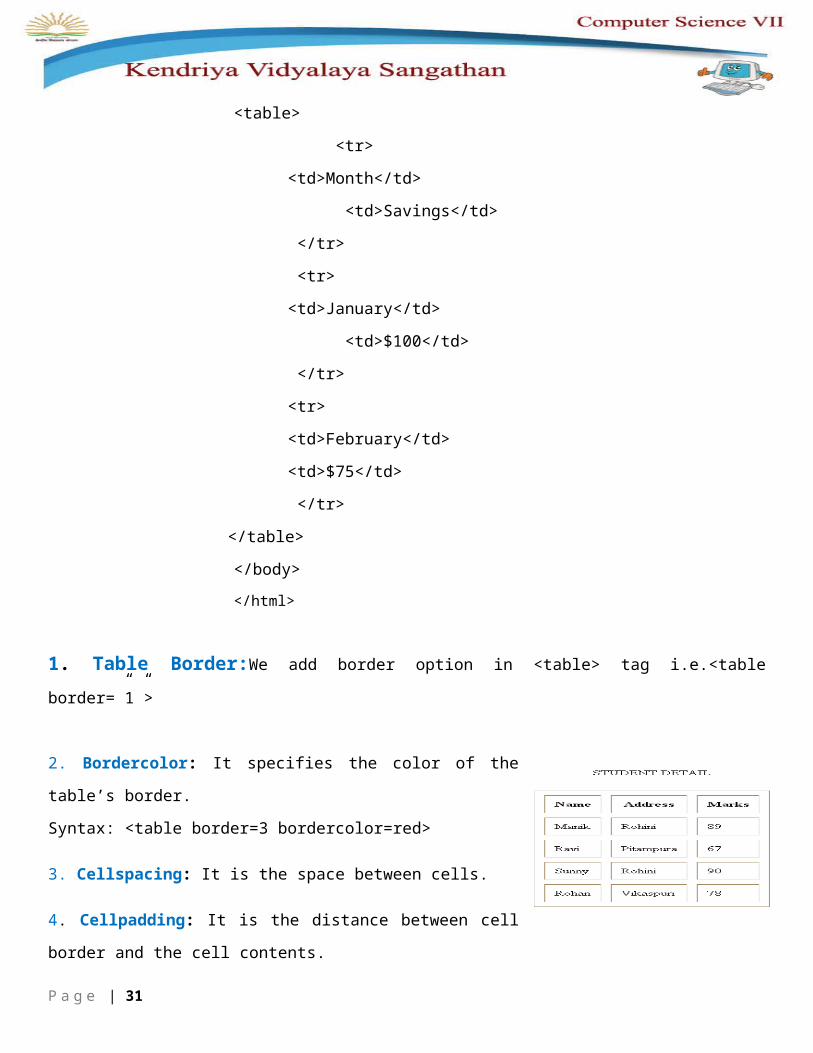
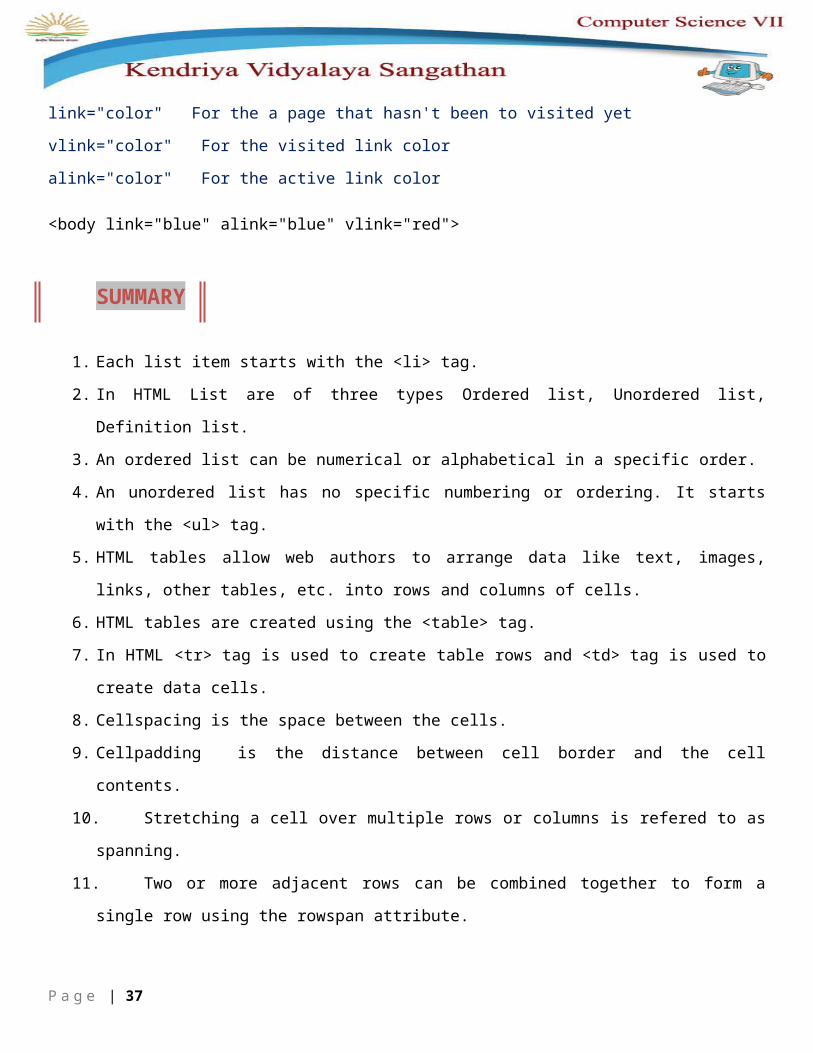
HTML tables allow web authors to arrange data like text, images, links, other tables, etc. into rows
and columns of cells. The HTML tables are created using the <table> tag in which
the <tr> tag is used to create table rows and <td> tag is used to create data cells.
Example: Create the following List in HTML
Month Saving
January $100
February $75
<html>
<head>
<title>
Table in html
</title>
</head>
<body>
<table>
<tr>
<td>Month</td>
<td>Savings</td>
</tr>
<tr>
<td>January</td>
<td>$100</td>
</tr>
<tr>
<td>February</td>
<td>$75</td>
</tr>
</table> P a g e | 23

</body>
</html>
1. Table Border:We add border option in <table> tag i.e.<table border=”1”>
2. Bordercolor: It specifies the color of the table’s border.
Syntax: <table border=3 bordercolor=red>
3. Cellspacing: It is the space between cells.
4. Cellpadding: It is the distance between cell border and the cell
contents.
Syntax: <table border=3 bordercolor=red cellspacing=10 cellpadding=10>
5. Background: It is used to give image in the background. This attribute takes URL of the file as its
value.
Syntax: <table background=”path”
6. Bgcolor: It is used to give colour in the background of the table.
Syntax: <table bgcolor=”red”>
7. Height and Width: These attributes are used to specify the height and width of the table in pixel
Syntax: <table height=200 width=300 >
ROWSPAN AND COLSPAN ATTRIBUTES OF TABLE TAG
Stretching a cell over multiple rows or columns is refered to as spanning. Two or more adjacent rows
can be combined together to form a single row using the rowspan attribute. Two or more adjacent
columns can be combined together to form a single columns using the colspan attribute.
P a g e | 24

Output :-
P a g e | 25
<html>
<Table border=1>
<caption> PRICE LIST</caption>
<tr><th colspan=2>Activity Name</th><th>Monthly Charges</th></tr>
<tr><td rowspan=2>INDOOR Activities</td><td>Indian Dance</td><td>Rs.
250</td></tr>
<tr><td>Dramatics</td><td>Rs. 350</td></tr>
<tr><td rowspan=2>OUTDOOR Activities</td><td>Skating</td><td>Rs.
150</td></tr>
<tr><td>Horse Riding</td><td>Rs. 400</td></tr>
</Table>
</html>

Anchor Tag:The ‘a’ or anchor tag. Hyperlinks, or links, are how you move around the web. An <a> or anchor tag is
how you make hyperlinks in HTML. The ‘a’ or anchor tag is an elegantly simple and powerful tool.
There are two ways two insert hyperlinks in html:
1. Internal link –
Steps: 1. Open My Pictures or Sample Pictures or any folder containing pictures or songs or any
file, Copy the file you want
2. Create a folder on the Desktop or in My Documents
3.Open the Folder, and paste the file.
4.Right click, and click new and click text document.
5.Open the text document and type the code given below.
<html>
<head>
<title>
Links in HTML
</title>
</head>
<body>
<p><a href=Name of the file. extension>Click here to download</a></p>
</body>
</html>
P a g e | 26

4.Save the file giving a name with dot html(mypage.html).
5.Open the webpage using browser.
2. External: Here we type the location or address of the picture or file where it is, instead of
simply writing the name of the picture.
Steps:
1.Open a text document and type the code given below.
<html>
<head>
<title>
Webpage with Pictures
</title>
</head>
<body >
<p><a href=c:\User\Name of the file. extension>Click here to download</a></p>
</body>
</html>
P a g e | 27

4.Save the file giving a name with dot html(mypage.html).
5.Open the webpage using browser
To open webpages using hyperlinks: We can open different webpages by simply clicking on a
hyperlink by providing the address of the webpage using <a> tag
<a href="http://www.yahoo.com">Visit Yahoo</a>
To change HTML Link Color: We can change the color of the hyperlinks by using the following
options in the <body> tag.
link="color" For the a page that hasn't been to visited yet
vlink="color" For the visited link color
alink="color" For the active link color
<body link="blue" alink="blue" vlink="red">
1. Each list item starts with the <li> tag.
2. In HTML List are of three types Ordered list, Unordered list, Definition list.
3. An ordered list can be numerical or alphabetical in a specific order.
4. An unordered list has no specific numbering or ordering. It starts with the <ul> tag.
5. HTML tables allow web authors to arrange data like text, images, links, other tables, etc. into
rows and columns of cells.
6. HTML tables are created using the <table> tag.
7. In HTML <tr> tag is used to create table rows and <td> tag is used to create data cells.
8. Cellspacing is the space between the cells.
9. Cellpadding is the distance between cell border and the cell contents.
10.Stretching a cell over multiple rows or columns is refered to as spanning.
11.Two or more adjacent rows can be combined together to form a single row using the rowspan
attribute.
12.Two or more adjacent columns can be combined together to form a single columns using the
colspan attribute. P a g e | 28
SUMMARY

13.An <a> or anchor tag is how you make hyperlinks in HTML.
14.There are two ways two insert hyperlinks in html : Internal Link, External Link.
A. Fill in the blanks
i. __________list can be numerical or alphabetical in a specific order.
ii. Each list item should start with_____________tag.
iii. We can create table in HTML by using___________tag.
iv. __________tag is used to create table row whereas ___________tag is used to create
Data cells.
v. Space between the cells is_____________.
vi. ___________is the distance between the cell border and the cell content.
B. Find true or false
i. We use Table border to change the color of border.
ii. Background is to give image in the background.
iii. <A HREF=”Lotus.html”> here ‘A’ stands for anchor tag.
iv. HREF attribute is used to set URL of the page.
v. <TD> tag is used to create table row.
C. Short Answer Questions
i. What is List in HTML?
ii. What are the types of List in HTML?
iii. Give one difference between Ordered list with Unordered list.?
iv. What is cellpadding?
v. Give one difference between rowspan with colspan.?
vi. What is cellspacing?
vii. What is the use of <A> tag in HTML? Give syntax.
viii. List four attributes of <A> tag. P a g e | 29
EXERCISES

ix. What are the types of Hyperlink?
x. Identify the error in code given below:
<img src=”mypage.html”
In the lab
1. The student of Lotus Public School wants to create the following web page related to the outdoor activities help them to create the code in HTML.
2. Create your class time table with class teacher name using <TABLE> in HTML , You are free to
use colors of your own choice.
3. Anita is trying to create two web pages computer.html and definition.html where computer.html
is the name and are linked to definition.html. She wants that a click on name and it should
display the web page definition.html. Try this assignment to yourself to see whether you get
output correctly.
P a g e | 30
Lesson-4
Photoshop Introduction
Desktop publishing
Desktop publishing (DTP) is the creation of documents
using page layout skills on a personal computer. Desktop
publishing software can generate layouts and produce
typographic quality text and images comparable to traditional
typography and printing. This technology allows individuals,
businesses, and other organizations to self-publish a wide
range of printed matter.
DTP skills and software used for common paper
and book publishing are sometimes used to create graphics
for point of sale displays, promotional items, trade show
exhibits, retail package designs and outdoor signs.
DTP applications - List of desktop publishing software.
Adobe Frame Maker, Adobe Home Publisher, Adobe
Illustrator, Adobe InDesign, Adobe PageMaker
Adobe Photoshop, CorelDraw, Microsoft PowerPoint
P a g e | 31
You will learn
DTP and its softwares Starting Photoshop Tool Palette How to create a new file How to save a file How to open an Existing
file How to use Photoshop
toolsUsing Layers Learning Layer Basics Using Layers palette Rearranging Layers Applying a Layer Style Flattening and saving files

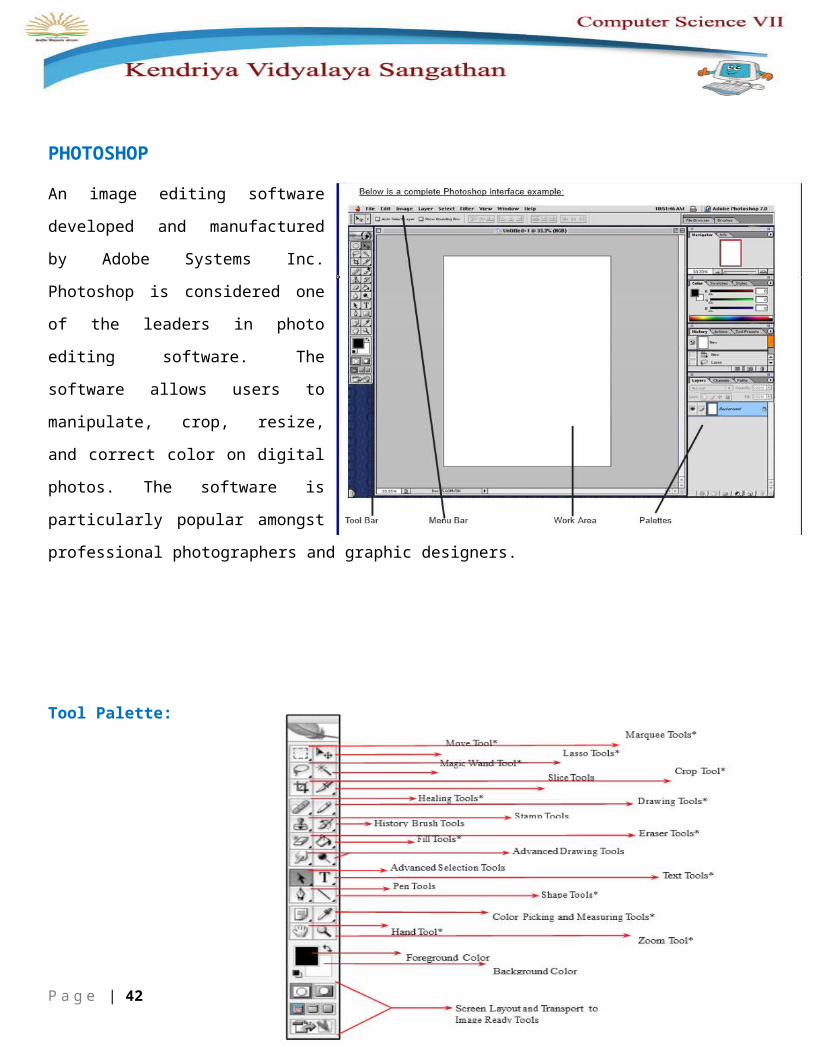
PHOTOSHOP
An image editing software developed
and manufactured by Adobe Systems
Inc. Photoshop is considered one of
the leaders in photo editing software.
The software allows users to
manipulate, crop, resize, and correct
color on digital photos. The software is
particularly popular amongst
professional photographers and
graphic designers.
Tool Palette:
P a g e | 32

CREATING A NEW DOCUMENT: To create a new document you choose Menu >File >New. This
opens a window that requires some input:
• Size…We will use 8 inches by 11 inches
• Background…We will use white.
• Resolution…We will use 150.
NOTE: Resolution specs
Web Resolution = 72
Print resolution = 150 or 300
Film Resolution = 600
Steps:1. Menu > File > New
2. Put in a Size ( 8 inch by 11 inch)
3. Background is White
4. Resolution is 150 this time.
SAVE DOCUMENT AND THE FORMAT
Formats:1. .PSD This is the Photoshop format and it preserves layers.
2. .JPG This is for the web and is used for graphics on the web.
3. .GIF This is also for the web but is best for text.
4. .TFF A great cross platform format that preserves all quality for printing.
5. .PCT Another good format for print and cross platform.
P a g e | 33

Steps:1. Open Photoshop
2. Click File >Open navigate to document, click once on it, click OK.
3. Next let us perform some editing on the image or document
4. Next save it as Work.jpg on the desktop or any other folder
5. Click> File > Save As Change name, navigate to desired save location, Click OK
OPENING A FILE: Opening a file is easy, just do Menu > File > Open…Navigate to the file and
highlight it, then click OK.
Steps:1. Open Photoshop
2. click File > Open >navigate to document, click once on it
How to use Photoshop tools
Solarize an image
1. Open an image on your canvas click File>Open and browse the image you want to open.
2. Click on Filter>Stylize>Solarize.
3. Click on OK
P a g e | 34

Painting Effect
1. Open an image
2. Click on Filter>Brush Stroke>Spatter. Give the values as follows: Spatter, Spray Radius - 10,
Smoothness - 5.
3. Next, click on Filter>Blur>Blur.
4. Click on OK and here is your result.
Cross-Stitch Effect
1. Open a new file.
2. Go to Filter>Texture>Patchwork. A new window opens; give the values Square Size - 5 and
Relief - 6.
3. Click on OK and here is your result.
REDUCING AN IMAGE SIZE
1. Open an image on your canvas by clicking on File>Open and browse for the image you want
to open.
2. click image, click image size-width 2cm, height 2cm (as given in online instruction)
3. click file save as, click save, enter the quality value to reduce the size
4. Save the photo.
Creating Photo Collage
1. Step 1. Open the image that will be your background or use any texture in Photoshop
Note: To use texture: click file->new, then click layer->new fill layer.
2. Step 2. Click File, click Place and select the image
3. Step 3. Resize the Image and move it position, right click and select place.
4. Step 4. Click File, click Place and select another image…Repeat step 3.
5. Step 5. Click layer->layer style, then click stroke or outer glow. To make it look attractive P a g e | 35
Layers
Learning Layer Basics
One of the most useful features of applications like Photoshop is the ability to work with layers.
Layers allow you to have several pieces of images in the same file, which can be arranged on top of
each other to create a complete image.
Using Layers palette
Creating new Layers: From the Layers menu select New and then Layer
P a g e | 36
Rearranging Layers: The stacking order is determined by the order in the layer’s palette. In the
layer’s palette, drag the circle layer so that it is above the rectangle layer.
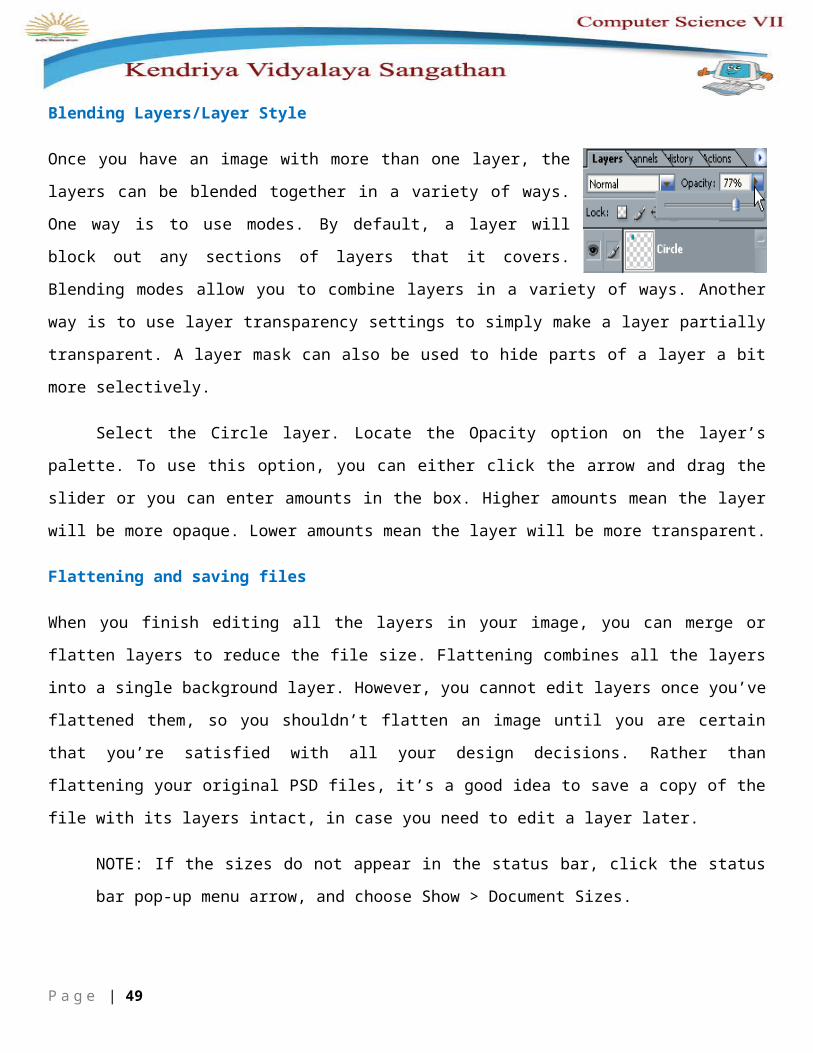
Blending Layers/Layer Style
Once you have an image with more than one layer, the layers can be
blended together in a variety of ways. One way is to use modes. By
default, a layer will block out any sections of layers that it covers.
Blending modes allow you to combine layers in a variety of ways. Another
way is to use layer transparency settings to simply make a layer partially
transparent. A layer mask can also be used to hide parts of a layer a bit more selectively.
Select the Circle layer. Locate the Opacity option on the layer’s palette. To use this option, you
can either click the arrow and drag the slider or you can enter amounts in the box. Higher amounts
mean the layer will be more opaque. Lower amounts mean the layer will be more transparent.
Flattening and saving files
When you finish editing all the layers in your image, you can merge or flatten layers to reduce the file
size. Flattening combines all the layers into a single background layer. However, you cannot edit
layers once you’ve flattened them, so you shouldn’t flatten an image until you are certain that you’re
satisfied with all your design decisions. Rather than flattening your original PSD files, it’s a good idea
to save a copy of the file with its layers intact, in case you need to edit a layer later.
NOTE: If the sizes do not appear in the status bar, click the status bar pop-up menu arrow, and
choose Show > Document Sizes.
P a g e | 37

1. Desktop publishing (DTP) is the creation of documents using page layout skills on a personal
computer.
2. Adobe Frame Maker, Adobe Home Publisher, Adobe Illustrator, Adobe InDesign, Adobe
PageMaker and Adobe Photoshop these all are DTP applications.
3. An image editing software developed and manufactured by Adobe Systems Inc. Photoshop is
considered one of the leaders in photo editing software.
4. .PSD, .JPG, .GIF, .TFF,.PCT these all are different Photoshop formats.
5. Layers allow you to have several pieces of images in the same file, which can be arranged on
top of each other to create a complete image.
A. Fill in the blanks
i. DTP means_____________________
ii. Corel Draw is an example of________________.
iii. Photoshop support____________________formats.
iv. ____________allows you to have several pieces of images in the same file.
v. ____________is for the web but is best for text.
B. Find true or false
i. DTP allows you to have several pieces of images in the same file.
ii. .TFF format is good format for print and cross platform.
iii. Photoshop is considered one of the leaders in photo editing software.
iv. By default, a layer blocks out any sections of layers that it covers.
P a g e | 38
SUMMARY
EXERCISES

C. Short Answer Question:
i. What are layers?
ii. What do you mean by DTP?
iii. Give two example of DTP applications.?
iv. What are the Photoshop formats?
In the lab
1. Sunita wants to reduce the image size in Photoshop but she could not achieve it. Can you help her to?
2. Create Photo Collage of your friends using Photoshop.
P a g e | 39

Lesson-5
Photoshop (Continued)
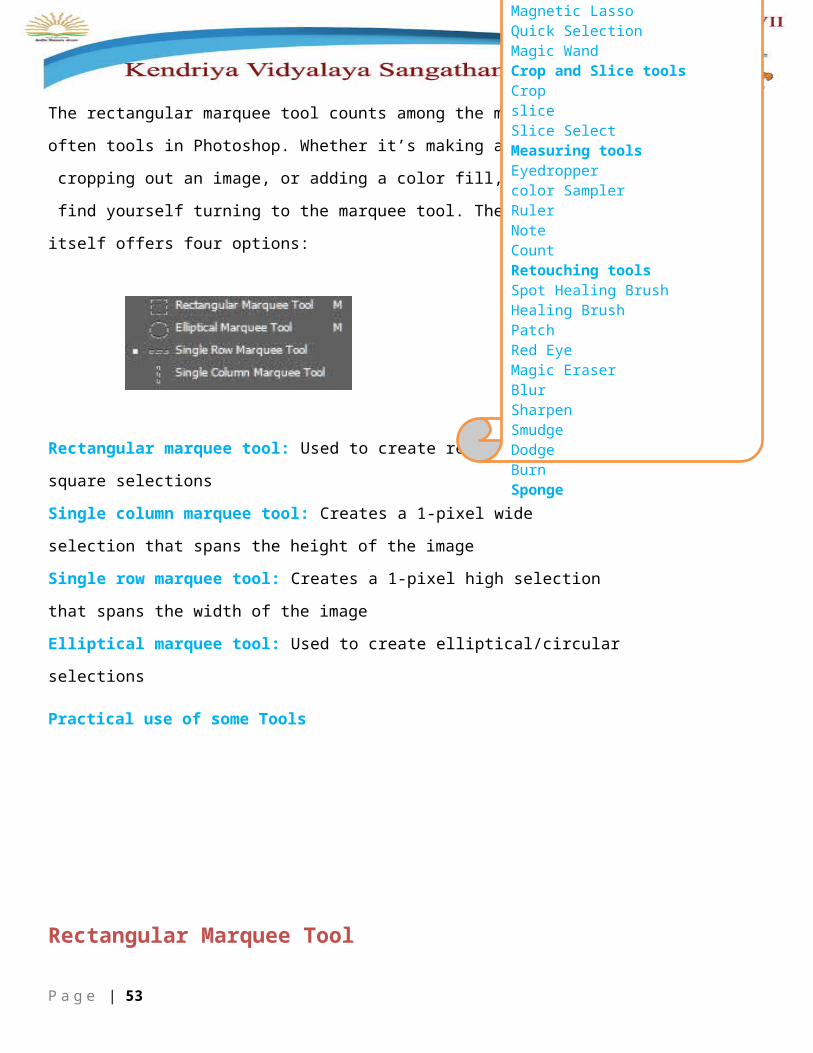
Rectangular Marquee ToolThe rectangular marquee tool counts among the most
often tools in Photoshop. Whether it’s making a selection,
cropping out an image, or adding a color fill, you’ll frequently
find yourself turning to the marquee tool. The marquee tool
itself offers four options:
Rectangular marquee tool: Used to create rectangular/
square selections
Single column marquee tool: Creates a 1-pixel wide
selection that spans the height of the image
Single row marquee tool: Creates a 1-pixel high selection
that spans the width of the image
Elliptical marquee tool: Used to create elliptical/circular
selections
Practical use of some Tools
P a g e | 40
You will learn
Rectangular Marquee Elliptical Marquee Single column Marquee Single Row Marquee
Lasso Polygonal Lasso Magnetic Lasso Quick Selection Magic Wand
Crop and Slice tools Crop slice Slice Select
Measuring tools Eyedropper color Sampler Ruler Note Count
Retouching tools Spot Healing Brush Healing Brush Patch Red Eye Magic Eraser Blur Sharpen Smudge Dodge Burn
Sponge

Rectangular Marquee Tool
1. Start by opening any image in Photoshop
2. Select the rectangular marquee tool. It will be the second icon from the top in the
toolbox on the left.
3. If you click and hold on this icon, you should be able to see the rest of the three
selection options (elliptical, single row and single column).
4. With the rectangular marquee tool selected, click and drag a box around any part of the
image (in this case, the otter’s head).
5. The blinking black and white lines indicate that a selection has been made.
We can now modify this selection as per our requirements.
6. If you hit ENTER, Photoshop will crop out the rest of the image.
Lasso Tool :
The lasso tool creates a custom, free-hand selection. It is usually used to cut out, or
select specific sections of a pre-existing picture. Access the lasso tool by clicking on the
icon located on the tool bar, or press the keyboard shortcut
Polygonal Lasso
The Polygonal Lasso tool is handy for selecting objects with many
angles because it draws only straight lines; you simply click when
you want to change directions.
Magnetic Lasso
Magnetic Lasso Tool is an edge detection tool, meaning that it actively searches for the edge
of the object as you are moving around it, then snaps the selection outline to the edge and
clings to it like a magnet!
P a g e | 41
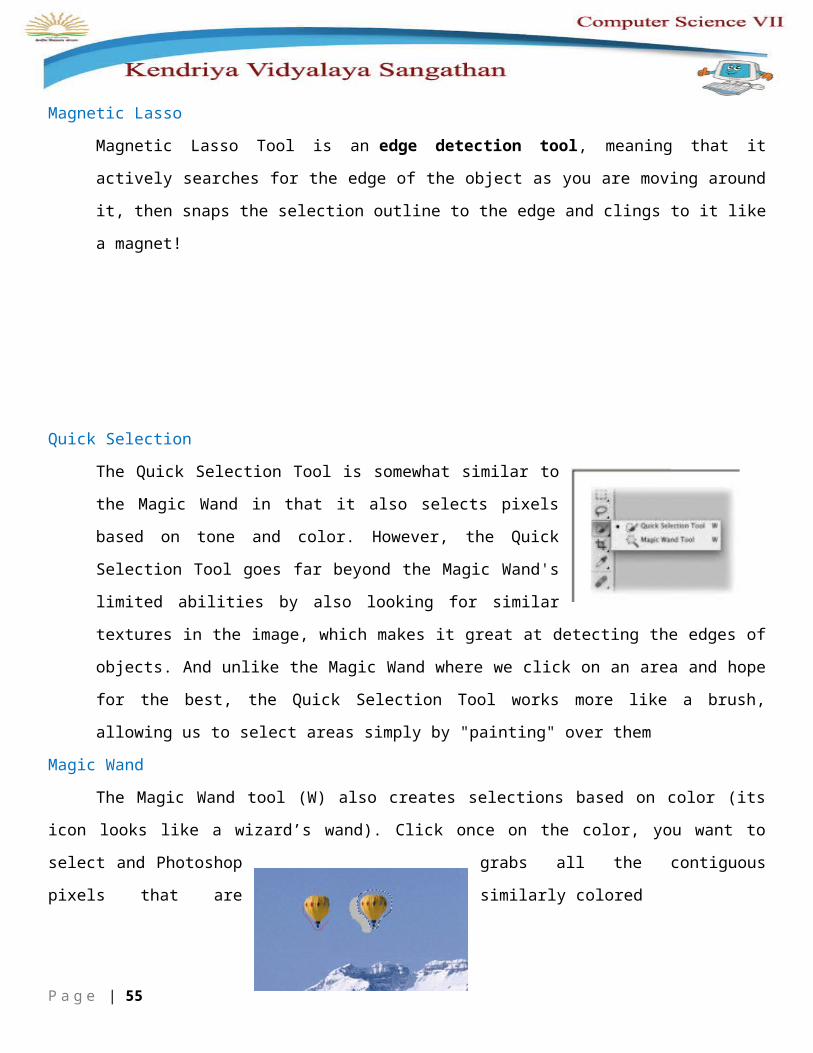
Quick Selection
The Quick Selection Tool is somewhat similar to the Magic Wand in
that it also selects pixels based on tone and color. However, the
Quick Selection Tool goes far beyond the Magic Wand's limited
abilities by also looking for similar textures in the image, which
makes it great at detecting the edges of objects. And unlike the
Magic Wand where we click on an area and hope for the best,
the Quick Selection Tool works more like a brush, allowing us to select areas simply by
"painting" over them
Magic Wand
The Magic Wand tool (W) also creates selections based on color (its icon looks like a wizard’s
wand). Click once on the color, you want to select and Photoshop grabs all the contiguous pixels that
are similarly colored
Practical use of some Tools
Magic Wand tool
1. Choose the Magic Wand tool
2. On the Options bar:
Choose a Tolerance value (use the scrubby slider) to control the range of colors the tool
selects (for a starting value, try between 30 and 40).
Check Anti-alias to allow the tool to add semitransparent pixels along the edges of the
color areas it detects. This will produce smoother edge transitions for your image edits.
P a g e | 42

Check Contiguous to limit the selection to areas that are connected to the first pixel you
click, or uncheck this option to allow the tool to select similarly colored, noncontiguous
(unconnected) areas throughout the image with the same click.
To select possible occurrences of a similar color on all visible layers, check Sample All
Layers, or uncheck this option to select colors on just the current layer.
3. Click a color in the image.
Magnetic Lasso tool
1. Select the Magnetic Lasso tool.
2. Specify one of the selection options in the options bar.
Selection options
A. New B. Add To C. Subtract From D. Intersect With
3. (Optional) Set feathering and anti-aliasing in the options bar.
4. Set any of these options:
Width
To specify a detection width, enter a pixel value for Width
Contrast
To specify the lasso’s sensitivity to edges in the image, enter a
value between 1% and 100% for Contrast
Frequency
To specify the rate at which the lasso sets fastening points, enter
a value between 0 and 100 for Frequency.
P a g e | 43

Stylus Pressure
If you are working with a stylus tablet, select or deselect the Stylus
Pressure option. When the option is selected, an increase in stylus
pressure decreases the edge width.
5. Click in the image to set the first fastening point. Fastening points anchor the
selection border in place.
6. Release the mouse button or keep it pressed, and then move the
pointer along the edge you want to trace.
7. When your starting and ending points the portion will be selected
Crop and Slice toolsCrop
The Crop tool (C) lets you trim distracting elements from the edges of your image, as well as
change the size of your image. Simply use it to draw a box around the part of the image you
want to keep and then press Enter to delete everything outside the box.
slice
The Slice tool allows you to divide an image into smaller sections, which fit together like a
jigsaw (but with straight edges). There are two tools: Slice (which creates the slices) and Slice
Select (which enables you to select and modify existing slices).
Slice Select
Select your image slices and adjust the size of the slices by moving the handles. Hold down
the Shift key to select multiple slices at once.
P a g e | 44

Practical use of some Tools
Photoshop Slice Tool
1. Select the slice tool in the toolbox.
2. Click and drag over the area you wish to make into a slice.
3. Release the mouse button –
4. Using the slice select tool, you can move and resize slices by dragging inside a
slice, or by dragging the handles.
5. Click File > Save for Web from the Photoshop menu. When you save the file, you
will have the option to save the images and/or a new HTML page to contain the
images.
Crop a photo
1. From the toolbar, select the Crop Tool .
2. Draw a new cropping area or drag the corner and edge handles to
specify the crop boundaries in your photo.
3. (Optional) Specify the Crop options using the Control bar.
A. Aspect Ratio Menu B. Swap Width and Height Values C.
Overlay Options
Size and proportions
Choose a ratio or size for the crop box. You can also choose a preset, enter your own, or even
define your own preset values for later use.
Overlay Options
P a g e | 45

Choose a view to display overlay guides while cropping. Guides such as Rule of Thirds,
Grid, and Golden Ratio are available.
4. Press Enter (Windows) or Return (Mac OS) to crop the photo.
Measuring tools
Eyedropper
The Eyedropper tool samples color to designate a new
foreground or background color. You can sample from the
active image or from anywhere else on the screen.
color Sampler
Color Sampler Tool allows you to view color values in defined
spots of your image:
1. In the Toolbox, select the Color Sampler Tool.
2. Click on the image where you want to set the first sampler.
3. You can set up to 4 color samplers on your image.
4. In the Options bar, you can change sample size (sampler's range).
5. You can move samplers with Color Sampler Tool to any other spot to read color values
from.
Ruler
The Ruler tool helps you position images or elements precisely. The Ruler tool calculates the
distance between any two points in the workspace. When you measure from one point to another, a
nonprinting line is drawn,
The options bar and Info panel show the following information:
The starting location (X and Y)
The horizontal (W) and vertical (H) distances traveled from the x and y axes
The angle measured relative to the axis (A)
The total length traveled (D1) P a g e | 46
The two lengths traveled (D1 and D2), when you use a protractor
Note
Like post-it notes, but digital. You can use this tool to add small little note boxes to your image.
Count
The Count tool is used to count objects in an image. To count objects manually, you click the
image with the Count tool and Photoshop tracks the number of clicks. The count number is
displayed on the item and in the Count tool options bar. Count numbers are saved when you
save a file.
Photoshop can also automatically count multiple selected areas in an image, and
record the results in the Measurement Log panel.
Practical use of some Tools
Eyedropper tool
1. Select the Eyedropper tool.
2. In the options bar, change the sample size of the eyedropper
3. Selecting a foreground color with the Eyedropper tool
Choose one of the following from the Sample menu:
All Layers: Samples color from all layers in the document.
Current Layer: Samples color from the currently active layer.
4. Do one of the following:
a. To select a new foreground color, click in the image.
b. To select a new background color, Alt-click (Windows) in the image. Or position
the pointer over the image, press Alt-click (Windows) press the mouse button,
and drag anywhere on the screen.
Color Sampler Tool
1. In the Toolbox, select the Color Sampler Tool.
2. Click on the image where you want to set the first sampler.
P a g e | 47

3. You can set up to 4 color samplers on your image.
4. In the Options bar, you can change sample size (sampler's range).
5. You can move samplers with Color Sampler Tool to any other spot to read color values
from.
Ruler tool
Measure between two points
1. Select the Ruler tool. (If the Ruler is not visible, hold down the Eyedropper tool.)
2. Drag from the starting point to the ending point. Hold down the Shift key to constrain
the tool to 45° increments.
3. To create a protractor from an existing measuring line, Alt-drag (Windows) at an angle
from one end of the measuring line, or double-click the line and drag. Hold down the
Shift key to constrain the tool to multiples of 45°.
Retouching tools:Spot Healing Brush
The spot healing brush can be used to clone areas from an image and blend the pixels from
the sampled area seamlessly with the target area. The basic principle is that the texture from
the sample area is blended with the color and luminosity surrounding wherever you paint.
The main difference between this and the standard healing brush is that the spot healing brush
requires no source point. You simply click on the blemishes you want to get rid of and the spot
healing brush works out the rest for you.
Healing Brush
The healing brush lets you sample part of the photograph and use it
to paint over another part. Once
you're finished, Photoshop will examine surrounding areas and try
to blend what you painted in with the
rest of the picture.
Patch
P a g e | 48
The patch tool uses the same complex algorithm as the healing brush to carry out its blend
calculations, but the patch tool works with selection-defined areas instead of a brush. When
the patch tool is selected, it initially operates in a lasso selection mode that can be used to
define the area to patch from or patch to
The Patch Tool retouches image using sampled pixels or pattern. It works as a
combination of the Healing Brush with the Lasso Tool
Red Eye
The undesirable effect in flash photography of people appearing to have red eyes, caused by a
reflection from the retina when the flashgun is too near the camera lens.
Magic Eraser
When you click in a layer with the Magic Eraser tool, the tool changes all similar pixels to
transparent. If you are working in a layer with locked transparency, the pixels change to the
background color. If you click in the background, it is converted to a layer and all similar pixels
change to transparent.
Blur
When you click on the blur tool your cursor turns into a circle and it acts as a paint brush. You
just paint over the part of the image you wish to blur. You can adjust the size of the brush and
the hardness (how much blur you want) at the top of your screen.
Sharpen
Sharpening enhances the definition of edges in an image. Whether your images come from a
digital camera or a scanner, most images can benefit from sharpening.
Smudge
The smudge tool is an interesting painting tool to work with because it can be used to smear
pixels the same way as one might mix paints together. The smudge
tool basically smears the pixels (rather than distort them the way the
Liquefy filter does) and for best results.
Dodge
P a g e | 49
The Dodge tool lighten areas of the image. This tool is based on a traditional darkroom
technique for regulating exposure on specific areas of a print. Photographers hold back light to
lighten an area on the print (dodging).
Burn
The Burn tool darken areas of the image. This tools is based on a traditional darkroom
technique for regulating exposure on specific areas of a print. Photographers hold back light to
increase the exposure to darken areas on a print (burning).
Sponge
The Sponge tool on an image in suitable ways to reduce the saturation in selected areas for an
interesting effect. The Sponge tool lets you reduce the color saturation of that area to allow the
other sections of your image to come to the forefront.
1. Rectangular marquee tool used to create rectangular/square selections.
2. Single column marquee tool creates a 1-pixel wide selection that spans the
height of the image
3. Single row marquee tool creates a 1-pixel high selection that spans the
width of the image
4. Elliptical marquee tool used to create elliptical/circular selections
5. The lasso tool creates a custom, free-hand selection. It is usually used to cut out, or
select specific sections of a pre-existing picture.
6. The Polygonal Lasso tool is handy for selecting objects with many angles because it
draws only straight lines.
7. Magnetic Lasso Tool is an edge detection tool, meaning that it actively searches for
the edge of the object as you are moving around it.
8. The Crop tool (C) lets you trim distracting elements from the edges of your image, as
well as change the size of your image. P a g e | 50
SUMMARY

9. The Slice tool allows you to divide an image into smaller sections, which fit together like
a jigsaw (but with straight edges).
10.The Eyedropper tool samples color to designate a new foreground or background color.
11.The Ruler tool helps you position images or elements precisely. The Ruler tool
calculates the distance between any two points in the workspace.
12.The Dodge tool lighten areas of the image. This tool is based on a traditional darkroom
technique for regulating exposure on specific areas of a print.
13.The Burn tool darken areas of the image. This tools is based on a traditional darkroom
technique for regulating exposure on specific areas of a print.
14.The Sponge tool on an image in suitable ways to reduce the saturation in selected
areas for an interesting effect.
A. Fill in the blanks
1. ____________Marquee tool uses to create elliptical/circular selection.
2. ____________tool is an edge detection tool.
3. Single row marquee tool creates___________ high selection that spans the
width of the image.
4. __________tool lets you trim distracting element from the edges of your image.
5. __________tool help you position images or elements precisely.
6. This tool darken areas of the image_____________.
7. When you click on ___________your cursor turns into a circle and it acts as
Paint brush.
B. Find true or false
i. Sharpen enhances the definition of edge in an image.
ii. Patch tool uses the same complex algorithm as the red eye.
iii. Count tool is used to count the objects in an image.
iv. To specify Detection width we enter a % value for width.
v. Quick selection tool is similar to magic wand tool.
P a g e | 51
EXERCISES

C. Short Answer Questions.
i. Write the names of marquee tool present in photoshop.
ii. Write the use of Lesso tool.?
iii. What is magic wand in Photoshop?
iv. Give one difference between crop and slice tool.?
v. What is Red Eye in Photoshop?
vi. Write the uses of Eyedropper in Photoshop.?
vii. What is the use of Dodge tool in Photoshop?
viii. Give one difference between Doge tool and Burn tool.?
ix. What is sponge tool?
x. What is patch in Photoshop?
In the lab
1. Using Rectangular marquee tool crop out an image in Photoshop and save it with .jpg
extension.
2. Using Eyedropper tool change the foreground/background color of an image in
Photoshop.
3. Change the color of an object using Magic wand tool.
Lesson-6
Painting Tools in Photoshop
P a g e | 52
Painting Tools
Adobe Photoshop provides several tools for painting
and editing image color. The Brush tool and the Pencil
tool work like traditional drawing tools applying color
with brush strokes. Tools like the Eraser tool, Blur tool,
and Smudge tool modify the existing colors in the image.
In the options bar for each of these painting tools, you
can set how color is applied to an image and choose from
preset brush tips.
You can save a set of brush options as a preset so you can
quickly access brush characteristics you use frequently. Photoshop includes several sample brush
presets. You can start with these presets and modify them to produce new effects. Many original
brush presets are available for
download on the web.
Healing Brush tool
1. Select the Healing Brush tool in the Tools panel (it’s a hidden tool of the Spot Healing Brush tool).
2. Find an area in the image that looks good and then Alt-click (Windows) or Option-click (Mac) to
sample that area.
For example, if you want to eliminate wrinkles on a face, choose a wrinkle-free area of skin near
the wrinkle. (Try to choose an area relatively close in skin tone.)
Position the mouse cursor over the area to be repaired and start painting.
The Healing Brush tool goes into action, blending and softening to create a realistic repair of the
area.
3. Repeat Steps 2 and 3 as necessary to repair the blemish, wrinkles, or scratches.
P a g e | 53
You will learn
Brush Pencil Color Replacement Mixer Brush History Brush Art History Brush Gradient Paint Bucket

Patch Tool
There are 2 methods to retouch using sampled pixels.
Method 1:
1. In the Toolbox, select the Patch Tool.
2. Drag in (select) a damaged area with the Patch Tool(exactly like with Lasso Tool)
3. On the Options bar, choose the Source mode.
4. Drag the selection (cursor inside the selection) onto a repair-source area (movie).
Method 2:
5. Drag in a repair-source area with the Patch Tool*.
6. On the Options bar, choose the Destination mode.
7. Drag the selection (cursor inside of selection) onto a damaged area (movie).
Red eye Removal tool
1. Open up a picture in Photoshop.
2. Click and hold the bandage icon on the left side of the screen. Select the option Red Eye Tool
that slides out as an extra feature.
3. Select the area you want to correct with the Photoshop Red Eye Tool.
4. Release the area that you selected. The program will cover the pupil with a darker color.
5. Do the same for the other eye.
Magic Eraser tool
1. Select the Magic Eraser tool.
2. Do the following in the options bar:
3. Enter a tolerance value to define the range of colors that can be erased. Select Anti-
aliased to smooth the edges of the area you erase.
4. Select Contiguous to erase only pixels contiguous to the one you click, or deselect to
erase all similar pixels in the image.
P a g e | 54
5. Select Sample All Layers to sample the erased color using combined data from all
visible layers.
6. Specify an opacity to define the strength of the erasure. An opacity of 100% erases
pixels completely.
7. Click in the part of the layer you want to erase.
Blur Tool
1. In the Toolbox, select the Blur Tool.
2. Choose brush size and style.
3. Set the tool's strength.
4. Drag on the image.
5. In the Options bar, you can also specify the effect's "Mode".
Dodge tool or Burn tool
1. Select the Dodge tool or the Burn tool .
2. Choose a brush tip and set brush options in the options bar.
3. In the options bar, select one of the following from the Range menu:
Midtones Changes the middle range of grays
Shadows Changes the dark areas
Highlights Changes the light areas
4. Specify the exposure for the Dodge tool or the Burn tool.
5. Click the airbrush button to use the brush as an airbrush. Alternatively, select the Airbrush
option in the Brush panel.
6. Select the Protect Tones option to minimize clipping in the shadows and highlights. This option
also tries to keep colors from shifting hue.
7. Drag over the part of the image you want to lighten or darken.
Brush
The Brush tool is a basic painting tool. It works like a traditional drawing tool by applying the
color using strokes. It's located in the standard Tool Bar and its default shortcut is the letter B.
P a g e | 55

Pencil
The pencil tool is nothing more than a rip off from the brush tool. In
fact, all it really consists of is a 1-pixel brush tool tip. Nearly all the
same options and tools are available to the Pencil tool as are
available with the brush tool.
Color Replacement
It enables us to change the color of an object in a photo without a lot of fuss or hassle. The
Color Replacement Tool is not the most professional way to change colors in an image and will
not always give you the results you need, but it usually works well for simple tasks and it is
such an easy tool to use
Mixer Brush
The Mixer Brush creates realistic painting techniques such as mixing colors on the canvas,
combining colors on a brush, and varying paint wetness across a stroke.
The Mixer Brush has two paint wells, a reservoir and a pickup. The reservoir stores the final
color deposited onto the canvas and has more paint capacity. The pickup well receives paint
only from the canvas; its contents are continuously mixed with canvas colors.
History Brush
The History Brush tool used to apply an image area from a different state or snapshot to your
current state. Use this tool to restore a portion of an image to an earlier state, while leaving the
rest of the modified image alone. The History Brush has an advantage over the Eraser tool
because the History Brush allows access too many blend modes.
Art History Brush
The Art History Brush tool is an interesting variation on the plain old History Brush tool. Both
tools paint over an image by using information from a previous state.
The Art History Brush tool, however, includes several choices on the Options bar that
let you apply brush-stroke effects to your image when you paint:
P a g e | 56

Style: The Style menu contains various-shaped brush stroke styles, such as Tight Short,
Loose Medium, Dab, or Loose Curl.
Area: This option controls the area that the paint stroke covers, independent of the
brush size you select. The larger the brush size, the more area it covers.
Tolerance: This option adjusts the amount of the change applied to your image. A low
tolerance value lets you apply strokes anywhere in the image, regardless of color
values. A high tolerance value limits Art History strokes to areas that are very different
from the source state or snapshot, making your image less dramatically different from
the original.
Gradient
The Gradient tool creates a gradual blend between multiple colors. You can choose from
preset gradient fills or create your own.
Paint Bucket
The paint bucket tool fills an area of an image based on color similarity. Click anywhere in the
image and the paint bucket will fill an area around the pixel you clicked.
The exact area filled is determined by how similar each adjoining pixel is to the pixel you
clicked on. You can adjust this setting in the options toolbar by changing the tolerance value (make
sure the paint bucket tool is selected first). A low tolerance means only very similar colors will be
affected, a high tolerance means more pixels will be affected. The range is 0 (exact color matches
only) to 255 (all colors).
Practical use of some Tools
Color Replacement Tool
P a g e | 57

1. Open the image in Photoshop
2. Select The Color Replacement Tool from toolbox by clicking on brush tool.
3. You can adjust the size, hardness of the circle as you want from above
4. Increase the Tolerance value to 50% for smooth edges
5. Select the Foreground color from the color swatch
6. Color the object you want to change color
Mixer Brush
1. Select the Mixer Brush tool from the Tools panel.
2. To load color into your reservoir, Alt+click where you wish to sample that color. You can
also choose your desired Foreground color from the Tools panel.
3. Choose a brush from the Brush Presets panel.
4. Set your desired options in the Options bar.
a) Current Brush Load Swatch:
b) Load Brush after Each Stroke.
c) Blending Brush Combinations:
d) Specify percentages of Wet, Load, Mix, and Flow
e) Sample All Layers:
5. Drag on your image to paint.
Art History Brush tool
1. Select the Art History Brush tool .
2. Do the following in the options bar:
Choose a brush from the Brush Presets picker, and set brush options.
Choose a blending mode from the Mode menu.
Choose an option from the Style menu to control the shape of the paint
stroke.
3. For Area, enter a value to specify the area covered by the paint strokes. The
greater the size, the larger the covered area and the more numerous the
strokes.
P a g e | 58

4. For Tolerance, enter a value to limit the regions where paint strokes can be
applied. A low tolerance lets you paint unlimited strokes anywhere in the image.
A high tolerance limits paint strokes to areas that differ considerably from the
color in the source state or snapshot.
5. Click and drag in the image to paint.
Gradient the Canvas
1. Select the paint bucket tool (G then shift+G).
2. Click and drag a gradient path to fill the canvas with a gradient.
To create a gradient
1. Choose the Gradient tool and click the Gradient Editor button on the Options bar.
2. Click a stop and click the color swatch to the right of the word Color to open the Color Picker
and assign a different color to the stop.
3. Click anywhere below the gradient preview to add more color stops.
4. Drag a color stop off the Gradient Editor dialog box to delete it.
5. Click the top of the gradient preview to assign different stops with varying opacity.
Assigning varying amounts of opacity using the stops on top of the gradient slider.
Assigning varying amounts of opacity using the stops on top of the gradient slider.
6. When you’re finished editing the gradient, name it and then click the New button.
7. The new gradient is added to the preset gradient choices.
8. To apply your gradient, drag across a selection or image with the Gradient tool.
Magic Eraser tool
1. Select the Magic Eraser tool.
2. Do the following in the options bar:
3. Enter a tolerance value to define the range of colors that can be erased. Select Anti-
aliased to smooth the edges of the area you erase.
4. Select Contiguous to erase only pixels contiguous to the one you click, or deselect to
erase all similar pixels in the image.
P a g e | 59

5. Select Sample All Layers to sample the erased color using combined data from all
visible layers.
6. Specify an opacity to define the strength of the erasure. An opacity of 100% erases
pixels completely.
7. Click in the part of the layer you want to erase.
1. The Brush tool and the Pencil tool work like traditional drawing tools applying colorwith
brush strokes.
2. The Brush tool is a basic painting tool. It works like a traditional drawing tool by applying the
color using strokes.
3. The pencil tool is nothing more than a rip off from the brush tool. In fact, all it really consists of
is a 1-pixel brush tool tip.
4. The Mixer Brush creates realistic painting techniques such as mixing colors on the canvas,
combining colors on a brush, and varying paint wetness across a stroke.
5. The History Brush tool to apply an image area from a different state or snapshot to your
current state.
6. The Art History Brush tool is an interesting variation on the plain old History Brush tool. Both
tools paint over an image by using information from a previous state.
7. The Gradient tool creates a gradual blend between multiple colors. You can choose from
preset gradient fills or create your own.
8. The paint bucket tool fills an area of an image based on color similarity. Click anywhere in the
image and the paint bucket will fill an area around the pixel you clicked.
P a g e | 60
SUMMARY
EXERCISES

A. Fill in the blanks
i. _____________tool is basic painting tool.
ii. _____________enables us to change the color of an object in a photo without
a lot of fuss or hassle.
iii. ____________brush tool is an interesting variation on the plain old History
Brush tool.
iv. ____________tool creates a gradual blend between multiple colors.
v. ____________fills an area of an image based on color similarity.
B. Find true or false
i. Paint bucket tool creates a gradual blend between multiple colors.
ii. History brush tool used to apply an image area from a different state or
Snapshot to your current state.
iii. Mixer brush tool enables you to change the color of object in a photo.
iv. Midtones of Dodge tool changes the middle range of groups.
C. Short Answer Questions
i. What is Brush tool in Photoshop?
ii. Write the use of color replacement in Photoshop.?
iii. Write one difference between History brush and Art History brush.?
iv. What is Gradient?
v. Write the use of Paint bucket tool.?
vi. Write about painting tools of Photoshop.?
P a g e | 61

In the lab
1. Try to replace the color of a Photo using Color replacement tool.
2. Sunita have one photo of her family in photo her father eye get infected with
red spot. Help Sunita to remove Red eye from that Photo.
P a g e | 62