a gunbuilding tutorial by mike brooks - american …americanlongrifles.org/pdf/tutorial.pdf · page...
TRANSCRIPT
Page 1 of 117 Copyright 2007 by Mike Brooks permission to use granted to AmericanLongrifles.org/forum 3/22/2014
A Gunbuilding Tutorial by
Mike Brooks
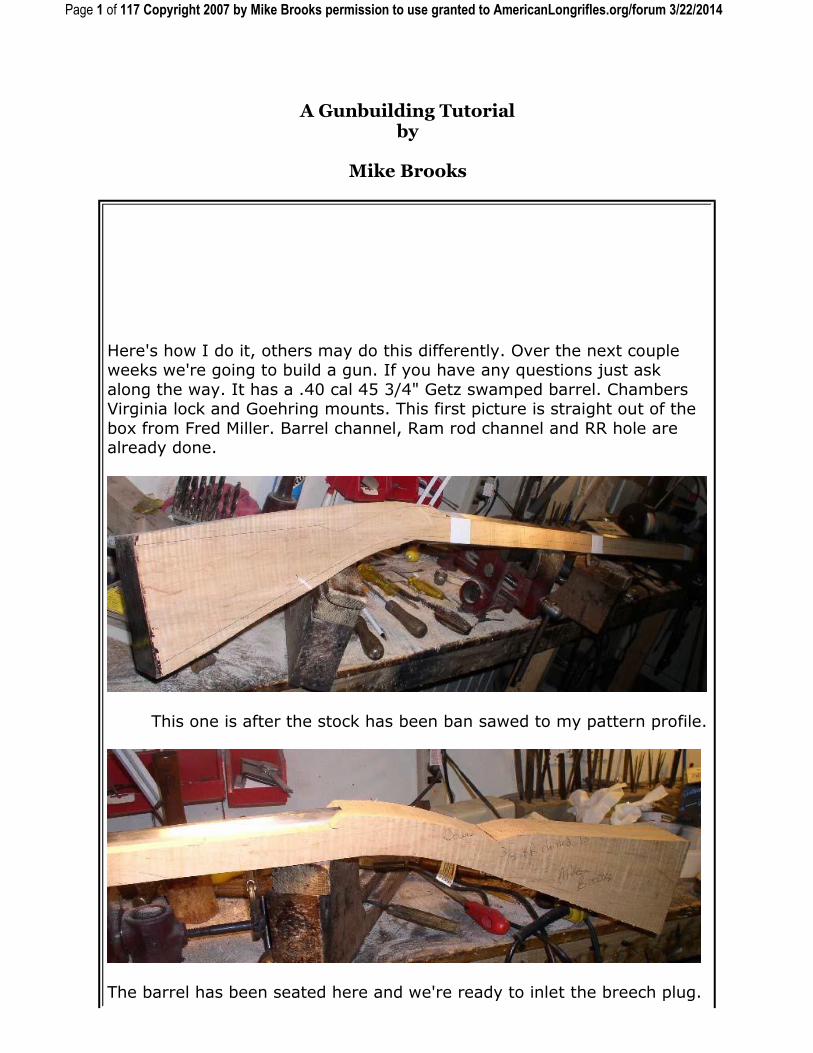
Here's how I do it, others may do this differently. Over the next couple weeks we're going to build a gun. If you have any questions just ask
along the way. It has a .40 cal 45 3/4" Getz swamped barrel. Chambers Virginia lock and Goehring mounts. This first picture is straight out of the
box from Fred Miller. Barrel channel, Ram rod channel and RR hole are already done.
This one is after the stock has been ban sawed to my pattern profile.
The barrel has been seated here and we're ready to inlet the breech plug.
Page 2 of 117 Copyright 2007 by Mike Brooks permission to use granted to AmericanLongrifles.org/forum 3/22/2014
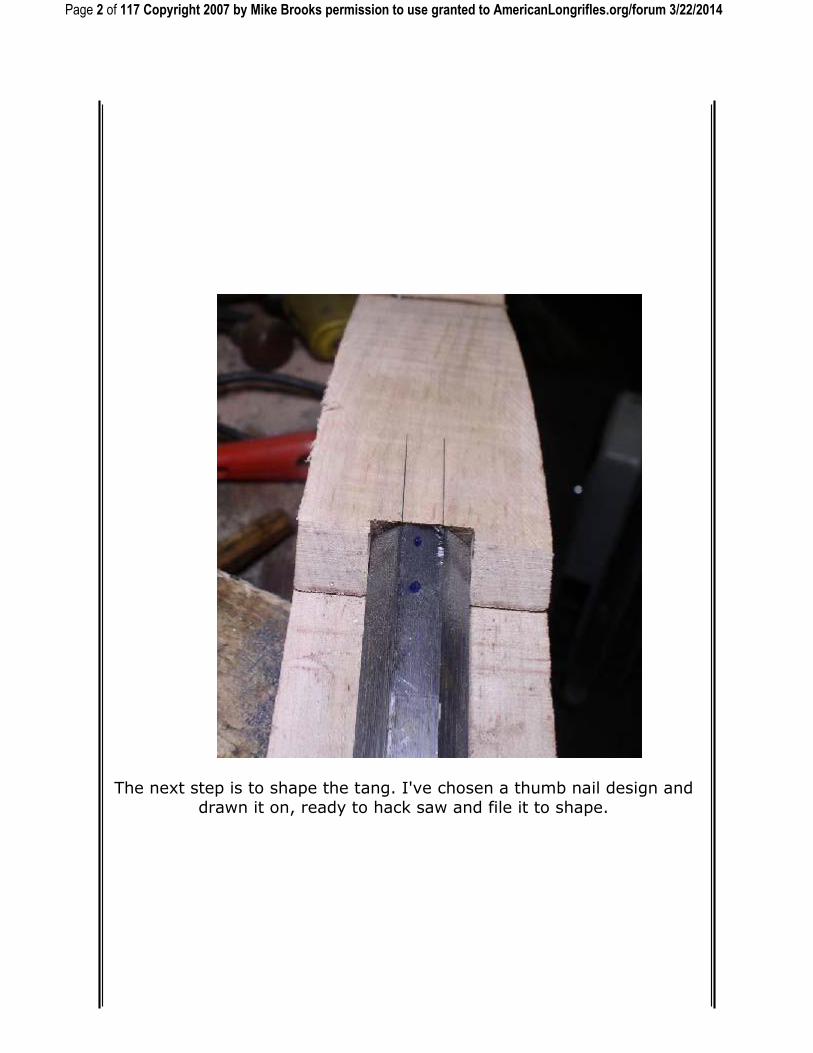
The next step is to shape the tang. I've chosen a thumb nail design and
drawn it on, ready to hack saw and file it to shape.

Page 3 of 117 Copyright 2007 by Mike Brooks permission to use granted to AmericanLongrifles.org/forum 3/22/2014
The VIOLA! it's ready to let into the stock.

Page 4 of 117 Copyright 2007 by Mike Brooks permission to use granted to AmericanLongrifles.org/forum 3/22/2014
I've chopped in the bolster for the plug so we can start to set it on in.

Page 5 of 117 Copyright 2007 by Mike Brooks permission to use granted to AmericanLongrifles.org/forum 3/22/2014
This is the completed inlet for the breech plug.

Page 6 of 117 Copyright 2007 by Mike Brooks permission to use granted to AmericanLongrifles.org/forum 3/22/2014
This is how it looks all put together.
Tomorrow we're making underlugs and dovetailing them in and drilling
the pins in and then probably we'll inlet the lock too and bolt that in.
Today we're going to start with making under lugs for the barrel. I start with brass that is roughly .030 and I cut it in strips that look to be about
3/8" wide. After several bends they look like underlugs.... I hope you'll get the idea from the pictures.

Page 7 of 117 Copyright 2007 by Mike Brooks permission to use granted to AmericanLongrifles.org/forum 3/22/2014

Page 8 of 117 Copyright 2007 by Mike Brooks permission to use granted to AmericanLongrifles.org/forum 3/22/2014
Did everyone get how to make these? Here's a high quality blurry picture
of the lug getting the dovetail bevel filed in.

Page 9 of 117 Copyright 2007 by Mike Brooks permission to use granted to AmericanLongrifles.org/forum 3/22/2014
Here's where most people become unhinged. :shocked2: Time to saw in the slots for the lugs. Make a series of cuts with your trusty hack saw
then file out what's left. Then take your three cornered file and cut the under cuts for the dove tail and fit and try till your lug fits the slot and
stake it in and clean off the excess hanging over the sides.

Page 10 of 117 Copyright 2007 by Mike Brooks permission to use granted to AmericanLongrifles.org/forum 3/22/2014
At this point file the tops of the lugs flat and hit them with some inletting black and put the barrel back in the stock so they mark where they'll sit
in the barrel channel.

Page 11 of 117 Copyright 2007 by Mike Brooks permission to use granted to AmericanLongrifles.org/forum 3/22/2014
Then I made this handy dandy depth drill out of one of those nifty all in one hinge driller thingies. Anyway, I've got this set right at the depth of
the height of my lugs. Drill a series of holes making your slot about
1/8" long on both ends to allow for barrel/stock expansion.

Page 12 of 117 Copyright 2007 by Mike Brooks permission to use granted to AmericanLongrifles.org/forum 3/22/2014
Then get out your 18th century high speed slotting machine and hog
out the webs left over from drilling.
Should end up looking like this... Do this for all your lugs then clamp the
barrel in the stock and see if your slots are deep enough.

Page 13 of 117 Copyright 2007 by Mike Brooks permission to use granted to AmericanLongrifles.org/forum 3/22/2014
If you'll notice in the background there's a gun with a horse head patch
box I've been working on in the evenings while you guys are loafing.... :winking: Ok, our barrel is clamped in and now we scribe a line on the top
line of the stock.

Page 14 of 117 Copyright 2007 by Mike Brooks permission to use granted to AmericanLongrifles.org/forum 3/22/2014
Then remove the barrel out of the stock and measure form the scribe
line down to where you want your pin to go thru.
Then transfer those measurements onto the side of the stock and mark and punch the "spot". I drill mine with a hand drill and a 1/16" drill bit.

Page 15 of 117 Copyright 2007 by Mike Brooks permission to use granted to AmericanLongrifles.org/forum 3/22/2014
Get it all lined up by eye, hold your tongue just right and stand on you
left foot and drill your pin holes thru...
I hit 100% just where I wanted them to go. :blah: Time to set in the lock. At this point I've filed the bolster flat where it will rest against the barrel
and filed a little draft on the lock plate edges. The lock needs a 1/4" of wood to inlet it into, so I leave a little leeway here and leave 3/8" of wood
after I band saw off the extra. This picture shows the lines that represent
3/8 of stock that will be left. You'll notice how a swamped barrel naturally kicks the tail of the lock out.

Page 16 of 117 Copyright 2007 by Mike Brooks permission to use granted to AmericanLongrifles.org/forum 3/22/2014
Now I lay my lock on the stock where I want it. I've got the bottom of the
barrel marked on the stock and I orient the lock so the lock screws will
pass just under the barrel. The other reference point is the mark where the vent will later go. I center the pan and get it in relation in height to
where it should go. Then I draw a pencil line around the bolster.

Page 17 of 117 Copyright 2007 by Mike Brooks permission to use granted to AmericanLongrifles.org/forum 3/22/2014
Then I chop out the area the bolster will occupy, then fit the lock down so
the bolster fits in the inlet I made for it. Usually a couple fit and tries till it gets where I want it to be.

Page 18 of 117 Copyright 2007 by Mike Brooks permission to use granted to AmericanLongrifles.org/forum 3/22/2014
Now the lock is setting precisely where I want it to be and I draw a pencil line around it.

Page 19 of 117 Copyright 2007 by Mike Brooks permission to use granted to AmericanLongrifles.org/forum 3/22/2014
Time to set in the inlet. I use a 3/16 chisel that You see here. Stay inside
the line and go all the way around the lock. I use a shallow gouge for the lock nose.

Page 20 of 117 Copyright 2007 by Mike Brooks permission to use granted to AmericanLongrifles.org/forum 3/22/2014
Then chop out the wood. A 1/2" chisel and a mallet is handy here.
Page 21 of 117 Copyright 2007 by Mike Brooks permission to use granted to AmericanLongrifles.org/forum 3/22/2014
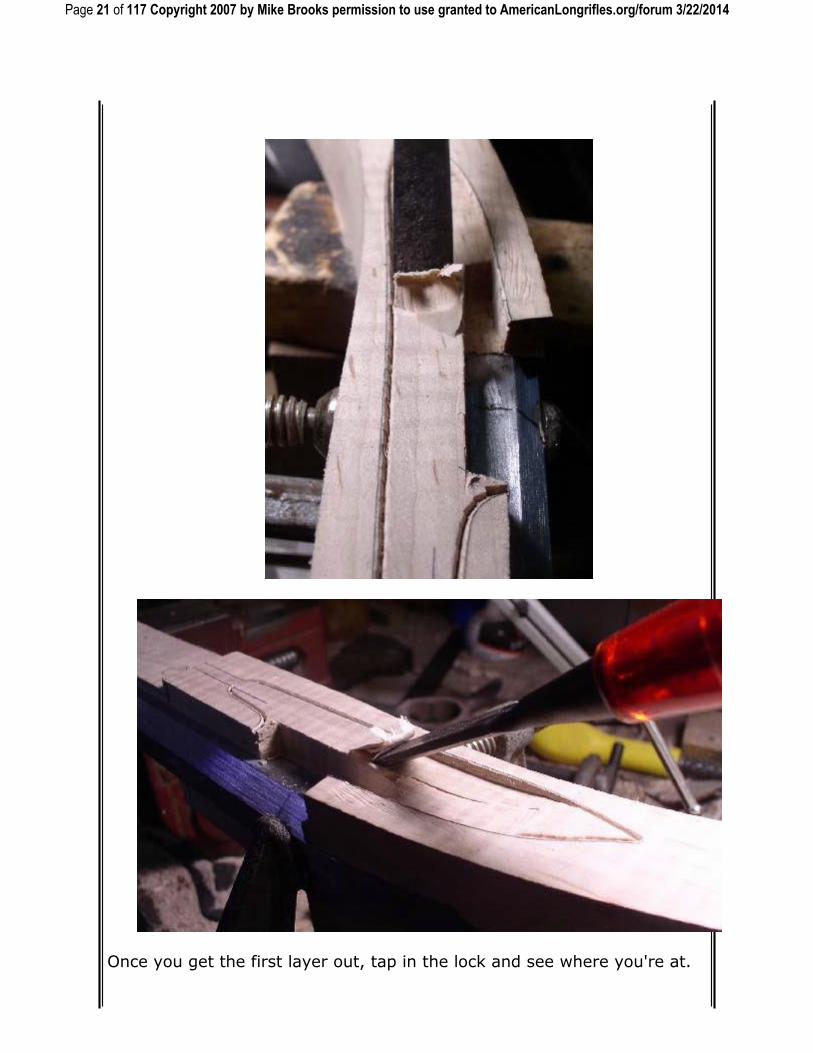
Once you get the first layer out, tap in the lock and see where you're at.

Page 22 of 117 Copyright 2007 by Mike Brooks permission to use granted to AmericanLongrifles.org/forum 3/22/2014
Here's the first print of inletting black. From this point on it's just fit and
try over and over till you get the lock bolster resting against the barrel.
Only remove the black on the lock edges, otherwise you'll end up with a sloppy lock fit. Most people go wrong here by using too little or too much
inletting black. I put it on only in a thickness that you can't actually measure, but will still leave an obvious print. Too much black is the
WORST.

Page 23 of 117 Copyright 2007 by Mike Brooks permission to use granted to AmericanLongrifles.org/forum 3/22/2014
Ok, the lock is now down and the bolster is resting against the barrel.

Page 24 of 117 Copyright 2007 by Mike Brooks permission to use granted to AmericanLongrifles.org/forum 3/22/2014
Here's the finished inlet.
Now take the whole thing over to the drill press and drill and tap your
lock bolts in.

Page 25 of 117 Copyright 2007 by Mike Brooks permission to use granted to AmericanLongrifles.org/forum 3/22/2014
Now mark where all of your lock gut are going to go.

Page 26 of 117 Copyright 2007 by Mike Brooks permission to use granted to AmericanLongrifles.org/forum 3/22/2014
Now remove your lock and lay the bridle over the marked spots and trace around it.
I use a 5/6" forester bit to remove the bulk of the wood. Just kind stay
inside your lines more or less and only go as deep as you need to.

Page 27 of 117 Copyright 2007 by Mike Brooks permission to use granted to AmericanLongrifles.org/forum 3/22/2014
Remove the wood that gets in the way as you add the rest of the lock pieces one at a time. this next picture shows that all the guts of the lock
are inlet except for the mainspring, and that has just been hogged out with the forester bit.
This last picture is the finished lock mortise.

Page 28 of 117 Copyright 2007 by Mike Brooks permission to use granted to AmericanLongrifles.org/forum 3/22/2014
I'm sure I didn't make some of this clear enough, so ask as many
questions as you like. Tomorrow is BUTTPLATE DAY!

Page 29 of 117 Copyright 2007 by Mike Brooks permission to use granted to AmericanLongrifles.org/forum 3/22/2014
A Gunbuilding Tutorial by
Mike Brooks
Ok, here we go with the buttplate. First you got to figure out what your trigger pull is
going to be by placing the triggers on the side of the stock where they will (hopefully)
end up. Then measure and mark where your buttplate should end up , 14
1/4" pull in thei case. Then lay your buttplate on the stock and tace around the inside
of it. Now flip you stock over and establish your center line and cast off. I start cast
off at the end of the breech tang. I was only able to get about 1/16" with this stock
and Buttplate combo.

Page 30 of 117 Copyright 2007 by Mike Brooks permission to use granted to AmericanLongrifles.org/forum 3/22/2014
Then band saw off the wood you need to take off to start inletting your buttplate.

Page 31 of 117 Copyright 2007 by Mike Brooks permission to use granted to AmericanLongrifles.org/forum 3/22/2014
Here you can see we're well on the way to getting this thing near fitting.
Now we have it close enough to screw down. You'll see a few gaps that are left, then

Page 32 of 117 Copyright 2007 by Mike Brooks permission to use granted to AmericanLongrifles.org/forum 3/22/2014
the next picture shows these gaps are gone after I've peened the edge with a hammer
to close everything up. I bent and tweaked this butplate a couple times to get it to
conform more to the stock. There are no hard and fast rules here, just show the
buttplate who's boss and get it to go where you want.

Page 33 of 117 Copyright 2007 by Mike Brooks permission to use granted to AmericanLongrifles.org/forum 3/22/2014
Now it's time to get ready to inlet the triggers. This gun is getting a set of L&R
triggers. First level out the bottom of the forestock down to the final level it will have
when finished. Then strike a centerline from the rear ram rod pipe area to the
buttplate. There will be some cast off involved here again.

Page 34 of 117 Copyright 2007 by Mike Brooks permission to use granted to AmericanLongrifles.org/forum 3/22/2014
Now lay out your triggers, trigger guard and tang screw out and move these all
around till you can ge everything to work right. I had to grind some of the rear
trigger off to shorten it and bend and file the trigger guard bow out. I also had to cut
off both ends of the trigger plate....then it finally all worked out.

Page 35 of 117 Copyright 2007 by Mike Brooks permission to use granted to AmericanLongrifles.org/forum 3/22/2014
Now strip your trigger plate and mark out on the stock where it needs to go and start
the inletting procedure just like we did on the lock.
Inlet the plate and all the guts and get the guts so they work properly. I always put a

Page 36 of 117 Copyright 2007 by Mike Brooks permission to use granted to AmericanLongrifles.org/forum 3/22/2014
wood screw in the rear off the trigger plate to keep it in place. Once all of that's in it's
time to drill the tang screw thru, Center punch the tang and the trigger plate where
you want them to go. The screw should be 90 degrees to the tang. Here's my drilling
jig gizmo, I think it's self-explanatory, if not ask what ever questions you need so we
can all get it figured out.
Here's the gun in the rig, ready to be drilled. The bottom centering pillar is in the
punch mark in the trigger plate at this point. Clearance drill from the top, then flip
it over and use your tap drill to go into the trigger plate.

Page 37 of 117 Copyright 2007 by Mike Brooks permission to use granted to AmericanLongrifles.org/forum 3/22/2014
Now, run your tap down thru the stock and tap the threads into your trigger plate,
then counter sink the tang using the drill press jig.

Page 38 of 117 Copyright 2007 by Mike Brooks permission to use granted to AmericanLongrifles.org/forum 3/22/2014
Here's a picture of the trigger installed and bolted in, then a view of the tang and
tang screw.

Page 39 of 117 Copyright 2007 by Mike Brooks permission to use granted to AmericanLongrifles.org/forum 3/22/2014
Tomorrow will mess around with the trigger guard. But, I'll warn you it's going to be
50 degrees here tomorrow and I'm likely to be in the barn most of the day building
chicken pens for the Old English Games I have coming from New York next week.
:thumbsup: Well after many delays and obligations we're finally back to gunbuilding.
Here we go with the trigger guard. Fill a little draft on the edges and drill a series of
holes for the lug on the forward extension to fit into.
Once you get your hole dug out, place the guard where it needs to go and draw
around it. Before you do this you should do any bending you need to do to get the
rear finial to line up with your cast off.

Page 40 of 117 Copyright 2007 by Mike Brooks permission to use granted to AmericanLongrifles.org/forum 3/22/2014
Here we are with the lug hole chopped in and the pencil line around the guard finial.
The go ahead and inlet it down to where it needs to be. The last picture shows the
inlet when it's finished.

Page 41 of 117 Copyright 2007 by Mike Brooks permission to use granted to AmericanLongrifles.org/forum 3/22/2014
Measure the lug on the guard and figure out where your pin should go thru, Then
place the guard in the stock, clamp it down measure where and mark where you
need to drill , then drill your pin hole thru.

Page 42 of 117 Copyright 2007 by Mike Brooks permission to use granted to AmericanLongrifles.org/forum 3/22/2014

Page 43 of 117 Copyright 2007 by Mike Brooks permission to use granted to AmericanLongrifles.org/forum 3/22/2014
Here we are with the trigger guard fully inlet and pined and screwed in. The chunk of
brass on the left is how much I cut off of the back end of the guard. Somehow I
completely missed showing the inletting of the rear extension. It's done after you get
the fron fully inlet, and clamped down with a C clamp. Then just draw around it and
inlet it like the front. I chose to use a wood screw to hold the rear finial.
I file and polish as much of the trigger guard as I can at this stage while it is secured
to the stock. It's just an easy way to hold the guard while you work on it. (I HATE
filing and polishing brass)

Page 44 of 117 Copyright 2007 by Mike Brooks permission to use granted to AmericanLongrifles.org/forum 3/22/2014
Now we're ready to install the pipes. First take the wood down on the bottom part of
the upper forestock so you end up showing a little more than 1/2 of the ram rod. I
take it of quickly with a cabinet rasp if I don't have to take much off.
I get my pipes as blanks or "kits" from MSB. I solder the tabs closed then shorten the
tab to a reasonable length.

Page 45 of 117 Copyright 2007 by Mike Brooks permission to use granted to AmericanLongrifles.org/forum 3/22/2014
I cut my slot for the tab then rasp a 45 degree angle on the stock for the pipe to lay
against. I also round the stock a bit in this area when I start too. I get the front
started then just keep on inlaying the rear straight down.

Page 46 of 117 Copyright 2007 by Mike Brooks permission to use granted to AmericanLongrifles.org/forum 3/22/2014
At this point I got tired and hung up my chisel for the day. Tomorrow we'll finish the
pipes and start the fun stuff... shaping the stock! :thumbsup: Ok, on with the rear
pipe. Just keep inleting the rear extension down till you get it all the way down and
level with the forestock. The first picture shows almost there, then the final fit as it is
all the way in. The last picture shows the finished inlet without the pipe.

Page 47 of 117 Copyright 2007 by Mike Brooks permission to use granted to AmericanLongrifles.org/forum 3/22/2014

Page 48 of 117 Copyright 2007 by Mike Brooks permission to use granted to AmericanLongrifles.org/forum 3/22/2014
A Gunbuilding Tutorial by
Mike Brooks
Now we're ready to put in the upper pipes which is easy compared to the
rear pipe. I position the upper pipe a little ways back from the forward barrel pin and then i position the middle one by measuring the distance
between the forward pipe and the rear and putting it in the middle of those two pipes.
Slot your ram rod channel for the tab, place the pipe in and draw around it, then inlet it down until it is flush with the bottom of thru RR channel.

Page 49 of 117 Copyright 2007 by Mike Brooks permission to use granted to AmericanLongrifles.org/forum 3/22/2014

Page 50 of 117 Copyright 2007 by Mike Brooks permission to use granted to AmericanLongrifles.org/forum 3/22/2014
Now, clamp your pipes down and scribe a short line on the side, take
the pipe out and measure where you want the pin to go, reinstall and clamp the pie , measure on the side of the stock where you pin will go
thru, mark it and drill it.

Page 51 of 117 Copyright 2007 by Mike Brooks permission to use granted to AmericanLongrifles.org/forum 3/22/2014
Ok, now for what you've all been waiting for! Time to make this square block of wood with the various parts attached look like a gun. I start with
the lock area. I install the lock and bolt it down. Then relieve the extra wood away with a chisel down to the bevel on the lock. This gives you a
guide as to how much wood you have to rasp away.

Page 52 of 117 Copyright 2007 by Mike Brooks permission to use granted to AmericanLongrifles.org/forum 3/22/2014
Here we are with the wood rasped away and the lock panel area at the
correct and finished level.
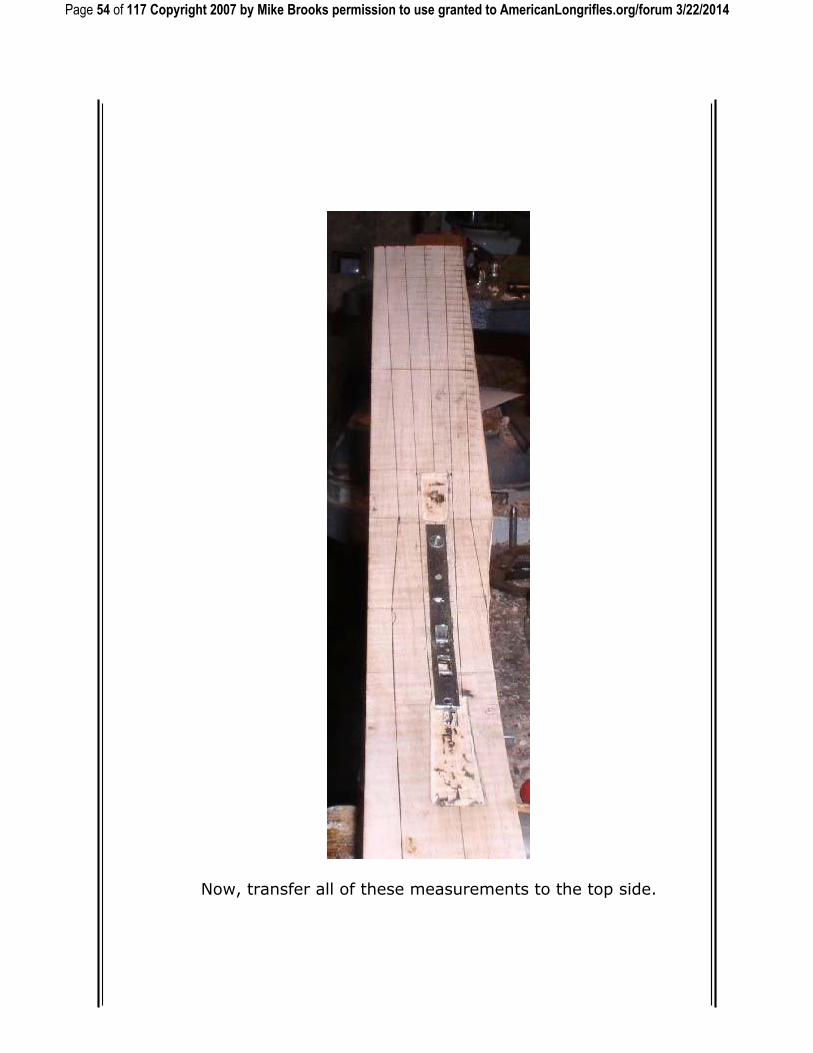
Ok, now we measure how far from the centerline the lock panel is and
transfer that measurement on to the off side lock panel.

Page 53 of 117 Copyright 2007 by Mike Brooks permission to use granted to AmericanLongrifles.org/forum 3/22/2014
In the next picture the profiles have been established in pencil. In this
case the tails of the lock panels ended up to be about 1 3/4" , I decided to make the smallest part of the wrist 1 7/16 for no, this may change some
later as I see how all of this looks. The butt plate is 2 1/6" wide.
Page 54 of 117 Copyright 2007 by Mike Brooks permission to use granted to AmericanLongrifles.org/forum 3/22/2014
Now, transfer all of these measurements to the top side.

Page 55 of 117 Copyright 2007 by Mike Brooks permission to use granted to AmericanLongrifles.org/forum 3/22/2014
And don't forget to leave wood for your cheek piece!
Then, take your stock over to your trusty band saw and saw off all the
extra wood, I stay 1bout an 1/8" outside of the line because with 5" or more of your blade showing it likes to twist and bobble and wander from
where it's supposed to be. Here’s what it looks like fresh from the saw. had a bobble on the right side near the butt plate, but as you'll see later
it's gone by the time I shape the stock round in that area.

Page 56 of 117 Copyright 2007 by Mike Brooks permission to use granted to AmericanLongrifles.org/forum 3/22/2014
Now we're going to start to round things up a bit. Draw out how you want
your lock panel to look and rasp down to that line.

Page 57 of 117 Copyright 2007 by Mike Brooks permission to use granted to AmericanLongrifles.org/forum 3/22/2014
Here’s the finished lock area....I often come back to this ond other areas
to tweak them as I notice things out of kilter.
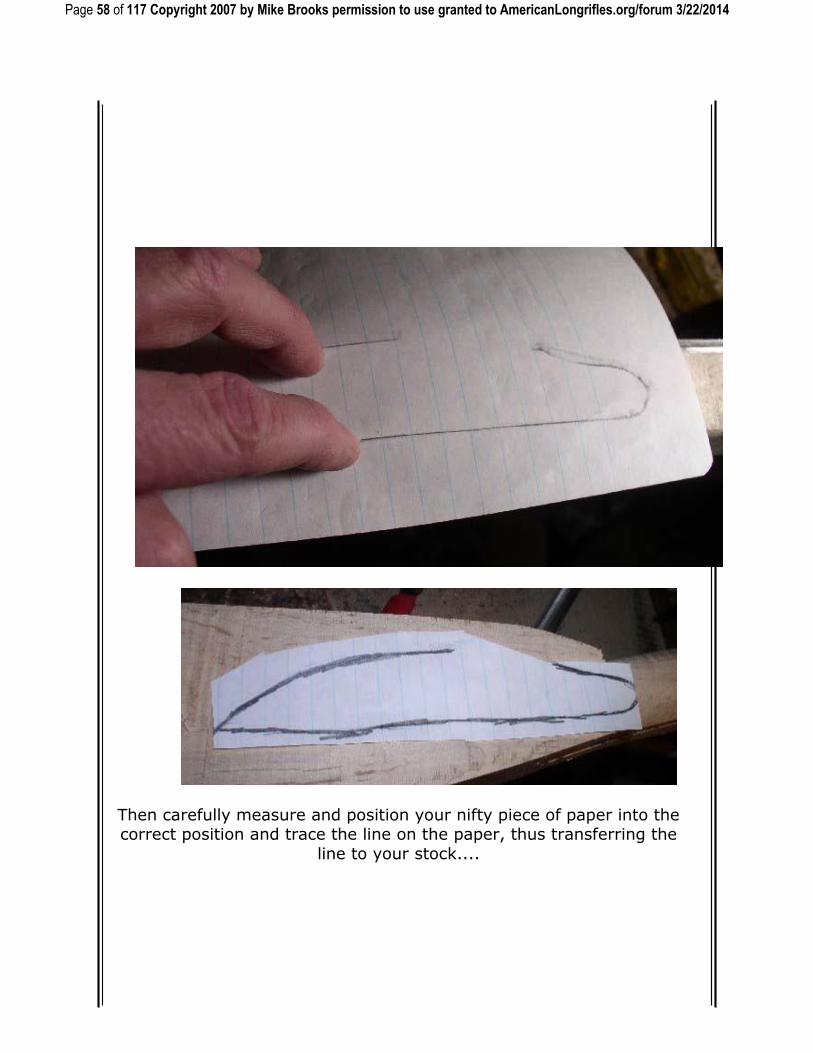
Now git you a piece of paper to use as a carbon paper. Lay it over your
finished lock area and trace the edges. Flip the paper over and transfer the line thru on the other side, then flip your paper over again and
scribble a bunch more pencil lead over your original line to transfer the line to your stock.
Page 58 of 117 Copyright 2007 by Mike Brooks permission to use granted to AmericanLongrifles.org/forum 3/22/2014
Then carefully measure and position your nifty piece of paper into the correct position and trace the line on the paper, thus transferring the
line to your stock....

Page 59 of 117 Copyright 2007 by Mike Brooks permission to use granted to AmericanLongrifles.org/forum 3/22/2014
Now rasp away all the wood on the outside of your lock panel, making it
look the same shape as the lock side.
Now it's time to start shaping the buttstock. You can use any tool you
want to do this, but I use a plane to do quite a bit of it now a days. Any

Page 60 of 117 Copyright 2007 by Mike Brooks permission to use granted to AmericanLongrifles.org/forum 3/22/2014
time I rasp I have to wear a mask (severe dust allergies), and I find that
to be a pain in the butt, so I plane all I can. Anyway, I start by removing
wood down to my comb line and the toe line. I get real close to the line with the plane, then rasp down the rest of the way. Always keep a
centerline drawn on your stock to keep a reference point as to where the center is.
Page 61 of 117 Copyright 2007 by Mike Brooks permission to use granted to AmericanLongrifles.org/forum 3/22/2014
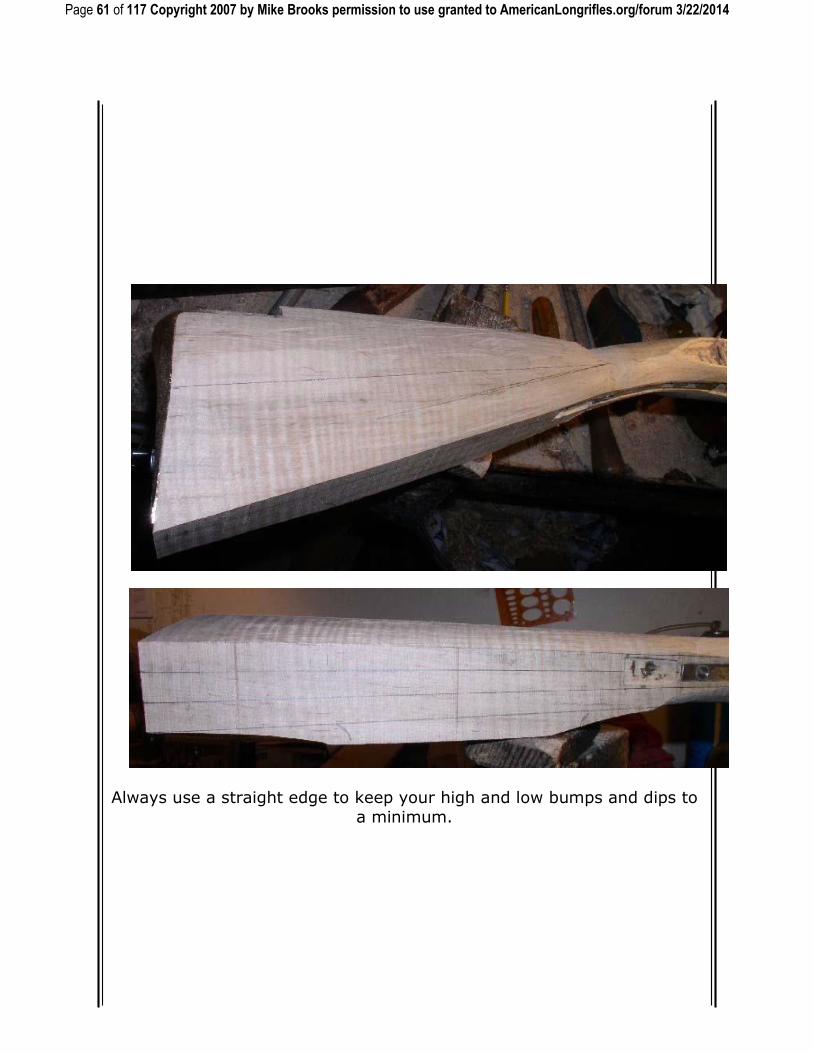
Always use a straight edge to keep your high and low bumps and dips to
a minimum.

Page 62 of 117 Copyright 2007 by Mike Brooks permission to use granted to AmericanLongrifles.org/forum 3/22/2014
Now it's time to flip the stock over and work on the cheek piece side. I've
used the plane here to remove the bulk of the wood between the comb and the cheek piece.
Now we have to set the bottom of the cheek piece in, so get your little
saw and saw straight down, somewhere near where you think it ought to
be. I might have to deepen this cut a time or two as I shape the buttstock out.

Page 63 of 117 Copyright 2007 by Mike Brooks permission to use granted to AmericanLongrifles.org/forum 3/22/2014
Now, chisel away the excess wood.
Here's how it looks with the excess wood chiseled away.

Page 64 of 117 Copyright 2007 by Mike Brooks permission to use granted to AmericanLongrifles.org/forum 3/22/2014
And, here's the buttstock roughed out a little more with a 1" chisel and a little more planning.
Ok, here we go. In this picture I've got the cheek piece side pretty well shaped up with a #49 cabinet rasp The cheek piece has also been
reduced in height with the plane.

Page 65 of 117 Copyright 2007 by Mike Brooks permission to use granted to AmericanLongrifles.org/forum 3/22/2014
Now I'm going to hollow out the area where the comb meets the wrist. I
use one of those round sure form files followed by a barrel channel scraper...just kind of lends itself well for these kinds of applications.

Page 66 of 117 Copyright 2007 by Mike Brooks permission to use granted to AmericanLongrifles.org/forum 3/22/2014

Page 67 of 117 Copyright 2007 by Mike Brooks permission to use granted to AmericanLongrifles.org/forum 3/22/2014
Now I'm going to draw the line that separates the comb from the
buttstock. It follows the line that the buttplate return makes, draw the line on both sides, then round off the top of the buttstock down to your
line.

Page 68 of 117 Copyright 2007 by Mike Brooks permission to use granted to AmericanLongrifles.org/forum 3/22/2014

Page 69 of 117 Copyright 2007 by Mike Brooks permission to use granted to AmericanLongrifles.org/forum 3/22/2014
Here's your finished product.

Page 70 of 117 Copyright 2007 by Mike Brooks permission to use granted to AmericanLongrifles.org/forum 3/22/2014
Tomorrow we have to do some work on the toe of the buttstock, then we'll go onto shaping the forestock.
Page 71 of 117 Copyright 2007 by Mike Brooks permission to use granted to AmericanLongrifles.org/forum 3/22/2014
A Gunbuilding Tutorial by
Mike Brooks
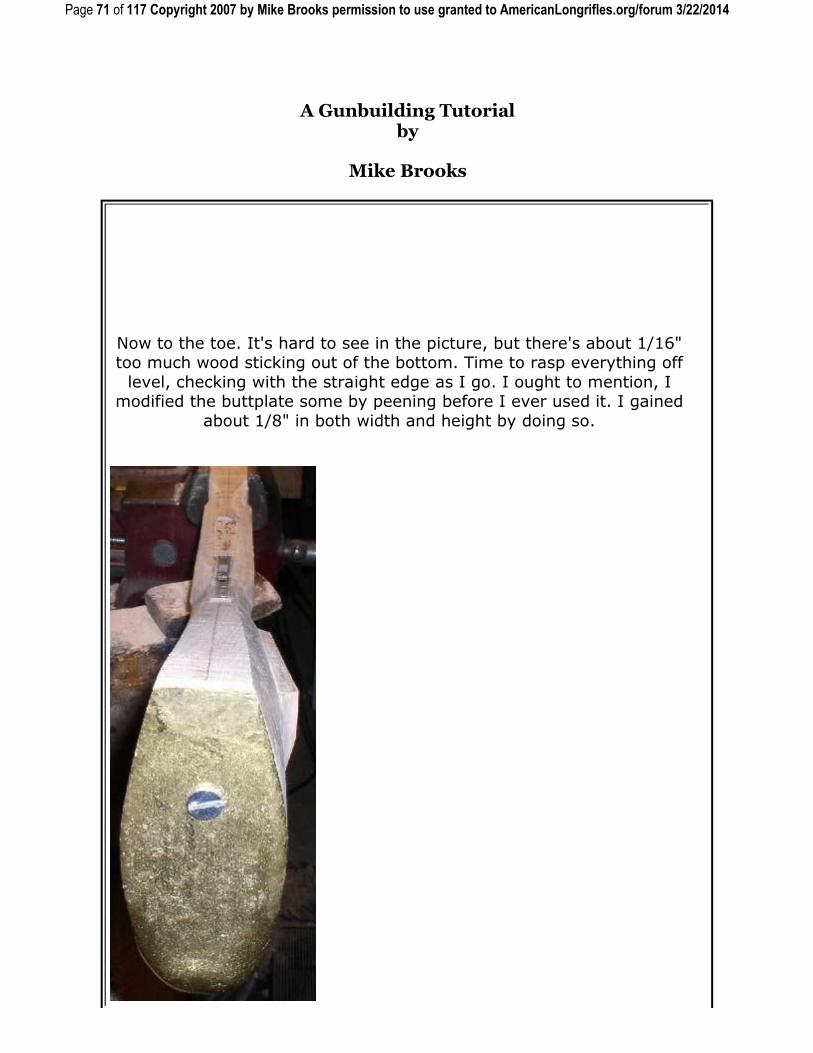
Now to the toe. It's hard to see in the picture, but there's about 1/16" too much wood sticking out of the bottom. Time to rasp everything off
level, checking with the straight edge as I go. I ought to mention, I modified the buttplate some by peening before I ever used it. I gained
about 1/8" in both width and height by doing so.

Page 72 of 117 Copyright 2007 by Mike Brooks permission to use granted to AmericanLongrifles.org/forum 3/22/2014
Then, as you can see I have to readjust the corner line of the bottom
edge of the buttstock again.
Then, after checking out Shumway's book I sculpt the cheek piece similar
to the "Brass Barreled Gun".

Page 73 of 117 Copyright 2007 by Mike Brooks permission to use granted to AmericanLongrifles.org/forum 3/22/2014
Now, on to the forestock! First off we have to strike a line along the upper forestock that will expose just a little bit more that 1/2 of the
barrel when the extra wood is removed. Then we have to measure down from
that line 1/3 of the distance of the thickness of the stock. I always put an "insurance line 1/8" above below the 1/3rd line to I don't get a diamond
shaped effect. The 1/3rd line will end up being the widest part of the
forestock. I hope all of that made sense.
Now, after removing the barrel, rasp off the extra wood that is above the
top line and now we should have a little more than 1/2 of the barrel showing.
Then flip the stock on its side and start rounding off the upper part of

Page 74 of 117 Copyright 2007 by Mike Brooks permission to use granted to AmericanLongrifles.org/forum 3/22/2014
the forestock down to the 1/3rd line. I do it in several facets then round
them off. I leave about a 1/32" or less flat next to the barrel.

Page 75 of 117 Copyright 2007 by Mike Brooks permission to use granted to AmericanLongrifles.org/forum 3/22/2014

Page 76 of 117 Copyright 2007 by Mike Brooks permission to use granted to AmericanLongrifles.org/forum 3/22/2014
Now, the barrel is put back into the stock and pinned in and we move on
to shaping the lower part of the upper forestock. It' done in a series of facets, just like I did before. Here’s a picture sequence of the operation.

Page 77 of 117 Copyright 2007 by Mike Brooks permission to use granted to AmericanLongrifles.org/forum 3/22/2014
Now we're going to do the same thing with the lower forestock.
Same thing, a bunch of facets that eventually end up being rounded off.

Page 78 of 117 Copyright 2007 by Mike Brooks permission to use granted to AmericanLongrifles.org/forum 3/22/2014

Page 79 of 117 Copyright 2007 by Mike Brooks permission to use granted to AmericanLongrifles.org/forum 3/22/2014

Page 80 of 117 Copyright 2007 by Mike Brooks permission to use granted to AmericanLongrifles.org/forum 3/22/2014
Now there are a few nasty areas that need to be cleaned up, one of them
is the rear ram rod thimble.
Page 81 of 117 Copyright 2007 by Mike Brooks permission to use granted to AmericanLongrifles.org/forum 3/22/2014
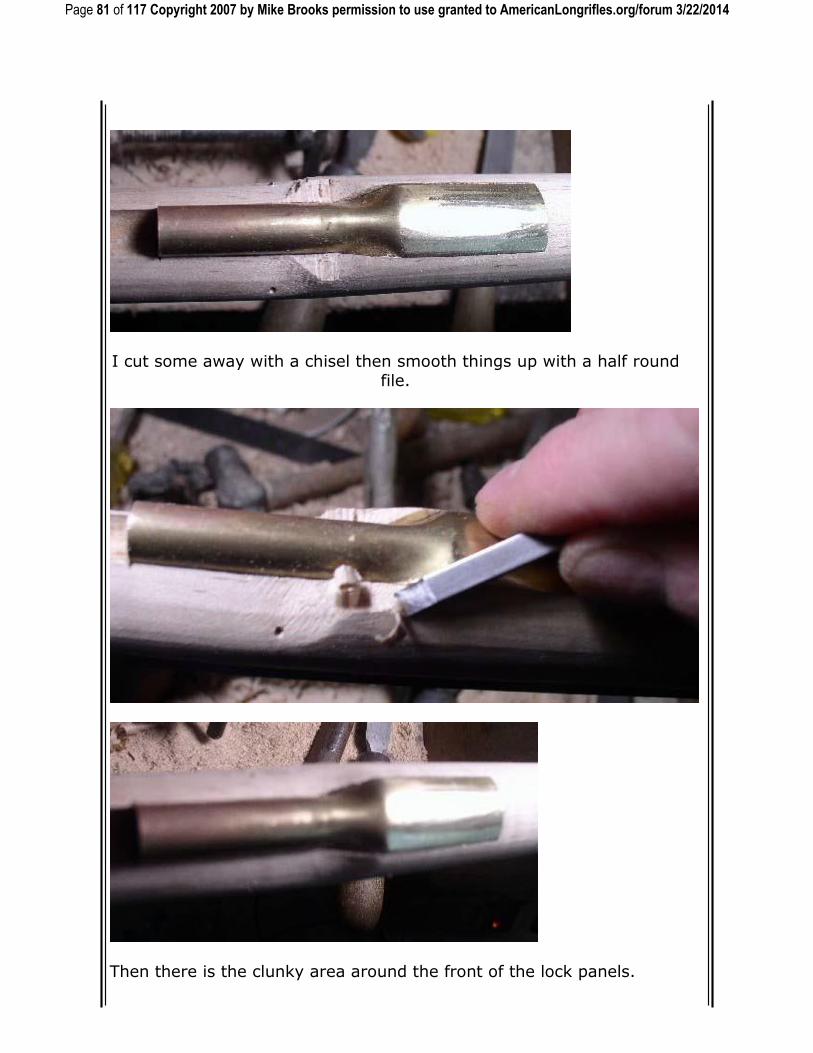
I cut some away with a chisel then smooth things up with a half round file.
Then there is the clunky area around the front of the lock panels.

Page 82 of 117 Copyright 2007 by Mike Brooks permission to use granted to AmericanLongrifles.org/forum 3/22/2014
I take out the wood here with a 7/16" rat tail and clean it up with a half round file and my ever handy round barrel channel scraper.

Page 83 of 117 Copyright 2007 by Mike Brooks permission to use granted to AmericanLongrifles.org/forum 3/22/2014
You've probably noticed the nice worm hole that's shown up as we've
shaped the stock out...I thought worm holes were only on Star Trek?

Page 84 of 117 Copyright 2007 by Mike Brooks permission to use granted to AmericanLongrifles.org/forum 3/22/2014
Then, we have to shape the muzzle area in preparation for the
muzzle cap.

Page 85 of 117 Copyright 2007 by Mike Brooks permission to use granted to AmericanLongrifles.org/forum 3/22/2014
I make a paper pattern for the muzzle cap like this. You just wrap a
piece of paper around the stock and draw a line.
Transfer this pattern to a piece of brass, cut it out, then anneal it.

Page 86 of 117 Copyright 2007 by Mike Brooks permission to use granted to AmericanLongrifles.org/forum 3/22/2014
Then clamp it down to your stock where it needs to go and bend it around the stock, you can just use your fingers, the brass is pretty soft
at this point.
Once it's bent around draw a line around the back end of it.

Page 87 of 117 Copyright 2007 by Mike Brooks permission to use granted to AmericanLongrifles.org/forum 3/22/2014
Here's what it should look like at this point.

Page 88 of 117 Copyright 2007 by Mike Brooks permission to use granted to AmericanLongrifles.org/forum 3/22/2014
Stay tuned in tomorrow when we continue making the muzzle cap!

Page 89 of 117 Copyright 2007 by Mike Brooks permission to use granted to AmericanLongrifles.org/forum 3/22/2014
A Gunbuilding Tutorial by
Mike Brooks
On with the nose cap. I cut just on the inside of my pencil mark with a
jeweler's saw then rasp off the extra wood.

Page 90 of 117 Copyright 2007 by Mike Brooks permission to use granted to AmericanLongrifles.org/forum 3/22/2014
Then wrap the brass back around the stock and strike a line even with
the top of the fore stock on both sides and remove the excess brass.
Here's the muzzle cap trimmed up and pinched in so it sets properly
against the barrel sides.

Page 91 of 117 Copyright 2007 by Mike Brooks permission to use granted to AmericanLongrifles.org/forum 3/22/2014
Now, solder on the front piece and cut out your octagon shape to fit
against the barrel.

Page 92 of 117 Copyright 2007 by Mike Brooks permission to use granted to AmericanLongrifles.org/forum 3/22/2014
Now, it's time to pin it down. I use copper wire as a rivet, it's about
5/64", so I drill a 5/64ths hole thru the cap and the stock and stop when it hits the barrel.
Now grasp your short piece of copper wire in the vice and dink on the
end to mushroom the top.

Page 93 of 117 Copyright 2007 by Mike Brooks permission to use granted to AmericanLongrifles.org/forum 3/22/2014
Take your barrel out and put your copper rivet you just made thru the
stock and cap. Counter sink the hole on both ends first by the way.
Now peen the end down against the cap and you're done!

Page 94 of 117 Copyright 2007 by Mike Brooks permission to use granted to AmericanLongrifles.org/forum 3/22/2014
Now we're going to make a side plate. I suppose the stock I use is .090
or so. Get your paper side panel pattern back out that you made before and place it on the side panel and draw out your side plate.
Cut out and glue your pattern on your brass and cut and file till it looks
like a side plate.

Page 95 of 117 Copyright 2007 by Mike Brooks permission to use granted to AmericanLongrifles.org/forum 3/22/2014
Now, inlet your side plate just like all the other parts we've inlet.

Page 96 of 117 Copyright 2007 by Mike Brooks permission to use granted to AmericanLongrifles.org/forum 3/22/2014
A Gunbuilding Tutorial by
Mike Brooks
Now it's time to sand or scrape, which ever you choose to do. I've always
sanded. I start with 100 grit then go to 150, then 220. I whisker the stock three times with 220. Then it's time to cut in the relief carving.
At this point I've made a paper pattern and transferred it to the stock.
You can see the pattern in the background.
I cut much of my carving in with a V shaped parting tool. I chase it with
a mallet, I don't push it.

Page 97 of 117 Copyright 2007 by Mike Brooks permission to use granted to AmericanLongrifles.org/forum 3/22/2014
I'm doing a lot of chip carving on this gun too. I use a small gouge and
drive it straight down into the wood, then come back and take the chip
out.

Page 98 of 117 Copyright 2007 by Mike Brooks permission to use granted to AmericanLongrifles.org/forum 3/22/2014

Page 99 of 117 Copyright 2007 by Mike Brooks permission to use granted to AmericanLongrifles.org/forum 3/22/2014
Here I'm cutting away the background wood to make the carving stand
out in relief. Take your time and taper everything off and blend it all in with the existing plane of the wood.

Page 100 of 117 Copyright 2007 by Mike Brooks permission to use granted to AmericanLongrifles.org/forum 3/22/2014
Here the beavertail is done.

Page 101 of 117 Copyright 2007 by Mike Brooks permission to use granted to AmericanLongrifles.org/forum 3/22/2014
In this picture I've laid out and relieved the lower buttstock molding.
This decoration I'm applying was done on the "brass barreled rifle" in
Shumway's book. You just use a gouge of the appropriate size and drive it in to make the design. No wood removal is needed. The circles are
done with a nail set.

Page 102 of 117 Copyright 2007 by Mike Brooks permission to use granted to AmericanLongrifles.org/forum 3/22/2014
Still carving, all the previous techniques are being used as before....

Page 103 of 117 Copyright 2007 by Mike Brooks permission to use granted to AmericanLongrifles.org/forum 3/22/2014

Page 104 of 117 Copyright 2007 by Mike Brooks permission to use granted to AmericanLongrifles.org/forum 3/22/2014
A Gunbuilding Tutorial by
Mike Brooks
Ok, off to the patchbox. This is a patch box "kit" from MBS.
I drew out a paper pattern and glued it to the brass, then cut it out with a jewelers saw.
Here we are partially inleted.

Page 105 of 117 Copyright 2007 by Mike Brooks permission to use granted to AmericanLongrifles.org/forum 3/22/2014
Once the patchbox is inleted, I drill out the box cavity with a forestner's bit.. It's probably about 1 1/4" deep.
Here's the box with the cavity all cleaned out. I've installed the kick open spring here too,
it's held in place with the same screw that holds the front finial of the box down.

Page 106 of 117 Copyright 2007 by Mike Brooks permission to use granted to AmericanLongrifles.org/forum 3/22/2014
Unfortunately, I forgot to photography the release mechanism. I'll do a separate tutorial on that at a later date.
Now the thumb piece. I start out with an old silver 50 cent piece and peen it out until it's big enough for the inlay I want to cut out of it. I then glue my pattern on it and cut it out
with a jeweler’s saw.

Page 107 of 117 Copyright 2007 by Mike Brooks permission to use granted to AmericanLongrifles.org/forum 3/22/2014
Place the inlay on the stock and trace around it. Remove the wood until it fits properly then attach it. I used two homemade 1/16" nails.

Page 108 of 117 Copyright 2007 by Mike Brooks permission to use granted to AmericanLongrifles.org/forum 3/22/2014
Who likes pumpkin colored stocks?
I stained with Jim Klien's stains, two coats of orange, one dark brown and one reddish
brown. Here's the dark brown over orange.

Page 109 of 117 Copyright 2007 by Mike Brooks permission to use granted to AmericanLongrifles.org/forum 3/22/2014
Here's the reddish brown over the other two.
Here I've burnished the stock with 0000 steel wool.
At this point I apple the finish that Jim Chambers sells, flooding it on the first coat until
the stock won't take any more. After that I put one coat a day on for 4 or 5 days, then assemble the gun.

Page 110 of 117 Copyright 2007 by Mike Brooks permission to use granted to AmericanLongrifles.org/forum 3/22/2014
Here's how I slot my barrel lugs by the way, I use my jeweler’s saw.
I antique my steel parts using LMF browning solution and a sweat box. I use about three
applications then let it set for a couple days and rust.

Page 111 of 117 Copyright 2007 by Mike Brooks permission to use granted to AmericanLongrifles.org/forum 3/22/2014
I also cut in the sights at this time, they are done just like the underlugs.

Page 112 of 117 Copyright 2007 by Mike Brooks permission to use granted to AmericanLongrifles.org/forum 3/22/2014
I antique the stock to a certain extent with rustoleum flat black spray paint. I shoot the whole gun than take most all of it back off with 0000 steel wool. The stock will need
about three more coats of finish after this procedure.

Page 113 of 117 Copyright 2007 by Mike Brooks permission to use granted to AmericanLongrifles.org/forum 3/22/2014
A Gunbuilding Tutorial by
Mike Brooks
The Finished Product

Page 114 of 117 Copyright 2007 by Mike Brooks permission to use granted to AmericanLongrifles.org/forum 3/22/2014

Page 115 of 117 Copyright 2007 by Mike Brooks permission to use granted to AmericanLongrifles.org/forum 3/22/2014

Page 116 of 117 Copyright 2007 by Mike Brooks permission to use granted to AmericanLongrifles.org/forum 3/22/2014

Page 117 of 117 Copyright 2007 by Mike Brooks permission to use granted to AmericanLongrifles.org/forum 3/22/2014
Remember how we started out?