a major qualifying project report: worcester ... -...
TRANSCRIPT

GUI DESIGN FOR GEM LITE ON A POCKET PC
A Major Qualifying Project Report:
submitted to the Faculty
of the
WORCESTER POLYTECHNIC INSTITUTE
in partial fulfillment of the requirements for the
Degree of Bachelor of Science
by
_________________________________ Evan Desmarais
_________________________________ Gregory Kern
March 2, 2006
Approved:
_________________________________ Robert Kinicki, Advisor
1. GUI 2. PDA 3. HCI
_________________________________
Mark Claypool, Advisor
2
Acknowledgements
The authors of this report would like to acknowledge the contributions of General
Dynamics C4 Systems for their assistance throughout this project. In addition, we would
like to thank Brendon Chetwynd of C4 Systems for all of his help in coordinating this
project between WPI and General Dynamics, Jeff Reynolds for his time in testing our
prototypes, and Michael Carielli for his time in assisting with our research of GEM Lite.
We would also like to acknowledge Professors Robert Kinicki and Mark Claypool for
their assistance and advice on the compilation of this report.

3
Table of Contents
Acknowledgements............................................................................................................. 2 Table of Contents................................................................................................................ 3 Table of Figures .................................................................................................................. 5 Abstract ............................................................................................................................... 6 1. Introduction..................................................................................................................... 7 2. Background..................................................................................................................... 9
2.1 GUI Design Research ............................................................................................... 9 2.2 Applying GUI Research to PDA’s.......................................................................... 12
3. Tools ............................................................................................................................. 14 3.1 Pocket PC................................................................................................................ 14 3.2 Development Environment ..................................................................................... 14 3.3 OpenNetCF Package............................................................................................... 16 3.4 Pocket PC Emulator................................................................................................ 17 3.5 Adobe Photoshop.................................................................................................... 17 3.6 ImageJ/Vischeck ..................................................................................................... 17
4. The Design of GEM Lite Pocket .................................................................................. 19 4.1 GEM Lite Analysis ................................................................................................. 19 4.2 Scope....................................................................................................................... 20 4.3 User Considerations ................................................................................................ 21
4.3.1 Familiarity vs. Best Practices........................................................................... 21 4.3.2 Expectations of the End-user ........................................................................... 23 4.3.3 Image Considerations....................................................................................... 24
4.4 Accessibility Considerations................................................................................... 25 4.4.1 Colors............................................................................................................... 26 4.4.2 Text Considerations ......................................................................................... 28
4.5 Device Limitations.................................................................................................. 29 4.5.1 Screen Size....................................................................................................... 30 4.5.2 Input Medium................................................................................................... 31 4.5.3 Technical Limitations ...................................................................................... 33 4.5.4 Microsoft .NET Compact Framework Limitations.......................................... 33
5. Building GEM Lite Pocket ........................................................................................... 35 5.1 GEM Lite Pocket Main Shell.................................................................................. 35 5.2 Forms and Panels .................................................................................................... 39
5.2.1 GEM_Alert Form............................................................................................. 39 5.2.2 GEM_GridPanel Panel..................................................................................... 41 5.2.3 GEM_AuditDataPanel Panel ........................................................................... 44 5.2.4 GEM_BarGridPanel Panel............................................................................... 45 5.2.5 GEM_BGLPanel Panel.................................................................................... 48 5.2.6 GEM_Checklist Panel...................................................................................... 52 5.2.7 GEM_Date_Time Panel................................................................................... 53 5.2.8 GEM_Default_Settings Panel.......................................................................... 55 5.2.9 GEM_Help form .............................................................................................. 56 5.2.10 GEM_About form.......................................................................................... 57

4
5.3 Custom .NETCF Controls....................................................................................... 57 5.3.1 FlexLabel ......................................................................................................... 58 5.3.2 FlexPanel.......................................................................................................... 59 5.3.3 PictureButton ................................................................................................... 60
6. Testing GEM Lite Pocket ............................................................................................. 61 7. Recommendations & Future Work ............................................................................... 65 8. Conclusion .................................................................................................................... 67 Works Cited ...................................................................................................................... 68 Bibliography ..................................................................................................................... 69 Appendix A: Development Tools ..................................................................................... 70 Appendix B: User Task List for Task-Based User Testing .............................................. 71 Appendix C: GEM Lite Pocket Operator’s Manual ......................................................... 72

5
Table of Figures
Figure 1: GEM Lite Pocket main shell ............................................................................. 36 Figure 2: Main shell under simulated Deuteranopia using ImageJ and Vischeck............ 39 Figure 3: Example of GEM_Alert form............................................................................ 41 Figure 4: The Devices portion of GEM Lite Pocket uses a GEM_GridPanel .................. 42 Figure 5: GEM_Record is another way for a user to view tabular data ........................... 43 Figure 6: Audit Data Query is a GEM_AuditDataPanel .................................................. 45 Figure 7: The Network Manager List is a GEM_BarGridPanel ....................................... 48 Figure 8: Bad Guy List ..................................................................................................... 52 Figure 9: The Event Log Settings are an example of a GEM_Checklist panel ................ 53 Figure 10: The GEM_Date_Time panel is used to choose the date range of the Event Log Query................................................................................................................................. 55 Figure 11: GEM_Default_Settings panel (left) and GEM_Default_Settings panel with confirmation panel (right). ................................................................................................ 56 Figure 12: Help file loaded in a GEM_Help form............................................................ 57

6
Abstract
The feasibility of porting the graphical user interface (GUI) of General Dynamics’ GEM
Lite application to a Pocket PC was explored. A prototype was built to demonstrate that it
is also possible to effectively address the usability and data representation issues that
arise in writing a port of a full-featured application to a handheld device.

7
1. Introduction
General Dynamics C4 Systems (GD) is a leader in the field of network-centric
solutions through its creation of high-value, low-risk network solutions. One of General
Dynamics’ products is their General Encryption Manager (GEM). GEM has been
developed to run on both Windows® and Unix® workstations. GD has developed three
software products in the GEM line: GEM, GEM Solo, and GEM Lite (General Dynamics
Encryptor Manager (GEM) Operator’s Manual, 2005). GEM is the full version of the
software which requires an HP OpenView® and Oracle® backend that can handle a
network of 600 IP and ATM TACLANE™ or FASTLANE® ATM encryptors. GEM
Solo is a less robust version of GEM that does not require HP OpenView® or Oracle® and
can manage up to 253 encryptors. GEM Lite, like GEM Solo, is a standalone version of
GEM that can manage up to 25 encryptors.
General Dynamics has begun taking steps to evaluate the possibility of porting
GEM Lite to the Pocket PC. In the previous year, GD had a team of students from
Worcester Polytechnic Institute begin the first phase of the project, which was to show a
proof-of-concept regarding the capability of a Pocket PC to run the Simple Network
Management Protocol (SNMP) (Stancioff et al. 2005). This was important considering
GEM is based on SNMP. The team was able to show that a SNMP manager can be run
on a Pocket PC.
One recommendation that last year’s team made was that the next phase of the
project should be to create a graphical user interface (GUI) for a Pocket PC version of
GEM Lite (GEM Lite Pocket). It was the focus of this Major Qualifying Project (MQP)
to create a functioning prototype of a GUI establishing the ability to port the application

8
to a Pocket PC. Our team created a proof-of-concept indicating that all of the
functionality of GEM Lite could be visualized on a far smaller screen without sacrificing
the usability of the product.
This document details the steps taken in completing this MQP. Chapter 2 presents
information on the principles of Human Computer Interaction (HCI) and discusses how
these principles are applied to designing user interfaces for PDAs. Chapter 3 outlines the
tools used in the development of GEM Lite Pocket. Chapter 4 illustrates the design of the
GEM Lite Pocket user interface, as well as the ways in which the principles of GUI
design were incorporated. Chapter 5 discusses the building of GEM Lite Pocket. The
methodology and results of testing GEM Lite Pocket are given in Chapter 6.
Recommendations for future work are given in Chapter 7. Chapter 8 presents our
conclusion regarding the completion of GEM Lite Pocket.

9
2. Background
This chapter reviews the existing research in the field of GUI design. This
research has been developed into standards that must be considered regarding GUI
design. These standards can be applied to designing applications for a PDA as well as a
PC with a few adaptations.
2.1 GUI Design Research
There are several key design principles that have been developed in the field of
GUI design. These principles include consistency, small learning curve, balance between
user control and freedom, recognition rather than recall, minimalist design, error
prevention and recovery, visibility of status, feedback, documentation, and help (Preece
2002).
One of the most important principles is the consistency of the GUI. There exist
well-known industry standards for GUI consistency. For example, the placement of the
“OK” and “Cancel” Buttons have been standardized to have the “OK” Button placed on
the left and the “Cancel” Button placed on the right. Another example is that there should
not be an exit button on the main program. Rather, it should be placed within a menu bar
and that menu bar should not exceed ten items with a cascading depth of one. While
creating a GUI the developer has to keep in mind not only the industry standards but also
that he or she can create one’s own standards, provided that they are consistent, within
the program. For example, one would not want to use an icon in one place to indicate an
available option and then spell out the words for which that icon stands in another part of
the interface. Keeping the design of the GUI consistent helps the user learn the program

10
more quickly and memorize it. However, there are situations when the developer
deliberately makes part of the program inconsistent to draw the user’s attention to that
component of the program.
Consistency is the first step in lowering the learning curve. It is important that the
program does not require unnecessary mental effort on the behalf of the user. The reason
behind this is that the user should be concentrating on the task at hand not the software
tool that is being used. The developer should simplify the tasks that are used the most
frequently to minimize user frustration.
While simplifying tasks the developer should be careful to not take too much
control and freedom away from the user. The user must feel like he or she is performing
the task. The developer must also consider the level of difficulty that the user may
encounter in navigating the interface.
Another design principle is that the user should be able to navigate through the
program using recognition rather than recall. This means that the user is able to recognize
the steps and paths needed to complete a task rather than just performing the tasks
completely from memory or without searching the program. This requires the developer
to make the steps easy to recall so that the user can figure out what to do without trying to
remember what the operational manual says.
An important principle of GUI design is to keep a minimalist design. The overuse
of color, sound, and other forms of multimedia may look nice and gets the user’s
attention. However, they should be used sparingly. Their use can distract the user from
the real function of the program, because the user will be paying more attention to the

11
sounds or animations than to the functionality of the program. Also, too much activity on
the screen can confuse the user.
Another important aspect of the GUI design is error prevention and recovery. If
the design is causing the user to continually make errors and lose work, then he or she
may not want to continue using the program. Through user testing the developer can
discover errors that are common to the user’s participating. Once the common errors are
found, the developer can fix those errors. The GUI design should provide mechanisms
such that users can recover from some types of errors. Simple additions of undoes and
escapes will reduce the number of errors that the user makes.
One good interface design principle is to keep the status of the system or other
processes easily visible at all times. This alerts the user to any changes in the program
that they are using. The status should be up to date at all times. It is good practice to use
status bars and/or icons to make the program state easily visible to the user.
The interface should give the user feedback on the tasks that are performed. This
feedback can be in terms of error reports for negative occurrences, alerts when the system
is failing, or a dialog box to give positive feedback. The feedback will then let the user
know that the program is responding to the actions being performed, mitigating possible
frustration. The negative feedback should allow the user to determine what he or she has
done wrong and suggest how to fix it. The positive feedback should inform the user that
what he or she is doing is working and that the program has not crashed.
The final two principles involve documentation and help. All programs should
have some external documentation such as an operational manual to assist in the
navigation of the program. The documentation should provide the user with a description

12
of the GUI design. Within the program there should be context-sensitive help available to
assist the user with task-specific instructions.
Other considerations that the above principles do not touch upon that need to be
explored while designing a GUI are colorblindness, readability and Fitt’s Law. Ten
percent of males are colorblind. Therefore accessibility considerations need to be made in
the color selections so that even the colorblind population can recognize the color
elements and read colored text. Not only does the color of the text have to be considered
but also the size of the text. Small text can cause eye strain to some users or be
completely invisible to others. However, if the text is too large it is considered a waste of
space and can be considered intrusive. One of the last major considerations for a GUI is
Fitts’ Law, which is a formula describing the amount of time it takes for a user to move
the cursor from the starting location to the target location (Preece 2002). If the design has
two actions that need to be performed one after the other, they should be close to each
other. Otherwise, efficiency is sacrificed and much of the user’s time is wasted.
2.2 Applying GUI Research to PDA’s
There has been very little research done in regards to the specifics of designing
GUIs for Personal Digital Assistants (PDA). Most of the research in the HCI field
regarding GUI design mainly targets applications that run on a desktop PC. However, the
same principles that are used for the PC can be applied to the PDA. However, there are
special considerations that need to be made when creating a GUI for a PDA.
One consideration is the small screen size of a PDA. There is 80% less screen
space to work with on a PDA than on a desktop PC, assuming a 3.5-inch PDA screen size
and a 17-inch PC screen size. This means that the developer must give much more weight

13
to the minimal design principle. If the GUI is not minimal then there will be no room to
fit all of the functionality. Readability is another important consideration because with
the small screen size there is less room for the text. On the other hand, the user will
generally have the PDA closer to his or her eyes, so smaller text may not be as much of
an issue as it would be on a full computer screen. Some of the design standards for
designing a traditional PC GUI are not applicable to designing a GUI for a PDA. For
example, the standard limitation of having up to ten menu bar items is hard to control
because there is less horizontal room on a PDA in which to contain all of the options.
Consequently, the guideline of having a menu cascading depth of one is more difficult to
follow because large applications may have more menu items than can be displayed in
the given guidelines, even with efficient organization.

14
3. Tools
3.1 Pocket PC
General Dynamics supplied this project with two Dell Axim X5 Pocket PCs. Each
PDA has a 400MHz Intel XScale™ processor, 64MB RAM, and 48MB ROM for storing
and running applications. Each PDA also has a 3.5” thin film transistor (TFT) screen that
displays a resolution of 240x320 pixels in 16-bit color. The PDA’s run a compact version
of Microsoft Windows, known as Microsoft Pocket PC 2003 or Windows CE 4.20. We
connected the PDA’s to two of the three development computers via the supplied USB
cradle and transferred data between the machines with Microsoft ActiveSync 3.8.
3.2 Development Environment
GEM Lite Pocket was developed on two computers running Windows 2000
Professional Edition. Originally, the Microsoft Embedded Visual C++ (eVC++)
integrated development environment was installed on the development computers to
enable writing code in eVC++. However, it was determined early in the project that this
would not allow for efficient use of time. Java, which is the language used to develop
GEM Lite, was considered but quickly rejected because the Pocket PC 2003 platform is
not supported by J2ME (“Mobile Java or J2ME.”, 1). Therefore, the Microsoft Visual
Studio.NET 2003 60-day trial version (Visual Studio) was installed on each computer.
Visual Studio supports Microsoft’s .NET Compact Framework version 1.0 and is an
integrated development environment for programming applications in Visual C#, Visual
Basic, Visual C++, Visual J++, and other .NET languages. C# was selected as the

15
programming language used to build the application after considering issues such as
efficiency, language compatibility, and performance.
Programming in C# facilitated more efficient time management when writing
code. One of the fundamental aspects of the C# language is strong support and
availability of the Microsoft .NET classes. For the Pocket PC, a subset of the .NET
Framework, known as the .NET Compact Framework (.NETCF), was used. This
provided specific classes and GUI building tools to aid in quickly building graphical and
complex interface components. One of the subsets of the aforementioned classes is the
controls subset. The .NET controls are classes that provide reusable graphical elements
for building GUIs, such as buttons, text boxes, and labels. Microsoft .NET controls are
analogous to the Java Swing classes. These particular components are not available for
developers using eVC++. The Microsoft Foundation Classes (MFC) would have been
necessary for GUI development, which would have been far more complicated.
Furthermore, since C# is managed code, it does not require any memory management on
the part of the developer. For this type of application, having the memory managed by the
compiler is useful and allows the developer to concentrate on other aspects of the
program. Using eVC++ does not support managed code and therefore the project would
have taken more time to code and debug.
Another reason for using C# and the .NETCF is the level of compatibility with
different versions of the Windows operating system. The Pocket PC’s used for testing ran
Windows CE 4.20. This is not the latest version of Windows CE. Newer handhelds run
newer versions of Windows, which may not necessarily offer the same system calls to
developers. However, any handheld device capable of running the .NET Compact

16
Framework will be able to run GEM Lite Pocket. This offers cross-platform compatibility
within the Windows family of operating systems.
Performance was an important consideration in deciding to use C#. Originally, the
assumption was that using C# and the .NET Compact Framework would make the
application run more slowly due to a higher overhead. Since this project is a proof-of-
concept, the decision was made to compromise application speed in favor of successfully
porting a larger portion of GEM Lite to the Pocket PC. Ultimately, using C# did not
cause the application to suffer any noticeable performance loss. Later it was discovered
that C# is very comparable in speed to Visual C++ in many benchmark tests. Some of the
benchmark tests showed that C# was faster than C++, most notably in object instantiation
(Wlodarczyk 2002).
3.3 OpenNetCF Package
Due to the limitations of .NETCF, it was necessary to supplement the API with
controls from third-party sources. The OpenNETCF Smart Device Framework version
1.4 (SDF) contained controls that allowed greater flexibility. This is because the
OpenNETCF controls support object properties not normally supported in the .NETCF.
One particularly useful control was the LinkLabel, which is a label that has the ability to
be hyperlinked. Since the SDF is open source, it was also a valuable reference in learning
to write custom controls for GEM Lite Pocket. Currently, the OpenNETCF Smart Device
Framework can be downloaded from the OpenNETCF Consulting, LLC website (see
Appendix A).

17
3.4 Pocket PC Emulator
Microsoft Visual Studio .NET 2003 comes packaged with Pocket PC emulators
for development purposes. This project used a combination of emulators and real Pocket
PC’s to test the application. This was mainly because there was only one USB cradle.
The emulator is dependent on the resources of its host computer and therefore it actually
took longer to test builds than to connect to a real Pocket PC. It is also important to note
that the Pocket PC 2002 emulator more closely resembles the functionality of the Dell
Axim X5 than the Pocket PC 2003 emulator, especially in determining actual control
placement and screen width. We were able to run the application on both emulators. The
emulator also allowed for screen shots to be taken of the application whereas the Pocket
PC does not lend itself well to such actions.
3.5 Adobe Photoshop
Adobe Photoshop CS2 was used to create the button graphics used in GEM Lite
Pocket. This allowed greater flexibility in creating higher quality images that degrade
gracefully when displayed on a Pocket PC. This also aided in designing aesthetics that
are far beyond the limitations of the .NETCF. A 30-day tryout of Adobe Photoshop is
available at the Adobe Systems Incorporated website (see Appendix A).
3.6 ImageJ/Vischeck
ImageJ is a public domain image processing and analysis tool written in Java. It
was used in conjunction with the Vischeck plugin (also free) to determine which colors to
use in GEM Lite Pocket. Vischeck allows the user to load an image, which was a
screenshot of the application running on an emulator in this case. Thus, Vischeck

18
permitted simulations for viewing different types of colorblindness, such as
Deuteranopia, Protanopia, and Tritanopia. Vischeck is also available as a plugin for
Adobe Photoshop, but this version was particularly cumbersome and limited for this
project. Download information for both ImageJ and Vischeck are listed in Appendix A.

19
4. The Design of GEM Lite Pocket
Designing GEM Lite Pocket was done by analyzing the PC version of GEM Lite,
determining the scope of the GEM Lite interface to be ported to the Pocket PC, and
taking accessibility and Pocket PC limitations into account. The following subsections
describe the decisions made in the design process in further detail.
4.1 GEM Lite Analysis
The first step in designing GEM Lite Pocket was to analyze the PC version of
GEM Lite. This meant determining both the scope of the project and selecting a course of
action necessary to overcome PDA display challenges. GD provided the project team
with a copy of GEM Lite to install on the development computers. Initially, the
application was explored in order to gain familiarity with the inteface. During this time,
different portions of GEM Lite were categorized and the application’s functionality was
mapped out. The initial categorization of the interface components was: main shell, help
screens, alerts, tables, and tabbed components. The main shell category implies the state
of the GEM Lite application when it is first run. It includes the menu structure, toolbar
icons, persistent display data, and main screen options. The help screens are simply all of
the screens related to the online help. There is one method of display for all of the online
help. The alerts category consists of all of the GEM alerts. The alerts are simply
messages displayed for the user in conjunction with specific events. Alerts contain a
timestamp, event type, and a message. The tables category consisted of all portions of the
program that displayed tabular data. The tables in GEM Lite are generally large,
scrollable, and in some cases editable. The tabbed components category consisted of

20
portions of the program that generally contained a number of views encapsulated in a
single form and accessible via a tabbed panel.
The initial exploration of GEM Lite facilitated mapping out the complete
functionality of the program. This was simply determining the logical flow of the
program and the navigational steps users have to take to complete various tasks within
the application. This process did not require a physical representation of the knowledge,
such as a flowchart, because GEM Lite was available as a constant reference.
4.2 Scope
The first task after familiarizing with GEM Lite was to determine the scope of the
project. The goal was to deliver a product that had an acceptable level of functionality
while maintaining a quality design. During exploration, it was discovered that there were
many parts of GEM Lite that were inaccessible because the development computers were
not connected to a FASTLANE or TACLANE device. Without having either a
FASTLANE or TACLANE present, many of the options available in GEM Lite are
grayed-out. Therefore, a GD lab tour was scheduled so that the application could be
viewed while connected to a FASTLANE or TACLANE device. The portions of the
program inaccessible on the development computers contained screens that did not fit
into the original categories. Many of the screens were unique. However, it was decided
that a higher quality deliverable would be produced in the time allotted by simply porting
over the components of the interface accessible on the development computers. The
project team estimated that the GEM Lite Pocket represents 50% of the original GEM
Lite GUI.

21
4.3 User Considerations
One of the major challenges of redesigning the GUI of an established computer
program for the Pocket PC is user consideration. It was necessary to address many
aspects of the user experience to build an effective interface. The aspects of the user
experience that were addressed in the GUI design are: Familiarity vs. best practices,
expectations of the end-user, and image representations.
4.3.1 Familiarity vs. Best Practices
A user’s familiarity with the interface of one piece of software aids in learning
how to use different software with a similar interface more quickly. This is because when
is familiar with an interface, a user can complete tasks with less thinking involved. This
leads to the ideas of intuitiveness and ease of use (Van de Walle, et al. 2003). However, a
GUI should also be designed with best practices in mind. For the purposes of this project,
best practices is defined as the practices that are widely accepted as appropriate GUI
design decisions, such as placing the ‘OK’ button to the left of the ‘Cancel’ button and
allowing the user a second chance to decide when performing a critical action. In this
design, the main challenges in balancing familiarity and best practices were in
transforming the PC GUI such that it could reasonably be displayed on the Pocket PC
without introducing much of a learning curve for the user. One example of this is in the
way tabular data is displayed in GEM Lite versus the techniques used to display tabular
data in GEM Lite Pocket. In the original GEM Lite application, tables can fit comfortably
in the space allotted and the user can quickly scroll to any necessary data that is not
already displayed on the screen. This same design works on a Pocket PC. However, the
Pocket PC can only display a very limited amount of data on the screen at any given time.
22
This requires the user to do more scrolling to get to the necessary data. Scrolling on a
Pocket PC is cumbersome because the grid control only scrolls at a certain speed and
dragging the stylus over the screen for quick scrolling is not always accurate. To improve
the original design to better meet the needs of a Pocket PC user, our team redesigned the
tables in GEM Lite Pocket. The tables in GEM Lite Pocket are designed so that they are
of fixed height and width and scrollable. Only a few columns can be displayed at any
given time. However, if the user taps on a table row (or any cell within that row) with the
stylus, a new form is generated that displays the entire row in a list format. At this point
the user’s only option is to close the form. This enables the user to quickly browse table
rows and display each record without scrolling. However, if the user is uncomfortable
with this change, the original mechanisms for viewing tabular data are still available.
Another improvement made in creating GEM Lite Pocket GUI involves the
buttons. The original GEM Lite application is somewhat inconsistent at times in the
conventions used for button naming. For instance, any dialog boxes that ask the user a
question should give the user ‘Yes’ and ‘No’ as choices. This rule is followed at some
places in the GEM Lite GUI, but in others, such as the Bad Guy List, the user is asked a
question but is given ‘OK’ and ‘Cancel’ as choices. One might not consider this a
significant problem, but many such discrepancies within a GUI create a lack of
uniformity. This in turn can increase the amount of time necessary for a user to become
familiar with the GUI. Furthermore, users feel more at ease using a GUI with dialog
boxes that utilize more natural speech. It makes more sense to answer ‘Yes’ or ‘No’ to a
question such as, “Are you sure you want to delete this row?” than it does to answer with
‘OK’ or ‘Cancel’.
23
GEM Lite Pocket contains more graphical elements than the original GEM Lite
application. Careful attention was given to designing buttons that remain informative and
familiar to the user, yet more aesthetically pleasing. The GEM Lite Pocket buttons are
round and white with black text and border. White was chosen because it is a neutral
color. The black text and border are a perfect contrast to the white coloring and allow all
users to easily see the buttons. The buttons were designed such that when pressed, they
look as though they are actually being pressed into the panel. This acts as feedback for
the user action. However, to maintain familiarity, the buttons have conventional labels,
such as ‘Yes’, ‘No’, ‘OK’, and ‘Cancel’. They are also located in locations consistent
with other well-known applications. For instance, ‘OK’ and ‘Yes’ are always to the left
of ‘Cancel’ and ‘No’. Button clusters are at the bottom of the containing panel and are
either centered or on the right side, depending on where the balance is needed.
4.3.2 Expectations of the End-user
Designing GEM Lite Pocket to be easy to use meant that it was very important to
determine the target user and the requirements that had to be met. Brief discussions with
General Dynamics employees indicated that the users of GEM Lite Pocket would be
adults with a moderately high level of technical expertise but not necessarily familiarity
with the original GEM Lite application. Since the end-user is not assumed to have used
GEM Lite before using GEM Lite Pocket, there was room for GUI creativity. However,
since the user may be familiar with GEM Lite, the design choices took into account
familiarity whenever there was no clear answer in design decisions. Since the user is
assumed to be technically adept, it was not necessary to over-saturate the program with
an overly-intrusive help system or wizards.

24
4.3.3 Image Considerations
Many of the buttons in GEM Lite Pocket contain icons that are meant to be
meaningful to the user. Whenever space allowed, buttons were designed so that there was
text accompanying the icon to eliminate confusion regarding each button’s purpose.
There were cases in which there was not enough room for text. In these situations, it was
critical that the icons be designed so that most users could easily determine their
meaning. For instance, buttons that perform named functions like New, Edit, Open, Save,
Copy, Paste, and Delete have icons that look similar to icons in popular programs such as
Microsoft Word and Excel. This promotes familiarity because most users have seen such
icons and can at least make an educated guess as to the role of the buttons in the context
of GEM Lite Pocket. Buttons that have text representation were given icons that may aid
the user in quickly recognizing the button’s function without having to read the text. For
instance, the ‘Discover’ button in the main shell of the application has a light bulb as an
icon. The light bulb is meant to be associated with discovery. However, it is not
completely necessary for the user to make that connection right away since there is a text
description accompanying the icon. Most of the icons that already existed in GEM Lite
were ported over to GEM Lite Pocket with only slight modifications. The modifications
that were made involved color correction to match theme and to facilitate viewing for the
colorblind as well as small aesthetic changes.
One thing that the project team discovered during a user test is that certain images
can be offensive to the user. In one specific situation, there is an eyeball that is used to
indicate that the button will let the user view a table record. It was thought that the user
would associate an eye with ‘view’ and would understand what the button did. However,

25
the icon was described as being “somewhat creepy”. This was not something that had
been taken into consideration. Unfortunately, the icon was a part of the final iteration of
GEM Lite Pocket. One suggestion for future work would be to redesign that particular
icon to contain another image that one could associate with ‘view’. One consideration
that was made initially was a picture of a magnifying glass. However, it was decided that
the magnifying glass may also be associated with ‘search’ and so should not be used in
that context.
4.4 Accessibility Considerations
One of the most important considerations when designing a GUI is accessibility.
Accessible software, that is, software in which the user can easily perform tasks with
reasonable accommodation, is much more effective than software that is difficult to use.
There are many facets of accessibility to consider, such as visibility, audibility and input
types. Since the project team was not given alternate input devices to work with, input
types other than those which are available for the Pocket PC by default were not
considered. Audio was also not a consideration due to the time allotted and the fact that
GEM Lite does not rely on audio to alert the user to state changes. However, it was
important to address the needs of users who are visually impaired. This is especially true
since GEM Lite relies on visual cues to alert the user as to what is currently happening in
the system. The project team focused on a combination of colors and text size to
overcome the screen limitations of the Pocket PC.

26
4.4.1 Colors
Color choice was the primary accessibility concern for a number of reasons.
Firstly, poor color choices can make the program completely unusable to colorblind
individuals. Secondly, certain color choices may illicit unwanted emotion in certain
cultures. Thirdly, colors contribute to the aesthetics of the user interface, which is an
often overlooked aspect of the user experience.
As stated above, poor color choice in a software application can act as a barrier to
those with visual impairment, particularly those who are colorblind. There are three main
types of colorblindness: Protanopia, Deuteranopia, and Tritanopia. Protanopia and
Deuteranopia are commonly referred to as Red-Green Colorblindness. People with either
of these conditions have trouble discerning red from green. Tritanopia is much less
common than either Protanopia or Deuteranopia. People with Tritanopia have difficulty
distinguishing the color blue. Our team focused on accommodating users with these types
of colorblindness.
Unfortunately, the project team was unable to completely stay away from the
problem colors without violating the other two principles of color choice. Therefore,
certain visual elements were put into place in order to mitigate any color issues. One
aspect of GEM Lite Pocket that alleviates the issue of color is that it does not contain any
graphical elements that rely on the user’s ability to discern color in order to perform a
given task. Although there are parts of the interface that use colors to emphasize certain
items of interest, there are also text cues that would prevent a colorblind user from being
at a disadvantage. Another action that was taken to minimize the problem was the actual
color choices. The project team chose colors that are high in contrast so that portions of

27
the interface would not become invisible to certain colorblind users. Reds, greens, and
blues were chosen such that the colors were not pure, but rather mixtures sufficient to still
be considered red, green, or blue respectively while still maintaining visibility to those
with visual impairment. One example of this is the status display of the application’s
main shell. When the system is operational, there is text informing the user of this fact.
The text is a maroon color and has a green highlight. A user that is not colorblind can
easily discern between the two colors because red and green are high in contrast to each
other. A colorblind user may normally have trouble distinguishing the green and the red.
However, the actual variations that were chosen for the green and red are discernible by a
colorblind user. This was tested using ImageJ with the Vischeck plugin. Screen shots of
the application were taken and processed through ImageJ to simulate the image as viewed
by a user with each type of colorblindness. All of the GEM Lite Pocket screens were
tested in this manner to ensure that all color choices were appropriate and readable by all
potential users.
GEM Lite can potentially be exported out of the United States. Therefore, it was
important to consider cultural implications of color choice. A majority of the colors used
are generally culture-neutral. For example, white and gray are generally neutral colors
(although in the east, white can have a negative connotation) and therefore were used as
the theme for the background of GEM Lite Pocket. Blue is generally a universal calming
color and in many cases also elicits positive emotion. This was chosen as the color for
our information dialogs. However, given the amount of time allotted for the project and
the fact that GEM Lite is mainly used in the United States, cultural color meanings were
not a major concern in the development of GEM Lite Pocket.

28
Color is an integral part of an application’s aesthetic value. It can enhance or
detract from the user’s experience depending on how judiciously it is used. User
interfaces that have a high aesthetic value tend to be more usable and lead to a more
positive user experience (Greenzweig 2006). Colors were used in conjunction with
graphic design to increase the aesthetic value of GEM Lite Pocket. One of the ways that
this was accomplished was in the button design. The buttons in the main shell were
redesigned to include informative icons as well as text. The actual buttons were colored
with a variation of white, which as stated above is neutral, and have a black outline that
makes the button appear to be 3D. This is to alert the user to the fact that the button is
indeed a button and not simply text on the screen. The icons in the buttons have vibrant,
yet appropriate colors to indicate what the image actually is. For example, the discover
button has an icon of a light bulb. The light bulb has coloring that is similar to a real light
bulb. However, the colors of the light bulb are a bit richer to draw the user’s attention to
the icon. Each button’s rollover image is considerably darker than the original image and
has the black shadow moved to the opposite end to create the illusion of a button being
pressed down. This particular design diverges from the default gray, picture-less button
that is supplied with Microsoft’s Windows controls. The buttons designed for GEM Lite
Pocket provide visual stimulus to the user while maintaining a judicious use of color to
avoid user distraction.
4.4.2 Text Considerations
The most obvious challenge to porting an application to a Pocket PC is finding a
way to build the user interface such that its integrity is maintained to an acceptable
degree and the information is still readable to the user. The project team accomplished

29
this in part by choosing effective text formatting. The font that was chosen for all text is
Arial. This is due to the clarity of the typeface. The characters are easily distinguishable
and adding extra formatting to the text does not adversely affect its readability. Text size
was modified when permitted to differentiate between different types of text, such as
column names, titles, and plain text. Titles in GEM Lite Pocket are considerably larger
than plain text and are bold to signify that the text is indeed a title. Column headers are in
bold, but could not be resized due to limitations of the datagrid control. The system status
text was made smaller to fit the information on the screen in such a way that it remained
persistent and did not claim a significant amount of screen real estate. The unfortunate
trade-off is that this text is more difficult to read for those who have difficulty focusing
on small objects. One suggestion for future work that may alleviate this issue would be to
build in an option to magnify portions of the screen. This option unfortunately is not built
into the Pocket PC 2003 operating system. Coloring was used to help users with such a
visual impairment to better utilize the program without having to actually read the status
text. Users who have difficulty seeing small objects would not have to necessarily read
the words ‘operational’ or ‘offline’, but could rather understand the status of the system
by its green and red text highlights, respectively. This would not be a very good solution
for an individual with colorblindness and difficulty focusing on small objects, but this
problem could be solved by the screen magnifier suggested above.
4.5 Device Limitations
The Pocket PC in many ways is a very limited computer. Due to its decreased
size, there are limitations in screen real estate and medium by which the user can input
data. As discussed in the Tools section of this document, the Pocket PC also has far less

30
memory and storage space than any current desktop PC. Microsoft .NETCF also contains
limited versions of interface controls. These limitations presented challenges in building
the user interface for GEM Lite Pocket. This section will further discuss the effects of
these limitations on the design of GEM Lite Pocket.
4.5.1 Screen Size
As stated previously in this document, the Dell Axim X5 used in this project for
the development of GEM Lite Pocket has a 3.5-inch screen that displays a resolution of
240x320 pixels. This is considerably smaller than the average 17” desktop monitor
capable of displaying resolutions in excess of 1024x768 pixels. It was necessary to find
ways to compact the original screens of GEM Lite to fit them within the given bounds.
One approach is to split up displayed information into separate sections. For instance, in
the original version of GEM Lite, the main screen displays two tables, one for devices
and one for events. There is an optional “Requests in Progress” table that can be
displayed as a floating window as well. This design would not have worked well on a
small screen because the tables would have been far too small to be considered readable
even to the average user. There would have also been far too much information clutter.
Thus, the decision was made to fabricate an entirely new main screen to address these
issues. The new screen solves the problem of displaying all of the original data by
breaking it into logical subsections and displaying them separately. Each separate piece
of information can have access to the entire screen when it is called upon. This design
provided the ability to display all of the original information in a coherent manner. The
actual layout of the new design is described in much further detail later in this document
(see Chapter 5). Other methods were employed to fit the GEM Lite interface within the

31
bounds of a Pocket PC screen and are discussed in the section of this document titled,
Building GEM Lite Pocket (see Chapter 5).
4.5.2 Input Medium
Another limitation of the Pocket PC is the way in which the user inputs data.
Although various other input devices for the Pocket PC can be purchased separately, it
cannot be assumed that the average GEM Lite Pocket user would have any of these input
devices. Therefore, GEM Lite Pocket was designed with the assumption that the only
means of input would be the default methods shipped with the Pocket PC, namely the
stylus/touch screen and the physical navigation buttons. One of the limitations having
these methods of input available as opposed to the traditional keyboard/mouse
combination is that tool tips are generally unavailable. Tool tips are helpful in a desktop
PC application because the user can simply move the mouse over a particular control,
causing a short description of the control function to appear. Another limitation is that
there is no right-click functionality since all ‘clicking’ is done by tapping the stylus on
the screen. Windows CE does have a method to bring up a context menu. It requires the
user to tap and hold the stylus on the screen for a few seconds. This method can be
cumbersome, especially for those users unaware of its availability. Initially, the project
team debated whether or not to use the context menu functionality to display tool tips.
Ultimately, the idea was not accepted because it created an ambiguity in the functioning
of the interface. In particular, a user using this method to view a tool tip of a button
would not know what to expect upon releasing the stylus from the screen. It would have
to be decided whether or not the button action would be performed upon release.
Furthermore, that would have been a large deviation from the functionality of other

32
programs, thereby making it unfair to assume that the user would intuitively know how to
access the tool tips. It was decided that this functionality would have been more
confusing to the user and was therefore rejected.
A necessary design decision that was made to accommodate the methods of input
for the Pocket PC concerned the on-screen keyboard. The interface elements needed to be
resizable to maintain usability when the on-screen keyboard is invoked. The project
design ultimately accommodates the on-screen keyboard in two ways. Panels that require
keyboard input resize themselves and automatically invoke the on-screen keyboard as a
convenience to the user. Panels that can take input from the keyboard or by means of a
copy/paste operation are simply located above the on-screen keyboard so that they never
interfere with the current task. The keyboard is not invoked in this situation because the
user may not necessarily want it.
The functionality of the physical buttons of the Pocket PC was not addressed
because it is not known if all Pocket PCs have the same button configuration. The Dell
Axim X5 has four small buttons on the front and one large circular directional pad that
also doubles as another button. It also has a thumb-wheel on the side which looks as
though it is made to facilitate scrolling. The buttons have limited functionality in GEM
Lite Pocket. More specifically, the buttons only do what the operating system maps them
to by default. In the case that all Pocket PCs in fact do have a very similar button
configuration, then it would be worthwhile to assign functionality to them in the future as
it may aid advanced users in completing repetitive tasks.

33
4.5.3 Technical Limitations
As stated previously, the Dell Axim X5 has a 400MHz processor, 64MB of
SDRAM, and 48MB of storage space. Initially it was not known how much of GEM Lite
would fit on the Pocket PC after the redesign. The final product is 2.14MB in size,
including all of the graphics and text files used by the executable. Although the current
version of GEM Lite Pocket is only a fraction of the entire GEM Lite product, the project
team created custom controls and designs that were reused in various places in the GUI to
minimize the amount of code necessary to complete the project.
The speed of the processor was an issue when loading data in GEM Lite Pocket.
The data files used were simply text files. When accessing a text file, the application
experienced a considerable performance hit, which would normally be irritating to a user.
Progress indicators were implemented in GEM Lite Pocket to alert the user to the fact
that the program is processing a request and is not locked up. Without the progress
indicators, the program appeared as though it had locked up when trying to load data.
Early user tests showed that without the progress indicators, users often became impatient
with waiting and tried to complete other tasks within the program, which usually led to
unexpected results and user frustration. Addition of the progress indicators reduced the
occurrence of these situations in the formal user test.
4.5.4 Microsoft .NET Compact Framework Limitations
The Microsoft .NET Compact Framework is basically a stripped-down version of
the normal .NET Framework. In stripping-down the framework, Microsoft successfully
created an API that does not require as much storage space and can easily fit on a Pocket
PC. The unfortunate trade-off is that this process leaves the .NETCF with controls that

34
offer only the most basic functionality and make certain programming tasks impossible
without the fabrication of custom controls. The project team overcame this limitation by
downloading publicly available custom controls from third parties and by creating
custom controls. These custom controls provided a more functional GUI that included the
ability to create hyperlinked text, use images with buttons, and create panel borders. The
custom controls are discussed further in this document in section 5.3, Custom .NETCF
Controls.

35
5. Building GEM Lite Pocket
The implementation of GEM Lite Pocket was designed such that there is the
application environment, referred to as the “main shell” of the program. The other
features of the application are contained in either forms or panels, depending on the
purpose. The implementation details of the user interface are discussed in this section.
For the convenience of future users of GEM Lite Pocket, an operator’s manual was
developed, which is included as Appendix C of this document.
5.1 GEM Lite Pocket Main Shell
The project team decided that the best way to visualize GEM Lite Pocket was to
start with a main shell. The main shell has several components: a menu bar, a toolbar, a
status bar, and a set of navigation buttons. All of the different parts of GEM Lite Pocket
are linked to this main shell. There are four pieces of the shell that are persistent
components. Those four pieces are the scrollbar, the menu bar, the toolbar, and the status
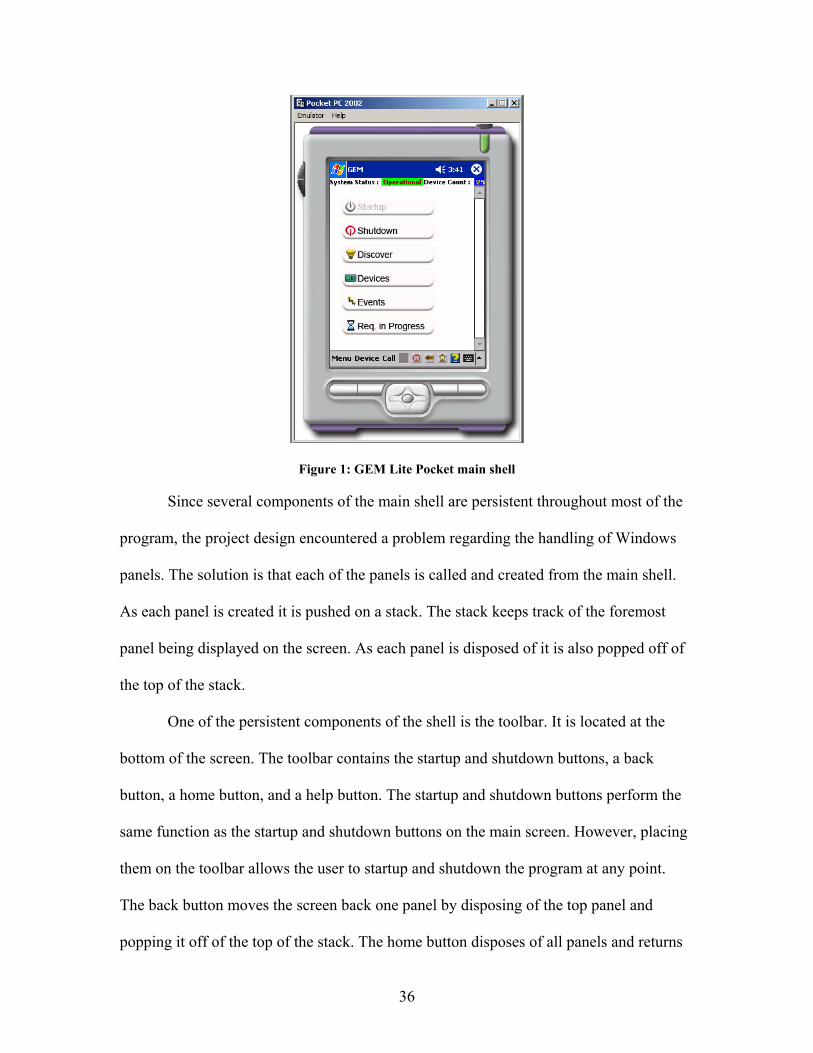
bar. The main shell is illustrated in Figure 1.
36
Figure 1: GEM Lite Pocket main shell
Since several components of the main shell are persistent throughout most of the
program, the project design encountered a problem regarding the handling of Windows
panels. The solution is that each of the panels is called and created from the main shell.
As each panel is created it is pushed on a stack. The stack keeps track of the foremost
panel being displayed on the screen. As each panel is disposed of it is also popped off of
the top of the stack.
One of the persistent components of the shell is the toolbar. It is located at the
bottom of the screen. The toolbar contains the startup and shutdown buttons, a back
button, a home button, and a help button. The startup and shutdown buttons perform the
same function as the startup and shutdown buttons on the main screen. However, placing
them on the toolbar allows the user to startup and shutdown the program at any point.
The back button moves the screen back one panel by disposing of the top panel and
popping it off of the top of the stack. The home button disposes of all panels and returns

37
the user to the main screen. It pops all panels off of the stack except the bottom element,
which is the panel that displays the main screen. Finally there is the help button, which is
context sensitive. There is a second stack of strings that contains strings that are names of
the help files corresponding to the panels on the panel stack. As the panels are popped off
of the panel stack, strings are popped off of the help stack.
There were several considerations that had to be made while designing the main
shell. One consideration was in regard to the menu bar design. There were more root
menus in the original GEM Lite application than could fit on the menu bar of GEM Lite
Pocket. It was necessary to consolidate the menu items to make them fit without creating
a confusing menu structure. Another challenge was scaling the GEM Lite user interface
to fit on a Pocket PC. The main screen of the GEM Lite interface displays two tables, one
for the devices connected and the other for the event log. On a Pocket PC, this design
would be too cluttered for the user to effectively glean any information from it. The main
screen was redesigned to consist of buttons that allow the user to display necessary
information or perform essential tasks without confusion. The buttons on the main screen
of GEM Lite Pocket include functionality for startup, shutdown, discover, devices,
events, and requests in progress. Startup and shutdown both create a confirmation panel.
Devices, events, and requests in progress create GEM_GridPanel panels. Discover
creates its own panel that has a text box and two buttons. When the discover panel is
created, the input panel of the Pocket PC is displayed so that the user can input the
address of the device to be discovered by the application. The discover panel has white
text on a green background with a black border for readability.

38
At the top of the GEM Lite application is a status bar, from which the user can see
both the system status and the number of devices that are being managed by GEM Lite at
any time. GEM Lite Pocket was designed to keep the persistent status to maintain
consistency and to display critical information to the user. When the system is not active,
the system status display reads “Offline” in white text on a red background. The device
count is zero in yellow text with a blue background. Once the user performs the startup
operation, the system status becomes “Operational” in maroon text with a green
background and the number of devices is set to 25. Twenty-five was chosen as the
operational device count because it is the maximum number of devices that the original
GEM Lite application can manage and at this stage GEM Lite Pocket could not be
connected to any encryptors.
The scroll bar of the main shell is located on the right side of the screen and
extends from the status bar to the bottom toolbar. It is always visible and is inactive
unless a panel is displayed that is taller than the Pocket PC can display. When panels are
resized or created, the scrollbar becomes active and resizes to fit the top panel.
Another function of the main shell is the creation of confirmation panels.
Confirmation panels are created when the user attempts to perform a critical action. For
example, when the user attempts to startup or shutdown the application, the main shell
creates a confirmation panel to verify the user’s intentions. Confirmation panels are also
created when the user attempts to modify critical data. Confirmation panels have white
text on a blue background.
As stated previously, all of the color choices were tested using ImageJ with
Vischeck to ensure that accessibility needs were met. The project team tested the
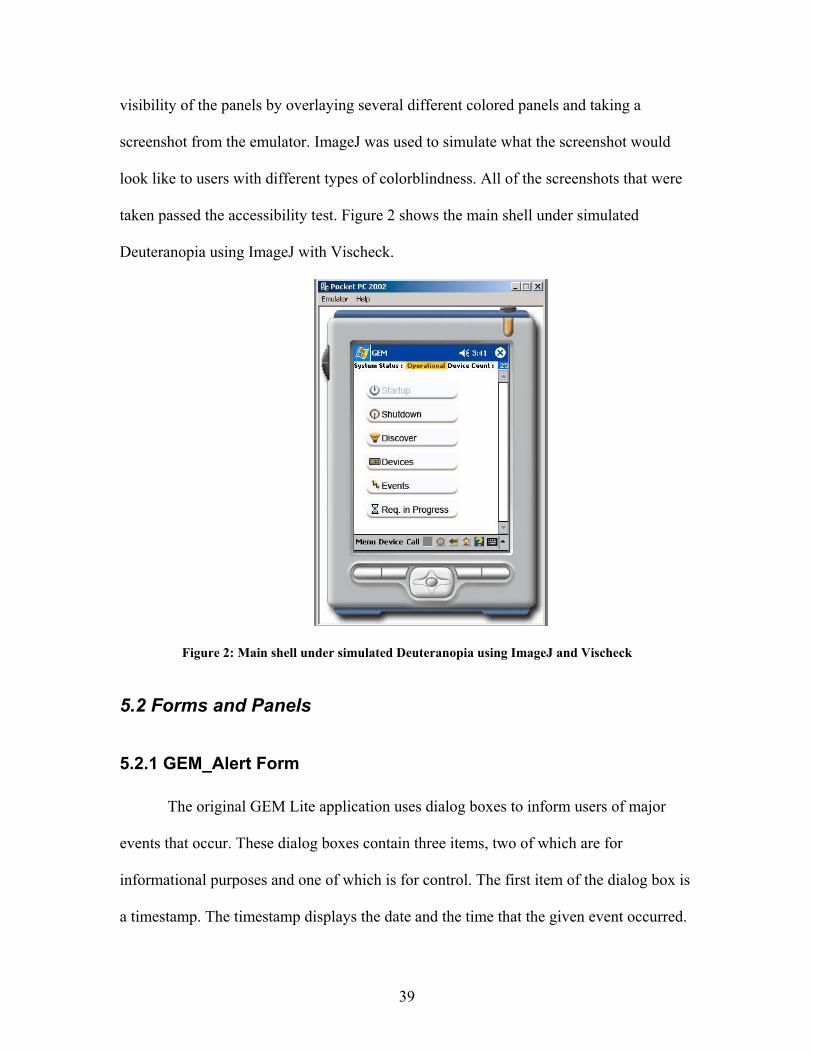
39
visibility of the panels by overlaying several different colored panels and taking a
screenshot from the emulator. ImageJ was used to simulate what the screenshot would
look like to users with different types of colorblindness. All of the screenshots that were
taken passed the accessibility test. Figure 2 shows the main shell under simulated
Deuteranopia using ImageJ with Vischeck.
Figure 2: Main shell under simulated Deuteranopia using ImageJ and Vischeck
5.2 Forms and Panels
5.2.1 GEM_Alert Form
The original GEM Lite application uses dialog boxes to inform users of major
events that occur. These dialog boxes contain three items, two of which are for
informational purposes and one of which is for control. The first item of the dialog box is
a timestamp. The timestamp displays the date and the time that the given event occurred.

40
The second item displayed by the dialog box is the event type. The event type contains a
message informing the user of the action that just occurred. The event type can also
contain error messages. The third item of the dialog box is the “OK” button, which closes
the dialog box when tapped.
The GEM_Alert form designed for GEM Lite Pocket embodies all of the elements
of the original dialog box used by GEM Lite. However, there were a few minor
modifications made for GEM Lite Pocket to more effectively display the information.
The alerts are meant to be addressed by the user before any other action is taken. The
most effective method of accomplishing this on a Pocket PC is to display the information
in a Windows form rather than a panel. The advantage of this is that Windows forms by
default occupy the entire screen, blocking out the GUI underneath. The user is then
forced to acknowledge the alert before continuing to execute tasks. The “OK” button is in
plain sight, located directly under the event type message. One other small modification
that was made when creating the GEM_Alert form was the timestamp format. GEM Lite
displays the timestamp in a very difficult to read format, which looks like it was
completely generated by a computer as digits with no attention to format, forcing the user
to spend unnecessary time deciphering it. The GEM_Alert form displays the date and the
time on separate lines, with the date in MM/DD/YYYY format and the time in
HH:MM:SS format. This is much more natural looking and allows the user to view the
date and time of an event occurrence with a quick glance. Figure 3 shows an example of
the GEM Alert form.

41
Figure 3: Example of GEM_Alert form
5.2.2 GEM_GridPanel Panel
The GEM_GridPanel is a panel that was created to aid in displaying tabular data
from GEM Lite in GEM Lite Pocket. An example of a GEM_GridPanel is shown in
Figure 4. It contains a title, a GEM_DataGrid control under the title, and a control button
below the datagrid. The GEM_GridPanel displays information from a comma-separated
value text file (CSV). The CSV file format contains the title as the first line, the column
names on the second line separated by commas, and the row data on each subsequent line
also separated by commas. The GEM_GridPanel reads in the data from a given text file
and populates the title and the GEM_DataGrid with the information. The GEM_DataGrid
is a control that extends the System.Windows.Forms.DataGrid control included in the
.NETCF. It properly formats column headers in bold type and populates column names

42
currently from the data contained in the CSV. It resizes the columns to accommodate the
column names since the default column width is too small in many cases.
Figure 4: The Devices portion of GEM Lite Pocket uses a GEM_GridPanel
One innovation in the way data is displayed in GEM Lite Pocket belongs to the
GEM_DataGrid. The control was extended such that an entire row is selected when the
user taps on any cell within that row. Once the user does this, a new Windows form is
displayed, called a GEM_Record (shown in Figure 5). The GEM_Record contains all of
the data from the selected row displayed in a line by line format. The column names are
listed on the left and the row values are listed on the right. The lines in GEM_Record
have an alternating background using a very light gray and a very light blue. The black
text is displayed over the background. Our colorblind tests using ImageJ with Vischeck
demonstrated that the color choices were safe for users with Protanopia, Deuteranopia, or
Tritanopia. The alternating text background was added to enhance readability. Since text
is more difficult to read on the small screen of a Pocket PC, one concern was that users

43
may mix up column names with the wrong values. The alternating text makes it much
easier for the user to associate each value with its proper column name. A Windows form
was chosen as the display method for the GEM_Record because it occupies the entire
screen. Designing this as a panel would have left the potential to have multiple records
open at the same time, which would lead to screen clutter and would confuse the user as
to which record was actually being viewed. The design is such that if a user study were to
demonstrate that users wanted to display multiple records concurrently, the GEM_Record
could easily be changed to be a Windows panel.
Figure 5: GEM_Record is another way for a user to view tabular data
Both the GEM_GridPanel and the GEM_Record have a control button labeled
“OK”. The “OK” button on the GEM_Record closes it and returns control to the main
shell. The “OK” button on the GEM_GridPanel closes the panel and pops it off of the
panel stack of the main shell. Both buttons are in plain sight to the user and are
unobstructed by any other GUI elements in their respective containers.

44
5.2.3 GEM_AuditDataPanel Panel
The GEM_AuditDataPanel panel serves two purposes in the context of GEM Lite
Pocket, the first of which is to supply the audit data archive functionality of GEM Lite
and the second of which is to supply the audit data query of GEM Lite. Both options
create a panel that is pushed onto the panel stack of the main shell and then display it as
the foremost panel on the screen. The audit data archive and audit data query portions of
the GEM Lite GUI are fairly simple and therefore they did not need much in the way of
innovation when redesigning for GEM Lite Pocket. The GEM Lite Pocket version of the
audit data archive displays a title at the top of the panel, a GEM_DataGrid directly
underneath the title, and two control buttons below the datagrid. The control buttons are
labeled “OK” and “Close”. For the purposes of this project, the “OK” button is disabled,
since it is also disabled in the version of GEM Lite installed on the development
computers. Functionality should be added to this button in the future. The “Close” button
closes the panel and pops it off of the stack in the main shell. Figure 6 shows the
GEM_AuditDataPanel.

45
Figure 6: Audit Data Query is a GEM_AuditDataPanel
5.2.4 GEM_BarGridPanel Panel
The GEM_BarGridPanel panel is used to display the static routing tables and the
GEM network manager list in GEM Lite Pocket. An example is shown in Figure 7. It
looks very similar to the GEM_GridPanel, which promotes familiarity within the system.
However, the GEM_BarGridPanel differs from the GEM_GridPanel in a number of
important ways.
One major difference between the GEM_BarGridPanel and the GEM_GridPanel
is that the datagrid is not a GEM_DataGrid but rather the
System.Windows.Forms.DataGrid control supplied by the .NETCF. This basic datagrid
control was chosen because the static routing tables and the network manager list require
user interaction with the data displayed in the datagrid. The datagrid was slightly
modified to provide proper column widths and header font. This datagrid does not allow

46
the user to select an entire row, which was an unfortunate tradeoff that needed to be made
to facilitate data manipulation.
The other major difference between the GEM_BarGridPanel and the
GEM_GridPanel is the presence of a row of icons across the top of the datagrid. These
icons allow the user to interact with the datagrid and modify the data that it contains.
There are five buttons with icons, each performing a unique function. The first button
allows the user to view the data in the row of the currently selected cell. This data is
displayed in a GEM_Record form. The icon is an image of an eye, which is supposed to
hint to the user that the button is used for viewing. The other option considered for the
view icon was a magnifying glass, but the eye was chosen because the magnifying glass
looked too much like an icon for search and could confuse the user.
The second button in the icon row creates a new blank row in the datagrid. The
user can enter data into the cells of the row after it is created. A possible variation that
could have been made would be to display another form asking the user to enter all of the
row data before the application actually created the row. This idea was rejected to
maintain a minimalistic design. The icon for this button is very similar to the icon used in
many popular programs, like Microsoft Word. It is a blank sheet of paper with the right
corner folded over. This image was chosen because most users would be familiar with
this representation of a “New” function.
The third button in the button row is used to edit the contents of a cell. The icon
looks like a sheet of paper with a pencil writing on it. When the user taps this button, a
sub-panel is displayed. This panel is called the edit panel. The edit panel contains a title,
which is the name of the column to which the selected cell belongs. Under the title is a

47
text box used for data entry by the user. The user can use any method of text entry
available for the Pocket PC. Directly under the textbox is a button labeled “Paste”. This
button is only active if there is data in memory available for pasting. Below the “Paste”
button are the “OK” and “Cancel” buttons. Tapping the “OK” button replaces the data in
the selected cell of the datagrid with the data from the textbox and closes the sub-panel.
Tapping the “Cancel” button simply closes the sub-panel without making any changes.
The fourth button in the button row is used to copy data into memory for pasting.
When the user taps this button, the data of the selected cell is copied into a buffer that can
be used for pasting when editing cell data. The image of this icon looks identical to the
copy icon used in other popular applications. It depicts two pieces of paper, both with
writing on them, stacked one on top of the other.
The last button in the button row is used to delete rows in the datagrid. When
tapped, a confirmation panel is created asking the user to confirm the decision to delete
the selected row. There are two control buttons, labeled “Yes” and “No”, respectively. If
the user taps “Yes”, the confirmation panel closes and the selected row is then deleted. If
the user taps “No”, the confirmation panel closes without making any changes to the
datagrid. The icon is an image of a trash can. This was modified from the original GEM
Lite icon, which is a large, red X. The reason why this was changed is because the red X
can be distracting to the user due to its coloring, yet choosing a different color would
have lost its effect.
Below the datagrid is a button labeled “Close”. When this button is tapped, GEM
Lite Pocket checks to see if any part of the datagrid was modified. If the datagrid has
been modified, a confirmation panel is created asking the user whether or not he or she

48
wishes to save the changes made. If the user taps “Yes”, then the changes are saved and
the GEM_BarGridPanel is closed and popped off of the panel stack in the main shell. If
the user taps “No”, then the GEM_BarGridPanel is simply closed and popped off of the
main shell panel stack. The changes are not saved. If no changes were made to the
datagrid, then the GEM_BarGridPanel will simply close and be popped off of the main
shell panel stack.
Figure 7: The Network Manager List is a GEM_BarGridPanel
5.2.5 GEM_BGLPanel Panel
The GEM_BGLPanel panel is used to represent the Bad Guy List (BGL) from
GEM Lite in GEM Lite Pocket. It is shown in Figure 8. This particular panel is the only
panel of its kind in the entire GEM Lite Pocket application. It looks similar to the
GEM_BarGridPanel with some key differences to extend its functionality. It has a title at
the top of the panel. Underneath the title is a drop-down box containing different versions

49
of the BGL. The default option is “Create New List”. When users save new versions of
the BGL, they appear in this drop-down box.
The BGL in GEM Lite has a tabbed display that allows the user to alternate
between viewing the BGL and the calculated CRC. It was decided that a tabbed layout
would be too cumbersome on the Pocket PC. Instead, the main display in the GEM Lite
Pocket version is the BGL, but there is a text hyperlink titled “View CRC” that generates
a Windows form displaying the BGL version, the GEM calculated CRC, and the “INE”
calculated CRC. Closing this form returns the user to the BGL.
Located directly underneath the drop-down box is a hyperlink titled “Delete
current list”. When tapped, a confirmation panel is created, asking the user to confirm the
intent to delete the current version of the BGL. If the user taps the “Yes” button, then the
list contents are purged and it is removed from the drop-down box. If the user taps the
“No” button, the dialog closes and returns the user to the BGL without making any
changes. This promotes the HCI principle of error prevention and recovery by giving the
user a second chance to decide whether or not to save changes to the data.
The BGL in GEM Lite Pocket has a button row similar to that of the
GEM_BarGridPanel, located above a datagrid. The button row of the BGL has six
buttons. The first button creates a sub-panel that contains a title, a textbox, and three
control buttons. The textbox is used for data entry by the user to enter a KMID value. The
control buttons are “Paste”, “OK”, and “Cancel”. Their layout and functionality is exactly
like that of the sub-panel of the GEM_BarGridPanel. The icon for the button is a blank
sheet of paper with the right corner folded over, like its GEM_BarGridPanel analog.

50
The second button in the button row is the edit button. It works exactly like its
GEM_BarGridPanel analog in that it allows the user to edit the value of the currently
selected cell of the datagrid. The sub-panel and the icon also look and function the same
as they do in the GEM_BarGridPanel.
The third button in the button row is for loading KMIDs from an external file.
This option is not enabled in the version of GEM Lite used by the project team, so its
functionality was not added to GEM Lite Pocket. However, the button was created and
disabled, which is indicated to the user by its grayed-out coloring.
The fourth button in the button row is the save button. Its icon is the image of a
blue floppy disk. This was chosen because the floppy disk icon is used in a majority of
popular applications to indicate a save function. The choice to use images that are similar
to those in other popular programs to perform the same functions follows the recognition
over recall principle, which helps the user to learn the program more quickly and carry-
out tasks with less cognitive thought required. When the user taps the save button, a
dialog box is displayed. This dialog box contains a title, a textbox for user input, and two
control buttons, labeled “OK” and “Cancel”. This dialog box asks the user to input a new
name for the BGL that is being saved. The original GEM Lite does not allow for the user
to overwrite a BGL that has already been created. GEM Lite Pocket was designed the
same way. All iterations of a BGL must be saved as a new version. Tapping “OK” will
save the BGL version with the name in the textbox and will close the dialog box. Tapping
“Cancel” will close the dialog box and cancel the save operation.
The fifth button in the button row is the copy button. It works exactly like its
analog from the GEM_BarGridPanel in that it copies the data from the currently selected

51
cell into memory for pasting. Its icon is also the same as that of the copy button from the
GEM_BarGridPanel to maintain consistency.
The final button in the button row is the delete button. The delete operation
pertains to the currently selected row of the datagrid. When the delete button is tapped, a
confirmation panel is created confirming the user’s intention to delete the current row.
This feature follows the error prevention and recovery principle by giving the user a
chance to change his or her mind before permanently deleting a record. If the user taps
the “Yes” button, the current row of the datagrid is removed and the confirmation panel is
closed. If the user taps “No”, the confirmation panel closes but no changes are made to
the datagrid.
The datagrid is located directly below the button row. The datagrid is a
System.Windows.Forms.DataGrid control. This was chosen because the extended
functionality of the GEM_DataGrid was unnecessary. A GEM BGL is simply a list of
KMIDs. Therefore, the datagrid only has one column and does not need to be displayed
as a GEM_Record. This datagrid is populated with data from a CSV corresponding to the
chosen version in the drop-down list described earlier in this section. The datagrid can be
manipulated using the buttons described above.
Below the datagrid is a “Close” button. When the user taps the “Close” button, the
application checks the current BGL for modifications. If the list has been modified, the
user is asked to save it. If the user chooses “Yes”, then he or she is prompted with the
same dialog box that save button provides. Choosing “No” cancels any save operation.
All of the options will ultimately lead to the panel being closed and popped off of the
main shell panel stack.
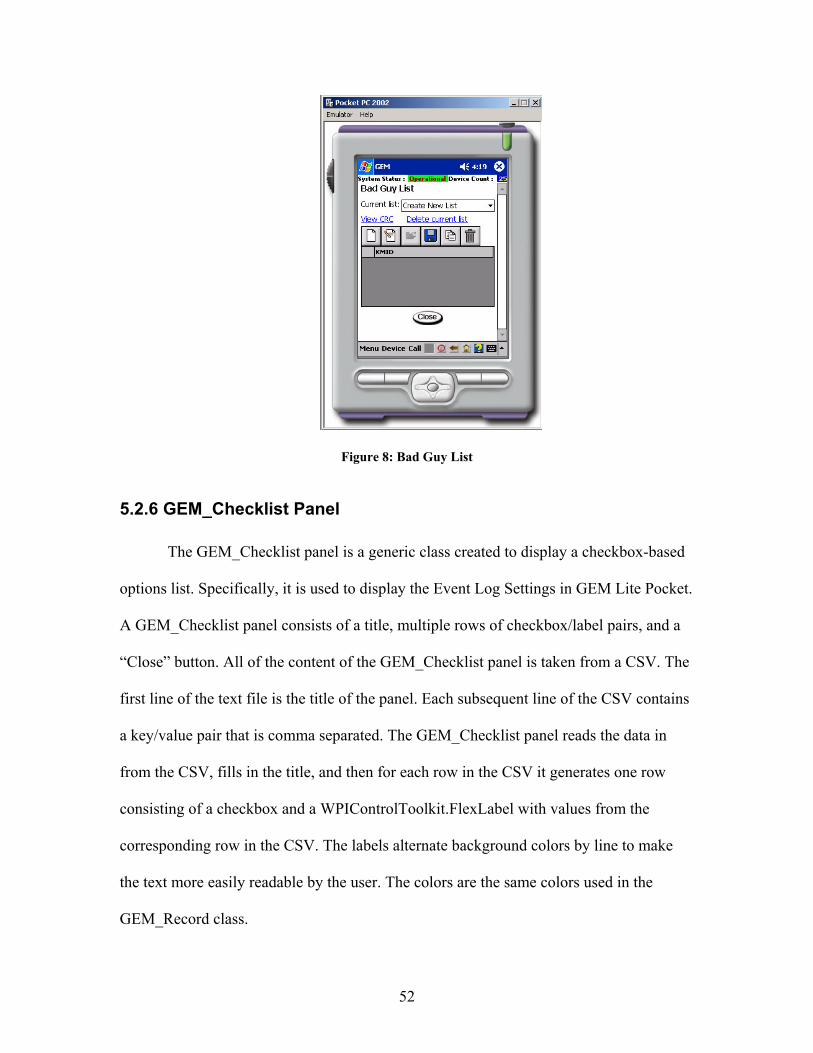
52
Figure 8: Bad Guy List
5.2.6 GEM_Checklist Panel
The GEM_Checklist panel is a generic class created to display a checkbox-based
options list. Specifically, it is used to display the Event Log Settings in GEM Lite Pocket.
A GEM_Checklist panel consists of a title, multiple rows of checkbox/label pairs, and a
“Close” button. All of the content of the GEM_Checklist panel is taken from a CSV. The
first line of the text file is the title of the panel. Each subsequent line of the CSV contains
a key/value pair that is comma separated. The GEM_Checklist panel reads the data in
from the CSV, fills in the title, and then for each row in the CSV it generates one row
consisting of a checkbox and a WPIControlToolkit.FlexLabel with values from the
corresponding row in the CSV. The labels alternate background colors by line to make
the text more easily readable by the user. The colors are the same colors used in the
GEM_Record class.

53
The “Close” button is located below the last row of the checkbox/label pairs.
When tapped, the application checks to see if any of the values of the checkboxes have
been changed. If the values have been changed, a confirmation panel is created asking the
user if he or she wishes to save the changes. If the user taps “Yes”, then the value data in
the CSV is replaced with the data from the checkboxes. If the user taps “No”, the data is
not saved. The panel is then closed and popped off of the main shell panel stack. The
GEM_Checklist panel is illustrated in Figure 9.
Figure 9: The Event Log Settings are an example of a GEM_Checklist panel
5.2.7 GEM_Date_Time Panel
The GEM_Date_Time panel is used to display the Event Log Query portion of
GEM Lite in GEM Lite Pocket. Figure 10 shows the GEM_Date_Time panel. It has been
scaled to fit in to the screen space of the Pocket PC. It allows the user to choose a date

54
ranging from the beginning of 2006 to the end of 9999. The use of numeric up and down
controls allowed the design to choose the maximum, minimum, and starting values for
year, day, and hour, using the 24 hr standard hours, minutes, and seconds. A drop down
box was used to display the month. The Event Log Query is a panel that allows the user
to choose a start and an end date and time for a query of the archived event logs. The
GEM_Date_Time panel is called and created twice from the Event Log Query, once for
the start date and time and once for the end date and time. There are two large buttons of
the Event Log Query panel that allow the user to call the GEM_Date_Time panel. The
data is type-checked to make sure that values were chosen for the years, days, hours,
minutes, and seconds. After the date and time have been chosen, they appear on the Event
Log Query panel in the form: YYYYMMDD HH:MM:SS Once both a start and end date
and time have been chosen, the “OK” button at the bottom of the panel becomes active.
For the purposes of this design, the application does not actually query event log data
from the system.

55
Figure 10: The GEM_Date_Time panel is used to choose the date range of the Event Log Query
5.2.8 GEM_Default_Settings Panel
The GEM_Default_Settings panel (shown in Figure 11) is a unique panel that is
used to display the default settings options in GEM Lite Pocket. The Default Settings
screen in GEM Lite contains six text boxes and three checkboxes, all with labels
informing the user of their purpose. The user is able save the default settings. In GEM
Lite Pocket, the settings are saved in a CSV file that the panel reads in upon instantiation
and uses to fill the text boxes and set the checkboxes. If any changes have been made
when the user attempts to close the panel, a confirmation panel is generated to verify the
user’s intent (also shown in Figure 11). If the user taps “Yes”, the program saves the
values to the CSV and closes the panel. If the user taps “No”, the panel is simply closed.
The Default Settings panel does not allow the user to save invalid data. If the user inputs
incorrect values, a GEM_Alert form is created inform the user what to do next.

56
Figure 11: GEM_Default_Settings panel (left) and GEM_Default_Settings panel with confirmation panel (right).
5.2.9 GEM_Help form
Each panel created in GEM Lite Pocket has a help file associated with it. The
project team designed the GEM_Help form to display the help files. This maintains
consistency with other well-known programs because the online help is usually created in
its own window. The GEM_Help form reads data from marked up text files that are
parsed by a helper function. The helper function creates an array of labels that are added
to the form. The helper function parses the file for bold tags and for new lines and
formats the labels accordingly. Figure 12 shows a help file loaded in a GEM_Help form.

57
Figure 12: Help file loaded in a GEM_Help form
5.2.10 GEM_About form
The GEM_About form simply displays the about information for GEM Lite
Pocket. It follows the same format as the about screen in the original GEM Lite
application. A Windows form was chosen to display this information to maintain
consistency with other programs in that the about screen is usually displayed in a separate
window from the rest of the application.
5.3 Custom .NETCF Controls
The Microsoft .NET Compact Framework is a very limited version of the original
.NET Framework. Due to the limitations of the .NETCF, it would have been impossible
to create an aesthetically pleasing and minimally designed user interface. The amount of
code necessary would have been much greater than what was written and the complexity
of the code would have slowed the progress of the project. This would have greatly

58
hindered us in porting over the promised percentage of the GEM Lite application to the
Pocket PC. To facilitate the development process and artistic value of GEM Lite Pocket,
custom controls were developed to supplement the .NETCF. This section describes the
custom controls that were developed and their purpose within GEM Lite Pocket.
5.3.1 FlexLabel
Microsoft supplies a System.Windows.Forms.Label control to display strings on a
user interface. Unfortunately, in the .NETCF, Microsoft stripped out many useful
properties of the label. One of the most important properties that the .NETCF label lacks
is the AutoSize property. The default size of a label is 200x20 pixels. However, the
location of GUI elements in GEM Lite Pocket depends on the sum of the location and
size of the preceding element. This created a problem because there was no way of
knowing what size to make each label to avoid large gaps between labels or to ensure that
a label can fit all of the text given. One option was to hard-code all of the data manually
into each label in the GUI, which would have been incredibly inefficient and would have
been a large waste of time and space. The FlexLabel is an extension of the
System.Windows.Forms.Label control. The FlexLabel contains properties for two
different types of auto-sizing. The first is called AutoSize, like its original .NET
Framework counterpart. This property automatically sizes the text box to the height and
the width of the string it contains. It does so by measuring the string contained by the
label and then setting its height and width properties accordingly. It is important to note
that the method used to measure the text string has to be inherited from the
System.Windows.Forms.Control class. Trying to use this method from any other class
raises a NotSupportedException when trying to run the application on the Pocket PC.

59
The second property added to the FlexLabel is AutoSizeVertical. The algorithm
for this property is much more complicated than that of AutoSize. The way the property
works is that given a label width, the FlexLabel resizes itself vertically to accommodate
text that has been word-wrapped. The algorithm for AutoSizeVertical in essence splits
the FlexLabel’s string into an array of words and tries concatenating the words together
until the length of the concatenated strings exceeds the width of the FlexLabel. Once the
width is exceeded, the last string concatenated becomes the first string in a new series of
string concatenations and the remaining strings that have not been added are added as in
the last iteration. The default height of the FlexLabel (18 pixels) is added to the
FlexLabel each time the width of the FlexLabel is exceeded by the strings. When the
algorithm completes, the height of the FlexLabel is sufficient to hold the entire string
word-wrapped.
5.3.2 FlexPanel
The .NETCF provides the System.Windows.Forms.Panel as a basic container for
other .NETCF controls. However, this panel is limited in the fact that it does not include
any property to facilitate a border. It was felt that a border would be necessary to
implement dialog boxes. The .NETCF does not supply standard dialog boxes. Therefore,
GEM Lite Pocket dialog boxes are simply small panels that have borders to help separate
them from any larger underlying panels. The border acts as a visual aid by helping the
user recognize that the panel is not a part of an underlying panel. For the sake of
convenience, BorderThickness and BorderColor were added to the FlexPanel as well.

60
5.3.3 PictureButton
The .NETCF provides the System.Windows.Forms.Button as a basic button
control. However, this button is very plain and is always a gray rectangle with black text.
It also does not support images. The PictureButton control was developed to remedy this
situation. The PictureButton control has properties for setting the normal image, active
image (image when button is being pressed), disabled image, active background color,
active foreground color, and border. Every button in GEM Lite Pocket is a picture button.
The ability to have separate normal and active images allowed us to create button
rollovers that have a 3-D appearance, adding to the aesthetic value of GEM Lite Pocket.

61
6. Testing GEM Lite Pocket
GEM Lite Pocket was tested constantly throughout its development. There were
three types of tests that were conducted: developer tests, exploratory tests, and a task-
based user test. Developer tests consisted of testing each build of GEM Lite Pocket for
functionality and bugs using either the Pocket PC device or the Pocket PC emulator.
Running the Pocket PC emulator requires an additional 64MB of RAM on the desktop
PC for each instance. It was quickly discovered that it took much less time to test builds
of GEM Lite Pocket on the actual Pocket PC device than it did to test them on the
emulator. However, there was only one USB cradle available to connect a Pocket PC to a
desktop computer. Therefore, one of the development PCs necessitated the use of the
emulator for testing. The emulator testing was conducted strictly for functionality
purposes. It was not very useful for evaluating aesthetic value because of the inaccuracies
of the emulator. For instance, the Pocket PC 2003 emulator did not allow for viewing the
same amount of screen real estate as the actual Pocket PC device, even though the
resolution of the emulator was set to the standard 240x320 pixels. The Pocket PC 2002
emulator was actually much more accurate for displaying the GUI as it would look on the
physical device. Another caveat of using the emulator was that colors and images did not
necessarily look the same as they did on the handhelds. Therefore, accessibility testing
was not done using the emulator.
Exploratory testing consisted of having a General Dynamics employee run GEM
Lite Pocket for a brief period of time. This kind of testing was very informal and did not
consist of any goals for the user to accomplish while using the application. The
exploratory testing served two main purposes. One of the main purposes of having a user

62
that was not a developer explore the system was to expose bugs that may not have
otherwise been discovered. This is because it is impossible to assume what actions a user
that is not familiar with the application my take while trying to navigate the user
interface. During the first two exploratory tests, many bugs in the functionality were
discovered. Additionally, the user generally made mistakes using the system due to lack
of progress response by the system. This was rectified in later builds and by the third test
the user was unable to find any bugs in the user interface. The second purpose of the
exploratory testing was to gauge the user’s opinion of the aesthetics. During the incipient
stages of development the primary objective was to strictly create a functional user
interface. Therefore, there was little effort put into the aesthetics of the interface.
However, as the aesthetic value became more of a focus, the user became more excited
about using the application and was more impressed with the way it looked. Three
exploratory tests were conducted in total.
The task-based user test was a formal test that consisted of having a General
Dynamics employee familiar with GEM Lite complete a series of tasks using GEM Lite
Pocket. This test lasted about 40 minutes. The user was asked to verbally communicate
each step that he took in completing each task. The project team observed the user and
recorded as many of his actions as possible as well as any other feedback that the user
gave while exploring the interface. The task list that the user was given is attached as
Appendix B of this document. The user was not given the user’s guide prior to testing.
This was to aid in testing the user interface based solely on the user’s intuition and not
any previous knowledge of the application.

63
The user chosen for the task-based testing was an experienced user/developer of
GEM Lite. Many of the tasks given were completed seamlessly and the user seemed to be
very comfortable using the GEM Lite Pocket interface. As expected, some of the
elements of the user interface did present a small learning curve to the user. These
elements were generally elements that were specifically designed for GEM Lite Pocket
and were not present in the original GEM Lite application. However, the learning curve
was small and the user grew familiar with the interface rather quickly. One of the aspects
of GEM Lite Pocket that seemed to cause minor confusion for the user was the row of
icons in the BGL and in the static routing tables. The user did, however, comment that
the icons were intuitive, though he had not expected to see them in GEM Lite Pocket.
The eyeball icon symbolizing “View” in the static routing table was the icon that created
the most confusion. The user commented that it made sense to have that particular image,
but it was not particularly effective and was deemed “spooky” by the user.
The user found the bottom toolbar of the main shell to be especially useful. The
introduction of the “Home” and “Back” buttons were met with positive response although
the user suggested that the icons be slightly larger. Unfortunately, due to the limitations
of the given .NET toolbar control, implementing larger icons would be impossible
without writing a custom toolbar control. This was not feasible in the time allotted. The
user was also pleased with the menu structure, commenting that consolidation of menu
items facilitated navigation based on intuition.
Another suggestion made by the user was to include some sort of a context-
sensitive menu. As discussed previously in this document, the challenge in creating a
context-sensitive menu lies in the fact that the user does not hover a cursor over items on

64
the screen. Also, there is no “right-click”. Therefore, considering the limitations
discussed previously, a context-sensitive menu would be impossible to implement
without innovation.

65
7. Recommendations & Future Work
This project in conjunction with the prior project of proving the feasibility of
running SNMP on a PDA (Stancioff 2005) has shown that it is possible to port GEM Lite
to a Pocket PC. Therefore, the next step is to actually build the backend of GEM Lite
Pocket and merge it with the GUI created by our team. The remaining portions of the
GUI must also be completed. It is our recommendation that the next team to work on this
project build a section of the backend that works with the GUI. From this project the new
team could get the discover device function to work or to get the program to fill the
device table using actual data.
There are still portions of the GUI functionality that are not complete. For
instance, the static routing tables should include the option to edit the entire row instead
of just a single cell of the table. Another aspect of the GUI that does not have full
functionality is the Audit Data table. One way of doing this might be to create the
backend to connect to a Microsoft SQL Server to get real data imported into the GUI. At
the time of this writing, the .NETCF does not have any built in options to connect to
other kinds of databases. Third party applications may exist that aid in doing so.
Implementing database connectivity would be instrumental in building the backend for
much of the GUI, since the only other method of retrieving data is to store it in a text-
based data file.
Another recommendation for future work is to implement context-sensitive tool
tips. As discussed in prior sections of this document, the Pocket PC has a cumbersome
method for “right-clicking”. The GUI would be greatly enhanced by an innovation that

66
allowed the user a way to get context-sensitive tool tips that were not intrusive to using
the application.
An innovation that could be made to help mitigate the problem of having a
smaller screen is to implement a landscape view of the GUI. This would allow the user to
turn the Pocket PC on its side and view the GUI on a wider screen. Of course, the trade-
off in this situation would be that less of the GUI could be displayed vertically. However,
there may be situations where it would be more expedient to view data on a wider screen,
especially when viewing data in tables. This would allow for more columns to be
displayed, which may allow the user to take fewer steps to display necessary data.
A suggestion for improving the accessibility of GEM Lite Pocket is to implement
a screen magnifier. Smaller text and icon size is intrinsic to the Pocket PC having a small
screen. Implementing a screen magnifier would allow users with less than perfect
eyesight to view difficult to read portions of the GUI at a larger size. This would also
help users with good vision in that it would help prevent unnecessary eye strain.

67
8. Conclusion
The fabrication of GEM Lite Pocket is the proof-of-concept that demonstrates the
feasibility of porting the user interface of General Dynamics’ GEM Lite application to a
Pocket PC. The design of GEM Lite Pocket provides full functionality of the chosen
portion of the original GEM Lite application given the limitations of a Pocket PC. It also
demonstrates that it is possible to create a version of GEM Lite for the Pocket PC that can
conform to accessibility standards. The implementation of some of the suggestions for
future work would help to make the GEM Lite Pocket application compliant with any
existing accessibility standards. The positive outcome of previous work exhibiting the
ability of running SNMP on a Pocket PC in conjunction with our work shows that not
only can GEM Lite be ported to a Pocket PC, but that it can be done in such a way that it
is accessible and marketable.

68
Works Cited
General Dynamics Encryptor Manager (GEM) Operator’s Manual. General Dynamics. 15 April 2005 Greenzweig, Tim. “Aesthetic Experience and the Importance of Visual Composition in Information Design.” Orange Journal. 22 Jan. 2006 <http://orange.eserver.org/issues/1-1/orange_comp_intro.html> Guy Van de Walle, Phil Turner, and Elisabeth Davenport. “A Study of Familiarity.” Human-Computer Interaction -- INTERACT’03. IOS Press. 2003: 463-470. Preece, Jennifer and Yvonne Rogers, Helen Sharp. Interaction Design: Beyond Human-Computer Interaction. New York, NY: John Wiley & Sons, Inc., 2002. Stancioff, Dimitri and Jeremy Lerch, Michael Milkin, Stephen Goranson. PDA Network Manager. Major Qualifying Project MQP-REK-0093, WPI Computer Science Department, Spring 2005 Wilson, Matthew. “C# Performance: Comparison with C, C++, D, and Java.” Windows::Developer Network Fall 2003: 2-23. Wlodarczyk, Robert. “Performance Testing Visual Studio .NET.” DevHood. 31 Jan. 2002 <http://www.devhood.com/tutorials/tutorial_details.aspx?tutorial_id=203>. “Mobile Java or J2ME.” Java.com. Sun Microsystems. 17 Feb. 2006 <http://www.java.com/en/download/faq/5000080200.xml>

69
Bibliography
1. Greenzweig, Tim. “Aesthetic Experience and the Importance of Visual Composition in Information Design.” Orange Journal. 22 Jan. 2006 <http://orange.eserver.org/issues/1-1/orange_comp_intro.html>
2. Guy Van de Walle, Phil Turner, and Elisabeth Davenport. “A Study of Familiarity.” Human-Computer Interaction -- INTERACT’03. IOS Press. 2003: 463-470.
3. “Mobile Java or J2ME.” Java.com. Sun Microsystems. 17 Feb. 2006 <http://www.java.com/en/download/faq/5000080200.xml>
4. Price, Jason, et. al. C# Complete. Almeda, CA: SYBEX, Inc., 2003.
5. Stancioff, Dimitri and Jeremy Lerch, Michael Milkin, Stephen Goranson. PDA Network Manager. Major Qualifying Project MQP-REK-0093, WPI Computer Science Department, Spring 2005
6. Wilson, Matthew. “C# Performance: Comparison with C, C++, D, and Java.” Windows::Developer Network Fall 2003: 2-23.
7. Wlodarczyk, Robert. “Performance Testing Visual Studio .NET.” DevHood. 31 Jan. 2002 <http://www.devhood.com/tutorials/tutorial_details.aspx?tutorial_id=203>.
8. Wigley, Andy and Peter Roxburgh. Building .NET Applications for Mobile Devices. Redmond, WA: Microsoft Press, 2002.
9. Wigley, Andy and Stephen Weelwright. Microsoft .NET Compact Framework Core Reference. Redmond, WA: Microsoft Press, 2003.
70
Appendix A: Development Tools
1. OpenNETCF Smart Device Framework <http://www.opennetcf.org>
2. Adobe Photoshop CS2 30-Day Tryout <http://www.adobe.com>
3. ImageJ <http://rsb.info.nih.gov/ij/>
4. Vischeck <http://www.vischeck.com>

71
Appendix B: User Task List for Task-Based User Testing
GEM Lite Pocket User Feedback Test 2/14/2006 Please complete the following numbered tasks below. Be sure to verbally communicate the steps you take to complete each task. For instance, one sequence could be, “Tapping on menu. Tapping audit data. Tapping summary.” Please verbally communicate whether or not your purported steps yielded the desired result (i.e, completion of the task) also. This data will be used to help us determine the quality of the user interface. We will be recording the steps taken (in writing) to complete each task, as well as the outcome of each sequence of steps. Tasks:
1. Display the Pre-Haipis Static Routing Table.
2. Edit the value of the second row of the “Network ID” column in the Pre-Haipis Static Routing Table to be 4000.
3. Delete the first row of the Pre-Haipis Static Routing Table.
4. Perform an Event Log Query using the start date 1/1/2006 22:10:03 and the end date 4/15/2006 1:01:04.
5. Display the Requests in Progress.
6. View the data in the fourth (‘Submitted’) column of the second row WITHOUT SCROLLING!
7. Display the Bad Guy List
8. Replace the third KMID value from the ‘badguylist_1’ list with the value 123456.
9. Save the list.
10. Create a duplicate of the first KMID value from the ‘badguylist_2’ list by first copying the value of the first row and then pasting it into a NEW row.
11. View the CRC of ‘badguylist_2’.
12. View the online help for Event Log Settings
13. View the online help for Bad Guy List
14. Delete the entire ‘badguylist_1’ list from Bad Guy List.
15. View the HAIPIS 1.3.5 Static Routing Table
16. Find the value of the fourth (RME INT PT) column of the second row of the HAIPIS 1.3.5 Static Routing Table WITHOUT SCROLLING!
17. Restart the GEM Lite Pocket application
18. Shutdown the GEM Lite Pocket application (you may exit the GEM application).
GEM Lite Pocket 17 February 2006 Operator’s Manual
72
Appendix C: GEM Lite Pocket Operator’s Manual
General Dynamics Encryptor Manager (GEM)
Operator’s Manual
for
GEM Lite Pocket 1.0
17 February 2006
PREPARED BY: Evan Desmarais and Gregory Kern

GEM Lite Pocket 17 February 2006 Operator’s Manual Table of Contents
73
A. Main User Interface (Shell).......................................................................................... 74
1. System status indicator ............................................................................................. 74 2. Device count indicator .............................................................................................. 74 3. Button cluster ............................................................................................................ 75
a. Startup ................................................................................................................... 75 b. Shutdown .............................................................................................................. 75 c. Discover ................................................................................................................ 76 d. Devices.................................................................................................................. 76 e. Events.................................................................................................................... 76 f. Req. in Progress..................................................................................................... 76
4. Menu/Icon Navigation Bar ....................................................................................... 76 5. Scrollbar.................................................................................................................... 77
B. Tasks............................................................................................................................. 77 1. Discover New Devices.............................................................................................. 78 2. View Device Log ...................................................................................................... 78 3. View Event Log ........................................................................................................ 79 4. View Requests in Progress........................................................................................ 79 5. Static Routing Tables................................................................................................ 80 6. Network Manager List .............................................................................................. 81 7. Bad Guy List ............................................................................................................. 81 8. Event Log.................................................................................................................. 83
a. Archiving the Event Log....................................................................................... 83 b. Querying the Event Log........................................................................................ 83 c. Event Log Settings ................................................................................................ 84

GEM Lite Pocket 17 February 2006 Operator’s Manual
74
A. Main User Interface (Shell) Upon launching the GEM Lite Pocket GUI, the user will be presented with the main interface of the program (which will be known as ‘the shell’). This interface consists of the following elements:
• System status indicator • Device count indicator • Cluster of buttons pertaining to some of the most common GEM Lite tasks. • Menu/Icon navigation bar • Scrollbar
Each of the aforementioned GUI elements will be explained further here.
1. System status indicator The System status indicator is a simple text-representation of the current system status. For this prototype, the only two values that it can contain are Offline and Online. The status text is colored depending on its value. When the application is in Online status, the text color is green. When the application is in Offline status, the text color is red.
2. Device count indicator The Device count indicator is a simple text label displaying the number of devices. It is located in the upper right-hand corner of the application screen. The GEM Lite application can support up to 25 devices, so this prototype was built to reflect that. When the application is in Offline status, the device count will show that zero devices are

GEM Lite Pocket 17 February 2006 Operator’s Manual
75
connected to GEM Lite Pocket. When the application is in Online status, the number of devices is 25.
3. Button cluster The largest portion of the shell is devoted to a cluster of buttons, stacked vertically, representing tasks that are most often performed by GEM users. The buttons are:
• Startup • Shutdown • Discover • Devices • Events • Req. in Progress
A description of what each button does:
a. Startup This button is enabled (able to be tapped) upon application startup. Once tapped, a confirmation dialog will appear asking whether or not the user wishes to startup the GEM application. Tapping NO will dispose the confirmation panel and return the program to its state before the startup button was pushed. Tapping YES will startup the GEM application. The startup button will then become disabled, while the shutdown and discover buttons will be enabled (become clickable). Various menu options that were once disabled will become enabled at this point as well. The system status will be set to Operational.
b. Shutdown The shutdown button is disabled upon application startup. This button has no functionality unless the user completes the startup process (see Startup above). If the system status is Operational, then the user can use the shutdown button to bring the system to and Offline state. Upon tapping the shutdown button, the user is presented with a confirmation dialog, which gives the user the ability to opt out of shutting down the system in the case that it was not the true intention of the user. If the user taps NO, he dialog is disposed and the application returns to the state it was in before the shutdown button was tapped. If the user taps YES, then another confirmation dialog is displayed, asking if the user intends to exit the GEM application. If the user taps YES from the second confirmation dialog, the entire application will exit. If the user taps NO at the second confirmation dialog, the system status will be set to Offline, at which point the shutdown and discover buttons will then be disabled (along with various other menu options). The startup button becomes enabled at this point and the device count is set to zero.

GEM Lite Pocket 17 February 2006 Operator’s Manual
76
c. Discover The discover button is disabled by default. It is enabled by completing the startup process (see above). In the event that the startup process is completed, tapping on the discover button will launch a small dialog panel asking for the IP address for the device that the user wishes for the program to discover. The user can input data into the textbox using the standard methods for entering data using a Pocket PC. The dialog panel also contains an OK button and a Cancel button. Tapping the Cancel button will dispose of the entire dialog panel and will return the program to its state prior to the discover button being tapped. Tapping the OK button currently does nothing.
d. Devices The devices button is enabled by default. Tapping it will launch a new panel displaying device data. SEE for more information.
e. Events The events button is enabled by default. Tapping it will launch a new panel displaying event data. SEE for more information.
f. Req. in Progress The Req. in Progress button is enabled by default. Tapping it will launch a new panel displaying information regarding requests in progress. SEE for more information.
4. Menu/Icon Navigation Bar The menu/icon navigation bar is used to navigate through the program and complete both primary and secondary tasks. There are three menu options, menu, device, and call. Both device and call are taken directly from the original GEM Lite application for the PC. All of the other menu options from the original GEM Lite application have been reorganized under the menu option in the GEM Lite Pocket version. For the purposes of this prototype, all of the menu items under the device and call menus are always disabled, with the exception of the discover option under the device menu, which is available when the system status is Online. The icon portion of the menu/icon navigation bar contains small icon representations of important GEM Lite functions and program navigation. The buttons are:
• Startup The startup button works exactly like the startup button in the main icon cluster of the shell. When this icon is disabled it is shown as a grey box.
• Shutdown The shutdown button works exactly like the shutdown button in the main icon cluster of the shell. When this icon is disabled it is shown as a grey box.
GEM Lite Pocket 17 February 2006 Operator’s Manual
77
• Back The back button works somewhat like the back button of a web browser. It brings
you to the previous screen that is still open. You can backtrack all the way to the main
shell button cluster. There is no forward feature. Tapping the back button effectively
closes the current panel to get to the previous one.
• Home The home button works somewhat like the home button of a web browser. It is
analogous to tapping the back button (described above) repeatedly until reaching the
main shell. All overlaying panels are closed upon pressing the home button.
• Help The help button opens a new form with context-sensitive help. For example, when tapped while the main shell is displayed, the help screen will display an overview of using the system. However, if tapped when the topmost panel is the static routing table, a different help text is displayed that is relevant to what the user is doing.
5. Scrollbar The main shell scrollbar is always present. However, it is only active whenever the information currently being displayed takes up more vertical room than is allowed by default, i.e, when the screen is not tall enough to display all of the information necessary. This allows the user to scroll through the contents of the panel.
B. Tasks This section describes how to perform specific tasks on GEM Lite Pocket. This guide assumes that the user is familiar with the PC version of GEM Lite.

GEM Lite Pocket 17 February 2006 Operator’s Manual
78
1. Discover New Devices
There are two ways to get to the discover panel. The first method is to tap the icon labeled ‘Discover’ located in the startup panel. The second method is to find its menu option, which can be done by traversing the menu in the following order: Device -> Discover. A new panel will be visible asking the user for the IP Address of the device that GEM should discover. The new panel contains a textbox for the IP Address and two buttons. As one might expect, IP Addresses must be of the form #.#.#.#, where the # represents a number between 0 and 255. Once the data has been entered into the textbox, the user can tap the Cancel button to dispose the panel, or tap the OK button, causing GEM Lite Pocket to attempt device discovery. An alert form will be displayed informing the user of whether or not the device was successfully discovered.
2. View Device Log
This set of instructions will allow the user to view the device log, which is normally on the main screen of the PC version of GEM Lite. At the startup panel, tap the button labeled ‘Devices’. A new panel (known as a gridpanel) will be created displaying a title (which should read, ‘Devices’), a data grid containing all of the log entries, and a button (labeled, ‘OK’). The user can scroll through the data grid to view the information in the log at a quick glance. However, in the case that the user wishes to view the information

GEM Lite Pocket 17 February 2006 Operator’s Manual
79
of a single record in a more readable fashion, the user can tap on a specific row in the grid. Upon tapping a specific row, a new form will be displayed. The form will contain the contents of the data row selected from the grid, displayed as a list of the form column name: value. When the user is finished viewing the data, the user can tap the OK button to close the form. There is a Close button on the gridpanel that will close the gridpanel when tapped.
3. View Event Log
The following instructions will demonstrate viewing the event log to the user. The event log is traditionally visible on the initial screen in the PC version of GEM Lite. To view the event log from GEM Lite Pocket, tap the button labeled ‘Events’ located on the startup panel. The panel that is generated is identical to that of the device log. For further information regarding this display, see section B-2, titled ‘View Device Log’.
4. View Requests in Progress
The following instructions will show the user how to view the current requests in progress. The table displaying requests in progress is traditionally available as a floating window that is enabled via menu option in the PC version of GEM Lite. To view the

GEM Lite Pocket 17 February 2006 Operator’s Manual
80
requests in progress table from GEM Lite Pocket, tap the button labeled ‘Req. in Progress’ located on the startup panel. The panel that is generated is identical to that of the device log. For further information regarding this display, see section B-2, titled ‘View Device Log’.
5. Static Routing Tables
Viewing the static routing tables in GEM Lite Pocket can be done via the menu using the following traversal: Menu -> View -> GEM Static Routing Table -> HAIPIS 1.3.5 Version or Menu -> View -> GEM Static Routing Table -> Pre-HAIPIS Version, depending on which static routing table is desired. Once the static routing table is chosen, a new panel will be displayed. This panel contains a title, a bar of icons, a data grid, and a button. The title will be identical to the menu option chosen. The bar of icons contains five icons, which do the following (in order from left to right):
• View entire row This option will display the entire row of the selected cell and display it in a new record form. It is also possible to view a row in a record form if the user double-taps any cell in a given row.
• Create new row This option will create a new row in the data grid
• Edit current cell This option will create a small panel allowing the user to edit the value in the current cell.
• Copy data from current cell This option will copy the contents of the current cell into a buffer. The contents of the buffer can then be pasted when editing cell data.
• Delete current row Upon selecting this option, the user will be presented with a confirmation panel. Tapping the Yes button will cause the application to delete the selected row. Tapping the No button will cancel the delete operation.

GEM Lite Pocket 17 February 2006 Operator’s Manual
81
The Close button does exactly as one would expect. It closes the static routing table panel. If any changes have been made to the static routing table, the user will be asked if he or she wishes to save the changes. Tapping the Yes button will save all changes and will close the static routing table. Tapping the No button will simply close the static routing table.
6. Network Manager List
Viewing the Network Manager List in GEM Lite Pocket is done via the menu using the following traversal: Menu -> View -> GEM Network Manager List. The network manager panel will then be displayed. This interface is exactly like that of the static routing tables. For more information regarding the use of this interface, see section 5.
7. Bad Guy List

GEM Lite Pocket 17 February 2006 Operator’s Manual
82
Viewing the Bad Guy List is done via the menu using the following traversal: Menu -> View -> GEM Bad Guy List. The bad guy list that is then displayed contains the following items:
• Title The title will always be ‘Bad Guy List’.
• Current list dropdown box This dropdown box allows the user to choose a bad guy list version to manage. The default is Create New List, which allows the user to work with a new version without modifying an existing version. Choosing an existing version from the dropdown box will cause that version’s contents to be displayed in the KMID grid below, which is explained further in this document.
• ‘View CRC’ link The link labeled View CRC is like a hyperlink one would view in a web browser. When tapped, it causes a new form to be displayed, which shows the Bad Guy List Version, GEM Calculated CRC, and INE Calculated CRC. The user can be disposed of by tapping the OK button.
• ‘Delete current list’ link The link labeled Delete current list is also a hyperlink like the View CRC link. Upon tapping this link, a confirmation dialog box will be displayed, asking the user if he or she wishes to delete the current list. If the user taps Yes, then the list displayed in the dropdown box is removed with its contents. If the user taps No, the delete operation is cancelled.
• Icon bar The icon bar is a row of six graphical buttons that perform the following operations (in order from left to right):
o New KMID The New KMID icon looks like a blank sheet of paper (like the ‘new document’ icon in programs like Microsoft Word). This option will display an input panel asking the user to input a new KMID value, which will then be displayed in the KMID grid described below.
o Edit KMID The Edit KMID icon looks like a piece of paper with a pencil writing on it. This option will create a small panel identical to the New KMID panel. However, the textbox will have the value of the current KMID. The user can change the value of the current KMID this way.
o Load Bad Guy List The Load Bad Guy List icon looks like an open folder with an arrow pointing out of it. This option would allow the user to load a bad guy list version from a file. However, this is not supported in this version of GEM Lite Pocket. Therefore, the option is always disabled.
o Save Current List The Save Current List icon looks like a blue floppy disk. Tapping this icon will save the current bad guy list. If it is a new list, the user will be prompted for a name for the new list.
o Copy data from current cell

GEM Lite Pocket 17 February 2006 Operator’s Manual
83
The Copy data from current cell icon contains a picture depicting two pieces of paper, one overlaying the other, with writing on both. This option will copy the contents of the current cell into a buffer. The contents of the buffer can then be pasted when creating a new KMID value or editing an existing KMID value.
o Delete KMID The Delete KMID icon contains a picture of a trash can. Upon selecting this option, the user will be presented with a confirmation panel. Tapping the Yes button will cause the application to delete the selected row. Tapping the No button will cancel the delete operation.
• KMID Grid Below the icon bar is the KMID Grid. This is simply a data grid that displays each KMID value from a bad guy list in a separate row.
• Close Button The Close button does as the user would expect. It closes the bad guy list panel.
8. Event Log All of the tasks concerning the event log can be found by traversing the menu in the following order: Menu -> GEM -> Event Log -> <desired task>.
a. Archiving the Event Log
Archiving the event log can only be done if the startup process has been completed. In this case, choosing Archive as the <desired task> will display a confirmation panel asking whether or not to archive all events. For the purposes of this demo, tapping either Yes or No leads to the same outcome, which is the disposing of the panel.
b. Querying the Event Log
Querying the event log can only be done if the startup process has been completed. In the case that the application has been started, the user should choose Query as the <desired

GEM Lite Pocket 17 February 2006 Operator’s Manual
84
task>. A new panel will be displayed to the user. The user must choose a start date/time and an end date/time span from which to query. Each of the aforementioned choices is made by choosing the appropriate button, labeled either ‘Choose Start Date/Time’ or ‘Choose End Date/Time’. Tapping on either of these buttons will bring up another panel that allows the user to choose the desired date and time using dropdown and combo boxes. After selecting the desired date and time, the user should tap the ‘OK’ button. The selected date and time will be displayed under its corresponding button. Once the user has chosen a start date/time and an end date/time, the ‘OK’ button that was previously disabled will become enabled for the user to tap. Tapping the ‘Cancel’ button will dispose of the panel and a query will not be made. For the purposes of this demo, tapping the ‘OK’ button will always cause the application to display an alert saying that no records could be found.
c. Event Log Settings
The event log settings can be modified regardless of the startup state of the application. To do this, the user must choose Settings as the <desired task>. The event log settings panel will be displayed, which consists of a list of options with checkboxes. The user can use the checkboxes to determine which items can be displayed in the event log. The user must scroll down to the end of the list and tap ‘Close’ when done. If the user made changes, he or she will be prompted to save them. Otherwise, the event log settings panel will close.