a quick start guide to powermax partitions ii · 2 what are partitions? • the powermax includes...
TRANSCRIPT

A quick start guide to PowerMax Partitions II
Product Management Team
April, 2010
R

2
What Are Partitions?
• The PowerMax includes an optional partition feature. Partitioning
allows you to have up to three independently controllable areas
whereby each can be in the HOME, AWAY or DISARM state.
• Each independent area is called a ‘partition’ and has its own
defined zones, user codes, etc.
• Partitions provide highly flexible control in premises where multiple
areas need to be monitored or secured independently.

3
Using Partitions in the Workplace
• The area in this example has 2 offices (accountant’s and solicitor’s)
• Each office runs independently with different working hours
• The reception area is shared by both offices
• Each area has a NEXT motion detector installedThe reception area is explained later in the ‘common area’ section
Accountants Solicitors
Reception
Partition 1Partition 2
Common area

4
Partitions II – What’s New?
• Partitions II, Visonic's new version of partitioning, now provides enhanced partitioning capabilities of the PowerMaxPro, including:
• Common areas
• Simultaneous control over multiple partitions
• Intuitive LCD display
• Smart siren operation

5
STEP 1: Planning & Enabling
• The panel comes with partitioning feature disabled.
• The first step is to enable Partitions II feature:
• From the INSTALLER MODE select PARTITIONING and press
• Select ENABLE and press twice
To avoid confusion and to make installation simpler, it is recommended to note down the zones and their corresponding partitions

6
STEP 2: Defining Partitions
• Partitioning programming is performed via the DEFINE ZONES menu.
• For each zone, set the zone type, name and chime option, as per the installer manual.
• Select the PARTITION option (follows CHIME)
• The screen will display [ P1:- P2:- P3:-] Black squares indicate the partitions to which the current zone is assigned.
• Assign the zone to its proper partition or partitions (1, 2, or 3).
• To select partitions simply press , or on the keypad respectively.
• Press twice to confirm the settings.
A zone must be assigned to at least one partition at all times

7
STEP 3: Setting User Codes & Keyfobs
• User code 1 is the master user code and controls all 3 partitions.
• Other user codes can control only a specific partition or a combination of partitions defined by the master user during setup.
• After selecting and defining user codes, select the ACCESS TO PART menu to associate the user code with a partition or a partition combination.
• Keyfobs are associated with a partition or a partition combination during enrolment, performed via the ENROLLING menu
To change the partition association of keyfobs simply re-enroll the keyfob

8
Arming and Disarming the System
• A user, using a user code or an
MCT-237 two-way keyfob, can control
all partitions associated with the code
or keyfob simultaneously, or an
individual partition
• When using MCT-234 keyfob or the
MCM-140 remote commander, a user
can only control all the associated
partition(s) simultaneously
(i.e. no control over individual partitions).MCT-234
MCT-237
MKP-150
MCM-140+
MCM-140

9
Arming multiple partitions
• Arm or Disarm as without partitions
• All partitions associated with the user code are Armed or Disarmed
Arming a specific partition
1. Press
2. LCD will show SELECT PARTITION
3. Press 1, 2, or 3 to select the partition
4. Press / (Arm) or (Disarm)
PowerMax & MKP-150/151 Keypad
Partition Select Button

10
MCT-237 Two-way Keyfob
Arming multiple partitions
• Pressing the arming buttons without selecting an individual partition Arms/Disarms all defined partitions.
Arming a specific partition
1. Press
2. In the LCD display, a digit [ P1:- P2:- P3:-] will light to indicate the currently selected partition
3. Repeated pressing of selects the following partitions
4. Press , or within 5 secondsPartition Select Button

11
What are Common Areas?
Consider the reception area in the example of the accountants andsolicitors:
• Neither office owner wants the reception area to be armed until both offices are armed so that even if one office is occupied (his office partition is disarmed), the reception area must be disarmed
• This is called a Common Area
Common Areas are used as walkthrough zones to multiple partitions• There may be more than one Common Area in an installation
depending on the layout of the property
• A Common Area is NOT the same as a partition:
• It cannot be armed/disarmed directly
• Common Area zones behave according to the state of the partitions sharing the Common Area.

12
Defining Common Areas
• A Common Area is defined by assigning more than one partition to a zone or a group of zones.
Example:• Accountants’ detector is
assigned to the first Partition • Solicitors’ detector is assigned
to the second Partition • Reception area’s detector is
assigned to both partitions and forms a common area
Accountants Solicitors
Reception
Partition 1Partition 2
Common Area

13
24hrs zones
• Are always armed
Perimeter zones
• Armed when all partitions they are assigned to are either HOME or AWAY
• Disarmed if at least one partition to which they are assigned is disarmed
Interior zones
• Armed when all partitions they are assigned to are AWAY
• Disarmed if at least one partition to which they are assigned is HOME or disarmed
How Zones in Common Area Behave
Zones in common areas behave according to the partition which is the “least secure”

14
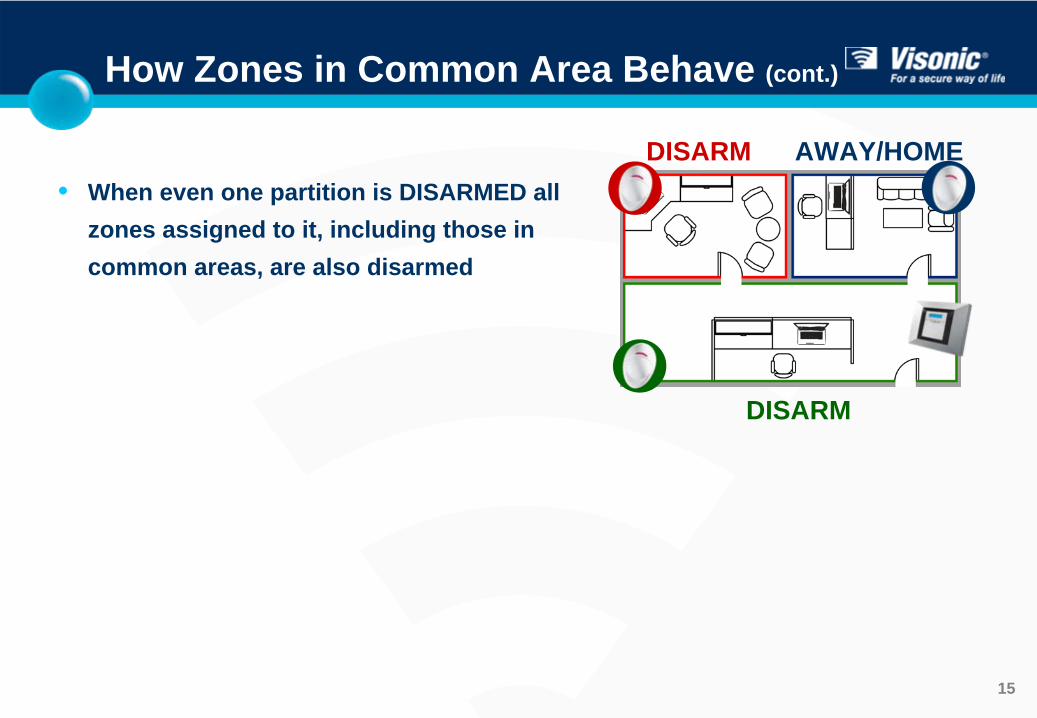
How Zones in Common Area Behave (cont.)
• When one partition is armed AWAY and another armed HOME, common area zones are armed HOME. (i.e. Interior zones will NOT give an alarm).
HOMEAWAY
HOMEAWAYAWAY
AWAY
• When all Partitions are armed AWAY, common area zones are also armed AWAY.
15
How Zones in Common Area Behave (cont.)
• When even one partition is DISARMED all zones assigned to it, including those in common areas, are also disarmed
AWAY/HOMEDISARM
DISARM

16
Smart Siren
An alarm from a Common Area zone
• When a zone in a common area is alarmed, disarming any one of the partitions to which that zone is assigned cancels the alarm and stops the siren.
Concurrent Alarms in different partitions
• When several zones are alarmed, and each zone is assigned to a different partition, the siren will continue to sound until all partitions are disarmed.

17
Alarm in a Common Area Zone
When a zone in a common area initiates an alarm, disarming one of the Partitions in that common area cancels the alarm and stops the siren.
(1) Alarm from zone in reception area
AWAYAWAY
ALARM
(2) The first Partition is DISARMED - siren stops
AWAYDISARM
SIREN STOPS

18
AWAYDISARM
(2 ) When the first partition is DISARMED sirens still sounds
ALARM
Concurrent Alarms in 2 Partitions
When the siren sounds due to the initiation of simultaneous alarms in two or more partitions, the siren will stop only when all partitions with alarmed zones are disarmed.
(1) While siren is sounding due to alarm from the first partition, another alarm from the second partition occurs
AWAYAWAY
ALARM

19
Concurrent Alarms in 2 Partitions (Cont.)
When the siren sounds due to the initiation of simultaneous alarms in two or more partitions, it will stop only when all partitions with alarmed zones are disarmed.
(3) Siren stops only when BOTH partitions are disarmed
DISARMDISARM
SIREN STOPS(2) When the first partition is DISARMED
sirens still sounds
AWAYDISARM
ALARM

20
LCD Display
• Once the Partition feature is enabled, the LCD will display the status ofall 3 partitions as [ P1:X P2:X P3:X ]
• Where “X” is the partition’s status:R = ReadyN = Not ReadyA = AwayH = HomeD = DisarmE = Entry/Exit delay
“-” = This partition is not used (does not have zones assigned to it)• In case of TROUBLE or MEMORY, LCD alternates between partitions’
status (explained above) and MEMORY/TROUBLE messages
Time/Date can be shown as a screen saver text

21
LED & Beep Indications
• Arming LED
• ON = at least one partition is AWAY
• Blinking = one or more partitions are HOME and none are AWAY
• OFF = all partitions are DISARMED
• Trouble LED
• Reflects a trouble in the entire system, not per partition
• More information in “Reviewing Trouble Information” in the User Manual
• Exit/Entry delay beeps
• Are sounded whenever an Entry/Exit delay is set in at least one partition

22
Arming options
• Quick Arm
• In Quick Arm mode, a user has access to arming the system without having to identify himself (by entering a code).
• With partitions II enabled, arming the system (HOME or AWAY) from the keypad or the control panel will arm ALL partitions (since user is not identified)
• It is still possible to arm one specific partition, by selecting a partition using the partition selection key prior to arming.
• Arming using keyfobs is not affected by QuickArm
• Arm Instant
• Arm Instant is possible only when arming ALL partitions simultaneously

23
• Force Bypass
• Setting affects all partitions
• Manual bypass
• The user can bypass zones assigned to any partition with which
he/she is associated
Bypass options

Thank You