a quick start to corba
DESCRIPTION
This is a short article composed to show how to implement working CORBA implementations in Python and C.TRANSCRIPT

Ganesh Hegde
A quick start to CORBA : Using omniORB and ORBit2

1
Preface
This document is developed as a supporting document to a blog article on CORBA and is
developed to help reader to get started with CORBA (said that, it does not cover complete
implementation of CORBA). The intention of this document is to illustrate a simple working
CORBA application and not the theory of CORBA. If you are already familiar with CORBA and
its implantation then this document might not be of much use to you.
Chapter 1, covers the installation of the necessary packages needed for the succeeding chapters.
Chapter 2, illustrates the system that we are going to implement.
Chapter 3, in this chapter the application illustrated in Chapter 2 is implemented in Python using
omniORB and tested.
Chapter 4, the same application is developed in C with ORBit2 and tested.
It is assumed that that the reader has good understanding of Python and C. All the application in
this document are developed and tested on 64bit Linux system (Ubuntu 14.04).Readers may need
to find appropriate packages for their native OS if they don’t have aforesaid OS.
If you have any questions please post in the blog comment section (preferred) or send an e-mail
to [email protected] (replace ‘id’ with ‘ghegde’)
Project website : http://corbacandpython.sourceforge.net
Happy reading and all the very best!!!!
2
1. Installing Packages
1.0 Overview
This chapter explains installation procedure for necessary software packages that we are going
to use in next chapters. The first software is omniORB which we use in Chapter 3 and Orbit2
which we need for Chapter 4.If you have this software and necessary libraries installed, then you
can safely skip this chapter and procedure to Chapter2.
1.1 Installing omniORB
omniORB is a robust high performance CORBA ORB for C++ and Python. It is freely
available under the terms of the GNU LGPL (for the libraries), and GNU GPL (for the tools).
omniORB is largely CORBA 2.6 compliant.
We use Python features of omniORB in Chapter 3.To install omniORB in your system open
terminal and type
If everything is good. You have installed,
omniidl : omniORB IDL to C++ and Python compiler.
python-omniorb : Python bindings for omniORB.
omniorb : IOR and naming service utilities for omniORB.
omniidl-python : omniidl backend to compile Python stubs from IDL files.
Note that this installation is sufficient for Chapter 3, but more advanced use may require some
additional packages.
1.2 Installing ORBit2
ORBit2 is a CORBA 2.4-compliant Object Request Broker (ORB) featuring mature C, C++
and Python bindings.
To install ORBit2 type in the below command in the terminal
$sudo apt-get install omniidl python-omniorb omniorb omniidl-python
$sudo apt-get install orbit2 liborbit2-dev

3
The above command installs orbit2 and necessary library for development.
Once you have installed the above packages you are good to go!!!!!!!
1.3 Reference
[1]ORBit2 : https://projects.gnome.org/ORBit2/
[2]omniORB : http://omniorb.sourceforge.net/

4
2. System overview
2.1 Simple Calculator design
In this design exercise we are going to set up a calculator server and a client application. Server
has the object to implement some calculation. The IDL file for this system is as below
As we can see there is one module (MyModule) with one interface (calculator) having two methods ( add() and sub() ). The server and client interaction for one sequence of operation can be depicted as follow.
Fig 2: Server, client interaction for calculator example
This same design will be implemented in different programming languages in the next two
chapters.
//calc.idl file
module MyModule
{
interface calculator
{
long add(in long a,in long b);
long sub(in long a,in long b);
};
};
Fig 1: IDL file for calculator example

5
3. Python CORBA Server and client implementation
3.0 Overview
In this chapter we are going to implement a CORBA based server and a client application for
the design mentioned in chapter 2. For this exercise we are going to use omniORB CORBA
ORB which we installed earlier. The code used for this chapter can be downloaded from
https://sourceforge.net/projects/corbacandpython/files/
3.1 Compiling IDL file
The command to compile .idl file using omniORB compiler is
The option –bpython means that python back end must be used to generate the stub for python
program (-bcxx is used to generate C++ stubs).
The result before and after invoking the command is as follow.
Fig 3: Compiling . idl for python application
It creates the necessary stubs to implement server and client. Do not edit anything inside
MyModule and MyModule__POA folder and also calc_idl.py.
3.2 Writing the Server code
Let’s now write server code in Python. The complete code is as follow. The steps followed for
this code is
Initialize ORB
Register servant with POA (in our case Root POA).
Put POA in active state.
Run the ORB.
$omniidl –bpython calc.idl

6
Fig 4: Server code for calculator
Line 6 - Line12: This class actually implements the required functions.
Line 14: Initializes the ORB. The ORB is initialized by calling CORBA.ORB_init
Line 16: To activate our servant object and make it available to clients, we must register it with a
POA. In this example, we use the Root POA, rather than creating any child POAs.
Line18-Line19: An instance of calculator servant is created and activated in the Root POA.
Line21: It prints IOR.
Line23-Line25: POAs are initially in the holding state, meaning that incoming requests are
blocked. Lines 23 and 25 acquire a reference to the POA’s POA manager, and use it to put the
POA into the active state. Incoming requests are now served. Failing to activate the POA will
look like a deadlock in program!!
Line 27 : Finally we run ORB.

7
3.3 Running server and client
For this exercise no separate client Python script is created, instead it will be executed directly in
terminal. Start server by
Now you must see IOR string printed on the terminal as shown below and the sever will be
running. Client will use this IOR to locate the object,
Fig 5: IOR string
Now open a new terminal and start Python terminal by command
Once the Python terminal is invoked do the following in the order specified to run client,
Above, we are initializing ORB in the client side. Then use string_to_object() function to convert
the string into a generic object reference(CORBA.Object). The object’s _narrow() function is
called to convert the CORBA.Object reference into an MyModule.calculator reference. If the
IOR was not actually of type MyModule.calculator, or something derived from it, _narrow()
returns None.
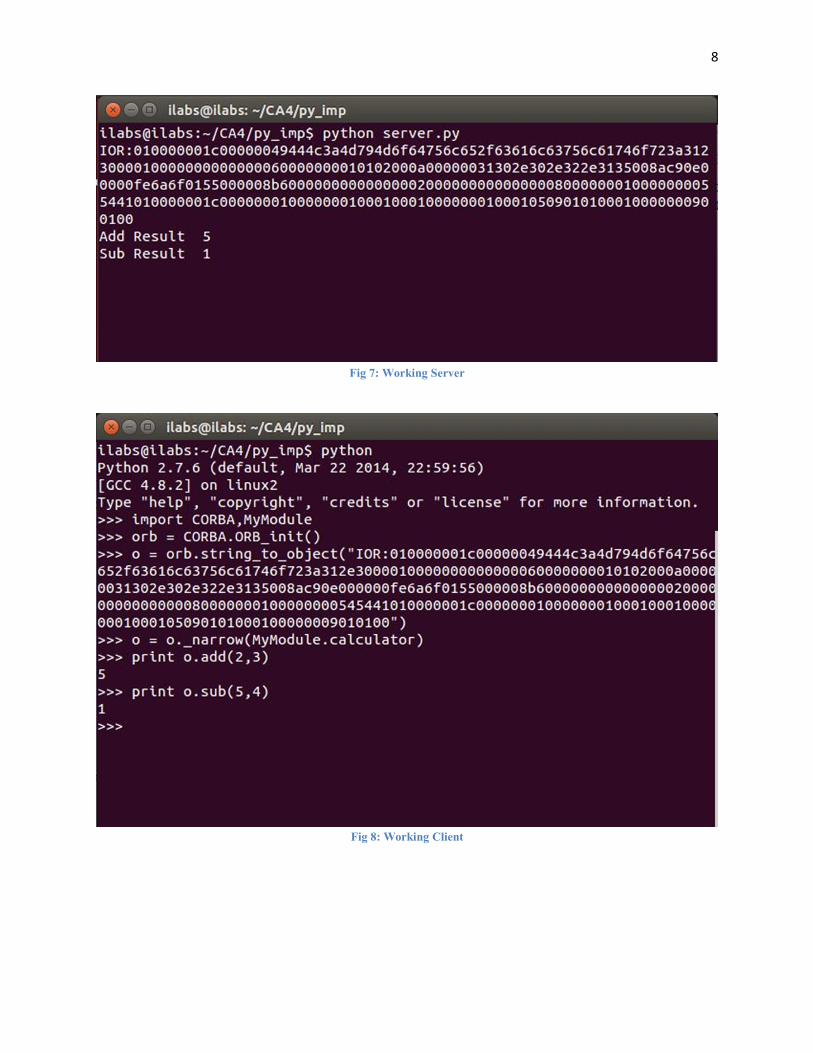
If everything is Okay, a working server and client will look something like in Fig.7 and Fig.8.
$python server.py
>>> import CORBA,MyModule >>> orb = CORBA.ORB_init() >>> o = rb.string_to_object(“<your IOR string from server>”) >>> o = o._narrow(MyModule.calculator) >>> print o.add(2,3)
$python
Fig 6: Python Commands to invoke client
8
Fig 7: Working Server
Fig 8: Working Client

9
4. C CORBA client and server implementation
4.1 Over view
Development in C is similar to what we did in previous chapter. However generated files might
be slightly different. For this chapter we are going to use Orbit2 CORBA which supports C
bindings. The source code for this chapter can be downloaded from
https://sourceforge.net/projects/corbacandpython/files/
4.2 Compiling IDL file
The same calc.idl file will be used in this chapter too. To compile this IDL file we use Orbi2
IDL compiler. Do the following in the terminal.
A successful compilation will look like below figure,
Now you must have five new files in the directory. We do not touch any files except calc-
skelimpl.c. The rest of the files deal with communication implementation and interested reader
can take a look into it. The calc-skelimpl.c file contains the framework of the servant functions:
you should find near the end of the file, function prototypes corresponding to the one we have
declared in IDL, our real code must be inserted between markers.
4.3 Creating server
Developing the server code is similar to what we did in Python version of implementation.
The main function of the server code will look something like shown in Fig.9.The sequence of
operations performed is exactly same as we did in Python example. So I assume no extra
explanation is need for the C code.
$orbit-idl-2 --skeleton-impl calc.idl

10
Fig 9: main function of Server code
If you downloaded the code, you might have observer one strange thing, we included .c file
(calc-skelimpl.c) in the server code which typically does not happen in traditional coding. In-fact
we need to access the method implementations from calc-skelimpl.c. Unfortunately, no
corresponding .h-file is created and the server code will not compile without the definitions in
calc-skelimpl.c , so we did.
Also you might have observed that we have not implemented the calculator function in this
code. So where should we implement it? Well, the answer is, in calc-skelimpl.c. You can extend
this by implementing your methods. If you open the calc-skelimpl.c you will see function for
add() as shown in Fig.10.We need to insert our code in the place mentioned. It will look like
Fig.11 after implementing the function. Same is true for sub().

11
Fig 10: Code inside calc-skelimpl.c
Fig 11: Code after implementation
I have provided a Makefile in order to avoid lengthy compilation code in the terminal. To
generate a server binary run below command in the terminal. You might see some warnings but
the end result will be a binary named “server” in your working directory.
$make server

12
4.4 Implementing Client
Client code is self-explanatory and I assume reader can easily understand the code. To compile
the code use make utility and Makefile as,
Now you must have a binary named “client” in your working directory. Now run server and
client in two different terminals. The working server and client will look as shown in Fig.12 and
Fig.13.Note how the client is invoked with IOR.
Fig 12: Server
Fig 13: Working client
$make client

13
4.5 Next step
We have implemented working CORBA in two different programming language viz. C and
Python. Try using the combination of your implementation i.e client implemented in C and
server implemented in Python and vice-versa. It will work!!!
4.6 Finally!!!
From Chapter 3 and Chapter 4 we understood that
1. CORBA as a middleware software allows two process written in different language to
communicate with each other (Python and C in our case).
2. Standard defined by OMG for communication is vendor independent(C implementation
was compiled using Orbit2 and Python by omniORB).
We can also show that
1. CORBA can make communication to happen between processes running on different OS
(Try compiling Python code using windows binary of omniORB).
2. The communication can happen over network (Simple illustration will be running server
and client in two different machines within the same network domain).
3. CPU independent.
***End of Document***