a slice of the apple - brick model...
TRANSCRIPT

TM
E
ndorsed by
A Slice of the AppleTouring Jonathan Lopes’
New York Inspired Layout
Smooth Curves (ooh lala!) FM H10-44 InstructionsExploring Narrow Gauge
INSIDE
PREMIERE ISSUE Issue 1

CONTENTSLEGO 9V Train Communication Billund, Oct. 1st ’07
Dear all,
Many of you are aware of the on-going discussions on the 9V train system. We would like to thank you all for the input you provided to us directly and through different channels. Based on critical business decisions and the consultations and discussions with various AFOLs we have decided to focus on one single solution in order to avoid the complexity of maintaining two systems in parallel and in order to solve the issues we have with the actual 9V system and the remote control City train system. We envision one upgradeable train system for all ages in the future. The LEGO Group has considered the future of the 9v at length, and has come to the conclusion that there is not sufficient demand for the product line to be profitable and competitive. The existing machines need to be replaced and minimum order quantities at external suppliers for motors and speed regulators are so high that the investment The LEGO Group would have to put in, would not be rational or reasonable compared to sales figures of the existing 9V system. The implication of this is that the 9v elements sold now are the last of the remaining stock and subsequent production of elements for the 9V platform has ceased. The LEGO Group will launch elements for a new train system based on the new electric LEGO Power Functions system in 2009. Using the LEGO Power Functions system the new train system will benefit from a set of electric elements that are cross theme, widely available and not completely train spe-cific which allows us to amortize the development and on going cost across multiple themes. We are at an early development stage of the new train system and several AFOLs are already involved in the development process, to ensure that the new system will accommodate the types of features and functions requested by the AFOL community. This collaboration with AFOLs is very important to The LEGO Group and we strive to involve the Adult Fan Community as much as possible. Holger Matthes, Germany, currently member of the AFOL team which is involved in the process of developing the new system explains the situation in this way:
“The LEGO train system has to fulfill different needs for different target groups in a very special way. On the one hand it’s a toy for kids because it is easy to set up and because of the playability in the kid’s room, and on the other hand it is also for AFOLs who build huge LEGO train layouts with realistic looking train mod-els and functionality. The LEGO Group is aware of this and the company tries to support both needs within the given restrictions (e.g. costs for a niche product like the LEGO trains).”
Using the universal LEGO Power Functions system for trains will give The LEGO Group the ability to match the demands and wishes of the AFOL Train community in the future. Steve Barile, USA – President of ILTCO (International LEGO Train Club Organization) and one of the involved AFOLs says about the new train system:
“I am excited that the new universal Power Functions system can make track side accessories viable and po-tentially automated and interactive.”
He continues:
“With the track being exclusively plastic the LEGO Power Functions Train system has the potential for new and innovative track geometries and continued innovation by both The LEGO Group and the AFOLs.”
These AFOL quotes give you an impression of what will be possible with the future system and we will keep you up to date on the development of the new LEGO Power Functions train system. We expect to have more information and details to share with you before the end of the year.
Richard Stollery, Head of LEGO Community Development

CONTENTS Issue 1 - Fall 2007
© Copyright 2007 RailBricks.LEGO® is a registered trademark of the LEGO Company, which does not sponsor, authorize or endorse this publication.
All other trademarks, service marks, and copyrights are property of their respective owners.
The Whistle Stop.........................................................4
Club Spotlight - NCLTC...................................................5
Getting From Here to There............................................6
More Brick for Your Buck................................................8
6 vs 8......................................................................10
Get Real!.................................................................13
Builder Spotlight - Jonathan Lopes..................................16
Reverse Engineering Challenge......................................21
Better American Style Frieght Trucks................................22
Putting Your Track to Bed.............................................26
NMRA National Train Show 2007......................................29
Smooth Curves..........................................................32
Building Narrow Gauge.................................................34
Trainspotting.......................................................37
FM H10-44 Instructions................................................38
FRED’s View.............................................................47

4 ISSUE 1 - FALL 2007
The RAILBRICKS Team
Senior Editor:Jeramy Spurgeon
Staff Editors and WritersThe “Think Tank”:Erik AmzallagSteve BarileMatt BiedaBenn CoifmanTim DavidDidier EnjaryHolger MatthesLyle MaysJohn NealMark PetersonLarry PieniazekJordan Schwarz
Content Contributors:Brian DarrowCale LeiphartJonathan Lopes
Copy Editing/Proofing:Chris SpurgeonJane Taylor
Copyright © 2007 Railbricks
Permission is granted to copy, dis-
tribute and/or modify this docu-
ment under the terms of the GNU
Free Documentation License, Ver-
sion 1.2 or any later version pub-
lished by the Free Software Foun-
dation; with no Invariant Sections,
no Front-Cover Texts, and no Back-
Cover Texts.
All Aboard!
Welcome to the first issue of Railbricks. It has been an excit-ing journey to get to this point and I want to first thank the “Think Tank” for making this happen. We hope that through this publication, we can bring new builders to the LEGO train hobby as well as inspire the cur-rent LEGO train fan. Each issue will have articles dedicated to three groups, the beginner, the intermediate, and the advanced builder, indicated by the follow-ing icons:
In the following pages, you will find inspirational models, tips & tricks, prototype histories, instructions, and much more.
While the LEGO train line will continually evolve, one thing is cer-tain, the LEGO train hobby will endure. As the track and motor technology change, some fans may convert to the new system, while others may hold steadfast to the one they’ve built up al-ready. Along the way, Railbricks will work to forward the hobby in whatever direction it takes.
There are also many opportunities for you, as the reader, to be-come a contributor for Railbricks. This magazine will be for the LEGO train community, but it will also be by the LEGO train com-munity. If you have an idea for an article, submit it to [email protected].
So now, flip through the pages and enjoy! We are eager to hear what you think! -Jeramy Spurgeon
On demand printed issues of Railbricks will be available at lulu.com.
photo by Benn Coifman
B I ABeginner Intermediate Advanced
CLUB SPOTLIGHT

ISSUE 1 - FALL 2007 5
Last winter, visitors to a mall near Raleigh, North Carolina discovered a magical holiday surprise: a world of LEGO bricks created by members of the North Carolina LEGO Train Club (NCLTC) and the North Carolina LEGO Users’ Group (NCLUG). Each year, members from across the state come together for this culminating event and bring the fascination of LEGO trains to holiday shoppers and their children. The state of North Carolina stretches from the Appalachian mountains to the Atlantic Ocean, and members of NCLTC hail from across the state as well as upstate South Carolina. Since NCLTC has only a dozen or so widely scattered mem-bers, meetings and events are typically shared with NCLUG. Most meetings are held at the pub-lic library in Apex, North Carolina near Raleigh. Special club gatherings are hosted by club mem-bers elsewhere, catering to those located in oth-er parts of the state. Between meetings, much of the club’s communication occurs in the forums of the NCLTC website and in Yahoo! forums. The club does not require formal dues of its mem-bers, although individual contributions keep the club running. NCLTC is largely the brainchild of its president, Mike Walsh, who is known for his work with ILTCO and on the LEGO Hobby Train project. Mike ad-
ministers the club’s website and organizes events such as the winter train show, the main event of the year. Like most large show layouts, the over-all layout is first designed on the computer using TrackDraw, then posted online. Club members then select sections of the layout to contribute to, and guidelines on the NCLTC website help to promote uniformity across modules. The show runs for several weeks, from Thanksgiving into January. Needless to say, the holiday show also serves as a stress test for LEGO train motors due to its long duration. This past winter, the 12’ by 30’ (3.66m by 9.14m) holiday layout featured the contributions of seven NCLTC members. A massive hotel provided one focal point, along with a city block and short line featuring Thomas the Tank Engine. Other NCLTC displays have featured the famous “monorail spi-rals” - multi-level monorail tracks that elevate monorail trains high above town displays. Local color makes its way into displays as well – from the Southern Railway’s old maintenance shops in Spencer, North Carolina to the notorious chemi-cal plant in Apex that exploded shortly before NCLTC’s winter show. These displays always meet with the fascina-tion of visitors to a show, many of whom are ex-periencing LEGO trains for the first time. Along with comments of admiration and amazement, club members frequently hear visitors exclaim, “I didn’t know that LEGO made trains!” Through the efforts of NCLTC and other LEGO train clubs, a new generation is being introduced to the mag-ic of LEGO trains.
by Jordan Schwarzhttp://www.ncltc.cc/
CLUB SPOTLIGHT

Increase your part collection
The easiest solution is to increase your part collection. That’s not as easy as it sounds, and certainly not the cheapest, nor the most creative solution.
So, how do you increase your part collection in an efficient way? Of course you can shop at your local toy store for some brand new sets. Your collection will increase as fast as your wallet will allow, but the variety of parts will remain quite poor and probably not train specific. That’s a bad move unless you are just getting into the LEGO hobby and your collection is rather small.
The fact is that train sets are mostly sold as exclusives in the online LEGO store(1). So, that’s probably a better way for a train fan to purchase new sets. However, what do you do if you want to buy some discontinued parts you have no chance to find in available sets?
Luckily, for years, the internet community had developed a second-hand market where you can buy spare parts, called Bricklink(2) . That is the best way to purchase specific parts. Recently, the LEGO company has opened services called LEGO Factory and Online Pick A Brick(3) that also allow you to buy spare (train) parts, but the choice has been quite limited until recently.
The conclusion of this is that even the owner of the biggest LEGO part collections are sometimes short of parts, hunting for the ultimate LEGO element. We need something else to create delightful models.
Within these pages, you will discover wonderful models and building instructions. However, your LEGO part collection never seems to be big enough, preventing you from creating cool train models. You certainly wonder how you could ever succeed in building
such nice LEGO train designs when you always run short of pieces.
Getting From Here to Thereby Didier Enjary
B
6 ISSUE 1 - FALL 2007

Be creative
I would say creativity is THE right way to solve any design difficulty with LEGO bricks. After all, that’s what LEGO is all about. Of course I cannot tell you how to design your models with your own parts collection, but I can give you some general advice:
- choose common colors for your designs. Yes I would like to build with dark green or dark blue all the time, but your collection is probably as full of red and yellow parts as mine. Green and orange are cool also but even less common than red and yellow. According to peeron(4), the most common colors are black, white, greys, red, yellow, and blue.
- some parts are no longer available. But often, the discontinued parts are replaced by others with only small changes in the shape. Windows(5) are a well known example, as noted in Jake McKee’s book “Getting Started With LEGO Trains”. That is wise advice: when you can’t get certain part, try to replace it with a similar part.
- Colors are sometimes not so important in the complete design. If you can’t get a part in certain color, try to replace this part in a neutral color. What is neutral? Neutral can be white, grey or black, or a lighter/darker hue of the same color. This could even lead you into a totally new and eye-catching livery (colour scheme) for your engine.
A perfect illustration of creativity based on limited part collection is the LEGO Hobby Train set (10183). The set has only 1080 parts but 10 LEGO adult fans have built more than 30 different models with them (one at a time).
Conclusion
Of course, creativity is not everything. You need a nice collection of parts to be creative. But a good designer should not blame his part collection limitations for his lack of inspiration.
Play well.
Links(1) http://shop.lego.com/ByTheme/Department.aspx?d=328(2) http://www.bricklink.com(3) http://us.factory.lego.com/pab/(4) http://www.peeron.com/cgi-bin/invcgis/reports/mostcommon.cgi?type=Color
Getting From Here to There
ISSUE 1 - FALL 2007 7

BMORE BRICK FOR YOUR BUCK
by Jordan Schwarz
8 ISSUE 1 - FALL 2007
tions (no trains, for example). Prices at Amazon range from well below to well above list prices, so it’s often worth a glance at the Shop At Home website first to make sure that prices seem in line. Tower Hobbies (2) also carries a good selection of LEGO products at list prices. They charge a flat shipping rate of $8.99USD, which is advantageous for some purchases. They also run frequent cou-pons on their website, making it possible to buy sets at below-retail prices on occasion.
The well-known auction site eBay (3) always has some LEGO items for sale. But eBay exhibits some unusual phenomena. Sets currently in pro-duction often sell on eBay for more than retail, and shipping is often quite expensive. eBay is a useful place to search for retired sets, such as older 9V and 12V train sets. If buying a particular set, first compare prices with BrickLink and look for similar items being auctioned to figure out what a reasonable value for a used set is. (Some eBay sellers will be de-lighted to sell you sets currently in production for more-than-retail prices!) And factor in shipping costs when making a purchase! On eBay, it is important to remember that items come and go. If you do not win an item, you can wait for a similar item to appear at a later time. eBay does involve a lot more watching and wait-ing than other purchasing venues in order to get a good deal. But watching and waiting are es-sential to getting a deal on eBay.
BrickLink (4) started life as BrickBay, an eBay-style venue geared toward LEGO enthusiasts. (Threats of a lawsuit by eBay over similarities to
The Internet era has ushered in a host of new shopping possibilities when it comes to LEGO products. Prior to 1996, purchasing from LEGO Shop At Home meant completing a paper order form and mailing it to LEGO. Now, most large-scale LEGO shopping occurs through websites like LEGO.com, Amazon, eBay, and BrickLink. Al-though each of these sites sells LEGO products, some finesse is called for in order to get a great deal on what you are looking for.
Shop at Home (1), the world’s largest LEGO store, has been the best friend of the LEGO maniac for decades. Here one can find the best selection of LEGO products anywhere, as well as the best source for LEGO train items. Most things on the site retail for list price, though it’s worth brows-ing the list of web specials (generally items on clearance, about 50% off of list price). There are also occasional specials if buying multiple packs of bulk bricks or train tracks, for instance. And sometimes as the holiday season arrives, LEGO usually offers coupons and free shipping on some orders. Less known are the LEGO weekly phone specials. By calling LEGO Shop At Home (USA) at 1-(800)-835-4386 and then pressing ‘4’, you can hear a listing of weekly specials, updated each Wednes-day morning. These are items on clearance that are in very limited supply. Usually, these aren’t much to get excited about, but every once in a while, one gets lucky… Shipping rates for LEGO Shop At Home are rel-atively high compared to some online retailers. For example, Amazon.com offers free shipping on orders over $25USD. Their selection of LEGO items is typically limited to more popular selec-

MORE BRICK FOR YOUR BUCK
Links(1) http://shop.lego.com(2) http://www.towerhobbies.com(3) http://www.ebay.com(4) http://www.bricklink.com
More Brick for Your Buck
If you use tiles for your sidewalks, in-tersperse 1x2 plates with one stud throughout to stand your minifigs on. You can also pre-place your minifigs pri-or to shows so that when you pull your module out, they are already in place!
44Quick TipBrian Darrow’s
ISSUE 1 - FALL 2007 9
the eBay name led to the new name, BrickLink.) BrickLink is a distinct creature from eBay, how-ever. You can find an incredibly vast assortment of LEGO elements and parts, including those that are long out of production. Although there are auctions on BrickLink, most items are available for immediate purchase, which reduces the time involved with BrickLink purchases relative to eBay ones. Prices vary considerably depending on the item for sale and the seller. BrickLink’s search fea-tures make it easy to find specific parts for sale, a key advantage. One can also search for parts in a set using the database at Peeron.com, then see if those parts are for sale on BrickLink.It’s also worth checking the parts assortment on the LEGO Pick-a-Brick website to see how those prices compare to BrickLink. Generally, BrickLink is much cheaper, but not always – red train doors and sliding train doors in light stone grey (the infamous “bley”) are, at the time of this writ-ing, cheaper than on BrickLink. For small orders, BrickLink can save you some money on shipping as well as getting the item to you sooner – LEGO’s Pick-a-Brick orders in the USA are shipped from Denmark and take quite some time to arrive. Although BrickLink’s forte is the parts business, there are plenty of sets for sale, and BrickLink is an excellent source of these as well, including vintage train sets.

Train models by the LEGO company have histori-cally been six studs wide, with a few exceptions. For original creations, builders try to follow a scale that lends itself naturally to modeling. A standard scale has been elusive, however, because stan-dard LEGO train wheels are too large for realistic 6-wide rolling stock. It is also often noted that 6-wide does not fit the minifig scale. Some builders have developed larger models, frequently 8-wide but also 7-wide, 10-wide, and even larger scales, each of which have distinct advantages as well as disadvantages. Moving to 8-wide is primarily a question of real-ism; some specialized LEGO parts such rails and trucks are obviously too large for 6-wide if you desire to fit the scale. Secondly, 8-wide allows builders to pack more details into their designs. Detailed and realistic scale models hold greater appeal for adult builders than simple, toy-like ones. 8-wide builders think of LEGO trains more like models and less as toys; they build less for play value and more to create the ultimate in realism.
So what is the correct scale for LEGO trains? It depends on the metric used to determine the scale as well as the rail prototype being mod-eled. If looking at track gauge, LEGO rails have a gauge of about 5 studs – the venerable ‘L-gauge’ track. Taking this to represent standard gauge, at 1435mm between the rails, yields a conversion factor of 1 stud to 287mm. The GE AC4400 is one example of a large, mod-
ern North American locomotive. At about 3.12m wide (10.2 feet), this unit should be nearly 11 studs wide if modeled in LEGO bricks using track gauge as a reference scale. Its 22.3m (73 feet) length translates to a model 78 studs long – more than the length of two standard LEGO baseplates! A model this size is too large to be practical for most LEGO layouts. Trains in other regions vary in size considerably. For example, a British Class 92 freight locomo-tive is only 2.66m (8.7 feet) wide. Again using track gauge for a reference scale, a LEGO model of this unit should be about 9 studs wide. Units from other countries are narrower still, leading to other optimal train widths. The 23mm outer diameter of LEGO train wheels dictates another scale. Taking a prototypical train wheel to be about 1m in diameter, to match the gauge correctly, LEGO train wheels should be about 3.5 studs in diameter. But LEGO train wheels are actually closer to 2.9 studs. So, if basing the scale on train wheels instead of track gauge, everything shrinks by 20 perfect. North American prototypes could be modeled in 9-wide, British trains in 8-wide, and other trains in yet more sizes. Still, other builders use minifig scale, using min-ifigures to represent the size of humans relative to full-scale trains. And this leads to yet another set of measurements… Hence, no scale lends itself perfectly to the re-alistic modeling of trains in LEGO bricks. It is easy to understand why a multitude of different
6 v s 8THE DEBATE OVER TRAIN SCALE RAGES ON
by Didier Enjary and Jordan Schwarz
B
photo by John Neal
10 ISSUE 1 - FALL 2007

scales exist, each a compromise on realism to some extent.
6-widers note the difficulties associated with moving to 8-wide. 8-wide models are bigger, which has several consequences. The trains are more expensive and require more parts; an 8-wide engine needs about twice many parts as a 6-wide one. 8-wide trains also weigh a lot and push the lim-its of the 9V power track system. Engines typical-ly need two motors rather than one. Big 8-wide trains sometimes require more than two motors, which requires more current than the LEGO speed regulator can typically provide. The extra weight of an 8-wide model is thought to wear out bear-ings in trucks and motors more quickly. Lastly, the LEGO system of tracks is based on a small-radius curve, causing 8-wide models to look somewhat silly as they go around curves since they are longer than their 6-wide counterparts.Train shows present an additional dimension. Typically, clubs try to be consistent in their train scale when doing a layout and go with what ac-commodates the majority of their members. Of-ten, this means a 6-wide layout, though some-times multi-scale layouts appear. Using 6-wide trains in a large club layout also allows longer trains to be run, adding realism in that sense.
However, these drawbacks do not deter fans of the 8-wide trains. For adult fans of LEGO, signifi-cant financial investment in the hobby is a way of life, and with that investment comes the fun of building. The additional realism available in 8-wide models is, to many builders, worth what they pay for it. Larger train wheels produced by Big Ben Bricks make possible realistic steam locomotives, and an 8-wide scale is often called for when including functional drive-rod assemblies – details that the more compact, 6-wide form do not permit. 8-wide trains are limited in length by the ability of their magnetic couplers to pull heavy loads. 8-wide builders have two common tricks for get-ting around this constraint. The first is to add a “helper” motor mid-way through a train to help take some of the load off of the couplers. This same technique is employed with some ac-tual trains going up and down steep mountain grades. A second popular technique Is to strengthen the couplers by inserting powerful neodymium magnets between standard LEGO couplers. This boosts the strength of the coupler significantly, making it possible to haul long and heavy trains.
And then, there are other scales, too. 7-wide models have been gaining ground in recent years
6 vs 8
photo by John Neal
ISSUE 1 - FALL 2007 11

as a compromise between the economy of 6-wide and the realism of 8-wide, with excellent results. Several giant scales – 10, 12, and 14 or more studs wide – exist, taking realism to the extreme on a massive scale while more closely matching the scale dictated by LEGO track gauge. At these sizes, standard LEGO train wheels become too small for the scale, so builders of these models sometimes employ tricks to hide the undersized wheels or in some instances use the larger Big Ben Bricks wheels. At these giant scales, building gets expensive, and it becomes prohibitively expensive to model a whole train. Consequently, giant-scale creations are limited to a locomotive or a stand-alone unit like a trolley, making for a magnificent display model with a distinct “Wow!” factor. Just as there are giant scales, there are mi-croscale trains as well. Only two or three studs wide, some builders relish trying to capture the character of a train using only a handful of bricks. In microscale building, elements take on entirely new purposes in order to evoke large, as opposed to small, details.
6 vs 8
RAIL GAUGE is the distance between the inner sides of the two parallel rails that make up a railway track. Sixty percent of the world’s railways use a gauge of 4 ft 8½ in (1435 mm), which is known as the stan-dard or international gauge. Gauges wid-er than standard gauge are called broad gauge, those smaller are called narrow gauge. Some stretches of track are dual gauge, with three (or sometimes four) parallel rails in place of the usual two, to allow trains of two different gauges to share the same path. The term break-of-gauge refers to the situation at a place where different gauges meet.
source: http://en.wikipedia.org/wiki/Rail_gauge
The debate over the “best” scale will persist as long as LEGO trains are around. Every scale of LEGO trains poses its own unique challenges – only a portion of which are discussed here. Each scale draws a following of avid builders who are willing to meet those challenges and take the size, scale, and realism of LEGO trains to entirely new dimensions.
44Quick TipBrian Darrow’s
When setting up diplays, use a stag-ing area with a table. This keeps your boxes out of the way and helps you to stay organized.
12 ISSUE 1 - FALL 2007

ISSUE 1 - FALL 2007 13
While the challenge of making your rolling stock look realistic in the resolution of just six or eight stud width is half the fun of LEGO trains, a model can only be as good as the prototype material. And when it comes to prototypes, it is hard to beat the real thing. If you are modeling the con-temporary railroads in your neighborhood, all it takes is a day out with your camera to get most of the photos you’ll need. Perhaps you’ll still have to figure out what the roof looks like or maybe the other side of the locomotive (most locomo-tives are not symmetric). The legwork of others can help a lot in this regard, either by looking at models or perusing photos. And such reference material may be the only option if you are mod-eling a historic train that no longer exists. But some of the old equipment still survives either as a steam engine on display in a park or perhaps in the care of a railway museum. Sometimes a piece of equipment will be far from its home rails, e.g., the UP Big Boy in Green Bay Wisconsin. If you want to see the equipment first hand you can’t beat visiting a large railway museum (most of the large museums have a web presence and you can get a feel for the collection from the com-fort of your desk chair). You can find books and web pages listing many train museums, as well as web pages on individual museums. A good place to start is: http://www.railmuseums.com/ but a web search will undoubtedly turn up even more train museums.
You can find railroad books on just about every railroad and every specialized topic. If you are planning on modeling several engines from a spe-cific line you’ll want to track down a few good books with lots of color photos. You might want
to start with your local hobby store or the next train show in town. Your local library or general bookstore could also prove fruitful too; of course there are the numerous on-line bookstores that have more specialized collections or simply a larger selection. It is still nice to visit your lo-cal hobby store and while you are there it is a great place to see firsthand how someone else modeled the hard-to-see details on the roof, etc. Look at a few of the models they have for sale, how many radiator fans are on the roof of that engine or how are the doors laid out on top of that covered hopper car? While you are at the hobby shop or train show, look around for ideas. Maybe there are some good buildings or combina-tions of equipment that you could model.
I’ve found the Model Railroader Cyclopedia to be a great general reference, providing scale sche-matics of locomotives, though unfortunately it looks like Volume 2- Diesel Locomotives has gone out of print. For those unfamiliar with such dia-grams, you can get a flavor of the schematics at: http://paintshop.railfan.net/.
GET REAL!
Model Railroader Cyclopedia Volume 1Edited by Linn H. WestcottKalmach Publishing
Model Railroader Cyclopedia Volume 2
Compiled by Bob HaydenKalmach Publishing
by Benn Coifman
phot
o by
Sea
n La
mb
I

But even such great references as the Cyclopedia cannot capture the small differences from one railroad to the next. Did the Milwaukee Road gp20 have dynamic brakes? Nothing beats the proto-typical photos. In addition to the books, there are many great photo resources on line. Here are several good railroad photo archives for the US, with little or no overlap among them:
Rail Pictures http://www.railpictures.net/Has a large collection of North American locomotives searchable by locomotive model and rail-road. Photos are mostly from the last 10 years, though some are older, with many new photos added each day.
Fallen Flags http://www.rr-fallenflags.org/The title refers to a common term for railroads that are no longer operating, while fallen flags are the focus of the collection, as the first page indicates, it includes contemporary railroads too. The photos are sorted by railroad, then type (diesel, steam, freight cars, passenger trains, etc.). Typi-cally the model is listed, but the lists are sorted by the locomotive or car’s number, not model. If there are a lot of photos in a given type, there might simply be a link to a second page.
RR Picture Archives http://www.rrpicturearchives.net/Similar to Fallen Flags in terms of focus, but accessed much differently. You can search by railroad, model, and many other variables, then refine your search. If you search by railroad, it will then present the results by the locomotive or car number. But you can then refine, grouping by model, etc. Also, be sure to keep an eye out for the “rolling stock” link in the top right above the results to see photos of the cars (here too, you can group by type, etc.). One catch to searching this ar-chive by railroad is that you’ll need to know the AAR reporting marks, e.g., “UP” for Union Pacific. But don’t worry, there are several cheat-sheets on-line, the first is on the site itself, the others offer the same decoding ring,
http://www.rrpicturearchives.net/railroadlistAll.aspxhttp://www.trainweb.org/rosters/marks.htmlhttp://www.spikesys.com/Trains/rep_mrks.html
Get Real!
European Resources
http://www.eisenbahnbilder.net/ (German)http://www.eisenbahnbilder.com/ (German)http://www.railfaneurope.net/ The European Railway Server (English)http://yvaugeois.free.fr/ (French)http://www.photosdetrains.net/ (French)http://www.web-trains.com/ (French)http://www.espacetrain.com/ (French)http://perso.orange.fr/trainfrancais/ (French)http://perso.orange.fr/mlgtraffic/ (French)
14 ISSUE 1 - FALL 2007

Passenger Car Photo Index http://www.trainweb.org/passengercars/Here you will find photos of passenger trains, mostly from fallen flags in the days before Amtrak, though contemporary photos are present too. Indexed by railroad, you might have to use your browser search page function if you are looking for a specific type of car. See the link on the first page for more Amtrak photos too.
Web Lurker’s Dome.main http://trainweb.org/web_lurker/WebLurkersDOMEmain/Dome cars, dome cars, and dome cars. This site has photos of just about every dome car built with lots of supporting material.
Of course you’ll be modeling a specific railroad and if it was a fallen flag of any significance odds are that it has a historical society (and even some of the current class I’s have historical societies). Many of the historical societies have photo archives on-line unique to their road. A good place to start is: http://www.ribbonrail.com/rrpro/database.html. When browsing the railroad historical societies, it helps to know the family tree arising from mergers. You might find photos of a suc-cessor railroad on a predecessors historical society (or vice-versa). Here are two different railroad family trees to help you in this search:
http://www.spikesys.com/Trains/fmly_tre.htmlhttp://trains.com/trn/default.aspx?c=ss&id=19
No matter what the reference source, keep in mind that someone may have taken an artistic license either in restoration of a historic car or in fabrication of a model- just as you will likely choose to omit a detail here or accentuate a feature there. Railroads also tend to change paint schemes every decade or so and they are continually rebuilding their equipment, so that engine or car may have looked different during another period of its life.
Get Real!
ISSUE 1 - FALL 2007 15

16 ISSUE 1 - FALL 2007
NEW YORKThe Streets of
Touring the Urban Sprawl of Jonathan Lopes
Interview by Jeramy Spurgeon
RailBricks: Tell us a little bit about yourself and how you got into modeling with LEGO.
Jonathan Lopes: I was raised just south of Bos-ton, where my family still resides. I moved to New York in 1990. I have always had a passion for city living. I work in book publishing and absolutely love it. I work with and have met some amazing people in this industry. I got into Lego as an adult in about 1998. When I first read about the Star Wars line coming out in the near future I bought an Adventurers Egypt set. From there it took off. I had my first layout (4’x 8’) in the works in 2000. Then I moved and didn’t have space for a layout so I concentrated on building realistic, detailed buildings. All that led to where I am now.
RB: How long have you been working on this lay-out and what are your inspirations?
JL: The physical aspect has been about two years in the making. Though, I had the overall idea and layout designed on paper for a couple years prior.The issue was finding the space for it, at an af-fordable price, in a hip neighborhood, in NYC no less. Not an easy task. I am inspired by things I see on an everyday basis. The first model I de-signed and created back in 1998 or 1999 was a DSNY Street Sweeper. The buildings I create are from my daily travels. My office recently moved to a neighborhood which I am not all that familiar with so I am seeing new buildings and infrastruc-
1: A look down Garrison Avenue

ISSUE 1 - FALL 2007 17
ture all the time now. This new environment will be reflected in some forthcoming projects. Also, seeing the work of others on Brickshelf.com is a huge influence. I get inspired by how others use certain parts.
RB: What are some of your future plans for the layout?
JL: I recently shifted all the tables over 6” to accommodate a new section I am adding. The new section will be appx 2’ x 18’ long and will essentially be building facades along a street with sidewalk along with two freight train lines and a surface trolley rail line. In addition, the new section is going to be lower than the main section. As far as the main layout is concerned, there are a few unfinished areas that need to be completed, so I hope to address those at some point as well.
RB: You are displaying in Detroit at the NMRA Na-tional Train Show show with TCLTC. Tell us about your collaborations with them.
JL: I had been a fan of John and Ross for quite some time and made the trip to NMRA in Philly last summer and met them in person. Later,
in November, they were in NYC and we met for lunch. I was going to ask if it would be possible to display one of my buildings on their layout at an upcoming show but they had another idea: They wanted me to do ALL the buildings. I was thrilled
and also quite flattered. After we worked it all out, I decided I want-ed to build all new buildings for the show rather than take existing ones with me.
RB: When you sit down to build, how do you begin you building process? Sketches? Reference pictures?
JL: Once I have something in mind that I want to build I do research and either find images of it or take pictures of it. Sometimes, rarely though, I draw things out. Most of my building and planning is actually done in my head, on the subway, on the way to and from work. Once I get a firm idea of what I want and determine the colors I want, I go to
Bricklink.com and see what parts are available, affordably, in those colors. Then I figure out which parts I can use to achieve certain aesthetic effects. I then start to build with actual Lego. The physical building part is the shortest time in my typical building process, believe it or not. I spend about 4 hours per week actually building. Rarely more than that.
The Streets of New York
2: Some flatiron style buildings
3: The bad side of town - Faile Street

18 ISSUE 1 - FALL 200718 ISSUE:VOLUME:QUARTER:YEAR
The Streets of New York
Cover
1
7
4
2
3
568

ISSUE 1 FALL 2007 19
RB: Your layout as a very “real” feel to it. John Neal termed it “ashcan”. Can you describe this aesthetic and the effect you are trying to achieve?
JL: Real life is what I am going for. Sometimes life is gritty; some might consider certain aspects of life unsightly; but it is reality and it has feel-ing and soul. That is what I aim for. The chal-lenge is doing it in Lego. It has gotten easier with the earth-toned color bricks being easier to ob-tain and more affordable over the past couple of years. The Ashcan reference is just perfect for the way I build and for what I want to achieve. I am into art and have admired the approach of artists like Henri and Hopper for years but truth be told, I never made the connection to the way I build until John mentioned it. It all makes per-fect sense. I am really inspired by the way these
artists were able to capture life in a warm soulful way.
RB: Your vehicles are just as impressive as your buildings! What are your inspirations when de-signing them?
JL: Thank you! My inspiration is real vehicles. I see fire trucks, garbage trucks, delivery trucks and roll-off trucks all the time. Building lots of detail in a small package isn’t easy and I am in-fluenced and borrow ideas from quite a lot of people for my vehicles. I truely consider my ve-hicles ‘community developed’. Without a doubt. Same with my trains.
RB: Tell us a little bit about the size of your lay-out.
JL: Main layout is 8’ (244cm) x 16’ 6” (503cm). There are two freight train lines, one surface trolley line, an elevated subway line and a cou-ple of ‘dead’ lines for show. There are two levels which allows the elevated subway line to go un-der ground and the freight lines go under ground at points as well. There are six bridges, four fire-houses, one police station, one canal along with a diner among the other buildings. It is set up as realistically as I could with warehouses and fac-tories near the burned out section and restau-
The Streets of New York
4: Exposed brick on Faile Street
5: Ashcan city 6: A garbage truck makes its rounds near Canal Street

20 ISSUE 1 - FALL 2007
The Streets of New York
rants, bars and night spots in the more lively section. The diner is near the industrial zone.
RB: Elaborate on anything else you’d like....
JL: I can’t say enough about the LEGO building community. I have learned so much from oth-ers and gotten so many ideas and so much encouragement. It goes a long way. I hope my creations provide inspiration to others and that they are able to build upon and improve upon some of my ideas and make them better!
7: A trolley rides over the Train Yard
8: The subway travels over Front Ave. on its way down Canal Street
CHALLENGE

ISSUE 1 - FALL 2007 21
ReverseEngineeringChallenge
A
If you build Lego trains, then you know the diffi-culty that arises when trying to capture all of the detail in a resolution of only 6 or 8 studs wide. Many tricks can be used to pull out the details you want. But when you are wandering off in to the land of MOCs, you aren’t following any di-rections. An important skill to have in this unex-plored territory is being able to reverse engineer someone else’s work and learn their tricks. Consider this model of a Northern Pacific, high-nose GP9.
At first glance it is rather unassuming, maybe some crafty snot to get the red pin-stripe to bend just so, but odds are, nothing jumps out.
Hopefully, it looks “right” without slapping you in the face. Now look closer, that cab is five studs long, and the window is three, but it has a full window frame, including a thin break between the two panes.
In fact it also has forward and rear windshields on this six wide cab, around a four wide hood.
Something is going on between those walls. Some clues are evident, but can you figure out how it’s done? Keep in mind that the engine is (roughly) symmet-ric, and the other side looks similar to this one shown. Submit your solution in either ldraw format or provide sufficient digital photos on how to con-struct the cab to [email protected] with the title REC #1 by November 1st, 2007. Be sure to include your name and contact information. The editorial staff will select the best design from all of the buildable submissions that achieve this effect and winner will receive a “RailBricks Challenge” engraved brick. We’ll publish the so-lution in the next issue. All submissions become the property of RailBricks and by submitting an entry you will allow us to print your submission in whole or in part. If you have ideas or suggestions for future chal-lenges, contact us at [email protected]
by Benn Coifman
CHALLENGE

photo by Sean Lamb
I
Better American Style Freight Trucksby Cale Leiphart
At some point every train builder modeling an American style freight car has looked at the stan-dard LEGO wheel sets and wondered if there was a better way. The LEGO train wheels are great for European prototypes, but the frames are lack-ing when it comes to modeling US freight trucks. So what is a builder to do? Building around the frames is difficult if not impossible without things looking horribly bulky. Removing the wheels and axels from the frames allows for a much more elegant build but presents the problem of how to attach the newly freed wheel sets to the rest of the truck. The instructions provided here repre-sent my solution (with some inspiration borrowed from other LEGO fans) to building a more Ameri-can style freight truck. I hope you the reader will find them useful. Since LEGO’s train wheels were designed to snap into the frames, attaching them without the housing can be tricky. For my trucks I pulled one wheel off the axle and slid the remaining axle and wheel into two 1x1 Plate with Light Clip. I then snapped the loose wheel back on the axle. This works ok but I’ve found that difference be-
tween the inside diameter of the clip and the di-ameter of the axel causes some excess play with the wheels. This sloppiness can cause unwanted drag, particularly on heavier eight wide mod-els. To eliminate this I’ve used a 1/8” (3.18 mm) brass tube cut to four studs in length and inserted through the clip plates. The axle can then ride in-side the tube eliminating much of the sloppiness. The 1/8” (3.18 mm) brass tube I use is from K&S Engineering (http://www.ksmetals.com/) and can be found in most hobby shops and through online hobby retailers. K&S also offers a cutter to cut the tube to length. You’ll also want to pick up some needle files to de-bur the brass tube after
22 ISSUE 1 - FALL 2007
INSTRUCTIONS

Better American Style Freight Trucks
it’s been cut. The thing I like best about this ap-proach is that it doesn’t require any modification of the brick. The tube is just small enough to fit snugly in the clips. In order to help reduce friction even further I’ve experimented with using grease to lubricate be-tween the axle and tubing. I’ve found that Tami-ya (http://www.tamiya.com/) Ceramic Grease works well for this. Tamiya uses this to lubricate gears inside the transmissions of their Radio Con-trol Cars which are often made from ABS plastic so it should be safe to use with LEGO. My truck design uses the older 9v wheels and axles where the wheel is pressed onto the axle and the axel pokes completely through the wheel for a tight fit. Unfortunately these wheels are be-coming harder to find and more expensive. The newer R/C train wheels are cheaper and more readily available but have a much looser fit and don’t stay together unless inserted in the LEGO frames. If you’re not opposed to gluing LEGO however you can use some Cyanoacrylate adhe-sive (also known as CA, Super Glue, Krazy Glue, etc.) to attach the wheels to the axles. Place a small amount (a little goes a long way) on the tip
of the axel then insert the axel into the wheel. Before gluing the second wheel, make sure the axle is inserted through the tube on the trucks. This should provide a sturdy long lasting bond.
Parts List
INSTRUCTIONS
ISSUE 1 - FALL 2007 23

24 ISSUE 1 - FALL 2007

ISSUE 1 - FALL 2007 25

PUTTING YOUR TRACK TO BED
I
A LOOK AT VARIOUS APPROACHES TO ADDING REALISM TO YOUR TRACK BALLASTby Mark Peterson
photo by Mark Peterson
TRACK BALLAST, consisting of gravel, cinders or other aggregate, forms the track bed upon which railroad ties (US) or railway sleepers (UK) are laid. It is used to facilitate drainage of water, and to create an even running surface. This also serves to hold the track in place as the trains roll by. In the early days of railroads in the United States, much material for ballast came from rock found in the local area. In the Midwest, for example, much use was made of quartzite, while states in the southeast, such as Florida, made use of limestone. One specific type of quartzite used in the Midwest earned the name “Pink Lady” due to its color; in other areas, the ballast can be a mix of light and dark colors called “Salt and Pepper”.
http://en.wikipedia.org/wiki/Track_ballast
Each piece of LEGO track consists of two rails and four ties. When the track is laid down on either baseplates or a table, the underlyng ma-terial shows through the track, such as pictured here. While this works fine for children, it looks can be a little bland and unrealistic. We’ll look at several ways of adding ballast to your track, all adding an extra level of detail that can make your layout stand out in the crowd.
26 ISSUE 1 - FALL 2007
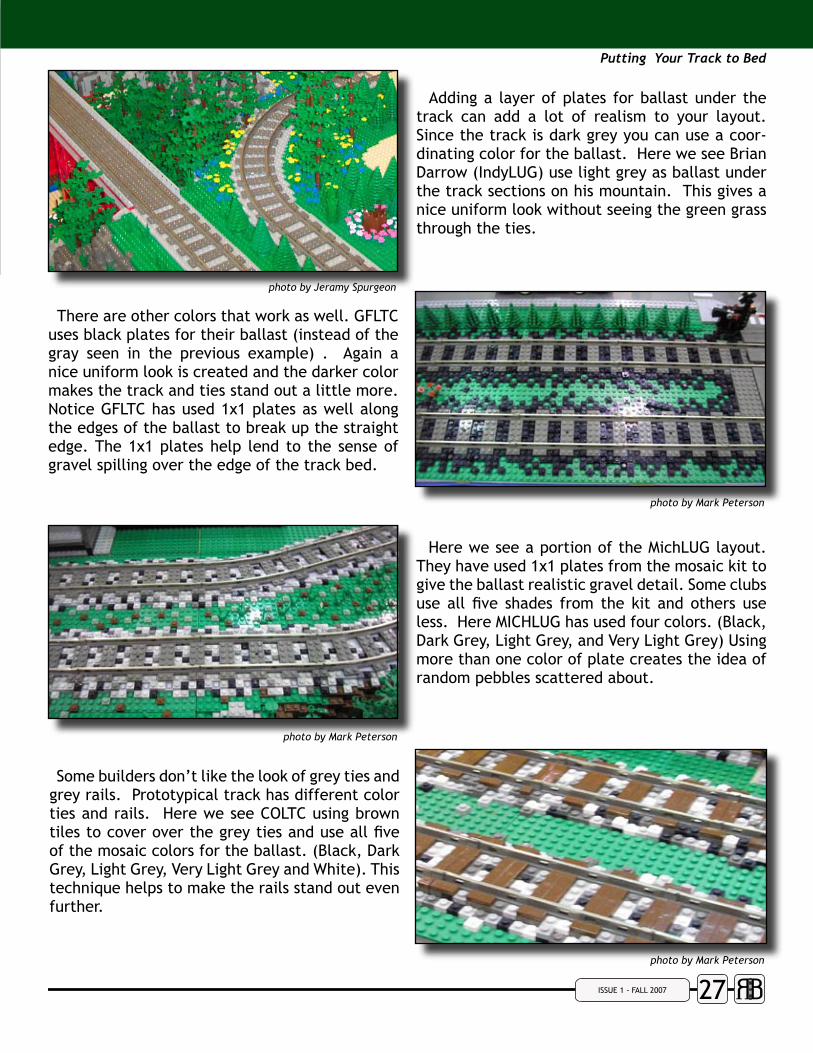
photo by Jeramy Spurgeon
photo by Mark Peterson
photo by Mark Peterson
photo by Mark Peterson
Putting Your Track to Bed
Adding a layer of plates for ballast under the track can add a lot of realism to your layout.Since the track is dark grey you can use a coor-dinating color for the ballast. Here we see Brian Darrow (IndyLUG) use light grey as ballast under the track sections on his mountain. This gives a nice uniform look without seeing the green grass through the ties.
There are other colors that work as well. GFLTC uses black plates for their ballast (instead of the gray seen in the previous example) . Again a nice uniform look is created and the darker color makes the track and ties stand out a little more. Notice GFLTC has used 1x1 plates as well along the edges of the ballast to break up the straight edge. The 1x1 plates help lend to the sense of gravel spilling over the edge of the track bed.
Here we see a portion of the MichLUG layout. They have used 1x1 plates from the mosaic kit to give the ballast realistic gravel detail. Some clubs use all five shades from the kit and others use less. Here MICHLUG has used four colors. (Black, Dark Grey, Light Grey, and Very Light Grey) Using more than one color of plate creates the idea of random pebbles scattered about.
Some builders don’t like the look of grey ties and grey rails. Prototypical track has different color ties and rails. Here we see COLTC using brown tiles to cover over the grey ties and use all five of the mosaic colors for the ballast. (Black, Dark Grey, Light Grey, Very Light Grey and White). This technique helps to make the rails stand out even further.
ISSUE 1 - FALL 2007 27

photo by Mark Peterson
photo by John Kyle
Putting Your Track to Bed
Another approach is to make everything dark grey and add ties to the grey. Here we see TCLTC; John and Ross Neal added 1x4 black tiles between the rails with 1x1 tiles on the outside. This adds an-other level of realism, as well as dimension, to a layout, but at a high cost. Notice, too, the 1x1 plates turned at angles to break up the square-ness of LEGO.
Here we see a mixture of different colored bal-last plates with black ties added, done by John Kyle (IndyLug). Also notice the use of 1x1 rounds intermixed with the square plates. This approach combines many of the ideas mentioned previ-ously.
Adding ballast to your track is a simple, but effective way to add realistic detail to your layout. The ideas presented here can be seen as a progression; a beginner who starts with simply adding some gray plates under the track, to the expert builder fully adding ties and “stones”.
Did you know? A typical mile (1.61 km) of rail contains
approximately 3,000 ties.
28 ISSUE 1 - FALL 2007
EVENTS

2007 Event Facts:
Particpating LTCs: CABRCOLTCGFLTCIndyLUGKCLUG
photos by Benn Coifman, John Neal, and Mark Peterson
Total AFOLs: ~100Show Attendance: ~22,000Total sq. feet: ~11,000 ( ~1000 m2)Total pieces: unkown
MichLTCMichianaLTCNILTCrtlTorontoTCLTC
ISSUE 1 - FALL 2007 29
EVENTS

NMRA National Train Show 2007
30 ISSUE 1 - FALL 2007

Welcome to 1001 bricks!www.1001bricks.com
NMRA National Train Show 2007
ISSUE 1 - FALL 2007 31
Without Cutting Corners
I
The available LEGO train tracks is pretty limited in it’s geometry. Be-side straight tracks there are only curved tracks in a pretty small radius and only one type of points/switches available. This little assortment is supplemented by a 90° crossing for 9V and a switch-crossing for the remote control system. LEGO trains are primary designed for kids to play with in their rooms, the track system should be easy enough to set up in a short period of time and it should be small enough to fit in the room of the kids. While adult LEGO train fans start to build huge layouts with miles of track they realize the limitations of the existing track geometry very fast.LEGO train fans were begging the LEGO Company and discussing other possible geometries for ages in various online forums. The new switch-crossing shows that LEGO has the ability to develop new track geom-etries but the metal tracks seems to be discontinued. Some train enthusiasts started modifying the existing track elements to make half or quarter elements of the straight track element. Also switches can be modified to avoid the typical S-shape of the side track. If space doesn’t matter another method can be used to realize an-other track geometry: smooth curves. You don’t have to cut or harm your track elements and at minimum you only need 5 LEGO elements per track element to build your own smooth curve. But keep in mind, it will become huge!
This smooth curve only uses straight track elements. This might sound confusing but it works, the straight tracks are used to build a polygon. To get the curve effect, each element is not connected tight with the
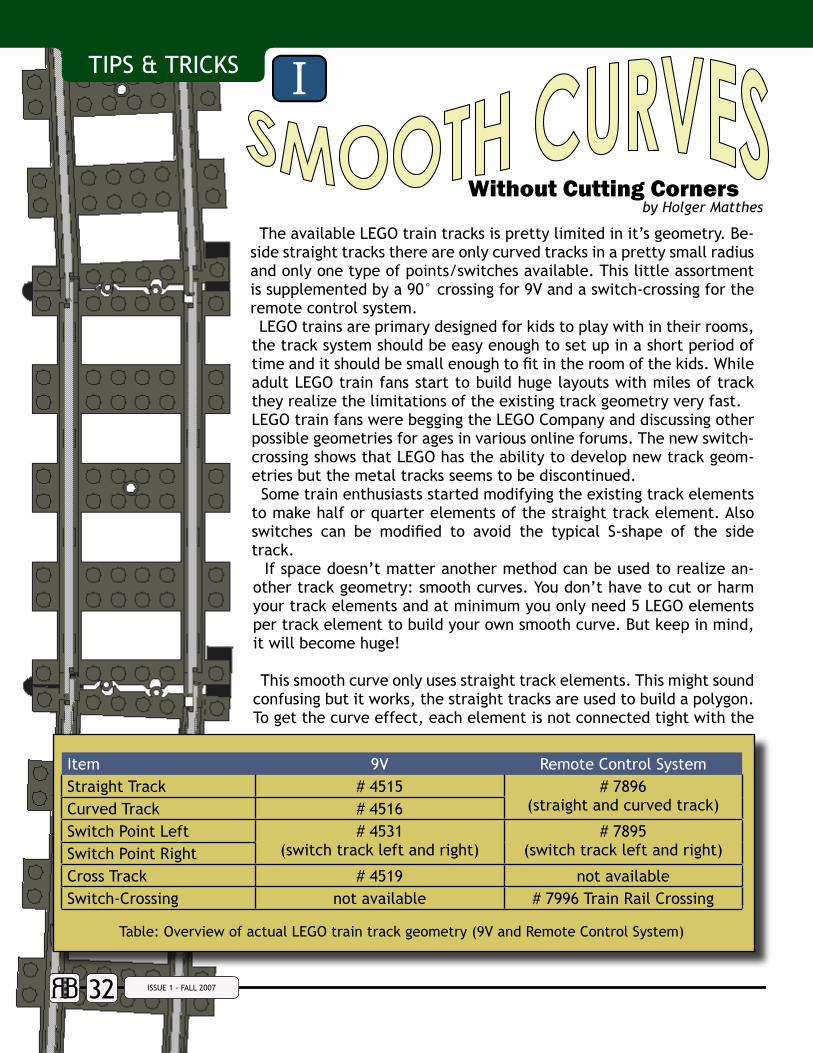
Item 9V Remote Control SystemStraight Track # 4515 # 7896
(straight and curved track)Curved Track # 4516Switch Point Left # 4531
(switch track left and right)# 7895
(switch track left and right)Switch Point RightCross Track # 4519 not availableSwitch-Crossing not available # 7996 Train Rail Crossing
Table: Overview of actual LEGO train track geometry (9V and Remote Control System)
by Holger Matthes
32 ISSUE 1 - FALL 2007

next one. Instead, a jumper plate is used to get ½ stud offset at one side of the track. Adding several of these modified tracks will give you a huge wide curve. For a ¼ circle 23 of these modified pieces of track are required. The outer radius while using 23 modified pieces is ca. 6.2 ft (190 cm). The electric current is not interrupted at the offset connection of the modified elements. All tests went well and there was always power on all modified tracks.
For one modified piece of track you’ll need:
1 straight track
1 1x4 plate with hinge
2 1x2 plates
1 1x1 plate
1 1x2 plate with one stud
While electrical continuity is preserved, resistance might increase with this design, i.e., heavy trains far from the pickup might slow or stop. A simple solution, if such a problem arises, is to use two or more electrical pickups from the same controller, distributed around the track (just be sure to connect them with the same orientation).
Smooth Curves
ISSUE 1 - FALL 2007 33

First of all, what is a narrow gauge railway? Stan-dard gauge is commonly accepted around the world as having a track gauge of 4’8½” and is by far the most common. Narrow gauge simply means anything below 4’8½” although, in certain parts of the world, this is actually the standard. Nar-row gauge trains can vary greatly in size, speed, and sophistication, allowing for plenty of variety. Light industrial lines often used 2’ or 60cm track with small four wheeled locos and stock, while the transcontinental 3’6” lines of Africa and part of Australia use stock far bigger than any on Euro-pean standard gauge lines.Building in LEGO Narrow gauge trains can be represented in LEGO in three ways:1: Ignoring the difference in track gauge and building to minifig scale (6 or 8 wide) and using Lego track.2: Building in minifig scale and using either the old LEGO 4.5/12V rails set closer together or brick-built track. This has the advantages of fit-
ting in a minifig scale scene, but makes it hard to build curves or pointwork.3: Using standard LEGO track 4.5/12V, 9V or IR all plastic track and increasing the scale of the model.4: Using non-LEGO components for the track. This allows any scale to be built. All of these methods have their advantages and disadvantages. When the track gauge is ignored, one of the distinctive features of narrow gauge is lost, but is the easiest method, and when done carefully, can look fairly convincing. Using brick-built track is possible, as Ross Neal has shown. Using standard track works, but models are heavy and end up consuming a lot of bricks. Using non-Lego components allows for more variety in track-work and more powerful motors to be used, but is not compatible with everyone’s LEGO building philosophy. My personal preference is to use method 3. I pick a prototype I like and scale it to suit the 38mm gauge of LEGO track. This means that, as
Building Narrow Gauge Trains
photo by Jan Pešula
by Tim David
34 ISSUE 1 - FALL 2007

an example, models of 2 foot gauge prototypes are a larger scale than metre gauge ones. How-ever, as a general rule of thumb, the narrower the gauge, the smaller the train, and the actual models end up roughly the same size. Getting a sense of scale A useful technique at the planning stage is to create a full LEGO scale drawing. Find a drawing of the prototype that includes an end elevation and enlarge it until the wheels are 45mm apart. Although a small original can often end up quite crude using this method, it doesn’t really matter for LEGO purposes. This technique allows one to get an idea of how large the model is going to be, something which can be harder with bigger models. It can also make you realise what you are in for when a vehicle comes out to over 60 studs long!Extra Detail As with any model built to a larger scale, there is more opportunity to get both the shape and details right. Complex curves can be replicated more accurately and small detail components can contain more components than they would at a smaller scale to better match the real thing.Track Standard LEGO track is already halfway towards looking like convincing narrow gauge track; the wide sleepers/ties and spacing are prototypical, as are the sharp curves. However, be aware that a sharp curve at Minifig scale is a very sharp curve at Technic fig scale! A simple method of improv-ing the appearance of the track is to add a 1x2 grey plate at each end of every sleeper/tie.Wheels Big Ben Bricks wheels are a must for building in larger scales. Not only are the wheels proportion-ally smaller, but the axle holes allow for Technic
motorising. The larger wheels don’t just have to be used for steam locos, because the wheels are so inset under the body of the vehicle that the holes for the crankpins aren’t obvious.Windows Large windows can be a problem in LEGO. There are a few options, but much depends on the de-sign of the prototype. -Use the larger windows in the range, part 2493 Window 1x4x5 is available in many colours. The largest window, part 3761 Window 1x6x5, is only available in a few colours and can be expensive. -Use multiples of the transparent panel parts and ignore the seams. -Use trans bricks in the way that the LEGOLand builders do and accept the semi-opacity. -Leave the glass out. -Use non-LEGO transparent plastic sheet mate-rial. Part 2412b grill tiles can provide a good win-dow frame.Couplings Couplings are still an area for experimentation.The greater weight of narrow gauge can cause similar problems to those of 8 wide and so some of the same solutions will work, such as using neo-dymium magnets between the standard magnets or distributing the power between the vehicles. Another problem, again not exclusive to narrow gauge trains, can be the long overhang. Various designs for pivoted and articulated arms to mount the couplings on can be found on Brickshelf. One point to note is that heavy vehicles also need sturdy mounting for the couplings.Making it move Heavy vehicles require lots of power and trac-tion to actually move. This means that building in a large scale needs to incorporate elements of Technic skill as well as those of standard train
building. My first model, a small petrol loco, is built around a standard 9V motor and as it and the rest of the train are small, there are no real problems. The second model, a Swiss tram and trailer, although both fairly small and four-wheeled, is at the limit of the power of the 9V motor. This
Building Narrow Gauge Trains
Prototype track gauge Scale using LEGO track 1 foot in LEGO studs2’ or 60cm 1:15.5 2.4750mm 1:19.5 22’6” 1:20 1.93’ 1:24 1.61000mm 1:26.5 1.43’6” 1:28 1.354’8½” or 1435mm 1:45 0.85Table showing the scale for some common track gauges (some rounding)
Building Narrow Gauge Trains
ISSUE 1 - FALL 2007 35

is partly due to weight but mainly due to the high friction of the long wheelbase of the (unpowered) tram. Because of this, I decided very early in the de-sign process to make my next loco, a 4-6-0 Bald-win steamer, all-wheel-drive. A standard LEGO train motor both powers the leading bogie/truck and provides power pickup for the 9V Technic motor that powers the all driving wheels through the use of a gearchain. While the success of this arrangement remains to be seen, I have gleaned the two points that follow and hope they will be useful for future builds. I experimented with several gear ratios trying to match the speed of the driving wheels to the train motor. However, it does not seem to mat-ter that much, since there is enough weight in the bodywork to ensure that neither set of wheels slips. The combined friction of the long gearchain and connecting rods possibly negates the power pro-duced by the Technic motor. However, the flex-ibility of the Technic flex rod system used for the connecting rods really requires that the axles be geared together in order that the wheels stay aligned. As this is the largest source of friction, I haven’t yet tested it without a motor.People who build Large scale A search of the Internet reveals quite a few peo-ple building in larger scales. In the UK, apart from myself (1), David Tabner (2) has also produced some models of 2’ gauge industrial prototypes, and Brickshelf users Stidy (3) and Blackflame (4) both have some nice industrial steam locos. In Germany Karl Heinz (5) has built a nice model of a rack mountain train, and there are several models of US Shay and Climax locomotives from Chris Thompson (6) Willvale (7) Rene Kok (8) Ross Crawford (9) and Brickbaron, (10) among others.Using 4-wide track Ross Neal(11) has built a working (non-narrow gauge) train running on four wide track. Gras1(12), Mocaholic (13), Misterzumbi (14) and Toemu (15) all have produced models of very small trains de-signed for four wide track.8 and 6 wide In 8 wide, Brickshelf user Monty (16) has a very realistic model of a Welsh Vale of Rheidol loco,
and Michel Brachmond (17) has produced some nice models of German stock. Felix–the-Swiss (18) has a cute 6 wide Feldbahn. Sastrei (19) has a typical US logging train in 8 wide.Using non-LEGO track A Dutch website shows some images of Swiss metre gauge trains using LGB components taken at Intermodellbau 2002 Dortmund, Germany, (20) while Railbricks contributor John Neal is promis-ing to build some similar US prototypes. (Apolo-gies to those whose models I may have missed.)Where to go next? For future builds I will be looking to the new IR motor set in the new 8275 Technic Bulldozer and other sets. After having seen the torque pro-duced by the larger motor I am confident that one (or even two!) will power large models with ease, the only limit being the strength of the ax-les. The separation of the battery box, motor, and IR receiver allows them to be distributed around the model, and the extra IR channels al-low for details such as remote uncoupling, open-ing doors, raising pantographs, etc. to be incor-porated. There are so many potential prototypes that the possibilities are endless. There are also techni-cal challenges; outside framed steam locos, long wheelbase four wheelers, and building a scenic layout to a large scale. There is no doubt that if LEGO trains are still only part way up the devel-opment curve, then narrow gauge LEGO trains are right at the bottom. (1) http://www.mocpages.com/home.php/1580(2) http://www.mocpages.com/folder.php/2613(3) http://www.brickshelf.com/cgi-bin/gallery.cgi?f=138501(4) http://www.brickshelf.com/cgi-bin/gallery.cgi?f=125095(5) http://www.vogt-com.de/brb.htm (6) http://www.brickshelf.com/cgi-bin/gallery.cgi?f=110731(7) http://www.brickshelf.com/cgi-bin/gallery.cgi?f=22280(8) http://www.brickshelf.com/cgi-bin/gallery.cgi?f=214997(9) http://www.brickshelf.com/cgi-bin/gallery.cgi?f=82292(10) http://www.brickshelf.com/cgi-bin/gallery.cgi?i=674631(11) http://www.brickshelf.com/cgi-bin/gallery.cgi?f=7051(12) http://www.brickshelf.com/cgi-bin/gallery.cgi?f=210712(13) http://www.brickshelf.com/cgi-bin/gallery.cgi?f=179671(14) http://www.brickshelf.com/cgi-bin/gallery.cgi?f=192209(15) http://www.brickshelf.com/cgi-bin/gallery.cgi?f=77605(16) http://www.brickshelf.com/cgi-bin/gallery.cgi?f=266275(17) http://www.brickshelf.com/cgi-bin/gallery.cgi?f=42091(18) http://www.brickshelf.com/cgi-bin/gallery.cgi?f=50506(19) http://www.brickshelf.com/cgi-bin/gallery.cgi?f=28307(20) http://www.sb.ele.tue.nl/~marcel/model/imb2002/imb2002.html
Building Narrow Gauge Trains
36 ISSUE 1 - FALL 2007
TRAINSPOTTING

Brickshelf Username: sekiyamahttp://www.brickshelf.com/cgi-bin/gallery.cgi?f=81363
Brickshelf Username: DundShttp://www.brickshelf.com/cgi-bin/gallery.cgi?m=DundS
Brickshelf Username: namohttp://www.brickshelf.com/cgi-bin/gallery.cgi?m=namo
Brickshelf Username: tompaul43http://www.brickshelf.com/cgi-bin/gallery.cgi?f=254137
ISSUE 1 - FALL 2007 37
TRAINSPOTTING

Fairbanks-MorseH 10-44
by Jeramy Spurgeon
photo by Sean Lamb
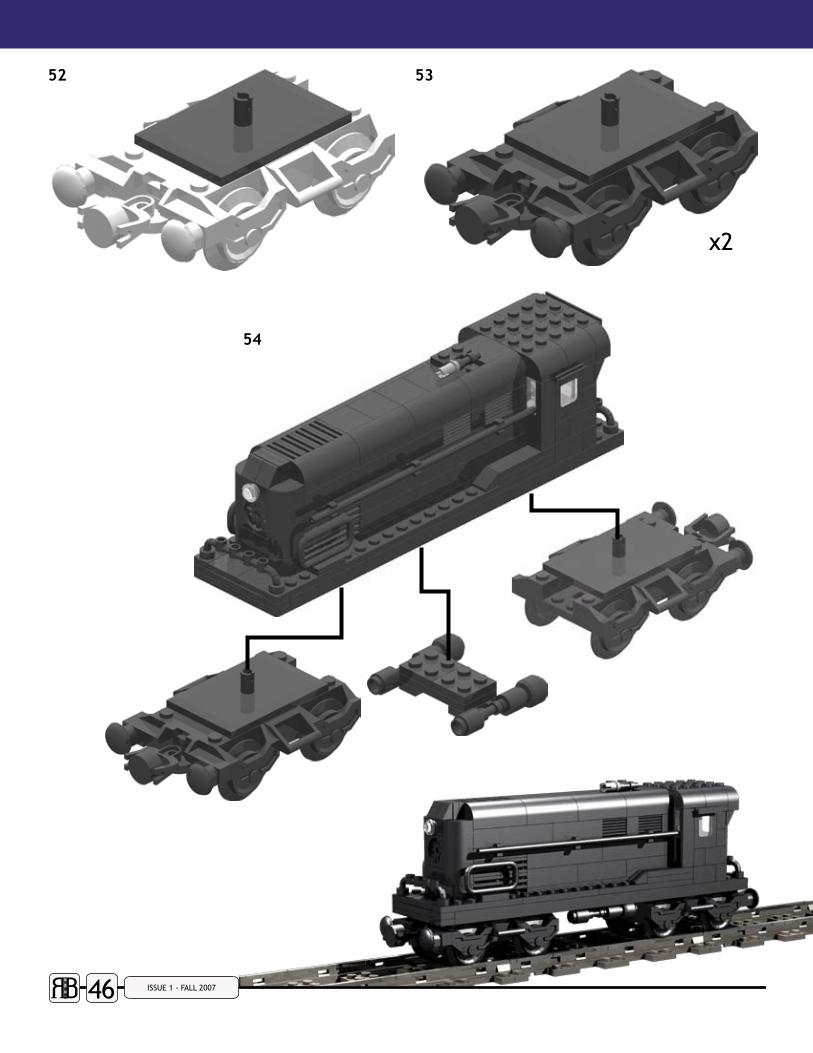
When I began modeling my favorite railroad, the MONON, one of the first engines that I wanted to model was the FM H10-44. Monon only had one of these engines, and it was the first diesel they recieved when the great switch over from steam took place. I had originally wanted to include the instructions for the original model that I did, which is 8 wide, but instead, I want to share the 6 wide version that I created for the Hobby Train project. When I was asked to participate in the project, I quickly chose the Fairbanks Morse unit as one of my first submissions. While it did not make the cut for inclusion in the box, I’m still very fond of this rendition. This engine can be built from one copy of the 10183 Hobby Train Set from LEGO Factory*. The instructions do not in-clude adding a motor, but the conversion is very simple.
*The “bogus” motors require 4 more 2x4 black plates than what is included in the box.
I
38 ISSUE 1 - FALL 2007
INSTRUCTIONS

black slope 45 2x2
1 2
43
5 6red plate 1x2
control panels
INSTRUCTIONS
ISSUE 1 - FALL 2007 39

8
10
1211
13
9
14
<flip>
7
<flip>
black slope 45 2x2
40 ISSUE 1 - FALL 2007

15
16 17
1918
20 21
black 1x1 headlight brick(reversed)
ISSUE 1 - FALL 2007 41

2322
24 25
2726
28
42 ISSUE 1 - FALL 2007

black brick 1x2
35
29 30
32
33 34
31
<flip>
36
ISSUE 1 - FALL 2007 43

37 38
4039
41 42
4443
44 ISSUE 1 - FALL 2007

45 46
47 48
49
51
50
52
ISSUE 1 - FALL 2007 45
52 53
x2
54
46 ISSUE 1 - FALL 2007
FRED’s VIEW

ISSUE 1 - FALL 2007 47
It isn’t often that you get the opportunity to glimpse greatness or be at the right place at the right time, but this past July that indeed happened to me. It was at the ILTCO layout at the NMRA 2007 National Train Show in Detroit. It was day two, I was in the typical sensory overload coma when one of many fantastic conversations spontaneously occurred. It actually started as a lament: The reduced number of posts to LUGNET, the splintering of our community as theme groups grow their own online presence, the threat of our community’s photo-repository going off line, and the last straw, the transition of the 9v train system to the next iteration. We all stood around staring at out feet reflecting on our own waning interests; it was a total downer. Then out of nowhere the dark clouds parted I looked up and as far as I could see; nothing but LEGO trains and the towns, cities and countryside scenery as a backdrop. I spoke up and spontaneously re-torted: Look around! We are at the largest LEGO train layout ever in the world! Not only large, but top shelf, from front to back; the best of the best! And we are standing here among ~60 of the top LEGO train builders in North America; the who’s who of AFOL master train and town builders. In the day time we indulge in each others designs, soak up the praise from the crowds, and wish for padded floors. At night we eat, drink, and be merry. So in many ways this is the apex of what we do. It reminds me of the stories about the Apple computer community in the heydays. The stories about the first years of Apple developer conventions in the basements of hotels in a sleepy city that was to become Silicon Valley. Where the young enthusiasts stood in 10’x10’ booths with hand written com-pany logo signs of who were to become the giants in Apple software and 5 ¼” floppies with dot matrix printed labels. These young enthusiasts became the CEOs and CTOs of top PC companies. Some still exist, some not, but regardless there are fans that now read about those days in history books and dream of being there when it all started. Well my friends look up, we are there right now in the LEGO train hobby. It wasn’t too long ago we dreamed of buildings in tan and gray, completely stud covered layouts, bal-lasted track, and train liveries in dark green and orange. We dreamed of the day when there would be a LEGO store in many major cities, when we could buy bulk brick locally and online. Moreover we dreamed that one day AFOLs would be affecting LEGO products and product plans on a regular basis. Cer-tainly there are still some unrealized dreams but …I’d say we’re on “11” right now! So start that next project you have dreamed of doing. Take that spectacular MOC that you’ve seen on the internet and do it one better. Cause just when you think there is nothing left to do or no more possible element combina-tions, you’ll see someone hang snow mobile treads on the side of a box car which then has the un-canny appearance of a car carrier!
The Right Place at the Right Time
FRED’s View is Railbricks’s closing thoughts article
by Steve Barile
FRED’s VIEW

See you next issue!Coming up in RAILBRICKS #2:
Modifying Track
Building Mountains with Brian Darrow!