a sloping floor for a barrier-free...
TRANSCRIPT
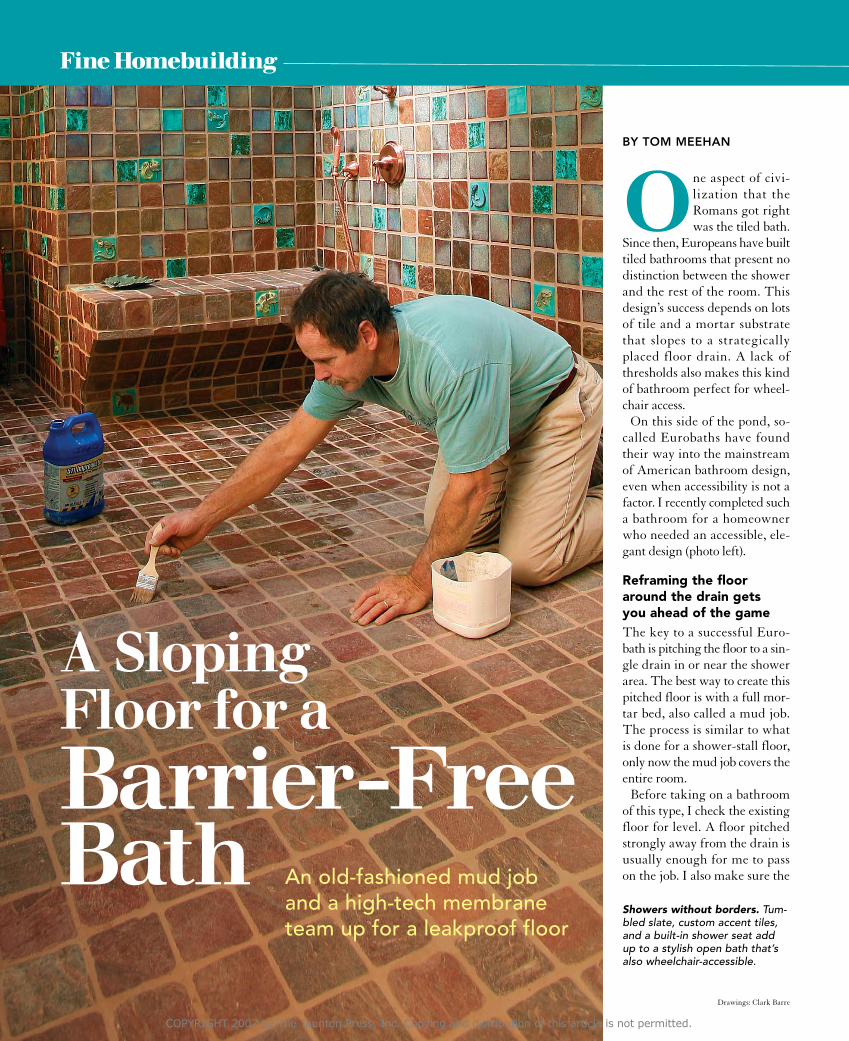
One aspect of civi-lization that the Romans got right was the tiled bath.
Since then, Europeans have built tiled bathrooms that present no distinction between the shower and the rest of the room. This design’s success depends on lots of tile and a mortar substrate that slopes to a strategically placed floor drain. A lack of thresholds also makes this kind of bathroom perfect for wheel-chair access.
On this side of the pond, so-called Eurobaths have found their way into the mainstream of American bathroom design, even when accessibility is not a factor. I recently completed such a bathroom for a homeowner who needed an accessible, ele- gant design (photo left).
Reframing the floor around the drain gets you ahead of the gameThe key to a successful Euro-bath is pitching the floor to a sin-gle drain in or near the shower area. The best way to create this pitched floor is with a full mor-tar bed, also called a mud job. The process is similar to what is done for a shower-stall floor, only now the mud job covers the entire room.
Before taking on a bathroom of this type, I check the existing floor for level. A floor pitched strongly away from the drain is usually enough for me to pass on the job. I also make sure the
Fine Homebuilding
Barrier-Free Bath An old-fashioned mud job
and a high-tech membrane team up for a leakproof floor
BY TOM MEEHAN
Showers without borders. Tum-bled slate, custom accent tiles, and a built-in shower seat add up to a stylish open bath that’s also wheelchair-accessible.
A Sloping Floor for a
Drawings: Clark Barre
COPYRIGHT 2007 by The Taunton Press, Inc. Copying and distribution of this article is not permitted.
FEBRUARY/MARCH 2007
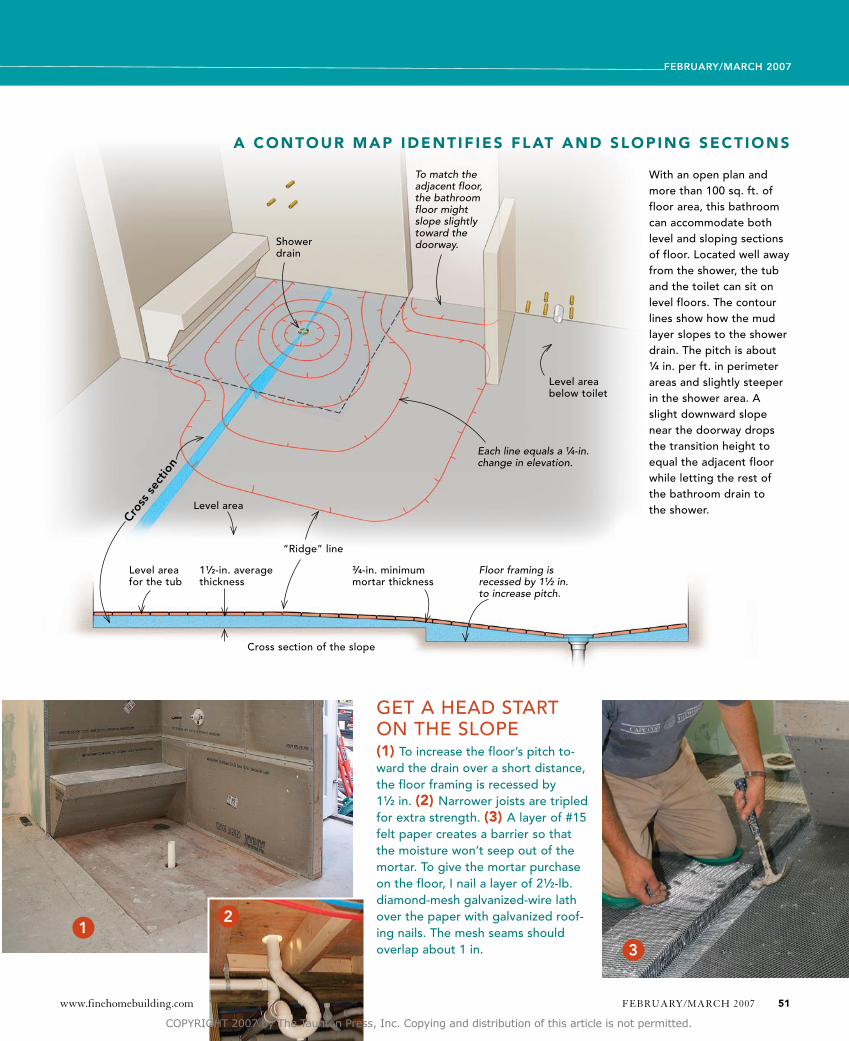
Get A heAd stArt on the slope(1) to increase the floor’s pitch to-ward the drain over a short distance, the floor framing is recessed by 11⁄2 in. (2) narrower joists are tripled for extra strength. (3) A layer of #15 felt paper creates a barrier so that the moisture won’t seep out of the mortar. to give the mortar purchase on the floor, I nail a layer of 21⁄2-lb. diamond-mesh galvanized-wire lath over the paper with galvanized roof-ing nails. the mesh seams should overlap about 1 in.
1
With an open plan and more than 100 sq. ft. of floor area, this bathroom can accommodate both level and sloping sections of floor. located well away from the shower, the tub and the toilet can sit on level floors. the contour lines show how the mud layer slopes to the shower drain. the pitch is about 1⁄4 in. per ft. in perimeter areas and slightly steeper in the shower area. A slight downward slope near the doorway drops the transition height to equal the adjacent floor while letting the rest of the bathroom drain to the shower.
3
level area for the tub
level area below toilet
“ridge” line
shower drain
To match the adjacent floor, the bathroom floor might slope slightly toward the doorway.
Each line equals a 1⁄4-in. change in elevation.
Floor framing is recessed by 11⁄2 in. to increase pitch.
A contouR mAp identif ies flAt And sloping sectionsCr
oss
sect
ion
Cross section of the slope
level area
3⁄4-in. minimum mortar thickness
2
11⁄2-in. average thickness
www.finehomebuilding.com FEBRuARy/MARCh 2007 51
COPYRIGHT 2007 by The Taunton Press, Inc. Copying and distribution of this article is not permitted.

floor is good and strong without any bounce.
To keep the finished floor from ending too high at doorways, I had the carpenters on this job frame a 11⁄2-in. recess in the shower area, replacing the 2x10 joists with narrower 2x6s that then were tripled for added strength. When reframing isn’t a viable option (on an upper floor or a slab, for instance), I get the drain as low as I can and use a smoother tile (2x2 or less) that won’t impede the flow toward the drain. I also have the option of using NobleFlex drain flashing (bottom sidebar, p. 54). When the reframing was complete, I put a layer of #15 felt paper over the entire floor, then nailed down 21⁄2-lb. diamond-mesh galvanized-wire lath with 11⁄2-in. roofing nails, overlapping the mesh joints by at least an inch. Felt paper isolates the mortar bed from movement in the subfloor and keeps the wooden subfloor from sucking moisture out of the mortar as it dries. The wire lath anchors the mortar to the floor.
screeds guide the floor pitchIn a large mortar box, I mix the mortar by thoroughly combin-ing 25 shovelfuls of sand to each bag of portland cement; then I add water a little at a time (about 5 gal. per batch) until the mortar has a dry but stiff consistency. It should stay together when you form it into a ball in your hand. I plan for about 35 sq. ft. of cov-erage averaging a 11⁄2-in. depth with each batch mixed as above.
I set the drain low enough to get a pitch of at least 1⁄4 in. per ft. (drawing p. 51). After gluing the drain flange to the PVC waste line, I dump buckets of mortar around the perimeter of the room and around the drain in 8-in.- to 10-in.-high mounds. using a slightly wetter mortar mix, I make sure to fill the space under the flange completely.
The height of the door thresh-old where the bathroom floor meets the adjacent floor is the most critical juncture. Taking into account the thickness of the floor tile and the height of the adjacent floor, I pack and flatten the mortar with a steel trowel until it is the proper height. With that as a standard height, I then work my way around the room’s perimeter. Because water is unlikely to reach the far cor-ners of the room, I level the pe-rimeter of the floor to allow the toilet, the vanity, and the tub to sit squarely.
the shower is a big shallow bowl Now I’m ready to pitch the floor of the shower area. I dump a few buckets of mortar between the
level perimeter and the drain, and pack the mortar into that area.
So that the mortar screeds evenly, one end of the straight-edge rides on the perimeter while the other end rides on the drain. As I work, I switch tools constantly, screeding with a level, packing with a steel trowel, and smoothing the surface with a wood float.
I find it easier to scrape the sur-face down to the finished height, so I keep the mortar slightly high, and use trowels and levels to pitch the floor to the drain. I continue to check the slant of the floor, pulling the excess mortar toward me to create a shallow bowl in the shower area.
Once the bowl is formed, the mortar is smoothed with a wood float to take out any small high
beGIn WIth mounds of mortAr(1) A dry mix of mortar is distributed evenly around the perimeter of the room. (2) After cementing the drain at the proper height, I fill the space below the flange with a slightly wetter mortar mix, making sure the space is filled completely. I then distribute more mortar around the shower area.
1 2
or low spots. Finally, I use a steel trowel at a shallow angle to press in a tight, shiny finish.
A membrane waterproofs the mudBecause mortar is porous, it needs to be waterproofed with an impervious membrane. The membrane needs not only to cover the floor but also to extend at least 6 in. up the wall.
I used Schlüter’s Kerdi mem-brane for this project (bottom sidebar, p. 54). Any nonlatex-modified thinset (also known as dry set) will attach the membrane to the mortar bed, but I used the recommended Ditra-Set (Bostik; www.bostik-us.com).
I begin by spreading thinset along the edges of the mor-tar bed and walls with a 3⁄16-in.
FINE hOMEBuILDING52 Product photos: Krysta S. Doerfler
COPYRIGHT 2007 by The Taunton Press, Inc. Copying and distribution of this article is not permitted.

pACk, sCreed, smoothmy basic strategy here is to bed the drain, pack the mud flat and level around the higher perimeter of the floor, and then work at creating the slope between high and low. (1) I use a short level and a long aluminum straightedge to get the perimeter level. (2) A wooden float held at a 45° angle pushes the mortar tight against the wall. (3) levels of dif-ferent lengths also serve as screeds, enabling me to check the pitch of the floor while removing bumps and filling hollows. (4) As I pack and fair the slope of the mud, I use a wooden float to remove high spots and a steel trowel held at a low angle to finish the surface.
2 3
4
1
subfloor
Bonding flange adheres to the membrane.
Pack a wetter mix of mortar beneath the flange.
www.finehomebuilding.com FEBRuARy/MARCh 2007 53
COPYRIGHT 2007 by The Taunton Press, Inc. Copying and distribution of this article is not permitted.
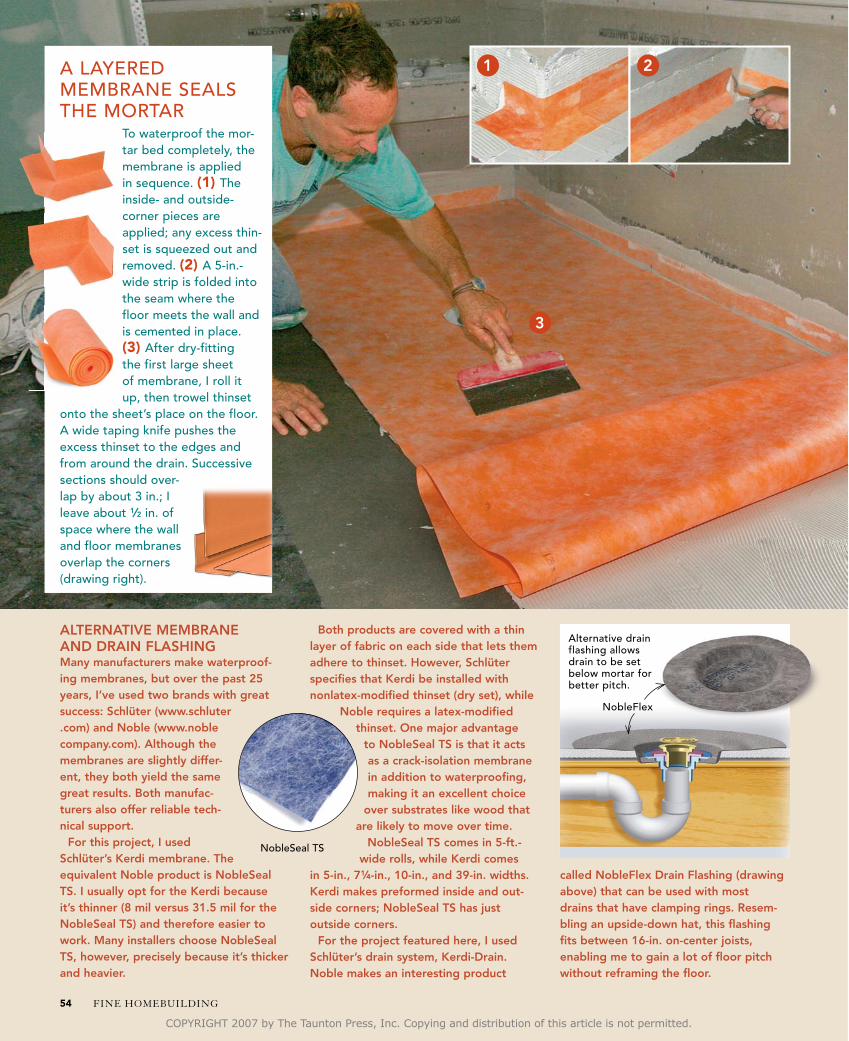
Many manufacturers make waterproof-ing membranes, but over the past 25 years, I’ve used two brands with great success: Schlüter (www.schluter.com) and Noble (www.noblecompany.com). Although the membranes are slightly differ-ent, they both yield the same great results. Both manufac-turers also offer reliable tech-nical support.
For this project, I used Schlüter’s Kerdi membrane. The equivalent Noble product is NobleSeal TS. I usually opt for the Kerdi because it’s thinner (8 mil versus 31.5 mil for the NobleSeal TS) and therefore easier to work. Many installers choose NobleSeal TS, however, precisely because it’s thicker and heavier.
A lAyered membrAne seAls the mortAr
to waterproof the mor-tar bed completely, the membrane is applied in sequence. (1) the inside- and outside-corner pieces are applied; any excess thin-set is squeezed out and removed. (2) A 5-in.-wide strip is folded into the seam where the floor meets the wall and is cemented in place. (3) After dry-fitting the first large sheet of membrane, I roll it up, then trowel thinset
onto the sheet’s place on the floor. A wide taping knife pushes the excess thinset to the edges and from around the drain. successive sections should over-lap by about 3 in.; I leave about 1⁄2 in. of space where the wall and floor membranes overlap the corners (drawing right).
ALTERNATIVE MEMBRANE AND DRAIN FLASHING
1
Both products are covered with a thin layer of fabric on each side that lets them adhere to thinset. However, Schlüter specifies that Kerdi be installed with nonlatex-modified thinset (dry set), while
Noble requires a latex-modified thinset. One major advantage
to NobleSeal TS is that it acts as a crack-isolation membrane in addition to waterproofing, making it an excellent choice
over substrates like wood that are likely to move over time.
NobleSeal TS comes in 5-ft.-wide rolls, while Kerdi comes
in 5-in., 71⁄4-in., 10-in., and 39-in. widths. Kerdi makes preformed inside and out-side corners; NobleSeal TS has just outside corners.
For the project featured here, I used Schlüter’s drain system, Kerdi-Drain. Noble makes an interesting product
called NobleFlex Drain Flashing (drawing above) that can be used with most drains that have clamping rings. Resem-bling an upside-down hat, this flashing fits between 16-in. on-center joists, enabling me to gain a lot of floor pitch without reframing the floor.
2
3
Alternative drain flashing allows drain to be set below mortar for better pitch.
nobleseal ts
nobleflex
FINE hOMEBuILDING54
COPYRIGHT 2007 by The Taunton Press, Inc. Copying and distribution of this article is not permitted.
V-notch trowel, then press the Kerdi preformed inside and out-side corners into place. using a taping knife with rounded cor-ners, I squeeze out excess thin-set from beneath the corners, then coat the exposed surfaces to attach the overlapping layer.
Next, I cut a length from a 5-in.-wide roll of membrane and fold it in half down the middle. Pressed into the corners, the mem- brane should cover each side by 21⁄2 in. and overlap the previ-ously installed corner pieces. As before, I flatten the membrane and squeeze out excess thinset.
Before installing the larger sections of membrane over the mortar bed, I sweep the floor thoroughly. Beginning in the shower area, I cut to length all sections and dry-fit them. The first section goes over the shower drain; I carefully mark and cut out the drain location, using a manufacturer’s template.
I also use a permanent marker to draw a line onto the mortar at the edge of the first section to guide the thinset application. Each successive section overlaps the line of the previous section about 3 in. After each section is dry-fit, I roll it up, number it, and put it aside.
When all the sections are cut, I spread thinset to the first guideline with a notched trowel. Spreading the thinset in one direction, I extend it onto the flange of the drain, then slowly unroll the first membrane sec-tion, keeping the edge aligned with the guideline. As mem-brane is unrolled, I press it into the thinset with a taping knife, keeping the membrane straight and flat by continually pushing excess thinset to the edge of the section. After bedding each sec-tion, I spread the thinset to the overlap line of the previous sec-tion before repeating the process. Finally, I apply a floor-to-ceiling membrane to the shower walls, using the same method that I
1
4
used on the floors to ensure a waterproof installation.
smaller tile means better drainageAfter the membrane sits over-night, the floor is ready for tile. I protect the membrane with felt paper or cardboard to minimize any puncture risk. The only dif-ference from a regular tile instal-lation is that the membrane is now the substrate for the tile.
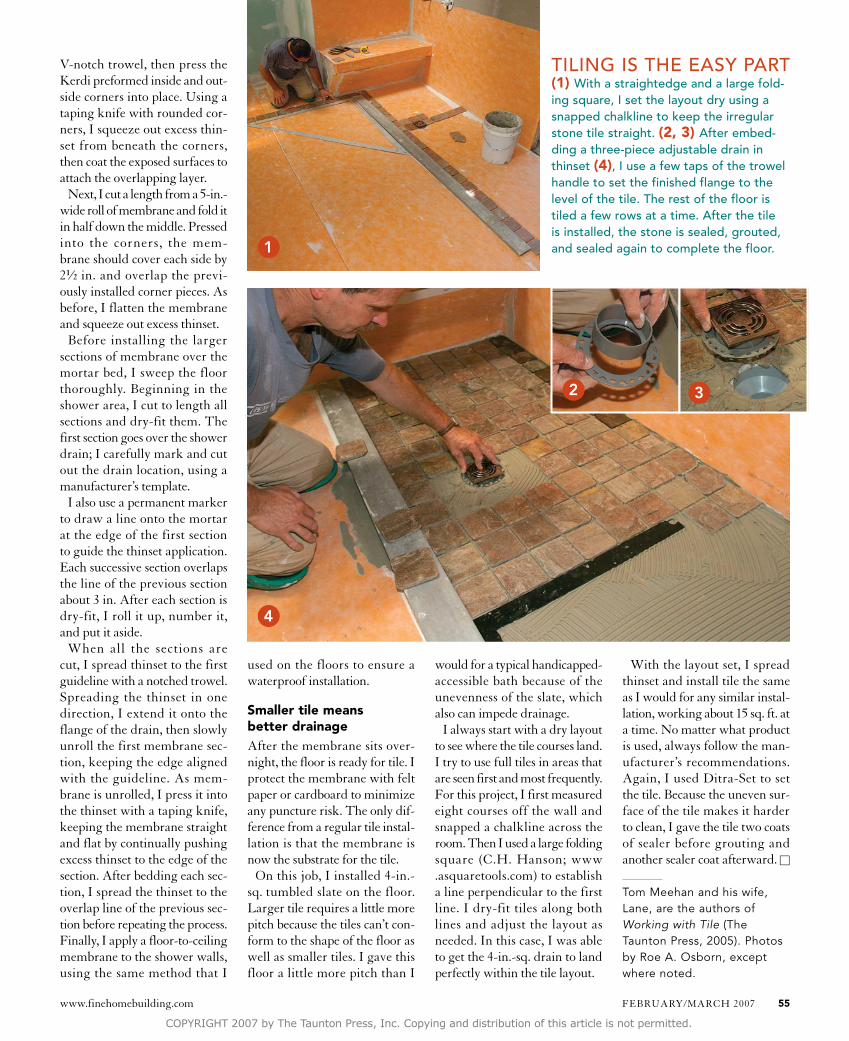
On this job, I installed 4-in.-sq. tumbled slate on the floor. Larger tile requires a little more pitch because the tiles can’t con-form to the shape of the floor as well as smaller tiles. I gave this floor a little more pitch than I
tIlInG Is the eAsy pArt (1) With a straightedge and a large fold-ing square, I set the layout dry using a snapped chalkline to keep the irregular stone tile straight. (2, 3) After embed-ding a three-piece adjustable drain in thinset (4), I use a few taps of the trowel handle to set the finished flange to the level of the tile. the rest of the floor is tiled a few rows at a time. After the tile is installed, the stone is sealed, grouted, and sealed again to complete the floor.
would for a typical handicapped-accessible bath because of the unevenness of the slate, which also can impede drainage.
I always start with a dry layout to see where the tile courses land. I try to use full tiles in areas that are seen first and most frequently. For this project, I first measured eight courses off the wall and snapped a chalkline across the room. Then I used a large folding square (C.h. hanson; www .asquaretools.com) to establish a line perpendicular to the first line. I dry-fit tiles along both lines and adjust the layout as needed. In this case, I was able to get the 4-in.-sq. drain to land perfectly within the tile layout.
With the layout set, I spread thinset and install tile the same as I would for any similar instal-lation, working about 15 sq. ft. at a time. No matter what product is used, always follow the man-ufacturer’s recommendations. Again, I used Ditra-Set to set the tile. Because the uneven sur-face of the tile makes it harder to clean, I gave the tile two coats of sealer before grouting and another sealer coat afterward. M
Tom Meehan and his wife, Lane, are the authors of Working with Tile (The Taunton Press, 2005). Photos by Roe A. Osborn, except where noted.
2 3
www.finehomebuilding.com FEBRuARy/MARCh 2007 55
COPYRIGHT 2007 by The Taunton Press, Inc. Copying and distribution of this article is not permitted.