a step-by-step guide to the three-colour image tool€¦ · web viewthe zoom preview works by...
TRANSCRIPT
www.schoolsobservatory.org
A Step-by-step guide to the Three-Colour Image Tool
Stages in making a 3-colour image
1. Loading the Images2. Starting the Tool3. Aligning the Images4. Pixel Value Range and Contrast5. Saving the Picture
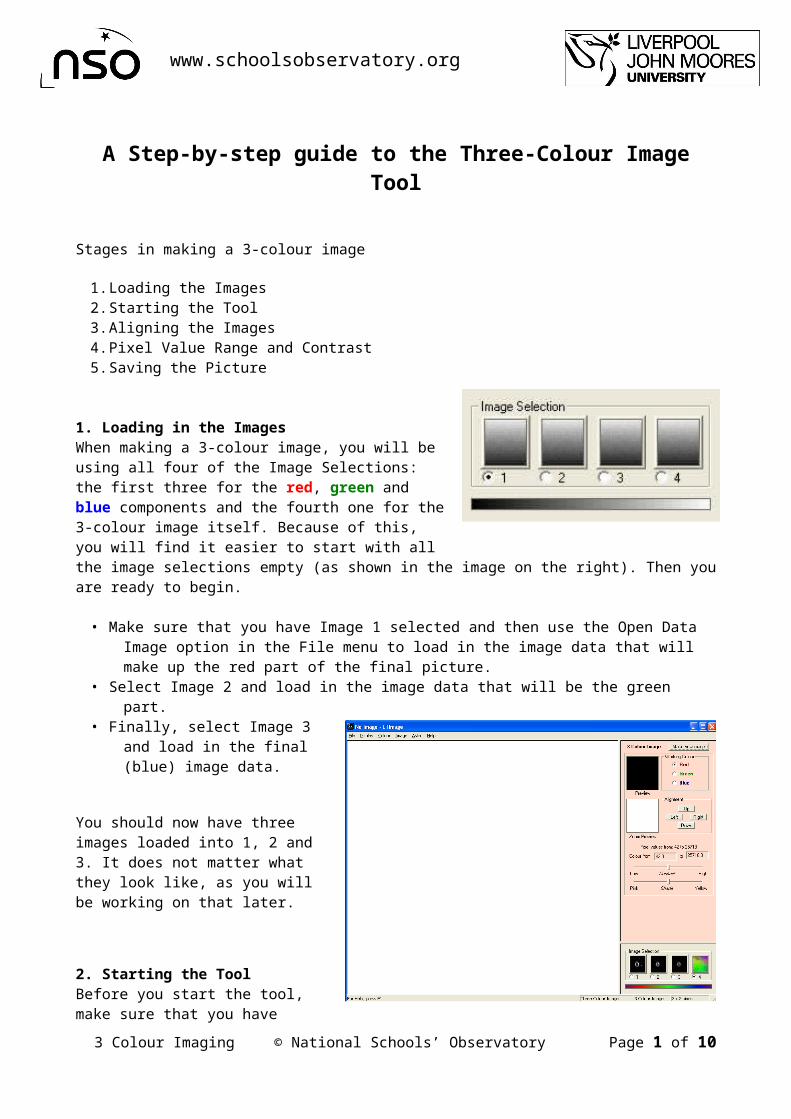
1. Loading in the ImagesWhen making a 3-colour image, you will be using all four of the Image Selections: the first three for the red, green and blue components and the fourth one for the 3-colour image itself. Because of this, you will find it easier to start with all the image selections empty (as shown in the image on the right). Then you are ready to begin.
• Make sure that you have Image 1 selected and then use the Open Data Image option in the File menu to load in the image data that will make up the red part of the final picture.
• Select Image 2 and load in the image data that will be the green part.• Finally, select Image 3 and load in the final (blue) image data.
You should now have three images loaded into 1, 2 and 3. It does not matter what they look like, as you will be working on that later.
2. Starting the ToolBefore you start the tool, make sure that you have Image 4 selected - this is where tool will put the final 3-colour image. Then simply go to the Colour menu and select 3-Colour Image.
That should give you something that looks a bit like the screenshot opposite:
3 Colour Imaging © National Schools’ Observatory Page 1 of 6

www.schoolsobservatory.org
Then, to get everything setup and ready, click on the "Make new image" button at the top of the tool. This will make a first-guess version of the 3-colour image and display it in the main image panel (see below). Do not worry if this look quite bad - it will often just show black with perhaps a couple of small "dots", but this is quite normal at this stage.
3. Aligning the ImagesUsually you will find that your three "colour" images are not perfectly lined up. The next stage, therefore, is to correct this.
To do this you will use the "Zoom Preview" panel and the buttons next to it to nudge each colour "Up", "Down", "Left" or "Right".
The Zoom Preview works by showing a small part of the 3-colour picture in detail as you make changes. (Making the complete picture takes most computers a several seconds, so it is not possible to keep the whole thing up-to-date all the time).
To use the Zoom Preview window, move your mouse pointer over the main picutre and then "click" with the left mouse button. The Zoom Preview will change to show the small piece of the image under your pointer.
Now find a "dot" or other clear feature on the image and centre the Zoom Preview window on it by clicking. (You may find it easier if you hold down the mouse button and move the mouse pointer slowly over the image).
3 Colour Imaging © National Schools’ Observatory Page 2 of 6
If you cannot find a suitable "dot", then do not worry - simply go on to step 4 below, which will help you to see more of your image. Then you can come back to align the images later. NOTE

www.schoolsobservatory.org
The Zoom Preview window should now look something like the image on the right. Can you see how the three images of the star are slightly separate, showing the red, green and blue colours?
You can now "nudge" the red image using the buttons until it is under the blue one, making the star look more purple - as in the picture on the right.
Next you want to move the green image a bit, so click on the little circle beside the word Green at the top of the tool. You should see the background colour of the tool change.
You are now changing the Green image, so you can "nudge" it into place. You should en up with a much whiter, point-like star as in the image here:
Obviously, you do not need to "nudge" the blue image - it is now underneath the red and green ones, so just click on "Make new image" and you are ready to move on to the next stage!
4. Pixel Value Range and ContrastSo far, you are probably thinking that you image is a bit disappointing! Do not worry - this is where you really start to see the power of 3-colour images.
If you have ever used the Display Scaling tool, you will have realised that changing the range of pixel values that you look at can make a big difference to how an image looks.
With 3-colour images, you can adjust each colour separately and make lots of changes to your picture. There is no "right" or "wrong" way to do this - you should experiment and explore to get a picture that you like.
3 Colour Imaging © National Schools’ Observatory Page 3 of 6

www.schoolsobservatory.org
To get you started, try the following:
• Go back to working on the Red image (i.e. click on the little circle next to the word Red at the top of the tool).
• About half-way down the tool, you will find a line that says something like "Colour from: 27.0 to 29812.2" (although your numbers will be different). This can be used to set the range of pixel values you are interested in. (The maximum and minimum pixel values found in the image are given on the line above, and will be the same at the moment).
• Try changing the second (larger) number to something a lot smaller - for example, if it says "20000" at the moment, try "2000" or even "1500".
• As you change it you should see the "Zoom Preview" and "Preview" images changing - see the example below.
3 Colour Imaging © National Schools’ Observatory Page 4 of 6

www.schoolsobservatory.org
• Click on "Make new image" to see the change in your main window:
Now go back and do something similar for the Green and Blue images:
3 Colour Imaging © National Schools’ Observatory Page 5 of 6
www.schoolsobservatory.org
It is worth playing around a bit with the values to bring out exactly what you want. Don't forget that you can use the Display menu tools to Zoom in and out on the main picture, and the "Zoom Preview" to explore in detail:
You can also use the "Contrast" and "Shade" sliders to make more subtle changes. The best way to learn what these do is simply to try them!
5. Saving the PictureWhenever you have a picture that you like, you should remember to Save it (you can save as many different 3-colour pictures as you like, of course, not just one!)
To save a picture, go to the File menu and select Save Picture.
You will be asked to choose a name for your picture (and you can also choose which folder to put it in). Simply type in a name and click on "Save". The picture will be saved as a "BMP" (Bitmap) file.
And that is it!
As you make more pictures you will get more and more used to the tool and all the different things it can do - the more you practise, the better you will get.
You can also take your picture and use image editing software like Photoshop or The Gimp to make even more adjustments and changes.
Most importantly of all, Have fun!
3 Colour Imaging © National Schools’ Observatory Page 6 of 6