a t stride skills arcade user guide
TRANSCRIPT

St r i d el ea rn i ng .com
2300 Corporate Park Dr ive , Herndon, VA 20171
Copy r ight © 2021 S t r i de, I nc . A l l r igh ts reserved .
ADMINISTRATORS AND TEACHERS Stride Skills Arcade
User Guide
Rev 09_15_21 101816-356
Back to Top
Contents Overview ......................................................................................................................... 3
Access Point Comparisons – Instructor View .............................................................. 3
Getting Started – Direct Access Users ............................................................................ 4
Access – Administrators/Teachers .............................................................................. 5
Creating Classroom and Instructor Accounts – Administrators .................................... 5
Import Students – Administrators/Teachers ................................................................. 6
One-Click Logins – Teachers ...................................................................................... 7
Getting Started – Via LMS Integrations ........................................................................... 7
Classroom Creation and Enrollment ............................................................................ 8
PEAK Access .............................................................................................................. 8
OLS Access ................................................................................................................. 8
Online Middle School/High School Access .................................................................. 8
Stride Skills Arcade Dashboard – Teachers .................................................................... 9
Navigation Tab Overview ............................................................................................. 9
Dashboard ................................................................................................................. 10
CUSTOMIZE DASHBOARD VIEW ........................................................................... 10
CORRECT RESPONSES (GRADE LEVEL WORK) ..................................................... 10
STUDENT WORK BY GRADE ................................................................................ 11
LIVE CLASS MONITOR ........................................................................................ 11
PERFORMANCE (% CORRECT) ............................................................................ 11
ACTIVITY .......................................................................................................... 11
Rapid Clicking ............................................................................................................... 11
Reports .......................................................................................................................... 12
All Reports ................................................................................................................. 12
Generate Reports ...................................................................................................... 13
DATA EXPORT BUILDER ..................................................................................... 13
Reports by Student .................................................................................................... 14
Report Emails ............................................................................................................ 15
My Students .................................................................................................................. 15
Curriculum ..................................................................................................................... 15
2 Back to Top
Customize for an Entire Class: .................................................................................. 16
Customize for an Individual Student .......................................................................... 17
Assigned Skills Mode ................................................................................................. 17
Quizzes ......................................................................................................................... 18
Create a Quiz ............................................................................................................ 18
Edit Quiz Properties ................................................................................................... 19
Edit Quiz Questions ................................................................................................... 19
Sorting Quizzes ......................................................................................................... 20
Archive or Restore a Quiz .......................................................................................... 21
Cloning ...................................................................................................................... 21
Share Quizzes ........................................................................................................... 21
StrideXchange ............................................................................................................... 22
Uploading Files .......................................................................................................... 22
Manage Files ............................................................................................................. 23
Learning Modules ...................................................................................................... 24
Assigned .................................................................................................................... 26
Shared with You ........................................................................................................ 26
Shared by Me ............................................................................................................ 26
Free Resources ......................................................................................................... 26
Trash ......................................................................................................................... 26
StrideXchange Top Menu Items ................................................................................ 26
Student Message View .............................................................................................. 27
Settings ......................................................................................................................... 27
Student Tools ............................................................................................................ 27
Report Emails ............................................................................................................ 28
Language Settings ..................................................................................................... 28
Class Info ................................................................................................................... 28
School Info ................................................................................................................. 29
Assessments ................................................................................................................. 29
Progress Monitoring Assessment (PMA) ................................................................... 29
Gap Assessment ....................................................................................................... 30
Games, Rewards, and Contests ................................................................................... 31
Games Settings ......................................................................................................... 31

3 Back to Top
Rewards and Coin Manager ...................................................................................... 31
Contests .................................................................................................................... 32
Student Shop ................................................................................................................ 33
Technology Needs ........................................................................................................ 34
Computer Tips ........................................................................................................... 34
Student Stride Skills Arcade .......................................................................................... 34
Student Tool Kit (Access Point Agnostic) .................................................................. 34
Student Overviews (Access Point Specific) ............................................................... 34
Overview Stride Skills ArcadeTM provides a unique teaching tool to motivate students toward content mastery by rewarding learning with game time. This program is a supplemental learning tool that offers a source of differentiated learning for students in Pre-K through 8th grade, including math, language arts, reading, and science content. When students solve problems or answer questions correctly, they are awarded coins. Coins can be banked and later redeemed for a brief brain break in the form of a video game, where the student can also earn points and badges. Instructors can utilize these student accomplishments and real-time data to create motivators for focused and effective learning. Sometimes recommended activities will appear while students are working through questions. These activities can include:
• Videos • Mini lessons • Worksheet activities • Bops – which guide students through solving a math problem
By completing one of these recommended activities, students earn bonus coins.
Access Point Comparisons – Instructor View There are four different access points depending on the implementation. The below table highlights differences in tools available via different access points.
Access Point Direct Access PEAK Access OLS Access OMHS Access
Dashboard Yes Yes Yes Yes
Reports Yes Yes Yes Yes

4 Back to Top
Rapid Clicking Notification
Yes Yes Yes Yes
My Students Yes View Only* View Only* View Only*
Import Students Yes Not Visible* Not Visible* Not Visible*
Curriculum Yes Yes Limited to a
specific subject** Limited to a
specific subject**
Quiz Builder Yes Yes Yes Yes
StrideXchange Yes Yes
Settings Yes Yes Yes Yes
Access Point Direct Access PEAK Access OLS Access OMHS Access
Assessments Yes Yes Locked*** Locked***
Contests Yes Yes Yes Yes
Games & Rewards
Yes Yes Yes Yes
Student Shop Yes Yes Yes Yes
Secondary Access/One -Click Login
Yes Not Visible**** Not Visible**** Not Visible****
Support Yes Yes Yes Yes
*Rosters are managed through the LMS (i.e., PEAK, OLS/TVS, OMHS/TVS). Changes must be done outside of Stride Arcade. **Access is limited to the subject of the course that the student is accessing via OLS or OMHS. ***Contact your administrator to request PMA or Gap Assessments be turned on. ****Teachers will access each Stride Arcade course through the course link within the LMS.
Getting Started – Direct Access Users Direct access accounts use Stride Arcade for supplemental learning and log into Stride Arcade through https://www.stridelogin.com/login/. Once a direct access program’s account is created, administrators will receive their login information. Once administrators have their login information, two primary needs must be addressed:
• Classroom Creation – administrator action. • Import Students – this action can be centralized by the administrator or
completed at the individual classroom teacher level.
Select the role-specific checklist to get started. • Administrator

5 Back to Top
• Teacher
Access – Administrators/Teachers Direct Access Only
Select here to view the video short. Users receive their login information in an automated email from [email protected] once their school or classroom is created.
1. Access https://www.stridelogin.com/login/.
2. Select the I’m a Teacher or Admin tab.
3. Enter login code and password provided via email. The code will begin with a
state abbreviation followed by the letter S or C and a number (i.e., AZS380637).
NOTE: If you will be managing more than one class, you will want to use your
email as the login. Select here for more information on One-Click Login.
4. Select Login. For Administrators and Instructors, the landing page is the Stride
Skills Arcade Dashboard. Users may be asked to verify their email.
5. Update user password if desired.
a. ADMINISTRATOR – select School Info > Change Password button.
b. INSTRUCTOR – under Settings > select General > Class Info tab > Change
Password button.
Creating Classroom and Instructor Accounts – Administrators Direct Access Only
Select here to view the video short.
1. Select Import Classes from the navbar.
2. Download the Excel template provided.
3. Enter the following information. Be sure to delete or replace the sample data with
real data.
a. Class Name – This is a descriptive field. (i.e., Ms. Potter’s Grade 3)
b. Grade – Use the Grade Chart found on the Import Class Data page for
valid entries.
c. Complete associated teacher fields (column C, D, and E)
d. Language – Default languages can be English or Spanish.
e. Teacher email – Email to which login information and reports are sent.

6 Back to Top
f. Hints – T or F based on if the program wishes hints to be provided to
students.
g. Send email – This should almost always be Yes. This provides teachers
notification that the course was created and their initial password.
4. Select Choose File. Select the recently created .csv file.
5. Select Upload.
Teachers will receive an email with their login credentials. Encourage teachers to
change their password via Settings > Classroom Info tab > Change Password button.
Import Students – Administrators/Teachers Direct Access Only
NOTE: The ability to import users is restricted to those who access the Stride Skills
Arcade platform directly. Those accessing via an LMS integration must use their normal
enrollment procedures.
ADMINISTRATOR OPTIONS:
To add students to a classroom:
1. Select Import Students from the Stride Skills Arcade navbar.
2. Select the option that best suits a program’s workflow. Administrators and
teachers may see slightly different options, but the directions for each are visible
within the system. How to determine what is best for your program? The option a
program takes is often related to its size. Many programs either opt to have
administrators upload students associated with specific classrooms or have
teachers upload their rosters. The efficiency in selecting off a master list can be
overwhelming for larger programs.
a. Import Student into Classes – this option allows administrators to pre-
populate classrooms with students. Admins must know the classroom
code before using this option. Class codes are visible via the Class
Manager tab.
b. Create a Master Roster for Teachers to Build Their Rosters – teachers
can add students to their roster by using a .csv upload or selecting
students off a schoolmaster roster. This option provides the ability to pick
students off a master list.
3. Follow on-screen prompts for the option selected.
TEACHER OPTIONS
To add students to a classroom:
7 Back to Top
1. Select My Students from the Stride Skills Arcade navbar.
2. Select + Add for individual students or Import for a larger number of students.
3. Follow on-screen prompts.
NOTE: Passwords are not required. However, to keep access for individual students secure, programs should assign students individual passwords. If passwords are not used, students can select any student’s name within the classroom and work as that student.
One-Click Logins – Teachers Direct Access Only
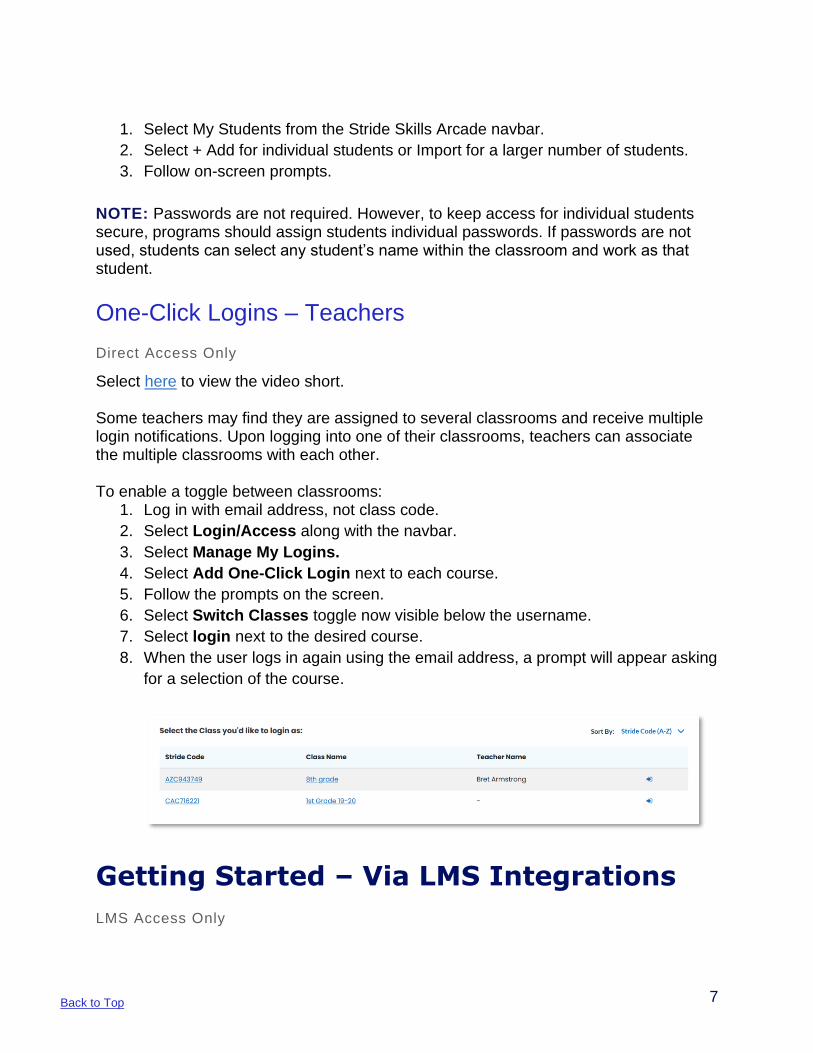
Select here to view the video short. Some teachers may find they are assigned to several classrooms and receive multiple login notifications. Upon logging into one of their classrooms, teachers can associate the multiple classrooms with each other. To enable a toggle between classrooms:
1. Log in with email address, not class code.
2. Select Login/Access along with the navbar.
3. Select Manage My Logins.
4. Select Add One-Click Login next to each course.
5. Follow the prompts on the screen.
6. Select Switch Classes toggle now visible below the username.
7. Select login next to the desired course.
8. When the user logs in again using the email address, a prompt will appear asking
for a selection of the course.
Getting Started – Via LMS Integrations LMS Access Only

8 Back to Top
Classroom Creation and Enrollment Stride Skills Arcade can be accessed through multiple access points based on a
program’s implementation. All classroom creation and student enrollments should be
made through normal processes for these access points (PEAK or TotalView).
PEAK Access Only instructors and students can access Stride Skills Arcade via PEAK. Administrators
need to request direct access to view the Stride Skills Arcade Dashboard if desired.
1. Access https://peak.getfueled.com.
2. Enter login information provided via email from [email protected].
3. Locate the Stride Skills Arcade course section within the My Sections widget
and select the hyperlinked section name.
4. Select the Jump to Stride Skills Arcade icon in the upper right corner of the
Section Detail screen. Instructors’ landing page is the Stride Skills Arcade
Dashboard.
WARNING: Do not change user passwords within Stride Skills Arcade. Only update
passwords via PEAK.
OLS Access Only Instructors and Students can access Stride Skills Arcade via the OLS.
Administrators need to request direct access to view the Stride Skills Arcade Dashboard
if desired.
1. Access https://login-learn.k12.com/#login
2. Enter OLS login information created during the previous account registration
process.
3. Select the drop-down arrow associated with the Stride Skills Arcade classroom
on the OLS home page.
4. Select the Unit list from a specific Stride Skills Arcade classroom.
5. Select Lesson 2 hyperlink.
6. Select Stride Skills Arcade and a new browser tab will open. Instructors land on
the Stride Skills Arcade Dashboard.
WARNING: Do not change user passwords within Stride Skills Arcade. Only update
passwords via the OLS.
Online Middle School/High School Access Administrators need to request direct access to view the Stride Skills Arcade Dashboard
if desired.
1. Access https://login-learn.k12.com/#login

9 Back to Top
2. Enter Online Middle School High School login information created during the
prior account registration process.
3. Select Classes from the Landing Page.
4. Select desired Stride Skills Arcade course.
5. Select 1: Stride Skills Arcade Practice from the content widget.
6. Select the Practice folder.
7. Select the Practice link.
8. Select Stride Skills Arcade and a new browser tab will open. Instructors land on
the Stride Skills Arcade Dashboard.
WARNING: Do not change user passwords within Stride Skills Arcade. Only update
passwords via the OMHS.
Stride Skills Arcade Dashboard –
Teachers Select here to view the video.
The Instructor Dashboard provides access to real-time data as well as detailed
interactive reports. It will be the teacher’s landing page upon entering Stride Skills
Arcade.
Navigation Tab Overview The navigation menu is located on the left side of the Dashboard. The following table
identifies the features available within each tab. Selecting the tab name within the table
will direct the user to a location within this document to provide greater detail. Not all
users see all navigation tabs.
Tabs Description
Dashboard Access to highlights based on student performance and activity.
All Reports Generate reports and customize report view.
Data Export Builder Create a custom export of your classroom's usage and performance data for this school year.
Reports by Students View class and student data; view data specific to one student during a specific time.
10 Back to Top
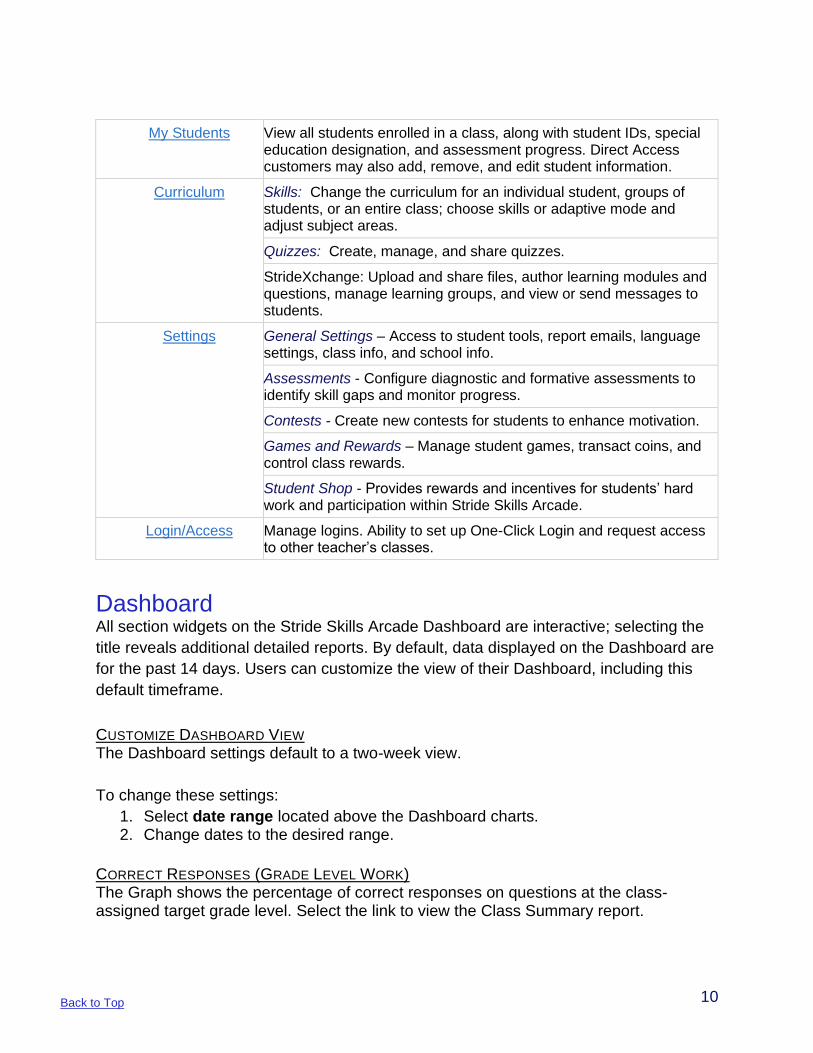
My Students View all students enrolled in a class, along with student IDs, special education designation, and assessment progress. Direct Access customers may also add, remove, and edit student information.
Curriculum Skills: Change the curriculum for an individual student, groups of students, or an entire class; choose skills or adaptive mode and adjust subject areas.
Quizzes: Create, manage, and share quizzes.
StrideXchange: Upload and share files, author learning modules and questions, manage learning groups, and view or send messages to students.
Settings General Settings – Access to student tools, report emails, language settings, class info, and school info.
Assessments - Configure diagnostic and formative assessments to identify skill gaps and monitor progress.
Contests - Create new contests for students to enhance motivation.
Games and Rewards – Manage student games, transact coins, and control class rewards.
Student Shop - Provides rewards and incentives for students’ hard work and participation within Stride Skills Arcade.
Login/Access Manage logins. Ability to set up One-Click Login and request access to other teacher’s classes.
Dashboard All section widgets on the Stride Skills Arcade Dashboard are interactive; selecting the
title reveals additional detailed reports. By default, data displayed on the Dashboard are
for the past 14 days. Users can customize the view of their Dashboard, including this
default timeframe.
CUSTOMIZE DASHBOARD VIEW The Dashboard settings default to a two-week view.
To change these settings:
1. Select date range located above the Dashboard charts. 2. Change dates to the desired range.
CORRECT RESPONSES (GRADE LEVEL WORK) The Graph shows the percentage of correct responses on questions at the class-assigned target grade level. Select the link to view the Class Summary report.

11 Back to Top
STUDENT WORK BY GRADE The Graph shows the distribution of all work in your class by grade level. Select the link to view the Class Summary Report.
LIVE CLASS MONITOR The Class Live Monitor shows near real-time information about your students' activity. Rapid click warnings are events that your students see when Stride Skills Arcade detects rapid guessing behavior.
PERFORMANCE (% CORRECT) This table shows each student's overall percentage of questions correct in each subject area. Select a student name to view a detail of student performance and access to additional instructional resources.
ACTIVITY This table shows recent student system usage activity at a glance. Select a student name to see details about the recent session activity.
Rapid Clicking Sometimes students are tempted to rapidly click through answer choices to access the Stride Skills Arcade games. The Rapid Clicking tab monitors and corrects rapid clicking behavior to ensure students understand the importance of taking their time. The anti-guessing detection feature picks up on this behavior at once and issues a one-time warning to the student. If the student does not correct the behavior, their coins are automatically cleared. This measure is in place to ensure that students are mastering critical foundational skills. It also protects the integrity of Stride Skills Arcade student data reports to ensure their value to instructors as a tool for instructional decision-making remains intact. To view a list of rapid click warnings:
1. Select Dashboard from the navigation bar. 2. From the Dashboard, select the Rapid Clicking hyperlink under the Live Class
Monitor section. NOTE: The Result column will detail who has been warned, whose coins have been cleared, and how many coins have been cleared.
3. Select Restore Coins when needed.
12 Back to Top
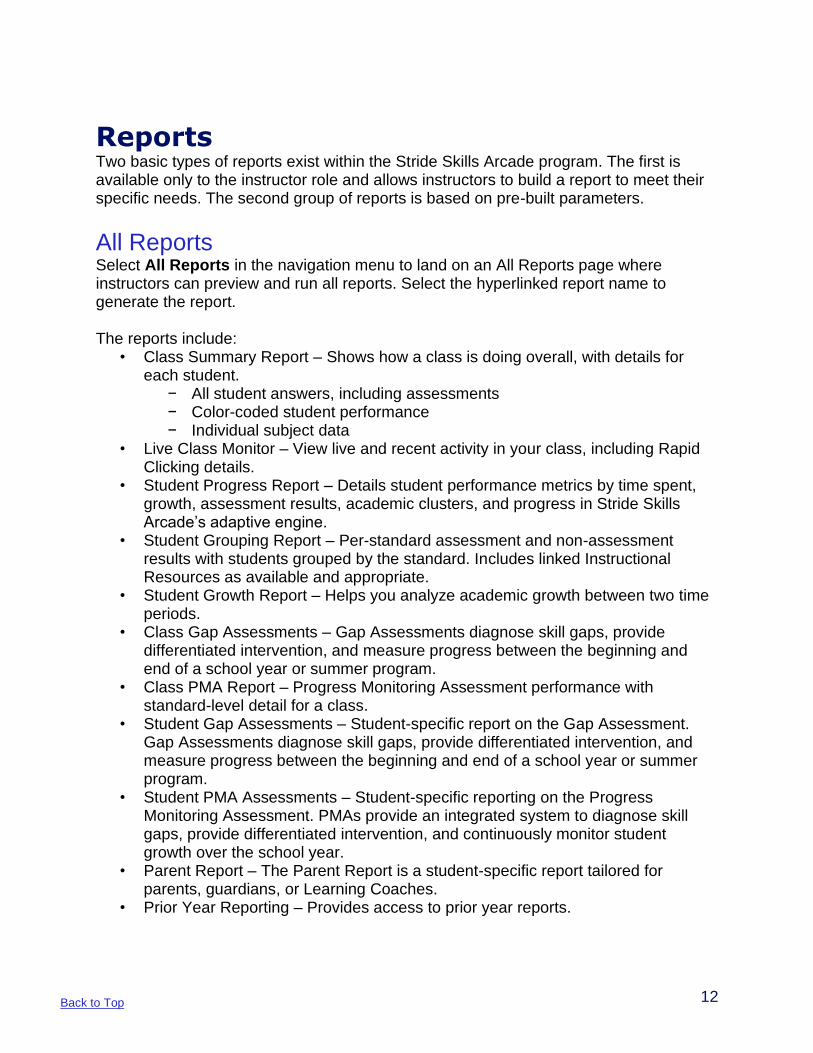
Reports Two basic types of reports exist within the Stride Skills Arcade program. The first is available only to the instructor role and allows instructors to build a report to meet their specific needs. The second group of reports is based on pre-built parameters.
All Reports Select All Reports in the navigation menu to land on an All Reports page where instructors can preview and run all reports. Select the hyperlinked report name to generate the report. The reports include:
• Class Summary Report – Shows how a class is doing overall, with details for each student.
− All student answers, including assessments − Color-coded student performance − Individual subject data
• Live Class Monitor – View live and recent activity in your class, including Rapid Clicking details.
• Student Progress Report – Details student performance metrics by time spent, growth, assessment results, academic clusters, and progress in Stride Skills Arcade’s adaptive engine.
• Student Grouping Report – Per-standard assessment and non-assessment results with students grouped by the standard. Includes linked Instructional Resources as available and appropriate.
• Student Growth Report – Helps you analyze academic growth between two time periods.
• Class Gap Assessments – Gap Assessments diagnose skill gaps, provide differentiated intervention, and measure progress between the beginning and end of a school year or summer program.
• Class PMA Report – Progress Monitoring Assessment performance with standard-level detail for a class.
• Student Gap Assessments – Student-specific report on the Gap Assessment. Gap Assessments diagnose skill gaps, provide differentiated intervention, and measure progress between the beginning and end of a school year or summer program.
• Student PMA Assessments – Student-specific reporting on the Progress Monitoring Assessment. PMAs provide an integrated system to diagnose skill gaps, provide differentiated intervention, and continuously monitor student growth over the school year.
• Parent Report – The Parent Report is a student-specific report tailored for parents, guardians, or Learning Coaches.
• Prior Year Reporting – Provides access to prior year reports.

13 Back to Top
Generate Reports 1. Choose the “preview card” for report you wish to generate. 2. Click Run Report. 3. Select Report date range, subject, and additional settings. 4. Select Run Report. 5. Select Print to print out the report.
Data Export Builder Select here to view the video short. The Data Export Builder allows instructors to create individualized reports based on needs.
1. Select Build Data Export Button. 2. Complete The Data Export Wizard. Select Continue After Each tab.
SETTINGS TAB
• Name – required (instructor choice). • Email (optional) – this option does not email the actual report, only a
notification that the report has been populated. Emails will come from Stride Skills Arcade – "Stride Skills Arcade" <[email protected]>.
• Dates – instructors can opt to pull data from the beginning of the year or for a more current timeframe. Data cannot be pulled from archived data.
• Options: o All classes your students are enrolled in – toggle off if data is
desired from just this current class. o Dropped, transferred, or historic classes – toggle off to view only
active data. • Subject – select the desired subject(s).
3. Select Continue.
DATA TAB
• Seven data categories exist. • Open each category. • Select desired data fields.
STUDENTS TAB
• Select individual students or the Select All option.
4. Select Finish.

14 Back to Top
5. Select Download once the report status indicates Completed. While the report is being created, the status indicates Queued. Normally the report takes only a few minutes to populate. However, large data files or high-volume times may delay this time frame.
Submit a case via the Service Station if the delay remains after an overnight time frame has passed.
6. Select the download file format.
NOTE: Following the creation of the report, instructors can use this initial report to create similar reports in the future.
Access the Manage menu and select Make a Copy. Make any alterations, such as a new report name, and complete the process as before. Initial selections remain active unless a change is purposefully selected.
Reports by Student Reports by Student allows you to view a quick overview of each student’s overall performance (avg. % correct) by subject area and run reports by individualized students. To Run a Reports by Student:
1. Adjust the date range. 2. Select a student’s name from the list. 3. Select the hyperlinked name of the student. 4. View Student Reports:
a) Progress in Strand Complexity - Graphs the progression of skill strand complexity/difficulty in the adaptive scope and sequence over time. Useful for visualizing adaptive activity.
b) Performance by Subject - Visualizes the student's performance in the adaptive grade-level skills strands they are currently working on. Useful to see foundational skills practice remediation at a glance.
c) Mathematics Gap Assessments d) Reading Gap Assessments e) Progress Monitoring Assessments (PMA) f) Academic Badges - Academic badges are awarded to students when they
master any skill in the adaptive curriculum. g) Stride F.A.S.T 360 Adaptive Performance Report - The F.A.S.T. 360
Adaptive Engine continually tracks academic performance to deliver a truly personalized educational experience for every student.
h) Stride Promotion & Demotion Report - The Stride system continually tracks academic performance to deliver a truly personalized educational experience for every student.
5. Export desired report.

15 Back to Top
NOTE: Available for Academic Badges, Stride F.A.S.T 360 Adaptive Performance Report, or Stride Promotion & Demotion Report.
Report Emails Go to the General tab under Settings. Select the Report Emails tab. This tab allows instructors to set up automated emails of reports.
My Students The My Students tab has a list of all students enrolled in a class, along with student IDs, special education designation, and assessment progress. WARNING: Options to change a class roster from this location (Add Student, Delete Student, Edit Info) should never be completed by those accessing via PEAK, OLS, or the OMHS. For non-direct users, this screen should only be used to view information. From the My Students tab, direct access instructors can add students individually, delete students, print logins, and restore students who have been deleted within the past three days.
All users can view programs students are enrolled in, enable/disable gameplay, and clear student progress. Users can select Assessment Status link to view assessment completion status.
Curriculum This tab offers the instructor the ability to customize the Stride Skills Arcade curriculum. Customization can be applied to an entire class, groups, or individual students. Customizations can always be changed or adapted.

16 Back to Top
Select here for a walkthrough of the curriculum settings.
Entire Class Customization Individual Customization
Customize for an Entire Class:
1. Select the Skills tab under Curriculum from the Stride Skills Arcade navbar. 2. In the Class-wide Settings tab at the top of the page, select Edit.
3. Select subject areas to be monitored. Remember, science is not available below
grade 3. 4. Check/Uncheck Show educational rationales (hints) as desired. 5. Select the Student-specific Adaptive Question Mode.
• F.A.S.T. 360 FASTER REMEDIATION − Drop students to lower grade levels more aggressively after just
one failed skill. − Best when instructors want to remediate students faster (up to 2-
grade levels below). • F.A.S.T. 360 ON-LEVEL SKILLS
− Students will need to fail two or more skills before dropping a grade level.
− Best when instructors want students to stay longer on grade level before dropping up to two grade levels if needed.
• BEGIN AND REMAIN AT CLASS GRADE LEVEL − Allows students to answer each question in sequential order; will
not drop student to lower grade level. • ASSIGNED SKILLS MODE
− Includes skill areas that instructors choose. − Disables the F.A.S.T. 360 Adaptive Engine. − Select here for further directions in completing this option.
6. Select the correct – Override Individual and Group Settings option. • Off (Default) – Students and groups with the custom setting will follow
those, while all other students follow the class-wide settings. • On – This option overrides any custom settings. All students will follow the
class settings. 6. Select Save.

17 Back to Top
Customize for an Individual Student 1. Select the Skills tab under Curriculum from the Stride Skills Arcade navbar. 2. In the Student-specific Settings tab at the bottom of the page, select an individual
student or multiple students. 3. Select the Edit Selected button for multiple students or select Edit next to an
individual student. 4. Select the desired subject(s). Remember, subjects available can be related to
grade level or access point. 5. Check/Uncheck Show educational rationales (hints) as desired. 6. Select Adaptive Question Mode.
• F.A.S.T. 360 FASTER REMEDIATION − Drop students to lower grade levels more aggressively after just
one failed skill. − Best when instructors want to remediate students faster (up to 2-
grade levels below).
• BEGIN AND REMAIN AT CLASS GRADE LEVEL − Allows students to answer each question in sequential order; will
not drop student to lower grade level.
• ASSIGNED SKILLS MODE − Includes skill areas that instructors choose. − Disables the F.A.S.T. 360 Adaptive Engine. − Review the section below for further directions in completing this
option. 7. Select Save.
NOTE: If you select Use Class Default, it will change student selection to class default settings.
Assigned Skills Mode Instructors can opt to assign specific skills across all students within the classroom, curriculum groups, or individual student(s).
1. Select the Skills tab along the main navigation bar. 2. Access the Assigned Skills Mode via one of the following actions:
a. Class-wide Default Settings i. Select Edit. ii. Select Assigned Skills Mode. iii. Select Save iv. Select the tab Class Assigned Skills v. Select Add Skills vi. Follow the prompts on the screen to select the subject, grade,
cluster, standard, and skill and select Continue after each selection. vii. Select Confirm when complete.
b. Individual Student i. Select the Student-specific Settings tab.

18 Back to Top
ii. Select the student by choosing the hyperlinked student name. iii. Select Edit associated with the individual student. iv. De-select Use class default. v. Select Save vi. Select Add Skills vii. Follow the prompts on the screen to select the subject, grade,
cluster, standard, and skill and select Continue after each selection. viii. Select Confirm when complete.
c. Multiple Students i. Select the Student-specific Settings tab. ii. Select checkboxes associated with desired students. iii. Select the Edit Selected button. iv. Select Assigned Skills Mode v. Select Save vi. Select a student name to view their Student Curriculum Settings
vii. Select Add Skills
viii. Follow the prompts on the screen to select the subject, grade,
cluster, standard, and skill and select Continue after each selection.
ix. Select Confirm when complete.
d. Curriculum Group Settings i. Determine if the needed group already exists.
3. Select Create New Group button only if a new group is desired. Follow on-screen directions to add users to the group.
4. Select Edit associated with the group if a group was created previously. i. Select Assigned Skills Mode. ii. Select Save. iii. Select the group name to open Group Curriculum Settings iv. Select Add Skills v. Follow the prompts on the screen to select the subject, grade,
cluster, standard, and skill and select Continue after each selection. vi. Select Confirm when complete.
Quizzes The Quizzes tool provides a comprehensive method of creating quizzes for an entire class or individual students. Quizzes can easily be cloned for pre-testing and post-testing on specific standards and skills.
Create a Quiz 1. Select Quizzes from the navigation bar. 2. Select Create Quiz, located in the upper right of the screen. 3. Complete Quiz details including:
a. Quiz Name b. Quiz Date Range
19 Back to Top
c. Description/Notes for new quiz 4. Place in the desired label or create a new label to organize. 5. Determine desired settings related to:
a. Allow Games During Quiz (default is set to off) b. Allow quiz after-school hours (default is set to off) c. Enforce proctoring of quiz – Allows a teacher to control the availability of a
quiz at a specific time for monitoring or roll call purposes. The teacher can control the specific start/stop times from within the quiz detail view by clicking a button. (Default is set to off)
6. Select Create. 7. Select the Questions tab.
a. Select + Add Questions button on the right-hand side. b. Follow the prompts on the screen to select the subject area, grade level,
standard cluster, standard, and skill. c. Select Confirm.
8. Select the Assign Students tab. a. Assign students to take the quiz by selecting the + Add Students button
on the right-hand side. b. Select individual students, groups of students, or all students from the
search bar. c. Select Save.
NOTES: • The new quiz will automatically take precedence over other Stride Skills Arcade
curriculum students are working on unless the student is taking a Progress Monitoring Assessment (PMA) or Gap Assessment. When the student completes the quiz, they will return to the Stride Skills Arcade curriculum where they left off.
• The newly created quiz will appear with a Start Here! Banner over the assigned subject area coin.
• To view quiz results for a quiz, select the quiz name from the quizzes list. Here users can view a summary of student scores and their completion status. More detailed results, such as Aggregate Scores by Quiz Question, are provided on the Reports menu option for the selected quiz.
Edit Quiz Properties 1. From the Quiz list, select the Manage drop-down on the right-hand side. 2. Select Edit from the drop-down menu. 3. Fill in desired fields, as described when creating a new quiz. 4. Select Save.
Edit Quiz Questions Questions in a quiz listed in Quiz Builder may be edited after a quiz has been created, but only before a student answers a question. To edit questions:

20 Back to Top
1. Select a hyperlinked quiz. 2. Select Questions on the top navigation bar. 3. View current questions on this screen. Select a hyperlinked question to view as a
student.
4. Select + Add Questions button in the upper right corner to add additional
questions and follow the prompts on the screen.
5. To remove questions, select the Remove button on the right-hand side. 6. Toggle Save Scratchpad Work to ON to save student work for an item. 7. Rearrange the order of the questions by selecting the squares next to the
question and drag to the desired location.
Sorting Quizzes TO SORT QUIZZES BY QUIZ NAME, START DATE, END DATE, OR AUTHOR
1. Select the Quizzes navigation tab. 2. Select the Sort By drop-down and select how to sort quizzes:
a. Quiz Name A-Z b. Quiz Name Z-A c. Author A-Z d. Author Z-A e. Start Date (early-later) f. Start Date (later-early) g. End Date (early-later) h. End Date (later-early)
TO SORT QUIZZES BY LABEL
1. Select the Quizzes navigation tab. 2. Choose the Labels drop-down. 3. Select which Label (previously created) you would like to sort by.
MORE SORTING OPTIONS
1. Select the Quizzes navigation tab. 2. Choose the View By drop-down and select how to sort quizzes:
a. My Quizzes b. All shared Quizzes c. Shared by Me d. Shared by Others e. Not Started f. In Progress g. Completed h. Archived Quizzes
21 Back to Top
Archive or Restore a Quiz Quizzes no longer in use or expired quizzes can be archived or restored as needed.
To archive a quiz: 1. Select the Manage drop-down. 2. Select Archive. 3. Select Yes in the pop-up window.
To restore a quiz:
1. Select the View By drop-down above the table. 2. Select Archived Quizzes. 3. Select the Manage drop-down. 4. Select Restore. The quiz will now appear as active on the landing page.
Cloning The process of cloning allows an instructor to create a replica of an existing quiz and assign or schedule it again. This can be helpful when creating a pre-test and post-test. To clone a quiz:
1. Select the Manage drop-down. 2. Select Clone. 3. Follow the prompts in the pop-up to select title, description, start, and end dates. 4. Select Clone this quiz. 5. Enter a description of cloned material. 6. Enter Start Date and End Date. 7. Select Clone this Quiz.
Share Quizzes The process of sharing allows an instructor to share a quiz with other instructors within the same school or district. This can be helpful when creating shared material for a grade band. To share a quiz:
1. Select the Manage drop-down. 2. Select Shared. 3. Select how you want the quiz to be shared. 4. Select Save.
To access shared quizzes:
Teachers will want to access StrideXchange. Note that StrideXchange is for Direct access users.
1. Select StrideXchange under Curriculum.

22 Back to Top
2. If you receive a prompt to confirm Email Address for Password Recovery, select Skip this Step.
3. Select View your collection. 4. Select Shared by Others. 5. Locate resource and select Add to My Collection. 6. Fill out the desired parameters and select Assign.
StrideXchange The StrideXchange feature allows direct access instructors to organize and upload their instructional resources and tools and assign them directly to students through their Stride Skills Arcade account. The main menu displays all options to create and manage .pdf files, images, or videos. When accessing StrideXchange, you may be prompted to confirm your email address for password recovery. Select Skip this Step to access StrideXchange.
Uploading Files PDF FILES
1. Select Upload a File. 2. Select the PDF icon. 3. Save a file in a .pdf format.
a. Mac Users - Open the document and save it as a .pdf file. i. Choose File and then Print. ii. Choose Save as PDF from the PDF pop-up menu. iii. Choose a name and location for the .pdf file.
b. Windows Users - Open the document and save it as a .pdf file. i. Select File and then Save As. ii. Select the .pdf option.
4. Select Next. 5. Choose Select a file and open the file. 6. Fill in the required fields as marked by an asterisk. 7. Select Save.
IMAGES
1. Select Upload a File. 2. Select Image or camera icon. 3. Select Next. 4. Choose Select a file and open the file. 5. Fill in the required fields as marked by an asterisk. 6. Use the navigation menu on the left to choose previous files. 7. Select Save.

23 Back to Top
NOTE: Uploading an image requires the image to be in .jpg, .jpeg, .png, or .gif format. For best results, images should not exceed 1500 px wide.
VIDEOS
Before uploading a video, it is suggested the video be pre-encoded.
To pre-encode a video: 1. Install the Handbrake encoder for Mac, Windows, and Linux. 2. Select Source and then File. 3. Choose Select a file and open the file. 4. Choose a destination where the file is to be saved. 5. Name the file.
To upload a video: 1. Select Upload a File. 2. Select Video icon. 3. Select I Have Pre-Encoded My Video or I Have Not Pre-Encoded My Video. 4. Choose Select a file and open the file. 5. Fill in the required fields as marked by an asterisk. 6. Select Save.
Manage Files StrideXchange provides a direct user the ability to manage files located in My Collection. My Collection provides an easy navigation menu to locate a variety of sources. Sample options available to the user are a simple search field and an advanced search field.
1. Select View your Collection from the StrideXchange landing page to access user files.
2. The New button provides a drop-down menu for the user to quickly add a new item to the collection of files.
The function of each tab is described below.
MOST RECENT
This tab displays items in the collection. Users can search, preview, assign, edit, or share resources. Actions available include:
• Type in keywords in Search Resources and then select Go. • Select the Show Most Recent drop-down to select the file group to view:
− Show Most Recent − Recently Assigned − Shared School-Wide − Shared District-Wide
• Select the Advanced button for a form to make an advanced resource search. • Select the hyperlinked file name. Action buttons in this screen include:
− Preview This Resource

24 Back to Top
− Assign − Edit/Share
• Select the Assign button to access a screen where the previous assignment can be modified.
• Select the Unassigned button to access a screen to assign the file. • Select the red X to Trash a file.
FOLDERS
This tab offers several folders to view and organize items by subject area with support for an unlimited depth of folders within folders. To create folders:
1. Select the green New button at the top of the navigation menu. 2. Select Folder from the drop-down menu. 3. Name the folder and type a description. 4. Select Create.
Instructors can add items to more than one folder, giving the option to place files in several resources for cross-curricular needs. To add items to a folder:
1. Select the hyperlinked name of the folder in the list. 2. Select the add to folder + icon. 3. Search resources if desired items are not visible in the table. 4. Check the items to add in the Select column of the table. 5. Select Done.
PLAYLISTS
This feature allows the user to add and organize multiple resources into ordered Playlists that can be assigned to students all at once. Actions available include:
• Select the hyperlinked playlist title to view and organize items. • Select the Assign button to assign to students. • Select the Edit icon under Action to edit the title or description of the playlist. • Select the red X under Action to delete the list.
To create a playlist:
1. Select the green New button at the top of the navigation menu. 2. Select Playlist from the drop-down menu. 3. Enter a name and description for the new playlist. 4. Select Save.
Learning Modules To create a new module,
1. Select the New button at the top of the navigation menu.

25 Back to Top
2. Select Learning Module from the drop-down menu. 3. Enter a name and description for the new module. 4. Select Save. 5. Add items by filling the required fields as marked by an asterisk. 6. Select Save.
WORKING WITH A MODULE
Select Edit in the list to open a module. The questions in the module are listed in a table, and a navigation bar is above the table. Actions available in the table include:
• Select the hyperlinked title of a question to preview. • Select Edit Answer for editing a question-answer only. • Select Edit to edit a question title, type of question, or prompt. • Select the red X to delete a question.
A module can be made up of several types of items, including a display slide with custom text and images, a Multiple-Choice Question (MCQ), or a survey question.
To add a new item: 1. Select the Add Item (+) icon within the desired module. 2. Fill in the required fields, as marked by an asterisk. 3. Select Save. 4. Add the Answer Type and Answer for multiple-choice questions when the
prompt appears. 5. Select the radio button next to Text or Image for answer choices. 6. Enter rationales or educational hints for each incorrect answer choice, if desired.
NOTE: By default, two boxes for answer choices appear. To work quickly or build a larger assessment, select Bulk Upload Items to download a template and upload many questions at once.
7. Select Add Answer to add a third (or additional) answer choice. 8. Select the number of attempts, if desired. 9. Select Save.
NOTE: Items may be edited later if necessary. To preview module:
1. Select Preview Module in the navigation bar to view the module. 2. Select Click here when complete at the top of the screen to return.
To assign the module to a student:
1. Select Students on the main navigational panel across the top of the screen.

26 Back to Top
2. Select the desired student to view history and work details for the student. 3. Select New Assignment to assign items to students. 4. Select Save.
NOTE: Selecting Groups from the navigation menu creates learning groups or allows quick assignments for multiple students.
Assigned Select this tab to view a table of resources and students assigned. Select Results to see individual student results on an item.
Shared with You Select from the dropdowns for Teachers, Grades, and Subject to view resources shared with you.
Shared by Me Select this tab to view a table of items shared with others.
Free Resources An instructor can search and play videos or create and manage playlists from the Free Resources tab. Search videos by keywords, standards, or standards code, and be filtered by subject matter or grade level. A playlist can be created and managed for a specific class or lesson plan by the instructor. Playlists work well in small or large group sessions and on a whiteboard for online instruction.
1. Select Free Resources from the navigation menu. 2. Type in the name or standard code, select subject and grade, and select Search. 3. Select the play icon to pre-watch the video 4. Select Assign to assign the video to one or more students.
Trash • Select hyperlinked titles in the list to preview trashed items. • Select Restore in the table to restore an item. • Select the red X to delete permanently.
StrideXchange Top Menu Items
While in My Collection, there is a menu above the collection list. These are the items available in the menu:
• Dashboard – Select this to return to the StrideXchange dashboard.

27 Back to Top
• Students – Select to visit the My Students page. − Select the Students tab to show the number of items assigned, items
viewed, and quizzes completed. Select a hyperlinked student name to see assigned details or make a new assignment for that student.
− Select the Groups tab to view groups or create a New Group. • My Collection – Select to return to the My Collection page. • Messages – Displays incoming questions from students, as well as outgoing
messages from the instructor. Use the navigation menu on the left side to view sent messages or to compose a new message.
• My Profile – Instructors select Edit Profile to upload instructor information to StrideXchange.
Student Message View When instructors utilize StrideXchange, students will see an Inbox of messages and a Filebox of their assignments. The Inbox will display the most recent messages at the top of the list. The Filebox will also show the most recent assignments first. Both areas have a search feature where the student will be able to search the contents using keywords.
Settings The Settings tab allows an instructor to change settings for students, reports, games, languages, class info, and school info.
Student Tools Change settings by following the instructions below.
1. Select Student Tools in the General Settings navbar. 2. Switch to OFF to disallow any of the following:
a. Enable dictionary word look-up b. Allow Instructional Resources c. Enable on-screen calculator d. Allow sound and music e. Enable scratchpad f. Allow videos
3. Select On/Off Slider for the Student Instant Stats Toolbar setting: a. Enabled for Entire Class
i. Select On/Off Slider to Include Correct Answer Counts, if desired
28 Back to Top
b. Disabled for Entire Class c. Individual Student Deactivation
i. Select On/Off Slider Per Student Deactivation to set individual students
Report Emails Follow these steps to adjust Report Email settings.
1. Select Report Emails in the Settings navbar. 2. Type email addresses in Carbon Copy (CC) emails, separated by a comma, to
send Assessment and Summary reports to others. 3. Check the box of each to allow, if desired:
a. Assessment reports b. Check Weekly and/or Monthly in Summary reports c. Rapid Clicking reports d. Assessment Assigned Instructional Resources
4. Select Update.
Language Settings Choose language preferences for students using this tool. Spanish translations are available in Math for grades K–8 and in Reading for grades K–3.
To manage language settings: 1. Select Languages in the Settings navbar. 2. Check the language option at the top of the table or individually for each student
from the three language options: a. ENGLISH ONLY – Students receive questions in English with no option to
toggle between translations. b. ENGLISH, SPANISH AVAILABLE – Students receive questions in English with
the option to toggle between English and Spanish. c. SPANISH, ENGLISH AVAILABLE – Students will receive questions in Spanish
with the option to toggle between Spanish and English. 3. Select Save.
Class Info Warning: Only Direct Access can make any changes (including updating password) at this location.
1. Select Class Info from the Settings navbar. 2. Fill out instructor and class information on this screen, as desired or required by
your school. If accessing Stride Skills Arcade directly, instructors can update their password from this tab.
3. Select Update.

29 Back to Top
School Info Check the School Info tab for accuracy. Users can view but not change this information.
1. Select School Info from the Settings navbar. 2. Verify the School listed and the School Code. If incorrect, contact the platform
administrator.
Assessments Stride Skills Arcade has two types of assessments within the program to assist the instructor in evaluating student progress and performance. Some roles may have view-only visibility to the assessment settings. Users receive a message if their role does not have the privileges to adjust the settings. For questions discuss with your administrator.
• Progress Monitoring Assessments (PMA) provide an integrated system to diagnose skill gaps, provide differentiated intervention, and continuously monitor student growth over the school year.
• Gap Assessments diagnose skill gaps, provide differentiated intervention, and measure student progress between the beginning and end of a school year or summer program.
Progress Monitoring Assessment (PMA) Select here to view a list of frequently asked questions for Progress Monitoring Assessments.
• PMA includes four formative assessments per grade level and is designed to be administered periodically throughout the school year.
• The assessments are available for Math and Reading in K–8 and Science in Grades 3–8.
• When PMA is turned on for a district, school, and class, the four assessments will be administered automatically according to a pre-determined schedule. Programs that desire flexibility with the timing of an assessment should consider using Gap Assessment instead.
• All four PMA assessments are on-level assessments. When evaluating results, instructors should expect to see lower results in the earlier assessments as students have not yet received instruction on all grade-level standards early in the school year.
To configure Instructor PMA settings (Direct Access Only):
1. Select PMA Settings from the Assessments tab. 2. Select the ON button.
NOTE: Progress Monitoring Assessments have been turned ON at the administrator level for all PEAK schools. Instructors of individual classes are granted permission to override this setting, turn the PMA off if desired and turn it back on again.
30 Back to Top
3. Select the subject area(s) to assess. NOTE: PMA dates are set by your school or district administrator.
4. Choose a completion setting to control how PMA is handled across multiple classes.
5. Select Allow students to finish their current test when forms are switched. a. This must be checked for students to complete their current PMA form,
even when testing is turned off, or forms are switched. b. If this is not checked, students will receive their normal Stride Skills
Arcade curriculum setting when testing is turned off. c. The student must have already started the assessment for it to remain
open after the testing period ends. 6. Select Allow games during PMA, if desired. 7. Select Save.
Gap Assessment Gap Assessments diagnose skill gaps, provide differentiated intervention, and measure progress between the beginning and end of a school year or summer program. By default, the Gap Assessment will be turned off; however, instructors are granted permission to enable and schedule this assessment for their students.
Three Gap Assessments are offered for each grade level in Math and Reading for Pre-K through Grade 8:
• Early-term – Instructors may administer the early term Gap at the beginning of a school year on the students' previous grade level, which assists in targeting skill deficits early on.
• Mid-term – Instructors can utilize the midterm Gap as a pre-test on the current grade level.
• Late-term – Instructors can utilize the late-term Gap as a post-test on the current grade level.
The midterm and late-term Gap tests for each subject and grade are strictly parallel and measure growth on similar but novel content. NOTE: The PMA assessments take precedence over Gap Assessments or other curriculum settings. This means that if the PMA test is active for a given student, they will be given the PMA test until it is completed. Only then will the student receive the Gap test, if it is active, or other curricula.
To configure Gap Assessments:
NOTE: Administrators must give teachers this access.
1. Select Gap Settings from the Assessments tab. 2. Follow the prompts on the screen to set Class Default settings. 3. Select Gap Student-Specific Settings.

31 Back to Top
4. Switch lock to OFF to select an individual student to assess. NOTE: The Class Defaults in the Gap Settings tab apply to all students except those who have been switched to OFF. This enables individual Gap settings.
• The Allow completion column must be checked to allow students to complete their current Gap form, even when testing is turned off, or forms are switched.
• If Allow completion is not checked, students will receive their normal Stride Skills Arcade curriculum setting when testing is turned off.
5. Select buttons to determine the subject area and terms. 6. Select Save. 7. Select Reset to School Defaults to return to the previous defaults as necessary.
NOTE: Assessments are only available in subject areas that have been previously set in the Curriculum tab.
Games, Rewards, and Contests Games Settings Follow these steps to adjust Games settings:
1. Select Games and Rewards under Settings in the Toolbar. 2. Select Games in the navbar. 3. To disable gameplay, turn the slider to NO. 4. Control gameplay amount by selecting from the following choices:
a. Less gameplay – earn 21 coins for 60 seconds. b. Normal gameplay – earn 16 coins for 60 seconds. c. More gameplay – earn 11 coins for 60 seconds.
5. Use slider to Allow gameplay during PMA testing. 6. Use slider to Allow gameplay during Gap testing. 7. Type comma-separate word list in Custom word list for Word Search Game field
to create a special word list for the class. 8. Use slider to Deactivate for the Class box by a game in the Deactivate games
table or select the Select Students hyperlink to select individual students for whom the game will be deactivated.
9. Select Update.
Rewards and Coin Manager Rewards provide instant and positive reinforcement for students’ work and achievements. The Games and Rewards tab is the tool where coin rewards are recorded, monitored, and edited. The instructor can add extra coins to individual student accounts as a bonus for good behavior, homework, classroom responsibilities, or winning a Stride Skills Arcade contest.
To add coins:

32 Back to Top
1. Select Games and Rewards from the navigation menu. 2. Select Coin Manager from the navbar. 3. Select Add/Remove Coins to reward individual students.
NOTE: To remove coins from an account, use a negative number.
To add coins as a reward for the entire class: 1. Select All. 2. Select Add/Remove Coins. 3. Select the number of coins to be rewarded.
NOTE: Negative amounts cannot be used for the entire class. Use Transact for individual students to remove coins.
4. Select Save.
Contests The Contest tab allows an instructor to create class-wide contests. When created, the automated tracking system will monitor star points earned or skill badges earned. Contests can be created for several events, unit themes, competitions, or simply to provide an activity over a vacation break. This tab provides the opportunity to edit existing contests, delete contests, view scores, or preview a contest.
To create a new contest: 1. Select Contests from the navigation menu. 2. Select New Contest. 3. Follow the prompts on the screen. 4. Select Switch to Advanced View to include additional details for the new
contest. 5. Select Save. 6. Select the Manage dropdown from the main contests page, then select Publish
to make the contest live. To edit an existing contest:
1. Select Edit on the Contest List page. 2. Adjust fields in the basic and advanced views as needed. 3. Select the Manage dropdown from the main contests page, then select
Unpublish to remove contest from student view. 4. Select Save.
To view contest data: 1. Select the Manage dropdown from the main contests page, then select View
Scores.
To delete a contest: 1. Select Delete.

33 Back to Top
Student Shop The Student Shop provides rewards and incentives for students’ hard work and participation within Stride Skills Arcade. An instructor will find the Student Shop to be their online marketplace for classroom rewards. The shop can be stocked with prizes such as pencils, school t-shirts, extra credit points, or maybe even lunch with the instructor. Stride Skills Arcade does not provide prizes, so be creative and search for community partners or a parent group to provide rewards.
To create a new product: 1. Select Student Shop from the navigation menu. 2. Select New product. 3. Enter a product name, item code, coin cost, inventory, purchase limit,
description, and delivery into each field to define the new product. 4. Select Choose File to upload an image. 5. Choose On or Off to make the newly created product available to students. 6. Select Create.
NOTE: As soon as one item has been added to the shop, students will be able to access the Student Shop on their Stride Skills Arcade interface. Instruct them to look for the shop tab in the menu bar on the home page.
To manage an existing product: 1. Select Edit from the product list. 2. Edit the information or descriptions of previously entered data. 3. Select Edit.
The Student Shop will track new orders each day and tabulate order history for easy reference. Tracking order history will show which prizes are most popular, allowing the instructor to add inventory. Setting up email alerts will allow the instructor to be notified when students place orders or when an item is out of stock.
To track and mark orders delivered: 1. Select Orders. 2. Select Manage once a prize has been delivered to the student. 3. Select Delivered to record the delivered prize. 4. Select Save.
To set an email alert:
1. Select the Alerts menu. 2. Select the settings page hyperlink to update an instructor’s email address. 3. Choose one or more email notification(s):
a. A new purchase is made. b. A digested list of purchases for the day. c. When an item is out of stock.
4. Select Save.
34 Back to Top
Technology Needs Select here for information on technical requirements and devices for effective use with Stride Skills Arcade.
Stride Skills Arcade is a web-based program, which makes it compatible with many devices. The iPad is the most reliable tablet, and the preferred browsers are Chrome for PC and Mac, and Safari for iPad. A best practice is to always run the latest version of operating systems for support and security.
Computer Tips • Update browsers and operating systems. • Check to make sure the firewall does not block Stride Skills Arcade. • Allow files with .jpeg, .gif, and .png. • Clear browser cache to speed up game loading and response time. • Check connection speed bandwidth to allow Stride Skills Arcade to run quickly
and smoothly. Recommended speeds are at least 4 Mb download and 1 Mb upload.
Student Stride Skills Arcade Select the desired link to view resources developed for students or view the student experience.
Student Tool Kit (Access Point Agnostic) Student Tool Kit
Student Overviews (Access Point Specific) Direct Access Users Stride Skills Arcade via PEAK
Stride Skills Arcade via OLS Stride Skills Arcade via Online MS/HS