a to b - golf swing | croker golf system
TRANSCRIPT

A to BYour one drill to better golf
PETER CROKERFor your complete path to better golf join
The Croker Golf System Master Coaching Academy
Trial 7 days for $1

2
346891011121518192124272930323435363738
|
|
|
|
|
|
|
|
|
|
|
|
|
|
|
|
|
|
|
|
|
|
3 A to B Contents
Hello there, I’m Peter Croker
I’m very excited now because I am going to present for you a
very special program. It’s called ‘A to B’ Your One Drill to
Better Golf.
The A to B Drill program is designed to build your golf swing
to one with which you can play golf with lots of consistency,
power, control and a body friendly swing. The more you do
the drills you’ll find the less you think. Good golf will be a lot
more fun, and good golf will become easy.
But what I would really like to emphasize here is be consistent
with the drill building because as you build the drill, you’ll build
the skill, and that will make it much easier for you to go out
there and play golf without thinking golf swing.
•You’ll be able to play with rhythm, balance and tempo.
•You’ll be able to play with strategy.
•You’ll be able to focus in an effortless way.
If you struggle to hit the ball with consistency or power and
spend too much time looking for your golf ball then we can
help you with this eBook program.
The more you do the A to B Drill the better you will get, and
you will really "Enjoy the Hit!".

4 A to B
When you see great golfers play you will rarely see two golfers
with the same golf swing. There will be features in common but
the differences can be quite extreme.
There is however one thing that great golfers all have, and it is
the one thing that high handicappers usually do not have. It is
also something that rarely comes naturally to anyone just
starting golf. And it’s something that most golf teachers fail to
teach, but without this one thing a golfer will never be able to
achieve that effortless power the great golfers display with
swings that look so easy.
Yet ask anyone who plays golf what this most important thing is
and they will probably not be able to tell you. So what is this
magic key - this most essential of essentials?
It is the ability to compress the ball at impact where the
leading hand is closer to the target than the club head.
Read any golf instruction manual or watch any instructional
video program and see if you can find out how to deliver the club
at impact so that you compress the ball, and you will probably
not be able to find it.
Impressive golf starts with solid ball compression. There is
no getting away from this fact. It is the wall that separates high
handicappers from low handicappers. Break through this wall
and your improvement will be rapid.
Contents

5 A to B
The A to B program teaches you to compress the ball like no
other teaching method does. Once learnt though it becomes the
engine that drives the swing for strong, consistent effortless
power as well as a sure means of preventing that most dreaded
of golf shots- the slice.
“For the golfer that wants to get better, an A to B club head to
the ball strike is their strongest strike.”
Quote by Martin Chuck
Revolution Golf
Contents

6 A to B
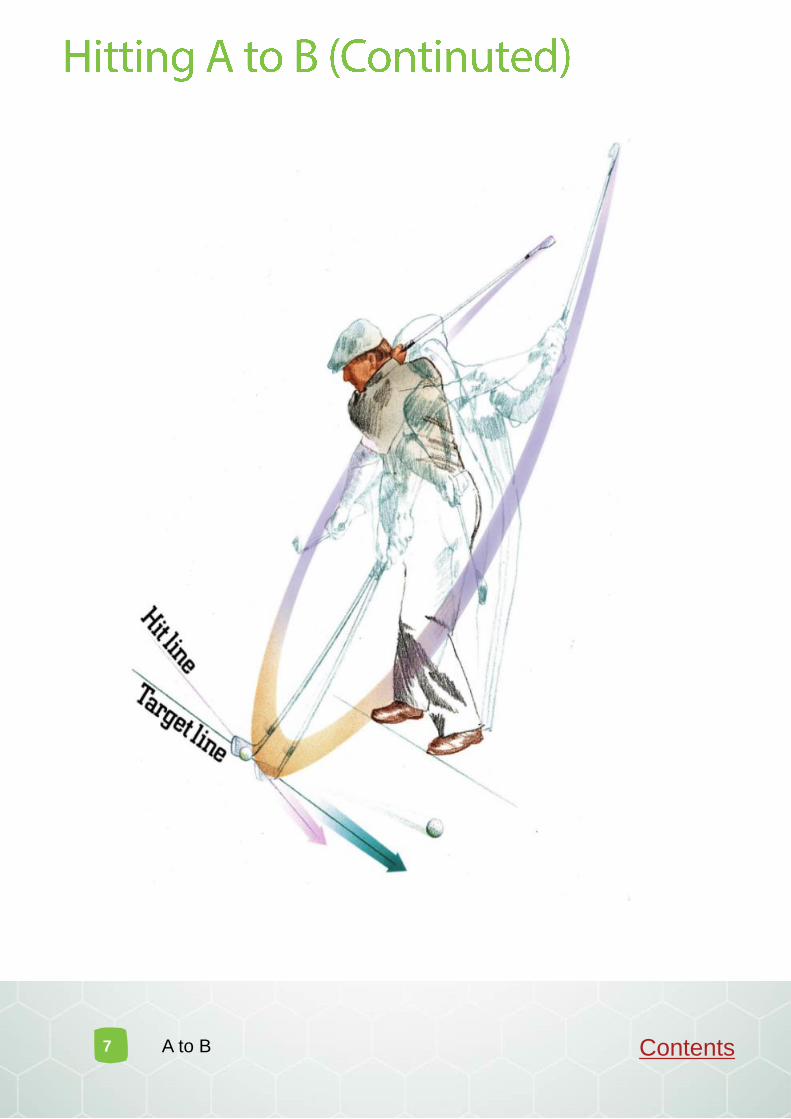
To hit a golf ball long and straight to the target with effortless
power, the intention should not be to swing the club along the
target line where the ball is intended to go. Rather it is to
compress the ball into the ground down and out along what
is referred to as the A to B or Hit line where the golfer effectively
throws the club head directly at the ball in a direction that cuts
down and across the target line.
Contents
7 A to B Contents

8 A to B
Hitting a golf ball is a little bit like trying to drive or compress a
stake or tent peg into the ground with a sledgehammer.
It’s just the same with the golf ball. The intention is to drive
the golf ball into the ground. The concept of a golf swing
can be a little misleading. While the club may be swung back
in the backswing, the down swing is in effect a down hit,
which when done with sufficient power will ‘cause’ an ‘effect’,
namely a follow through to complete the swing. The swing
through as we view it is a consequence of the hit, where the
ball is compressed into the ground by the club head which is
delivered down and out along the Hit line or A to B line, at an
angle to the Target line.
Video Contents

9 A to B
It is very important therefore to understand that golf is a 2
target game
The ball’s target is
the flag or a section
of the fairway.
The clubhead’s
target is the ball,
which should be hit
so as to compress it
deep into the
ground.
Video Contents

10 A to B
1. The concept of A to B is that A is at the top of the backswing
and B is the golf ball with the direction of the hit down and
out through the golf ball.
2. The golfer should be attempting to throw the club head into
the back of the ball confidently as if attempting to drive the
golf ball deep into ground.
3. As the golfer compresses the ball, the club face squares to
the ball. The ball flies up and to the ball’s target, while the
momentum of the swing (hit) continues on to a follow through
and finish, ideally in a nice balanced position.
4. The more positively the golfer hits down into the golf ball the
better the golf ball is compressed which in turn causes it to
fly straight and true to its target.
Video Contents
11 A to B
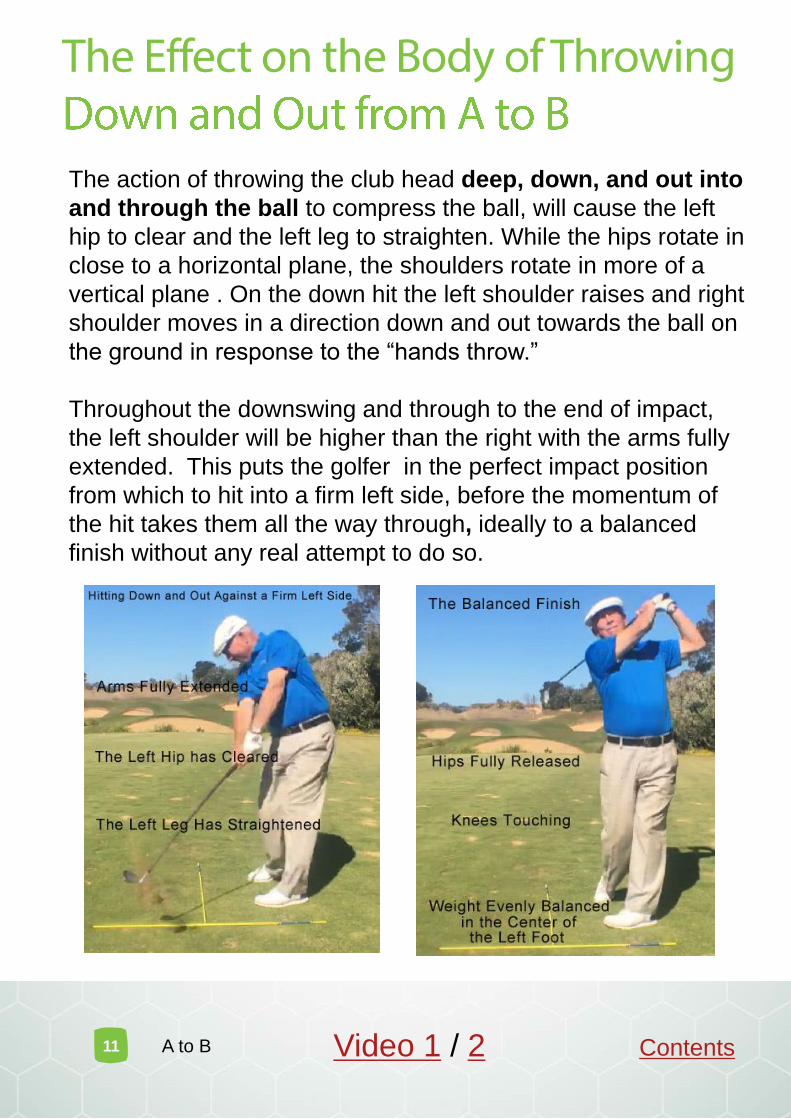
The action of throwing the club head deep, down, and out into
and through the ball to compress the ball, will cause the left
hip to clear and the left leg to straighten. While the hips rotate in
close to a horizontal plane, the shoulders rotate in more of a
vertical plane . On the down hit the left shoulder raises and right
shoulder moves in a direction down and out towards the ball on
the ground in response to the “hands throw.”
Throughout the downswing and through to the end of impact,
the left shoulder will be higher than the right with the arms fully
extended. This puts the golfer in the perfect impact position
from which to hit into a firm left side, before the momentum of
the hit takes them all the way through, ideally to a balanced
finish without any real attempt to do so.
Video 1 / 2 Contents

12 A to B
This is a drill to make the A to B hit really penetrate deep into the
golf ball.
To start the drill it is important that you are in a good position A. Until
you master the takeaway and backswing there is a great checkpoint
drill you can use to help get yourself into a solid position A at the top
of the backswing, from which you can easily practice the down hit A
to B. It is called the “Push the Right Hand Bent” Drill.
With a good grip and stance push the right hand bent with the club
at about a 45 degree angle as demonstrated in the picture. Note that
when you push out in front of you, you cannot over swing.
Practice in front of a mirror to make sure the hands are in the centre
of the body.
Then turn the hips. and shoulders and you will arrive at what would
be a good position A at the top of the backswing.
Contents

13 A to B
From the top of the backswing position A, move the hands down to
the grip 6 inches so that when you hit down the club head stays
above the ball.
In this drill the intention is not to swing through to a full swing. It is
hit down from the top and stop above the ball as though you are
trying to drive the ball into the ground. Since you are down the grip
you will finish above the ball.
Do two half hit downswings 1...2... and then a full hit downswing on.
..3. On 3 you go deep down towards the ball with a solid action.
Don’t go too hard but go at it at a reasonable pace to get a positive
feeling of what A to B really is.
Contents

14 A to B
You can almost see the blur of the club as it stops just past the ball.
Notice when you do the drill how it affects the left side. The deeper
you throw the more the left hip clears and the left leg straightens as
you really feel you are hitting down, out, and away from your head.
As you hit deep, the club head goes down and out and the head
stays up.
Video Contents

15 A to B
When you are doing this drill it is important to note that there are
two parts to release in sequence.
Part 1 is to release the club shaft angle to the left arm by
uncocking (thumbs down) with the left hand/left wrist.
Part 1
Contents

16 A to B
Part Two is done by tightening the last 3 fingers of the left
hand and rotating the left wrist (for a right-handed golfer)
anti-clockwise. You do this while maintaining the “thumbs
down” push into the ball. When doing this release drill
slowly, the club shaft moves in line with the left arm when
the hands reach approximately above the right foot.
The club face release happens from here with the last 3
fingers of the left hand tightening and the left wrist rotating
anti-clockwise, squaring the club face to the ball at impact .
This action locks in the structure and alignment of club shaft
to left arm through the “Impact Zone.”
Contents
Part 2
17 A to B
.
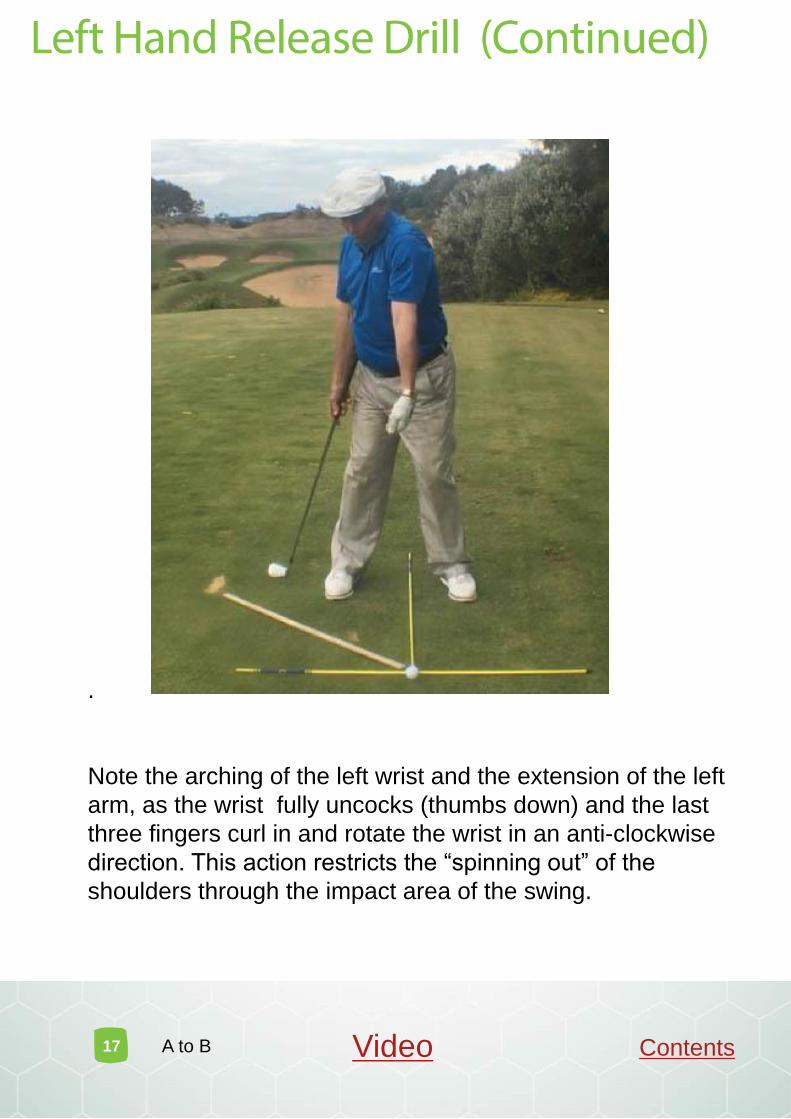
Note the arching of the left wrist and the extension of the left
arm, as the wrist fully uncocks (thumbs down) and the last
three fingers curl in and rotate the wrist in an anti-clockwise
direction. This action restricts the “spinning out” of the
shoulders through the impact area of the swing.
Video Contents

18 A to B
You should always try to stay on top of the ball as long as possible
before continuing on through the follow through.
The last 3 fingers of the left hand cause the left hand to rotate anti-
clockwise to a palm facing almost up well into follow through. This is
a continuous pushing action that helps maintain structure and body
rotation well into follow through and finish.
The deeper you go into the ball
“A to B”, the momentum and
the release continues on and
the body will follow through with
the club fully extended until the
arms fold to bring the club up
and over the left shoulder.
When you stay as long as
possible in the shot with the
hands staying low you get the
best release of your body. This
gives you great balance and
also takes strain off the body,
especially the back. Always
keep the left hand pushing over
post impact. Don’t quit and
push the club out to the right of
the target line and don’t attempt
to go down the target line. Rotating left hand on
tennis racket post impact
Video Contents

19 A to B
To get into position A you ideally need a solid and correct start
to the backswing from which to hit down and out through the ball
(B) with as much power as you are capable of producing.
While many golfers will have a backswing that will enable them
to reach a solid position A at the top of their backswing, many
others will not be in the best position they can be to deliver the
club to the ball with their maximum power and accuracy.
With this in mind, we need to develop a sound backswing to get
into position ‘A’ - the easy way.
.
Starting with a slight forward press
to give the takeaway a “kick start”,
push the grip of the club straight
back with the hands for a distance
of approximately 10 to 12 inches so
as to ensure the club head is not
lifted from the ground. The club
head moves back parallel to the
feet at the start of the takeaway,
and the handle leads the club head
ever so slightly.
Contents

20 A to B
In the process the hips
and shoulders are
activated to allow the
pivot of the body to
transport the club away.
After the takeaway the
momentum of the
swinging club will hinge
the wrists in what is in
effect a back sling.
With a little more
energy the backswing
will bring you into a
position set at the top in
position A.
Video 1 / 2 / 3 / 4 / 5 / 6 Contents

21 A to B
From the top of the backswing, position A, move the left
hand down the grip so that the club shaft is protruding and
in line with the left forearm.
Contents

22 A to B
The club and the arm drop down with the club shaft moving
into line with the left forearm, until the protruding grip of the
club hits the side of the left forearm.
Once the club shaft moves into line with the left forearm,
the last 3 fingers of the left hand curl to rotate the clubface
and release the club head down and out into and through
the ball, position B.
Contents

23 A to B
This all occurs in the actual throw from A to B.
Since the club can become quite heavy doing this drill, it is
often advisable to practice using a light stick for repeated
drilling at faster speed.
ContentsVideo 1 / 2

24 A to B
Position A at the top of the
swing, has the right hand in
front of the right shoulder, not
behind, with the right wrist bent
back at an angle.
The right wrist remains bent all
the way throughout the drill.
Leaving the body turned
back, the right hand comes
down in a karate chop action
with the edge of the hand
going towards the ball.
Contents

25 A to B
The right hand continues down
and as it does it causes the left
hip to turn and the left leg to
straighten. Continuing down
the right hand karate chop
action turns the shoulders and
as it reaches the bottom the
chest moves up as part of the
release into follow through.
To reiterate as you continue
through the shot it is important
that the right wrist remains bent
as the karate chop continues
deep into the impact zone. It
doesn’t flip over.
This ensures that in the
actual swing at the impact
position the handle of the
club would be forward of
the ball so as to produce
greater compression.
Video Contents

26 A to B
Once the right-hand movement is understood without a
club in hand, practice the drill with a club held down the
grip, or preferably with a light stick to master the correct
right-hand action and the effect it has on the rest of the
body.
Contents

27 A to B
The down hit or down swing can best be drilled by placing a
guideline along the A to B path. Follow the line and start with
a ‘thumbs down’ action in the direction of the ball or position B .
Make sure the club head follows this line while the club shaft
remains in line with the left arm.
This will trigger the body pivot to bring the club head to the
ball and then all the way to a balanced finish.
Contents

28 A to B
It is very important not to take the club on the backswing inside
thinking you will get an inside-out path. Invariably what
happens when you get inside too early is that the arms bounce
off the body, and the club head to come on an outside-in path,
causing the ball to go to the left of the target if the clubface is
closed to the path, or else a big slice if the club face is open to
that path, neither of which you want.
The demonstration above represents bringing the club too
much inside the target line in the backswing and then out and
“over the top” in the downswing.
ContentsVideo 1 / 2

29 A to B
As part of my routine I have a slight forward press and I would
recommend you adopt one too. It helps you ‘kick start’ the swing
from a static position and unlocks your body. It also resembles a
miniature impact position.
I start by pushing on the pressure point at the top of the life line of
the right hand from up towards the wrist, against the side of the left
thumb. As I push right against left, it initiates a little hip turn forward,
the left leg straightens a little and I can also feel as my hands move
a little forward, that my left shoulder rises up slightly as my right
shoulder drops slightly. I can also feel my hands move a little
forward.
The forward press is quite subtle and barely noticeable, but it puts
me in a great position to start the takeaway and backswing with
momentum.
Stance Forward Press
Video Contents

30 A to B
When you swing the club properly it has an ‘open door – closed
door’ motion. It’s a bit like a tennis swing but on an incline.
The Butterfly Drill will assist you to learn this naturally and
demonstrate and understand how the hands are the source of
motion in the swing.
The Drill
Put your hands together and push the upper life line of the right
hand against the side of the left thumb. The hands are open like a
butterfly but pushed together with the wrists in a shake hands
position.
Take your stance with the hands
opposite the belt buckle. Pushing the
hands against each other you will feel
your hands moving the arms, body,
hips and shoulders. Starting with the
forward press, push the left hand
against the right, followed by the left
hand pushing against the right to
instigate the takeaway and backswing
to the top of the swing position A.
Then pushing ‘thumbs down’ along the A to B line, ‘karate chop’
with the side of the right hand down deep towards the ball and
then to the follow through and finish.
The Butterfly Drill will give you a great feeling of connection.
Hands at Address
Contents

31 A to B
Stance Forward Press Takeaway
Backswing Down Hit Deep into the Ball
Impact Follow Through
Video Contents

32 A to B
A great golf swing is never jerky. To this end, it is important to
develop a rhythm to your swing. One common method which I
use, is to do things in threes.
For example 1, 2, 3, for my forward press, backswing and hit.
I also like to start the swing with 3 sets of threes. In my swing I do
3 waggles, 3 taps on the ground, a forward press (push forward),
backswing (push backswing) and hit. Which I say under my
breath. So its -
1, 2, 3 or waggle, waggle, waggle,
1, 2, 3 or tap, tap, tap
1, 2, 3 or push, push, hit
You can say your names or numbers under your breath while
playing, but while practicing it can be beneficial to some players
to say the names or numbers out loud.
The rhythm of your swing should not be confused with the tempo.
Your tempo relates to the how fast your swing is. Your rhythm
however might be such that your waggle counts are longer than
your tap, tap, tap counts. Eventually after some drilling you will
establish a rhythm best suited to your physical capabilities and
temperament.
This routine stops me over analyzing, helps me focus, and
certainly helps with the rhythm of my swing. I stop thinking about
the swing, get into the feeling of it, and really enjoy the hit.
Contents


34 A to B
As part of the golf swing, it is good to have a pre-shot or address
routine that sets you up on a consistent basis to the 2 targets, ball,
and flag or fairway, every time. It helps to focus and sets up the
rhythm of the swing.
In my routine, I start from behind the ball, relax in balance and
envisage the shot want to play. I walk to the ball from the side, aim
the clubface at the target, take my grip, set my arms, assume my
address position by bending from the hips, unlock my knees, and
commence my rhythm routine.
Then its:
Waggle, waggle,
waggle
Tap, tap, tap
Push, push, hit
A great way to ensure you really enjoy the hit.
Video Contents

35 A to B
Missing Right
Here the focus is on the "Impact" area of the swing. Focus on
"Toe-Down -Toe-First" through the ball.
The left hand needs to be drilled to combine in-sequence –
1. uncocking (Thumbs Down) followed by
2. the last 3 fingers of the left-hand curling 'anti-clockwise" for a
full release through the ball.
Missing Left
The Fix for when you hit the ball to the left of your intended target
is found at the transition area from backswing to downswing
(providing that you have a neutral grip and square stance to start
and that you are not ‘swaying” laterally forward at the start of the
downswing which will block the hip pivot through the impact zone
and have your hands and arms stuck too much inside and behind
the right hip).
Go to the top of the backswing position - opposite the right
shoulder in height and depth - From here start the downswing by
focusing on the "uncocking action" causing the club shaft to move
into line with the left arm and the club head, hands, and arms
move down and out toward the ball.
Your intention and attention is to throw the club head down and
out more to the right of the target line and down through the ball -
start the club head more down as you transition from backswing to
downswing.
Video 1 / 2 Contents

36 A to B
The “A to B” with the driver is slightly different to that of the iron.
Because of the longer shaft you need to stand further away from
the golf ball. You start the swing low and straight back with the
handle first but the club will be swinging away on a flatter angle.
On the down hit (down swing) while the shaft is still moving into
line with the left arm, the club head is travelling on a flatter plane
towards the ball.
The ball is more forward in the stance than with an iron and
therefore the low point for the driver is underneath the left armpit
and behind the ball.
When you reach the bottom of the release of the swing the club
head will be travelling parallel to the ground or slightly up. You still
throw the club head directly at the ball but the hit will be made
slightly on the upswing.
Video Contents

37 A to B
Similar to the driver, the club head for the fairway wood is
travelling close to parallel to the ground at impact. You are still
throwing the club head down and out at the ball, but it is the ball
position (not as far forward as the driver and not as far back as an
iron) which causes the club to make impact with the ball parallel to
the ground so that the ball is hit without the club taking a divot.
The Fairway Wood at the moment of Impact
with no divot
Video Contents

38 A to B
Gary Schaal – Past President of the PGA of America – was quoted in
Golf Digest Magazine in the Master Edition as saying:
“I was sceptical at first about Peter Croker’s instruction, namely
because I am a traditionalist. I had learned and taught differently from
what Peter showed me. But after two weeks of watching and listening,
I’m a believer in what he’s talking about, and what is at the center of
this paradigm shift in golf instruction is the “A to B Drill” and focusing
on golf as a two target game, where you throw the clubhead directly
down and out into the ball – A to B – and to see the ball fly straight
and true to its target – the Flag.”
Fred Dolan - Executive Director of the American Flexibility Institute:
“Peter Croker’s “A to B – The One Drill to Better Golf” teaching
method is biomechanically sound. It creates a golf swing that rotates
nicely around the spine. Croker has correctly identified the proper
sequence of movements in the golf swing. His simple “A to B Drill”
allows golfers to quickly learn these movements. In just one month
after applying the “A to B Drill” I started hitting my irons more crisply
and longer and straighter than ever before. I believe I have found a
swing that will last a lifetime.”
Sandy Kurceba – Member of the Canadian PGA and "Teacher of the
Year“ B.C. Canada
“Thanks to using Peter Croker’s “A to B Drill” and program, I became
the proud recipient of the “Teacher of the Year” award among golf
instructors.”
Contents

39 A to B
Glenn Deck - PGA of AMERICA Member and past Teacher of the
Year in Southern California Section
“Peter Croker’s “A to B Drill” and Program is simple, educational, and
beneficial to any golf instructor. It furthered my understanding of the
golf swing and enhanced my communication skills as an instructor.
My students now have a clear picture of what to do and consistently
hit the ball with more power and control. Yes, they are playing better
and having more fun. I thank Peter Croker for taking my teaching
skills to the next level and my students to the next generation of
champions.”
William Safrin - Education Co-Chairman of the New England PGA
“Through years of experience as an accomplished player and
acclaimed golf instructor, Peter Croker has founded a refreshing new
school of thinking in golf instruction, backed up by the innovative “A to
B Drill” and learning process.”
Duke Delcher - amateur champion and a Walker Cup Player at the
age of 40
“Peter Croker’s “A to B Drill” and teaching system enabled me to add
20 yards to my drive, and to hit long irons for the first time in my
golfing life. Without Peter’s help, I do not think I would have made the
prestigious Walker Cup Team.”
Michael Rossi - Italian amateur golfer and Champion.
“As an eighteen-year-old I finished fifth in the Italian Amateur
Championship. As a nineteen-year-old, I won the Italian Matchplay
Championship. Peter Croker’s simple teaching methods are
responsible for my improved play and power game – especially the “A
to B Drill” I am only 5 feet 5 inches tall, yet I now hit tee shots 285
yards – and accurately!”
Contents

Copyright Peter Croker
2018
For your complete path to better golf join
The Croker Golf System Master Coaching Academy
Trial 7 days for $1