a01 cu-flex® conductor insulated bootlace installation guide
TRANSCRIPT

A01 CU-FLEX® Conductor Insulated Bootlace
This Installation Guide was designed with great care and proper testing before publication to ensure the product works perfectly with TriCab flexible cables. Insulated Bootlace/Ferrules are specifically designed, tested and certified for use with TriCab CU-FLEX® and ALI-FLEX®cables only. TriCab is not liable for any errors, omissions, damages etc. due to improper use of this product, included but not limited to improper installation deviating from this Guide, safety and warning rules violation, using unsuitable cable other than TriCab flexible cable. TriCab reserves the right to modify this Installation Guide at any time without prior notice.
www.tricab.com TCIM-ACC-A01-CU Rev. 00 1
(*) The (XX) stands for the Length of the barrel that is reflected in the Product Code.
Installation Guide
Insulation
Tin Plated CopperBarrel
Conductor Size Product Code Section* Bootlace Colour Recommended
Tool
mm²
0.5 A01-AMXX/(XX)B.5WH White
0.75 A01-AMXX/(XX)B.75LB Light Blue
1 A01-AMXX/(XX)B1RE Red
1.5 A01-AMXX/(XX)B1.5BK Black
2.5 A01-AMXX/(XX)B2.5GY Grey4 A01-AMXX/(XX)B4OR Orange
6 A01-AMXX/(XX)B6GR Green10 A01-AMXX/(XX)B10BR Brown16 A01-AKXX/(XX)B16IV Ivory25 A01-AKXX/(XX)B25BK Black35 A01-AKXX/(XX)B35RE Red50 A01-AGXX/(XX)B50BL Blue70 A01-AGXX/(XX)B70YE Yellow95 A01-AGXX/(XX)B95RE Red120 A01-AGXX/(XX)B120BL Blue150 A01-AGXX/32B150YE Yellow
Z01-AAXX/4J16
Use Standard Bootlace Crimping
Tools
A01 SELECTION TABLE - CU-FLEX BOOTLACE/ FERRULES
Z01-AAXX/0.5J6
This Installation Guide was designed with great care and proper testing before publication to ensure the product works perfectly with TriCab flexible cables. Insulated Bootlace/ Ferrules are specifically designed, tested and certified for use with TriCab CU-FLEX® and ALI-FLEX®cables only. TriCab is not liable for any errors, omissions, damages etc. due to improper use of this product, included but not limited to improper installation deviating from this Guide, safety and warning rules violation, using unsuitable cable other than TriCab flexible cable. TriCab reserves the right to modify this Installation Guide at any time without prior notice.
www.tricab.com TCIM-ACC-A01-CU Rev. 00 2
A01 CU-FLEX® Conductor Insulated Bootlace
Installation Guide
1.
2.
3.
4.
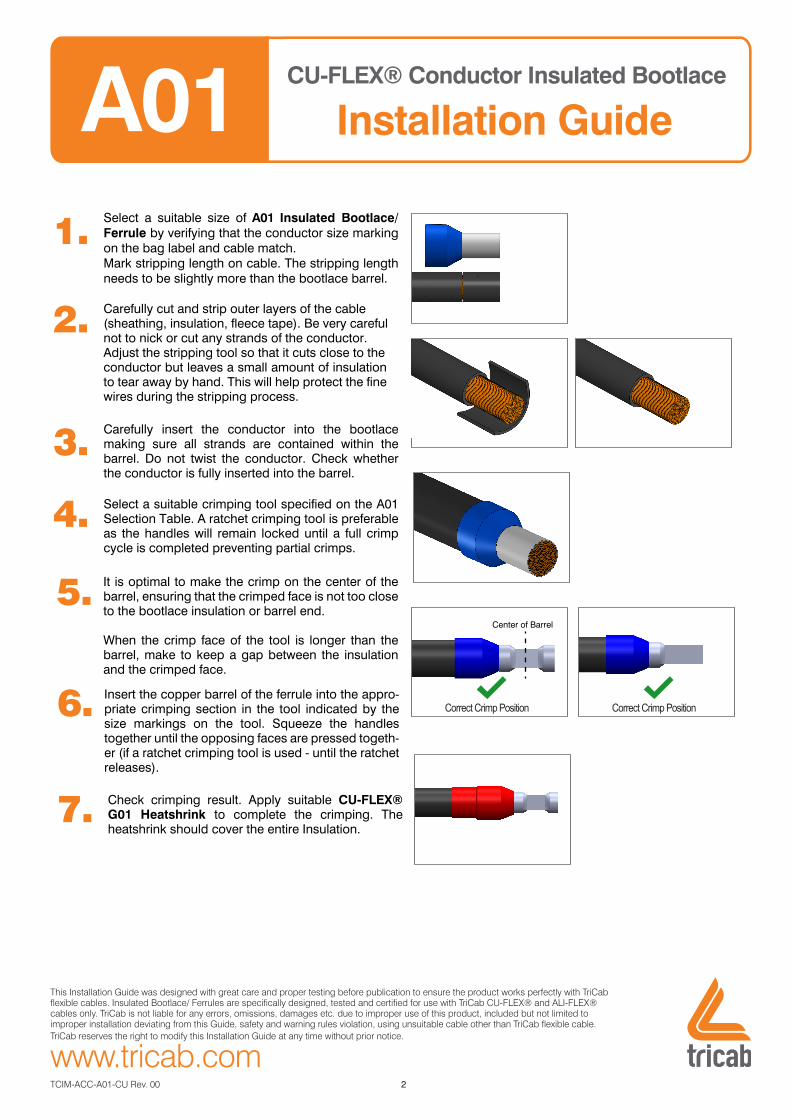
Select a suitable size of A01 Insulated Bootlace/ Ferrule by verifying that the conductor size marking on the bag label and cable match. Mark stripping length on cable. The stripping length needs to be slightly more than the bootlace barrel.
Carefully insert the conductor into the bootlace making sure all strands are contained within the barrel. Do not twist the conductor. Check whether the conductor is fully inserted into the barrel.
5.
6. Correct Crimp Position
Check crimping result. Apply suitable CU-FLEX® G01 Heatshrink to complete the crimping. The heatshrink should cover the entire Insulation.
Center of Barrel
7.
Carefully cut and strip outer layers of the cable (sheathing, insulation, fleece tape). Be very carefulnot to nick or cut any strands of the conductor. Adjust the stripping tool so that it cuts close to the conductor but leaves a small amount of insulation to tear away by hand. This will help protect the fine wires during the stripping process.
Select a suitable crimping tool specified on the A01 Selection Table. A ratchet crimping tool is preferable as the handles will remain locked until a full crimp cycle is completed preventing partial crimps.
It is optimal to make the crimp on the center of the barrel, ensuring that the crimped face is not too close to the bootlace insulation or barrel end.
When the crimp face of the tool is longer than the barrel, make to keep a gap between the insulation and the crimped face.
Insert the copper barrel of the ferrule into the appro-priate crimping section in the tool indicated by the size markings on the tool. Squeeze the handles together until the opposing faces are pressed togeth-er (if a ratchet crimping tool is used - until the ratchet releases).
Correct Crimp Position