a1 visual c++.net intro programming in c++ computer science dept va tech august, 2002 ©1995-2002...
TRANSCRIPT
Computer Science Dept Va Tech August, 2002 ©1995-2002 Barnette ND & McQuain WD
1A1 Visual C++ .NET
Intro Programming in C++
Quick Introduction
The following pages provide a quick tutorial on using Microsoft Visual C++.NET to produce a small project. There are substantial changes from version 6.0 of Visual Studio.
The following discussion is based on an actual session using the Visual C++.NET Developer’s Studio. The menu selections and options illustrated here do not conform to earlier versions of Visual C++. Please note the disclaimer in the front of these notes regarding compiler selection.
MS Visual C++.NET Introduction

Computer Science Dept Va Tech August, 2002 ©1995-2002 Barnette ND & McQuain WD
2A1 Visual C++ .NET
Intro Programming in C++
Getting Started: MS Visual C++.NETStart Visual C++ .NET from the menu:
The main window will look something like:

Computer Science Dept Va Tech August, 2002 ©1995-2002 Barnette ND & McQuain WD
3A1 Visual C++ .NET
Intro Programming in C++
Creating a New Project
Before you can begin coding, you must create a new Project.
To do so, go to the File menu and select New… and then Project:
You should see a dialog box:
In the Template window, select Win32 Project.
In the Name field, type the name you want to give the project.
Here, we call it DayOfTheWeek.
Also pick the location you want for your project files.

Computer Science Dept Va Tech August, 2002 ©1995-2002 Barnette ND & McQuain WD
4A1 Visual C++ .NET
Intro Programming in C++
Win32 Application Wizard
After clicking Ok from the New project dialog window you will be presented with the Win32 Application Wizard dialog window. Click on Application Settings.

Computer Science Dept Va Tech August, 2002 ©1995-2002 Barnette ND & McQuain WD
5A1 Visual C++ .NET
Intro Programming in C++
Win32 Application Settings
For all the assignments in CS 1044, you must select "Console application"
and "Empty project":
Click "Finish".
If you get either of these settings wrong, you will not be able to complete your assignment.

Computer Science Dept Va Tech August, 2002 ©1995-2002 Barnette ND & McQuain WD
6A1 Visual C++ .NET
Intro Programming in C++
The Project Workspace
You should now see the main Visual C++ .NET window shown below:
The window panel at the right is called the Solution Explorer. It's not of much use in CS 1044, but it shows a tree diagram that can display names of all the files in your project.
You can hide the panel by clicking its close button if you prefer not to see it.

Computer Science Dept Va Tech August, 2002 ©1995-2002 Barnette ND & McQuain WD
7A1 Visual C++ .NET
Intro Programming in C++
Creating a Code File
Now that you have created a Project, you need to add source code to it.
To do so, go to the File menu and select Add New Item.
(If you had already typed in your C++ source code file, you'd select Add Existing Item.)
In the dialog box, select the Template C++ file:
And enter the name you
want to give the file.
Click "Open".

Computer Science Dept Va Tech August, 2002 ©1995-2002 Barnette ND & McQuain WD
8A1 Visual C++ .NET
Intro Programming in C++
Creating a Code File (continued)
The main Visual C++ .NET window now shows an empty edit box in which you will type the C++ language statements for your program:

Computer Science Dept Va Tech August, 2002 ©1995-2002 Barnette ND & McQuain WD
9A1 Visual C++ .NET
Intro Programming in C++
C++ Code for DayOfTheWeek
Now in the edit window that just appeared type in the following C++ source code (exactly as it is given):
#include <iostream>using namespace std;
int main() //Find the Day of the Week for a Date{ int mon, day, year;
cout << "Enter a date for which you wish to know" << endl; cout << "the day of the week (MM DD YYYY)? "; cin << month >> day >> year;
if (year < 1752) cout << "Only Gregorian dates accepted, sorry " << endl; else {
if (month < 3) { //Jan & Feb = 13 & 14 preceding year month += 12; year -= 1; { // end if

Computer Science Dept Va Tech August, 2002 ©1995-2002 Barnette ND & McQuain WD
10A1 Visual C++ .NET
Intro Programming in C++
C++ Code (continued)
weekDay = (day + 2*month + 3*(month+1)/5 + year + year/4 - year/100 + year/400 + 1) % 7;
if (month > 12) { //reset Jan & Feb month -= 12; year += 1 ; } // end if
cout << month << "/" < day << "/" << year << " falls on "; switch (weekday) { case 0: cout << "Sunday" << endl; break; case 1: cout << "Monday" << endl; break; case 2: cout << "Tuesday" << endl; break; case 3: cout << "Wednesday" << endl; break; case 4: cout << "Thursday" << endl; break; case 5: cout << "Friday" << endl; break; case 6: cout << "Saturday" << endl; break; } // end switch
} // end else
return 0;} // end main Be sure to save the file
occasionally as you work.
Computer Science Dept Va Tech August, 2002 ©1995-2002 Barnette ND & McQuain WD
11A1 Visual C++ .NET
Intro Programming in C++
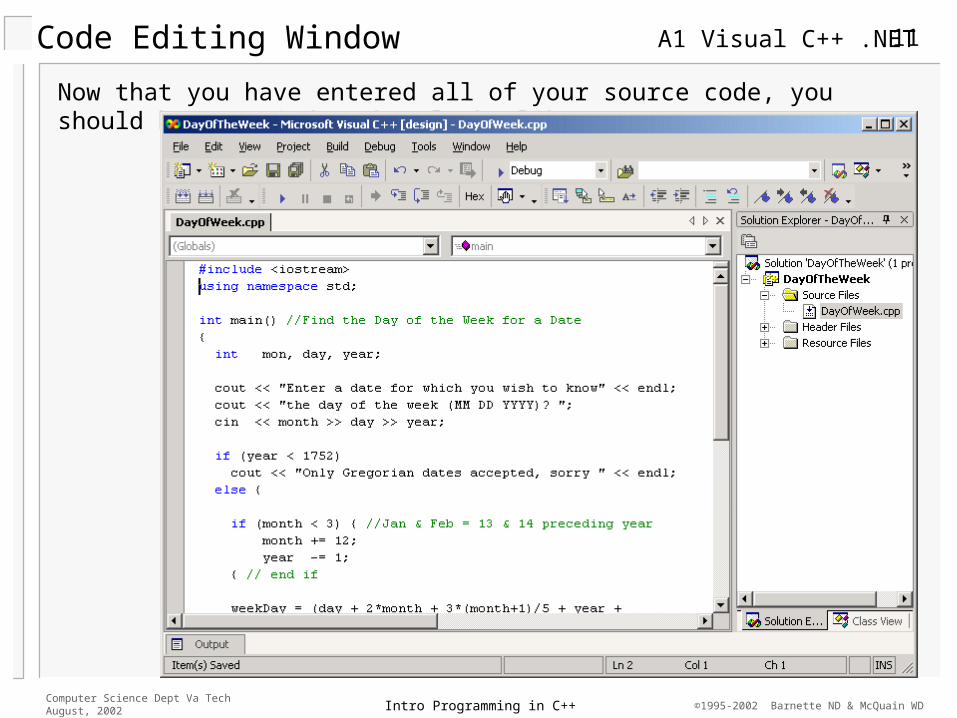
Code Editing Window
Now that you have entered all of your source code, you should have a window that looks like:
Computer Science Dept Va Tech August, 2002 ©1995-2002 Barnette ND & McQuain WD
12A1 Visual C++ .NET
Intro Programming in C++
Building an Executable
Before your program can be executed ("run"), the C++ language code you just typed in must be translated into a language the underlying computer hardware can understand.
This is easily done by using the Visual C++ .NET environment, via the toolbars or menus.
As discussed elsewhere in these notes, the translation process involves two main phases:
Compilation checks your C++ language code for grammatical correctness and partially translates it into machine language.
Linking checks the results of the compilation phase for other errors, and completes the translation, producing a new file called an executable image ("exe") file.
The two phases together are often referred to as "building" the executable.

Computer Science Dept Va Tech August, 2002 ©1995-2002 Barnette ND & McQuain WD
13A1 Visual C++ .NET
Intro Programming in C++
Building in Visual C++ .NET
You can attempt to build an executable for your Project by selecting the Build option from the Build menu:
It is entirely possible that the compilation phase will find
errors in your C++ code. In fact, if you typed the given
example code exactly as given, errors are guaranteed.
The compiler will generate error messages describing the things it found wrong in your C++ code. Those messages will be displayed in the Output panel:

Computer Science Dept Va Tech August, 2002 ©1995-2002 Barnette ND & McQuain WD
14A1 Visual C++ .NET
Intro Programming in C++
Interpreting Error Messages
The error messages generated by the compiler attempt to describe some grammatical (syntax) error in your C++ language code.
Understanding what an error message means requires that you have some understanding of the grammar of the C++ language.
In many cases, the meaning is very clear.
In others, the message may be phrased in a way that only a "language lawyer" would understand. It gets better with experience.

Computer Science Dept Va Tech August, 2002 ©1995-2002 Barnette ND & McQuain WD
15A1 Visual C++ .NET
Intro Programming in C++
Finding the Location of an Error
Notice the compiler error messages in the lower window. Double click on an error message, and the line* with the error will be indicated in the code edit window:
* Well, more or less…

Computer Science Dept Va Tech August, 2002 ©1995-2002 Barnette ND & McQuain WD
16A1 Visual C++ .NET
Intro Programming in C++
Correcting Errors
Once you have determined the cause of the error message, you merely edit your C++ language code to correct the problem.
You might want to attempt to correct several errors at once, or attempt to re-build after each change. It is important to consider the error messages in the order they are generated. In many cases, one mistake in your code may produce an avalanche of error messages.
In our case, the first error is fairly simple. C++ grammar requires that every identifier (variable name) must be formally declared before it is used. In this case, we have a spelling error, but it is in the declaration a few lines up from the flagged line:

Computer Science Dept Va Tech August, 2002 ©1995-2002 Barnette ND & McQuain WD
17A1 Visual C++ .NET
Intro Programming in C++
Error List
In case you can't figure out the other errors here are the corrections:
Line 10: change the << to >>Line 21: add a declaration for the name weekDay, right after the declaration for
monthLine 29: change the < to <<Line 30: change the spelling of "weekday" to match the capitalization used aboveLine 20: change '{' to '}'
Note that if you didn't format your code like the notes, then the line numbers above won't match.

Computer Science Dept Va Tech August, 2002 ©1995-2002 Barnette ND & McQuain WD
18A1 Visual C++ .NET
Intro Programming in C++
Clean Compilation
Once you have corrected all the errors, the Output panel will show the message below, indicating "0 errors" during compiling and linking:
This does NOT mean your program is logically correct, just that the grammar is correct.

Computer Science Dept Va Tech August, 2002 ©1995-2002 Barnette ND & McQuain WD
19A1 Visual C++ .NET
Intro Programming in C++
Executing Your Program
Now that your code has been compiled into an executable, it is ready to be executed.
You can do so by pressing <Ctrl F5> or going to the Debug menu and selecting Start without debugging:
Now you should see a DOS prompt with the program running: