a30 hardware guide - datalogic...the a30 camera is designed to be used in an industrial environment...
TRANSCRIPT

A30 Hardware Guide
Publication # 843-0153 (Rev F)

Datalogic Automation, Inc. 5775 West Old Shakopee Rd Suite 160 Bloomington MN 55437 USA A30™ Hardware Guide Edited: 07/2015 © 2015 Datalogic Automation, Inc. ALL RIGHTS RESERVED. Protected to the fullest extent under U.S. and international laws. Copying or altering of this document is prohibited without express written consent from Datalogic Automation, Inc. (DLA) Datalogic and the Datalogic logo are registered trademarks of Datalogic S.p.A. in many countries, including the U.S.A. and the E.U. A30, Vision Program Manager, Control Panel Manager, and Impact are trademarks of Datalogic Automation S.r.l. All other brand and product names mentioned herein are for identification purposes only and may be trademarks or registered trademarks of their respective owners. DLA makes no representations or warranties for merchantability or fitness for any particular purpose, regarding DLA’s software or hardware. DLA shall not be liable for errors contained herein or for incidental or consequential damages in connection with the furnishing, performance, or use of this publication or its contents. DLA reserves the right to revise this publication from time to time and to make changes in the content hereof without obligation to notify any person of such revision or changes.
Printed 27 July 2015

i
TABLE OF CONTENTS
REFERENCES .......................................................................................................... iii Conventions ............................................................................................................... iii Reference Documentation ......................................................................................... iii Service and Support .................................................................................................. iii Patents ...................................................................................................................... iii
COMPLIANCE ........................................................................................................... iv EMC Compliance ....................................................................................................... iv Power Supply ............................................................................................................. iv CE Compliance .......................................................................................................... iv FCC Compliance ....................................................................................................... iv
HANDLING ................................................................................................................. v
GENERAL VIEW ...................................................................................................... vii
1 RAPID CONFIGURATION .......................................................................................... 1 Step 1 – Assemble the Camera .................................................................................. 1 Step 2 – Connect the System ..................................................................................... 2 Step 3 – Mount and Position the Camera .................................................................... 4 Step 4 – Focus the Camera ........................................................................................ 4 Step 5 – Calibrate Image Density ................................................................................ 4
2 INTRODUCTION ........................................................................................................ 5 2.1 Product Description ..................................................................................................... 5 2.2 Indicators and Keypad Button ..................................................................................... 6 2.3 Accessories ................................................................................................................ 7
3 INSTALLATION ......................................................................................................... 8 3.1 Package Contents....................................................................................................... 8 3.2 Mechanical Dimensions .............................................................................................. 9 3.3 Mounting and Positioning the camera ....................................................................... 11
4 CBX ELECTRICAL CONNECTIONS........................................................................ 13 4.1 Power Supply ............................................................................................................ 14 4.1.1 Recommended Power Supplies ................................................................................ 14 4.2 RS232 Serial Interface .............................................................................................. 15 4.2.1 RS485 Full-Duplex Interface ..................................................................................... 15 4.3 Auxiliary RS232 Serial Interface ................................................................................ 15 4.4 Inputs ........................................................................................................................ 16 4.5 Outputs ..................................................................................................................... 21 4.6 External Illuminators ................................................................................................. 23
5 CAMERA ELECTRICAL CONNECTIONS................................................................ 24 5.1 Power, Serial, and I/O terminal block ........................................................................ 24 5.2 Power, Serial, and I/O cable ..................................................................................... 25 5.3 GigaEthernet Connector ........................................................................................... 27 5.4 Power Supply ............................................................................................................ 27

TABLE OF CONTENTS
ii
5.4.1 Recommended Power Supplies ................................................................................ 28 5.5 RS232 Serial Interface .............................................................................................. 28 5.5.1 RS485 Full-Duplex Interface ..................................................................................... 29 5.5.2 Auxiliary RS232 Serial Interface ................................................................................ 29 5.6 Ethernet Interface ..................................................................................................... 29 5.7 Inputs ........................................................................................................................ 31 5.8 Outputs ..................................................................................................................... 35
6 TYPICAL LAYOUTS ................................................................................................ 38 6.1 Embedded (On-Board) GigaEthernet ........................................................................ 38 6.2 Ethernet Networks .................................................................................................... 39 6.2.1 External Trigger Ethernet Host .................................................................................. 39 6.2.2 Software Trigger Ethernet Host ................................................................................. 40
7 IMAGE CAPTURE FEATURES ................................................................................ 41 7.1 Maximum Line Speed and Exposure Time Calculations ........................................... 41
8 SOFTWARE CONFIGURATION .............................................................................. 43 8.1 VPM™ System Requirements .................................................................................. 43 8.2 Installing Impact Software ......................................................................................... 43 8.3 Startup ...................................................................................................................... 44 8.3.1 Calibration ................................................................................................................ 44 8.3.2 Partial Scan .............................................................................................................. 45
9 MAINTENANCE ....................................................................................................... 47 9.1 Cleaning ................................................................................................................... 47
10 TROUBLESHOOTING ............................................................................................. 48 10.1 General Guidelines ................................................................................................... 48
11 TECHNICAL FEATURES ......................................................................................... 50
GLOSSARY .............................................................................................................. 51
INDEX ....................................................................................................................... 54

iii
REFERENCES CONVENTIONS This manual uses the following conventions: "User" refers to anyone using an A30 camera. "Camera" refers to an A30 camera. "You" refers to the System Administrator or Technical Support person using this manual to install, configure, operate, maintain, or troubleshoot an A30 camera. REFERENCE DOCUMENTATION For further details refer to the Impact Reference Guide provided as supplementary documentation on the installation CD. SERVICE AND SUPPORT DLA provides several services as well as technical support through its website. Log on to www.datalogic.com and click on one of the following links for further information:
• PRODUCTS Search through the links to arrive at your product page which describes specific Info, Features, Applications, Models, Accessories, and specific Downloads.
• SUPPORT & SERVICES - Service Program - Repair Centers - On-Line RMA - Technical Support - Industrial Automation - Partner Program - Downloads
PATENTS This product is covered by one or more of the following patents:
U.S. patents: 6,512,218 B1; 6,616,039 B1; 6,808,114 B1; 6,997,385 B2; 7,102,116 B2;
7,282,688 B2
European patents: 999,514 B1; 1,014,292 B1; 1,128,315 B1.
Additional patents pending.

iv
COMPLIANCE For installation, use, and maintenance, it is not necessary to open the camera. Opening the camera will void the warranty. Connect Ethernet and dataport connections to a network which has routing only within the plant or building and no routing outside the plant or building. EMC COMPLIANCE In order to meet the EMC requirements: • connect the camera chassis to the plant earth ground by means of a flat copper braid shorter
than 100 mm; • for CBX connections, connect the pin "Earth" to a good Earth Ground; • for direct connections, connect the main interface cable shield to pin K of the 19-pin
connector. POWER SUPPLY ATTENTION: READ THIS INFORMATION BEFORE INSTALLING THE PRODUCT This product is intended to be installed by Qualified Personnel only. This product is intended to be connected to a UL Listed Direct Plug-in Power Unit marked LPS or “Class 2”, rated 10-30Vdc 1-0.33A. CE COMPLIANCE Warning: This is a Class A product. In a domestic environment this product may cause radio interference in which case the user may be required to take adequate measures. FCC COMPLIANCE Modifications or changes to this equipment without the expressed written approval of DLA could void the authority to use the equipment. This device complies with PART 15 of the FCC Rules. Operation is subject to the following two conditions: (1) This device may not cause harmful interference, and (2) this device must accept any interference received, including interference which may cause undesired operation. This equipment has been tested and found to comply with the limits for a Class A digital device, pursuant to part 15 of the FCC Rules. These limits are designed to provide reasonable protection against harmful interference when the equipment is operated in a commercial environment. This equipment generates, uses, and can radiate radio frequency energy and, if not installed and used in accordance with the instruction manual, may cause harmful interference to radio communications. Operation of this equipment in a residential area is likely to cause harmful interference in which case the user will be required to correct the interference at the user’s own expense.

v
HANDLING The A30™ camera is designed to be used in an industrial environment and is built to withstand vibration and shock when correctly installed However, it is also a precision product and therefore it must be handled correctly before and during installation to avoid damage. • Avoid dropping the camera (exceeding shock limits).
• Do not fine tune the positioning by striking the camera or bracket.

HANDLING
vi
• Do not weld the camera into position. This can cause electrostatic, heat, or imager damage.
• Do not spray paint near the camera. This can cause imager damage.

vii
GENERAL VIEW A30™ Camera
1 Power Indicator LED 2 Power, Serial Interface, and I/O Connector 3 MAC Address label 4 Ethernet Connector 5 Ethernet Network Presence LED 6 Indicator Lights (see page 6) 7 Reset and Camera Button Event (see page 6)
1
2
3
6
7
5
4


RAPID CONFIGURATION
1
1
1 RAPID CONFIGURATION STEP 1 – ASSEMBLE THE CAMERA The first step to perform is to assemble any accessories that make up the A30™ camera. A lens must be used. A strobe or other external illuminator may be required.
CAUTION
The camera must be disconnected from the power supply during this procedure.
1. In a dust-free environment, remove the Camera Lens Cover by unscrewing it.
CAUTION
Do not touch the sensor aperture, lens glass or lens cover glass. These areas must be kept clean. Avoid any abrasive substances that might damage these surfaces during cleaning.
2. Remove the sensor protection label (dust cap) by pulling it off of the base. 3. Mount a lens by slowly screwing it onto the base until it arrives at the mechanical stop.
Figure 1 – Assembling the Camera and Lens
4. To keep dust and dirt off of the lens during mounting, temporarily replace the lens cover.
Lens
Lens Cover
Lens Spacer (optional) Protective Film
(remove before calibration)
Camera

A30™ HARDWARE GUIDE
2
1
STEP 2 – CONNECT THE SYSTEM In the typical standalone layout shown in the figure below, an EtherNet host is connected to the camera. The camera can use an external trigger to signal image acquisition. The CBX is used to facilitate the connection between the camera and the host interface, external trigger, and optional input and output devices.
A30™ Standalone Layout to Ethernet Host
• Power Supply Connection Use the PG-120 power Kit (3 versions for European, UK or US plug) and CAB-PG-0002 + BA400 connector to connect the PG-120 to the CBX. An alternative power supply to the PG-120 is the PWR-120.
• CBX Connection Use CAB-SCSxx between the A30 camera and the CBX for power, external trigger device (photocell), and additional I/O connections.
Use the CAB-GE0x for the Gigabit Ethernet connection to the host.
NOTE
The A30 does not support sourcing power towards the CBX in order to power I/O devices. These devices must be powered through the CBX or from an external source.
CAB-GE0x
CAB-PG-0002 + BA400
CAB-SCSxx
PG-120
Ext. Trigger
CBX500
I/O
Ethernet Host (Data collection + A30
configuration)
Camera

RAPID CONFIGURATION
3
1
CBX500 Connectors for A30™ The table below gives the CBX500 terminal block connectors. Use this table when the camera is connected using the CBX500.
CBX500 Terminal Block Connectors Input Power Outputs
Vdc Power Supply Input Voltage + +V Power Source - Outputs GND Power Supply Input Voltage - -V Power Reference - Outputs Earth Protection Earth Ground O1+ Output 1 +
O1- Output 1 - Inputs O2+ Output 2 +
+V Power Source – External Trigger O2- Output 2 - I1A External Trigger + or -
(polarity insensitive) O3A Strobe + / Output 3 + (See Note)
I1B External Trigger + or - (polarity insensitive) O3B Strobe - / Output 3 -
-V Power Reference – External Trigger RS232 Interface +V Power Source – Inputs TX Transmit I2A Input 2 + or - (polarity insensitive) RX Receive I2B Input 2 + or - (polarity insensitive) SGND Signal Ground I3A NOT USED I4A NOT USED I34B NOT USED -V Power Reference – Inputs
Shield Shield Network Cable Shield
Note: The strobe signal connection is shared with Output 3. If a non-zero value is defined for the Strobe Pulse Length value (in VPM – Impact – General), the strobe is active. If the value is zero, Output 3 is active.
CAUTION
Do not connect GND and SGND to different (external) ground references. GND and SGND are internally connected through filtering circuitry which can be permanently damaged if subjected to voltage drops over 0.8 Vdc.

A30™ HARDWARE GUIDE
4
1
STEP 3 – MOUNT AND POSITION THE CAMERA 1. Mounting solutions are provided in Chapter 0 of this Hardware Guide. STEP 4 – FOCUS THE CAMERA
1. Remove the lens cover.
2. Attach the correct accessory lens for your application.
3. Replace the lens cover, if needed.
4. Power the camera on. On the connector side of the camera near the cable, the “POWER ON” LED (blue) indicates the camera is correctly powered.
5. Start Impact Vision Program Manager (VPM) and use it to connect to the camera.
6. Direct the camera toward a correctly lighted calibration image or other clearly defined object.
7. Select the Settings tab, then click the Camera system object.
8. In the Camera Setup tab, click the Live button.
9. Adjust the lens until the image is clearly in focus in the VPM image window. STEP 5 – CALIBRATE IMAGE DENSITY In order to function correctly when inspecting images, the camera needs the image resolution or PPI (pixels per inch). This calibration procedure is necessary for first time installation, if the lens type is changed, or if the focal distance is changed. There are several methods available for calibrating the camera. Refer to the Calibration Panel section of the Impact Reference Guide (Publication # 843-0093) for complete details.

INTRODUCTION
5
2
2 INTRODUCTION 2.1 PRODUCT DESCRIPTION The A30 features a 1.1 GHz processor, 256 megabytes of flash memory, integrated Gigabit Ethernet, and a right-angle mount. It provides a 640 x 480 pixel image at 60 frames per second using a 1/3” CCD imager. Excellent Performance
• Adjustable focus through C-Mount lenses
• Frame Rate up to 60 frames/sec
• Partial Scan capabilities for higher frame rate Flexible Solution
• Modular design
• Adjustable C-Mount lenses
• Complete set of Accessories like external lighting systems, mounting brackets, connection boxes, cables, and photocells
• Ethernet Connectivity to the host processor PC for parameter configuration, inspection program development, and data and image transfer.
• General purpose optocoupled I/Os Industrial Strength
• Industrial compact camera
• Rugged full metal construction
• Sealed circular connectors
• IP65 protection class
• 45 °C (113 °F) max operating temperature
• Supply voltage ranges from 10 to 30 Vdc

A30™ HARDWARE GUIDE
6
2
2.2 INDICATORS AND KEYPAD BUTTON
Figure 2 - Indicators
The following LED indicators are located on the camera (Figure 2):
1 POWER On – camera is connected to power 2 NET On – Ethernet link is established. Blinking - data transmission 3 BUSY LED blinks during image and flash memory access 4 OUT1 On – Output 1 is on 5 OUT2 On – Output 2 is on 6 OUT3 On – Output 3 is on 7 ONLINE On – Loaded tasks will be executed based on their trigger parameters 8 BUTTON Camera Reset: See Note below
Camera Button event: Press and release the button (Internal software event trigger only)
Note: Camera Reset restores the factory camera settings including deleting all user settings and resetting the camera’s Mask and IP Address to the factory default (192.168.0.128).
To Reset the Camera 1. Turn off camera power.
2. Press and hold the Camera Reset button.
3. Turn on power. Continue holding the Camera Reset button.
4. After about 30 seconds, all the LED indicators turn on for a few seconds. Continue holding the Camera Reset button.
5. The LED indicators turn off for about five seconds, then turn on.
6. When all the LED indicators have turned on and remain lit, release the Camera Reset button.
7. Wait approximately 30 seconds for the camera to restart.
1 2 3 4 5 6 7
8

INTRODUCTION
7
2
2.3 ACCESSORIES The following is a partial list of optional accessories for the A30 camera.
Model Description Order No. OCR Software License OCR Software License 098-0223
CAB-SCS01 Cable, A30/T4x to CBX, 1M A30 to CBX connection cable - 1 meter 95A906068
CAB-SCS03 Cable, A30/T4x to CBX, 3M A30 to CBX connection cable - 3 meters 95A906069
CAB-SCS05 Cable, A30/T4x to CBX, 5M A30 to CBX connection cable - 5 meters 95A906070
CAB-SCS10 Cable, A30/T4x to CBX, 10M A30 to CBX connection cable - 10 meters 95A906071
CAB-GE01 M12-IP67 TO RJ45 1M Gig-E Ethernet cable - 1 meter 93A050034
CAB-GE03 M12-IP67 TO RJ45 3M Gig-E Ethernet cable - 3 meter 93A050035
CAB-GE05 M12-IP67 TO RJ45 5M Gig-E Ethernet cable - 5 meter 93A050036
CAB-GE10 M12-IP67 TO RJ45 10M Gig-E Ethernet cable - 10 meter 93A051389
I/O Board, A30/T4x, Female DB25, DIN Rail Mountable I/O Board, DIN Rail Mountable 95A906346
CBX500 CONNECTION BOX MODULAR CBX500 connection box 93A301068
CBX800 GATEWAY CBX800 connection box 93A301077
BM300 PROFIBUS MODULE Profibus module 93ACC1810
BM310 PROFIBUS IP65 MODULE Profibus module with IP65 connector 93ACC1811
BA100 DIN RAIL ADAPTERS CBX adapter for DIN rail mounting 93ACC1821
BA200 BOSCH ADAPTERS CBX adapter for Bosch profile mounting 93ACC1822

A30™ HARDWARE GUIDE
8
3
3 INSTALLATION 3.1 PACKAGE CONTENTS Verify that the A30™ camera and all the parts supplied with the equipment are present and intact when opening the packaging. The list of parts includes: A30 camera with Lens Cover Software and Documentation CD QuickStart Guide Mounting Kit
• Mounting Screws (4 + 3) • Washers (2) • Mounting Brackets (2)
Figure 3 – A30 Package Contents

INSTALLATION
9
3
3.2 MECHANICAL DIMENSIONS The A30 can be installed to operate in different positions using the body mounting bracket shown in Figure 5. The twelve screw holes (M4) on the body of the camera can be used for custom mounting solutions. The diagram below gives the overall dimensions of the camera. Refer to section 3.3 for various mounting solutions and correct positioning.
Figure 4 – A30 Overall Dimensions

A30™ HARDWARE GUIDE
10
3
Figure 5 – Mounting Bracket Overall Dimensions
mm [in]

INSTALLATION
11
3
3.3 MOUNTING AND POSITIONING THE CAMERA Using the A30 mounting brackets, you can obtain rotation on the various axes of the camera as shown in the diagrams below.
Figure 6 –Positioning with Body Mounting Bracket (Back)
Figure 7 –Positioning with Body Mounting Bracket (Side)
Figure 8 –Positioning with Body Mounting Bracket (Front)

A30™ HARDWARE GUIDE
12
3
The A30 camera is able to capture images at a variety of angles. When mounting the camera, take into consideration that significant pitch, skew, or tilt may degrade accuracy. The Pitch and Skew angles are represented by the values P and S in Figure 9 and Figure 10. Position the camera to avoid the direct reflection of the light emitted by the camera or other lighting. In some cases, such as low contrast or low illumination, the Pitch or Skew angle should be adjusted.
Minimize
Figure 9 - Pitch angle
Figure 10 - Skew angle The Tilt angle is represented by the value T in Figure 11.
Figure 11 - Tilt angle

CBX ELECTRICAL CONNECTIONS
13
4
4 CBX ELECTRICAL CONNECTIONS All A30 cameras can be connected to a CBX500 connection box using a CAB-SCSxx accessory cable. These accessory cables terminate in a 19-pin connector on the camera side and in a 25-pin male D-sub connector on the CBX side. (See Power, Serial, and I/O Connector on page 25.) We recommend making system connections through one of the CBX connection boxes since they offer the advantages of easy connection, easy device replacement, and filtered reference signals.
NOTE
If you require direct or terminal block wiring to the camera, see Page 25.
The table below shows the terminal block connections for the CBX500.
CBX500 Terminal Block Connectors Input Power
Vdc Power Supply Input Voltage + GND Power Supply Input Voltage - Earth Protection Earth Ground
Inputs +V Power Source – External Trigger I1A External Trigger + or - (polarity insensitive) I1B External Trigger + or - (polarity insensitive) -V Power Reference – External Trigger +V Power Source – Inputs I2A Input 2 + or - (polarity insensitive) I2B Input 2 + or - (polarity insensitive) I3A NOT USED I4A NOT USED
I34B NOT USED -V Power Reference – Inputs
Outputs +V Power Source - Outputs -V Power Reference - Outputs
O1+ Output 1 + O1- Output 1 - O2+ Output 2 + O2- Output 2 - O3A Strobe + / Output 3 + (See Note) O3B Strobe - / Output 3 -
RS232 Interface TX Transmit RX Receive
SGND Signal Ground Note: The strobe signal connection is shared with Output 3. If a non-zero value is defined for the Strobe Pulse Length value (in VPM – Impact – General), the strobe is active. If the value is zero, Output 3 is active.
CAUTION
Do not connect GND and SGND to different (external) ground references. GND and SGND are internally connected through filtering circuitry which can be permanently damaged if subjected to voltage drops over 0.8 Vdc.

A30™ HARDWARE GUIDE
14
4
NOTE
To avoid electromagnetic interference when the camera is connected to a CBX connection box, verify the jumper positions in the CBX as indicated in its Installation Manual.
4.1 POWER SUPPLY
NOTE
The A30 does not support sourcing power towards the CBX through the CBX "power from device" source jumper setting. Power must be supplied to the CBX as shown below.
To power the camera and/or I/O devices through the CBX, power must be supplied to the CBX500 spring clamp terminal pins as shown in Figure 12:
Figure 12 - Power Supply Connections
The power must be between 10 and 30 Vdc only. It is recommended to connect the device CHASSIS to earth ground (Earth) by setting the appropriate jumper in the CBX connection box. See the CBX Installation Manual for details. 4.1.1 Recommended Power Supplies The following optional accessory power supplies are recommended for A30 cameras:
Power Supplies Power Supply Number of Cameras Supported
PG-120 2 PWR-120 2 PWR-240 4
PWR-480A 8

CBX ELECTRICAL CONNECTIONS
15
4
4.2 RS232 SERIAL INTERFACE The signals relative to the following serial interface types are available on the CBX spring clamp terminal blocks. The serial interface parameters (baud rate, data bits, etc.) are defined in Vision Program Manager (VPM) software. Refer to the Serial Port section of the Impact Reference Guide (Publication # 843-0093). The following pins are used for RS232 interface connection. The Impact software does not support hardware (CTS/RTS) or software (Xon/Xoff) data flow control.
CBX500 Function TX Transmit Data RX Receive Data
SGND Signal Ground It is always advisable to use shielded cables. The overall maximum cable length must be less than 15 m (49.2 ft.).
Figure 13 – RS232 Main Interface Connections Using Hardware Handshaking
4.2.1 RS485 Full-Duplex Interface The Impact software does not support RS485 protocol. 4.3 AUXILIARY RS232 SERIAL INTERFACE The 9-pin female Auxiliary Interface connector inside the CBX is to be used by Factory and Support personnel only.
NOTE
Do not make any connections to the Aux Interface.

A30™ HARDWARE GUIDE
16
4
4.4 INPUTS There are two optocoupled polarity insensitive inputs available on the camera: Input 1 (Trigger) and Input 2, a generic input: The Trigger is used to trigger the camera so that it will acquire an image. Input 2 can be used as a signal to a software task to perform an action. The electrical features of both inputs are:
VAB = 30 Vdc max.
IIN = 10 mA (camera) + 12 mA (CBX) max. The active state of these inputs are selected in software. Refer to the Camera Setup tab and Discrete Input tool sections of the Impact Reference Guide (Publication # 843-0093). An anti-disturbance filter is implemented in software on both inputs so that the minimum pulse duration is ≅ 0.5 milliseconds. This value can be increased through the software parameter Debounce Filter. Refer to the Camera Setup tab section in the Impact Reference Guide for further details. These inputs are optocoupled and can be driven by both NPN and PNP type commands.
NOTE
Polarity insensitive inputs assure full functionality even if pins A and B are exchanged.
The connections are indicated in the following diagrams:

CBX ELECTRICAL CONNECTIONS
17
4
EXTERNAL TRIGGER INPUT CONNECTIONS USING CBX POWER
CAUTION
Power is available directly to the Input Device, independently from the Power Supply Switch inside the CBX.
Figure 14 – PH-1 External Trigger Using CBX Power
Figure 15 - NPN External Trigger Using CBX Power
EXTERNAL TRIGGER INPUT CONNECTIONS USING EXTERNAL POWER
Figure 16 - PNP External Trigger Using External Power
CBX500 Function +V Power Source - External Trigger I1A External Trigger + or - (polarity insensitive) I1B External Trigger + or - (polarity insensitive) -V Power Reference - External Trigger

A30™ HARDWARE GUIDE
18
4
Figure 17 - NPN External Trigger Using External Power

CBX ELECTRICAL CONNECTIONS
19
4
INPUT 2 CONNECTIONS USING CBX POWER
CAUTION
Power is available directly to the Input Device, independently from the Power Supply Switch inside the CBX.
Figure 18 - PNP Input 2 Using CBX Power
Figure 19 - NPN Input 2 Using CBX Power
INPUT 2 CONNECTIONS USING EXTERNAL POWER
Figure 20 - PNP Input 2 Using External Power
CBX500 Function +V Power Source - Inputs I2A Input 2 + or - (polarity insensitive) I2B Input 2 + or - (polarity insensitive) -V Power Reference - Inputs

A30™ HARDWARE GUIDE
20
4
Figure 21 - NPN Input 2 Using External Power

CBX ELECTRICAL CONNECTIONS
21
4
4.5 OUTPUTS Three optocoupled general purpose outputs are available. The meaning of the outputs can be defined by the user. They are typically used either to signal the data collection result or to control an external lighting system. The electrical features of the two outputs are the following:
VCE = 30 Vdc max.
ICE = 40 mA continuous max.; 130 mA pulsed max.
VCE saturation = 1 Vdc max. @ 10 mA
PD = 80 mW Max. @ 45 °C ambient temp. The output signals are fully programmable. Refer to the Discrete Output tool section in the Impact Reference Guide for further details.
OUTPUT CONNECTIONS USING CBX POWER
Note: The strobe signal connection is shared with Output 3. If a non-zero value is defined for the Strobe Pulse Length value (in VPM – Impact – General), the strobe is active. If the value is zero, Output 3 is active.
CAUTION
Power is available directly to the Output Device, independently from the Power Supply Switch inside the CBX.
Figure 22 - Open Emitter Output Using CBX Power
CBX500 Function +V Power Source - Outputs
O1+ Output 1 + O1- Output 1 - O2+ Output 2 + O2- Output 2 - O3A Strobe + / Output 3 + (See Note) O3B Strobe - / Output 3 - -V Power Reference Outputs

A30™ HARDWARE GUIDE
22
4
Figure 23 - Open Collector Output Using CBX Power
OUTPUT CONNECTIONS USING EXTERNAL POWER
Figure 24 - Output Open Emitter Using External Power
Figure 25 - Output Open Collector Using External Power

CBX ELECTRICAL CONNECTIONS
23
4
4.6 EXTERNAL ILLUMINATORS If an External Illuminator (strobe light) is used, it can be powered from the CBX connection box. It must be connected to the Vdc and GND terminal clamps. The strobe signal connection is shared with Output 3. If a non-zero value is defined for the Strobe Pulse Length value (in VPM – Impact – General), the strobe is active. If the value is zero, Output 3 is active.
CAUTION
Power is available directly to the strobe, independently from the Power Supply Switch inside the CBX.
Configure the Strobe Signal in the VPM software. Refer to the Camera Setup tab section of the Impact Reference Guide.
Figure 26 – External Illuminator Connections
Below is a table summarizing the External Illuminator wiring and power requirements.
CBX/Camera Signal Meaning Vdc 10 to 30 Vdc GND Ground Earth Shield/Earth Ground O3B Control Signal – (See Note) O3A Control Signal +
Note: The strobe signal connection is shared with Output 3. If a non-zero value is defined for the Strobe Pulse Length value (in VPM – Impact – General), the strobe is active. If the value is zero, Output 3 is active.

A30™ HARDWARE GUIDE
24
5
5 CAMERA ELECTRICAL CONNECTIONS 5.1 POWER, SERIAL, AND I/O TERMINAL BLOCK Camera power, trigger signals, and strobe triggers can be connected to the camera using a terminal block and cable or an unterminated cable (see page 25). To use a terminal block (95A906346) you must also use the optional camera cable (CAB-SCSxx). The camera cannot source power through this connector. Figure 27 – A30/T4x-Series I/O Block
Terminal Name Function 9 & 13 Vdc Power supply input voltage + 7 & 25 GND Power supply input voltage -
18 I1A External Trigger + or - (polarity insensitive)
19 I1B External Trigger + or - (polarity insensitive)
6 I2A Input 2 + or - (polarity insensitive)
10 I2B Input 2 + or - (polarity insensitive)
22 O1- Output 1 -
11 O2+ Output 2 + 8 O1+ Output 1 + 12 O2- Output 2 -
2 TX RS232 Transmit
3 RX RS232 Receive
4 Not Used Not Used
5 Not Used Not Used
21 Not Used Not Used
20 Not Used Not Used
17 Strobe-/O3B Strobe - / Output 3 – (See Note)
16 Strobe+/O3A Strobe + / Output 3 +
1 CHASSIS Cable shield internally connected by capacitor to the chassis in CBX500
Note: The strobe signal connection is shared with Output 3. If a non-zero value is defined for the Strobe Pulse Length value (in VPM – Impact – General), the strobe is active. If the value is zero, Output 3 is active.

CAMERA ELECTRICAL CONNECTIONS
25
5
5.2 POWER, SERIAL, AND I/O CABLE The camera is equipped with an M16 19-pin male connector (Binder, 423 Series) for connection to the power supply, serial interface and input/output signals. The details of the 19- pin and 25-pin connectors are shown here for using an unterminated cable. The camera cannot source power through this connector.
Figure 28 – M16 19-pin Connector (Pin Side) 25-pin D-Sub Connector (Pin Side)
Connector Pinout
25-Pin 19-Pin Wire Color Name Function 9 & 13 A Red Vdc Power supply input voltage + 7 & 25 L Black GND Power supply input voltage -
18 B Orange I1A External Trigger + or - (polarity insensitive) 19 C Green-Black I1B External Trigger + or - (polarity insensitive) 6 D Grey I2A Input 2 + or - (polarity insensitive)
10 E Green-Red I2B Input 2 + or - (polarity insensitive) 22 F Black-White O1- Output 1 - 11 G White-Red O2+ Output 2 + 8 H Purple O1+ Output 1 +
12 I White-Blue O2- Output 2 - 2 M Yellow TX RS232 Transmit 3 U Brown RX RS232 Receive 4 N Pink Not Used 5 T Green Not Used
21 O Yellow-White Not Used 20 S Yellow-Blue Not Used 17 R White Strobe-/O3B Strobe - / Output 3 – (See Note) 16 P Blue Strobe+/O3A Strobe + / Output 3 +
1 K Shields CHASSIS Cable shield internally connected by capacitor to the chassis in CBX500
Note: The strobe signal connection is shared with Output 3. If a non-zero value is defined for the Strobe Pulse Length value (in VPM – Impact – General), the strobe is active. If the value is zero, Output 3 is active.

A30™ HARDWARE GUIDE
26
5
In order to meet EMC requirements:
• connect the camera chassis to the plant earth ground by means of a flat copper braid shorter than 100 mm
• connect the main interface cable shield to pin K of the 19-pin connector
CAUTION
Do not connect GND and SGND to different (external) ground references. GND and SGND are internally connected through filtering circuitry which can be permanently damaged if subjected to voltage drops over 0.8 Vdc.

CAMERA ELECTRICAL CONNECTIONS
27
5
5.3 GIGAETHERNET CONNECTOR An M12 8-pin female connector is provided for the on-board GigaEthernet connection**. This interface is 1000BASE-T (also known as IEEE 802.3ab) compliant. See section 5.5 for connection details.
Figure 29 - M12 8-Pin Female GigaEthernet Network Connector
M12 8-Pin GigaEthernet Network Connector pinout
Pin Name Function 1 DB- Channel B bi-directional data (negative pin) 2 DD+ Channel D bi-directional data (positive pin) 3 DD- Channel D bi-directional data (negative pin) 4 DA- Channel A bi-directional data (negative pin) 5 DC+ Channel C bi-directional data (positive pin) 6 DA+ Channel A bi-directional data (positive pin) 7 DB+ Channel B bi-directional data (positive pin) 8 DC- Channel C bi-directional data (negative pin)
(**) Due to the high speed signals, it is strongly suggested that you use CAT5e or CAT6 cables. 5.4 POWER SUPPLY Power is supplied to the camera through the pins provided on the M16 19-pin connector (see Figure 29). The camera cannot source power through this connector.
CAMERA
A
L
Vdc
GND
K SHIELD
USER INTERFACE
CHASSIS
V- (Ground)
V+ (10 - 30 Vdc)
Earth Ground Earth Ground
Chassis
Figure 30 - Power Supply Connection
The allowed supply voltage range for the camera is 10 to 30 Vdc.

A30™ HARDWARE GUIDE
28
5
5.4.1 Recommended Power Supplies The following optional accessory power supplies are recommended for A30 cameras:
Power Supplies Power Supply Number of Cameras Supported
PG-120 2 PWR-120 2 PWR-240 4
PWR-480A 8 5.5 RS232 SERIAL INTERFACE The signals relative to the following serial interface types are available on the M16 19-pin connector: The main serial interface parameters (baud rate, data bits, etc.) are defined using Impact VPM software. The following pins of the M16 19-pin connector are used for RS232 interface connection. The Impact software does not support hardware (CTS/RTS) or software (Xon/Xoff) data flow control.
Pin Name Function M TX Transmit Data U RX Receive Data L GND Ground
It is always advisable to use shielded cables. The overall maximum cable length must be less than 15 m (49.2 ft.).
Earth Ground Earth Ground
Chassis
Camera
GND
RX
TX
USER INTERFACE
Reference Ground
TXD
RXD
SHIELD
L
U
M
K
Figure 31 - RS232 Interface Connections

CAMERA ELECTRICAL CONNECTIONS
29
5
5.5.1 RS485 Full-Duplex Interface The Impact software does not support RS485 protocol. 5.5.2 Auxiliary RS232 Serial Interface The 9-pin female Auxiliary Interface connector inside the CBX is to be used by Factory and Support personnel only.
NOTE
Do not make any connections to the Aux Interface.
5.6 ETHERNET INTERFACE The Ethernet Interface can be used for TCP/IP communication with a remote or local host computer by connecting the camera to either a LAN or directly to a host PC. There is no need to use a crossover adapter since the camera incorporates an auto-cross function. The following is an example of a connection to a LAN using a CAB-GE0x straight through cable:
M12 8-Pin GigaEthernet Connector Pinout Pin Name Function 1 DB- Channel B bi-directional data (negative pin) 2 DD+ Channel D bi-directional data (positive pin) 3 DD- Channel D bi-directional data (negative pin) 4 DA- Channel A bi-directional data (negative pin) 5 DC+ Channel C bi-directional data (positive pin) 6 DA+ Channel A bi-directional data (positive pin) 7 DB+ Channel B bi-directional data (positive pin) 8 DC- Channel C bi-directional data (negative pin)

A30™ HARDWARE GUIDE
30
5
Figure 32 - CAB-GE0x GigaEthernet Cable
On the camera Ethernet interface the following communication channels are available:
• Data Socket • HTTP Server
• Image Socket • Ethernet IP
• WebSentinel Socket • Modbus TCP
• Image FTP Client
CAMERA
1
7
4
6
LAN
3
5
4
2
1
6
7
8
M12 8-pin
RJ45
2
3
8
5
DB-
DA-
DA+
DB+
DD+
DC-
DC+
DD-
CAB-GE0x
DB-
DA-
DA+
DB+
DD+
DC-
DC+
DD-

CAMERA ELECTRICAL CONNECTIONS
31
5
5.7 INPUTS There are two optocoupled polarity insensitive inputs available on the M16 19-pin connector of the camera: Input 1 (External Trigger) and Input 2, a generic input. The External Trigger is the image acquisition trigger. The main function of the general purpose Input 2 is to detect an input signal. The electrical features of both inputs are:
INPUT | V AB | Min. | V AB | Max. I IN Max. Open 0 V 2 V 0 mA Closed 4.5 V 30 V 10 mA
The active states of these inputs are selected in software. An anti-disturbance filter is implemented in software on both inputs so that the minimum pulse duration is ≅ 0.5 milliseconds. This value can be increased through the software parameter Debounce Filter. Refer to the Camera Setup tab section in the Impact Reference Guide for further details. These inputs are optocoupled and can be driven by both NPN and PNP type commands.
NOTE
Polarity insensitive inputs assure full functionality even if pins A and B are exchanged.
The connections are indicated in the following diagrams:
Pin Name Function A Vdc Power Supply input voltage + B I1A External Trigger + or - (polarity insensitive) C I1B External Trigger + or - (polarity insensitive) L GND Power Supply input voltage -
The Busy LED is on when the active state of the External Trigger corresponds to ON.

A30™ HARDWARE GUIDE
32
5
EXTERNAL TRIGGER INPUT PNP PH-1
Vdc
GND
I1A
I1B
PNP PH-1 wires Camera
B
C
L
(brown) +10-30 Vdc
(black) NO
(blue) 0 V
VCC ~ ~
+ -
A
Figure 33 - External Trigger Using PNP PH-1 Photocell
EXTERNAL TRIGGER INPUT CONNECTIONS USING A30 POWER
EXTERNAL TRIGGER Camera
B
C
A
L Ground
V
Signal
VCC ~ ~
+ -
Vdc
GND
I1A
I1B
Figure 34 – External Trigger PNP Using A30 Power
EXTERNAL TRIGGER Camera
Signal
B
C
A
L Ground
V
VCC ~ ~
+ -
Vdc
GND
I1A
I1B
Figure 35 - External Trigger NPN Using Camera Power
EXTERNAL TRIGGER INPUT CONNECTIONS USING EXTERNAL POWER
Camera EXTERNAL TRIGGER Vext 30 Vdc max.
A
B VCC ~
~ + -
V
Signal I1A
I1B I in

CAMERA ELECTRICAL CONNECTIONS
33
5
Figure 36 - External Trigger PNP Using Camera Power
Camera EXTERNAL TRIGGER Vext 30 Vdc max.
A
B
Signal
V VCC ~
~ + -
I1A
I1B
Figure 37 - External Trigger NPN Using Camera Power
INPUT 2 CONNECTIONS USING CAMERA POWER
Pin Name Function A Vdc Power Supply input voltage + D I2A Input 2 + or - (polarity insensitive) E I2B Input 2 + or - (polarity insensitive) L GND Power Supply input voltage -
INPUT DEVICE Camera
D
E
A
L Ground
V
Signal
VCC ~ ~
+ -
Vdc
GND
I2A
I2B
Figure 38 - Input PNP Using Camera Power
INPUT DEVICE Camera
Signal
D
E
A
L Ground
V
VCC ~ ~
+ -
Vdc
GND
I2A
I2B
Figure 39 - Input NPN Using Camera Power

A30™ HARDWARE GUIDE
34
5
INPUT 2 CONNECTIONS USING EXTERNAL POWER
Camera INPUT DEVICE Vext 30 Vdc max.
D
E VCC ~
~ + -
V
Signal I2A
I2B I in
Figure 40 - Input PNP Using External Power
Camera INPUT DEVICE Vext 30 Vdc max.
D
E
Signal
V VCC ~
~ + -
I2A
I2B
Figure 41 - Input NPN Using External Power
CAMERA ELECTRICAL CONNECTIONS
35
5
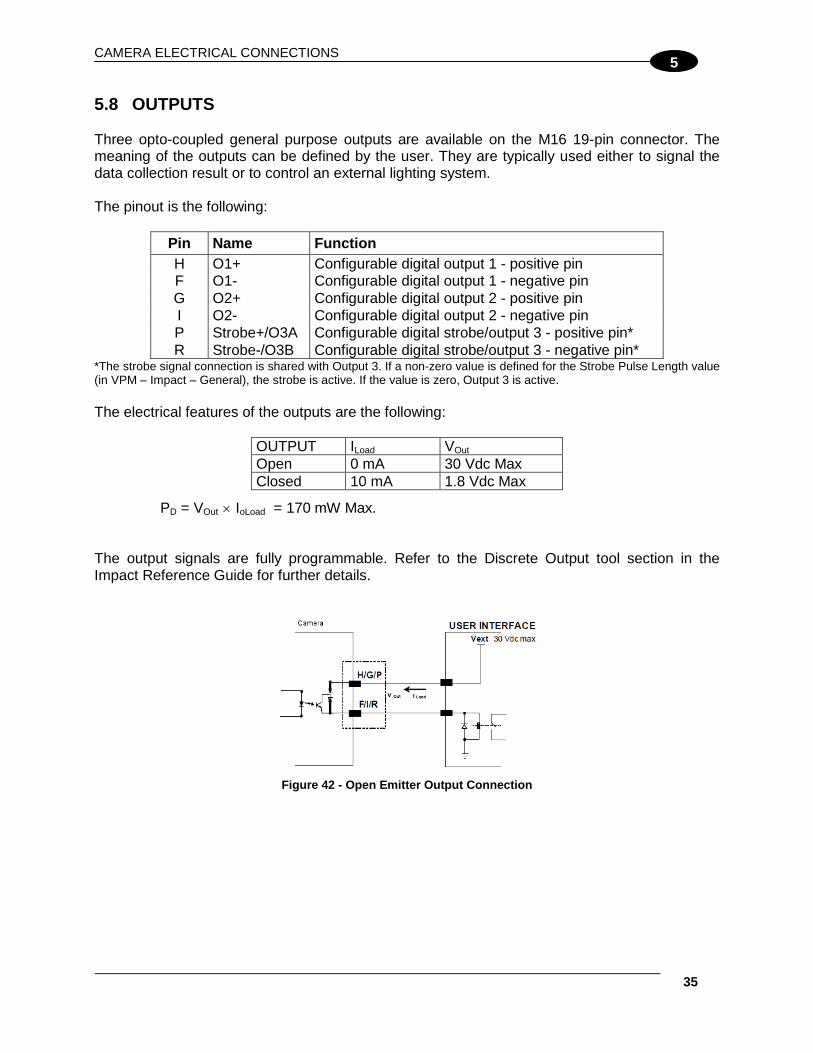
5.8 OUTPUTS Three opto-coupled general purpose outputs are available on the M16 19-pin connector. The meaning of the outputs can be defined by the user. They are typically used either to signal the data collection result or to control an external lighting system. The pinout is the following:
Pin Name Function H O1+ Configurable digital output 1 - positive pin F O1- Configurable digital output 1 - negative pin G O2+ Configurable digital output 2 - positive pin I O2- Configurable digital output 2 - negative pin P Strobe+/O3A Configurable digital strobe/output 3 - positive pin* R Strobe-/O3B Configurable digital strobe/output 3 - negative pin*
*The strobe signal connection is shared with Output 3. If a non-zero value is defined for the Strobe Pulse Length value (in VPM – Impact – General), the strobe is active. If the value is zero, Output 3 is active. The electrical features of the outputs are the following:
OUTPUT ILoad VOut Open 0 mA 30 Vdc Max Closed 10 mA 1.8 Vdc Max
PD = VOut × IoLoad = 170 mW Max. The output signals are fully programmable. Refer to the Discrete Output tool section in the Impact Reference Guide for further details.
Figure 42 - Open Emitter Output Connection

A30™ HARDWARE GUIDE
36
5
Figure 43 - Open Collector Output Connection

CAMERA ELECTRICAL CONNECTIONS
37
5
How To Build A Simple Interface Test Cable: The following wiring diagram shows a simple test cable including power and external (push-button) trigger and Input 2 connections.
Figure 44- Test Cable for the Camera

A30™ HARDWARE GUIDE
38
6
6 TYPICAL LAYOUTS The following typical layouts refers to system hardware configurations. However, these layouts also require the correct setup of the software configuration parameters. 6.1 EMBEDDED (ON-BOARD) GIGAETHERNET A point-to-point configuration can be made to the on-board Ethernet connection. In order to be recognized by VPM, it is necessary to align the camera’s Ethernet parameters using VPM. For further details, refer to Configuring the Impact Device or Camera in the Impact Reference Guide. In a Point-to-Point layout the camera is connected to a local host by using a CAB-GE0x cable. There is no need to use a crossover adapter since the camera incorporates an autocross function.
Figure 45 - Standalone Layout to Ethernet Host (Point-to-Point)
CAB-GE0x
Ethernet Host (Data collection + A30
configuration)

TYPICAL LAYOUTS
39
6
6.2 ETHERNET NETWORKS 6.2.1 External Trigger Ethernet Host When using a Local Area Network (LAN), one or more cameras can be connected to the network by using CAB-GE0x cables. In the example below an External Trigger is used which is connected through a CBX connection box.
Figure 46 - Ethernet Network Layout
NOTE
The camera does not support sourcing power towards the CBX in order to power I/O devices (including the External Trigger). These devices must be powered from the CBX or from an external source.
CBX
A30™
HOST
Hub
Power
CA
B-G
E0x
CA
B-S
CSx
x
1
2
Ethernet Interface External Trigger
2
CA
B-G
E0x
CA
B-G
E0x
CA
B-S
CSx
x CA
B-S
CSx
x
2
CBX CBX

A30™ HARDWARE GUIDE
40
6
6.2.2 Software Trigger Ethernet Host The LAN connections are simplified when a software Trigger is supplied by the host. In this case, the CBX connection box is not necessary.
Figure 47 - Ethernet Network Layout
A30™
HOST
Hub
Power
CA
B-G
E0x
CA
B-G
E0x
CA
B-G
E0x
Ethernet Interface
1 1 1

IMAGE CAPTURE FEATURES
41
7
7 IMAGE CAPTURE FEATURES 7.1 MAXIMUM LINE SPEED AND EXPOSURE TIME CALCULATIONS The Exposure Time (or Shutter) parameter defines the time during which the image will be exposed to the image sensor to be acquired. This parameter depends heavily on the environmental conditions (external lighting system, image contrast etc.). In general, a longer time corresponds to a lighter image but is susceptible to blurring due to the part movement; a shorter exposure time corresponds to a darker image. Assuming:
• X: Part Resolution (mm)
• Texp: Exposure Time (s)
• LS: Line Speed (mm/s) The essential condition to avoid blurring effects between two adjacent elements in a dynamic inspection application is:
LS ∗ Texp ≤ X The maximum (theoretical) line speed LS can be calculated as follows:
X / Texp (max) = LS (max) Example: Using:
Lighting Mode = Very High Power Strobe Exposure Time (x10 µs) = 10 (100 µs) Part Resolution (X) = 0.254 mm (10 mils)
has a maximum line speed of:
0.254 (mm) / 0.0001 (s) = 2540 mm/s Likewise, Texp (max) is the maximum Exposure Time value that can be used without blurring for the given application line speed and code resolution. Therefore:
X / LS (max) = Texp (max)

A30™ HARDWARE GUIDE
42
7
Texp (max) and LS (max) are represented in the graph below as the curved line for X (image resolution). Values above the curve result in blurring. In practice, the application values are somewhere below the theoretical line due to environmental and other conditions.
Line Speed
T exp
SW Limit
Texp (min) SW/HW Limit
X 2X
Con
veyo
r Spe
ed
Lim
it
Readable Blurring For example, the maximum target speed in the application is also affected by these conditions:
• Part/Background Contrast: maximum speed decreases when decreasing image contrast (poor quality images, reflective transparent coverings, different supports and printing techniques).
• Part Resolution: maximum speed increases when decreasing part resolution, (i.e. 2X). There is a decrement of overlapping effects between two adjacent elements.
• Tilt Angle: maximum speed decreases when increasing Tilt angle (from 0 to 45 degrees). Texp (min) is the minimum Exposure Time value obtainable for the specific application. It can be evaluated in static inspection conditions and depends on the camera hardware selected for the application (lighting system, optical lens, diaphragm aperture, distance) and on any external lighting system. It may also depend on part clarity and camera position.

SOFTWARE CONFIGURATION
43
8
8 SOFTWARE CONFIGURATION Software configuration of your A30 camera can be accomplished by the procedures described in the Impact Reference Guide. VPM is used to configure the camera for specific applications, and provides the tools to create vision programs. 8.1 VPM™ SYSTEM REQUIREMENTS To install and run Vision Program Manager™ you should have a Laptop or PC that meets or exceeds the requirements defined in the system requirements section of the Impact Reference Guide. 8.2 INSTALLING IMPACT SOFTWARE To install Impact Software, proceed as follows:
1. Turn on the Laptop or PC that will be used for configuration (connected to the Ethernet port of the A30 camera).
2. You may need to turn off automatic virus checking during the install if it causes installation problems.
3. You must log in to an operating system account that has administrative privileges in order to install or run Impact software on a Windows operating system.
4. Insert the Impact Installation CD in the drive.
5. The installation program should start. Select the language you want the install to use, then click OK.
6. Follow the on-screen instructions. You will have the option to install Impact software to the client, camera, or both. Note: If security is enabled on the camera, you cannot install new software on it. You must exit the install program, disable security on the camera, then restart the install.
7. When the installation has completed, you can start VPM.

A30™ HARDWARE GUIDE
44
8
8.3 STARTUP After completing the mechanical and electrical connections to the A30 camera, you can begin software configuration as follows:
1. Power on the camera. Wait for the camera startup. The system bootstrap requires a few seconds to complete.
2. Start VPM. It will automatically search for any cameras on the network. Select the desired camera from the list, then click Connect to Device. The PC will automatically connect to the camera. Upon connection, VPM is in Edit mode with all the tools necessary to create vision programs. Refer to the Impact Reference Guide for more details.
8.3.1 Calibration VPM provides calibration software to insure that the measurements indicated in VPM tools accurately relate to the inspected object’s measurements. You may calibrate a camera using a calibrated target, a part with known dimensions, or you can enter the camera’s units-per-pixel factor manually. Refer to the Calibration Panel section of the Impact Reference Guide for details. Under-exposure: To correct this result it is recommended to change the parameters in the following order:
1. increase the Exposure Time 2. increase the Gain
NOTE
In general, a longer exposure time corresponds to a lighter image but is susceptible to blurring due to code movement. Exposure time is also limited by the lighting. Longer exposure times can be set if the power strobe level is lowered. High gain settings may produce a grainy image that may affect the inspection process.
Figure 48 - Example Under Exposure: Too Dark

SOFTWARE CONFIGURATION
45
8
Over-exposure: To correct this result, change the parameters in the following order:
1. decrease the Gain 2. decrease the Exposure Time
Figure 49 - Example Over Exposure: Too Light
8.3.2 Partial Scan In order to satisfy very high throughput applications, higher frame rates can be achieved using the powerful Partial Scan parameters in the Camera setup menu. Partial Scan allows defining a region or window within the camera Field of View. The Top, Bottom, Left and Right parameters allow you to precisely define the image window to be processed. In the camera the frame rate is dependent on the number of lines (or rows) in the defined window. The smaller the window, the lower the frame period, and consequently the higher the frame rate. In general the Image Processing time can be reduced by reducing the window dimensions.

A30™ HARDWARE GUIDE
46
8

SOFTWARE CONFIGURATION
47
8
9 MAINTENANCE 9.1 CLEANING Use soft material and alcohol to clean the lens and cover and avoid any abrasive substances. Clean the lens and lens cover periodically for continued correct operation of the camera. Repeat the cleaning more frequently in particularly dirty environments. Dust, dirt, etc. on the lens or cover may alter the image clarity.

A30™ HARDWARE GUIDE
48
10
10 TROUBLESHOOTING 10.1 GENERAL GUIDELINES • When wiring the device, pay careful attention to the signal name on the CBX500 spring clamp
connectors (chapter. 1). If you are connecting directly to the A30 M16 19-pin connector, pay attention to the pin number of the signals (chapter. 1).
• If you need information about a certain camera parameter, you can refer to the Impact Reference Guide.
• If you’re unable to fix the problem and you’re going to contact your local DLA office, DLA Partner or ARC, we suggest providing (if possible) the Software version, Parameter Configuration file, Serial Number and Order Number of your camera. You can get some of this information in VPM while it is connected to the camera. The software version is shown in the About dialog and the Serial Number can be obtained from the Device Connection dialog.
TROUBLESHOOTING GUIDE
Problem Suggestion Power ON: the “POWER” LED is not lit.
• Is power connected? • If using a power adapter (like PG-120), is it connected
to wall outlet? • If using rail power, does rail have power? • If using CBX, does it have power (check switch and
LED)? • Check if you are using the M16 19-pin connector or the
CBX spring clamp connectors. • Measure Voltage either at pin A and pin L (for 19-pin
connector) or at spring clamp Vdc and GND (for CBX). Using the Input 1 (External Trigger) or Input 2: the ”BUSY” LED is not blinking while the External Trigger is switching.
• Check if you are using the 19-pin connector or the CBX spring clamp connectors.
• Is the sensor connected to the Input 1 or Input 2? • Is power supplied to the photo sensor? • For NPN configuration, is power supplied to one of the
two I1 or I2 signals (A or B)? • For PNP configuration, is one of the two I1 or I2 signals
grounded (A or B)? • Is the sensor/reflector system aligned (if present)? • In VPM, check the EXTERNAL TRIGGER or INPUT 2
Debounce Filter parameter setting. • In VPM, check the Camera Trigger settings.

TROUBLESHOOTING
49
10
TROUBLESHOOTING GUIDE Problem Suggestion Using the Input 1 (External Trigger) the ”TRIGGER" LED is correctly blinking but no image is displayed in VPM.
• Is the Camera online?
Image not clear: • verify the camera focus Image focused but tool measurements are inaccurate
• verify the Image calibration.
Communication: camera is not transmitting anything to the host.
• Is the Ethernet cable wiring correct? • Is the Ethernet cable connected? • Are the camera and host PC IP addresses set
correctly? Communication: data transferred to the host are incorrect, corrupted or incomplete.
• Is the Ethernet cable intermittent?
How do I obtain my camera Serial Number?
• The camera Serial Number consists of the character “C” followed by a series of numbers. It is printed on a label that is affixed to the side of the case.
• The Serial Number can also be obtained in the Device Connect dialog in VPM.

A30™ HARDWARE GUIDE
50
11
11 TECHNICAL FEATURES
ELECTRICAL FEATURES Power Supply Voltage 10-30 Vdc ± 20% Consumption (max) 0.8 to 0.27 A, 8 W max.; 0.5 to 0.17 A, 5 W typical Communication Interfaces RS232 2400 to 115200 bit/s Ethernet 10/100/1000 Mbit/s, Gigabit Ethernet Inputs Input 1(External Trigger) and Input 2 Opto-coupled and polarity insensitive Max. Voltage 30 Vdc Max. Input Current 10 mA Outputs Output 1, Output 2 and Strobe/Output 3 Opto-coupled VOut (ILoad = 0 mA) Max. 30 Vdc VOut (ILoad = 10 mA) Max. 1.8 Vdc PD = VOut x ILoad Max. 170 mW
OPTICAL FEATURES Image Sensor CCD Image Format 640 x 480 Frame Rate 60 frames/sec ENVIRONMENTAL FEATURES Operating Temperature1 0 to 45 °C (32 to 113 °F) Storage Temperature -20 to 70 °C (-4 to 158 °F) Max. Humidity 90% non-condensing Vibration Resistance EN 60068-2-6
14 mm @ 2 to 10 Hz; 1.5 mm @ 13 to 55 Hz; 2 g @ 70 to 200 Hz; 2 hours on each axis
Shock Resistance 30g; 11 ms EN 60068-2-27 3 shocks on each axis Protection Class2 EN 60529
IP67
PHYSICAL FEATURES Dimensions 125 x 65 x 86 mm (4.92 x 2.56 x 3.39 in.) with lens cover Weight (with lens) 482 g. (17 oz.) Material Aluminum Parameter Storage Permanent memory (Flash) USER INTERFACE LED Indicators Power, Busy/Trigger, Out 1; Out 2; Out 3, Online Keypad Button Reset
1 High ambient temperature applications should use metal mounting bracket for heat dissipation. 2 Requires correct connection to IP67 cables with seals and Lens Cover mounting.

GLOSSARY
51
GLOSSARY AIM (Association for Automatic Identification and Mobility): AIM Global is the international trade association representing automatic identification and mobility technology solution providers. AIM DPM Quality Guideline Standard applicable to the symbol quality assessment of direct part marking (DPM) performed in using two-dimensional bar code symbols. It defines modifications to the measurement and grading of several symbol quality parameters. AS9132 Standard defining uniform quality and technical requirements for direct part marking (DPM) using Data Matrix symbologies. Barcodes (1D Codes) A pattern of variable-width bars and spaces which represents numeric or alphanumeric data in machine-readable form. The general format of a barcode symbol consists of a leading margin, start character, data or message character, check character (if any), stop character, and trailing margin. Within this framework, each recognizable symbology uses its own unique format. BIOS Basic Input Output System. A collection of ROM-based code with a standard API used to interface with standard PC hardware. Bit Binary digit. One bit is the basic unit of binary information. Generally, eight consecutive bits compose one byte of data. The pattern of 0 and 1 values within the byte determines its meaning. Bits per Second (bps) Number of bits transmitted or received per second. Byte On an addressable boundary, eight adjacent binary digits (0 and 1) combined in a pattern to represent a specific character or numeric value. Bits are numbered from the right, 0 through 7, with bit 0 the low-order bit. One byte in memory can be used to store one ASCII character. Composite Symbologies Consist of a linear component, which encodes the item's primary data, and an adjacent 2D composite component, which encodes supplementary data to the linear component. Dark Field Illumination Lighting of surfaces at low angles used to avoid direct reflection of the light in the camera’s lens. Decode To recognize a barcode symbology (e.g., Codabar, Code 128, Code 3 of 9, UPC/EAN, etc.) and analyze the content of the barcode scanned.

GLOSSARY
52
Depth of Field The difference between the minimum and the maximum distance of the object in the field of view that appears to be in focus. Diffused Illumination Distributed soft lighting from a wide variety of angles used to eliminate shadows and direct reflection effects from highly reflective surfaces. Direct Part Mark (DPM) A symbol marked on an object using specific techniques like dot peening, laser etching, chemical etching, etc. EEPROM Electrically Erasable Programmable Read-Only Memory. An on-board non-volatile memory chip. Element The basic unit of data encoding in a 1D or 2D symbol. A single bar, space, cell, dot. Exposure Time For digital cameras based on image sensors equipped with an electronic shutter, it defines the time during which the image will be exposed to the sensor to be acquired. Flash Non-volatile memory for storing application and configuration files. Host A computer that serves other terminals in a network, providing services such as network control, database access, special programs, supervisory programs, or programming languages. Image Processing Any form of information processing for which the input is an image and the output is for instance a set of features of the image. Image Resolution The number of rows and columns of pixels in an image. The total number of pixels of an image sensor. Image Sensor Device converting a visual image to an electric signal. It is usually an array of CCD (Charge Coupled Devices) or CMOS (Complementary Metal Oxide Semiconductor) pixel sensors. IEC (International Electrotechnical Commission): Global organization that publishes international standards for electrical, electronic, and other technologies. IP Address The terminal’s network address. Networks use IP addresses to determine where to send data that is being transmitted over a network. An IP address is a 32-bit number referred to as a series of 8-bit numbers in decimal dot notation (e.g., 130.24.34.03). The highest 8-bit number you can use is 254.

GLOSSARY
53
ISO (International Organization for Standardization): A network of the national standards institutes of several countries producing world-wide industrial and commercial standards. LED (Light Emitting Diode) A low power electronic light source commonly used as an indicator light. It uses less power than an incandescent light bulb but more than a Liquid Crystal Display (LCD). LED Illuminator LED technology used as an extended lighting source in which extra optics added to the chip allow it to emit a complex radiated light pattern. Matrix Symbologies (2D Codes) An arrangement of regular polygon shaped cells where the center-to-center distance of adjacent elements is uniform. Matrix symbols may include recognition patterns which do not follow the same rules as the other elements within the symbol. Multidrop A communication protocol for connecting two or more cameras in a network with a concentrator (or controller) and characterized by the use of individual device addresses. Multi-row (or Stacked) Symbologies Symbologies where a long symbol is broken into sections and stacked one upon another similar to sentences in a paragraph. RAM Random Access Memory. Data in RAM can be accessed in random order, and quickly written and read. Transmission Control Protocol/Internet Protocol (TCP/IP) A suite of standard network protocols that were originally used in UNIX environments but are now used in many others. The TCP governs sequenced data; the IP governs packet forwarding. TCP/IP is the primary protocol that defines the Internet.

54
INDEX A Accessories, 7 Auxiliary RS232 Serial Interface, 15 Auxiliary Serial Interface, 29 C Calibration, 44 Camera
button, 6 reset, 6
Camera Electrical Connections, 24 CBX Electrical Connections, 13 CBX500 Connectors, 3 Compliance, iv Connect the System, 2 Connectors
GigaEthernet Connector, 27 Power, Serial, I/O, 24, 25
E Ethernet Interface, 29, 38 Ethernet Networks
software trigger, 40 Ethernet Networks
external trigger, 39 Event
Camera button, 6 Exposure Time, 41 External Illuminators, 23 G General View, vii Glossary, 51 H Handling, v I Image Capture Features, 41 Indicators, 6 Inputs, 16, 31 Installing Impact Software, 43
L Layouts
Ethernet Networks, 39, 40 typical, 38
Line Speed, 41 M Maintenance, 47 Mechanical Dimensions, 9 Mounting the Camera, 11 O Outputs, 21, 35 P Package Contents, 8 Partial Scan, 45 Patents, iii Power Supply, iv, 14, 27 Product Description, 5 R Rapid Configuration, 1 References, iii Reset button, 6 RS232 Serial Interface
signals, 28 terminals, 15
S Service and Support, iii Software Configuration, 43 Startup, 44 System Requirements, 43 T Technical Features, 50 Test cable
diagram, 37 Trigger
Camera button event, 6 Troubleshooting, 48
