abacus fmc users guide
TRANSCRIPT
8/10/2019 Abacus FMC Users Guide
http://slidepdf.com/reader/full/abacus-fmc-users-guide 1/11
Abacus Flight Management Computer (FMC) Users Guide
The Abacus Flight Management Computer, or FMC, was created by Peter Jacobson. The FMC is a customgauge that allows you to load flight plans saved with the Flight Simulator 2004 or Flight Simulator X Flight
Planner or create your own custom flight plans right from within the FMC gauge itself. Once a flight is loadedor created, the FMC will control the aircraft using the autopilot system and will fly the aircraft hands-free from
departure to destination. This documentation will cover:
Basic Overview of the FMC
Loading a Flight PlanInserting New Waypoints
Creating and Saving Custom Flight Plans
Setting the AutopilotFMC Options
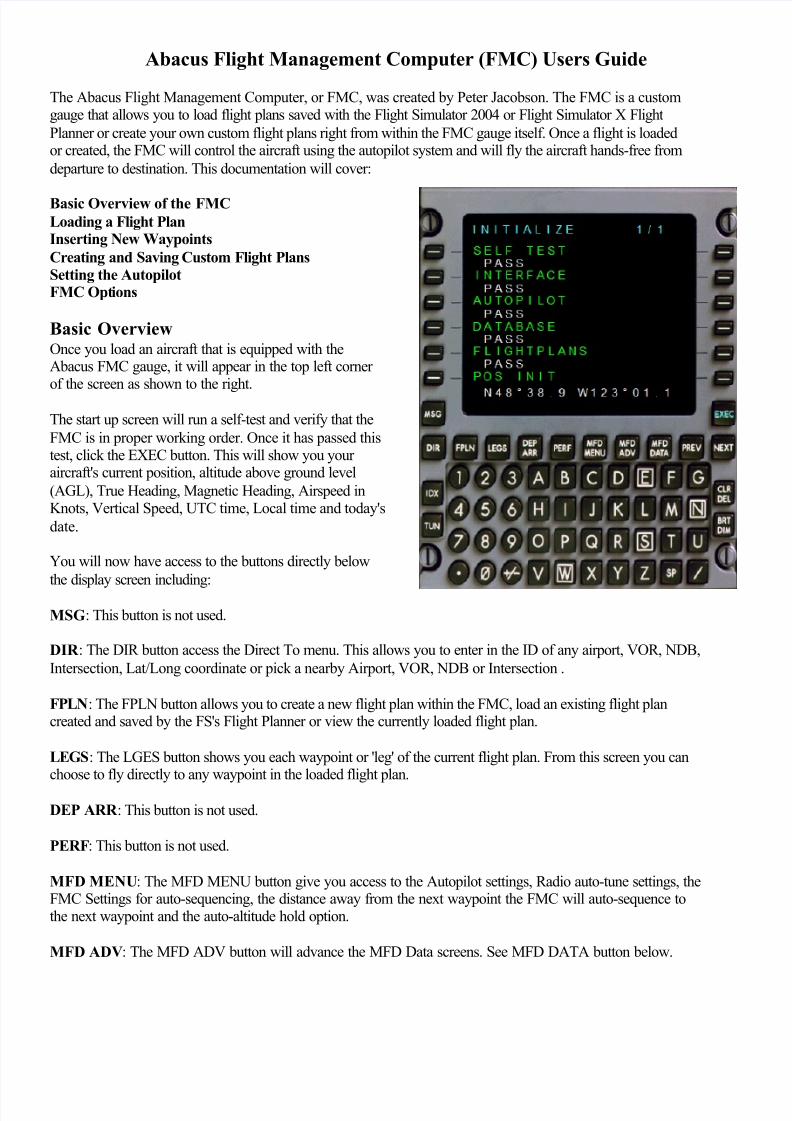
Basic Overview Once you load an aircraft that is equipped with theAbacus FMC gauge, it will appear in the top left cornerof the screen as shown to the right.
The start up screen will run a self-test and verify that the
FMC is in proper working order. Once it has passed thistest, click the EXEC button. This will show you youraircraft's current position, altitude above ground level
(AGL), True Heading, Magnetic Heading, Airspeed inKnots, Vertical Speed, UTC time, Local time and today's
date.
You will now have access to the buttons directly below
the display screen including:
MSG: This button is not used.
DIR : The DIR button access the Direct To menu. This allows you to enter in the ID of any airport, VOR, NDB,
Intersection, Lat/Long coordinate or pick a nearby Airport, VOR, NDB or Intersection .
FPLN: The FPLN button allows you to create a new flight plan within the FMC, load an existing flight plancreated and saved by the FS's Flight Planner or view the currently loaded flight plan.
LEGS: The LGES button shows you each waypoint or 'leg' of the current flight plan. From this screen you canchoose to fly directly to any waypoint in the loaded flight plan.
DEP ARR : This button is not used.
PERF: This button is not used.
MFD MENU: The MFD MENU button give you access to the Autopilot settings, Radio auto-tune settings, theFMC Settings for auto-sequencing, the distance away from the next waypoint the FMC will auto-sequence tothe next waypoint and the auto-altitude hold option.
MFD ADV: The MFD ADV button will advance the MFD Data screens. See MFD DATA button below.
8/10/2019 Abacus FMC Users Guide
http://slidepdf.com/reader/full/abacus-fmc-users-guide 2/11
MFD DATA: The MFD DATA button will display three screens; Navigation information, Waypoint
information, and the Course Deviation Indicator (CDI). The screens are advanced by clicking the MFD ADV button.
PREV: The PREV button is used to scroll the screen. For example, if you have a flight plan that has more legsthan will fit on one screen, click the NEXT and PREV buttons to scroll. Note the top right corner of the display
screen. If this shows 1 / 1 then there is only one page and the NEXT and PREV buttons will not function. If it
shows 1 / 2, click the NEXT button to view page 2 / 2, then the PREV button to go back and view page 1 / 2.
NEXT: The NEXT button is used to scroll the screen. For example, if you have a flight plan that has more legsthan will fit on one screen, click the NEXT and PREV buttons to scroll. Note the top right corner of the display
screen. If this shows 1 / 1 then there is only one page and the NEXT and PREV buttons will not function. If itshows 1 / 2, click the NEXT button to view page 2 / 2, then the PREV button to go back and view page 1 / 2.
EXEC: The EXEC button is used to activate the FMC. When a flight plan is selected, the EXEV button is usedto engage the autopilot and fly the flight plan.
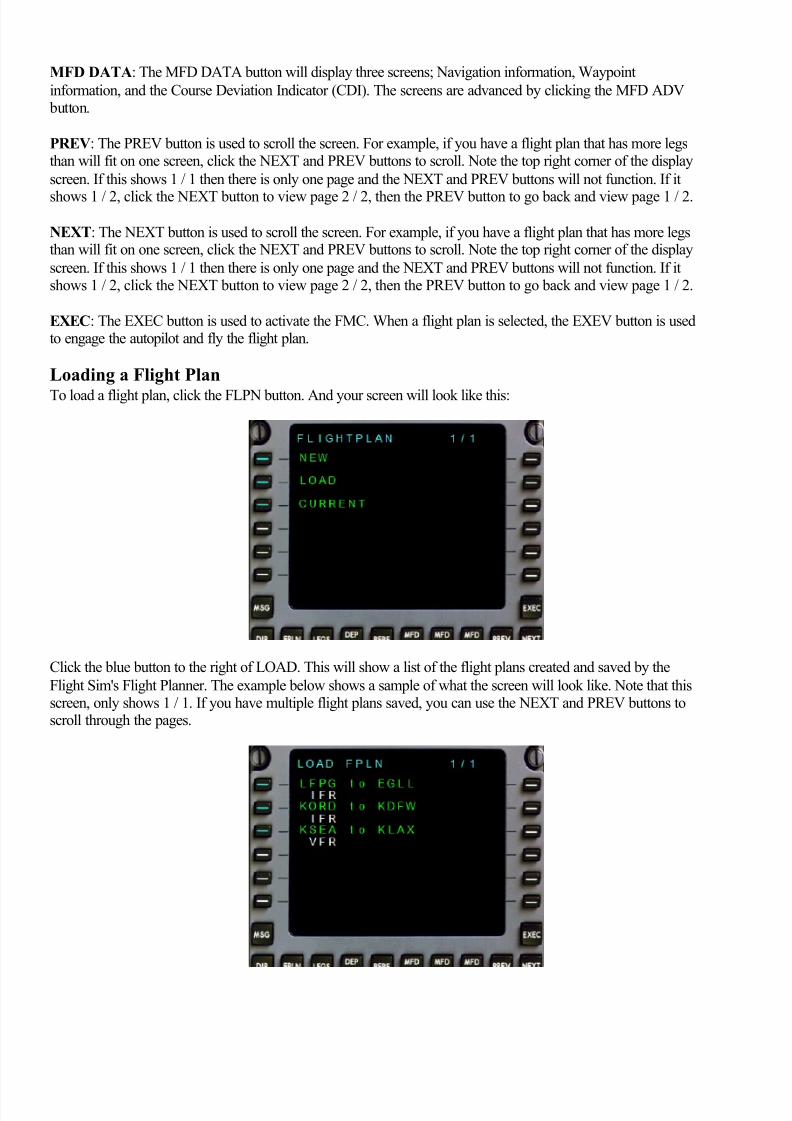
Loading a Flight Plan
To load a flight plan, click the FLPN button. And your screen will look like this:
Click the blue button to the right of LOAD. This will show a list of the flight plans created and saved by the
Flight Sim's Flight Planner. The example below shows a sample of what the screen will look like. Note that thisscreen, only shows 1 / 1. If you have multiple flight plans saved, you can use the NEXT and PREV buttons toscroll through the pages.

8/10/2019 Abacus FMC Users Guide
http://slidepdf.com/reader/full/abacus-fmc-users-guide 3/11
To select a flight plan simply click the button to the left of the desired plan. The green text shows the TO and
FROM airport Ids and the white text shows the type of flight plan.
Once selected, you will see an overview of the selected flight plan.
To accept the flight plan and continue, click the EXEC button. This will take you to the LEGS screenautomatically. The first waypoint, which is also your departure airport, will be highlighted in orange by default.
At any time during the flight, you can switch to fly the plane to any of the waypoints in the plan by clicking the blue button to the RIGHT of the waypoint.
Inserting and Removing A WaypointWith a flight plan already loaded, you can quickly remove waypoints from the plan, or insert new/custom
waypoints. To remove a waypoint from a flight plan that is already loaded, click the LEGS button and thenclick the blue button to the LEFT of the waypoint you want to remove. This will provide you the options toActivate, Insert or Delete on the right side of the FMC display. Click the blue button to the RIGHT of Delete.
With our example, we'll click the SEA VOR on the list, the second one.

8/10/2019 Abacus FMC Users Guide
http://slidepdf.com/reader/full/abacus-fmc-users-guide 4/11
After clicking the Blue button to the left of SEA, we see the following options:
To remove the waypoint from the list, click the blue button to the right of DELETE on the display. This will
immediately delete the waypoint.
To insert a new waypoint, one that is not currently part of the flight plan, click the blue button to the right ofINSERT on the display. This will show the following screen:
Choose which type of waypoint you want to enter by clicking the blue button next to the desired waypoint typeon the left. Here we'll click the button next to Airport.

8/10/2019 Abacus FMC Users Guide
http://slidepdf.com/reader/full/abacus-fmc-users-guide 5/11
To enter the new waypoint, simply click the letters on the lower part of the FMC to enter. In this example, we'llenter KBLI, which is Bellingham Intl airport near Seattle (our departure airport). This process is the same forthe VOR, NBD, and Intersections. Once the letters are entered, you may or may not, depending on the type of
waypoint you are entering, have a blank space (orange dash) after your new waypoint.
To add this waypoint to the flight plan, click the blue button to the left of the name of the new waypoint.
This will show you an overview of the new waypoint. To accept the new waypoint and add it to the plane, clickthe EXEC button.
You can see from the picture below that the new waypoint was added AFTER the SEA VOR on the list.

8/10/2019 Abacus FMC Users Guide
http://slidepdf.com/reader/full/abacus-fmc-users-guide 6/11
Creating and Saving Custom Flight Plans
To create a custom flight plan, click the FLPN button below the main FMC display, then click the blue button tothe left of NEW.
Here you will see setup screen allowing you to set the Departure, Destination, flight plan type and the cruise
altitude.
8/10/2019 Abacus FMC Users Guide
http://slidepdf.com/reader/full/abacus-fmc-users-guide 7/11
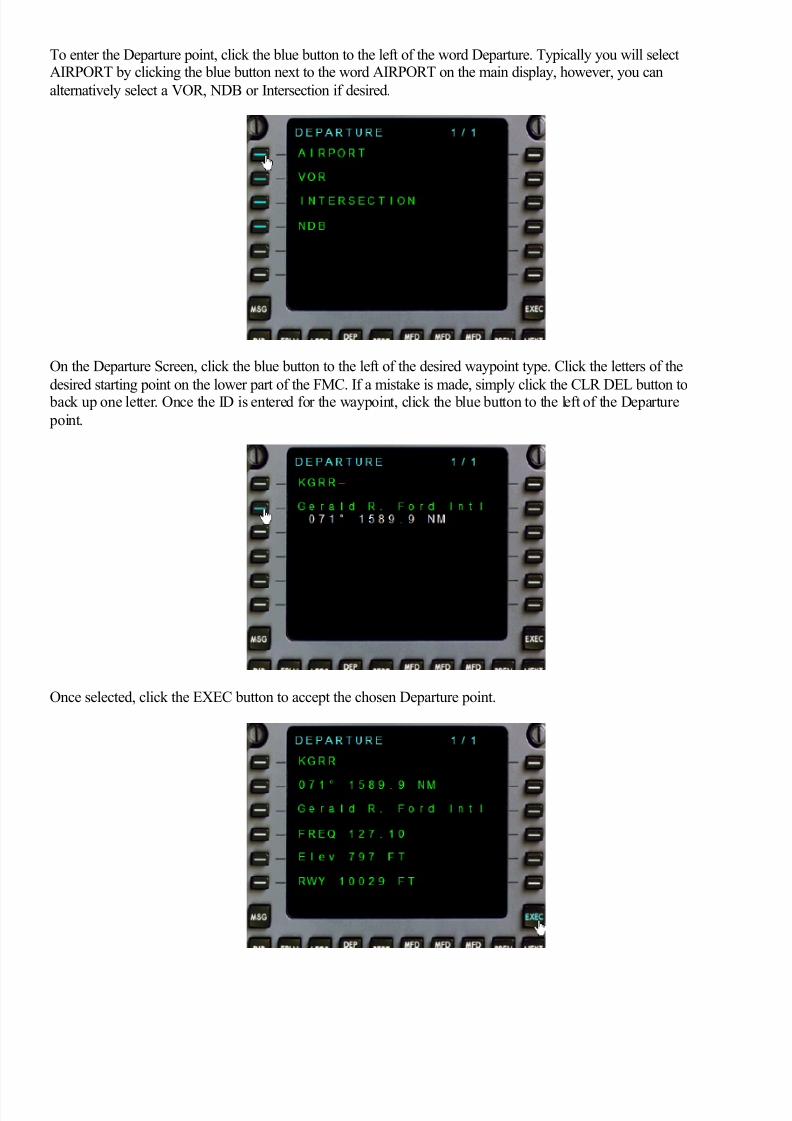
To enter the Departure point, click the blue button to the left of the word Departure. Typically you will selectAIRPORT by clicking the blue button next to the word AIRPORT on the main display, however, you can
alternatively select a VOR, NDB or Intersection if desired.
On the Departure Screen, click the blue button to the left of the desired waypoint type. Click the letters of the
desired starting point on the lower part of the FMC. If a mistake is made, simply click the CLR DEL button to back up one letter. Once the ID is entered for the waypoint, click the blue button to the left of the Departure
point.
Once selected, click the EXEC button to accept the chosen Departure point.

8/10/2019 Abacus FMC Users Guide
http://slidepdf.com/reader/full/abacus-fmc-users-guide 8/11
After clicking the EXEC button you will return to the NEW FPLN page. Note that to the right of theDEPARTURE it reads SET meaning the departure airport has been set.
Repeat the process above for the DESTINATION. To change the plan type between VFR and IFR, click the
blue button on the right side of the PLAN TYPE line. To set the Cruise Altitude, click the blue button next to
CRUISE ALT. Click the numbers of the desired altitude. Note that you can only set the first 3 digits. To set9,000 feet for example, click 0, then 9 then 0 again and finally EXEC to accept the cruise altitude.
Once both the Departure and Destination are set, click the EXEC button to accept and activate the flight plan.

8/10/2019 Abacus FMC Users Guide
http://slidepdf.com/reader/full/abacus-fmc-users-guide 9/11
Here you will return to the main Flight Plan screen. Note that the SAVE option is available. You can click the blue button next to SAVE to open a standard Windows dialog box to save the file.
Note that on the Save Plan As screen, you MUST double-click the Flight Simulator X Files or the Flight
Simulator Files folder for the FMC to be able to load the flight plan again in the FMC.
Setting the Autopilot and general optionsTo manually set the Autopilot, click the MFD MENU button. This screen lets you choose to set the Autopilot,the Radios auto-tuning options as well as the auto-sequencing options.

8/10/2019 Abacus FMC Users Guide
http://slidepdf.com/reader/full/abacus-fmc-users-guide 10/11
Click the blue button to the left of AUTOPILOT on the display to see the Autopilot settings.
Clicking the blue buttons on the right side of the display will turn the Autopilot (AP) on and off, and will let
you choose to fly in GPS mode or in VOR mode as well as adjust the Altitude and Vertical Speed of theaircraft. These buttons along the right side basically turn the feature(s) on and off. The buttons along the left
side allow you to adjust the settings. The VOR settings will allow you to tune the NAV1 radio to a VORfrequency and will set the Autopilot directly to a VOR. You will have to tune the OBS manually. In GPS Mode,the FMC will control the OBS and will control the aircraft through each leg of the flight plan to the destination.
To return to the main MFD Menu, click the PREV button. The Radio option lets you determine if you want the
FMC to auto-tune the NAV and ADF radios. Click the blue buttons on the right side to toggle the auto-tuneability.

8/10/2019 Abacus FMC Users Guide
http://slidepdf.com/reader/full/abacus-fmc-users-guide 11/11
Again to return to the MFD Main menu, click the PREV button. Clicking the blue button to the left of
SETTINGS allows you to chance some core functions of the FMC.
The first option, SEQ AUTO is the Auto Sequencing. When set to YES, the FMC will automatically update thecurrent waypoint when it gets within range. This allows you to fly hands-free from the first waypoint of your
flight plan to the last. This can be turned on and off by clicking the blue button on the right side.
The second option, SEQ DIST is the Sequencing Distance. This tells the FMC how far away from the waypoint
it automatically update to the next point. For larger aircraft with a slower turning time, a larger distance isrecommended. Smaller planes would use a smaller distance. The default for the FMC is set to 2 miles. This
means that when the FMC is 2 Nautical Miles away from the next waypoint, it will automatically update itselfto the next waypoint.
The last option, ALT AUTO allows you to decide if you want the FMC to automatically set the Autopilot.When set to NO, the FMC will engage only the heading hold. The altitude hold will be up to you. When set to
YES, the FMC will auto-set the altitude when the AP is engaged.