abb-welcome system 83342 ip gateway online en v1.2 ... installation and electrical connection ........
TRANSCRIPT

V1.2 │15.02.2017
ABB-Welcome
Pos: 2 /#Neustruktur#/Online-Dokumentation (+KNX)/Titelblätter/Türkommunikation/Busch-Welcome II/Titelblatt - 83341 - ABB @ 36\mod_1370935982690_15.docx @ 296874 @ @ 1
IP-Gateway 83342-500
=== Ende der Liste für Textmarke Cover ===

Operating Instructions
ABB-Welcome
— 2 —
Pos: 4 /#Neustruktur#/Online-Dokumentation (+KNX)/Inhaltsverzeichnis (--> Für alle Dokumente <--)/Inhaltsverzeichnis @ 19\mod_1320649044386_15.docx @ 109653 @ @ 1
1 Information about the IP gateway ............................................................................................................................ 4
1.1 General information................................................................................................................................. 4 1.2 Structure of the manual ........................................................................................................................... 4 1.3 Symbols in the manual ............................................................................................................................ 5
2 Safety ....................................................................................................................................................................... 6 2.1 Intended use ........................................................................................................................................... 6 2.2 Improper use ........................................................................................................................................... 6 2.3 Target groups and qualifications ............................................................................................................. 6 2.4 Liability and warranty .............................................................................................................................. 6
3 Environment ............................................................................................................................................................. 7 4 Integrating mobile end devices with ABB-Welcome IP-Gateway ............................................................................. 7
4.1 System requirements .............................................................................................................................. 7 4.2 IP-Gateway start-up ................................................................................................................................ 8 4.2.1 Option 1: Commissioning with the Windows UPnP service ..................................................................... 9 4.2.2 Option 2: Entering the IP address directly ............................................................................................. 11 4.2.3 Manual configuration ............................................................................................................................. 13 4.3 Setup of the mobile devices with IP-Gateway ....................................................................................... 14 4.3.1 Step 1: Registering and logging into myABB-LivingSpace portal .......................................................... 14 4.3.2 Step 2: Connecting the IP gateway with the myABB-LivingSpace portal .............................................. 14 4.3.3 Step 3: Installing the "Welcome " app ................................................................................................... 15 4.3.4 Step 4: Coupling the IP gateway and "Welcome " app .......................................................................... 15
5 General function of home page .............................................................................................................................. 17 5.1 General buttons in the configuration ..................................................................................................... 17 5.2 Login ..................................................................................................................................................... 17 5.2.1 RESET .................................................................................................................................................. 20
6 Configuration for IP Gateway ................................................................................................................................. 21 6.1 Network information .............................................................................................................................. 21 6.2 "Network configuration" page ................................................................................................................ 22 6.3 "Basic settings" configuration page ....................................................................................................... 23 6.4 "Change password" configuration page ................................................................................................ 24 6.5 "Device settings" configuration page ..................................................................................................... 25 6.5.1 Add device ............................................................................................................................................ 26 6.5.2 Refresh camera list ............................................................................................................................... 29 6.6 "Portal Login" configuration page .......................................................................................................... 30 6.7 "APP Management" configuration page ................................................................................................ 31 6.8 "Associated ComfortTouch 2.x" configuration page .............................................................................. 34 6.9 "Associated ComfortTouch 3.x" configuration page .............................................................................. 35 6.9.1 "Add user" configuration page ............................................................................................................... 36 6.10 "Import / Export configuration file" configuration page ........................................................................... 37 6.11 "Firmware Update" configuration page .................................................................................................. 38 6.12 "NTP settings" configuration page......................................................................................................... 39 6.13 "Versions Information" configuration page ............................................................................................ 40
7 Configuration for Telephone Gateway ................................................................................................................... 41 8 Integrating mobile end devices with the Welcome app .......................................................................................... 45
8.1 Home page ........................................................................................................................................... 46 8.2 Favorites page ...................................................................................................................................... 47 8.3 History page .......................................................................................................................................... 48 8.4 Setting ................................................................................................................................................... 49 8.5 Call from outdoor station ....................................................................................................................... 50 8.6 Call from indoor station / guard unit ...................................................................................................... 51 8.7 Call from apartment door bell ................................................................................................................ 52
9 Network security .................................................................................................................................................... 53 10 Integrating a Busch-ComfortTouch® 3.0 or higher ................................................................................................ 54 11 Technical data........................................................................................................................................................ 55
11.1 Overview table ...................................................................................................................................... 55
Operating Instructions
ABB-Welcome
— 3 —
11.2 Device connection / circuit diagram ...................................................................................................... 56 11.3 Dimensions / dimensional drawing ........................................................................................................ 57
12 Product overview ................................................................................................................................................... 57 12.1 Device setup ......................................................................................................................................... 57
13 Installation and electrical connection ..................................................................................................................... 58 13.1 Requirements for the electrician ........................................................................................................... 58 13.2 Mounting ............................................................................................................................................... 58
=== Ende der Liste für Textmarke TOC ===

Operating Instructions
ABB-Welcome Information about the IPgateway
— 4 —
Pos: 6.1 /#Neustruktur#/Online-Dokumentation (+KNX)/Überschriften (--> Für alle Dokumente <--)/1. Ebene/G - L/Hinweise zum IP-Gateway @ 35\mod_1363611958376_15.docx @ 288301 @ 1111 @ 1
1 Information about the IP gateway Pos: 6.2.1 /#Neustruktur#/Online-Dokumentation (+KNX)/Überschriften (--> Für alle Dokumente <--)/2. Ebene/A - F/Allgemeine Hinweise @ 30\mod_1348481024126_15.docx @ 238505 @ 2 @ 1
1.1 General information Pos: 6.2.2 /#Neustruktur#/Online-Dokumentation (+KNX)/Hinweise zum KNX Technischen Handbuch (--> Für alle Dokumente --<)/Allgemeine Hinweise/Allgemeine Hinweise - KNX Technisches Handbuch @ 30\mod_1348479193040_15.docx @ 238433 @ 1111 @ 1
Please read this manual through carefully and adhere to the information listed. This will ensure reliable operation and long service life of your product. For reasons of clarity this manual does not contain all the detailed information on all the models of the product, nor can it take into consideration all conceivable circumstances related to installation, operation and maintenance. If additional information is required or problems arise that are not dealt with in this manual, the necessary information can be requested from the manufacturer. The product has been constructed according to the latest valid regulations governing technology and is operationally reliable. It has been tested and left the factory in a technically safe and reliable state. To maintain this state for the period of its operation the specifications of this manual must be observed and adhered to. Modifications and repairs to the product must only be undertaken if the manual expressly permits this. It is only the adherence to the safety instructions and all safety and warning symbols in this manual that will ensure the optimum protection of the user and the environment as well as the safe and trouble-free operation of the product. Pos: 6.3.1 /#Neustruktur#/Online-Dokumentation (+KNX)/Überschriften (--> Für alle Dokumente <--)/2. Ebene/A - F/Aufbau des Handbuches @ 24\mod_1338552603038_15.docx @ 215245 @ 222 @ 1
1.2 Structure of the manual Pos: 6.3.2 /#Neustruktur#/Online-Dokumentation (+KNX)/Hinweise zum KNX Technischen Handbuch/Türkommunikation/Busch-Welcome II/Aufbau des Handbuches - 83341 @ 35\mod_1363611984396_15.docx @ 288342 @ @ 1 (
• This manual provides you with the detailed technical information about the device, its installation and configuration. The use of the device is explained by means of examples.
• The chapters "Information on the manual", "Safety", "Environmental information" and "Product overview" contain general specifications and basic information as well as a description of functions.
• Chapters "Technical data" and "Installation and electrical connection" describe the device technology and installation, mounting and the electrical connections.
• Chapters "Integrating" and "Configuration" contain instructions on commissioning and setting up or integrating the device.
• Chapter "Maintenance" contains information about cleaning, fault condition diagnostics and repairing the device.
Pos: 6.4 /#Neustruktur#/Online-Dokumentation (+KNX)/Steuermodule - Online-Dokumentation (--> Für alle Dokumente <--)/++++++++++++ Seitenumbruch ++++++++++++ @ 9\mod_1268898668093_0.docx @ 52149 @ 1 @ 1
Operating Instructions
ABB-Welcome Information about the IPgateway
— 5 —
Pos: 6.5.1 /#Neustruktur#/Online-Dokumentation (+KNX)/Überschriften (--> Für alle Dokumente <--)/2. Ebene/S - T/Symbole des Handbuches @ 30\mod_1348481258296_15.docx @ 238518 @ 1111 @ 1
1.3 Symbols in the manual Pos: 6.5.2 /#Neustruktur#/Online-Dokumentation (+KNX)/Hinweise zum KNX Technischen Handbuch (--> Für alle Dokumente --<)/Symbole des Handbuches (Vollständig - KNX THB)/Symbole des Handbuches (Vollständig - KNX THB) @ 30\mod_1348480199844_15.docx @ 238490 @ 1 @ 1
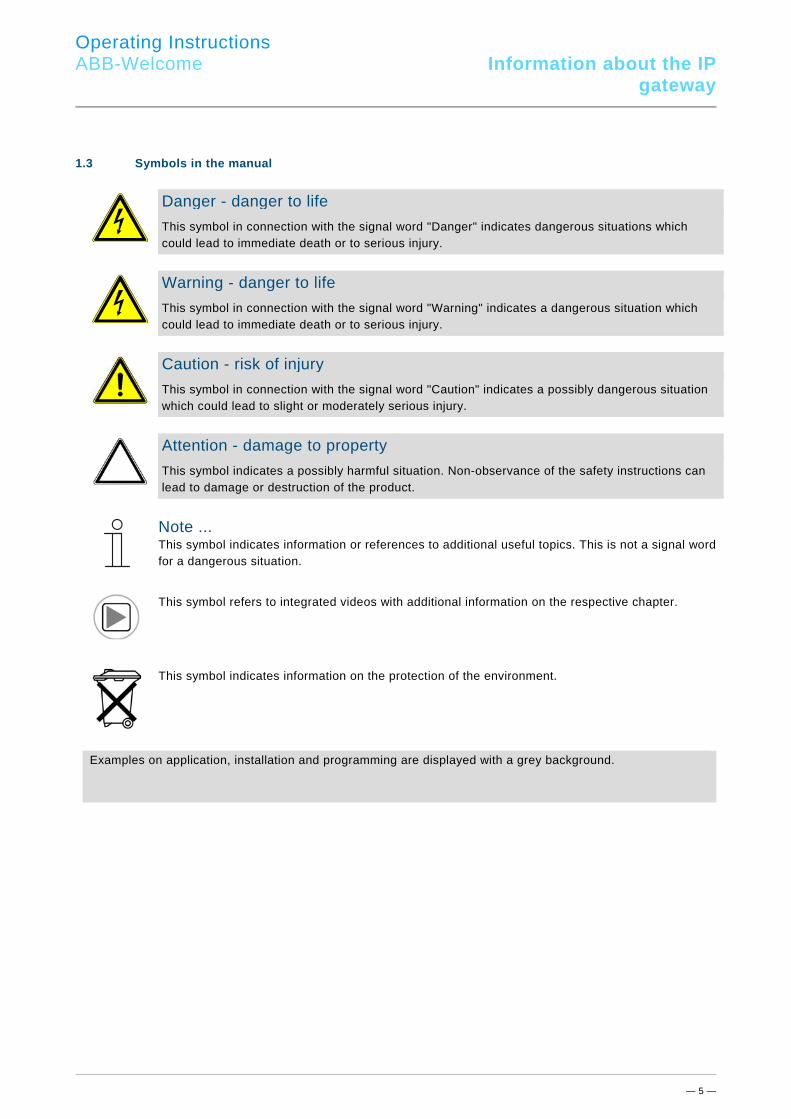
Danger - danger to life
This symbol in connection with the signal word "Danger" indicates dangerous situations which could lead to immediate death or to serious injury.
Warning - danger to life
This symbol in connection with the signal word "Warning" indicates a dangerous situation which could lead to immediate death or to serious injury.
Caution - risk of injury
This symbol in connection with the signal word "Caution" indicates a possibly dangerous situation which could lead to slight or moderately serious injury.
Attention - damage to property
This symbol indicates a possibly harmful situation. Non-observance of the safety instructions can lead to damage or destruction of the product.
Note ... This symbol indicates information or references to additional useful topics. This is not a signal word for a dangerous situation.
This symbol refers to integrated videos with additional information on the respective chapter.
This symbol indicates information on the protection of the environment.
Examples on application, installation and programming are displayed with a grey background.
Pos: 7 /#Neustruktur#/Online-Dokumentation (+KNX)/Steuermodule - Online-Dokumentation (--> Für alle Dokumente <--)/++++++++++++ Seitenumbruch ++++++++++++ @ 9\mod_1268898668093_0.docx @ 52149 @ 1 @ 1
Operating Instructions
ABB-Welcome Safety
— 6 —
Pos: 8.1 /#Neustruktur#/Online-Dokumentation (+KNX)/Überschriften (--> Für alle Dokumente <--)/1. Ebene/S - T/Sicherheit @ 18\mod_1302612791790_15.docx @ 103357 @ 22122 @ 1
2 Safety Pos: 8.2 /#Neustruktur#/Online-Dokumentation (+KNX)/Sicherheitshinweise und Hinweise (--> Für alle Dokumente <--)/Warnhinweise/Sicherheit - 230 V @ 18\mod_1302606816750_15.docx @ 103308 @ 1 @ 1
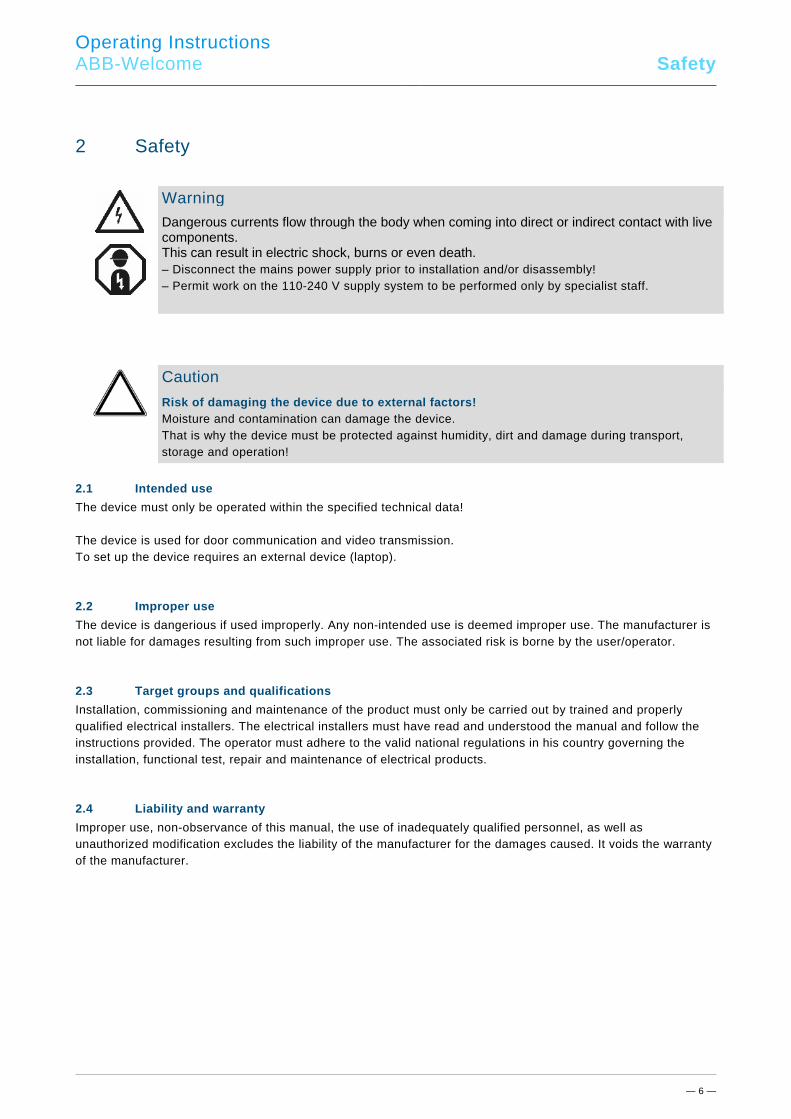
Warning
Dangerous currents flow through the body when coming into direct or indirect contact with live components. This can result in electric shock, burns or even death. – Disconnect the mains power supply prior to installation and/or disassembly! – Permit work on the 110-240 V supply system to be performed only by specialist staff.
Pos: 8.3 /#Neustruktur#/Online-Dokumentation (+KNX)/Sicherheitshinweise und Hinweise (--> Für alle Dokumente <--)/Hinweise - Sachschäden/Achtung - Beschädigung durch äußere Einwirkungen @ 26\mod_1343995985123_15.docx @ 226743 @ 222222 @ 1
Caution
Risk of damaging the device due to external factors! Moisture and contamination can damage the device. That is why the device must be protected against humidity, dirt and damage during transport, storage and operation!
Pos: 8.4.1 /#Neustruktur#/Online-Dokumentation (+KNX)/Überschriften (--> Für alle Dokumente <--)/2. Ebene/A - F/Bestimmungsgemäßer Gebrauch @ 25\mod_1340691838858_15.docx @ 220036 @ 222222 @ 1
2.1 Intended use Pos: 8.4.2 /#Neustruktur#/Online-Dokumentation (+KNX)/Sicherheit/Musterdokument/Bestimmungsgemäßer Gebrauch/Bestimmungsgemäßer Gebrauch - 83341 @ 35\mod_1363612058226_15.docx @ 288438 @ 22 @ 1
The device must only be operated within the specified technical data! The device is used for door communication and video transmission. To set up the device requires an external device (laptop). Pos: 8.5.1 /#Neustruktur#/Online-Dokumentation (+KNX)/Überschriften (--> Für alle Dokumente <--)/2. Ebene/A - F/Bestimmungswidriger Gebrauch @ 30\mod_1348482382253_15.docx @ 238583 @ 11111111 @ 1
2.2 Improper use Pos: 8.5.2 /#Neustruktur#/Online-Dokumentation (+KNX)/Sicherheit/Musterdokument/Bestimmungswidriger Gebrauch/Bestimmungswidriger Gebrauch - 83341 @ 35\mod_1363612092911_15.docx @ 288470 @ 1222333 @ 1
The device is dangerious if used improperly. Any non-intended use is deemed improper use. The manufacturer is not liable for damages resulting from such improper use. The associated risk is borne by the user/operator. Pos: 8.6.1 /#Neustruktur#/Online-Dokumentation (+KNX)/Überschriften (--> Für alle Dokumente <--)/2. Ebene/U - Z/Zielgruppen und Qualifikationen @ 30\mod_1348478339232_15.docx @ 238335 @ 223 @ 1
2.3 Target groups and qualifications Pos: 8.6.2 /#Neustruktur#/Online-Dokumentation (+KNX)/Sicherheit (--> Für alle Dokumente <--)/Zielgruppen und Qualifikationen/Zielgruppen und Aulifikationen @ 30\mod_1348478121448_15.docx @ 238322 @ 3211113331 @ 1
Installation, commissioning and maintenance of the product must only be carried out by trained and properly qualified electrical installers. The electrical installers must have read and understood the manual and follow the instructions provided. The operator must adhere to the valid national regulations in his country governing the installation, functional test, repair and maintenance of electrical products. Pos: 8.7.1 /#Neustruktur#/Online-Dokumentation (+KNX)/Überschriften (--> Für alle Dokumente <--)/2. Ebene/G - L/Haftung und Gewährleistung @ 30\mod_1348478525228_15.docx @ 238363 @ 3311111333 @ 1
2.4 Liability and warranty Pos: 8.7.2 /#Neustruktur#/Online-Dokumentation (+KNX)/Sicherheit (--> Für alle Dokumente <--)/Haftung und Gewährleistung/Haftung und Gewährleistung - KNX ... @ 30\mod_1348478419853_15.docx @ 238349 @ 2222233111323 @ 1
Improper use, non-observance of this manual, the use of inadequately qualified personnel, as well as unauthorized modification excludes the liability of the manufacturer for the damages caused. It voids the warranty of the manufacturer. Pos: 9 /#Neustruktur#/Online-Dokumentation (+KNX)/Steuermodule - Online-Dokumentation (--> Für alle Dokumente <--)/++++++++++++ Seitenumbruch ++++++++++++ @ 9\mod_1268898668093_0.docx @ 52149 @ 31113 @ 1
Operating Instructions
ABB-Welcome Environment
— 7 —
Pos: 10.1 /#Neustruktur#/Modul-Struktur/Online-Dokumentation/Überschriften (--> Für alle Dokumente <--)/1. Ebene/U - Z/Umwelt @ 18\mod_1302614158967_15.docx @ 103383 @ 333333 @ 1
3 Environment Pos: 10.2 /#Neustruktur#/Online-Dokumentation (+KNX)/Sicherheitshinweise und Hinweise (--> Für alle Dokumente <--)/Hinweise/Hinweis - Umwelt - Hinweis Elektrogeräte @ 18\mod_1302763973434_15.docx @ 103500 @ 3333333333333 @ 1
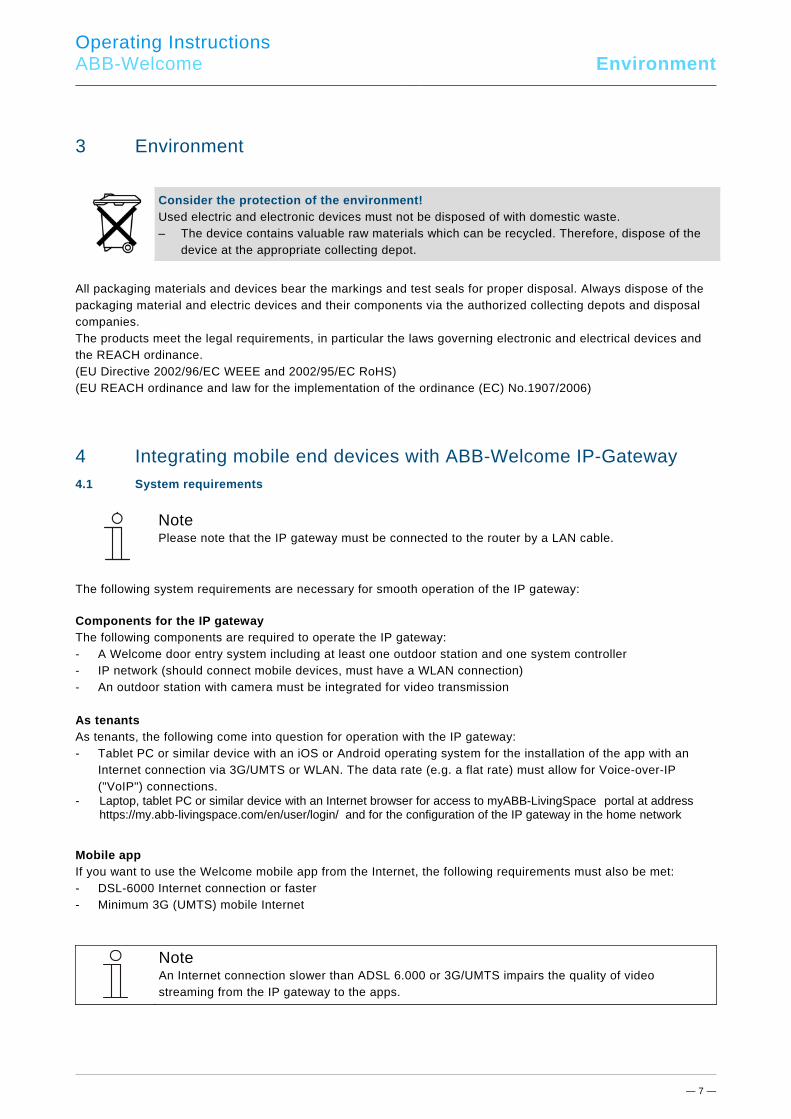
Consider the protection of the environment! Used electric and electronic devices must not be disposed of with domestic waste. – The device contains valuable raw materials which can be recycled. Therefore, dispose of the
device at the appropriate collecting depot.
Pos: 10.3 /#Neustruktur#/Online-Dokumentation (+KNX)/Sicherheitshinweise und Hinweise (--> Für alle Dokumente <--)/Hinweise/Hinweis - Umwelt - Entsorgung Elektrogeräte @ 20\mod_1325760695972_15.docx @ 136583 @ 3333333333 @ 1
All packaging materials and devices bear the markings and test seals for proper disposal. Always dispose of the packaging material and electric devices and their components via the authorized collecting depots and disposal companies. The products meet the legal requirements, in particular the laws governing electronic and electrical devices and the REACH ordinance. (EU Directive 2002/96/EC WEEE and 2002/95/EC RoHS) (EU REACH ordinance and law for the implementation of the ordinance (EC) No.1907/2006)
4 Integrating mobile end devices with ABB-Welcome IP-Gateway 4.1 System requirements
Note Please note that the IP gateway must be connected to the router by a LAN cable.
The following system requirements are necessary for smooth operation of the IP gateway: Components for the IP gateway The following components are required to operate the IP gateway: - A Welcome door entry system including at least one outdoor station and one system controller - IP network (should connect mobile devices, must have a WLAN connection) - An outdoor station with camera must be integrated for video transmission As tenants As tenants, the following come into question for operation with the IP gateway: - Tablet PC or similar device with an iOS or Android operating system for the installation of the app with an
Internet connection via 3G/UMTS or WLAN. The data rate (e.g. a flat rate) must allow for Voice-over-IP ("VoIP") connections.
- Laptop, tablet PC or similar device with an Internet browser for access to myABB-LivingSpace portal at address https://my.abb-livingspace.com/en/user/login/ and for the configuration of the IP gateway in the home network
Mobile app If you want to use the Welcome mobile app from the Internet, the following requirements must also be met: - DSL-6000 Internet connection or faster - Minimum 3G (UMTS) mobile Internet
Note An Internet connection slower than ADSL 6.000 or 3G/UMTS impairs the quality of video streaming from the IP gateway to the apps.

Operating Instructions
ABB-Welcome Integrating mobile end deviceswith ABB-Welcome IP-Gateway
— 8 —
4.2 IP-Gateway start-up The IP gateway has a user interface that can be reached via an Internet browser. The user interface can be opened from every computer that is part of the same network as the gateway that is to be configured. For the initial startup of the IP gateway a few basic settings need to be made in this user interface. Two options are available to you for commissioning:
Commissioning Description
Option 1 - UPnP Commissioning with the Windows UPnP service (Windows Vista or higher)
Option 2 - IP address Enter IP address directly
Information regarding documentation The Windows 7 interface is used to describe the configuration options.

Operating Instructions
ABB-Welcome Integrating mobile end deviceswith ABB-Welcome IP-Gateway
— 9 —
Pos: 18 /
4.2.1 Option 1: Commissioning with the Windows UPnP service Preconditions: – There is a DHCP server on the network, e.g. integrated in the router. – The IP gateway is connected to the router by a LAN cable. – The PC is connected to to the router by a LAN cable – The IP gateway is connected and ready for operation.
Fig. 1: Windows UPnP service
1. Open Windows Explorer. 2. Click the "Network" entry below the displayed drives. The window pane on the right now displays all devices currently on the network. 3. Double-click the IP gateway icon.
Fig. 2 A browser window with the configuration interface automatically opens.
Operating Instructions
ABB-Welcome Integrating mobile end deviceswith ABB-Welcome IP-Gateway
— 10 —
Note If the browser does not open automatically, the device properties appear instead. Copy the displayed IP address, e.g. 192.168.0.180, and enter it manually into the browser's address bar.
Note If the IP-Gateway icon can’t be found, you could check the Windows firewall. For example, turn off the windows firewall. If you still can’t find the IP-Gateway icon, you can go to Option 2.
Operating Instructions
ABB-Welcome Integrating mobile end deviceswith ABB-Welcome IP-Gateway
— 11 —
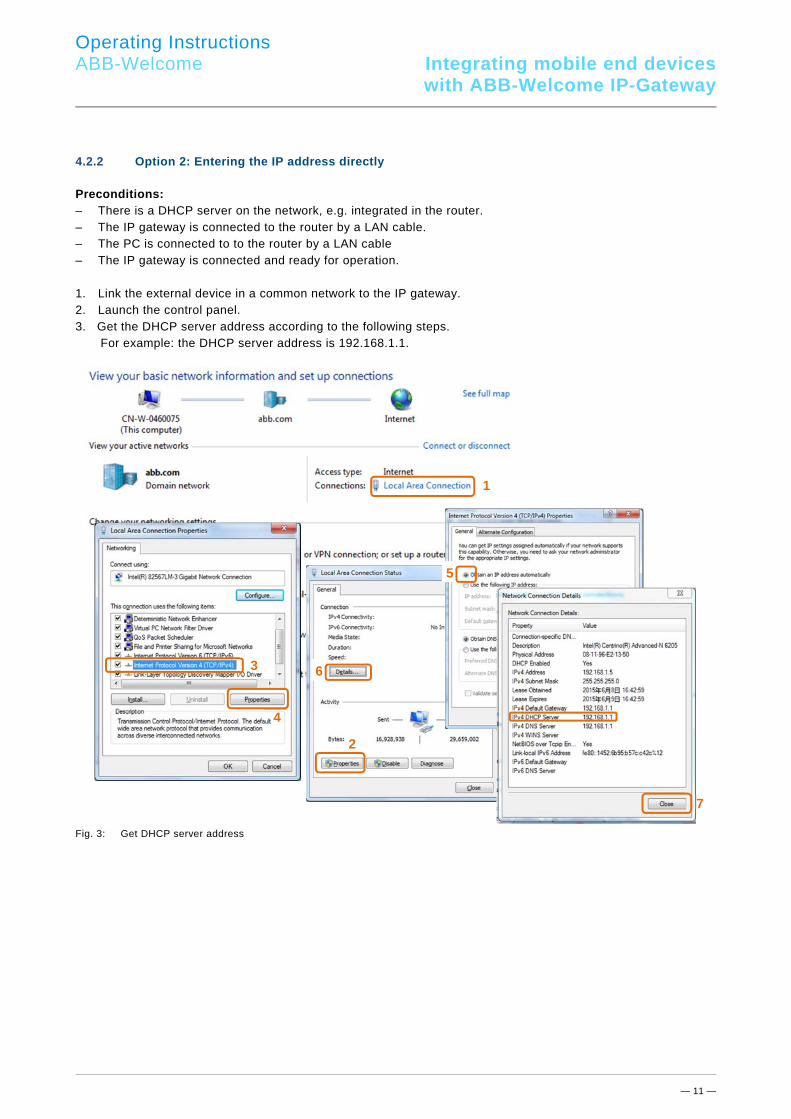
4.2.2 Option 2: Entering the IP address directly Preconditions: – There is a DHCP server on the network, e.g. integrated in the router. – The IP gateway is connected to the router by a LAN cable. – The PC is connected to to the router by a LAN cable – The IP gateway is connected and ready for operation. 1. Link the external device in a common network to the IP gateway. 2. Launch the control panel. 3. Get the DHCP server address according to the following steps.
For example: the DHCP server address is 192.168.1.1.
Fig. 3: Get DHCP server address
1
2
3
4
5
6
7
Operating Instructions
ABB-Welcome Integrating mobile end deviceswith ABB-Welcome IP-Gateway
— 12 —
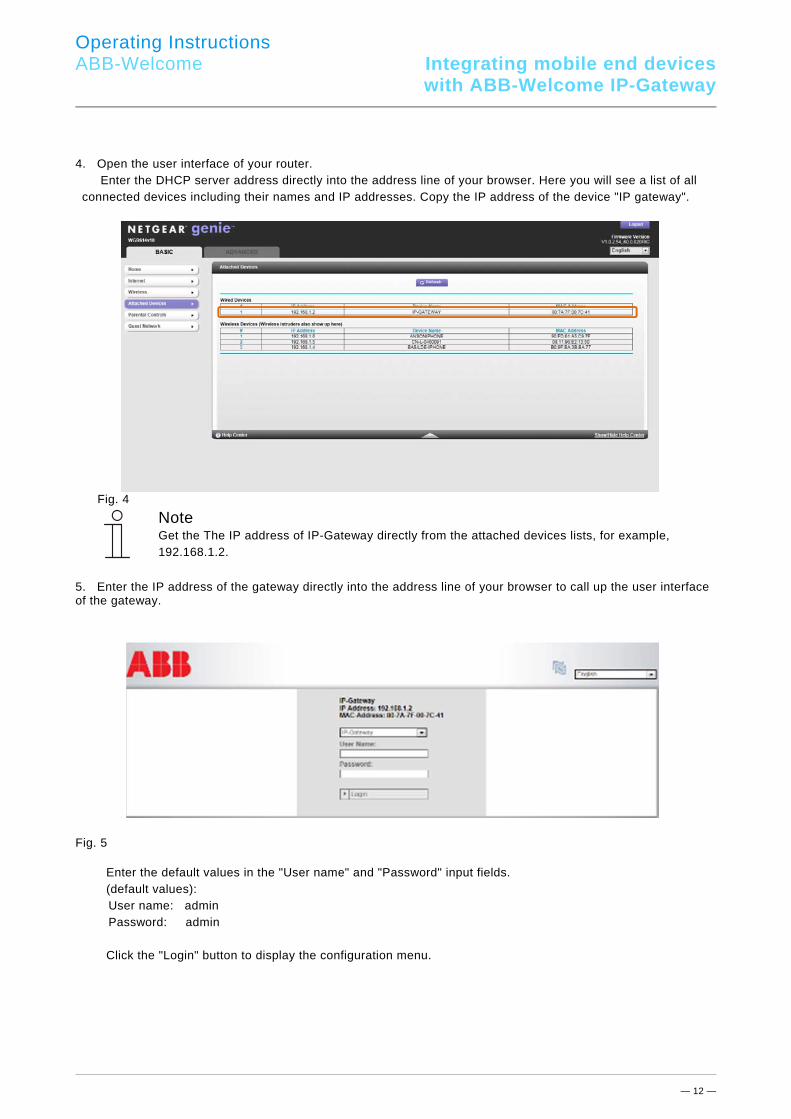
4. Open the user interface of your router. Enter the DHCP server address directly into the address line of your browser. Here you will see a list of all
connected devices including their names and IP addresses. Copy the IP address of the device "IP gateway".
Fig. 4
Note Get the The IP address of IP-Gateway directly from the attached devices lists, for example, 192.168.1.2.
5. Enter the IP address of the gateway directly into the address line of your browser to call up the user interface of the gateway.
Fig. 5
Enter the default values in the "User name" and "Password" input fields. (default values):
User name: admin Password: admin
Click the "Login" button to display the configuration menu.
Operating Instructions
ABB-Welcome Integrating mobile end deviceswith ABB-Welcome IP-Gateway
— 13 —
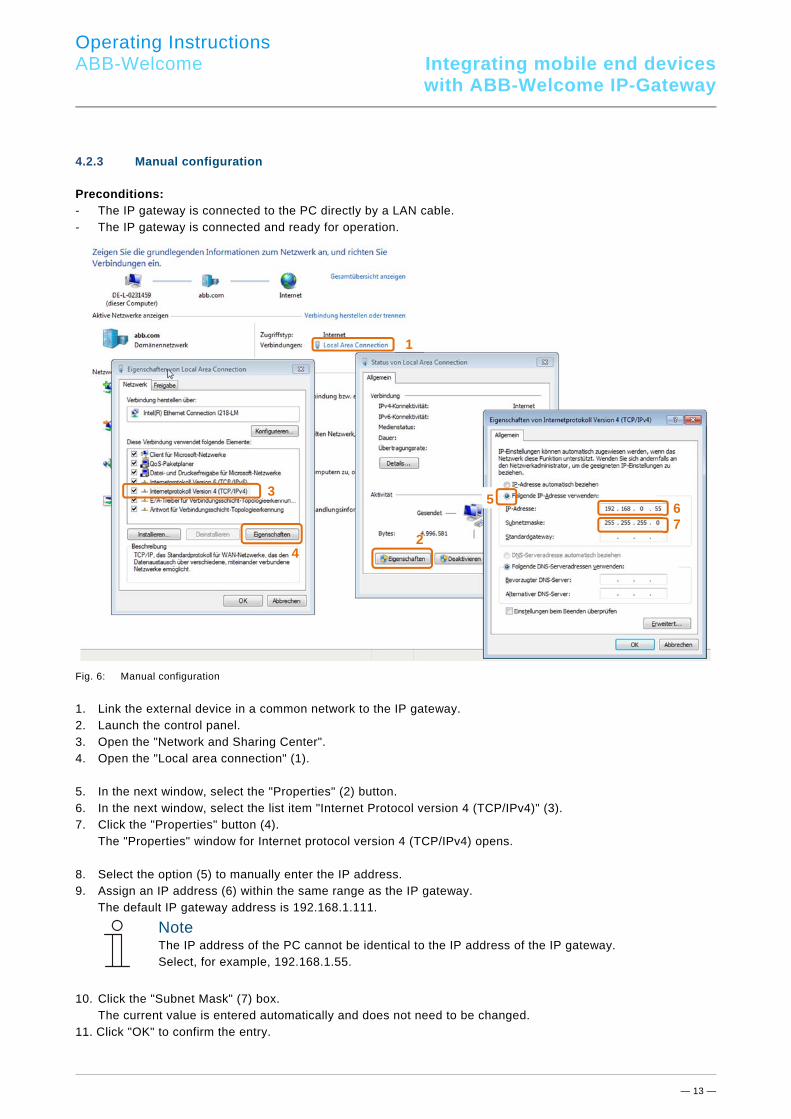
4.2.3 Manual configuration Preconditions: - The IP gateway is connected to the PC directly by a LAN cable. - The IP gateway is connected and ready for operation.
Fig. 6: Manual configuration
1. Link the external device in a common network to the IP gateway. 2. Launch the control panel. 3. Open the "Network and Sharing Center". 4. Open the "Local area connection" (1). 5. In the next window, select the "Properties" (2) button. 6. In the next window, select the list item "Internet Protocol version 4 (TCP/IPv4)" (3). 7. Click the "Properties" button (4). The "Properties" window for Internet protocol version 4 (TCP/IPv4) opens. 8. Select the option (5) to manually enter the IP address. 9. Assign an IP address (6) within the same range as the IP gateway. The default IP gateway address is 192.168.1.111.
Note The IP address of the PC cannot be identical to the IP address of the IP gateway. Select, for example, 192.168.1.55.
10.Click the "Subnet Mask" (7) box. The current value is entered automatically and does not need to be changed. 11.Click "OK" to confirm the entry.
1
2
3
4
56 7

Operating Instructions
ABB-Welcome Integrating mobile end deviceswith ABB-Welcome IP-Gateway
— 14 —
4.3 Setup of the mobile devices with IP-Gateway 4.3.1 Step 1: Registering and logging into myABB-LivingSpace portal
Fig. 7 ABB portal Login
1. Open page https://my.abb-livingspace.com/en/user/login/ ,register yourself as new user. 2. Input the username,password and mailbox to receive your active link. 3. Read and accept both of the items. 4. Click the “Register” button. 5. Activate your user account by your mailbox.
4.3.2 Step 2: Connecting the IP gateway with the myABB-LivingSpace portal
In the web interface of the IP gateway, in menu Portal Login, enter your data for access to the myABB-LivingSpace portal and the name of the IP gateway. Click the login button to connect the IP gateway with the portal.
Fig. 8 Web Interface IP-Gateway
1
2
4
3

Operating Instructions
ABB-Welcome Integrating mobile end deviceswith ABB-Welcome IP-Gateway
— 15 —
4.3.3 Step 3: Installing the "Welcome " app You can download the ABB-Welcome app from Google Play or the Apple App Store directly by entering keyword "ABB Welcome".
4.3.4 Step 4: Coupling the IP gateway and "Welcome " app
Smart phone: Open the Welcome APP, input the user name and password
1
4
Friendly Name of IP gateway
Portal Client UUID
Select the IP gateway to pair
Click the Setting
5
IP gateway: "APP Management" configuration page displays the pairing request, click the “Handle” button.
Android: select “Network settings” iOS: select “Manage IPGW”
Friendly Name of Smart phone
Friendly Name of Smart phone
Integrity code
2 3
Operating Instructions
ABB-Welcome Integrating mobile end deviceswith ABB-Welcome IP-Gateway
— 16 —
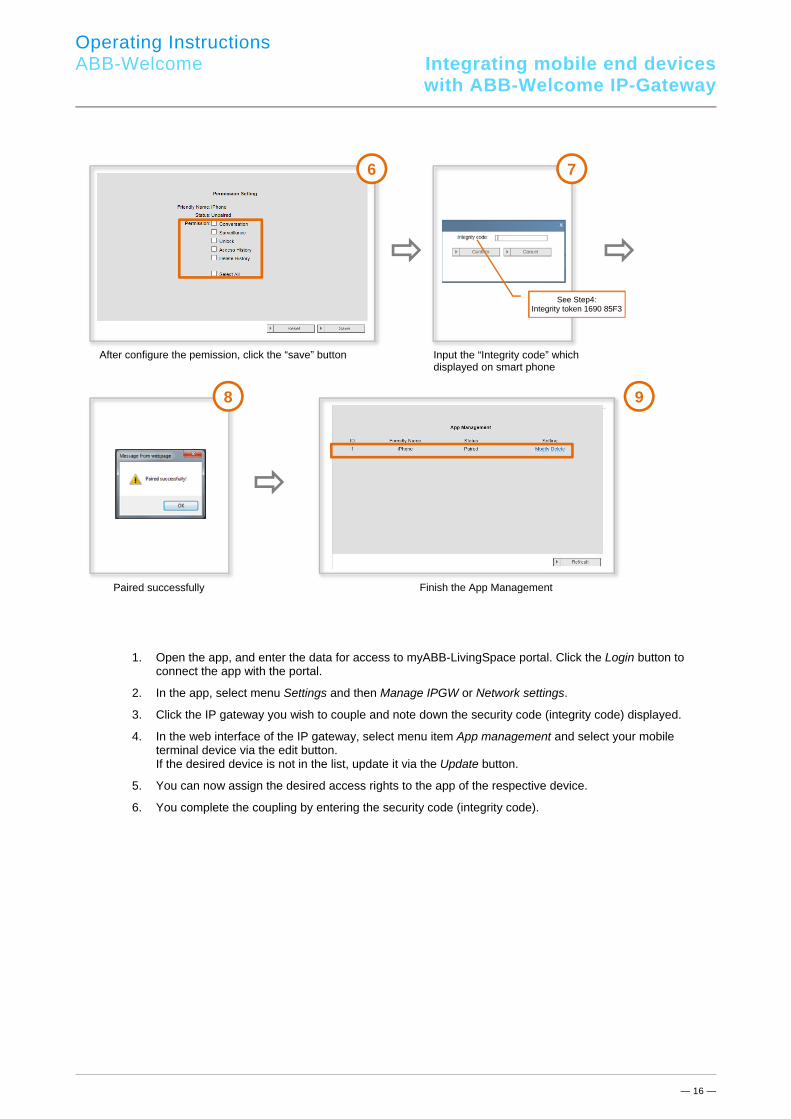
1. Open the app, and enter the data for access to myABB-LivingSpace portal. Click the Login button to connect the app with the portal.
2. In the app, select menu Settings and then Manage IPGW or Network settings.
3. Click the IP gateway you wish to couple and note down the security code (integrity code) displayed.
4. In the web interface of the IP gateway, select menu item App management and select your mobile terminal device via the edit button. If the desired device is not in the list, update it via the Update button.
5. You can now assign the desired access rights to the app of the respective device.
6. You complete the coupling by entering the security code (integrity code).
After configure the pemission, click the “save” button
7
Input the “Integrity code” which displayed on smart phone
See Step4: Integrity token 1690 85F3
Paired successfully Finish the App Management
8 9
6

Operating Instructions
ABB-Welcome General function of home page
— 17 —
Po
Pos: 28 /#Neustruktur#/Online-Dokumentation (+KNX)/Überschriften (--> Für alle Dokumente <--)/1. Ebene/G - L/Konfiguration @ 35\mod_1363612248673_15.docx @ 288599 @ 322111122223111111111111111111111112111111222222222222222222222222222333333333333333333333333333333333321222222222233333333333333333333333333333333333333333333333333333332111111111111111111111111111111111111211111111111111111111111111111 @ 1
5 General function of home page Pos: 29 /#Neustruktur#/Online-Dokumentation (+KNX)/Bedienung/Türkommunikation/Busch-Welcome/Allgemeine Schaltflöschen der Konfigurations Interface - 83341 @ 35\mod_1363612261829_15.docx @ 288614 @ 111132222221112222222212111111111111111111111111111111111111113333333333333333333333333333333333333333333333333333333333333333333212222222222222222222222222223333333333333333333333333333333333111111222222222211111111111111111111111111111111111333333333333333333332222222222222222221121111233333333 @ 1
All configurations are set in the browser interface. 5.1 General buttons in the configuration
"Log off" button Click the "Log off" button at the top right to leave the configuration interface as a logged-on user. You can leave the configuration interface at any time. "Reset" button If you have entered incorrect data in the input fields, click the "Reset" button to clear all your entries. All input fields are cleared and you can enter your data again. "Save" button Click the "Save" button to save your entries and to continue to the next configuration page. Switching to a new configuration page Click the individual configuration pages in the left column of the configurations to switch to the required configuration page. Pos: 30 /#Neustruktur#/Online-Dokumentation (+KNX)/Überschriften (--> Für alle Dokumente <--)/2. Ebene/G - L/LOGIN @ 35\mod_1363612270771_15.docx @ 288630 @ 11111122222222222222222222222222233333333333333333333333333333333332122222222223333333333333333333333333333333333322222222222222222222 @ 1
5.2 Login Pos: 31 /#Neustruktur#/Online-Dokumentation (+KNX)/Bedienung/Türkommunikation/Busch-Welcome/Menü LOGIN - 83341 @ 36\mod_1370935237191_15.docx @ 296760 @ 11111111111111111111111111111111113333333333333333333333333333333333333333333333333333333333333333333212222222222222222222222222223333333333333333333333333333333333111111222222222211111111111111111111111111111111111333333333333333333332222222222222222221121111233333333222222222222222222222222222222222222222222222222222222222222222222222222222222222222222222222222222333333333331222222222222233333333333333333333333333333333333333333333333333333333333333333333333333333333333333333333333333322222222222222222222222222222222222111111111111112222222222222222222222222222222222222222222222222222222222222222222222222222222222222222222222222222222222222222222211111111111111111111111111111111111111111111111111111111111111111111111111111111111111111111111111111111111111111111111111111111111111111111111111111111111111111111111111111111111111111111111111111111111111111111111111111111111111111111111111111111111111111111111111111111111111111111111111111111111111111111111111111111111111111111111111111111111111111111111111111111111111111111111111111111111111111111111111111111 @ 1 12. Tragen
Fig. 9: Login window
The IP address shows you the IP address currently used by the device. The MAC address shows you the MAC address currently used by the device. Language The default language is English, and clicking the flag can select other languages. User name Enter the default values in the "User name" and "Password" input fields.
Operating Instructions
ABB-Welcome General function of home page
— 18 —
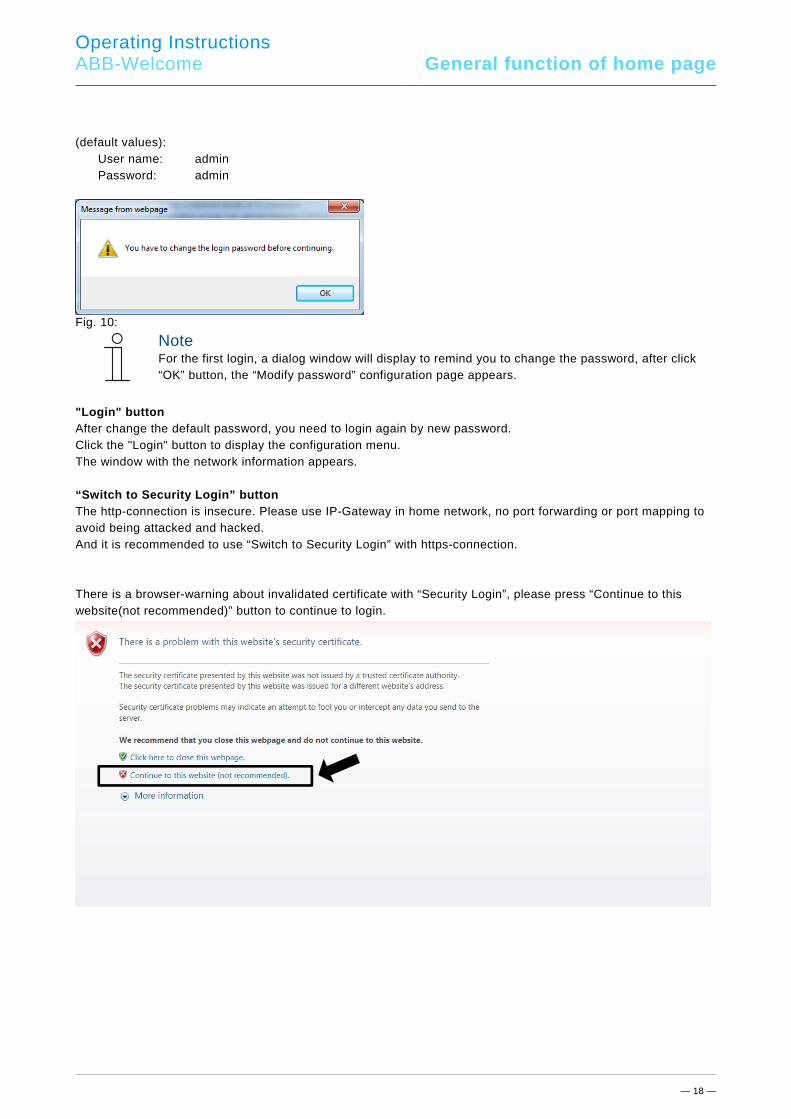
(default values): User name: admin Password: admin
Fig. 10:
Note For the first login, a dialog window will display to remind you to change the password, after click “OK” button, the “Modify password” configuration page appears.
"Login" button After change the default password, you need to login again by new password. Click the "Login" button to display the configuration menu. The window with the network information appears. “Switch to Security Login” button The http-connection is insecure. Please use IP-Gateway in home network, no port forwarding or port mapping to avoid being attacked and hacked. And it is recommended to use “Switch to Security Login” with https-connection. There is a browser-warning about invalidated certificate with “Security Login”, please press “Continue to this website(not recommended)” button to continue to login.

Operating Instructions
ABB-Welcome General function of home page
— 19 —
Security mode is connected via https link.

Operating Instructions
ABB-Welcome General function of home page
— 20 —
5.2.1 RESET
Note If you forget your user name and password, you can reset the IP gateway back to its factory settings.
The "Reset" button is located on the front of the IP gateway behind a flap. Performing the reset 1. Press the "Reset" button for at least 3 seconds.
Fig. 11: Position of the RESET button
Pos: 32 /#Neustruktur#/Online-Dokumentation (+KNX)/Steuermodule - Online-Dokumentation (--> Für alle Dokumente <--)/++++++++++++ Seitenumbruch ++++++++++++ @ 9\mod_1268898668093_0.docx @ 52149 @ 222222222222113333333322221121222221111111111111111111111111111111111111111111111111111111111111111111111111111111111111111111111111111122222222222222222223333333311211112222222222222222222222222222222222222222222222222222222222222222222222222222222222222222222222222222222222222222222222222222222222222222222222222222222222222222 @ 1

Operating Instructions
ABB-Welcome Configuration for IP Gateway
— 21 —
Pos: 33 /#Neustruktur#/Online-Dokumentation (+KNX)/Überschriften (--> Für alle Dokumente <--)/2. Ebene/M - O/Menü Netzwerkinformation @ 34\mod_1362494554308_15.docx @ 284581 @ 222222222222222222222222222222222222222222222222222222222222222222222222222222222222222222222222222333333333331222222222222233333333333333333333333333333333333333333333333333333333333333333333333333333333333333333333333333322222222222222222222222222222222222111111111111112222222222222222222222222222222222222222222222222222222222222222222222222222222222222222222222222222222222222222222211111111111111111111111111111111111111111111111111111111111111111111111111111111111111111111111111111111111111111111111111111111111111111111111111111111111111111111111111111111111111111111111111111111111111111111111111111111111111111111111111111111111111111111111111111111111111111111111111111111111111111111111111111111111111111111111111111111111111111111111111111111111111111111111111111111111111111111111111111111 @ 1
6 Configuration for IP Gateway 6.1 Network information Pos: 34 /#Neustruktur#/Online-Dokumentation (+KNX)/Bedienung/Türkommunikation/Busch-Welcome/Menü Netzwerkinformation - 83341 @ 36\mod_1370935257488_15.docx @ 296776 @ 23333333333312222222222223333333333333333333333333333333333333333333333333333333333333333333333333333333333333333333333333332222222222222222222222222222222222211111111111111222222222222222222222222222222222222222222222222222222222222222222222 @ 1
The network information appears after logging in.
Fig. 12: Network information
The "Network information" page display the IP gateway settings currently used. IP address The IP address is the address for accessing the connected IP gateway. You need this address to log into the configuration interface! Portal client information Display the connection status between IP gateway and server. Date and time synchronization Display the status of the date and time synchronization.
Note Note the displayed IP address to log into the configuration again, e.g. after restarting the system when creating other users.
Pos: 35 /#Neustruktur#/Online-Dokumentation (+KNX)/Steuermodule - Online-Dokumentation (--> Für alle Dokumente <--)/++++++++++++ Seitenumbruch ++++++++++++ @ 9\mod_1268898668093_0.docx @ 52149 @ 12233333333333222222222222222222222222222222222222222222222222222222222222222222222222211222121222211222222222222222222222222222222222222222222222222222222222222222222222222222222222222222222222222222222222222222222222222222222222 @ 1
Operating Instructions
ABB-Welcome Configuration for IP Gateway
— 22 —
Pos: 36 /#Neustruktur#/Online-Dokumentation (+KNX)/Überschriften (--> Für alle Dokumente <--)/2. Ebene/G - L/Konfigurationsseite „Netzwerkkonfiguration" @ 34\mod_1362494753800_15.docx @ 284613 @ 222222222222222222222222222211111111111111111111111111111111111111111111111111111111111111111111111111111111212221111111 @ 1
6.2 "Network configuration" page Pos: 37 /#Neustruktur#/Online-Dokumentation (+KNX)/Bedienung/Türkommunikation/Busch-Welcome/Menü Netzwerkkonfiguration - 83341 @ 36\mod_1370935504989_15.docx @ 296854 @ 212111112333333333111111122212111111111111111111111111111113333333333333333333333333333333333333333333333333333333333333111111111111111111 @ 1
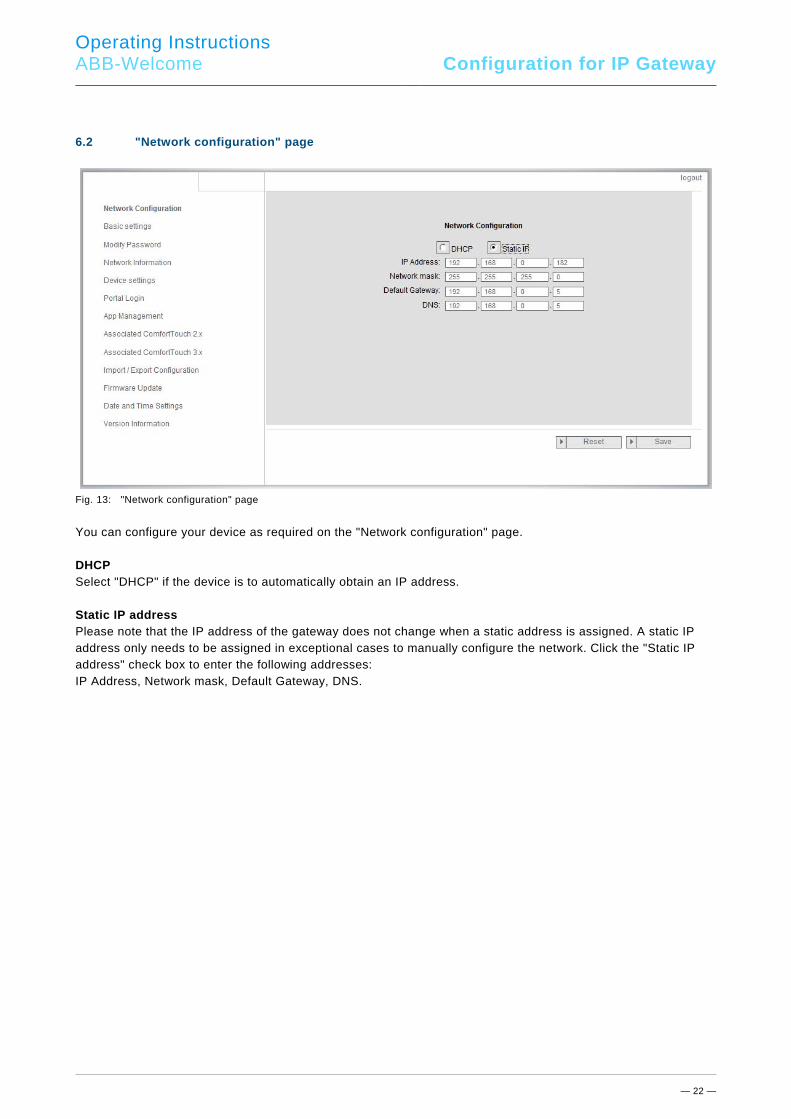
Fig. 13: "Network configuration" page
You can configure your device as required on the "Network configuration" page. DHCP Select "DHCP" if the device is to automatically obtain an IP address. Static IP address Please note that the IP address of the gateway does not change when a static address is assigned. A static IP address only needs to be assigned in exceptional cases to manually configure the network. Click the "Static IP address" check box to enter the following addresses: IP Address, Network mask, Default Gateway, DNS. Pos: 39 /#Neustruktur#/Online-Dokumentation (+KNX)/Überschriften (--> Für alle Dokumente <--)/2. Ebene/M - O/Konfigurationsseite "Grundeinstellungen" @ 34\mod_1362494927689_15.docx @ 284645 @ 111111111111111111111111111111111111111111111111111111111112111111112111111111111111111112222222222222222222222222222222222211111111111111 @ 1
Operating Instructions
ABB-Welcome Configuration for IP Gateway
— 23 —
6.3 "Basic settings" configuration page Pos: 40 /#Neustruktur#/Online-Dokumentation (+KNX)/Bedienung/Türkommunikation/Busch-Welcome/Menü Grundeinstellungen - 83341 @ 35\mod_1363612329100_15.docx @ 288694 @ 23333333333311112211111111211111111111111111111111111111111111111111111111111111111111111111111111111111111111111111111111111111111111111111111111111111111232223322222222222222 @ 1
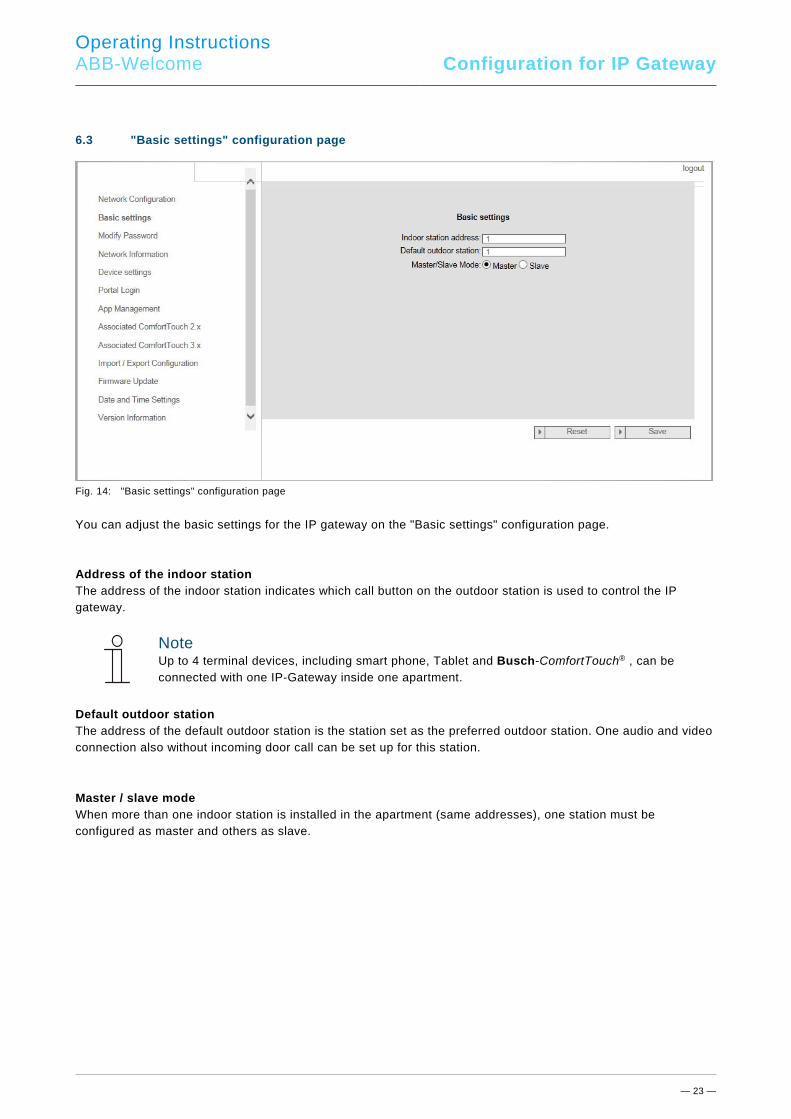
Fig. 14: "Basic settings" configuration page
You can adjust the basic settings for the IP gateway on the "Basic settings" configuration page. Address of the indoor station The address of the indoor station indicates which call button on the outdoor station is used to control the IP gateway.
Note Up to 4 terminal devices, including smart phone, Tablet and Busch-ComfortTouch® , can be connected with one IP-Gateway inside one apartment.
Default outdoor station The address of the default outdoor station is the station set as the preferred outdoor station. One audio and video connection also without incoming door call can be set up for this station.
Master / slave mode When more than one indoor station is installed in the apartment (same addresses), one station must be configured as master and others as slave.
os: 41 /#Neustruktur#/Online-Dokumentation (+KNX)/Steuermodule - Online-Dokumentation (--> Für alle Dokumente <--)/++++++++++++ Seitenumbruch ++++++++++++ @ 9\mod_1268898668093_0.docx @ 52149 @ 22222222222222222222222222222222222222222222222222222222222222222222222222222222222222222222222222222222222222222222222222222222222222222222222222222222222222222222222222222222121112222222222222121112222222222222222222222232223322222222222222 @ 1
Operating Instructions
ABB-Welcome Configuration for IP Gateway
— 24 —
Pos: 42 /#Neustruktur#/Online-Dokumentation (+KNX)/Überschriften (--> Für alle Dokumente <--)/3. Ebene/M - O/Konfigurationsseite "Passwort ändern" @ 34\mod_1362495029239_15.docx @ 284676 @ 211121112222222222222222222222222222222222222222222222211111111111111111111111111111111111111111111111111111111111111111111111111111111111111111111111111111111111222222222222 @ 1
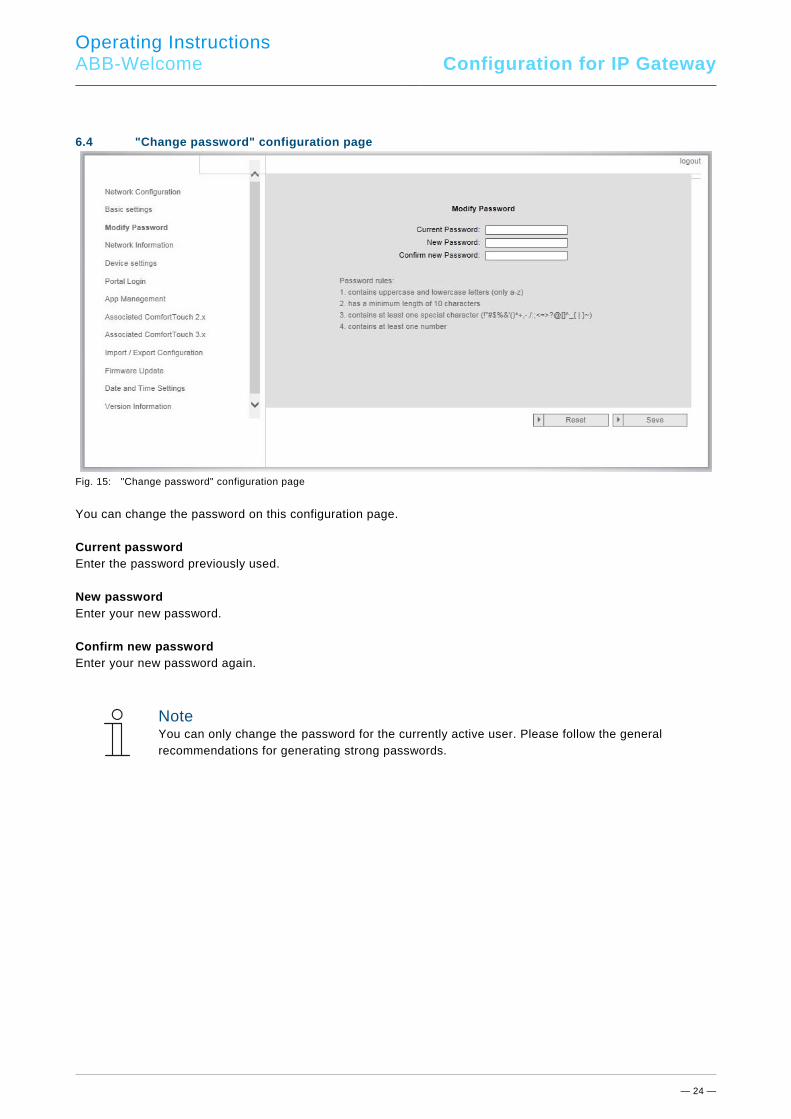
6.4 "Change password" configuration page Pos: 43 /#Neustruktur#/Online-Dokumentation (+KNX)/Bedienung/Türkommunikation/Busch-Welcome/Menü Passwort ändern - 83341 @ 35\mod_1363612344390_15.docx @ 288710 @ 211111111111211122222121111111211121111111111111111111111111111111111111111111111111111111111111111111111111111111111111111111111111111111111111111111111111111111111111111111111111111111112222222222221 @ 1
Fig. 15: "Change password" configuration page
You can change the password on this configuration page. Current password Enter the password previously used. New password Enter your new password. Confirm new password Enter your new password again.
Note You can only change the password for the currently active user. Please follow the general recommendations for generating strong passwords.
Pos: 44 /#Neustruktur#/Online-Dokumentation (+KNX)/Steuermodule - Online-Dokumentation (--> Für alle Dokumente <--)/++++++++++++ Seitenumbruch ++++++++++++ @ 9\mod_1268898668093_0.docx @ 52149 @ 22222222222222222222222222222222222222222222222222222222222222222222222222222222222222222222222222222222222222222222222222222222222222222222222222222222222222222222222222222222222222222222222222222222222222222222222111212222222222221111111112221112221222222222222222 @ 1

Operating Instructions
ABB-Welcome Configuration for IP Gateway
— 25 —
Pos: 52 /#Neustruktur#/Online-Dokumentation (+KNX)/Überschriften (--> Für alle Dokumente <--)/2. Ebene/M - O/Konfigurationsseite "Geräteeinstellungen" @ 34\mod_1362495353459_15.docx @ 284773 @ 22211211111211122222222222222111122211111121111111111221111111212111212112221221111222111111232222222222222211111111111111111111111111111111111111111111111111111111111111111111111111111111111111111111111111111111111111111111111111111111111111111111111111111111111111111111111111111111111111111111111111111111111111111111111111111111111111111111111111111111111111111111111111111111111111111111111111111111111111111111111111111111111111111111111111111111111222222222222222222222222222222222222222211111112112221222222222222222222222222222222222222222222222222222222222222222222222222222222222222222222222222222222222222222222222222222222222222222222222222222222222222222222222222222222222222222222222222222222222222222222222222222222222222222222222222222222222222222222222222222222222222222222222222222222222222222222222222222222222222222222222222222222222222222222222222222222222222222222222222222222222222222222222222222222222222222222222222222222222222222222222222222222222222222222222222222222222222222222222222222222222222222222222222222222222222222222222222222222222222222222222222222222222222222222222222222222222222222222222222222222222222222222222222222222222222222222222222222222222222222222222222222222222222222222222222222222222222222222222222222222222222222222222222222222222222222222222222222222222222222222222222222222222222222222222222222222222222222222222222222222222222222222222222222222222222222222222222222222222222222222222222222222222222222222222222222222222222222222222222222222222222222222222222222222222222222222222222222222222222222222222222222222222222222222222222222222222222222222222222222222222222222222222222222222222222222222222222222222222222222222222222222222222222222222222222222222222222222222222222222222222222222222222222222222222222222222222222222222222222222222222222222222222222222222222222222222222222222222222222222222222222222222222222222222222222222222222222222222222222222222222222222222222222222222222222222222222222222222222222222222222222222222222222222222222222222111111112111111111111111111111111111111111111111111111111111111111111111111111111111111111111111111111111111111111111111111111111111111111111111111111111111111111111111111111111111111111111111111111111111111111111111111111111111111111111111111111111111111111111111111111111111111111111111111111111111111111111111111111111111111111111111111111111111111111111111111111111111111111111111111111111111111111111111111111111111111111111111111111111111111111111111111111111111111111111111111111111111111111111111111111111111111111111111111111111111111111111111111111111111111111111111111111111111111111111111111111111111111111111111111111111111111111111111111111111111111111111111111111111111111111111111222222222222222222222222222222222222222222222222222222222222222222222222222222222222222222222222222222222222222222222222222222222222222222222222222222222222222222222222222222222222222222222222222222222222222222222222222222222222222222222222222222222222222222222222222222222222222222222222222222222222222222222222 @ 1
6.5 "Device settings" configuration page Pos: 53 /#Neustruktur#/Online-Dokumentation (+KNX)/Bedienung/Türkommunikation/Busch-Welcome/Menü Geräteeinstellungen - 83341 @ 35\mod_1363612407376_15.docx @ 288774 @ 11111111111111111111111111111111111111111111111111111111111111111111111111111111111111111111111111111111111111111111111111111111111111111111111111111111111111111111111111111111111111111111111111111111111111111111111111111111111111111111111111111111111111111111111111111111111111111111111111111111111111111121111111111111111111111111111111111111111111111111111111111111111111111111111111111111111111111111111111111111111111111111111111111111111111111111111111111111111111111111111111111111111111111111111111111111111111111111111111111111111111111111111111111111111111111111111111111111111111111111111111111111111111111111111111111111111111111111111111111111111111111111111111111111111111111111111111111111111111111111111111111111111111111111111111111111111111111111111111111111111111111111111111111111111111111111111111111111111111111111111111111111111111111111111111111111111111111111111111111111111111111111111111111111111111111111111111111111111111111111111111111111111111111111111111111111112222222 @ 1
Fig. 16: "Device settings" configuration page
All outdoor stations to be connected to the IP gateway (max. 9) must be listed in the Device settings. Add device: You can add individual devices on this page. For the next steps, see the "Add devices" section below. The configuration page displays a list of added devices. Refresh camera list: If there are cameras connected with camera interface and are associated with indoor station, the camera list can be refreshed by press this button. Meanwhile, the camera list can be synchronized in paired Welcome APP automatically. ID The ID is the sequential number of the device. Modify Click the "Modify" button to change your settings. The current settings appear and can be modified. Delete Click the "Delete" button to remove a user from the list. Device type This is the device type description. Device ID The ID is the address of the outdoor station (If there is only one outdoor station, the ID as a rule is 1). Name When using the Welcome app, the name is shown. 2nd-lock status Show the availability of the 2nd-lock of the outdoor station
Outdoor station 1

Operating Instructions
ABB-Welcome Configuration for IP Gateway
— 26 —
6.5.1 Add device
Device type Select the required device type from the "Device type" drop-down list.
Note The floor call button is already set up as the default device. The device name can be adjusted as required.
Outdoor station:
Fig. 17: "Add device" outdoor station
Device ID Enter the address set on the first control dial of the outdoor station (1 – 9). Name The device name, e.g. for incoming calls, appears on the display of the mobile device or Busch-ComfortTouch®. Assign intuitive names, e.g. "Front door". Permission Whether the option to automatically record images (snapshots) is permitted can be specified for each outdoor station individually. Pos: 54 /#Neustruktur#/Online-Dokumentation (+KNX)/Hinweis/Busch-Welcome II/Hinweis Erstellung von Videoaufnahmen @ 34\mod_1362495517512_15.docx @ 284804 @ 2111111112111111111111111111111111111111111111111111111111111111111111111111111111111111111111111111111111111111111111111111111111111111111111111111111111111111111111111111222222222222222222222222222222222222222222222222222222222222222222222222222222222222222222222222222222222222222222222222222222222222222222222222222222222222222222222222222222222222222222222222222222222222222222222222222222222222222222222222222222222222222222222222222222222222222222222222222222222222222222222222222222222222222222222222222222222222222222222222222222222222222222222222222222222222222222222222222222222222222222222222222222222222222222222222222222222222222222222222222222222222222222222222222222222222222222222222222222222222222222222222222222222222222222222222222222222222222222222222222222222222222222222222222222222222222222222222222222222222222222222222222222222222222222222222222222222222222222222222222222222222222222222111111111111111111111111111111111111111111111111111111111111111111111111111111111111111122222222222222222222222222222222222222222222222222222222222222222222222222222222222222222222222222222222222222222222222222222222222222222222222222222222222222222222222222222222222222222222222222222222222222222222222222222211122221212112122222222232223322222222222222 @ 1
Note Making and saving video recordings can infringe on personal rights! Always observe applicable legal and labeling requirements for placement and operation of video components!
2nd-lock If choose YES, means 2nd-lock is available, and there needs an additional button on APP to control it. If choose NO, means only one lock for OS.
Operating Instructions
ABB-Welcome Configuration for IP Gateway
— 27 —
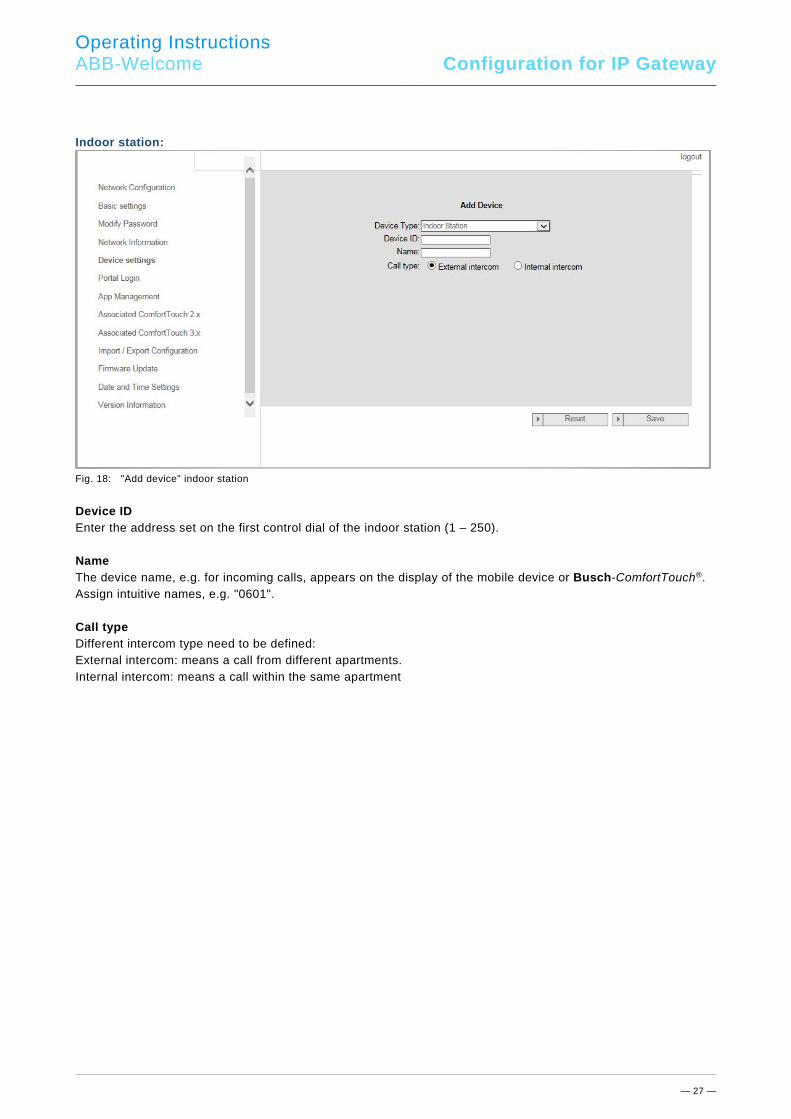
Indoor station:
Fig. 18: "Add device" indoor station
Device ID Enter the address set on the first control dial of the indoor station (1 – 250). Name The device name, e.g. for incoming calls, appears on the display of the mobile device or Busch-ComfortTouch®. Assign intuitive names, e.g. "0601". Call type Different intercom type need to be defined: External intercom: means a call from different apartments. Internal intercom: means a call within the same apartment
Operating Instructions
ABB-Welcome Configuration for IP Gateway
— 28 —
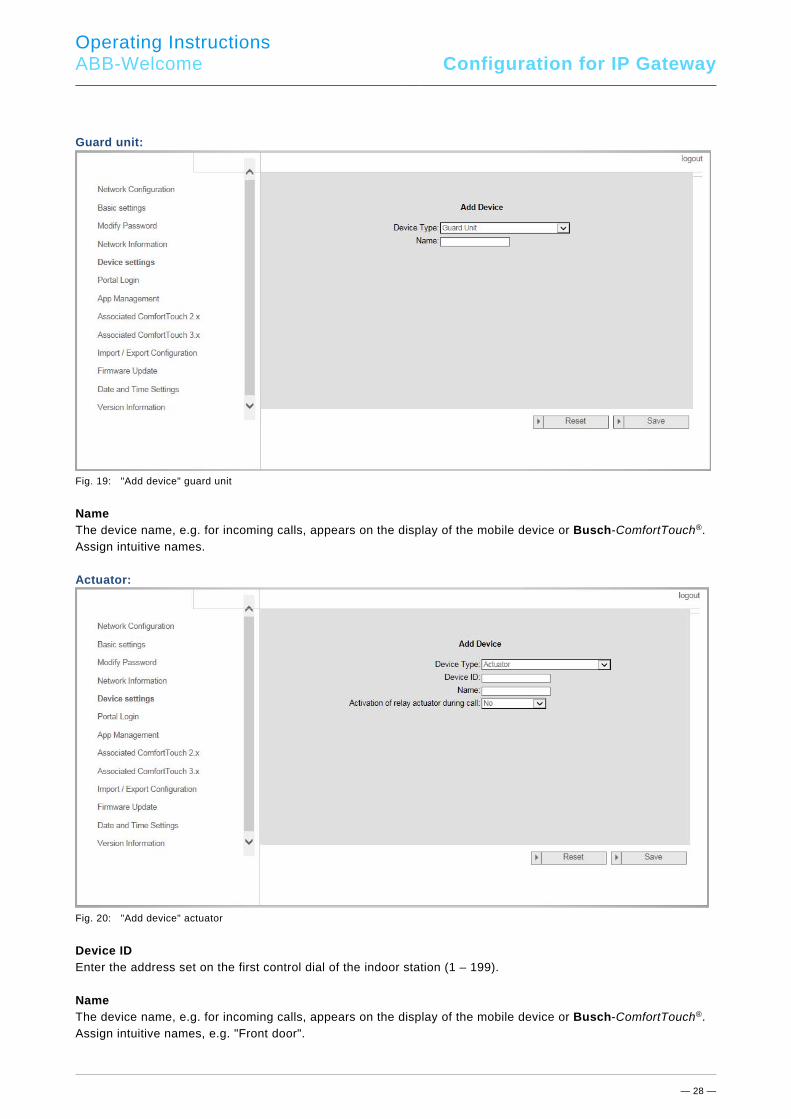
Guard unit:
Fig. 19: "Add device" guard unit
Name The device name, e.g. for incoming calls, appears on the display of the mobile device or Busch-ComfortTouch®. Assign intuitive names. Actuator:
Fig. 20: "Add device" actuator
Device ID Enter the address set on the first control dial of the indoor station (1 – 199). Name The device name, e.g. for incoming calls, appears on the display of the mobile device or Busch-ComfortTouch®. Assign intuitive names, e.g. "Front door".
Operating Instructions
ABB-Welcome Configuration for IP Gateway
— 29 —
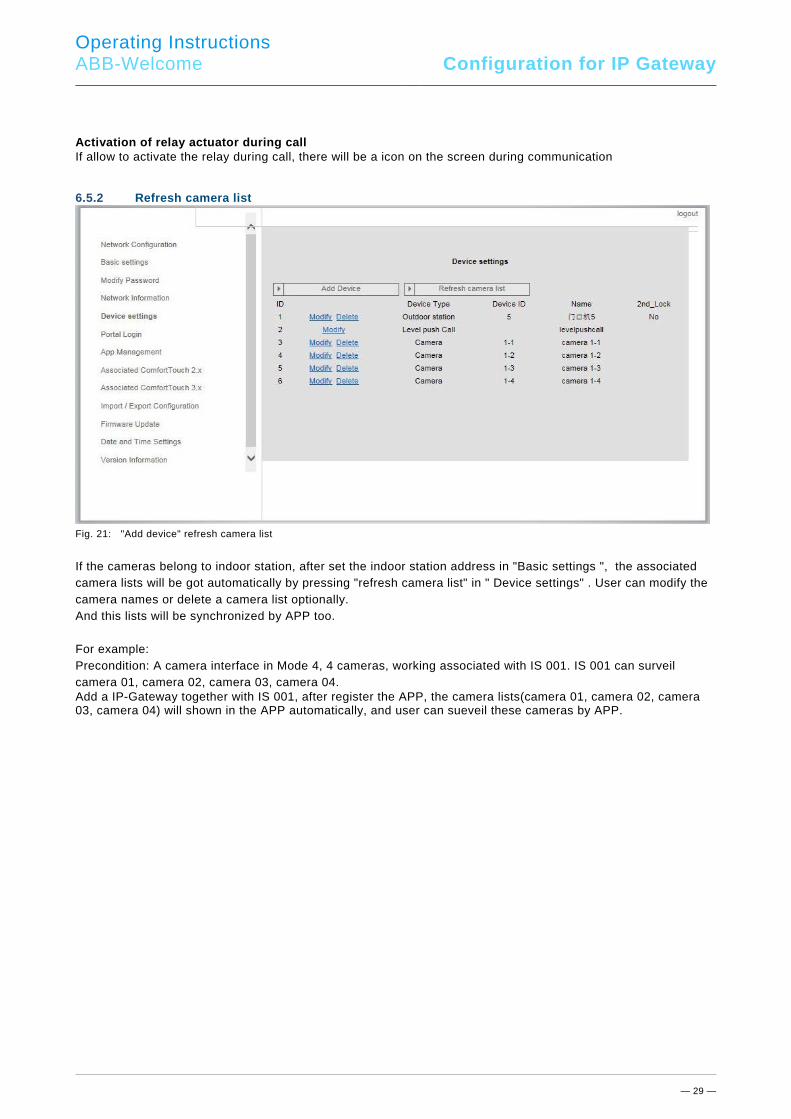
Activation of relay actuator during call If allow to activate the relay during call, there will be a icon on the screen during communication 6.5.2 Refresh camera list
Fig. 21: "Add device" refresh camera list
If the cameras belong to indoor station, after set the indoor station address in "Basic settings ", the associated camera lists will be got automatically by pressing "refresh camera list" in " Device settings" . User can modify the camera names or delete a camera list optionally. And this lists will be synchronized by APP too. For example: Precondition: A camera interface in Mode 4, 4 cameras, working associated with IS 001. IS 001 can surveil camera 01, camera 02, camera 03, camera 04. Add a IP-Gateway together with IS 001, after register the APP, the camera lists(camera 01, camera 02, camera 03, camera 04) will shown in the APP automatically, and user can sueveil these cameras by APP.

Operating Instructions
ABB-Welcome Configuration for IP Gateway
— 30 —
6.6 "Portal Login" configuration page Pos: 53 /#Neustruktur#/Online-Dokumentation (+KNX)/Bedienung/Türkommunikation/Busch-Welcome/Menü Geräteeinstellungen - 83341 @ 35\mod_1363612407376_15.docx @ 288774 @ 11111111111111111111111111111111111111111111111111111111111111111111111111111111111111111111111111111111111111111111111111111111111111111111111111111111111111111111111111111111111111111111111111111111111111111111111111111111111111111111111111111111111111111111111111111111111111111111111111111111111111111121111111111111111111111111111111111111111111111111111111111111111111111111111111111111111111111111111111111111111111111111111111111111111111111111111111111111111111111111111111111111111111111111111111111111111111111111111111111111111111111111111111111111111111111111111111111111111111111111111111111111111111111111111111111111111111111111111111111111111111111111111111111111111111111111111111111111111111111111111111111111111111111111111111111111111111111111111111111111111111111111111111111111111111111111111111111111111111111111111111111111111111111111111111111111111111111111111111111111111111111111111111111111111111111111111111111111111111111111111111111111111111111111111111111111112222222 @ 1
Fig. 22: "Portal Login" configuration page
1. Rigister a new username from this website https://my.abb-livingspace.com/en/user/login/
2. Input the username,password and mailbox to receive your active link. 3. Read and accept both of the items. 4. Click the “Register” button. 5. Activate your user account by your mailbox. 6. Login the user name and password on "Portal Login" configuration page. Friendly Name Name for this IP gateway, which will display in the device list of smartphone, e.g. IP gateway.
2
4
3
1

Operating Instructions
ABB-Welcome Configuration for IP Gateway
— 31 —
6.7 "APP Management" configuration page Pos: 53 /#Neustruktur#/Online-Dokumentation (+KNX)/Bedienung/Türkommunikation/Busch-Welcome/Menü Geräteeinstellungen - 83341 @ 35\mod_1363612407376_15.docx @ 288774 @ 11111111111111111111111111111111111111111111111111111111111111111111111111111111111111111111111111111111111111111111111111111111111111111111111111111111111111111111111111111111111111111111111111111111111111111111111111111111111111111111111111111111111111111111111111111111111111111111111111111111111111111121111111111111111111111111111111111111111111111111111111111111111111111111111111111111111111111111111111111111111111111111111111111111111111111111111111111111111111111111111111111111111111111111111111111111111111111111111111111111111111111111111111111111111111111111111111111111111111111111111111111111111111111111111111111111111111111111111111111111111111111111111111111111111111111111111111111111111111111111111111111111111111111111111111111111111111111111111111111111111111111111111111111111111111111111111111111111111111111111111111111111111111111111111111111111111111111111111111111111111111111111111111111111111111111111111111111111111111111111111111111111111111111111111111111111112222222 @ 1
Fig. 23: "APP Management" configuration page

Operating Instructions
ABB-Welcome Configuration for IP Gateway
— 32 —
Pair IP gateway and smart phone:
Smart phone: Open the Welcome APP, input the user name and password
1 2 3
4
Friendly Name of IP gateway
Portal Client UUID
Select the IP gateway to pair
Click the Setting
5
IP gateway: "APP Management" configuration page displays the pairing request, click the “Handle” button.
Android: select “Network settings” iOS: select “Manage IPGW”
Friendly Name of Smart phone
Friendly Name of Smart phone
Integrity code

Operating Instructions
ABB-Welcome Configuration for IP Gateway
— 33 —
Modify Click the "Modify" button to change your settings. The current settings appear and can be modified. Delete Click the "Delete" button to remove a user from the list. Pos: 55 /#Neustruktur#/Online-Dokumentation (+KNX)/Steuermodule - Online-Dokumentation (--> Für alle Dokumente <--)/++++++++++++ Seitenumbruch ++++++++++++ @ 9\mod_1268898668093_0.docx @ 52149 @ 11111111111111211111111111111111111111111111111111111111111111111111111111111111111111111111111111111111111111111111111111111111111111111111111111111222222222211111111111111121121212222212112221222222222222221111222111111211111111111111111111111111111111111111111111111111111111111111111111111111111111111111111111111111111111111111111111111111111111111111111111111111111111111111111111111111111111111111111111111111111111111111111111111111111111111111111111111111111111111111111111111111111111111111111111111111111111111111111111111111111111111111111111111111111111111111111111111111111111111111111111111111111111111111111111111111111111111111111111111111111111111111111111111111111111111111111111111111111111111111111111111111111111111111111111111111111111111111111111111111111111111111111111111111111111111111111111111111111111111111111111111111111111111111111111111111111111111111111111111111111111111111111111111111111111111111111111111111111111111111111111111111111111111111111111111111111111111111111111111111111111111111111111111111111111111111111111111111111111111111111111111111111111111111111111111111111111111111111111111111111111111111111111111111111111111111111111111111111111111111111111111 @ 1
After configure the pemission, click the “save” button
7
Input the “Integrity code” which displayed on smart phone
See Step4: Integrity token 1690 85F3
Paired successfully Finish the App Management
8 9
6
Operating Instructions
ABB-Welcome Configuration for IP Gateway
— 34 —
Pos: 56 /#Neustruktur#/Online-Dokumentation (+KNX)/Überschriften (--> Für alle Dokumente <--)/2. Ebene/M - O/Konfigurationsseite "ComfortPanel 2.x" @ 34\mod_1362552773805_15.docx @ 284825 @ 22222222222222222222222222222222222211111111111111111111111111111111111111111111111111111111111111111111111111111111111111111111111111111111111111111111111111111111111111111111111111111111111111111111111111111111111111111111111111111111111111111111111111111111111111111111111111111111111111111111111111111111111111111111111111111111111111111111111111111111111111111111111111111111111111111111111111111111111111111111111111111111111111111111111111111111111111111111111111111111111111111111111111111111111111111111111111111111111111111111111111111111111111111111111111111111111111111111111111111111111112111111111111111111111111111111111111111111111111111111111111111111111111111111111111111111111111111111111111111111111111111111111111111111111111111112112121222222222222222121122212222222222222211112221111112222222222222222222222222222222222222222222222222222222222222221111111111111111111111111111111111111111111111111111111111111111111111111111111111111111111112111111111112122221 @ 1
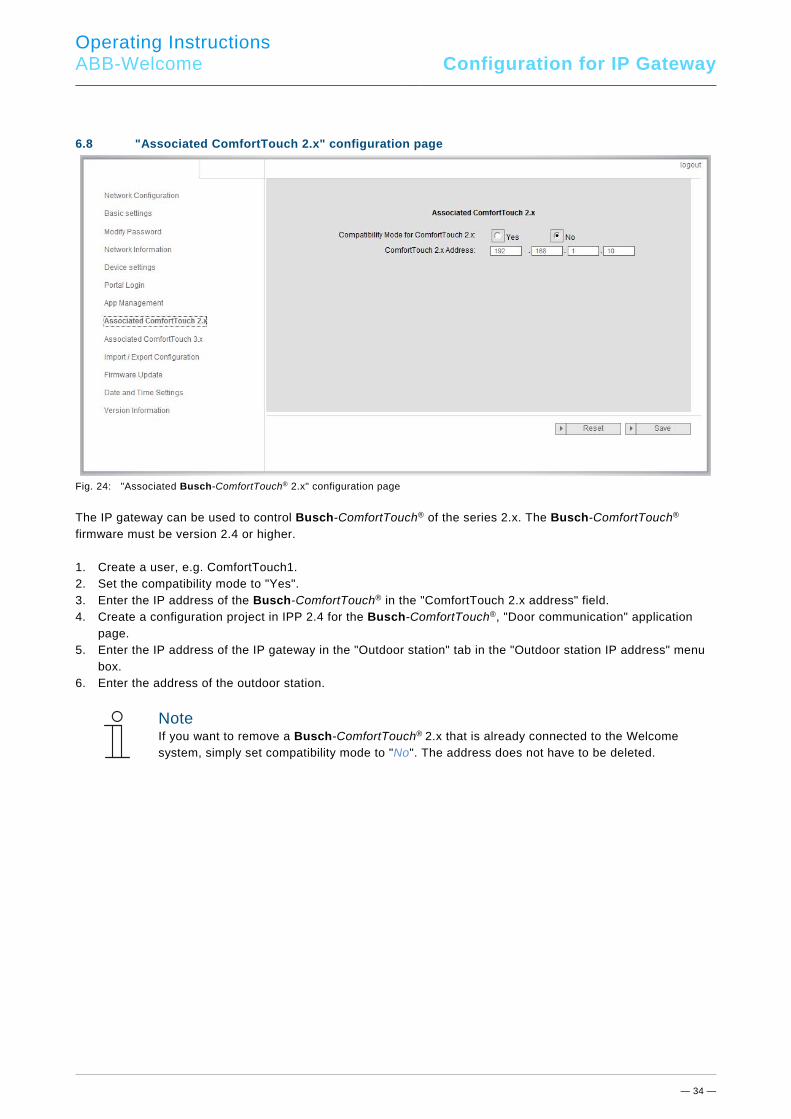
6.8 "Associated ComfortTouch 2.x" configuration page Pos: 57 /#Neustruktur#/Online-Dokumentation (+KNX)/Bedienung/Türkommunikation/Busch-Welcome/Menü ComfortPanel 2.x - 83341 @ 35\mod_1363612425144_15.docx @ 288790 @ 11111211212221222222222222222222222222222222222222222111111111111111111111111111111111111111111111111111111111111111111111111111111111111111111111111111111111111111111111111111111111111111111111111111111121211112111111111112221111111111111111111111111111111111111111111111111111111111111111111111111111111111111111111111111111111111111111111111111111111111111111111111111111111111111111111111111111111111111111111111111111111111111111111111111111111111111111111111111111111111111111111111111111111111111111111111111111111111111111111111111111111111111111111111111111111111111111111111111111111111111111111111111111111111111111111111111111111111111111111111111111111111111111111111111111111111111111111111111111111111111111111111111111111111111111111111111111111111111111111111111111111111 @ 1
Fig. 24: "Associated Busch-ComfortTouch® 2.x" configuration page
The IP gateway can be used to control Busch-ComfortTouch® of the series 2.x. The Busch-ComfortTouch® firmware must be version 2.4 or higher. 1. Create a user, e.g. ComfortTouch1. 2. Set the compatibility mode to "Yes". 3. Enter the IP address of the Busch-ComfortTouch® in the "ComfortTouch 2.x address" field. 4. Create a configuration project in IPP 2.4 for the Busch-ComfortTouch®, "Door communication" application
page. 5. Enter the IP address of the IP gateway in the "Outdoor station" tab in the "Outdoor station IP address" menu
box. 6. Enter the address of the outdoor station.
Note If you want to remove a Busch-ComfortTouch® 2.x that is already connected to the Welcome system, simply set compatibility mode to "No". The address does not have to be deleted.
Operating Instructions
ABB-Welcome Configuration for IP Gateway
— 35 —
6.9 "Associated ComfortTouch 3.x" configuration page Pos: 46 /#Neustruktur#/Online-Dokumentation (+KNX)/Bedienung/Türkommunikation/Busch-Welcome/Menü Benutzerverwaltung - 83341 @ 36\mod_1370935278536_15.docx @ 296792 @ 2222222222222222222222221111111111111111111111111111111111111111111111111111111111111111111111111111111111111111111111111111111111111111111111111111111111111111111111111111222222222222222222222222222222221111111112211112221111111111111311111111111111111111111111111111111111111221111111111111111111111111111322222221124232223322222222222222 @ 1
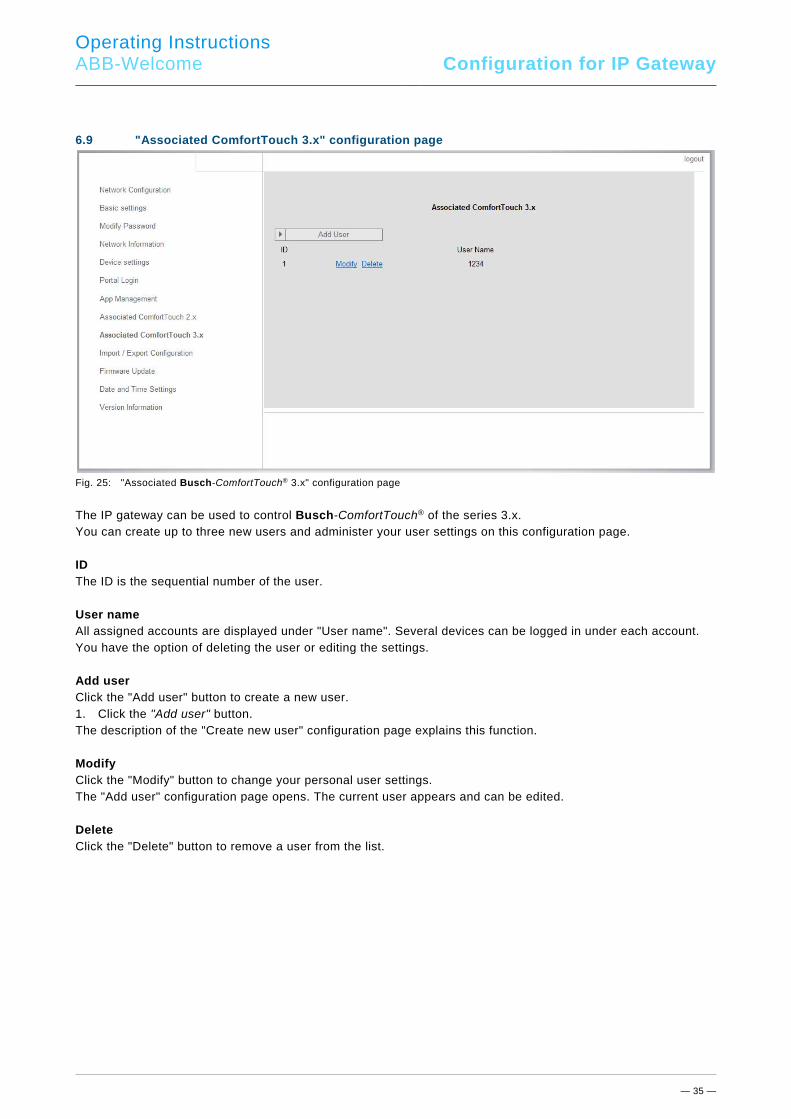
Fig. 25: "Associated Busch-ComfortTouch® 3.x" configuration page
The IP gateway can be used to control Busch-ComfortTouch® of the series 3.x. You can create up to three new users and administer your user settings on this configuration page. ID The ID is the sequential number of the user. User name All assigned accounts are displayed under "User name". Several devices can be logged in under each account. You have the option of deleting the user or editing the settings. Add user Click the "Add user" button to create a new user. 1. Click the "Add user" button. The description of the "Create new user" configuration page explains this function. Modify Click the "Modify" button to change your personal user settings. The "Add user" configuration page opens. The current user appears and can be edited. Delete Click the "Delete" button to remove a user from the list.

Operating Instructions
ABB-Welcome Configuration for IP Gateway
— 36 —
6.9.1 "Add user" configuration page
Fig. 26: "Add user" configuration page
The "Add user" configuration page opens. User name Enter the name of the new user in the "User name" input field. A total of 3 different users with different roles can be created. Password Enter the required password of the new user in the "Password" input field. Confirm Enter the required password of the new user again in the "Confirm" input field.
Note When specifying the user name, use characters without umlauts and numbers only, e.g. ComfortTouch. Spaces and special characters are not allowed.
Permission You can assign the following permissions to the user: Surveillance The user can use ComfortTouch to establish a video connection to the outdoor station without there being a door call. Unlock Specify if the door can be opened by ComfortTouch or not. Save new user 1. Click the "Save" button. The new user is saved. Pos: 47 /#Neustruktur#/Online-Dokumentation (+KNX)/Steuermodule - Online-Dokumentation (--> Für alle Dokumente <--)/++++++++++++ Seitenumbruch ++++++++++++ @ 9\mod_1268898668093_0.docx @ 52149 @ 212111122221111111111111111111111111111111111111111111111111111111111111111111111111111111111111111111111111111111111111111111112222222222222222222222222222222222222222222222222222222222222222222222222222222222222222222222222222222222222222222222222222222222222222222222222222222222222222222222222222222222222222222222222222222222222222222222222222222222222222222222222222222222222222222222222222222222222222222222222222222222222222222222222222222222222222222222222222222222222222222222222222222222222222222222222222222222222222222222222222222222222222222222222222222222222222222222211112211111111122222232223322222222222222 @ 1

Operating Instructions
ABB-Welcome Configuration for IP Gateway
— 37 —
Pos: 48 /#Neustruktur#/Online-Dokumentation (+KNX)/Bedienung/Türkommunikation/Busch-Welcome/Menü Benutzerverwaltung - Neuen Benutzer anlegen - 83341 @ 35\mod_1363612371770_15.docx @ 288742 @ 22131111111111111111111111111111111111111111111111111111111111111111111111111111111111111111111111111111111111111111211112112222122222222222222222221111111111111111111111111111111111111111111111111111111111111111111111111111111111111111111111111111111111111111111111111111111111111111111111111111111111111111111111111111111111111111111111111111111111111111111111111111111111111111111111111111111111111111111111111111111111111111111111111111111111111111114232223322222222222222 @ 1 Pos: 59 /#Neustruktur#/Online-Dokumentation (+KNX)/Überschriften (--> Für alle Dokumente <--)/2. Ebene/M - O/Konfigurationsseite "Upload/Download der Konfigurationsdatei" @ 34\mod_1362552895392_15.docx @ 284857 @ 22211211212122222222222222221111211111111111222121222222222222222222222222222222222222222222222222222222222222222222222222222222222222222222222222222222222222222222222222222222222222222222222222222222222222222222222222222222222222222222222222222222222222222222222222222222222222222222222222222222222222222222222222222222222222222222222 @ 1
6.10 "Import / Export configuration file" configuration page Pos: 60 /#Neustruktur#/Online-Dokumentation (+KNX)/Bedienung/Türkommunikation/Busch-Welcome/Menü Upload/Download der Konfigurationsdatei - 83341 @ 35\mod_1363612438046_15.docx @ 288806 @ 2222222222222121122212121222222222222222211112111111111112221212111111111111111111111111111111111111111111111111111111111111111111111111111111111111111111111111111111111111111111111111111111111111111111111111111111111111111111111111111111111111111111111111111111111111111111111111111111111111222222222222222222222222222222222222222222222222222222222222222222222222222222212232223322222222222222 @ 1
Fig. 27: "Import / Export configuration file" configuration page
Note The option to create and replace an IP gateway configuration file is for service purposes For details, please contact your electrical installer. .
Pos: 61 /#Neustruktur#/Online-Dokumentation (+KNX)/Steuermodule - Online-Dokumentation (--> Für alle Dokumente <--)/++++++++++++ Seitenumbruch ++++++++++++ @ 9\mod_1268898668093_0.docx @ 52149 @ 2222121211122222222222222222222222222222222222222222222222222222222222222222222222222222222222222222222222222222222222222222222222222222222222222222222222222222222222222222222222222222222222222222222222222222222222222222222222222222222222222222222222222222222222222222222222222222222222222222222222222222222222222222222222222222222222222222222222222222222222222222232223322222222222222 @ 1
Operating Instructions
ABB-Welcome Configuration for IP Gateway
— 38 —
Pos: 62 /#Neustruktur#/Online-Dokumentation (+KNX)/Überschriften (--> Für alle Dokumente <--)/2. Ebene/M - O/Konfigurationsseite "Firmware Update" @ 35\mod_1362553067374_15.docx @ 284908 @ 21211222121212221121122222222222222221111111111111111111111111111111111111111111111111111111111111111111111111111111111111111111111111111111111111111111111111111122222222222222222222222222222222222222222222222222222222222222222222222222222222222222222222222222222222222222222232223322222222222222 @ 1
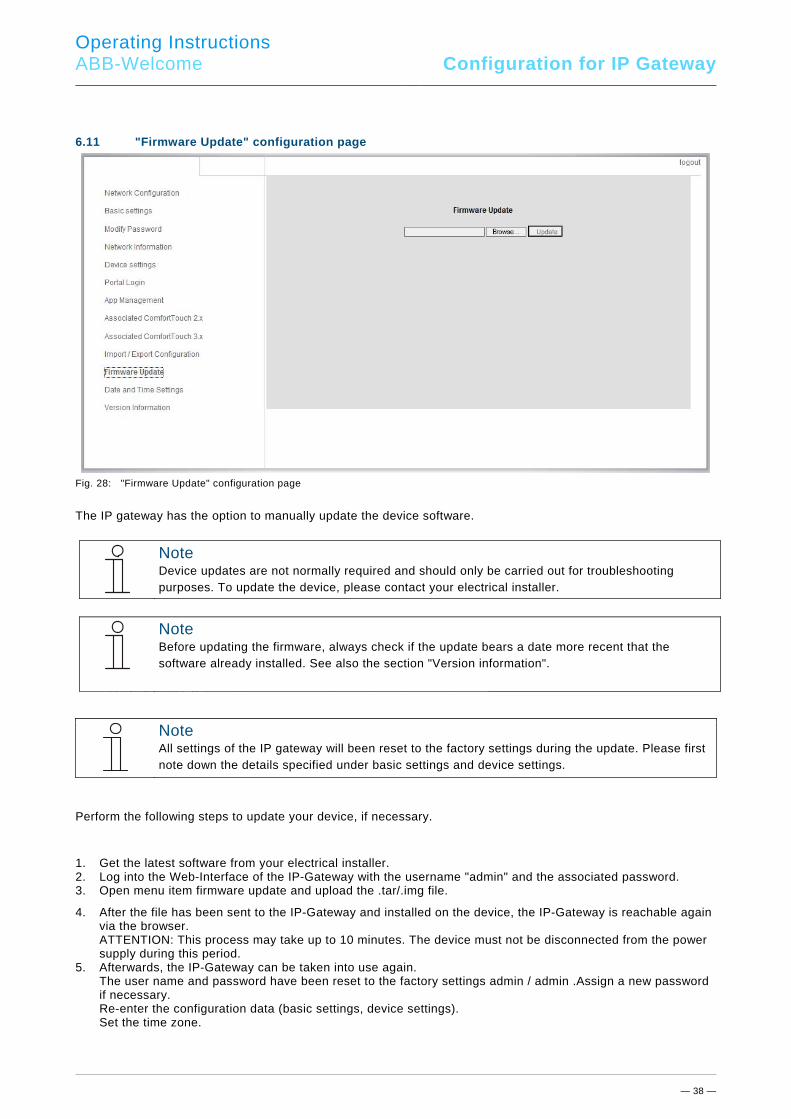
6.11 "Firmware Update" configuration page Pos: 63 /#Neustruktur#/Online-Dokumentation (+KNX)/Projektierung/Türkommunikation/Busch-Welcome II/Menü Firmware Update - 83341 @ 36\mod_1370935346604_15.docx @ 296824 @ 2111111111112222222222222222222222222222111111111112121122212121222112112222222222222222111111111111111111111111111111111111111111111111111111111111111111111111111111111111111111111111111111111111111111111111111112222222222222222222222222222222222222222222222222222222222222222222222222222222222222222222222222222222222222222211111111111112232223322222222222222 @ 1
Fig. 28: "Firmware Update" configuration page
The IP gateway has the option to manually update the device software.
Note Device updates are not normally required and should only be carried out for troubleshooting purposes. To update the device, please contact your electrical installer.
Note Before updating the firmware, always check if the update bears a date more recent that the software already installed. See also the section "Version information".
Pos: 64 /#Neustruktur#/Online-Dokumentation (+KNX)/Steuermodule - Online-Dokumentation (--> Für alle Dokumente <--)/++++++++++++ Seitenumbruch ++++++++++++ @ 9\mod_1268898668093_0.docx @ 52149 @ 22212121222222222222222222222222222222222222222222222222222222222222222222222222222222222222222222222222222222222222222222222222222222222222222222222222222222222222222222222222222222222222222222222222222222222222222222222222222222222222222222222222222222222222222222222222222222222222222222222222222222222222222222222222222222222222222222222222222222222222222222222222222222222222 @ 1
Note All settings of the IP gateway will been reset to the factory settings during the update. Please first note down the details specified under basic settings and device settings.
Pos: 63 /#Neustruktur#/Online-Dokumentation (+KNX)/Projektierung/Türkommunikation/Busch-Welcome II/Menü Firmware Update - 83341 @ 36\mod_1370935346604_15.docx @ 296824 @ 2111111111112222222222222222222222222222111111111112121122212121222112112222222222222222111111111111111111111111111111111111111111111111111111111111111111111111111111111111111111111111111111111111111111111111111112222222222222222222222222222222222222222222222222222222222222222222222222222222222222222222222222222222222222222211111111111112232223322222222222222 @ 1
Perform the following steps to update your device, if necessary.
1. Get the latest software from your electrical installer. 2. Log into the Web-Interface of the IP-Gateway with the username "admin" and the associated password. 3. Open menu item firmware update and upload the .tar/.img file.
4. After the file has been sent to the IP-Gateway and installed on the device, the IP-Gateway is reachable again via the browser. ATTENTION: This process may take up to 10 minutes. The device must not be disconnected from the power supply during this period.
5. Afterwards, the IP-Gateway can be taken into use again. The user name and password have been reset to the factory settings admin / admin .Assign a new password if necessary. Re-enter the configuration data (basic settings, device settings). Set the time zone.
Operating Instructions
ABB-Welcome Configuration for IP Gateway
— 39 —
Note In case of a fixed IP address there is the possibility that the device has obtained a new address via DHCP after the software update. For a new assignment of the IP address, please observe the details in chapter 5 of the IP gateway manual.
6.12 "NTP settings" configuration page Pos: 66 /#Neustruktur#/Online-Dokumentation (+KNX)/Bedienung/Türkommunikation/Busch-Welcome/Menü NTP Einstellungen - 83341 @ 36\mod_1363612489392_15.docx @ 288838 @ 221221111111111111111111111222222222222222222222222222222222222222222222222222222222222222222222222222222222222222222222222222222222222222222222222222222222222222222222222222222222222222222222222222222222222222222222222222222222222222222222222222222222222222222222222222222222222222222222222222222222221222222222111121111111111111111111111111112232223322222222222222 @ 1
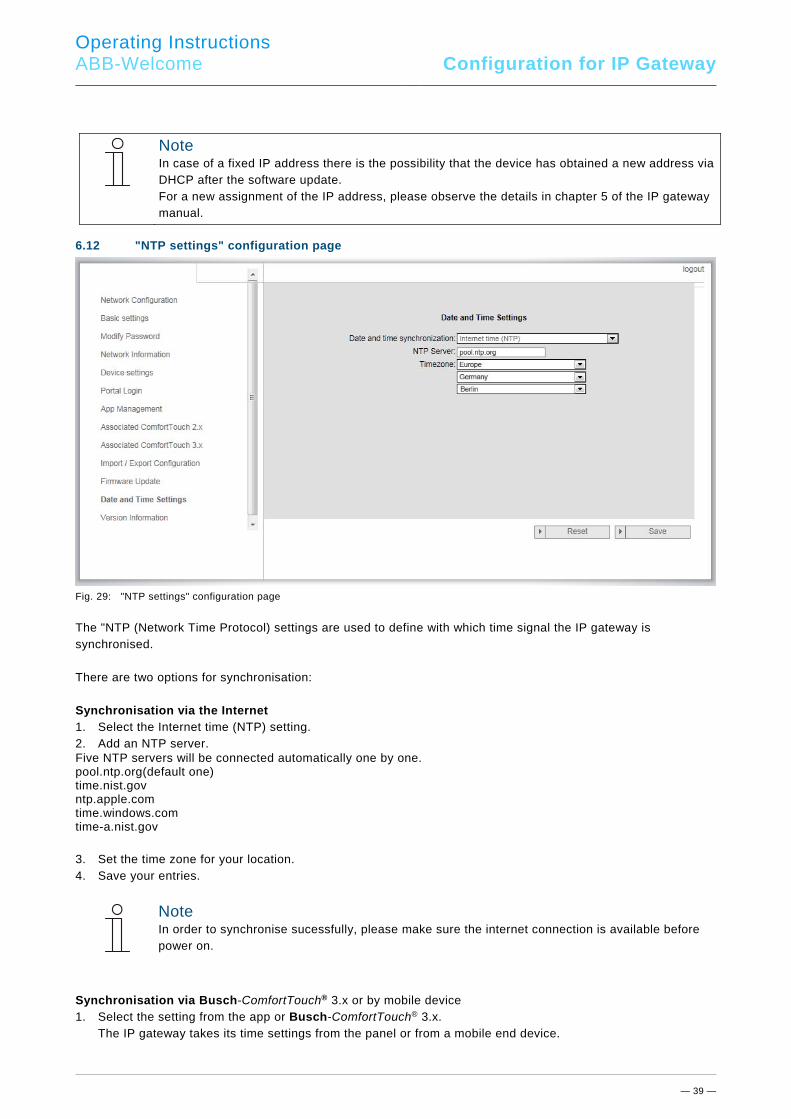
Fig. 29: "NTP settings" configuration page
The "NTP (Network Time Protocol) settings are used to define with which time signal the IP gateway is synchronised. There are two options for synchronisation: Synchronisation via the Internet 1. Select the Internet time (NTP) setting. 2. Add an NTP server. Five NTP servers will be connected automatically one by one. pool.ntp.org(default one) time.nist.gov ntp.apple.com time.windows.com time-a.nist.gov 3. Set the time zone for your location. 4. Save your entries.
Note In order to synchronise sucessfully, please make sure the internet connection is available before power on.
Synchronisation via Busch-ComfortTouch® 3.x or by mobile device 1. Select the setting from the app or Busch-ComfortTouch® 3.x. The IP gateway takes its time settings from the panel or from a mobile end device. Pos: 67 /#Neustruktur#/Online-Dokumentation (+KNX)/Steuermodule - Online-Dokumentation (--> Für alle Dokumente <--)/++++++++++++ Seitenumbruch ++++++++++++ @ 9\mod_1268898668093_0.docx @ 52149 @ 11111111111222222222222222222222222222222222222222222222222222222222222222222222222222222222222222222222222222222222222222222222222222222222222222222222222222222222222222222222222222222222222222222222222222222222222222222222222222222222222222222222222222222222222222222222222222222222222222222222222222222222222222 @ 1
Operating Instructions
ABB-Welcome Configuration for IP Gateway
— 40 —
Pos: 68 /#Neustruktur#/Online-Dokumentation (+KNX)/Überschriften (--> Für alle Dokumente <--)/2. Ebene/M - O/Konfiurationsseite "Neues Zertifikat ertsellen" @ 35\mod_1362553221181_15.docx @ 284956 @ 22222222222222222222222222222222222222222222222222222222222222222222222222222222222222222222222222222222222222222222222222222222222222222222222222222222222222222222222222222222222222222222222222222222222222222222222222222222222222222222222222221111212232223322222222222222 @ 1 Pos: 71 /#Neustruktur#/Online-Dokumentation (+KNX)/Überschriften (--> Für alle Dokumente <--)/2. Ebene/M - O/Menü Versions Information @ 35\mod_1362553337526_15.docx @ 284988 @ 111111111111111111111111111111111111111111111111111111111111111111111111111111111111111111111111111111111111111111111111111111111111111111111111111111111111111111111111111111111111111111111111111111111111111111111111111111111111111 @ 1
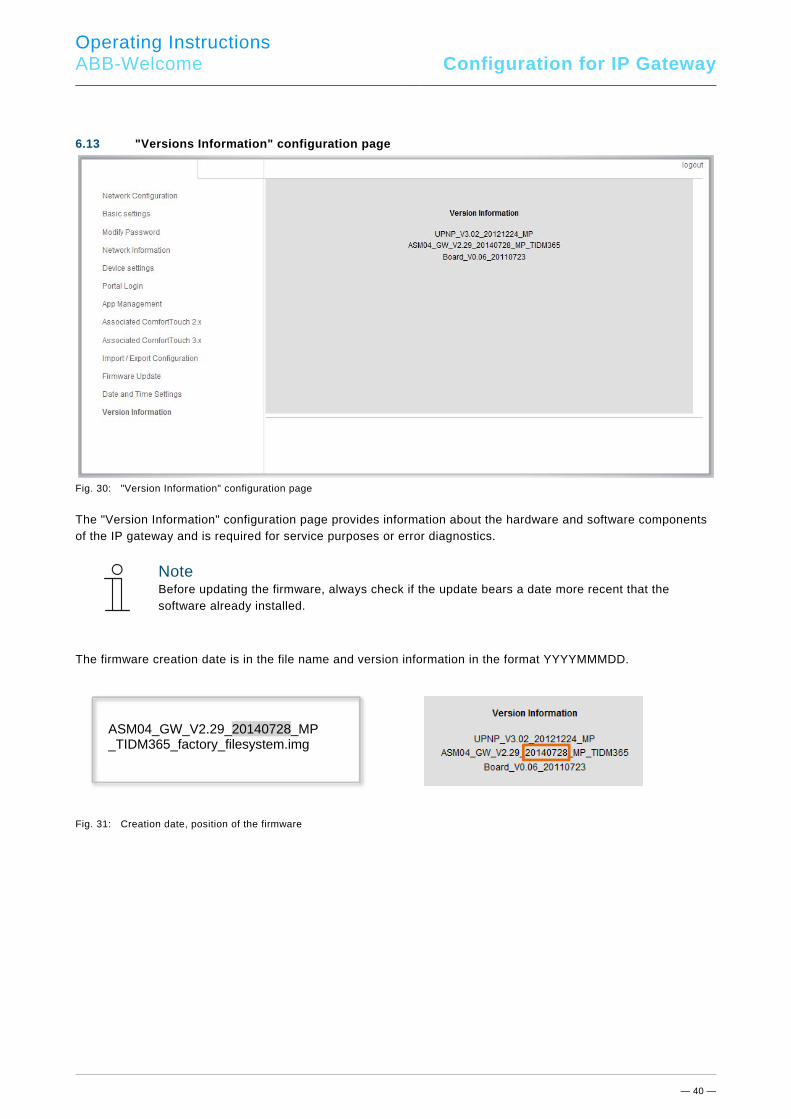
6.13 "Versions Information" configuration page Pos: 72 /#Neustruktur#/Online-Dokumentation (+KNX)/Bedienung/Türkommunikation/Busch-Welcome/Menü Versions Information - 83341 @ 36\mod_1363612527526_15.docx @ 288870 @ 1111111111111111111111111111111111111111111111111111111111111111111111111111111111111111111111111111111111111111111111111111112222222222222222222222222222222222222222222222222222222222222222222222222222222222222222222222222222222222222222222222222222222222222222222222222222222111111111111111111111111111111111112221 @ 1
Fig. 30: "Version Information" configuration page
The "Version Information" configuration page provides information about the hardware and software components of the IP gateway and is required for service purposes or error diagnostics.
Note Before updating the firmware, always check if the update bears a date more recent that the software already installed.
The firmware creation date is in the file name and version information in the format YYYYMMMDD.
Fig. 31: Creation date, position of the firmware
ASM04_GW_V2.29_20140728_MP_TIDM365_factory_filesystem.img
Operating Instructions
ABB-Welcome Configuration for TelephoneGateway
— 41 —
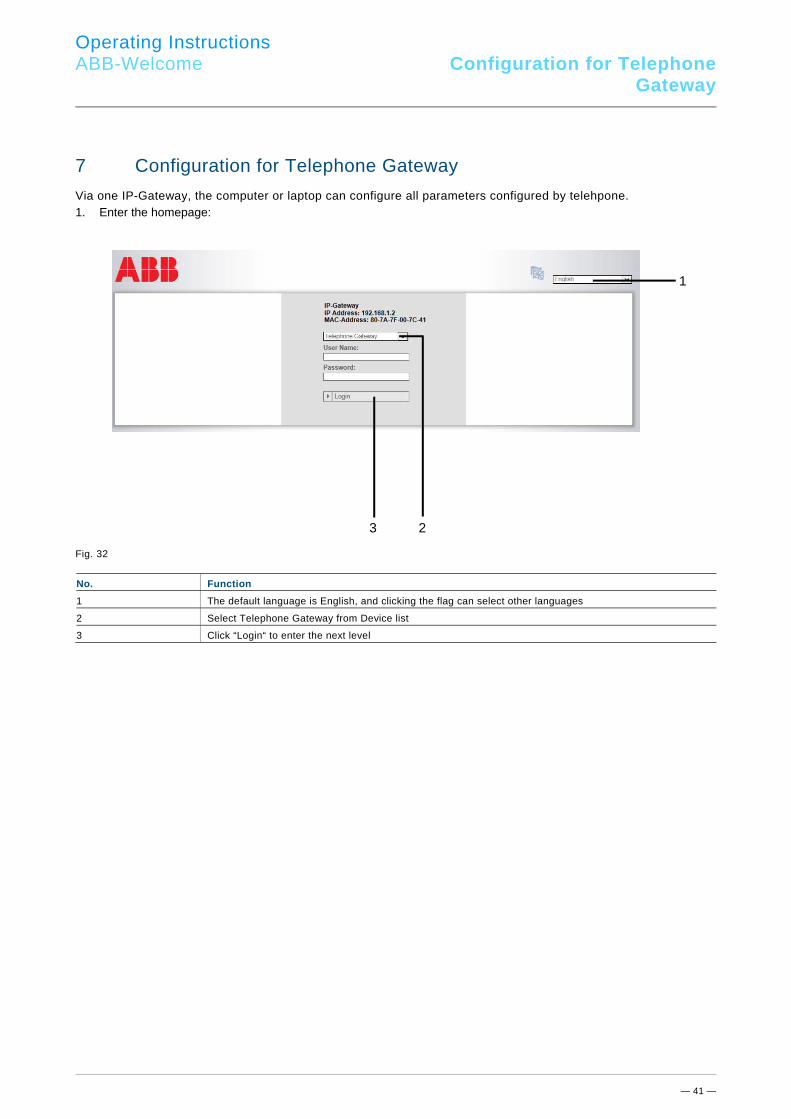
7 Configuration for Telephone Gateway
Via one IP-Gateway, the computer or laptop can configure all parameters configured by telehpone. 1. Enter the homepage:
Fig. 32 No. Function
1 The default language is English, and clicking the flag can select other languages
2 Select Telephone Gateway from Device list
3 Click “Login“ to enter the next level
1
23
Operating Instructions
ABB-Welcome Configuration for TelephoneGateway
— 42 —
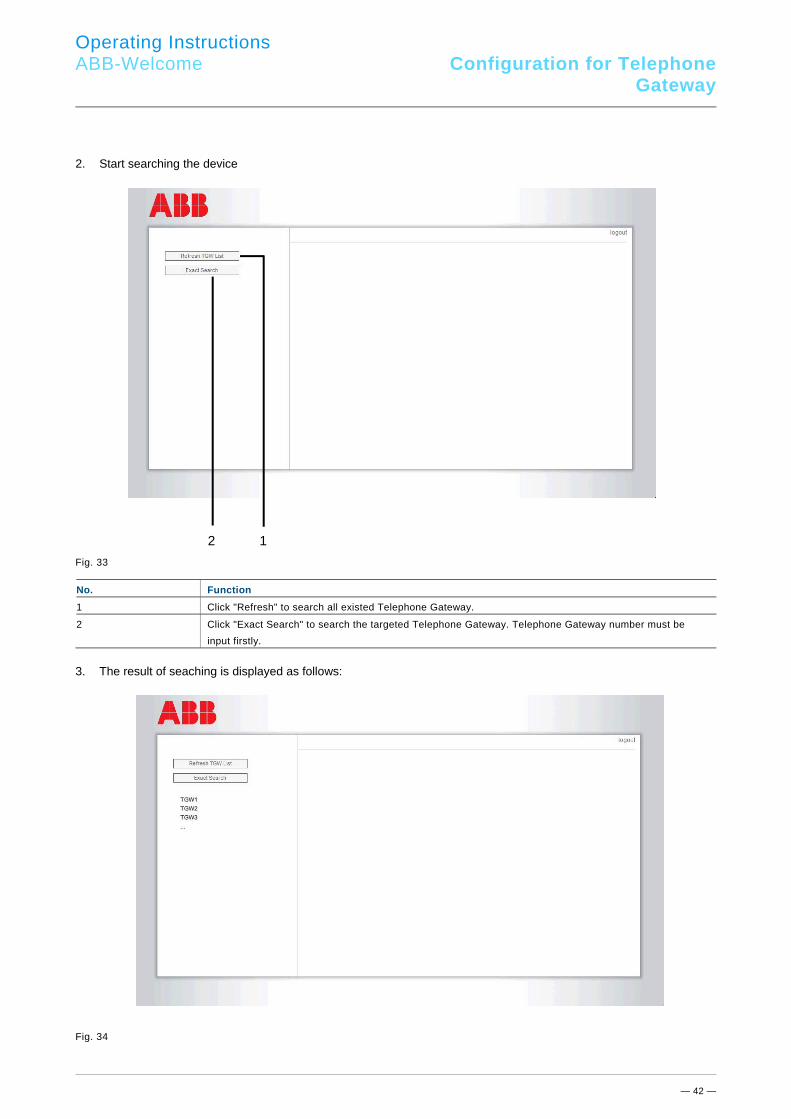
2. Start searching the device
Fig. 33
No. Function
1 Click "Refresh" to search all existed Telephone Gateway.
2 Click "Exact Search" to search the targeted Telephone Gateway. Telephone Gateway number must be
input firstly.
3. The result of seaching is displayed as follows:
Fig. 34
1 2
Operating Instructions
ABB-Welcome Configuration for TelephoneGateway
— 43 —
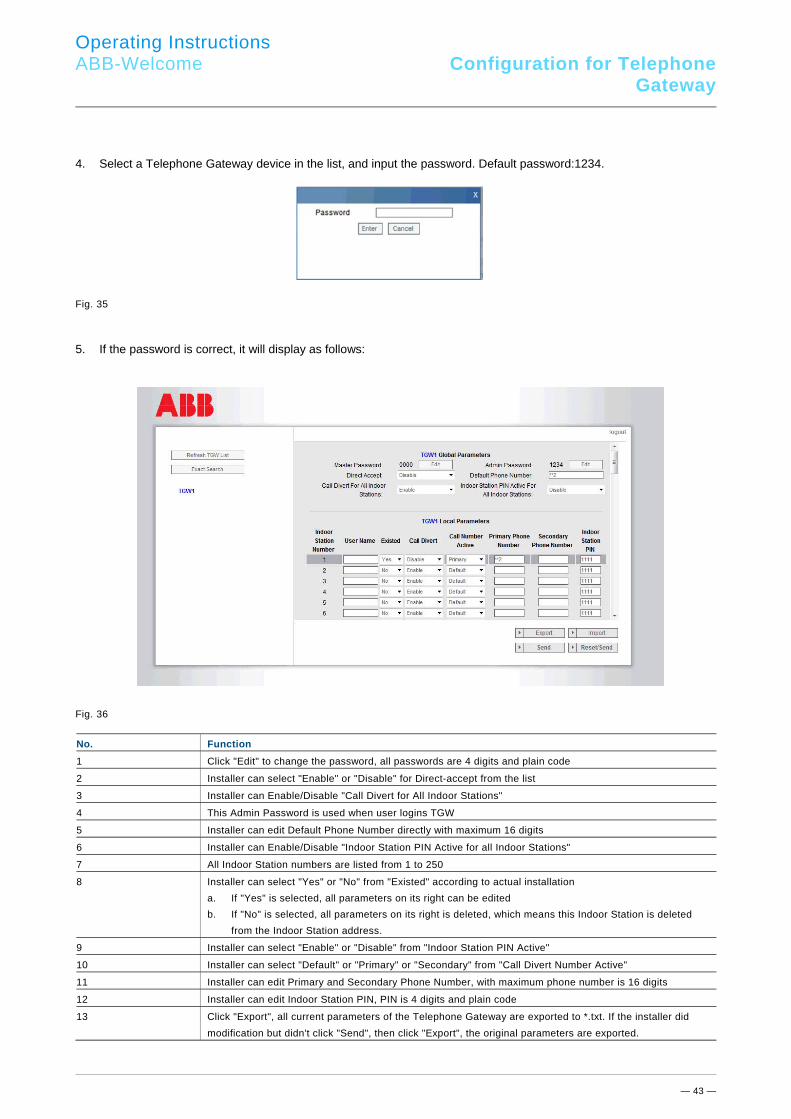
4. Select a Telephone Gateway device in the list, and input the password. Default password:1234.
Fig. 35 5. If the password is correct, it will display as follows:
Fig. 36 No. Function
1 Click "Edit" to change the password, all passwords are 4 digits and plain code
2 Installer can select "Enable" or "Disable" for Direct-accept from the list
3 Installer can Enable/Disable "Call Divert for All Indoor Stations"
4 This Admin Password is used when user logins TGW
5 Installer can edit Default Phone Number directly with maximum 16 digits
6 Installer can Enable/Disable "Indoor Station PIN Active for all Indoor Stations"
7 All Indoor Station numbers are listed from 1 to 250
8 Installer can select "Yes" or "No" from "Existed" according to actual installation
a. If "Yes" is selected, all parameters on its right can be edited
b. If "No" is selected, all parameters on its right is deleted, which means this Indoor Station is deleted
from the Indoor Station address.
9 Installer can select "Enable" or "Disable" from "Indoor Station PIN Active"
10 Installer can select "Default" or "Primary" or "Secondary" from "Call Divert Number Active"
11 Installer can edit Primary and Secondary Phone Number, with maximum phone number is 16 digits
12 Installer can edit Indoor Station PIN, PIN is 4 digits and plain code
13 Click "Export", all current parameters of the Telephone Gateway are exported to *.txt. If the installer did
modification but didn't click "Send", then click "Export", the original parameters are exported.
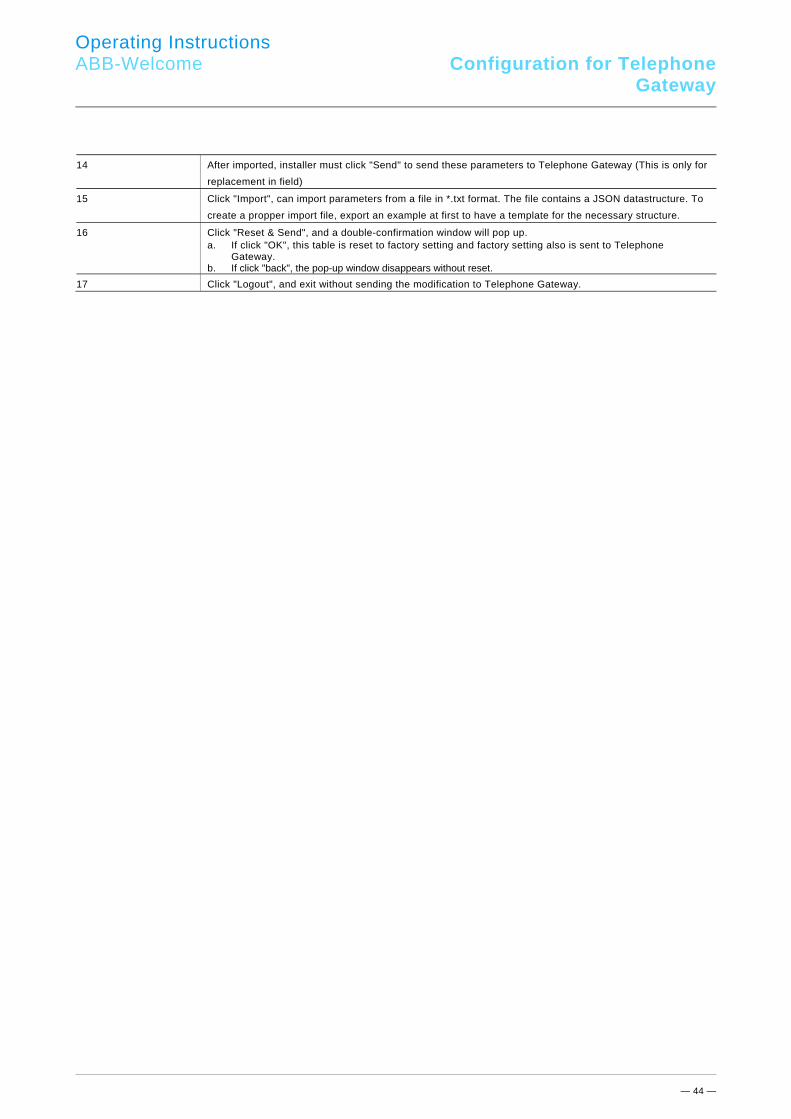
Operating Instructions
ABB-Welcome Configuration for TelephoneGateway
— 44 —
14 After imported, installer must click "Send" to send these parameters to Telephone Gateway (This is only for
replacement in field)
15 Click "Import", can import parameters from a file in *.txt format. The file contains a JSON datastructure. To
create a propper import file, export an example at first to have a template for the necessary structure.
16 Click "Reset & Send", and a double-confirmation window will pop up. a. If click "OK", this table is reset to factory setting and factory setting also is sent to Telephone
Gateway. b. If click "back", the pop-up window disappears without reset.
17 Click "Logout", and exit without sending the modification to Telephone Gateway.
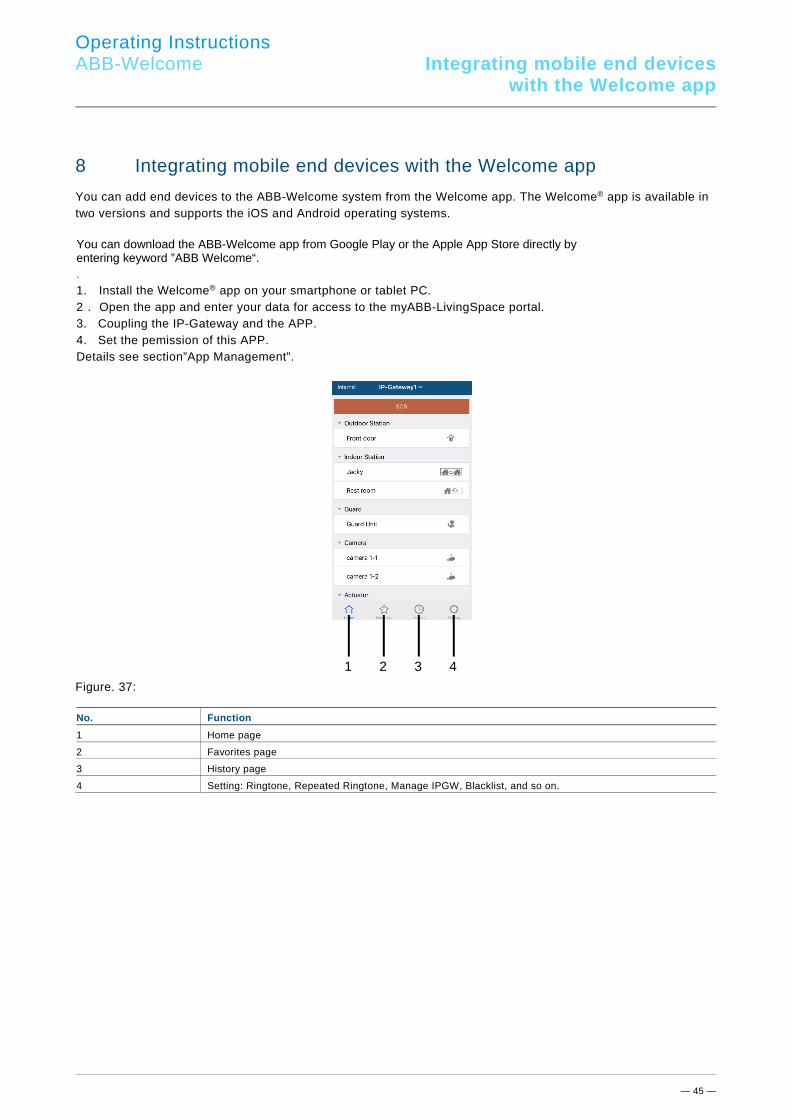
Operating Instructions
ABB-Welcome Integrating mobile end deviceswith the Welcome app
— 45 —
8 Integrating mobile end devices with the Welcome app
You can add end devices to the ABB-Welcome system from the Welcome app. The Welcome® app is available in two versions and supports the iOS and Android operating systems. You can download the ABB-Welcome app from Google Play or the Apple App Store directly by entering keyword ”ABB Welcome“. . 1. Install the Welcome® app on your smartphone or tablet PC. 2. Open the app and enter your data for access to the myABB-LivingSpace portal. 3. Coupling the IP-Gateway and the APP. 4. Set the pemission of this APP. Details see section”App Management”.
Figure. 37: No. Function
1 Home page
2 Favorites page
3 History page
4 Setting: Ringtone, Repeated Ringtone, Manage IPGW, Blacklist, and so on.
Pos: 76 /#Neustruktur#/Online-Dokumentation (+KNX)/Überschriften (--> Für alle Dokumente <--)/2. Ebene/A - F/Android ab Version 4.0 @ 35\mod_1362553819736_15.docx @ 285085 @ 22222222222222222222222222222221222222222222222222222222222222222222222222222222222222222222222122222222222222222222222222222222222222222222222222222222222222222222222222222222222222222222222222222222222222222222222222222222222222222222222222222222222222222222222222222222222222222222222222222222222222222222222222222222222222222222222222222222222222222111111111111111111111111111111111111111222222222222222222222222222222222222222222222222222222222222222222222222222222222222222222222222222222222222222222222222222222222222222222222222222222222222232223322222222222222 @ 1
1 2 3 4

Operating Instructions
ABB-Welcome Integrating mobile end deviceswith the Welcome app
— 46 —
8.1 Home page Pos: 77 /#Neustruktur#/Online-Dokumentation (+KNX)/Bedienung/Türkommunikation/Busch-Welcome/Android ab Version 4.0 - 83341 @ 36\mod_1363612557212_15.docx @ 288902 @ 122222222222222222222222222222222222222222222222222222222222222222222222222222 @ 1
Figure. 38:
After pairing the mobile APP with IP-Gateway, the APP will synchronize the lists from IP-Gateway automatically. All the devices should
be set in IP-Gateway PC website in advance.
No. Function
1 Friendly name of IP-Gateway. If more than one IP-Gateway paired with the APP, you could click drop-down
box to choose the desired IP-Gateway to control.
2 Network status: Internal/External/Not connect.
3 SOS: Press this icon to send an alarm message to guard unit. This function is available only if guard unit is
added in “device list” of IP-Gateway.
4 There are 5 kinds of control devices, press each icon to control the device directly.
- Outdoor station
- Indoor station
Home to home (H2H)
Room to room (R2R)
- Camera
- Actuator
- Guard
1 2
3 4
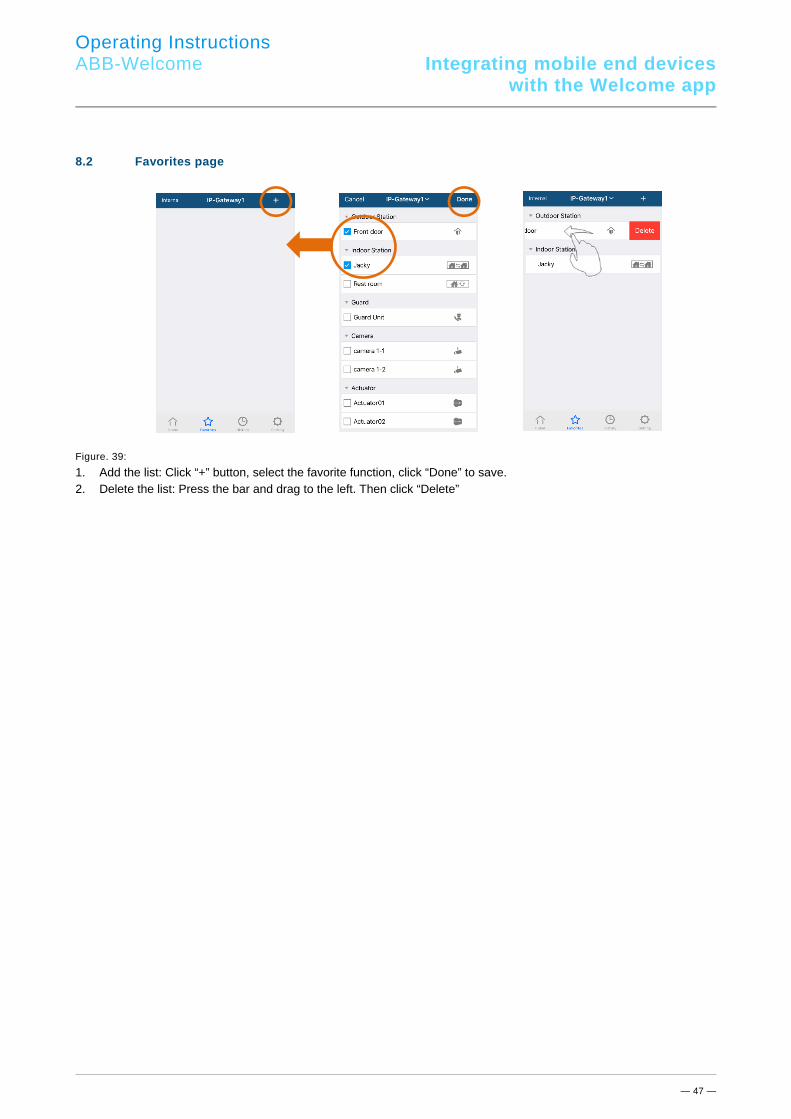
Operating Instructions
ABB-Welcome Integrating mobile end deviceswith the Welcome app
— 47 —
8.2 Favorites page Pos: 77 /#Neustruktur#/Online-Dokumentation (+KNX)/Bedienung/Türkommunikation/Busch-Welcome/Android ab Version 4.0 - 83341 @ 36\mod_1363612557212_15.docx @ 288902 @ 122222222222222222222222222222222222222222222222222222222222222222222222222222 @ 1
Figure. 39:
1. Add the list: Click “+” button, select the favorite function, click “Done” to save. 2. Delete the list: Press the bar and drag to the left. Then click “Delete”

Operating Instructions
ABB-Welcome Integrating mobile end deviceswith the Welcome app
— 48 —
8.3 History page
Figure. 40: 1. View the history:
Click the snapshot to show the details. - Incoming call - Outgoing call - Missing call
2. Delete the history: Hold the bar and slide to the left. Then click “Delete”. 3. Add to blacklist: Select one record(Only the intercom call record can be set as blacklist), Click “blacklist” icon,
then click “OK”.

Operating Instructions
ABB-Welcome Integrating mobile end deviceswith the Welcome app
— 49 —
8.4 Setting
Figure. 41: No. Function
1 Choose Ringtone type (outdoor/apartment/others). For Android mobile, there are more ringtones (from
mobile itself) to choose.
2 Repeated Ringtone. If this function is activated, the ringtone will ring 30 s during the calling.
3 Mange IPGW. This function is to pair mobile APP with IP-Gateway. See chapter 4.3.4 Step 4: Coupling
the IP gateway and "Welcome " app
4 Click “Blacklist”.Hold the bar and slide to the left. Then click “Delete”.
5 Click “About”, to show application information about mobile APP.
6 Click “Reset Application”to reset all configuration information of mobile APP. After resetting, you need to
login and pair again.
2
1
3
4
5
6
IOS Android

Operating Instructions
ABB-Welcome Integrating mobile end deviceswith the Welcome app
— 50 —
8.5 Call from outdoor station
Figure. 42: No. Function
1 Press this icon to accept the call.
2 Press this icon to release a lock. The 2nd-lock function need to be set by IP gateway. See chapter 6.5.1
Add device.
3 Press this icon to control designated switch actuator. The function needs to be activated through IP-
Gateway setting firstly. See chapter 6.5.1 Add device.
4 Press this icon to reject the call.
5 Double click on the image or spread two fingers to view full screen.
6 Press “>” or “<“ to survey different cameras if have.
7 Press this icon to take a snap shot manually.
8 The rest time of the conversation.
1 2 3 4
5
6
7
8
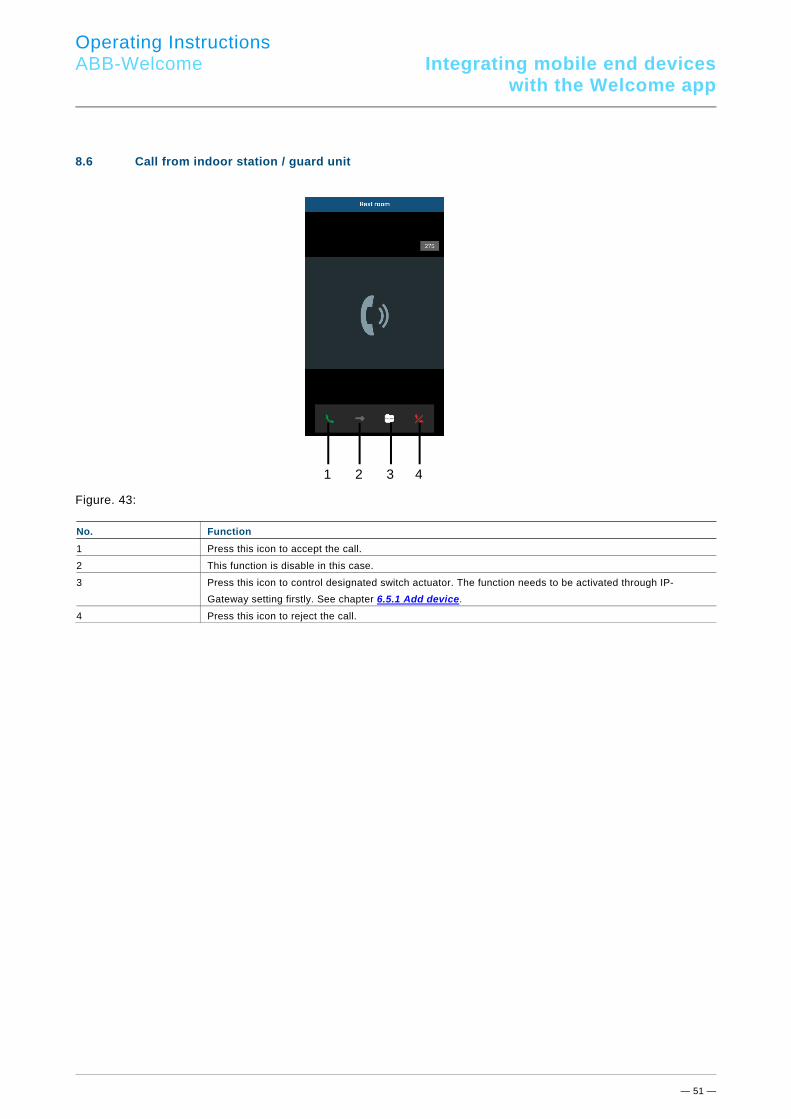
Operating Instructions
ABB-Welcome Integrating mobile end deviceswith the Welcome app
— 51 —
8.6 Call from indoor station / guard unit
Figure. 43: No. Function
1 Press this icon to accept the call.
2 This function is disable in this case.
3 Press this icon to control designated switch actuator. The function needs to be activated through IP-
Gateway setting firstly. See chapter 6.5.1 Add device.
4 Press this icon to reject the call.
1 2 3 4
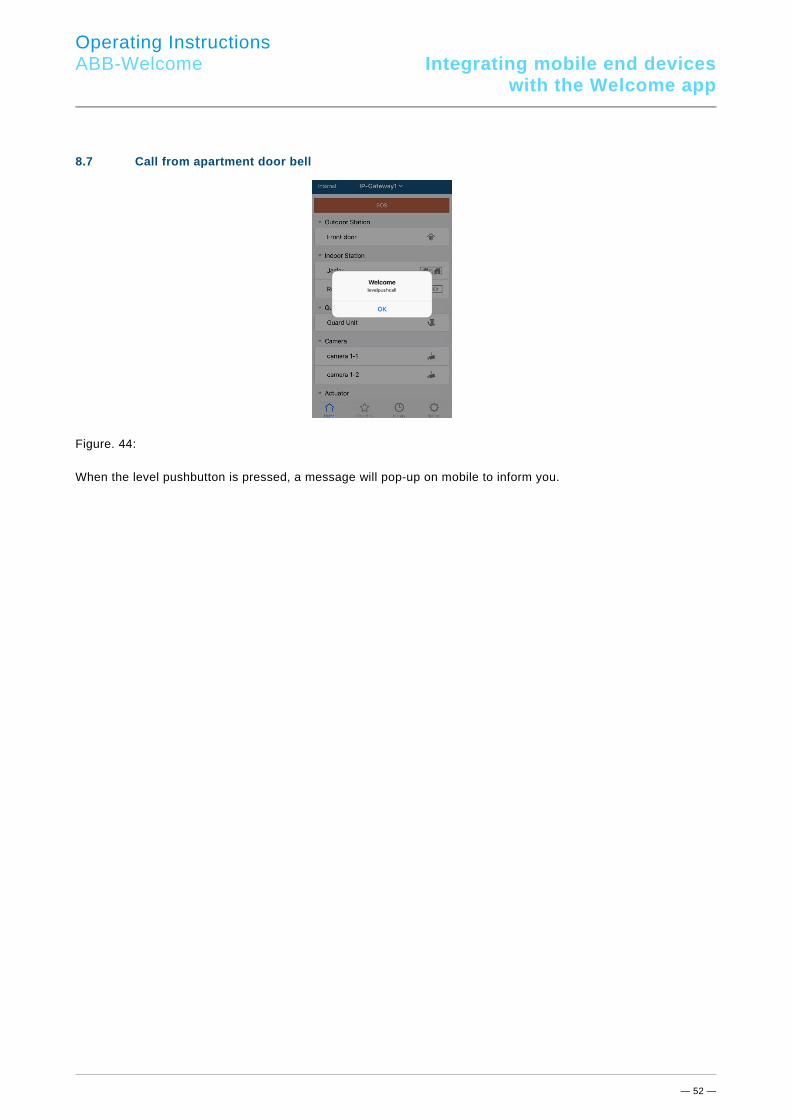
Operating Instructions
ABB-Welcome Integrating mobile end deviceswith the Welcome app
— 52 —
8.7 Call from apartment door bell
Figure. 44: When the level pushbutton is pressed, a message will pop-up on mobile to inform you.
Pos: 78 /#Neustruktur#/Online-Dokumentation (+KNX)/Steuermodule - Online-Dokumentation (--> Für alle Dokumente <--)/++++++++++++ Seitenumbruch ++++++++++++ @ 9\mod_1268898668093_0.docx @ 52149 @ 22222222222222222222222222222222222222222222222222222222222222222222222222222122222222222222222222222222222221111111111111111111111111111111111111111111112222222222222222222222222222222222222222222222222222222222222222222222222222222222222222222222222222222222222222222222222222222222222222222222222222222222222222222222222222222222222222222222222222222222222222222222222222222222222222222222222222222222222222222222222222222222222222222222222222222222222222222222222222222222222222222222222222222222222222222222222222222222222222222222222222222222222222222222222222222222222222222222222222222222222222222222222222222222222222222222222222222222222222222222222222222222222222222222222222222222222222222222222222222222222222222222222222222222222232223322222222222222 @ 1

Operating Instructions
ABB-Welcome Network security
— 53 —
Pos: 79 /#Neustruktur#/Online-Dokumentation (+KNX)/Bedienung/Türkommunikation/Busch-Welcome/Mobile Endgeräte - 83341 @ 36\mod_1363612570097_15.docx @ 288918 @ 22222222222222222222222222222222222222222222222222222222222222222222222222222222222222222222222222222222222222222222222222222222222222222222222222222222222222222222222222222222222222222222222222222222222222222222222222222222222222222221111111111111111111111111111111111111112111111111111111111111111111111111111111111111111111111111111111111111111111111111111111111111111111111111111111111111111111111111111111111111111111111111111111111111111111111111111111111111111111 @ 1
9 Network security This product is designed to be connected to and to communicate information and data via a network interface, It is your sole responsibility to provide and continuously ensure a secure connection between the product and to your network or any other network (as the case may be). You shall establish and maintain any appropriate measures (such as but not limited to the installation of firewalls, application of authentication measures, encryption of data, installation of anti-virus programs, etc) to protect the product, the network, its system and the interface against any kind of security breaches, unauthorized access, interference, intrusion, leakage and/or theft of data or information. ABB Ltd and its entities are not liable for damages and/or losses related to such security breaches, any unauthorized access, interference, intrusion, leakage and/or theft of data or information.
Pos: 80 /#Neustruktur#/Online-Dokumentation (+KNX)/Steuermodule - Online-Dokumentation (--> Für alle Dokumente <--)/++++++++++++ Seitenumbruch ++++++++++++ @ 9\mod_1268898668093_0.docx @ 52149 @ 21111111111111111111111111111111111111122222222222222222222222222222222222222222222222222222222222222222222222222222111111111111111111111111111111111111111211111111111111111111111111111111111111111111111111111111111111111111111111111111111111111111111111111111111111111111111111111111111111111111111111111111111111222222222222222222222222222222222222222222222222222222222222222222222222222222222222222222222222222222222222222222222222222222222222222222222222222222222222222222222222222222222222222222222222222 @ 1

Operating Instructions
ABB-Welcome Integrating a Busch-ComfortTouch® 3.0 or higher
— 54 —
Pos: 81 /#Neustruktur#/Online-Dokumentation (+KNX)/Überschriften (--> Für alle Dokumente <--)/1. Ebene/A - F/Einbindung Busch-ComfortPanel® ab 3.0 @ 35\mod_1362554085194_15.docx @ 285148 @ 2222222222222222222222222222222222222222222222222222222222211111111111111111111111111111111111111111111111111111111111111111111111111111111111111111111111111111111111111111111111111111111111111111111111111111111111111111111111111111111111111111111111111111111111111111111111111111111111111111111111111111111111111111111111111111111111111111111111111111111111111111111111111111111111111111111111111111111111111111111111111111111111 @ 1
10 Integrating a Busch-ComfortTouch® 3.0 or higher Pos: 82 /#Neustruktur#/Online-Dokumentation (+KNX)/Bedienung/Türkommunikation/Busch-Welcome/Einbindung Busch-ComfortPanel® ab 3.0 - 83341 @ 36\mod_1363612585429_15.docx @ 288934 @ 11111111111111111111111111111111111111111111111111111111111111111111111111111111111111111111111111111111111111111111111111111111111111111111111111111111111111111111111111111111111111111111111111111111111111111111111111111111111111111111111111111111111111111111111111111111111111111111111111111111111111111111111111111111111111111111111111111111111111111111111111111111111 @ 1
Fig. 45: Integrating Busch-ComfortTouch® 3.0 or higher
The Busch-ComfortTouch® series 3.0 or higher can be connected to a Busch-Welcome® system directly via the IP gateway. 1. Create a user, e.g. ComfortTouch1, in the IP gateway. See section "Create new user". 2. Create a configuration project in IPP 3.x for the Busch-ComfortTouch®, a "Door Entry" application page. 3. Enter the "IP gateway address" and user in the "IP Gateway" tab.
Note ... A detailed user description is available in the IPP online help.
Jeweils 1 ComfortPanel der Baureihe 2.x kann Pos: 83 /#Neustruktur#/Online-Dokumentation (+KNX)/Steuermodule - Online-Dokumentation (--> Für alle Dokumente <--)/++++++++++++ Seitenumbruch ++++++++++++ @ 9\mod_1268898668093_0.docx @ 52149 @ 22222222222222222222222222222222222222222222222222222222222111111111111111111111111111111111111111111111111111111111111222222222222222222222222222222222222222222222222222222222222222222222222222222222222222222222222222222222222222222222222222222222222222222222222222222222222222222222222222222222222222222222222222222222222222222222222222222222222222222222222222222222222222222222222222222222222222222222222222222222222222222222222 @ 1

Operating Instructions
ABB-Welcome Technical data
— 55 —
Pos: 84 /#Neustruktur#/Leermodule/-----------------------------------------Technische Daten------------------------------------------- @ 25\mod_1340800767896_15.docx @ 220397 @ 1111111111111111111111111111111111111111111111111111111111111122222222222222222222222222222222222222222222222222222222222 @ 1
Pos: 85.1 /#Neustruktur#/Online-Dokumentation (+KNX)/Überschriften (--> Für alle Dokumente <--)/1. Ebene/S - T/Technische Daten @ 11\mod_1279185386320_15.docx @ 83019 @ 21 @ 1
11 Technical data Pos: 85.2 /#Neustruktur#/Online-Dokumentation (+KNX)/Überschriften (--> Für alle Dokumente <--)/2. Ebene/U - Z/Übersichtstabelle @ 33\mod_1361369213708_15.docx @ 278559 @ 2111111111111111111111111111 @ 1
11.1 Overview table Pos: 85.3 /#Neustruktur#/Online-Dokumentation (+KNX)/Technische Daten/Türkommunikation/Busch-Welcome/Übersichtstabelle Technische Daten - 83341 @ 35\mod_1362554518764_15.docx @ 285196 @ 2122111111111111111111111111122222222222222222222222222 @ 1
General
Operating temperature -25 °C - +55 °C
Protection type (only for related installation) IP 20
Single-wire clamps 2 x 0.28 mm² - 2 x 0.75 mm²
Fine-wire clamps 2 x 0.28 mm² - 2 x 0.75 mm²
Size 10 U
Bus input voltage 20-30 V DC
Pos: 85.4 /#Neustruktur#/Online-Dokumentation (+KNX)/Steuermodule - Online-Dokumentation (--> Für alle Dokumente <--)/++++++++++++ Seitenumbruch ++++++++++++ @ 9\mod_1268898668093_0.docx @ 52149 @ 2122 @ 1
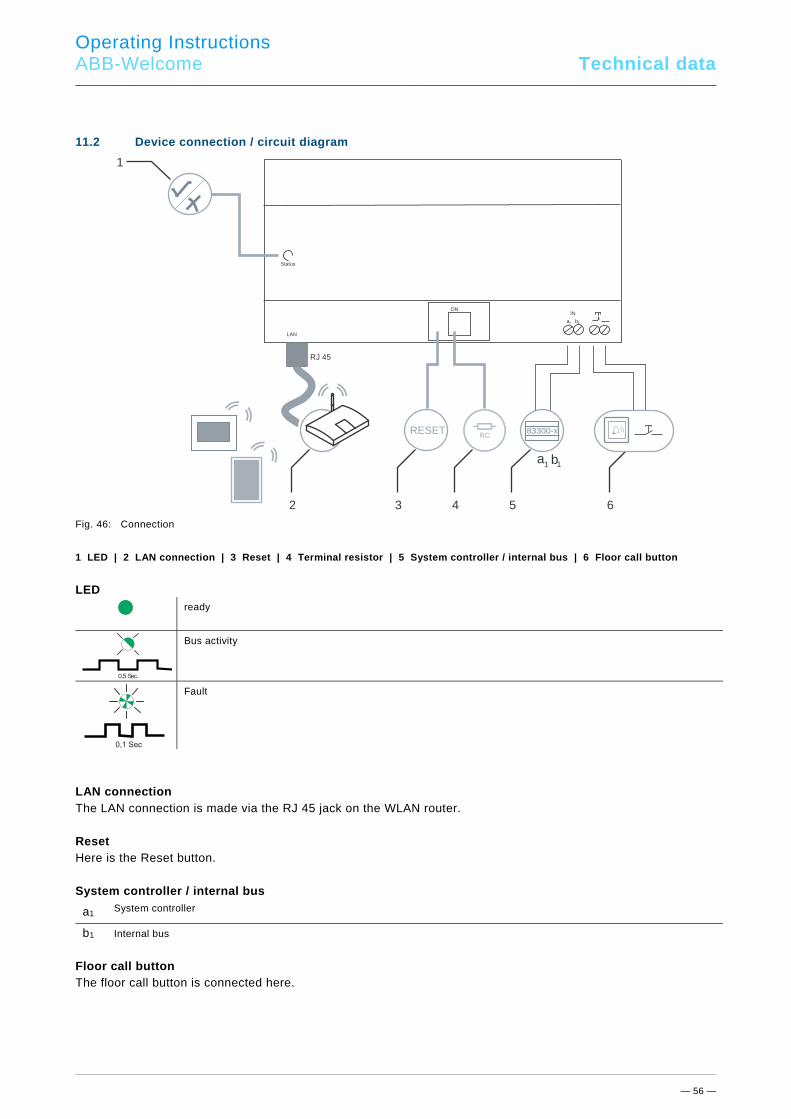
Operating Instructions
ABB-Welcome Technical data
— 56 —
Pos: 85.5 /#Neustruktur#/Online-Dokumentation (+KNX)/Überschriften (--> Für alle Dokumente <--)/2. Ebene/G - L/Geräteanschluss / Anschlussbild @ 33\mod_1361369125277_15.docx @ 278543 @ 211121111111111122222222222222222222222222221111111111122222222222222222222222222222222 @ 1
11.2 Device connection / circuit diagram Pos: 85.6 /#Neustruktur#/Online-Dokumentation (+KNX)/Technische Daten/Türkommunikation/Busch-Welcome/Geräteanschluss, Anschlussbild - 83341 @ 35\mod_1363080549492_15.docx @ 287162 @ 2111111111112222222222222222222222222222111111111111111111111111111111111111111112212 @ 1
Fig. 46: Connection
1 LED | 2 LAN connection | 3 Reset | 4 Terminal resistor | 5 System controller / internal bus | 6 Floor call button
LED
ready
Bus activity
Fault
LAN connection The LAN connection is made via the RJ 45 jack on the WLAN router. Reset Here is the Reset button. System controller / internal bus
a1 System controller
b1 Internal bus
Floor call button The floor call button is connected here. Pos: 85.7 /#Neustruktur#/Online-Dokumentation (+KNX)/Steuermodule - Online-Dokumentation (--> Für alle Dokumente <--)/++++++++++++ Seitenumbruch ++++++++++++ @ 9\mod_1268898668093_0.docx @ 52149 @ 22222222222222222222222222222222222222222222222222222222222 @ 1
a1 b1
LAN
Status
INON
RJ 45
a b1 1
83300-xRESET
1
2 3 4 5 6
RCRC
0,5 Sec.
0,1 Sec.

Operating Instructions
ABB-Welcome Product overview
— 57 —
Pos: 85.8 /#Neustruktur#/Online-Dokumentation (+KNX)/Überschriften (--> Für alle Dokumente <--)/2. Ebene/A - F/Abmessungen / Maßbild @ 33\mod_1361368902556_15.docx @ 278527 @ 111111111111111111111111111111111111111111111111111111122 @ 1
11.3 Dimensions / dimensional drawing Pos: 85.9 /#Neustruktur#/Online-Dokumentation (+KNX)/Technische Daten/Türkommunikation/Busch-Welcome/Abmessungen, Maßbild - 83341 @ 35\mod_1363080518891_15.docx @ 287146 @ 222222222222221111111111111111111111111111111111111111111111111111111211111111111 @ 1
The dimensions of the IP gateway are indicated in the following image.
Fig. 47: Dimensional drawing
The depth of the device is 65 mm. The module width is 10 MW. Pos: 86 /#Neustruktur#/Leermodule/-----------------------------------------Aufbau und Funktion---------------------------------------- @ 25\mod_1340800826537_15.docx @ 220411 @ 222222211111222111111111111122222222222222222222 @ 1
Pos: 87.1 /#Neustruktur#/Online-Dokumentation (+KNX)/Überschriften (--> Für alle Dokumente <--)/1. Ebene/P - R/Produktübersicht @ 33\mod_1361365511862_15.docx @ 278082 @ 2222222221111122212222 @ 1
12 Product overview Pos: 87.2 /#Neustruktur#/Online-Dokumentation (+KNX)/Überschriften (--> Für alle Dokumente <--)/2. Ebene/A - F/Aufbau Gerät @ 33\mod_1361366224154_15.docx @ 278226 @ 2222 @ 1
12.1 Device setup Pos: 87.3 /#Neustruktur#/Online-Dokumentation (+KNX)/Aufbau und Funktion/Türkommunikation/Busch-Welcome/Aufbau Gerät Funktionen - 83341 @ 36\mod_1363612633767_15.docx @ 288950 @ 22222222222222222222222222222222222222222222222222222222222222222222222222222 @ 1
The IP gateway is a Welcome door communication system and is used for door communication and video transmission. - The IP address makes communication possible between the Welcome door communication and the local IP
network. - It also allows use of the Busch-ComfortTouch® as door communication indoor station and a Welcome app. - The product connects to the myABB-LivingSpace Internet portals. It can be used to configure other Welcome
products using a web browser. Pos: 88 /#Neustruktur#/Online-Dokumentation (+KNX)/Steuermodule - Online-Dokumentation (--> Für alle Dokumente <--)/++++++++++++ Seitenumbruch ++++++++++++ @ 9\mod_1268898668093_0.docx @ 52149 @ 222222222212222222222222222222222222222122222222222222222222222222222222222222222222222222222222222222222222222222222222222222222222222222222222222222222222 @ 1
a1 b1
LAN
Status
INON
180 mm
90 mm
Operating Instructions
ABB-Welcome Installation and electricalconnection
— 58 —
Pos: 89 /#Neustruktur#/Leermodule/-----------------------------------------Montage und elektrischer Anschluss ------------------------ @ 25\mod_1340800921288_15.docx @ 220439 @ 2222222222122222222222222222222222222221222222222222222222222222222222222222222222222222222222222222222222222 @ 1
Pos: 90 /#Neustruktur#/Online-Dokumentation (+KNX)/Überschriften (--> Für alle Dokumente <--)/1. Ebene/M - O/Montage und elektrischer Anschluss @ 23\mod_1336477157864_15.docx @ 209033 @ 22212222222222222222222222222222212222222222222222222222222222222222222222222222222222222222222222222222222222222222222222222 @ 1
13 Installation and electrical connection Pos: 91 /#Neustruktur#/Online-Dokumentation (+KNX)/Sicherheitshinweise und Hinweise (--> Für alle Dokumente <--)/Warnhinweise/Sicherheit - Niederspannungs- und 230 V-Leitungen @ 23\mod_1336558868201_15.docx @ 209164 @ 222222222222222222222222222221222222222222222222222 @ 1
Warning
Electric voltage! Risk of death due to electrical voltage of 100-240 V during short-circuit in the low-voltage line. – Low-voltage and 100-240 V lines must not be installed together in a flush-mounted socket!
Pos: 92 /#Neustruktur#/Online-Dokumentation (+KNX)/Sicherheitshinweise und Hinweise (--> Für alle Dokumente <--)/Warnhinweise/Sicherheit - Fachkenntnisse @ 23\mod_1336559183027_15.docx @ 209179 @ 222222222222 @ 1
13.1 Requirements for the electrician
Warning
Electric voltage! Install the device only if you have the necessary electrical engineering knowledge and experience. • Incorrect installation endangers your life and that of the user of the electrical system. • Incorrect installation can cause serious damage to property, e.g. due to fire. The minimum necessary expert knowledge and requirements for the installation are as follows: • Apply the "five safety rules" (DIN VDE 0105, EN 50110): 1. Disconnect from power; 2. Secure against being re-connected; 3. Ensure there is no voltage; 4. Connect to earth and short-circuit; 5. Cover or barricade adjacent live parts. • Use suitable personal protective clothing. • Use only suitable tools and measuring devices. • Check the supply network type (TN system, IT system, TT system) to secure the following
power supply conditions (classic connection to ground, protective earthing, necessary additional measures, etc.).
Pos: 93 /#Neustruktur#/Online-Dokumentation (+KNX)/Sicherheitshinweise und Hinweise (--> Für alle Dokumente <--)/Warnhinweise/Sicherheit - 230 V @ 18\mod_1302606816750_15.docx @ 103308 @ 11111112222222222222222222222222222222222222222222222222222222222222222222222222221 @ 1
Warning
Dangerous currents flow through the body when coming into direct or indirect contact with live components. This can result in electric shock, burns or even death. – Disconnect the mains power supply prior to installation and/or disassembly! – Permit work on the 110-240 V supply system to be performed only by specialist staff.
Pos: 94 /#Neustruktur#/Online-Dokumentation (+KNX)/Überschriften (--> Für alle Dokumente <--)/2. Ebene/M - O/Montage @ 18\mod_1302615960458_15.docx @ 103424 @ 221111111222222222222222222222222222222222222222222222222222222222222222122222222222221111111111121111111111111111111111111111111111111111112222222 @ 1
13.2 Mounting Pos: 95 /#Neustruktur#/Online-Dokumentation (+KNX)/Montage/alle Geräte/Montage - Hutschienen nach DIN EN 500022 - Ohne Docvariable @ 20\mod_1325766045140_15.docx @ 136603 @ 22222222222222211111111111211111111111111111111111111111111111111111122222221111111111111111111111111111111121 @ 1
The MDRC must only be installed on mounting rails according to DIN EN 500022. The MDRC is latched onto the mounting rail.
Operating Instructions
ABB-Welcome
Pos: 97 /#Neustruktur#/Online-Dokumentation (+KNX)/Rückseiten (--> Für alle Dokumente <--)/Rückseite - ABB-Variante @ 36\mod_1368707504080_15.docx @ 296059 @ 2111111111111112222222222222222222222222222222222222222222222222222222222222222222222222222222222222222222222222222222222222222222222222222222222222222222222222222222222222222222222222222222222222222222 @ 1
Notice We reserve the right to at all times make technical changes as well as changes to the contents of this document without prior notice. The detailed specifications agreed to at the time of ordering apply to all orders. ABB accepts no responsibility for possible errors or incompleteness in this document. We reserve all rights to this document and the topics and illustrations contained therein. The document and its contents, or extracts thereof, must not be reproduced, transmitted or reused by third parties without prior written consent by ABB.