abel tutorial for beginners - uio.no · 3 1.resources this tutorial is intended as a start for...
TRANSCRIPT

1
Abel tutorial for beginners
Katerina Michalickova, Nikolai Vazov, Miquel Oliveira
April 16th , 2013
The Research Computing Service Group
http://www.uio.no/hpc

2
Contents 1.Resources ............................................................................................................................ 3
2.About this tutorial ................................................................................................................ 3
3.Log into Abel ...................................................................................................................... 4
3.1 From a Windows machine ............................................................................................ 4
3.2 From a Linux machine ................................................................................................. 5
3.3 From a Mac .................................................................................................................. 6
4.Get your bearings ................................................................................................................ 7
4.1 Home directory ............................................................................................................. 7
4.2 Directory content listings ............................................................................................. 8
5.Unix mini course ............................................................................................................... 10
5.1 Unix commands .......................................................................................................... 10
5.2 Shell scripting ............................................................................................................. 12
5.3 Online tutorials ........................................................................................................... 14
6.Prepare and run your first job ............................................................................................ 15
6.1 Software and modules ................................................................................................ 15
6.2 Job script .................................................................................................................... 15
6.3 Submit your job and follow the progress ................................................................... 16
6.4 Look at the results ...................................................................................................... 17
7. Prepare a job using scratch area ....................................................................................... 19
7.1 Job script .................................................................................................................... 19
7.2 Upload you own file ................................................................................................... 20
8. Prepare arrayrun job ......................................................................................................... 23
8.1 Job scripts ................................................................................................................... 24
8.2. Examining the results ................................................................................................ 25

3
1.Resources This tutorial is intended as a start for people who would like to use Abel. Links below point to a complete user guide and information about the system.
Abel page: http://www.uio.no/english/services/it/research/hpc/abel/
Abel user guide: http://www.uio.no/english/services/it/research/hpc/abel/help/user-guide/
2.About this tutorial This tutorial was created for people who have no Unix or high-performance computing experience. However, I noticed some people who signed up for today already have Abel account. For you who already know a bit about using Abel, you might find useful information in the later sections of the handout.
Each section contains worked examples supplemented with screen shots. Work through the examples as they are shown in the screen shots, you can copy all the commands from the text to your screen (commands are quoted in the text). When you worked through the examples, try the exercise at the end of the section (in blue).

4
3.Log into Abel
3.1 From a Windows machine Download putty, a windows ssh client, from http://www.putty.org/
Start putty and type “abel.uio.no” into the host mane dialog box:
Press Open button:
Type in your UiO user name (and press Enter):
Type in your UiO password (and press Enter):

5
3.2 From a Linux machine Open a terminal and type “ssh [email protected]”:
Type in your UiO password:

6
3.3 From a Mac Open terminal app and type type “ssh [email protected]”. Proceed in the same way as on the linux system.
Summary: You are now logged on the Abel cluster.

7
4.Get your bearings
4.1 Home directory You are logged in and it looks like this:
This is a shell (in our case the bash shell). Shell provides an interface between you and the operating system of the computer. The “$” sign is the prompt and that is where you type each command. Commands are executed by pressing Enter at the end.
Which machine are you on? Type “hostname”:
You are on one of the two so-called login nodes of the Abel computer cluster. Abel consists of 600+ computers and only two are available for login. If you are interested, you can read about Abel technical specifications here: http://www.uio.no/english/services/it/research/hpc/abel/more/
When you login into Abel, you always find yourself in your “home directory”. It is a place in the directory tree where you keep your files. Regardless what machine you are on, this directory is available to you. Type “pwd” (print working directory) to see the full path:

8
4.2 Directory content listings What is in my directory? Type “ls” (for list) to see files and directories:
Type “ls –l” to see the details in the “long listing format”:

9
You see more information about each file or directory. From the left - permissions, hard links, ownership, group, size, date, file/directory name.
File owner in the example above is “katerim” and the group is “users”. Permissions (or access rights) specify who can manipulate the file (or directory). Files can be read, written into or executed. The permissions statement consists of 10 positions: -rwsrwxrwx. The first one is reserved for a directory (or link) sign. Ordinary files have just a “-” sign. The next three triads (rwx) specify permissions for the owner, group and everybody else. Each triad holds read (r), write (w) and execute (x) permissions. In –rwsrwxrwx statement all permissions are set, in -r--r--r-- statement, the file can only be read. Commands chown, chgrp and chmod are used to edit ownership, group and permissions respectively. Read more at a concise tutorial: http://www.dartmouth.edu/~rc/help/faq/permissions.html
In the example below, myfile is writable only by katerim and it can be read by katerim and also by all members of the group users. Thus, groups provide a useful tool for file sharing.
Summary: You know what is your home area and you can see the content of you home directory. You know a bit about permissions too.

10
5.Unix mini course
5.1 Unix commands In this mini course, we learn by setting up our tutorial environment.
First, make sure that you are in your home directory. You can type “cd ~” (or “cd” for short). Make a directory named tutorial to keep all tutorial materials together. Type “mkdir tutorial”, this makes the directory. To change working directory to tutorial, type “cd tutorial”. Finally, type “pwd” (this, as you know, tells you where you are in the directory tree) to see if it worked.
Second, copy a file to the tutorial directory. I prepared a file and placed it in an area that all of you can copy from. Type “cp /cluster/abel_tutorial/welcome.txt .”; this copies a simple text file called welcome.txt to your current directory. Type “ls –l” to see if you have the welcome.txt file.
The same operation could be achieved by “cp /cluster/abel_tutorial/welcome.txt /usit/abel/u1/katerim/tutorial” (if you want to try this, replace katerim with your own user name). The “.” sign in “cp /cluster/abel_tutorial/welcome.txt .” thus represents your current directory.
Third, learn how to move and copy a file. To change a file name, type “mv welcome.txt welcome2.txt”. Use “ls -l” to see that the directory now contains one file named welcome2.txt. To get another copy of this file type “cp welcome2.txt welcome3.txt”:

11
The copy and move commands can be used to move files between directories as we have seen in the first operation of this section. For example, “mv welcome3.txt ../” would move the file welcome3.txt into your home area.
Fourth, to delete one of the files, type “rm welcome3.txt” and check the directory listing:
Now we know the basics of file manipulation. Next section shows how to see and edit contents of a file. To see the text file contents, you can use more, cat or less commands. Try “more welcome2.txt” (if you use “less”, type “q” to get out of the command):
Finally, learn to edit a file. There are several good editors available in Unix such as emacs, nano or vi (people tend to strongly favor one of them and dislike the others). These editors work with no graphical user interface and can be used easily on a remote system. I provide an example of emacs editing.

12
Type emacs “welcome2.txt” (if this does not work, type “emacs –nw welcome2.txt” to avoid X11 forwarding problem):
Try to edit the file (move cursor using arrow keys, mouse does not work). To save the file, type “Ctrl-x-s” and get out type “Ctrl-x-c”. You can also try to search using “Ctrl-s” and typing the search string.
In general, unix commands tend to have many switches, for example “ls” versus “ls –l”. To get the complete information, type “man ls” (the man utility is available for all unix commands). Use arrow keys to move around the text and to get out type “q”.
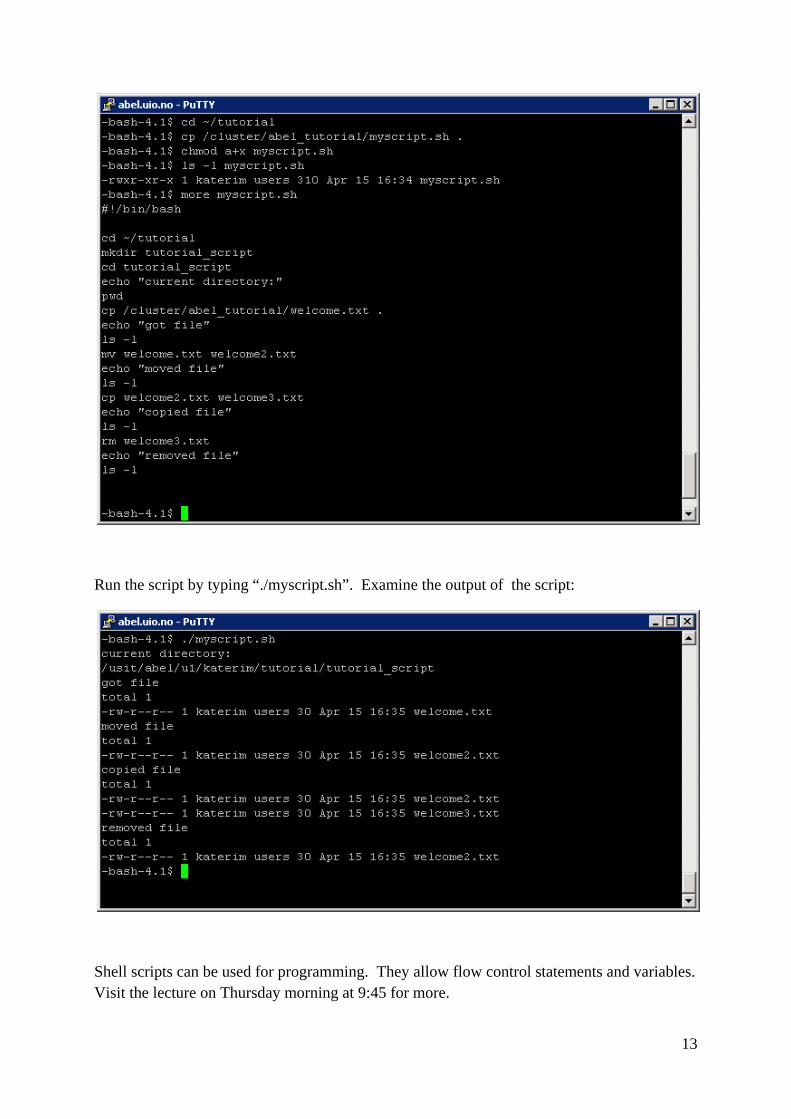
5.2 Shell scripting Shell script is a series of unix commands written in a text file. Each command is on a separate line. Upon execution, all commands are executed sequentially.
Copy an example script called myscript.sh from the common area (/cluster/abel_tutorial) to your tutorial directory. Change permissions so the script can be executed; the command “chmod a+x myscript.txt” makes the file executable for everybody. Examine the script; as you can see, it executes the same commands in a separate subdirectory called tutorial_script. The first line of the script “#! /bin/bash” (#! is hashbang) tells the program loader to parse the rest through an interpreter /bin/bash:
13
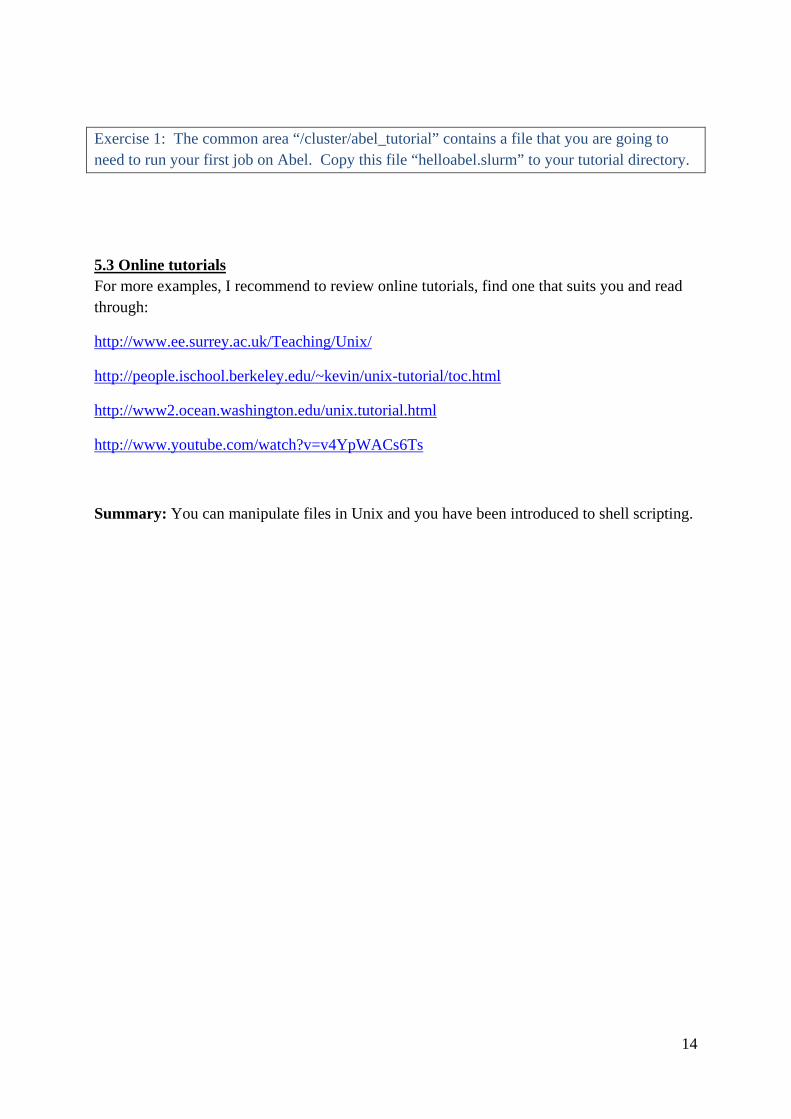
Run the script by typing “./myscript.sh”. Examine the output of the script:
Shell scripts can be used for programming. They allow flow control statements and variables. Visit the lecture on Thursday morning at 9:45 for more.
14
Exercise 1: The common area “/cluster/abel_tutorial” contains a file that you are going to need to run your first job on Abel. Copy this file “helloabel.slurm” to your tutorial directory.
5.3 Online tutorials For more examples, I recommend to review online tutorials, find one that suits you and read through:
http://www.ee.surrey.ac.uk/Teaching/Unix/
http://people.ischool.berkeley.edu/~kevin/unix-tutorial/toc.html
http://www2.ocean.washington.edu/unix.tutorial.html
http://www.youtube.com/watch?v=v4YpWACs6Ts
Summary: You can manipulate files in Unix and you have been introduced to shell scripting.

15
6.Prepare and run your first job
6.1 Software and modules Type “module avail” to see software available on abel. If you find a program that you want to execute you have to use “module load module_name” to be able to call the program. If you do not see the software that you are looking for, you can always place the executable in your home directory and run it from there.
6.2 Job script The Abel computer cluster uses a job manager that schedules jobs on the cluster compute nodes (in our case it is SLURM https://computing.llnl.gov/linux/slurm/). To submit a job on Abel, you have to communicate with the job manager first. So as opposed to a simple command line execution (where you would simply type a command for your executable to run), on the cluster you have to prepare a job script to run a job. A job script is a shell script that communicates with the job manager. Never use command line on login nodes to run jobs, this prevents other users from using Abel effectively. If you need interactive login, read about the qlogin command http://www.uio.no/english/services/it/research/hpc/abel/help/user-guide/interactive-logins.html.
Below is an example of a minimal Abel job script (copy helloabel.slurm from /cluster/abel_tutorial and look at it):
• The script contains #SBATCH keywords that communicate to the job manager various settings for the job. The minimal set of these involve an account, time and memory. The “--account” is an administrative group of Abel users that you belong to. Type “projects” on the command line to see which account(s) you have access to. The “--

16
time” is the real time you expect your program to run. The “--mem-per-cpu” is the RAM requirement for your job. The job manager has to know this so it can schedule jobs in the most efficient manner. If you exceed time or memory specified, your job is cancelled. The parameter “--job-name” is not compulsory but it is useful if you want to follow your job easily.
• The “source /cluster/bin/jobsetup” sets up environment variables for your job. This line must always be present.
• The “module load helloabel” gives you access to the helloabel executable. • The “./helloabel.pl > out.txt” is the core of the script, it is the program that is executed
on Abel. In this case, the output is captured into the file called out.txt.
6.3 Submit your job and follow the progress To submit the helloabel job type “sbatch helloabel.slurm”. You get back your jobid. To see your job in the job queue, type “squeue –u your_user_name”. To see all possible details of the job, type “scontrol show job your_jobid”. If you need to cancel a job, type “scancel jobid”.

17
• In the example above, the job id is 1760453. • There are two instances of the squeue command output. In the first case, the status
(ST) of the job is PD or pending as the job is waiting for available resource. In the second case, the job has been running on the node c11-28 for the last 12 sec.
• The example above also shows the output of the scontrol command that contains detailed information about the job. Note the last two rows that show the path to the working directory and to the job script. The RunTime and TimeLimit items (in the 5th row) tell you how much total time you have and how long the job has been running. If you are running out, let us know, we can extend the time.
6.4 Look at the results Type “ls –l” to see the file listing in your tutorial directory:
The file out.txt contains the output of our program. It tells you when and on which computer node the program was executed. The file slurm-jobid.out contains messages from the queuing system. It also contains time, place and other parameters of cluster execution. If there is a problem, error messages are logged in this file.
Exercise 2: Learn how to run a script from your tutorial directory. Copy a script called hellolocal.pl from /cluster/abel_tutorial to your tutorial directory. Prepare a job script to run hellolocal.pl. First, copy ~/tutorial/helloabel.slurm into ~/tutorial/hellolocal.slurm. Second, make changes to hellolocal.slurm so it executes “hellolocal.pl” from your directory (hint use ./ to tell the script that the program is in the current directory). Finally, submit the job and check the output file.

18
Summary: Now you know how to run a job on Abel. You can use software available on Abel using a module load statement as well as software from your own directory. You might have noticed that when you run your own script, you do not need to use the module load statement. However, you need to specify a path to the script yourself.

19
7. Prepare a job using scratch area If your job reads and writes a lot of data (and especially if this happens often and in small chunks), we recommend to stage the job execution onto a faster file system that is available on Abel. This partition is more suitable for I/O demanding jobs than your home (and slower) directory. On Abel, this partition is called /work and every job receives a temporal (scratch) space on this partition (specifically in /work/jobid.d subdirectory). This directory is removed when the job is finished. It cannot be used for data storage.
7.1 Job script Example of a job script that uses the scratch directory (specified by the SCRATCH variable) is below (copy files scratchabel.slurm, scratchabel.pl and mybigdata.txt from /cluster/abel_tutorial):
• The script takes advantage of environment variables SUBMITDIR (directory that you are submitting from) and SCRATCH (temporal directory assigned to your job). These are variables set up by the jobsetup script. They are accessible to your job script and your executable during job execution.
• To use SCRATCH, you have to copy your executable and your input data files (mybigdata.txt and scratchabel.pl) there. This is accomplished using “cp $SUBMITDIR/mybigdata.txt $SCRATCH” and “cp $SUBMITDIR/scratchabel.pl $SCRATCH” lines.

20
• Register output file(s) that you want copied back from the scratch area using the chkfile command. This is the recommended way of doing so since this command is always executed at the end of your job regardless if the job finished successfully or not. Alternatively, you could simply copy the result file at the end of your script (e.g. “cp $SCRATCH/mybigoutput.txt $SUBMITDIR”). This is fine if the job runs successfully. In case of a failed run, the last copy statement is not be executed as opposed to chkfile that always runs.
• Before the job runs, you have to change working directory to scratch area using “cd $SCRATCH”.
• Being just a simple demonstration of the principle, the script scratchabel.pl simply echoes back your input data and adds information about time, node and current directory.
Submit the script using “sbatch scratchabel.slurm”, note job id and check the /work/jobid.d subdir where you can see your script and data files. When done, check the output:
The script produced information about where the job was running. You can see that the directory path is derived from the jobid of the job.
7.2 Upload you own file
7.2.1 On Windows Download Winscp from http://winscp.net/eng/download.php. Install and run. Type abel.uio.no into the “Host name” dialog box. Below, specify user name and password:

21
Press “Login” and manipulate your files using “drag and drop”:
7.22 On Linux

22
Open a terminal and use scp (secure copy) command. Type “scp myfile.txt [email protected]:~/tutorial” to copy a file from a current directory to abel tutorial directory. For large file the rsync command is preffered since, in case of interruption, it is able to resume where it left off; “rsync –z myfile.txt [email protected]:~/tutorial” uploads your file to the tutorial directory on Abel.
7.2.3 On the Mac Open a terminal and use scp the same way as on Linux.
Exercise 3: Upload a text file from your own workstation. Make changes to scratchabel.slurm so that the scratchabel.pl reads the file you uploaded (i.e. replace the file mybigdata.txt with your own). Submit the job again and examine the output. You should find the contents of your file contents there.
Summary: You can set up and run a job using a scratch area on Abel. You can also upload your own files to Abel.

23
8. Prepare arrayrun job Arrayrun is useful when you need to execute many instances of the same executable in parallel. This is often needed when you have many input datasets or when you run simulations with different input parameters. It might even be possible to split a large input file into chunks.
Array run is driven by the same job script from the same directory therefore the main consideration is to manage your input and output in such a way that the files do not overwrite each other. The recommended way is to use a TASK_ID environment variable. This variable has unique value for each run; if you run your program 10 times using arrayrun command, the TASK_ID ranges from 1 to 10. You can use TASK_ID to name your input and output files.
In your tutorial directory, make a subdirectory called arrayruntest and cd into it (cd ~/tutorial, mkdir arrayruntest, cd arrayruntest). Copy file arrrayruntest.tar from /cluster/abel_tutorial to your arrayruntest directory. Unpack all files by “tar xvf arrayrun.tar”:

24
8.1 Job scripts The archive (arrayruntest.tar) unpacked into one executable (echofile.pl) This is just a very simple placeholder for your program, it copies an input file to output and adds some useful info about time and place. There are ten data files data.* and two job scripts. Every arrayrun needs one so-called worker script and one submit script. The worker script is similar to the scripts we have already used in this tutorial, I added only the file management using the TASK_ID variable. As you can see below, I added two variables DATASET for input and OUTFILE for output. Their names use the value of TASK_ID in each run. In run 1, the input is “data.1” and output “result.1” and in the last, 10th run “data.10” and “result.10”:
The submit script also submits a job that is responsible for administering the whole arrayrun. You can observe that it contains the same SBATCH settings as an ordinary job script. Note that the memory consumption for this job is low but the time setting is high. The time for the submit job should always be much longer than the time for individual jobs because the jobs are not started all at once but are released in batches. The whole arrayrun is started by the command arrayrun with parameters specifying the number of runs and the name of the worker script:

25
Submit by “sbatch echofile_submit.slurm” and then type “watch squeue –u your_user_name”. You can see the individual jobs being released by the submit script. If you need to cancel the run, use scancel and the job id of your submit script. Below, in the first instance of the squeue command, the submit script is waiting to run. In the second instance, you can see that the worker scripts have been released and are waiting to run. Finally, in the third instance, most of the worker scripts started to run:
8.2. Examining the results When you see no more jobs in the queue you can examine the results. Your arrayruntest directory should look like this:

26
You can see the result files (result.1-10) and also slurm log files. There is a log file for each run as well as for the submit script. The biggest one is always the one for the submit script.
Finally, we examine the content of the result files. Type “grep Job *.result” to see the time information in each file. All jobs have been released at more less the same time and they all but one run on one node:

27
Exercise 4: Try to run larger arrayrun:
• edit the submit script to add more runs (pls do not go over 50, our course queue is limited).
• get more input data files, use a tar file called bigdata.tar in /cluster/abel_tutorial that contains more data
• change the input file name in your worker script • increase the time limit in your submit script to one hour (--time=01:00:00)
Watch the queue, you see the jobs being released in batches. When your all is finished you can examine the time information in the output files. Can you see the batches of jobs being released by arrayrun?
Tip: To examine the results, use “grep Job *.result > times”, “sort –n times > stimes”, the file stimes holds sorted info about times.
Summary: You have learned how to use arrayrun command; you can manage your input and output files using the TASK_ID environment variable.