abra abdominal wall closure set - dynamic tissue systems · abra ® abdominal wall closure set a...
TRANSCRIPT

Instructions for Use
ABRA® Abdominal Wall Closure Set
a Dynamic Wound Closure System
Introduction The ABRA® Abdominal Wall Closure Set provides dynamic reduction for full thickness, retracted, midline abdominal defects with the goal of maintaining
or restoring the definitive primary closure option.
Indications The ABRA® Dynamic Wound Closure Systems are indicated for use in controlling, reducing, or closing retracted soft tissue defects.
Warnings System is to be used by a qualified surgical practitioner.
The ABRA® Abdominal Wall Closure Set must not be left on for more than 29 days.
NO REUSE: Sterile. ABRA® system components are not intended to be resterilized or reused. Stresses and fractures may be created during use and resterilization that cannot be detected by visual inspection, which may prevent thorough decontamination of the product and compromise structural integrity.
NOTE: The ABRA® Abdominal Wall Closure Set has been fully MRI-compatible since 2007. To ensure you are using MRI-compatible Button
Tails, confirm that the color of the printed illustration on the Button Tails is blue. If the printing on the Button Tails is black, simply remove the
Button Tails prior to the MRI procedure, then replace afterwards.
All ABRA® Dynamic Wound Closure Systems are not made with natural rubber latex.
Contents
PRE-OPERATIVE
INSTRUCTIONS
PAGE POST-OPERATIVE
INSTRUCTIONS
PAGE
Step 1. Wound Size and Product Requirements
2. Patient Preparation
OPERATIVE INSTRUCTIONS
2 Step 14.
3 15.
16.
Physician Care 10
Dressing Changes 10
Nursing Care 10
Step 3. Layout 3 CLOSE: PRIMARY CLOSURE
4. Installing the Silicone Sheet as a Viscera Protector 4 Step 17. When to Close 11
5. Making Incisions for Elastomers 5 18. Primary Closure 11
6. Installing the Elastomers 5
7. Installing the Button Anchors 6 CRITICAL POINTS 11
8. Installing the Elastomer Retainer 7
9. How to Read and Set Elastomer Tension 7
10. Elastomer Tensioning 8 11. Advancing the Wound Margins (“The Move”) 8
12. Installing Negative Pressure Wound Therapy 9
13. Installing the Button Tails 9
IFU0235A

2 1D1544RC
Overview of the Key Components
Button Anchor
Button.Tail.Lock
Cleat
(Locks
elastomer)
Front Slot
Button Tail
Adhesive Fabric
Blue ink = MRI compatible
Black ink is not MRI compatible
(See NOTE, page 1)
Finger.grip Button.pad
Hook
Elastomer
Canulator
Handle
Blunt Tip
Elastomer Hole (eyelet)
Tension
markings
The Canulator is a blunt, atraumatic muscle dividing tool. It requires a small skin
incision of 3 mm to allow it to pass through the skin layer. By applying a 180°
oscillating motion combined with gentle pressure, it will divide muscle fiber to
create a passage for the elastomer. Correct use of the Canulator will greatly
reduce the risk of herniation.
Completed System Installation
Completed installation of the ABRA® Abdominal Wall
Closure System will resemble diagrams shown. Follow
the steps below to begin the installation procedure.
Note: For clarity, system shown without Negative
Pressure Wound Therapy (NPWT) installation.
Pre-operative Instructions
Wound Size and Product Requirements
1 Operating Room Supply Requirement
Determine total materials required based on the patient's wound size. Each ABRA Abdominal.Wall.Closure Set includes materials for 10 pairs of Button Anchors (up to 30 cm of wound length). The ABRA Extender Set contains enough materials for 3 additional
Button pairs (9 cm at 3 cm spacing).
Determine product requirements based on the wound size: Width
Length
Wound Size Quantity Materials Required
All sizes
1
CWK08 ABRA Abdominal Wall Closure Set
Length or width > 30 cm add 1 CWK08-EX ABRA Extension.Kit
IFU0235A

3 1D1544RC
2
3
IFU0235A
Exudate Management
ABRA Abdominal Wall Closure should always be used in combination with a Negative Pressure Wound Therapy System
(supplied by other manufacturers) for exudate management. The Perforated Silicone Sheet provides viscera protection during
closure and acts as an adhesion barrier, allowing the NPWT dressings to be installed over top.
Negative. Pressure Wound Therapy (NPWT)
When ABRA is used in combination with NPWT:
ABRA provides the dynamic apposition force to re-approximate the abdominal wall.
The Silicone Sheet (viscera protector) protects the viscera from strangulation, prevents adhesions from forming, and allows active fluid transfer using NPWT, while facilitating bedside dressing changes.
Negative Pressure Wound Therapy provides active exudate management and containment, assists in reducing abdominal volume, and adds structural stabilization of the adipose tissue.
Patient Preparation
The skin area, extending 20 cm from each wound
margin, should be shaved and cleaned.
Skin preparation area
20 cm 20 cm
All necrotic tissue, adhesions and inter-layer
granulation should be excised to create clean,
mobile wound margins. It is impor tant to remove
any existing abdominal closure devices (such as
mesh).
Observe and note peak ventilator pressure to
establish a baseline.
Operative Instructions
Layout
With a skin marker, draw placement margins at 5
cm from the wound edge.
Note: Setting the anchors back fur ther than 5 cm
decreases the available working domain, and
reduces the system's effectiveness.
Mark anchor placement at 3 cm intervals star ting
from the lower aspect of the wound. The first pair
of buttons should align with the lowest aspect of
the fascial wound, as shown.
Tip: Use a malleable retractor to ensure marks are
directly opposed to one another, and that there is an
even number of marks.
5 cm
3 cm
Lowest aspect of
fascial margin
Star t here
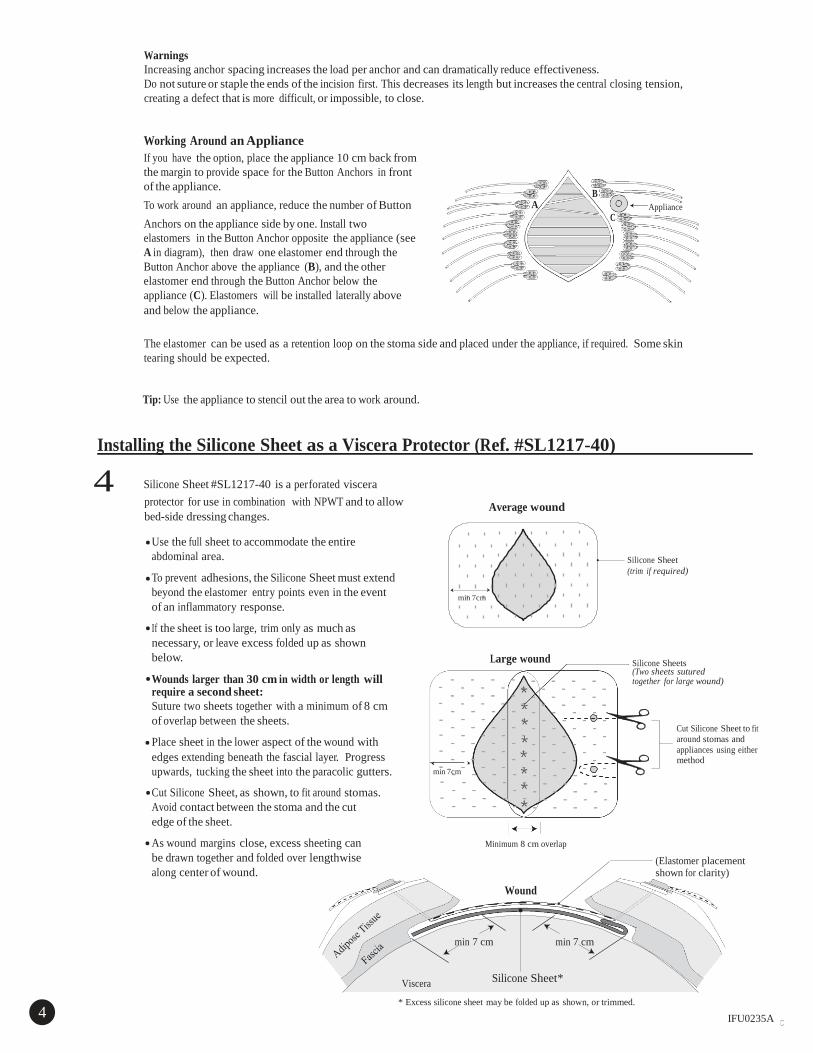
* Excess silicone sheet may be folded up as shown, or trimmed.
4 1D1544RC
IFU0235A
Warnings
Increasing anchor spacing increases the load per anchor and can dramatically reduce effectiveness.
Do not suture or staple the ends of the incision first. This decreases its length but increases the central closing tension,
creating a defect that is more difficult, or impossible, to close.
Working Around.an Appliance
If you have the option, place the appliance 10 cm back from
the margin to provide space for the Button Anchors in front
of the appliance.
To work around an appliance, reduce the number of Button
Anchors on the appliance side by one. Install two
elastomers in the Button Anchor opposite the appliance (see
A in diagram), then draw one elastomer end through the
Button Anchor above the appliance (B), and the other
elastomer end through the Button Anchor below the
appliance (C). Elastomers will be installed laterally above
and below the appliance.
B
A Appliance
C
The elastomer can be used as a retention loop on the stoma side and placed under the appliance, if required. Some skin
tearing should be expected.
Tip: Use the appliance to stencil out the area to work around.
Installing the Silicone Sheet as a Viscera Protector (Ref. #SL1217-40)
4 Silicone Sheet #SL1217-40 is a perforated viscera
protector for use in combination with NPWT and to allow
bed-side dressing changes.
Average wound
Use the full sheet to accommodate the entire
abdominal area.
To prevent adhesions, the Silicone Sheet must extend
beyond the elastomer entry points even in the event
of an inflammatory response.
If the sheet is too large, trim only as much as
necessary, or leave excess folded up as shown
below.
Wounds larger than 30 cm in width or length will require a second sheet:
Suture two sheets together with a minimum of 8 cm
of overlap between the sheets.
Place sheet in the lower aspect of the wound with
min 7cm
Large wound
Silicone Sheet
(trim if required)
Silicone Sheets (Two sheets sutured together for large wound)
Cut Silicone Sheet to fit
around stomas and
appliances using either edges extending beneath the fascial layer. Progress method
upwards, tucking the sheet into the paracolic gutters.
Cut Silicone Sheet, as shown, to fit around stomas.
Avoid contact between the stoma and the cut
edge of the sheet.
As wound margins close, excess sheeting can
be drawn together and folded over lengthwise
along center of wound.
min 7cm
Minimum 8 cm overlap
Wound
(Elastomer placement shown for clarity)
min 7 cm min 7 cm
Viscera Silicone Sheet*

1D1544RC
5
IFU0235A
Making Incisions for Elastomers
Following the marks on the layout, make holes in the skin using
a 3 mm electrocautery blade or a #11 scalpel blade.
Note: Keep holes small and shallow, piercing just through the
dermal layer. During elastomer installation, the Canulator will
stretch the skin as required and divide the fibrous muscle layer
without leaving a permanent hole in the muscle, reducing the
risk of herniation.
Installing the Elastomers
6 The SurgiFish is provided as extra protection for the viscera during installation of the elastomers.
Begin at the lower aspect of the wound and work upward along one margin, then the other.
A Use two fingers inside and a thumb outside to align the layers
at the wound margin. Turn out to provide full visualization.
Ensure skin and fascial margins are aligned in order.to create a
square bite. (See diagram B)
B Using minimal force and oscillating 180°, use the Canulator to
divide the fat and muscle tissues through the fascia as shown.
Take a 5 cm square bite (square to both skin and fascia, and 5
cm from both margins). * Graphically exaggerated for clarity.
Cross section of wound
showing 5 cm square bite
using Canulator. *
Oscillating
180°
Fat
Fascia
Viscera
C If it is difficult to advance the Canulator through the muscle, increase the oscillation with less forward thrust.
5

until the elastomer drops into the cleat (#2). 6 1D1544RC
IFU0235A
D Thread a maximum 5 cm of the elastomer in the eyelet (to prevent accidentally nicking the elastomer in its working range) and pull back through the skin. The
eyelet retains the elastomer as it is passed.
Max 5 cm
E Complete threading elastomers. on one side of the wound.
Note: Hemostats should be used to clamp elastomer
ends to prevent them from being pulled back into the
wound while installing elastomers in the opposite side.
Clamp close to ends to avoid nicking the elastomers
within their working length.
F Complete threading elastomers on the other side.
Installing the Button Anchors
7 Install Button Anchors and secure the elastomer as shown below, but do not tension elastomer.at this time.
A Face Button Anchor slot
towards.the wound.
B Slide the Button Anchor until
elastomer is in the slot.
C Secure and Lock
Do not tension.elastomers
at this time.
2
1
Secure the elastomer with your finger (#1), then
draw back on the loose end with the opposite hand Select the elastomer with your finger (#1), then
draw back on the loose end with the opposite
hand until the elastomer drops into the cleat (#2)

1D1544RC
8
IFU0235A
a
D Install. a pair of Button Anchors for each elastomer. E Note: Do not trim elastomer ends.
Installing the Elastomer Retainer (Ref# AWC01)
Use the Elastomer Retainer to prevent elastomer migration to
upper and lower aspects of the wound.
A Slip the Elastomer Retainer under the elastomers resting on
top of the viscera protector. Star ting at the lower aspect of
the wound, insert with smooth side up to ease installation,
then rotate to expose elastomer slots. Always place the
Elastomer Retainer at the lower aspect of the wound.
B Star ting at the lower aspect of the wound, place each of the
elastomers into the appropriate slot in the Elastomer
Retainer.
Note: The Elastomer Retainer can be trimmed to match the
wound length.
Elastomer Retainer
Slots
Silicone Sheet
How to Read and Set Elastomer Tension
9 The black bars on the elastomer provide a visual indication of elastomer tension. Maximum working tension is indicated when
the mark is stretched to twice (2X) its untensioned length. To set elastomer tension, release the elastomer from the cleat, and
compare tensioned marks to untensioned marks, as shown. Secure the tensioned elastomer in the Button Anchors (see Step 7).
Untensioned
1X
1.5 : 1 Stretch
Untensioned
Tensioned
2 : 1 Stretch
1.5X
Minimum
1X
2X
1 : 2
Stretch
Released from cleat
2X
Maximum 7

1D1544RC
10
11
IFU0235A
Elastomer Tensioning
It is critical to set and maintain appropriate elastomer tensions at all times. Failure to maintain correct elastomer tensions will reduce system effectiveness. Over tensioning will increase the risk of abdominal compartment syndrome, and trauma to skin and/or muscle.
Warning
If peak ventilator pressure or bladder pressure is adversely increasing during an inflammatory response, elastomer tensions should be reduced to 1.5X stretch, as required, to normalize pressure. This may need to be repeated until the inflammatory response subsides.
Wound Shape
Strive to make the wound margins parallel, usually with greater tension in the middle and less at the extremities.
Never close the ends of the wound prior to closing the mid-point.
Longer wounds with parallel margins will close faster and with less tension.
Goal
Example of Tension Settings (Based on Wound Width)
Low tension:
1.5X
High tension:
2X Max
Low tension: 1.5X
Goal
Widest points = High tension = 2X
Narrower points = Low tension =
1.5X Note: Patients. with a large.pannus require high tension. on the lower aspect of the wound.
Advancing the Wound Margins ( The Move”)
The first step in re-establishing control of the wound
margins.is to re-shape the abdomen by changing its
aspect ratio, which will increase the volume of the
abdominal cavity.
This is accomplished through a repeated sequence
of tensioning elastomers, followed by massaging the
musculature (a therapeutic method we call “The
Move”). "The Move" will mobilize the abdominal
oblique muscles from their lateral origin to their
medial aspect while the elastomers.maintain
dynamic apposition of the musculature.
Method: 1. Set all elastomers to 2X stretch.
2. Perform "The Move": Star ting from the patient's sides,
apply a palmar, massaging, tension-reduction force
toward the midpoint.
3. Observe margin advancement and the reduction in
elastomer tension. 4. Re-set all elastomers to 2X stretch.
5. Repeat “The Move” once more.
6. Re-set all elastomers to 2X stretch.
7. Release elastomer tension to 1.5X stretch in areas
such as the upper and lower aspects to adjust the
wound shape. The margins should be as close to
parallel as possible, with the highest tension on any
elastomer at 2X stretch.
Note: Do not trim elastomer.ends.
Re-shaping abdomen by
changing its aspect ratio
(Smaller abdominal volume)
"The Move"
Wound margins advanced
(Larger abdominal volume)
8

1D1544RC
Installing Negative Pressure Wound Therapy (NPWT)
12 1.
2.
3.
4.
5.
The silicone viscera protector is perforated to allow use with NPWT, while
protecting the viscera from adhesions. Additional non-adherent dressings
supplied by the NPWT manufacturer may be used over the elastomers
and Silicone Sheet, and installed per the manufacturer’s
instructions. Fill the wound with NPWT packing material.
If using suction drains under the occluding dressing, place per the
manufacturer’s instructions.
Place the occluding dressing over the entire wound, adhering it to the
space between the wound edge and the elastomers, under the front edge
of Button Anchors. (Do not cover Button Anchors)
Attach the vacuum.
Follow the NPWT manufacturer’s instructions for vacuum application,
draw-down and maintenance.
Tip: Adhesive-enhancing sprays improve the
adhesion between the occluding dressing
and skin.
Vacuum Por t
Occluding Dressing
Occluding dressing boundary
NPWT Packing Material
Silicone Sheet
Elastomer Retainer
Non-adherent Dressing
(if used)
NOTE: It is impor tant that the occluding top dressing does not cover the Button Anchors. Trim the dressing and seal to the skin within the 5 cm margin in front of the elastomers.
Re-set ABRA Tension After NPWT Installed
Once vacuum is applied, a reduction in elastomer tensions will occur. Re-set all elastomers to 2X stretch, then reduce low-tension areas to 1.5X stretch.
If there is concern that the patient may experience a post-operative inflammatory response (e.g. immune-compromised, older patients, etc.), set the maximum tension to 1.5X stretch, then reduce low-tension areas to 1.25X stretch.
Note: No significant change in wound shape or size should be expected while the vacuum is applied.
Installing the Button Tails
13 Button Tails should be installed initially in the OR.
A Clean the skin area 10 cm beyond the Button Anchors with an alcohol wipe. A skin preparatory wipe designed to increase skin adhesion may also be used after cleaning.
Skin preparation
area
10 cm
10 cm
Low tension
High tension
Low tension
B Fold the front of the release liner under, without
exposing the adhesive, then hook a Button Tail on each Button Anchor. To fully secure hook to Button Anchor, lift back of Button Anchor and tilt the hook ver tically to allow it to drop into the slot.
Button Anchor
Hook
Release Liner Button Tail
9 IFU0235A

1D1544RC
C Star ting at the widest point of the
wound, slide the Button Anchors back
slightly (< 0.5 cm). This important
step pre-loads the Button Tails with
tension, thus distributing some of the
load from the Button Anchor.
front edge
Keeping the Button Tail firmly in position, peel off the
liner and press onto the skin. For optimal adhesion,
gently rub the entire surface of the Button Tail onto
the skin. (Try not to touch the adhesive side while
peeling off the liner.)
D Button Tails will overlap, but trimming the
tails is usually only required to accommodate wound drains or defects.
The Button Tail uses a single contact adhesive and cannot be re-positioned once it is applied to the skin. If re-positioning is required, peel off and replace with a new Button Tail.
Do not trim
in wire area.
Post-operative Instructions
Physician Care (every 24 hours)
14 1. Re-set elastomer tensions to 2X stretch.
2. Do "The Move". (See Page 8)
3. Re-set all elastomer tensions to 2X stretch, then reduce low-tension areas to 1.5X stretch.
Tips:
•Normalize fluid balance, if possible, to minimize abdominal volumes.
•Maintain lower respirator volumes, if possible, to minimize pressure on diaphragm.
Dressing Changes
15 NPWT dressings should be changed per manufacturer's protocol.
1. Remove dressings and inspect wound.
2. Clean and dry under Button Anchors.
3. Re-set elastomer tensions to 2X stretch.
4. Do “The Move”.
5. Re-set elastomer tensions to 2X stretch.
6. Re-install NPWT dressings and draw down.
7. Re-set all elastomer tensions to 2X stretch, then reduce low-tension areas to 1.5X stretch.
Tips:
•Ensure that the Silicone Sheet is clear of stomas and appliances. The sheet can be trimmed and drawn out of
the way at the surgeon’s discretion (see Page 4).
•Do not cover Button Anchors with occluding dressings.
Nursing Care (once per shift, or every 12 hours)
16 1. Clean and dry the skin under the Button Anchors. 2. Check that Button Tails are attached and engaged. Button Tails should be replaced when necessary.
Note: Monitor peak ventilator pressure at all times. Sharp increases may indicate an inflammatory response and a need to
call the attending physician to decrease elastomer tensions to 1.5X stretch.
Refer to Post-operative Nursing Instruction sheet (IFU0236) in Floor Pack supplied with the ABRA Abdominal Wound
Closure Set or visit www.southmedic.com for the most current version.
10 IFU0235A

11 1D1544RC
Close: Primary Closure
When to Close
17 A low-tension fascial closure can usually be achieved when the fascial margins have been re-approximated to within 1 cm.
Closing too early may result in unacceptable increases in abdominal compartment pressure and increased risk of re-herniation. Manually assessing the force required to re-approximate fascial margins is recommended at dressing changes and prior to
attempting final closure.
Primary Closure
18 Remove the Button Anchors, leaving the elastomers in place. Elastomers can be retained using hemostats clamped on the
elastomer ends. Remove Button Tails, Elastomer Retainer and Silicone Sheet viscera protector. Once it is determined that a low-tension closure is feasible, remove elastomers. Suture fascia using established protocols at surgeon’s discretion.
Tip: Elastomers can be left in during initial suturing until it is concluded that a low-tension closure is feasible. This allows the
system to be quickly re-installed, should it be determined that closure tension remains too high, as indicated by significant
increases in peak ventilator pressures and surgeon’s assessment. If unacceptable tension exists, remove all sutures, re-install
the ABRA Abdominal Wall Closure System with NPWT, and re-assess in 1-2 days.
CriticaWarnings
If peak ventilator pressure or bladder pressure is adversely increasing during an inflammatory response, elastomer
tensions should be reduced to 1.5X stretch to normalize pressure.
Monitor the patient's fluid balance. If appropriate, consider steps to reduce interstitial volumes. High fluid balance
increases abdominal volumes and makes fascial re-approximation more difficult.
Constipation may increase bowel volume, which may slow wound closure progress.
The Button Anchor pad is occlusive so it is important to clean and dry under the Buttons at least once every 12 hours,
or every nursing shift, to prevent skin maceration. Hydrocolloid or other dressings may be placed under the Buttons to
assist in moisture collection and load distribution.
Button Anchors and Button Tails must remain dry. Do not cover with occlusive dressings.
The Button Tails must be maintained at all times. Improperly installed or maintained Button Tails will result in
unnecessary skin tears. Replace Button Tails immediately if skin tears are observed.
Do not trim elastomer ends. The added length may be required during an inflammatory response period.
Do not restrain or knot the ends of the elastomer beyond the cleat of the Button Anchor.
Tips:
During the post-operative period, the system may be loosened and the viscera protector re-positioned to allow for inspection and cleaning of the wound.
During patient transfers, abdominal binders may be used to temporarily support the mass of adipose tissues.
(Do not leave binder in place for more than 10 minutes!)
IFU0235A
Emergo Europe
Molenstraat 15
2513 BH, The Hague
The Netherlands
50 Alliance Blvd.,
Barrie, Ontario,
Canada, L4M 5K3
705-726-9386
705-728-9537 FAX
www.southmedic.com
U.S Distribution Center
111 Harvester Rd.
West Chicago, IL
60185