accessories - roland care service & support |...
TRANSCRIPT

AccessoriesThe following items are included with this machine. Check that all items are present.
Power cord (1) USB cable (1) Wiper (1)Jig for inserting cartridges
(1) **SOL INK cleaning cartridge (1)** and
dummy cartridge(4) ** Software RIP***(1)
Blade holder, blade, Pin (1 each) Cleaning sticks Felt wiper (1) Cleaning fluid (1) ** Inkjet printer maintenance guide (1)**
Media flanges (2),Media bar (1), Mounting pin (1)
Tweezers (1)Roland Software
Package (1)
Label for cartridge slot (one each for ECO-SOL MAX and
FPG)Operation manuals (4)*
* "To Ensure Safe Use," "First Step Guide" (this document)," "MASTER GUIDE," "BN-20 VersaWorks Metallic Silver Ink Guide" ** Included only in ECO-SOL MAX ink type machines, *** Roland VersaWorks (with Quick Start Guide)
Thank you very much for purchasing the BN-20.This document describes the procedure of "First Time Printing and Cutting," from installation and setup of this machine to the actual printing.
About Roland OnSupportUsing OnSupport allows you to receive your printer's ink status and error information as an email sent to your PC and mobile phone. You can also receive product updates and other support information from OnSupport. To install OnSupport, download from the following URL.http://download.rolanddg.jp/en/bn_onsupport.html
R1-110607
ImportantLeave the main power switched on at all times.Never switch off the main power. By switching on the main power, the automatic maintenance function is carried out periodically. If the automatic maintenance is not carried out, it may result in a machine breakdown, e.g. damage to the print heads.
Never switch off the main power or unplug the power cord during operation.Switching off the main power or unplugging the power cord during operation may damage the print heads. Be sure to first switch off the sub power. If the main power is accidentally switched off, immediately turn the main and sub power back on.
Periodic use of the machine is recommended.We recommend using the machine at least once a week. If left unused for a long period of time, the ink may settle, resulting in unstable discharge (and dot drop-out). Any dry ink will need to be discharged.
Allow the ink to dry completely.After output, allow the ink to dry completely. In particular, metallic silver ink must be printed with a high concentration and takes longer to dry than CMYK ink.
Lamination of metallic silver ink is strongly recommended.Because metallic silver ink may not be as weather resistant as CMYKLcLm ink, depending on conditions, we strongly recommend laminating output of metallic silver ink.
Thank you for purchasing this product. To ensure safe use of this product and to thoroughly familiarize yourself with its performance,
be sure to read this operation manual and store it for future reference. Unauthorized copying or transfer, in whole or in part, of this manual is prohibited. The contents of this document and the specifications of this product are subject to change
without notice. The documentation and the product have been prepared and tested as much as possible. If you
find any misprint or errors, please inform us. Roland DG Corp. assumes no responsibility for any direct or indirect loss or damage which may
occur through use of this product, regardless of any failure of this product. Roland DG Corp. assumes no responsibility for any direct or indirect loss or damage which may
occur with respect to any article made using this product.
This product is using GNU General Public License (GPL) / GNU Lesser General Public License (LGPL) software. You have the right to acquire, modify, and distribute the source code for this GPL/LGPL software. You can obtain the GPL/LGPL source code used in this product by downloading it from the following website.URL: http://www.rolanddg.com/gpl/
RolandDG Corp. has licensed the MMP technology from the TPL Group.
http://www.rolanddg.com/
Company names and product names are trademarks or registered trademarks of their respective holders.
Copyright © 2011 Roland DG Corporation
CV_BN-20_STA_EN_R1.indd 1 2011/06/08 10:43:42

Select [No, not this time], and then click [Next].Select [Install the software automatically], and then click [Next].
* When having difficulty pulling out the dummy cartridges which is used for filling with ink, insert the Jig for inserting cartridges into the slots to make the task easier.
When the message of "The ink tanks have been filled" appears, filling with ink is completed. Click [Close], and then continue to “Printing and Cutting for the First Time” on the back.
2.Setting up the printer
Place the label for the ink type that will be used.Mixing different types of ink may cause a malfunction. Please make sure to affix this label.
Close the front cover, press Main power, and then press POWER key.When the POWER key indicator changes f r o m f l a s h i n g t o s t e a d y, s t a r t u p i s completed.
Connect the machine to the computer by USB cable.Use the supplied USB cable.Do not use a USB hub.
Windows Vista / 7:The driver is installed automatically. Go to Procedure .
Windows XP:
1. Installing the software
Insert the Roland Software Package CD-ROM into the computer.Windows Vista or 7 : When the automatic playback window appears, click [Run Setup.exe].
Click [Install] for either "Driver & Util-ity" or "R-Works."The order of the installation is not important.
Windows Vista or 7: When the [User Account Control] appears, click [Allow] or [Yes].
Driver & UtilityInstalls the BN-20 driver and utility software.
Select [Install], Model name [Roland BN-20], Port [USB], and then click [Start].Installation of the BN-20 driver starts. Proceed with the installation by following the on-screen instructions.
Windows Vista / 7:If the screen shown in the figure appears, click [Install this driver software anyway].
Windows XP:If the screen shown in the figure appears, click [Continue Anyway].
After completing the instal lat ion of the driver, continue to install the utility software.When the screen shown on the lef t appears, the installation is complete.
R-WorksInstalls R-Works.
Proceed with the installation by following the on-screen instructions.When the screen shown on the lef t appears, the installation is complete.
Remove the Roland Software Package CD-ROM from the computer.
System requirements
Operating system Windows XP/Vista/7 (32- or 64-bit)
CPU and RAM CPU of 2.0-GHz or faster Core 2 Duo, and RAM of 2 GB or more
Optical drive CD-ROM drive
Video card and display Recommended: 1024 x 768 dots or higher, 256 colors or more
For the latest information, see the Roland DG Corp. website (http://www.rolanddg.com).
This software is a 32-bit application and uses WoW64 (Windows 32-bit On Windows-64) when run on a 64-bit Windows system.
Operations have not been confirmed in Windows XP mode.
Installation LocationTemperature and HumidityMaintain the specified temperature and humidity even when the machine is not in use. If temperatures are too high or too low, it may cause the machine to malfunction. During operation: Temperature 20 to 32˚C (68 to 90˚F), relative humidity
35 to 80% (no condensation) During non-operation: Temperature 5 to 40˚C (41 to 104˚F), relative
humidity 20 to 80% (no condensation)
Installation Space
Provide space as shown in the figure on the left.
Height of InstallationThe height of installation should be 0.6 m (23.7 in.) or higher above the work floor. This machine is desktop type. Please decide the height of installation so that you can easily reach the emergency stop button when operating this machine.
Installation
Installing and Setting Up the Software
Work Space
600 mm
1000 mm
1010 mm
1400 mm
Unit Space
Removing and storing the retainer
WARNINGCarry out these operations before you connect the power cord.Inadvertent powerup may result in pinched hands or other injury.
Be sure to remove the retainer. Failure to do so may cause faulty operation or breakdown when the power is switched on.
The retainer is required when moving the machine to a different location. Store it carefully so that it does not get misplaced.
Connecting the Power Cable
WARNINGPerform this task with all power switches left switched off.Otherwise sudden movement of the machine may cause injury.
Installation software
BN-20 drive Driver required for sending data from a computer to this machine.
UtilitySoftware for operating the machine, checking its status, and performing maintenance.
R-Works Software for creating output data.
* For information on how to install software RIP (Roland VersaWorks), refer to "Roland VersaWorks Quick Start Guide."
ImportantDo not connect the machine with a computer using a USB cable before installing the BN-20 driver. If you do so, you may not be able to install the BN-20 driver.
300 mm
350 mm(Front)
(Rear)
Click [Continue Anyway].
Select [No, not this time], and then click [Next].
Select [Install the software auto-matically], and then click [Next].
Remove the Roland Software Package CD-ROM from the computer, click [Back], and start over from the previ-ous screen.
If this screen appears during installation
Click [Finish].Do not uncheck.
01_BN-20_STA_EN_R1.indd 2 2011/06/08 10:43:57

STEP 1: Installing the Blade and Roll Media
Prepare roll media for printing and cutting that meets the following criteria: Width: 150 - 515 mm (5.9 - 20.27 in.). Paper tube inner diameter: 3 or 2 inches.*In this manual, the paper wound onto the paper tube is called "roll media."* To purchase these media, contact your authorized dealer or Roland DG.
Printing and Cutting for the First Time
Make sure that there are no gaps.
Unit
Media feeding direction
OK NG
Media flange
Media barMounting pin
Push in
Push the loading lever backward.
Move the left media guide to the left.
Push in
Media bar
Media clamp
Pull the loading lever forward.
Close the front cover.
Make sure the left media guide is pressed against the media flange.
Insert the side of the media bar with a hole into the media flange, and secure it with the mounting pin. Use one of the two media flanges. The inside should be the one that fits the inner diameter of the roll media paper tube.
Place the fixed media flange at the bottom, so that the media feeds in a clockwise direction when looking from above. You cannot set the media correctly if the feed direction is not right.
Pull the media straight to keep it taut, and let it pass beneath the media clamps.
Initialization starts when the front cover is closed and the loading lever is raised. Initialization is complete when the POWER key stops flashing and remains lit.
* For detailed information about how to install sheet media, such as standard-sized media, and usable media for this machine, refer to "BN-20 Master Guide."
Move the roll media to the right so the media flange touches the right media guide. Right media guide
Media flange
Slide the left media guide and press it to the media flange.Left media
guide
Media flange
Hole
Important Note on the Handling and Use of the Cutting CarriageLeave the cutting-carriage screw loose when no blade holder is in-stalled. Keeping the screw tightened causes the blade-holder inser-tion hole to become gradually smaller, making installation difficult.
Insert the pin into the blade holder.Insert until the tip protrudes about 3 - 5 mm (0.12 - 0.20 in.).
Loosen the screw shown in the figure.Open the front cover.
Insert the blade.
Support the screw from below and insert the blade holder.Installing it without supporting the screw from below can adversely affect the cutting quality.
Tighten the screw.Tug the blade holder upward to make sure it does not come loose.
1. Installing the Blade
2.Loading the Roll Media
02_BN-20_STA_EN_R1.indd 3 2011/06/07 20:28:12
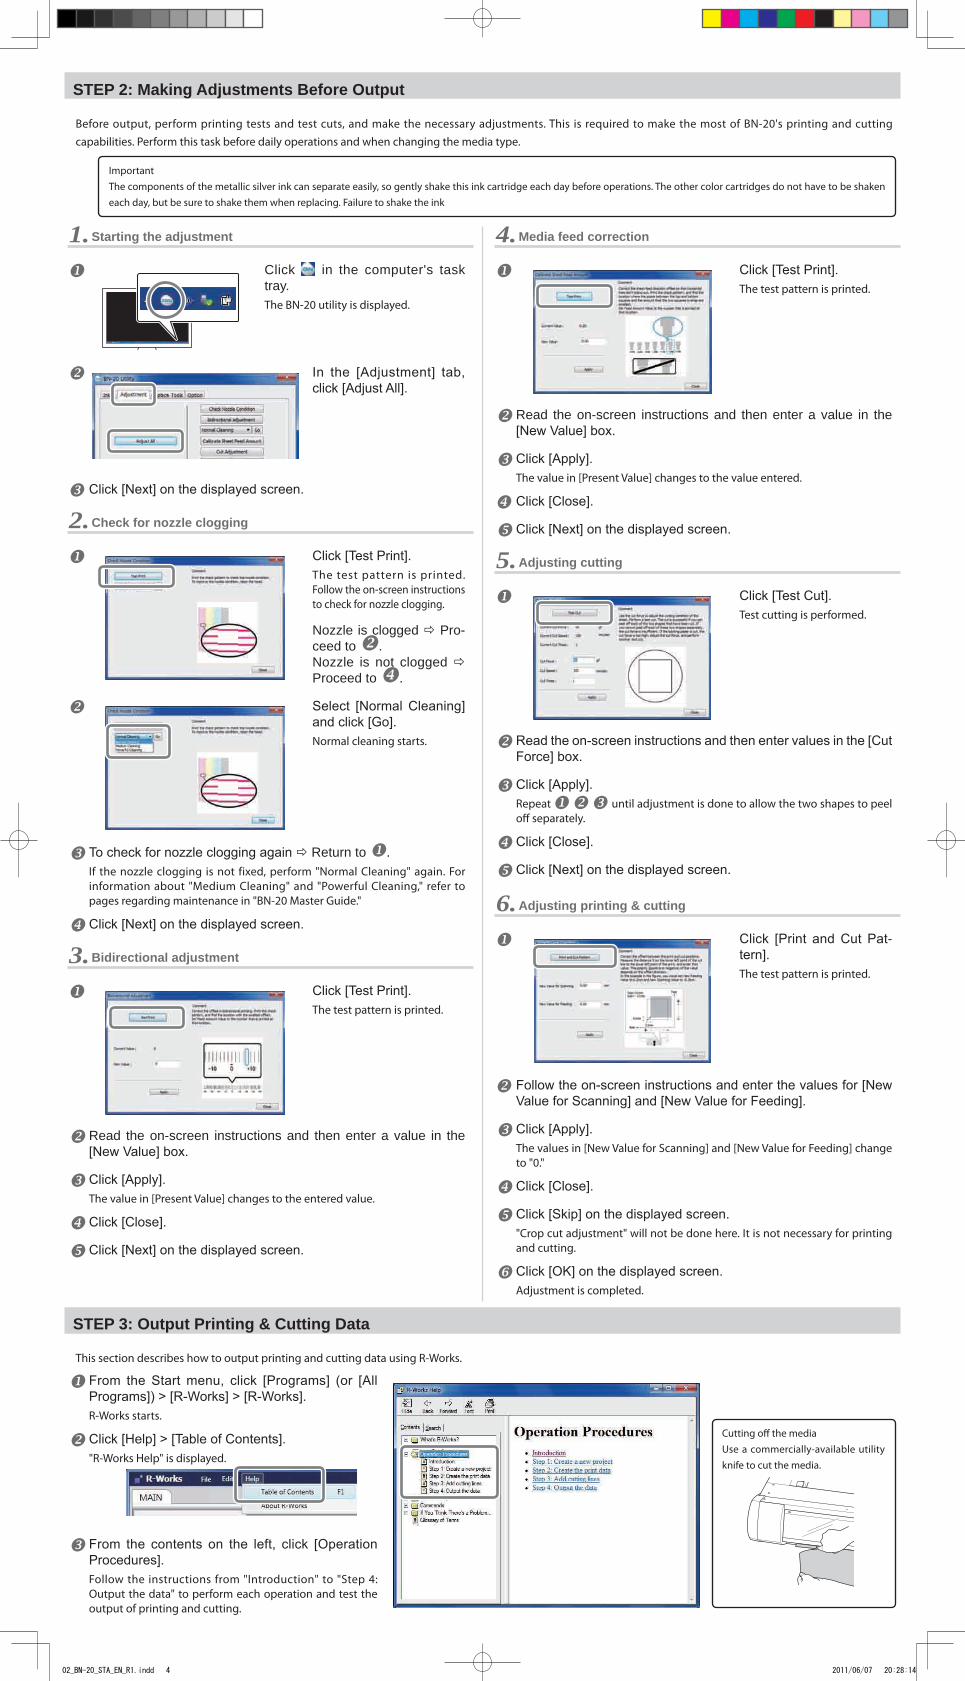
STEP 3: Output Printing & Cutting Data
This section describes how to output printing and cutting data using R-Works.
From the Start menu, click [Programs] (or [All Programs]) > [R-Works] > [R-Works].R-Works starts.
Click [Help] > [Table of Contents]."R-Works Help" is displayed.
From the contents on the left, click [Operation Procedures].Follow the instructions from "Introduction" to "Step 4: Output the data" to perform each operation and test the output of printing and cutting.
4.Media feed correction
Click [Test Print].The test pattern is printed.
Read the on-screen instructions and then enter a value in the [New Value] box.
Click [Apply].The value in [Present Value] changes to the value entered.
Click [Close].
Click [Next] on the displayed screen.
5.Adjusting cutting
Click [Test Cut].Test cutting is performed.
Read the on-screen instructions and then enter values in the [Cut Force] box.
Click [Apply].Repeat until adjustment is done to allow the two shapes to peel off separately.
Click [Close].
Click [Next] on the displayed screen.
6.Adjusting printing & cutting
Click [Print and Cut Pat-tern].The test pattern is printed.
Follow the on-screen instructions and enter the values for [New Value for Scanning] and [New Value for Feeding].
Click [Apply].The values in [New Value for Scanning] and [New Value for Feeding] change to "0."
Click [Close].
Click [Skip] on the displayed screen."Crop cut adjustment" will not be done here. It is not necessary for printing and cutting.
Click [OK] on the displayed screen.Adjustment is completed.
1.Starting the adjustment
Click in the computer's task tray.The BN-20 utility is displayed.
In the [Adjustment] tab, click [Adjust All].
Click [Next] on the displayed screen.
2.Check for nozzle clogging
Click [Test Print].The test pattern is printed. Follow the on-screen instructions to check for nozzle clogging.
Nozzle is clogged Pro-ceed to .Nozzle is not clogged Proceed to .
Select [Normal Cleaning] and click [Go].Normal cleaning starts.
To check for nozzle clogging again Return to .If the nozzle clogging is not fixed, perform "Normal Cleaning" again. For information about "Medium Cleaning" and "Powerful Cleaning," refer to pages regarding maintenance in "BN-20 Master Guide."
Click [Next] on the displayed screen.
3.Bidirectional adjustment
Click [Test Print].The test pattern is printed.
Read the on-screen instructions and then enter a value in the [New Value] box.
Click [Apply].The value in [Present Value] changes to the entered value.
Click [Close].
Click [Next] on the displayed screen.
Cutting off the mediaUse a commercially-available utility knife to cut the media.
STEP 2: Making Adjustments Before Output
Before output, perform printing tests and test cuts, and make the necessary adjustments. This is required to make the most of BN-20's printing and cutting capabilities. Perform this task before daily operations and when changing the media type.
ImportantThe components of the metallic silver ink can separate easily, so gently shake this ink cartridge each day before operations. The other color cartridges do not have to be shaken each day, but be sure to shake them when replacing. Failure to shake the ink
02_BN-20_STA_EN_R1.indd 4 2011/06/07 20:28:14