accord server user guide; · 7.1.2 archiving .....59 7.1.2.1 configuring a threshold ... 9.7 plc...
TRANSCRIPT
Accord Server
Accord Server V3.22 User Guide R03 Page 0 of 189
Accord Server
User Guide
Document: Accord Server V 3.22 User Guide R03
Accord Server
Accord Server V3.22 User Guide R03 Page 1 of 189
Table of Contents
1 Introduction ...................................................................................................................... 10
2 Product Overview ............................................................................................................. 11
3 Installation ........................................................................................................................ 12
3.1 Requirements ............................................................................................................ 12
3.1.1 Recommended ................................................................................................... 12
3.2 Installation ................................................................................................................. 13
3.3 Initial Configuration ................................................................................................... 16
3.3.1 Database Management ...................................................................................... 16
3.3.2 OPC Configuration.............................................................................................. 19
3.3.3 Advanced Communications ............................................................................... 22
3.3.4 Service Redundancy ........................................................................................... 23
3.3.5 User Management ............................................................................................. 24
3.3.6 Archiving ............................................................................................................ 25
3.4 Uninstallation ............................................................................................................ 26
4 Understanding Accord Server ........................................................................................... 27
4.1 The Service Manager ................................................................................................. 27
4.1.1 Service Control ................................................................................................... 27
4.1.2 Module Status .................................................................................................... 28
4.1.2.1 Obtaining Module Status Information ....................................................... 30
4.1.2.2 Acknowledging a Status .............................................................................. 31
4.1.3 Quick Launch ...................................................................................................... 31
4.2 OPC Manager ............................................................................................................ 32
4.3 The Project Manager ................................................................................................. 34
4.4 Tools .......................................................................................................................... 35
4.5 Settings ...................................................................................................................... 37
4.5.1 Historian ............................................................................................................. 38
4.5.1.1 Devices ........................................................................................................ 38
4.5.1.2 Archiving ..................................................................................................... 38
4.5.2 Security .............................................................................................................. 38
Accord Server
Accord Server V3.22 User Guide R03 Page 2 of 189
4.5.2.1 Access Levels............................................................................................... 38
4.5.2.2 Users ........................................................................................................... 38
4.5.2.3 Projects ....................................................................................................... 38
4.5.3 Communications ................................................................................................ 39
4.5.3.1 ActiveX ........................................................................................................ 39
4.5.3.2 Advanced .................................................................................................... 39
4.5.3.3 External Tags ............................................................................................... 39
4.5.3.4 Redundancy ................................................................................................ 39
4.5.4 Start-up Modules ............................................................................................... 39
4.5.5 Event Logging ..................................................................................................... 39
4.5.6 Performance ...................................................................................................... 40
4.5.7 Email ................................................................................................................... 40
4.5.8 Language ............................................................................................................ 40
4.5.9 Version ............................................................................................................... 40
4.5.10 Accord Server Password .................................................................................... 40
4.5.11 License ................................................................................................................ 40
5 Managing OPC Profiles ..................................................................................................... 41
5.1 Adding a Profile ......................................................................................................... 42
5.2 Deleting a Profile ....................................................................................................... 42
5.3 Changing OPC Server ................................................................................................. 43
5.3.1 Supported OPC Servers ...................................................................................... 43
5.4 Changing PLC Type .................................................................................................... 43
5.4.1 Supported PLC’s ................................................................................................. 43
5.5 Detaching a Project ................................................................................................... 44
5.6 Changing OPC Channel/Device ................................................................................. 44
5.7 Changing the Available Memory ............................................................................... 45
5.8 Changing Update Rate ............................................................................................... 45
5.9 Activating/Deactivation an OPC Group ..................................................................... 46
5.10 Viewing Related OPC Groups .................................................................................... 46
5.11 Licensing .................................................................................................................... 47
5.11.1 License Types ..................................................................................................... 49

Accord Server
Accord Server V3.22 User Guide R03 Page 3 of 189
5.11.2 Configuring a License ......................................................................................... 49
5.12 Viewing Project Device Counts ................................................................................. 51
6 Managing Projects ............................................................................................................ 52
6.1 Downloading a Project .............................................................................................. 54
6.2 Re-Importing a Project .............................................................................................. 54
6.3 Synchronising a Project ............................................................................................. 54
6.4 Deleting a Project ...................................................................................................... 54
6.5 Activating/Deactivating a Project.............................................................................. 55
6.6 Viewing Project Deployment..................................................................................... 55
6.7 Generating an Excel Tag List ..................................................................................... 55
7 Configuration Settings ...................................................................................................... 56
7.1 Historian .................................................................................................................... 57
7.1.1 Devices ............................................................................................................... 57
7.1.1.1 Activating/Deactivating Logging ................................................................. 57
7.1.1.2 Deadbands .................................................................................................. 58
7.1.1.2.1 Understanding Deadbanding .................................................................. 58
7.1.1.2.2 Setting a Deadband ................................................................................. 58
7.1.2 Archiving ............................................................................................................ 59
7.1.2.1 Configuring a Threshold ............................................................................. 60
7.1.2.2 Configuring Automatic Deletion of Archives .............................................. 60
7.1.2.3 Configuring the Off-Peak Schedule ............................................................ 60
7.2 Security ...................................................................................................................... 61
7.2.1 Access Levels ...................................................................................................... 61
7.2.1.1 Configuring an Access Level ....................................................................... 62
7.2.2 Users .................................................................................................................. 63
7.2.2.1 Adding a User.............................................................................................. 63
7.2.2.2 Deleting a User ........................................................................................... 64
7.2.2.3 Changing a User’s Password ....................................................................... 65
7.2.2.4 Changing a User’s Email .............................................................................. 66
7.2.2.5 Associating a User with an Active Directory Login ..................................... 67
7.2.3 Projects .............................................................................................................. 69
Accord Server
Accord Server V3.22 User Guide R03 Page 4 of 189
7.2.3.1 Adding a User Group .................................................................................. 69
7.2.3.2 Deleting a User Group ................................................................................ 70
7.2.3.3 Assigning a User Group to a User ............................................................... 70
7.3 Communications ....................................................................................................... 71
7.3.1 ActiveX ............................................................................................................... 71
7.3.1.1 Changing the Legacy Port ........................................................................... 71
7.3.1.2 Changing Service Visibility .......................................................................... 72
7.3.2 Advanced Communications for Accord HMI Controls ....................................... 73
7.3.2.1 Changing the Interface ............................................................................... 74
7.3.2.2 Changing the Advanced Port ...................................................................... 74
7.3.2.3 Changing Remote Clients ............................................................................ 74
7.3.3 External Tags ...................................................................................................... 75
7.3.3.1 Adding an External Tag ............................................................................... 76
7.3.3.2 Deleting an External Tag ............................................................................. 77
7.3.3.3 Changing the OPC Tag ................................................................................ 77
7.3.3.4 Changing the Engineering Unit ................................................................... 78
7.3.3.5 Changing the Active/Inactive State ............................................................ 78
7.3.3.6 Exporting External Tags to CSV File ............................................................ 79
7.3.3.7 Importing External Tags from CSV File ....................................................... 79
7.3.4 Redundancy ....................................................................................................... 80
7.3.4.1 Primary Service versus Partner Service ...................................................... 81
7.3.4.2 How does it work? ...................................................................................... 82
7.3.4.3 Configuring a Primary Service .................................................................... 83
7.3.4.4 Configuring a Partner Service ..................................................................... 83
7.3.4.5 Creating a Partnership ................................................................................ 83
7.3.4.6 Deleting a Partnership ................................................................................ 85
7.3.4.7 Changing a Partnerships Name .................................................................. 85
7.3.4.8 Changing a Partnerships Server .................................................................. 86
7.3.4.9 Changing a Partnerships Port ..................................................................... 86
7.3.4.10 Changing a Partnerships Priority ................................................................ 86
7.4 Start-up Modules ...................................................................................................... 87
Accord Server
Accord Server V3.22 User Guide R03 Page 5 of 189
7.4.1 Enabling/Disabling Auto Start ............................................................................ 87
7.4.2 Enabling/Disabling a Module ............................................................................. 88
7.5 Event Logging ............................................................................................................ 89
7.5.1 Choosing Log File Location ................................................................................. 90
7.5.2 Clearing the Log File ........................................................................................... 90
7.5.3 Configuring a Log Level ...................................................................................... 90
7.6 Performance .............................................................................................................. 91
7.6.1 Computer Rating ................................................................................................ 92
7.6.2 Understanding Threading .................................................................................. 93
7.6.3 Memory .............................................................................................................. 93
7.6.3.1 Setting the Memory Level .......................................................................... 94
7.6.4 Processor ............................................................................................................ 94
7.6.5 Setting the Processor Priority Level ................................................................... 95
7.7 Email .......................................................................................................................... 96
7.7.1 Configuring an SMTP Server .............................................................................. 97
7.8 Language ................................................................................................................... 98
7.8.1 Changing Language ............................................................................................ 98
7.9 Version ...................................................................................................................... 99
7.10 License ..................................................................................................................... 100
7.10.1 Configuring a License ....................................................................................... 100
8 The Service ...................................................................................................................... 102
8.1 Understanding the Service ...................................................................................... 102
8.2 Determining Service State ....................................................................................... 102
8.3 Starting the Service ................................................................................................. 104
8.4 Stopping the Service ................................................................................................ 105
8.4.1 Shutting Down Windows ................................................................................. 105
9 Tools & Diagnostics ......................................................................................................... 106
9.1 Accord Server Diagnostics Manager ....................................................................... 106
9.2 ActiveX Connection Monitor ................................................................................... 107
9.2.1 Accessing the ActiveX Connection Monitor ..................................................... 107
9.3 Data Archiving Monitor ........................................................................................... 108
Accord Server
Accord Server V3.22 User Guide R03 Page 6 of 189
9.3.1 Accessing the Data Archiving Monitor ............................................................. 109
9.4 Manual Archiving .................................................................................................... 110
9.5 Database Management ........................................................................................... 111
9.5.1 Accessing the Database Management Tool ..................................................... 112
9.5.2 Selecting a DBMS Server .................................................................................. 112
9.6 OPC Diagnostics ....................................................................................................... 113
9.6.1 Accessing the OPC Diagnostics Tool ................................................................ 114
9.6.2 OPC Device Communications Diagnostics ....................................................... 115
9.6.3 UDT Layout Viewer .......................................................................................... 116
9.7 PLC Register Status .................................................................................................. 117
9.7.1 Accessing the OPC Diagnostics Tool ................................................................ 118
9.7.2 Adding a Register Profile .................................................................................. 118
9.7.3 Deleting a Profile .............................................................................................. 119
9.7.4 Adding Tags ...................................................................................................... 120
9.7.5 Changing Tag Values ........................................................................................ 121
9.7.6 Deleting a Tag .................................................................................................. 121
9.8 Scan Time Optimiser ............................................................................................... 122
9.8.1 Accessing the Scan Time Optimiser ................................................................. 122
9.8.2 Optimising Scan Time....................................................................................... 123
9.9 Device Report (Basic) .............................................................................................. 124
9.9.1 Accessing the Device Report (Basic) ................................................................ 125
9.10 Device Report (Complete) ....................................................................................... 126
9.10.1 Accessing the Device Report (Complete) ......................................................... 127
9.11 Excel Tag List ........................................................................................................... 128
9.11.1 Generating an Excel Tag List ............................................................................ 128
9.12 Accord Server Configuration Report ....................................................................... 129
9.12.1 Generating a Config Report ............................................................................. 130
9.13 Resource Monitor.................................................................................................... 131
9.13.1 Accessing the Resource Monitor ..................................................................... 131
9.14 Project Downloader ................................................................................................ 132
9.14.1 Accessing the Project Downloader .................................................................. 132
Accord Server
Accord Server V3.22 User Guide R03 Page 7 of 189
9.14.2 Importing a Project .......................................................................................... 132
9.14.3 Full Download with Reset ................................................................................ 133
9.14.4 Full Download without Reset ........................................................................... 134
9.14.5 Partial Download .............................................................................................. 134
9.14.6 Project Selection .............................................................................................. 135
9.14.7 Import Progress ............................................................................................... 137
9.14.8 Profile Selection ............................................................................................... 139
9.14.9 Download Type Selection ................................................................................ 140
9.14.10 Memory Assignment .................................................................................... 141
9.14.10.1 Assigning Spares ....................................................................................... 143
9.14.10.2 Automatically Assigning Spares to Pending Objects ................................ 143
9.14.10.3 Resetting Assigned Spares ....................................................................... 143
9.14.11 Priming Progress .......................................................................................... 143
9.14.12 Download Confirmation ............................................................................... 145
9.14.12.1 No Changes Detected ............................................................................... 148
9.14.12.2 Device Summary Report .......................................................................... 149
9.14.12.3 List Space Summary Report ..................................................................... 150
9.14.12.4 Data (Download) Summary Report .......................................................... 151
9.14.12.5 Data (Config) Summary Report ................................................................ 152
9.14.12.6 Recipe Summary Report .......................................................................... 153
9.14.12.7 Transition Summary Report ..................................................................... 154
9.14.12.8 Reference Summary Report ..................................................................... 155
9.14.13 Download Progress ...................................................................................... 156
9.14.14 Download Summary ..................................................................................... 158
9.15 Project Synchroniser ............................................................................................... 159
9.15.1 Accessing the Project Synchroniser ................................................................. 160
9.15.2 The Synchronisation UI .................................................................................... 161
9.15.2.1 Synchronisation Aids ................................................................................ 162
9.15.2.2 Device Filtration ........................................................................................ 162
9.15.2.3 Apply to All ................................................................................................ 163
9.15.2.4 Apply to Selection ..................................................................................... 163
Accord Server
Accord Server V3.22 User Guide R03 Page 8 of 189
9.15.2.5 Apply to Highlighted ................................................................................. 164
9.15.3 Performing Synchronisation ............................................................................ 164
9.16 Security Log Viewer ................................................................................................. 165
9.16.1 Accessing the Security Log Viewer ................................................................... 167
9.16.2 Searching the Log ............................................................................................. 167
9.17 Schedule Management ........................................................................................... 168
9.17.1 Accessing the Schedule Management Tool ..................................................... 169
9.17.2 Defining/Editing a Schedule ............................................................................. 169
9.17.3 Deleting a Schedule ......................................................................................... 170
9.18 Exporting Data ......................................................................................................... 171
10 Troubleshooting .......................................................................................................... 172
10.1 OPC Configuration ................................................................................................... 172
10.1.1 No OPC Servers Found ..................................................................................... 172
10.1.2 OPC Channel/Device Not Found ...................................................................... 172
10.1.3 The PLC ID Cannot Be Loaded .......................................................................... 173
10.1.4 Voucher Activation Failure............................................................................... 173
10.2 The Service .............................................................................................................. 174
10.2.1 The Service Fails to Start .................................................................................. 174
10.2.2 The Service Fails to Stop .................................................................................. 174
10.2.3 The Service Cannot be Stopped/Started ......................................................... 175
10.3 ActiveX Communications ........................................................................................ 176
10.3.1 Accord Controls Unable to Connect ................................................................ 176
10.3.2 Accord Controls Showing Missing Status ......................................................... 176
10.3.3 Accord Controls Showing Bad Communications.............................................. 177
10.4 Advanced Communications..................................................................................... 178
10.4.1 Accord Controls Unable to Connect ................................................................ 178
10.4.2 Accord Controls Showing Missing Status ......................................................... 178
10.4.3 Accord Controls Showing Bad Communications.............................................. 179
10.4.4 Accord Controls Interaction Sluggish ............................................................... 179
10.5 OPC Communications .............................................................................................. 181
10.5.1 Device Not Listed ............................................................................................. 181
Accord Server
Accord Server V3.22 User Guide R03 Page 9 of 189
10.5.2 Project Mismatch ............................................................................................. 181
10.5.3 Bad Quality Reads ............................................................................................ 182
10.6 Project Deployment ................................................................................................ 183
10.6.1 Accord Builder Project Not Listed .................................................................... 183
10.6.2 Accord Builder Project Incompatible ............................................................... 183
10.6.3 Inconsistent Accord Builder Project................................................................. 183
10.6.4 Partial Download Expected, But Full Download With Reset Required ............ 184
10.6.5 Partial Download Larger Than Expected .......................................................... 184
10.6.6 The Reserved Entry .......................................................................................... 184
10.6.7 PLC Reset Failure .............................................................................................. 185
10.6.8 Project Mismatch ............................................................................................. 186
10.7 Service Redundancy ................................................................................................ 187
10.7.1 Primary Service Not Found .............................................................................. 187
10.7.2 Consolidation Failures ...................................................................................... 187
10.7.3 Partner Service Fails to Deactivate a Partner Project ...................................... 188
Accord Server
Accord Server V3.22 User Guide R03 Page 10 of 189
1 Introduction
Accord Server is a data acquisition and reporting tool developed to simplify the
development of complex SCADA systems. Accord Server is part of the Accord platform, for
systems developed using Accord Builder, the control system model development
environment for the platform. Accord Server provides a platform for Operations
Functionality and Engineering functionality. The platform for Operations is given by object
linking between PLC Data and the Accord Controls. Engineering functionality is provided in
data logging and reporting services, along with a number of diagnostics tools.
Using Accord Server, Engineering personnel can manage consistent projects developed
using Accord Builder that have been imported into the Accord Server database. It is not
possible to add, change or remove individual aspects of the control system through Accord
Server.
This document, which is intended for use by engineering personnel, describes how to install
and configure Accord Server. The illustrations in this document are using an Accord Project
‘CIP 1 Tank 1 Line C1’.
Accord Server
Accord Server V3.22 User Guide R03 Page 11 of 189
2 Product Overview
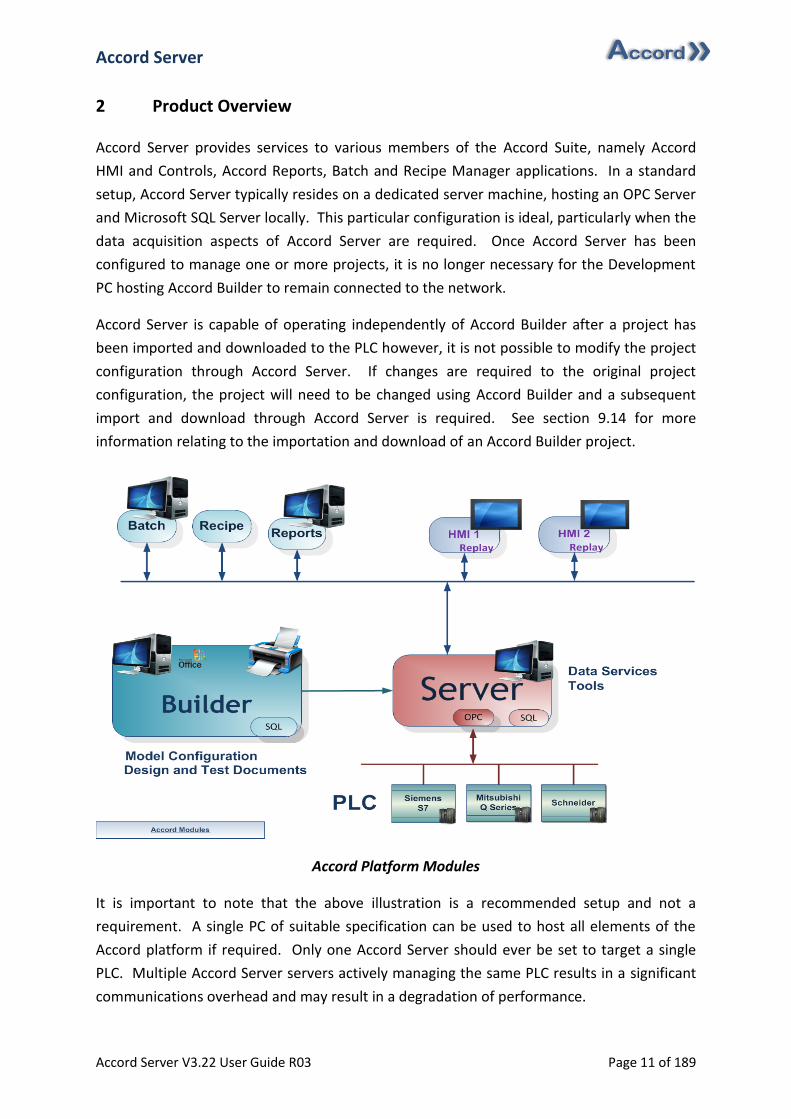
Accord Server provides services to various members of the Accord Suite, namely Accord
HMI and Controls, Accord Reports, Batch and Recipe Manager applications. In a standard
setup, Accord Server typically resides on a dedicated server machine, hosting an OPC Server
and Microsoft SQL Server locally. This particular configuration is ideal, particularly when the
data acquisition aspects of Accord Server are required. Once Accord Server has been
configured to manage one or more projects, it is no longer necessary for the Development
PC hosting Accord Builder to remain connected to the network.
Accord Server is capable of operating independently of Accord Builder after a project has
been imported and downloaded to the PLC however, it is not possible to modify the project
configuration through Accord Server. If changes are required to the original project
configuration, the project will need to be changed using Accord Builder and a subsequent
import and download through Accord Server is required. See section 9.14 for more
information relating to the importation and download of an Accord Builder project.
Accord Platform Modules
It is important to note that the above illustration is a recommended setup and not a
requirement. A single PC of suitable specification can be used to host all elements of the
Accord platform if required. Only one Accord Server should ever be set to target a single
PLC. Multiple Accord Server servers actively managing the same PLC results in a significant
communications overhead and may result in a degradation of performance.

Accord Server
Accord Server V3.22 User Guide R03 Page 12 of 189
3 Installation
3.1 Requirements
3.1.1 Recommended
Processor 1.6 GHz Quad Core Processor (or better)
Memory 4GB (or higher)
Disk Space A large disk is recommended for data acquisition, depending on the
requirements of the project(s) Accord Server will host.
DBMS Microsoft SQL 2014
Screen Resolution 1024x768 (or higher)
Operating System Windows 7 [Service Pack 1], Windows 8
Network Interface 1 GBps, Wired (Static IPv4)
Accord Server
Accord Server V3.22 User Guide R03 Page 13 of 189
3.2 Installation
Accord Server is installed as part of Accord Project installation. Accord Builder and HMI
Design are also installed. Before installing Accord Project, it is recommended to verify the PC
meets the recommended requirements above.
To install Accord Server, simply do the following:
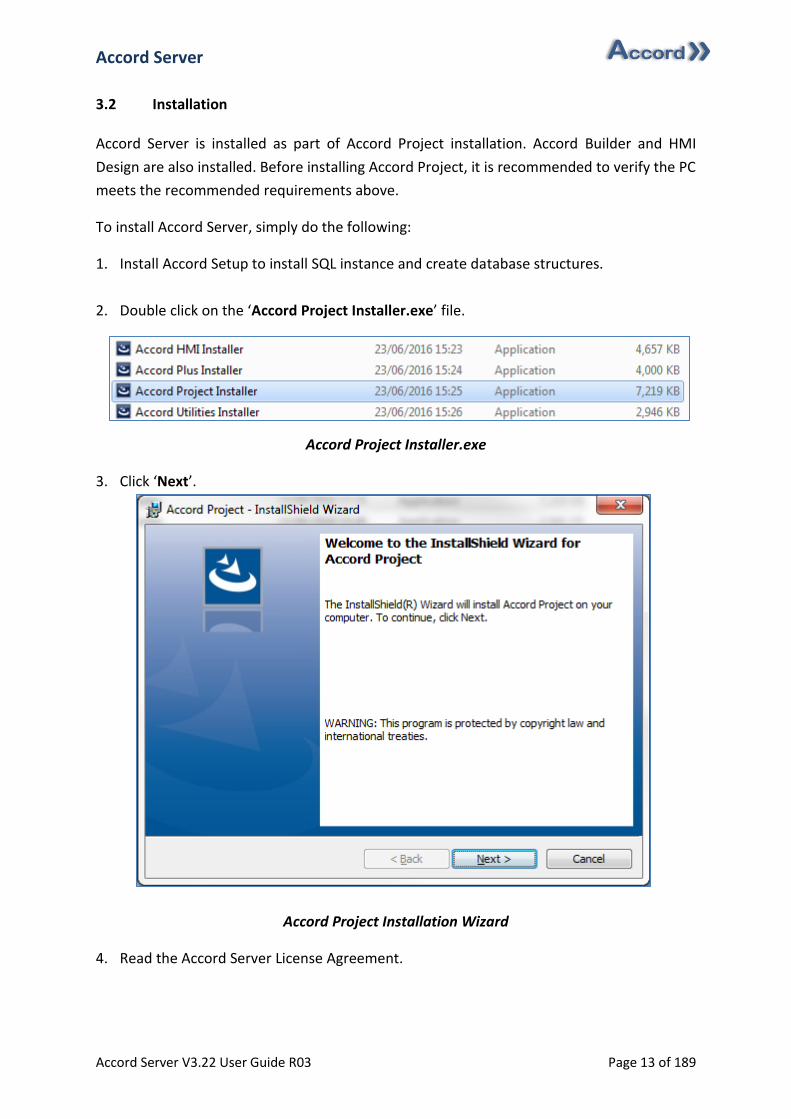
1. Install Accord Setup to install SQL instance and create database structures.
2. Double click on the ‘Accord Project Installer.exe’ file.
Accord Project Installer.exe
3. Click ‘Next’.
Accord Project Installation Wizard
4. Read the Accord Server License Agreement.
Accord Server
Accord Server V3.22 User Guide R03 Page 14 of 189
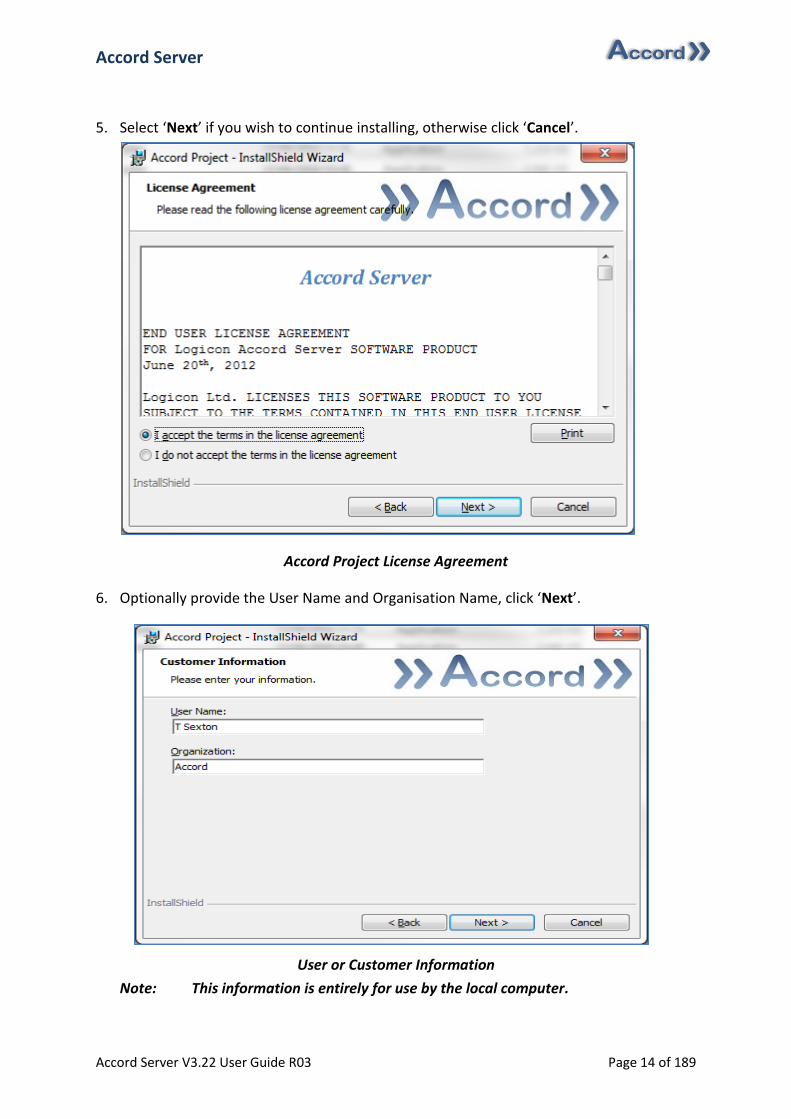
5. Select ‘Next’ if you wish to continue installing, otherwise click ‘Cancel’.
Accord Project License Agreement
6. Optionally provide the User Name and Organisation Name, click ‘Next’.
User or Customer Information
Note: This information is entirely for use by the local computer.
Accord Server
Accord Server V3.22 User Guide R03 Page 15 of 189
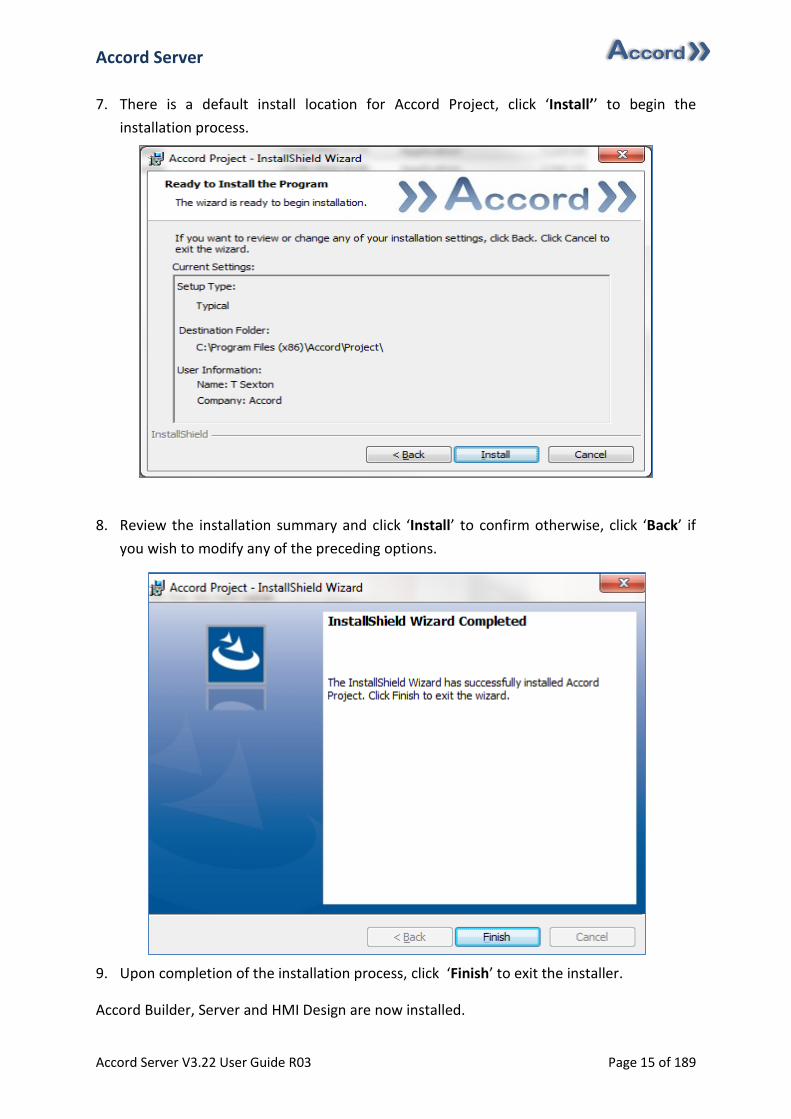
7. There is a default install location for Accord Project, click ‘Install’’ to begin the
installation process.
8. Review the installation summary and click ‘Install’ to confirm otherwise, click ‘Back’ if
you wish to modify any of the preceding options.
9. Upon completion of the installation process, click ‘Finish’ to exit the installer.
Accord Builder, Server and HMI Design are now installed.
Accord Server
Accord Server V3.22 User Guide R03 Page 16 of 189
3.3 Initial Configuration
Once Accord Server is first launched after a successful installation, you will be presented
with the Accord Server Setup Wizard. The Setup Wizard is designed to assist you in the
configuration of some of the more commonly used components of Accord Server, making it
easier to get the system up and running as quickly as possible. All settings configured using
the Wizard can be changed later using the Accord Server user interface. The following
sections describe each screen, in order, that will be presented to you upon the first launch
of Accord Server.
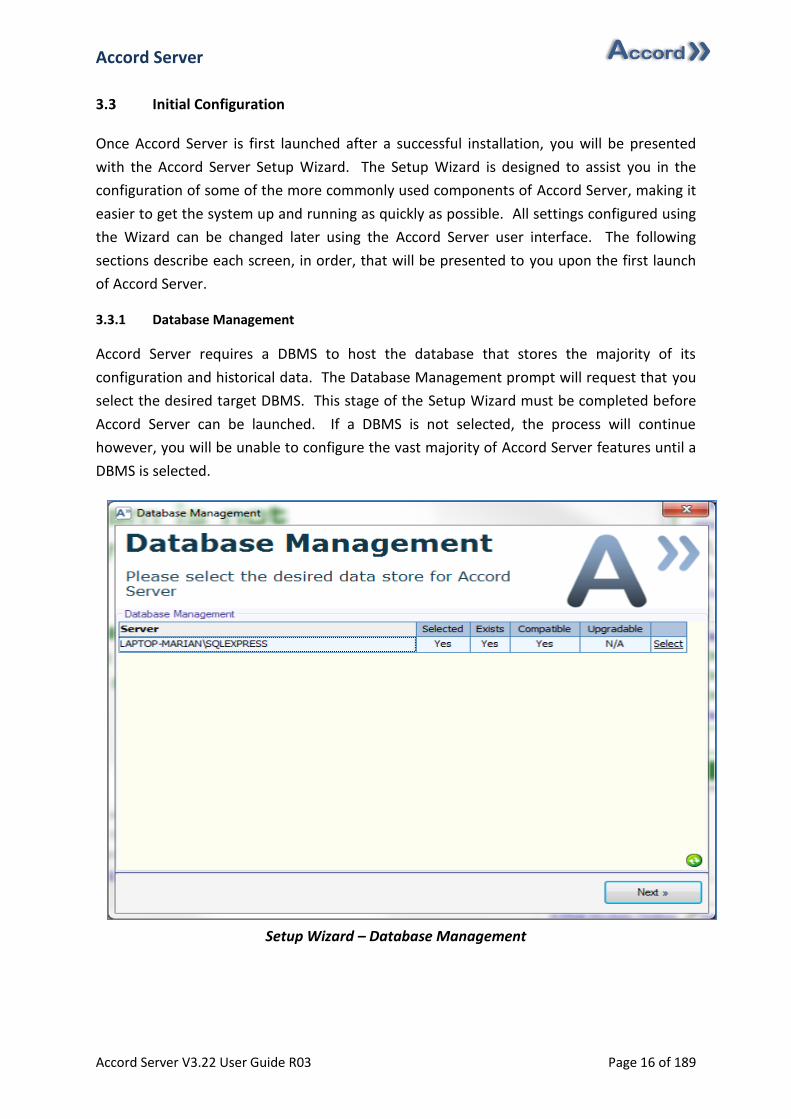
3.3.1 Database Management
Accord Server requires a DBMS to host the database that stores the majority of its
configuration and historical data. The Database Management prompt will request that you
select the desired target DBMS. This stage of the Setup Wizard must be completed before
Accord Server can be launched. If a DBMS is not selected, the process will continue
however, you will be unable to configure the vast majority of Accord Server features until a
DBMS is selected.
Setup Wizard – Database Management
Accord Server
Accord Server V3.22 User Guide R03 Page 17 of 189
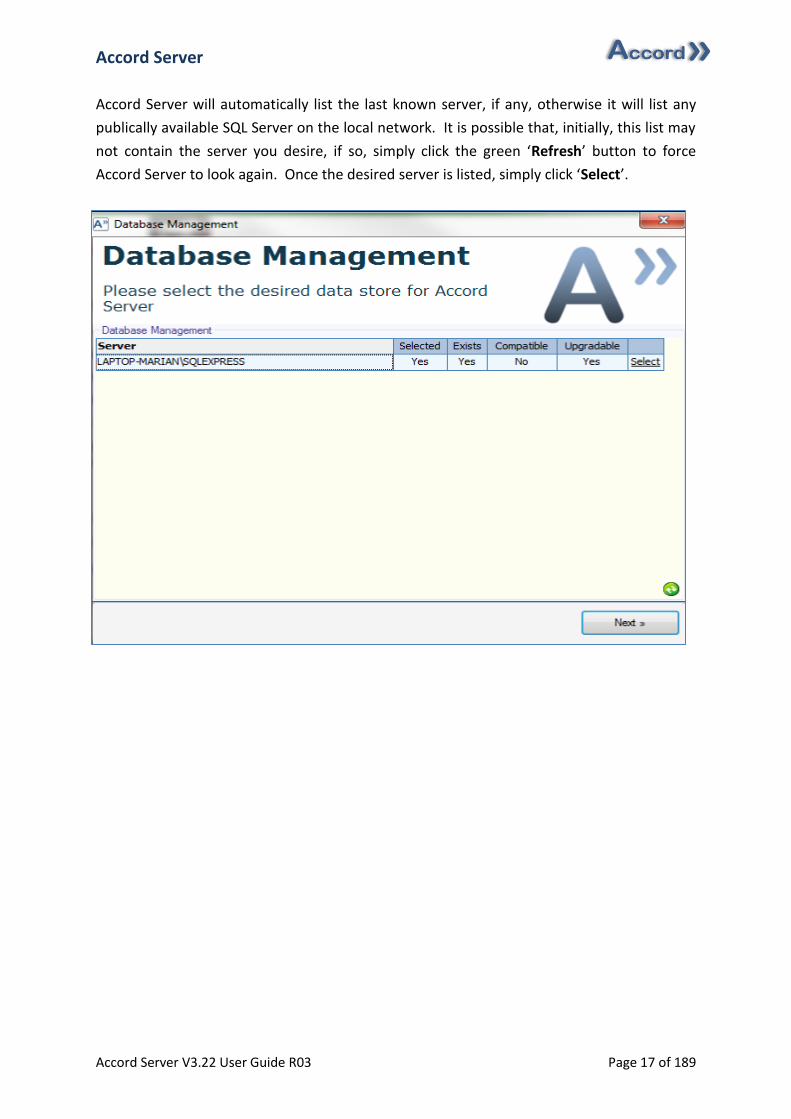
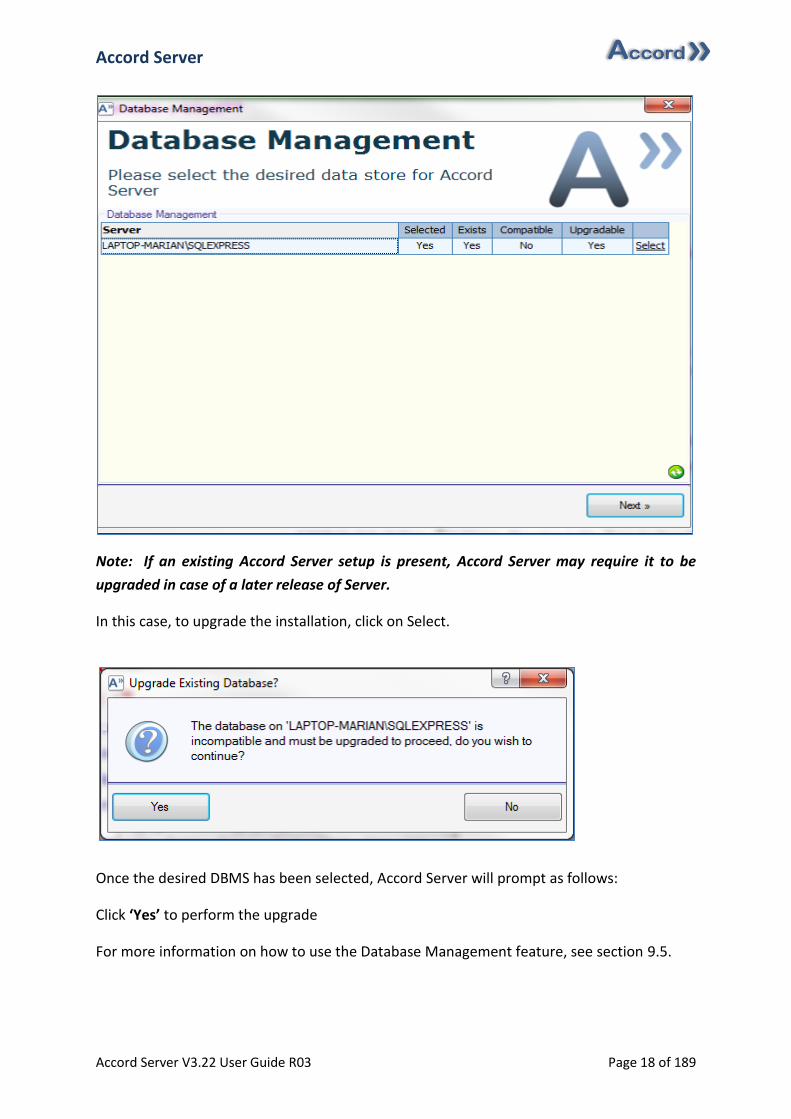
Accord Server will automatically list the last known server, if any, otherwise it will list any
publically available SQL Server on the local network. It is possible that, initially, this list may
not contain the server you desire, if so, simply click the green ‘Refresh’ button to force
Accord Server to look again. Once the desired server is listed, simply click ‘Select’.
Accord Server
Accord Server V3.22 User Guide R03 Page 18 of 189
Note: If an existing Accord Server setup is present, Accord Server may require it to be
upgraded in case of a later release of Server.
In this case, to upgrade the installation, click on Select.
Once the desired DBMS has been selected, Accord Server will prompt as follows:
Click ‘Yes’ to perform the upgrade
For more information on how to use the Database Management feature, see section 9.5.
Accord Server
Accord Server V3.22 User Guide R03 Page 19 of 189
3.3.2 OPC Configuration
In order to deploy a project on a PLC, Accord Server requires a minimum of one OPC Profile
providing the configuration to communication with the target PLC. The OPC Configuration
prompt will request the minimum required settings to configure a Default profile. While
more advanced settings are available through the Accord Server user interface, this prompt
enables rapid configuration of the settings typically used by the majority of Accord Server
users. This stage of the Setup Wizard must be completed before Accord Server can be
launched. If an OPC Profile already exists, this step in the Setup Wizard will be automatically
skipped. To configure the Default OPC Profile using the OPC Configuration prompt, simply
do the following:
1. Select the desired OPC Server from the ‘OPC Server’ list. Use the Refresh Button if
required. For more information relating to the configuration of OPC Servers, see
section 5.3.
2. Select the desired OPC Channel from the ‘Channel’ list. A list of configured channels
will be available.
3. Select the desired OPC Device from the ‘Device’ list, if any. This refers to the PLC in
the OPC Server. For more information on the section of Channel/Device setup, see
section 5.6.
4. Select the type of PLC, for which the OPC settings are configured, from the ‘PLC
Type’ list. This must be the same as selected in the model project in Accord
Builder. For more information relating to the configuration of PLC types, see section
5.4.
5. Specify the total amount of ‘Memory (Bytes)’ available to Accord Server in the
PLC for project deployment, if known. For more information on the available
memory, see section 5.7.
6. Select, or type, the desired update rate for the OPC Server configuration using the
‘Rate’ field. For more information on the update rate, see section 5.8.
7. Using the ‘License’ field, provide the license code for the OPC Profile or alternatively,
click the ‘Change License’ button to use the ‘Voucher Activation’ dialog to obtain the
required license. If no license code or voucher is available at this time, simply leave
the ‘License’ field blank. For information on the activation of a voucher, see section
5.11.2.

Accord Server
Accord Server V3.22 User Guide R03 Page 20 of 189
OPC Setup – OPC Device Selection
OPC Setup – OPC License
Accord Server
Accord Server V3.22 User Guide R03 Page 21 of 189
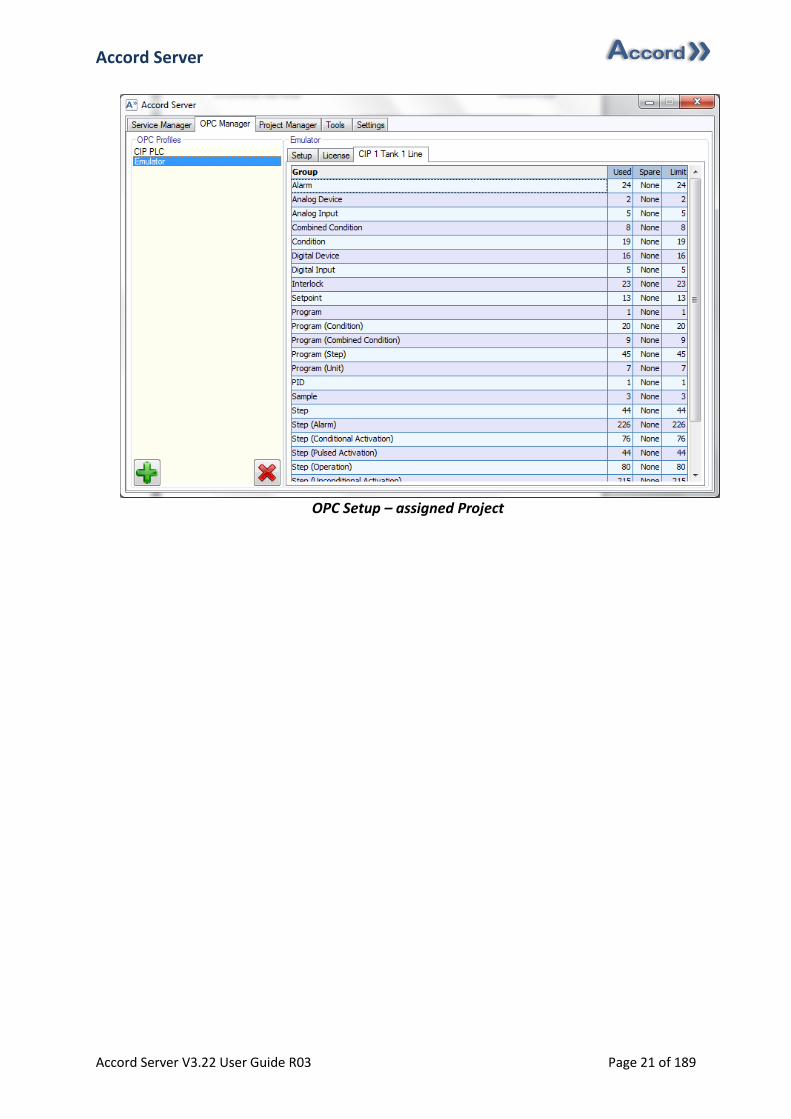
OPC Setup – assigned Project

Accord Server
Accord Server V3.22 User Guide R03 Page 22 of 189
3.3.3 Advanced Communications
Accord Server provides communication services to a variety of different possible clients.
Advanced Communications facilitates communication with the Accord Controls. The
Advanced Communications prompt facilitates configuration of important settings relating to
the way in which Accord Server provides those services. This stage of the Setup Wizard
must be completed before Accord Server can be launched. Accord Server will attempt to
automatically configure this section to the optimal settings for the target PC, by selecting
the fastest of the available active connections. To aid configuration, information relating to
the selected connection is presented, such as the medium type and speed available. In the
event that Accord Server does not automatically select the correct interface, simply select
the correct interface from the ‘Interface’ list. Upon selection, Accord Server will list the
available IP addresses for the selected interface, as sometimes there can be multiple
addresses for a single interface. If the default address selected is incorrect, simply select the
correct address from the ‘IP Address’ list. To permit remote clients access to the services
provided by Accord Server, ensure ‘Remote Clients’ is ticked. It is not necessary to change
the default ‘Advanced Port’, unless the internal network policy requires otherwise.
Note: It is strongly recommended that the selected interface uses a wired and uses a
static IPv4 address.
For more information on the optimum configuration of Advanced Communication, see
section 7.3.2.
Accord Server
Accord Server V3.22 User Guide R03 Page 23 of 189
3.3.4 Service Redundancy
Service Redundancy enables an Accord Server installation to act as a backup for another
networked Accord Server Service installation. The Service Redundancy prompt enables users
to decide what role, if any, this installation will perform in their redundancy solution. A
Accord Server service can act as both a primary and a partner server at the same time,
however, primary services will always take priority over partner services in this scenario.
Configuration of this step is optional and can be skipped entirely.
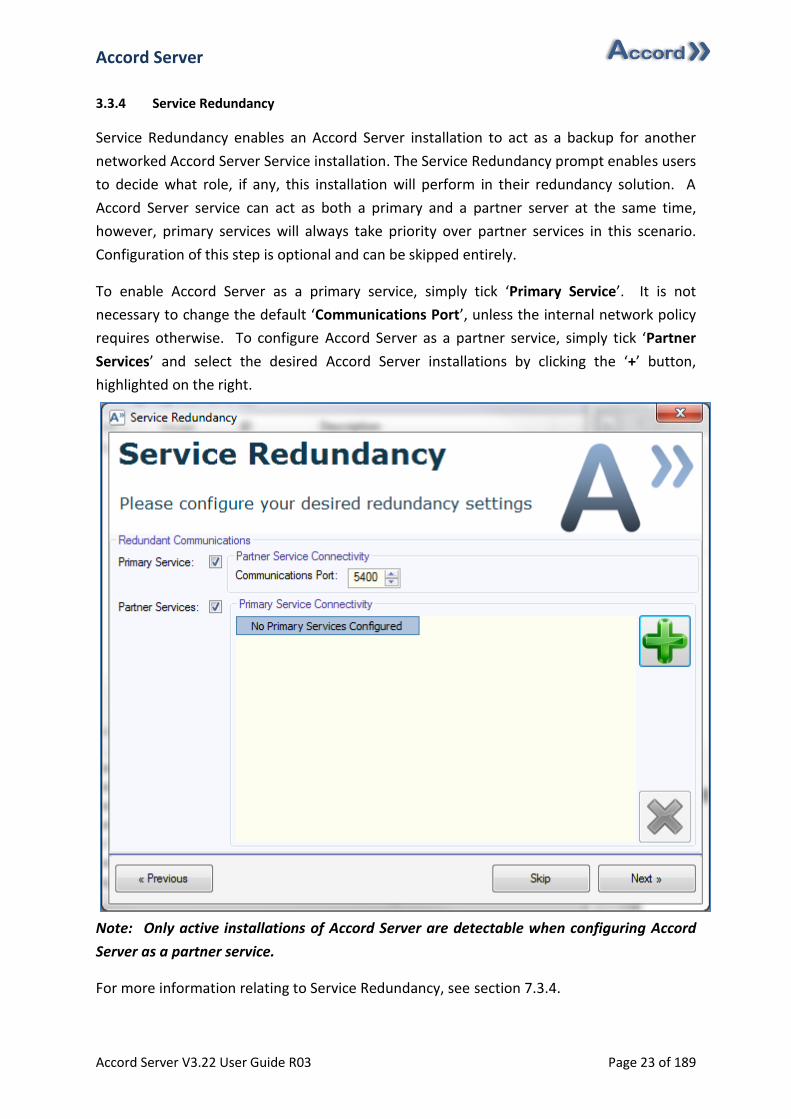
To enable Accord Server as a primary service, simply tick ‘Primary Service’. It is not
necessary to change the default ‘Communications Port’, unless the internal network policy
requires otherwise. To configure Accord Server as a partner service, simply tick ‘Partner
Services’ and select the desired Accord Server installations by clicking the ‘+’ button,
highlighted on the right.
Note: Only active installations of Accord Server are detectable when configuring Accord
Server as a partner service.
For more information relating to Service Redundancy, see section 7.3.4.
Accord Server
Accord Server V3.22 User Guide R03 Page 24 of 189
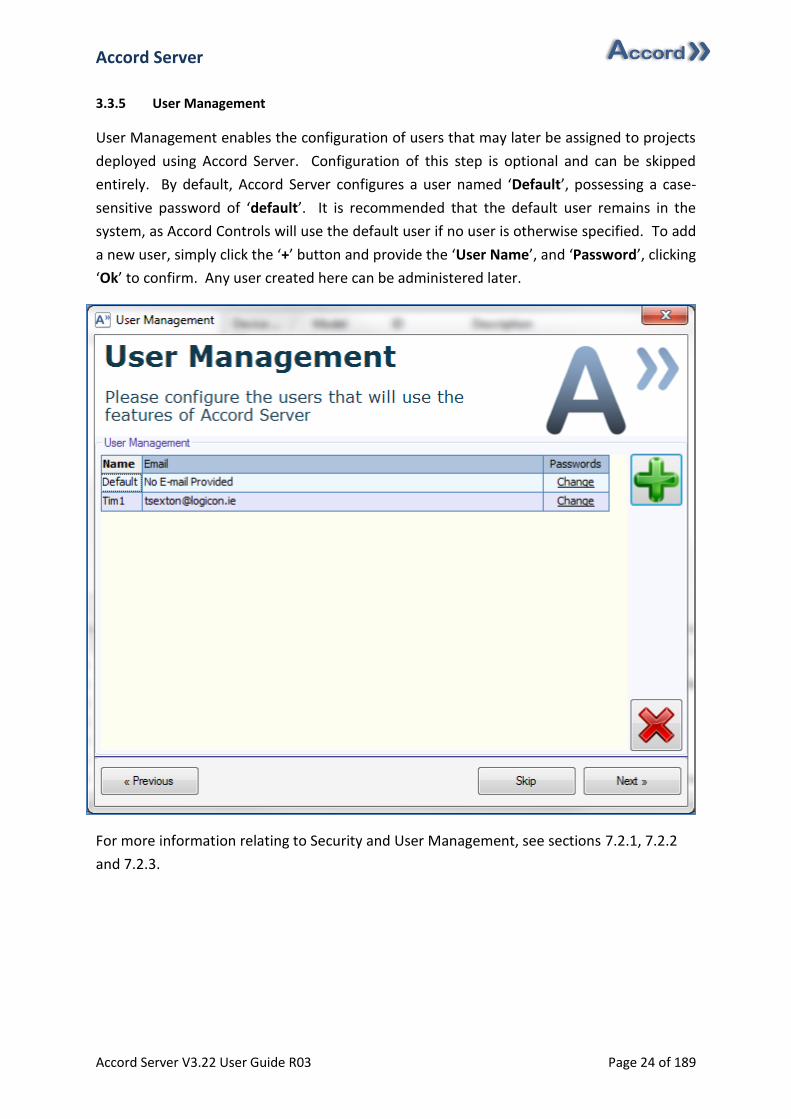
3.3.5 User Management
User Management enables the configuration of users that may later be assigned to projects
deployed using Accord Server. Configuration of this step is optional and can be skipped
entirely. By default, Accord Server configures a user named ‘Default’, possessing a case-
sensitive password of ‘default’. It is recommended that the default user remains in the
system, as Accord Controls will use the default user if no user is otherwise specified. To add
a new user, simply click the ‘+’ button and provide the ‘User Name’, and ‘Password’, clicking
‘Ok’ to confirm. Any user created here can be administered later.
For more information relating to Security and User Management, see sections 7.2.1, 7.2.2
and 7.2.3.
Accord Server
Accord Server V3.22 User Guide R03 Page 25 of 189
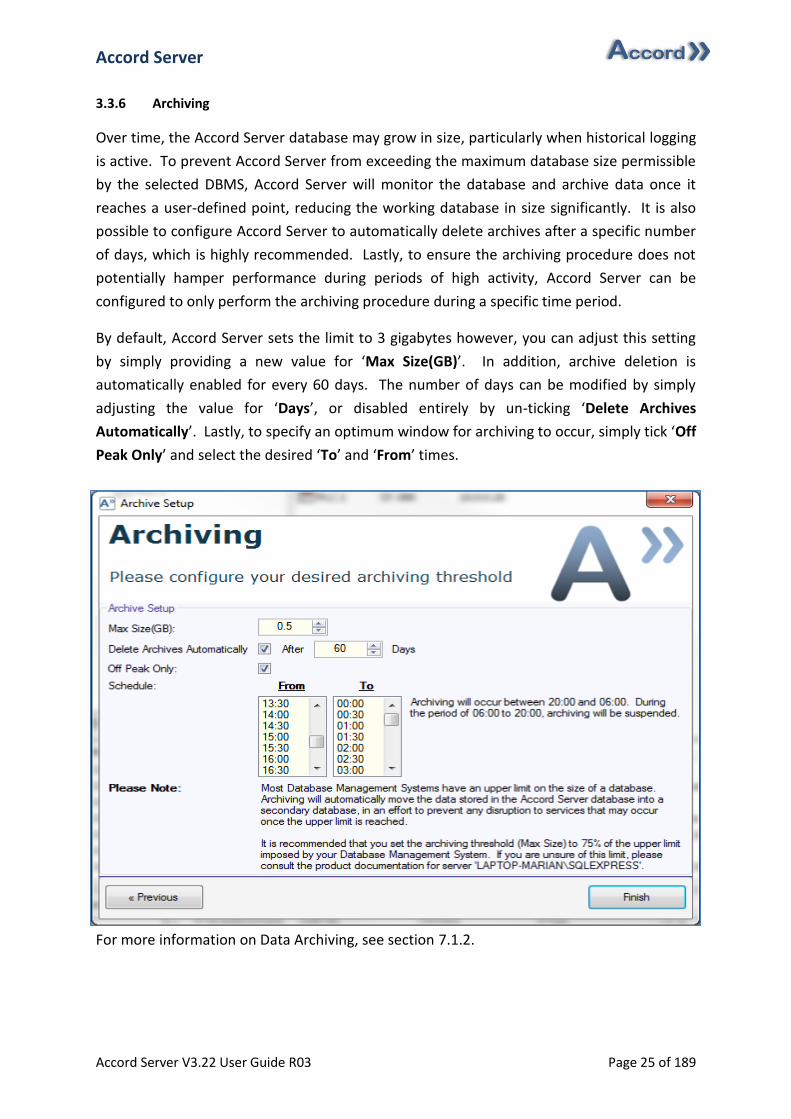
3.3.6 Archiving
Over time, the Accord Server database may grow in size, particularly when historical logging
is active. To prevent Accord Server from exceeding the maximum database size permissible
by the selected DBMS, Accord Server will monitor the database and archive data once it
reaches a user-defined point, reducing the working database in size significantly. It is also
possible to configure Accord Server to automatically delete archives after a specific number
of days, which is highly recommended. Lastly, to ensure the archiving procedure does not
potentially hamper performance during periods of high activity, Accord Server can be
configured to only perform the archiving procedure during a specific time period.
By default, Accord Server sets the limit to 3 gigabytes however, you can adjust this setting
by simply providing a new value for ‘Max Size(GB)’. In addition, archive deletion is
automatically enabled for every 60 days. The number of days can be modified by simply
adjusting the value for ‘Days’, or disabled entirely by un-ticking ‘Delete Archives
Automatically’. Lastly, to specify an optimum window for archiving to occur, simply tick ‘Off
Peak Only’ and select the desired ‘To’ and ‘From’ times.
For more information on Data Archiving, see section 7.1.2.
Accord Server
Accord Server V3.22 User Guide R03 Page 26 of 189
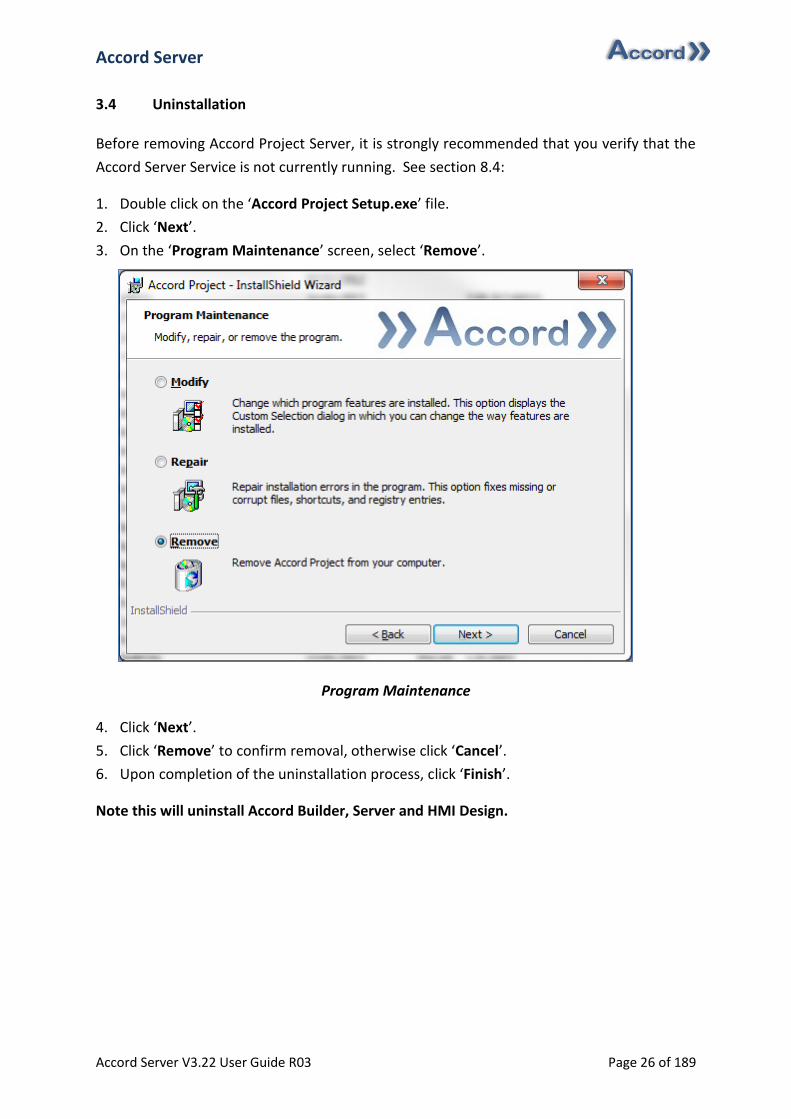
3.4 Uninstallation
Before removing Accord Project Server, it is strongly recommended that you verify that the
Accord Server Service is not currently running. See section 8.4:
1. Double click on the ‘Accord Project Setup.exe’ file.
2. Click ‘Next’.
3. On the ‘Program Maintenance’ screen, select ‘Remove’.
Program Maintenance
4. Click ‘Next’.
5. Click ‘Remove’ to confirm removal, otherwise click ‘Cancel’.
6. Upon completion of the uninstallation process, click ‘Finish’.
Note this will uninstall Accord Builder, Server and HMI Design.
Accord Server
Accord Server V3.22 User Guide R03 Page 27 of 189
4 Understanding Accord Server
The Accord Server user interface encapsulates all of the functionality provided by Accord
Server and its related modules. The following sections discuss the functionality provided in
each section of the Accord Server user interface.
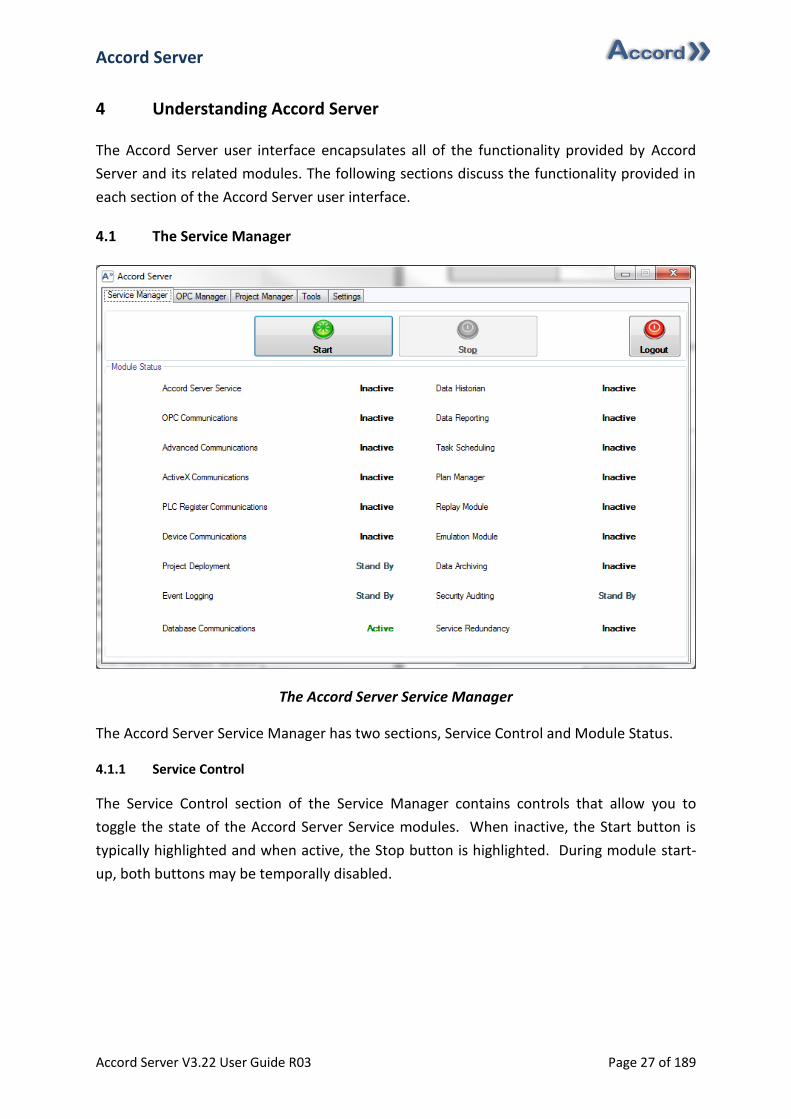
4.1 The Service Manager
The Accord Server Service Manager
The Accord Server Service Manager has two sections, Service Control and Module Status.
4.1.1 Service Control
The Service Control section of the Service Manager contains controls that allow you to
toggle the state of the Accord Server Service modules. When inactive, the Start button is
typically highlighted and when active, the Stop button is highlighted. During module start-
up, both buttons may be temporally disabled.
Accord Server
Accord Server V3.22 User Guide R03 Page 28 of 189
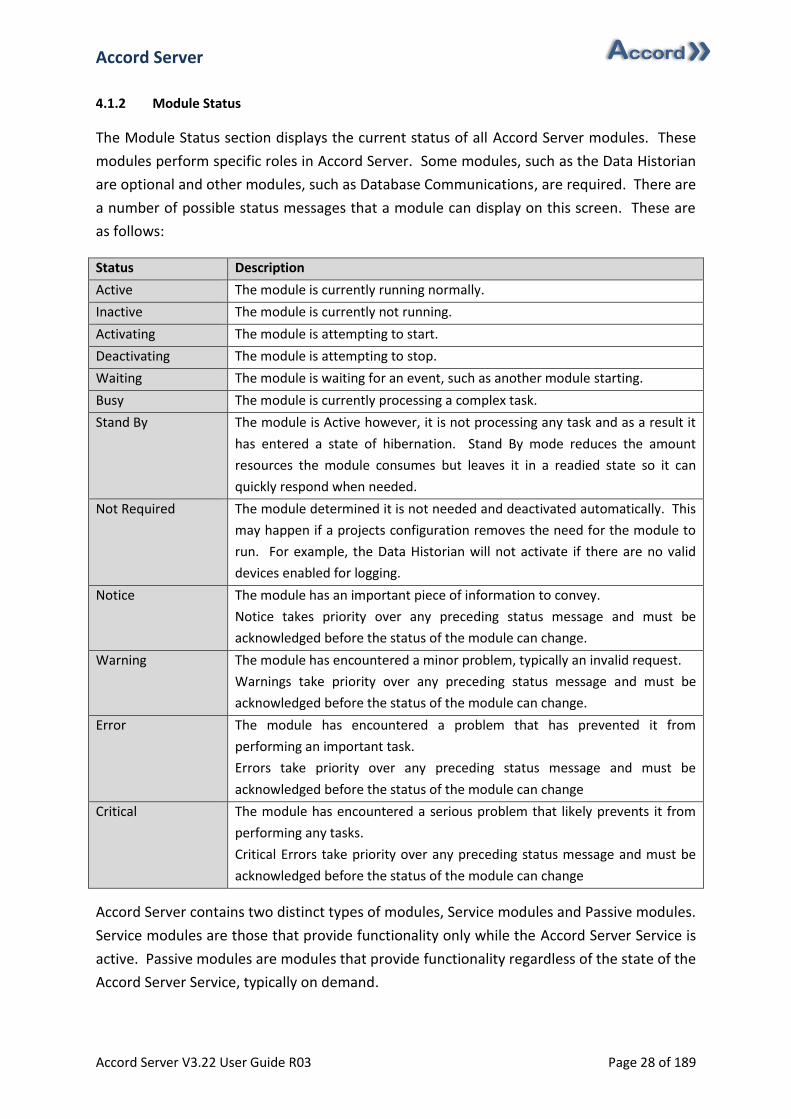
4.1.2 Module Status
The Module Status section displays the current status of all Accord Server modules. These
modules perform specific roles in Accord Server. Some modules, such as the Data Historian
are optional and other modules, such as Database Communications, are required. There are
a number of possible status messages that a module can display on this screen. These are
as follows:
Status Description
Active The module is currently running normally.
Inactive The module is currently not running.
Activating The module is attempting to start.
Deactivating The module is attempting to stop.
Waiting The module is waiting for an event, such as another module starting.
Busy The module is currently processing a complex task.
Stand By The module is Active however, it is not processing any task and as a result it
has entered a state of hibernation. Stand By mode reduces the amount
resources the module consumes but leaves it in a readied state so it can
quickly respond when needed.
Not Required The module determined it is not needed and deactivated automatically. This
may happen if a projects configuration removes the need for the module to
run. For example, the Data Historian will not activate if there are no valid
devices enabled for logging.
Notice The module has an important piece of information to convey.
Notice takes priority over any preceding status message and must be
acknowledged before the status of the module can change.
Warning The module has encountered a minor problem, typically an invalid request.
Warnings take priority over any preceding status message and must be
acknowledged before the status of the module can change.
Error The module has encountered a problem that has prevented it from
performing an important task.
Errors take priority over any preceding status message and must be
acknowledged before the status of the module can change
Critical The module has encountered a serious problem that likely prevents it from
performing any tasks.
Critical Errors take priority over any preceding status message and must be
acknowledged before the status of the module can change
Accord Server contains two distinct types of modules, Service modules and Passive modules.
Service modules are those that provide functionality only while the Accord Server Service is
active. Passive modules are modules that provide functionality regardless of the state of the
Accord Server Service, typically on demand.
Accord Server
Accord Server V3.22 User Guide R03 Page 29 of 189
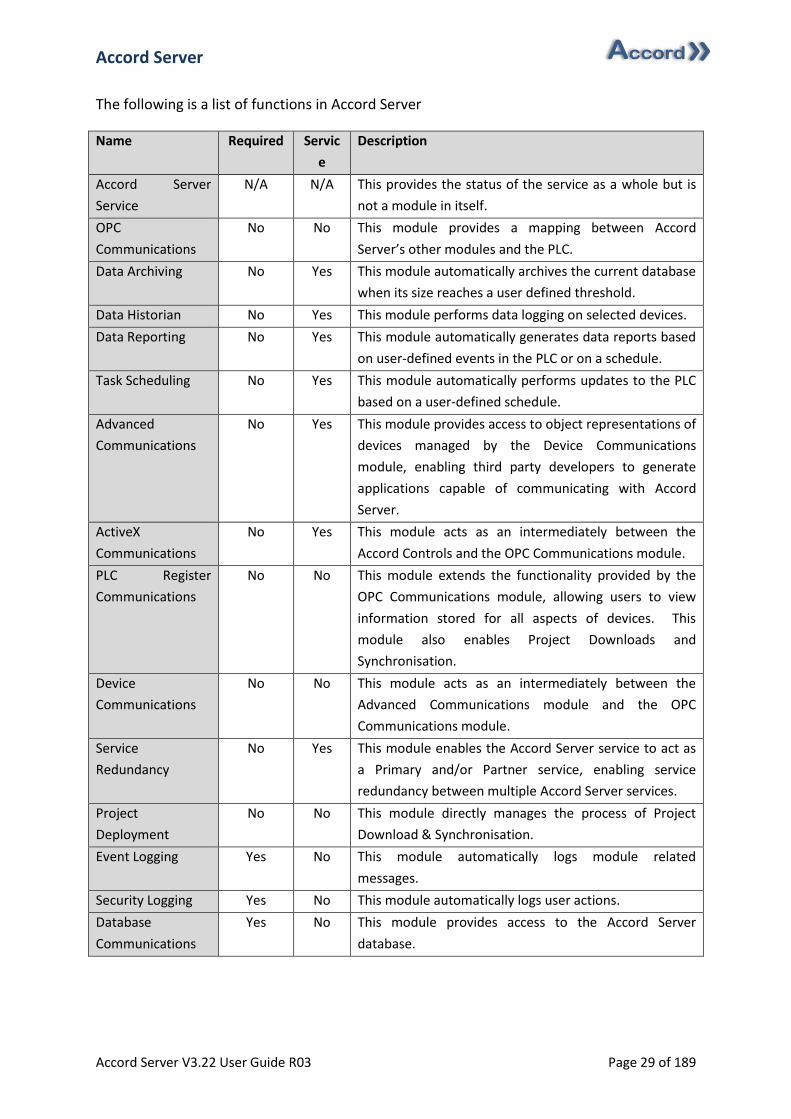
The following is a list of functions in Accord Server
Name Required Servic
e
Description
Accord Server
Service
N/A N/A This provides the status of the service as a whole but is
not a module in itself.
OPC
Communications
No No This module provides a mapping between Accord
Server’s other modules and the PLC.
Data Archiving No Yes This module automatically archives the current database
when its size reaches a user defined threshold.
Data Historian No Yes This module performs data logging on selected devices.
Data Reporting No Yes This module automatically generates data reports based
on user-defined events in the PLC or on a schedule.
Task Scheduling No Yes This module automatically performs updates to the PLC
based on a user-defined schedule.
Advanced
Communications
No Yes This module provides access to object representations of
devices managed by the Device Communications
module, enabling third party developers to generate
applications capable of communicating with Accord
Server.
ActiveX
Communications
No Yes This module acts as an intermediately between the
Accord Controls and the OPC Communications module.
PLC Register
Communications
No No This module extends the functionality provided by the
OPC Communications module, allowing users to view
information stored for all aspects of devices. This
module also enables Project Downloads and
Synchronisation.
Device
Communications
No No This module acts as an intermediately between the
Advanced Communications module and the OPC
Communications module.
Service
Redundancy
No Yes This module enables the Accord Server service to act as
a Primary and/or Partner service, enabling service
redundancy between multiple Accord Server services.
Project
Deployment
No No This module directly manages the process of Project
Download & Synchronisation.
Event Logging Yes No This module automatically logs module related
messages.
Security Logging Yes No This module automatically logs user actions.
Database
Communications
Yes No This module provides access to the Accord Server
database.
Accord Server
Accord Server V3.22 User Guide R03 Page 30 of 189
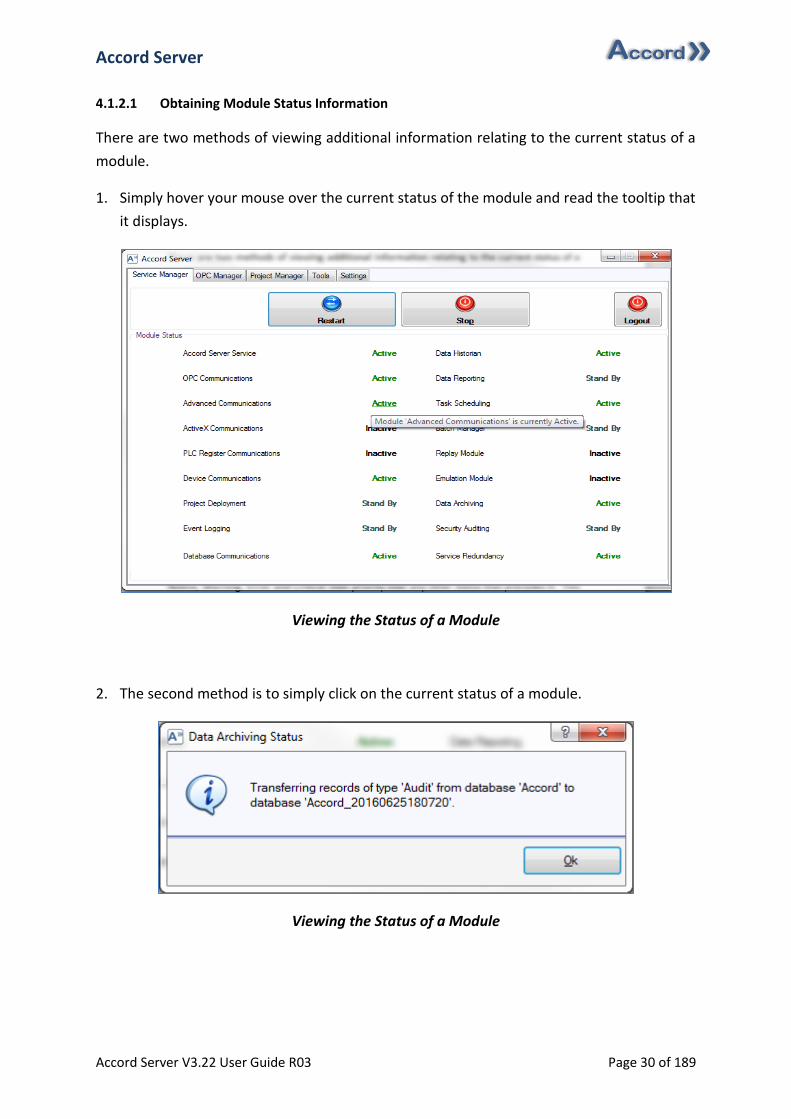
4.1.2.1 Obtaining Module Status Information
There are two methods of viewing additional information relating to the current status of a
module.
1. Simply hover your mouse over the current status of the module and read the tooltip that
it displays.
Viewing the Status of a Module
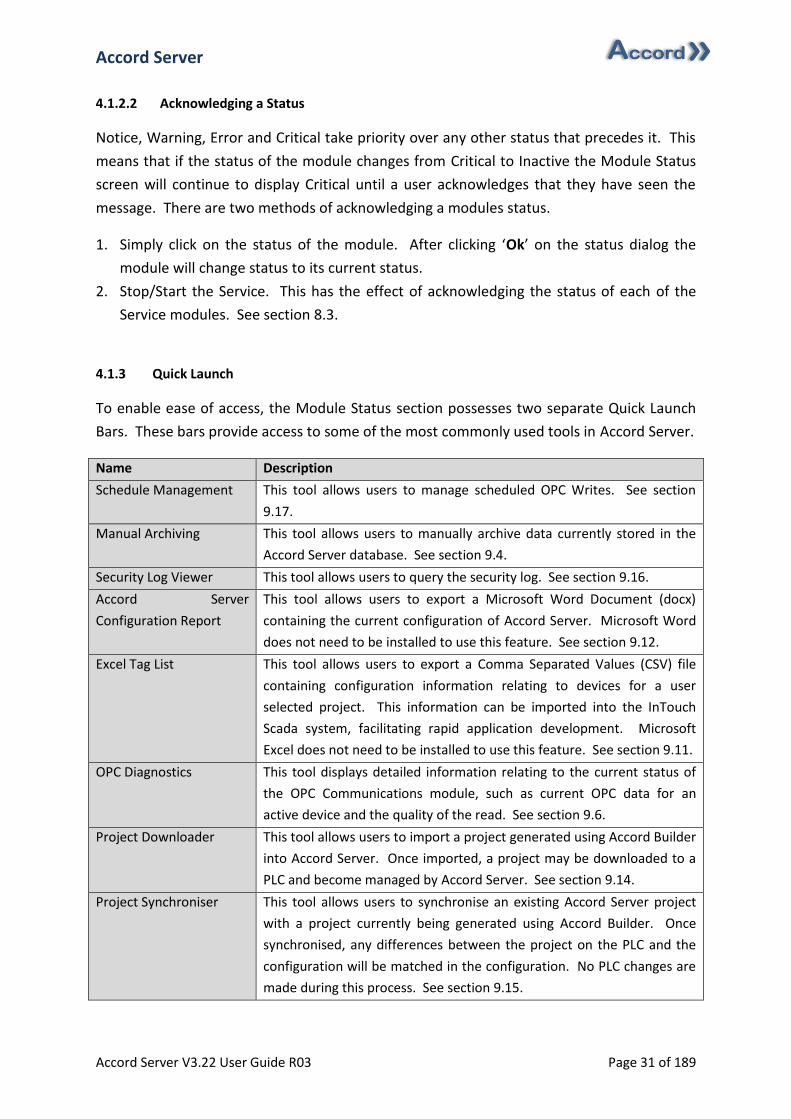
2. The second method is to simply click on the current status of a module.
Viewing the Status of a Module
Accord Server
Accord Server V3.22 User Guide R03 Page 31 of 189
4.1.2.2 Acknowledging a Status
Notice, Warning, Error and Critical take priority over any other status that precedes it. This
means that if the status of the module changes from Critical to Inactive the Module Status
screen will continue to display Critical until a user acknowledges that they have seen the
message. There are two methods of acknowledging a modules status.
1. Simply click on the status of the module. After clicking ‘Ok’ on the status dialog the
module will change status to its current status.
2. Stop/Start the Service. This has the effect of acknowledging the status of each of the
Service modules. See section 8.3.
4.1.3 Quick Launch
To enable ease of access, the Module Status section possesses two separate Quick Launch
Bars. These bars provide access to some of the most commonly used tools in Accord Server.
Name Description
Schedule Management This tool allows users to manage scheduled OPC Writes. See section
9.17.
Manual Archiving This tool allows users to manually archive data currently stored in the
Accord Server database. See section 9.4.
Security Log Viewer This tool allows users to query the security log. See section 9.16.
Accord Server
Configuration Report
This tool allows users to export a Microsoft Word Document (docx)
containing the current configuration of Accord Server. Microsoft Word
does not need to be installed to use this feature. See section 9.12.
Excel Tag List This tool allows users to export a Comma Separated Values (CSV) file
containing configuration information relating to devices for a user
selected project. This information can be imported into the InTouch
Scada system, facilitating rapid application development. Microsoft
Excel does not need to be installed to use this feature. See section 9.11.
OPC Diagnostics This tool displays detailed information relating to the current status of
the OPC Communications module, such as current OPC data for an
active device and the quality of the read. See section 9.6.
Project Downloader This tool allows users to import a project generated using Accord Builder
into Accord Server. Once imported, a project may be downloaded to a
PLC and become managed by Accord Server. See section 9.14.
Project Synchroniser This tool allows users to synchronise an existing Accord Server project
with a project currently being generated using Accord Builder. Once
synchronised, any differences between the project on the PLC and the
configuration will be matched in the configuration. No PLC changes are
made during this process. See section 9.15.
Accord Server
Accord Server V3.22 User Guide R03 Page 32 of 189
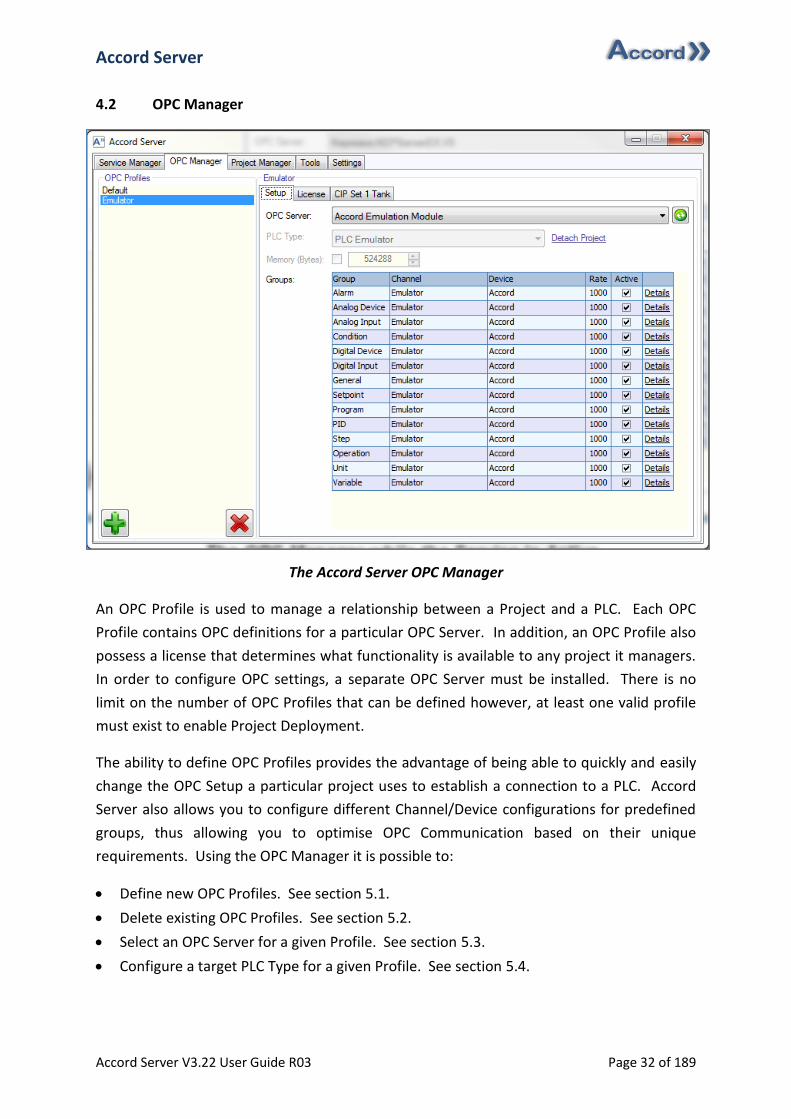
4.2 OPC Manager
The Accord Server OPC Manager
An OPC Profile is used to manage a relationship between a Project and a PLC. Each OPC
Profile contains OPC definitions for a particular OPC Server. In addition, an OPC Profile also
possess a license that determines what functionality is available to any project it managers.
In order to configure OPC settings, a separate OPC Server must be installed. There is no
limit on the number of OPC Profiles that can be defined however, at least one valid profile
must exist to enable Project Deployment.
The ability to define OPC Profiles provides the advantage of being able to quickly and easily
change the OPC Setup a particular project uses to establish a connection to a PLC. Accord
Server also allows you to configure different Channel/Device configurations for predefined
groups, thus allowing you to optimise OPC Communication based on their unique
requirements. Using the OPC Manager it is possible to:
Define new OPC Profiles. See section 5.1.
Delete existing OPC Profiles. See section 5.2.
Select an OPC Server for a given Profile. See section 5.3.
Configure a target PLC Type for a given Profile. See section 5.4.
Accord Server
Accord Server V3.22 User Guide R03 Page 33 of 189
Configure specific Channel/Device definitions for each of the predefined OPC Groups.
See section 5.6.
Configure the Memory available for Accord Server to perform downloads. See section
5.7.
Configure an Update Rate for a specific OPC Group in order to optimise performance.
See section 5.8.
Activate/Deactivate OPC Groups. See section 5.9.
View related OPC Groups. See section 5.10.
Configure a license. See section 5.11.2.
View project device counts. See section 5.12.
Note: Deactivating an OPC Group has the effect of deactivating OPC
Communications on all devices in that group on any project that uses the selected OPC
Profile.
It is not possible to change any settings while the service is active.
Accord Server
Accord Server V3.22 User Guide R03 Page 34 of 189
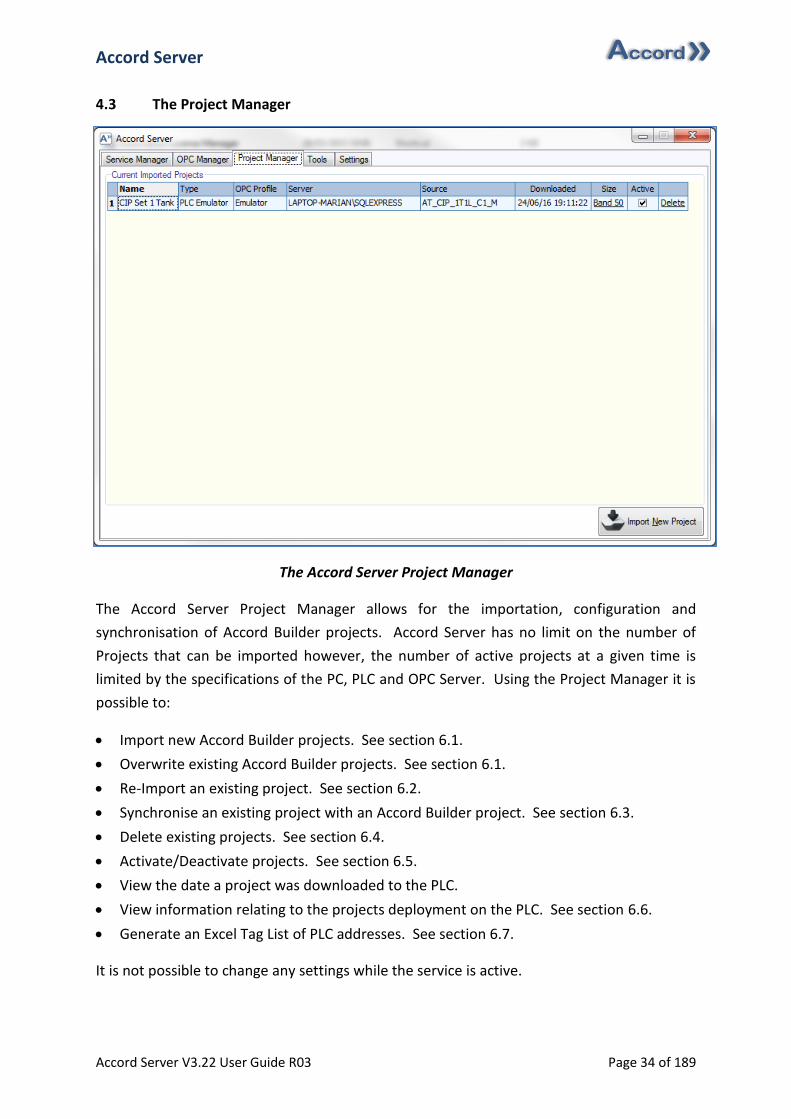
4.3 The Project Manager
The Accord Server Project Manager
The Accord Server Project Manager allows for the importation, configuration and
synchronisation of Accord Builder projects. Accord Server has no limit on the number of
Projects that can be imported however, the number of active projects at a given time is
limited by the specifications of the PC, PLC and OPC Server. Using the Project Manager it is
possible to:
Import new Accord Builder projects. See section 6.1.
Overwrite existing Accord Builder projects. See section 6.1.
Re-Import an existing project. See section 6.2.
Synchronise an existing project with an Accord Builder project. See section 6.3.
Delete existing projects. See section 6.4.
Activate/Deactivate projects. See section 6.5.
View the date a project was downloaded to the PLC.
View information relating to the projects deployment on the PLC. See section 6.6.
Generate an Excel Tag List of PLC addresses. See section 6.7.
It is not possible to change any settings while the service is active.
Accord Server
Accord Server V3.22 User Guide R03 Page 35 of 189
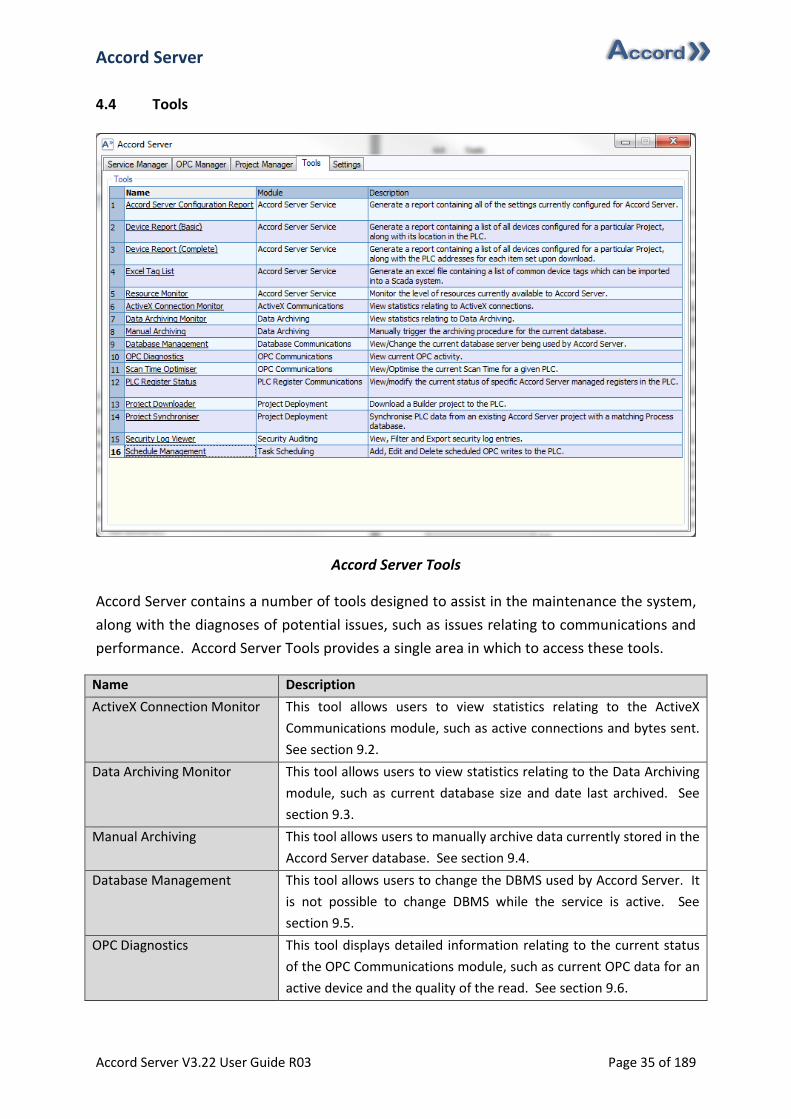
4.4 Tools
Accord Server Tools
Accord Server contains a number of tools designed to assist in the maintenance the system,
along with the diagnoses of potential issues, such as issues relating to communications and
performance. Accord Server Tools provides a single area in which to access these tools.
Name Description
ActiveX Connection Monitor This tool allows users to view statistics relating to the ActiveX
Communications module, such as active connections and bytes sent.
See section 9.2.
Data Archiving Monitor This tool allows users to view statistics relating to the Data Archiving
module, such as current database size and date last archived. See
section 9.3.
Manual Archiving This tool allows users to manually archive data currently stored in the
Accord Server database. See section 9.4.
Database Management This tool allows users to change the DBMS used by Accord Server. It
is not possible to change DBMS while the service is active. See
section 9.5.
OPC Diagnostics This tool displays detailed information relating to the current status
of the OPC Communications module, such as current OPC data for an
active device and the quality of the read. See section 9.6.
Accord Server
Accord Server V3.22 User Guide R03 Page 36 of 189
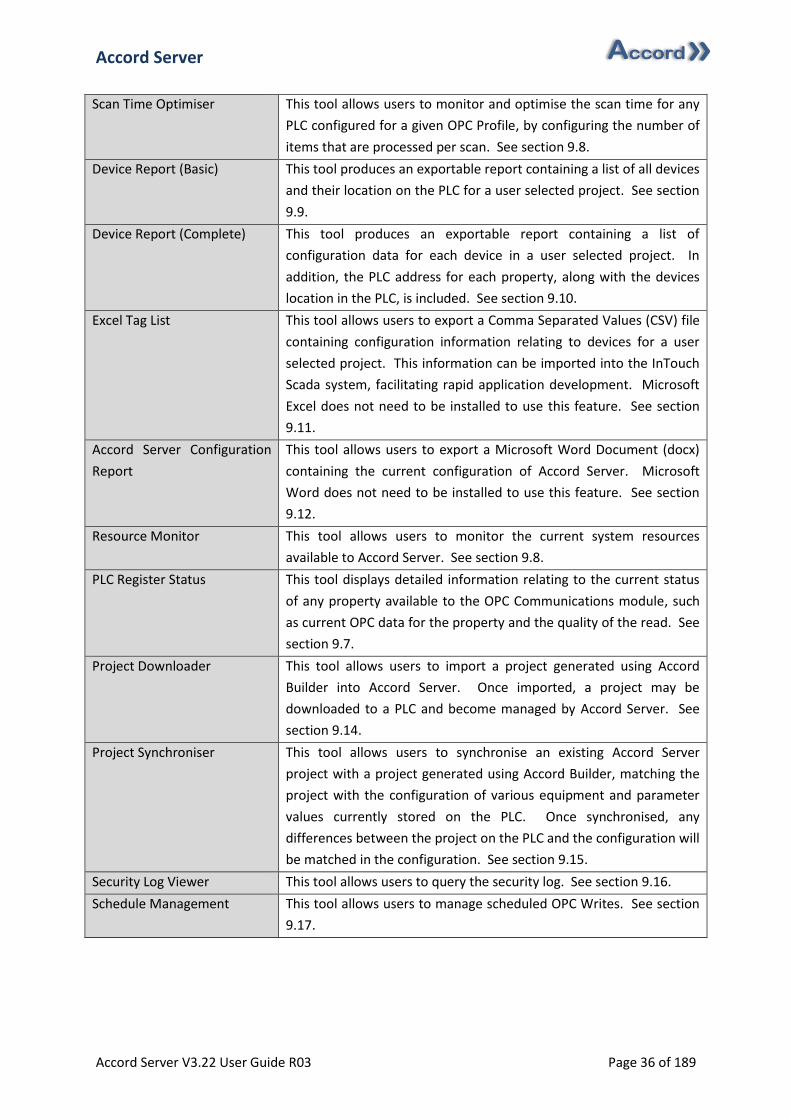
Scan Time Optimiser This tool allows users to monitor and optimise the scan time for any
PLC configured for a given OPC Profile, by configuring the number of
items that are processed per scan. See section 9.8.
Device Report (Basic) This tool produces an exportable report containing a list of all devices
and their location on the PLC for a user selected project. See section
9.9.
Device Report (Complete) This tool produces an exportable report containing a list of
configuration data for each device in a user selected project. In
addition, the PLC address for each property, along with the devices
location in the PLC, is included. See section 9.10.
Excel Tag List This tool allows users to export a Comma Separated Values (CSV) file
containing configuration information relating to devices for a user
selected project. This information can be imported into the InTouch
Scada system, facilitating rapid application development. Microsoft
Excel does not need to be installed to use this feature. See section
9.11.
Accord Server Configuration
Report
This tool allows users to export a Microsoft Word Document (docx)
containing the current configuration of Accord Server. Microsoft
Word does not need to be installed to use this feature. See section
9.12.
Resource Monitor This tool allows users to monitor the current system resources
available to Accord Server. See section 9.8.
PLC Register Status This tool displays detailed information relating to the current status
of any property available to the OPC Communications module, such
as current OPC data for the property and the quality of the read. See
section 9.7.
Project Downloader This tool allows users to import a project generated using Accord
Builder into Accord Server. Once imported, a project may be
downloaded to a PLC and become managed by Accord Server. See
section 9.14.
Project Synchroniser This tool allows users to synchronise an existing Accord Server
project with a project generated using Accord Builder, matching the
project with the configuration of various equipment and parameter
values currently stored on the PLC. Once synchronised, any
differences between the project on the PLC and the configuration will
be matched in the configuration. See section 9.15.
Security Log Viewer This tool allows users to query the security log. See section 9.16.
Schedule Management This tool allows users to manage scheduled OPC Writes. See section
9.17.
Accord Server
Accord Server V3.22 User Guide R03 Page 37 of 189
4.5 Settings
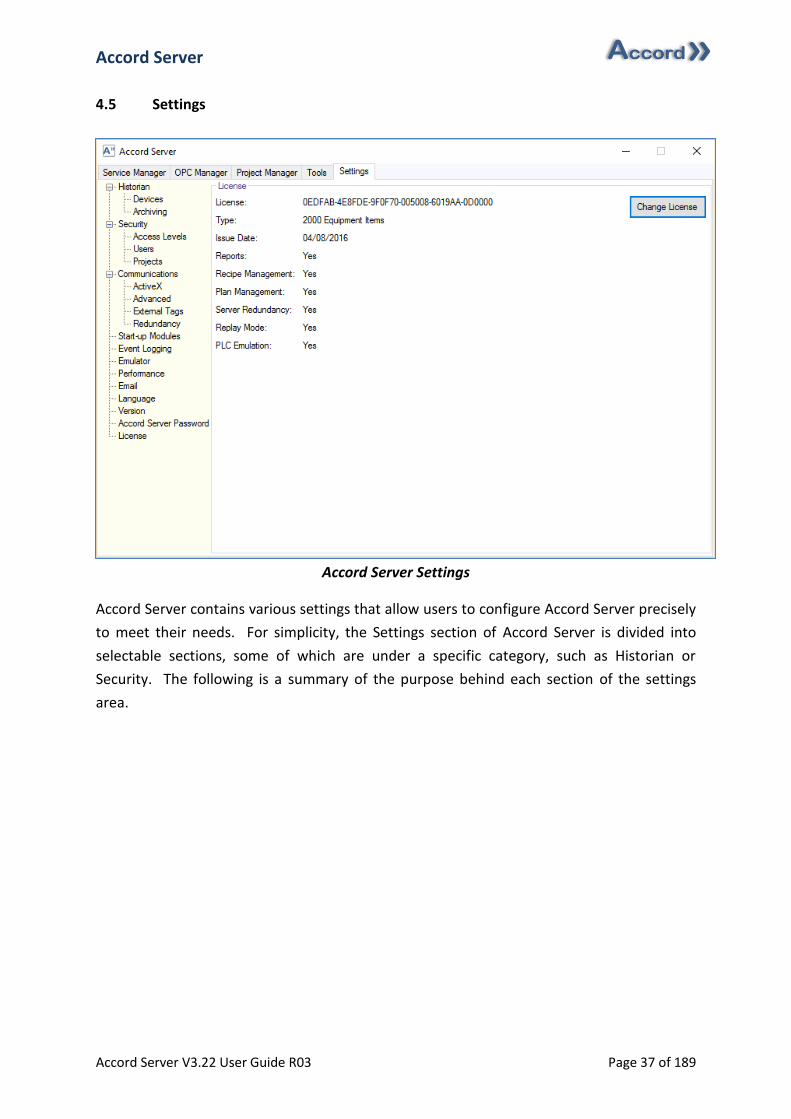
Accord Server Settings
Accord Server contains various settings that allow users to configure Accord Server precisely
to meet their needs. For simplicity, the Settings section of Accord Server is divided into
selectable sections, some of which are under a specific category, such as Historian or
Security. The following is a summary of the purpose behind each section of the settings
area.
Accord Server
Accord Server V3.22 User Guide R03 Page 38 of 189
4.5.1 Historian
4.5.1.1 Devices
Devices allows users to configure the Logging and Deadband settings for specific devices on
a given Project. By default, all Alarms and Program are automatically logged. Although it is
not possible to deselect logging for Alarms, it is possible to deselect logging for Programs.
Logging on Programs should only be deselected if information relating to them is no longer
required for reporting purposes. Additionally, some groups, such as Analog Device contain
configurable Deadbands. Deadbands are used as a logging threshold for a given device and
can help avoid large quantities of unnecessary data being logged in the database. It is not
possible to change these settings while the service is active. See section 7.1.1.
4.5.1.2 Archiving
Archiving allows users to define the maximum allowable database size before data is
automatically transferred to a new archived database. The maximum allowable size of a
database differs from one DBMS to the next. Please consult the documentation for your
DBMS before selecting an archiving threshold. It is not possible to change these settings
while the service is active. See section 7.1.2.
4.5.2 Security
4.5.2.1 Access Levels
Access Levels allows you to override the default security level required for actions that can
be performed on device types (groups) using the client controls. If a user logged in on the
SCADA system has been assigned to the permitted User Group, or the action is enabled to
all users, then the user will be permitted access to modifiers for that property. It is not
possible to change these settings while the service is active. See section 7.2.1.
4.5.2.2 Users
Users allows for the configuration of users that may be assigned to any of the imported
projects. Users are assigned an access level, a password, and an optional email address. It
is not possible to change these settings while the service is active. See section 7.2.2.
4.5.2.3 Projects
Project Management allows for the configuration of User Groups for a specific project, along
with the users that may be assigned to that project. User Groups may be used to override
the default Access Level for any modifiable property of a specific device type (group). It is
not possible to change these settings while the service is active. See section 7.2.3.
Accord Server
Accord Server V3.22 User Guide R03 Page 39 of 189
4.5.3 Communications
4.5.3.1 ActiveX
ActiveX Communications allows for the configuration of TCP related settings for the ActiveX
Communications module. In most situations, these settings do not need to be changed
however, unique security requirements by an individual client may necessitate
customisation of these settings. See section 7.3.1.
4.5.3.2 Advanced
Advanced Communications allows for the configuration of network related settings for the
Advanced Communications for Accord HMI / Controls. It is important that these settings are
reviewed and configured correctly to ensure the service performs at optimal levels. See
section 7.3.2.
4.5.3.3 External Tags
External Tags allow for the configuration of custom devices that relate to data external to
the selected Accord Server project. External Tags are treated much in the same way as
standard devices within a project are and thus, are available to the Accord Controls and the
Accord Server SDK. See section 7.3.3.
4.5.3.4 Redundancy
Redundancy allows for the configuration of the role the Accord Server service will serve as
part of an overall backup solution. A Accord Server service can act as both a primary and a
partner service at the same time however, primary services will always take priority over
partner services in this scenario. See section 7.3.4.
4.5.4 Start-up Modules
Start-up Modules allows the user to enable/disable optional Service modules. This is useful
when dealing with limited system resources. For example, if the computer is intended only
as a Data Historian, then all modules other than Data Archiving and Data Historian could be
deactivated to save system resources. It is not possible to change these settings while the
service is active. See section 7.4.
4.5.5 Event Logging
The Logging section allows users to configure what module related messages are recorded
by the Event Logging module, along with the location of the log file. It is recommended to
choose a lower setting, unless otherwise required, to save disk space and reduce processing
load. It is not possible to change these settings while the service is active. See section 7.5.
Accord Server
Accord Server V3.22 User Guide R03 Page 40 of 189
4.5.6 Performance
The Performance section allows users to configure how many system resources Accord
Server will reserve while the service is active. The value assigned here depends entirely on
the specification of the computer and the needs of the user. If Accord Server is expected to
host multiple projects, or a large quantity of data logging is expected, a higher performance
rating is recommended. A higher performance rating decreases the response time from
Accord Server but has the negative effect of increasing the amount of RAM Accord Server
uses. If you notice a slow response times from Accord Server, it may indicate that you need
to increase this setting. It is not possible to change these settings while the service is active.
See section 7.6.
4.5.7 Email
The Email section allows users to configure an optional SMTP Server for Accord Server.
When an SMTP server is provided, Accord Server will be able to automatically email reports
generated using the Data Reporting module to any of the users defined by the specific
trigger. It is not possible to change these settings while the service is active. See section
7.7.
4.5.8 Language
The Language section allows for the localisation of the Accord Server user interface. See
section 7.8.
4.5.9 Version
The Version section provides a summary of all assembles Accord Server is dependent on,
along with their version numbers. See section 7.9.
4.5.10 Accord Server Password
Access to Accord Server Settings, Tools and Engineering is protected by a password. The
default password is ‘default’. This may be changed at any time. Care should be taken to
record the new password safely.
4.5.11 License
The License section provides a summary of the current license applied to Accord Server. A
new licence may also be applied in this section. See section 10.
Accord Server
Accord Server V3.22 User Guide R03 Page 41 of 189
5 Managing OPC Profiles
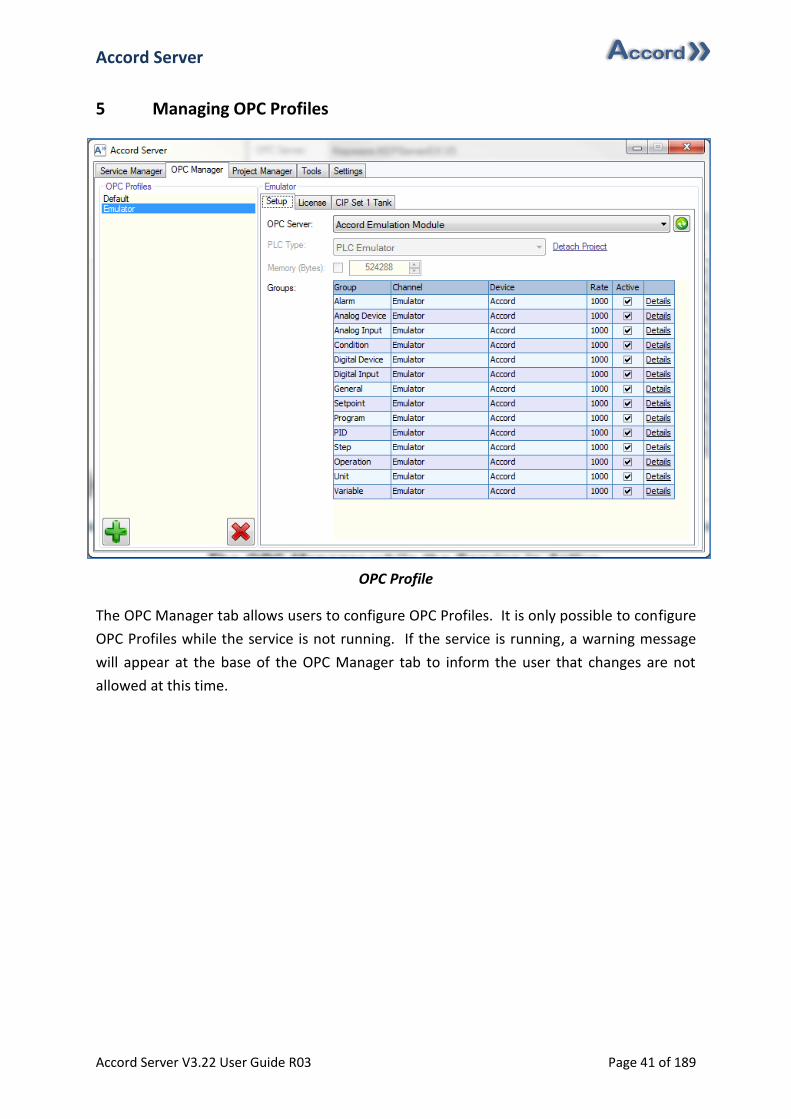
OPC Profile
The OPC Manager tab allows users to configure OPC Profiles. It is only possible to configure
OPC Profiles while the service is not running. If the service is running, a warning message
will appear at the base of the OPC Manager tab to inform the user that changes are not
allowed at this time.
Accord Server
Accord Server V3.22 User Guide R03 Page 42 of 189
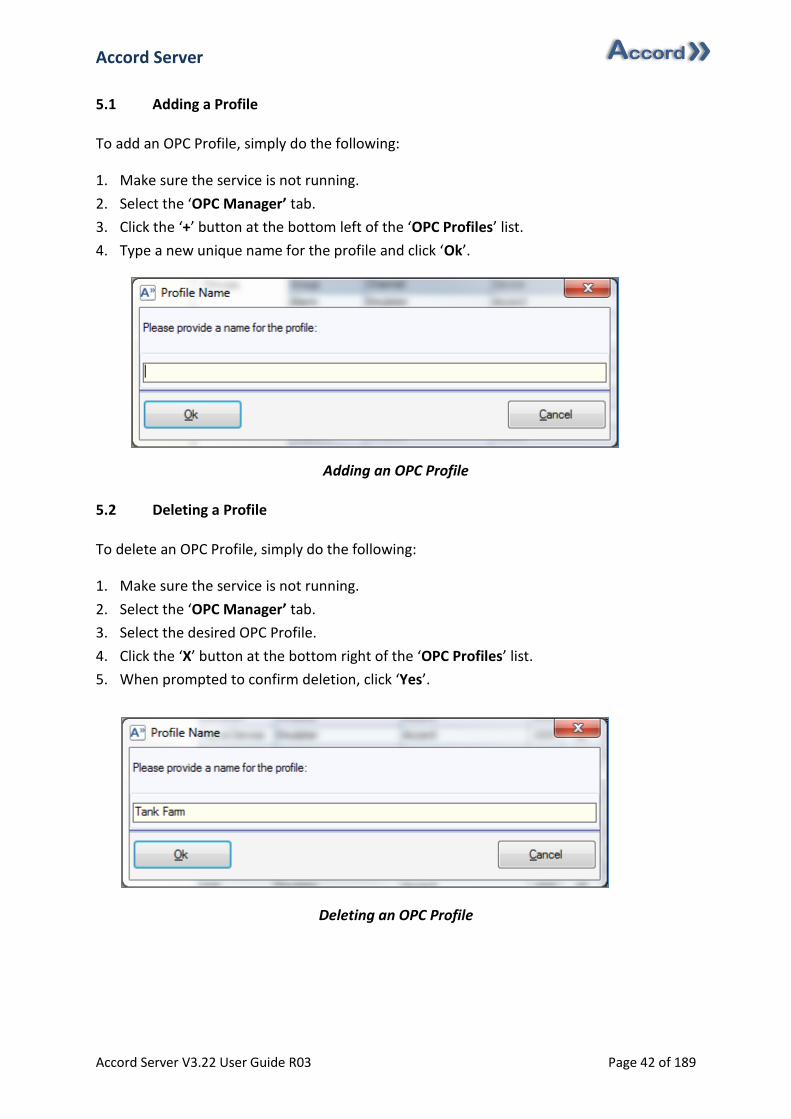
5.1 Adding a Profile
To add an OPC Profile, simply do the following:
1. Make sure the service is not running.
2. Select the ‘OPC Manager’ tab.
3. Click the ‘+’ button at the bottom left of the ‘OPC Profiles’ list.
4. Type a new unique name for the profile and click ‘Ok’.
Adding an OPC Profile
5.2 Deleting a Profile
To delete an OPC Profile, simply do the following:
1. Make sure the service is not running.
2. Select the ‘OPC Manager’ tab.
3. Select the desired OPC Profile.
4. Click the ‘X’ button at the bottom right of the ‘OPC Profiles’ list.
5. When prompted to confirm deletion, click ‘Yes’.
Deleting an OPC Profile
Accord Server
Accord Server V3.22 User Guide R03 Page 43 of 189
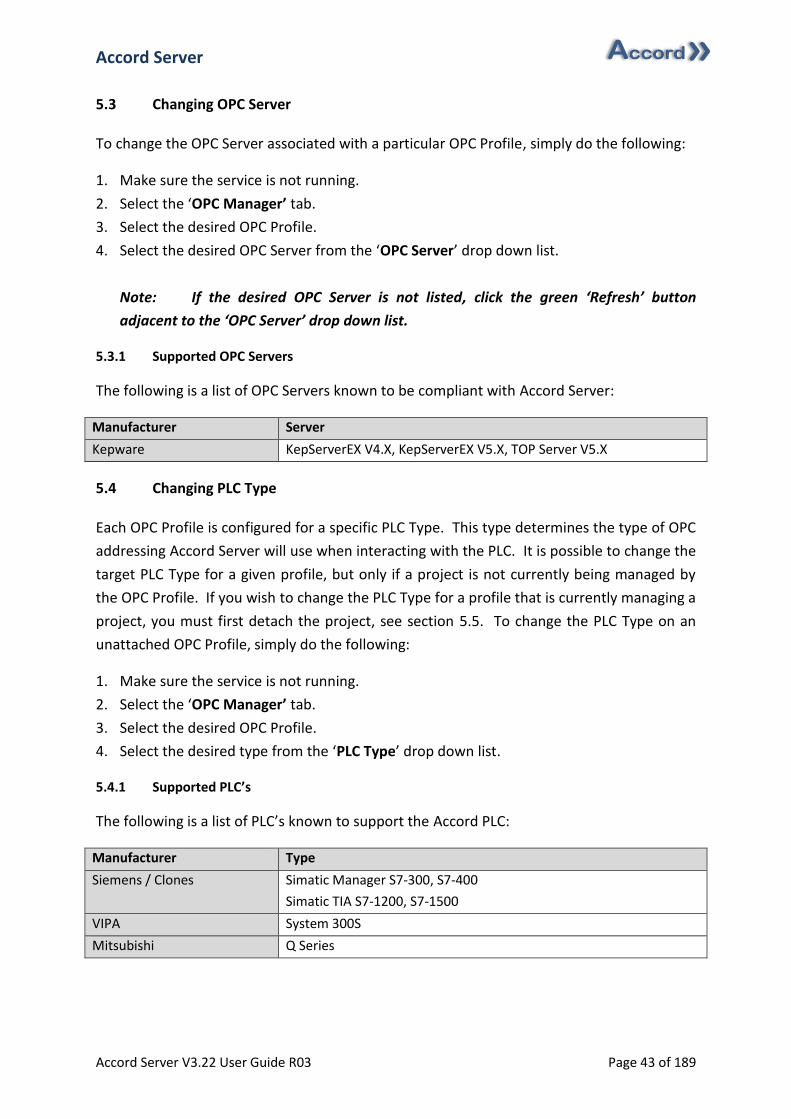
5.3 Changing OPC Server
To change the OPC Server associated with a particular OPC Profile, simply do the following:
1. Make sure the service is not running.
2. Select the ‘OPC Manager’ tab.
3. Select the desired OPC Profile.
4. Select the desired OPC Server from the ‘OPC Server’ drop down list.
Note: If the desired OPC Server is not listed, click the green ‘Refresh’ button
adjacent to the ‘OPC Server’ drop down list.
5.3.1 Supported OPC Servers
The following is a list of OPC Servers known to be compliant with Accord Server:
Manufacturer Server
Kepware KepServerEX V4.X, KepServerEX V5.X, TOP Server V5.X
5.4 Changing PLC Type
Each OPC Profile is configured for a specific PLC Type. This type determines the type of OPC
addressing Accord Server will use when interacting with the PLC. It is possible to change the
target PLC Type for a given profile, but only if a project is not currently being managed by
the OPC Profile. If you wish to change the PLC Type for a profile that is currently managing a
project, you must first detach the project, see section 5.5. To change the PLC Type on an
unattached OPC Profile, simply do the following:
1. Make sure the service is not running.
2. Select the ‘OPC Manager’ tab.
3. Select the desired OPC Profile.
4. Select the desired type from the ‘PLC Type’ drop down list.
5.4.1 Supported PLC’s
The following is a list of PLC’s known to support the Accord PLC:
Manufacturer Type
Siemens / Clones Simatic Manager S7-300, S7-400
Simatic TIA S7-1200, S7-1500
VIPA System 300S
Mitsubishi Q Series
Accord Server
Accord Server V3.22 User Guide R03 Page 44 of 189
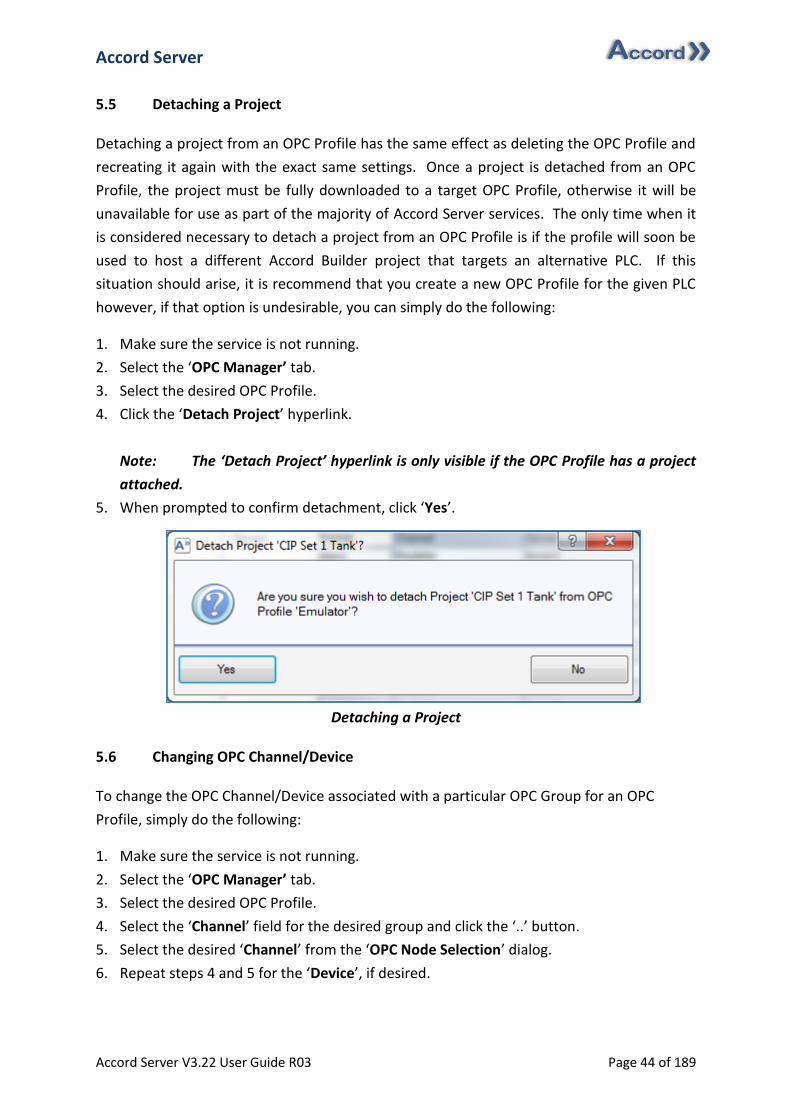
5.5 Detaching a Project
Detaching a project from an OPC Profile has the same effect as deleting the OPC Profile and
recreating it again with the exact same settings. Once a project is detached from an OPC
Profile, the project must be fully downloaded to a target OPC Profile, otherwise it will be
unavailable for use as part of the majority of Accord Server services. The only time when it
is considered necessary to detach a project from an OPC Profile is if the profile will soon be
used to host a different Accord Builder project that targets an alternative PLC. If this
situation should arise, it is recommend that you create a new OPC Profile for the given PLC
however, if that option is undesirable, you can simply do the following:
1. Make sure the service is not running.
2. Select the ‘OPC Manager’ tab.
3. Select the desired OPC Profile.
4. Click the ‘Detach Project’ hyperlink.
Note: The ‘Detach Project’ hyperlink is only visible if the OPC Profile has a project
attached.
5. When prompted to confirm detachment, click ‘Yes’.
Detaching a Project
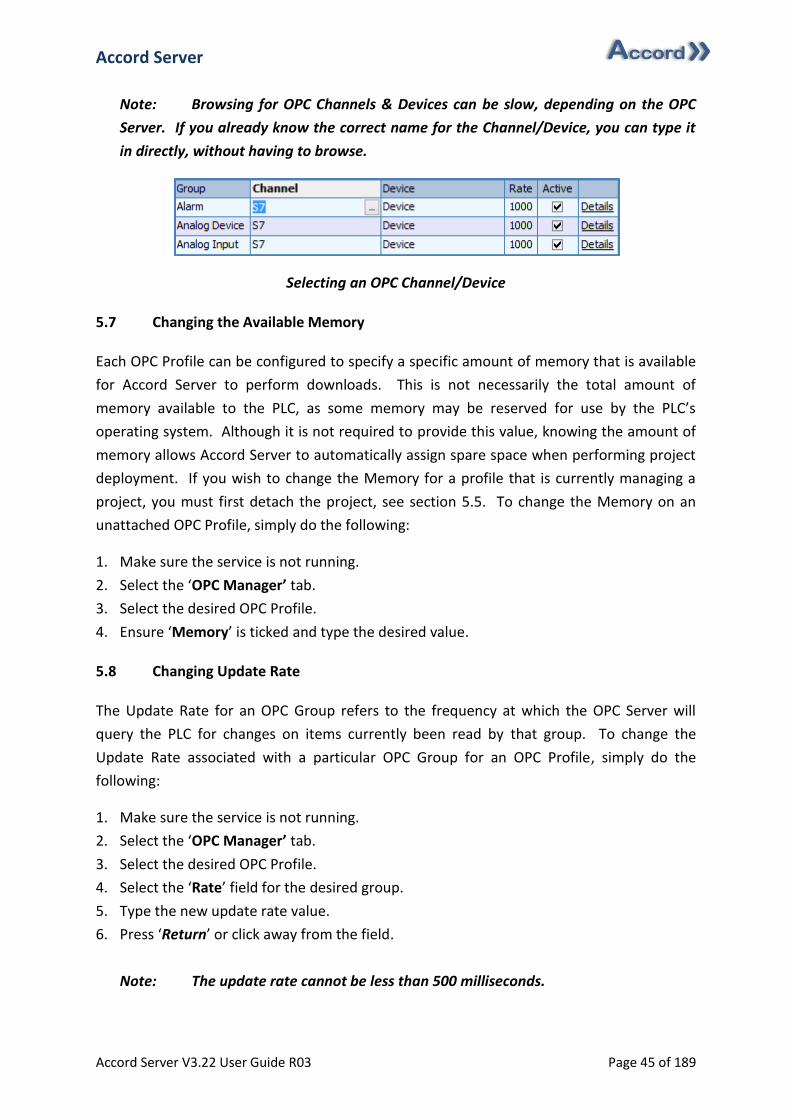
5.6 Changing OPC Channel/Device
To change the OPC Channel/Device associated with a particular OPC Group for an OPC
Profile, simply do the following:
1. Make sure the service is not running.
2. Select the ‘OPC Manager’ tab.
3. Select the desired OPC Profile.
4. Select the ‘Channel’ field for the desired group and click the ‘..’ button.
5. Select the desired ‘Channel’ from the ‘OPC Node Selection’ dialog.
6. Repeat steps 4 and 5 for the ‘Device’, if desired.
Accord Server
Accord Server V3.22 User Guide R03 Page 45 of 189
Note: Browsing for OPC Channels & Devices can be slow, depending on the OPC
Server. If you already know the correct name for the Channel/Device, you can type it
in directly, without having to browse.
Selecting an OPC Channel/Device
5.7 Changing the Available Memory
Each OPC Profile can be configured to specify a specific amount of memory that is available
for Accord Server to perform downloads. This is not necessarily the total amount of
memory available to the PLC, as some memory may be reserved for use by the PLC’s
operating system. Although it is not required to provide this value, knowing the amount of
memory allows Accord Server to automatically assign spare space when performing project
deployment. If you wish to change the Memory for a profile that is currently managing a
project, you must first detach the project, see section 5.5. To change the Memory on an
unattached OPC Profile, simply do the following:
1. Make sure the service is not running.
2. Select the ‘OPC Manager’ tab.
3. Select the desired OPC Profile.
4. Ensure ‘Memory’ is ticked and type the desired value.
5.8 Changing Update Rate
The Update Rate for an OPC Group refers to the frequency at which the OPC Server will
query the PLC for changes on items currently been read by that group. To change the
Update Rate associated with a particular OPC Group for an OPC Profile, simply do the
following:
1. Make sure the service is not running.
2. Select the ‘OPC Manager’ tab.
3. Select the desired OPC Profile.
4. Select the ‘Rate’ field for the desired group.
5. Type the new update rate value.
6. Press ‘Return’ or click away from the field.
Note: The update rate cannot be less than 500 milliseconds.
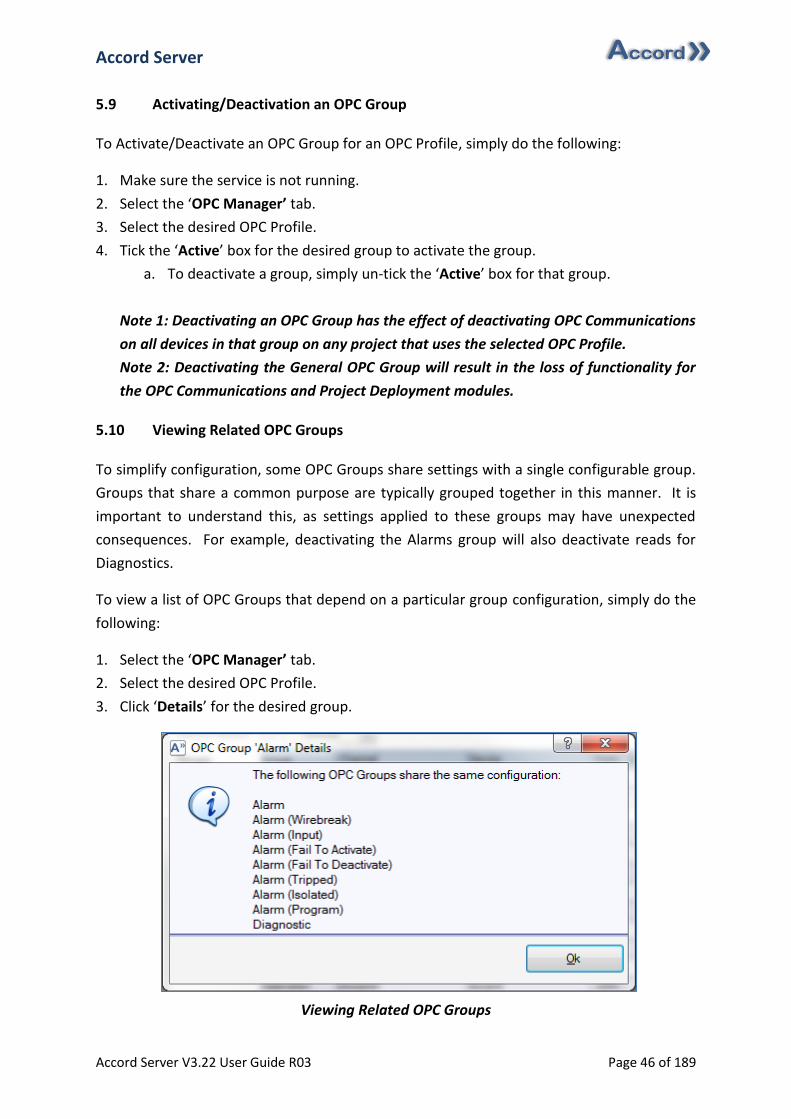
Accord Server
Accord Server V3.22 User Guide R03 Page 46 of 189
5.9 Activating/Deactivation an OPC Group
To Activate/Deactivate an OPC Group for an OPC Profile, simply do the following:
1. Make sure the service is not running.
2. Select the ‘OPC Manager’ tab.
3. Select the desired OPC Profile.
4. Tick the ‘Active’ box for the desired group to activate the group.
a. To deactivate a group, simply un-tick the ‘Active’ box for that group.
Note 1: Deactivating an OPC Group has the effect of deactivating OPC Communications
on all devices in that group on any project that uses the selected OPC Profile.
Note 2: Deactivating the General OPC Group will result in the loss of functionality for
the OPC Communications and Project Deployment modules.
5.10 Viewing Related OPC Groups
To simplify configuration, some OPC Groups share settings with a single configurable group.
Groups that share a common purpose are typically grouped together in this manner. It is
important to understand this, as settings applied to these groups may have unexpected
consequences. For example, deactivating the Alarms group will also deactivate reads for
Diagnostics.
To view a list of OPC Groups that depend on a particular group configuration, simply do the
following:
1. Select the ‘OPC Manager’ tab.
2. Select the desired OPC Profile.
3. Click ‘Details’ for the desired group.
Viewing Related OPC Groups
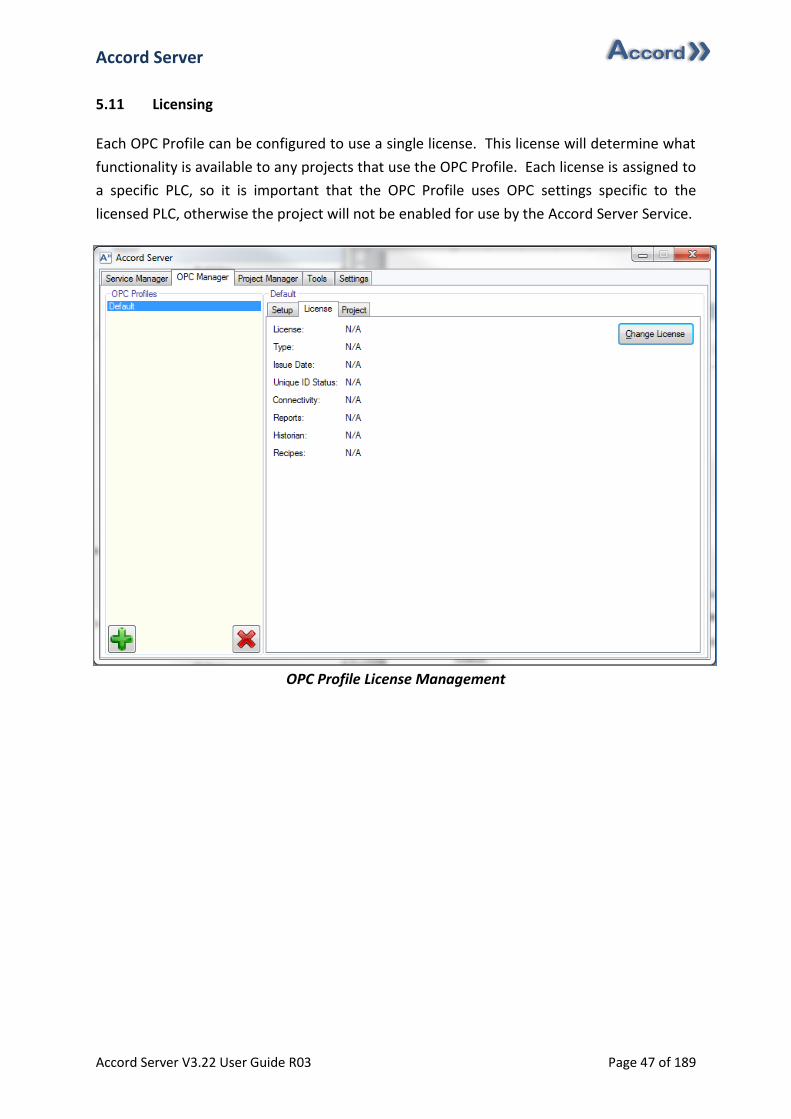
Accord Server
Accord Server V3.22 User Guide R03 Page 47 of 189
5.11 Licensing
Each OPC Profile can be configured to use a single license. This license will determine what
functionality is available to any projects that use the OPC Profile. Each license is assigned to
a specific PLC, so it is important that the OPC Profile uses OPC settings specific to the
licensed PLC, otherwise the project will not be enabled for use by the Accord Server Service.
OPC Profile License Management
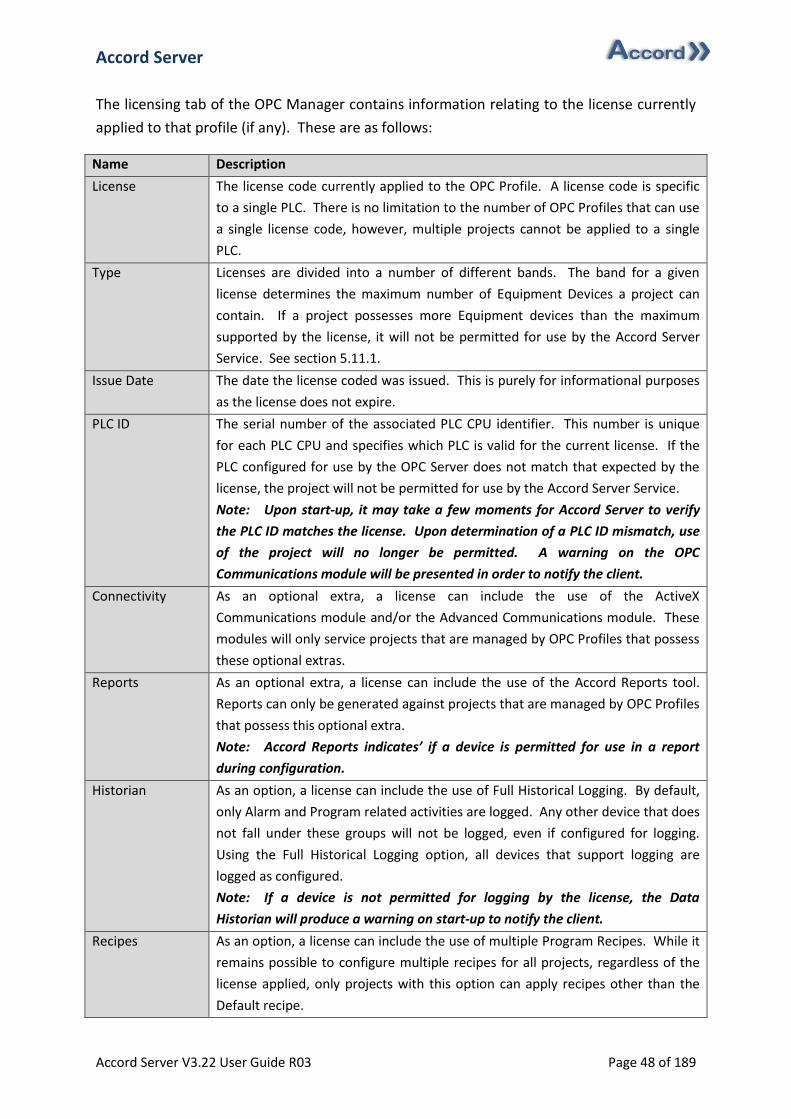
Accord Server
Accord Server V3.22 User Guide R03 Page 48 of 189
The licensing tab of the OPC Manager contains information relating to the license currently
applied to that profile (if any). These are as follows:
Name Description
License The license code currently applied to the OPC Profile. A license code is specific
to a single PLC. There is no limitation to the number of OPC Profiles that can use
a single license code, however, multiple projects cannot be applied to a single
PLC.
Type Licenses are divided into a number of different bands. The band for a given
license determines the maximum number of Equipment Devices a project can
contain. If a project possesses more Equipment devices than the maximum
supported by the license, it will not be permitted for use by the Accord Server
Service. See section 5.11.1.
Issue Date The date the license coded was issued. This is purely for informational purposes
as the license does not expire.
PLC ID The serial number of the associated PLC CPU identifier. This number is unique
for each PLC CPU and specifies which PLC is valid for the current license. If the
PLC configured for use by the OPC Server does not match that expected by the
license, the project will not be permitted for use by the Accord Server Service.
Note: Upon start-up, it may take a few moments for Accord Server to verify
the PLC ID matches the license. Upon determination of a PLC ID mismatch, use
of the project will no longer be permitted. A warning on the OPC
Communications module will be presented in order to notify the client.
Connectivity As an optional extra, a license can include the use of the ActiveX
Communications module and/or the Advanced Communications module. These
modules will only service projects that are managed by OPC Profiles that possess
these optional extras.
Reports As an optional extra, a license can include the use of the Accord Reports tool.
Reports can only be generated against projects that are managed by OPC Profiles
that possess this optional extra.
Note: Accord Reports indicates’ if a device is permitted for use in a report
during configuration.
Historian As an option, a license can include the use of Full Historical Logging. By default,
only Alarm and Program related activities are logged. Any other device that does
not fall under these groups will not be logged, even if configured for logging.
Using the Full Historical Logging option, all devices that support logging are
logged as configured.
Note: If a device is not permitted for logging by the license, the Data
Historian will produce a warning on start-up to notify the client.
Recipes As an option, a license can include the use of multiple Program Recipes. While it
remains possible to configure multiple recipes for all projects, regardless of the
license applied, only projects with this option can apply recipes other than the
Default recipe.
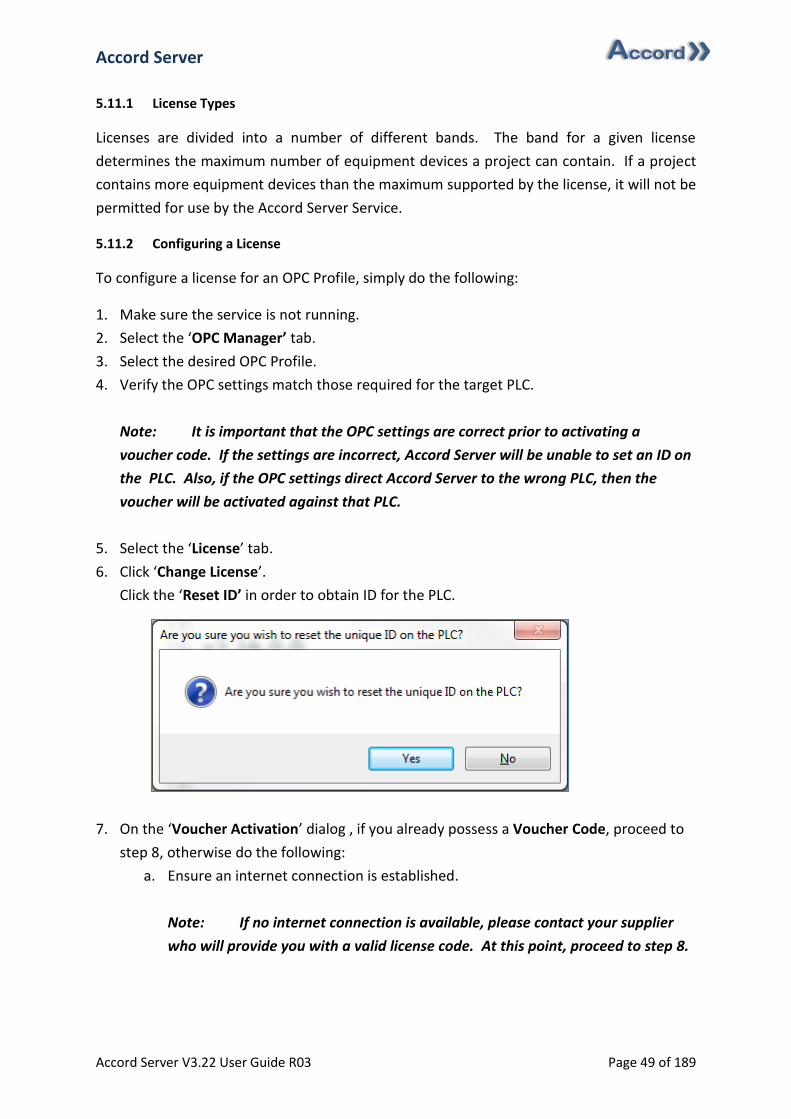
Accord Server
Accord Server V3.22 User Guide R03 Page 49 of 189
5.11.1 License Types
Licenses are divided into a number of different bands. The band for a given license
determines the maximum number of equipment devices a project can contain. If a project
contains more equipment devices than the maximum supported by the license, it will not be
permitted for use by the Accord Server Service.
5.11.2 Configuring a License
To configure a license for an OPC Profile, simply do the following:
1. Make sure the service is not running.
2. Select the ‘OPC Manager’ tab.
3. Select the desired OPC Profile.
4. Verify the OPC settings match those required for the target PLC.
Note: It is important that the OPC settings are correct prior to activating a
voucher code. If the settings are incorrect, Accord Server will be unable to set an ID on
the PLC. Also, if the OPC settings direct Accord Server to the wrong PLC, then the
voucher will be activated against that PLC.
5. Select the ‘License’ tab.
6. Click ‘Change License’.
Click the ‘Reset ID’ in order to obtain ID for the PLC.
7. On the ‘Voucher Activation’ dialog , if you already possess a Voucher Code, proceed to
step 8, otherwise do the following:
a. Ensure an internet connection is established.
Note: If no internet connection is available, please contact your supplier
who will provide you with a valid license code. At this point, proceed to step 8.
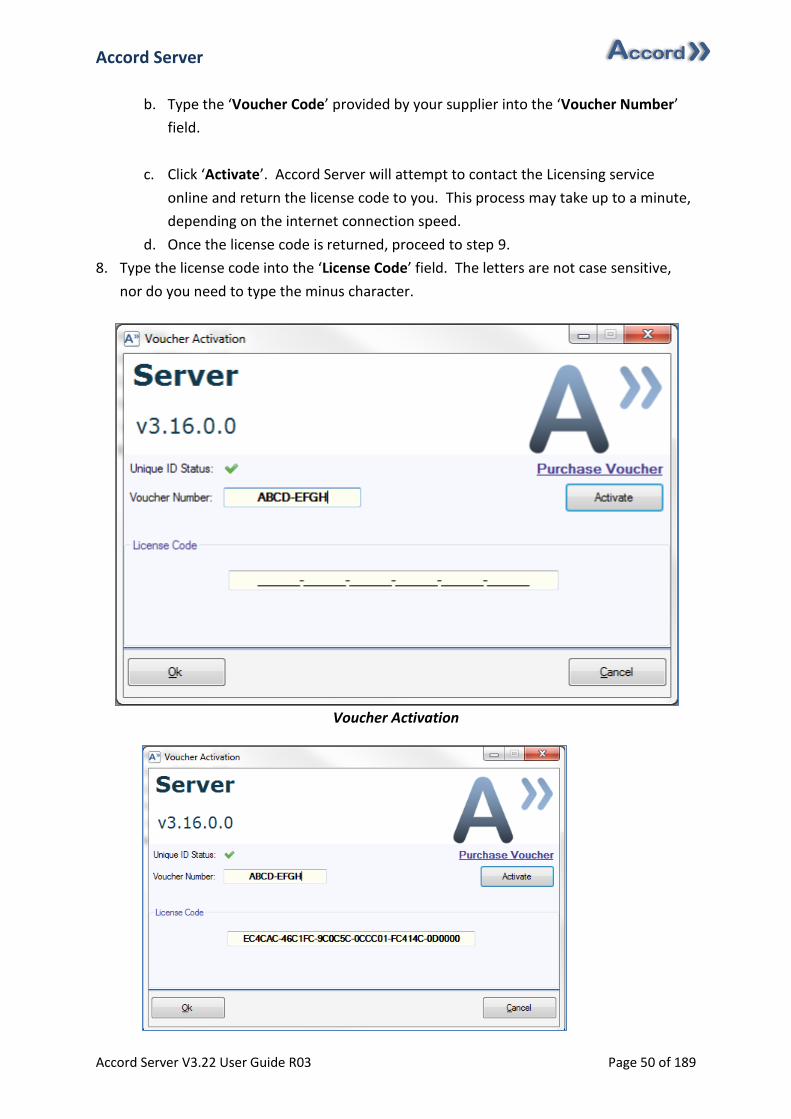
Accord Server
Accord Server V3.22 User Guide R03 Page 50 of 189
b. Type the ‘Voucher Code’ provided by your supplier into the ‘Voucher Number’
field.
c. Click ‘Activate’. Accord Server will attempt to contact the Licensing service
online and return the license code to you. This process may take up to a minute,
depending on the internet connection speed.
d. Once the license code is returned, proceed to step 9.
8. Type the license code into the ‘License Code’ field. The letters are not case sensitive,
nor do you need to type the minus character.
Voucher Activation
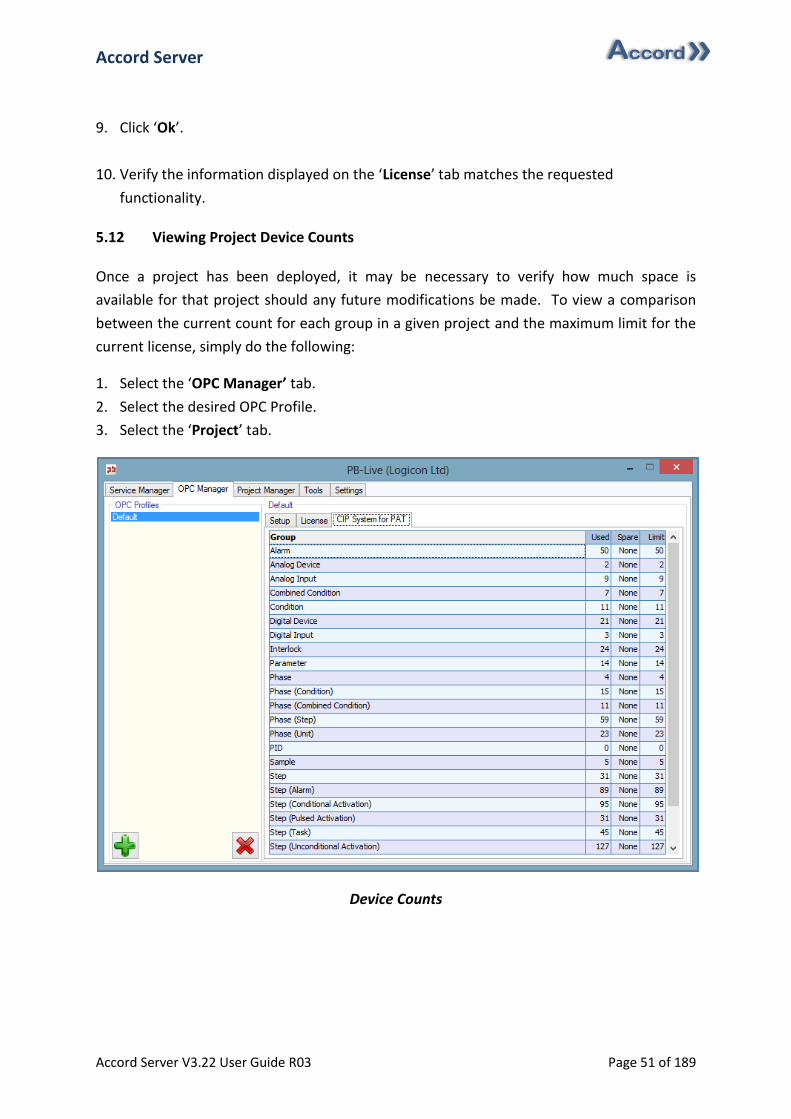
Accord Server
Accord Server V3.22 User Guide R03 Page 51 of 189
9. Click ‘Ok’.
10. Verify the information displayed on the ‘License’ tab matches the requested
functionality.
5.12 Viewing Project Device Counts
Once a project has been deployed, it may be necessary to verify how much space is
available for that project should any future modifications be made. To view a comparison
between the current count for each group in a given project and the maximum limit for the
current license, simply do the following:
1. Select the ‘OPC Manager’ tab.
2. Select the desired OPC Profile.
3. Select the ‘Project’ tab.
Device Counts
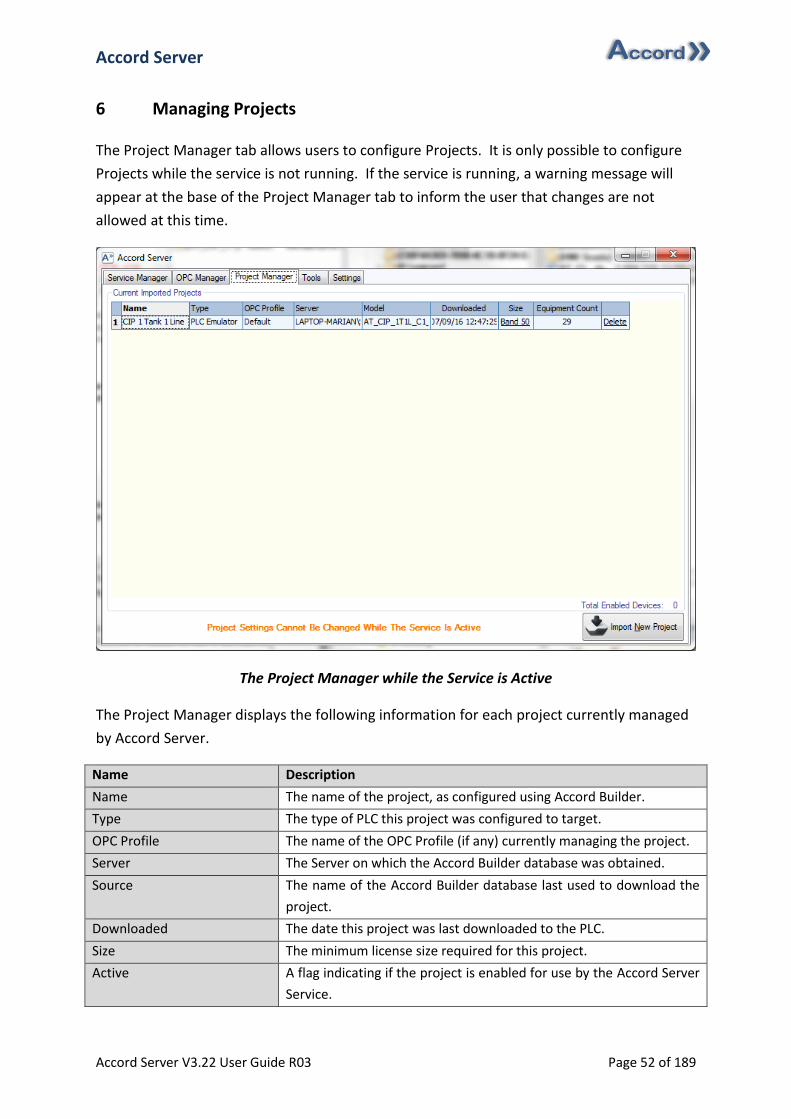
Accord Server
Accord Server V3.22 User Guide R03 Page 52 of 189
6 Managing Projects
The Project Manager tab allows users to configure Projects. It is only possible to configure
Projects while the service is not running. If the service is running, a warning message will
appear at the base of the Project Manager tab to inform the user that changes are not
allowed at this time.
The Project Manager while the Service is Active
The Project Manager displays the following information for each project currently managed
by Accord Server.
Name Description
Name The name of the project, as configured using Accord Builder.
Type The type of PLC this project was configured to target.
OPC Profile The name of the OPC Profile (if any) currently managing the project.
Server The Server on which the Accord Builder database was obtained.
Source The name of the Accord Builder database last used to download the
project.
Downloaded The date this project was last downloaded to the PLC.
Size The minimum license size required for this project.
Active A flag indicating if the project is enabled for use by the Accord Server
Service.

Accord Server
Accord Server V3.22 User Guide R03 Page 53 of 189
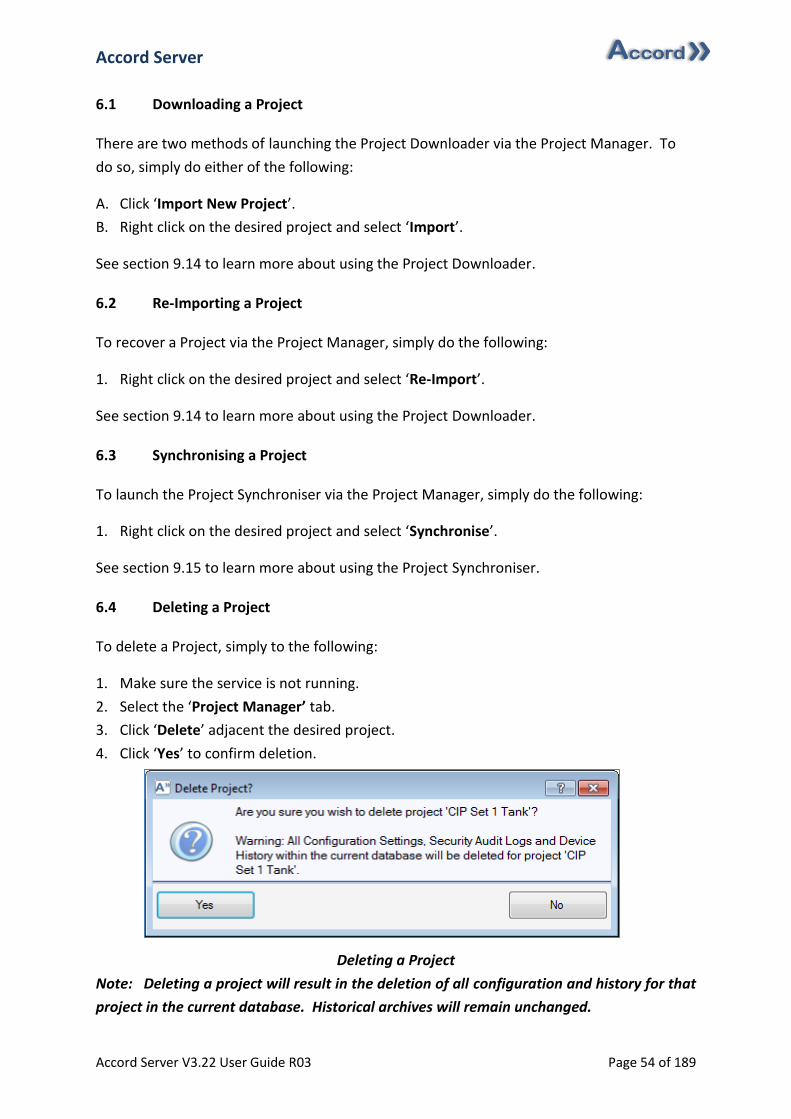
Accord Server
Accord Server V3.22 User Guide R03 Page 54 of 189
6.1 Downloading a Project
There are two methods of launching the Project Downloader via the Project Manager. To
do so, simply do either of the following:
A. Click ‘Import New Project’.
B. Right click on the desired project and select ‘Import’.
See section 9.14 to learn more about using the Project Downloader.
6.2 Re-Importing a Project
To recover a Project via the Project Manager, simply do the following:
1. Right click on the desired project and select ‘Re-Import’.
See section 9.14 to learn more about using the Project Downloader.
6.3 Synchronising a Project
To launch the Project Synchroniser via the Project Manager, simply do the following:
1. Right click on the desired project and select ‘Synchronise’.
See section 9.15 to learn more about using the Project Synchroniser.
6.4 Deleting a Project
To delete a Project, simply to the following:
1. Make sure the service is not running.
2. Select the ‘Project Manager’ tab.
3. Click ‘Delete’ adjacent the desired project.
4. Click ‘Yes’ to confirm deletion.
Deleting a Project
Note: Deleting a project will result in the deletion of all configuration and history for that
project in the current database. Historical archives will remain unchanged.

Accord Server
Accord Server V3.22 User Guide R03 Page 55 of 189
6.5 Activating/Deactivating a Project
To Activate/Deactivate a Project, simply do the following:
1. Make sure the service is not running.
2. Select the ‘Project Manager’ tab.
3. Tick the ‘Active’ box for the appropriate project.
a. To deactivate a project, simply un-tick the ‘Active’ box for that project.
Note: Deactivating a Project has the effect of deactivating OPC Communications
on all devices in that project.
6.6 Viewing Project Deployment
The Project Manager provides easy access to the Device Reports for a given project. This
report displays the current deployment information for each device contained in that
project. To generate this report, simply do either of following:
A. Click the link under the ‘Size’ column for the desired project. This will generate a Device
Report (Basic).
B. Right click on the desired project, highlight ‘Reports’ and then select ‘Device Report
(Basic)’ or ‘Device Report (Complete)’.
See sections 9.9 and 9.10 to learn more about the Device Reports.
6.7 Generating an Excel Tag List
To generate an Excel Tag List via the Project Manager, simply do the following:
1. Right click on the desired project.
2. Highlight ‘Reports’.
3. Select ‘Excel Tag List’.
See section 9.11 to learn more about the Excel Tag List.
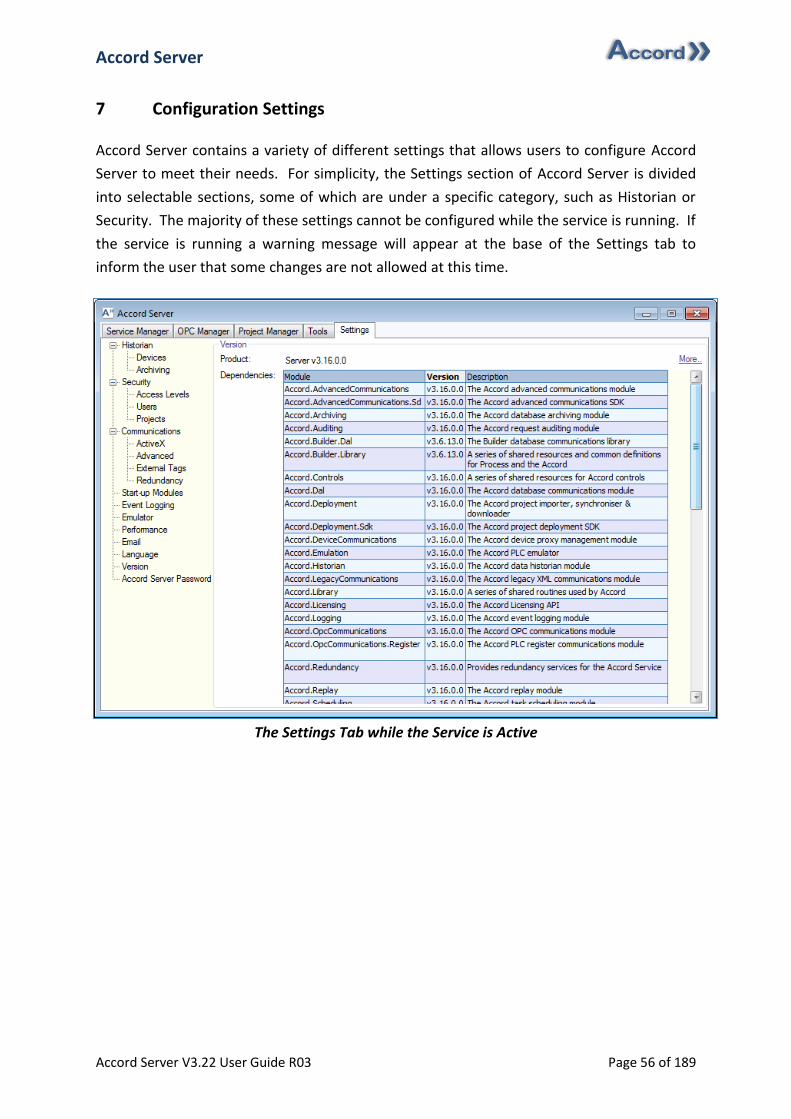
Accord Server
Accord Server V3.22 User Guide R03 Page 56 of 189
7 Configuration Settings
Accord Server contains a variety of different settings that allows users to configure Accord
Server to meet their needs. For simplicity, the Settings section of Accord Server is divided
into selectable sections, some of which are under a specific category, such as Historian or
Security. The majority of these settings cannot be configured while the service is running. If
the service is running a warning message will appear at the base of the Settings tab to
inform the user that some changes are not allowed at this time.
The Settings Tab while the Service is Active
Accord Server
Accord Server V3.22 User Guide R03 Page 57 of 189
7.1 Historian
7.1.1 Devices
Devices allows users to configure the Logging and Deadband settings for specific devices on
a given Project. By default, all Alarms and Program are automatically logged. Although it is
not possible to deselect logging for Alarms, it is possible to deselect logging for Programs.
Logging on Programs should only be deselected if information relating to them is no longer
required for reporting purposes. Additionally, some groups, such as Analog Device, contain
configurable Deadbands. Deadbands are used as a logging threshold for a given device and
can help avoid large quantities of unnecessary data being logged in the database.
7.1.1.1 Activating/Deactivating Logging
To Activate/Deactivate Logging on a particular device, simply do the following:
1. Make sure the service is not running.
2. Select the ‘Settings’ tab.
3. Select ‘Devices’ under the ‘Historian’ node from the settings tree.
4. Select the desired project from the ‘Project’ list.
5. Select the desired group from the ‘Group’ list.
6. Tick the ‘Logged’ box for the appropriate device.
a. To deactivate logging on a device, simply un-tick the ‘Logged’ box for that device.
Note 1: It is not possible to configure logging for Alarms. By default, all alarms are
logged.
Note 2: Deactivating Logging for a device will not delete any history previously
recorded for that device. It simply prevents any future history from being recorded.
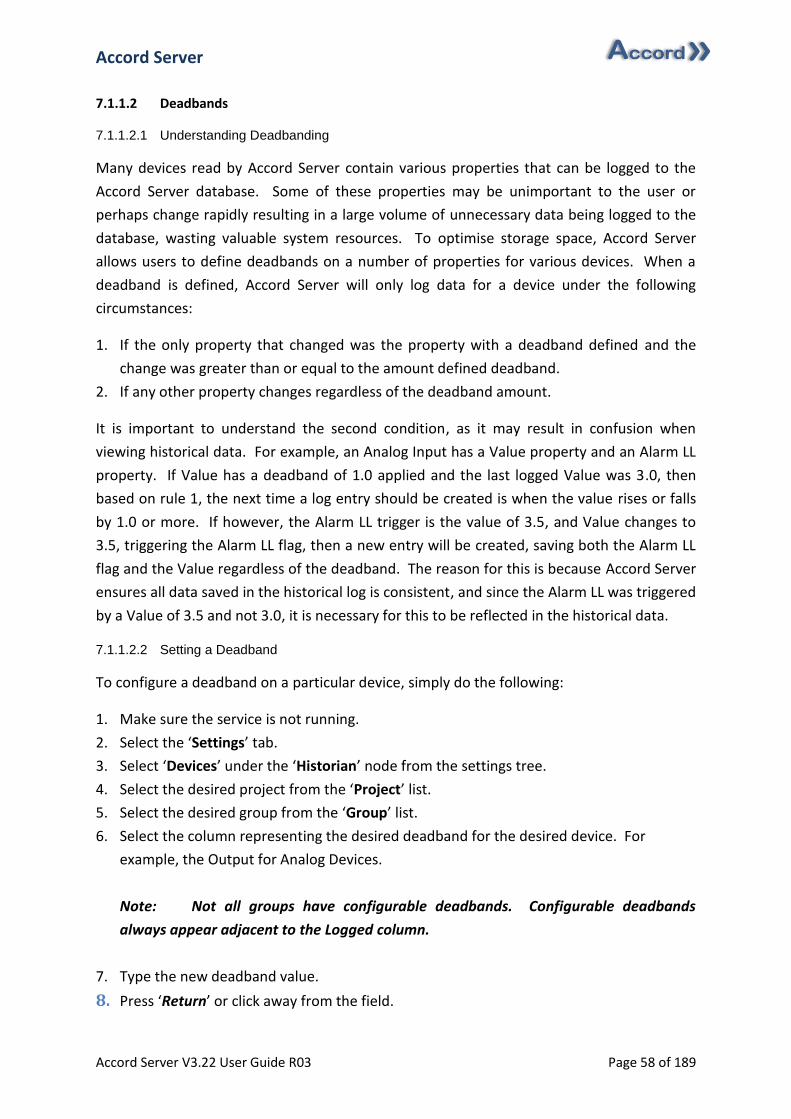
Accord Server
Accord Server V3.22 User Guide R03 Page 58 of 189
7.1.1.2 Deadbands
7.1.1.2.1 Understanding Deadbanding
Many devices read by Accord Server contain various properties that can be logged to the
Accord Server database. Some of these properties may be unimportant to the user or
perhaps change rapidly resulting in a large volume of unnecessary data being logged to the
database, wasting valuable system resources. To optimise storage space, Accord Server
allows users to define deadbands on a number of properties for various devices. When a
deadband is defined, Accord Server will only log data for a device under the following
circumstances:
1. If the only property that changed was the property with a deadband defined and the
change was greater than or equal to the amount defined deadband.
2. If any other property changes regardless of the deadband amount.
It is important to understand the second condition, as it may result in confusion when
viewing historical data. For example, an Analog Input has a Value property and an Alarm LL
property. If Value has a deadband of 1.0 applied and the last logged Value was 3.0, then
based on rule 1, the next time a log entry should be created is when the value rises or falls
by 1.0 or more. If however, the Alarm LL trigger is the value of 3.5, and Value changes to
3.5, triggering the Alarm LL flag, then a new entry will be created, saving both the Alarm LL
flag and the Value regardless of the deadband. The reason for this is because Accord Server
ensures all data saved in the historical log is consistent, and since the Alarm LL was triggered
by a Value of 3.5 and not 3.0, it is necessary for this to be reflected in the historical data.
7.1.1.2.2 Setting a Deadband
To configure a deadband on a particular device, simply do the following:
1. Make sure the service is not running.
2. Select the ‘Settings’ tab.
3. Select ‘Devices’ under the ‘Historian’ node from the settings tree.
4. Select the desired project from the ‘Project’ list.
5. Select the desired group from the ‘Group’ list.
6. Select the column representing the desired deadband for the desired device. For
example, the Output for Analog Devices.
Note: Not all groups have configurable deadbands. Configurable deadbands
always appear adjacent to the Logged column.
7. Type the new deadband value.
8. Press ‘Return’ or click away from the field.
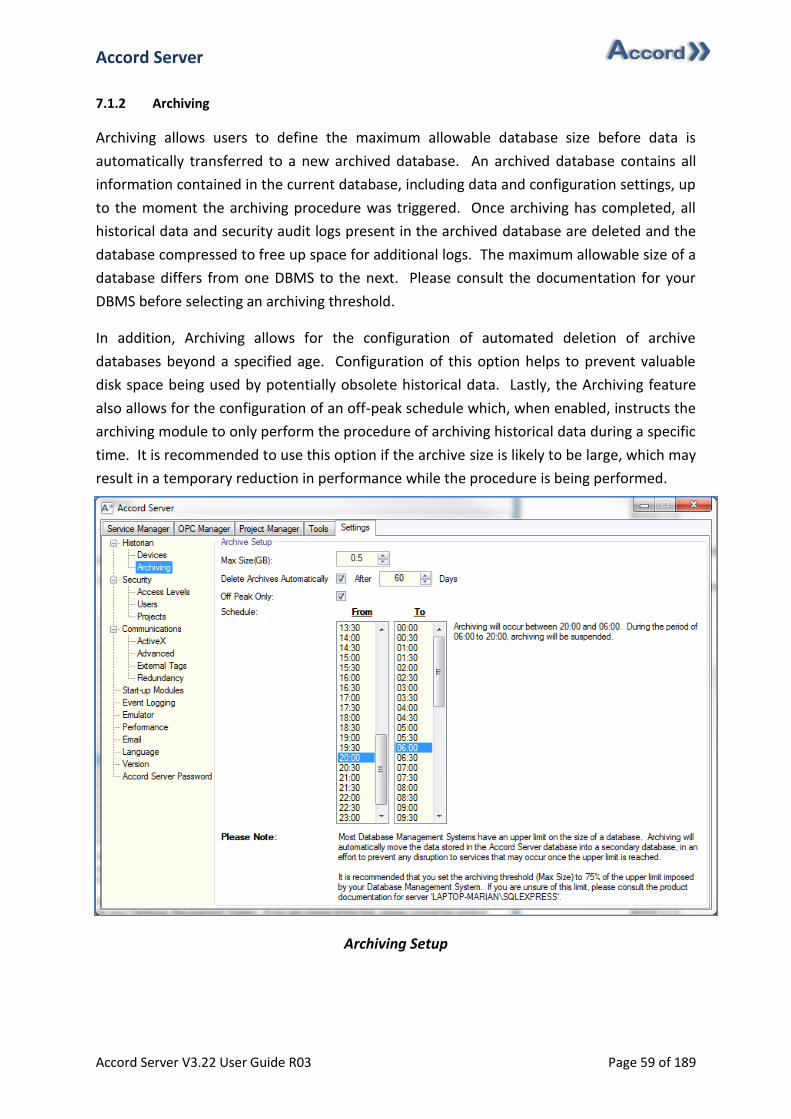
Accord Server
Accord Server V3.22 User Guide R03 Page 59 of 189
7.1.2 Archiving
Archiving allows users to define the maximum allowable database size before data is
automatically transferred to a new archived database. An archived database contains all
information contained in the current database, including data and configuration settings, up
to the moment the archiving procedure was triggered. Once archiving has completed, all
historical data and security audit logs present in the archived database are deleted and the
database compressed to free up space for additional logs. The maximum allowable size of a
database differs from one DBMS to the next. Please consult the documentation for your
DBMS before selecting an archiving threshold.
In addition, Archiving allows for the configuration of automated deletion of archive
databases beyond a specified age. Configuration of this option helps to prevent valuable
disk space being used by potentially obsolete historical data. Lastly, the Archiving feature
also allows for the configuration of an off-peak schedule which, when enabled, instructs the
archiving module to only perform the procedure of archiving historical data during a specific
time. It is recommended to use this option if the archive size is likely to be large, which may
result in a temporary reduction in performance while the procedure is being performed.
Archiving Setup

Accord Server
Accord Server V3.22 User Guide R03 Page 60 of 189
7.1.2.1 Configuring a Threshold
To configure an archiving threshold, simply do the following:
1. Make sure the service is not running.
2. Select the ‘Settings’ tab.
3. Select ‘Archiving’ under the ‘Historian’ node from the settings tree.
4. Use the Up/Down arrows to increase/decrease the threshold.
Note: It is recommended to set the threshold to approximately 75% of the
maximum allowable database size.
7.1.2.2 Configuring Automatic Deletion of Archives
To configure the automatic deletion of historical archives, simply do the following:
1. Make sure the service is not running.
2. Select the ‘Settings’ tab.
3. Select ‘Archiving’ under the ‘Historian’ node from the settings tree.
4. To enable the feature, ensure ‘Delete Archives Automatically’ is ticked, otherwise un-
tick it.
a. To define the age threshold of archive databases, simply select the age using the
‘Days’ field.
7.1.2.3 Configuring the Off-Peak Schedule
To configure the off-peak schedule for historical archiving, simply do the following:
1. Make sure the service is not running.
2. Select the ‘Settings’ tab.
3. Select ‘Archiving’ under the ‘Historian’ node from the settings tree.
4. To enable the feature, ensure ‘Off Peak Only’ is ticked, otherwise un-tick it.
a. To define the time frame for the Off Peak Schedule, simply select the appropriate
times using the from the ‘To’ and ‘From’ fields. To assist in the accurate
configuration of the schedule, a description of the configured schedule will
appear adjacent to the fields.
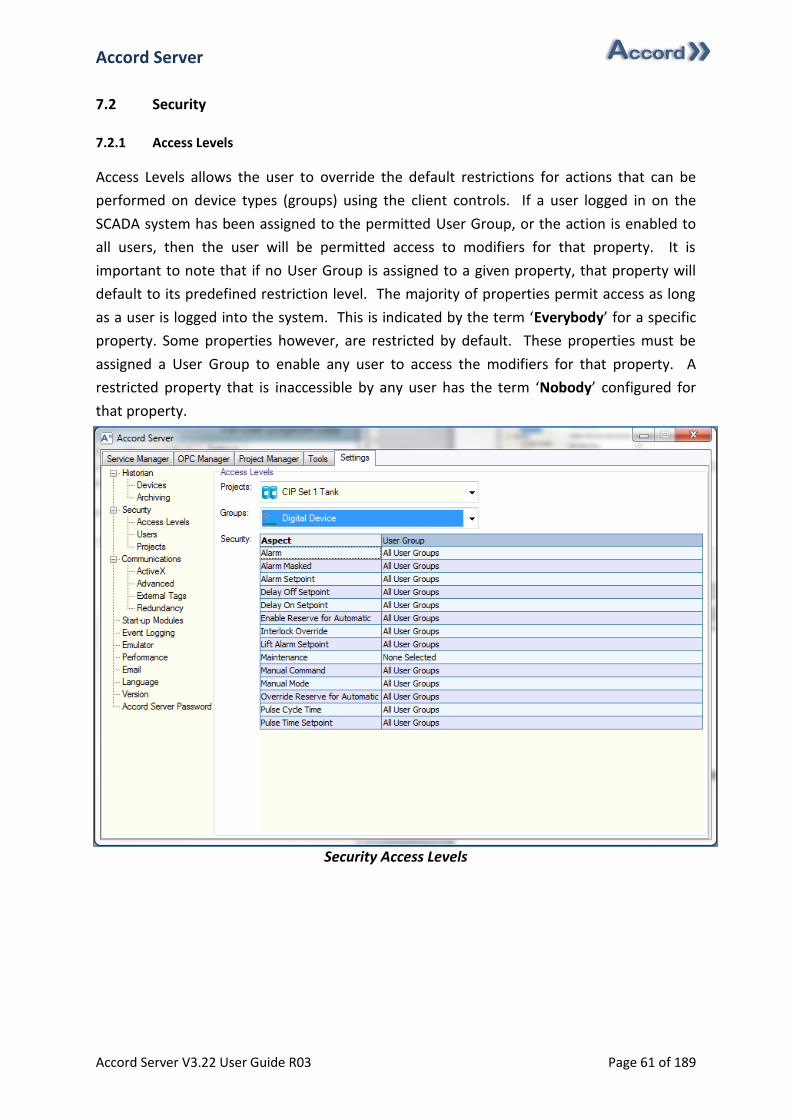
Accord Server
Accord Server V3.22 User Guide R03 Page 61 of 189
7.2 Security
7.2.1 Access Levels
Access Levels allows the user to override the default restrictions for actions that can be
performed on device types (groups) using the client controls. If a user logged in on the
SCADA system has been assigned to the permitted User Group, or the action is enabled to
all users, then the user will be permitted access to modifiers for that property. It is
important to note that if no User Group is assigned to a given property, that property will
default to its predefined restriction level. The majority of properties permit access as long
as a user is logged into the system. This is indicated by the term ‘Everybody’ for a specific
property. Some properties however, are restricted by default. These properties must be
assigned a User Group to enable any user to access the modifiers for that property. A
restricted property that is inaccessible by any user has the term ‘Nobody’ configured for
that property.
Security Access Levels

Accord Server
Accord Server V3.22 User Guide R03 Page 62 of 189
7.2.1.1 Configuring an Access Level
To configure an access level for a particular feature, simply do the following:
1. Make sure the service is not running.
2. Select the ‘Settings’ tab.
3. Select ‘Access Levels’ under the ‘Security’ node from the settings tree.
4. Select the desired project from the ‘Project’ list.
5. Select the desired group from the ‘Group’ list.
6. Select the Level column for the desired feature. For example, Maintenance for Digital
Device.
7. Click the ‘..’ button that appears adjacent the current selected value.
8. Select the desired User Group(s).
Note: Pressing Control (Ctrl) while making a selection will enable the ability to
deselect that item.
9. Click ‘Ok’.
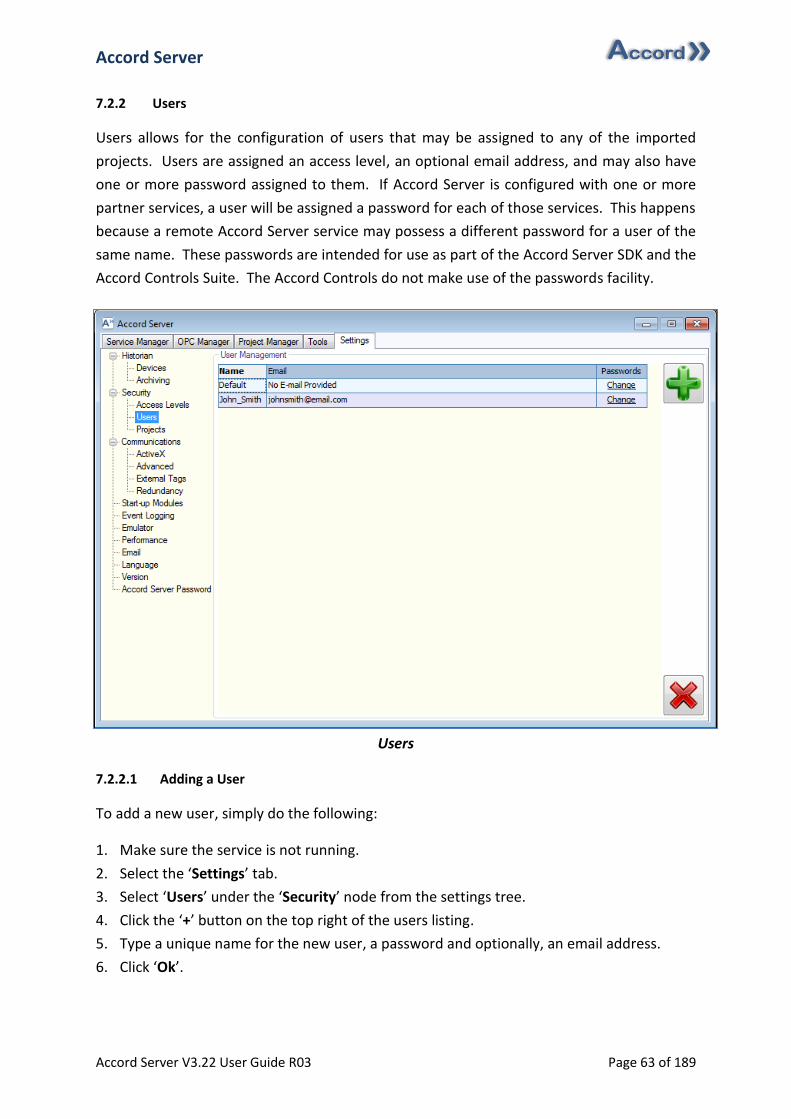
Accord Server
Accord Server V3.22 User Guide R03 Page 63 of 189
7.2.2 Users
Users allows for the configuration of users that may be assigned to any of the imported
projects. Users are assigned an access level, an optional email address, and may also have
one or more password assigned to them. If Accord Server is configured with one or more
partner services, a user will be assigned a password for each of those services. This happens
because a remote Accord Server service may possess a different password for a user of the
same name. These passwords are intended for use as part of the Accord Server SDK and the
Accord Controls Suite. The Accord Controls do not make use of the passwords facility.
Users
7.2.2.1 Adding a User
To add a new user, simply do the following:
1. Make sure the service is not running.
2. Select the ‘Settings’ tab.
3. Select ‘Users’ under the ‘Security’ node from the settings tree.
4. Click the ‘+’ button on the top right of the users listing.
5. Type a unique name for the new user, a password and optionally, an email address.
6. Click ‘Ok’.
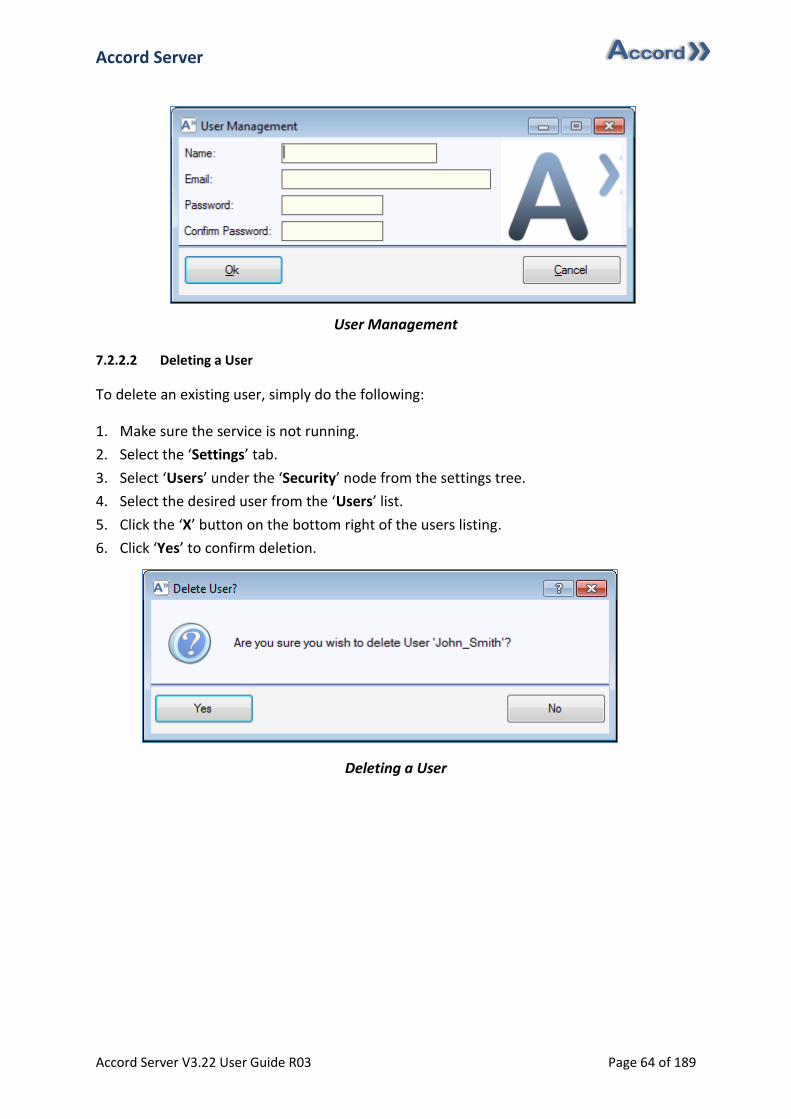
Accord Server
Accord Server V3.22 User Guide R03 Page 64 of 189
User Management
7.2.2.2 Deleting a User
To delete an existing user, simply do the following:
1. Make sure the service is not running.
2. Select the ‘Settings’ tab.
3. Select ‘Users’ under the ‘Security’ node from the settings tree.
4. Select the desired user from the ‘Users’ list.
5. Click the ‘X’ button on the bottom right of the users listing.
6. Click ‘Yes’ to confirm deletion.
Deleting a User
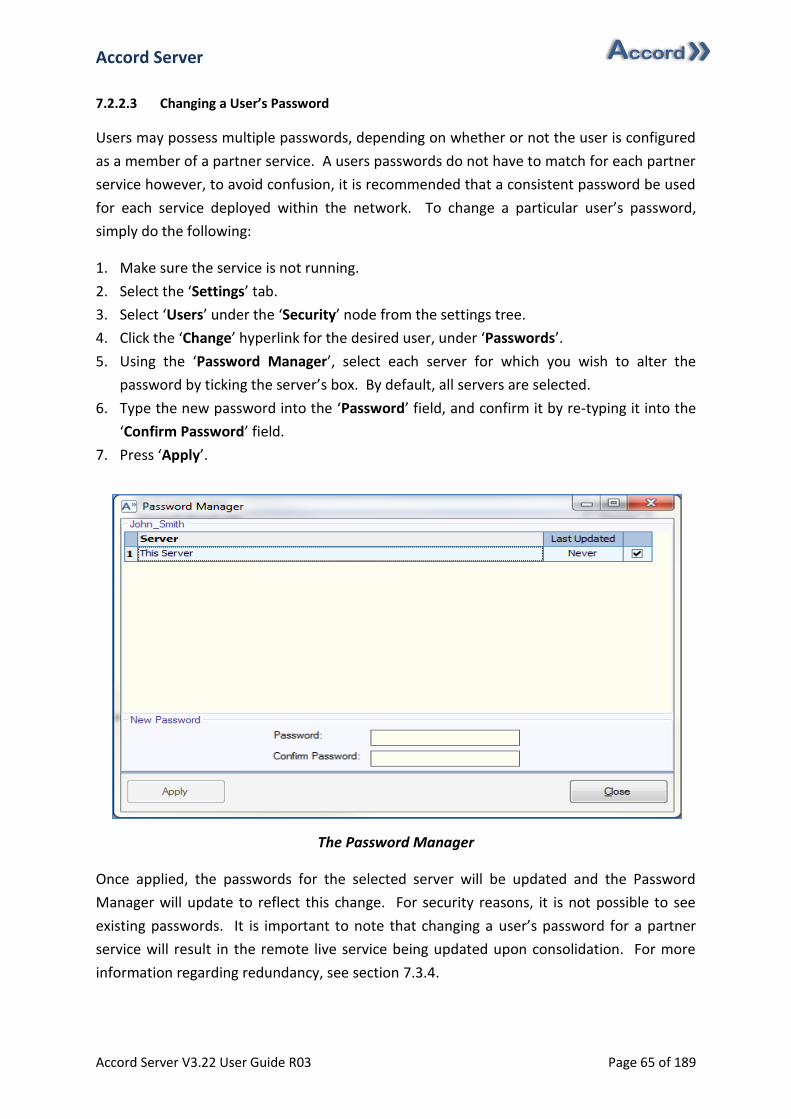
Accord Server
Accord Server V3.22 User Guide R03 Page 65 of 189
7.2.2.3 Changing a User’s Password
Users may possess multiple passwords, depending on whether or not the user is configured
as a member of a partner service. A users passwords do not have to match for each partner
service however, to avoid confusion, it is recommended that a consistent password be used
for each service deployed within the network. To change a particular user’s password,
simply do the following:
1. Make sure the service is not running.
2. Select the ‘Settings’ tab.
3. Select ‘Users’ under the ‘Security’ node from the settings tree.
4. Click the ‘Change’ hyperlink for the desired user, under ‘Passwords’.
5. Using the ‘Password Manager’, select each server for which you wish to alter the
password by ticking the server’s box. By default, all servers are selected.
6. Type the new password into the ‘Password’ field, and confirm it by re-typing it into the
‘Confirm Password’ field.
7. Press ‘Apply’.
The Password Manager
Once applied, the passwords for the selected server will be updated and the Password
Manager will update to reflect this change. For security reasons, it is not possible to see
existing passwords. It is important to note that changing a user’s password for a partner
service will result in the remote live service being updated upon consolidation. For more
information regarding redundancy, see section 7.3.4.
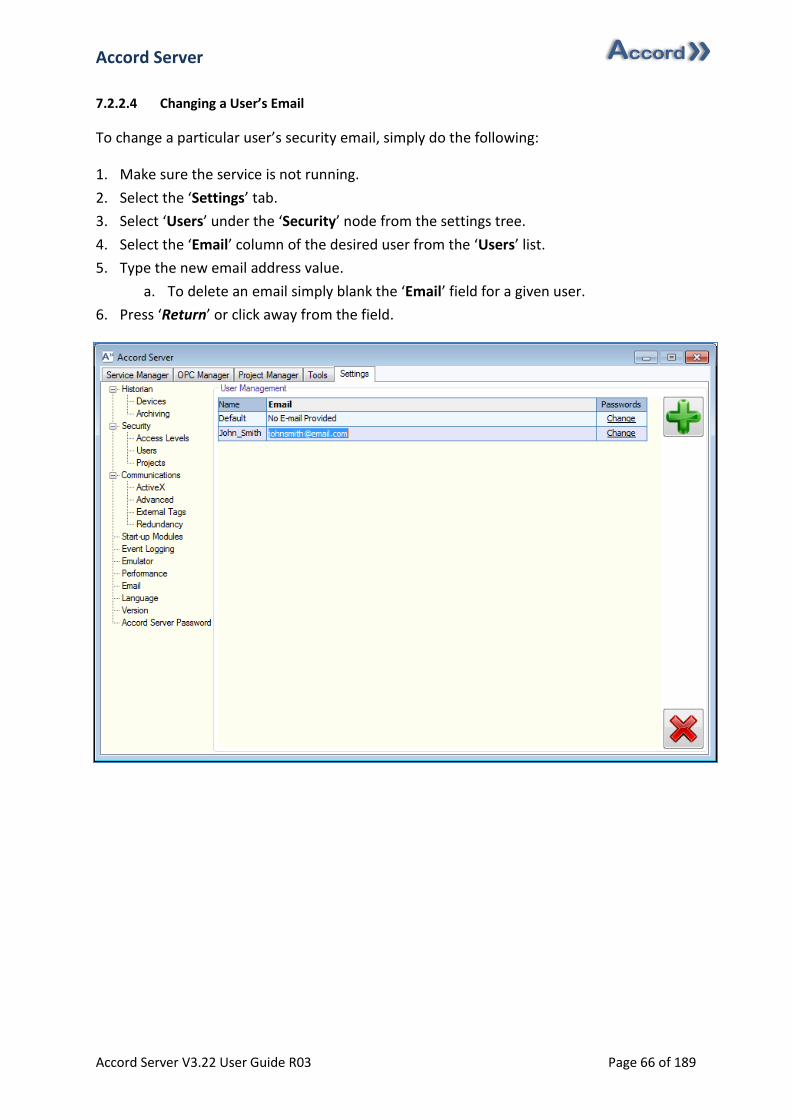
Accord Server
Accord Server V3.22 User Guide R03 Page 66 of 189
7.2.2.4 Changing a User’s Email
To change a particular user’s security email, simply do the following:
1. Make sure the service is not running.
2. Select the ‘Settings’ tab.
3. Select ‘Users’ under the ‘Security’ node from the settings tree.
4. Select the ‘Email’ column of the desired user from the ‘Users’ list.
5. Type the new email address value.
a. To delete an email simply blank the ‘Email’ field for a given user.
6. Press ‘Return’ or click away from the field.
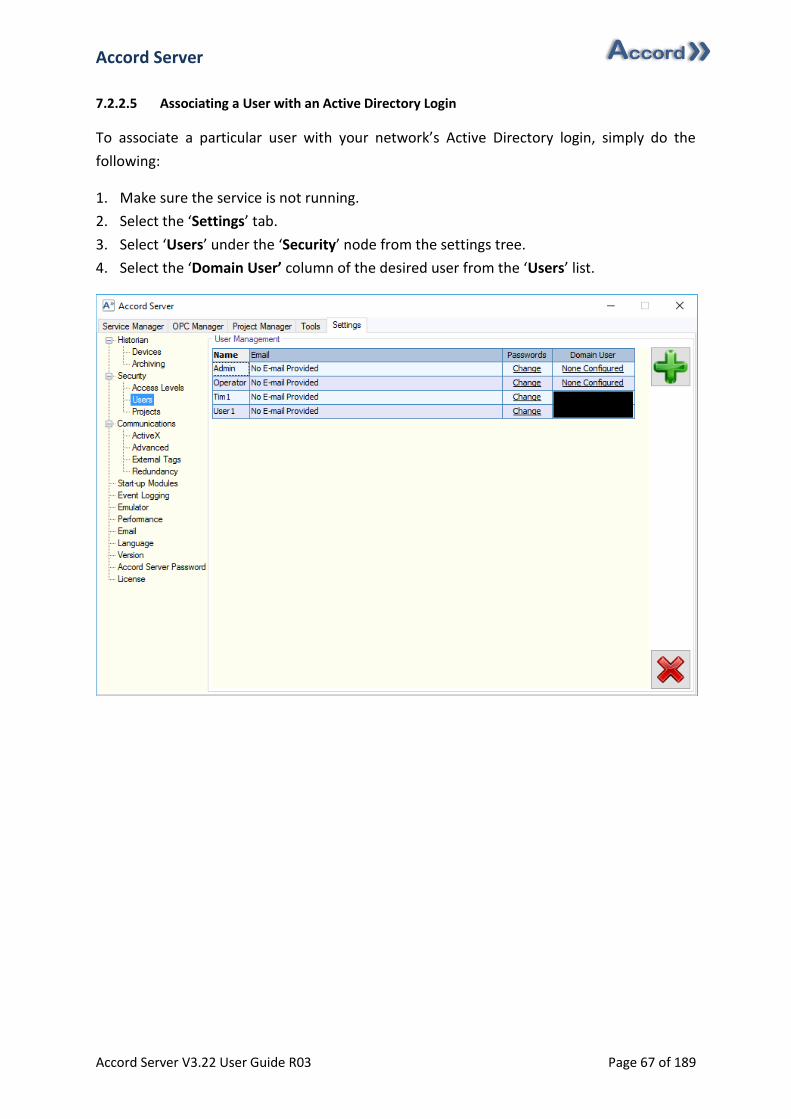
Accord Server
Accord Server V3.22 User Guide R03 Page 67 of 189
7.2.2.5 Associating a User with an Active Directory Login
To associate a particular user with your network’s Active Directory login, simply do the
following:
1. Make sure the service is not running.
2. Select the ‘Settings’ tab.
3. Select ‘Users’ under the ‘Security’ node from the settings tree.
4. Select the ‘Domain User’ column of the desired user from the ‘Users’ list.
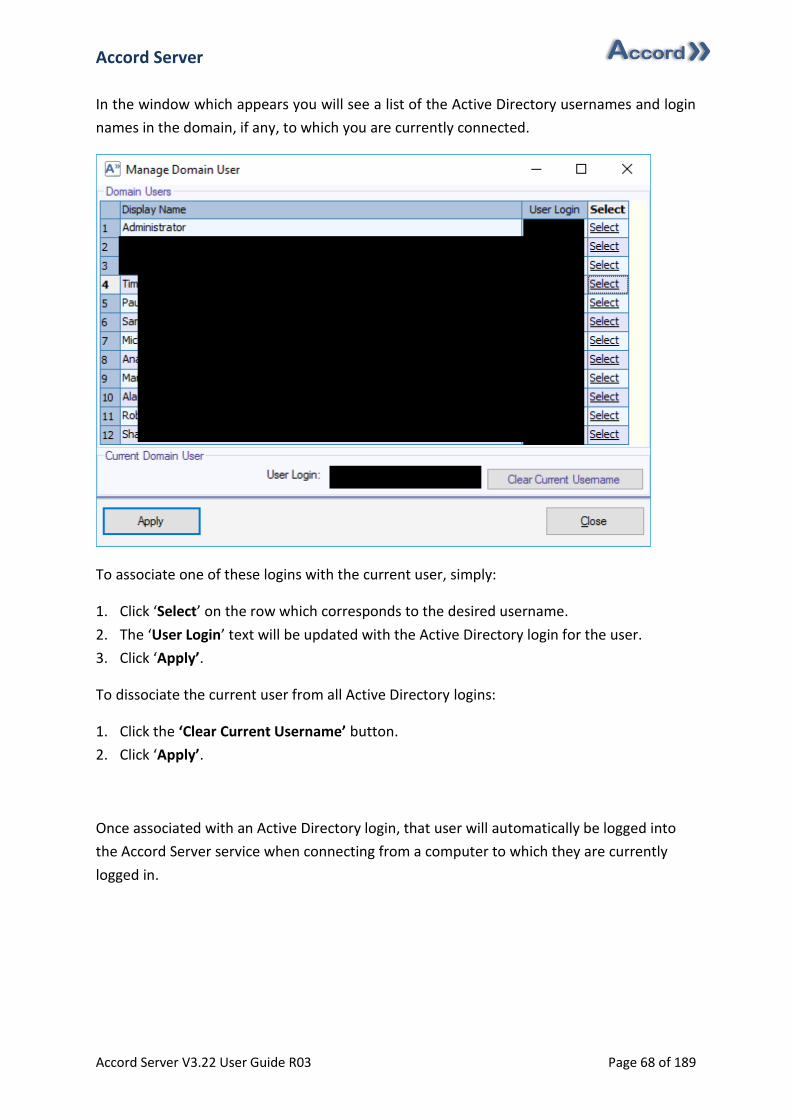
Accord Server
Accord Server V3.22 User Guide R03 Page 68 of 189
In the window which appears you will see a list of the Active Directory usernames and login
names in the domain, if any, to which you are currently connected.
To associate one of these logins with the current user, simply:
1. Click ‘Select’ on the row which corresponds to the desired username.
2. The ‘User Login’ text will be updated with the Active Directory login for the user.
3. Click ‘Apply’.
To dissociate the current user from all Active Directory logins:
1. Click the ‘Clear Current Username’ button.
2. Click ‘Apply’.
Once associated with an Active Directory login, that user will automatically be logged into
the Accord Server service when connecting from a computer to which they are currently
logged in.
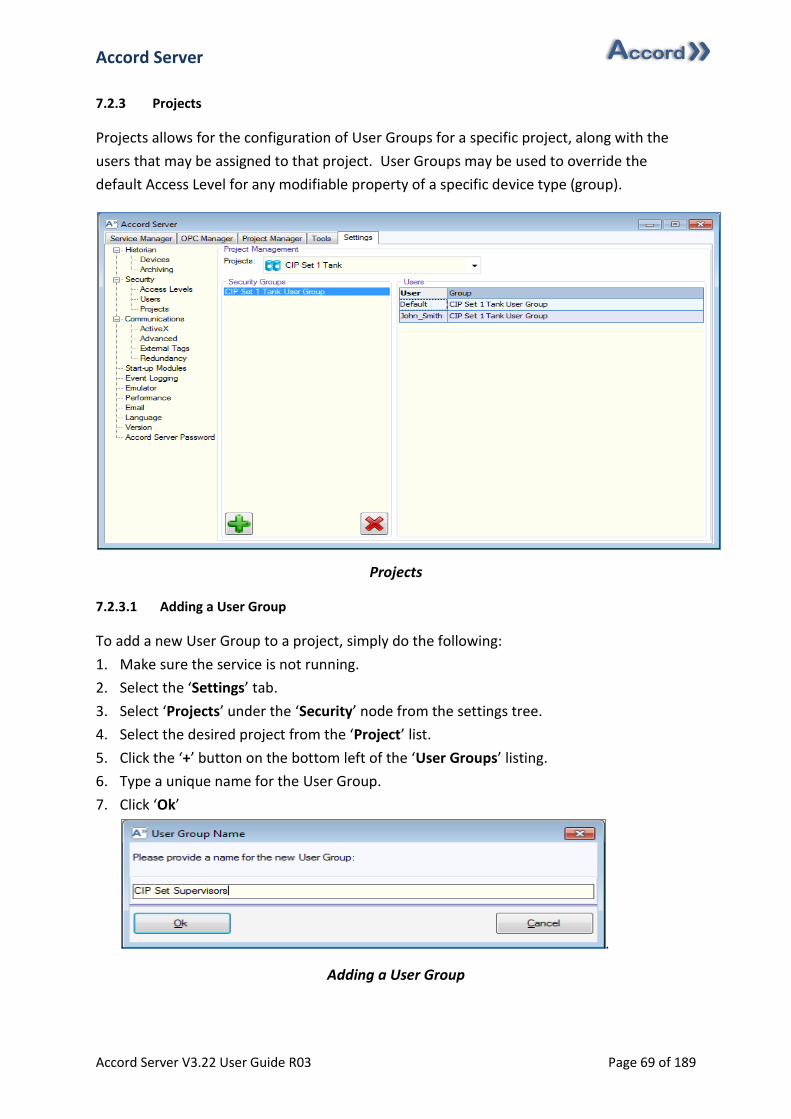
Accord Server
Accord Server V3.22 User Guide R03 Page 69 of 189
7.2.3 Projects
Projects allows for the configuration of User Groups for a specific project, along with the
users that may be assigned to that project. User Groups may be used to override the
default Access Level for any modifiable property of a specific device type (group).
Projects
7.2.3.1 Adding a User Group
To add a new User Group to a project, simply do the following:
1. Make sure the service is not running.
2. Select the ‘Settings’ tab.
3. Select ‘Projects’ under the ‘Security’ node from the settings tree.
4. Select the desired project from the ‘Project’ list.
5. Click the ‘+’ button on the bottom left of the ‘User Groups’ listing.
6. Type a unique name for the User Group.
7. Click ‘Ok’
.
Adding a User Group
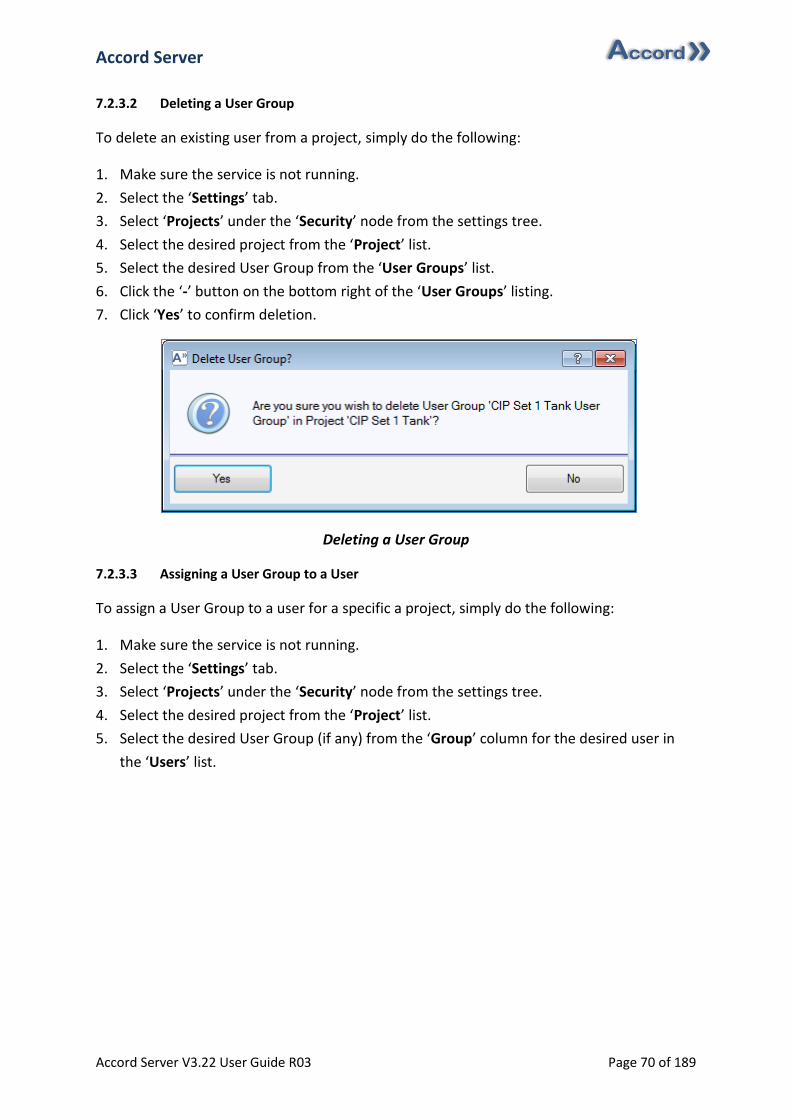
Accord Server
Accord Server V3.22 User Guide R03 Page 70 of 189
7.2.3.2 Deleting a User Group
To delete an existing user from a project, simply do the following:
1. Make sure the service is not running.
2. Select the ‘Settings’ tab.
3. Select ‘Projects’ under the ‘Security’ node from the settings tree.
4. Select the desired project from the ‘Project’ list.
5. Select the desired User Group from the ‘User Groups’ list.
6. Click the ‘-’ button on the bottom right of the ‘User Groups’ listing.
7. Click ‘Yes’ to confirm deletion.
Deleting a User Group
7.2.3.3 Assigning a User Group to a User
To assign a User Group to a user for a specific a project, simply do the following:
1. Make sure the service is not running.
2. Select the ‘Settings’ tab.
3. Select ‘Projects’ under the ‘Security’ node from the settings tree.
4. Select the desired project from the ‘Project’ list.
5. Select the desired User Group (if any) from the ‘Group’ column for the desired user in
the ‘Users’ list.
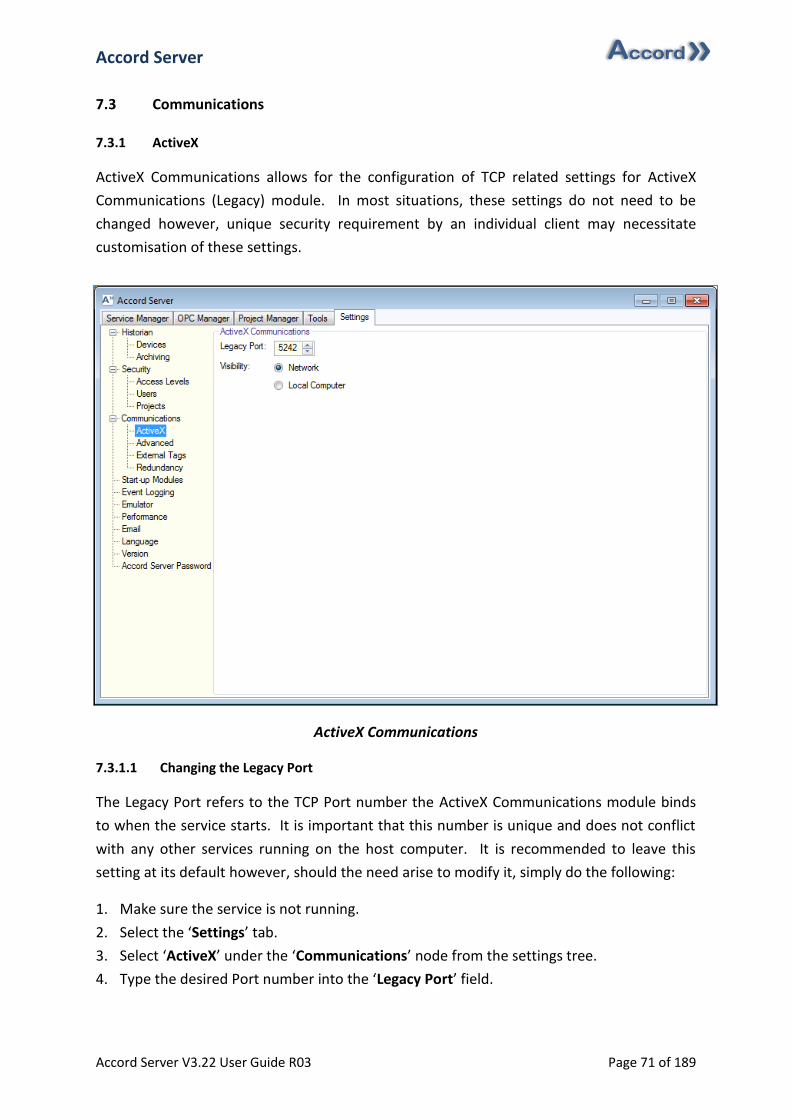
Accord Server
Accord Server V3.22 User Guide R03 Page 71 of 189
7.3 Communications
7.3.1 ActiveX
ActiveX Communications allows for the configuration of TCP related settings for ActiveX
Communications (Legacy) module. In most situations, these settings do not need to be
changed however, unique security requirement by an individual client may necessitate
customisation of these settings.
ActiveX Communications
7.3.1.1 Changing the Legacy Port
The Legacy Port refers to the TCP Port number the ActiveX Communications module binds
to when the service starts. It is important that this number is unique and does not conflict
with any other services running on the host computer. It is recommended to leave this
setting at its default however, should the need arise to modify it, simply do the following:
1. Make sure the service is not running.
2. Select the ‘Settings’ tab.
3. Select ‘ActiveX’ under the ‘Communications’ node from the settings tree.
4. Type the desired Port number into the ‘Legacy Port’ field.
Accord Server
Accord Server V3.22 User Guide R03 Page 72 of 189
7.3.1.2 Changing Service Visibility
In some situations, it may be desirable to only allow connections between clients on the
local computer and the ActiveX Communications module. Using the visibility option, it is
possible to impose this restriction. To change the visibility, simply do the following:
1. Make sure the service is not running.
2. Select the ‘Settings’ tab.
3. Select ‘ActiveX’ under the ‘Communications’ node from the settings tree.
4. Select the desired ‘Visibility’ level.
a. To allow connections from any computer on the network, select ‘Network’.
b. To restrict connections to the local computer only, select ‘Local’.
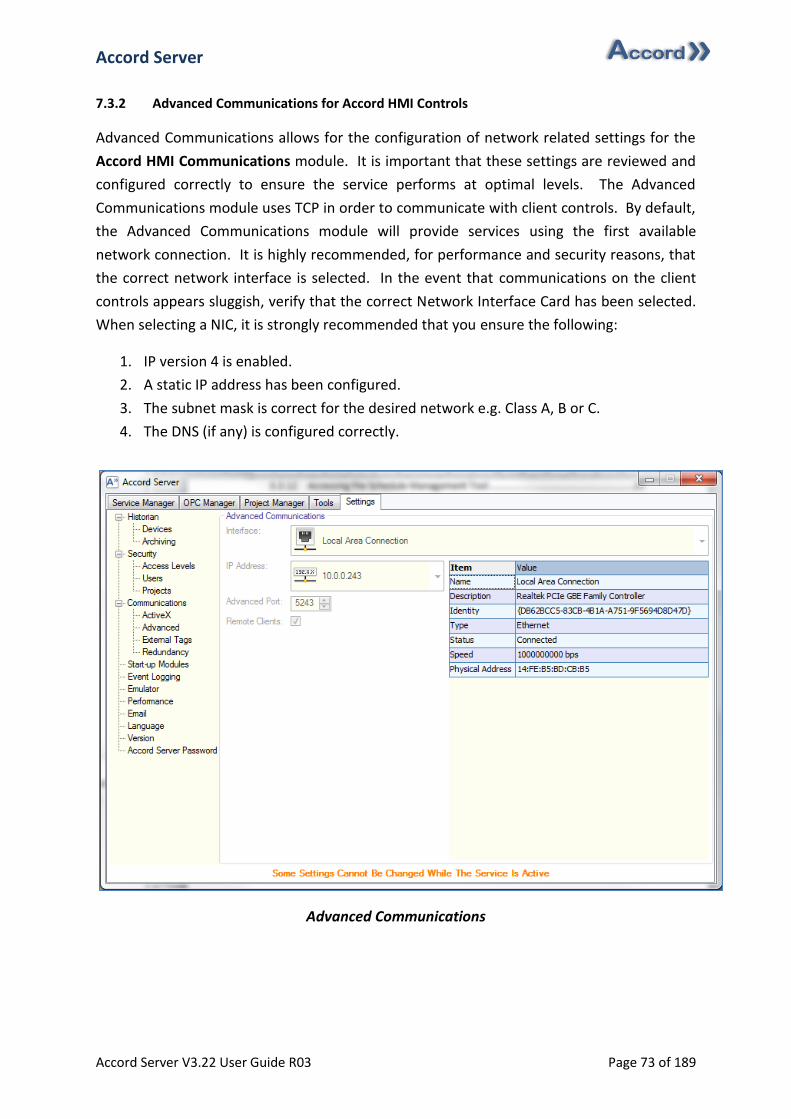
Accord Server
Accord Server V3.22 User Guide R03 Page 73 of 189
7.3.2 Advanced Communications for Accord HMI Controls
Advanced Communications allows for the configuration of network related settings for the
Accord HMI Communications module. It is important that these settings are reviewed and
configured correctly to ensure the service performs at optimal levels. The Advanced
Communications module uses TCP in order to communicate with client controls. By default,
the Advanced Communications module will provide services using the first available
network connection. It is highly recommended, for performance and security reasons, that
the correct network interface is selected. In the event that communications on the client
controls appears sluggish, verify that the correct Network Interface Card has been selected.
When selecting a NIC, it is strongly recommended that you ensure the following:
1. IP version 4 is enabled.
2. A static IP address has been configured.
3. The subnet mask is correct for the desired network e.g. Class A, B or C.
4. The DNS (if any) is configured correctly.
Advanced Communications
Accord Server
Accord Server V3.22 User Guide R03 Page 74 of 189
7.3.2.1 Changing the Interface
The Interface used by the Advanced Communications module should be the optimal route
between the server and the clients. Please ensure the correct network interface is selected,
otherwise it may compromise performance and security. For example, binding the service
to an interface connected to the internet may expose the service to the internet if no
firewall exists. Please review section for 7.3.2 more information. To change the interface,
simply do the following:
1. Make sure the service is not running.
2. Select the ‘Settings’ tab.
3. Select ‘Advanced’ under the ‘Communications’ node from the settings tree.
4. Select the desired Interface from the ‘Interface’ list.
5. Verify the correct interface has been selected by reviewing the interface statistics,
adjacent the ‘IP Address’ field.
6. Select the desired IP address for the selected interface from the ‘IP Address’ list.
Note: Only Ethernet compliant interfaces are listed.
7.3.2.2 Changing the Advanced Port
The Advanced Port refers to the TCP Port number the Advanced Communications module
binds to when the service starts. It is important that this number is unique and does not
conflict with any other services running on the host computer. It is recommended to leave
this setting at its default however, should the need arise to modify it, simply do the
following:
1. Make sure the service is not running.
2. Select the ‘Settings’ tab.
3. Select ‘Advanced’ under the ‘Communications’ node from the settings tree.
4. Type the desired Port number into the ‘Advanced Port’ field.
7.3.2.3 Changing Remote Clients
By default, Accord Server restricts access to the services offered by the Advanced
Communications module to the local computer only. If you wish to change the setting to
permit/restrict access to remote clients, simply do the following:
1. Make sure the service is not running.
2. Select the ‘Settings’ tab.
3. Select ‘Advanced’ under the ‘Communications’ node from the settings tree.
4. Tick the ‘Remote Clients’ box to enable access for remote clients.
a. To restrict access to the local computer, simply un-tick the ‘Remote Clients’ box.

Accord Server
Accord Server V3.22 User Guide R03 Page 75 of 189
7.3.3 External Tags
External Tags allow for the configuration of custom devices that relate to data external to
the selected Accord Server project. External Tags are treated much in the same way as
standard devices within a project are and thus, are available to the Accord Controls and the
Accord Server SDK. There are three supported data types for External Tags, these are as
follows:
1. Boolean Supporting values that are either True or False.
2. Integer Support values ranging from -2147483648 to 2147483647.
3. Real Supporting values ranging from -3.40282e+038 to 3.40282e+038.
External Tags
External Tags use the same OPC Server that the project uses however, it is not required that
they use the same Channel/Device configuration as used by the various groups within the
project. This means it is possible to configure an External Tag to read data from an entirely
different PLC than that used by the project. When configuring an External Tag, it is
important to remember that the absolute tag address must be used. This means that if the
tag requires a specific OPC Channel and Device, those must be included in the address.
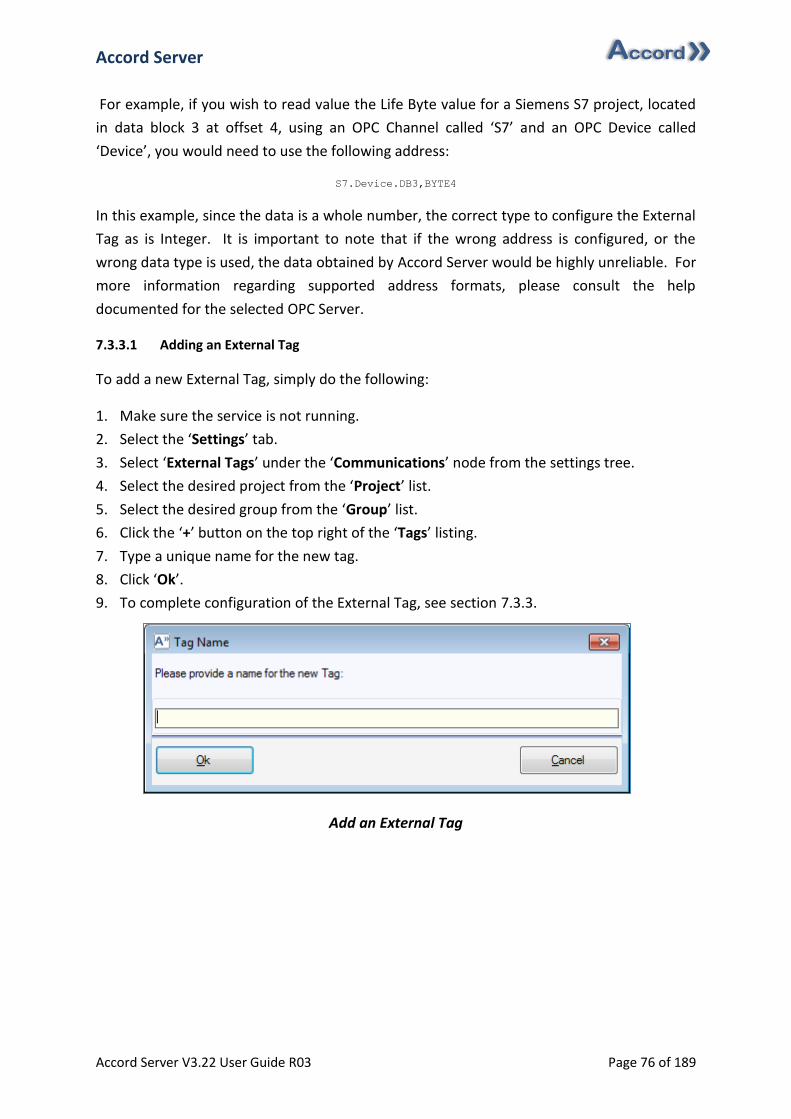
Accord Server
Accord Server V3.22 User Guide R03 Page 76 of 189
For example, if you wish to read value the Life Byte value for a Siemens S7 project, located
in data block 3 at offset 4, using an OPC Channel called ‘S7’ and an OPC Device called
‘Device’, you would need to use the following address:
S7.Device.DB3,BYTE4
In this example, since the data is a whole number, the correct type to configure the External
Tag as is Integer. It is important to note that if the wrong address is configured, or the
wrong data type is used, the data obtained by Accord Server would be highly unreliable. For
more information regarding supported address formats, please consult the help
documented for the selected OPC Server.
7.3.3.1 Adding an External Tag
To add a new External Tag, simply do the following:
1. Make sure the service is not running.
2. Select the ‘Settings’ tab.
3. Select ‘External Tags’ under the ‘Communications’ node from the settings tree.
4. Select the desired project from the ‘Project’ list.
5. Select the desired group from the ‘Group’ list.
6. Click the ‘+’ button on the top right of the ‘Tags’ listing.
7. Type a unique name for the new tag.
8. Click ‘Ok’.
9. To complete configuration of the External Tag, see section 7.3.3.
Add an External Tag
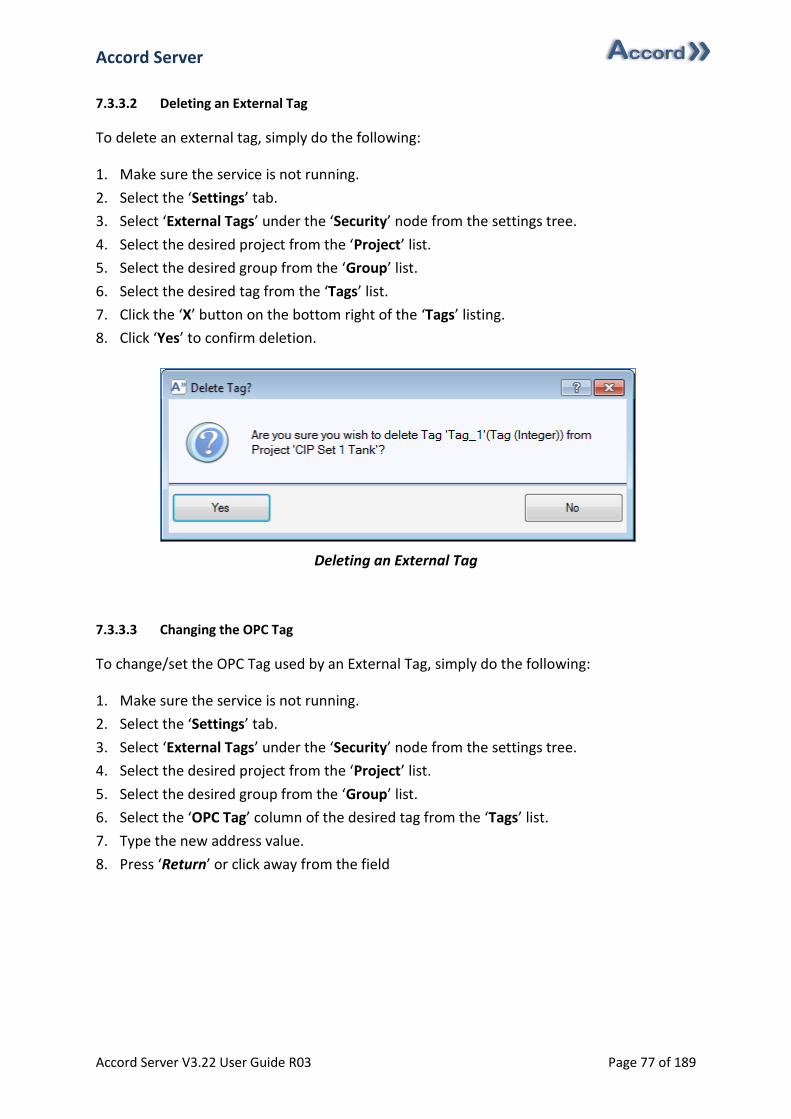
Accord Server
Accord Server V3.22 User Guide R03 Page 77 of 189
7.3.3.2 Deleting an External Tag
To delete an external tag, simply do the following:
1. Make sure the service is not running.
2. Select the ‘Settings’ tab.
3. Select ‘External Tags’ under the ‘Security’ node from the settings tree.
4. Select the desired project from the ‘Project’ list.
5. Select the desired group from the ‘Group’ list.
6. Select the desired tag from the ‘Tags’ list.
7. Click the ‘X’ button on the bottom right of the ‘Tags’ listing.
8. Click ‘Yes’ to confirm deletion.
Deleting an External Tag
7.3.3.3 Changing the OPC Tag
To change/set the OPC Tag used by an External Tag, simply do the following:
1. Make sure the service is not running.
2. Select the ‘Settings’ tab.
3. Select ‘External Tags’ under the ‘Security’ node from the settings tree.
4. Select the desired project from the ‘Project’ list.
5. Select the desired group from the ‘Group’ list.
6. Select the ‘OPC Tag’ column of the desired tag from the ‘Tags’ list.
7. Type the new address value.
8. Press ‘Return’ or click away from the field
Accord Server
Accord Server V3.22 User Guide R03 Page 78 of 189
7.3.3.4 Changing the Engineering Unit
Integer and Real values have an associated Engineering Unit. To change the engineering for
an External Tag, simply do the following:
1. Make sure the service is not running.
2. Select the ‘Settings’ tab.
3. Select ‘External Tags’ under the ‘Security’ node from the settings tree.
4. Select the desired project from the ‘Project’ list.
5. Select the desired group from the ‘Group’ list.
6. Select the ‘Engineering Unit’ column of the desired tag from the ‘Tags’ list.
7. Type the new ‘Engineering Unit’ value.
8. Press ‘Return’ or click away from the field.
7.3.3.5 Changing the Active/Inactive State
Boolean values have an associated Active/Inactive state. When the External Tag reads a
True state, the Active State is displayed, whereas when the value reads False, the Inactive
State is displayed. This allows users to configure a more meaningful display value to assist
operators in their decision making process. To change the Active/Inactive State for an
External Tag, simply do the following:
1. Make sure the service is not running.
2. Select the ‘Settings’ tab.
3. Select ‘External Tags’ under the ‘Security’ node from the settings tree.
4. Select the desired project from the ‘Project’ list.
5. Select the desired group from the ‘Group’ list.
6. Select the ‘Active State’ column of the desired tag from the ‘Tags’ list.
7. Type the new ‘Active State’ value.
8. Select the ‘Inactive State’ column of the desired tag from the ‘Tags’ list.
9. Type the new ‘Inactive State’ value.
10. Press ‘Return’ or click away from the field
Accord Server
Accord Server V3.22 User Guide R03 Page 79 of 189
7.3.3.6 Exporting External Tags to CSV File
A list of external tags (of the same Group) can be exported to a CSV file for reference or to
be imported at a later time. An export using this method will export the name, the OPC
address and the appropriate Engineering Unit or Active/Inactive state text.
1. Make sure the service is not running.
2. Select the ‘Settings’ tab.
3. Select ‘External Tags’ under the ‘Security’ node from the settings tree.
4. Select the desired group from the ‘Group’ list.
5. Right click anywhere in the ‘Tags’ list.
6. Select the ‘Export As’ option.
7. Browse to the desired folder in the browser window that appears and enter a file name.
7.3.3.7 Importing External Tags from CSV File
Multiple external tags (of the same Group) can be imported from a CSV file. This file can be
created from a previous export, can be manually created or a combination of both. An
export using this method will import the name, the OPC address and the appropriate
Engineering Unit or Active/Inactive state text. Existing tags with the same name will be
replaced with the new address.
When entering the address for an External Tag in the CSV file, it is important to remember
that the absolute tag address must be used. This means that if the tag requires a specific
OPC Channel and Device, those must be included in the address.
For example, if you wish to read value the Life Byte value for a Siemens S7 project, located
in data block 3 at offset 4, using an OPC Channel called ‘S7’ and an OPC Device called
‘Device’, you would need to use the following address:
S7.Device.DB3,BYTE4
1. Make sure the service is not running.
2. Select the ‘Settings’ tab.
3. Select ‘External Tags’ under the ‘Security’ node from the settings tree.
4. Select the desired project from the ‘Project’ list.
5. Select the desired group from the ‘Group’ list.
6. Click the arrowed ‘Import’ button.
7. Browse to the desired folder in the browser window that appears and select the file to
be imported.
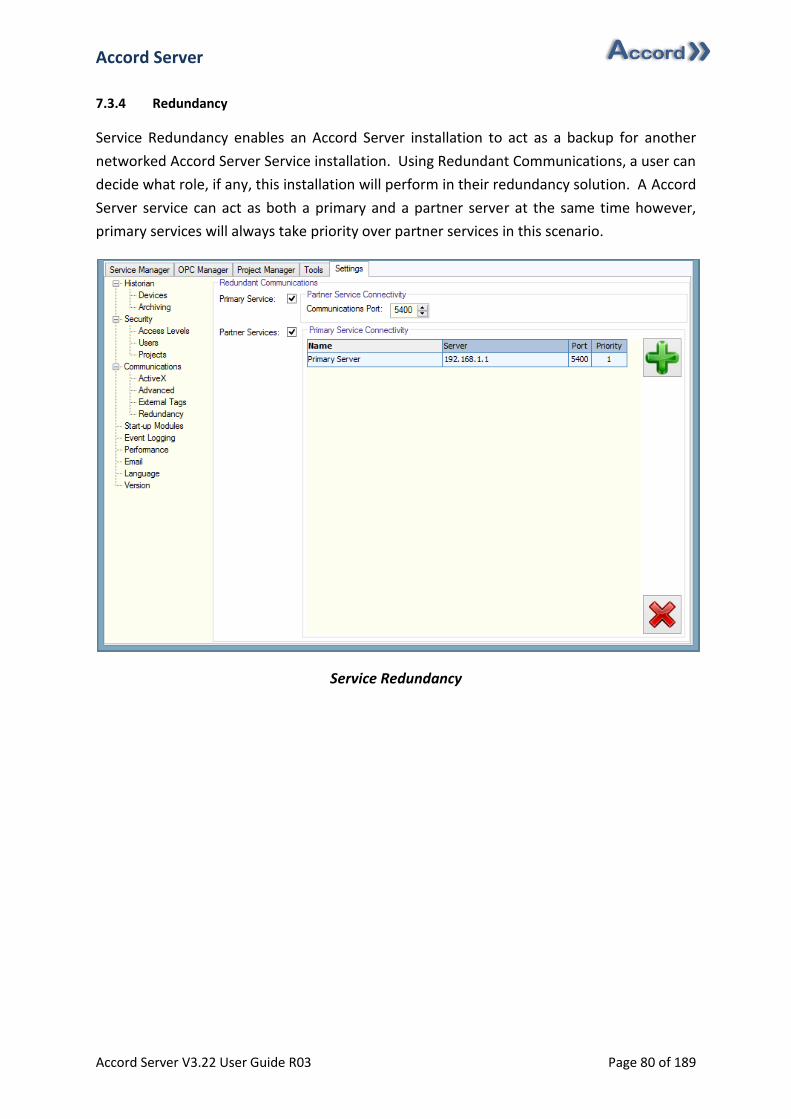
Accord Server
Accord Server V3.22 User Guide R03 Page 80 of 189
7.3.4 Redundancy
Service Redundancy enables an Accord Server installation to act as a backup for another
networked Accord Server Service installation. Using Redundant Communications, a user can
decide what role, if any, this installation will perform in their redundancy solution. A Accord
Server service can act as both a primary and a partner server at the same time however,
primary services will always take priority over partner services in this scenario.
Service Redundancy
Accord Server
Accord Server V3.22 User Guide R03 Page 81 of 189
7.3.4.1 Primary Service versus Partner Service
A Primary Service is a service that is intended to be the first point of contact for all services
relating to one or more Accord Server projects. In a typical network scenario, the Primary
Service would be installed on the machine that is of optimal performance and in the best
location to provide the required services as efficiently and as affectively as possible. Any
Accord Server service that has a project deployed directly through its service is
automatically considered a Primary Service, even if the Primary Service option is not
enabled for that service. The difference here is that if Primary Service is not selected for a
given service, it means that projects managed directly by this service cannot be partnered
with another Accord Server installation, and thus, they have no backup in the event of a
failure.
A Partner Service is a service that is acting as a backup for a Primary Service, and is only
contacted by clients in the event of a failure in the Primary Service. Projects imported into a
service from a remote Primary Service are automatically considered Partner projects, and
are given a lower priority than projects managed directly by that service. This means that if
a project managed by the service shares the same name as the project on the remote
Accord Server installation, the service will not import the project as to do so would
compromise its primary duty. Partner projects are also only activated on an as needed
basis, and historical data is maintained only until the Primary Service indicates that it is
ready to receive the data.
Accord Server
Accord Server V3.22 User Guide R03 Page 82 of 189
7.3.4.2 How does it work?
Once Accord Server Service is started, with the Primary Service option enabled, the service
publishes access to project related data via the network. If another service on the network
wishes to form a partnership with this service, it will now be able to do so. If a partnership
is established and the Partner Service is started, the Partner Service will request permission
to perform consolidation of data between the two services, ensuring that both are in a
consistent state. This means that any projects managed by the Primary Service will be
automatically copied to the Partner Service, as long as the Partner Service does not possess
existing projects that are considered a higher priority than those managed by the Primary
Service.
Once consolidation has completed, the Partner Service will watch the state of the Primary
Service, ensuring the service is operating correctly. If the Partner Service detects that the
Primary Service is no longer operating, it will trigger the activation of all projects it obtained
from that service, performing their roles until such a time as the Primary Service is restored.
Upon restoration of the Primary Service, the Partner Service will deactivate all projects it
obtained from that service, to conserve resources, and automatically consolidate all changes
that occurred during the downtime with the Primary Service.
This means that all exchange of data between the services is handled automatically,
significantly simplifying the configuration process. Any changes that are performed during
the downtime are automatically consolidated on an as needed basis, without any need for
external interaction by the user. The distinct advantage of this approach is that the user is
not restricted from performing downloads and altering logging or security configurations for
the project while the Partner Service is providing the required services. Changes to the
Primary Service while it is active are also automatically consolidated with its respective
partners.
Accord Server
Accord Server V3.22 User Guide R03 Page 83 of 189
7.3.4.3 Configuring a Primary Service
To configure a service as a Primary Service, simply do the following:
1. Make sure the service is not running.
2. Select the ‘Settings’ tab.
3. Select ‘Redundancy’ under the ‘Communications’ node from the settings tree.
4. Tick the ‘Primary Service’ box if the intent is to enable Primary Services, otherwise un-
tick the box.
5. Type the desired Port number into the ‘Communications Port’ field. This is the Port that
Partner Services will use to communication with the service.
7.3.4.4 Configuring a Partner Service
To configure a service as a Partner Service, simply do the following:
1. Make sure the service is not running.
2. Select the ‘Settings’ tab.
3. Select ‘Redundancy’ under the ‘Communications’ node from the settings tree.
4. Tick the ‘Partner Service’ box if the intent is to enable Partner Services, otherwise un-
tick the box.
7.3.4.5 Creating a Partnership
To create a partnership between a Partner Service and a Primary Service, simply do the
following:
1. Make sure the service is not running.
2. Select the ‘Settings’ tab.
3. Select ‘Redundancy’ under the ‘Communications’ node from the settings tree.
4. Ensure the ‘Partner Service’ box is ticked.
5. Click the ‘+’ button on the top right of the partnerships listing to produce the ‘New
Redundancy Pairing’ dialog.
Note: As Redundancy requires a direct connection between both SQL Server instances and
is configured to use Windows Authentication, both computers hosting the database
servers must be part of the same domain or have login credentials properly configured to
allow for access.
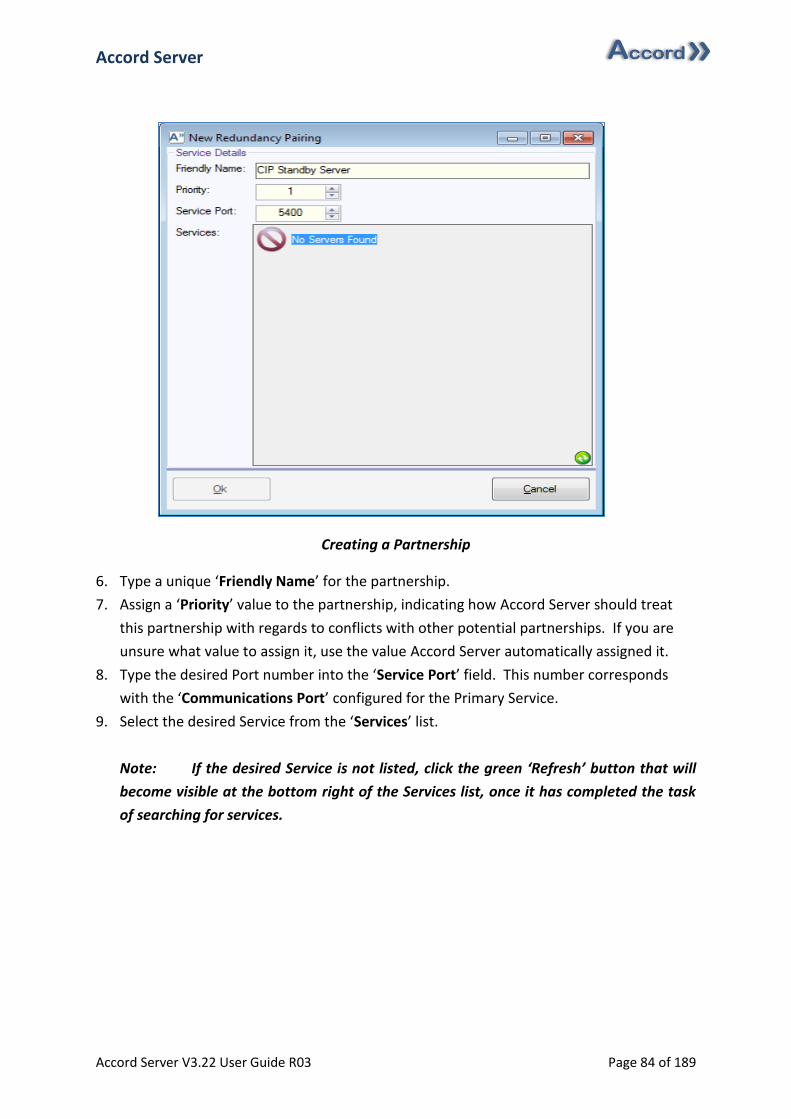
Accord Server
Accord Server V3.22 User Guide R03 Page 84 of 189
Creating a Partnership
6. Type a unique ‘Friendly Name’ for the partnership.
7. Assign a ‘Priority’ value to the partnership, indicating how Accord Server should treat
this partnership with regards to conflicts with other potential partnerships. If you are
unsure what value to assign it, use the value Accord Server automatically assigned it.
8. Type the desired Port number into the ‘Service Port’ field. This number corresponds
with the ‘Communications Port’ configured for the Primary Service.
9. Select the desired Service from the ‘Services’ list.
Note: If the desired Service is not listed, click the green ‘Refresh’ button that will
become visible at the bottom right of the Services list, once it has completed the task
of searching for services.
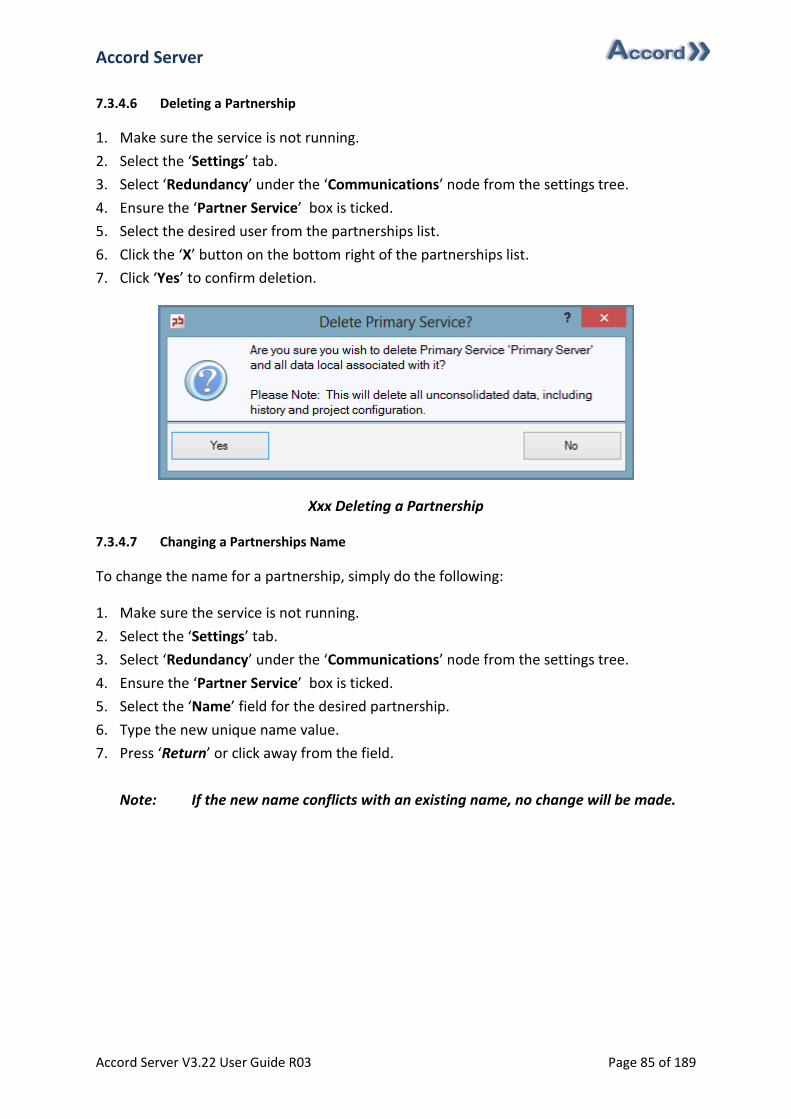
Accord Server
Accord Server V3.22 User Guide R03 Page 85 of 189
7.3.4.6 Deleting a Partnership
1. Make sure the service is not running.
2. Select the ‘Settings’ tab.
3. Select ‘Redundancy’ under the ‘Communications’ node from the settings tree.
4. Ensure the ‘Partner Service’ box is ticked.
5. Select the desired user from the partnerships list.
6. Click the ‘X’ button on the bottom right of the partnerships list.
7. Click ‘Yes’ to confirm deletion.
Xxx Deleting a Partnership
7.3.4.7 Changing a Partnerships Name
To change the name for a partnership, simply do the following:
1. Make sure the service is not running.
2. Select the ‘Settings’ tab.
3. Select ‘Redundancy’ under the ‘Communications’ node from the settings tree.
4. Ensure the ‘Partner Service’ box is ticked.
5. Select the ‘Name’ field for the desired partnership.
6. Type the new unique name value.
7. Press ‘Return’ or click away from the field.
Note: If the new name conflicts with an existing name, no change will be made.
Accord Server
Accord Server V3.22 User Guide R03 Page 86 of 189
7.3.4.8 Changing a Partnerships Server
To change the target server for a partnership, simply do the following:
1. Make sure the service is not running.
2. Select the ‘Settings’ tab.
3. Select ‘Redundancy’ under the ‘Communications’ node from the settings tree.
4. Ensure the ‘Partner Service’ box is ticked.
5. Select the ‘Server’ field for the desired partnership.
6. Type the new server value.
7. Press ‘Return’ or click away from the field.
7.3.4.9 Changing a Partnerships Port
To change the target server for a partnership, simply do the following:
1. Make sure the service is not running.
2. Select the ‘Settings’ tab.
3. Select ‘Redundancy’ under the ‘Communications’ node from the settings tree.
4. Ensure the ‘Partner Service’ box is ticked.
5. Select the ‘Port’ field for the desired partnership.
6. Type the new port value.
7. Press ‘Return’ or click away from the field.
7.3.4.10 Changing a Partnerships Priority
To change the target server for a partnership, simply do the following:
1. Make sure the service is not running.
2. Select the ‘Settings’ tab.
3. Select ‘Redundancy’ under the ‘Communications’ node from the settings tree.
4. Ensure the ‘Partner Service’ box is ticked.
5. Select the ‘Priority’ field for the desired partnership.
6. Type the new priority value.
7. Press ‘Return’ or click away from the field.
Note: If an existing partnership has the same priority value, the existing
partnership will be automatically demoted, along with any other partnerships beneath
it in priority.
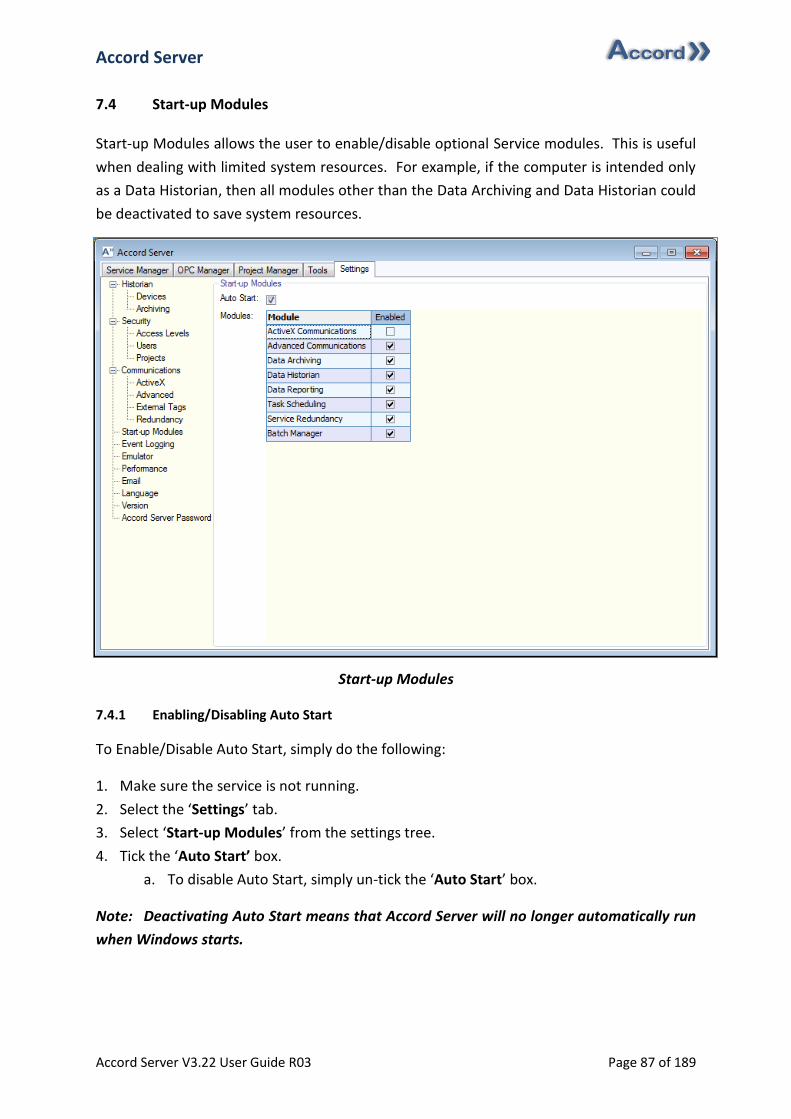
Accord Server
Accord Server V3.22 User Guide R03 Page 87 of 189
7.4 Start-up Modules
Start-up Modules allows the user to enable/disable optional Service modules. This is useful
when dealing with limited system resources. For example, if the computer is intended only
as a Data Historian, then all modules other than the Data Archiving and Data Historian could
be deactivated to save system resources.
Start-up Modules
7.4.1 Enabling/Disabling Auto Start
To Enable/Disable Auto Start, simply do the following:
1. Make sure the service is not running.
2. Select the ‘Settings’ tab.
3. Select ‘Start-up Modules’ from the settings tree.
4. Tick the ‘Auto Start’ box.
a. To disable Auto Start, simply un-tick the ‘Auto Start’ box.
Note: Deactivating Auto Start means that Accord Server will no longer automatically run
when Windows starts.

Accord Server
Accord Server V3.22 User Guide R03 Page 88 of 189
7.4.2 Enabling/Disabling a Module
To Activate/Deactivate a module, simply do the following:
1. Make sure the service is not running.
2. Select the ‘Settings’ tab.
3. Select ‘Start-up Modules’ from the settings tree.
4. Tick the ‘Enabled’ box for the appropriate module.
a. To disable a module, simply un-tick the ‘Enabled’ box for that module.
Note: Deactivating a module means that all functionality that module provides to
other dependent modules is no longer available. It is strongly recommended to verify
the service operates as intended following the deactivation of a module.
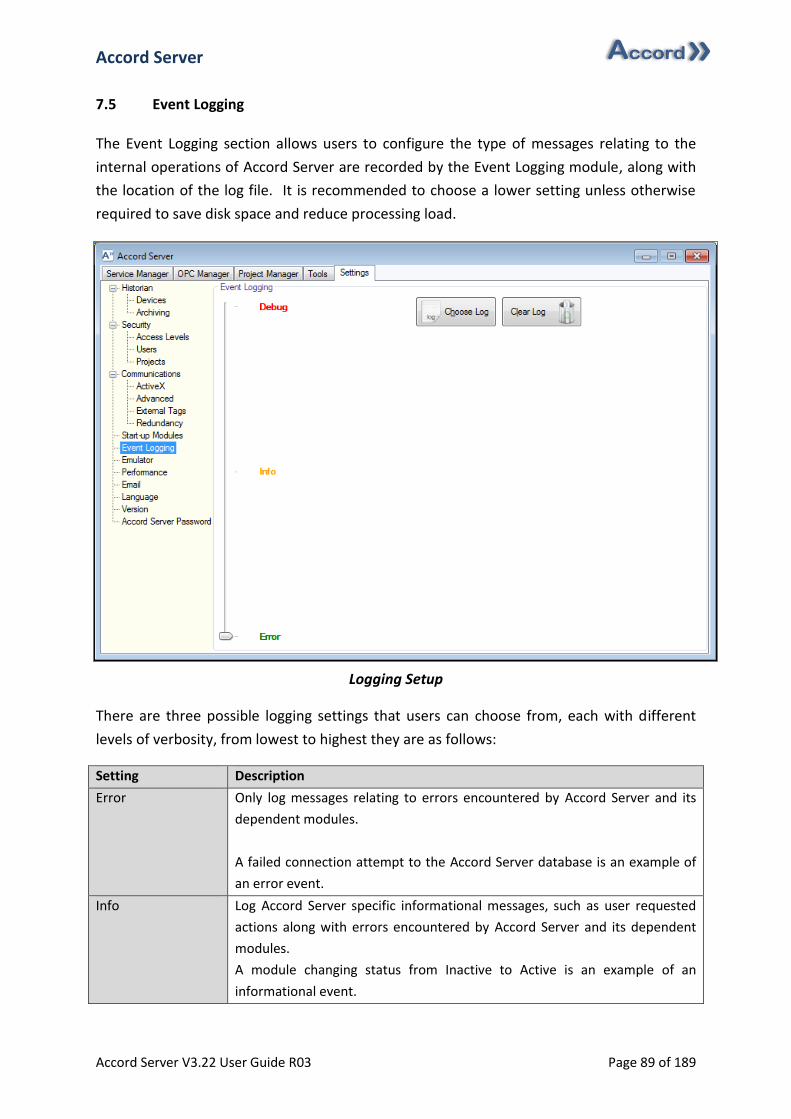
Accord Server
Accord Server V3.22 User Guide R03 Page 89 of 189
7.5 Event Logging
The Event Logging section allows users to configure the type of messages relating to the
internal operations of Accord Server are recorded by the Event Logging module, along with
the location of the log file. It is recommended to choose a lower setting unless otherwise
required to save disk space and reduce processing load.
Logging Setup
There are three possible logging settings that users can choose from, each with different
levels of verbosity, from lowest to highest they are as follows:
Setting Description
Error Only log messages relating to errors encountered by Accord Server and its
dependent modules.
A failed connection attempt to the Accord Server database is an example of
an error event.
Info Log Accord Server specific informational messages, such as user requested
actions along with errors encountered by Accord Server and its dependent
modules.
A module changing status from Inactive to Active is an example of an
informational event.
Accord Server
Accord Server V3.22 User Guide R03 Page 90 of 189
Debug Log Accord Server specific debugging messages, such as information relating
to current activity and calculations, along with informational messages and
errors encountered by Accord Server and its dependent modules.
The ActiveX Communications module attempting to initiate the process of
listening for Accord Controls is an example of a debug event.
7.5.1 Choosing Log File Location
By default, Accord Server will set the log file location to match that of Accord Server. Users
can also choose to have this file saved in an alternative location. To change the log file
location for Accord Server, simply do the following:
1. Select the ‘Settings’ tab.
2. Select ‘Logging’ from the settings tree.
3. Click ‘Choose Log’.
4. Select the location for the log file and click ‘Ok’.
7.5.2 Clearing the Log File
To simplify log file management, Accord Server has an easy to access method of clearing the
log file. To clear the log file, simply do the following:
1. Select the ‘Settings’ tab.
2. Select ‘Logging’ from the settings tree.
3. Click ‘Clear Log’.
4. Click ‘Yes’ to confirm the deletion of the current log file.
7.5.3 Configuring a Log Level
To configure the level of verbosity of the Accord Server log, simply do the following:
1. Select the ‘Settings’ tab.
2. Select ‘Logging’ from the settings tree.
3. Click the desired level name to move the level indicator to the desired setting.
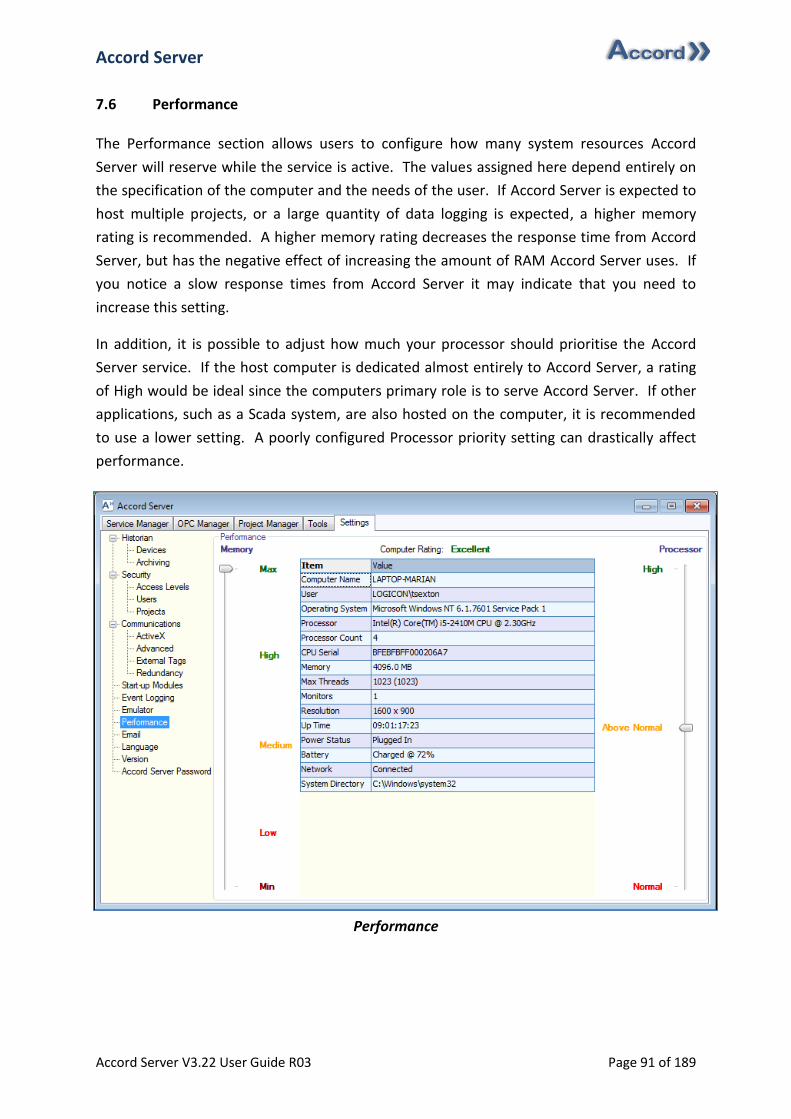
Accord Server
Accord Server V3.22 User Guide R03 Page 91 of 189
7.6 Performance
The Performance section allows users to configure how many system resources Accord
Server will reserve while the service is active. The values assigned here depend entirely on
the specification of the computer and the needs of the user. If Accord Server is expected to
host multiple projects, or a large quantity of data logging is expected, a higher memory
rating is recommended. A higher memory rating decreases the response time from Accord
Server, but has the negative effect of increasing the amount of RAM Accord Server uses. If
you notice a slow response times from Accord Server it may indicate that you need to
increase this setting.
In addition, it is possible to adjust how much your processor should prioritise the Accord
Server service. If the host computer is dedicated almost entirely to Accord Server, a rating
of High would be ideal since the computers primary role is to serve Accord Server. If other
applications, such as a Scada system, are also hosted on the computer, it is recommended
to use a lower setting. A poorly configured Processor priority setting can drastically affect
performance.
Performance
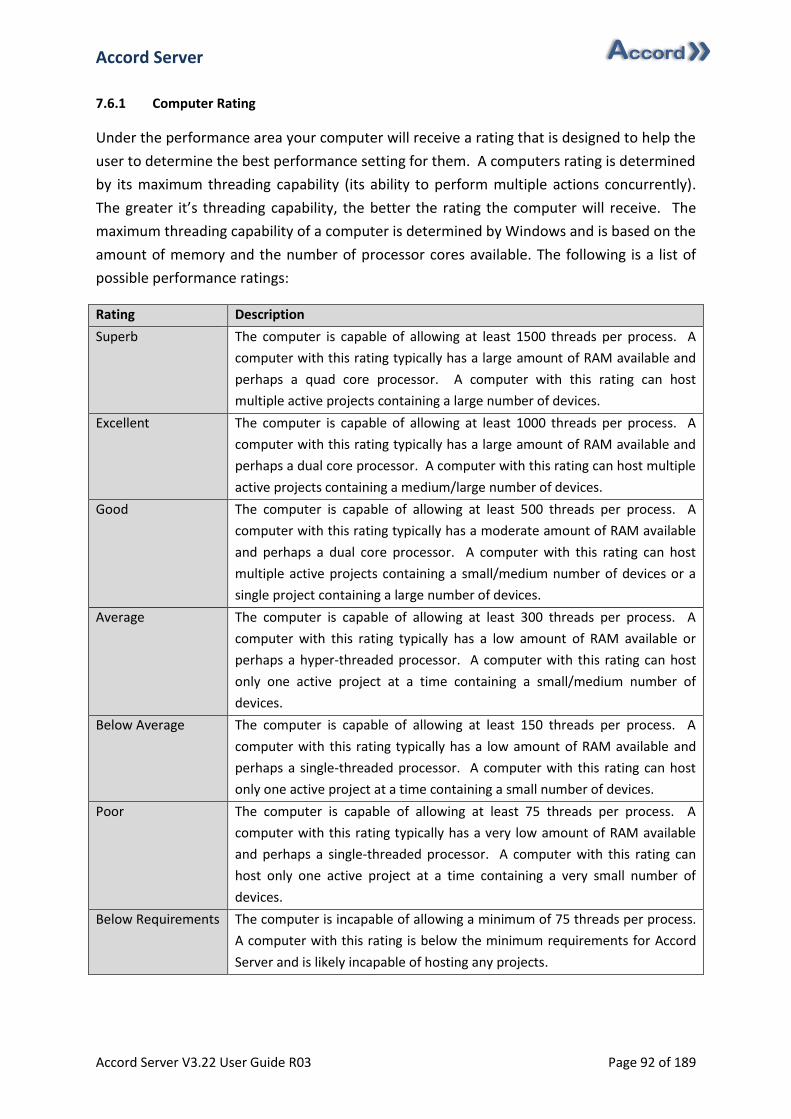
Accord Server
Accord Server V3.22 User Guide R03 Page 92 of 189
7.6.1 Computer Rating
Under the performance area your computer will receive a rating that is designed to help the
user to determine the best performance setting for them. A computers rating is determined
by its maximum threading capability (its ability to perform multiple actions concurrently).
The greater it’s threading capability, the better the rating the computer will receive. The
maximum threading capability of a computer is determined by Windows and is based on the
amount of memory and the number of processor cores available. The following is a list of
possible performance ratings:
Rating Description
Superb The computer is capable of allowing at least 1500 threads per process. A
computer with this rating typically has a large amount of RAM available and
perhaps a quad core processor. A computer with this rating can host
multiple active projects containing a large number of devices.
Excellent The computer is capable of allowing at least 1000 threads per process. A
computer with this rating typically has a large amount of RAM available and
perhaps a dual core processor. A computer with this rating can host multiple
active projects containing a medium/large number of devices.
Good The computer is capable of allowing at least 500 threads per process. A
computer with this rating typically has a moderate amount of RAM available
and perhaps a dual core processor. A computer with this rating can host
multiple active projects containing a small/medium number of devices or a
single project containing a large number of devices.
Average The computer is capable of allowing at least 300 threads per process. A
computer with this rating typically has a low amount of RAM available or
perhaps a hyper-threaded processor. A computer with this rating can host
only one active project at a time containing a small/medium number of
devices.
Below Average The computer is capable of allowing at least 150 threads per process. A
computer with this rating typically has a low amount of RAM available and
perhaps a single-threaded processor. A computer with this rating can host
only one active project at a time containing a small number of devices.
Poor The computer is capable of allowing at least 75 threads per process. A
computer with this rating typically has a very low amount of RAM available
and perhaps a single-threaded processor. A computer with this rating can
host only one active project at a time containing a very small number of
devices.
Below Requirements The computer is incapable of allowing a minimum of 75 threads per process.
A computer with this rating is below the minimum requirements for Accord
Server and is likely incapable of hosting any projects.
Accord Server
Accord Server V3.22 User Guide R03 Page 93 of 189
7.6.2 Understanding Threading
In Accord Server, a thread is essentially a unit of work. Anytime a request is made to Accord
Server to perform a task, a new thread is created to perform that task. The easiest example
is when an Accord Control connects to the Accord Server service, a thread is created to
service that control therefore, if a screen contains 50 controls, the service will need to
assign a minimum of 50 threads to service those controls. Additionally, the historian also
needs to create a thread for each time it has to log data to the database. On a busy system
this can add up to several hundred threads running concurrently. While most of these
threads perform minor, short-term duties, once the permitted limit per process is achieved,
any future requests will have to wait until existing threads are freed up.
7.6.3 Memory
The memory setting you choose depends on your requirements, along with your computers
specification. The memory setting in Accord Server represents a percentage of the
maximum amount of threads the computer supports for a given thread. For example, if a
computer supports 2000 threads and the memory setting is set to Low, then Accord Server
will reserve resources for a minimum of 500 concurrent threads when the service is active.
The means that connections from Accord Controls, OPC Reads/Writes, Database
Reads/Writes will be significantly more responsive, as long as those 500 have not been
exceeded at any one time.
If the system is extremely busy, Accord Server will request additional resources above the
500 allocated to it. This process involves a slight delay and can effect response times. Once
Accord Server has determined it no longer needs the extra resources it requested, it
releases them.
As a general rule, it is recommended to estimate the maximum number of Accord Controls
that can connect to the service at a given time (e.g. the SCADA screen with the most ActiveX
controls on it), doubling that value and then adding to it the number of devices selected for
logging. Then divide it by the maximum threading capability of your computer and
converting that to a percentage.
(([𝑀𝑎𝑥𝑖𝑚𝑢𝑚 𝐶𝑜𝑛𝑐𝑢𝑟𝑟𝑒𝑛𝑡 𝐴𝑐𝑡𝑖𝑣𝑒𝑋 𝐶𝑜𝑛𝑡𝑟𝑜𝑙𝑠]∗2) + [𝑇𝑜𝑡𝑎𝑙 𝐿𝑜𝑔𝑔𝑒𝑑 𝐷𝑒𝑣𝑖𝑐𝑒𝑠]
[𝐶𝑜𝑚𝑝𝑢𝑡𝑒𝑟𝑠 𝑀𝑎𝑥𝑖𝑚𝑢𝑚 𝑇ℎ𝑟𝑒𝑎𝑑𝑖𝑛𝑔 𝐶𝑎𝑝𝑏𝑖𝑙𝑖𝑡𝑦]) ∗ 100 =
𝑃𝑒𝑟𝑓𝑜𝑟𝑚𝑎𝑛𝑐𝑒 𝑆𝑒𝑡𝑡𝑖𝑛𝑔
For example, on a computer that can handle up to 1000 threads for a single process and has
a SCADA system with a maximum number of 50 Accord Controls on a single screen and logs
150 devices, the performance setting would be as follows:
((50 ∗ 2) + 150
1000) ∗ 100 = 25%
Accord Server
Accord Server V3.22 User Guide R03 Page 94 of 189
7.6.3.1 Setting the Memory Level
The performance settings tab contains a vertical level indicator with a series of fixed points
to simplify user configuration. The following is a list of fixed settings that users can choose
to utilise:
Setting Description
Max Reserve a minimum of 100% of the maximum supported threads per process.
High Reserve a minimum of 75% of the maximum supported threads per process.
Medium Reserve a minimum of 50% of the maximum supported threads per process.
Low Reserve a minimum of 25% of the maximum supported threads per process.
Min Reserve a minimum of 10% of the maximum supported threads per process.
To change the desired performance setting, simply do the following:
1. Make sure the service is not running.
2. Select the ‘Settings’ tab.
3. Select ‘Performance’ from the settings tree.
4. To use a fixed level, simply click on the name of the ‘Memory’ setting to auto adjust the
level indicator.
a. To use a variable setting, simply drag the level indicator up/down to the desired
level.
7.6.4 Processor
The processor setting you choose depends entirely on the role played by the computer that
hosts Accord Server. Accord Server is a multi-threaded application, meaning it takes full
advantage of all available cores on its host computer. This means that resources will never
be underutilised, which is advantageous when dealing with a particularly busy system. In
some circumstances, it may be desirable to prioritise Accord Server over other
applications/services hosted on the computer. By default, Accord Server assigns itself an
Above Normal priority, meaning it will always receive attention from the processor over
applications such as web browsers. This does mean that if the computer is being used
regularly for other purposes, such as hosting a Scada system, the Scada system itself may
perform poorly if Accord Server is currently under a heavy load. It is highly recommended
to set the processor priority to Normal if the computer is intended to host a HMI or Scada
application of any kind.
Accord Server
Accord Server V3.22 User Guide R03 Page 95 of 189
7.6.5 Setting the Processor Priority Level
The performance settings tab contains a vertical level indicator with a series of fixed points
to simplify user configuration. The following is a list of the three possible priority settings:
Setting Description
Normal Accord Server receives the same attention from the processor as any other
application. The performance of Accord Server may suffer if the host
computer is handling many applications and services.
Above Normal Accord Server receives more attention that most applications and services on
the host computer. This is ideal if the computer is not intended to host a
HMI, as any HMI would receive less attention from the processor as may
perform poorly if Accord Server is under a heavy load.
High Accord Server receives a significant amount of attention from the processor.
This is recommended if the host computer is almost entirely dedicated to
Accord Server and is particularly useful when Accord Server is expected to
handle a large number of client requests.
To change the desired processor priority setting, simply do the following:
1. Select the ‘Settings’ tab.
2. Select ‘Performance’ from the settings tree.
3. Click on the name of the ‘Processor’ setting to auto adjust the level indicator.
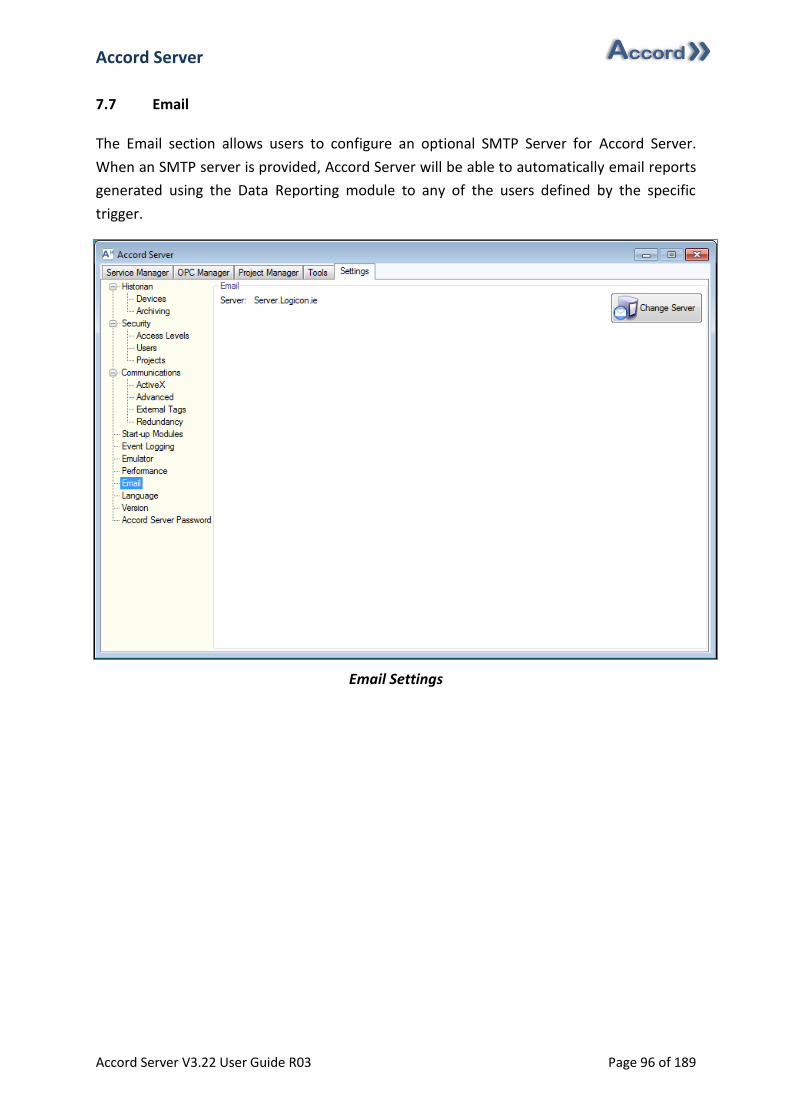
Accord Server
Accord Server V3.22 User Guide R03 Page 96 of 189
7.7 Email
The Email section allows users to configure an optional SMTP Server for Accord Server.
When an SMTP server is provided, Accord Server will be able to automatically email reports
generated using the Data Reporting module to any of the users defined by the specific
trigger.
Email Settings
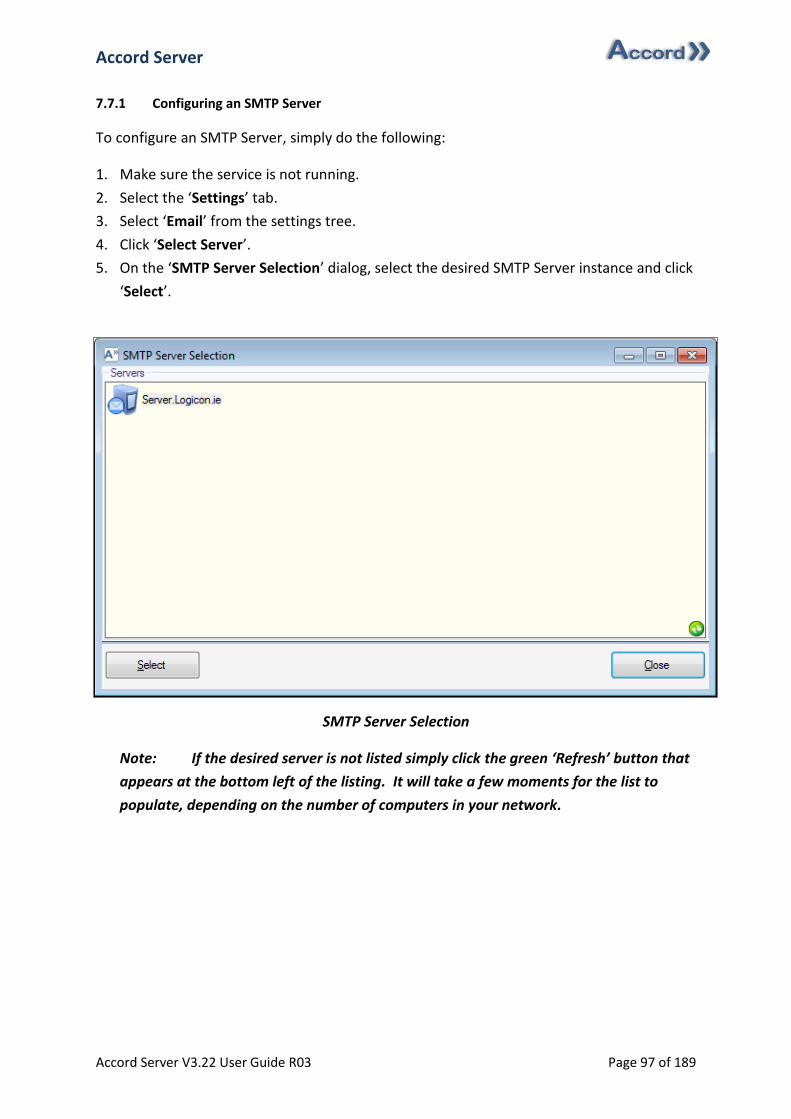
Accord Server
Accord Server V3.22 User Guide R03 Page 97 of 189
7.7.1 Configuring an SMTP Server
To configure an SMTP Server, simply do the following:
1. Make sure the service is not running.
2. Select the ‘Settings’ tab.
3. Select ‘Email’ from the settings tree.
4. Click ‘Select Server’.
5. On the ‘SMTP Server Selection’ dialog, select the desired SMTP Server instance and click
‘Select’.
SMTP Server Selection
Note: If the desired server is not listed simply click the green ‘Refresh’ button that
appears at the bottom left of the listing. It will take a few moments for the list to
populate, depending on the number of computers in your network.

Accord Server
Accord Server V3.22 User Guide R03 Page 98 of 189
7.8 Language
The Language section allows users to select which language the Accord Server user interface
will use. This also affects the language used when generating any reports using either
Accord Server or Accord Reports. Once the language has been changed, Accord Server will
automatically restart using the selected language.
Language
7.8.1 Changing Language
To change the current language, simply do the following:
1. Make sure the service is not running.
2. Select the ‘Settings’ tab.
3. Select ‘Language’ from the settings tree.
4. Select the desired language from the ‘Language’ list.
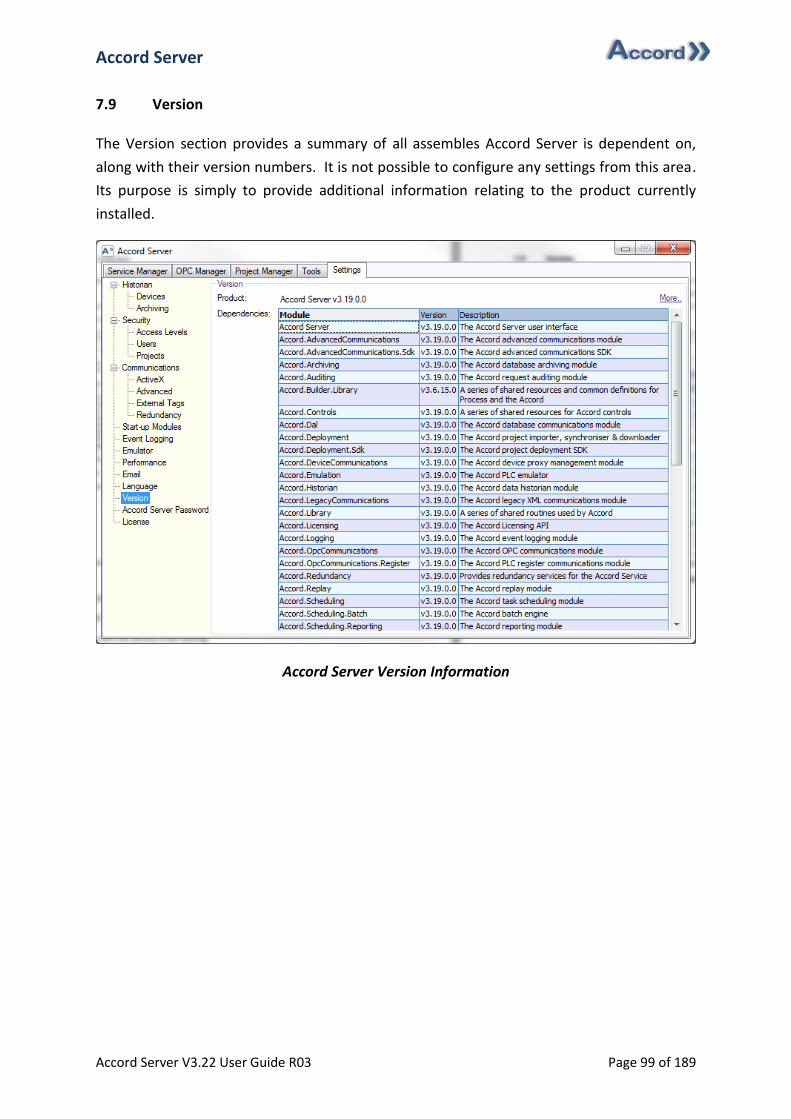
Accord Server
Accord Server V3.22 User Guide R03 Page 99 of 189
7.9 Version
The Version section provides a summary of all assembles Accord Server is dependent on,
along with their version numbers. It is not possible to configure any settings from this area.
Its purpose is simply to provide additional information relating to the product currently
installed.
Accord Server Version Information
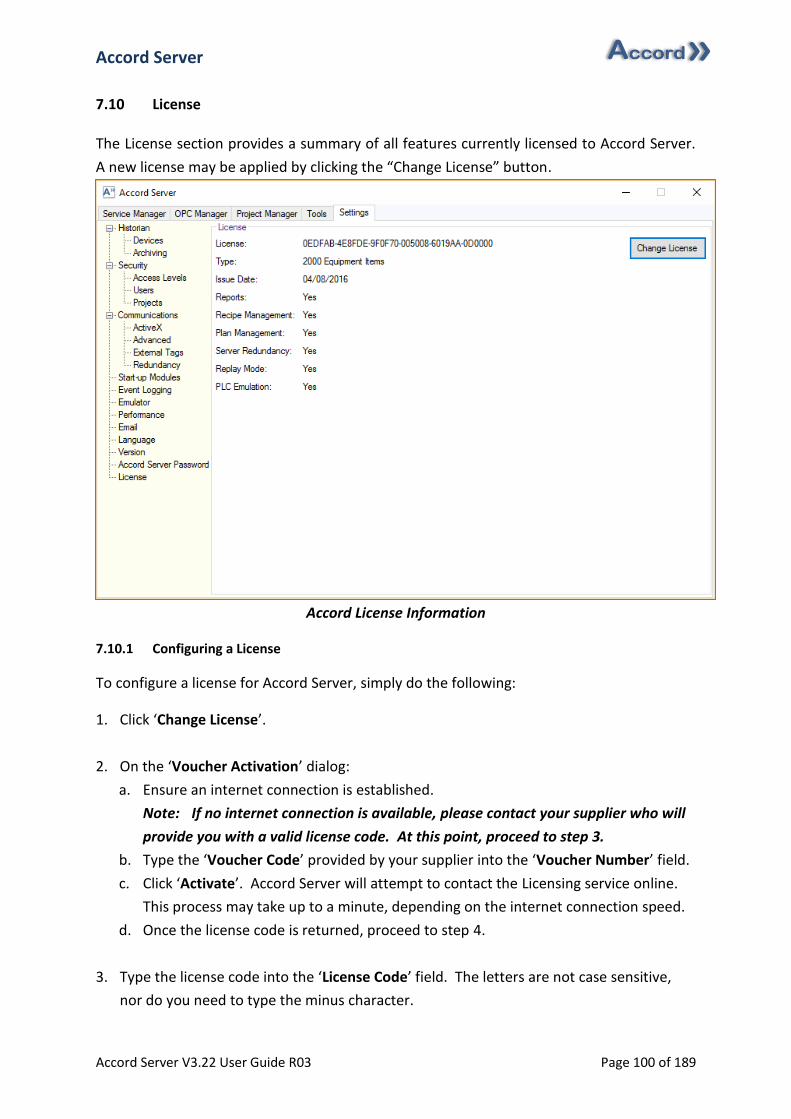
Accord Server
Accord Server V3.22 User Guide R03 Page 100 of 189
7.10 License
The License section provides a summary of all features currently licensed to Accord Server.
A new license may be applied by clicking the “Change License” button.
Accord License Information
7.10.1 Configuring a License
To configure a license for Accord Server, simply do the following:
1. Click ‘Change License’.
2. On the ‘Voucher Activation’ dialog:
a. Ensure an internet connection is established.
Note: If no internet connection is available, please contact your supplier who will
provide you with a valid license code. At this point, proceed to step 3.
b. Type the ‘Voucher Code’ provided by your supplier into the ‘Voucher Number’ field.
c. Click ‘Activate’. Accord Server will attempt to contact the Licensing service online.
This process may take up to a minute, depending on the internet connection speed.
d. Once the license code is returned, proceed to step 4.
3. Type the license code into the ‘License Code’ field. The letters are not case sensitive,
nor do you need to type the minus character.
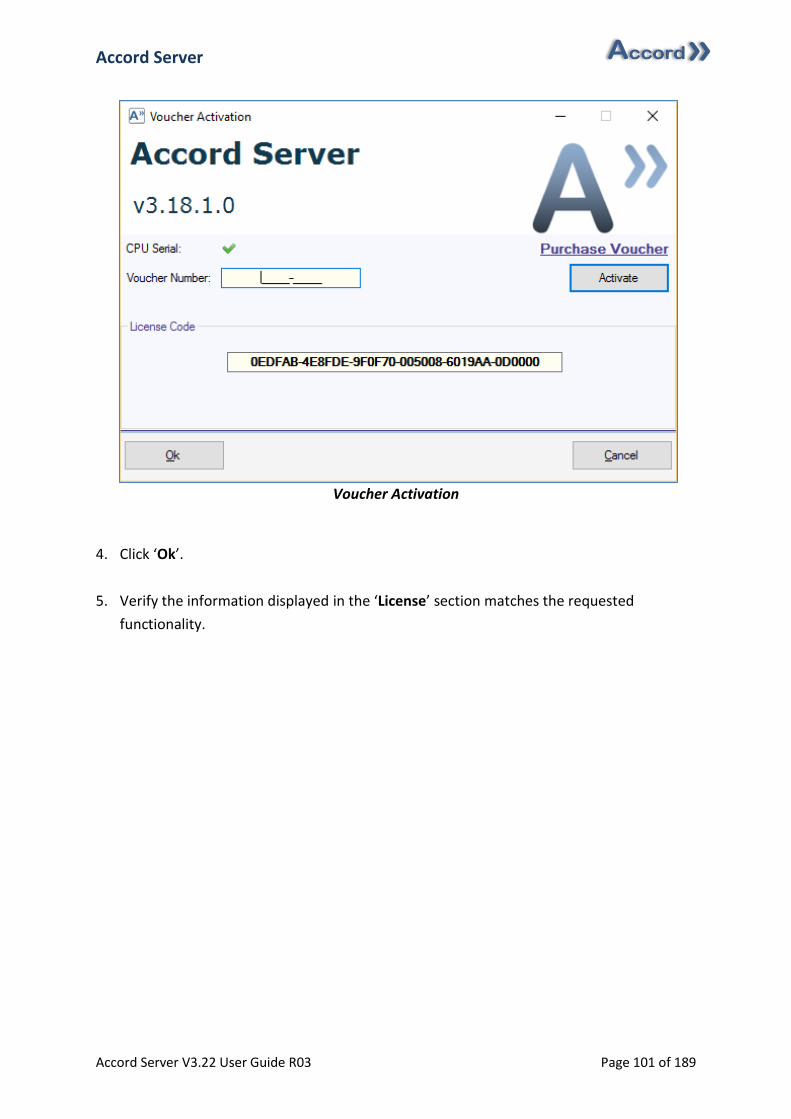
Accord Server
Accord Server V3.22 User Guide R03 Page 101 of 189
Voucher Activation
4. Click ‘Ok’.
5. Verify the information displayed in the ‘License’ section matches the requested
functionality.

Accord Server
Accord Server V3.22 User Guide R03 Page 102 of 189
8 The Service
8.1 Understanding the Service
Accord Server does not run as a Windows Service, instead Accord Server runs as a standard
windows based application, controlled and managed using the Accord Server user interface
you use to configure projects, OPC and security settings. This has the added advantage of
allowing the Accord Server user interface to provide the user with real time status and
diagnostic information relating to its current activity. Once installed, Accord Server will
automatically run silently upon windows start-up and automatically activate all configured
Service modules. For simplicity, these Service modules are referred to as the Accord Server
Service, since they provide service functionality.
8.2 Determining Service State
The Accord Server Service tab displays information relating to the current state of each of
the Accord Server modules. Additionally this tab also displays the status of the service itself
in two different ways.
Accord Server Service Status
Accord Server
Accord Server V3.22 User Guide R03 Page 103 of 189
The first method Accord Server uses to display the status of the service is in the current
state of the ‘Service Control’ buttons. The following is a list of their possible states and their
related meaning:
Start Stop Description
Enabled Disabled The service is currently not running and can be activated by clicking
‘Start’.
Disabled Enabled The service is currently running and can be deactivated by clicking
‘Stop’.
Disabled Disabled The service is currently running however, it is in a busy state and
cannot be deactivated at this time. Typically this state occurs during
activation or deactivation of the service.
The second method Accord Server uses to display the status is in the status of the ‘Accord
Server Service’ status indicator under ‘Module Status’. The Accord Server Service status
indicator represents the state of the Accord Server Service itself, rather than the state of a
particular module therefore, if this indicator shows an Active status, the service is
considered active, even if the other modules are in different states. This is particularly
useful since Accord Server modules may encounter errors during start-up and it may not be
obvious at a glance if the modules are currently active or inactive since their Notice,
Warning, Error or Critical states take priority over any other status.
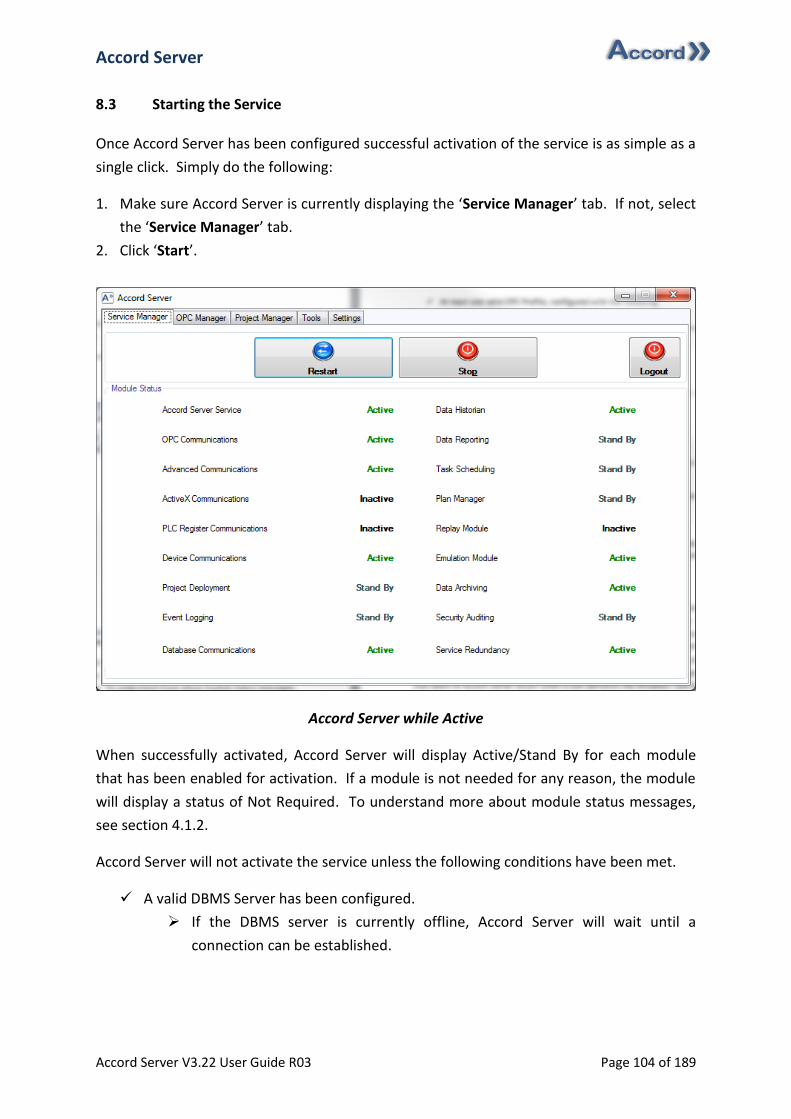
Accord Server
Accord Server V3.22 User Guide R03 Page 104 of 189
8.3 Starting the Service
Once Accord Server has been configured successful activation of the service is as simple as a
single click. Simply do the following:
1. Make sure Accord Server is currently displaying the ‘Service Manager’ tab. If not, select
the ‘Service Manager’ tab.
2. Click ‘Start’.
Accord Server while Active
When successfully activated, Accord Server will display Active/Stand By for each module
that has been enabled for activation. If a module is not needed for any reason, the module
will display a status of Not Required. To understand more about module status messages,
see section 4.1.2.
Accord Server will not activate the service unless the following conditions have been met.
A valid DBMS Server has been configured.
If the DBMS server is currently offline, Accord Server will wait until a
connection can be established.
Accord Server
Accord Server V3.22 User Guide R03 Page 105 of 189
At least one valid OPC Profile, configured with the following:
A valid OPC Server.
Accord Server will attempt to activate the OPC Server if it is not
current running.
At least one active group configured with a Channel/Device.
A valid license.
The OPC configuration matches the PLC for the license.
At least one Project has been imported, flagged as active and uses a valid OPC
Profile.
8.4 Stopping the Service
Stopping Accord Server is as easy as a single click. To stop Accord Server simply do the
following:
1. Make sure Accord Server is currently displaying the ‘Service Manager’ tab. If not, select
the ‘Service Manager’ tab.
2. Click ‘Stop’.
If the ‘Stop’ button is not enabled, Accord Server is currently busy processing a request and
cannot be stopped at this time. Accord Server will only enable the ‘Stop’ button if it is safe
to perform a clean shutdown of the service.
8.4.1 Shutting Down Windows
Accord Server can automatically detect a Windows Shutdown in progress and will attempt
to perform a clean shutdown of the Accord Server service when this occurs. Under normal
circumstances, Accord Server will deactivate quickly, without adding a delay to the Windows
Shutdown procedure. It is strongly recommended that you do not perform a forced
shutdown of Accord Server, as it may leave Accord Server in an inconsistent state and result
in potential problems the next time Accord Server attempts to activate the service. A forced
shut down of Accord Server occurs when a user performs the Windows Task Manager’s ‘End
Task’ procedure on the Accord Server process, or if Windows has been instructed to shut
down using the force switch.
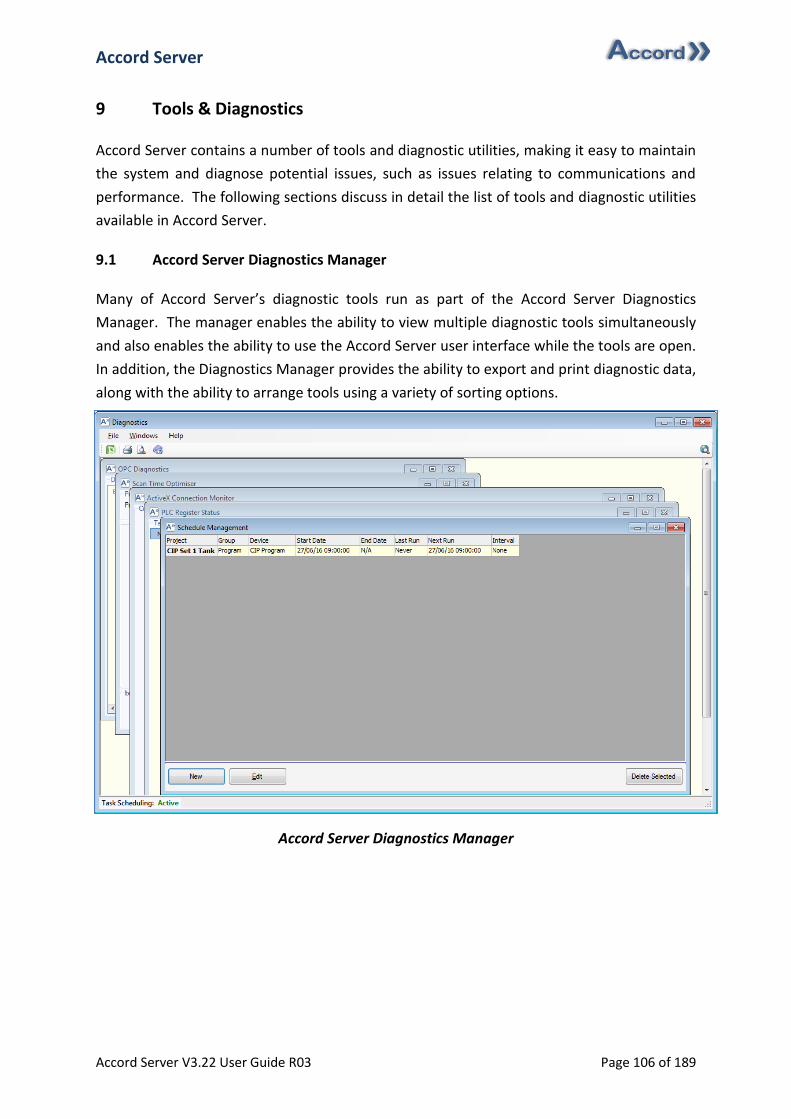
Accord Server
Accord Server V3.22 User Guide R03 Page 106 of 189
9 Tools & Diagnostics
Accord Server contains a number of tools and diagnostic utilities, making it easy to maintain
the system and diagnose potential issues, such as issues relating to communications and
performance. The following sections discuss in detail the list of tools and diagnostic utilities
available in Accord Server.
9.1 Accord Server Diagnostics Manager
Many of Accord Server’s diagnostic tools run as part of the Accord Server Diagnostics
Manager. The manager enables the ability to view multiple diagnostic tools simultaneously
and also enables the ability to use the Accord Server user interface while the tools are open.
In addition, the Diagnostics Manager provides the ability to export and print diagnostic data,
along with the ability to arrange tools using a variety of sorting options.
Accord Server Diagnostics Manager
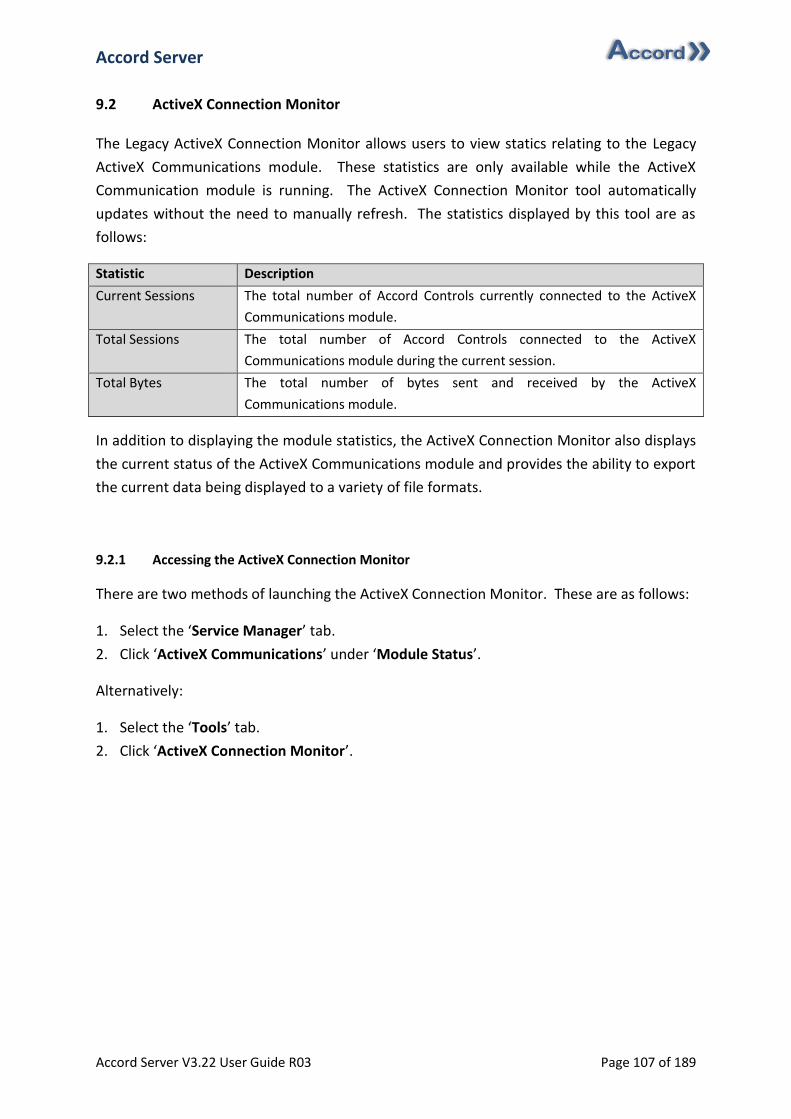
Accord Server
Accord Server V3.22 User Guide R03 Page 107 of 189
9.2 ActiveX Connection Monitor
The Legacy ActiveX Connection Monitor allows users to view statics relating to the Legacy
ActiveX Communications module. These statistics are only available while the ActiveX
Communication module is running. The ActiveX Connection Monitor tool automatically
updates without the need to manually refresh. The statistics displayed by this tool are as
follows:
Statistic Description
Current Sessions The total number of Accord Controls currently connected to the ActiveX
Communications module.
Total Sessions The total number of Accord Controls connected to the ActiveX
Communications module during the current session.
Total Bytes The total number of bytes sent and received by the ActiveX
Communications module.
In addition to displaying the module statistics, the ActiveX Connection Monitor also displays
the current status of the ActiveX Communications module and provides the ability to export
the current data being displayed to a variety of file formats.
9.2.1 Accessing the ActiveX Connection Monitor
There are two methods of launching the ActiveX Connection Monitor. These are as follows:
1. Select the ‘Service Manager’ tab.
2. Click ‘ActiveX Communications’ under ‘Module Status’.
Alternatively:
1. Select the ‘Tools’ tab.
2. Click ‘ActiveX Connection Monitor’.
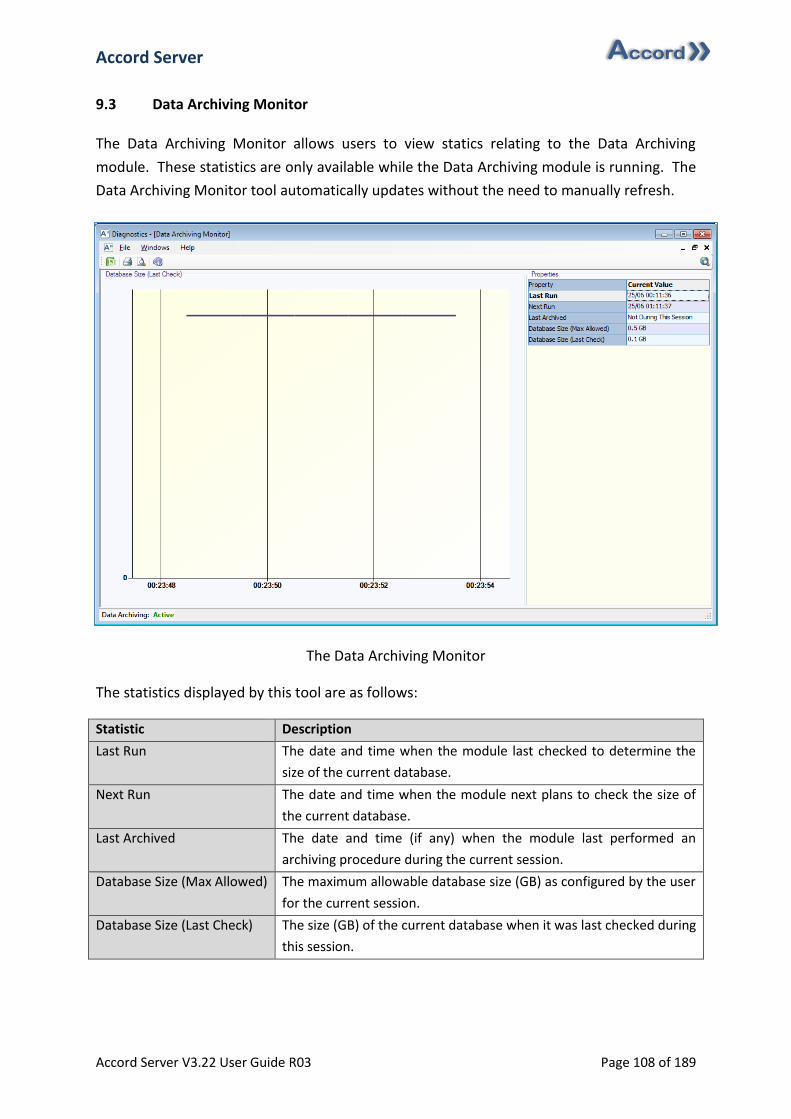
Accord Server
Accord Server V3.22 User Guide R03 Page 108 of 189
9.3 Data Archiving Monitor
The Data Archiving Monitor allows users to view statics relating to the Data Archiving
module. These statistics are only available while the Data Archiving module is running. The
Data Archiving Monitor tool automatically updates without the need to manually refresh.
The Data Archiving Monitor
The statistics displayed by this tool are as follows:
Statistic Description
Last Run The date and time when the module last checked to determine the
size of the current database.
Next Run The date and time when the module next plans to check the size of
the current database.
Last Archived The date and time (if any) when the module last performed an
archiving procedure during the current session.
Database Size (Max Allowed) The maximum allowable database size (GB) as configured by the user
for the current session.
Database Size (Last Check) The size (GB) of the current database when it was last checked during
this session.

Accord Server
Accord Server V3.22 User Guide R03 Page 109 of 189
9.3.1 Accessing the Data Archiving Monitor
There are two methods of launching the Data Archiving Monitor. These are as follows:
1. Select the ‘Service Manager’ tab.
2. Click ‘Data Archiving’ under ‘Module Status’.
Alternatively:
1. Select the ‘Tools’ tab.
2. Click ‘Data Archiving Monitor’.
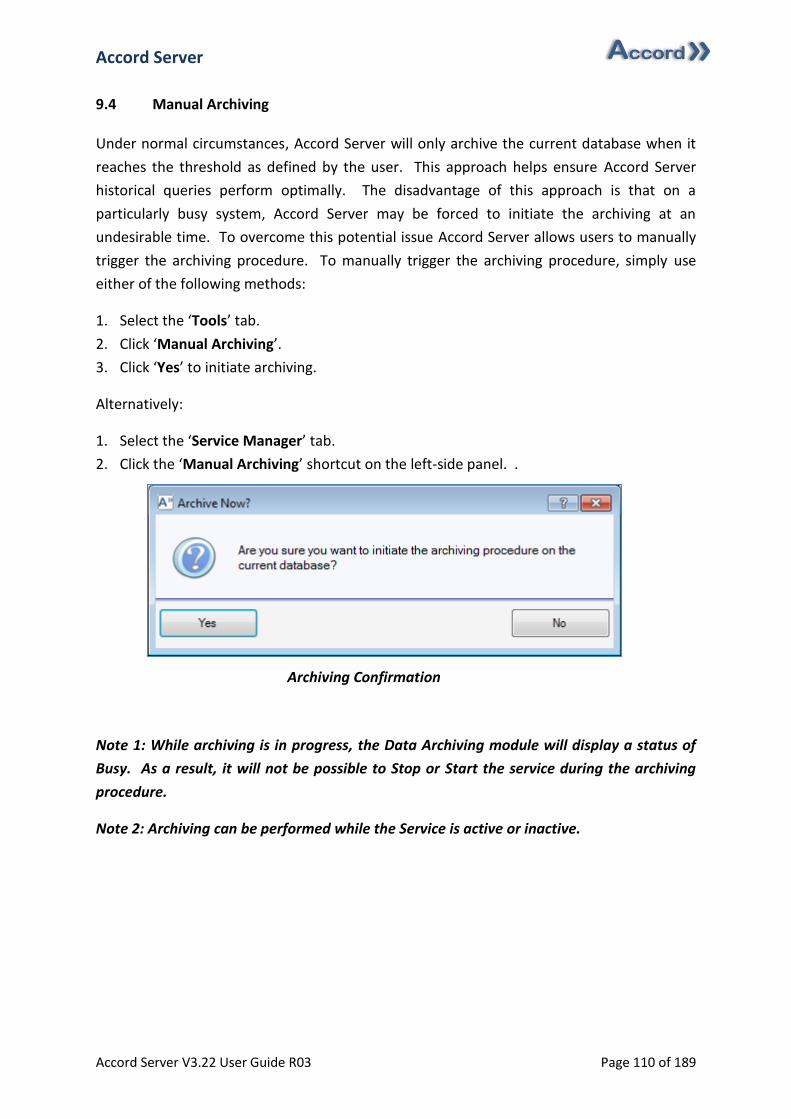
Accord Server
Accord Server V3.22 User Guide R03 Page 110 of 189
9.4 Manual Archiving
Under normal circumstances, Accord Server will only archive the current database when it
reaches the threshold as defined by the user. This approach helps ensure Accord Server
historical queries perform optimally. The disadvantage of this approach is that on a
particularly busy system, Accord Server may be forced to initiate the archiving at an
undesirable time. To overcome this potential issue Accord Server allows users to manually
trigger the archiving procedure. To manually trigger the archiving procedure, simply use
either of the following methods:
1. Select the ‘Tools’ tab.
2. Click ‘Manual Archiving’.
3. Click ‘Yes’ to initiate archiving.
Alternatively:
1. Select the ‘Service Manager’ tab.
2. Click the ‘Manual Archiving’ shortcut on the left-side panel. .
Archiving Confirmation
Note 1: While archiving is in progress, the Data Archiving module will display a status of
Busy. As a result, it will not be possible to Stop or Start the service during the archiving
procedure.
Note 2: Archiving can be performed while the Service is active or inactive.
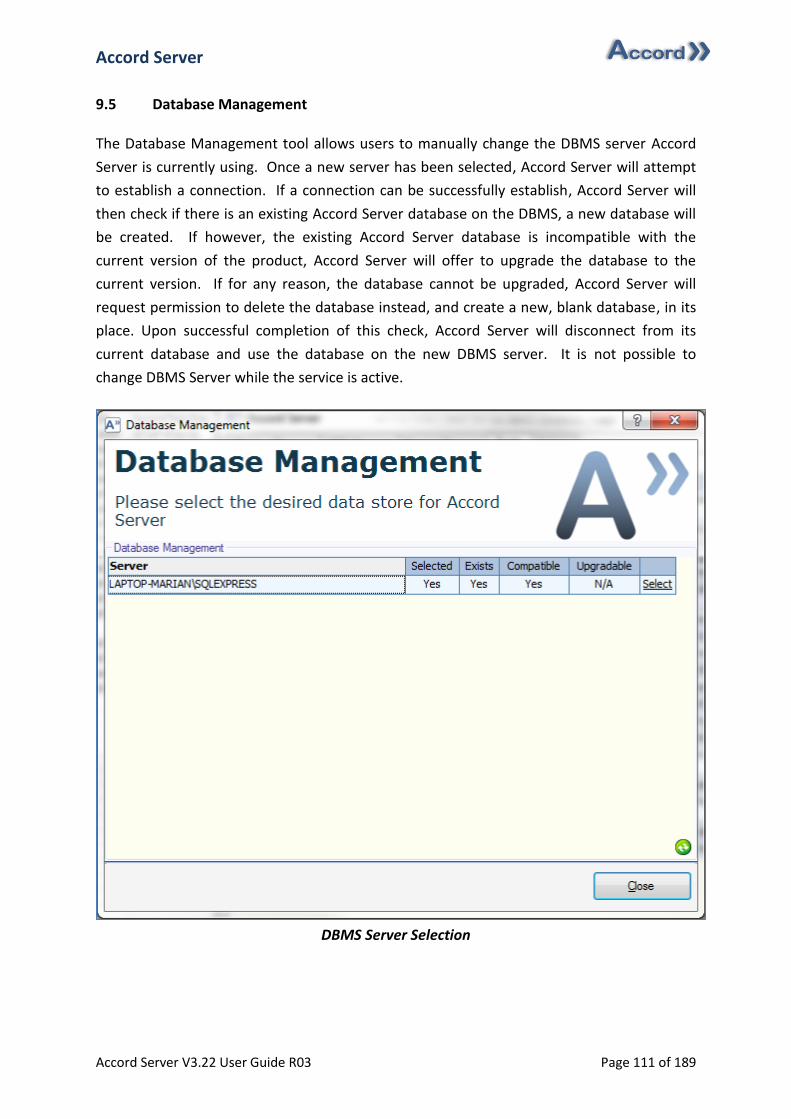
Accord Server
Accord Server V3.22 User Guide R03 Page 111 of 189
9.5 Database Management
The Database Management tool allows users to manually change the DBMS server Accord
Server is currently using. Once a new server has been selected, Accord Server will attempt
to establish a connection. If a connection can be successfully establish, Accord Server will
then check if there is an existing Accord Server database on the DBMS, a new database will
be created. If however, the existing Accord Server database is incompatible with the
current version of the product, Accord Server will offer to upgrade the database to the
current version. If for any reason, the database cannot be upgraded, Accord Server will
request permission to delete the database instead, and create a new, blank database, in its
place. Upon successful completion of this check, Accord Server will disconnect from its
current database and use the database on the new DBMS server. It is not possible to
change DBMS Server while the service is active.
DBMS Server Selection
Accord Server
Accord Server V3.22 User Guide R03 Page 112 of 189
9.5.1 Accessing the Database Management Tool
There are two methods of launching the Database Management tool. These are as follows:
1. Select the ‘Service Manager’ tab.
2. Click ‘Database Communications’ under ‘Module Status’.
Alternatively:
1. Select the ‘Tools’ tab.
2. Click ‘Database Management’.
9.5.2 Selecting a DBMS Server
To select a new DBMS server simply do the following:
1. Make sure the service is not running.
2. Open the ‘Database Management’ tool.
3. Click ‘Select’ the desired server from the ‘Servers’ list.
Note 1: To ensure optimum performance and reliability, it is recommended that
you select a local DBMS server.
Note 2: If the desired DBMS is not listed, click the green ‘Refresh’ button at the
bottom right of the DBMS listing, as soon as it becomes available. This process may
take a few moments to complete, depending on the number of computers in your
network.
Note 3: If an existing Accord Server database is present, Accord Server will attempt
to upgrade it automatically however, if the database is not upgradable or compatible
with the installed version of Accord Server, the existing database will be deleted with a
loss of all data contained. Accord Server will warn you prior to performing either an
upgrade or a deletion.
4. Confirm ‘Yes’ for upgrade or deletion, if that is your preference.
5. Click ‘Close’.
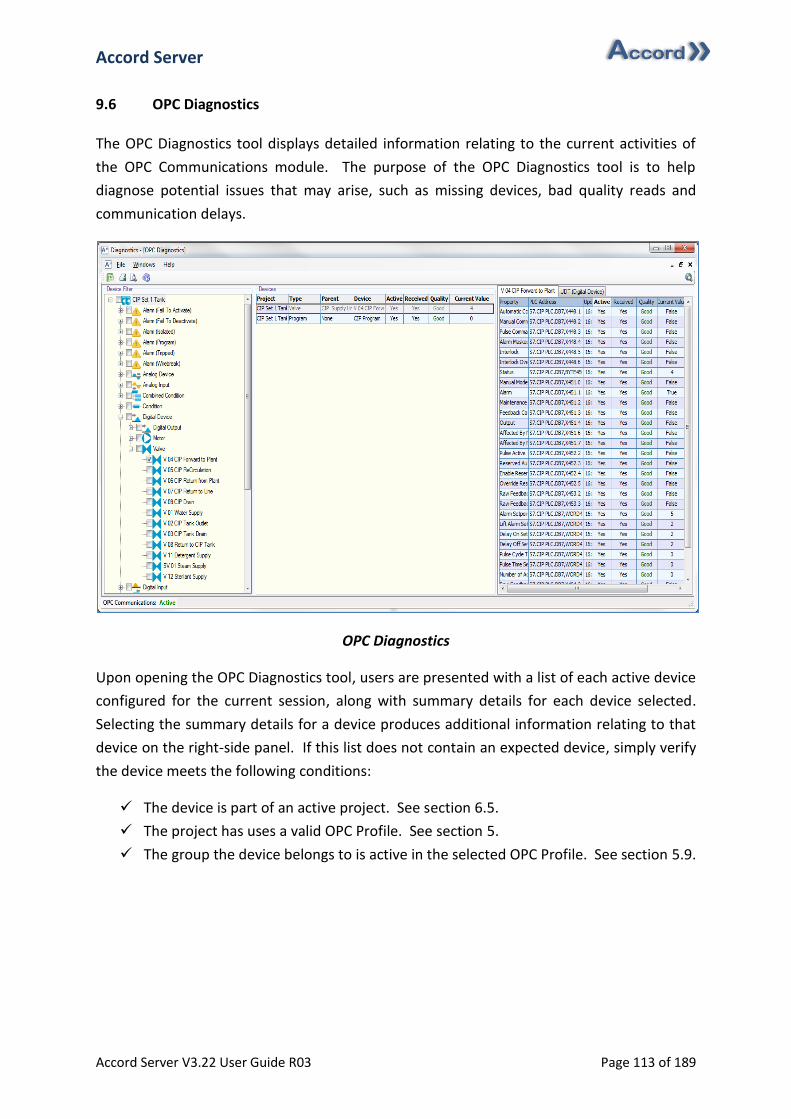
Accord Server
Accord Server V3.22 User Guide R03 Page 113 of 189
9.6 OPC Diagnostics
The OPC Diagnostics tool displays detailed information relating to the current activities of
the OPC Communications module. The purpose of the OPC Diagnostics tool is to help
diagnose potential issues that may arise, such as missing devices, bad quality reads and
communication delays.
OPC Diagnostics
Upon opening the OPC Diagnostics tool, users are presented with a list of each active device
configured for the current session, along with summary details for each device selected.
Selecting the summary details for a device produces additional information relating to that
device on the right-side panel. If this list does not contain an expected device, simply verify
the device meets the following conditions:
The device is part of an active project. See section 6.5.
The project has uses a valid OPC Profile. See section 5.
The group the device belongs to is active in the selected OPC Profile. See section 5.9.
Accord Server
Accord Server V3.22 User Guide R03 Page 114 of 189
The device listing summarises the following pieces of important information for each device
currently available to the OPC Communications module:
Item Description
Project The name of the project the device belongs to.
Type The type of the device, e.g. Digital Input, Program etc.
Parent The name of the devices parent, typically a unit.
Device The name of the device.
Active A flag indicating if the module is currently actively reading data for this
device. The following may result in a device being active:
An Accord Controls control is currently monitoring the device.
The Device Communications module has produced an active proxy
for the device.
The Data Historian is logging device data for this device.
The Data Reporting module is watching the device as part of a
trigger or file name value.
A scheduled task is currently in the process of performing a write.
The user has manually activated the device by selecting it on the
OPC Diagnostics list.
Received A flag indicating if the module has successfully received any data for this
device, whether it is good or bad.
Quality A flag indicating if the OPC Server has reported (in general) a good or bad
quality read for this device. A device typically possesses multiple properties
to read, if any of these properties have a bad quality read the device will be
given a Bad quality flag.
Current Value The default value as last read by the module for the device. If the device is
not current active then this value may not be the value in the PLC.
9.6.1 Accessing the OPC Diagnostics Tool
There are three methods of launching the OPC Diagnostics tool. These are as follows:
1. Select the ‘Service Manager’ tab.
2. Click the ‘OPC Diagnostics’ shortcut on the right-side panel. See section 9.6.
Alternatively:
1. Select the ‘Service Manager’ tab.
2. Click ‘OPC Communications’ under ‘Module Status’.
Alternatively:
1. Select the ‘Tools’ tab.
2. Click ‘OPC Diagnostics’.
Accord Server
Accord Server V3.22 User Guide R03 Page 115 of 189
9.6.2 OPC Device Communications Diagnostics
The OPC Device Communications Diagnostics tool provides a detailed display of each
property for a given device on the right-side panel. This tool is useful when attempting to
diagnose potential communications related issues. The following information is displayed
for a given device:
Item Description
Property The name of the OPC property for the current device.
PLC Address The OPC Address used by the OPC Communications module to retrieve data
from the selected OPC Server.
Last Updated The date and time when this property was lasted updated by the OPC
Server, typically when the property last changed.
Active A flag indicating if the module is currently actively reading data for this
property. The following may result in a property being active:
The device itself has been activated, thus reading all properties for
the device.
A HMI/Control being served by the Advanced Communications
module is currently monitoring the property.
Received A flag indicating if the OPC Communications module has successfully
received data for the property, whether it is good or bad.
Quality A flag indicating if the OPC Server has reported a good or bad quality read
for the property.
Value The value for the property as last read by the OPC Communications
module.

Accord Server
Accord Server V3.22 User Guide R03 Page 116 of 189
9.6.3 UDT Layout Viewer
The UDT Layout viewer displays the definition for each property being read for a particular
group. Whenever a device is selected, the UDT information is automatically displays along
with the device information on the right-side panel. This tool is intended primarily for use
by developers who wish to use the XML input features of the ActiveX Communications
module.
The UDT Layout Viewer
The following information is displayed for each property of a UDT:
Item Description
Property The name of the property of the UDT.
XML Tag The XML tag used by the ActiveX Communications module to represent the
property.
PLC Address The prefix of the OPC Address used by the OPC Communications module to
retrieve data from the selected OPC Server.
Offset The address offset in the PLC for the current property.
Min The minimum physical acceptable value for the current property.
Max The maximum physical acceptable value for the current property.
Modify A flag indicating if the property can be modified using Accord Server.
Extended A flag indicating if the property is used exclusively for diagnostic purposes.
Accord Server
Accord Server V3.22 User Guide R03 Page 117 of 189
9.7 PLC Register Status
The PLC Register Status tool displays detailed information relating to the current activities of
individual property managed by the Accord Server Service. Using the OPC Communications
and PLC Register Communications modules, this provides access to every property of each
device available to the Accord Server Service. Unlike the OPC Communications Diagnostics
tool, the PLC Register Status tool provides direct access to all extended properties of a
device UDT. In addition, the PLC Register Status tool allows for the creation of profiles that
can be customised to suit the specific needs of the user, facilitating easier diagnosis of
potential problems that may arise. It is also possible to modify the current value of any
modifiable property using this tool, removing any requirement to refer to a Scada
component or third party tool. Properties configured for a given Profile are referred to as
Tags.
Upon opening the PLC Register Status tool, users are presented with a list of currently
selected Tags, if any. These Tags belong to the Profile selected in the Profiles section, on the
bottom right-side panel. By default, Accord Server creates a profile known as ‘Default’ for
which users can customise. This profile is required and cannot be deleted. Once a profile is
selected, the Tags list will display a summary for each configured property. Selecting the
summary details for a property produces additional information relating to that property on
the top right-side panel. If this list does not contain an expected property, simply verify the
device the property belongs too meets the following conditions:
The device is part of an active project. See section 6.5.
The project uses a valid OPC Profile. See section 5.
The group the device belongs to is active in the selected OPC Profile. See section 5.9.
The property listing summarises the following pieces of important information for each
device currently available to the OPC Communications module:
Item Description
Name The custom name given for the property by the user.
Last Updated The date and time when this property was lasted updated by the OPC
Server, typically when the property last changed.
Current Value The value for the property as last read by the OPC Communications
module.
Modifiable If the property is modifiable, a ‘Change’ hyperlink will be presented,
enabling write access to the property, otherwise the value will read as
‘Read Only’.
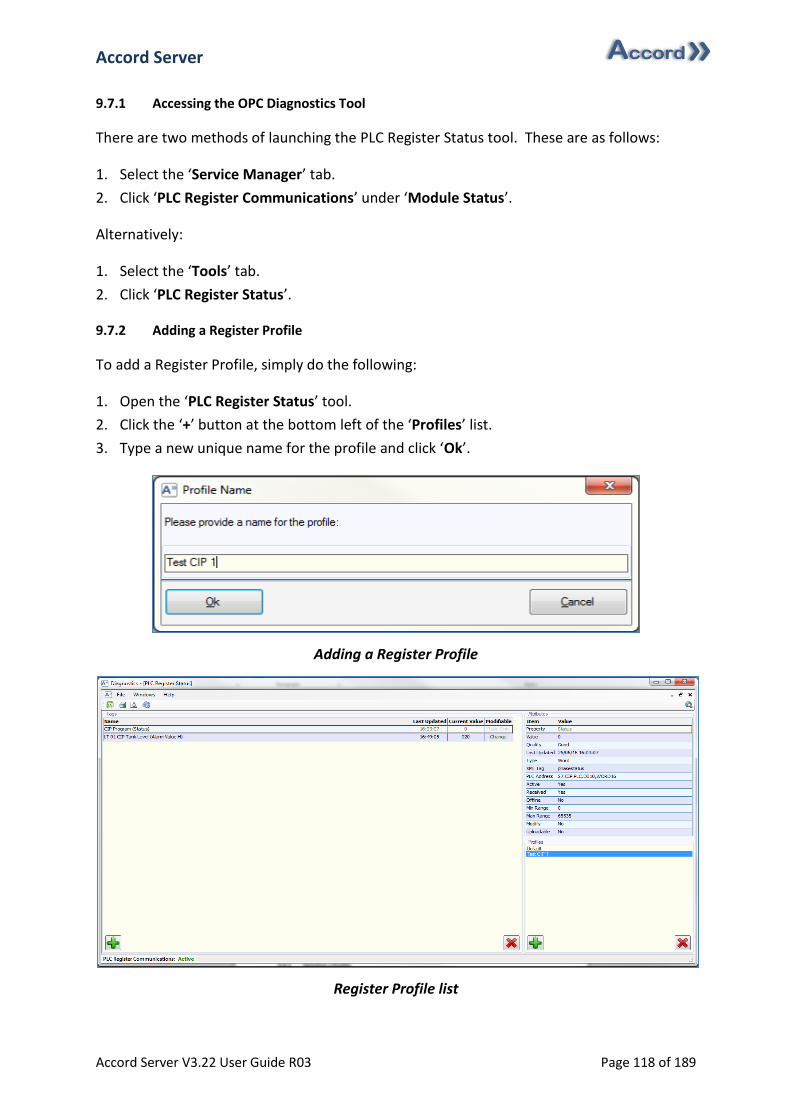
Accord Server
Accord Server V3.22 User Guide R03 Page 118 of 189
9.7.1 Accessing the OPC Diagnostics Tool
There are two methods of launching the PLC Register Status tool. These are as follows:
1. Select the ‘Service Manager’ tab.
2. Click ‘PLC Register Communications’ under ‘Module Status’.
Alternatively:
1. Select the ‘Tools’ tab.
2. Click ‘PLC Register Status’.
9.7.2 Adding a Register Profile
To add a Register Profile, simply do the following:
1. Open the ‘PLC Register Status’ tool.
2. Click the ‘+’ button at the bottom left of the ‘Profiles’ list.
3. Type a new unique name for the profile and click ‘Ok’.
Adding a Register Profile
Register Profile list
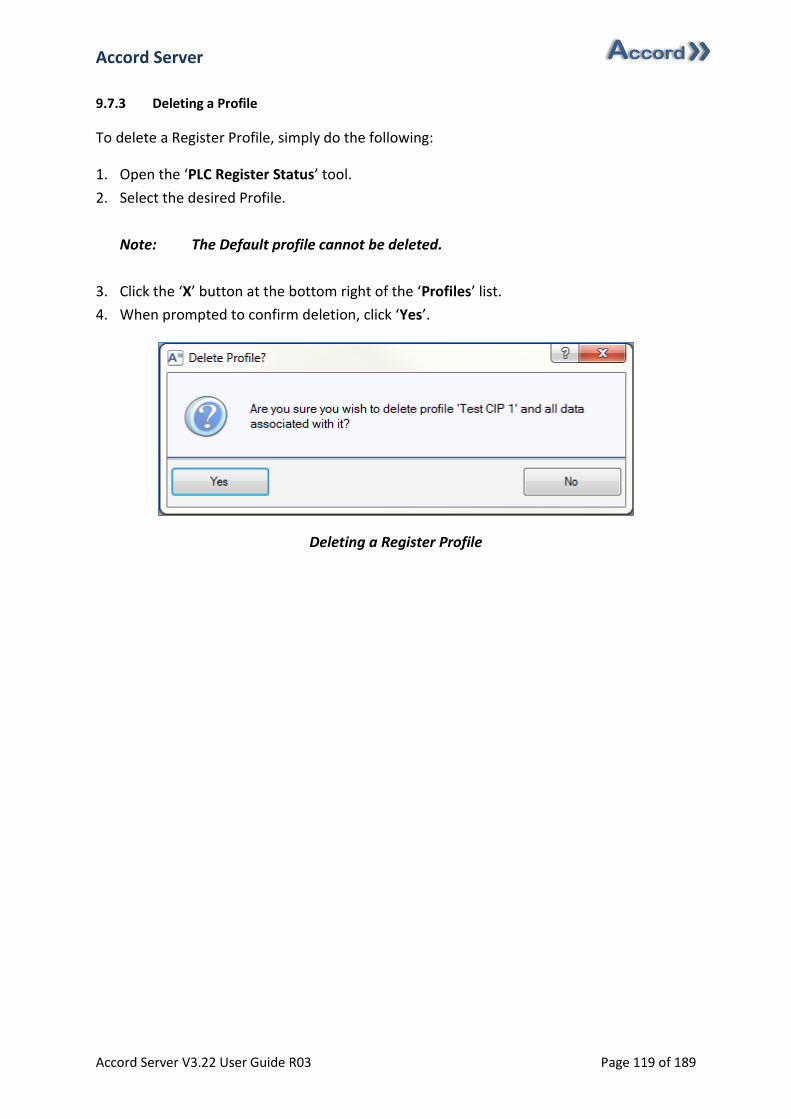
Accord Server
Accord Server V3.22 User Guide R03 Page 119 of 189
9.7.3 Deleting a Profile
To delete a Register Profile, simply do the following:
1. Open the ‘PLC Register Status’ tool.
2. Select the desired Profile.
Note: The Default profile cannot be deleted.
3. Click the ‘X’ button at the bottom right of the ‘Profiles’ list.
4. When prompted to confirm deletion, click ‘Yes’.
Deleting a Register Profile
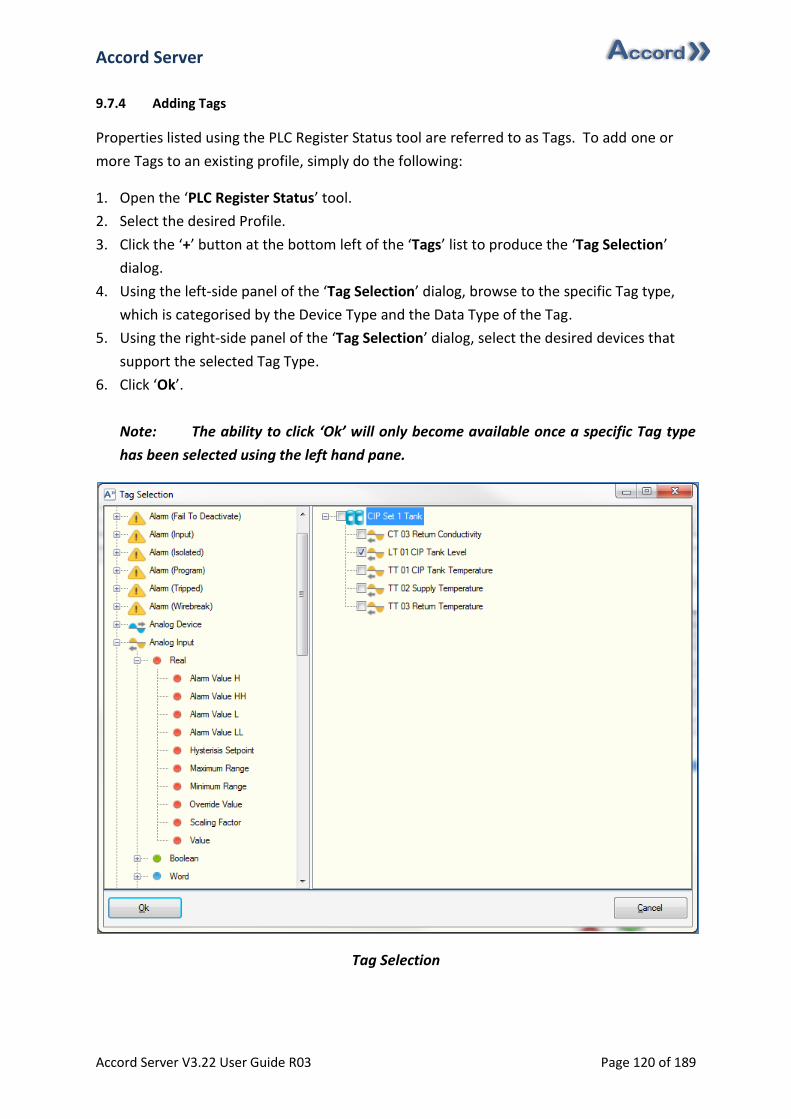
Accord Server
Accord Server V3.22 User Guide R03 Page 120 of 189
9.7.4 Adding Tags
Properties listed using the PLC Register Status tool are referred to as Tags. To add one or
more Tags to an existing profile, simply do the following:
1. Open the ‘PLC Register Status’ tool.
2. Select the desired Profile.
3. Click the ‘+’ button at the bottom left of the ‘Tags’ list to produce the ‘Tag Selection’
dialog.
4. Using the left-side panel of the ‘Tag Selection’ dialog, browse to the specific Tag type,
which is categorised by the Device Type and the Data Type of the Tag.
5. Using the right-side panel of the ‘Tag Selection’ dialog, select the desired devices that
support the selected Tag Type.
6. Click ‘Ok’.
Note: The ability to click ‘Ok’ will only become available once a specific Tag type
has been selected using the left hand pane.
Tag Selection
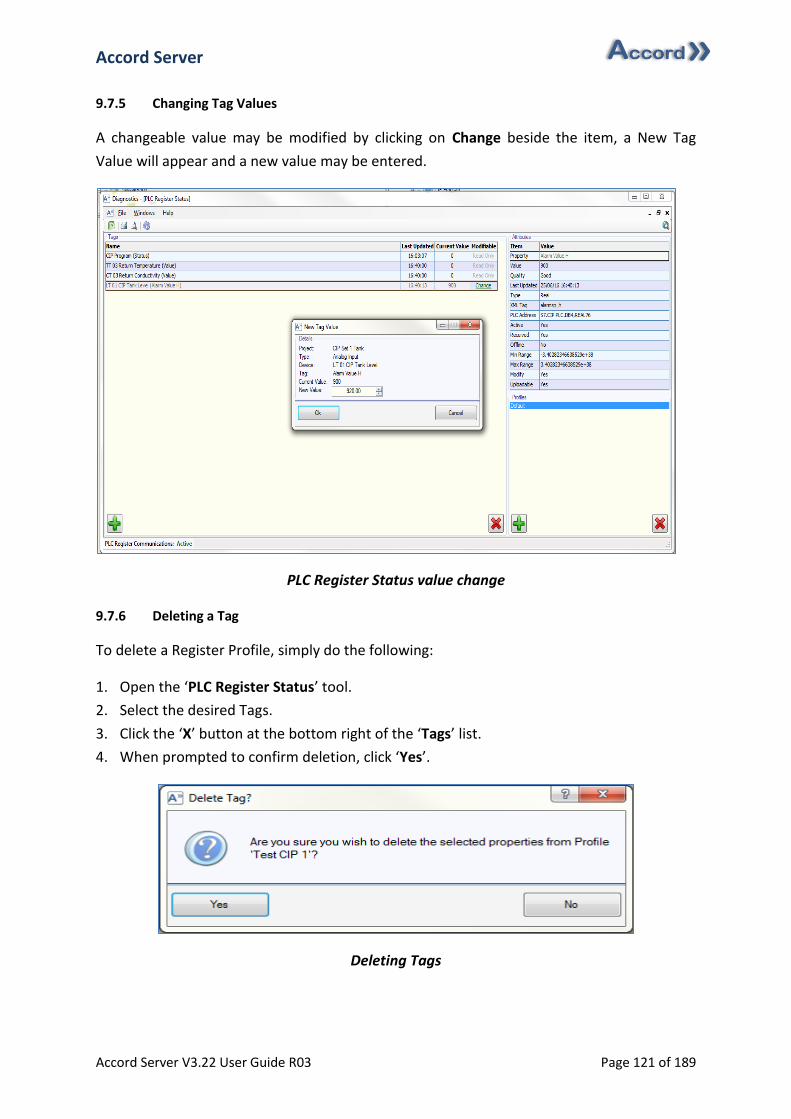
Accord Server
Accord Server V3.22 User Guide R03 Page 121 of 189
9.7.5 Changing Tag Values
A changeable value may be modified by clicking on Change beside the item, a New Tag
Value will appear and a new value may be entered.
PLC Register Status value change
9.7.6 Deleting a Tag
To delete a Register Profile, simply do the following:
1. Open the ‘PLC Register Status’ tool.
2. Select the desired Tags.
3. Click the ‘X’ button at the bottom right of the ‘Tags’ list.
4. When prompted to confirm deletion, click ‘Yes’.
Deleting Tags
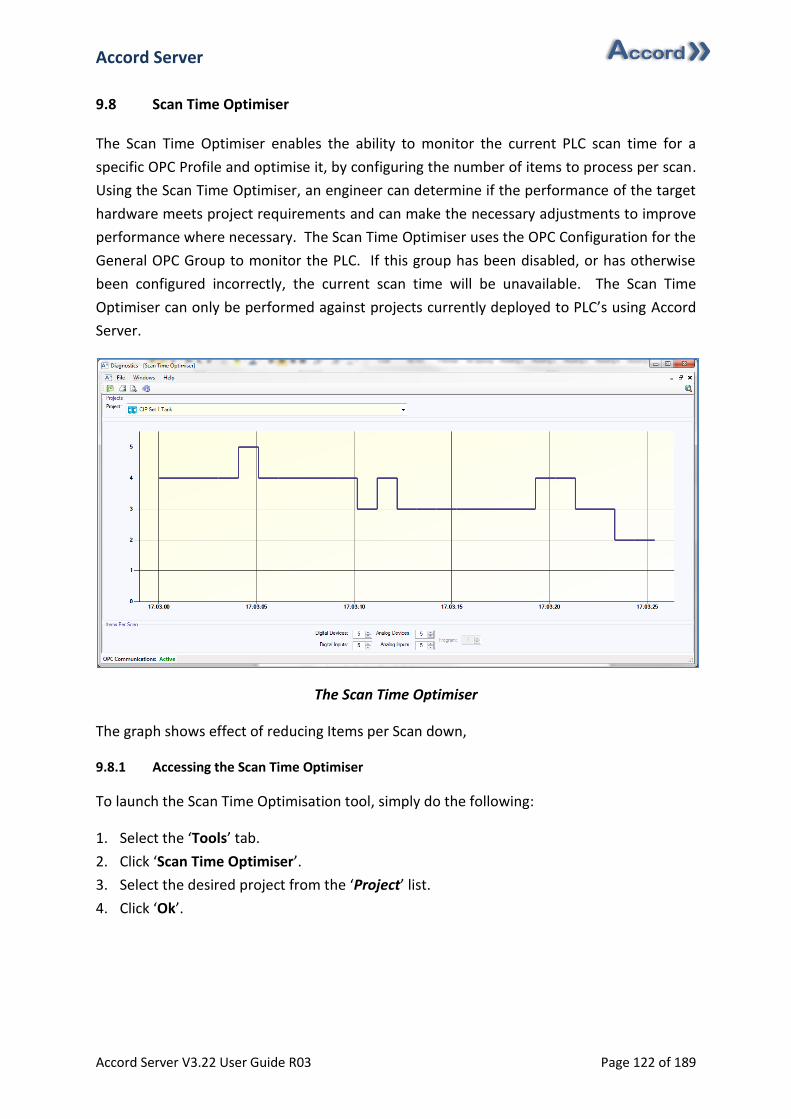
Accord Server
Accord Server V3.22 User Guide R03 Page 122 of 189
9.8 Scan Time Optimiser
The Scan Time Optimiser enables the ability to monitor the current PLC scan time for a
specific OPC Profile and optimise it, by configuring the number of items to process per scan.
Using the Scan Time Optimiser, an engineer can determine if the performance of the target
hardware meets project requirements and can make the necessary adjustments to improve
performance where necessary. The Scan Time Optimiser uses the OPC Configuration for the
General OPC Group to monitor the PLC. If this group has been disabled, or has otherwise
been configured incorrectly, the current scan time will be unavailable. The Scan Time
Optimiser can only be performed against projects currently deployed to PLC’s using Accord
Server.
The Scan Time Optimiser
The graph shows effect of reducing Items per Scan down,
9.8.1 Accessing the Scan Time Optimiser
To launch the Scan Time Optimisation tool, simply do the following:
1. Select the ‘Tools’ tab.
2. Click ‘Scan Time Optimiser’.
3. Select the desired project from the ‘Project’ list.
4. Click ‘Ok’.
Accord Server
Accord Server V3.22 User Guide R03 Page 123 of 189
9.8.2 Optimising Scan Time
To optimise the PLC Scan Time, simply do the following:
1. Open the ‘Scan Time Optimiser’ tool.
2. Observe the current ‘Scan Time’ to verify if a change is required.
3. Adjust one of the five possible values for ‘Items Per Scan’.
4. Observe the effects of the changes on the ‘Scan Time’ prior to making additional
changes, adjust as required until desired result is achieved.
Note: Changes to the ‘Items Per Scan’ make take a few moments to have an
impact on the PLC ‘Scan Time’. In addition, making scans longer may have an effect on
PLC interrupt processing outside Accord PLC, such as for processing items such as
pulses for Flowmeters.

Accord Server
Accord Server V3.22 User Guide R03 Page 124 of 189
9.9 Device Report (Basic)
The Device Report (Basic) produces an exportable report containing a list of all devices and
their location on the PLC for a user selected project.
Device Report (Basic)
The following information is displayed in the Device Report (Basic):
Item Description
Group The group the device belongs to, e.g. Digital Input.
Parent The name of the devices parent, typically a unit.
Name The name of the device.
Position The location of the device in its respective Data Area in the PLC.

Accord Server
Accord Server V3.22 User Guide R03 Page 125 of 189
9.9.1 Accessing the Device Report (Basic)
There are three methods of launching the Device Report (Basic). These are as follows:
1. Select the ‘Project Manager’ tab.
2. Click on the ‘Size’ field for the desired project.
Alternatively:
1. Select the ‘Project Manager’ tab.
2. Right click on the desired project.
3. Highlight ‘Reports’.
4. Select ‘Device Report (Basic)’.
Alternatively:
1. Select the ‘Tools’ tab.
2. Click ‘Device Report (Basic)’.
3. Select the desired project from the list.
4. Click ‘Ok’.
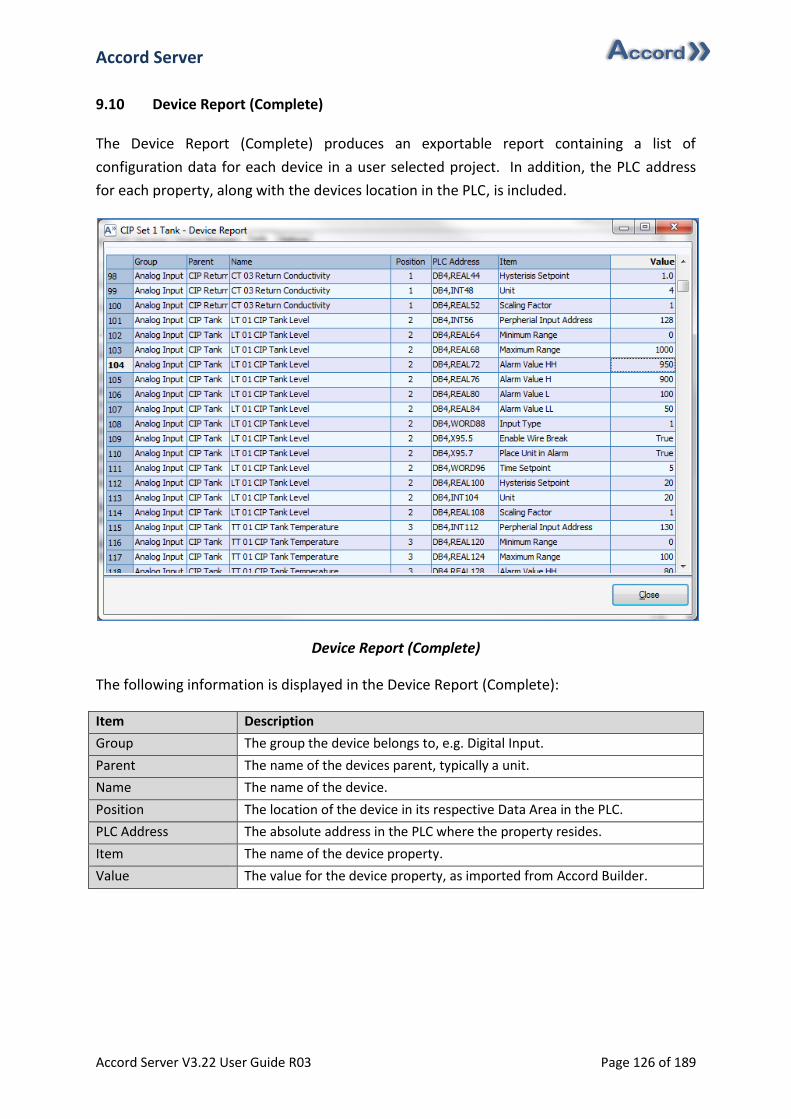
Accord Server
Accord Server V3.22 User Guide R03 Page 126 of 189
9.10 Device Report (Complete)
The Device Report (Complete) produces an exportable report containing a list of
configuration data for each device in a user selected project. In addition, the PLC address
for each property, along with the devices location in the PLC, is included.
Device Report (Complete)
The following information is displayed in the Device Report (Complete):
Item Description
Group The group the device belongs to, e.g. Digital Input.
Parent The name of the devices parent, typically a unit.
Name The name of the device.
Position The location of the device in its respective Data Area in the PLC.
PLC Address The absolute address in the PLC where the property resides.
Item The name of the device property.
Value The value for the device property, as imported from Accord Builder.
Accord Server
Accord Server V3.22 User Guide R03 Page 127 of 189
9.10.1 Accessing the Device Report (Complete)
There are two methods of launching the Device Report (Complete). These are as follows:
1. Select the ‘Project Manager’ tab.
2. Right click on the desired project.
3. Highlight ‘Reports’.
4. Select ‘Device Report (Complete)’.
Alternatively:
1. Select the ‘Tools’ tab.
2. Select ‘Device Report (Complete)’.
3. Select the desired project from the list.
4. Click ‘Ok’.

Accord Server
Accord Server V3.22 User Guide R03 Page 128 of 189
9.11 Excel Tag List
The Excel Tag List allows users to export a Comma Separated Values (CSV) file containing
configuration information relating to devices for a user selected project. This information
can be imported into the InTouch Scada system, or modified for import into another HMI or
Scada system. This facilitates the generation of tags with correct PLC Data Types, Addresses
and Comment. Microsoft Excel does not need to be installed to use this feature.
9.11.1 Generating an Excel Tag List
There are three methods of generating an Excel Tag List. These are as follows:
1. Select the ‘Service Manager’ tab.
2. Click the ‘Excel Tag List’ shortcut on the right-side panel. See section 9.11.
3. Select the desired project from the list.
4. Click ‘Ok’.
Alternatively:
1. Select the ‘Project Manager’ tab.
2. Right click on the desired project.
3. Highlight ‘Reports’.
4. Select ‘Excel Tag List’.
Alternatively:
1. Select the ‘Tools’ tab.
2. Select ‘Device Report (Complete)’.
3. Select the desired project from the list.
4. Click ‘Ok’.
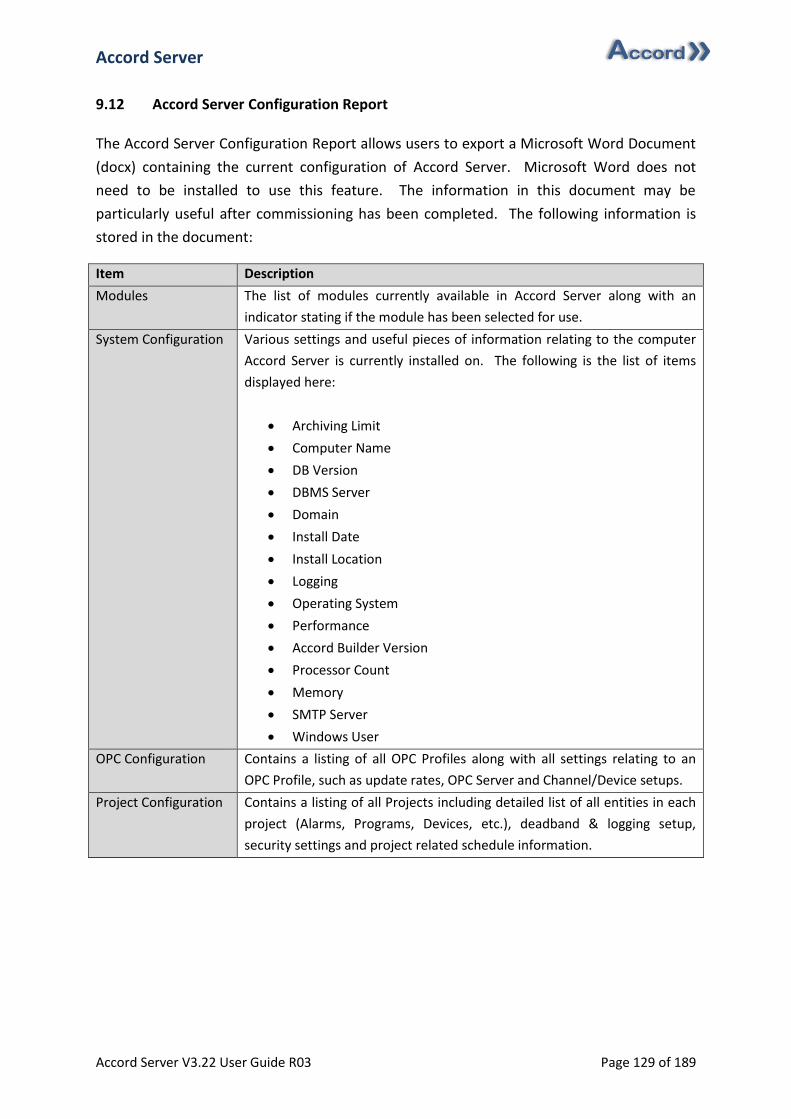
Accord Server
Accord Server V3.22 User Guide R03 Page 129 of 189
9.12 Accord Server Configuration Report
The Accord Server Configuration Report allows users to export a Microsoft Word Document
(docx) containing the current configuration of Accord Server. Microsoft Word does not
need to be installed to use this feature. The information in this document may be
particularly useful after commissioning has been completed. The following information is
stored in the document:
Item Description
Modules The list of modules currently available in Accord Server along with an
indicator stating if the module has been selected for use.
System Configuration Various settings and useful pieces of information relating to the computer
Accord Server is currently installed on. The following is the list of items
displayed here:
Archiving Limit
Computer Name
DB Version
DBMS Server
Domain
Install Date
Install Location
Logging
Operating System
Performance
Accord Builder Version
Processor Count
Memory
SMTP Server
Windows User
OPC Configuration Contains a listing of all OPC Profiles along with all settings relating to an
OPC Profile, such as update rates, OPC Server and Channel/Device setups.
Project Configuration Contains a listing of all Projects including detailed list of all entities in each
project (Alarms, Programs, Devices, etc.), deadband & logging setup,
security settings and project related schedule information.

Accord Server
Accord Server V3.22 User Guide R03 Page 130 of 189
9.12.1 Generating a Config Report
There are two methods of generating an Accord Server Configuration Report. These are as
follows:
1. Select the ‘Service Manager’ tab.
2. Click the ‘Accord Server Configuration Report’ shortcut on the right-side panel. See
section 9.12.
Alternatively
1. Select the ‘Tools’ tab.
2. Select ‘Accord Server Configuration’.
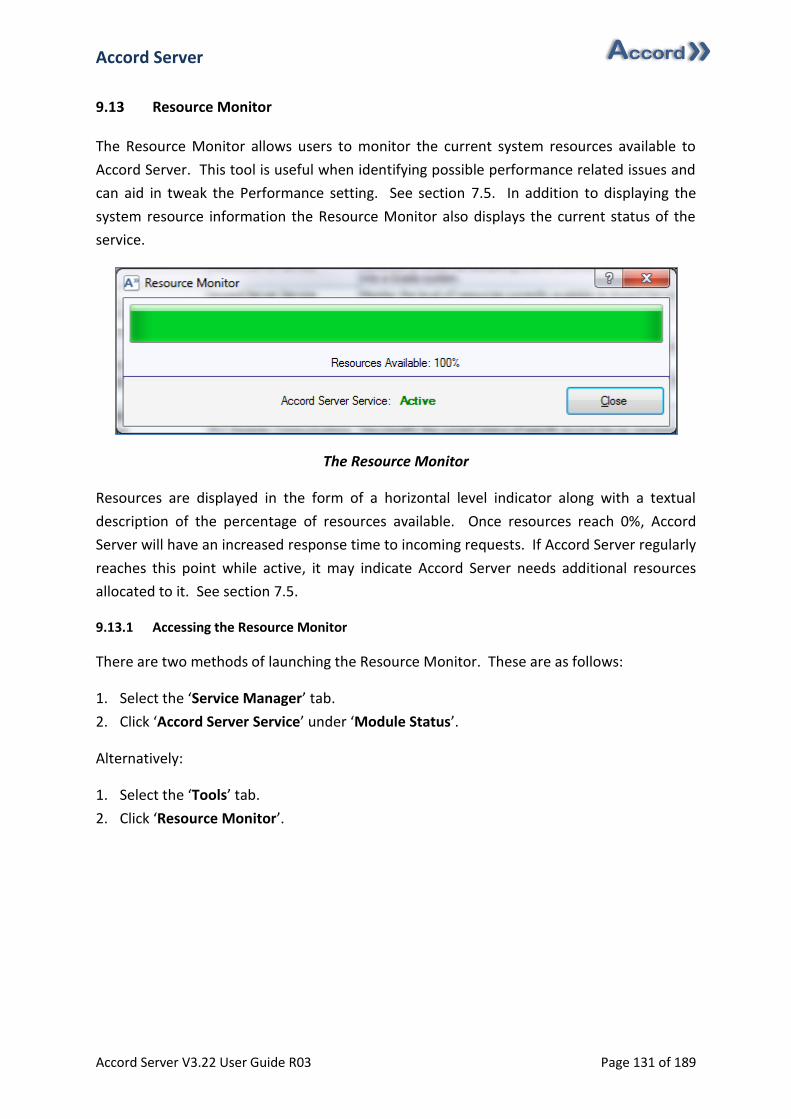
Accord Server
Accord Server V3.22 User Guide R03 Page 131 of 189
9.13 Resource Monitor
The Resource Monitor allows users to monitor the current system resources available to
Accord Server. This tool is useful when identifying possible performance related issues and
can aid in tweak the Performance setting. See section 7.5. In addition to displaying the
system resource information the Resource Monitor also displays the current status of the
service.
The Resource Monitor
Resources are displayed in the form of a horizontal level indicator along with a textual
description of the percentage of resources available. Once resources reach 0%, Accord
Server will have an increased response time to incoming requests. If Accord Server regularly
reaches this point while active, it may indicate Accord Server needs additional resources
allocated to it. See section 7.5.
9.13.1 Accessing the Resource Monitor
There are two methods of launching the Resource Monitor. These are as follows:
1. Select the ‘Service Manager’ tab.
2. Click ‘Accord Server Service’ under ‘Module Status’.
Alternatively:
1. Select the ‘Tools’ tab.
2. Click ‘Resource Monitor’.
Accord Server
Accord Server V3.22 User Guide R03 Page 132 of 189
9.14 Project Downloader
The Project Downloader allows users to import existing Accord Builder projects into Accord
Server. Once imported, a project can be downloaded to a target OPC Profile. Accord Server
also supports the ability to perform a Partial Download. A Partial Download allows users to
download only the elements of a project that changed, rather than the entire project as a
whole. This is an extremely useful feature, as it allows normal plant operation to continue
in the majority of situations while the changes are applied. Downloads may be performed
while the Accord Server service is running however, some changes may necessitate an
automatic restart of some elements of the service upon completion.
9.14.1 Accessing the Project Downloader
There are three methods of launching the Project Downloader. These are as follows:
1. Select the ‘Service Manager’ tab.
2. Click the ‘Project Downloader’ shortcut on the right-side panel. See section 9.14.
Alternatively:
1. Select the ‘Project Manager’ tab.
2. Click ‘Import New Project’.
Alternatively:
1. Select the ‘Tools’ tab.
2. Click ‘Project Downloader’.
9.14.2 Importing a Project
The Project Downloader is designed to guide the user through the steps required to perform
either a Full or Partial download. The number of steps may vary, depending on the type of
download being performed. For example, download a new project for the first time will
require the selection of the target OPC Profile, along with the configuration of spare
memory for that project however, downloading an existing project does not require either
of these steps. In addition, the Project Downloader also provide a wealth of information
relating to the actions it intends to perform, along with an analysis on of the potential
impact to Accord Server services and the PLC itself. Using this information, a user can
determine if the project they import will have the effect they intended, at which point they
can choose to either proceed or cancel either. Accord Server and the PLC are unaffected by
the Project Downloader up until the point at which the user clicks ‘Download’, so there is no
risk to simply performing an import operation, only to cancel it midway through.
Accord Server
Accord Server V3.22 User Guide R03 Page 133 of 189
There are three different types of download that a user may be presented with, these are as
follows:
Download Type Description
Full Download with Reset A download that involves a full re-configuration of the PLC, wiping
any existing project that may be hosted on that PLC and the
rearrangement of download addresses to ensure optimal usage of
available space, where appropriate.
Full Download without Reset A download that involves a full deployment of all information relating
to the project to the same PLC that it was previously downloaded
too, usually used to restore a project to its last known good state.
Partial Download A download that involves the deployment of all aspects of the project
that have changed since the last download to the PLC.
9.14.3 Full Download with Reset
A Full Download with Reset is most commonly performed during the initial download only.
When performing a Full Download with Reset, Accord Server arranges all items in their
optimal configuration, usually contiguously, grouped based on common semantics. In
addition, PLC memory is re-configured based on the projects requirements, resulting in a full
clean of existing project data that may be deployed on the PLC. A Full Download with Reset
is only ever required on an existing project in the following circumstances:
1. If the newly imported project exceeds the spare space currently available on the target
PLC. It is important to note that if this happens, any previously assigned download
positions may change in the new download, which may impact custom hard-coded tags
addresses in use in a Scada system. For this reason, it is recommended that a Full
Download with Reset be avoided by properly configuring the available PLC memory in
advance of the initial download to the PLC. To configure the available memory for a PLC,
see section 5.7.
2. If the existing project has since been displaced, or detached, from the OPC Profile that
managed it. This means, as far as Accord Server is concerned, the target PLC does not
contains any data relating to project and therefore, requires reconfiguration.
If a Full Download with Reset is selected, the following dialogs will be presented in order:
1. Project Selection, see section 9.14.6.
2. Import Progress, see section 9.14.7.
3. Profile Selection, see section 9.14.8.
4. Memory Assignment, see section 9.14.10.
5. Priming Progress, see section 9.14.11.
6. Download Confirmation, see section 9.14.12.
7. Download Progress, see section 9.14.13.
Accord Server
Accord Server V3.22 User Guide R03 Page 134 of 189
8. Download Summary, see section 9.14.14.
9.14.4 Full Download without Reset
A Full Download without Reset is the least common type of download, as its function is to
merely restore a project to its last known good state. Since no download positions are
change and no PLC reset is performed, this type of download is affectively a Partial
Download of everything contained within the project, including flags relating to removed
items. This is only likely to ever be required if an external editor has been used to modify
key values in the PLC, outside of the control of Accord Server, something that is strongly
discouraged. A Full Download without Reset is only possible if the following conditions are
met:
1. The imported project matches an existing project currently being managed by Accord
Server.
2. The existing project is attached to an OPC Profile.
3. There are no changes between the imported project and the existing project.
In the event a Full Download without Reset is selected, the following dialogs will be
presented in order:
1. Project Selection, see section 9.14.6.
2. Import Progress, see section 9.14.7.
3. Download Type Selection, see section 9.14.9.
4. Priming Progress, see section 9.14.11.
5. Download Confirmation, see section 9.14.12.
6. Download Progress, see section 9.14.13.
7. Download Summary, see section 9.14.14.
9.14.5 Partial Download
Partial Downloads are the most common type of download likely to be performed using
Accord Server. Partial Downloads occur when a project is imported that matches an existing
project currently managed by an OPC Profile. A Partial Download involves the download of
any information that has changed between the existing project and the newly imported
project. This is an extremely useful feature, as it often allows for the rapid modification of
existing PLC data without impacting its current operation, depending on the changes being
made. A Partial Download is only possible if the following conditions are met:
1. The imported project matches an existing project currently being managed by Accord
Server.
2. The existing project is attached to an OPC Profile.
Accord Server
Accord Server V3.22 User Guide R03 Page 135 of 189
3. The imported project does not exceed the maximum block capacities as defined by the
existing project, configured during the initial Full Download with Reset.
4. The imported project does not exceed the license band being used by the existing
project.
5. The imported project contains differences between it and the existing project.
In the event a Partial Download is selected, the following dialogs will be presented in order:
1. Project Selection, see section 9.14.6.
2. Import Progress, see section 9.14.7.
3. Download Type Selection, see section 9.14.9
4. Priming Progress, see section 9.14.11.
5. Download Confirmation, see section 9.14.12.
6. Download Progress, see section 9.14.13.
7. Download Summary, see section 9.14.14.
9.14.6 Project Selection
The Project Selection dialog allows for the selection of the target project for which the
Project Downloader will process. The dialog is usually presented whenever the target
project is not immediately known when the Project Downloader is launched. The only time
it is not presented is usually when the ‘Re-Import’ option is selected, as in this case the last
known Accord Builder server and source are known, see section 6.2. The Project Selection
dialog lists two types of projects, existing projects and Accord Builder Projects. Existing
projects are merely listed by name, as the previous source the project was imported using is
known to Accord Server. Accord Builder projects are listed by Project name, with their
database name in brackets, to aid selection, as often more than one database may exist for
the same project on a given DBMS.
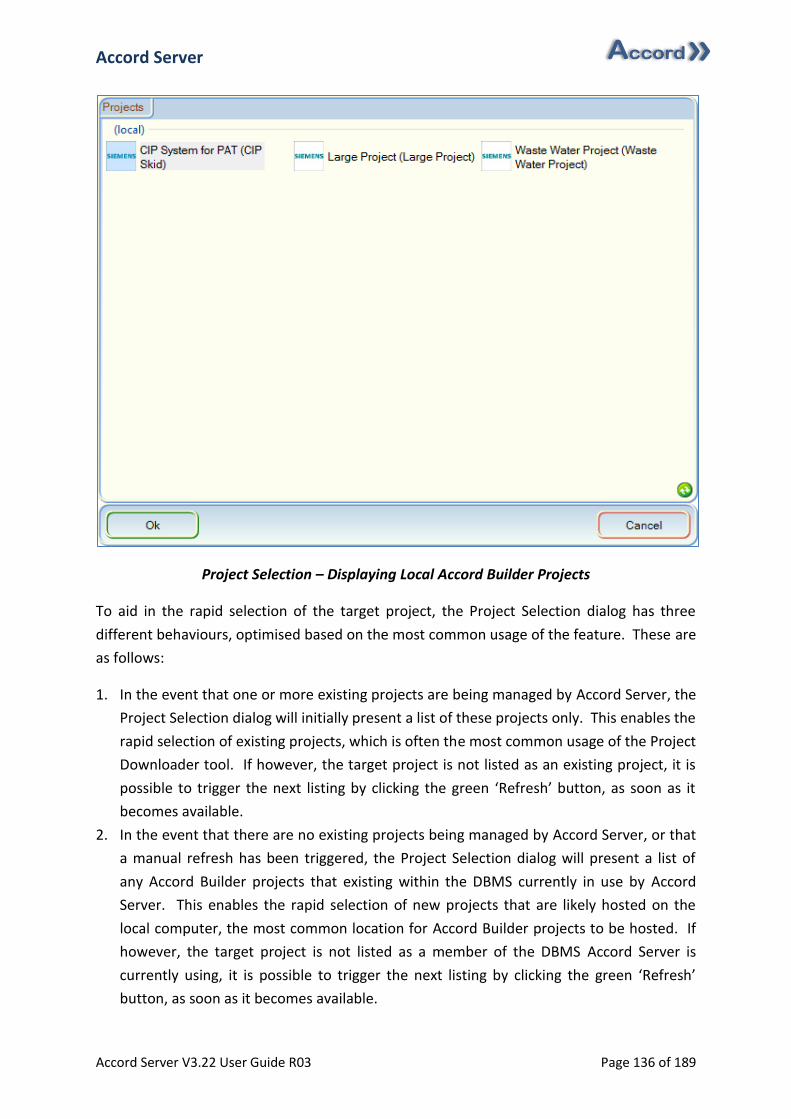
Accord Server
Accord Server V3.22 User Guide R03 Page 136 of 189
Project Selection – Displaying Local Accord Builder Projects
To aid in the rapid selection of the target project, the Project Selection dialog has three
different behaviours, optimised based on the most common usage of the feature. These are
as follows:
1. In the event that one or more existing projects are being managed by Accord Server, the
Project Selection dialog will initially present a list of these projects only. This enables the
rapid selection of existing projects, which is often the most common usage of the Project
Downloader tool. If however, the target project is not listed as an existing project, it is
possible to trigger the next listing by clicking the green ‘Refresh’ button, as soon as it
becomes available.
2. In the event that there are no existing projects being managed by Accord Server, or that
a manual refresh has been triggered, the Project Selection dialog will present a list of
any Accord Builder projects that existing within the DBMS currently in use by Accord
Server. This enables the rapid selection of new projects that are likely hosted on the
local computer, the most common location for Accord Builder projects to be hosted. If
however, the target project is not listed as a member of the DBMS Accord Server is
currently using, it is possible to trigger the next listing by clicking the green ‘Refresh’
button, as soon as it becomes available.
Accord Server
Accord Server V3.22 User Guide R03 Page 137 of 189
3. In the event that there are no existing projects, or Accord Builder projects in the DBMS
currently managed by Accord Server, or that a manual refresh was triggered on an
earlier selection, the Project Selection dialog will attempt to locate Accord Builder
databases within any DBMS located within the local network. This particular listing is
the least common, and significantly slower than the previous two, which is why it is the
last resort. The duration of the listing may vary, depending on the number of computers
in the local network and the security permissions being employed within the networked
hosts.
Note: It is important to note that only Accord Builder databases that are
compatible with the installed version of Accord Server are listed.
9.14.7 Import Progress
The Project Downloader obtains its configuration information from the Accord Builder
configuration utility, meaning it is necessary for Accord Server to convert that information
into a format suitable for download to the PLC. Accord Server does this during the Import
Progress stage of the Project Downloader tool. At this point, there is no need for user input,
and it is possible to cancel the process without any negative effect on either Accord Server
or Accord Builder. During the import process, Accord Server will create a full picture of the
project, as it would appear on the PLC, and attempt to determine the follow:
1. If the project is in a consistent state, as defined by Accord Builder.
2. If the project is an existing project current being managed by Accord Server.
3. If it is possible to download the project to any of the OPC Profiles currently defined
within Accord Server.
4. If a Partial Download is possible (see section 9.14.5), or a Full Download with Reset is
required (see section 9.14.3).
During the import process, the Import Progress dialog will present a wealth of information
relating to the current activity and provides summary justifications for many of the
important decisions it makes. At the end of the import process, the next dialog in the
process will be presented based on the type of download(s) available. In the event that the
import does not end in the expected result, it is possible to click ‘Decide Later’ on whichever
dialog is presented, so that the summary of each stage of the Import Progress dialog can be
reviewed. Clicking ‘Continue’ will allow for the process to resume.
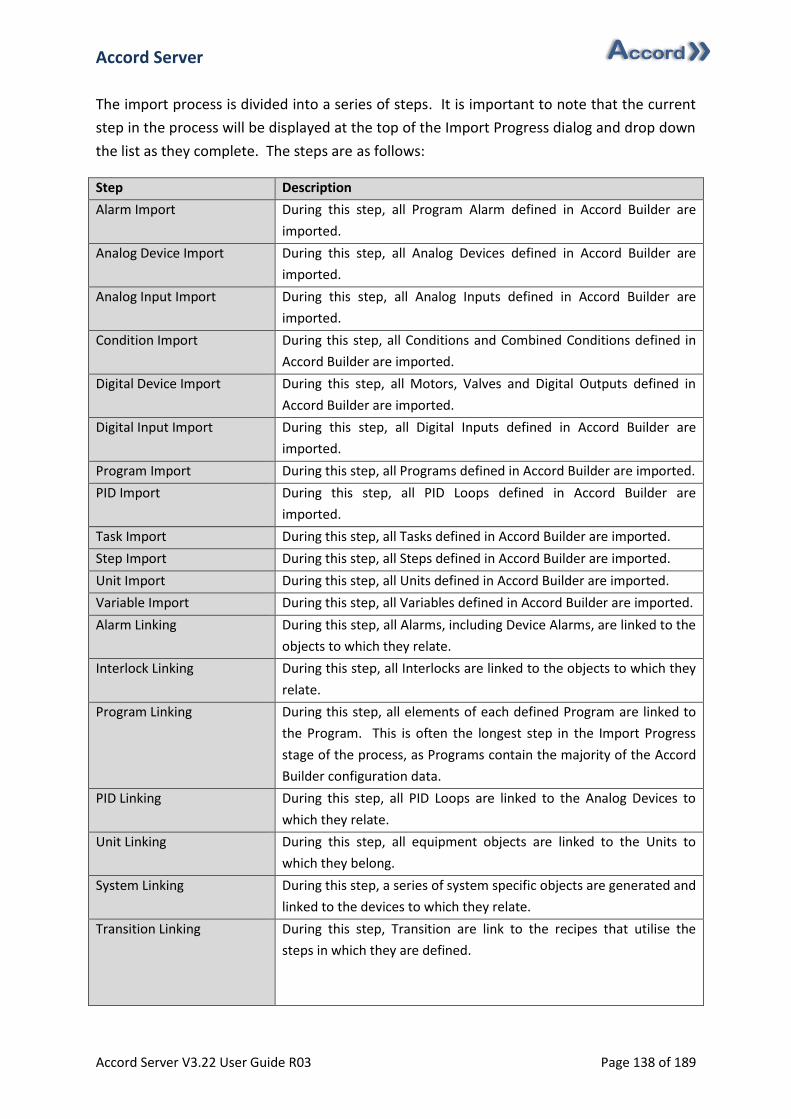
Accord Server
Accord Server V3.22 User Guide R03 Page 138 of 189
The import process is divided into a series of steps. It is important to note that the current
step in the process will be displayed at the top of the Import Progress dialog and drop down
the list as they complete. The steps are as follows:
Step Description
Alarm Import During this step, all Program Alarm defined in Accord Builder are
imported.
Analog Device Import During this step, all Analog Devices defined in Accord Builder are
imported.
Analog Input Import During this step, all Analog Inputs defined in Accord Builder are
imported.
Condition Import During this step, all Conditions and Combined Conditions defined in
Accord Builder are imported.
Digital Device Import During this step, all Motors, Valves and Digital Outputs defined in
Accord Builder are imported.
Digital Input Import During this step, all Digital Inputs defined in Accord Builder are
imported.
Program Import During this step, all Programs defined in Accord Builder are imported.
PID Import During this step, all PID Loops defined in Accord Builder are
imported.
Task Import During this step, all Tasks defined in Accord Builder are imported.
Step Import During this step, all Steps defined in Accord Builder are imported.
Unit Import During this step, all Units defined in Accord Builder are imported.
Variable Import During this step, all Variables defined in Accord Builder are imported.
Alarm Linking During this step, all Alarms, including Device Alarms, are linked to the
objects to which they relate.
Interlock Linking During this step, all Interlocks are linked to the objects to which they
relate.
Program Linking During this step, all elements of each defined Program are linked to
the Program. This is often the longest step in the Import Progress
stage of the process, as Programs contain the majority of the Accord
Builder configuration data.
PID Linking During this step, all PID Loops are linked to the Analog Devices to
which they relate.
Unit Linking During this step, all equipment objects are linked to the Units to
which they belong.
System Linking During this step, a series of system specific objects are generated and
linked to the devices to which they relate.
Transition Linking During this step, Transition are link to the recipes that utilise the
steps in which they are defined.
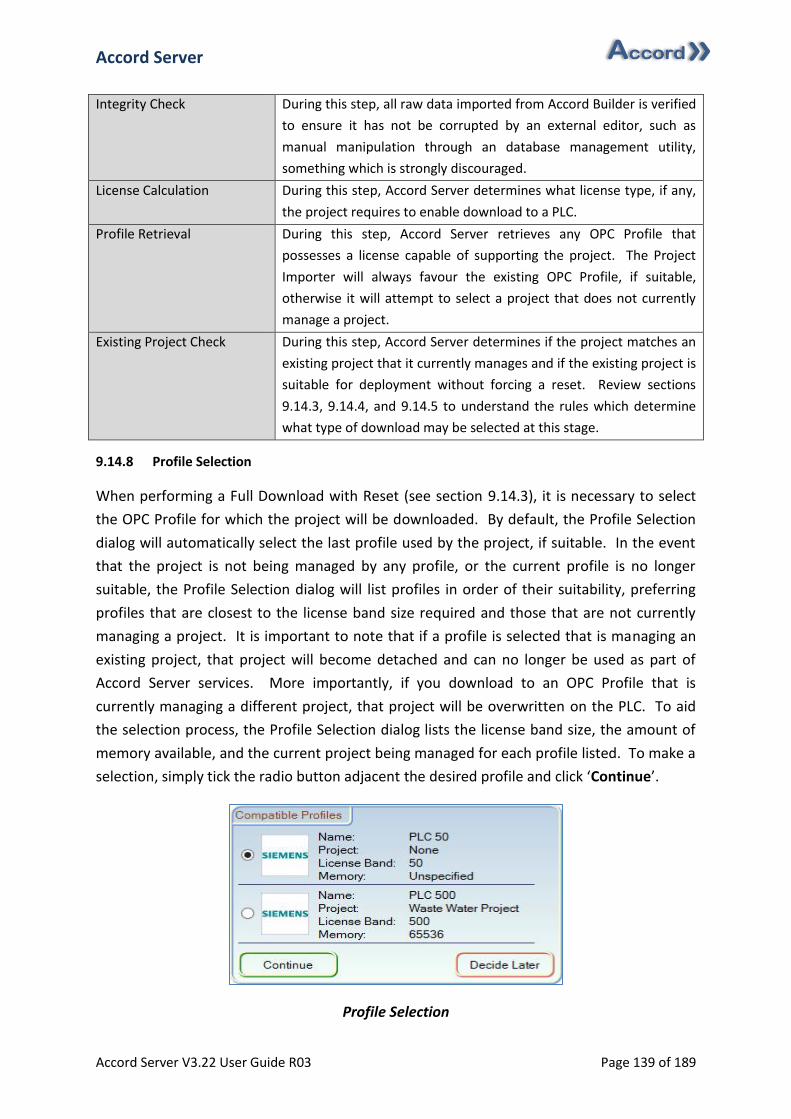
Accord Server
Accord Server V3.22 User Guide R03 Page 139 of 189
Integrity Check During this step, all raw data imported from Accord Builder is verified
to ensure it has not be corrupted by an external editor, such as
manual manipulation through an database management utility,
something which is strongly discouraged.
License Calculation During this step, Accord Server determines what license type, if any,
the project requires to enable download to a PLC.
Profile Retrieval During this step, Accord Server retrieves any OPC Profile that
possesses a license capable of supporting the project. The Project
Importer will always favour the existing OPC Profile, if suitable,
otherwise it will attempt to select a project that does not currently
manage a project.
Existing Project Check During this step, Accord Server determines if the project matches an
existing project that it currently manages and if the existing project is
suitable for deployment without forcing a reset. Review sections
9.14.3, 9.14.4, and 9.14.5 to understand the rules which determine
what type of download may be selected at this stage.
9.14.8 Profile Selection
When performing a Full Download with Reset (see section 9.14.3), it is necessary to select
the OPC Profile for which the project will be downloaded. By default, the Profile Selection
dialog will automatically select the last profile used by the project, if suitable. In the event
that the project is not being managed by any profile, or the current profile is no longer
suitable, the Profile Selection dialog will list profiles in order of their suitability, preferring
profiles that are closest to the license band size required and those that are not currently
managing a project. It is important to note that if a profile is selected that is managing an
existing project, that project will become detached and can no longer be used as part of
Accord Server services. More importantly, if you download to an OPC Profile that is
currently managing a different project, that project will be overwritten on the PLC. To aid
the selection process, the Profile Selection dialog lists the license band size, the amount of
memory available, and the current project being managed for each profile listed. To make a
selection, simply tick the radio button adjacent the desired profile and click ‘Continue’.
Profile Selection
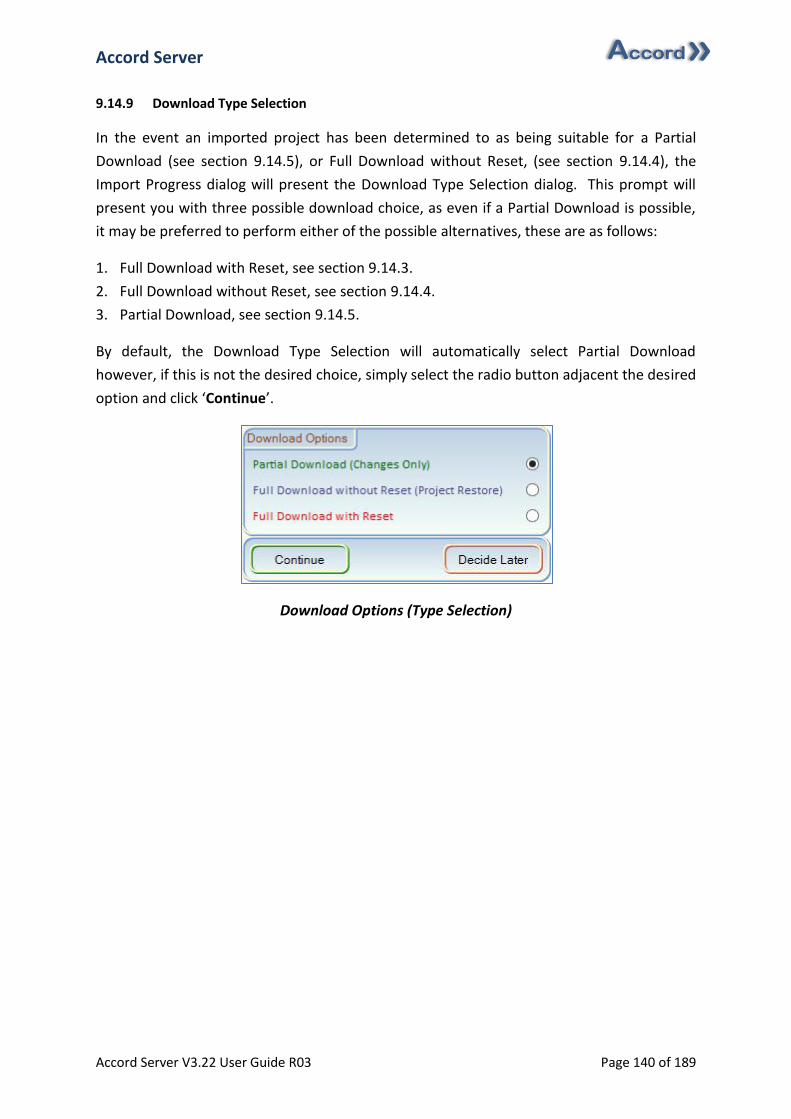
Accord Server
Accord Server V3.22 User Guide R03 Page 140 of 189
9.14.9 Download Type Selection
In the event an imported project has been determined to as being suitable for a Partial
Download (see section 9.14.5), or Full Download without Reset, (see section 9.14.4), the
Import Progress dialog will present the Download Type Selection dialog. This prompt will
present you with three possible download choice, as even if a Partial Download is possible,
it may be preferred to perform either of the possible alternatives, these are as follows:
1. Full Download with Reset, see section 9.14.3.
2. Full Download without Reset, see section 9.14.4.
3. Partial Download, see section 9.14.5.
By default, the Download Type Selection will automatically select Partial Download
however, if this is not the desired choice, simply select the radio button adjacent the desired
option and click ‘Continue’.
Download Options (Type Selection)
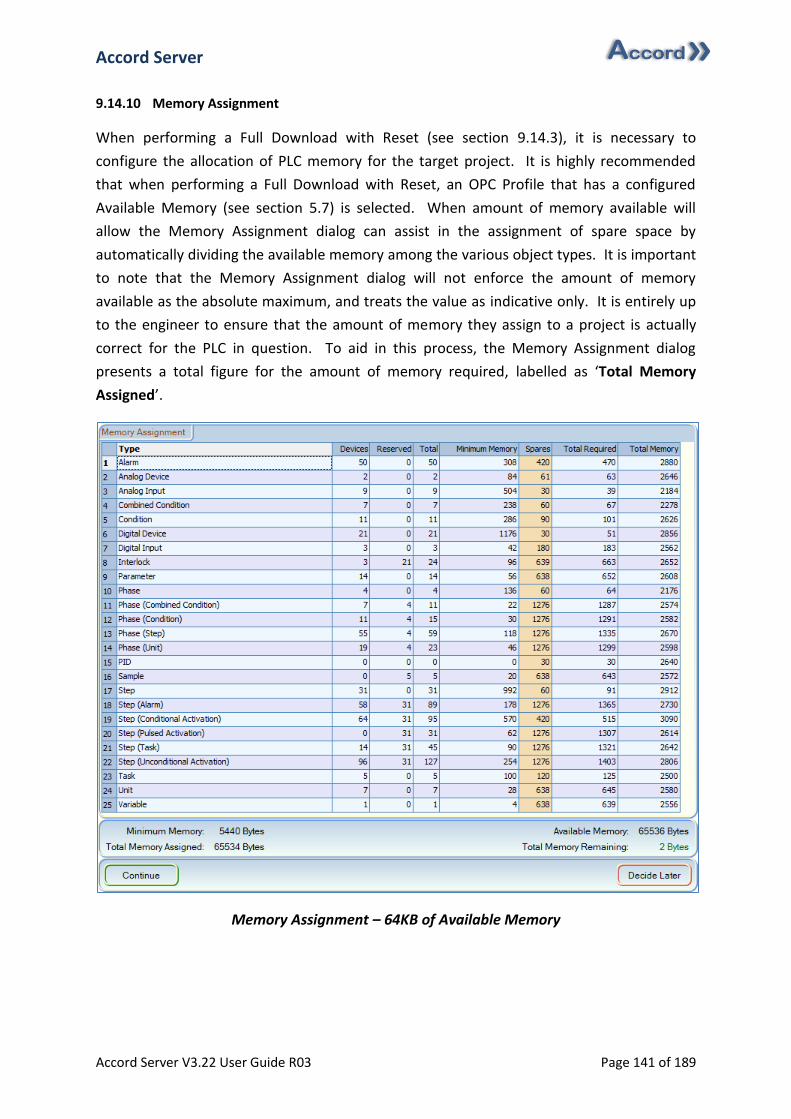
Accord Server
Accord Server V3.22 User Guide R03 Page 141 of 189
9.14.10 Memory Assignment
When performing a Full Download with Reset (see section 9.14.3), it is necessary to
configure the allocation of PLC memory for the target project. It is highly recommended
that when performing a Full Download with Reset, an OPC Profile that has a configured
Available Memory (see section 5.7) is selected. When amount of memory available will
allow the Memory Assignment dialog can assist in the assignment of spare space by
automatically dividing the available memory among the various object types. It is important
to note that the Memory Assignment dialog will not enforce the amount of memory
available as the absolute maximum, and treats the value as indicative only. It is entirely up
to the engineer to ensure that the amount of memory they assign to a project is actually
correct for the PLC in question. To aid in this process, the Memory Assignment dialog
presents a total figure for the amount of memory required, labelled as ‘Total Memory
Assigned’.
Memory Assignment – 64KB of Available Memory
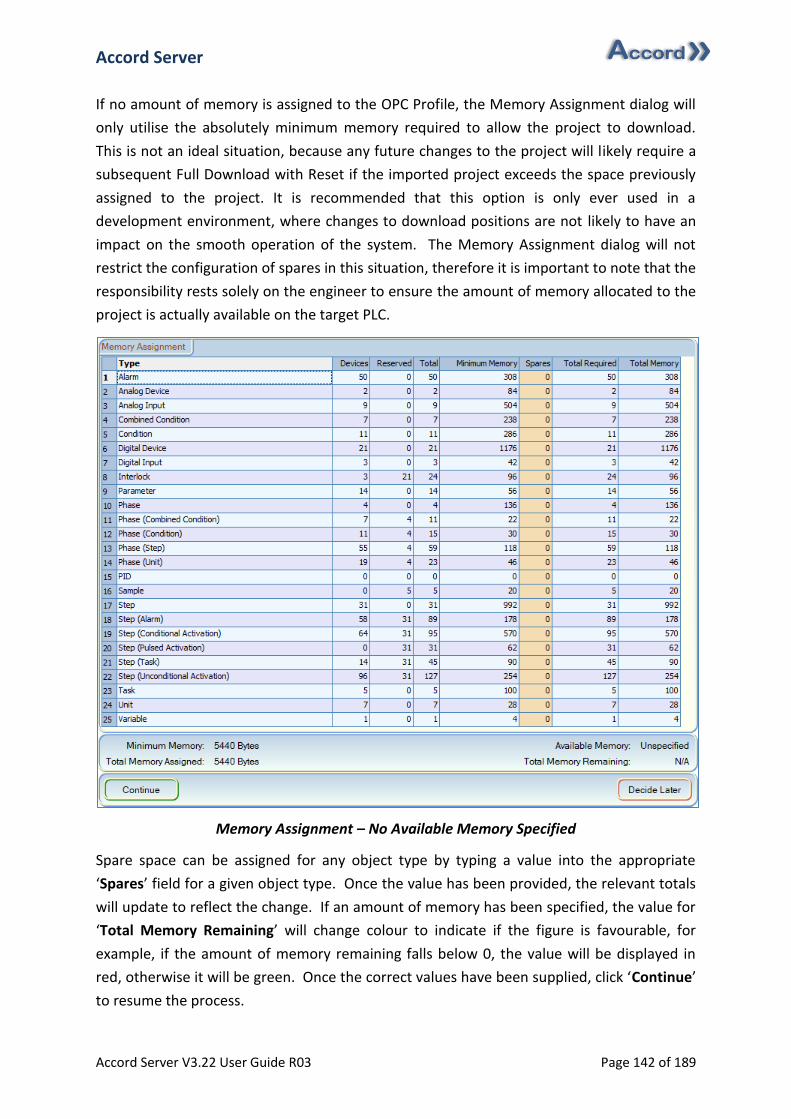
Accord Server
Accord Server V3.22 User Guide R03 Page 142 of 189
If no amount of memory is assigned to the OPC Profile, the Memory Assignment dialog will
only utilise the absolutely minimum memory required to allow the project to download.
This is not an ideal situation, because any future changes to the project will likely require a
subsequent Full Download with Reset if the imported project exceeds the space previously
assigned to the project. It is recommended that this option is only ever used in a
development environment, where changes to download positions are not likely to have an
impact on the smooth operation of the system. The Memory Assignment dialog will not
restrict the configuration of spares in this situation, therefore it is important to note that the
responsibility rests solely on the engineer to ensure the amount of memory allocated to the
project is actually available on the target PLC.
Memory Assignment – No Available Memory Specified
Spare space can be assigned for any object type by typing a value into the appropriate
‘Spares’ field for a given object type. Once the value has been provided, the relevant totals
will update to reflect the change. If an amount of memory has been specified, the value for
‘Total Memory Remaining’ will change colour to indicate if the figure is favourable, for
example, if the amount of memory remaining falls below 0, the value will be displayed in
red, otherwise it will be green. Once the correct values have been supplied, click ‘Continue’
to resume the process.
Accord Server
Accord Server V3.22 User Guide R03 Page 143 of 189
9.14.10.1 Assigning Spares
To assign an amount of spares for a specific object, simply do the following:
1. Select the ‘Spares’ field for the desired object type.
2. Type a positive numeric value.
3. Press tab, or simply click away from the field.
4. Observe the effect of the change on the ‘Total Memory Assigned’ and the ‘Total
Memory Remaining’.
9.14.10.2 Automatically Assigning Spares to Pending Objects
Objects that current have a zero value are considered pending for configuration. If an
amount of memory has been specified, showing in the ‘Memory Available’ area, the Auto
Assignment feature can be used to distribute the remaining memory among items currently
possessing a zero value. This is particularly useful, as it means you can manually assign
preferred values to priority items, and then distribute the remaining memory easily among
the lower priority objects. To use this feature, simply do the following:
1. Right-click on the ‘Memory Assignment’ grid.
2. Select ‘Auto-Assign Remaining Memory’.
3. Observe the values assigned to ensure they meet potential future requirements.
9.14.10.3 Resetting Assigned Spares
Whenever the available memory has been specified, the Memory Assignment dialog will
automatically distribute the spare space upon initial opening of the dialog. The amount of
memory provided to a number of items may not be suitable, or you may simply wish to
manually assign all items. To assist in this process, a feature is available to reset all values to
zero. To use this feature, simply do the following:
1. Right-click on the ‘Memory Assignment’ grid.
2. Select ‘Reset All’.
9.14.11 Priming Progress
The Priming Progress stage is involved in all possible downloads and involves a series of
steps that prepare the project for download to the target PLC. This essentially involves the
assignment of download positions, the propagation of addresses to cross referenced
objects, the comparison of the imported project against the existing project and an analysis
of the changes on both the PLC and Accord Server, where appropriate. Depending on the
download type, some steps of this process may be skipped entirely. During the priming
process, the Priming Progress dialog will present a wealth of information relating to the
current activity and provides summary justifications for many of the important decisions it
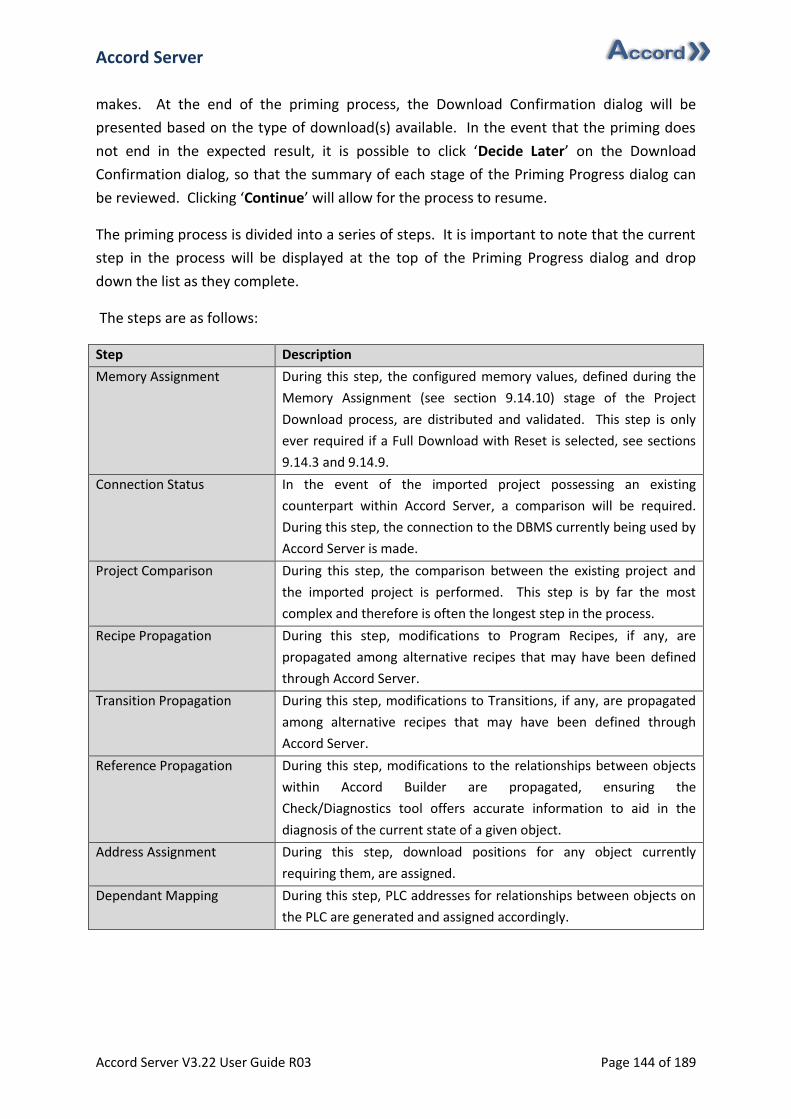
Accord Server
Accord Server V3.22 User Guide R03 Page 144 of 189
makes. At the end of the priming process, the Download Confirmation dialog will be
presented based on the type of download(s) available. In the event that the priming does
not end in the expected result, it is possible to click ‘Decide Later’ on the Download
Confirmation dialog, so that the summary of each stage of the Priming Progress dialog can
be reviewed. Clicking ‘Continue’ will allow for the process to resume.
The priming process is divided into a series of steps. It is important to note that the current
step in the process will be displayed at the top of the Priming Progress dialog and drop
down the list as they complete.
The steps are as follows:
Step Description
Memory Assignment During this step, the configured memory values, defined during the
Memory Assignment (see section 9.14.10) stage of the Project
Download process, are distributed and validated. This step is only
ever required if a Full Download with Reset is selected, see sections
9.14.3 and 9.14.9.
Connection Status In the event of the imported project possessing an existing
counterpart within Accord Server, a comparison will be required.
During this step, the connection to the DBMS currently being used by
Accord Server is made.
Project Comparison During this step, the comparison between the existing project and
the imported project is performed. This step is by far the most
complex and therefore is often the longest step in the process.
Recipe Propagation During this step, modifications to Program Recipes, if any, are
propagated among alternative recipes that may have been defined
through Accord Server.
Transition Propagation During this step, modifications to Transitions, if any, are propagated
among alternative recipes that may have been defined through
Accord Server.
Reference Propagation During this step, modifications to the relationships between objects
within Accord Builder are propagated, ensuring the
Check/Diagnostics tool offers accurate information to aid in the
diagnosis of the current state of a given object.
Address Assignment During this step, download positions for any object currently
requiring them, are assigned.
Dependant Mapping During this step, PLC addresses for relationships between objects on
the PLC are generated and assigned accordingly.

Accord Server
Accord Server V3.22 User Guide R03 Page 145 of 189
PLC Impact Analysis During this step, an analysis of the potential impact of the changes
being planned for download is performed. The impact may vary,
depending on the download type or the specific changes. These may
involve a temporary suspension to the processing of affected objects,
or a complete reset of the PLC, wiping all existing data on the PLC.
Service Impact Analysis During this step, an analysis of the potential impact of the changes
being planned for commit to the Accord Server database is
performed. In the event the changes involve the addition or deletion
of objects covered by either the ActiveX or Advanced
Communications modules, a soft reset may be required. This reset is
automated and may result in a temporary disruption to any Scada UI
currently connected using the affected modules.
9.14.12 Download Confirmation
The Download Confirmation dialog presents wealth of information relating to the planned
changes that will be made once the ‘Download’ button is clicked. This is the last step along
the Project Download process at which the process can be cancelled without any
modifications to either the Accord Server database or the PLC therefore, it is strongly
recommended that you review the information presented by the Download Confirmation
dialog prior to initiating the download. The information presented by the Download
Confirmation dialog is divided into two sections, Download Actions and Project Summary.
Download Actions displays summary information relating to the overall changes that will
occur once the download is initiated, these are as follows:
Download Action Description
Project The name of the project being downloaded.
Profile The name of the profile being used to manage the project, hosting
the OPC settings and license for the target PLC.
Displaced Project The name of the project currently being managed by the target
profile (if any). This project will be deleted from the target PLC upon
download and detached from the OPC Profile in favour of the newly
downloaded project.
Project License Band The minimum license band required by the project.
Profile License Band The license band offered by the target profile.
Required Memory The minimum amount of memory, in bytes, required to download
the project.
Available Memory The amount of memory available for download by Accord Server on
the target PLC, if configured.
Download Type The type of download being performed, these are:
1. Full Download with Reset, see section 9.14.3.
2. Full Download without Reset, see section 9.14.4.
3. Partial Download, see section 9.14.5.

Accord Server
Accord Server V3.22 User Guide R03 Page 146 of 189
Download Necessary An indication if Accord Server believes if the download is actually
necessary. This is usually ‘Yes’ however, if no changes are detected
between the newly imported project and any existing project current
managed within Accord Server, this will display ‘No’ instead.
Full PLC Reset Required An indication of whether or not the Project Downloader will trigger a
full PLC reset upon initiation of the download process.
Processing Hold Required An indication of whether or not the Project Downloader will trigger a
temporary suspension to the processing of affected objects upon
initiation of the download process.
Service Reload Required An indication of whether or not the Project Downloader will trigger a
soft reset of affected Accord Server modules once the download
completes.
Project Summary displays totals relating to a series of important objects that exist as part of
the project, including the overall number of objects and, in the case of an existing project,
the number of which have been modified in the imported project. In addition, the Project
Summary provides detailed reports for each object type, listing specific information relating
to each of the objects that form part of the summary figures. The objects covered by the
Project Summary are as follows:
Download Action Description
Devices Devices refers to a range of entities that usually reside on the PLC,
such as equipment devices, Programs and units. See section
9.14.12.2 for more information.
List Space List Space refers to objects that manage the segments of spare space
that may exist between the various object lists that are used by
project elements such as Programs or Units. See section 9.14.12.3
for more information.
Data (Download) Data (Download) refers to the raw information that is downloaded
directly to the PLC for the range of Devices contained with the
project. See section 9.14.12.4 for more information.
Data (Config) Data (Config) refers to the setup information that is stored within the
Accord Server database for the range of Devices contained with the
project. See section 9.14.12.5 for more information.
Recipes Recipes refers to the recipes defined as part of a Program, containing
custom Steps and Parameters definitions for a given process. See
section 9.14.12.6 for more information.
Transitions Transitions refers to specific step behaviours, defined as part of a
Program, involving a change of step from the current step to another
that does not usually form part planned step order. In Accord
Builder, this is often referred to as the Alternative Step On. See
section 9.14.12.7 for more information.
References References refer to the relationships between certain devices within
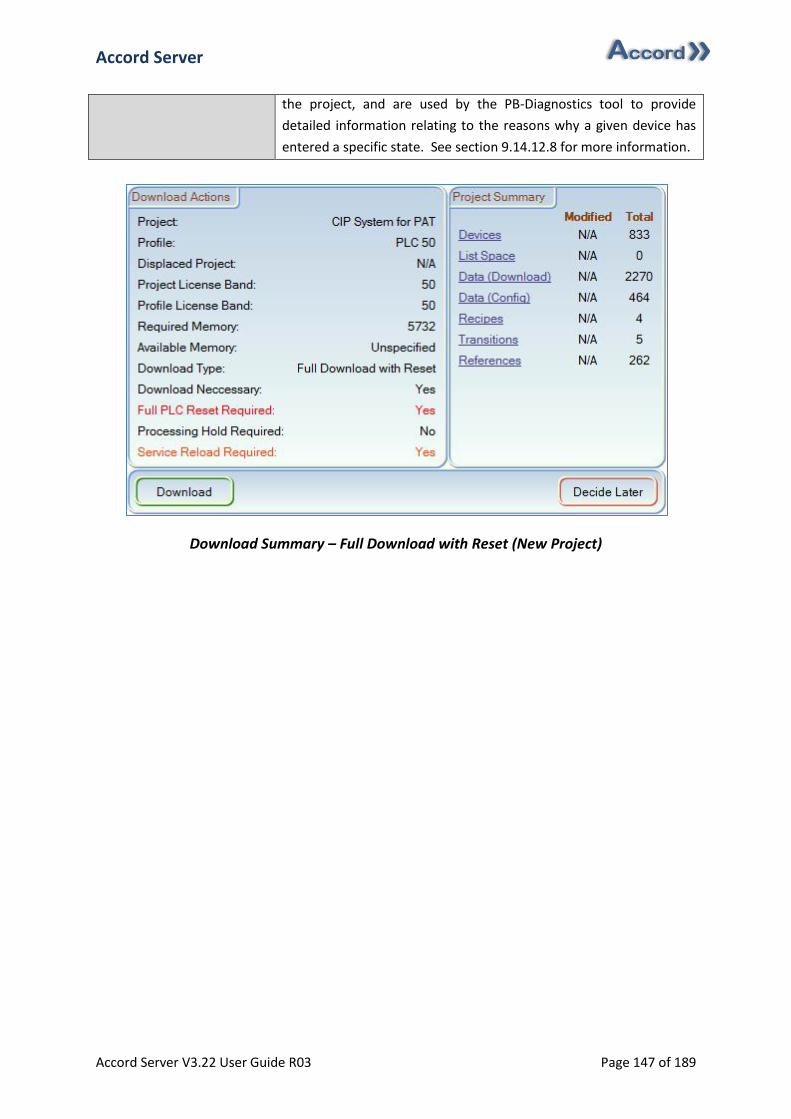
Accord Server
Accord Server V3.22 User Guide R03 Page 147 of 189
the project, and are used by the PB-Diagnostics tool to provide
detailed information relating to the reasons why a given device has
entered a specific state. See section 9.14.12.8 for more information.
Download Summary – Full Download with Reset (New Project)

Accord Server
Accord Server V3.22 User Guide R03 Page 148 of 189
9.14.12.1 No Changes Detected
When selecting a Partial Download (see section 9.14.5), it is entirely possible that the
imported project may contain no changes when compared against the existing project. If
this happens, the download is deemed to be unnecessary, as the PLC is already up-to-date
therefore, the Download Summary dialog will prompt, asking if a Full Download without
Reset is preferred instead.
No Changes Detected
If you select ‘Yes’, the Download Summary will update to reflect this change, otherwise the
Project Download process will terminate without any changes to either Accord Server or the
PLC.
Download Summary – No Changes, Full Download without Reset
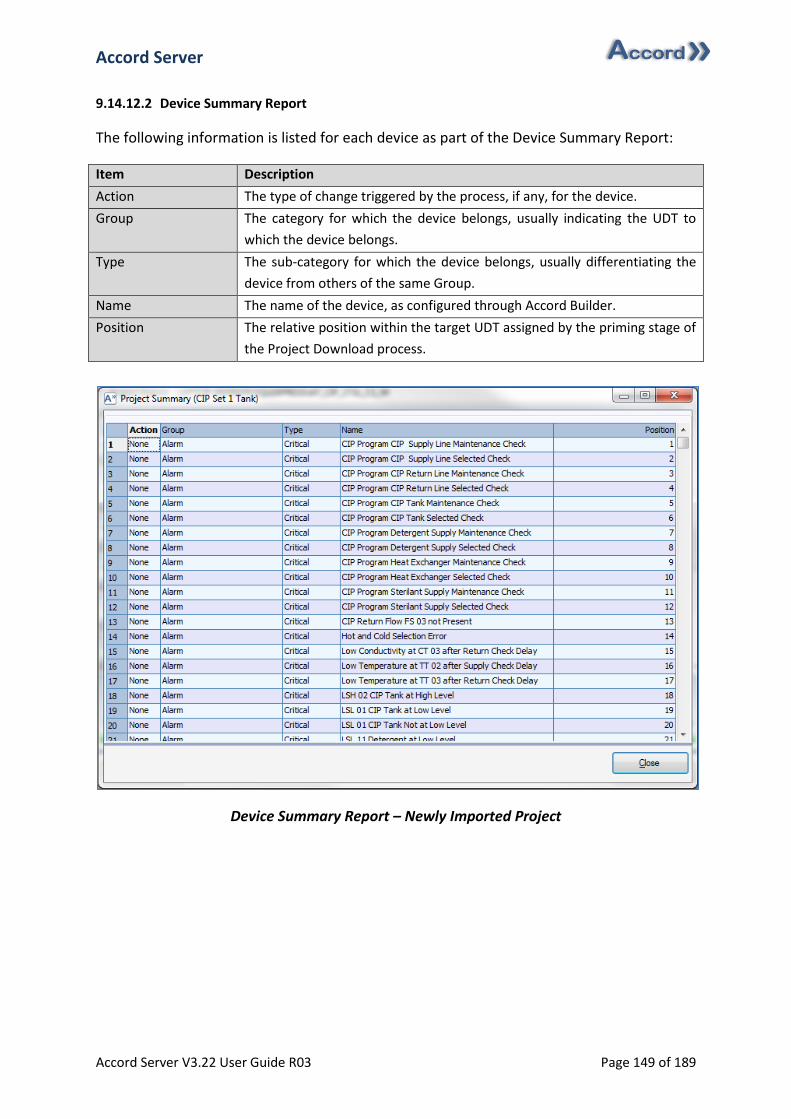
Accord Server
Accord Server V3.22 User Guide R03 Page 149 of 189
9.14.12.2 Device Summary Report
The following information is listed for each device as part of the Device Summary Report:
Item Description
Action The type of change triggered by the process, if any, for the device.
Group The category for which the device belongs, usually indicating the UDT to
which the device belongs.
Type The sub-category for which the device belongs, usually differentiating the
device from others of the same Group.
Name The name of the device, as configured through Accord Builder.
Position The relative position within the target UDT assigned by the priming stage of
the Project Download process.
Device Summary Report – Newly Imported Project
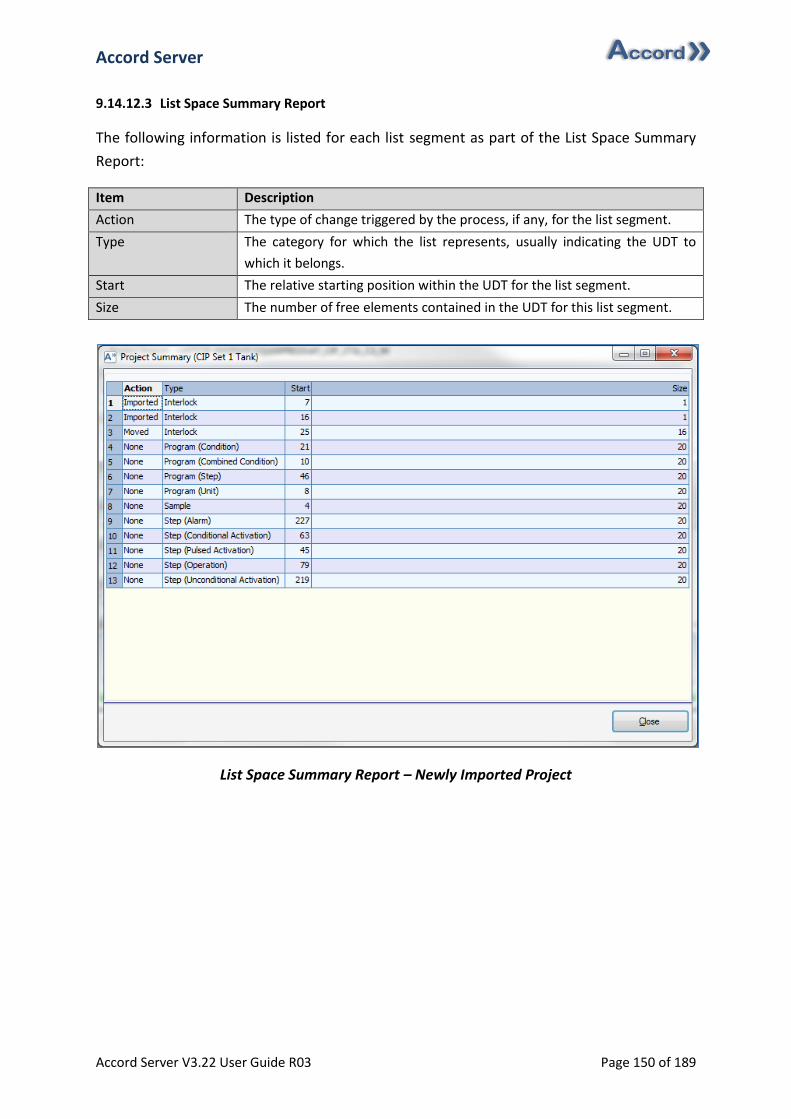
Accord Server
Accord Server V3.22 User Guide R03 Page 150 of 189
9.14.12.3 List Space Summary Report
The following information is listed for each list segment as part of the List Space Summary
Report:
Item Description
Action The type of change triggered by the process, if any, for the list segment.
Type The category for which the list represents, usually indicating the UDT to
which it belongs.
Start The relative starting position within the UDT for the list segment.
Size The number of free elements contained in the UDT for this list segment.
List Space Summary Report – Newly Imported Project
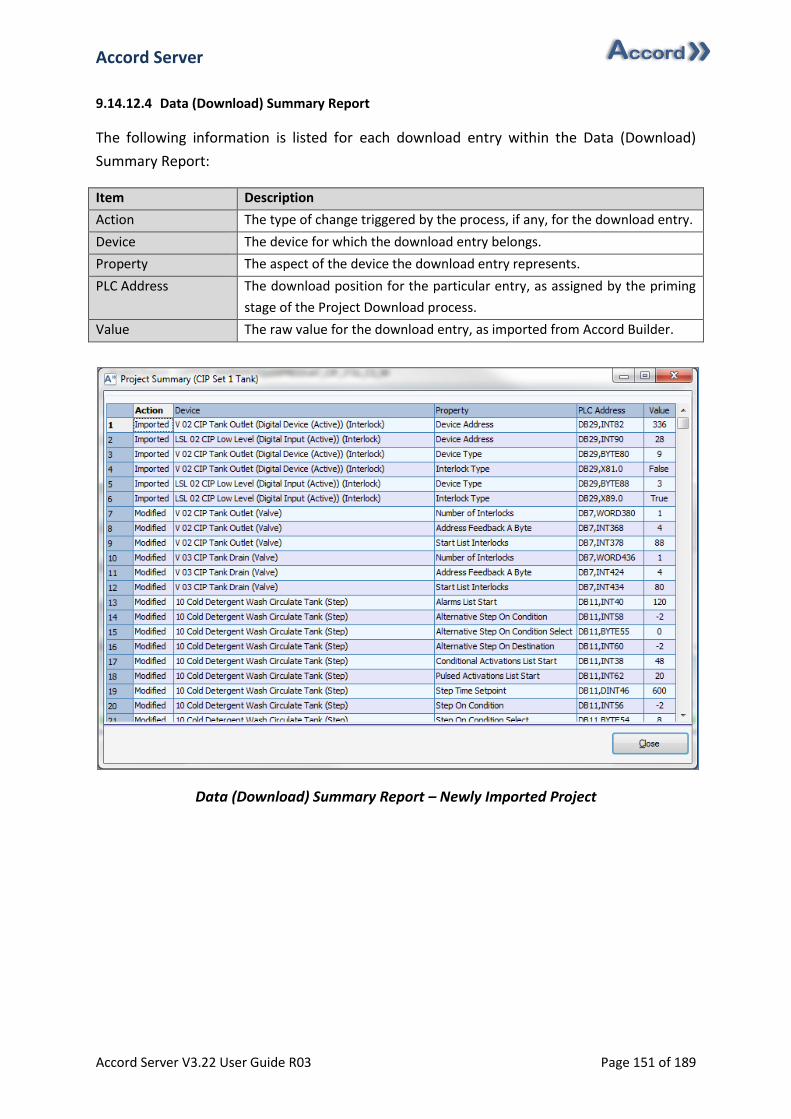
Accord Server
Accord Server V3.22 User Guide R03 Page 151 of 189
9.14.12.4 Data (Download) Summary Report
The following information is listed for each download entry within the Data (Download)
Summary Report:
Item Description
Action The type of change triggered by the process, if any, for the download entry.
Device The device for which the download entry belongs.
Property The aspect of the device the download entry represents.
PLC Address The download position for the particular entry, as assigned by the priming
stage of the Project Download process.
Value The raw value for the download entry, as imported from Accord Builder.
Data (Download) Summary Report – Newly Imported Project
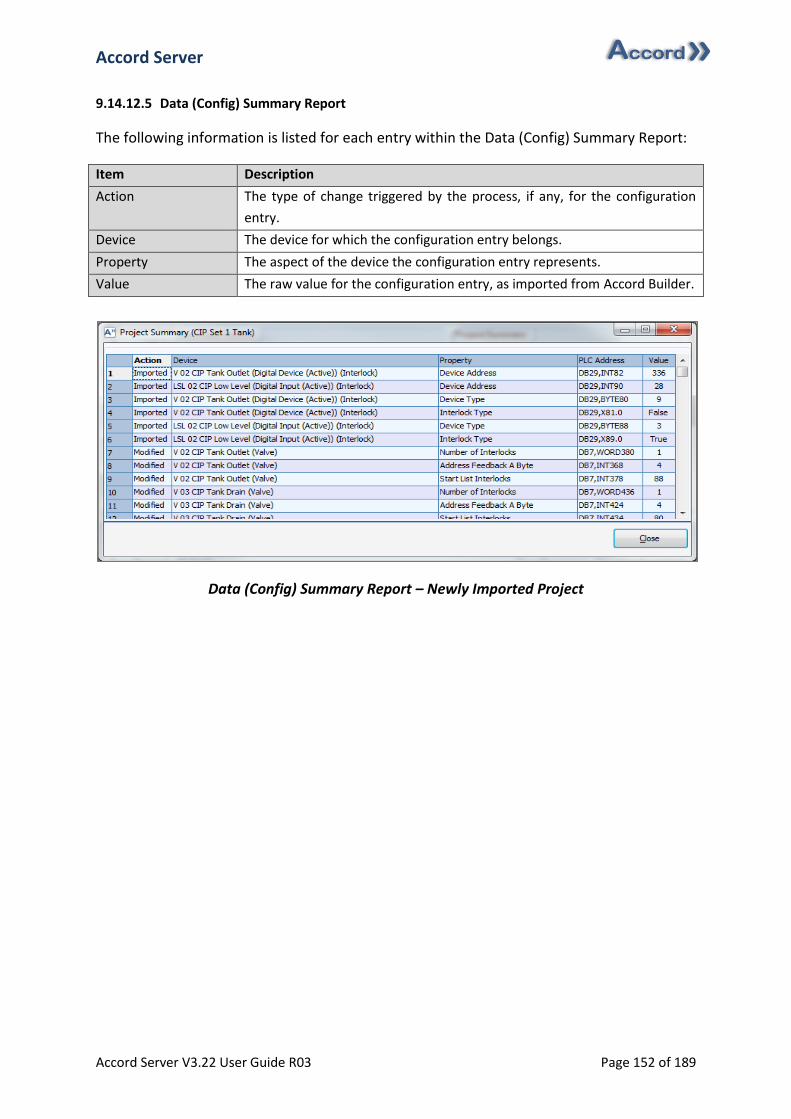
Accord Server
Accord Server V3.22 User Guide R03 Page 152 of 189
9.14.12.5 Data (Config) Summary Report
The following information is listed for each entry within the Data (Config) Summary Report:
Item Description
Action The type of change triggered by the process, if any, for the configuration
entry.
Device The device for which the configuration entry belongs.
Property The aspect of the device the configuration entry represents.
Value The raw value for the configuration entry, as imported from Accord Builder.
Data (Config) Summary Report – Newly Imported Project
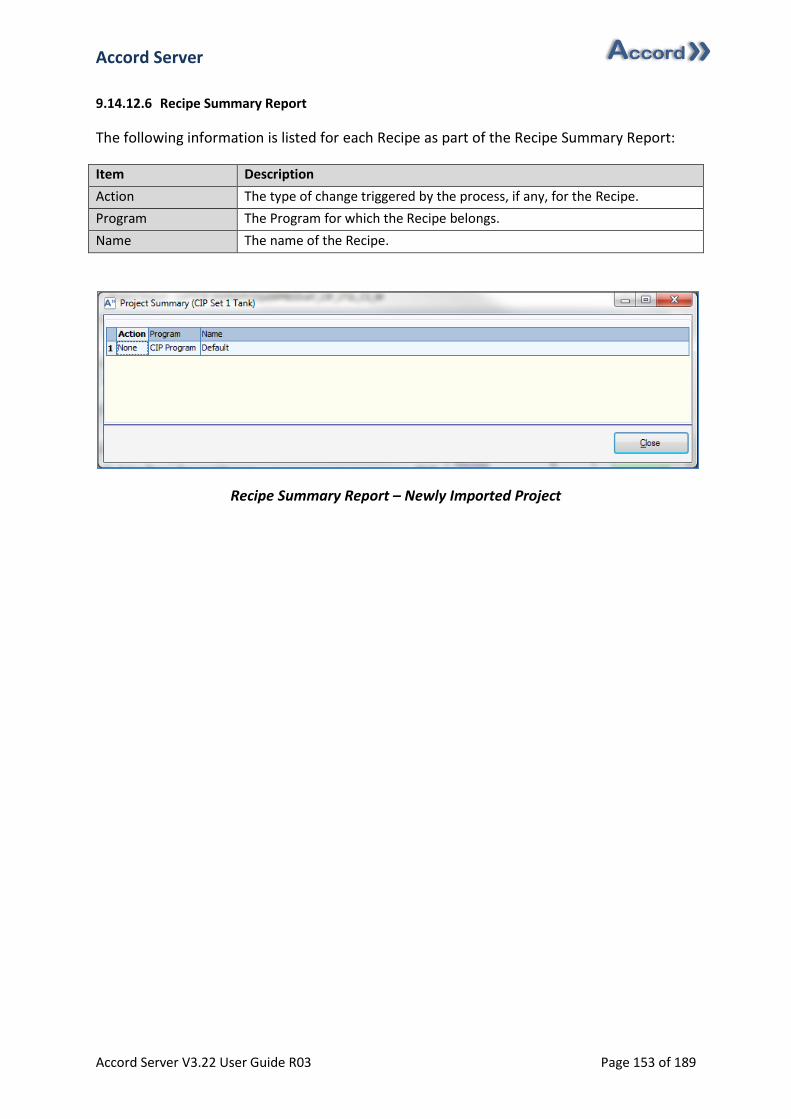
Accord Server
Accord Server V3.22 User Guide R03 Page 153 of 189
9.14.12.6 Recipe Summary Report
The following information is listed for each Recipe as part of the Recipe Summary Report:
Item Description
Action The type of change triggered by the process, if any, for the Recipe.
Program The Program for which the Recipe belongs.
Name The name of the Recipe.
Recipe Summary Report – Newly Imported Project
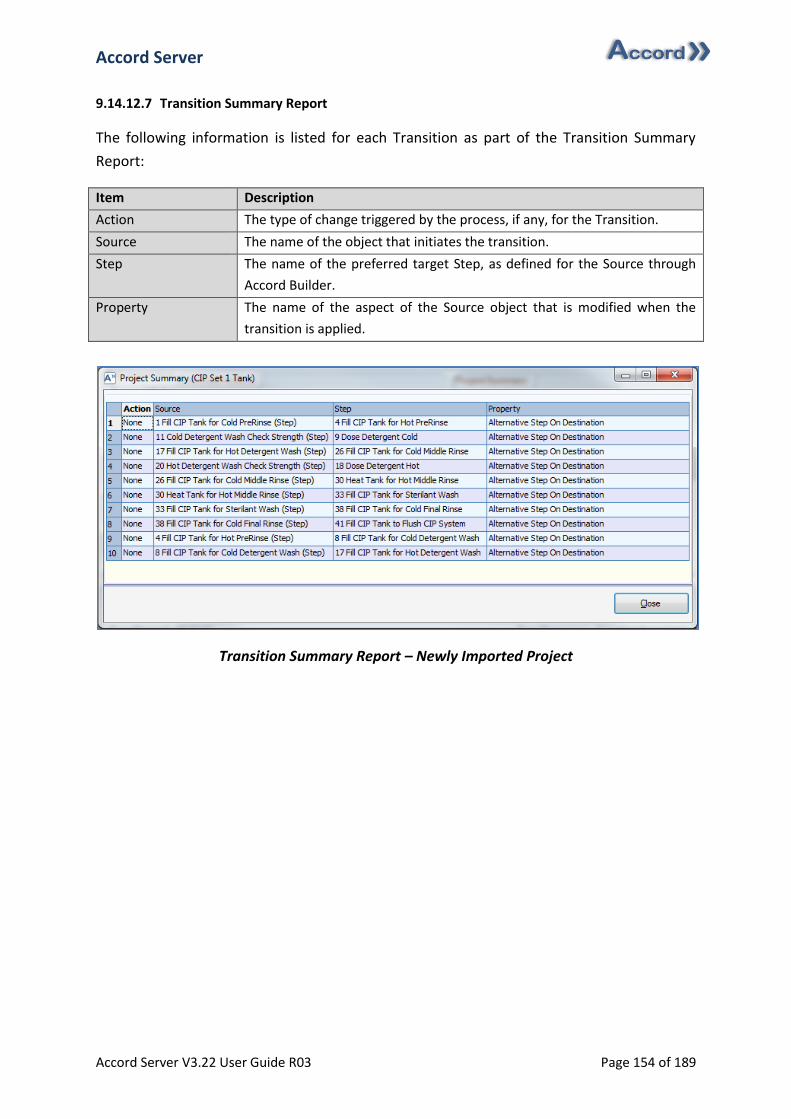
Accord Server
Accord Server V3.22 User Guide R03 Page 154 of 189
9.14.12.7 Transition Summary Report
The following information is listed for each Transition as part of the Transition Summary
Report:
Item Description
Action The type of change triggered by the process, if any, for the Transition.
Source The name of the object that initiates the transition.
Step The name of the preferred target Step, as defined for the Source through
Accord Builder.
Property The name of the aspect of the Source object that is modified when the
transition is applied.
Transition Summary Report – Newly Imported Project
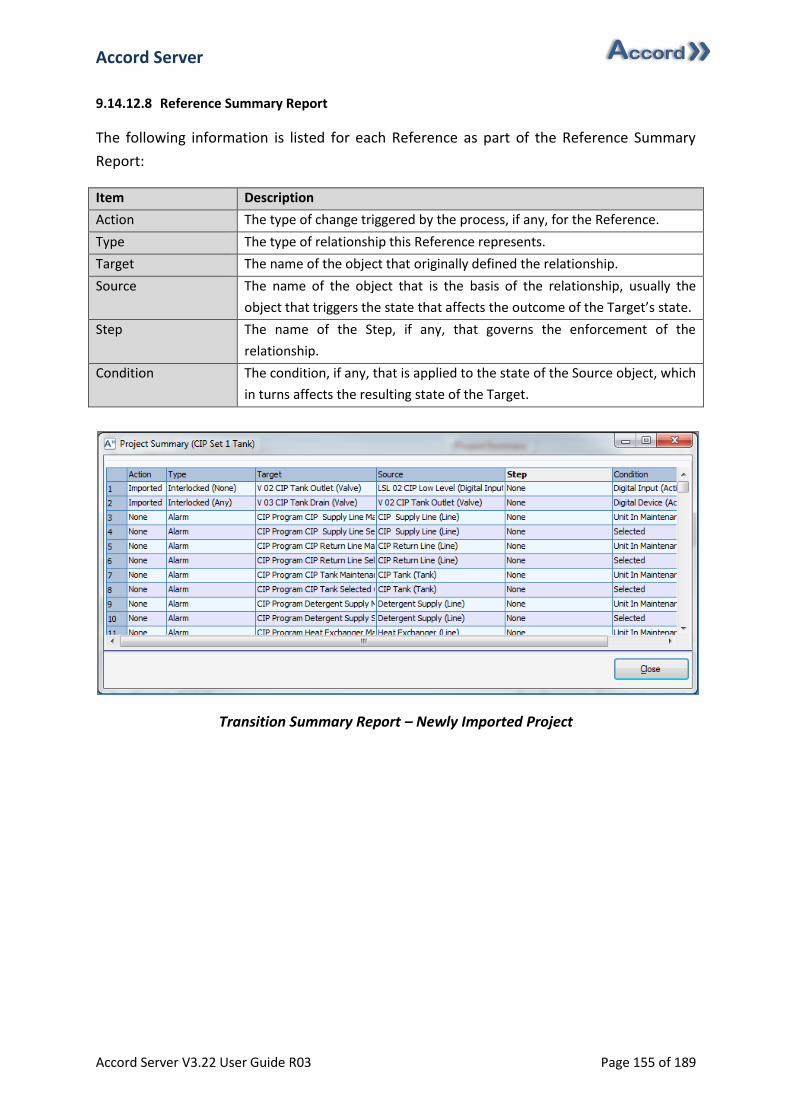
Accord Server
Accord Server V3.22 User Guide R03 Page 155 of 189
9.14.12.8 Reference Summary Report
The following information is listed for each Reference as part of the Reference Summary
Report:
Item Description
Action The type of change triggered by the process, if any, for the Reference.
Type The type of relationship this Reference represents.
Target The name of the object that originally defined the relationship.
Source The name of the object that is the basis of the relationship, usually the
object that triggers the state that affects the outcome of the Target’s state.
Step The name of the Step, if any, that governs the enforcement of the
relationship.
Condition The condition, if any, that is applied to the state of the Source object, which
in turns affects the resulting state of the Target.
Transition Summary Report – Newly Imported Project

Accord Server
Accord Server V3.22 User Guide R03 Page 156 of 189
9.14.13 Download Progress
The Download Progress stage is involved in all possible downloads and contains a series of
steps that perform the necessary modifications to both the target PLC and the Accord Server
database, where applicable. The actions performed throughout the various steps vary
significantly, depending on the type of download selected. It is important to note that once
this stage has been triggered, it is no longer possible to cancel the process, as to do so could
potentially leave the PLC in an unpredictable state. For this reason, it is strongly
recommended that you verify the download actions conform to your expectations at the
Download Confirmation stage of the process, see section 9.14.12.
During the download process, the Download Progress dialog will present a wealth of
information relating to the current activity and provides summary justifications for many of
the important decisions it makes. At the end of the download process, the Download
Summary dialog will be presented. In the event that the download does not end in the
expected result, it is possible to click ‘Decide Later’ on the Download Summary dialog, so
that the summary of each stage of the Download Progress dialog can be reviewed. Clicking
‘Continue’ will allow for the Download Confirmation dialog to be reviewed.
The download process is divided into a series of steps. It is important to note that the
current step in the process will be displayed at the top of the Download Progress dialog and
drop down the list as they complete. The steps are as follows:
Step Description
Atomicity Check During this stage, the planned download is verified against the current state
of Accord Server, verifying that the changes do not conflict with any actions
that may have been performed external to this process. For example, if a
Recipe Download is performed for the same project during any of the
previous stages, without the knowledge of the person attempting the
download, it will result in changes that may conflict with the planned
changes. This type of conflict cannot be allowed, as it means neither person
is truly aware of the effects of their changes, therefore, this stage of the
process ensures the changes being made do not have any negative or
unexpected impact on any other users. Once this stage has been passed, no
other user can perform a download against the project until after the process
completes, verifying the download is performed in a single, atomic,
transaction.
Write Generation During this stage, the planned PLC writes are generated and consolidated to
ensure optimal performance during the download stage of the process.
Download
Preparation
During this stage, a temporary project is generated using the OPC
Communications module, containing references to all devices and properties
that are relevant for the download stage of the process.
Connection Status During this stage, a connection is made to the PLC using the OPC
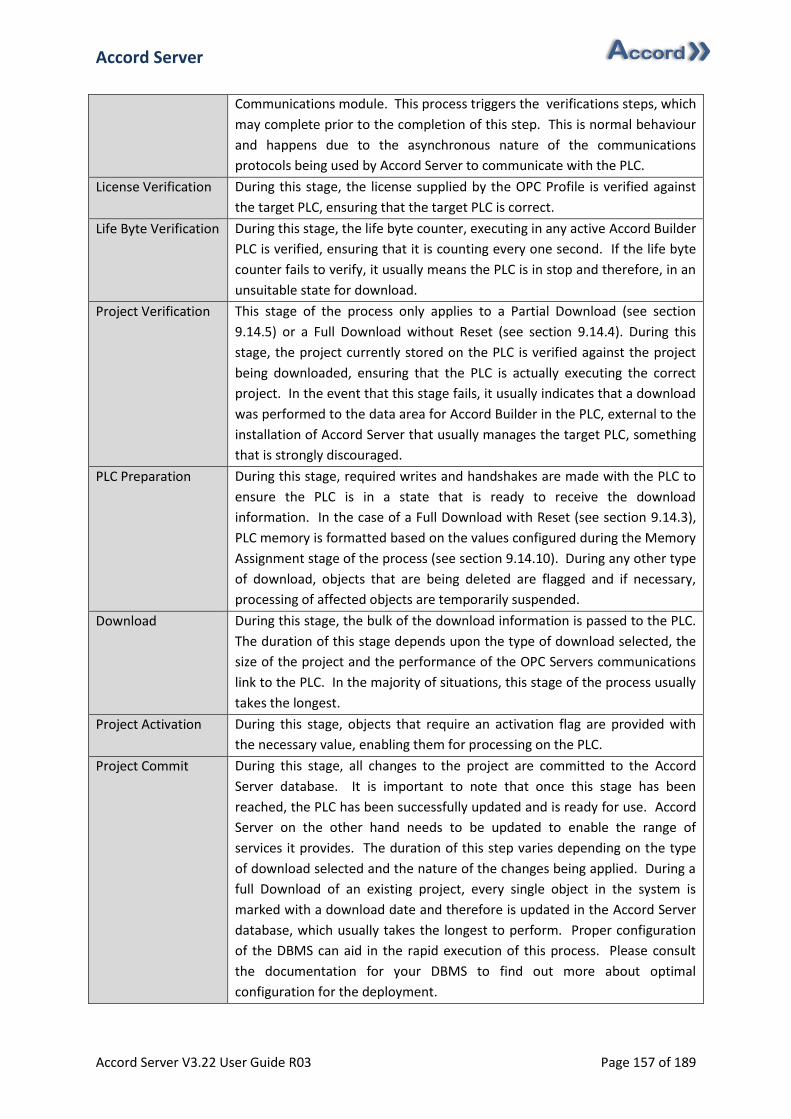
Accord Server
Accord Server V3.22 User Guide R03 Page 157 of 189
Communications module. This process triggers the verifications steps, which
may complete prior to the completion of this step. This is normal behaviour
and happens due to the asynchronous nature of the communications
protocols being used by Accord Server to communicate with the PLC.
License Verification During this stage, the license supplied by the OPC Profile is verified against
the target PLC, ensuring that the target PLC is correct.
Life Byte Verification During this stage, the life byte counter, executing in any active Accord Builder
PLC is verified, ensuring that it is counting every one second. If the life byte
counter fails to verify, it usually means the PLC is in stop and therefore, in an
unsuitable state for download.
Project Verification This stage of the process only applies to a Partial Download (see section
9.14.5) or a Full Download without Reset (see section 9.14.4). During this
stage, the project currently stored on the PLC is verified against the project
being downloaded, ensuring that the PLC is actually executing the correct
project. In the event that this stage fails, it usually indicates that a download
was performed to the data area for Accord Builder in the PLC, external to the
installation of Accord Server that usually manages the target PLC, something
that is strongly discouraged.
PLC Preparation During this stage, required writes and handshakes are made with the PLC to
ensure the PLC is in a state that is ready to receive the download
information. In the case of a Full Download with Reset (see section 9.14.3),
PLC memory is formatted based on the values configured during the Memory
Assignment stage of the process (see section 9.14.10). During any other type
of download, objects that are being deleted are flagged and if necessary,
processing of affected objects are temporarily suspended.
Download During this stage, the bulk of the download information is passed to the PLC.
The duration of this stage depends upon the type of download selected, the
size of the project and the performance of the OPC Servers communications
link to the PLC. In the majority of situations, this stage of the process usually
takes the longest.
Project Activation During this stage, objects that require an activation flag are provided with
the necessary value, enabling them for processing on the PLC.
Project Commit During this stage, all changes to the project are committed to the Accord
Server database. It is important to note that once this stage has been
reached, the PLC has been successfully updated and is ready for use. Accord
Server on the other hand needs to be updated to enable the range of
services it provides. The duration of this step varies depending on the type
of download selected and the nature of the changes being applied. During a
full Download of an existing project, every single object in the system is
marked with a download date and therefore is updated in the Accord Server
database, which usually takes the longest to perform. Proper configuration
of the DBMS can aid in the rapid execution of this process. Please consult
the documentation for your DBMS to find out more about optimal
configuration for the deployment.
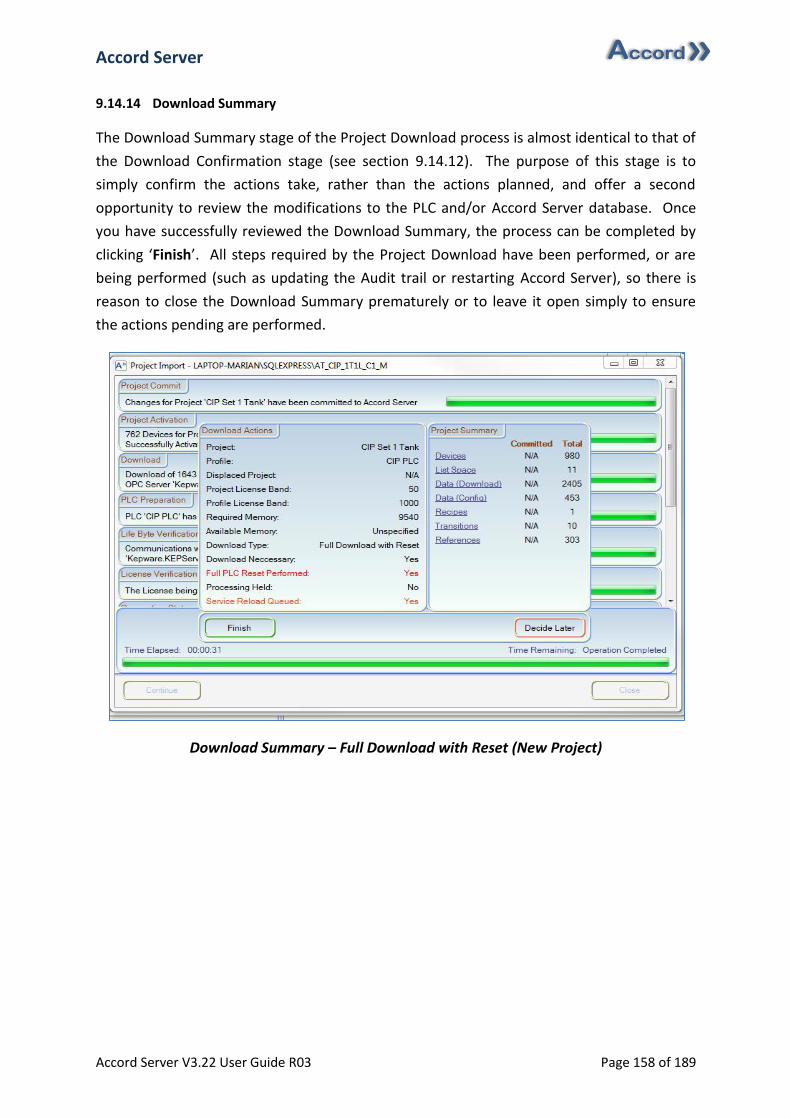
Accord Server
Accord Server V3.22 User Guide R03 Page 158 of 189
9.14.14 Download Summary
The Download Summary stage of the Project Download process is almost identical to that of
the Download Confirmation stage (see section 9.14.12). The purpose of this stage is to
simply confirm the actions take, rather than the actions planned, and offer a second
opportunity to review the modifications to the PLC and/or Accord Server database. Once
you have successfully reviewed the Download Summary, the process can be completed by
clicking ‘Finish’. All steps required by the Project Download have been performed, or are
being performed (such as updating the Audit trail or restarting Accord Server), so there is
reason to close the Download Summary prematurely or to leave it open simply to ensure
the actions pending are performed.
Download Summary – Full Download with Reset (New Project)
Accord Server
Accord Server V3.22 User Guide R03 Page 159 of 189
9.15 Project Synchroniser
The Project Synchroniser allows users to synchronise an existing Accord Server project with
the last Accord Builder project that was used to download the project. This is useful in
order to capture all current changeable settings before performing modifications to the
project in Accord Builder, or perhaps before performing a subsequent download through
Accord Server. Once synchronised, any differences between the three possible sources of
download information will be consolidated based on the user’s selections. A project can
only be synchronised while it is being managed by a valid OPC Profile, see section 5. The
following is a list of synchronisable properties for each device group:
Group Properties
Analog Device Min Range
Max Range
Analog Input Min Range
Max Range
Alarm High High Setpoint
Alarm High Setpoint
Alarm Low Setpoint
Alarm Low Low Setpoint
Time Setpoint
Hysteresis Setpoint
Digital Device Alarm Setpoint
Lift Alarm Setpoint
Delay On Setpoint
Delay Off Setpoint
Pulse Cycle Time
Pulse Cycle Setpoint
Digital Input Delay On Setpoint
Delay Off Setpoint
Parameter Current Value
PID P (Gain Setpoint)
I (Integral Setpoint)
D (Derivative Setpoint)
Store Integral when Steady State
Steady State Hysteresis
Step Time Setpoint
After project synchronisation has been performed, any modifications to the target Accord
Builder configuration will result in that configuration being flagged as inconsistent, requiring
a consistency check to be performed prior to any subsequent download attempt.
Accord Server
Accord Server V3.22 User Guide R03 Page 160 of 189
9.15.1 Accessing the Project Synchroniser
There are three methods of launching the Project Synchroniser. These are as follows:
1. Select the ‘Service Manager’ tab.
2. Click the ‘Project Synchroniser’ shortcut on the right-side panel. See section 9.15.
3. Select the desired project from the ‘Projects’ list.
4. Click ‘Ok’.
Alternatively:
1. Select the ‘Project Manager’ tab.
2. Right click on the desired project.
3. Click ‘Synchronise’.
Note: The synchronise option is unavailable for projects that are not currently
managed by a valid OPC Profile, see section 5.
Alternatively:
1. Select the ‘Tools’ tab.
2. Click ‘Project Synchroniser’.
3. Select the desired project from the ‘Projects’ list.
4. Click ‘Ok’.
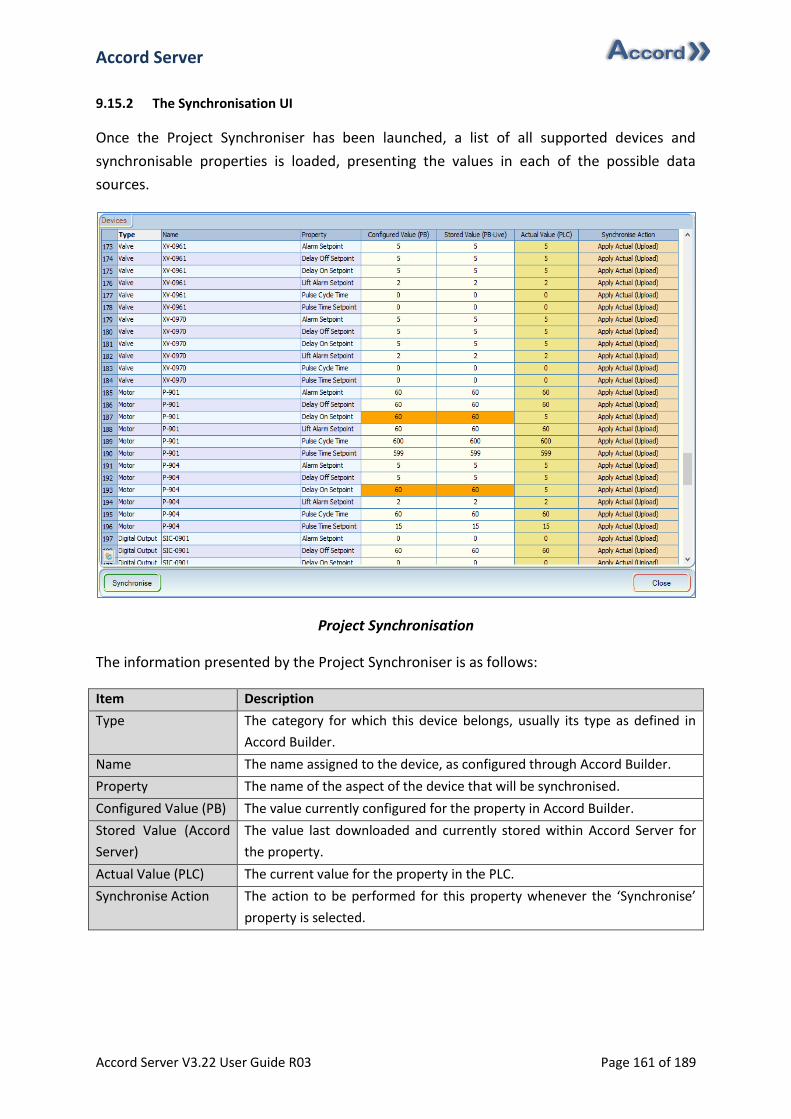
Accord Server
Accord Server V3.22 User Guide R03 Page 161 of 189
9.15.2 The Synchronisation UI
Once the Project Synchroniser has been launched, a list of all supported devices and
synchronisable properties is loaded, presenting the values in each of the possible data
sources.
Project Synchronisation
The information presented by the Project Synchroniser is as follows:
Item Description
Type The category for which this device belongs, usually its type as defined in
Accord Builder.
Name The name assigned to the device, as configured through Accord Builder.
Property The name of the aspect of the device that will be synchronised.
Configured Value (PB) The value currently configured for the property in Accord Builder.
Stored Value (Accord
Server)
The value last downloaded and currently stored within Accord Server for
the property.
Actual Value (PLC) The current value for the property in the PLC.
Synchronise Action The action to be performed for this property whenever the ‘Synchronise’
property is selected.
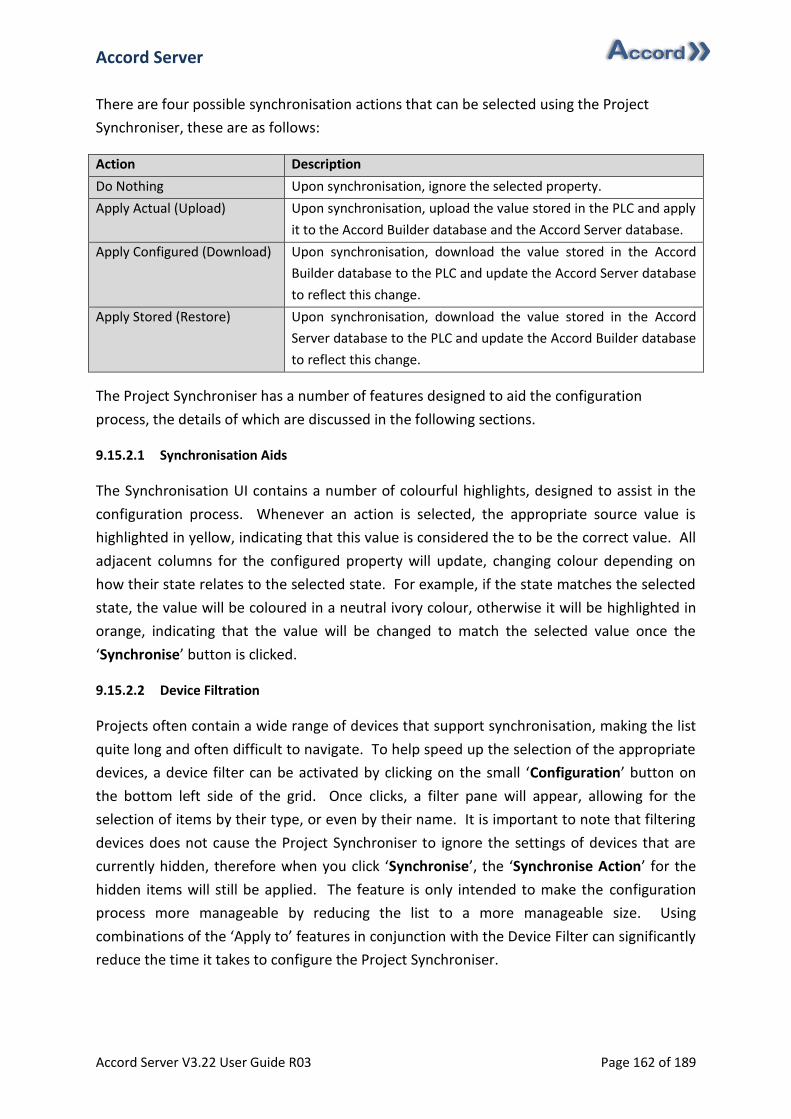
Accord Server
Accord Server V3.22 User Guide R03 Page 162 of 189
There are four possible synchronisation actions that can be selected using the Project
Synchroniser, these are as follows:
Action Description
Do Nothing Upon synchronisation, ignore the selected property.
Apply Actual (Upload) Upon synchronisation, upload the value stored in the PLC and apply
it to the Accord Builder database and the Accord Server database.
Apply Configured (Download) Upon synchronisation, download the value stored in the Accord
Builder database to the PLC and update the Accord Server database
to reflect this change.
Apply Stored (Restore) Upon synchronisation, download the value stored in the Accord
Server database to the PLC and update the Accord Builder database
to reflect this change.
The Project Synchroniser has a number of features designed to aid the configuration
process, the details of which are discussed in the following sections.
9.15.2.1 Synchronisation Aids
The Synchronisation UI contains a number of colourful highlights, designed to assist in the
configuration process. Whenever an action is selected, the appropriate source value is
highlighted in yellow, indicating that this value is considered the to be the correct value. All
adjacent columns for the configured property will update, changing colour depending on
how their state relates to the selected state. For example, if the state matches the selected
state, the value will be coloured in a neutral ivory colour, otherwise it will be highlighted in
orange, indicating that the value will be changed to match the selected value once the
‘Synchronise’ button is clicked.
9.15.2.2 Device Filtration
Projects often contain a wide range of devices that support synchronisation, making the list
quite long and often difficult to navigate. To help speed up the selection of the appropriate
devices, a device filter can be activated by clicking on the small ‘Configuration’ button on
the bottom left side of the grid. Once clicks, a filter pane will appear, allowing for the
selection of items by their type, or even by their name. It is important to note that filtering
devices does not cause the Project Synchroniser to ignore the settings of devices that are
currently hidden, therefore when you click ‘Synchronise’, the ‘Synchronise Action’ for the
hidden items will still be applied. The feature is only intended to make the configuration
process more manageable by reducing the list to a more manageable size. Using
combinations of the ‘Apply to’ features in conjunction with the Device Filter can significantly
reduce the time it takes to configure the Project Synchroniser.
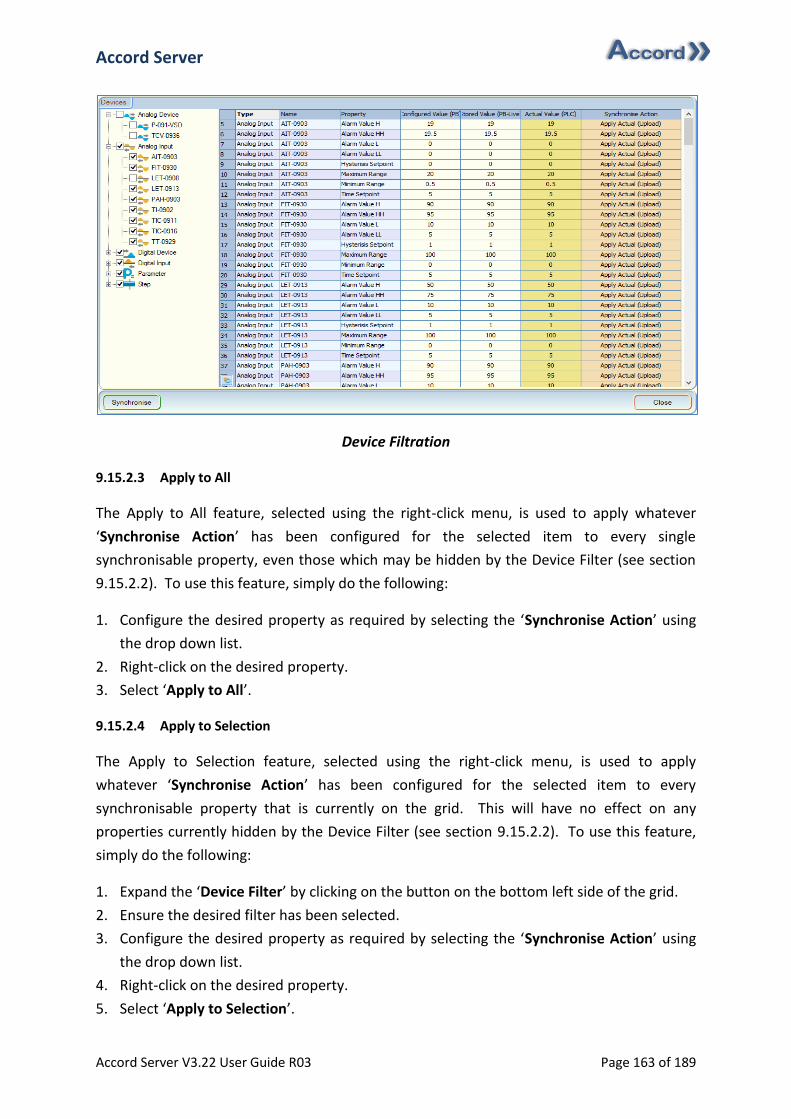
Accord Server
Accord Server V3.22 User Guide R03 Page 163 of 189
Device Filtration
9.15.2.3 Apply to All
The Apply to All feature, selected using the right-click menu, is used to apply whatever
‘Synchronise Action’ has been configured for the selected item to every single
synchronisable property, even those which may be hidden by the Device Filter (see section
9.15.2.2). To use this feature, simply do the following:
1. Configure the desired property as required by selecting the ‘Synchronise Action’ using
the drop down list.
2. Right-click on the desired property.
3. Select ‘Apply to All’.
9.15.2.4 Apply to Selection
The Apply to Selection feature, selected using the right-click menu, is used to apply
whatever ‘Synchronise Action’ has been configured for the selected item to every
synchronisable property that is currently on the grid. This will have no effect on any
properties currently hidden by the Device Filter (see section 9.15.2.2). To use this feature,
simply do the following:
1. Expand the ‘Device Filter’ by clicking on the button on the bottom left side of the grid.
2. Ensure the desired filter has been selected.
3. Configure the desired property as required by selecting the ‘Synchronise Action’ using
the drop down list.
4. Right-click on the desired property.
5. Select ‘Apply to Selection’.
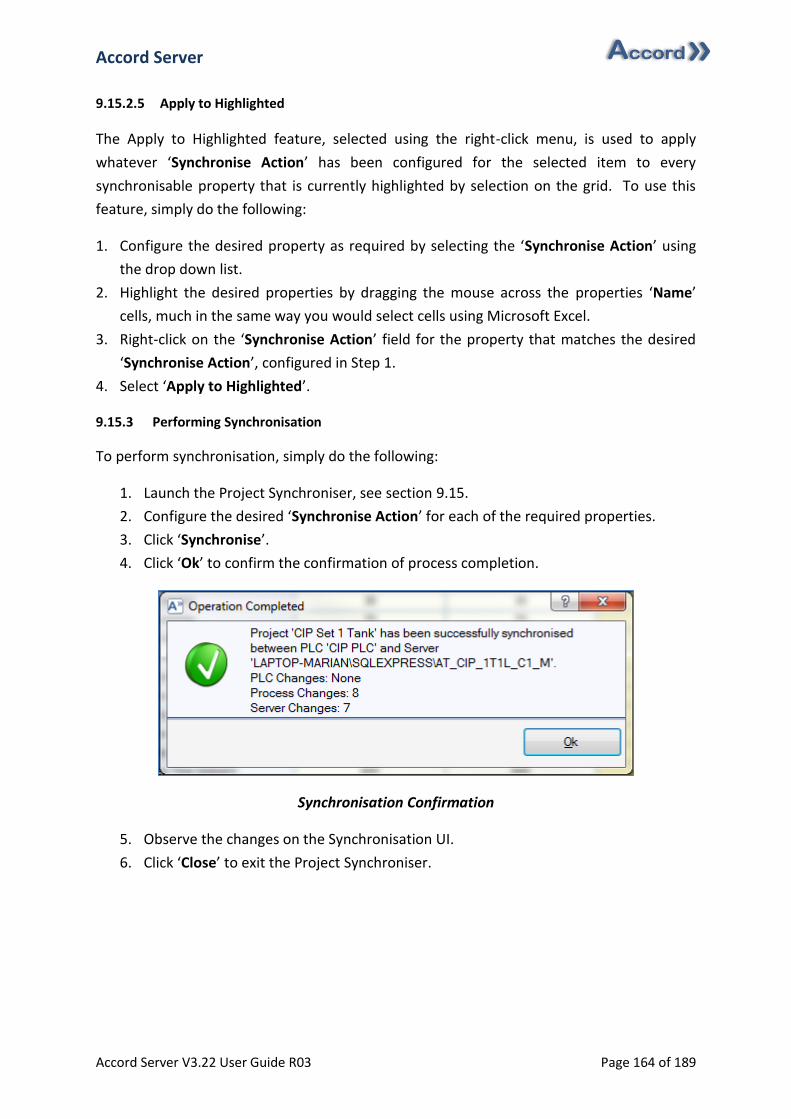
Accord Server
Accord Server V3.22 User Guide R03 Page 164 of 189
9.15.2.5 Apply to Highlighted
The Apply to Highlighted feature, selected using the right-click menu, is used to apply
whatever ‘Synchronise Action’ has been configured for the selected item to every
synchronisable property that is currently highlighted by selection on the grid. To use this
feature, simply do the following:
1. Configure the desired property as required by selecting the ‘Synchronise Action’ using
the drop down list.
2. Highlight the desired properties by dragging the mouse across the properties ‘Name’
cells, much in the same way you would select cells using Microsoft Excel.
3. Right-click on the ‘Synchronise Action’ field for the property that matches the desired
‘Synchronise Action’, configured in Step 1.
4. Select ‘Apply to Highlighted’.
9.15.3 Performing Synchronisation
To perform synchronisation, simply do the following:
1. Launch the Project Synchroniser, see section 9.15.
2. Configure the desired ‘Synchronise Action’ for each of the required properties.
3. Click ‘Synchronise’.
4. Click ‘Ok’ to confirm the confirmation of process completion.
Synchronisation Confirmation
5. Observe the changes on the Synchronisation UI.
6. Click ‘Close’ to exit the Project Synchroniser.
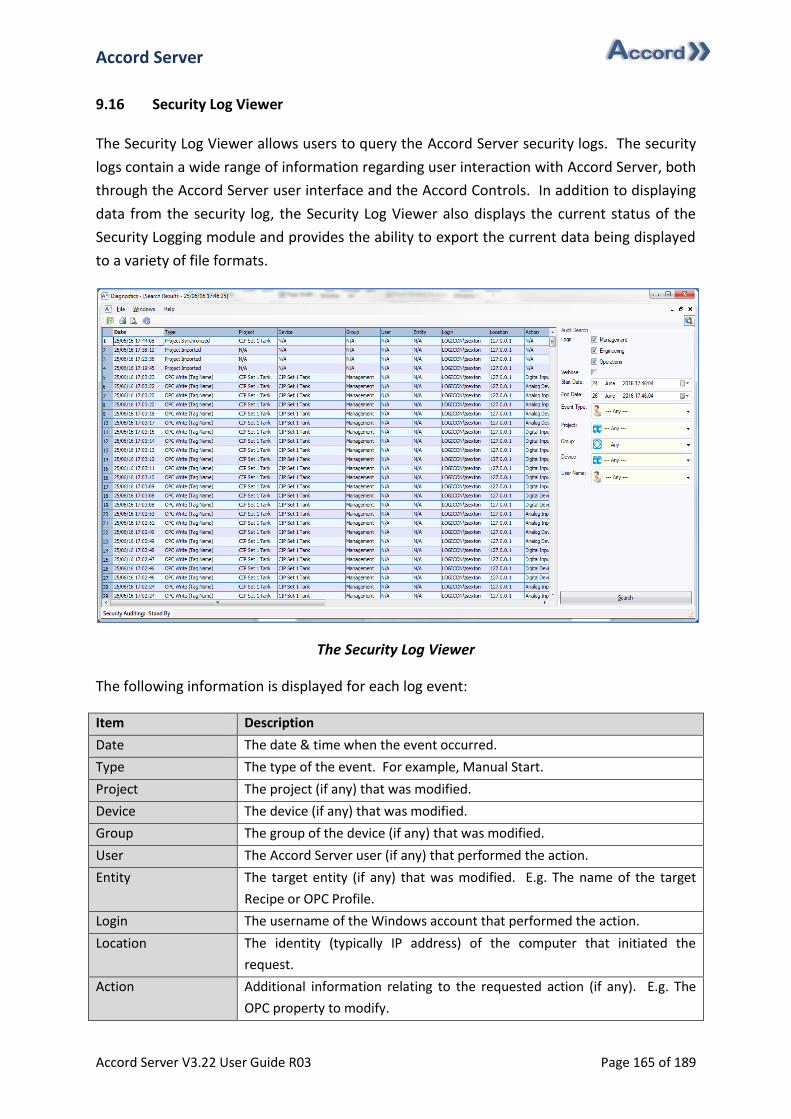
Accord Server
Accord Server V3.22 User Guide R03 Page 165 of 189
9.16 Security Log Viewer
The Security Log Viewer allows users to query the Accord Server security logs. The security
logs contain a wide range of information regarding user interaction with Accord Server, both
through the Accord Server user interface and the Accord Controls. In addition to displaying
data from the security log, the Security Log Viewer also displays the current status of the
Security Logging module and provides the ability to export the current data being displayed
to a variety of file formats.
The Security Log Viewer
The following information is displayed for each log event:
Item Description
Date The date & time when the event occurred.
Type The type of the event. For example, Manual Start.
Project The project (if any) that was modified.
Device The device (if any) that was modified.
Group The group of the device (if any) that was modified.
User The Accord Server user (if any) that performed the action.
Entity The target entity (if any) that was modified. E.g. The name of the target
Recipe or OPC Profile.
Login The username of the Windows account that performed the action.
Location The identity (typically IP address) of the computer that initiated the
request.
Action Additional information relating to the requested action (if any). E.g. The
OPC property to modify.

Accord Server
Accord Server V3.22 User Guide R03 Page 166 of 189
Request Additional information relating to the requested change (if any). E.g. The
value assigned to an OPC property.
Result The end result of the request as reported by Accord Server.
Reason Additional information relating to the end result as reported by Accord
Server (if any). Typically this contains an explanation for a failed result.
The security log viewer possesses a number of filtration options to better enable users to
find the desired information. These are as follows:
Item Description
Logs Each log event is categorised using a combination of three possible
categories:
Management
Engineering
Operations
Using this option, users can choose to filter logs by specific categories.
Verbose Using this option, users can choose to show/hide log entries that are
flagged as verbose. This includes log information relating to the specifics of
a Project Download.
Start Date The start date of the query. No log entries prior to this date will be
included.
End Date The end date of the query. No log entries beyond this date will be included.
Event Type The Accord Server Security Auditing module logs events of various types,
such as OPC Writes and Communication Port changes. This list allows for
the selection of a specific event type. Only logs of the selected event type
will be included in the search result.
Project Using this options, users can choose to limit the search result to events
carried out on a specific project.
Group Using this options, users can choose to limit the search result to events
carried out on a specific device group.
Device Using this options, users can choose to limit the search result to events
carried out on a specific device. In order to use this option, a Project and a
Group must be selected.
User Name Using this options, users can choose to limit the search result to events
carried out by a specific user. In order to use this option, a Project must be
selected.
Accord Server
Accord Server V3.22 User Guide R03 Page 167 of 189
9.16.1 Accessing the Security Log Viewer
There are three methods of launching the Security Log Viewer. These are as follows:
1. Select the ‘Service Manager’ tab.
2. Click the ‘Security Log Viewer’ shortcut on the left-side panel. See section Error!
eference source not found..
Alternatively:
1. Select the ‘Service Manager’ tab.
2. Click ‘Security Logging’ under ‘Module Status’.
Alternatively:
1. Select the ‘Tools’ tab.
2. Click ‘Security Log Viewer’.
9.16.2 Searching the Log
To search the security log simply do the following:
1. Launch the ‘Security Log Viewer’.
2. Select the desired ‘Log’ categories.
3. Select the ‘Verbose’ to include events flagged as verbose.
4. Select the ‘Start Date’ by clicking on the calendar on the right side of the control.
5. Select the ‘End Date’ by clicking on the calendar on the right side of the control.
6. Select the desired event (if any) from the ‘Event Type’ list.
7. Select the desired project (if any) from the ‘Project’ list.
8. Select the desired group (if any) from the ‘Group’ list.
9. Select the desired device (if any) from the ‘Device’ list.
10. Select the desired user (if any) from the ‘User Name’ list.
11. Click ‘Search’.
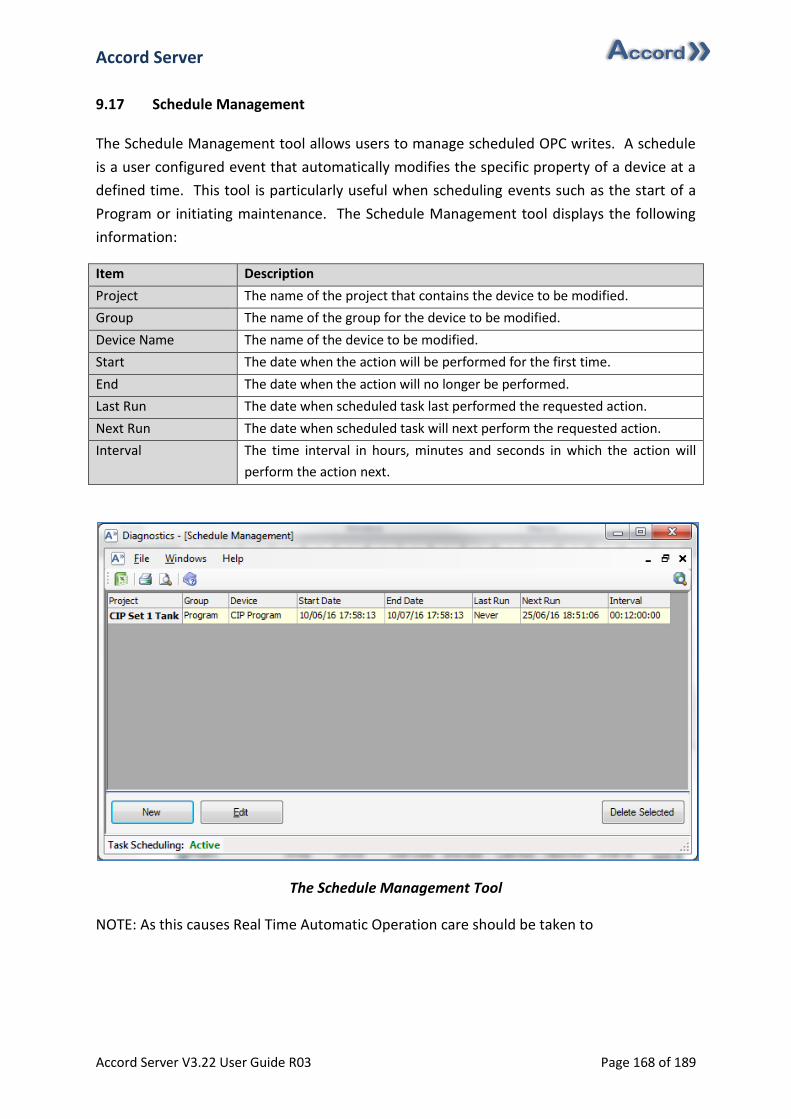
Accord Server
Accord Server V3.22 User Guide R03 Page 168 of 189
9.17 Schedule Management
The Schedule Management tool allows users to manage scheduled OPC writes. A schedule
is a user configured event that automatically modifies the specific property of a device at a
defined time. This tool is particularly useful when scheduling events such as the start of a
Program or initiating maintenance. The Schedule Management tool displays the following
information:
Item Description
Project The name of the project that contains the device to be modified.
Group The name of the group for the device to be modified.
Device Name The name of the device to be modified.
Start The date when the action will be performed for the first time.
End The date when the action will no longer be performed.
Last Run The date when scheduled task last performed the requested action.
Next Run The date when scheduled task will next perform the requested action.
Interval The time interval in hours, minutes and seconds in which the action will
perform the action next.
The Schedule Management Tool
NOTE: As this causes Real Time Automatic Operation care should be taken to
Accord Server
Accord Server V3.22 User Guide R03 Page 169 of 189
9.17.1 Accessing the Schedule Management Tool
There are three methods of launching the Schedule Management tool. These are as follows:
1. Select the ‘Service Manager’ tab.
2. Click the ‘Schedule Management’ shortcut on the left-side panel. See section Error!
eference source not found..
Alternatively:
1. Select the ‘Service Manager’ tab.
2. Click ‘Task Scheduling’ under ‘Module Status’.
Alternatively:
1. Select the ‘Tools’ tab.
2. Click ‘Schedule Management’.
9.17.2 Defining/Editing a Schedule
Editing a schedule is almost identical to creating a new schedule. To perform either action,
simply do the following:
1. Open the ‘Schedule Management’ tool.
2. Click ‘New’ to create a new schedule, otherwise click ‘Edit’ adjacent the appropriate
schedule.
3. Select the project from the ‘Project’ list.
4. Select the group from the ‘Group’ list.
5. Select the device from the ‘Device’ list.
6. Select the property of the device from the ‘Property’ list.
7. If the ‘Value’ field takes the form of a list, select the desired value, otherwise type the
value for the property.
8. Select the ‘Start Date’ by clicking on the calendar button to the right side of the field.
9. If the schedule needs to run more than once tick ‘Repeat’, otherwise leave it un-ticked.
a. Select the time interval by adjusting the arrows up or down on the right side of
the ‘Interval’ field. The field displays the time interval in the format of hh:mm:ss.
To adjust hours, select the hour’s portion of the control and adjust it by clicking
the arrows.
b. If the schedule needs to end on a specific date tick ‘End On Date’, otherwise
leave it un-ticked.
i. Select the ‘End Date’ by clicking on the calendar button to the right side
of the field.

Accord Server
Accord Server V3.22 User Guide R03 Page 170 of 189
10. Click ‘Save’.
Note: Accord Server does not need to be restarted, the new/edited schedule will be
automatically loaded by Accord Server during its next check cycle.
9.17.3 Deleting a Schedule
To delete an existing schedule, simply do the following:
1. Open the ‘Schedule Management’ tool.
2. Click ‘Delete adjacent the appropriate schedule.
Note: Accord Server does not need to be restarted, the schedule will be
automatically be removed by Accord Server during its next check cycle.

Accord Server
Accord Server V3.22 User Guide R03 Page 171 of 189
9.18 Exporting Data
Each grid based list displayed on Accord Server or Accord Reports possess the option to
export. This export option supports a variety of different file types. This may be useful,
particularly when dealing with diagnostic information, as it may be needed for future
reference. To perform an export, simply do the following:
1. Right click on the desired grid.
2. Click ‘Export As’.
3. Select the export location for the file.
4. Select the export type from the ‘Save as type’ list.
5. Click ‘Ok’.
Alternatively, when using the Diagnostics Manager:
1. Ensure the desired tool is selected.
2. Click ‘Export’ in the top toolbar.
3. Select the export location for the file.
4. Select the export type from the ‘Save as type’ list.
5. Click ‘Ok’.
Accord Server
Accord Server V3.22 User Guide R03 Page 172 of 189
10 Troubleshooting
The following sections contain possible solutions to potential issues that may arise during
the use of Accord Server. In the event of an issue occurring that is not covered by this
document please visit http://www.accord-platform.com/support.
10.1 OPC Configuration
During the configuration of an OPC Profile it is possible that either of the following issues
may occur. The most common of these issues are as follows:
10.1.1 No OPC Servers Found
Accord Server initially checks for the existence of OPC Servers on start-up. If no OPC Servers
have been found or a particular OPC Server is missing, verify the following:
Verify there is no error on the OPC Communications module. See section 4.1.2.
Perform a manual refresh of OPC Servers. See section 5.3.
Make sure the OPC Server in question has been installed correctly.
If the problem persists it may be necessary to perform a repair installation of the affected
OPC Server(s).
10.1.2 OPC Channel/Device Not Found
Accord Server automatically queries new OPC Servers on start-up for channel/device
configurations. If a Channel/Device configuration is not listed, simply do the following:
Verify there is no error on the OPC Communications module. See section 4.1.2.
Perform a manual refresh of OPC Servers. See section 5.3.
Verify the OPC Server is running. (If a demo mode is active or expired, Accord Server
may not be able to query the OPC Server).
Verifying the OPC configuration is classed as active by the OPC Server. Some OPC
Servers do not provide details of settings that have not yet been committed to the
service.
If the problem persists it may be necessary to perform a repair installation of the affected
OPC Server.
Accord Server
Accord Server V3.22 User Guide R03 Page 173 of 189
10.1.3 The PLC ID Cannot Be Loaded
When attempt to activate a license for an OPC Profile, Accord Server will load the PLC ID
based on the OPC Settings provided.
In the event the PLC ID does not load in a timely manner, verify the following:
Verify the correct OPC Server has been configured. See section 5.3.
Verify the correct OPC Channel/Device setup has been configured for each group,
ensuring the General group is Active. See sections 5.6 and 5.9.
Verify the OPC Server has been configured to point to the correct PLC.
Verify the PLC is currently running the Accord Builder correct version of the PLC
operating system for the installed version of Accord Server.
Reset the PLC ID in OPC Setup
10.1.4 Voucher Activation Failure
There are a number of possible reasons why a voucher may fail to activate, these are as
follows:
1. The PLC ID has not loaded correctly, see section 10.1.3.
2. The voucher is Not Intended Product, consult the documentation that accompanied
the voucher to confirm the correct voucher has been provided.
3. The Voucher is Invalid and could not be located by the licensing service, consult the
documentation that accompanied the voucher to confirm the number is correct.
4. A connection to the internet is unavailable to the local computer.
5. Access to licensing server site is being restricted locally, either by firewall or local
network configuration.
6. The DNS server being used by the local computer, or the local network, is unable to
route requests to licensing server site
7. The licensing server site is unavailable due to an unexpected outage.
In the event that all attempts have been made and the PLC ID is available, it will become
necessary to contact your supplier to manually obtain the required license code.
Accord Server
Accord Server V3.22 User Guide R03 Page 174 of 189
10.2 The Service
During service start-up and shutdown Accord Server performs a series of operations that
can potentially delay the operation or even halt the operation. The following sections
discuss possible reasons for issues that may arise when performing service start-up or
shutdown:
10.2.1 The Service Fails to Start
Accord Server will not activate the service under certain conditions. If Accord Server fails to
start, verify the following:
Verify at least one valid OPC Profile exists and it is flagged as active. See section 5.
Verify there is no error displayed for the Accord Server Service. See section 4.1.2.
Verify there is no error on the Database Communications module. See section 4.1.2.
Verify an OPC Profile has been configured with a valid OPC Server and at least one
active group has a valid Channel/Device configuration. See section 5.
Verify at least one Project has been imported, flagged as active and uses a valid OPC
Profile. See section 6.
Verify the target OPC Server is running.
Accord Server will attempt to launch it automatically however, it is possible it
may not be successful in some circumstances. For example, if the product is
in demonstration timeout mode.
Verify the computer meets the minimum requirements. See section 3.1 & 7.5.
10.2.2 The Service Fails to Stop
Accord Server may have difficulty stopping under the certain circumstances. If Accord
Server fails to stop, verify the following:
Verify the Data Reporting module is not currently busy or in error. See section 4.1.2
Processing the reports queue can be time consuming and may halt service
shutdown until the queue has been cleared.
Verify there is no error on the Database Communications module. See section 4.1.2.
If the DBMS has stopped it may delay shutdown as the modules attempt to
finalise current activities.
Verify the Data Historian is not currently busy or deactivating. See section 4.1.2.
If the Data Historian is experiencing a large number of device changes they
need to be processed before a clean shutdown of the service can be
completed. Allow time for successful completion of its activities.
Accord Server
Accord Server V3.22 User Guide R03 Page 175 of 189
Verify there is no error on the OPC Communications module. See section 4.1.2.
If the OPC Server has shut down or its demonstration period has expired,
Accord Server may be attempting to restore the connection, if the
demonstration period has expired, shutdown the OPC Server manually.
Verify no open Diagnostic Tools are placing a demand on the service.
Some modules, such as the OPC Communications module, are known as
Demand modules. These are modules that activate when needed. As a
result, an open Diagnostic tool for that module will prevent the service from
shutting down while it is open. Simply closing the tool will allow shutdown to
proceed.
If after a prolonged period of time Accord Server fails to Stop or report a change in status it
may be necessary to end the process using Task Manager however, this should only be
viewed as a measure of last resort.
10.2.3 The Service Cannot be Stopped/Started
If both the Start and Stop buttons are disabled it may indicate that Accord Server is
currently processing a start-up or shutdown procedure. Verify the following:
Verify no modules are currently Activating. See section 4.1.2.
Verify no modules are currently Deactivating. See section 4.1.2.
Verify no modules are currently Busy. See section 4.1.2.
Verify no demand modules are currently in use by diagnostic tools. See section 9.
See section 8.2 for more information.
Accord Server
Accord Server V3.22 User Guide R03 Page 176 of 189
10.3 ActiveX Communications
The ActiveX Communications module has a number of dependencies, both internal and
external, that can prevent it from successfully performing its duties. The following sections
discuss potential reasons for a number of issues that may arise when using the ActiveX
Communications module:
10.3.1 Accord Controls Unable to Connect
If the Accord Controls are unable to connect to the service, verify the following:
Verify the service is running. See section 8.2.
Verify the ActiveX Communications module has been selected as a start-up module.
See section 7.4.
Verify there is no error on the ActiveX Communications module. See section 4.1.2.
Verify the Accord Controls are using the correct service address. Consult the Accord
Controls documentation.
Verify the Accord Controls use the same TCP Port configured for the ActiveX
Communications module. See section 7.3.1.
Verify the network visibility of the ActiveX Communication module allows a
connection from the Accord Controls host computer. See section 7.3.1.
Verify there is no firewall blocking connections to Accord Server. The firewall maybe
on the Accord Server machine, or the Accord Controls machine.
Verify the version of the Accord Controls are compatible with the version of Accord
Server.
10.3.2 Accord Controls Showing Missing Status
There are a number of possible reasons why Accord Server may report a device as missing.
If a device shows as missing verify the following:
Verify the device is listed under as part of the ‘OPC Diagnostics’ listing. See section
9.6.
If present, verify the Project and Group matches those used by the Accord
Controls control.
Verify the device is listed under ‘Device Selection’. See section 7.1.1.
Verify the device is part of an active project. See section 6.5.
Verify the project has a valid OPC Profile assigned to it. See section 6.
Verify the license used by the OPC Profile possesses the ActiveX Communications
add-on. See section 5.11.
Verify the group the device belongs to is active in the selected OPC Profile. See
section 5.9.
Verify there is no error on the OPC Communications module. See section 4.1.2.
Accord Server
Accord Server V3.22 User Guide R03 Page 177 of 189
If the problem persists, rebind the Accord Controls control. Consult the Accord Controls
documentation.
10.3.3 Accord Controls Showing Bad Communications
If an Accord Controls shows Bad Communications verify do the following:
Verify there is no error on the OPC Communications module. See section 4.1.2.
Verify the quality of the current OPC read on the device using the ‘OPC Diagnostics’
tool. See section 9.6.
Bad Quality Read
1. Verify the OPC Server used by the project is running normally.
2. Confirm the ‘Downloaded Date’ of the project against the date shown in
Accord Builder. See section 6.
3. Confirm the IP address of the PLC configured in the OPC Server matches the
IP address used to download the project in Accord Builder.
Good Quality Read
4. Rebind the Accord Controls control. Consult the Accord Controls
documentation.
Note: A bad quality read on any Program will result in all Programs
showing bad communications.
Accord Server
Accord Server V3.22 User Guide R03 Page 178 of 189
10.4 Advanced Communications
The Advanced Communications module uses a feature of the .Net framework, known as
.Net Remoting to provide access to object representations of devices present on the PLC.
This advanced feature of the framework has a number of dependency that may affect its
performance. The following sections discuss potential reasons for a number of potential
issues that may arise when using the Advanced Communications module:
10.4.1 Accord Controls Unable to Connect
If the Accord Controls suite are unable to connect to the service verify the following:
Verify the service is running. See section 8.2.
Verify the Advanced Communications module has been selected as a start-up
module. See section 7.4.
Verify there is no error on the Advanced Communications module. See section 4.1.2.
Verify Accord Controls are using the correct service address. Consult the Accord
Controls documentation.
Verify Accord Controls uses the same TCP Port configured for the Advanced
Communications module. See section 7.3.2.
Verify the selected interface is capable of offering services to the Accord Controls
host computer. See section 7.3.2.
Verify there is no firewall blocking connections to Accord Server. The firewall maybe
on the Accord Server machine, or the Accord Controls machine.
Verify the version of the Accord Controls are compatible with the version of Accord
Server.
10.4.2 Accord Controls Showing Missing Status
There are a number of possible reasons why Accord Server may report a device as missing.
If a device shows as missing verify the following:
Verify the device is listed under as part of the ‘OPC Diagnostics’ listing. See section
9.6.
If present, verify the Project and Group matches those used by Accord
Controls.
Verify the device is listed under ‘Device Selection’. See section 7.1.1.
Verify the device is part of an active project. See section 6.5.
Verify the project has a valid OPC Profile assigned to it. See section 6.
Verify the license used by the OPC Profile possesses the Advanced Communications
add-on. See section 5.11.
Verify the group the device belongs to is active in the selected OPC Profile. See
section 5.9.
Accord Server
Accord Server V3.22 User Guide R03 Page 179 of 189
Verify there is no error on the OPC Communications module. See section 4.1.2.
Verify there is no error on the Device Communications module. See section 4.1.2.
If the problem persists, rebind the control. Consult the Accord Controls documentation.
10.4.3 Accord Controls Showing Bad Communications
If Accord Controls shows Bad Communications verify do the following:
Verify there is no error on the OPC Communications module. See section 4.1.2.
Verify the quality of the current OPC read on the device using the ‘OPC Diagnostics’
tool. See section 9.6.
Bad Quality Read
1. Verify the OPC Server used by the project is running normally.
2. Confirm the ‘Downloaded Date’ of the project against the date shown in
Accord Builder. See section 6.
3. Confirm the IP address of the PLC configured in the OPC Server matches the
IP address used to download the project in Accord Builder.
Good Quality Read
4. Rebind the control. Consult the Accord- HMI / Controls documentation.
Note: A bad quality read on any Program will result in all Programs
showing bad communications.
10.4.4 Accord Controls Interaction Sluggish
If interaction between the Accord Controls and the Accord Server service seem sluggish,
please verify the following:
Verify there is sufficient resources available for Accord Server to operate. See
section 9.13.
Verify the selected interface for the Advanced Communications module is correct.
See section 7.3.2.
Verify that no firewall on the client or service computers are configured to filter the
content of communications on the port configured for the Advanced
Communications module. See section 7.3.2.
Verify the DNS settings for the computer are configured for optimal performance on
the local area network. For example, if your computer is called “ServicePC” then it
should be possible for the IP address for ServicePC to be resolved rapidly by any
Accord Server
Accord Server V3.22 User Guide R03 Page 180 of 189
client on the local network. If no DNS server is available, modification of the clients
host file can improve performance. The steps are as follows:
Note: Incorrect modifications to the hosts file may negatively affect your
computers performance. If you are unsure about performing this procedure, please
consult an IT professional.
1. Configure a Static IP for ServicePC. For example, 192.168.1.1.
2. On the client machine, open the ‘Run’ dialog. Pressing Start+R will display
the dialog.
3. Type %SystemRoot%\system32\drivers\etc\hosts and click ‘Ok’.
4. Select ‘Notepad’ and click ‘Ok’.
5. At the bottom of the file, add an entry as follows based on your own internal
values:
192.168.1.1 ServicePC
Note: You need to substitute the IP and the name of the service host for
those used by your organisation.
6. Save the file.
7. Restart the application using Accord Controls.
Accord Server
Accord Server V3.22 User Guide R03 Page 181 of 189
10.5 OPC Communications
The OPC Communications module is perhaps the single most important module in Accord
Server. It provides functionality required by almost all other Accord Server modules. There
are a number of reasons why the OPC Communications module may be unable to perform
its duties. The following sections discuss some potential issues that may arise when using
the OPC Communications module:
10.5.1 Device Not Listed
There are a number of possible reasons why Accord Server may fail to include a device in
the list of devices available to the OPC Communications. If a device is not listed verify the
following:
Verify the device is listed under ‘Device Selection’. See section 7.1.1.
Verify the device is part of an active project. See section 6.5.
Verify the project has a valid OPC Profile assigned to it. See section 6.
Verify the group the device belongs to is active in the selected OPC Profile. See
section 5.9.
Verify there is no error on the OPC Communications module. See section 4.1.2.
If the problem persists, despite all settings being correct, perform a re-import of the project.
See section 9.14.2.
10.5.2 Project Mismatch
Accord Server uses a unique identifier for each project to verify that the project running on
the target PLC is in fact the project it expects. In some circumstances it may be possible for
a mismatch to occur if an external application or service is also managing the PLC. To
prevent potential undesirable interaction with the PLC, Accord Server constantly verifies
that the unique identifier is as expected. If it detects that the identifier has changed, Accord
Server will shut down all communications services relating to that project. This is necessary
as the application now hosted on the PLC may behave entirely differently than that
expected by Accord Server. When such an event occurs, the OPC Communications module
will report a Critical status message indicating Project does not match Project on PLC:
Accord Server
Accord Server V3.22 User Guide R03 Page 182 of 189
10.5.3 Bad Quality Reads
The reason for bad quality reads may depend on the number of devices affected. If bad
quality reads are reported diagnose as follows using the ‘OPC Diagnostics’ tool:
Verify there is no error on the OPC Communications module. See section 4.1.2.
A Single Device
Confirm the ‘Downloaded Date’ of the project against the date shown in Accord
Builder. See section 6.
A Group
Confirm the OPC Channel/Device setup for the group is correct for the OPC Profile
used by the project. See section 5.
A Project
Confirm the OPC Server used by the projects OPC Profile is running normally and has
not reported any errors.
Verify the Channel/Device setup for each group is correct. See section 5.
Ensure only one Accord Server is currently connected to the target PLC.
If the problem persists it may indicate a problem with the OPC Server or perhaps a firewall
issue.
Accord Server
Accord Server V3.22 User Guide R03 Page 183 of 189
10.6 Project Deployment
10.6.1 Accord Builder Project Not Listed
Accord Server will only list Accord Builder Projects that are compatible with the current
version of the product. If the desired database is not listed for a given server, please consult
the Accord Builder documentation to verify the version of Accord Server compatible with
the version of Accord Builder installed. To view the version of Accord Builder compatible
with the installed version of Accord Server, consult the Accord Server Configuration Report,
see section 9.12.
10.6.2 Accord Builder Project Incompatible
Accord Server can only support Accord Builder Projects that are generated using a version of
the product compatible with the current version of the product. In the event that an
incompatible database is selected, Accord Server will abort the import process. To view the
version of Accord Builder compatible with the installed version of Accord Server, consult the
Accord Server Configuration Report, see section 9.12.
10.6.3 Inconsistent Accord Builder Project
During the first two stages of the project import process, Accord Server reads all
configuration information from the target Accord Builder project. It is essential that this
information is consistent, as to download an inconsistent project to the PLC could have
undesirable consequences. To prevent this, Accord Server performs a two stage check, both
before and after the data import. If Accord Server determines at any point that the data
may be inconsistent, it will abort the import process. This includes if any changes are made
to the project using the Accord Builder during the import.
If Accord Server reports a project inconsistency, simply re-run the Accord Builder
consistency check and click ‘Retry’.
Accord Server
Accord Server V3.22 User Guide R03 Page 184 of 189
10.6.4 Partial Download Expected, But Full Download With Reset Required
Partial Downloads are only permitted if all the following conditions exist:
The imported project matches an existing project currently being managed by
Accord Server.
The existing project is attached to an OPC Profile.
The imported project does not exceed the maximum block capacities as defined by
the existing project, configured during the initial Full Download with Reset. See
section 9.14.10
The imported project does not exceed the license band being used by the existing
project.
The imported project contains differences between it and the existing project.
For more information on Partial Downloads, see section 9.14.5.
10.6.5 Partial Download Larger Than Expected
During the initial import of a project, the Project Downloader will attempt to assign objects
in an optimal layout for the given data block. This generally means all objects are laid out
contiguously, leaving any spare space at the end of the data block. Over time, as Partial
Downloads are made, objects containing lists may be deleted, or the number of entries in
those lists may change. The Project Downloader will always aim to make the changes
necessary with the minimum number of PLC writes however, in the event a change cannot
be accommodated within the existing layout of a data block, the Project Downloader will be
forced to reorganise that data block. This reorganisation involves laying out all objects in a
contiguous manor which may involve modifications to the positions of lists for a range of
objects. Although this behaviour is often undesirable, it is considered the Project
Downloaders measure of last resort, and helps ensure that the number of PLC write for the
majority of Partial Downloads are kept to a minimum.
10.6.6 The Reserved Entry
During the assignment of spare space, users may notice that the amount of space already
used by a list is one element larger than expected. This happens because the PLC requires
an End of List entry to mark the termination of that list. Accord Server automatically assigns
a placeholder device, known as Reserved, to the end of each list. While this object is not
part of the Accord Builder configuration, it is an essential operational component of the PLC
code. The Reserved entry does not impact on the size of the license band required for a
project. See section 5.11.1 for more information regarding license types.
Accord Server
Accord Server V3.22 User Guide R03 Page 185 of 189
10.6.7 PLC Reset Failure
There are a number of reasons why the PLC Reset procedure might result in failure, the
majority of which require an engineer’s intervention to correct. There is however, one
possible failure that may not directly relate to the PLC itself, a failure due to timeout. In the
event that the PLC Reset reports a timeout failure, it is necessary to check that the OPC
Communications module has not encountered an issue of bad quality reads. Accord Server
uses the General group of an OPC Profile to perform the reset. If this group is not properly
configured for any reason, or the OPC Server has encountered issues while reading the
target OPC group, the reset procedure will fail. In addition, the PLC Reset procedure
requires that the PLC is running during the download procedure. If the PLC is current in Stop
or an error is preventing execution of the PLC code, the reset procedure will fail.
To diagnose these potential issues, verify the following:
Verify the target OPC Profile for the download has a correct Channel/Device
configuration for the General group. See section 5.6.
If performing a download on an existing project, use the OPC Diagnostics tool to
verify a good quality read on the General group. See sections 9.6 and 10.5.3.
If the OPC Server possesses a tag viewing facility, verify a successful read on the
LifeByte address (Siemens – DB3, Byte4)
Verify the target PLC is not in Stop or Error.
The other possible failure that may occur are:
In Siemens Simatic Manager for S7-300, S7-400,
1. Data block compression failure
2. Data block creation failure
3. Data block deletion failure
4. Data block test failure
These may require a PLC programmer engineer to connect.
Accord Server
Accord Server V3.22 User Guide R03 Page 186 of 189
10.6.8 Project Mismatch
During a Partial Download (see section 9.14.5), or a Full Download without Reset (see
section 9.14.4), Accord Server verifies that the project on the target PLC has a unique
identifier matching the unique identifier assigned to the project upon initial download. If a
mismatch is confirmed, Accord Server will automatically abort the download process. A
mismatch in the unique identifier happens when an external application or service has been
used to manage the project on the target PLC. For safety reasons, Accord Server will
assume it is unsafe to interact with the project and shutdown communications.
Performing a Full Download with Reset (see section 9.14.3) will correct this issue however, it
is strongly advised to determine the original cause of the mismatch prior to performing the
download.
Accord Server
Accord Server V3.22 User Guide R03 Page 187 of 189
10.7 Service Redundancy
10.7.1 Primary Service Not Found
When configuring a Partner Service, it is required to select an active Primary Service. If the
‘New Redundancy Pairing’ dialog is unable to connect to the service, verify the following:
Verify the Primary Service is running. See section 8.2.
Verify the Service Redundancy module has been selected as a start-up module on
the Primary Service. See section 7.4.
Verify there is no error on the Service Redundancy module for the Primary Service.
See section 4.1.2.
Verify the Primary Service has been configured to publish as a Primary Service. See
section 7.3.4.3.
Verify the ‘Service Port’ configured on the Partner Service matches the
‘Communications Port’ configured on the Primary Service. See sections 7.3.4.3 and
7.3.4.5.
Verify there is no firewall blocking connections between the two Accord Server
services. The blockage is usually on the side of the Primary Service.
Verify the version of the each Accord Server Service matches. See section 4.5.9.
10.7.2 Consolidation Failures
Accord Server has a robust consolidation mechanism that ensures changes between the
Primary and Partner Services are synchronised on a regular basis. Much of the work is
processed by the Partner Service, reducing the strain on the Primary Service. This approach
is logical since consolidation never happens while the Primary Service is down, meaning that
once the Primary Service is operational, the Partner Service usually is idle and has resources
to perform the complex consolidation process. In the event of consolidation failure, issues
usually arise as a result of SQL Server communication issues, since the consolidation process
requires a reliable connection between the Primary Service database and the Partner
Service database be maintained throughout the procedure. If consolidation failures, verify
the following:
Verify the SQL Server Installation for the Primary Service is configured to permit
connections over TCP/IP.
Verify there is no firewall blocking SQL Server connections. This problem is more
likely to be as a result of poor firewall configuration on the computer hosting the
Primary Service.
Verify a stable network connection exists between both the Primary Service and the
Partner Service.
Accord Server
Accord Server V3.22 User Guide R03 Page 188 of 189
10.7.3 Partner Service Fails to Deactivate a Partner Project
The Partner Service will automatically activate/deactivate any project obtained from the
Primary Service whenever the state of the Primary Service is detected to have changed. If
the Primary Service and Partner Services are in states that contradict this model, the likely
cause is related to a communications failure. The end result in this situation is that both the
Primary and Partner Services will both be active at the same time. The Partner Service will
not deactivate until such as time as communications with the Primary Service is restored,
and that the Primary Service confirms services are operating as expected. To diagnose the
potential cause of a communications failure, see section 10.7.1.