acropolis hypervisor administration guidentnx-portal-sb.s3.amazonaws.com/.../ahv_admin-acr_v4_6.pdf4...
TRANSCRIPT
Acropolis Hypervisor Administration Guide
Acropolis 4.618-Apr-2016
Copyright | Acropolis Hypervisor Administration Guide | AHV | 2
Notice
CopyrightCopyright 2016 Nutanix, Inc.
Nutanix, Inc.1740 Technology Drive, Suite 150San Jose, CA 95110
All rights reserved. This product is protected by U.S. and international copyright and intellectual propertylaws. Nutanix is a trademark of Nutanix, Inc. in the United States and/or other jurisdictions. All other marksand names mentioned herein may be trademarks of their respective companies.
License
The provision of this software to you does not grant any licenses or other rights under any Microsoftpatents with respect to anything other than the file server implementation portion of the binaries for thissoftware, including no licenses or any other rights in any hardware or any devices or software that are usedto communicate with or in connection with this software.
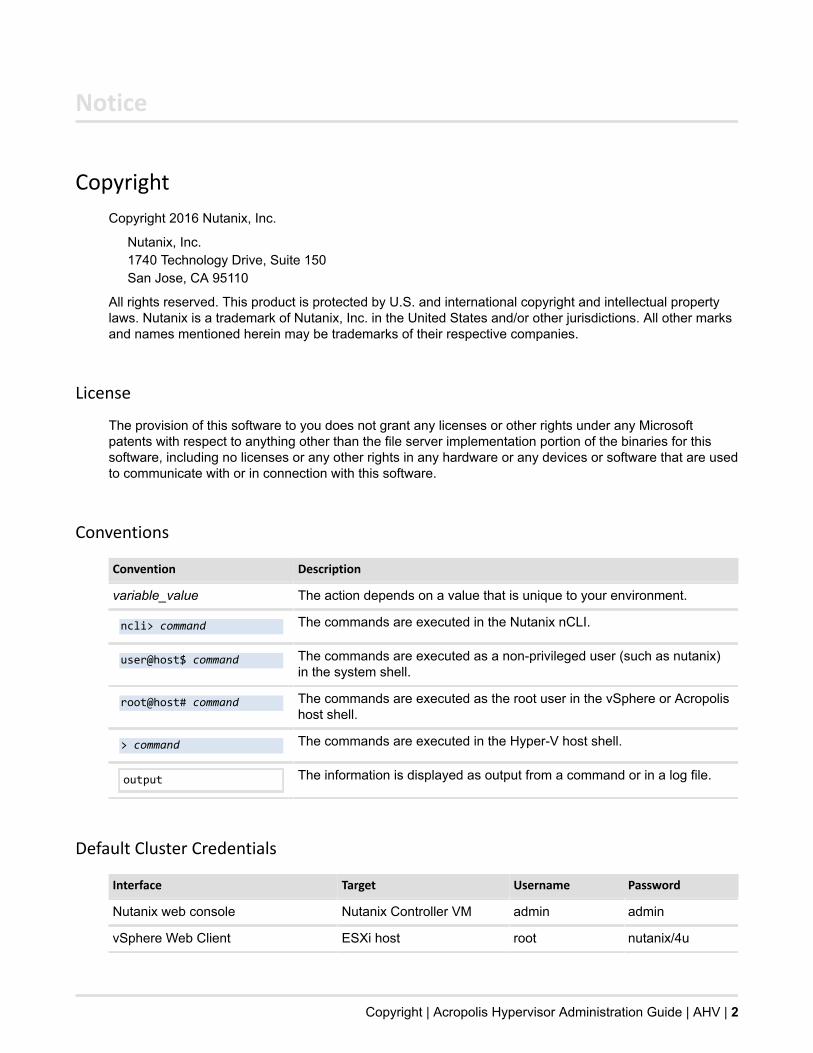
Conventions
Convention Description
variable_value The action depends on a value that is unique to your environment.
ncli> command The commands are executed in the Nutanix nCLI.
user@host$ command The commands are executed as a non-privileged user (such as nutanix)in the system shell.
root@host# command The commands are executed as the root user in the vSphere or Acropolishost shell.
> command The commands are executed in the Hyper-V host shell.
output The information is displayed as output from a command or in a log file.
Default Cluster Credentials
Interface Target Username Password
Nutanix web console Nutanix Controller VM admin admin
vSphere Web Client ESXi host root nutanix/4u

Copyright | Acropolis Hypervisor Administration Guide | AHV | 3
Interface Target Username Password
vSphere client ESXi host root nutanix/4u
SSH client or console ESXi host root nutanix/4u
SSH client or console AHV host root nutanix/4u
SSH client or console Hyper-V host Administrator nutanix/4u
SSH client Nutanix Controller VM nutanix nutanix/4u
SSH client or console Acropolis OpenStackServices VM (NutanixOVM)
root admin
Version
Last modified: April 18, 2016 (2016-04-18 15:30:10 GMT-7)
4
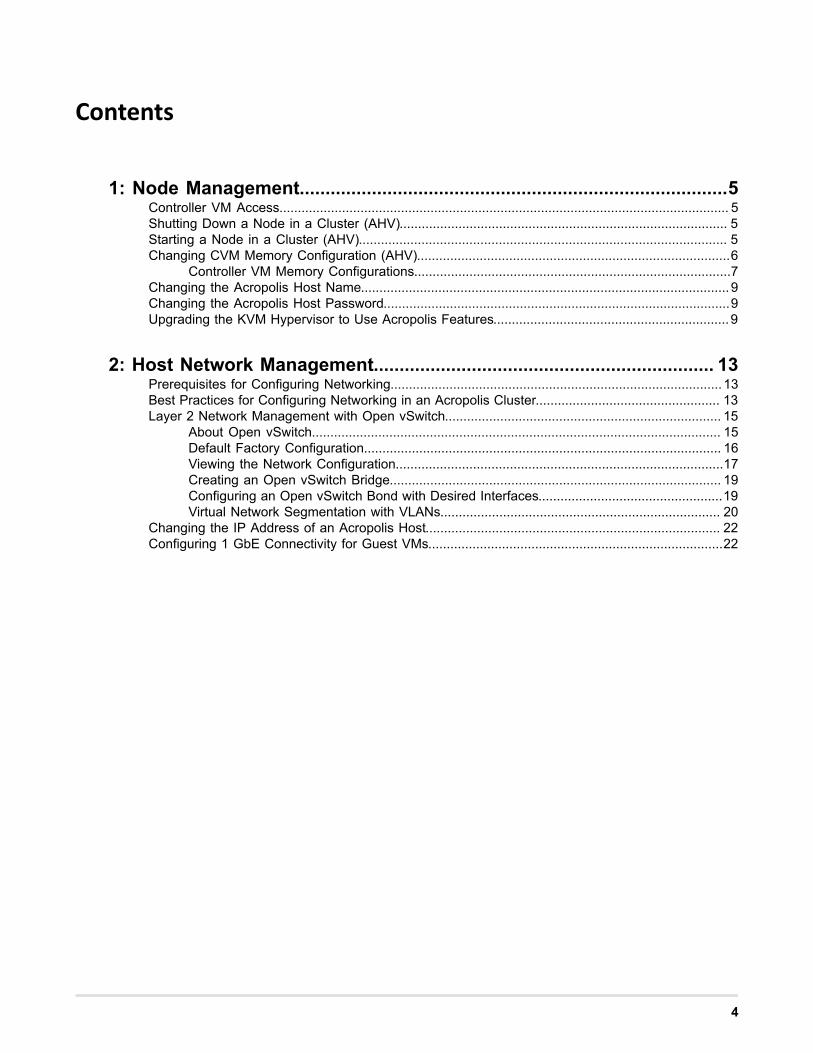
Contents
1: Node Management...................................................................................5Controller VM Access.......................................................................................................................... 5Shutting Down a Node in a Cluster (AHV)......................................................................................... 5Starting a Node in a Cluster (AHV).................................................................................................... 5Changing CVM Memory Configuration (AHV).....................................................................................6
Controller VM Memory Configurations......................................................................................7Changing the Acropolis Host Name....................................................................................................9Changing the Acropolis Host Password..............................................................................................9Upgrading the KVM Hypervisor to Use Acropolis Features................................................................9
2: Host Network Management.................................................................. 13Prerequisites for Configuring Networking.......................................................................................... 13Best Practices for Configuring Networking in an Acropolis Cluster.................................................. 13Layer 2 Network Management with Open vSwitch........................................................................... 15
About Open vSwitch............................................................................................................... 15Default Factory Configuration................................................................................................. 16Viewing the Network Configuration.........................................................................................17Creating an Open vSwitch Bridge.......................................................................................... 19Configuring an Open vSwitch Bond with Desired Interfaces..................................................19Virtual Network Segmentation with VLANs............................................................................ 20
Changing the IP Address of an Acropolis Host................................................................................ 22Configuring 1 GbE Connectivity for Guest VMs................................................................................22
Node Management | Acropolis Hypervisor Administration Guide | AHV | 5
1
Node Management
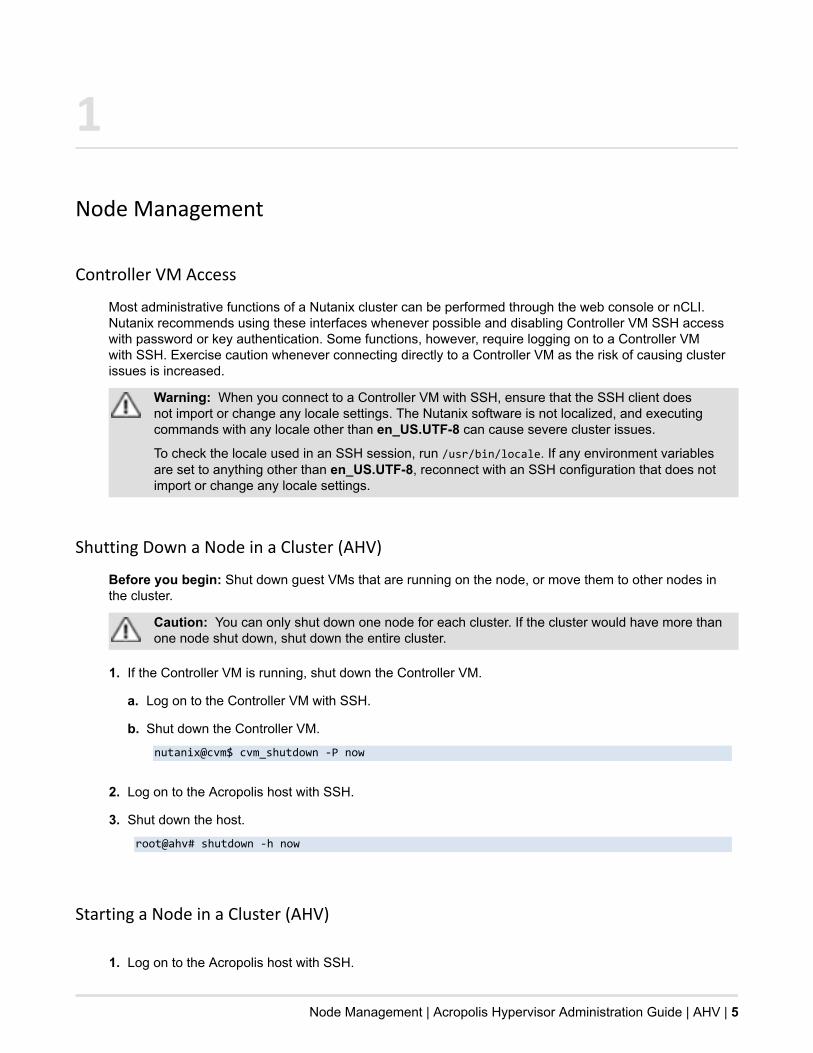
Controller VM Access
Most administrative functions of a Nutanix cluster can be performed through the web console or nCLI.Nutanix recommends using these interfaces whenever possible and disabling Controller VM SSH accesswith password or key authentication. Some functions, however, require logging on to a Controller VMwith SSH. Exercise caution whenever connecting directly to a Controller VM as the risk of causing clusterissues is increased.
Warning: When you connect to a Controller VM with SSH, ensure that the SSH client doesnot import or change any locale settings. The Nutanix software is not localized, and executingcommands with any locale other than en_US.UTF-8 can cause severe cluster issues.
To check the locale used in an SSH session, run /usr/bin/locale. If any environment variablesare set to anything other than en_US.UTF-8, reconnect with an SSH configuration that does notimport or change any locale settings.
Shutting Down a Node in a Cluster (AHV)
Before you begin: Shut down guest VMs that are running on the node, or move them to other nodes inthe cluster.
Caution: You can only shut down one node for each cluster. If the cluster would have more thanone node shut down, shut down the entire cluster.
1. If the Controller VM is running, shut down the Controller VM.
a. Log on to the Controller VM with SSH.
b. Shut down the Controller VM.
nutanix@cvm$ cvm_shutdown -P now
2. Log on to the Acropolis host with SSH.
3. Shut down the host.
root@ahv# shutdown -h now
Starting a Node in a Cluster (AHV)
1. Log on to the Acropolis host with SSH.

Node Management | Acropolis Hypervisor Administration Guide | AHV | 6
2. Find the name of the Controller VM.
root@ahv# virsh list --all | grep CVM
Make a note of the Controller VM name in the second column.
3. Determine if the Controller VM is running.
• If the Controller VM is off, a line similar to the following should be returned: - NTNX-12AM2K470031-D-CVM shut off
Make a note of the Controller VM name in the second column.
• If the Controller VM is on, a line similar to the following should be returned: - NTNX-12AM2K470031-D-CVM running
4. If the Controller VM is shut off, start it.
root@ahv# virsh start cvm_name
Replace cvm_name with the name of the Controller VM that you found from the preceding command.
5. Log on to another Controller VM in the cluster with SSH.
6. Verify that all services are up on all Controller VMs.
nutanix@cvm$ cluster status
If the cluster is running properly, output similar to the following is displayed for each node in the cluster:
CVM: 10.1.64.60 Up Zeus UP [3704, 3727, 3728, 3729, 3807, 3821] Scavenger UP [4937, 4960, 4961, 4990] SSLTerminator UP [5034, 5056, 5057, 5139] Hyperint UP [5059, 5082, 5083, 5086, 5099, 5108] Medusa UP [5534, 5559, 5560, 5563, 5752] DynamicRingChanger UP [5852, 5874, 5875, 5954] Pithos UP [5877, 5899, 5900, 5962] Stargate UP [5902, 5927, 5928, 6103, 6108] Cerebro UP [5930, 5952, 5953, 6106] Chronos UP [5960, 6004, 6006, 6075] Curator UP [5987, 6017, 6018, 6261] Prism UP [6020, 6042, 6043, 6111, 6818] CIM UP [6045, 6067, 6068, 6101] AlertManager UP [6070, 6099, 6100, 6296] Arithmos UP [6107, 6175, 6176, 6344] SysStatCollector UP [6196, 6259, 6260, 6497] Tunnel UP [6263, 6312, 6313] ClusterHealth UP [6317, 6342, 6343, 6446, 6468, 6469, 6604, 6605, 6606, 6607] Janus UP [6365, 6444, 6445, 6584] NutanixGuestTools UP [6377, 6403, 6404]
Changing CVM Memory Configuration (AHV)
Before you begin: Perform these steps once for each Controller VM in the cluster if you need to changethe Controller VM memory allocation.
Node Management | Acropolis Hypervisor Administration Guide | AHV | 7
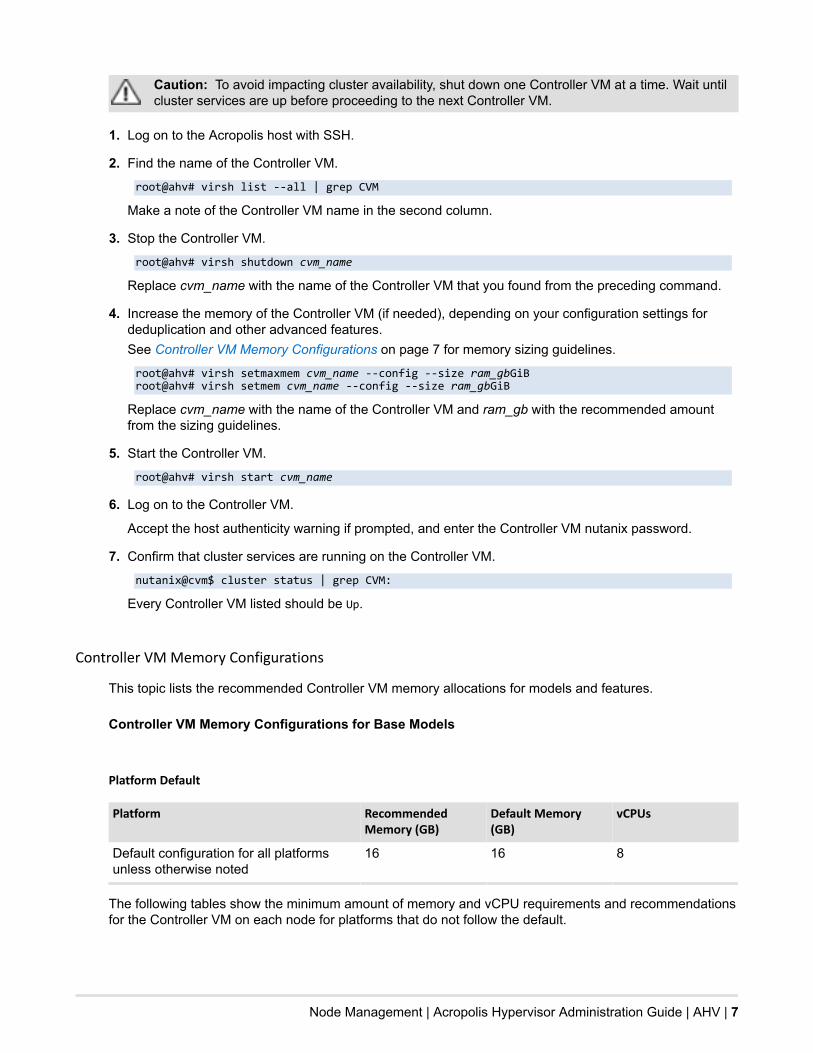
Caution: To avoid impacting cluster availability, shut down one Controller VM at a time. Wait untilcluster services are up before proceeding to the next Controller VM.
1. Log on to the Acropolis host with SSH.
2. Find the name of the Controller VM.
root@ahv# virsh list --all | grep CVM
Make a note of the Controller VM name in the second column.
3. Stop the Controller VM.
root@ahv# virsh shutdown cvm_name
Replace cvm_name with the name of the Controller VM that you found from the preceding command.
4. Increase the memory of the Controller VM (if needed), depending on your configuration settings fordeduplication and other advanced features.See Controller VM Memory Configurations on page 7 for memory sizing guidelines.
root@ahv# virsh setmaxmem cvm_name --config --size ram_gbGiBroot@ahv# virsh setmem cvm_name --config --size ram_gbGiB
Replace cvm_name with the name of the Controller VM and ram_gb with the recommended amountfrom the sizing guidelines.
5. Start the Controller VM.
root@ahv# virsh start cvm_name
6. Log on to the Controller VM.
Accept the host authenticity warning if prompted, and enter the Controller VM nutanix password.
7. Confirm that cluster services are running on the Controller VM.
nutanix@cvm$ cluster status | grep CVM:
Every Controller VM listed should be Up.
Controller VM Memory Configurations
This topic lists the recommended Controller VM memory allocations for models and features.
Controller VM Memory Configurations for Base Models
Platform Default
Platform RecommendedMemory (GB)
Default Memory(GB)
vCPUs
Default configuration for all platformsunless otherwise noted
16 16 8
The following tables show the minimum amount of memory and vCPU requirements and recommendationsfor the Controller VM on each node for platforms that do not follow the default.
Node Management | Acropolis Hypervisor Administration Guide | AHV | 8
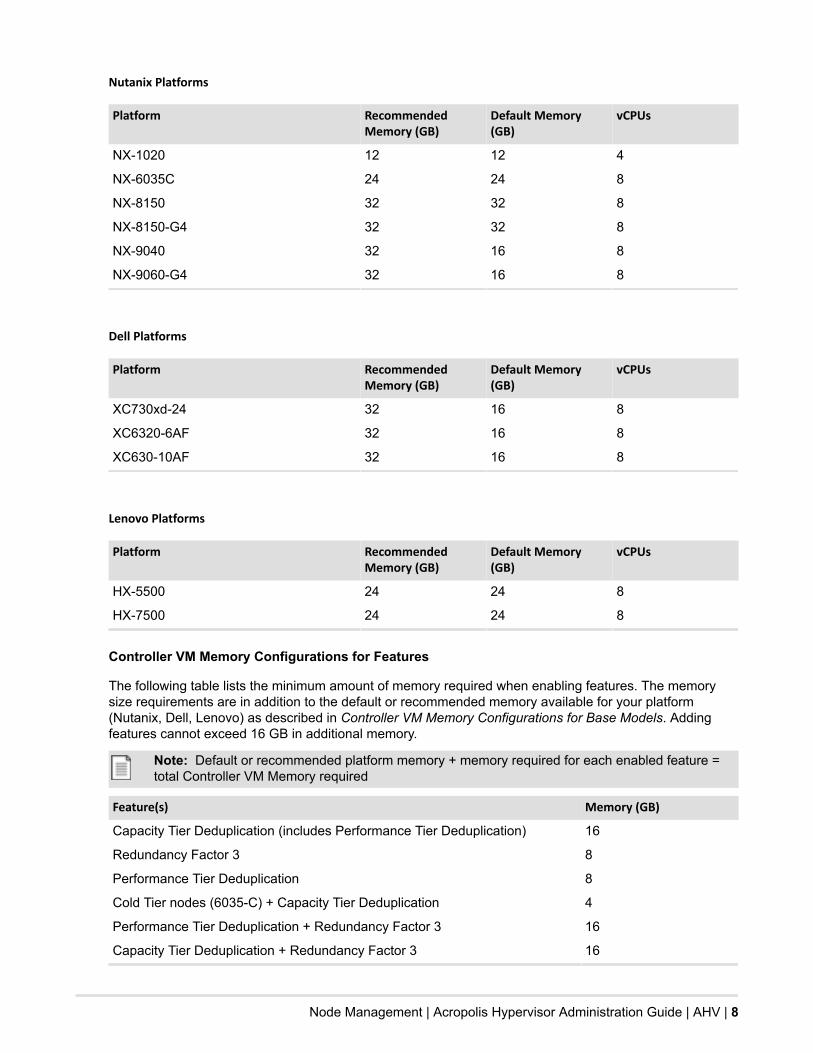
Nutanix Platforms
Platform RecommendedMemory (GB)
Default Memory(GB)
vCPUs
NX-1020 12 12 4
NX-6035C 24 24 8
NX-8150 32 32 8
NX-8150-G4 32 32 8
NX-9040 32 16 8
NX-9060-G4 32 16 8
Dell Platforms
Platform RecommendedMemory (GB)
Default Memory(GB)
vCPUs
XC730xd-24 32 16 8
XC6320-6AF 32 16 8
XC630-10AF 32 16 8
Lenovo Platforms
Platform RecommendedMemory (GB)
Default Memory(GB)
vCPUs
HX-5500 24 24 8
HX-7500 24 24 8
Controller VM Memory Configurations for Features
The following table lists the minimum amount of memory required when enabling features. The memorysize requirements are in addition to the default or recommended memory available for your platform(Nutanix, Dell, Lenovo) as described in Controller VM Memory Configurations for Base Models. Addingfeatures cannot exceed 16 GB in additional memory.
Note: Default or recommended platform memory + memory required for each enabled feature =total Controller VM Memory required
Feature(s) Memory (GB)
Capacity Tier Deduplication (includes Performance Tier Deduplication) 16
Redundancy Factor 3 8
Performance Tier Deduplication 8
Cold Tier nodes (6035-C) + Capacity Tier Deduplication 4
Performance Tier Deduplication + Redundancy Factor 3 16
Capacity Tier Deduplication + Redundancy Factor 3 16
Node Management | Acropolis Hypervisor Administration Guide | AHV | 9
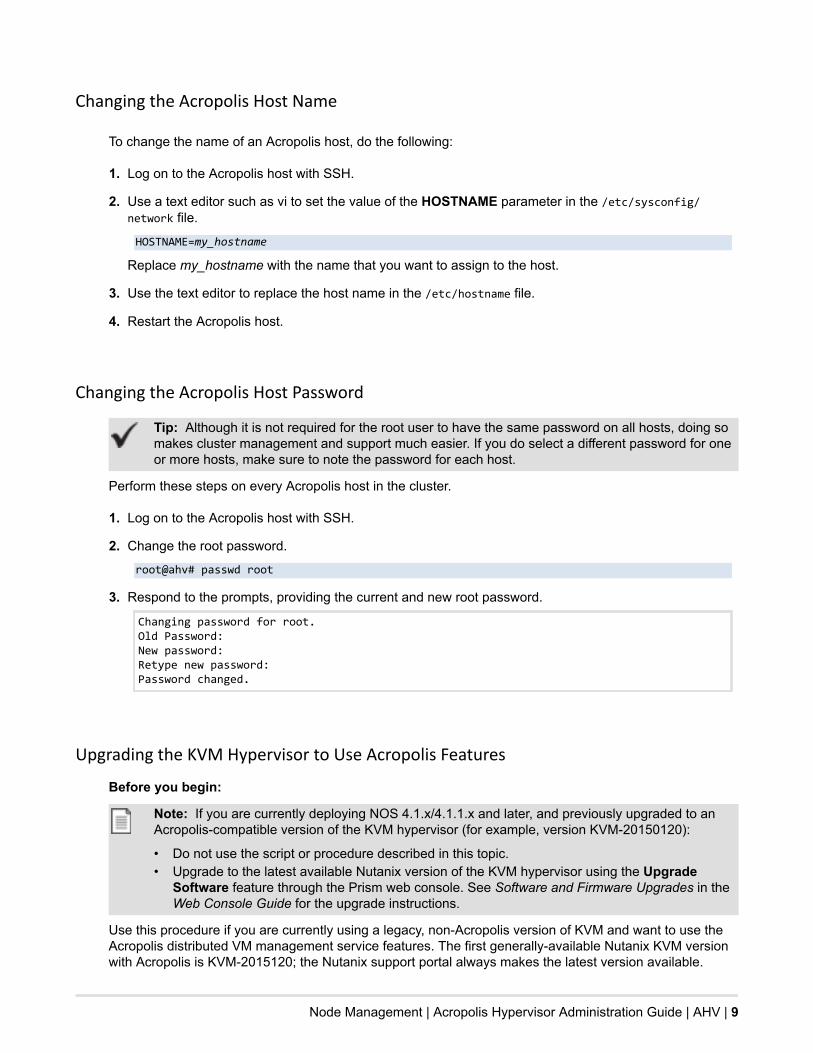
Changing the Acropolis Host Name
To change the name of an Acropolis host, do the following:
1. Log on to the Acropolis host with SSH.
2. Use a text editor such as vi to set the value of the HOSTNAME parameter in the /etc/sysconfig/network file.
HOSTNAME=my_hostname
Replace my_hostname with the name that you want to assign to the host.
3. Use the text editor to replace the host name in the /etc/hostname file.
4. Restart the Acropolis host.
Changing the Acropolis Host Password
Tip: Although it is not required for the root user to have the same password on all hosts, doing somakes cluster management and support much easier. If you do select a different password for oneor more hosts, make sure to note the password for each host.
Perform these steps on every Acropolis host in the cluster.
1. Log on to the Acropolis host with SSH.
2. Change the root password.
root@ahv# passwd root
3. Respond to the prompts, providing the current and new root password.
Changing password for root.Old Password:New password:Retype new password:Password changed.
Upgrading the KVM Hypervisor to Use Acropolis Features
Before you begin:
Note: If you are currently deploying NOS 4.1.x/4.1.1.x and later, and previously upgraded to anAcropolis-compatible version of the KVM hypervisor (for example, version KVM-20150120):
• Do not use the script or procedure described in this topic.• Upgrade to the latest available Nutanix version of the KVM hypervisor using the Upgrade
Software feature through the Prism web console. See Software and Firmware Upgrades in theWeb Console Guide for the upgrade instructions.
Use this procedure if you are currently using a legacy, non-Acropolis version of KVM and want to use theAcropolis distributed VM management service features. The first generally-available Nutanix KVM versionwith Acropolis is KVM-2015120; the Nutanix support portal always makes the latest version available.
Node Management | Acropolis Hypervisor Administration Guide | AHV | 10
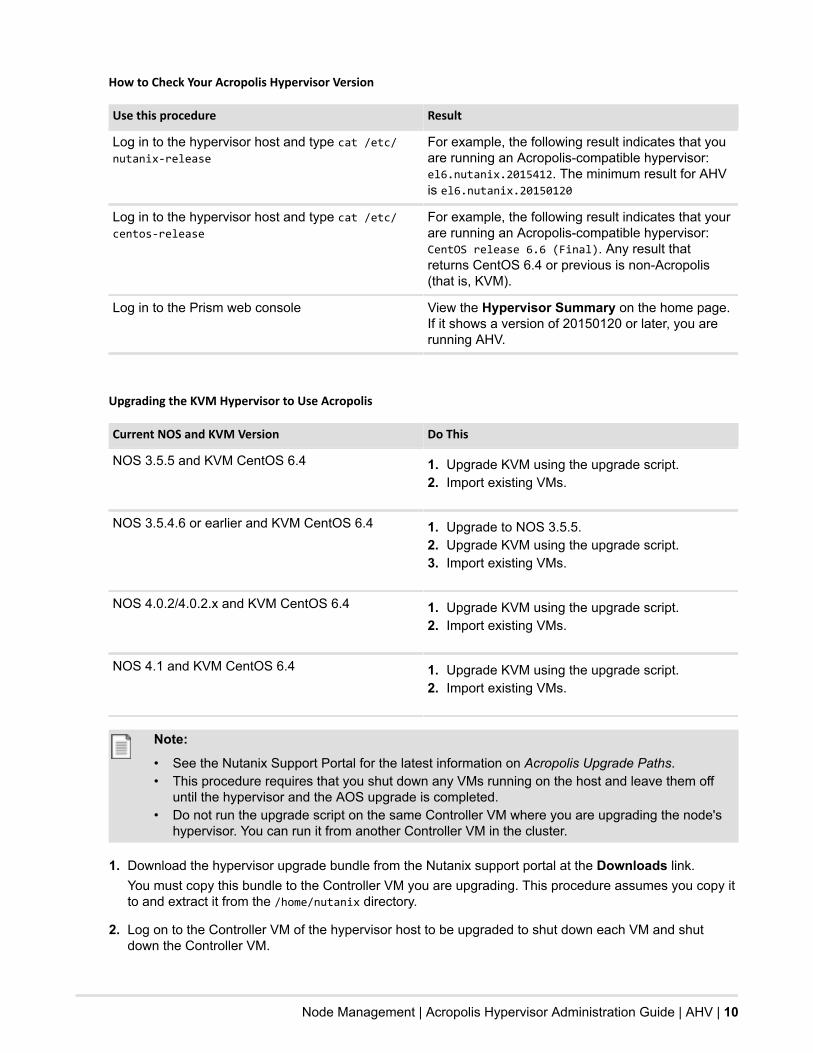
How to Check Your Acropolis Hypervisor Version
Use this procedure Result
Log in to the hypervisor host and type cat /etc/nutanix-release
For example, the following result indicates that youare running an Acropolis-compatible hypervisor:el6.nutanix.2015412. The minimum result for AHVis el6.nutanix.20150120
Log in to the hypervisor host and type cat /etc/centos-release
For example, the following result indicates that yourare running an Acropolis-compatible hypervisor:CentOS release 6.6 (Final). Any result thatreturns CentOS 6.4 or previous is non-Acropolis(that is, KVM).
Log in to the Prism web console View the Hypervisor Summary on the home page.If it shows a version of 20150120 or later, you arerunning AHV.
Upgrading the KVM Hypervisor to Use Acropolis
Current NOS and KVM Version Do This
NOS 3.5.5 and KVM CentOS 6.4 1. Upgrade KVM using the upgrade script.2. Import existing VMs.
NOS 3.5.4.6 or earlier and KVM CentOS 6.4 1. Upgrade to NOS 3.5.5.2. Upgrade KVM using the upgrade script.3. Import existing VMs.
NOS 4.0.2/4.0.2.x and KVM CentOS 6.4 1. Upgrade KVM using the upgrade script.2. Import existing VMs.
NOS 4.1 and KVM CentOS 6.4 1. Upgrade KVM using the upgrade script.2. Import existing VMs.
Note:
• See the Nutanix Support Portal for the latest information on Acropolis Upgrade Paths.• This procedure requires that you shut down any VMs running on the host and leave them off
until the hypervisor and the AOS upgrade is completed.• Do not run the upgrade script on the same Controller VM where you are upgrading the node's
hypervisor. You can run it from another Controller VM in the cluster.
1. Download the hypervisor upgrade bundle from the Nutanix support portal at the Downloads link.You must copy this bundle to the Controller VM you are upgrading. This procedure assumes you copy itto and extract it from the /home/nutanix directory.
2. Log on to the Controller VM of the hypervisor host to be upgraded to shut down each VM and shutdown the Controller VM.
Node Management | Acropolis Hypervisor Administration Guide | AHV | 11
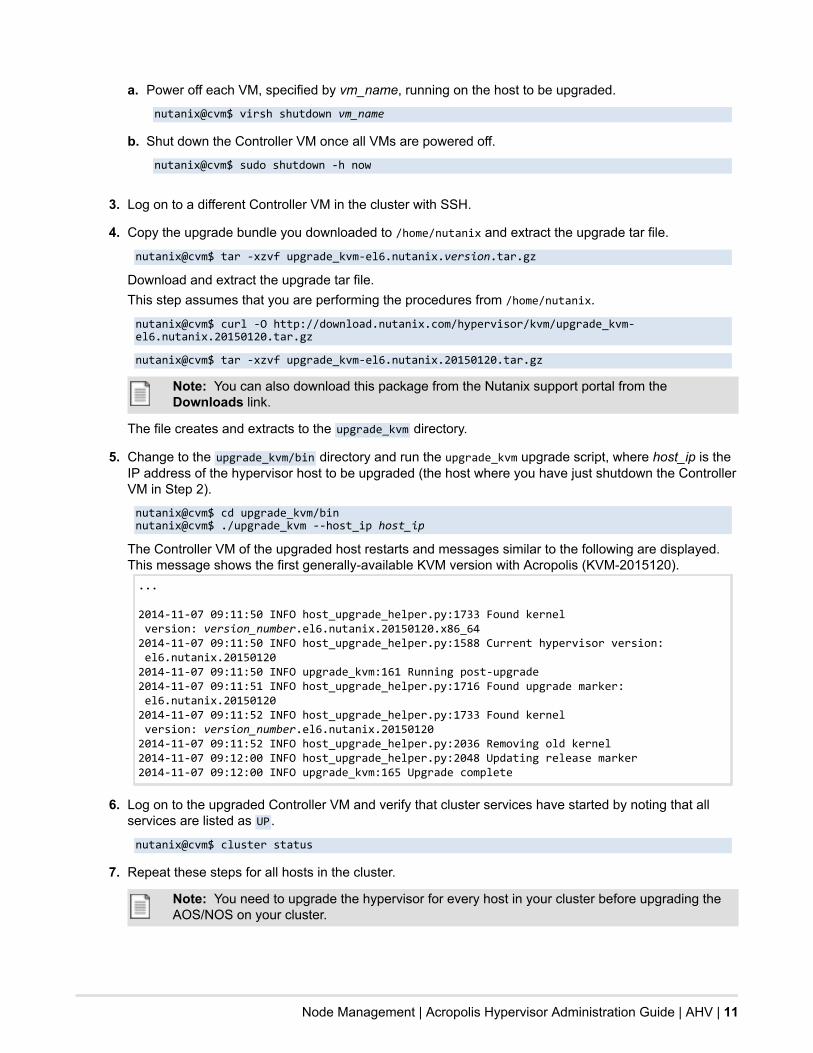
a. Power off each VM, specified by vm_name, running on the host to be upgraded.
nutanix@cvm$ virsh shutdown vm_name
b. Shut down the Controller VM once all VMs are powered off.
nutanix@cvm$ sudo shutdown -h now
3. Log on to a different Controller VM in the cluster with SSH.
4. Copy the upgrade bundle you downloaded to /home/nutanix and extract the upgrade tar file.
nutanix@cvm$ tar -xzvf upgrade_kvm-el6.nutanix.version.tar.gz
Download and extract the upgrade tar file.This step assumes that you are performing the procedures from /home/nutanix.
nutanix@cvm$ curl -O http://download.nutanix.com/hypervisor/kvm/upgrade_kvm-el6.nutanix.20150120.tar.gz
nutanix@cvm$ tar -xzvf upgrade_kvm-el6.nutanix.20150120.tar.gz
Note: You can also download this package from the Nutanix support portal from theDownloads link.
The file creates and extracts to the upgrade_kvm directory.
5. Change to the upgrade_kvm/bin directory and run the upgrade_kvm upgrade script, where host_ip is theIP address of the hypervisor host to be upgraded (the host where you have just shutdown the ControllerVM in Step 2).
nutanix@cvm$ cd upgrade_kvm/binnutanix@cvm$ ./upgrade_kvm --host_ip host_ip
The Controller VM of the upgraded host restarts and messages similar to the following are displayed.This message shows the first generally-available KVM version with Acropolis (KVM-2015120)....
2014-11-07 09:11:50 INFO host_upgrade_helper.py:1733 Found kernel version: version_number.el6.nutanix.20150120.x86_642014-11-07 09:11:50 INFO host_upgrade_helper.py:1588 Current hypervisor version: el6.nutanix.201501202014-11-07 09:11:50 INFO upgrade_kvm:161 Running post-upgrade2014-11-07 09:11:51 INFO host_upgrade_helper.py:1716 Found upgrade marker: el6.nutanix.201501202014-11-07 09:11:52 INFO host_upgrade_helper.py:1733 Found kernel version: version_number.el6.nutanix.201501202014-11-07 09:11:52 INFO host_upgrade_helper.py:2036 Removing old kernel2014-11-07 09:12:00 INFO host_upgrade_helper.py:2048 Updating release marker2014-11-07 09:12:00 INFO upgrade_kvm:165 Upgrade complete
6. Log on to the upgraded Controller VM and verify that cluster services have started by noting that allservices are listed as UP .
nutanix@cvm$ cluster status
7. Repeat these steps for all hosts in the cluster.
Note: You need to upgrade the hypervisor for every host in your cluster before upgrading theAOS/NOS on your cluster.

Node Management | Acropolis Hypervisor Administration Guide | AHV | 12
After the hypervisor is upgraded, you can now import any existing powered-off VMs according toprocedures described in the Acropolis App Mobility Fabric Guide.

Host Network Management | Acropolis Hypervisor Administration Guide | AHV | 13
2
Host Network ManagementNetwork management in an Acropolis cluster consists of the following tasks:
• Configuring Layer 2 switching through Open vSwitch. When configuring Open vSwitch, you configurebridges, bonds, and VLANs.
• Optionally changing the IP address, netmask, and default gateway that were specified for the hostsduring the imaging process.
Prerequisites for Configuring Networking
Change the configuration from the factory default to the recommended configuration. See Default FactoryConfiguration on page 16 and Best Practices for Configuring Networking in an Acropolis Cluster onpage 13.
Best Practices for Configuring Networking in an Acropolis Cluster
Nutanix recommends that you perform the following OVS configuration tasks from the Controller VM, asdescribed in this documentation:
• Viewing the network configuration• Configuring an Open vSwitch bond with desired interfaces• Assigning the Controller VM to a VLAN
For performing other OVS configuration tasks, such as adding an interface to a bridge and configuringLACP for the interfaces in an OVS bond, log on to the Acropolis hypervisor host, and then follow theprocedures described in the OVS documentation at http://openvswitch.org/.
Nutanix recommends that you configure the network as follows:
Recommended Network Configuration
Network Component Best Practice
Open vSwitch Do not modify the OpenFlow tables that are associated with the defaultOVS bridge br0.
VLANs Add the Controller VM and the Acropolis hypervisor to the same VLAN.By default, the Controller VM and the hypervisor are assigned to VLAN0, which effectively places them on the native VLAN configured on theupstream physical switch.
Do not add any other device, including guest VMs, to the VLAN to whichthe Controller VM and hypervisor host are assigned. Isolate guest VMs onone or more separate VLANs.

Host Network Management | Acropolis Hypervisor Administration Guide | AHV | 14
Network Component Best Practice
Virtual bridges Do not delete or rename OVS bridge br0.
Do not modify the native Linux bridge virbr0.
OVS bonded port (bond0) Aggregate the 10 GbE interfaces on the physical host to an OVS bondon the default OVS bridge br0 and trunk these interfaces on the physicalswitch.
By default, the 10 GbE interfaces in the OVS bond operate in therecommended active-backup mode. LACP configurations are known towork, but support might be limited.
1 GbE and 10 GbEinterfaces (physical host)
If you want to use the 10 GbE interfaces for guest VM traffic, make surethat the guest VMs do not use the VLAN over which the Controller VM andhypervisor communicate.
If you want to use the 1 GbE interfaces for guest VM connectivity, followthe hypervisor manufacturer’s switch port and networking configurationguidelines.
Do not include the 1 GbE interfaces in the same bond as the 10 GbEinterfaces. Also, to avoid loops, do not add the 1 GbE interfaces to bridgebr0, either individually or in a second bond. Use them on other bridges.
IPMI port on the hypervisorhost
Do not trunk switch ports that connect to the IPMI interface. Configure theswitch ports as access ports for management simplicity.
Upstream physical switch Nutanix does not recommend the use of Fabric Extenders (FEX)or similar technologies for production use cases. While initial, low-load implementations might run smoothly with such technologies,poor performance, VM lockups, and other issues might occur asimplementations scale upward (see Knowledge Base article KB1612).Nutanix recommends the use of 10Gbps, line-rate, non-blocking switcheswith larger buffers for production workloads.
Use an 802.3-2012 standards–compliant switch that has a low-latency,cut-through design and provides predictable, consistent traffic latencyregardless of packet size, traffic pattern, or the features enabled onthe 10 GbE interfaces. Port-to-port latency should be no higher than 2microseconds.
Use fast-convergence technologies (such as Cisco PortFast) on switchports that are connected to the hypervisor host.
Avoid using shared buffers for the 10 GbE ports. Use a dedicated buffer foreach port.
Physical Network Layout Use redundant top-of-rack switches in a traditional leaf-spine architecture.This simple, flat network design is well suited for a highly distributed,shared-nothing compute and storage architecture.
Add all the nodes that belong to a given cluster to the same Layer-2network segment.
Other network layouts are supported as long as all other Nutanixrecommendations are followed.
Controller VM Do not remove the Controller VM from either the OVS bridge br0 or thenative Linux bridge virbr0.
Host Network Management | Acropolis Hypervisor Administration Guide | AHV | 15
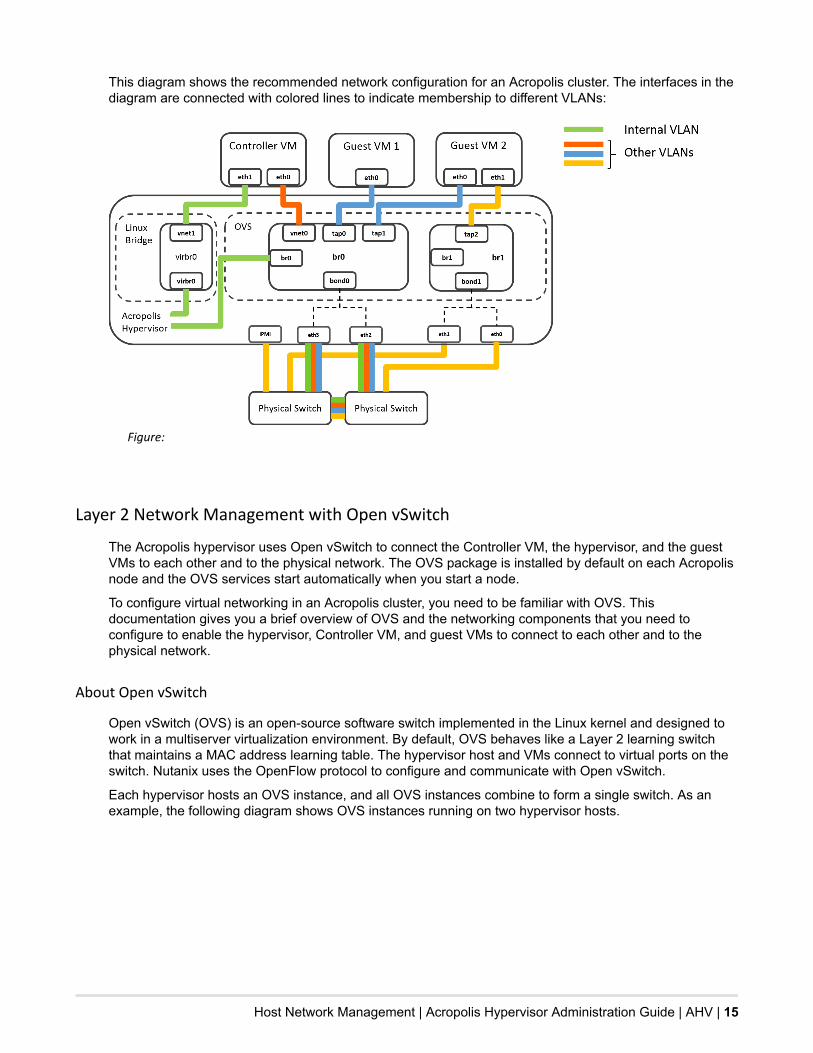
This diagram shows the recommended network configuration for an Acropolis cluster. The interfaces in thediagram are connected with colored lines to indicate membership to different VLANs:
Figure:
Layer 2 Network Management with Open vSwitch
The Acropolis hypervisor uses Open vSwitch to connect the Controller VM, the hypervisor, and the guestVMs to each other and to the physical network. The OVS package is installed by default on each Acropolisnode and the OVS services start automatically when you start a node.
To configure virtual networking in an Acropolis cluster, you need to be familiar with OVS. Thisdocumentation gives you a brief overview of OVS and the networking components that you need toconfigure to enable the hypervisor, Controller VM, and guest VMs to connect to each other and to thephysical network.
About Open vSwitch
Open vSwitch (OVS) is an open-source software switch implemented in the Linux kernel and designed towork in a multiserver virtualization environment. By default, OVS behaves like a Layer 2 learning switchthat maintains a MAC address learning table. The hypervisor host and VMs connect to virtual ports on theswitch. Nutanix uses the OpenFlow protocol to configure and communicate with Open vSwitch.
Each hypervisor hosts an OVS instance, and all OVS instances combine to form a single switch. As anexample, the following diagram shows OVS instances running on two hypervisor hosts.

Host Network Management | Acropolis Hypervisor Administration Guide | AHV | 16
Figure: Open vSwitch
Default Factory Configuration
The factory configuration of an Acropolis host includes a default OVS bridge named br0 and a native linuxbridge called virbr0.
Bridge br0 includes the following ports by default:
• An internal port with the same name as the default bridge; that is, an internal port named br0. This is theaccess port for the hypervisor host.
• A bonded port named bond0. The bonded port aggregates all the physical interfaces available on thenode. For example, if the node has two 10 GbE interfaces and two 1 GbE interfaces, all four interfacesare aggregated on bond0. This configuration is necessary for Foundation to successfully image thenode regardless of which interfaces are connected to the network.
Note: Before you begin configuring a virtual network on a node, you must disassociate the1 GbE interfaces from the bond0 port. See Configuring an Open vSwitch Bond with DesiredInterfaces on page 19.
The following diagram illustrates the default factory configuration of OVS on an Acropolis node:
Host Network Management | Acropolis Hypervisor Administration Guide | AHV | 17
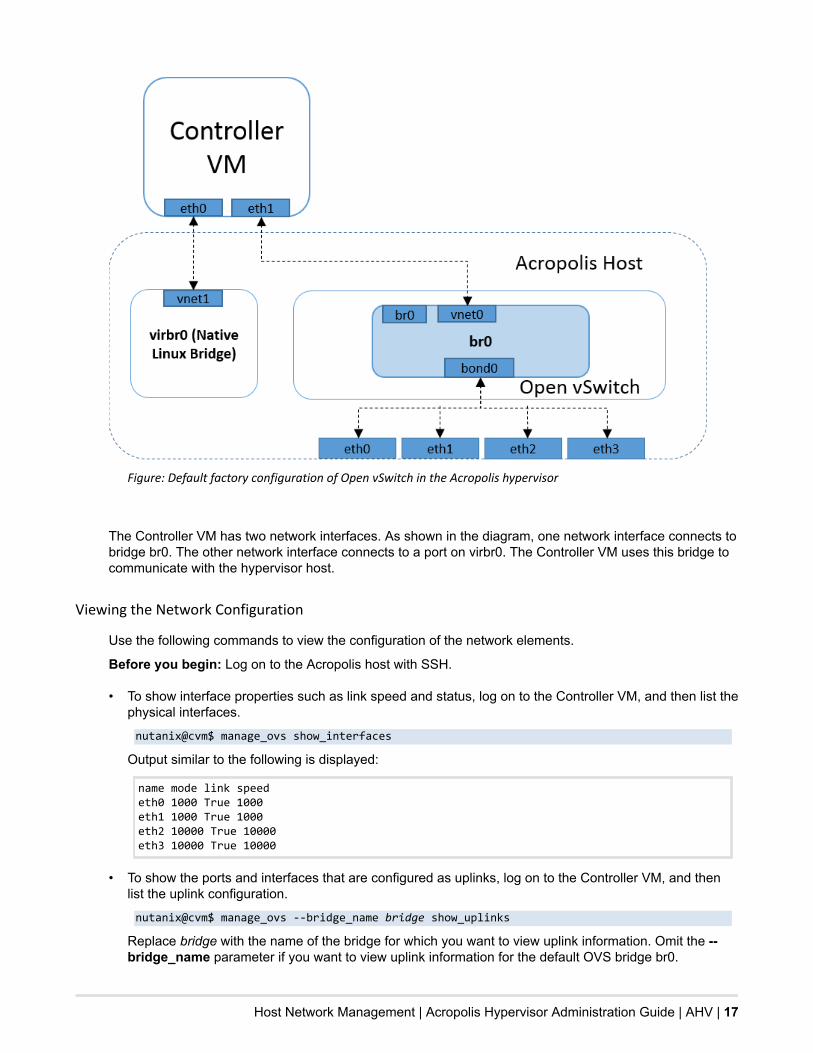
Figure: Default factory configuration of Open vSwitch in the Acropolis hypervisor
The Controller VM has two network interfaces. As shown in the diagram, one network interface connects tobridge br0. The other network interface connects to a port on virbr0. The Controller VM uses this bridge tocommunicate with the hypervisor host.
Viewing the Network Configuration
Use the following commands to view the configuration of the network elements.
Before you begin: Log on to the Acropolis host with SSH.
• To show interface properties such as link speed and status, log on to the Controller VM, and then list thephysical interfaces.
nutanix@cvm$ manage_ovs show_interfaces
Output similar to the following is displayed:
name mode link speed eth0 1000 True 1000 eth1 1000 True 1000 eth2 10000 True 10000 eth3 10000 True 10000
• To show the ports and interfaces that are configured as uplinks, log on to the Controller VM, and thenlist the uplink configuration.
nutanix@cvm$ manage_ovs --bridge_name bridge show_uplinks
Replace bridge with the name of the bridge for which you want to view uplink information. Omit the --bridge_name parameter if you want to view uplink information for the default OVS bridge br0.
Host Network Management | Acropolis Hypervisor Administration Guide | AHV | 18
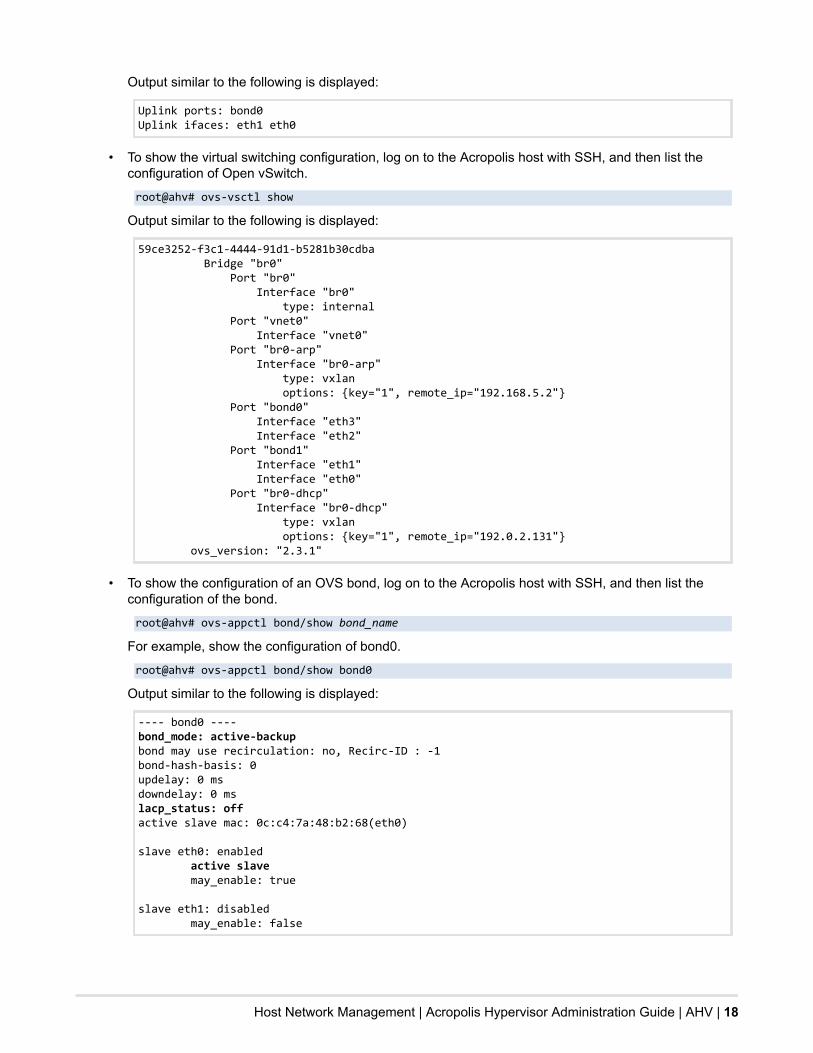
Output similar to the following is displayed:
Uplink ports: bond0Uplink ifaces: eth1 eth0
• To show the virtual switching configuration, log on to the Acropolis host with SSH, and then list theconfiguration of Open vSwitch.
root@ahv# ovs-vsctl show
Output similar to the following is displayed:
59ce3252-f3c1-4444-91d1-b5281b30cdba Bridge "br0" Port "br0" Interface "br0" type: internal Port "vnet0" Interface "vnet0" Port "br0-arp" Interface "br0-arp" type: vxlan options: {key="1", remote_ip="192.168.5.2"} Port "bond0" Interface "eth3" Interface "eth2" Port "bond1" Interface "eth1" Interface "eth0" Port "br0-dhcp" Interface "br0-dhcp" type: vxlan options: {key="1", remote_ip="192.0.2.131"} ovs_version: "2.3.1"
• To show the configuration of an OVS bond, log on to the Acropolis host with SSH, and then list theconfiguration of the bond.
root@ahv# ovs-appctl bond/show bond_name
For example, show the configuration of bond0.
root@ahv# ovs-appctl bond/show bond0
Output similar to the following is displayed:
---- bond0 ----bond_mode: active-backupbond may use recirculation: no, Recirc-ID : -1bond-hash-basis: 0updelay: 0 msdowndelay: 0 mslacp_status: offactive slave mac: 0c:c4:7a:48:b2:68(eth0)
slave eth0: enabled active slave may_enable: true
slave eth1: disabled may_enable: false

Host Network Management | Acropolis Hypervisor Administration Guide | AHV | 19
Creating an Open vSwitch Bridge
To create an OVS bridge, do the following:
1. Log on to the Acropolis host with SSH.
2. Log on to the Controller VM.
root@host# ssh [email protected]
Accept the host authenticity warning if prompted, and enter the Controller VM nutanix password.
3. Create an OVS bridge on each host in the cluster.
nutanix@cvm$ allssh 'ssh [email protected] /usr/bin/ovs-vsctl add-br bridge'
Replace bridge with a name for the bridge. The output does not indicate success explicitly, so you canappend && echo success to the command. If the bridge is created, the text success is displayed.
For example, create a bridge and name it br1.
nutanix@cvm$ allssh 'ssh [email protected] /usr/bin/ovs-vsctl add-br br1 && echo success'
Output similar to the following is displayed:
nutanix@cvm$ allssh 'ssh [email protected] /usr/bin/ovs-vsctl add-br br1 && echo success'Executing ssh [email protected] /usr/bin/ovs-vsctl add-br br1 && echo success on the cluster================== 192.0.2.203 =================FIPS mode initializedNutanix KVMsuccess...
Configuring an Open vSwitch Bond with Desired Interfaces
When creating an OVS bond, you can specify the interfaces that you want to include in the bond.
Use this procedure to create a bond that includes a desired set of interfaces or to specify a new set ofinterfaces for an existing bond. If you are modifying an existing bond, the Acropolis hypervisor removes thebond and then re-creates the bond with the specified interfaces.
Note: Perform this procedure on factory-configured nodes to remove the 1 GbE interfaces fromthe bonded port bond0. You cannot configure failover priority for the interfaces in an OVS bond, sothe disassociation is necessary to help prevent any unpredictable performance issues that mightresult from a 10 GbE interface failing over to a 1 GbE interface. Nutanix recommends that youaggregate only the 10 GbE interfaces on bond0 and use the 1 GbE interfaces on a separate OVSbridge.
To create an OVS bond with the desired interfaces, do the following:
1. Log on to the Acropolis host with SSH.
2. Log on to the Controller VM.
root@host# ssh [email protected]
Accept the host authenticity warning if prompted, and enter the Controller VM nutanix password.
Host Network Management | Acropolis Hypervisor Administration Guide | AHV | 20
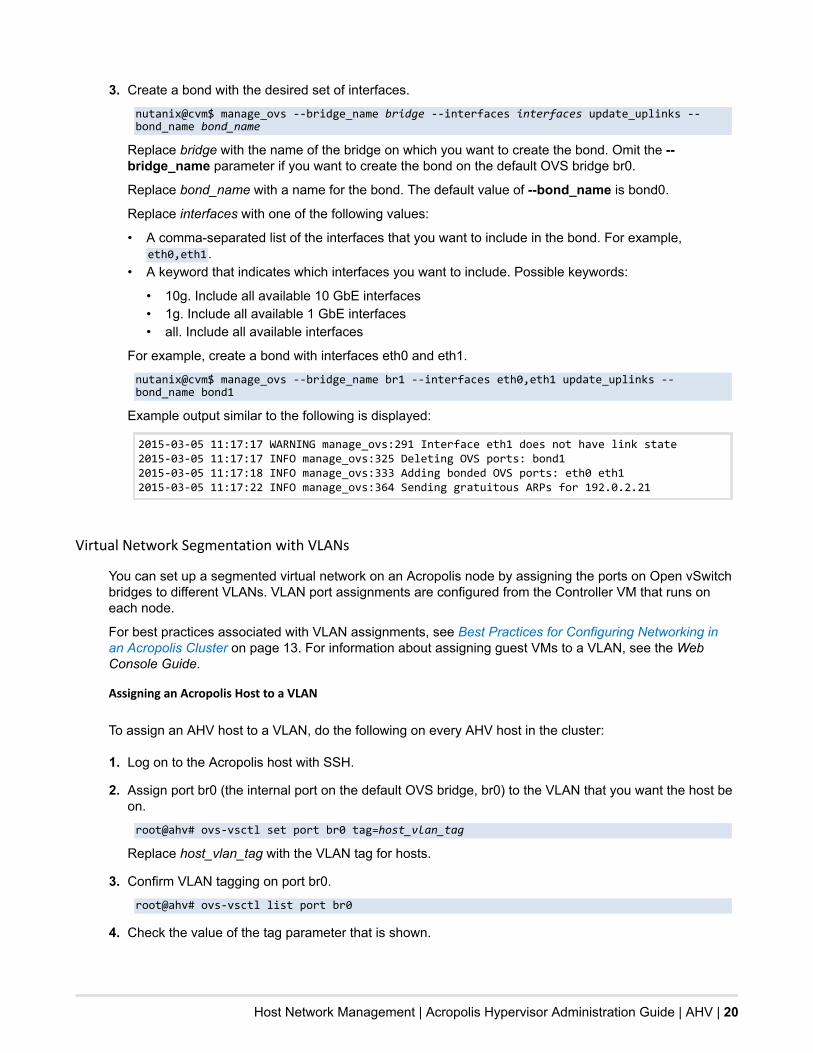
3. Create a bond with the desired set of interfaces.
nutanix@cvm$ manage_ovs --bridge_name bridge --interfaces interfaces update_uplinks --bond_name bond_name
Replace bridge with the name of the bridge on which you want to create the bond. Omit the --bridge_name parameter if you want to create the bond on the default OVS bridge br0.
Replace bond_name with a name for the bond. The default value of --bond_name is bond0.
Replace interfaces with one of the following values:
• A comma-separated list of the interfaces that you want to include in the bond. For example,eth0,eth1 .
• A keyword that indicates which interfaces you want to include. Possible keywords:
• 10g. Include all available 10 GbE interfaces• 1g. Include all available 1 GbE interfaces• all. Include all available interfaces
For example, create a bond with interfaces eth0 and eth1.
nutanix@cvm$ manage_ovs --bridge_name br1 --interfaces eth0,eth1 update_uplinks --bond_name bond1
Example output similar to the following is displayed:
2015-03-05 11:17:17 WARNING manage_ovs:291 Interface eth1 does not have link state2015-03-05 11:17:17 INFO manage_ovs:325 Deleting OVS ports: bond12015-03-05 11:17:18 INFO manage_ovs:333 Adding bonded OVS ports: eth0 eth1 2015-03-05 11:17:22 INFO manage_ovs:364 Sending gratuitous ARPs for 192.0.2.21
Virtual Network Segmentation with VLANs
You can set up a segmented virtual network on an Acropolis node by assigning the ports on Open vSwitchbridges to different VLANs. VLAN port assignments are configured from the Controller VM that runs oneach node.
For best practices associated with VLAN assignments, see Best Practices for Configuring Networking inan Acropolis Cluster on page 13. For information about assigning guest VMs to a VLAN, see the WebConsole Guide.
Assigning an Acropolis Host to a VLAN
To assign an AHV host to a VLAN, do the following on every AHV host in the cluster:
1. Log on to the Acropolis host with SSH.
2. Assign port br0 (the internal port on the default OVS bridge, br0) to the VLAN that you want the host beon.
root@ahv# ovs-vsctl set port br0 tag=host_vlan_tag
Replace host_vlan_tag with the VLAN tag for hosts.
3. Confirm VLAN tagging on port br0.
root@ahv# ovs-vsctl list port br0
4. Check the value of the tag parameter that is shown.
Host Network Management | Acropolis Hypervisor Administration Guide | AHV | 21
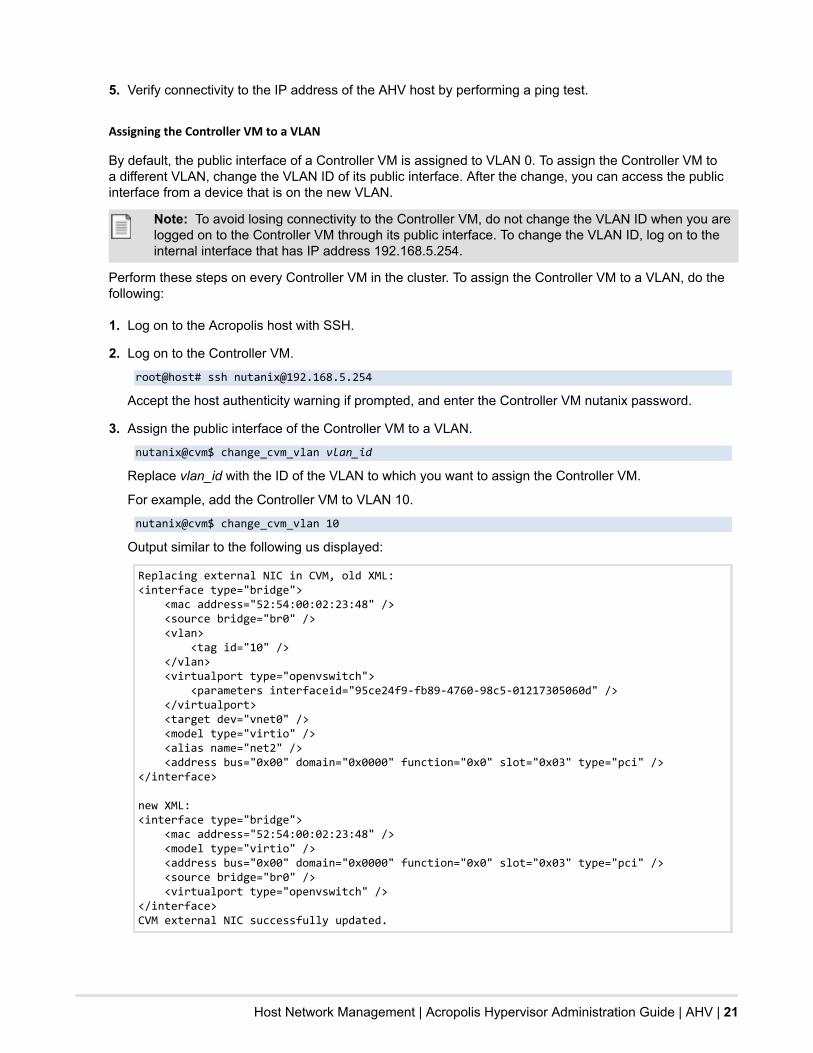
5. Verify connectivity to the IP address of the AHV host by performing a ping test.
Assigning the Controller VM to a VLAN
By default, the public interface of a Controller VM is assigned to VLAN 0. To assign the Controller VM toa different VLAN, change the VLAN ID of its public interface. After the change, you can access the publicinterface from a device that is on the new VLAN.
Note: To avoid losing connectivity to the Controller VM, do not change the VLAN ID when you arelogged on to the Controller VM through its public interface. To change the VLAN ID, log on to theinternal interface that has IP address 192.168.5.254.
Perform these steps on every Controller VM in the cluster. To assign the Controller VM to a VLAN, do thefollowing:
1. Log on to the Acropolis host with SSH.
2. Log on to the Controller VM.
root@host# ssh [email protected]
Accept the host authenticity warning if prompted, and enter the Controller VM nutanix password.
3. Assign the public interface of the Controller VM to a VLAN.
nutanix@cvm$ change_cvm_vlan vlan_id
Replace vlan_id with the ID of the VLAN to which you want to assign the Controller VM.
For example, add the Controller VM to VLAN 10.
nutanix@cvm$ change_cvm_vlan 10
Output similar to the following us displayed:
Replacing external NIC in CVM, old XML: <interface type="bridge"> <mac address="52:54:00:02:23:48" /> <source bridge="br0" /> <vlan> <tag id="10" /> </vlan> <virtualport type="openvswitch"> <parameters interfaceid="95ce24f9-fb89-4760-98c5-01217305060d" /> </virtualport> <target dev="vnet0" /> <model type="virtio" /> <alias name="net2" /> <address bus="0x00" domain="0x0000" function="0x0" slot="0x03" type="pci" /></interface>
new XML:<interface type="bridge"> <mac address="52:54:00:02:23:48" /> <model type="virtio" /> <address bus="0x00" domain="0x0000" function="0x0" slot="0x03" type="pci" /> <source bridge="br0" /> <virtualport type="openvswitch" /></interface>CVM external NIC successfully updated.
Host Network Management | Acropolis Hypervisor Administration Guide | AHV | 22
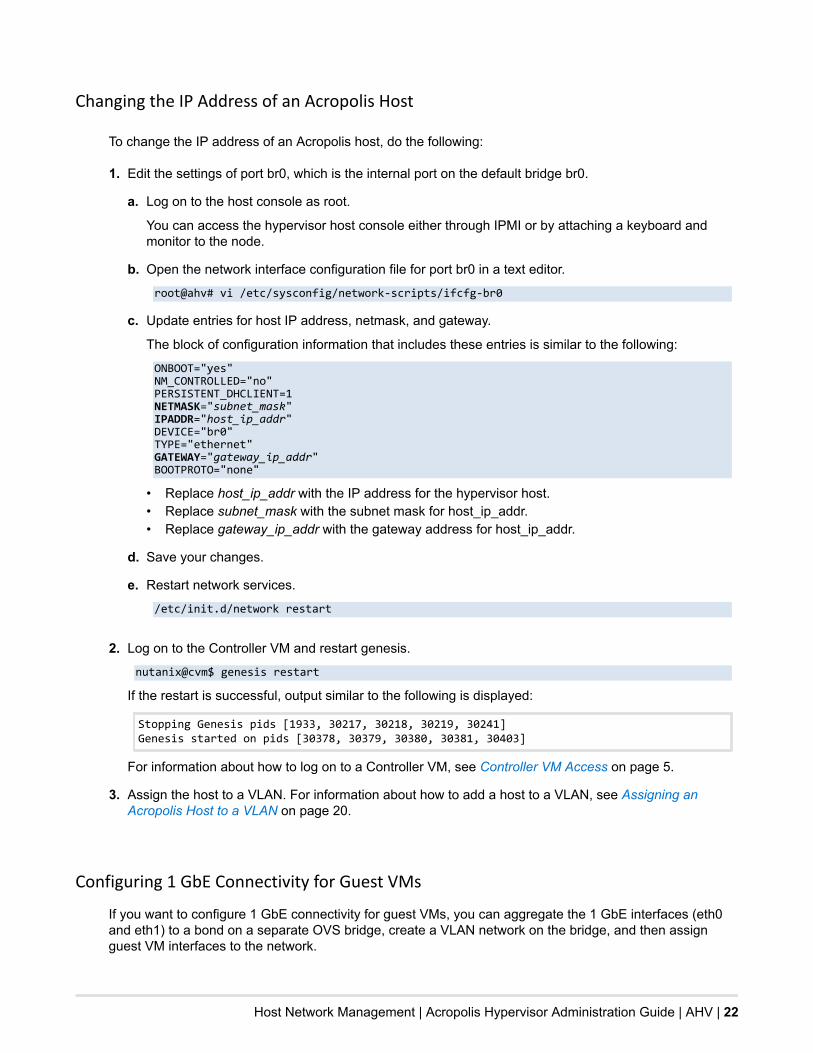
Changing the IP Address of an Acropolis Host
To change the IP address of an Acropolis host, do the following:
1. Edit the settings of port br0, which is the internal port on the default bridge br0.
a. Log on to the host console as root.
You can access the hypervisor host console either through IPMI or by attaching a keyboard andmonitor to the node.
b. Open the network interface configuration file for port br0 in a text editor.
root@ahv# vi /etc/sysconfig/network-scripts/ifcfg-br0
c. Update entries for host IP address, netmask, and gateway.
The block of configuration information that includes these entries is similar to the following:
ONBOOT="yes" NM_CONTROLLED="no" PERSISTENT_DHCLIENT=1NETMASK="subnet_mask" IPADDR="host_ip_addr" DEVICE="br0" TYPE="ethernet" GATEWAY="gateway_ip_addr"BOOTPROTO="none"
• Replace host_ip_addr with the IP address for the hypervisor host.• Replace subnet_mask with the subnet mask for host_ip_addr.• Replace gateway_ip_addr with the gateway address for host_ip_addr.
d. Save your changes.
e. Restart network services.
/etc/init.d/network restart
2. Log on to the Controller VM and restart genesis.
nutanix@cvm$ genesis restart
If the restart is successful, output similar to the following is displayed:
Stopping Genesis pids [1933, 30217, 30218, 30219, 30241]Genesis started on pids [30378, 30379, 30380, 30381, 30403]
For information about how to log on to a Controller VM, see Controller VM Access on page 5.
3. Assign the host to a VLAN. For information about how to add a host to a VLAN, see Assigning anAcropolis Host to a VLAN on page 20.
Configuring 1 GbE Connectivity for Guest VMs
If you want to configure 1 GbE connectivity for guest VMs, you can aggregate the 1 GbE interfaces (eth0and eth1) to a bond on a separate OVS bridge, create a VLAN network on the bridge, and then assignguest VM interfaces to the network.

Host Network Management | Acropolis Hypervisor Administration Guide | AHV | 23
To configure 1 GbE connectivity for guest VMs, do the following:
1. Log on to the Acropolis host with SSH.
2. Log on to the Controller VM.
root@host# ssh [email protected]
Accept the host authenticity warning if prompted, and enter the Controller VM nutanix password.
3. Determine the uplinks configured on the host.
nutanix@cvm$ allssh manage_ovs show_uplinks
Output similar to the following is displayed:
Executing manage_ovs show_uplinks on the cluster================== 192.0.2.49 =================Bridge br0: Uplink ports: br0-up Uplink ifaces: eth3 eth2 eth1 eth0
================== 192.0.2.50 =================Bridge br0: Uplink ports: br0-up Uplink ifaces: eth3 eth2 eth1 eth0
================== 192.0.2.51 =================Bridge br0: Uplink ports: br0-up Uplink ifaces: eth3 eth2 eth1 eth0
4. If the 1 GbE interfaces are in a bond with the 10 GbE interfaces, as shown in the sample output in theprevious step, dissociate the 1 GbE interfaces from the bond. Assume that the bridge name and bondname are br0 and br0-up , respectively.
nutanix@cvm$ allssh 'manage_ovs --bridge_name br0 --interfaces 10g --bond_name br0-up update_uplinks'
The command removes the bond and then re-creates the bond with only the 10 GbE interfaces.
5. Create a separate OVS bridge for 1 GbE connectivity. For example, create an OVS bridge called br1 .
nutanix@cvm$ allssh 'ssh [email protected] /usr/bin/ovs-vsctl add-br br1'
6. Aggregate the 1 GbE interfaces to a separate bond on the new bridge. For example, aggregate them toa bond named br1-up .
nutanix@cvm$ allssh 'manage_ovs --bridge_name br1 --interfaces 1g update_uplinks --bond_name br1-up'
7. Log on to each CVM and create a network on a separate VLAN for the guest VMs, and associate thenew bridge with the network. For example, create a network named vlan10.br1 on VLAN 10 .
nutanix@cvm$ acli net.create vlan10.br1 vlan=10 vswitch_name=br1
8. To enable guest VMs to use the 1 GbE interfaces, log on to the web console and assign interfaces onthe guest VMs to the network.For information about assigning guest VM interfaces to a network, see "Creating a VM" in the PrismWeb Console Guide.