acti v.a.c. international user manual · v.a.c. is short for vacuum assisted closure. v.a.c....
TRANSCRIPT
340076 Rev A
July 2007
International User ManualEnglish
®
Acti
If there are questions or if themissing,
immediately contact KCI. See back cover of this UserManual for country specific contact information.
V.A.C. Therapy SafetyInformation Sheet or Quick Reference Guide are
V.A.C. Therapy Safety Information can befound on the internet at www.kci-medical.com.
®
®
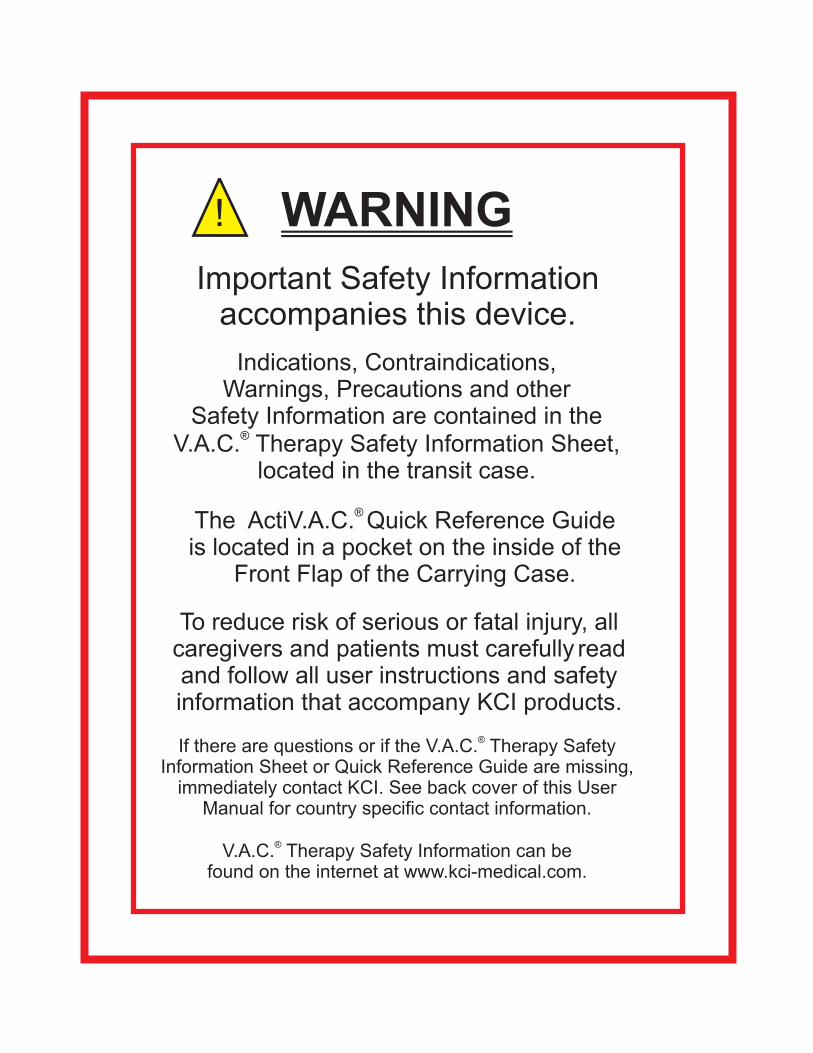
WARNING
Important Safety Informationaccompanies this device.
Indications, Contraindications,Warnings, Precautions and other
Safety Information are contained in theV.A.C. Therapy Safety Information Sheet,
located in the transit case.
®
To reduce risk of serious or fatal injury, allcaregivers and patients must carefully readand follow all user instructions and safetyinformation that accompany KCI products.
The ActiV.A.C. Quick Reference Guideis located in a pocket on the inside of the
Front Flap of the Carrying Case.
®
!
Table of Contents
(Continued on next page)
Important Safety Information Statement . . . . . . . . . . Inside Front Cover
Important Safeguards . . . . . . . . . . . . . . . . . . . . 3
ActiV.A.C. Therapy System Overview . . . . . . . . . . . . . . . 4
Introduction . . . . . . . . . . . . . . . . . . . . . . . 6
Patient Mode . . . . . . . . . . . . . . . . . . . . . . . 8
Patient Operating Instructions . . . . . . . . . . . . . . . . . 10
Help Menu. . . . . . . . . . . . . . . . . . . . . . . . 11
Battery Charging Instructions . . . . . . . . . . . . . . . . . . 12
Canister Changes . . . . . . . . . . . . . . . . . . . . . 14
Inserting the Therapy Unit into the Carrying Case . . . . . . . . . . . . 20
Carrying Case Configurations . . . . . . . . . . . . . . . . . . 21
®
Clinician Mode . . . . . . . . . . . . . . . . . . . . . . 22
Clinician Operating Instructions . . . . . . . . . . . . . . . . . 24
Patient 'Home' Screen . . . . . . . . . . . . . . . . . . . 8Common Screen Control Buttons . . . . . . . . . . . . . . . . 8Navigation Buttons . . . . . . . . . . . . . . . . . . . . 9
Power the ActiV.A.C. Therapy Unit On or Off . . . . . . . . . . . . . 10Therapy On or Off . . . . . . . . . . . . . . . . . . . . 10Audio Pause . . . . . . . . . . . . . . . . . . . . . . 10
Changing Languages . . . . . . . . . . . . . . . . . . . . 11On-screen Operating Instructions . . . . . . . . . . . . . . . . 11
Battery Charging Indicator Light . . . . . . . . . . . . . . . . 13Battery Charge Level Indicator . . . . . . . . . . . . . . . . . 13
Identifying Canister and Related Parts . . . . . . . . . . . . . . . 14Changing the Canister . . . . . . . . . . . . . . . . . . . 15Carrying Case Parts Identification . . . . . . . . . . . . . . . . 16Canister Change (in Carrying Case). . . . . . . . . . . . . . . . 17
®
Clinician Mode Home Screen . . . . . . . . . . . . . . . . . 22Common Screen Control Buttons . . . . . . . . . . . . . . . . 22Navigation Buttons . . . . . . . . . . . . . . . . . . . . 23
Power the ActiV.A.C. Therapy Unit On or Off . . . . . . . . . . . . 24Accessing Manual Therapy Settings . . . . . . . . . . . . . . . 25
Settings . . . . . . . . . . . . . . . . . . . . . . 25Pressure Settings . . . . . . . . . . . . . . . . . . . 26Intensity Control . . . . . . . . . . . . . . . . . . . . 26'Continuous' and 'Intermittent' Modes . . . . . . . . . . . . . . 27Intermittent Settings . . . . . . . . . . . . . . . . . . . 27Settings Confirmation . . . . . . . . . . . . . . . . . . 28
®
1
®
Acti
Table of Contents (cont.)
Clinician Operating Instructions (cont.)
Starting Therapy . . . . . . . . . . . . . . . . . . . . . 31
View or Export Therapy History . . . . . . . . . . . . . . . . . 35
Clinician Help Menu . . . . . . . . . . . . . . . . . . . . 37
Clinician Utilities . . . . . . . . . . . . . . . . . . . . . 38
Alerts and Alarms . . . . . . . . . . . . . . . . . . . . . 40Important Information About Alerts and Alarms . . . . . . . . . . . . 40
Frequently Asked Questions . . . . . . . . . . . . . . . . . . 50
Standard Precautions . . . . . . . . . . . . . . . . . . . . 52
Care and Cleaning . . . . . . . . . . . . . . . . . . . . . 53
Manufacturer Information . . . . . . . . . . . . . . . . . . . 55
Explanation of Symbols Used . . . . . . . . . . . . . . . . . . 56
Specifications . . . . . . . . . . . . . . . . . . . . . . 57
Customer Contact Information . . . . . . . . . . . . . . Back Cover
Settings Guide . . . . . . . . . . . . . . . . . . . . . . 28Settings Guide Confirmation . . . . . . . . . . . . . . . . 30
Seal Check™ Overview . . . . . . . . . . . . . . . . . . . 31How to Use Seal Check™ (When Starting Therapy) . . . . . . . . . . . 32Finding the Leak Using Seal Check™ . . . . . . . . . . . . . . . 32Log Tool Overview . . . . . . . . . . . . . . . . . . . . 33How to Use Log Tool (When Starting Therapy) . . . . . . . . . . . . 33
View Therapy History . . . . . . . . . . . . . . . . . . . 35Export Therapy History Report . . . . . . . . . . . . . . . . . 36Troubleshooting USB or Infrared Export Problems . . . . . . . . . . . 36
Changing to Patient or Clinician Mode. . . . . . . . . . . . . . . 37
Changing Time and Date . . . . . . . . . . . . . . . . . . 38Changing Pressure Units and Date Format . . . . . . . . . . . . . 39Changing Screen Brightness . . . . . . . . . . . . . . . . . 39Changing AC Light . . . . . . . . . . . . . . . . . . . . 39
Index of Alerts and Alarms . . . . . . . . . . . . . . . . . . 40
2
®
Acti
Important Safeguards
In order for KCI products to provide safe and proper performance:
The product must be used in accordance with this manual.
It is recommended that the ActiV.A.C. Therapy Unit always be kept in the Carrying Case when in use.
The ActiV.A.C. Therapy System may present a tripping hazard if placed on the floor. Ensure that theActiV.A.C. Therapy Unit is not placed in areas where people may walk.
To help provide safe and effective use, V.A.C. Dressings are only to be used withV.A.C. Therapy Units.
All assembly, adjustment, modification, maintenance and/or repair should be carried out by qualifiedpersonnel authorized by KCI.
The electrical installation of the room must comply with the appropriate electrical wiring standards.
Refer to the section of this manual for information on infection controlprocedures. Refer to the section for recommended daily and weekly cleaningfor the ActiV.A.C. Therapy Unit.
Never operate this product if it has a damaged power cord, power supply or plug. Should the powercord, power supply or plug be found to be worn or damaged, contact KCI. See back cover.
Never drop or insert any object into any opening or tubing of the ActiV.A.C. Therapy System.
Do not connect or attach V.A.C. Therapy units or its components, to devices not recommended by KCI.
Keep the ActiV.A.C. Therapy System away from heated surfaces.
Although the ActiV.A.C. Therapy System conforms to the intent of the standard IEC 60601-1-2 inrelation to Electromagnetic Compatibility, electrical equipment may produce interference. Ifinterference is suspected, separate the equipment and contact KCI.
�
�
�
�
�
�
�
�
�
�
�
®
®
®
®
®
®
®
®
®
®
Please note:
Standard PrecautionsCare and Cleaning
�
See back cover.
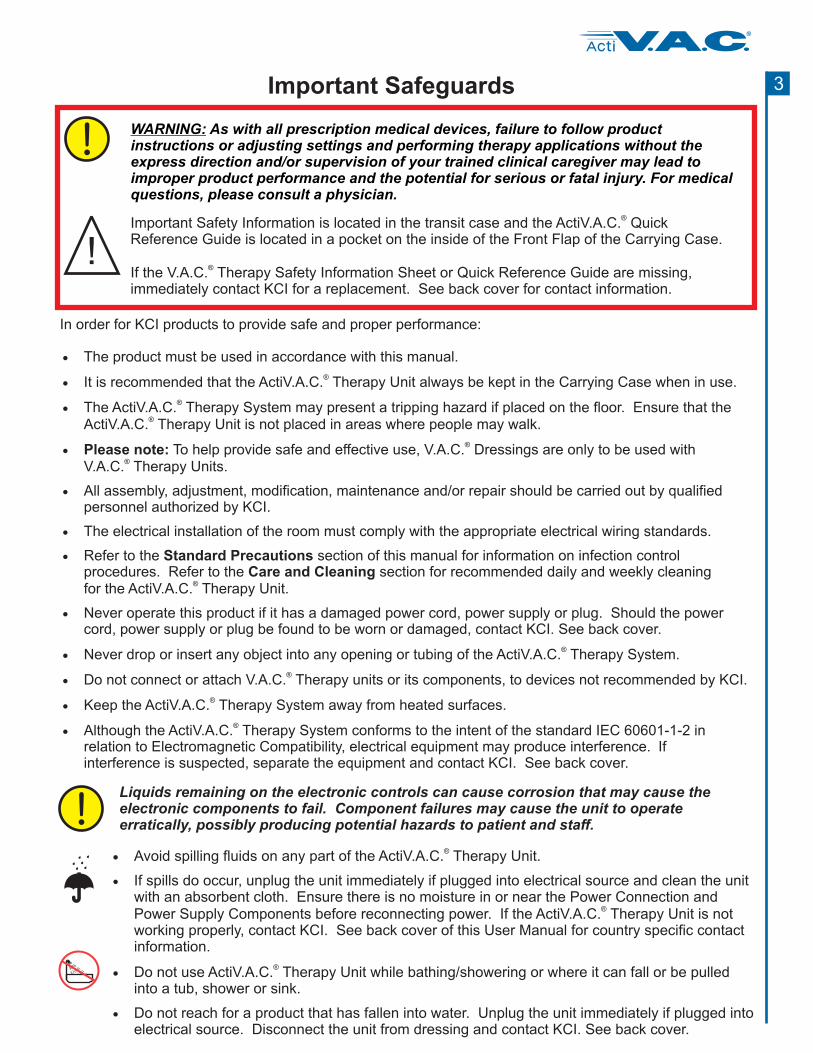
WARNING: As with all prescription medical devices, failure to follow productinstructions or adjusting settings and performing therapy applications without theexpress direction and/or supervision of your trained clinical caregiver may lead toimproper product performance and the potential for serious or fatal injury. For medicalquestions, please consult a physician.
Important Safety Information is located in the transit case and the ActiV.A.C. QuickReference Guide is located in a pocket on the inside of the Front Flap of the Carrying Case.
If the V.A.C. Therapy Safety Information Sheet or Quick Reference Guide are missing,immediately contact KCI for a replacement. See back cover for contact information.
®
®!
Liquids remaining on the electronic controls can cause corrosion that may cause theelectronic components to fail. Component failures may cause the unit to operateerratically, possibly producing potential hazards to patient and staff.
�
�
�
�
Avoid spilling fluids on any part of the ActiV.A.C. Therapy Unit.
If spills do occur, unplug the unit immediately if plugged into electrical source and clean the unitwith an absorbent cloth. Ensure there is no moisture in or near the Power Connection andPower Supply Components before reconnecting power. If the ActiV.A.C. Therapy Unit is notworking properly, contact KCI. See back cover of this User Manual for country specific contactinformation.
Do not use ActiV.A.C. Therapy Unit while bathing/showering or where it can fall or be pulledinto a tub, shower or sink.
Do not reach for a product that has fallen into water. Unplug the unit immediately if plugged intoelectrical source. Disconnect the unit from dressing and contact KCI. See back cover.
®
®
®
3
®
Acti
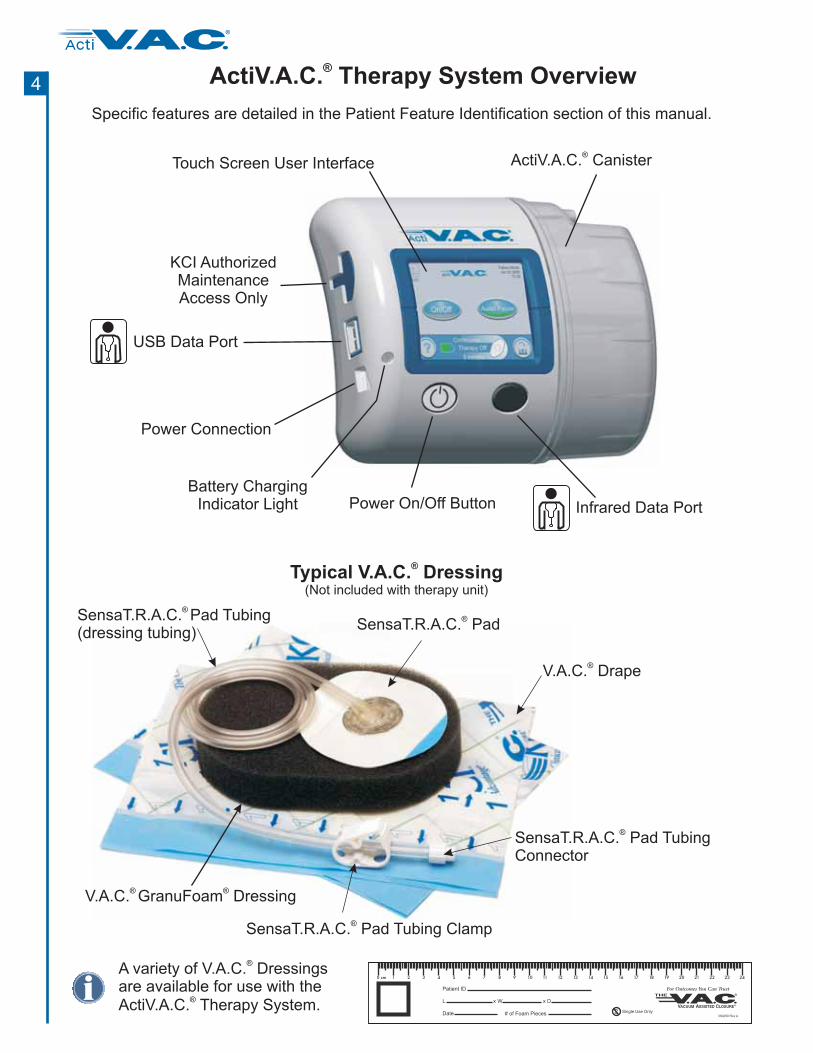
ActiV.A.C. Therapy System Overview®
Typical V.A.C. Dressing®
(Not included with therapy unit)
V.A.C. Drape®
V.A.C. GranuFoam Dressing® ®
SensaT.R.A.C. Pad®
TubingConnector
SensaT.R.A.C. Pad®
Tubing Clamp
SensaT.R.A.C. Pad®
Tubing(dressing tubing)
SensaT.R.A.C. Pad®
Specific features are detailed in the Patient Feature Identification section of this manual.
Touch Screen User Interface
USB Data Port
Power Connection
Battery ChargingIndicator Light Infrared Data PortPower On/Off Button
ActiV.A.C. Canister®
KCI AuthorizedMaintenanceAccess Only
A variety of V.A.C. Dressingsare available for use with the
®
ActiV.A.C. Therapy System.®
4
®
Acti
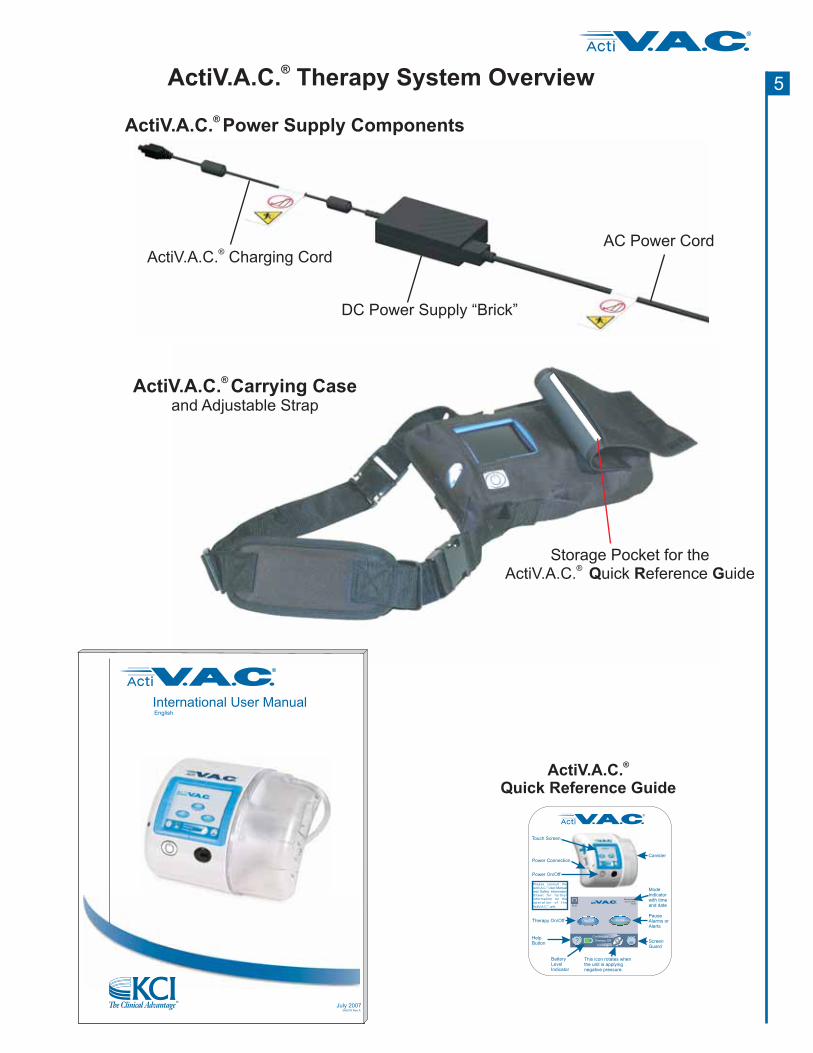
ActiV.A.C. Therapy System Overview®
ActiV.A.C. Charging Cord®
DC Power Supply “Brick”
AC Power Cord
ActiV.A.C. Power Supply Components®
ActiV.A.C.Quick Reference Guide
®
ActiV.A.C. Carrying Case®
and Adjustable Strap
Storage Pocket for theActiV.A.C. uick eference uide
®Q R G
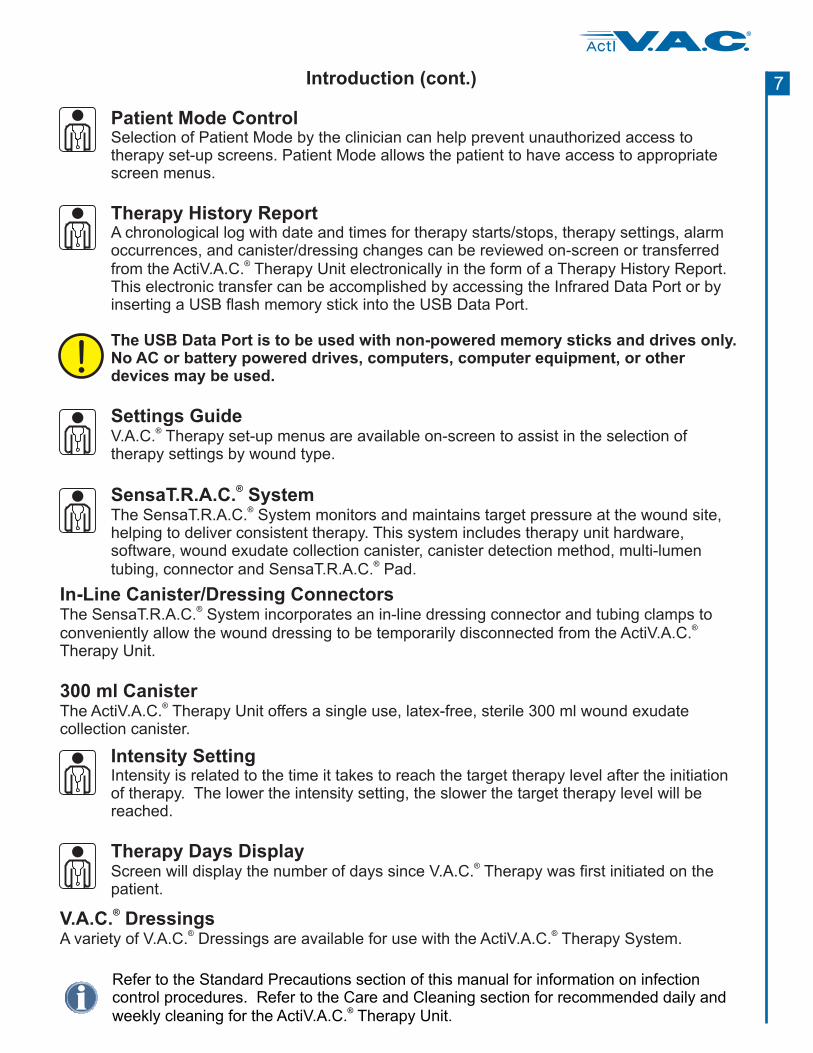
On/Off Audio Pause
Patient ModeJun 22 2007
15:3858:23
Continuous
0 mmHg
Therapy Off
®
This icon rotates whenthe unit is applyingnegative pressure.
ModeIndicatorwith timeand date
ScreenGuard
PauseAlarms orAlerts
BatteryLevelIndicator
HelpButton
Therapy On/Off
Power On/Off
Power Connection
Touch Screen
Canister
®
Acti
Please consult theUser Manual
and Safety InformationS h e e t f o r f u r t h e rinformation on theo p e r a t i o n o f t h e
ActiV.A.C.®
ActiV.A.C. unit.®
340076 Rev A
July 2007
International User ManualEnglish
®
Acti
5
®
Acti
Introduction
V.A.C. is short for Vacuum Assisted Closure. V.A.C. Therapy is a system that uses controllednegative pressure (vacuum) to create an environment that promotes wound healing by bringingthe wound edges together, reducing edema, promoting granulation tissue formation andperfusion, and by removing wound fluids and infectious material. It is a flexible therapy in that,with appropriate precautions in place, may be used in most instances in both hospital andcommunity settings. This advanced wound healing technology, coupled with microprocessor-controlled therapy units, and first-class technical back-up, helps provide peace of mind for bothclinicians and patients.
The V.A.C. family of devices is used to help promote wound healing through multiplemechanisms of action under the influence of continuous and/or intermittent negative pressure inassociation with wound-site feedback control (SensaT.R.A.C. technology). The ActiV.A.C.Therapy System is a Vacuum Assisted Closure System that provides Negative Pressure WoundTherapy (NPWT) and Therapeutic Regulated Acute Care (SensaT.R.A.C. ) for use on a varietyof chronic and acute wound types.
® ®
®
® ®
®
®
Touch Screen User Interface
Battery Operation
On-Screen Operating Instructions
Seal Check Tool
Carrying Case
The Touch Screen User Interface allows for easy navigation through operational and helpmenus. A Screen Guard is available to help prevent unintentional changes.
In order to facilitate mobility and help patients return to daily activities, battery operation isavailable with the ActiV.A.C. Therapy Unit. During typical usage, the battery may provide up to14 hours of operation before needing to be recharged.
Abbreviated “Operating Instructions” are available on-screen. Always familiarize yourself withand refer to this manual for detailed and specific information for use.
This tool assists in finding air leaks in the SensaT.R.A.C. System and dressing through the useof audible tones and on-screen visual aids during the troubleshooting process.
A convenient Carrying Case is provided to allow discreet delivery of therapy. It is recommendedthat the ActiV.A.C. Therapy Unit always be kept in the Carrying Case.
®
™
®
®
V.A.C. Therapy is prescribed by a physician or other licensed prescriber. Thetherapy should only be administered by a medical practitioner. Patients should notattempt to perform a change of settings and/or therapy application with out theexpress permission of the treating physician and/or under the supervision of atrained clinical caregiver.
®
Important product and therapy indications, contraindications, precautions andsafety information apply. Please consult your clinician, the accompanying V.A.C.Therapy Safety Information Sheet, Quick ReferenceGuide (located in the pocket on the inside of the Front Flap of the Carrying Case)and this User Manual prior to use.
®
(located in the transit case)
ActiV.A.C. Therapy System Key Features®
6
®
ActI
Introduction (cont.)
Patient Mode Control
Therapy History Report
Settings Guide
SensaT.R.A.C. System
Selection of Patient Mode by the clinician can help prevent unauthorized access totherapy set-up screens. Patient Mode allows the patient to have access to appropriatescreen menus.
A chronological log with date and times for therapy starts/stops, therapy settings, alarmoccurrences, and canister/dressing changes can be reviewed on-screen or transferredfrom the ActiV.A.C. Therapy Unit electronically in the form of a Therapy History Report.This electronic transfer can be accomplished by accessing the Infrared Data Port or byinserting a USB flash memory stick into the USB Data Port.
V.A.C. Therapy set-up menus are available on-screen to assist in the selection oftherapy settings by wound type.
The SensaT.R.A.C. System monitors and maintains target pressure at the wound site,helping to deliver consistent therapy. This system includes therapy unit hardware,software, wound exudate collection canister, canister detection method, multi-lumentubing, connector and SensaT.R.A.C. Pad.
®
®
®
®
The USB Data Port is to be used with non-powered memory sticks and drives only.No AC or battery powered drives, computers, computer equipment, or otherdevices may be used.
®
In-Line Canister/Dressing Connectors
300 ml Canister
The SensaT.R.A.C. System incorporates an in-line dressing connector and tubing clamps toconveniently allow the wound dressing to be temporarily disconnected from the ActiV.A.C.Therapy Unit.
The ActiV.A.C. Therapy Unit offers a single use, latex-free, sterile 300 ml wound exudatecollection canister.
®
®
®
V.A.C. Dressings®
A variety of V.A.C. Dressings are available for use with the ActiV.A.C. Therapy System.®®
Intensity Setting
Therapy Days Display
Intensity is related to the time it takes to reach the target therapy level after the initiationof therapy. The lower the intensity setting, the slower the target therapy level will bereached.
Screen will display the number of days since V.A.C. Therapy was first initiated on thepatient.
®
Refer to the Standard Precautions section of this manual for information on infectioncontrol procedures. Refer to the Care and Cleaning section for recommended daily andweekly cleaning for the ActiV.A.C. Therapy Unit.
®
7
®
ActI
On/Off Audio Pause
Patient ModeJun 22 2006
15:3858:23
Continuous
0 mmHg
Therapy Off
®
Patient Mode
This icon rotates when theActiV.A.C. Therapy Unit isapplying negative pressure.
®
Audio PauseIndicator withCountdown Timer
Mode IndicatorCurrent DateCurrent Time
Therapy StatusBar and DisplayArea.
Screen Guard
Battery Level Indicator
Help Button
Therapy On/OffButton
This “plug” indicatorwhile plugged
into .appears
a wall outlet
Patient ‘Home’ Screen
Common Screen Control Buttons
accesses screensHelp .
activates the feature .Screen Guard to help prevent unintentional changes Thisfeature should be used when cleaning the Touch Screen User Interface.
To release Screen Guard, press ‘1’ and then ‘2’.
A green lighted crescentmeans the function is on.
An unlit crescentmeans the function is off.
On/Off starts or stops V.A.C. Therapy.®
Audio Pause When the Audio Pause button is selected, alerts that do not need immediateattention will be silenced for 60 minutes. A Countdown Timer and Audio PauseIndicator will be displayed in the upper left hand corner of the screen.
Alarms needing immediate attention override this feature.
Most screens have one or more common control buttons. These are:
8
®
ActI
Patient Mode (cont.)
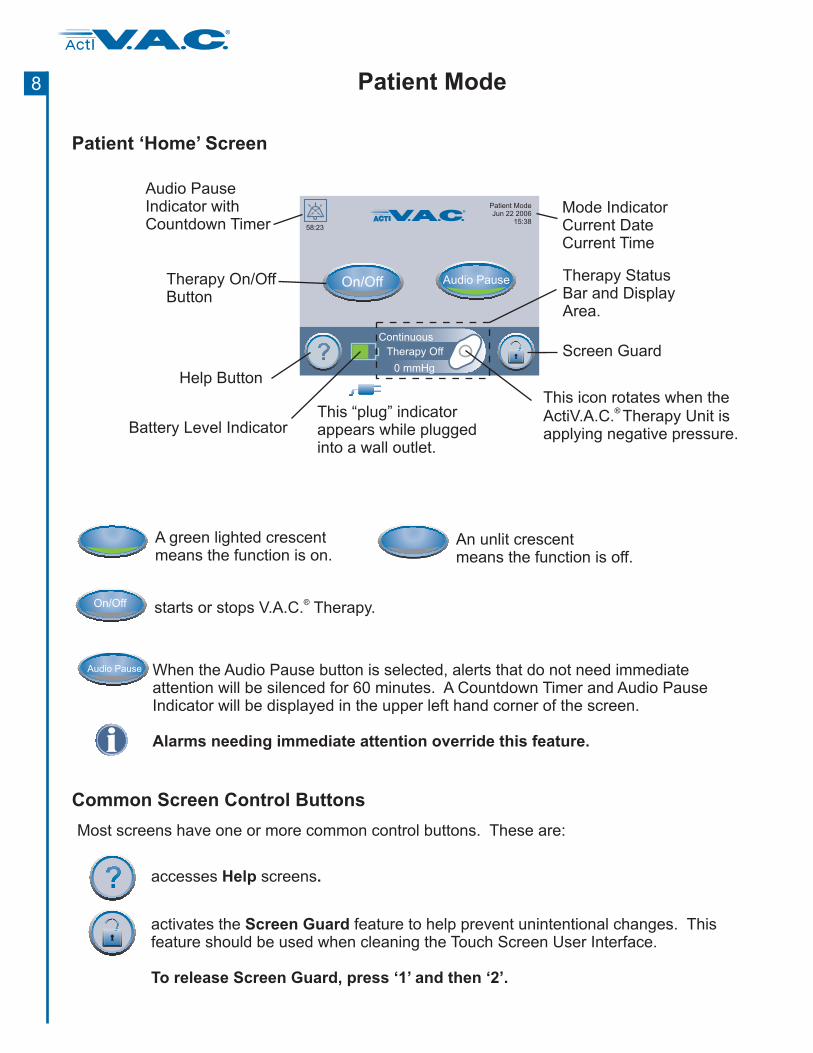
One or more of these buttons may appear on a screen.
returns to the previous screen of that particular procedure.Back
goes to the next screen of that particular procedure.Next
stops action in progress.Cancel
leaves that particular screen.Exit
Navigation Buttons
acknowledges the action is complete and displays the next screen.OK
9
®
ActI
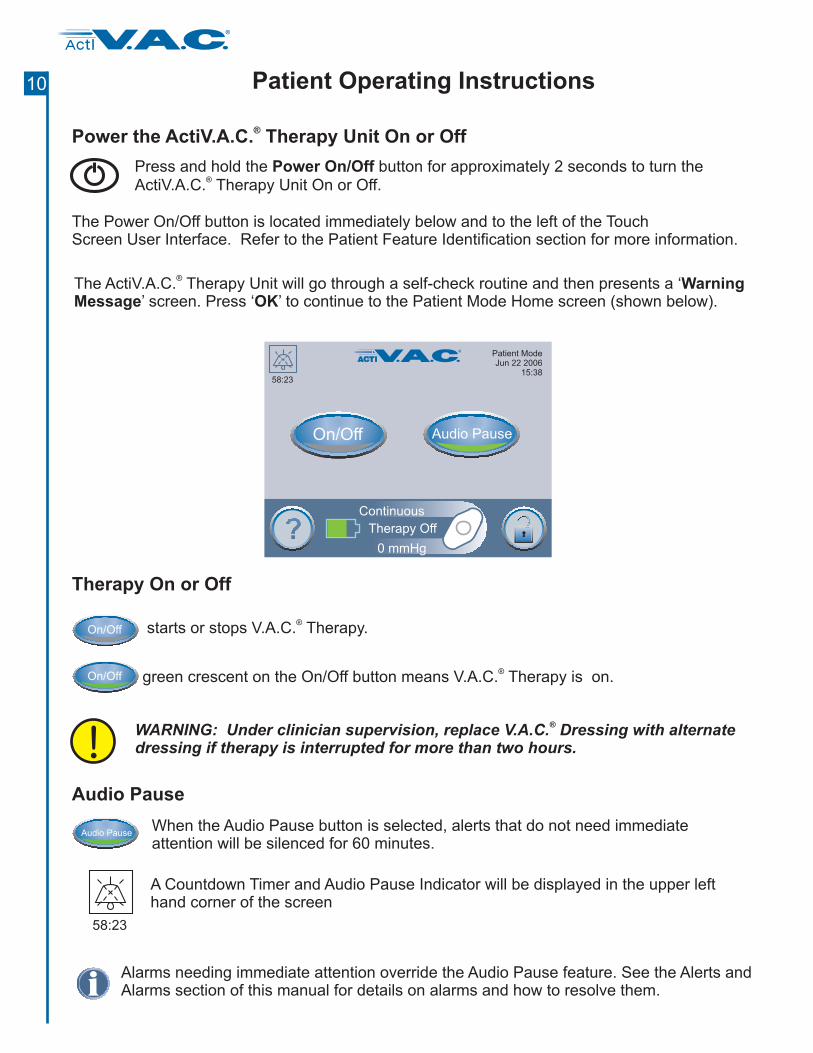
Power the ActiV.A.C. Therapy Unit On or Off®
Patient Operating Instructions
Press and hold the button for approximately 2 seconds to turn theActiV.A.C. Therapy Unit On or Off.
Power On/Off®
Therapy On or Off
green crescent on the On/Off button means V.A.C. Therapy is on.®
On/Off
On/Off
Alarms needing immediate attention override the Audio Pause feature. See the Alerts andAlarms section of this manual for details on alarms and how to resolve them.
Audio PauseWhen the Audio Pause button is selected, alerts that do not need immediateattention will be silenced for 60 minutes.
Audio Pause
On/Off Audio Pause
Patient ModeJun 22 2006
15:3858:23
Continuous
0 mmHg
Therapy Off
®
58:23
A Countdown Timer and Audio Pause Indicator will be displayed in the upper lefthand corner of the screen
The ActiV.A.C. Therapy Unit will go through a self-check routine and then presents a ‘’ screen. Press ‘ ’ to continue to the Patient Mode Home screen (shown below).
®Warning
Message OK
The Power On/Off button is located immediately below and to the left of the TouchScreen User Interface. Refer to the Patient Feature Identification section for more information.
starts or stops V.A.C. Therapy.®
WARNING: Under clinician supervision, replace V.A.C. Dressing with alternatedressing if therapy is interrupted for more than two hours.
®
10
®
ActI
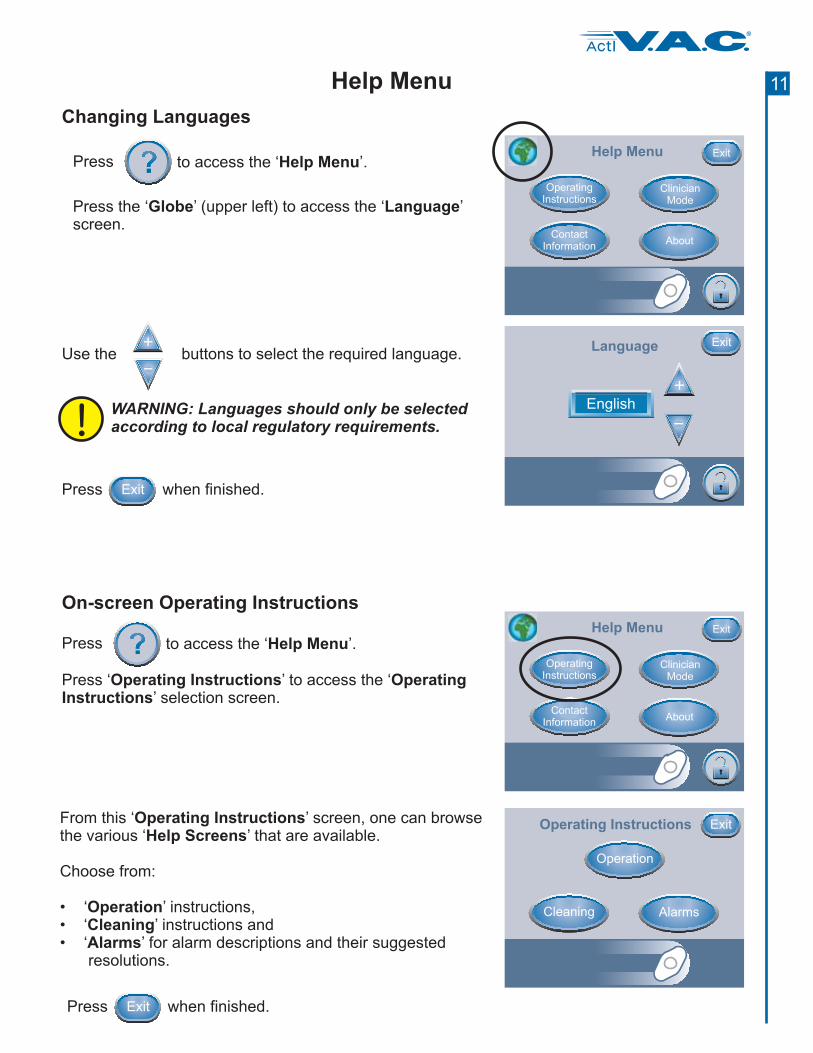
WARNING: Languages should only be selectedaccording to local regulatory requirements.
On-screen Operating Instructions
Press ‘ ’ to access the ‘’ selection screen.
Operating Instructions OperatingInstructions
Help Menu
OperatingInstructions
ContactInformation
About
Exit
ClinicianMode
Operation
Cleaning Alarms
ExitOperating InstructionsFrom this ‘ ’ screen, one can browsethe various ‘ ’ that are available.
Choose from:
‘ ’ ,‘ ’ instructions and‘ ’ for alarm descriptions and their suggestedresolutions.
Operating InstructionsHelp Screens
OperationCleaningAlarms
• instructions••
when finished.Press Exit
Press to access the ‘ ’.Help Menu
Changing Languages
Press the ‘ ’ (upper left) to access the ‘ ’screen.
Globe Language
Press to access the ‘ ’.Help MenuHelp Menu
OperatingInstructions
ContactInformation
About
Exit
ClinicianMode
when finished.Press Exit
Language Exit
English+
_
Help Menu
Use the buttons to select the required language.+_
11
®
ActI
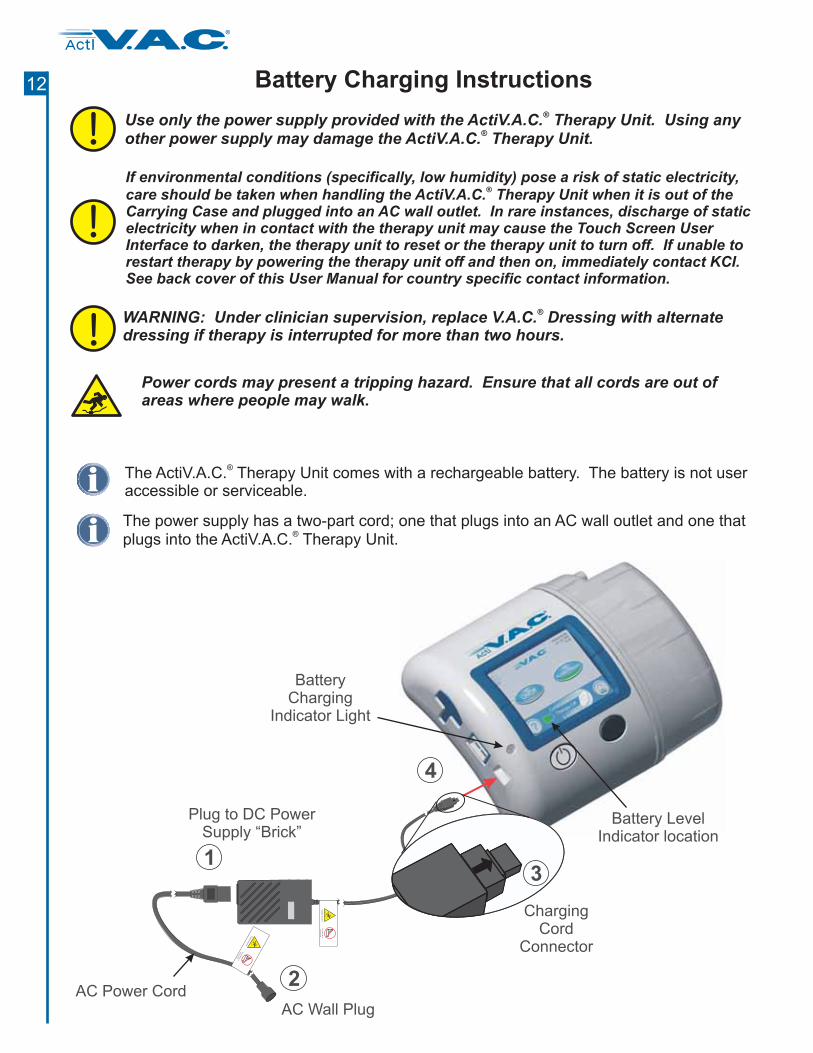
Battery Charging Instructions
Use only the power supply provided with the ActiV.A.C. Therapy Unit. Using anyother power supply may damage the ActiV.A.C. Therapy Unit.
®
®
If environmental conditions (specifically, low humidity) pose a risk of static electricity,care should be taken when handling the ActiV.A.C. Therapy Unit when it is out of theCarrying Case and plugged into an AC wall outlet. In rare instances, discharge of staticelectricity when in contact with the therapy unit may cause the Touch Screen UserInterface to darken, the therapy unit to reset or the therapy unit to turn off. If unable torestart therapy by powering the therapy unit off and then on, immediately contact KCI.See back cover of this User Manual for country specific contact information.
®
P mayower cords present a tripping hazard. Ensure that all cords are out ofareas where people may walk.
The comes with a rechargeable battery. The battery is not useraccessible or serviceable.
ActiV.A.C. Therapy Unit®
The power supply has a two-part cord; one that plugs into an AC wall outlet and one thatplugs into the ActiV.A.C. Therapy Unit.
®
WARNING: Under clinician supervision, replace V.A.C. Dressing with alternatedressing if therapy is interrupted for more than two hours.
®
AC Wall Plug
Plug to DC PowerSupply “Brick”
ChargingCord
Connector
BatteryCharging
Indicator Light
Trip
pin
gH
aza
rd
No
bath
ing
or
show
erin
g
8
2
1
4
Battery LevelIndicator location
AC Power Cord
Trip
pin
gH
azard
No
bath
ing
or
show
erin
g
3
12
®
ActI

It should take approximately 6 hours to fully recharge the battery from a completelydischarged state.
To maximize battery life, keep the unit plugged in when the patient is not mobile forsignificant periods.
Battery Charging Instructions (cont.)
2
1
3
4
Plug the AC Power Cord into the DC Power Supply “Brick”.
Plug the AC Wall Plug into an AC wall outlet.
Locate the “Arrow” on the ActiV.A.C. Charging Cord Connector.
With ActiV.A.C. Touch Screen User Interface facing up, the “Arrow” should also be up as theCharging Cord Connector is plugged into the Power Connection on the ActiV.A.C. TherapyUnit.
®
®
®
The battery level is shown on the bottom of the Touch Screen User Interface.
When the ActiV.A.C. Therapy Unit is correctly plugged into the ActiV.A.C. Power Supply, thewill glow as the battery is charging.
When the battery has reached full charge the will glow
® ®
Battery Charging Indicator Light Amber
Battery Charging Indicator Light Green.
Battery Charging Indicator Light
Battery Level Indicator
FullyCharged
BatteryCritical
BatteryLow
(Charge battery soon) (Charge battery)immediately
InUse
Steps are numbered in order. See picture on previous page.
13
®
ActI
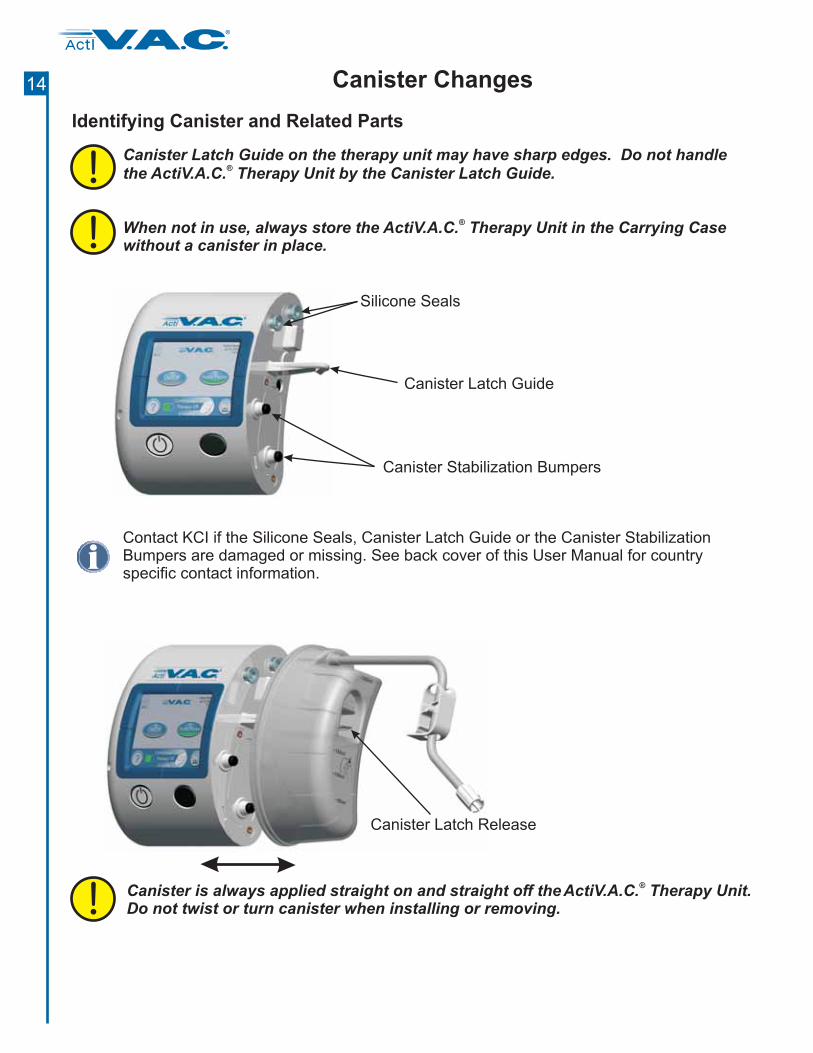
Identifying Canister and Related Parts
Canister Latch Guide on the therapy unit may have sharp edges. Do not handlethe ActiV.A.C. Therapy Unit by the Canister Latch Guide.
When not in use, always store the ActiV.A.C. Therapy Unit in the Carrying Casewithout a canister in place.
®
®
Canister Latch Guide
Canister Stabilization Bumpers
Canister Latch Release
Silicone Seals
Canister is always applied straight on and straight off theActiV.A.C. .Do not twist or turn canister when installing or removing.
®Therapy Unit
Contact KCI if the Silicone Seals, Canister Latch Guide or the Canister StabilizationBumpers are damaged or missing. See back cover of this User Manual for countryspecific contact information.
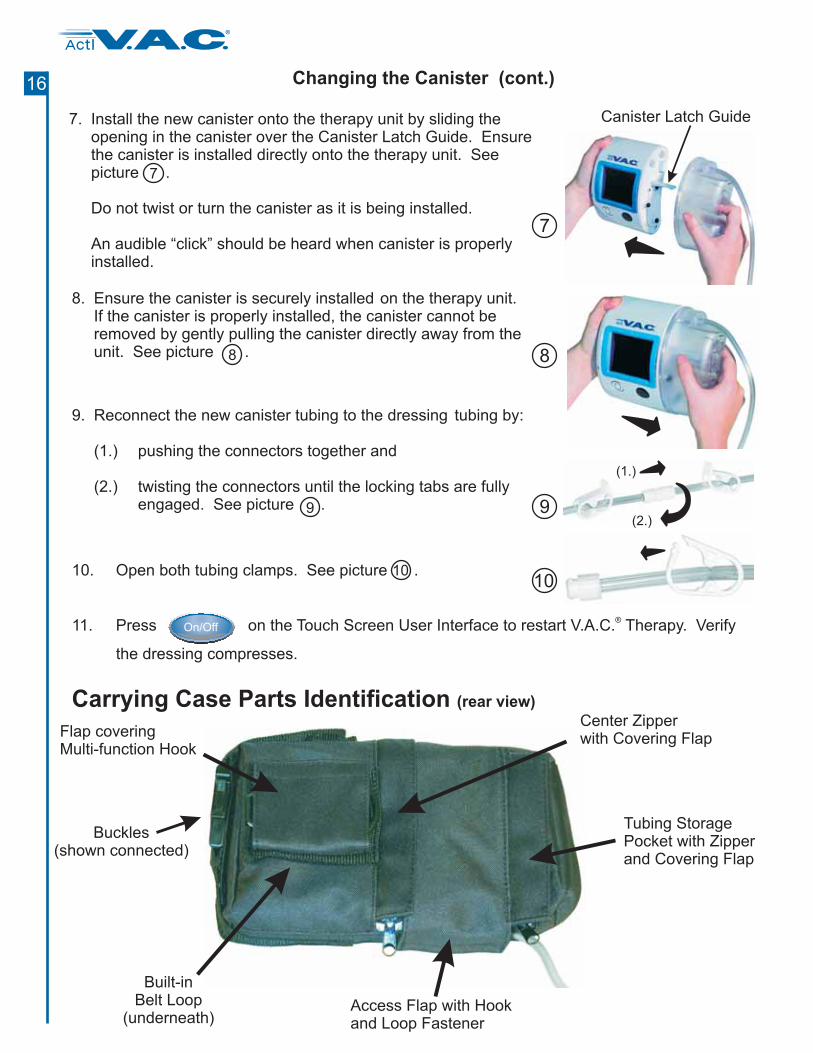
Canister Changes14
®
ActI
5
2
6
3
(1.)(2.)
4
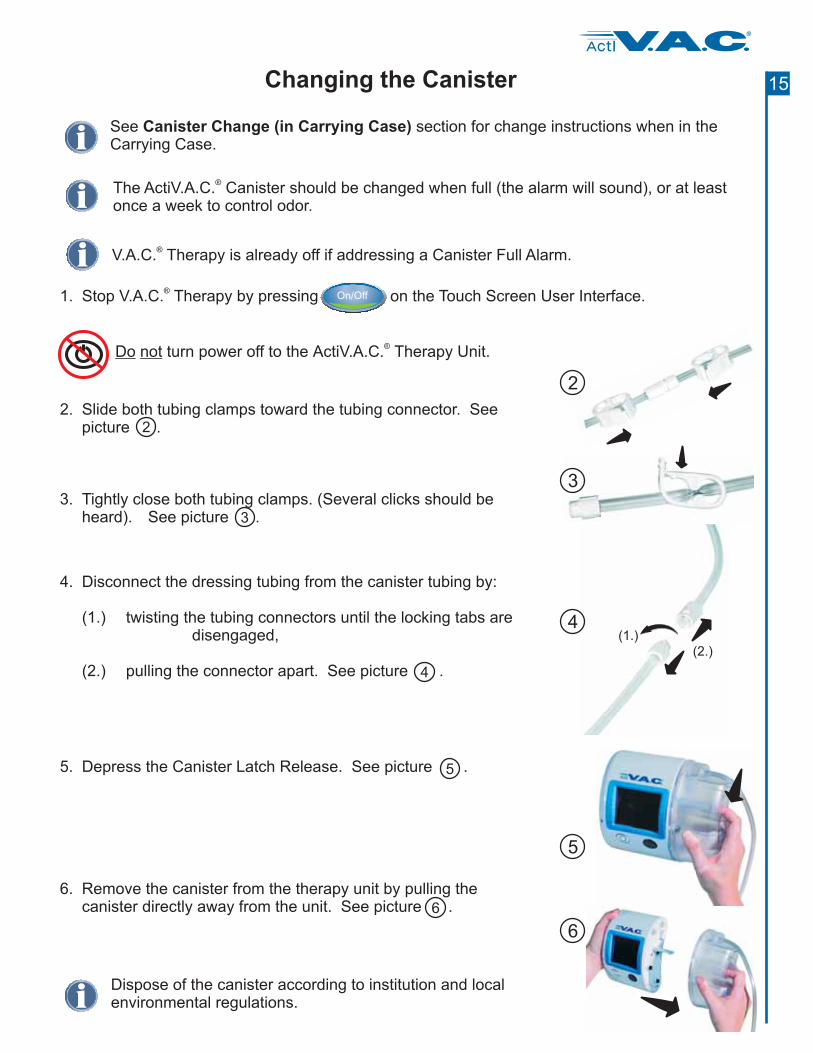
Changing the Canister
See section for change instructions when in theCarrying Case.
Canister Change (in Carrying Case)
Do not turn power off to the Therapy Unit.ActiV.A.C.®
1. Stop V.A.C. Therapy by pressing on the Touch Screen User Interface.®
On/Off
Dispose of the canister according to institution and localenvironmental regulations.
The ActiV. .C. Canister should be changed when full (the alarm will sound), or at leastonce a week to control odor.
®A
2 Slide both tubing clamps toward the tubing connectorpicture .
. . See2
3. Tightly close both tubing clamps. (Several clicks should beheard). See picture .3
4. Disconnect the dressing tubing from the canister tubing by:
(1.) twisting the tubing connectors until the locking tabs aredisengaged,
(2.) pulling the connector apart. See picture .4
5 e picture .. Depress the Canister Latch Release. Se 5
6 therapye picture .
. Remove the canister from the unit by pulling thecanister directly away from the unit. Se 6
V.A.C. Therapy is already off if addressing a Canister Full Alarm.®
15
®
ActI
1 . Press to restart V.A.C. Therapy1 on the Touch Screen User Interface . Verify
the dressing compresses.
®On/Off
Canister Latch Guide
7
8
(1.)
(2.)9
Flap coveringMulti-function Hook
Built-inBelt Loop
(underneath)
Buckles(shown connected)
Center Zipperwith Covering Flap
Access Flap with Hookand Loop Fastener
Tubing StoragePocket with Zipperand Covering Flap
Carrying Case Parts Identification (rear view)
7 therapyi Guide
t c therapypicture .
An audible “click” should be heard when canister is properlyinstalled.
. Install the new canister onto the unit by sliding theopening n the canister over the Canister Latch . Ensurehe anister is installed directly onto the unit. See
Do not twist or turn the canister as it is being installed.
7
8 therapy
e picture .
. Ensure the canister is securely installed on the unit.If the canister is properly installed, the canister cannot beremoved by gently pulling the canister directly away from theunit. Se 8
9 dressing tubing :
(1.) the connectors
(2.) wisting the connectorsSee picture .
. Reconnect the new canister tubing to the by
pushing together and
t until the locking tabs are fullyengaged. 9
1010 both e picture .. Open tubing clamps. Se 10
Changing the Canister (cont.)16
®
ActI
(1.)(2.)
4
2
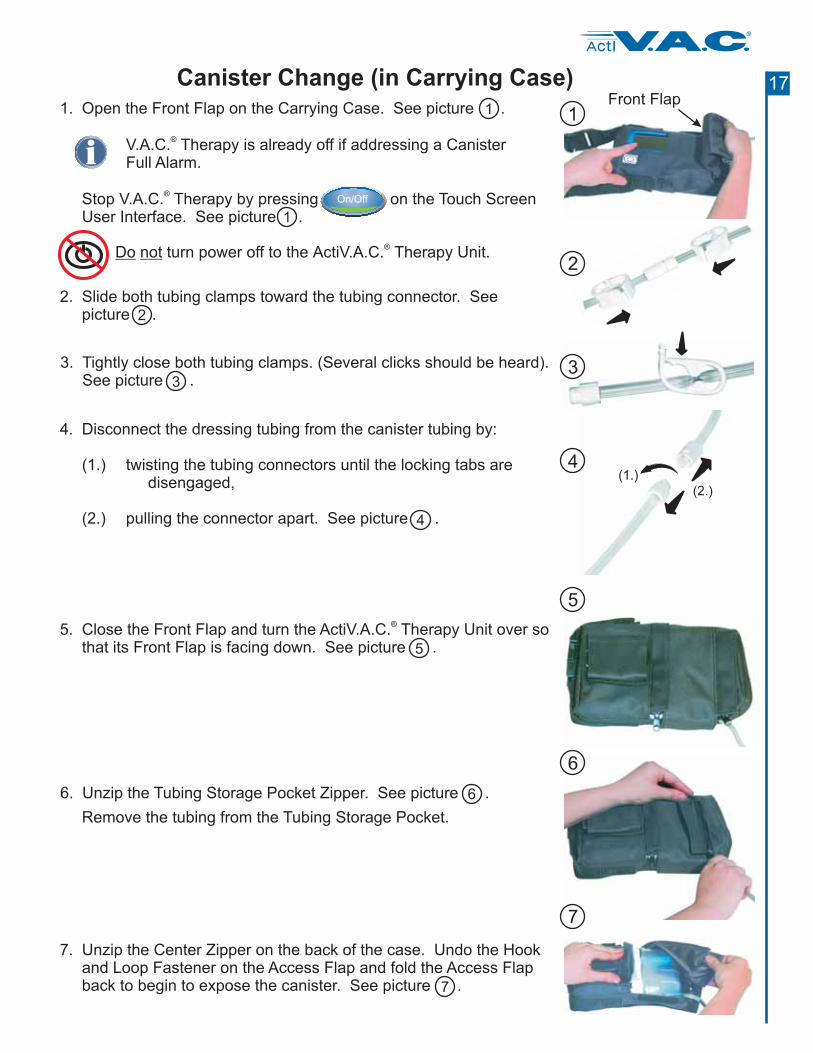
1Front Flap
3
Canister Change (in Carrying Case)
Do not turn power off to the Therapy Unit.ActiV.A.C.®
4. Disconnect the dressing tubing from the canister tubing by:
(1.) twisting the tubing connectors until the locking tabs aredisengaged,
(2.) pulling the connector apart. See picture .4
5
5. Close the Front Flap and turn the ActiV.A.C. Therapy Unit over sothat its Front Flap is facing down. See picture .
®
5
6
Remove the tubing from the Tubing Storage Pocket.
6. Unzip the Tubing Storage Pocket Zipper. See picture .6
7
7. Unzip the Center Zipper on the back of the case. Undo the Hookand Loop Fastener on the Access Flap and fold the Access Flapback to begin to expose the canister. See picture .7
2 Slide both tubing clamps toward the tubing connector. . Seepicture .2
1. Open the Front Flap on the Carrying Case. See picture .
f addressing a CanisterFull Alarm.
Stop V.A.C. Therapy by pressing on the Touch ScreenUser Interface. See picture .
V.A.C. Therapy is already off i®
®On/Off
1
1
3. Tightly close both tubing clamps. (Several clicks should be heard).See picture .3
17
®
ActI
Canister Change (in Carrying Case) cont.
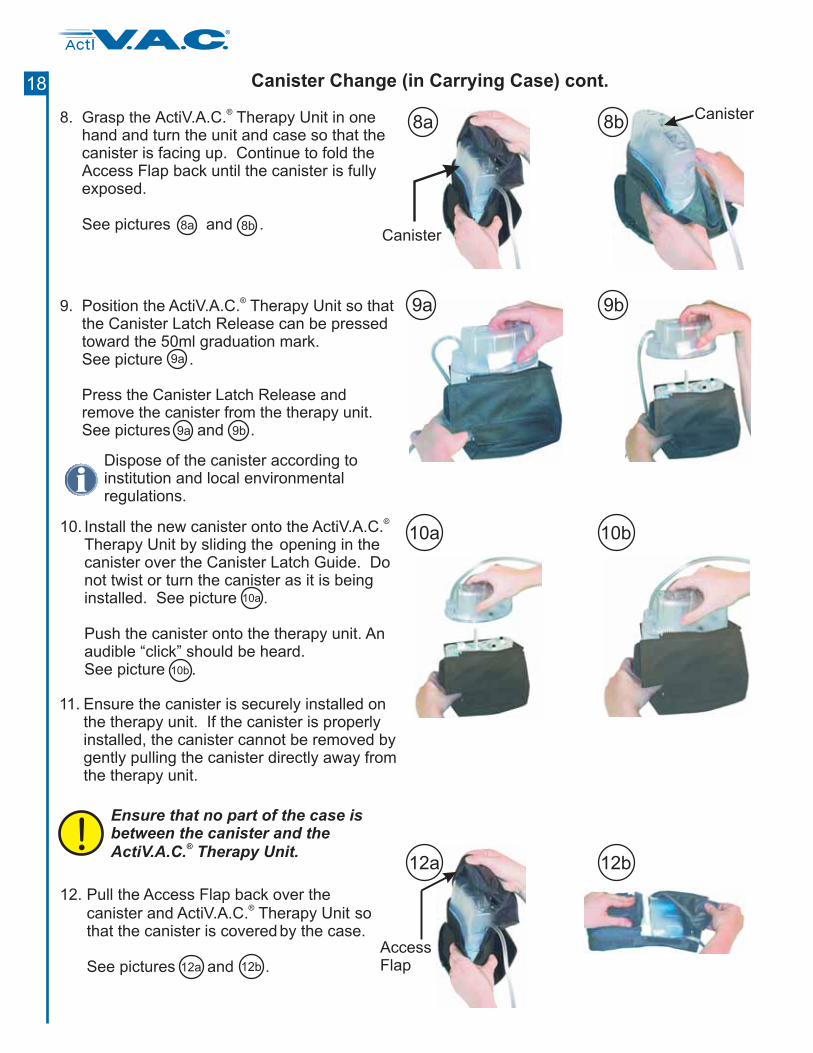
8 Grasp the ActiV.A.C. Therapy Unit in onehand and turn the unit and case so that thecanister is facing up. Continue to fold theAccess Flap back until the is
.
See pictures and .
®.
canister fullyexposed
8a 8b
9a 9b9
Press the Canister Latch Release andremove the canister from the therapy unit.
ActiV.A.C. Therapy Unit so thatthe Canister Latch Release can be pressedtoward the 50ml graduation mark.See picture .
See pictures and .
®. Position the
9a
9a 9b
10a 10b10. Install the new canister onto the ActiV.A.C.Therapy Unit by sliding the opening in thecanister over the Canister Latch Guide. Donot twist or turn the canister as it is beinginstalled. See picture
Push the canister onto the therapy unit. Anaudible “click” should be heard.See picture .
®
.10a
10b
Ensure that no part of the case isbetween the canister and theActiV.A.C. Therapy Unit.
®
11. Ensure the canister is securely installed onthe therapy unit. If the canister is properlyinstalled, the canister cannot be removed bygently pulling the canister directly away fromthe therapy unit.
8a
Canister
8bCanister
12. Pull the Access Flap back over thecanister and ActiV.A.C. Therapy Unit sothat the canister is covered by the case.
See pictures and .
®
12a 12b
12a
AccessFlap
12b
Dispose of the canister according toinstitution and local environmentalregulations.
18
®
ActI
Canister Change (in Carrying Case) cont.
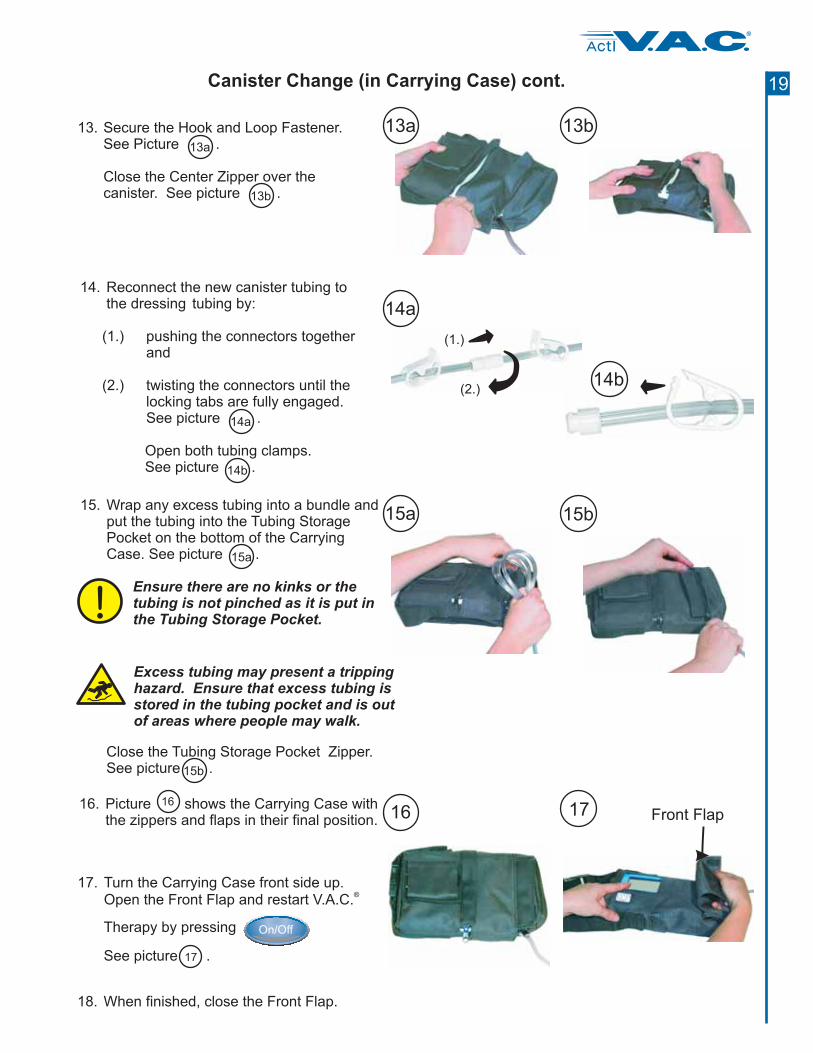
14a
14b
14 Reconnect the new canister tubing tothe dressing tubing by:
(1.) pushing the connectors togetherand
(2.) twisting the connectors until thelocking tabs are fully engaged.See picture .
Open both tubing clamps.See picture .
.
14a
14b
13b
15a
13a
16
15b15. Wrap any excess tubing into a bundle and
put the tubing into the Tubing StoragePocket on the bottom of the CarryingCase. See picture .
Ensure there are no kinks or thetubing is not pinched as it is put inthe Tubing Storage Pocket.
15a
18. When finished, close the Front Flap.
17. Turn the Carrying Case front side up.Open the Front Flap and restart V.A.C.
®
Therapy by pressing .On/Off
See picture .17
17 Front Flap
13. Secure the Hook and Loop Fastener.See Picture .
Close the Center Zipper over thecanister. See picture .
13a
13b
1616. Picture shows the Carrying Case withthe zippers and flaps in their final position.
15b
Close the Tubing Storage Pocket Zipper.See picture .
Excess tubing may present a trippinghazard. Ensure that excess tubing isstored in the tubing pocket and is outof areas where people may walk.
(1.)
(2.)
19
®
ActI
3
2
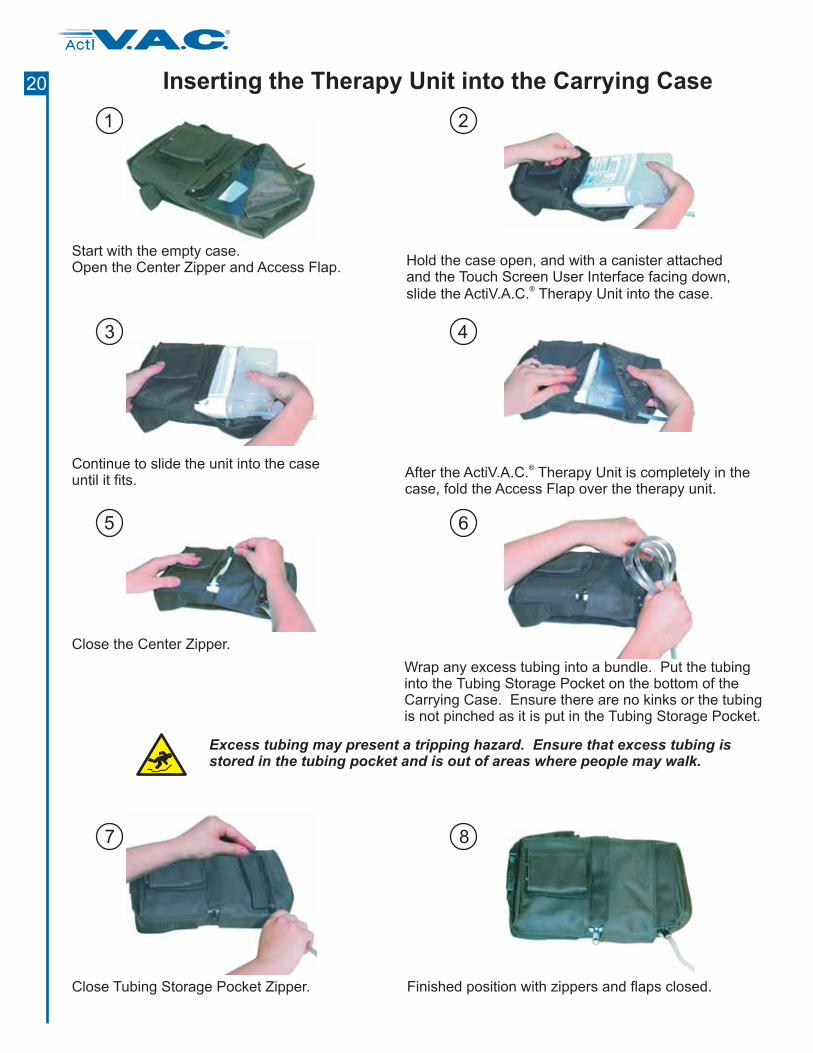
Start with the empty case.Open the Center Zipper and Access Flap.
Continue to slide the unit into the caseuntil it fits.
Hold the case open, and with a canister attachedand the Touch Screen User Interface facing down,slide the ActiV.A.C. Therapy Unit into the case.
®
After the ActiV.A.C. Therapy Unit is completely in thecase, fold the Access Flap over the therapy unit.
®
Inserting the Therapy Unit into the Carrying Case
5
Close the Center Zipper.
6
Wrap any excess tubing into a bundle. Put the tubinginto the Tubing Storage Pocket on the bottom of theCarrying Case. Ensure there are no kinks or the tubingis not pinched as it is put in the Tubing Storage Pocket.
7
Close Tubing Storage Pocket Zipper.
8
Finished position with zippers and flaps closed.
4
Excess tubing may present a tripping hazard. Ensure that excess tubing isstored in the tubing pocket and is out of areas where people may walk.
1
20
®
ActI
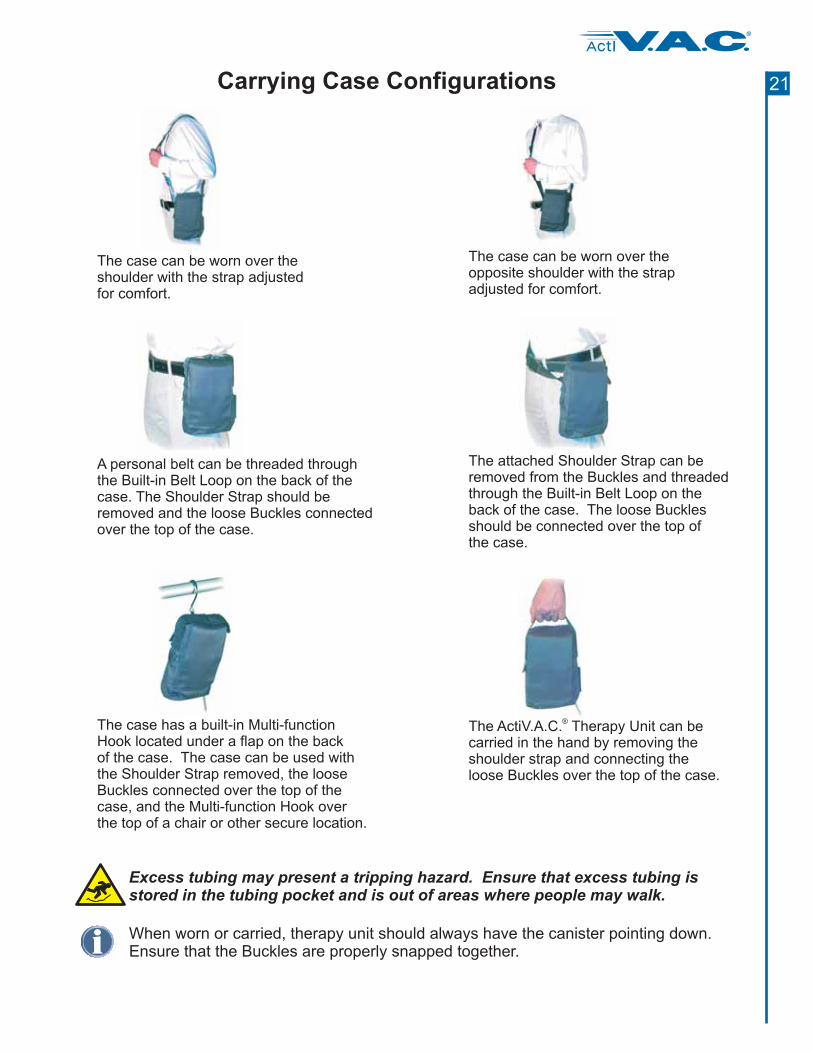
Carrying Case Configurations
The case can be worn over theshoulder with the strap adjustedfor comfort.
The case can be worn over theshoulder with the strap
adjusted for comfort.opposite
A personal belt can be
Strap
threaded throughthe Built-in Belt Loop on the back of thecase. The Shoulder should beremoved and the loose Buckles connectedover the top of the case.
The ActiV.A.C. Therapy Unit can becarried in the hand by removing theshoulder strap and connecting theloose Buckles over the top of the case.
®The case
Multi-function H
has a built-in Multi-functionHook located under a flap on the backof the case. The case can be used withthe Shoulder Strap removed, the looseBuckles connected over the top of thecase, and the ook overthe top of a chair or other secure location.
When worn or carried, therapy unit should always have the canister pointing down.Ensure that the Buckles are properly snapped together.
Excess tubing may present a tripping hazard. Ensure that excess tubing isstored in the tubing pocket and is out of areas where people may walk.
The attached Strapthreaded
through the Built-in Belt Loop on theback of the case. he Buckles
connected over the top ofthe case.
Shoulder can beremoved from the Buckles and
T looseshould be
21
®
ActI
®
ActI
On/Off
TherapyUtilities
Clinician ModeJun 22 2006
15:38
Continuous
0 mmHg
Therapy Off
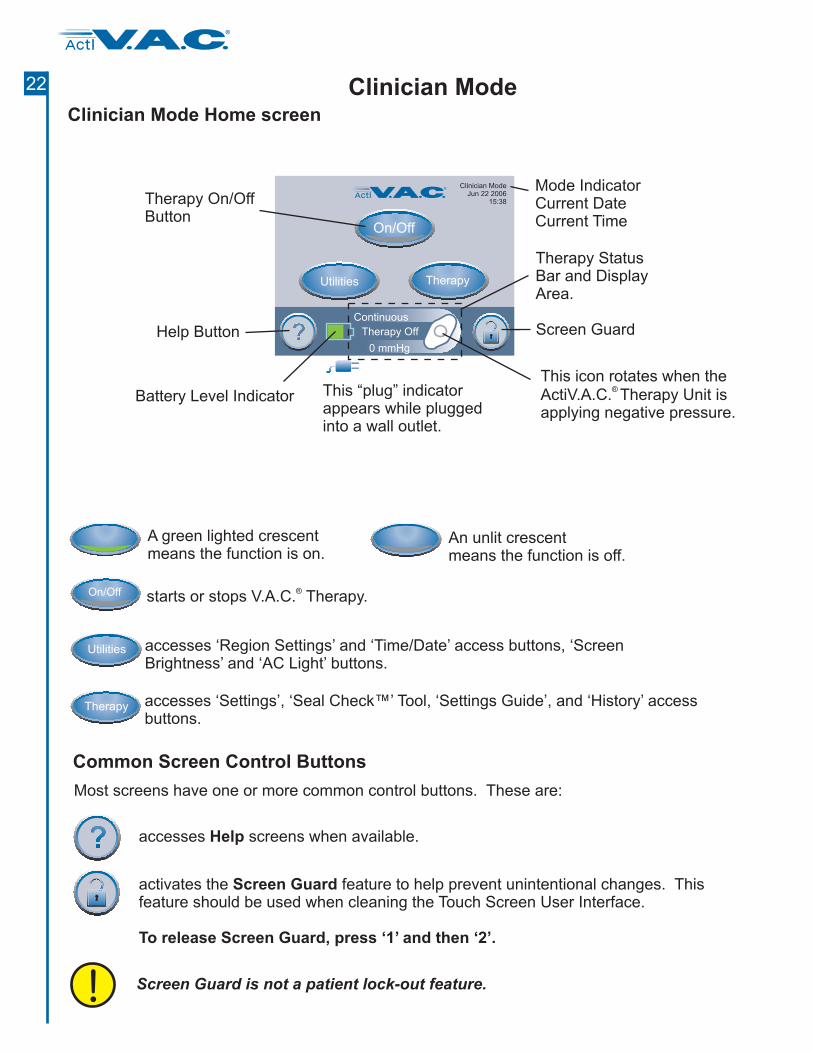
Clinician Mode Home screen
Clinician Mode
Therapy On/OffButton
Help Button Screen Guard
This “plug” indicatorwhile plugged
into .appears
a wall outlet
Battery Level Indicator
This icon rotates when theActiV.A.C. Therapy Unit isapplying negative pressure.
®
Therapy StatusBar and DisplayArea.
Mode IndicatorCurrent DateCurrent Time
Screen Guard is not a patient lock-out feature.
Common Screen Control Buttons
accesses screens when available.Help
activates the feature .Screen Guard to help prevent unintentional changes Thisfeature should be used when cleaning the Touch Screen User Interface.
To release Screen Guard, press ‘1’ and then ‘2’.
On/Off starts or stops V.A.C. Therapy.®
Most screens have one or more common control buttons. These are:
Utilities accesses ‘Region Settings’ and ‘Time/Date’ , ‘ScreenBrightness’ and ‘AC Light’ buttons.
access buttons
Therapy accesses ‘Settings’, ‘Seal Check™’ Tool, ‘Settings Guide’, and ‘History’ accessbuttons.
A green lighted crescentmeans the function is on.
An unlit crescentmeans the function is off.
22
®
ActI

Clinician Mode (cont.)
One or more of these buttons may appear on a screen.
returns to the previous screen of that particular procedure.Back
goes on to the next screen of that particular procedure.Next
stops action in progress.Cancel
leaves that particular screen.Exit
Navigation Buttons
acknowledges the action is complete and displays the next screen.OK
Holding these b will rapidly scroll through available selections.uttons+_
23
®
ActI
Clinician Operating Instructions
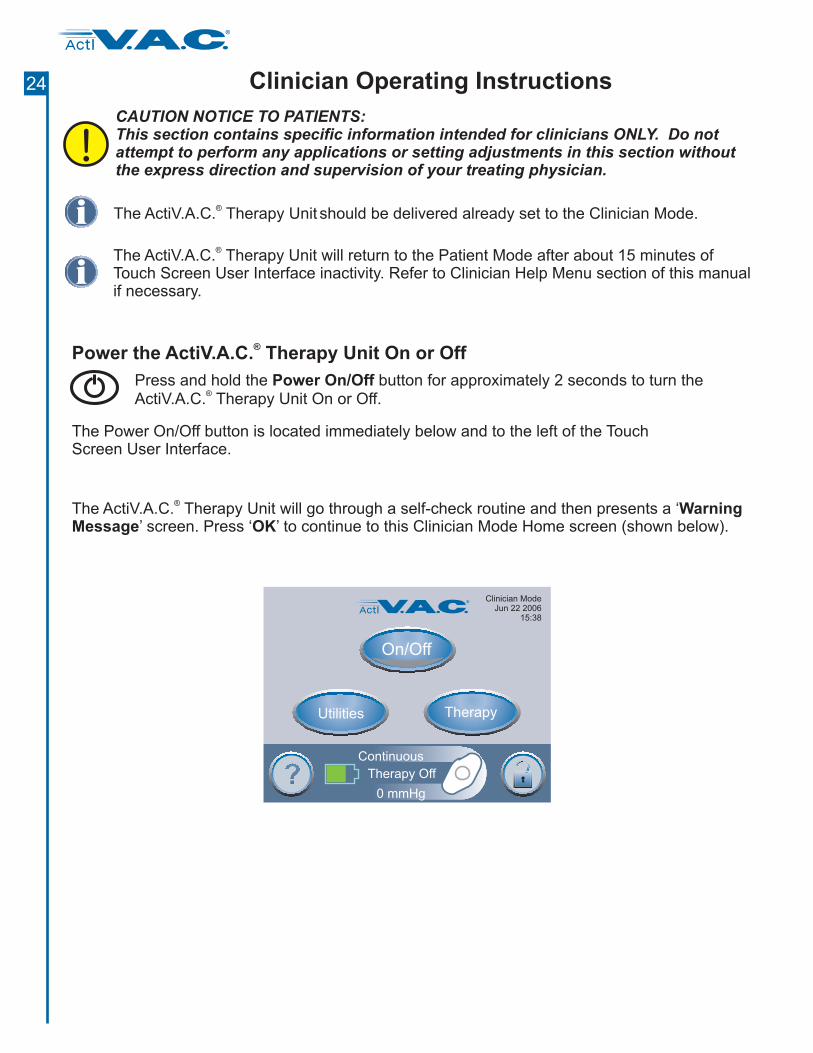
The ActiV.A.C. Therapy Unit should be delivered already set to the Clinician Mode.®
The ActiV.A.C. Therapy Unit will return to the Patient Mode after about 15 minutes ofTouch Screen User Interface inactivity. Refer to Clinician Help Menu section of this manualif necessary.
®
The ActiV.A.C. Therapy Unit will go through a self-check routine and then presents a ‘’ screen. Press ‘ ’ to continue to this Clinician Mode Home screen (shown below).
®Warning
Message OK
Power the ActiV.A.C. Therapy Unit On or Off®
®
ActI
On/Off
TherapyUtilities
Clinician ModeJun 22 2006
15:38
Continuous
0 mmHg
Therapy Off
Press and hold the button for approximately 2 seconds to turn theActiV.A.C. Therapy Unit On or Off.
Power On/Off®
The Power On/Off button is located immediately below and to the left of the TouchScreen User Interface.
CAUTION NOTICE TO PATIENTS:This section contains specific information intended for clinicians ONLY. Do notattempt to perform any applications or setting adjustments in this section withoutthe express direction and supervision of your treating physician.
24
®
ActI
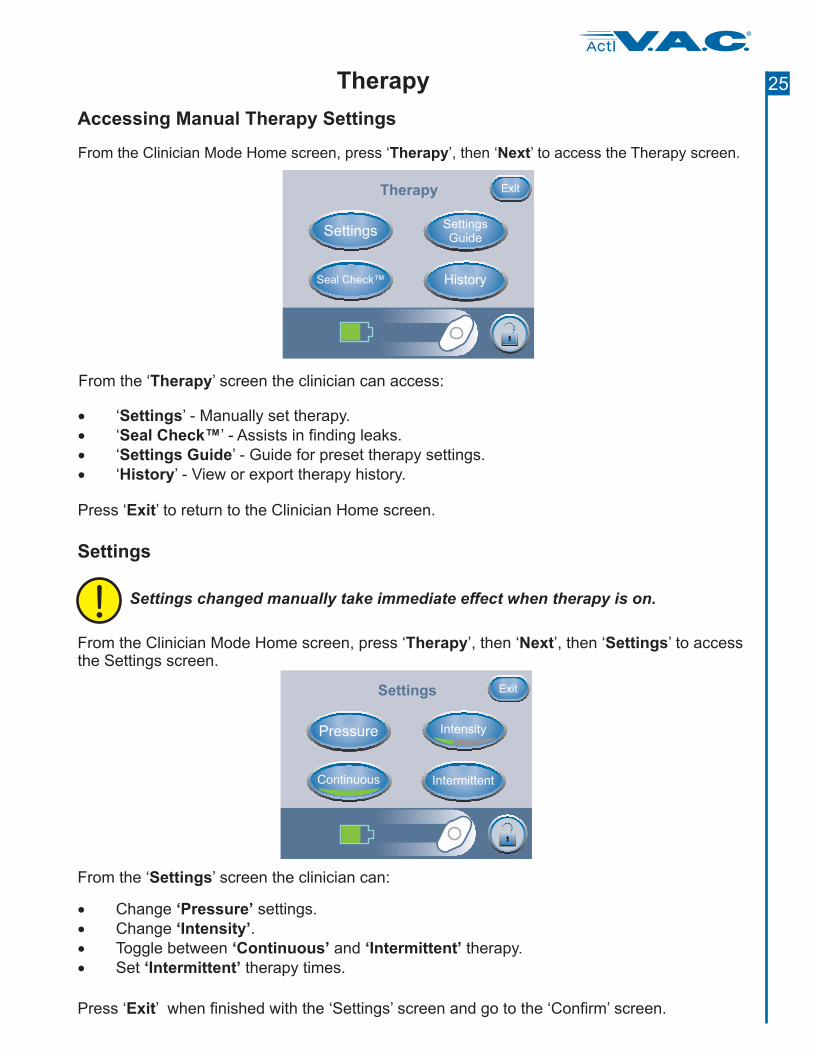
Therapy
From the ‘ ’ screen the clinician can access:Therapy
�
�
�
�
Settings
Seal Check™
Settings Guide
History
Exit
‘ ’ - Manually set therapy.
‘ ’ - Assists in finding leaks.
‘ ’ - Guide for preset therapy settings.
‘ ’ - View or export therapy history.
Press ‘ ’ to return to the Clinician Home screen.
Accessing Manual Therapy Settings
Therapy
Settings
Seal Check™ History
Exit
SettingsGuide
Settings
From the ‘ ’ screen the clinician can:Settings
Settings changed manually take immediate effect when therapy is on.
Settings
Pressure
Continuous Intermittent
Exit
Intensity
�
�
�
�
Change settings.
Change .
Toggle between and therapy.
Set therapy times.
‘Pressure’
‘Intensity’
‘Continuous’ ‘Intermittent’
‘Intermittent’
From the Clinician Mode Home screen, press ‘ ’, then to accessthe Settings screen.
Therapy then ‘ ’, ‘ ’Next Settings
From the Clinician Mode Home screen, press ‘ ’, then ‘ ’ to access the Therapy screen.Therapy Next
Press ‘ ’ when finished with the ‘Settings’ screen and go to the ‘Confirm’ screen.Exit
25
®
ActI
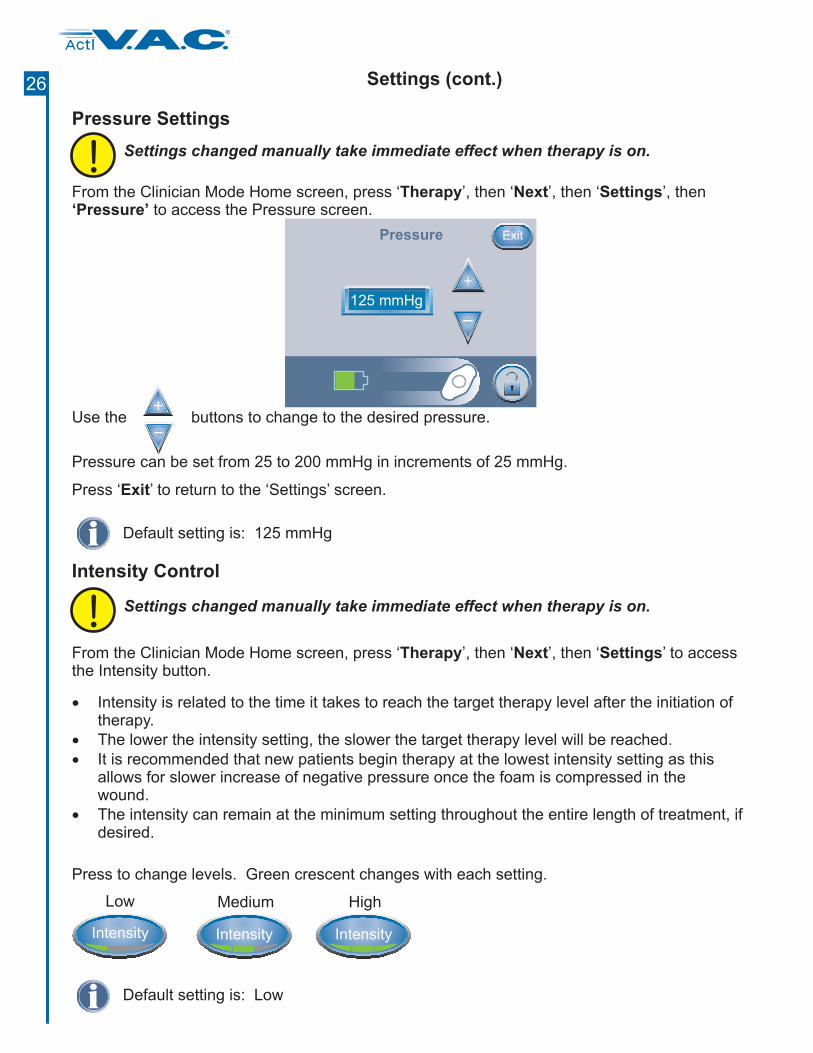
26
Intensity Control
�
�
�
�
Intensity is related to the time it takes to reach the target therapy level after the initiation oftherapy.
The lower the intensity setting, the slower the target therapy level will be reached.
It is recommended that new patients begin therapy at the lowest intensity setting as thisallows for slower increase of negative pressure once the foam is compressed in thewound.
The intensity can remain at the minimum setting throughout the entire length of treatment, ifdesired.
IntensityIntensityIntensity
Low Medium High
Press to change levels. Green crescent changes with each setting.
Default setting is: Low
From the Clinician Mode Home screen, press ‘ ’, then to accessth
Therapy then ‘ ’, ‘ ’e Intensity button.
Next Settings
Settings changed manually take immediate effect when therapy is on.
Settings (cont.)
Pressure Settings
ExitPressure
125 mmHg
+
_
Press ‘ ’ to return to the ‘Settings’ screen.Exit
From the Clinician Mode Home screen, press ‘ ’, thento access th
Therapy then ‘ ’, ‘ ’, thene Pressure screen.
Next Settings‘Pressure’
Settings changed manually take immediate effect when therapy is on.
Use the buttons to change to the desired pressure.
Pressure can be set from 25 to 200 mmHg in increments of 25 mmHg.
+_
D setting is: 125 mmHgefault
26
®
ActI
27
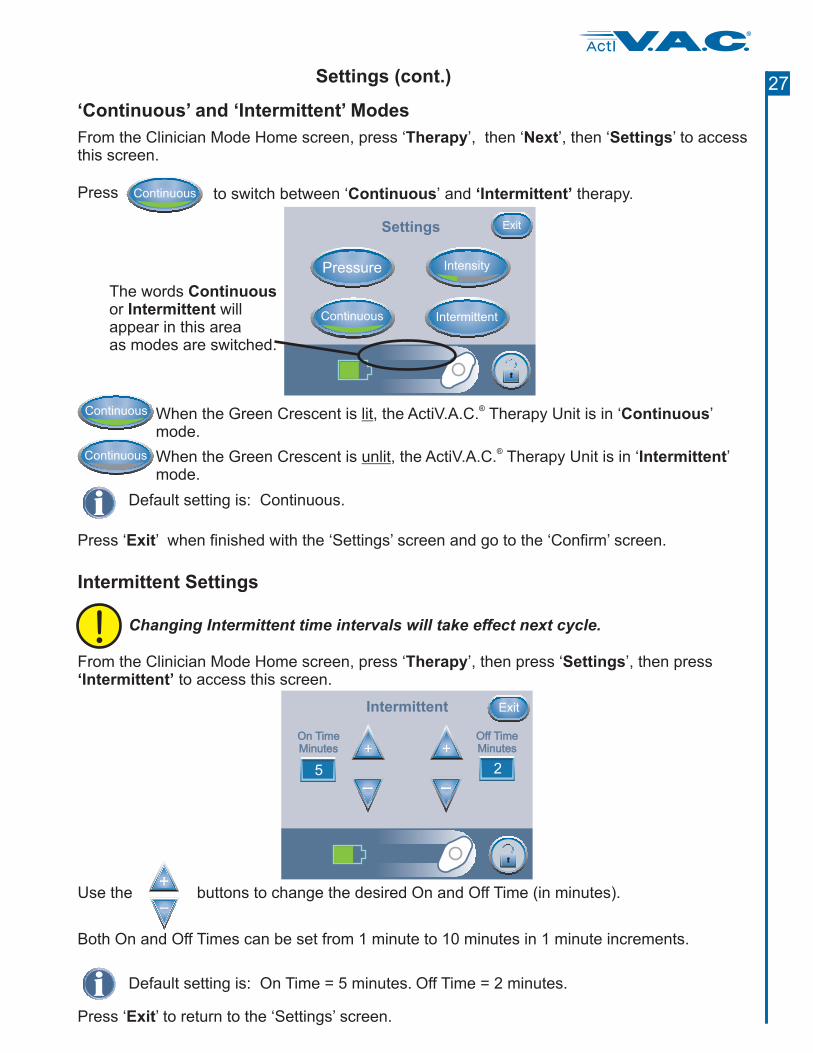
Changing Intermittent time intervals will take effect next cycle.
From the Clinician Mode Home screen, press ‘ ’, then pressto access th
Therapy ‘ ’, then pressis screen.
Settings‘Intermittent’
From the Clinician Mode Home screen, press ‘ ’, then ‘ ’, then ‘ ’ to accessthis screen.
Therapy Next Settings
‘Continuous’ and ‘Intermittent’ Modes
When the Green Crescent is , the ActiV.A.C. Therapy Unit is in ‘ ’mode.
lit®
ContinuousContinuous
When the Green Crescent is , the is in ‘ ’mode.
unlit IntermittentActiV.A.C. Therapy Unit®Continuous
Continuous to switch between ‘ ’ and therapy.Continuous ‘Intermittent’Press
Settings (cont.)
Press ‘ ’ to return to the ‘Settings’ screen.Exit
Intermittent Settings
ExitIntermittent
+
_
+
_
On TimeMinutesOn TimeMinutes
Off TimeMinutesOff TimeMinutes
25
Settings
Pressure
Continuous Intermittent
Exit
Intensity
The wordsor willappear in this areaas modes are switched.
ContinuousIntermittent
Use the buttons to change the desired On and Off Time (in minutes).
Both On and Off Times can be set from 1 minute to 10 minutes in 1 minute increments.
+_
Default is: On Time = 5 minutes. Off Time = 2 minutes.setting
Default setting is: Continuous.
Press ‘ ’ when finished with the ‘Settings’ screen and go to the ‘Confirm’ screen.Exit
27
®
ActI
28
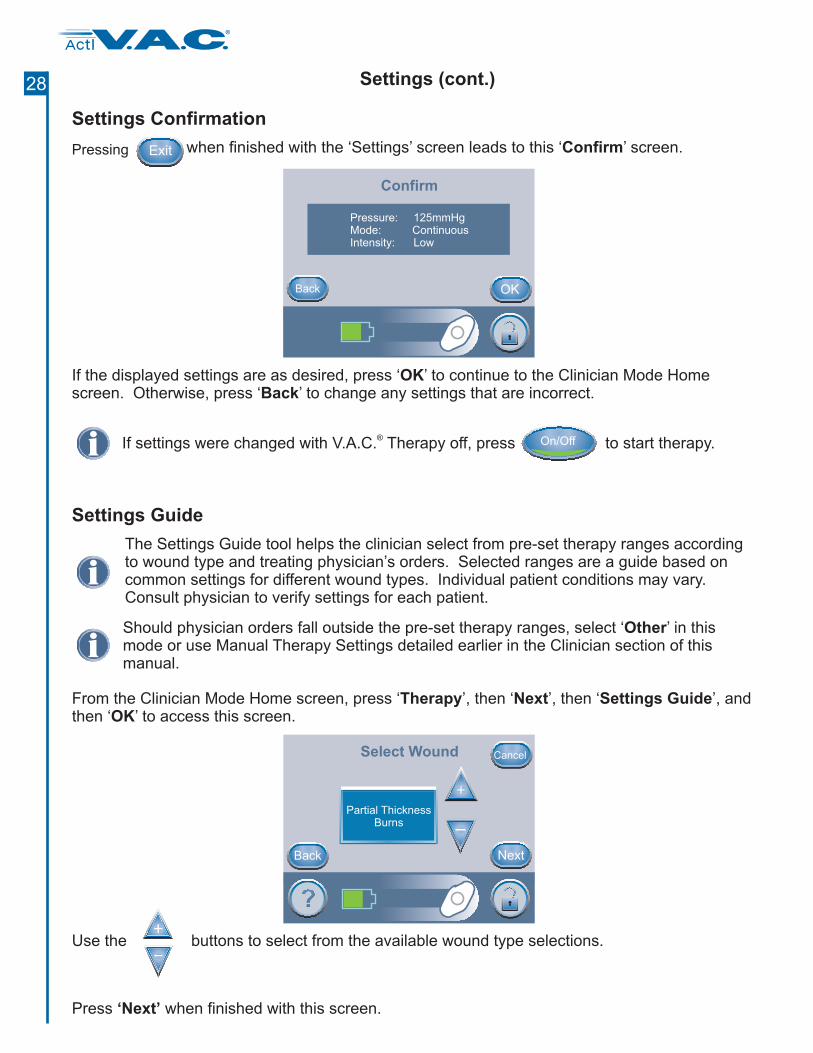
Settings Confirmation
If the displayed settings are as desired, press ‘ ’ to continue to the Clinician Mode Homescreen. Otherwise, press ‘ ’ to change any settings that are incorrect.
OKBack
when finished with the ‘Settings’ screen leads to this ‘ ’ screen.ConfirmPressing Exit
Settings (cont.)
Confirm
Back OK
Pressure: 125mmHgMode: ContinuousIntensity: Low
Settings Guide
From the Clinician Mode Home screen, press ‘ ’, then ‘ ’, thenTherapy Next ‘ ’, andthen ‘ ’ to access this screen.
Settings GuideOK
Press when finished with this screen.‘Next’
Use the buttons to select from the available wound type selections.+_
Select Wound Cancel
NextBack
+
_Partial Thickness
Burns
If settings were changed with V.A.C. Therapy off, press to start therapy.® On/Off
Should physician orders fall outside the pre-set therapy ranges, select ‘ ’ in thismode or use Manual Therapy Settings detailed earlier in the Clinician section of thismanual.
Other
The Settings Guide tool helps the clinician select from pre-set therapy ranges accordingto wound type and treating physician’s orders. Selected ranges are a guide based oncommon settings for different wound types. Individual patient conditions may vary.Consult physician to verify settings for each patient.
®
ActI
29
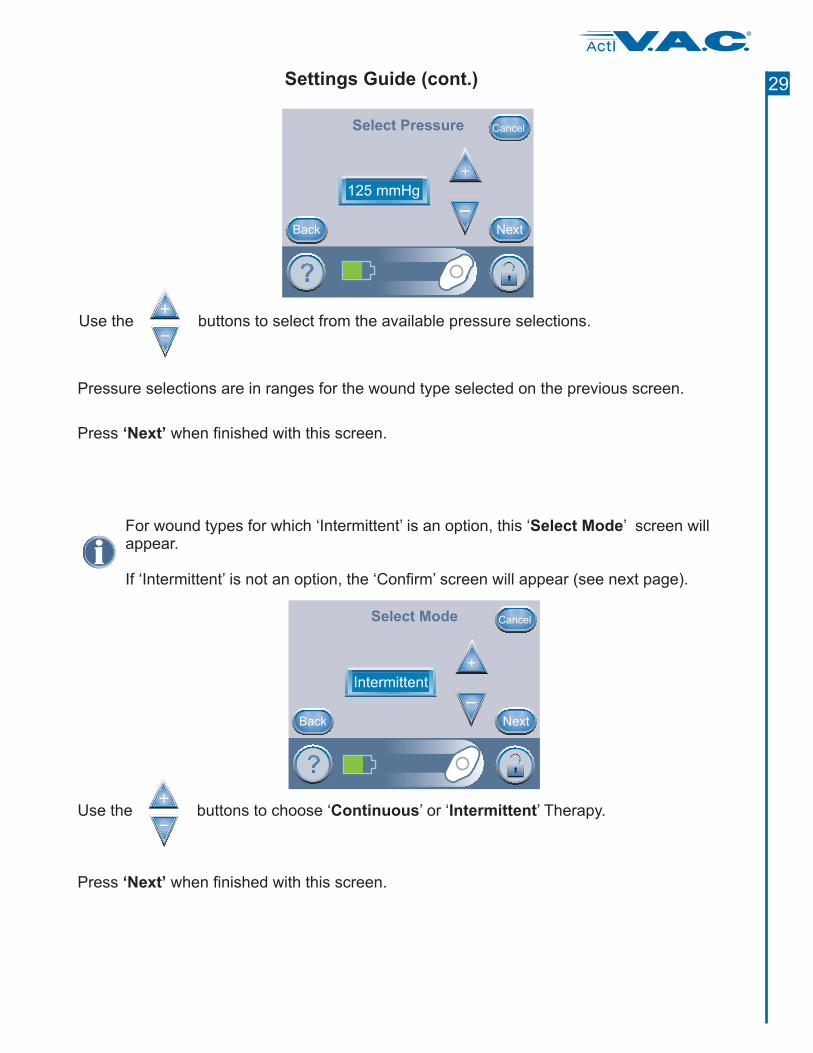
Pressure selections are in ranges for the wound type selected on the previous screen.
Settings Guide (cont.)
Press when finished with this screen.‘Next’
For wound types for which ‘Intermittent’ is an option, this ‘ ’ screen willappear.
If ‘Intermittent’ is not an option, the ‘Confirm’ screen will appear (see next page).
Select Mode
Press when finished with this screen.‘Next’
Use the buttons to select from the available pressure selections.+_
Use the buttons to choose ‘ ’ or ‘ ’ Therapy.Continuous Intermittent+_
Select Mode
Intermittent
+
_
Cancel
Back Next
Select Pressure
125 mmHg
+
_
Cancel
Back Next
®
ActI
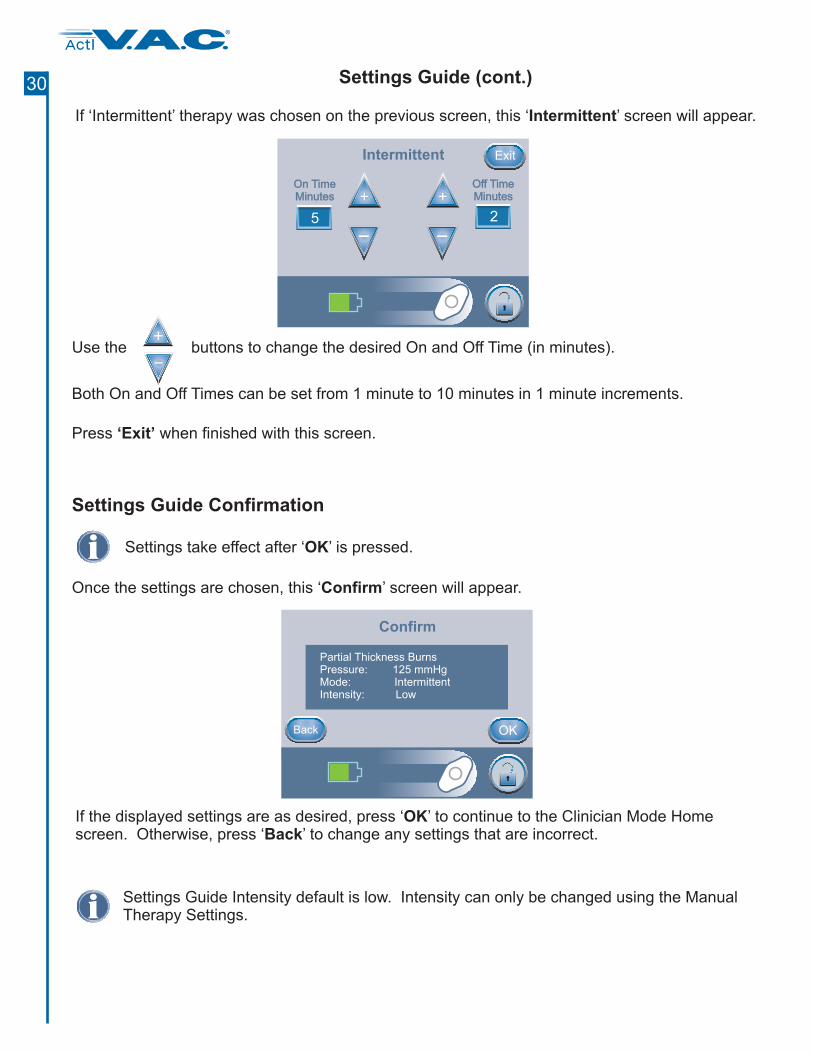
If ‘Intermittent’ therapy was chosen on the previous screen, this ‘ ’ screen will appear.Intermittent
Press when finished with this screen.‘Exit’
Settings Guide (cont.)
Confirm
Back OK
Partial Thickness BurnsPressure: 125 mmHgMode: IntermittentIntensity: Low
Settings Guide Confirmation
Once the settings are chosen, this ‘ ’ screen will appear.Confirm
ExitIntermittent
+
_
+
_
On TimeMinutesOn TimeMinutes
Off TimeMinutesOff TimeMinutes
25
Settings take effect after ‘ ’ is pressed.OK
Settings Guide Intensity default is low. Intensity can only be changed using the ManualTherapy Settings.
Use the buttons to change the desired On and Off Time (in minutes).
Both On and Off Times can be set from 1 minute to 10 minutes in 1 minute increments.
+_
If the displayed settings are as desired, press ‘ ’ to continue to the Clinician Mode Homescreen. Otherwise, press ‘ ’ to change any settings that are incorrect.
OKBack
®
ActI
30
16
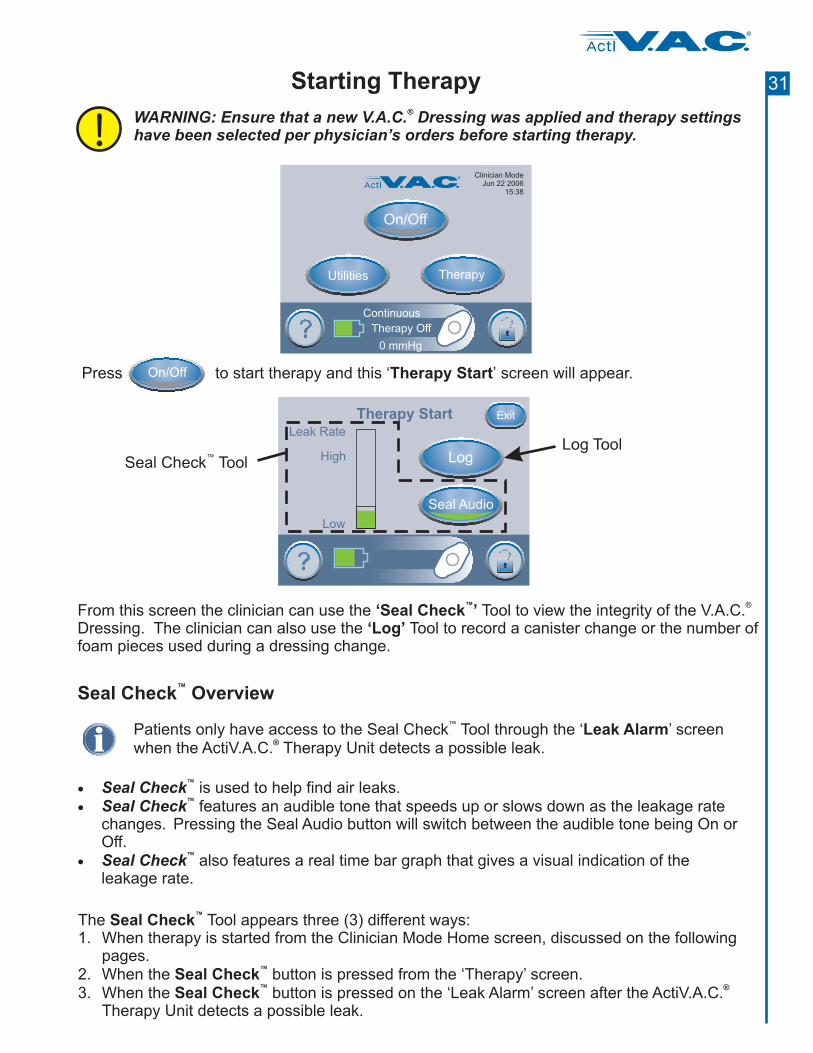
On/Off to start therapy .and this ‘ ’ screen will appearTherapy StartPress
Starting Therapy
®
ActI
On/Off
TherapyUtilities
Clinician ModeJun 22 2006
15:38
Continuous
0 mmHg
Therapy Off
Seal Check Overview™
Patients only have access to the Seal Check Tool through the ‘ ’ screenwhen the ActiV.A.C. Therapy Unit detects a possible leak.
™Leak Alarm
®
�
�
�
Seal CheckSeal Check
Seal Check
™
™
™
is used to help find air leaks.features an audible tone that speeds up or slows down as the leakage rate
changes. Pressing the Seal Audio button will switch between the audible tone being On orOff.
also features a real time bar graph that gives a visual indication of theleakage rate.
The Tool appears three (3) different ways:
3. the ‘Leak Alarm’ screen after
Seal Check™
™
™ ®
1. When therapy is started from the Clinician Mode Home screen, discussed on the followingpages.
2. When the button is pressed from the ‘Therapy’ screen.When the button is pressed on the ActiV.A.C.Therapy Unit detects a possible leak.
Seal CheckSeal Check
From this screen the clinician can use the Tool to view the integrity of the V.A.C.Dressing. The clinician can also use the Tool to record a canister change or the number offoam pieces used during a dressing change.
‘Seal Check ’‘Log’
™ ®
Therapy Start
About
Exit
Log
Leak Rate
Low
High
Seal Audio
Seal Check Tool™
Log Tool
WARNING: Ensure that a new V.A.C. Dressing was applied and therapy settingshave been selected per physician’s orders before starting therapy.
®
®
ActI
31

How to Use Seal Check™ (When Starting Therapy)
Finding the Leak Using Seal Check™
Starting Therapy (cont.)
Most leaks occur:
where the drape meets the skin.
where the SensaT.R.A.C. Pad is attached to the drape.
at tubing connections.
�
�
�
®
1. Ensure connector between dressing tubing and canister tubing is properly locked.
2. Ensure the canister is securely installed on the therapy unit. If the canister is properly installed, thecanister cannot be removed by gently pulling the canister directly away from the unit
3. While therapy is on and using light pressure, move your hand and fingers slowly around the edgesof the drape and the SensaT.R.A.C. Pad. The bar graph will lower and the audible tone (if
is on) will slow down when the leak is found.
4. Refer to the provided with V.A.C. Dressings for information on usingexcess V.A.C. Drape material to seal the leak area.
®
®
®
SealAudio
Application Instructions
When finished with this screen, press ‘ ’ to return to the Clinician Mode Home screen.Exit
Therapy Start
About
Exit
Leak Rate
Low
High
Seal Audio
Log
Orange bar graphindicates a significant leak.
Green bar graph indicatesthat the ActiV.A.C.Therapy System isoperating normally.
®
Press to turn the Seal Audiotone On or Off.
The feature provides an audible tone and a bar graph to assist in finding leaks.
The frequency of the audible tone and the height of the bar graph will reflect the leak rate.
The audible tone slows down and the bar graph decreases in height as the leak is found.
Seal Check™
�
�
During initial dressing draw down, the bar graph should turn orange and then return to agreen state if there are no significant leaks.
Seal Check™ Tool
Line on bar graph is thetransition point from green toorange and vice-versa.
Pressing located on the Clinician Mode Home screen will immediately display
this ‘ ’ screen.Therapy Start
On/Off
®
ActI
32
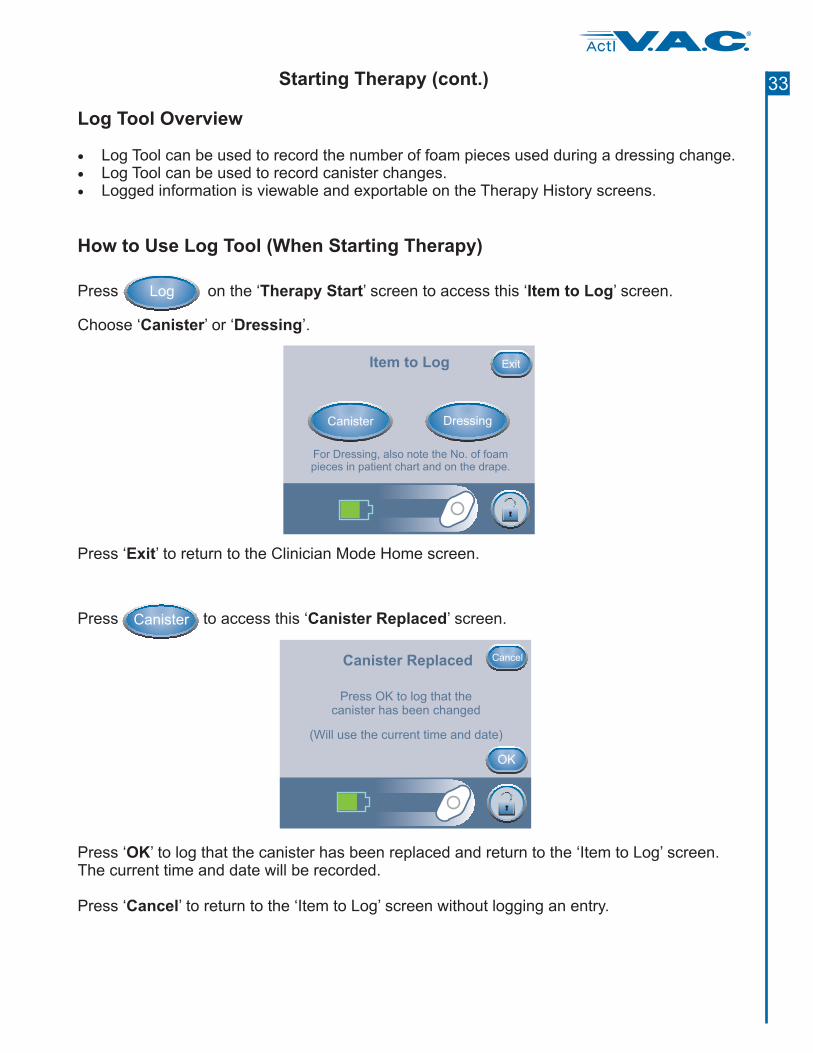
Log Tool Overview
�
�
�
Log Tool can be used to record the number of foam pieces used during a dressing change.Log Tool can be used to record canister changes.Logged information is viewable and exportable on the Therapy History screens.
Starting Therapy (cont.)
How to Use Log Tool (When Starting Therapy)
Press ‘ ’ to return to the Clinician Mode Home screen.Exit
Item to Log
For Dressing, also note the No. of foampieces in patient chart and on the drape.
DressingCanister
Exit
Choose ‘ ’ or ‘ ’.Canister Dressing
Log on the screen to accessTherapy Start‘ ’ this ‘ ’ screen.Item to LogPress
Press ‘ ’ to log that the canister has been replaced and return to the ‘Item to Log’ screen.The current time and date will be recorded.
Press ‘ ’ to return to the ‘Item to Log’ screen without logging an entry.
OK
Cancel
Canister to access this ‘ ’ screen.Canister ReplacedPress
Canister Replaced
Press OK to log that thecanister has been changed
(Will use the current time and date)
OK
Cancel
®
ActI
33
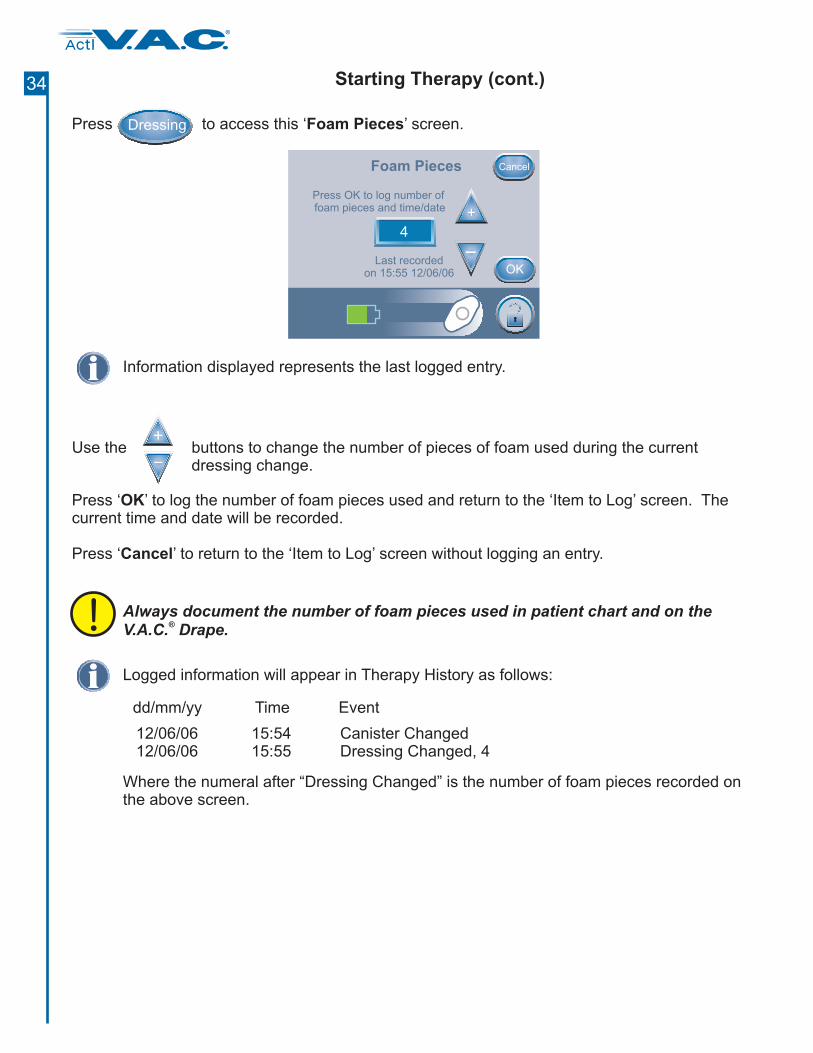
Always document the number of foam pieces used in patient chart and on theV.A.C. Drape.
®
Information displayed represents the last logged entry.
Dressing to access this ‘ ’ screen.Foam PiecesPress
Use the buttons to change the number of pieces of foam used during the currentdressing change.
+_
OK
Foam Pieces
Press OK to log number offoam pieces and time/date
Last recordedon 15:55 12/06/06
4
+
_
Cancel
Starting Therapy (cont.)
Logged information will appear in Therapy History as follows:
Where the numeral after “Dressing Changed” is the number of foam pieces recorded onthe above screen.
12/06/06 15:54 Canister Changed12/06/06 15:55 Dressing Changed, 4
dd/mm/yy Time Event
Press ‘ ’ to log the number of foam pieces used and return to the ‘Item to Log’ screen. Thecurrent time and date will be recorded.
Press ‘ ’ to return to the ‘Item to Log’ screen without logging an entry.
OK
Cancel
®
ActI
34
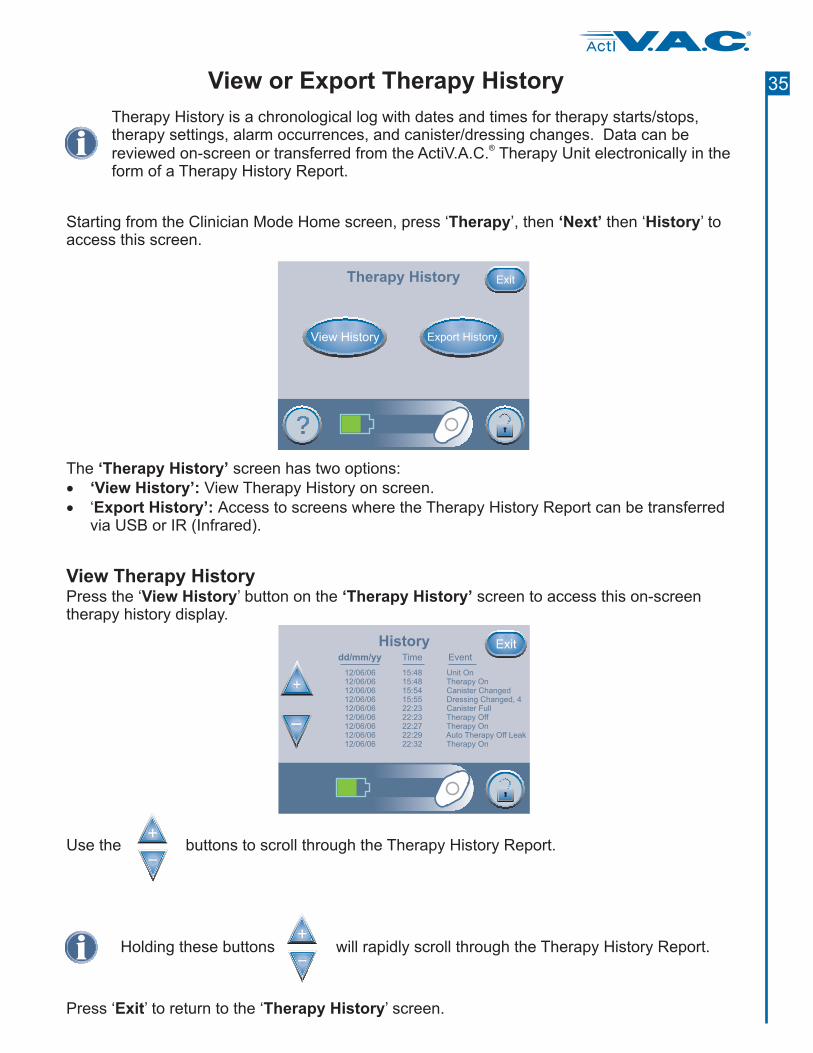
View or Export Therapy History
Starting from the Clinician Mode Home screen, press ‘ ’, then then ‘ ’ toaccess this screen.
Therapy ‘Next’ History
The screen has two options:
View Therapy History on screen.
‘Therapy History’
‘View History’:�
� Export History’:‘ Access to screens where the Therapy History Report can be transferredvia USB or IR (Infrared).
Therapy History
Export HistoryView History
Exit
View Therapy HistoryPress the ‘ ’ button on the screen to access this on-screentherapy history display.
View History ‘Therapy History’
Press ‘ ’ to return to the ‘ ’ screen.Exit Therapy History
Use the buttons to scroll through the Therapy History Report.+_
Holding these b will rapidly scroll through the Therapy History Report.uttons+_
History
+
_
Exitdd/mm/yy Time Event
12/06/06 15:48 Unit On12/06/0612/06/0612/06/06 15:55 Dressing Changed, 412/06/06 22:2312/06/06 22:23 Therapy Off12/06/06 22:27 Therapy On12/06/06 22:29
15:48 Therapy On15:54 Canister Changed
Canister Full
Auto Therapy Off Leak12/06/06 22:32 Therapy On
Therapy History is a chronological log with dates and times for therapy starts/stops,therapy settings, alarm occurrences, and canister/dressing changes. Data can bereviewed on-screen or transferred from the ActiV.A.C. Therapy Unit electronically in theform of a Therapy History Report.
®
®
ActI
35
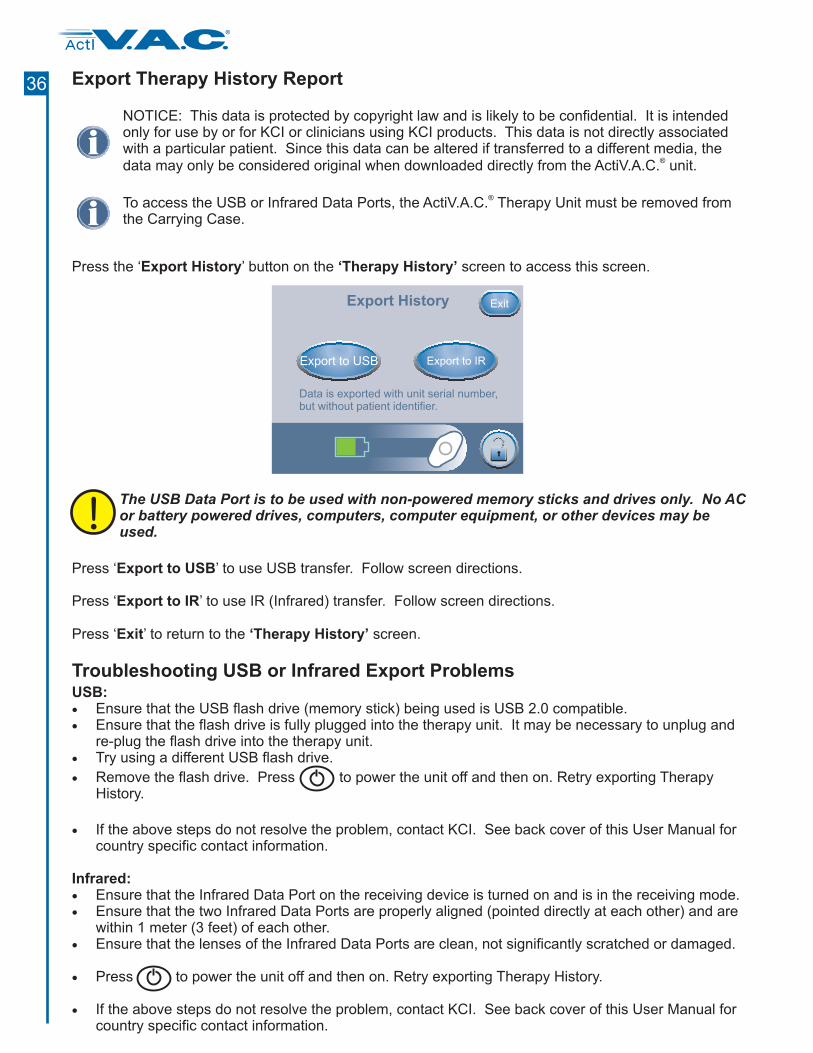
Export Therapy History Report
Press ‘ ’ to use USB transfer. Follow screen directions.
Press ‘ ’ to use IR (Infrared) transfer. Follow screen directions.
Export to USB
Export to IR
Export History
Data is exported with unit serial number,but without patient identifier.
Export to IRExport to USB
Exit
Press the ‘ ’ button on the screen to access this screen.Export History ‘Therapy History’
Press ‘ ’ to return to the screen.Exit ‘Therapy History’
Troubleshooting USB or Infrared Export Problems
The USB Data Port is to be used with non-powered memory sticks and drives only. No ACor battery powered drives, computers, computer equipment, or other devices may beused.
USB:
Infrared:
�
�
�
�
�
�
�
�
�
�
Ensure that the USB flash drive (memory stick) being used is USB 2.0 compatible.Ensure that the flash drive is fully plugged into the therapy unit. It may be necessary to unplug andre-plug the flash drive into the therapy unit.Try using a different USB flash drive.
Remove the flash drive. Press to power the unit off and then on. Retry exporting TherapyHistory.
If the above steps do not resolve the problem, contact KCI. See back cover of this User Manual forcountry specific contact information.
Ensure that the Infrared Data Port on the receiving device is turned on and is in the receiving mode.Ensure that the two Infrared Data Ports are properly aligned (pointed directly at each other) and arewithin 1 meter (3 feet) of each other.Ensure that the lenses of the Infrared Data Ports are clean, not significantly scratched or damaged.
Press to power the unit off and then on. Retry exporting Therapy History.
If the above steps do not resolve the problem, contact KCI. See back cover of this User Manual forcountry specific contact information.
NOTICE: This data is protected by copyright law and is likely to be confidential. It is intendedonly for use by or for KCI or clinicians using KCI products. This data is not directly associatedwith a particular patient. Since this data can be altered if transferred to a different media, thedata may only be considered original when downloaded directly from the ActiV.A.C. unit.
®
To access the USB or Infrared Data Ports, the ActiV.A.C. Therapy Unit must be removed fromthe Carrying Case.
®
36
®
ActI
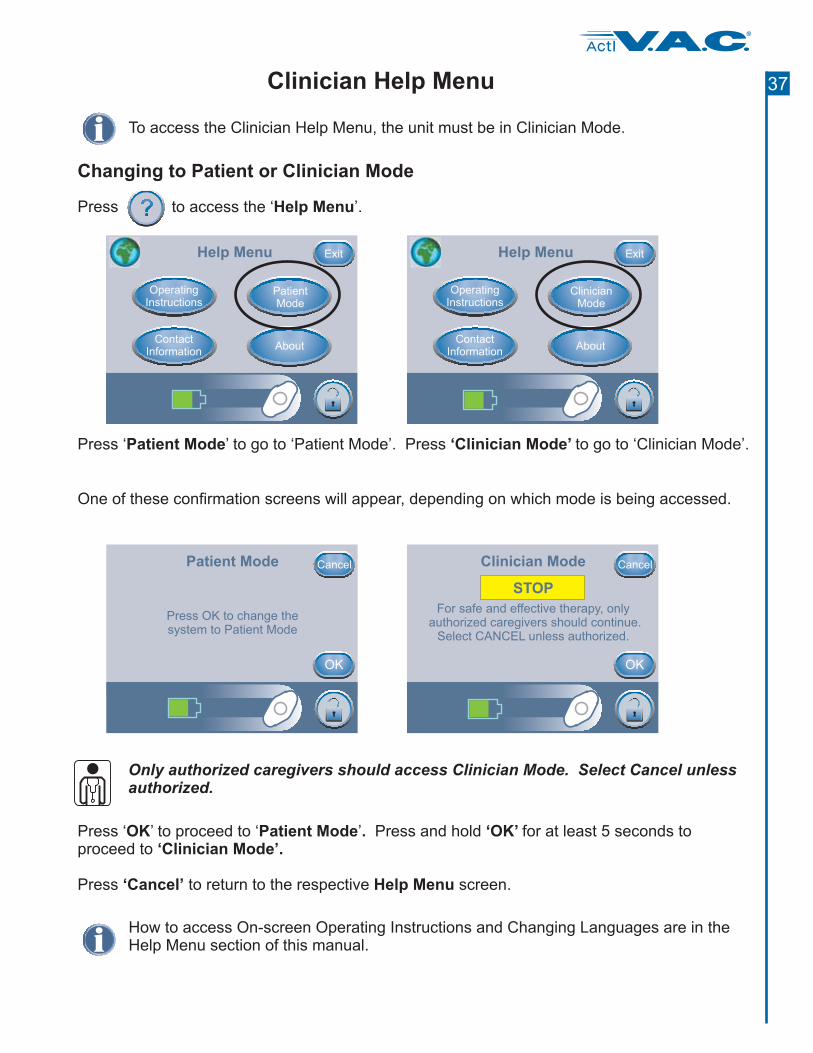
To access the Clinician Help Menu, the unit must be in Clinician Mode.
Changing to Patient or Clinician Mode
Press ‘ ’ to go to ‘Patient Mode’. Press to go to ‘Clinician Mode’.Patient Mode ‘Clinician Mode’
One of these confirmation screens will appear, depending on which mode is being accessed.
Press ‘ ’ to proceed to ‘ ’ Press and hold for at least 5 seconds toproceed to
OK Patient Mode . ‘OK’‘Clinician Mode’.
Help Menu
OperatingInstructions
ContactInformation
About
Exit
PatientMode
Press to access the ‘ ’.Help Menu
Clinician Help Menu
Press to return to the respective screen.‘Cancel’ Help Menu
Help Menu
OperatingInstructions
ContactInformation
About
Exit
ClinicianMode
Only authorized caregivers should access Clinician Mode. Select Cancel unlessauthorized.
Patient Mode
Press OK to change thesystem to Patient Mode
Cancel
OK
Clinician Mode
For safe and effective therapy, onlyauthorized caregivers should continue.
Select CANCEL unless authorized.
Cancel
OK
STOP
How to access On-screen Operating Instructions and Changing Languages are in theHelp Menu section of this manual.
37
®
ActI
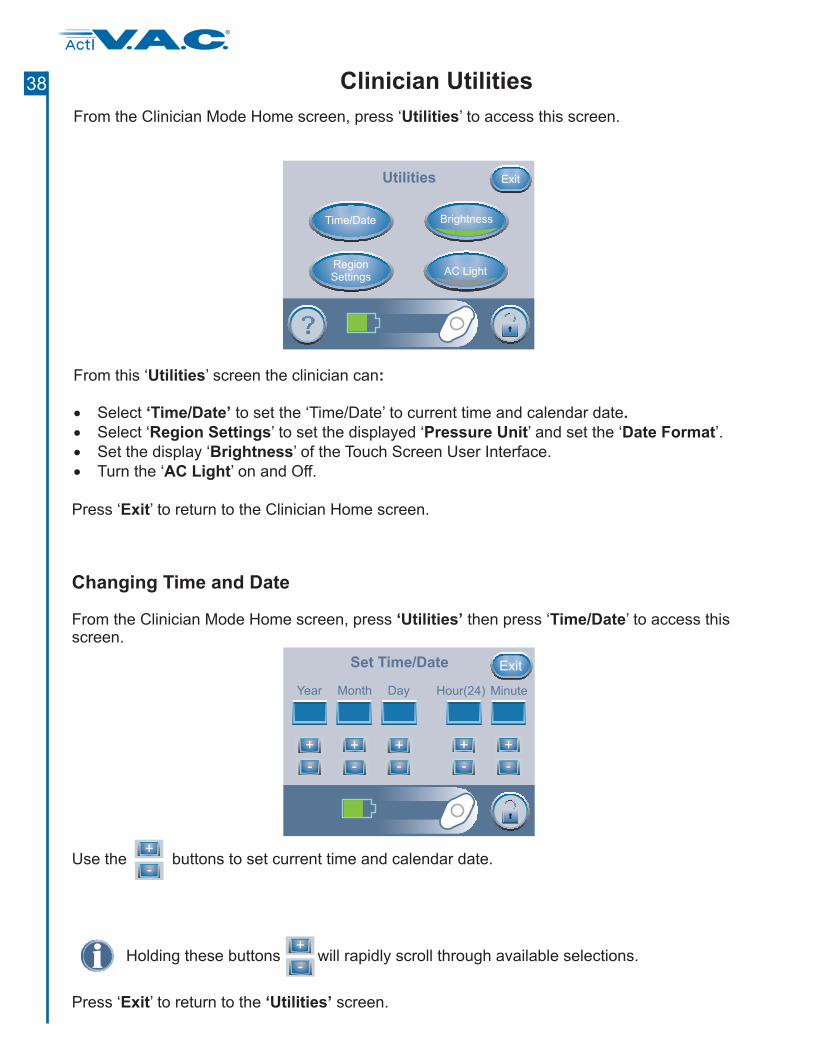
From the Clinician Mode Home screen, press ‘ ’ to access this screen.Utilities
Clinician Utilities
From this ‘ ’ screen the clinician can
Select to set the ‘Time/Date’ to current time and calendar date
Turn the ‘ ’ on and Off.
Utilities :
‘Time/Date’ .
AC Light
�
�
�
Select ‘ ’ to set the displayed ‘ ’ and set the ‘ ’.
Set the display ‘ ’ of the Touch Screen User Interface.
Region Settings Pressure Unit Date Format
Brightness�
Utilities
Time/Date
RegionSettings
AC Light
Exit
Brightness
From the Clinician Mode Home screen, press then press ‘ ’ to access thisscreen.
‘Utilities’ Time/Date
Changing Time and Date
Press ‘ ’ to return to the screen.Exit ‘Utilities’
Use the buttons to set current time and calendar date.+
-
+
-
Set Time/Date
Year Month Day Hour(24) Minute
Exit
+ + + ++
- - ---
Holding these b will rapidly scroll through available selections.uttons
Press ‘ ’ to return to the Clinician Home screen.Exit
38
®
ActI
Press ‘ ’ to return to the screen.Exit ‘Utilities’
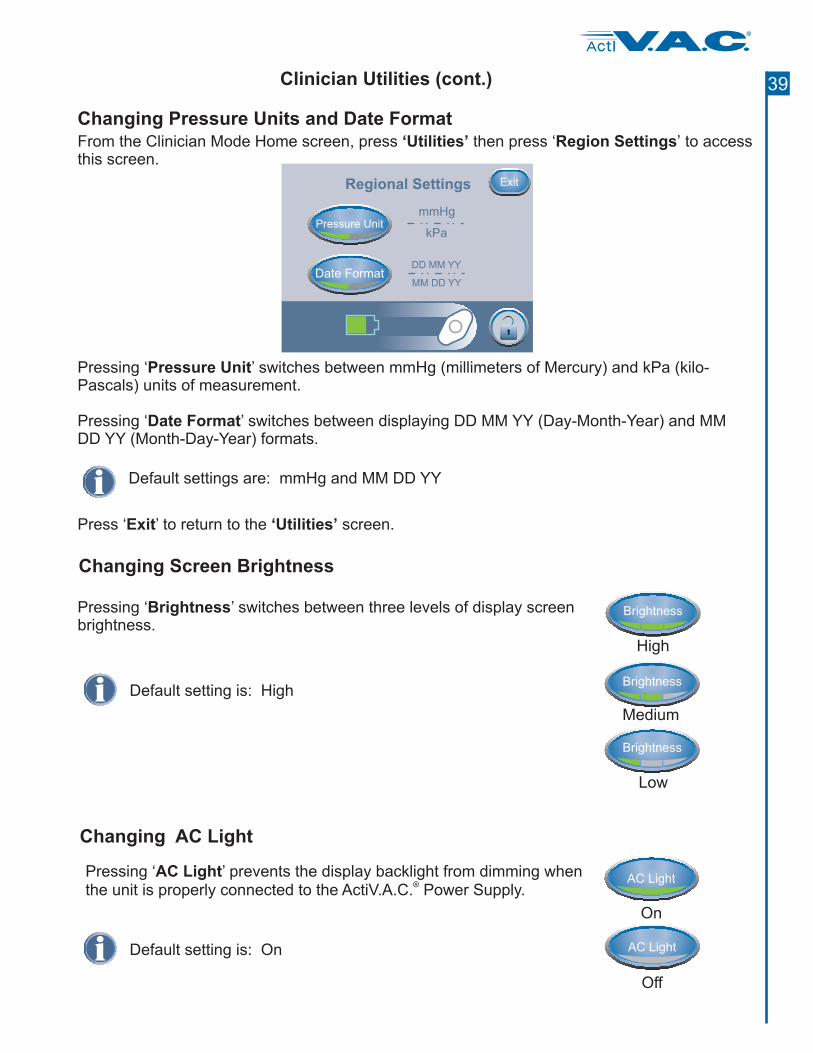
Changing Screen Brightness
Changing AC Light
AC Light
AC Light
Brightness
Brightness
Brightness
Pressing ‘ ’ switches between three levels of display screenbrightness.
Brightness
Pressing ‘ ’ prevents the display backlight from dimming whenthe unit is properly connected to the ActiV.A.C. Power Supply.
AC Light®
D setting is: Onefault
From the Clinician Mode Home screen, ‘ ’Region Settingspress then press to accessthis screen.
‘Utilities’
Clinician Utilities (cont.)
Changing Pressure Units and Date Format
Pressing ‘ ’ switches between (millimeters of Mercury) and kPa (kilo-Pascals) units of measurement.
Pressing ‘ ’ switches between displaying DD MM YY (Day-Month-Year) and MMDD YY (Month-Day-Year) formats.
Pressure Unit
Date Format
mmHg
Regional Settings
Pressure Unit
Date Format
Exit
kPa
DD MM YY
MM DD YY
mmHg
D settings are: mmHg and MM DD YYefault
D setting is: Highefault
High
Medium
Low
On
Off
39
®
ActI
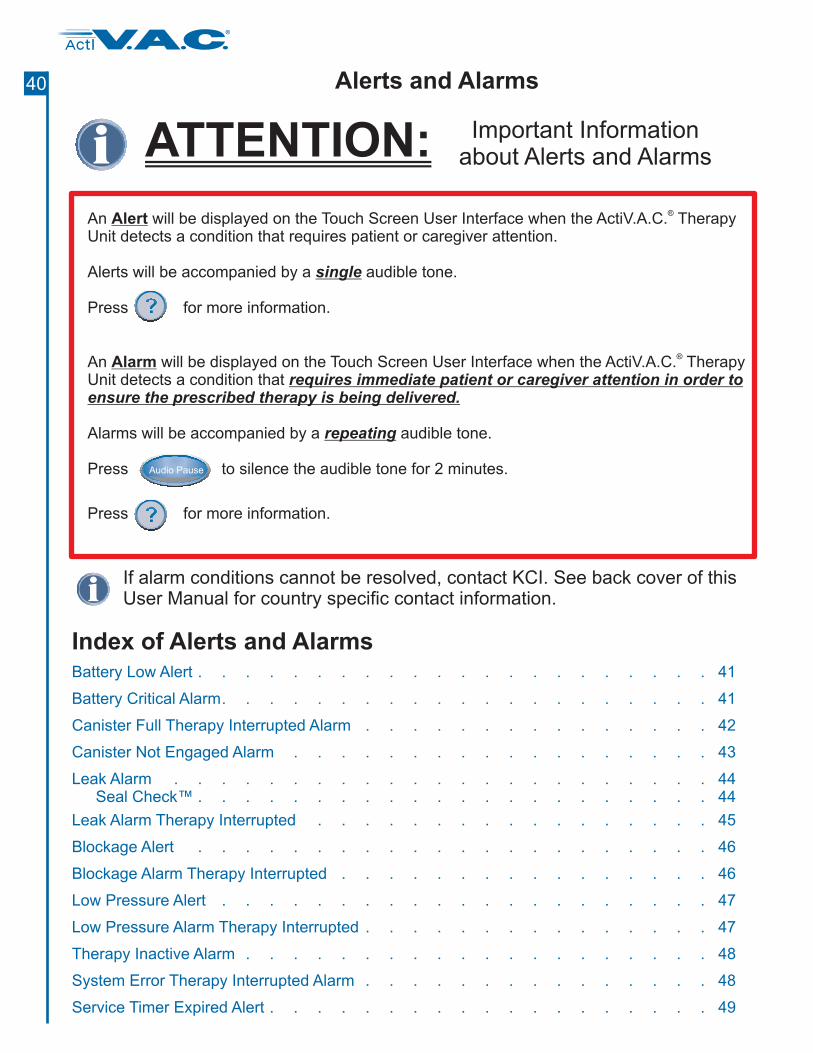
Alerts and Alarms
Battery Low Alert . . . . . . . . . . . . . . . . . . . . . . 41
Battery Critical Alarm. . . . . . . . . . . . . . . . . . . . . 41
Canister Full Therapy Interrupted Alarm . . . . . . . . . . . . . . . 42
Canister Not Engaged Alarm . . . . . . . . . . . . . . . . . . 43
Leak Alarm . . . . . . . . . . . . . . . . . . . . . . . 44Seal Check™ . . . . . . . . . . . . . . . . . . . . . . 44
Leak Alarm Therapy Interrupted . . . . . . . . . . . . . . . . . 45
Blockage Alert . . . . . . . . . . . . . . . . . . . . . . 46
Blockage Alarm Therapy Interrupted . . . . . . . . . . . . . . . . 46
Low Pressure Alert . . . . . . . . . . . . . . . . . . . . . 47
Low Pressure Alarm Therapy Interrupted . . . . . . . . . . . . . . . 47
Therapy Inactive Alarm . . . . . . . . . . . . . . . . . . . . 48
System Error Therapy Interrupted Alarm . . . . . . . . . . . . . . . 48
Service Timer Expired Alert . . . . . . . . . . . . . . . . . . . 49
An will be displayed on the Touch Screen User Interface when the ActiV.A.C. TherapyUnit detects a condition that requires patient or caregiver attention.
Alerts will be accompanied by a audible tone.
Press for more information.
An will be displayed on the Touch Screen User Interface when the ActiV.A.C. TherapyUnit detects a condition that
Alarms will be accompanied by a audible tone.
Press to silence the audible tone for 2 minutes.
Press for more information.
Alert
Alarm
®
®
single
requires immediate patient or caregiver attention in order toensure the prescribed therapy is being delivered.
repeating
Audio Pause
If alarm conditions cannot be resolved, contact KCI. See back cover of thisUser Manual for country specific contact information.
Index of Alerts and Alarms
ATTENTION: Important Informationabout Alerts and Alarms
40
®
ActI
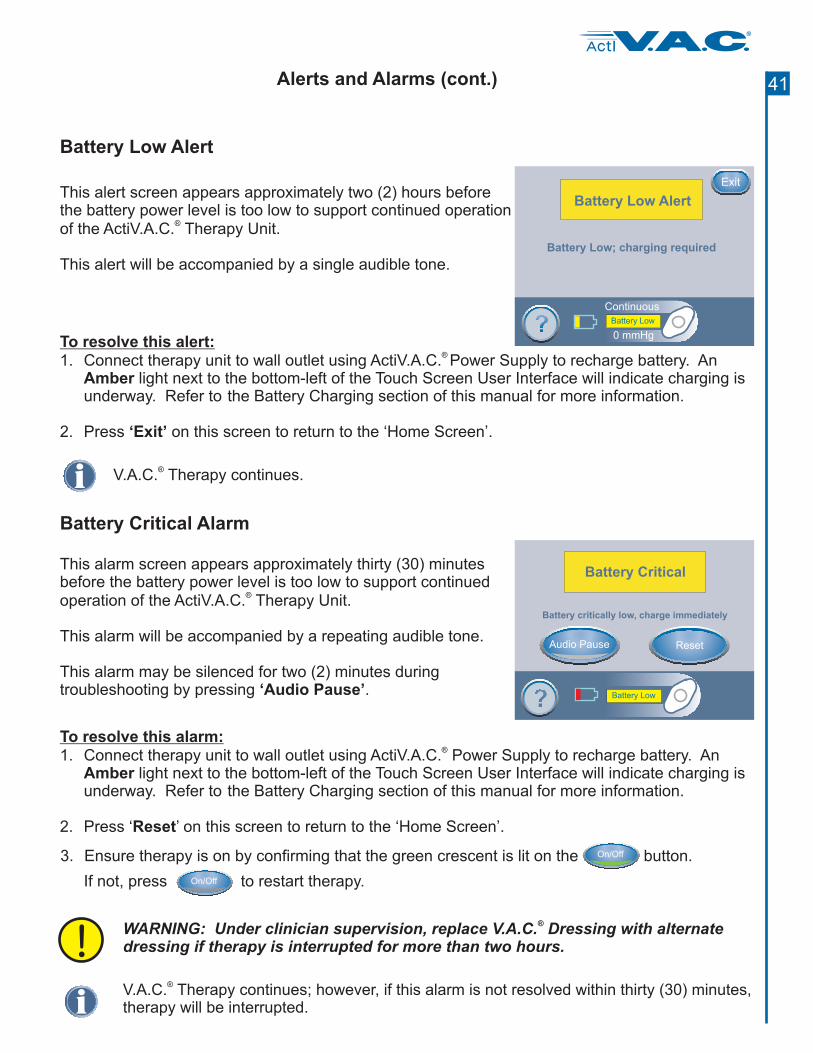
Battery Low Alert
To resolve this alert:1. Connect therapy unit to wall outlet using ActiV.A.C. Power Supply to recharge battery. An
light next to the bottom-left of the Touch Screen User Interface will indicate charging isunderway. Refer to the Battery Charging section of this manual for more information.
2. Press on this screen to return to the ‘Home Screen’.
®
Amber
‘Exit’
This alert screen appears approximately two (2) hours beforethe battery power level is too low to support continued operationof the ActiV.A.C. Therapy Unit.
This alert will be accompanied by a single audible tone.
®
Battery Low; charging required
Battery Low Alert
Battery Low
Continuous
0 mmHg
Exit
This alarm screen appears approximately minutesbefore the battery power level is too low to support continuedoperation of the
thirty (30)
ActiV.A.C. Therapy Unit.
This alarm will be accompanied by a repeating audible tone.
This alarm may be silenced for two (2) minutes duringtroubleshooting by pressing .
®
‘Audio Pause’
Battery Critical Alarm
On/Off
On/OffIf not, press to restart therapy.
To resolve this alarm:1. Connect therapy unit to wall outlet using ActiV.A.C. Power Supply to recharge battery. An
light next to the bottom-left of the Touch Screen User Interface will indicate charging isunderway. Refer to the Battery Charging section of this manual for more information.
2. Press ‘ ’ on this screen to return to the ‘Home Screen’.
®
Amber
Reset
3. Ensure therapy is on by confirming that the green crescent is lit on the button.
Audio Pause Reset
Battery Critical
Battery critically low, charge immediately
Battery Low
V.A.C. Therapy continues; however, if this alarm is not resolved within thirty (30) minutes,therapy will be interrupted.
®
WARNING: Under clinician supervision, replace V.A.C. Dressing with alternatedressing if therapy is interrupted for more than two hours.
®
V.A.C. Therapy continues.®
Alerts and Alarms (cont.) 41
®
ActI
On/Off4. Restart therapy by pressing .
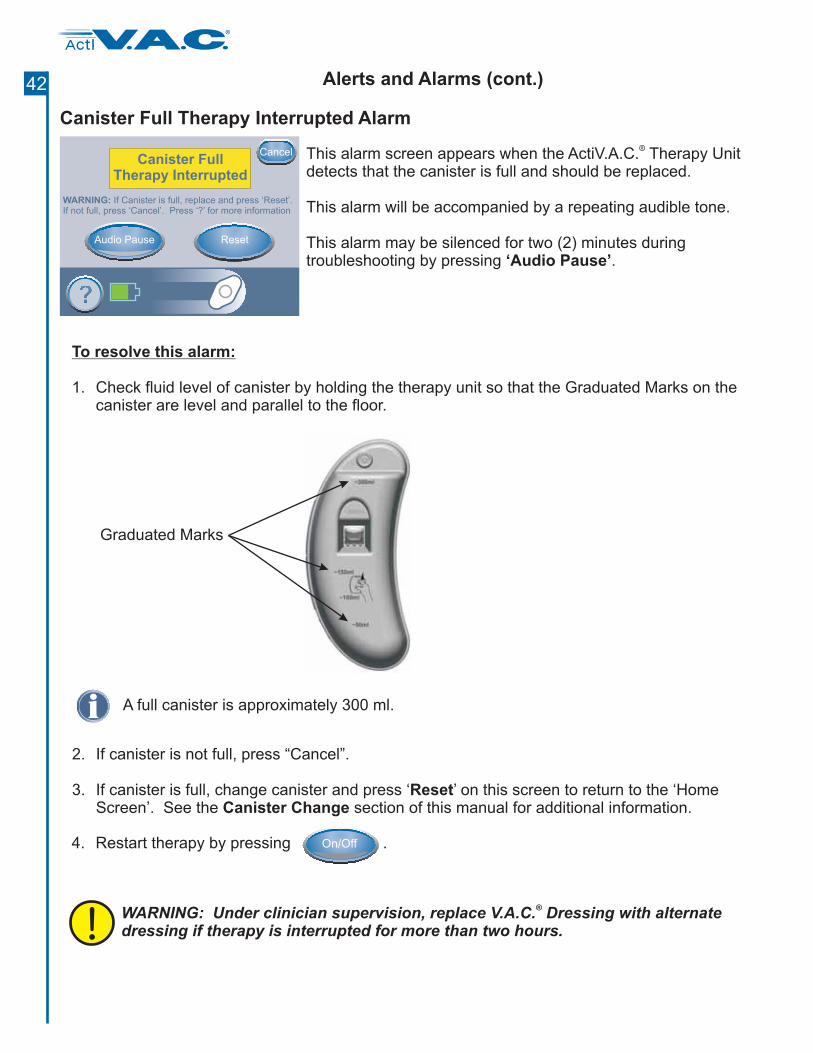
2. If canister is not full, press “Cancel”.
3. If canister is full, change canister and press ‘ ’ on this screen to return to the ‘HomeScreen’. See the section of this manual for additional information.
ResetCanister Change
To resolve this alarm:
1. Check fluid level of canister by holding the therapy unit so that the Graduated Marks on thecanister are level and parallel to the floor.
This alarm screen appears when the ActiV.A.C. Therapy Unitdetects that the canister is full and should be replaced.
This alarm will be accompanied by a repeating audible tone.
This alarm may be silenced for two (2) minutes duringtroubleshooting by pressing .
®
‘Audio Pause’
Alerts and Alarms (cont.)
Canister Full Therapy Interrupted Alarm
Reset
Canister FullTherapy Interrupted
WARNING: If Canister is full, replace and press ‘Reset’.If not full, press ‘Cancel’. Press ‘?’ for more information
Cancel
Audio Pause
WARNING: Under clinician supervision, replace V.A.C. Dressing with alternatedressing if therapy is interrupted for more than two hours.
®
Graduated Marks
A full canister is approximately 300 ml.
42
®
ActI
Alerts and Alarms (cont.)
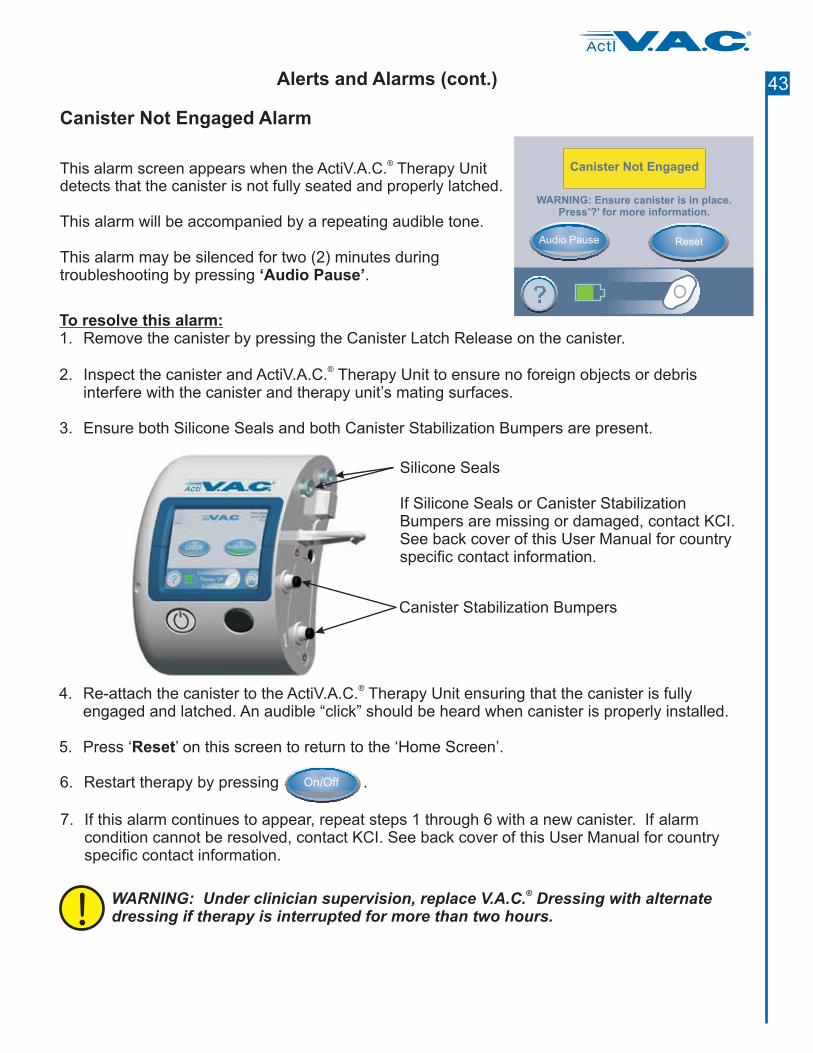
This alarm screen appears when the ActiV.A.C. Therapy Unitdetects that the canister is not fully seated and properly latched.
®
This alarm will be accompanied by a repeating audible tone.
This alarm may be silenced for two (2) minutes duringtroubleshooting by pressing .‘Audio Pause’
To resolve this alarm:1. Remove the canister by pressing the Canister Latch Release on the canister.
2. Inspect the canister and ActiV.A.C. Therapy Unit to ensure no foreign objects or debrisinterfere with the canister and therapy unit’s mating surfaces.
3. Ensure both Silicone Seals and both Canister Stabilization Bumpers are present.
®
4. Re-attach the canister to the ActiV.A.C. Therapy Unit ensuring that the canister is fullyengaged and latched. An audible “click” should be heard when canister is properly installed.
5. Press ‘ ’ on this screen to return to the ‘Home Screen’.
®
Reset
WARNING: Under clinician supervision, replace V.A.C. Dressing with alternatedressing if therapy is interrupted for more than two hours.
®
On/Off6. Restart therapy by pressing .
7. If this alarm continues to appear, repeat steps 1 through 6 with a new canister. If alarmcondition cannot be resolved, contact KCI. See back cover of this User Manual for countryspecific contact information.
Audio Pause Reset
Canister Not Engaged
WARNING: Ensure canister is in place.Press’?’ for more information.
Canister Not Engaged Alarm
Silicone Seals
If Silicone Seals or CanisterBumpers are missing or damaged, contact KCI.
Stabilization
See back cover of this User Manual for countryspecific contact information.
Canister Stabilization Bumpers
43
®
ActI
44
®
ActI
This alarm screen appears when the ActiV.A.C. Therapy Unitdetects a significant air leak.
If this alarm is not resolved in three (3) minutes, therapy will beinterrupted.
This alarm will be accompanied by a repeating audible tone.
This alarm may be silenced for two (2) minutes duringtroubleshooting by pressing .
®
‘Audio Pause’
To resolve this alarm:1. Ensure connector between dressing tubing and canister tubing is properly locked.
2. Ensure canister is fully engaged. (See Canister Not Engaged Alarm.)
3. Press to use the Tool to help identify leaks in dressing.Seal Check™
Leak Alarm
SealCheck
™
Alerts and Alarms (cont.)
Audio Pause Reset
Leak Alarm
Press ‘Seal Check™’ or ‘?’ for more information
SealCheck
™
If this alarm is resolved within 3 minutes without using , theautomatically reset and the ‘Home’ screen will be displayed.
the Seal Check ToolActiV.A.C. Therapy Unit willPressing on this screen to return to the ‘Home’ screen.
™
®
‘Reset’
Flashing ovalgreen
The patient’s only access to the Seal Check Tool is through this Leak Alarm screen.™
The feature provides an audible tone and bar graph to assist in finding leaks.The frequency of the audible tone and the height of the bar graph will reflect the leak rate.
The audible tone frequency slows down and the bar graph decreases in height as the leak isfound.
Seal Check™
�
�
�
�
Orange bar graphindicates a significant leak.
Green bar graph indicatesthat the ActiV.A.C.Therapy System isoperating normally.
®
Finding the Leak
Seal Check™
Press to turn the Seal Audiotone on or Off.
Line on bar graph is thetransition point from greento orange and vice-versa.
Most leaks occur:
where the drape meets the skin.
where the SensaT.R.A.C. Pad is attached to the drape.
at tubing connections.
�
�
�
®
Seal Check™
About
Exit
Leak Rate
Low
High
Seal Audio
45
®
ActI
5. Refer to the provided with V.A.C. Dressingsfor information on using excess V.A.C. Drape material to seal the leak area.
6. Once the leak is resolved using the Seal Check Tool, press on the Seal Checkscreen to return to the ‘Home’ screen.
Dressing Application Instructions for Use®
®
™ ™Exit
WARNING: Under clinician supervision, replace V.A.C. Dressing with alternatedressing if therapy is interrupted for more than two hours.
®
If alarm condition cannot be resolved, contact KCI. See back cover of this User Manualfor country specific contact information.
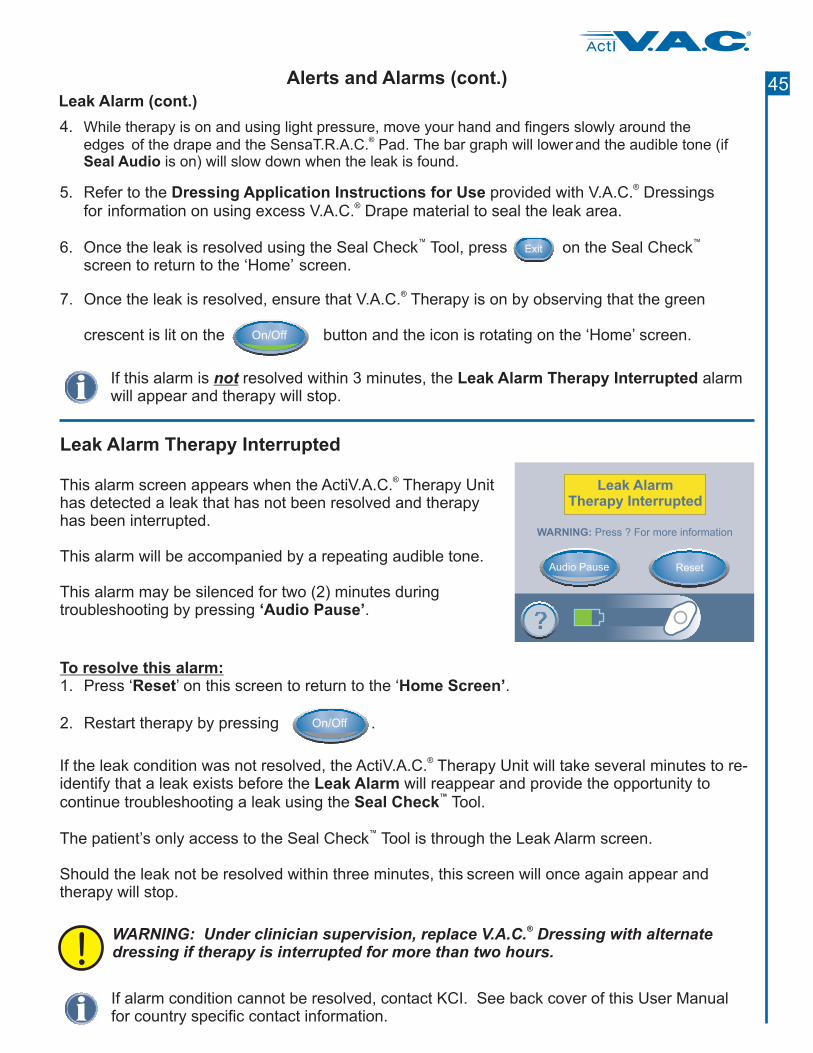
This alarm screen appears when the ActiV.A.C. Therapy Unithas detected a leak that has not been resolved and therapyhas been interrupted.
This alarm will be accompanied by a repeating audible tone.
This alarm may be silenced for two (2) minutes duringtroubleshooting by pressing .
®
‘Audio Pause’
To resolve this alarm:1. Press ‘ ’ on this screen to return to the ‘ .Reset Home Screen’
If the leak condition was not resolved, the ActiV.A.C. Therapy Unit will take several minutes to re-identify that a leak exists before the will reappear and provide the opportunity tocontinue troubleshooting a leak using the Tool.
The patient’s only access to the Seal Check Tool is through the Leak Alarm screen.
Should the leak not be resolved within three minutes, this screen will once again appear andtherapy will stop.
®
™
Leak AlarmSeal Check
™
Audio Pause Reset
Leak AlarmTherapy Interrupted
WARNING: Press ? For more information
Leak Alarm Therapy Interrupted
Alerts and Alarms (cont.)
On/Off2. Restart therapy by pressing .
4. While therapy is on and using light pressure, move your hand and fingers slowly around theedges of the drape and the SensaT.R.A.C. Pad. The bar graph will lower and the audible tone (if
is on) will slow down when the leak is found.
®
Seal Audio
7. Once the leak is resolved, ensure that V.A.C. Therapy is on by observing that the green
crescent is lit on the button and the icon is rotating on the ‘Home’ screen.
®
On/Off
If this alarm is resolved within 3 minutes, the alarmwill appear and therapy will stop.
not Leak Alarm Therapy Interrupted
Leak Alarm (cont.)
Audio Pause Reset
Blockage AlarmTherapy Interrupted
WARNING: Unit may be running, but therapyis interrupted. Press ‘?’ for more information.
Blockage
Potential Blockage detected
Blockage Alert
Blockage
Continuous
0 mmHg
Exit
Press ‘?’ for more information
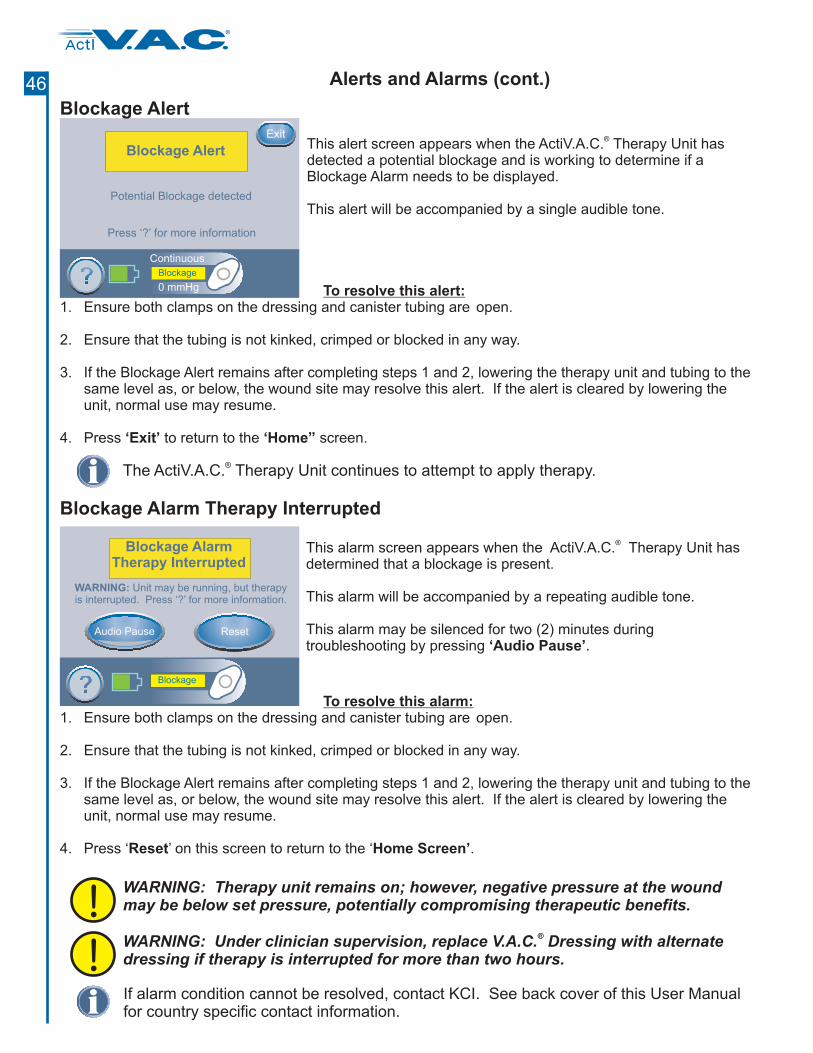
1. Ensure both clamps on the dressing and canister tubing are open.
2. Ensure that the tubing is not kinked, crimped or blocked in any way.
3. If the Blockage Alert remains after completing steps 1 and 2, lowering the therapy unit and tubing to thesame level as, or below, the wound site may resolve this alert. If the alert is cleared by lowering theunit, normal use may resume.
4. Press ‘ ’ on this screen to return to the ‘ .
To resolve this alarm:
Reset Home Screen’
This alarm screen appears when the ActiV.A.C. Therapy Unit hasdetermined that a blockage is present.
This alarm will be accompanied by a repeating audible tone.
This alarm may be silenced for two (2) minutes duringtroubleshooting by pressing .
®
‘Audio Pause’
WARNING: Under clinician supervision, replace V.A.C. Dressing with alternatedressing if therapy is interrupted for more than two hours.
®
Blockage Alarm Therapy Interrupted
Blockage Alert
1. Ensure both clamps on the dressing and canister tubing are open.
2. Ensure that the tubing is not kinked, crimped or blocked in any way.
3. If the Blockage Alert remains after completing steps 1 and 2, lowering the therapy unit and tubing to thesame level as, or below, the wound site may resolve this alert. If the alert is cleared by lowering theunit, normal use may resume.
4. Press to return to the screen.
To resolve this alert:
‘Exit’ ‘Home”
This al screen appears when theert ActiV.A.C. Therapy Unit hasdetected a potential blockage and is working to determine if aBlockage Alarm needs to be displayed.
This alert will be accompanied by a single audible tone.
®
Alerts and Alarms (cont.)
The ActiV.A.C. Therapy Unit continues to attempt to apply therapy.®
If alarm condition cannot be resolved, contact KCI. See back cover of this User Manualfor country specific contact information.
WARNING: Therapy unit remains on; however, negative pressure at the woundmay be below set pressure, potentially compromising therapeutic benefits.
46
®
ActI
To resolve this alarm:1. Ensure both clamps on the dressing and canister tubing are open.
2. Ensure that the tubing is not kinked, crimped or blocked in any way.
3. If the Low Pressure Alarm Therapy Interrupted remains after completing steps 1 and 2, lowering thetherapy unit and tubing to be level with or below the wound site may resolve this alarm. If the alert iscleared by lowering the unit, normal use may resume.
4. Press ‘ ’ on this screen to return to the ‘ .Reset Home Screen’
WARNING: Therapy unit remains on; however, negative pressure at the woundmay be below set pressure, potentially compromising therapeutic benefits.
WARNING: Under clinician supervision, replace V.A.C. Dressing with alternatedressing if therapy is interrupted for more than two hours.
®
To resolve this alert:1. Ensure both clamps on the dressing and canister tubing are open.
2. Ensure that the tubing is not kinked, crimped or blocked in any way.
3. If the Low Pressure Alert remains after completing steps 1 and 2, lowering the therapy unit and tubingto be level with or below the wound site may resolve this alert. If the alert is cleared by lowering theunit, normal use may resume.
4. Press to return to the screen.‘Exit’ ‘Home”
This al r screen appears when thee t ActiV.A.C. Therapy Unit has notreached the selected therapy set pressure.
This alert will be accompanied by a single audible tone.
®
Low Pressure Alert
Low Pressure Alarm Therapy Interrupted
Alerts and Alarms (cont.)
This alarm screen appears when the ActiV.A.C. Therapy Unit hasnot reached the selected therapy set pressure and negative
pressure at the wound
This alarm will be accompanied by a repeating audible tone.
This alarm may be silenced for two (2) minutes duringtroubleshooting by pressing .
®
may be below set pressure, potentiallycompromising therapeutic benefits.
‘Audio Pause’
Low Pressure
Low PressureAlert
The measured wound pressure isbelow the set pressure.
Press ‘?’ For more information
Exit
Audio Pause Reset
Low Pressure
Low Pressure AlarmTherapy Interrupted
WARNING: Unit may be running, but therapy isinterrupted. Press ‘?’ For more information
V.A.C. Therapy, at a lower than selected pressure, is still being applied.®
If alarm condition cannot be resolved, contact KCI. See back cover of this User Manualfor country specific contact information.
47
®
ActI

Alerts and Alarms (cont.)
WARNING: Under clinician supervision, replace V.A.C. Dressing with alternatedressing if therapy is interrupted for more than two hours.
®
This alarm screen appears when the ActiV.A.C. Therapy Unithas detected that V.A.C. Therapy has been off for fifteen (15)minutes (with the unit powered on) without the Touch ScreenUser Interface being touched.
This alarm will be accompanied by a repeating audible tone.
This alarm may be silenced for two (2) minutes duringtroubleshooting by pressing .
®
®
‘Audio Pause’
AudioPause
Reset
Therapy Inactive
WARNING: Press ‘Reset’ and Restart TherapyPress ? For more information
Therapy Inactive Alarm
Audio Pause
System ErrorTherapy Interrupted
WARNING: Turn therapy unit off then on if errorcontinues, contact KCI. Press ‘?’ for more information.
This alarm screen appears when there is a technical faultwithin the ActiV.A.C. Therapy Unit.
Several different types of system errors may occur. A numberwill appear in the yellow alarm box that represents thediagnostic code of the technical fault.
This alarm will be accompanied by a repeating audible tone.
This alarm may be silenced for two (2) minutes duringtroubleshooting by pressing .
®
‘Audio Pause’
System Error Therapy Interrupted Alarm
WARNING: Under clinician supervision, replace V.A.C. Dressing with alternatedressing if therapy is interrupted for more than two hours.
®
To resolve this alarm:1. Press ‘ ’ on this screen to return to the ‘ .
3. If V.A.C. Therapy is not desired, turn the ActiV.A.C. Therapy Unit off by using the
button on the front of the unit.
Reset Home Screen’
Power
On/Off
® ®
On/Off2. Restart therapy by pressing .
To resolve this alarm:1. Record the error number.
2. Power the unit off and then on using the button on the front of the unit.
3. If error persists, contact KCI. See back cover of this User Manual for country specific contactinformation.
Power On/Off
48
®
ActI
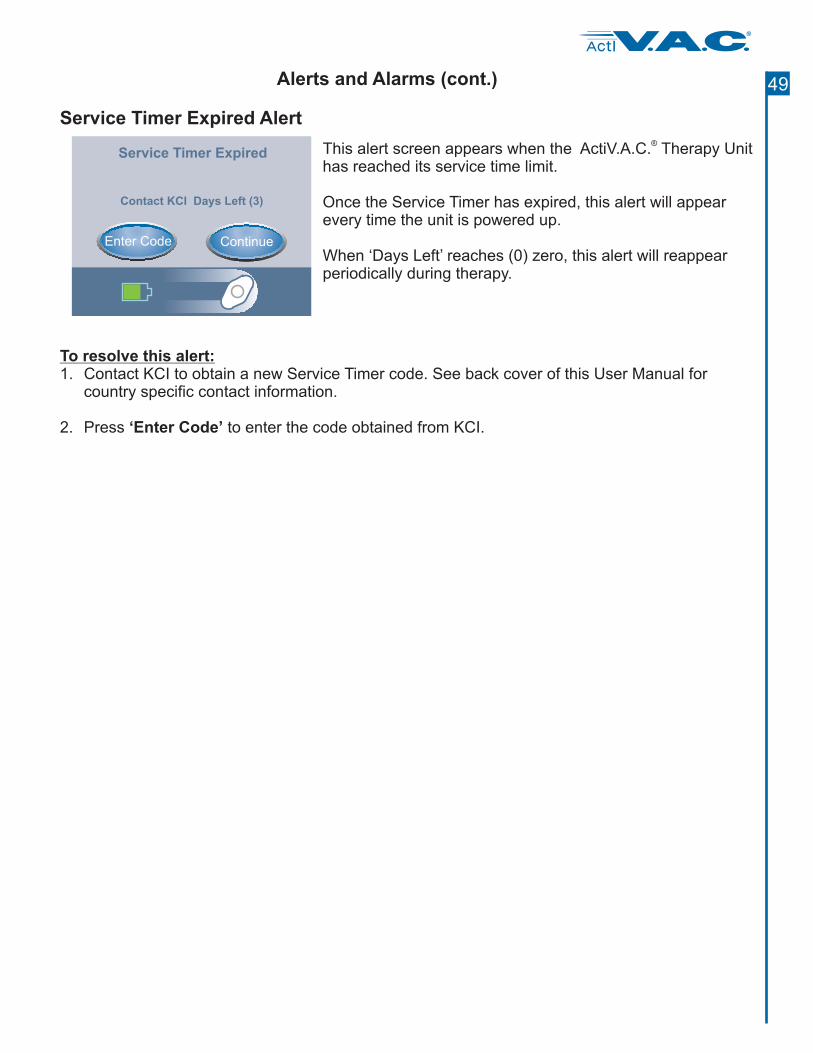
To resolve this alert:1. Contact KCI to obtain a new Service Timer code. See back cover of this User Manual for
country specific contact information.
2. Press to enter the code obtained from KCI.‘Enter Code’
This al screen appears when theert ActiV.A.C. Therapy Unithas reached its service time limit.
Once the Service Timer has expired, this alert will appearevery time the unit is powered up.
When ‘Days Left’ reaches (0) zero, this alert will reappearperiodically during therapy.
®
Enter Code Continue
Service Timer Expired
Contact KCI Days Left (3)
Service Timer Expired Alert
Alerts and Alarms (cont.) 49
®
ActI
ActiV.A.C. Frequently Asked Questions®
Q: How much does the ActiV.A.C. Therapy Unit weigh?A:
Q: How long does it take to charge the battery and how long will a fully chargedbattery last?
A:
Q. The ActiV.A.C. Therapy Unit is sometimes noisy. Why is this?A.
Q: How do I know if the ActiV.A.C. Therapy Unit is working properly?A:
Q: What if I do not hear an audible click when installing a canister onto the ActiV.A.C.Therapy Unit?
A:
Q: Is the ActiV.A.C. Canister specific to the ActiV.A.C. Therapy Unit?A:
Q: What languages are available in the ActiV.A.C. Therapy Unit?A:
Q: Is the ActiV.A.C. Therapy Unit allowed in flight?A:
The ActiV.A.C. Therapy Unit weighs with an empty canister installed.
It takes approximately 6 hours to fully charge the battery. The ActiV.A.C. battery can maintaina charge up to 14 hours.
During normal operation it may be possible to hear the therapy unit stopping and starting(therapy on/off). This is to ensure accurate delivery of pressure.
The Therapy Status Bar at the bottom of the Touch Screen User Interface indicates specifictherapy information. The rotating icon, also found in the Therapy Status Bar, indicates theActiV.A.C. Therapy Unit is applying negative pressure. Wound fluid may or may not be seenmoving in the tubing.
An audible click should be heard when installing a new canister. Occasionally, you may nothear an audible click. If the canister is properly installed, the canister cannot be removed bygently pulling the canister directly away from the unit.
Yes, the 300 ml canister is specifically designed to be used with the ActiV.A.C. Therapy Unit.
When fully implemented, the therapy unit is pre-programmed with the following languages:English, Spanish, Swedish, Dutch, German, Italian, French, and Danish.
Commercial airlines will allow the ActiV.A.C. Therapy Unit to be carried onboard withdocumentation from a physician, typically in the form of a doctor's prescription. The UserManual should also be available for presentation, and not in checked baggage. The label onthe therapy unit and the User Manual identify the ActiV.A.C. Therapy Unit as a medicaldevice.
The security check point can be handled in one of two ways:
®
®
®
®
® ®
®
®
®
®
®
®
®
®
~2.4 lbs (~1.08 kg)
�
�
The canister tubing and dressing tubing can be clamped and disconnected from eachother. This will allow the therapy unit and canister to go through security detection in abin, while the patient moves through the security scanner with the dressing in place.
Alternatively, the patient can keep the dressing attached to the therapy unit, and have thesecurity personnel hand-wand the patient and therapy device
WARNING: Languages should only be selected according to local regulatoryrequirements.
50
®
ActI
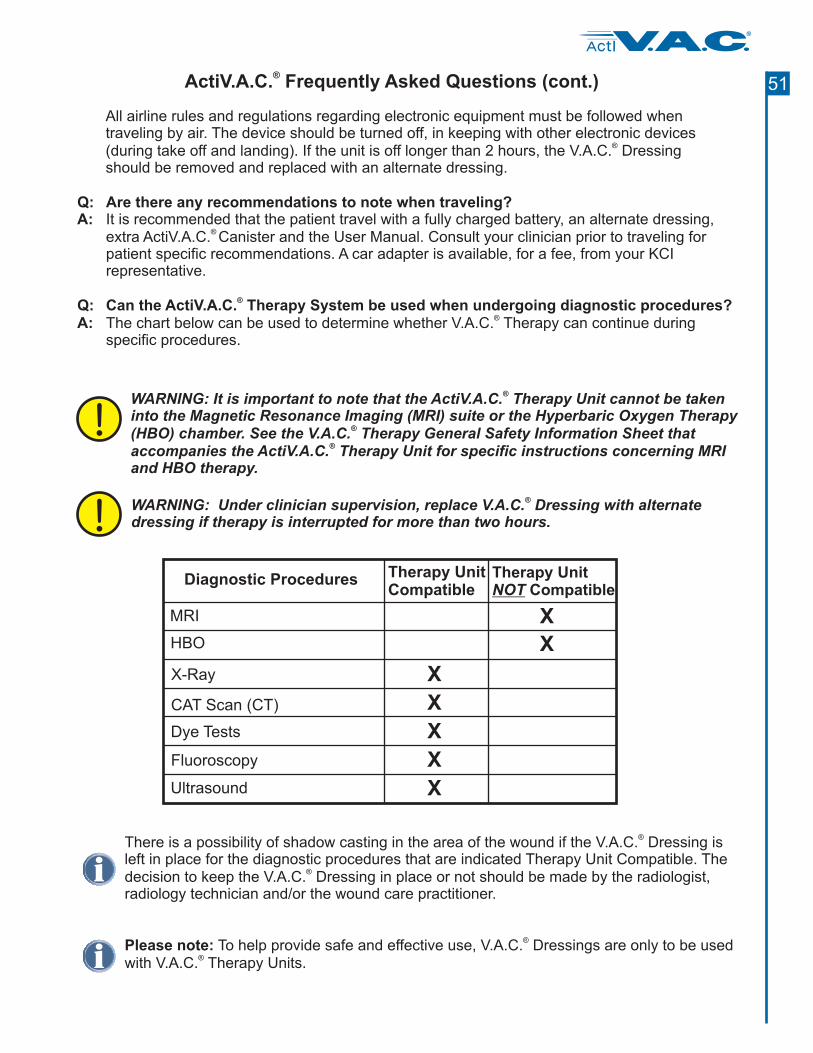
All airline rules and regulations regarding electronic equipment must be followed whentraveling by air. The device should be turned off, in keeping with other electronic devices(during take off and landing). If the unit is off longer than 2 hours, the V.A.C. Dressingshould be removed and replaced with an alternate dressing.
®
ActiV.A.C. Frequently Asked Questions (cont.)®
Q: Are there any recommendations to note when traveling?A:
Q: Can the ActiV.A.C. Therapy System be used when undergoing diagnostic procedures?A:
It is recommended that the patient travel with a fully charged battery, an alternate dressing,extra ActiV.A.C. Canister and the User Manual. Consult your clinician prior to traveling forpatient specific recommendations. A car adapter is available, for a fee, from your KCIrepresentative.
The chart below can be used to determine whether V.A.C. Therapy can continue duringspecific procedures.
®
®
®
Diagnostic Procedures
MRI
HBO
X-Ray
CAT Scan (CT)
Dye Tests
Fluoroscopy
Ultrasound
Therapy UnitCompatible
Therapy UnitCompatibleNOT
X
X
X
X
X
X
X
WARNING: It is important to note that the ActiV.A.C. Therapy Unit cannot be takeninto the Magnetic Resonance Imaging (MRI) suite or the Hyperbaric Oxygen Therapy(HBO) chamber.
®
See the V.A.C. Therapy General Safety Information Sheet thataccompanies the ActiV.A.C. Therapy Unit for specific instructions concerning MRIand HBO therapy.
®
®
WARNING: Under clinician supervision, replace V.A.C. Dressing with alternatedressing if therapy is interrupted for more than two hours.
®
There is a possibility of shadow casting in the area of the wound if the V.A.C. Dressing isleft in place for the diagnostic procedures that are indicated Therapy Unit Compatible. Thedecision to keep the V.A.C. Dressing in place or not should be made by the radiologist,radiology technician and/or the wound care practitioner.
To help provide safe and effective use, V.A.C. Dressings are only to be usedwith V.A.C. Therapy Units.
®
®
®
®
Please note:
51
®
ActI
Standard Precautions
The following are the KCI recommended daily and weekly cleaning and infection control proceduresfor the ActiV.A.C. Therapy Unit.
®
Always follow Standard Precautions.
Standard Precautions are designed to reduce the risk of transmission of microorganisms from bothknown and unknown sources of infection. These precautions can be applied to all patients,regardless of their diagnosis or presumed infection status. Standard Precautions should be usedwhen contact is anticipated with blood and all body fluids. This also includes secretions andexcretions, except sweat, regardless of whether blood is visible or not, non-intact skin (i.e., openwounds) and mucous membranes.
Proper hand washing is the most important step in preventing the spread of infection. Follow thesesteps to properly wash hands:
Wet hands with warm, running water and apply liquid or clean bar soap. Lather well.Rub hands together vigorously for at least 15 seconds.Scrub all surfaces, including the backs of hands, wrist, between fingers and under fingernails.Rinse well.Dry hands with a clean or disposable towel.Use a towel to turn off the faucet.
Alcohol based hand sanitizers are a good alternative when soap and water are not available. Theyhave been shown to be more effective than soap and water in decreasing the number of bacteriaand viruses. Use only 'alcohol based' products since the hand sanitizers without alcohol do not havethe same effect. To properly use an alcohol based sanitizer, follow these steps:
Apply about ½ teaspoon of the product to the palm of the hand.Rub hands together, covering all surfaces of the hands, until they are dry.
If hands are visibly dirty, however, wash with soap and water rather than a sanitizer.
Wash hands before and after direct contact with the patient. When using gloves, wash handsimmediately after gloves are removed, between patient contacts and when necessary to avoidtransfer of microorganisms to other patients or environments. It may be necessary to wash handsbetween tasks and procedures on the same patient to prevent cross-contamination of different bodysites.
Wear medical gloves when touching blood, body fluids, secretions, excretions and contaminateditems. Medical gloves may be clean and non-sterile, latex or latex-free. Put clean gloves on justbefore touching moist areas, such as mucous membranes and non-intact skin. Change glovesbetween tasks and procedures on the same patient when gloves become contaminated or soiled.Remove gloves promptly after use, before touching non-contaminated items and environmentalsurfaces. Gloves do not provide complete protection against hand contamination. Hands should bewashed immediately after completed tasks or procedures to avoid transfer of microorganisms toother people or environments.
Wear a mask and eye protection or a face shield to protect the mucous membranes of the eyes,nose and mouth during procedures, and patient care activities that are likely to generate splashes orsprays of blood, body fluids, secretions and excretions.
Hand Washing
Gloves
Mask, Eye Protection, Face Shield
�
�
�
�
�
�
�
�
52
®
ActI

Gown
Patient Care Equipment
Linen
Waste Disposal
Wear a gown (a clean, non-sterile gown is adequate) to protect skin and to prevent soiling of clothingduring procedures and patient care activities that are likely to generate splashes or sprays of blood,body fluids, secretions or excretions. Select a gown that is appropriate for the activity and amount offluid likely to be encountered. Remove a soiled gown as promptly as possible, and wash hands toavoid transfer of microorganisms to other people or environments.
Handle used patient care equipment soiled with blood, body fluids, secretions and excretions in amanner that prevents skin and mucous membrane exposures, contamination of clothing and transferof microorganisms to other patients or environments.
Handle, transport and process used linen soiled with blood, body fluids, secretions and excretions ina manner that prevents skin and mucous membrane exposures and contamination of clothing andthat avoids transfer of microorganisms to other people, patients and environments.
Discard all disposable items (all tubing, connectors, clamps, used canister, used dressings, etc.) inaccordance with local medical waste disposal regulations.
Standard Precautions (cont.)
Care and CleaningCleaning the Touch Screen User Interface
Daily Care and Cleaning
Alerts and Alarms
Weekly Care and Cleaning
�
�
�
Lock the Touch Screen User Interface by pressing . Follow on screen instructions to unlock.
Do not use any liquid to clean the Touch Screen User Interface.Use a soft, non-abrasive cloth to clean the Touch Screen User Interface. Pressing too hardmay damage the Touch Screen User Interface.
Perform a visual inspection of the unit. Check for any sign of contamination and ensure that the unit isfunctioning properly. If there are signs of contamination or the unit appears dirty, follow the WeeklyCare and Cleaning instructions below.
If the unit is not operating properly refer to the section of this manual or contact yourhealthcare provider or KCI.
Avoid spilling liquid on any part of the ActiV.A.C. Therapy Unit. Liquids remaining onelectronic controls can cause corrosion which can cause the electronic components to fail.Component failure may cause the ActiV.A.C. Therapy Unit to operate erratically, possiblycausing a potential hazard to patient or care providers.
Particular care must be taken when handling undiluted chlorine bleach, including propershielding of eyes. Always mix solution by adding the concentrated chlorine bleach to thewater.
To help reduce risk of infection and contact with blood and body fluids wear protective equipment whencleaning the ActiV.A.C. Therapy Unit.
At least once per week, the ActiV.A.C. Therapy Unit should be wiped with a diluted solution of 5milliliters bleach in 1 liter (1 teaspoon bleach in 1 quart) of warm water. Use a soft cloth and wring outexcess solution until the cloth is damp and not dripping. Other cleaning solutions should not be used asthey may damage the ActiV.A.C. Therapy Unit.
gently
®
®
®
®
®
53
®
ActI

This page left intentionally blank
54
®
ActI

04735KA5
© 2007 KCI Licensing, Inc. All Rights Reserved. All trademarks designated herein are property of KCI Licensing,Inc, its affiliates and licensors. Those KCI trademarks designated with the "®" symbol are registered and thosedesignated with "TM" are considered to be proprietary trademarks or are pending trademark applications in atleast one country where this product/work is commercialized. Most KCI products referred to herein are subject topatents or patent applications.
For additional information concerning the System,contact your local KCI Representative or:
ActiV.A.C. Therapy®
KCI USA, INC.San Antonio, Texas 78219 USAwww.kci1.com
Manufacturer Information
Manufacturer REPEC
KCI Medical Products (UK), Ltd.Wimborne, DorsetBH21 7SHUnited Kingdomwww.kci-medical.com
55
®
ActI
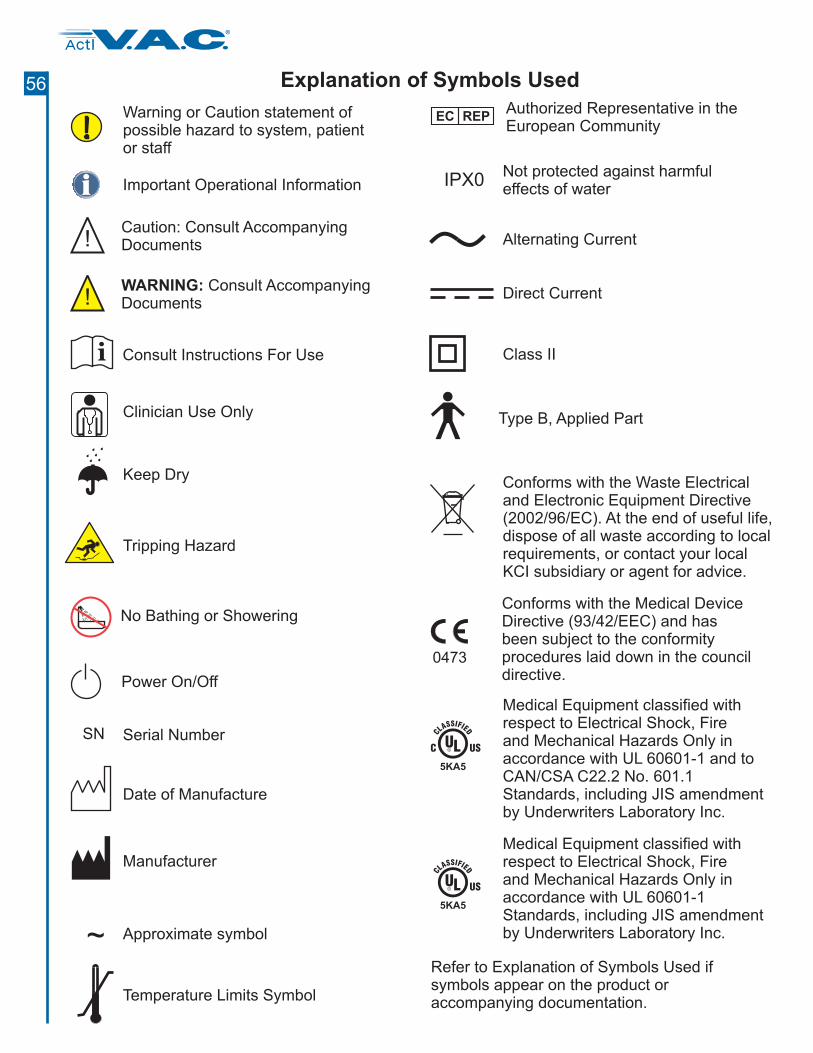
5KA5
Medical Equipment classified withrespect to Electrical Shock, Fireand Mechanical Hazards Only inaccordance with UL 60601-1Standards, including JIS amendmentby Underwriters Laboratory Inc.
Explanation of Symbols Used
Type B, Applied Part
IPX0Not protected against harmfuleffects of water
Class II
Alternating Current!Caution: Consult AccompanyingDocuments
!WARNING: Consult AccompanyingDocuments
Conforms with the Waste Electricaland Electronic Equipment Directive(2002/96/EC). At the end of useful life,dispose of all waste according to localrequirements, or contact your localKCI subsidiary or agent for advice.
Medical Equipment classified withrespect to Electrical Shock, Fireand Mechanical Hazards Only inaccordance with UL 60601-1 and toCAN/CSA C22.2 No. 601.1Standards, including JIS amendmentby Underwriters Laboratory Inc.
Tripping Hazard
Warning or Caution statement ofpossible hazard to system, patientor staff
Important Operational Information
Direct Current
0473
5KA5
No Bathing or Showering
Date of Manufacture
Manufacturer
SN Serial Number
Power On/Off
Consult Instructions For Usei
Conforms with the Medical DeviceDirective (93/42/EEC) and hasbeen subject to the conformityprocedures laid down in the councildirective.
Temperature Limits Symbol
Approximate symbol~
Keep Dry
Clinician Use Only
REPECAuthorized Representative in theEuropean Community
Refer to Explanation of Symbols Used ifsymbols appear on the product oraccompanying documentation.
56
®
ActI
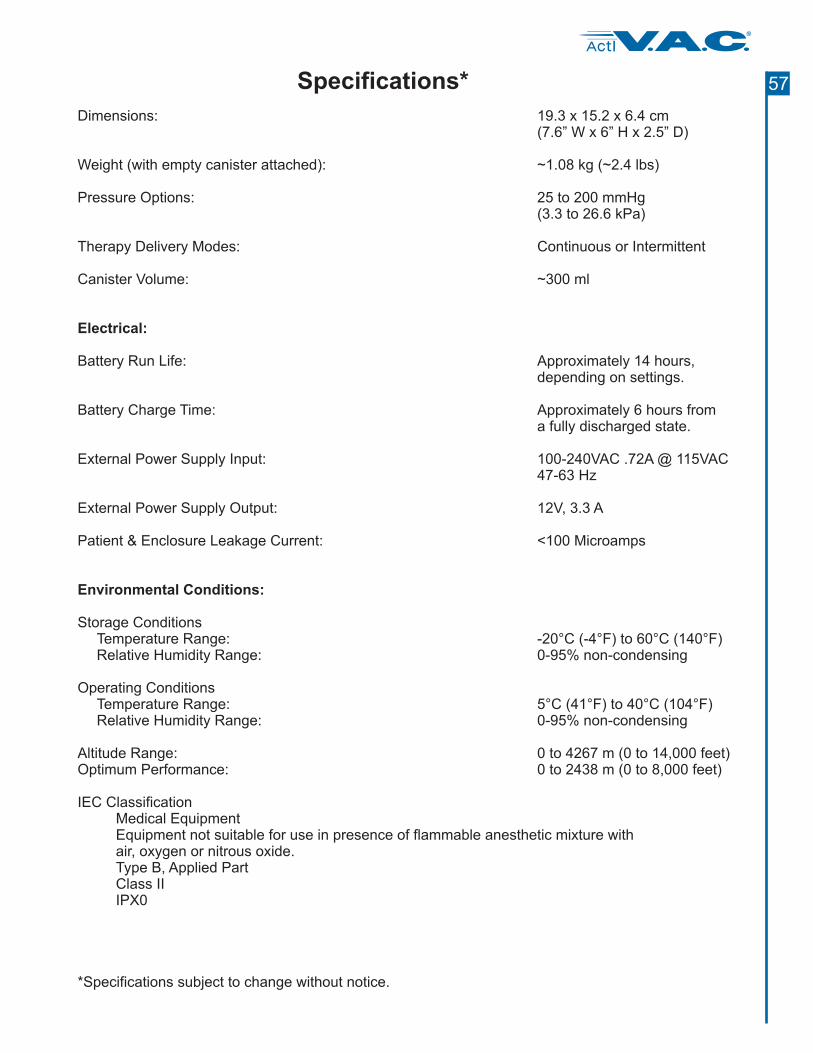
Specifications*
Dimensions:
Weight (with empty canister attached): ~1.08 kg
Pressure Options: 25 to 200 mmHg(3.3 to 26.6 kPa)
Therapy Delivery Modes: Continuous or Intermittent
Canister Volume: ~300 ml
Battery Run Life: Approximately 14 hours,depending on settings.
Battery Charge Time: Approximately 6 hours froma fully discharged state.
External Power Supply Output: 12V, 3.3 A
Patient & Enclosure Leakage Current: <100 Microamps
Storage ConditionsTemperature Range: (-4°F) to 140°F)Relative Humidity Range: 0-95% non-condensing
Operating ConditionsTemperature Range: 41°F) to (104°F)
5
IEC ClassificationMedical EquipmentEquipment not suitable for use in presence of flammable anesthetic mixture withair, oxygen or nitrous oxide.Type B, Applied PartClass IIIPX0
*Specifications subject to change without notice.
19.3 x 15.2 x 6.4 cm(7.6” W x 6” H x 2.5” D)
(~2.4 lbs)
External Power Supply Input: 100-240VAC .72A @ 115VAC47-63 Hz
-20°C 60°C (
5°C ( 40°CRelative Humidity Range: 0-9 % non-condensing
Altitude Range: 0 to 4267 m (0 to 14,000 feet)Optimum Performance: 0 to 2438 m (0 to 8,000 feet)
Electrical:
Environmental Conditions:
57
®
ActI
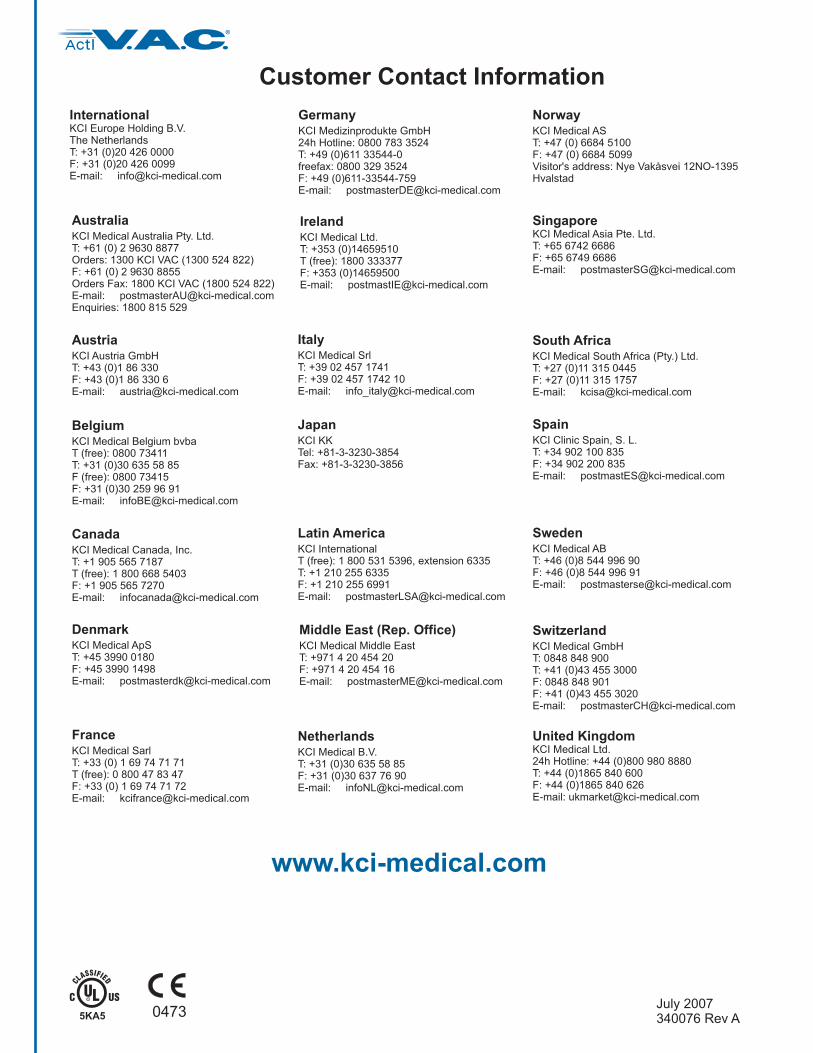
®
ActI
Customer Contact Information
July 2007340076 Rev A
AustraliaKCI Medical Australia Pty. Ltd.T: +61 (0) 2 9630 8877Orders: 1300 KCI VAC (1300 524 822)F: +61 (0) 2 9630 8855Orders Fax: 1800 KCI VAC (1800 524 822)E-mail: [email protected]: 1800 815 529
AustriaKCI Austria GmbHT: +43 (0)1 86 330F: +43 (0)1 86 330 6E-mail: [email protected]
BelgiumKCI Medical Belgium bvbaT (free): 0800 73411T: +31 (0)30 635 58 85F (free): 0800 73415F: +31 (0)30 259 96 91E-mail: [email protected]
CanadaKCI Medical Canada, Inc.T: +1 905 565 7187T (free): 1 800 668 5403F: +1 905 565 7270E-mail: [email protected]
DenmarkKCI Medical ApST: +45 3990 0180F: +45 3990 1498E-mail: [email protected]
NorwayKCI Medical AST: +47 (0) 6684 5100F: +47 (0) 6684 5099Visitor's address: Nye Vakåsvei 12NO-1395Hvalstad
NetherlandsKCI Medical B.V.T: +31 (0)30 635 58 85F: +31 (0)30 637 76 90E-mail: [email protected]
FranceKCI Medical SarlT: +33 (0) 1 69 74 71 71T (free): 0 800 47 83 47F: +33 (0) 1 69 74 71 72E-mail: [email protected]
GermanyKCI Medizinprodukte GmbH24h Hotline: 0800 783 3524T: +49 (0)611 33544-0freefax: 0800 329 3524F: +49 (0)611-33544-759E-mail: [email protected]
IrelandKCI Medical Ltd.T: +353 (0)14659510T (free): 1800 333377F: +353 (0)14659500E-mail: [email protected]
ItalyKCI Medical SrlT: +39 02 457 1741F: +39 02 457 1742 10E-mail: [email protected]
JapanKCI KKTel: +81-3-3230-3854Fax: +81-3-3230-3856
Latin AmericaKCI InternationalT (free): 1 800 531 5396, extension 6335T: +1 210 255 6335F: +1 210 255 6991E-mail: [email protected]
South AfricaKCI Medical South Africa (Pty.) Ltd.T: +27 (0)11 315 0445F: +27 (0)11 315 1757E-mail: [email protected]
Middle East (Rep. Office)KCI Medical Middle EastT: +971 4 20 454 20F: +971 4 20 454 16E-mail: [email protected]
SpainKCI Clinic Spain, S. L.T: +34 902 100 835F: +34 902 200 835E-mail: [email protected]
SwedenKCI Medical ABT: +46 (0)8 544 996 90F: +46 (0)8 544 996 91E-mail: [email protected]
04735KA5
SingaporeKCI Medical Asia Pte. Ltd.T: +65 6742 6686F: +65 6749 6686E-mail: [email protected]
SwitzerlandKCI Medical GmbHT: 0848 848 900T: +41 (0)43 455 3000F: 0848 848 901F: +41 (0)43 455 3020E-mail: [email protected]
United KingdomKCI Medical Ltd.24h Hotline: +44 (0)800 980 8880T: +44 (0)1865 840 600F: +44 (0)1865 840 626E-mail: [email protected]
InternationalKCI Europe Holding B.V.The NetherlandsT: +31 (0)20 426 0000F: +31 (0)20 426 0099E-mail: [email protected]
www.kci-medical.com