active cadet fitness guide - civil air patrol · 2018-02-07 · active cadet fitness guide capp...
TRANSCRIPT
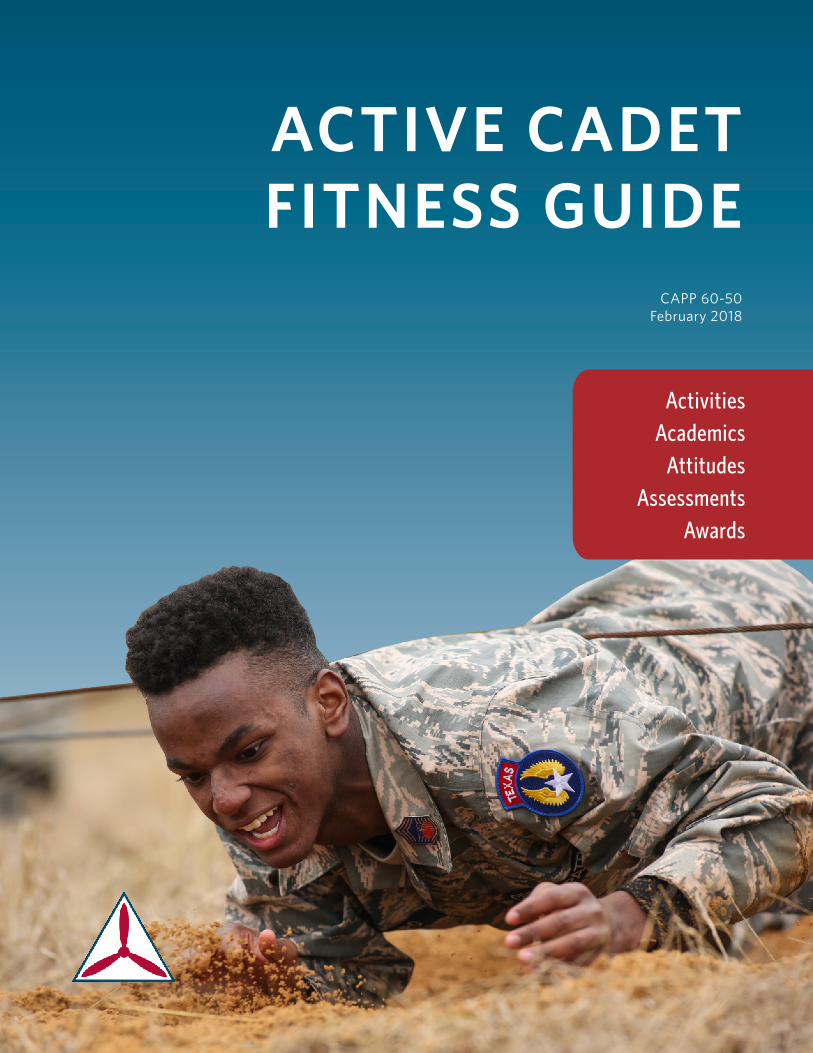
ACTIVE CADET FITNESS GUIDE
CAPP 60-50February 2018
ActivitiesAcademicsAttitudes
AssessmentsAwards


2
CAP Cadet Program
Leadership
Aerospace
Character
Fitness
Activities
Academics
Attitudes
Assessment
Awards

3

4
5

6
7
8
9

10
Fitness Concepts
Cadet Preparation
Practice Procedures
Assessment
Program Planning/
Goal Setting
Promoting/ Tracking
Achievement
Reassessment
Revise/Refine Goals
11

12

13

14
Why health-related fitness?
Historically, emphasis was placed on
skill- or sport- related fitness (e.g. speed
as measured by the students’ mile-run
time). Students’ scores were compared
with those of other students (normative
scoring), leading many students to
perceive themselves as unfit.
Conversely, some students were able to
achieve good scores primarily because of
their good genetic makeup, giving them a
false picture of their present fitness
levels.
Effective health-related fitness
assessments are not used to compare
students with each other; they are used
as a means to communicate each
person’s level of fitness. Scores achieved
using appropriate forms of fitness
assessment can be used to establish
personal goals that allow students to
attain a level of fitness associated with
good health. Personal goals rather than
peer competition are the focus, allowing
students to experience feelings of
success based on their own levels of
achievement.
Physical Education for Lifelong Fitness, the
Physical Best Teachers’ Guide, 3rd Edition.

15
Phase ILearning Phase
Take CPFT for baseline
Not necessary to score in the HFZ to promote
Wright Brothers AwardTransition to the Leadership Phase
Must have a valid HFZ credential to earn award
(CPFT w/ HFZ for run plus 2 out of 3 events in past 6 mo.)
Phases II, III & IVLeadership, Command, & Executive Phases
Must have a valid HFZ credential to promote
Spaatz AwardHighest Cadet Achievement
USAFA Candidate Fitness Assessment
(Mile run, push-ups, curl-ups)
16
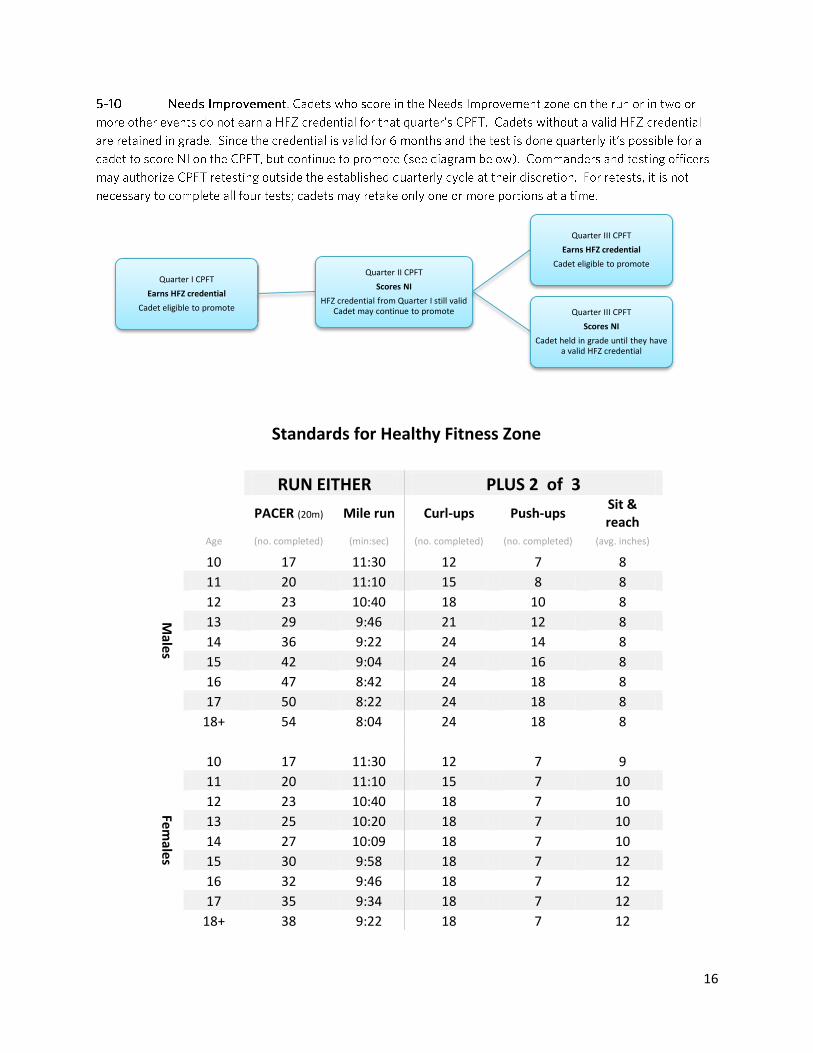
Standards for Healthy Fitness Zone
RUN EITHER PLUS 2 of 3
PACER (20m) Mile run Curl-ups Push-ups Sit & reach
Age (no. completed) (min:sec) (no. completed) (no. completed) (avg. inches)
Male
s
10 17 11:30 12 7 8
11 20 11:10 15 8 8
12 23 10:40 18 10 8
13 29 9:46 21 12 8
14 36 9:22 24 14 8
15 42 9:04 24 16 8
16 47 8:42 24 18 8
17 50 8:22 24 18 8
18+ 54 8:04 24 18 8
Female
s
10 17 11:30 12 7 9
11 20 11:10 15 7 10
12 23 10:40 18 7 10
13 25 10:20 18 7 10
14 27 10:09 18 7 10
15 30 9:58 18 7 12
16 32 9:46 18 7 12
17 35 9:34 18 7 12
18+ 38 9:22 18 7 12
Quarter I CPFT
Earns HFZ credential
Cadet eligible to promote
Quarter II CPFT
Scores NI
HFZ credential from Quarter I still valid Cadet may continue to promote
Quarter III CPFT
Earns HFZ credential
Cadet eligible to promote
Quarter III CPFT
Scores NI
Cadet held in grade until they have a valid HFZ credential

17
5-11 Outside Fitnessgram Tests. The Presidential Youth Fitness Program is used in many schools across the country. At the discretion of the unit commander, cadets may submit their teacher administered Fitnessgram results in place of the CPFT. 5-12 Spaatz Award. Come time for Spaatz, it’s virtually guaranteed that the cadet will be age 17 or older, so Air Force fitness standards may be applied. During the Spaatz testing cadets will be administered a portion of the Candidate Fitness Assessment that US Air Force Academy applicants take. Test items are curl-ups (2 minutes), push-ups (2 minutes), and the mile run. Please note that the testing protocols are different from the PYFP standards used for all previous promotions. To earn the Spaatz award cadet must meet or exceed the average score of USAFA candidates. It is recommended that cadets with their eye on earning the Spaatz set their personal training goals higher than the HFZ minimums starting at the Mitchell Award. A detailed test administration guide is available on the Spaatz webpage, www.capmembers.com/spaatz.
Spaatz Award Fitness Test
Males Females Curl-ups 81 78 Push-ups 62 41 Mile Run 6:29 7:30
PYFP Fitnessgram v. CAP’s CPFT
The full PYFP Fitnessgram includes test items not included in CAP’s CPFT. These include the walk test,
trunk lift, shoulder stretch and body composition tests. These tests have been omitted from CAP’s CPFT
to make the test easier to administer for volunteers in the field. The teachers who administer the PYFP
in schools have training and equipment not available to all CAP squadrons.

18
T
Outside Award Programs
Presidential Youth Fitness Award Cadets
who score in the Healthy Fitness Zone on at
least five test categories of the
FITNESSGRAM assessment are eligible to
receive the Presidential Youth Fitness
Award. This will include assessments that
are not included in the CPFT. Go to
PYFP.org to learn more.
Presidential Active Lifestyle Award (PALA+)
A six week challenge program geared
toward people who want to set themselves
on the road to a healthier life through
positive changes to physical activity and
eating behaviors. Go to
presidentschallenge.org to learn more.
Presidential Champions Aimed at people
who are already physically active, the
Presidential Champions challenge is all
about pushing yourself to be even more
active, logging activities, and earning points
as you do it. Go to presidentschallenge.org
to learn more.

19

Aerobic Capacity
Aerobic capacity is perhaps the most important
component of any fitness program. Research indicates
that acceptable levels of aerobic capacity are associated
with a reduced risk of high blood pressure, coronary
heart disease, obesity, diabetes, some forms of cancer,
and other health problems in adults. The evidence
documenting the health benefits of physical activity has
been well described, and this information was the basis
for the development of the U.S. physical activity guidelines
and other similar public health recommendations for
physical activity.
Many terms have been used to describe this dimension
of physical fitness, including cardiovascular fitness,
cardiorespiratory fitness, cardiorespiratory endurance,
aerobic fitness, aerobic work capacity, and physical
working capacity. Although defined somewhat differently,
these terms can generally be considered synonymous
with aerobic capacity. A laboratory measure of maximal
oxygen uptake (VO2max) is generally considered to be
the best measure of aerobic capacity. Because differences
in body size can influence oxygen uptake, aerobic capacity
is typically expressed relative to body weight (i.e.,
milliliters O2 consumed per kilogram of body weight per
minute, or ml·kg–1·min–1).
The FITNESSGRAM program provides three field tests
of aerobic capacity (PACER, one-mile run/walk, and walk
test). Beginning with version 8.6 and version 9 of the
FITNESSGRAM software, estimates of aerobic capacity
are reported as VO2max and expressed as ml-kg ·min.
For the one-mile run/walk and the walk test, calculation
of aerobic capacity requires the use of BMI (which is
calculated from height and weight). Therefore, entry of
height and weight are required in order to estimate
VO2max when these tests are used. High test–retest
.reliability and accurate estimates of measured VO2max
have been demonstrated for all measures of aerobic
capacity. The following sections provide guidelines for
administering and scoring all three tests.
Need Additional Resources?
For complete information about FITNESSGRAM, visit
www.fitnessgram.net. To order the FITNESSGRAM
software and related resources, call Human Kinetics at
800-747-4457, or order online at
www.HumanKinetics.com. To review the science
behind the assessment, please read the Reference Guide,
which is available at no cost at www.fitnessgram.net.
Distribution by FITNESSGRAM® for the Presidential Youth Fitness
Program; not for resale. Copyright by The Cooper Institute. For additional
information about the Presidential Youth Fitness Program, visit
www.pyfp.org.
2
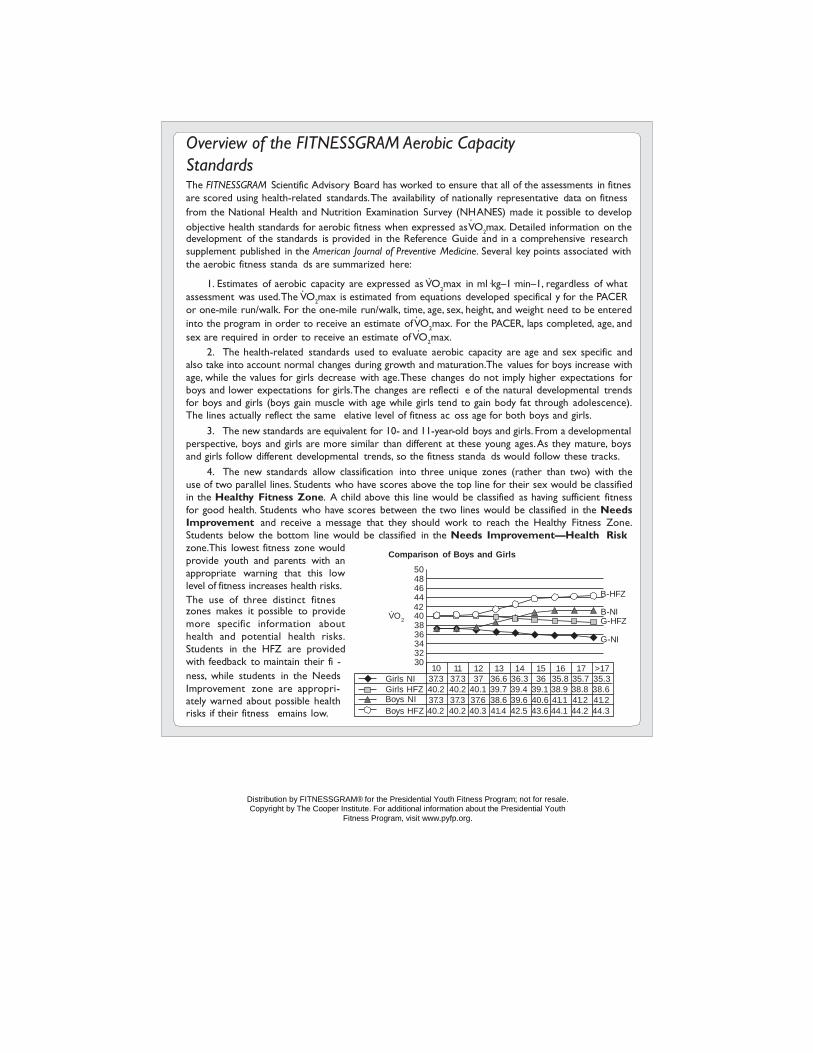
Overview of the FITNESSGRAM Aerobic Capacity
Standards The FITNESSGRAM Scientific Advisory Board has worked to ensure that all of the assessments in fitnes
are scored using health-related standards.The availability of nationally representative data on fitness
from the National Health and Nutrition Examination Survey (NH.
ANES) made it possible to develop
objective health standards for aerobic fitness when expressed asVO2max. Detailed information on the
development of the standards is provided in the Reference Guide and in a comprehensive research
supplement published in the American Journal of Preventive Medicine. Several key points associated with
the aerobic fitness standa ds are summarized here: .
1. Estimates of aerobic. capacity are expressed as VO2max in ml·kg–1·min–1, regardless of what
assessment was used.The VO2max is estimated from equations developed specifical y for the PACER
or one-mile run/walk. For the one-mile run/walk, tim.e, age, sex, height, and weight need to be entered
into the program in order to receive an estimate of V.O2max. For the PACER, laps completed, age, and
sex are required in order to receive an estimate of VO2max.
2. The health-related standards used to evaluate aerobic capacity are age and sex specific and
also take into account normal changes during growth and maturation.The values for boys increase with
age, while the values for girls decrease with age.These changes do not imply higher expectations for
boys and lower expectations for girls.The changes are reflecti e of the natural developmental trends
for boys and girls (boys gain muscle with age while girls tend to gain body fat through adolescence).
The lines actually reflect the same elative level of fitness ac oss age for both boys and girls.
3. The new standards are equivalent for 10- and 11-year-old boys and girls. From a developmental
perspective, boys and girls are more similar than different at these young ages. As they mature, boys
and girls follow different developmental trends, so the fitness standa ds would follow these tracks.
4. The new standards allow classification into three unique zones (rather than two) with the
use of two parallel lines. Students who have scores above the top line for their sex would be classified
in the Healthy Fitness Zone. A child above this line would be classified as having sufficient fitness
for good health. Students who have scores between the two lines would be classified in the Needs
Improvement and receive a message that they should work to reach the Healthy Fitness Zone.
Students below the bottom line would be classified in the Needs Improvement—Health Risk
zone.This lowest fitness zone would
provide youth and parents with an
appropriate warning that this low
level of fitness increases health risks.
The use of three distinct fitnes
Comparison of Boys and Girls
50 48 46 44
B-HFZ
zones makes it possible to provide
more specific information about
health and potential health risks.
Students in the HFZ are provided
with feedback to maintain their fi -
· 42 VO 40
38 36 34 32 30
10
11 12
13 14
15 16
B-NI G-HFZ
G-NI
17 >17
ness, while students in the Needs Girls NI 37.3 37.3 37 36.6 36.3 36 35.8 35.7 35.3
Improvement zone are appropri- Girls HFZ 40.2 40.2 40.1 39.7 39.4 39.1 38.9 38.8 38.6
ately warned about possible health Boys NI 37.3 37.3 37.6 38.6 39.6 40.6 41.1 41.2 41.2
risks if their fitness emains low. Boys HFZ 40.2 40.2 40.3 41.4 42.5 43.6 44.1 44.2 44.3
Distribution by FITNESSGRAM® for the Presidential Youth Fitness Program; not for resale.
Copyright by The Cooper Institute. For additional information about the Presidential Youth
Fitness Program, visit www.pyfp.org.

PACER ➩ Recommended
The PACER (Progressive Aerobic Cardiovascular Endurance Run) is the default aerobic capacity test in FITNESSGRAM. The PACER is a multistage fitness test adapted from the 20-meter shuttle run test published by Leger and Lambert (1982) and revised in 1988 (Leger et al.). The test is progressive in intensity—it is easy at the beginning and gets more difficult at the end. The progressive nature of the test provides a built-in warm-up and helps children to pace themselves. The test has also been set to music to create a valid, fun alternative to the customary distance run test for measuring aerobic capacity.
The PACER is recommended for all ages, but its use is strongly recommended for participants in grades K-3. The PACER is recommended for a number of reasons, including the following:
All students are more likely to have a positive experience in performing the PACER.
The PACER helps students learn the skill of pacing.
Students who have a poorer performance will finish first and not be subjected to the embar- rassment of being the last person to complete the test.
When you are administering the test to these younger children, the emphasis should be on allow- ing the children to have a good time while learning how to take this test and pace themselves. Allow children to continue to run as long as they wish and as long as they are still enjoying the activity. The main goal for young children is to allow them the opportunity to experience the assessment and to enjoy it.
Test Objective
The objective is to run as long as possible with continuous movement back and forth across a 20-meter space at a specified pace that gets faster each minute. A 15-meter version of the PACER test has been developed for teachers with smaller- sized facilities.
Equipment and Facilities Administering the PACER requires a flat, nonslip
surface at least 20 meters long, CD player with adequate volume, CD with PACER cadence (available for purchase from Human Kinetics), measuring tape, marker cones, pencil, and
a score sheet. Students should wear shoes with nonslip soles. Plan for each student to have a 40- to 60-inch-wide space for run-ning. An outdoor area can be used for this test if you do not have adequate indoor space. There should be a designated area for runners who have finished and for scorekeepers. You may want to paint lines or draw chalk lines to assist students in running in a straight line. Note: Because many gyms are not 20 meters in length, an alternative 15-meter PACER test is now available. The procedures described as follows are the same for the 15-meter distance, but an alternative cadence and scoring sheet are required for tracking the number of laps. The 15-meter PACER test is for use only in elementary schools.
Test Instructions
Mark the 20-meter (21-yard, 32-inch) course with marker cones to divide lanes and use a tape or chalk line at each end.
Make copies of the score sheet for each group of students to be tested.
Before test day, allow students to listen to several minutes of the cadence CD so that they know what to expect. Students should then be allowed at least two practice sessions.
Allow students to select a partner. Have stu- dents who are being tested line up behind the start line.
Each student being tested should run across the 20-meter distance and touch the line with a foot by the time the beep sounds. The stu- dent should take full weight on the foot that is touching the line. At the sound of the beep, the student turns around and runs back to the other end. If some students get to the line before the beep, they must wait for the beep before running the other direction. Students continue in this manner until they fail to reach the line before the beep for the second time.
( continued )
Distribution by FITNESSGRAM® for the Presidential Youth Fitness Program; not for resale.
Copyright by The Cooper Institute. For additional information about the Presidential Youth
Fitness Program, visit www.pyfp.org.

A single beep will sound at the end of the time
for each lap. A triple beep sounds at the end of each minute. The triple beep serves the same function as the single beep and also alerts the runners that the pace will get faster. Inform students that when the triple beep sounds, they should not stop but should continue the test by turning and running toward the other end of the area.
Calculation of aerobic capacity requires a score of at least 10 laps (20-meter version).
When to Stop
The first time a student does not reach the line by the time of the beep, the student stops where he or she is and reverses direction immediately, attempt- ing to get back on pace. The test is completed for a student the next time (second time) he or she fails to reach the line by the time of the beep (the two misses do not have to be consecutive; the test is over after two total misses). Students just complet- ing the test should continue to walk and stretch in the designated cool-down area.
Note: A student who remains at one end of the testing area through two beeps (does not run to the other end and back) should be scored as having two misses and the test is over.
Scoring
In the PACER test, a lap is one 20-meter distance (from one end to the other). The scorer records the lap number (crossing off each lap number) on a PACER score sheet. The recorded score is the total number of laps completed by the student. For ease in administra-tion, it is permissible to count the first miss (not making the line by the time of the beep). It is impor-tant to be consistent with all of the students and classes in the method used for counting.
An alternative scoring method is available. This method does not eliminate students when they miss their second beep (Schiemer, 1996). Using the PACER score sheet, establish two different symbols to be used in recording, such as a star for making the line by the time of the beep and a tri-
angle for not making the line. The scorer then draws a star in the circle when the runner makes the line by the time of the beep and a triangle when the runner fails to make the line by the time of the beep, simply making a record of what occurs. The runners can continue to participate until the leader stops the music or until they voluntarily stop running. To determine the score, find the second triangle (or whatever symbol was used). The number associated with the preceding star is the score.
Regardless of the method, the scoring of the PACER test is based on the number of laps com- pleted. It is important to count each individual 15-meter or 20-meter distance as a lap (rather than based on a down-and-back count for the laps).
Criterion standards are not available for students in grades K-3. The object of the test for these younger students is simply to have them participate in the testing process and to complete as many laps as possible. The main goal is to provide the students with the opportunity to experience the PACER and to have a positive experience with the assessment. Nine-year-olds in grade 4 will receive a score, and it will be evaluated against a criterion standard. All 10-year-old students receive a score regardless of grade level.
Suggestions for Test
Administration Both PACER CDs contain 21 levels (1 level per
minute for 21 minutes). During the first minute, the 20-meter version allows 9 seconds to run the dis- tance; the 15-meter version allows 6.75 seconds. The lap time decreases by approximately half a second at each successive level. Make certain that students have practiced and understand that the speed will increase each minute.
A single beep indicates the end of a lap (one 20-meter distance). The students run from one end to the other between each beep. Caution students not to begin too fast. The beginning speed is very slow. Nine seconds is allowed for running each 20-meter lap during the first minute
( continued )
Distribution by FITNESSGRAM® for the Presidential Youth Fitness Program; not for resale.
Copyright by The Cooper Institute. For additional information about the Presidential Youth
Fitness Program, visit www.pyfp.org.

Triple beeps at the end of each minute indicate
the end of a level and an increase in speed. Students should be alerted that the speed will increase. When students hear the triple beeps they should turn around at the line and immediately continue running. Some students have a tendency to hesitate when they hear the triple beeps.
A student who cannot reach the line when the beep sounds should be given one more chance to regain the pace. The second time a student cannot reach the line by the time of the beep, his or her test is completed.
Groups of students may be tested at one time. Adult volunteers may be asked to help record scores. Students may record scores for each other or for younger students.
Each runner must be allowed a path 40 to 60 inches wide. It may work best to mark the course.
Using the CD is an efficient method for administering this test item.
One-Mile Run ➩ Alternative
The one-mile run can be used instead of the. PACER
to provide an estimate of aerobic capacity (VO2max).
For students who enjoy running and are highly motivated, it is a very good alternative assessment. Scoring of the one-mile run will require the input of a student’s height and weight since the calculation of aerobic capacity includes BMI.
Test Objective
The objective of the assessment is to run a mile at the fastest pace possible (i.e., shortest time). If a student gets tired, it is okay to allow him or her to walk, but encourage the student to try to at least maintain a slow jog throughout the assessment. An aerobic capacity score cannot be obtained for mile times greater than 13:00, and this time would not likely be achieved at a walking pace. If students cannot complete a one-mile jog or run, they should be encouraged to complete the one-mile walk test. Note that the walk test is validated only for those age 13 and older.
Equipment and Facilities
A flat and accurately measured running course, stopwatch, pencil, and score sheets are required. The course may be a track or any other measured area. The course may be mea-sured using a tape measure or cross country wheel. Caution: If the track is metric or shorter than 440 yards, adjust the running course (1,609.34 meters = 1 mile; 400 meters = 437.4 yards; 1,760 yards = 1 mile).
On a 400-meter track the run should be four laps plus 10 yards.
Test Instructions
Describe the course to the students, and encourage them to complete the distance in the shortest pos- sible time. Remind them to listen for their time as they cross the line. Also, many students begin too fast and tire out, so it is important to remind them to use appropriate pacing to get an accurate assess- ment. To initiate the assessments, you can provide a signal of “Ready . . . start.” As they cross the finish line, elapsed time should be called out to the participants (or their partners) and then recorded.
Scoring
The scoring of the one-mile run is based on the total time as well as the child’s age, sex, and BMI (obtained from height and weight). The software will use the entered data to estimate the child’s aerobic capacity. The score will then be used in the software to determine what fitness zone the child is placed into and what feedback is provided.
Criterion standards are not available for students in grades K-3 (ages 5-9). The object of the test for these younger students is simply to complete the one-mile distance at a comfortable pace and to prac-tice pacing, so it is not necessary to time the run for these students. Nine-year-olds in grade 4 will receive a standard. All 10-year-olds should receive a score regardless of grade level.
( continued )
Distribution by FITNESSGRAM® for the Presidential Youth Fitness Program; not for resale.
Copyright by The Cooper Institute. For additional information about the Presidential Youth
Fitness Program, visit www.pyfp.org.
One-Mile Run ( continued )
Remember that the height and weight for each
student must be entered in addition to the perfor- mance time on the one-mile run. Calculation of aerobic capacity also requires a time less than 13:01. A child scoring above this time will be placed into the Needs Improvement—Health Risk zone since this achievement would result in an estimate of aerobic capacity below the health standard.
Suggestions for Test
Administration Call out times as the runners pass the start-and-
stop line to assist students in pacing themselves.
Preparation for the test should include instruc- tion about pacing and practice in pacing. Without instruction, students usually run too fast early in the test and then are forced to walk near the end.
Results are generally better if a student can maintain a constant pace during most of the test.
Walking is certainly permitted, but students should be encouraged to complete the assessment at a slow jog rather than a walking pace. If students can’t complete a mile, they should be assessed with the one-mile walk test, although that test is validated only for ages 13 and older.
Have students set a goal before running.
Students should always warm up before taking the test. They should also cool down by continuing to walk for several minutes after completing the dis- tance. A good suggestion is to have those who have completed the distance do an easy activity (juggle, hula hoop) while waiting for others to complete the distance. This keeps everyone moving and busy and takes the focus off the slower students who will complete the distance last.
the wind is strong, because these elements may be unsafe or may lead to an invalid estimate of aerobic capacity.
Counting laps completed and accurately record- ing the run time can be a problem when a relatively small course is used with younger children. Many techniques are acceptable. Pair the students and have the resting partner count laps and record time for the runner. Older students or parents may be asked to assist in recording results for younger students.
Avoid administering the test under conditions
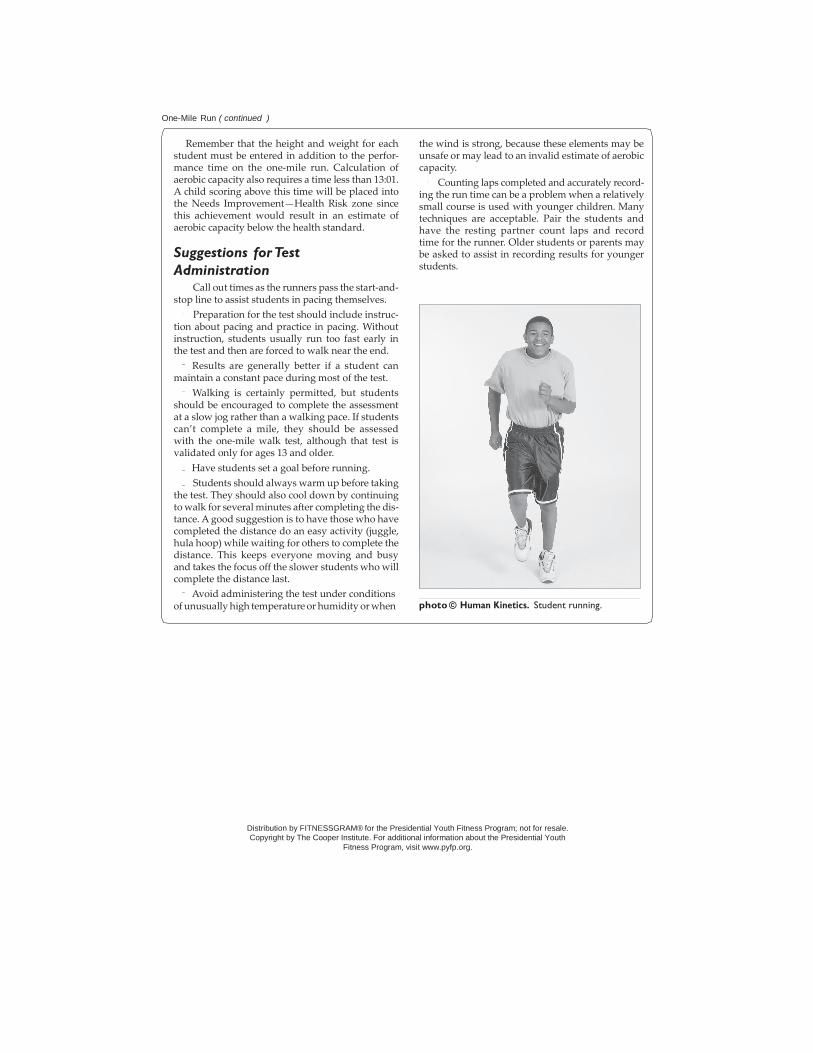
of unusually high temperature or humidity or when photo © Human Kinetics. Student running.
Distribution by FITNESSGRAM® for the Presidential Youth Fitness Program; not for resale.
Copyright by The Cooper Institute. For additional information about the Presidential Youth
Fitness Program, visit www.pyfp.org.

Muscular Strength, Endurance, and Flexibility
Tests of muscular strength, muscular endurance, and flexibility have been combined into one broad fitness category because the primary consideration is determining the functional health status of the musculoskeletal system. It is equally important to have strong muscles that can work forcefully and over a period of time and to be flexible enough to have a full range of motion at the joint. Musculoskel- etal injuries are often the result of muscle imbalance at a specific joint; the muscles on one side may be much stronger than the opposing muscles or may not be flexible enough to allow complete motion or sudden motion to occur.
It is important to remember that the specificity of training bears directly on the development of mus- culoskeletal strength, endurance, and flexibility. The movements included in these test items are only a sampling of the many ways in which the body is required to move and adjust during physical activity.
The upper body and the abdominal/trunk region have been selected as areas for testing because of their perceived relationship to activities of daily living, correct posture, and the development/ maintenance of a healthy, well-functioning back.
The goals for a healthy back include proper align- ment of the vertebrae and pelvis without exces- sive disc pressure and the ability of the pelvis to rotate forward and backward without strain on the muscles or connective tissue. To accomplish these goals an individual must have sufficient, but not excessive, flexibility of the low back, hamstring, and hip flexor muscles and strong, fatigue-resistant, abdominal and trunk extensor muscles. Although most students will be able to achieve the criterion standards for one or two of the included test items, it is important to educate them regarding the impor- tance of muscular strength, muscular endurance, and flexibility in preventing problems as adults. It is especially important to make students aware of correct postural alignment and body mechanics in the event that they are developing scoliosis, which is a problem for teenage youth. The school nurse, a local physician, or a physical therapist is a good source of information about scoliosis.
Need Additional Resources? For complete
information about FITNESSGRAM, visit
www.fitnessgram.net. To order the FITNESSGRAM
Distribution by FITNESSGRAM® for the Presidential Youth Fitness Program; not for resale.
Copyright by The Cooper Institute. For additional information about the Presidential Youth
Fitness Program, visit www.pyfp.org.
software and related resources, call Human Kinetics at
800-747-4457, or order online at
www.HumanKinetics.com. To review the science
behind the assessment, please read the Reference
Guide, which is available at no cost at
www.fitnessgram.net.
Abdominal Strength and Endurance Strength and endurance of the abdominal muscles are important in promoting good posture and
correct pelvic alignment. The latter is particularly important in the maintenance of low back health. In testing and training the muscles of this region, it is difficult to isolate the abdominal muscles. The modified sit-up, which is used in many fitness tests, involves the action of the hip flexor muscles in addi- tion to the abdominal muscles. The curl-up assess- ment used in FITNESSGRAM is a safer and more effective test since it does not involve the assistance of the hip flexor muscles and minimizes compres- sion in the spine, when compared to a full sit-up with the feet held. The protocol has been adapted from a version reported by Massicote (1990).
Curl-Up This section provides information on the curl-up assessment used in FITNESSGRAM. The curl-up with knees flexed and feet unanchored has been selected because individually these elements have been shown to a) decrease movement of the fifth lumbar vertebra over the sacral vertebrae, b) mini- mize the activation of the hip flexors, c) increase the activation of the external and internal obliques and transverse abdominals, and d) maximize abdominal muscle activation of the lower and upper rectus abdominals relative to disc compression (load) when compared with a variety of sit-ups.
Few results are available on the consistency and accuracy of the curl-up. Reliability is higher for col- lege students than for children but the values are acceptable for this type of assessment. Determina- tion of validity has been hampered by the lack of an established criterion measure. Anatomical analysis and electromyographical documentation provide the primary support for the use of the curl-up test to determine abdominal strength and endurance.
Test Objective
To complete as many curl-ups as possible up to a maximum of 75 at a specified pace.
Equipment and Facilities
Gym mats and a measuring strip for every two students are needed. The measuring strip may be made of cardboard, rubber, smooth wood, or any similar thin, flat material and should be 30 to 35 inches long. Two widths of measuring strip may
be needed. The narrower strip should be 3 inches wide and is used to test 5- to 9-year-olds; for older students the strip should be 4.5 inches wide. Test Instructions
Allow students to select a partner. Partner A will perform the curl-ups while partner B counts and watches for form errors.
Partner A lies in a supine position on the mat, knees bent at an angle of approximately 140°, feet flat on the floor, legs slightly apart, arms straight and parallel to the trunk with palms of hands rest- ing on the mat. The fingers are stretched out and the head is in contact with the mat. Make sure students have extended their feet as far as possible from the buttocks while still allowing feet to remain flat on floor. The closer the feet are positioned in relation to the buttocks, the more difficult the movement.
After partner A has assumed the correct position on the mat, partner B places a measuring strip on the mat under partner A’s legs so that partner A’s fingertips are just resting on the nearest edge of the measuring strip. Partner B then kneels down at partner A’s head in a position to count curl- ups and watch for form breaks. Partner B places a piece of paper under partner A’s head. The paper will assist partner B in judging if partner A’s head touches down on each repetition. The observer should watch for the paper to crinkle each time partner A touches it with his or her head.
Before beginning the curl-up, it is a good practice for partner B to pull on partner A’s hands to en- sure that the shoulders are relaxed and in a normal resting position. If partner A is allowed to hunch
( continued )
Distribution by FITNESSGRAM® for the Presidential Youth Fitness Program; not for resale.
Copyright by The Cooper Institute. For additional information about the Presidential Youth
Fitness Program, visit www.pyfp.org.

Photo © Human Kinetics. Starting position for the curl-up test.
Photo © Human Kinetics. Position of the student in the “up” position for the curl-up test.
( continued )
Distribution by FITNESSGRAM® for the Presidential Youth Fitness Program; not for resale.
Copyright by The Cooper Institute. For additional information about the Presidential Youth
Fitness Program, visit www.pyfp.org.

a b
Photo © Human Kinetics. Close-up of the fingertips sliding: (a) starting position and (b) ending position.
the shoulders before beginning the test, he or she may be able to get the fingertips t o t he o ther s ide of the testing strip by merely moving the arms and shoulders up and down. Keeping heels in contact with the mat, partner A curls up slowly, sliding fingers across the measuring strip until fingertips reach the other side; then partner A curls back down until his or her head touches the piece of paper on the mat. Movement should be slow and gauged to the specified cadence of about 20 curl-ups per minute (1 curl every 3 seconds). The teacher should call a cadence or use a prerecorded cadence. A recorded cadence should be used to ensure accurate testing for students. Partner A continues with-out pausing until he or she can no longer continue or has completed 75 curl-ups.
When to Stop Students are stopped after completing 75 curl-ups, when the second form correction is made, or when they can no longer continue.
Form Corrections Heels must remain in contact with the mat.
Head must return to the mat on each repetition.
Pauses and rest periods are not allowed. The movement should be continuous and with the cadence.
Fingertips must touch the far side of the mea- suring strip.
Scoring
The score is the number of curl-ups performed. Curl-ups should be counted when the student’s head returns to the mat. For ease in administration, it is permissible to count the first incorrect curl-up. It is important to be consistent with all of the students and classes when determining whether or not you will count the first incorrect curl-up.
Suggestions for Test
Administration The student being tested should reposition if
the body moves so that the head does not contact the mat at the appropriate spot or if the measuring strip is out of position.
Movement should start with a flattening of the lower back followed by a slow curling of the upper spine.
The hands should slide across the measur- ing strip until the fingertips reach the opposite side (3 or 4.5 inches) and then return to the supine posi- tion. The movement is completed when the back of the head touches the paper placed on mat.
( continued )
Distribution by FITNESSGRAM® for the Presidential Youth Fitness Program; not for resale.
Copyright by The Cooper Institute. For additional information about the Presidential Youth
Fitness Program, visit www.pyfp.org.

The cadence will encourage a steady, continu-
ous movement done in the correct form.
Students should not forcibly “reach” with their arms and hands but simply let the arms passively move along the floor in response to the action of the trunk and shoulders. Any jerking, kipping, or reach- ing motion will cause the students to constantly move out of position. When students first begin to
use this test item, many will want to “reach” with their arms and hands, especially if they have previ- ously done a timed sit-up test.
This curl-up protocol is quite different from the one-minute sit-up. Students will need to learn how to correctly perform this curl-up movement and be allowed time to practice.
Upper Body Strength and Endurance Strength and endurance of the muscles in the upper body are important in activities of daily living, maintaining functional health and promoting good posture. The role of upper body strength in main- taining functionality becomes more evident as a person ages. It is important that children and youth learn the importance of upper body strength and endurance as well as methods to use in developing
and maintaining this area of fitness. The 90° push- up is the recommended test item. This 90° push-up has been adapted from assessments reported by Massicote (1990). Alternative tests include the modified pull-up, pull-up, and flexed arm hang. It should be noted that although all of these items are intended to measure upper arm and shoulder girdle strength and endurance, they do not all involve the same muscle groups to the same extent and handling body weight is more of a factor in some than others.
90° Push-Up
The 90° push-up to an elbow angle of 90° is the recommended test for upper body strength and endurance. Test administration requires little or no equipment; multiple students may be tested at one time; and few zero scores result. This test also teaches students an activity that can be used throughout life as a conditioning activity as well as in self-testing.
The 90° push-up has generally been shown to produce consistent scores but reliability depends on how it is administered. Lower values have been reported for elementary aged students using part- ners to count the repetitions. Objectivity, or the ability of different observers to attain the same results, is a factor in this item because of the necessity of judging the 90° angle. Scores from stu- dent partners are consistently higher than adult
counts because students tend to simply count each attempted 90° push-up and not evaluate whether it was done correctly. As with several of the other neu- romuscular fitness items, determining the accuracy of the 90° push-up as a test of upper body strength and endurance is made difficult by the lack of an agreed upon criterion measure. Specific validation data are available for the 90° push-up in only two stud- ies conducted on college age students. Validity coef- ficients against a 1-RM bench press were the highest when the criterion test was the number of repetitions (endurance) at an absolute, but sex-specific, load.
Before test day, students should be allowed to practice doing 90° push-ups and watching their partner do them. Teachers should make a concerted effort during these practice sessions to correct students who are not achieving the 90° angle. In this manner all students will gain greater skill in knowing what 90° “feels like” and “looks like.”
( continued )
Distribution by FITNESSGRAM® for the Presidential Youth Fitness Program; not for resale.
Copyright by The Cooper Institute. For additional information about the Presidential Youth
Fitness Program, visit www.pyfp.org.

Test Objective
To complete as many 90° push-ups as possible at a rhythmic pace. This test item is used for males and females.
Equipment and Facilities
The only equipment necessary is having the correct cadence. The correct cadence is 20 90° push-ups per minute (1 90° push-up every 3 seconds). A recorded cadence should be used to ensure accurate testing for students. The 90° push-up may be performed on a mat. Squares of cardboard or anything else that has a 90° angle may assist students in judging 90°.
Test Instructions The students should be paired; one will perform the test while the other counts 90° push-ups and watches to see that the student being tested bends the elbow to 90° with the upper arm parallel to the floor.
The student being tested assumes a prone posi- tion on the mat with hands placed under or slightly wider than the shoulders, fingers stretched out, legs straight and slightly apart, and toes tucked under. The student pushes up off the mat with the arms until arms are straight, keeping the legs and back straight. The back should be kept in a straight line from head to toes throughout the test.
The student then lowers the body using the arms until the elbows bend at a 90° angle and the upper arms are parallel to the floor. This move- ment is repeated as many times as possible. The student should push up and continue the movement until the arms are straight on each repetition. The rhythm should be approximately 20 90° push-ups per minute or 1 90° push-up every 3 seconds.
When to Stop Students are stopped when the second form correc- tion (mistake) is made. Only one form correction is allowed.
Form Corrections Stopping to rest or not maintaining a rhythmic
pace
Not achieving a 90° angle with the elbow on each repetition
Not maintaining correct body position with a straight back
Not extending arms fully
Scoring The score is the number of 90° push-ups performed. For ease in administration, it is permissible to count the first incorrect 90° push-up. It is important to be consistent with all of the students and classes
Photo © Human Kinetics. Starting position for
the 90° push-up test.
Photo © Human Kinetics. Student in the
“down” position for the 90° push-up test.
Distribution by FITNESSGRAM® for the Presidential Youth Fitness Program; not for resale.
Copyright by The Cooper Institute. For additional information about the Presidential Youth
Fitness Program, visit www.pyfp.org.
( continued )
when determining if you will count the first incor- rect push-up.
Suggestions for Test
Administration Test should be terminated if the student
appears to be in extreme discomfort or pain.
Cadence should be called or played on a
player device or CD.
Males and females follow the same
protocol.
Find a short cone or other piece of pliable
equipment that could be placed under the
student’s chest. The student must lower to the
equipment in order for the 90° push-up to
count. The size and height of the equipment
that is used may vary depending on the age
and size of your students.
Flexibility
Maintaining adequate joint flexibility is important to functional health. However, for young people, decreased flexibility is generally not a problem. Many of your students will easily pass the flexibility
item; therefore, the flexibility item has been made optional. If you decide not to administer the flex- ibility test, remember that you should teach students about flexibility and inform them that maintaining flexibility and range of motion will be important as they age.
Back-Saver Sit and Reach
The back-saver sit and reach is very similar to the traditional sit and reach except that the measure- ment is performed on one side at a time. By testing one leg at a time a determination can be made of any asymmetry in hamstring flexibility, and hyper- extension of both knees is avoided. The sit and reach measures predominantly the flexibility of the hamstring muscles. Normal hamstring flexibility
allows rotation of the pelvis in forward bending movements and posterior tilting of the pelvis for proper sitting.
The back-saver sit and reach has been shown to provide extremely consistent scores when administered under standardized conditions. The back-saver sit and reach has also been shown to be a reasonably accurate measure of hamstring flexibility. When compared with criterion mea- sures of hamstring flexibility, the correlations for both right and left legs have been moderate to high. Conversely, the back-saver sit and reach has been shown to correlate poorly with criterion tests
( continued )
Distribution by FITNESSGRAM® for the Presidential Youth Fitness Program; not for resale.
Copyright by The Cooper Institute. For additional information about the Presidential Youth
Fitness Program, visit www.pyfp.org.

Back-Saver Sit and Reach ( continued )
of low back flexibility. Therefore, the back-saver sit and reach cannot be considered a valid measure of low back flexibility and should not be interpreted as such.
Test Objective
To be able to reach the specified distance on the right and left sides of the body. The distance required to achieve Healthy Fitness Zone is adjusted for age and gender.
Equipment and Facilities
This assessment requires a sturdy box approxi- mately 12 inches high. A measuring scale is placed on top of the box with the 9-inch mark parallel to the face of the box against which the student’s foot will rest. The “zero” end of the ruler is nearest the student. Instructions for construction of a special measuring apparatus are available. However, a wooden box and yardstick will suffice.
Tape the yardstick to the top of the box with the 9-inch mark at the nearest edge of the box. The “zero” end of the yardstick is nearest the student.
Test Instructions
The student removes his or her shoes and sits down at the test apparatus. One leg is fully extended with the foot flat against the face of the box. The other knee is bent with the sole of the foot flat on the floor. The instep is placed in line with, and 2 to 3 inches to the side of, the straight knee. The arms are extended forward over the measuring scale with the hands placed one on top of the other. With palms down, the student reaches directly forward (keeping back straight and the head up) with both hands along the scale four times and holds the position of the fourth reach for at least 1 second. After one side has been measured, the student switches the position of the legs and reaches again. The student may allow the bent knee to move to the side as the body moves
Photo © Human Kinetics. Starting position
for measuring the right side.
Photo © Human Kinetics. Back-saver sit and
reach stretch for the right side.
( continued )
Distribution by FITNESSGRAM® for the Presidential Youth Fitness Program; not for resale.
Copyright by The Cooper Institute. For additional information about the Presidential Youth
Fitness Program, visit www.pyfp.org.

Back-Saver Sit and Reach ( continued )
forward if necessary, but the sole of the foot must remain on the floor.
Scoring
Record the number of inches on each side to the nearest 1/2 inch reached, to a maximum score of 12 inches. Performance is limited to discourage hypermobility. To be in the Healthy Fitness Zone, the student should meet the standard on both the right and the left sides.
Suggestions for Test
Administration The bent knee moves to the side, allowing the
body to move past it, but the sole of the foot must remain on the floor.
Keep the back straight and the head up during the forward flexion movement.
The knee of the extended leg should remain straight. Tester may place one hand above the stu- dent’s knee to help keep the knee straight.
Hands should reach forward evenly.
The trial should be repeated if the hands reach unevenly or the knee bends.
Hips must remain square to the box. Do not allow the student to turn the hip away from the box while reaching.
Distribution by FITNESSGRAM® for the Presidential Youth Fitness Program; not for resale.
Copyright by The Cooper Institute. For additional information about the Presidential Youth
Fitness Program, visit www.pyfp.org.

Laps (20-meter lengths)
Level
1 1 2 3 4 5 6 7
2 8 9 10 11 12 13 14 15
3 16 17 18 19 20 21 22 23
4 24 25 26 27 28 29 30 31 32
5 33 34 35 36 37 38 39 40 41
6 42 43 44 45 46 47 48 49 50 51
7 52 53 54 55 56 57 58 59 60 61
8 62 63 64 65 66 67 68 69 70 71 72
9 73 74 75 76 77 78 79 80 81 82 83
10 84 85 86 87 88 89 90 91 92 93 94
11 95 96 97 98 99 100 101 102 103 104 105 106
12 107 108 109 110 111 112 113 114 115 116 117 118
13 119 120 121 122 123 124 125 126 127 128 129 130 131
14 132 133 134 135 136 137 138 139 140 141 142 143 144
15 145 146 147 148 149 150 151 152 153 154 155 156 157
Laps Completed
The PACER Individual Score Sheet
Score-keeper:________________________________
Adapted from FITNESSGRAM/ACTIVITYGRAM Test Administration Manual, Fourth Edition by the Cooper Institute, 2005, Champaign, IL: Human Kinetics.
Cadet NameDate Lane
Laps

Test Event Not Restricted Temporarily Restricted Indefinitely Restricted
Sit and Reach
Curl-Ups
Push-Ups
Mile Run/PACER
Cadet Physical Fitness Category Assignment
Physical fitness is a component of the Civil Air Patrol Cadet Program. Unless restricted by a physician,
cadets participate in a variety of calisthenics, sports, and other vigorous phyiscal activity. Periodically, in
their quest to progress through the program, cadets take a physical fitness asssessment.
Please check the appropriate box to let CAP know that your patient is able to participate in, or is restricted
from, these activities.
Not Restricted. Cadet is determined to be in good health and may participate in physical fitness exercises
without restriction.
Temporarily Restricted. Medical condition or injury is temporary in nature. Normally, cadets will remain in
this category for six months or less.
Indefinitely Restricted. Medical condiditon or injury is chronic or permanent in nature. Conditions lasting
more than six months are considered chronic. The cadet is indefinitely restricted from this activity.
Please explain the nature of any restrictions.
Are there any other activities this individual is restricted from? Please explain.
The information on this request may be shared with Department of Defense agencies. By submitting this
form, the cadet and cadet's parent(s) authorize CAP to discuss the information above with the physician.
Physician's Name:
Cadet's Name:
Physician's Telephone:
Date:
CAPID:
Physician's Signature:

Fitness Goal Setting
5. Commit to the achievement of the goal.
I pledge to work towards my fitness goals. I commit myself to health and I will push myself to be better each day. I will not be discouraged. If I need help I will reach out to my fitness partner and, in turn, I
will support those around me.
I pledge to support my fitness partner in reaching their goals. I will
motivate, provide encouragement and accountability.
6. Reinforce by working towards your goals daily. Put this sheet somewhere you’ll see it everyday. Reassess at your due dates. Exceed the challenge!
3. List activities to be performed. 4. Identify a timeline. Action Due Date
1. Determine a baseline. Aerobic Fitness Flexibility
PACER Sit & Reach Mile Run Other
Muscular Strength & Endurance Curl-up Push-up
2. Clearly define the desired outcome. Goals Write down at least one long-term goal. Focus on where you want to be in the next 6 months to a year.
1
2
3
SMART Goals Specific Measurable Attainable Realistic Tangible
Keep in mind: Frequency, Intensity,
Time, Type
Setting goals is the first step in reaching your dreams. Use this worksheet to help you look at where you are with your fitness currently, think about where you want to be, create an action plan to get you there and commit to working hard to bring it about. Setting, working towards, and reevaluating your goals is an continual practice. The more you familiarize yourself with the process, and the better you know yourself, the more effective your goal setting will be.

PACER (20m) Mile run Curl-ups Push-ups Sit & reach
Age (no. completed) (min:sec) (no. completed) (no. completed) (avg. inches)
10 17 11:30 12 7 8
11 20 11:10 15 8 8
12 23 10:40 18 10 8
13 29 9:46 21 12 8
14 36 9:22 24 14 8
15 42 9:04 24 16 8
16 47 8:42 24 18 8
17 50 8:22 24 18 8
18+ 54 8:04 24 18 8
10 17 11:30 12 7 9
11 20 11:10 15 7 10
12 23 10:40 18 7 10
13 25 10:20 18 7 10
14 27 10:09 18 7 10
15 30 9:58 18 7 12
16 32 9:46 18 7 12
17 35 9:34 18 7 12
18+ 38 9:22 18 7 12
Standards for Healthy Fitness Zone
RUN EITHER PLUS 2 of 3
M
a
l
e
s
F
e
m
a
l
e
s