active lifestyle products - mobility scooters amigo mobility
TRANSCRIPT
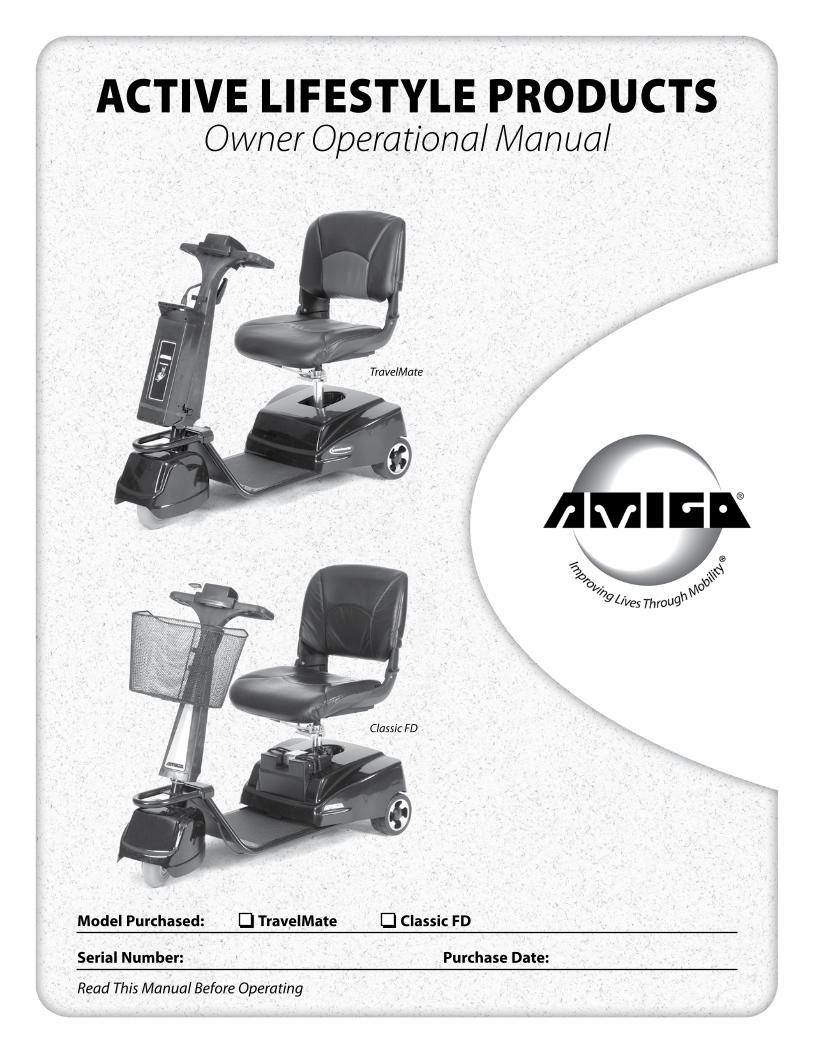
Active LifestyLe Products Owner Operational Manual
TravelMate
Classic FD
Model Purchased: TravelMate Classic FD
Serial Number: Purchase Date:
Read This Manual Before Operating
sAfety firstFor your convenience and understanding, signal words are defined below:
Warning is used to indicate the presence oF a hazard, Which can cause severe personal injury, death or substantial property damage iF the Warning is ignored.
caution is used to indicate the presence oF a hazard Which Will or can cause minor personal injury or property damage iF the Warning is ignored.
Safety Suggestionsuse the following guidelines for the safe operation and use of your amigo. should you have any questions about the safe operation of your vehicle, please contact ami or your amigo dealer. if you are in doubt about your ability to operate your amigo, consult your personal physician.
DO • ReadtheoperatingmanualbeforeusingyourAmigo.
• AlwaysturnyourAmigoOFFbeforegettingonoroffyourvehicle.
• WhileoperatingortransferringoffyourAmigo,alwaysmakesuretheSeatLockisinthelockedposition.
• Alwaysremainseatedwhilethevehicleisinoperation.
• Keeplegsontheplatformwhiledriving.
• AllowtheAmigotocometoacompletestopbeforeattemptingtoreverse.
• Alwaysdriveataslow,sensiblemannerwhilepedestriansarearound.
• Driveslowlywhileturningandoninclines.
• Alwaysdrivestraightupanddowninclines.
• Alwaysbecarefulwhenmaneuveringoninclinesorramps.NotallrampsareconstructedaccordingtoFederalstandards. the Federal standard for wheelchair ramps is one-inch (2.5 cm) rise per foot (30 cm) = 5 degrees or 8% grade.
• Doavoidsuddenstartswhilethehandleisturnedsharply.
• Alwaysapproachobstaclesatalowspeedifyouaretodriveoverthem.
• Beawareofmechanicalpinchpoints,especiallywhenassemblinganddisassemblingyourAmigo.
• RemoveBatteryPackwhenloadingordisassemblingyourAmigounlesssecurelystrapped to handle/tiller restricting any movements.
Turning The swiTch OFF while in mOTiOn will bring The AmigO TO A cOnTrOlled sTOp.
DO NOT • Donotexceedthemaximumweightcapacity.Exceedingtheweightcapacityvoidsyourwarrantyandmay result in personal injury and damage to your amigo. amigo company will not be responsible for injuries and/or property damage resulting from failure to observe weight limitations.
• Donotdriveoveroroffobstaclesmorethan1inch(2.5cm)high.ThiscouldbeunsafeandcoulddamageyourAmigo.
• DonotturnyourAmigoathighspeeds,asthiscouldresultintipping.
• Donotreversedownasteephillorincline.
• Donotparkoninclinesordeclines.
• DonotsitontheAmigoinamovingvehicle.
Anewindustrybeganin1968whenAmigorevolutionizedmobilityforpeoplewithwalkinglimitations.AmigoPowerOperatedVehicles(POVs)quicklybecameahouseholdname for their ease of operation and maneuverability. Eversinceourfirstcreation,AmigoCompanyhasworkedhard to bring comfort, freedom and satisfaction to our many thousands of customers.
In1977,theUnitedStatesSocialSecurityActwas amended to include the amigo power operated vehicle as an official medical mobility device, creating new opportunities for accessibility by medicare clients across the nation. Worldwide, more people than ever are discovering the amigo lifestyle.
Wewouldliketotakethisopportunitytothankyouforchoosing amigo. our business will provide you with personalizedandinnovativeelectricmobilityproducts and customer satisfaction, today and in the future.
sincerely,
amigo mobility international, inc. (ami)
Welcome to the Amigo family of active and independent people. For thousands of individuals around the world, Amigo provides the opportunity to enjoy life more fully. We are confident that the following instructions and helpful hints will make your Amigo an extremely useful and reliable “friend.” Because we are concerned about your health and safety, please read this manual carefully before operating your vehicle. After learning to use your Amigo properly, you will discover a world of enjoyment and independence.
Please return your warranty card to be placed on our e-mailing list for Friendly Wheels. Friendly Wheels, e-mailed monthly, is about owners participating in life. It also keeps you informed about new products, accessories, helpful hints and service tips!
Amigo Mobility International, Inc. (AMI) disclaims any responsibility for personal injury or property damage resulting from the improper or unsafe use of its products.
TravelMate Classic FD
Table OF CONTeNTSSafety First 3-4
location of controls 4
identification of parts 4
assembling your amigo 5
AdjustingYourAmigo 6
OperatingYourAmigo 7
RidingYourAmigo 7-8
SafetyWarnings 9
battery information & ChargingInstructions 9-10
CleaningInstructions 11
Maintenance 11-12
Troubleshooting/DiagnosticCodes 13
ElectromagneticInterference 14
WiringDiagrams 15-17
ExplodedViews 18-19
PartsLists 20-21
Warranty 22
www.myamigo.com 3

• Donotallowanyonetoridewithyou.
• DonotoperateyourAmigonearstairs,steps,curbsorterraceswhereyoumightaccidentallydropawheelofftheedge.
• DonotoperateyourAmigoonstreetsorotherareaswithvehiculartraffic.
• Donotdisengageyourbrakeleverwhenparkedonaslope.
• Donotusethehandletoassistintransferring.
• Donotliftrearsectionofplatformbyholdingtherearwheel.
• DonotexposeyourAmigotospray-oncleaningsolutionsandexcessivemoisturesuchassprayingitwithagardenhose, shower or leaving it uncovered in heavy rain.
AMI is not responsible for any damage or injury incurred due to the improper or unsafe use of the POV. AMI specifically disclaims responsibility for any bodily injury or property damage that may occur during any use, which does not comply with applicable federal, state or local laws or ordinances.
LocAtion of controLsHI/lO Speed adjustment Handle1. accelerator lever (right and left)
2. on/oFF switch
3. battery indicator light
4. Forward and reverse position diagrams for accelerator levers
5. Speedadjustmentknob
identificAtion of PArts
AsseMBLinG your AMiGoTo assemble the TravelMate: 1 PlacetheSeatintheSeatPostandlocktheSeatLockLever.
2 TipAmigobackwards,soitisrestingontheSeatback.
3 lift the Front assembly (tiller and drive head) up and align the two posts on the rear platform with the two holes on the Front assembly (TillerandDriveHead),keepingbothsurfacesflush.
4 TurnTakeApartKnobclockwiseuntiltightened(approximately8turns).
5 tip amigo upright, so it is resting on its wheels.
6 ReplaceBatteryPackandconnectBatteryConnector.
Seat Installation 1 UnlocktheSeatLock.
2 insert the upper seat post into the opening of the lower seat post.
3 SpinSeataroundtomakesureitrotatesfreely.
4 TolocktheSeat,pulltheSeatLockLevertowardtherearoftheSeat.
battery Pack Installation 1 SettheBatteryCaseontheBatteryCaseHangingBracket.
2 CentertheBatteryCasewithHandleandswingitintotheHandle,ensuringthatthewirebracketholdsthebottom in place. Wire on battery case straddles the tiller. the latch on the top of the battery case will engage itself.
3 connect the battery power connector to the battery case by aligning the connector.
ensure the latch and Wire Form at the base oF battery are Fully engaged to avoid the battery case dislodging during operation or transporting.
ensure that the battery poWer connector is connected to the battery case securely during operation. While charging ensure that the battery charger connector is attached securely to the battery case.
To Disassemble and Transport your amigo TravelMate,take apart the Front assembly: 1 turn amigo oFF.
2 UnplugBatteryConnectorandremoveBatteryPack.
3 TipAmigobackward,soitisrestingontheSeatback..
4 TurnTakeApartKnobcounterclockwise(approximately 8 turns), and lift Front assembly (Tiller and Drive Head) off Frame.
5 tip amigo upright, so it is resting on its wheels.
6 UnlockandremoveSeat.
7 LiftRearPlatformintotrunkofvehicle.Placepartsintrunk.
do not liFt the amigo travelmate tiller by the battery case handle.
1 1
2
3
4 4
8
6
5 4
3
21
8
TravelMate
9
11
10
Classic FD
6
5
1
3
4
2
9
1. battery case
2. tiller
3. Front drive Wheel
4. rear Wheels
5. platform
6. seat
7. charger
8. TakeApartKnob
9. handle adjustment lever
10. battery power connector
11. battery case latch
12. SeatLockLever
www.myamigo.com 5
5
12
1212
7
AdjustinG your AMiGoto adjust your amigo to a comfortable driving position, you can alter the handle, seat and armrests as follows:
eZ-Tilt Handle adjustmentToadjusttheangleoftheHandle,turntheAdjustmentLevercounterclockwise.Movethe Handletothedesiredposition.TightentheAdjustmentLeverbyturningitclockwise(Figure 1). the placement of the spring-activated adjustment lever, itself, can be moved out of the way for your comfort. pull the adjustment lever straight out. turn in either direction. release adjustment lever at desired placement (Figure 2).
do not use the handle adjustment lever For a Foot rest. such use may cause the adjustment lever to loosen the handle and cause personal injury.
adjusting Seat Height to raise or lower your seat height, remove the nut and screw that holds the seat collar in place on the seat post, then adjust and reinstall in the desired hole on the seat post. (Figure 3)
It is recommended that the Seat Lock be installed in the second hole position from the seat on a Folding Seat and the Premier I Seat. (Figure 4)
Seat lock leverThisallowstheSeattorotate360degreesandlockinanypositiondesired. TheSeatLockLeverisabarwithavinylcaponitsend,locatedunderthe right side of the seat. push the lever forward to rotate to any position.
adjustable armrest Width (Available Option)TheArmrestwidthisdeterminedbylooseningtheArmrestKnobsandtighteningthem when the arms are at the desired width.
Flip Up armrest (Available Option)BypullingupontheendofeitherArmrest,theArmrestwillflipback for easy transfer in and out of the amigo.
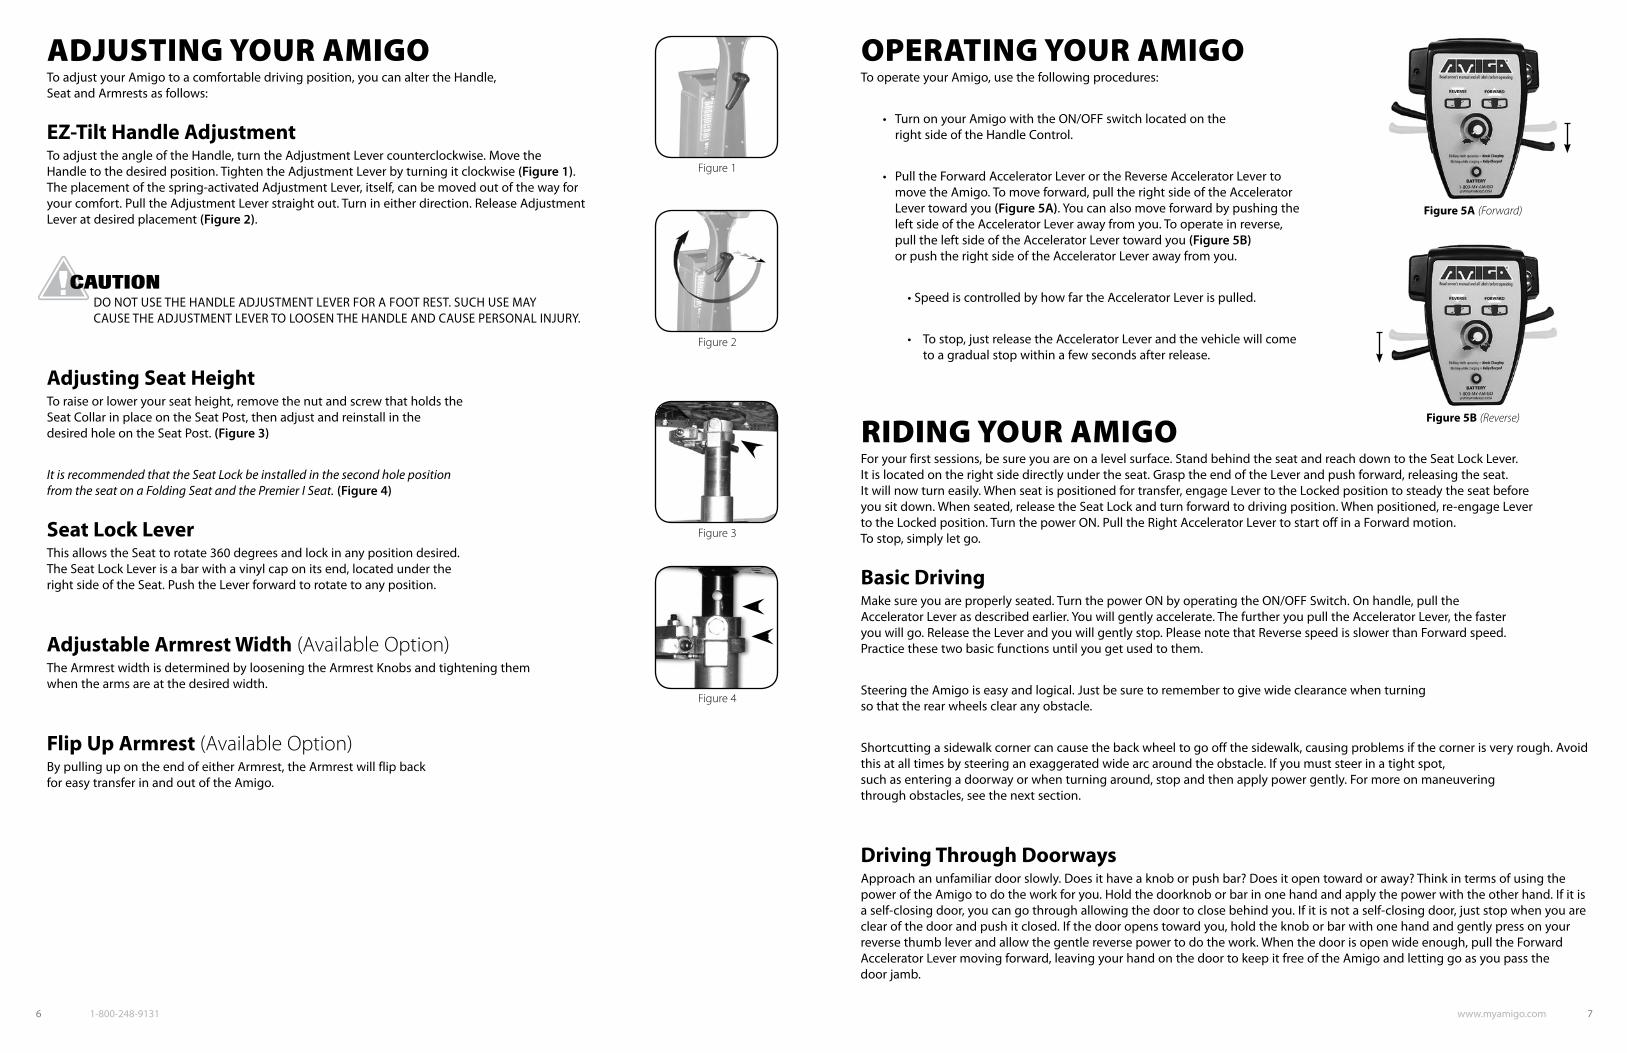
oPerAtinG your AMiGoto operate your amigo, use the following procedures:
• TurnonyourAmigowiththeON/OFFswitchlocatedonthe right side of the handle control.
• PulltheForwardAcceleratorLeverortheReverseAcceleratorLeverto move the amigo. to move forward, pull the right side of the accelerator lever toward you (Figure 5A). you can also move forward by pushing the left side of the accelerator lever away from you. to operate in reverse, pull the left side of the accelerator lever toward you (Figure 5B) or push the right side of the accelerator lever away from you.
•SpeediscontrolledbyhowfartheAcceleratorLeverispulled.
• Tostop,justreleasetheAcceleratorLeverandthevehiclewillcome to a gradual stop within a few seconds after release.
ridinG your AMiGoForyourfirstsessions,besureyouareonalevelsurface.StandbehindtheseatandreachdowntotheSeatLockLever. it is located on the right side directly under the seat. grasp the end of the lever and push forward, releasing the seat. Itwillnowturneasily.Whenseatispositionedfortransfer,engageLevertotheLockedpositiontosteadytheseatbefore yousitdown.Whenseated,releasetheSeatLockandturnforwardtodrivingposition.Whenpositioned,re-engageLever totheLockedposition.TurnthepowerON.PulltheRightAcceleratorLevertostartoffinaForwardmotion. to stop, simply let go.
basic DrivingMakesureyouareproperlyseated.TurnthepowerONbyoperatingtheON/OFFSwitch.Onhandle,pullthe accelerator lever as described earlier. you will gently accelerate. the further you pull the accelerator lever, the faster you will go. release the lever and you will gently stop. please note that reverse speed is slower than Forward speed. practice these two basic functions until you get used to them.
steering the amigo is easy and logical. just be sure to remember to give wide clearance when turning so that the rear wheels clear any obstacle.
Shortcuttingasidewalkcornercancausethebackwheeltogooffthesidewalk,causingproblemsifthecornerisveryrough.Avoidthisatalltimesbysteeringanexaggeratedwidearcaroundtheobstacle.Ifyoumuststeerinatightspot, such as entering a doorway or when turning around, stop and then apply power gently. For more on maneuvering throughobstacles,seethenextsection.
Driving Through DoorwaysApproachanunfamiliardoorslowly.Doesithaveaknoborpushbar?Doesitopentowardoraway?ThinkintermsofusingthepoweroftheAmigotodotheworkforyou.Holdthedoorknoborbarinonehandandapplythepowerwiththeotherhand.Ifitisa self-closing door, you can go through allowing the door to close behind you. if it is not a self-closing door, just stop when you are clearofthedoorandpushitclosed.Ifthedooropenstowardyou,holdtheknoborbarwithonehandandgentlypressonyourreversethumbleverandallowthegentlereversepowertodothework.Whenthedoorisopenwideenough,pulltheForwardAcceleratorLevermovingforward,leavingyourhandonthedoortokeepitfreeoftheAmigoandlettinggoasyoupassthe door jamb.
Figure 1
Figure 2
Figure 3
Figure 4
Figure 5a (Forward)
Figure 5b (Reverse)
www.myamigo.com 7 6 1-800-248-9131
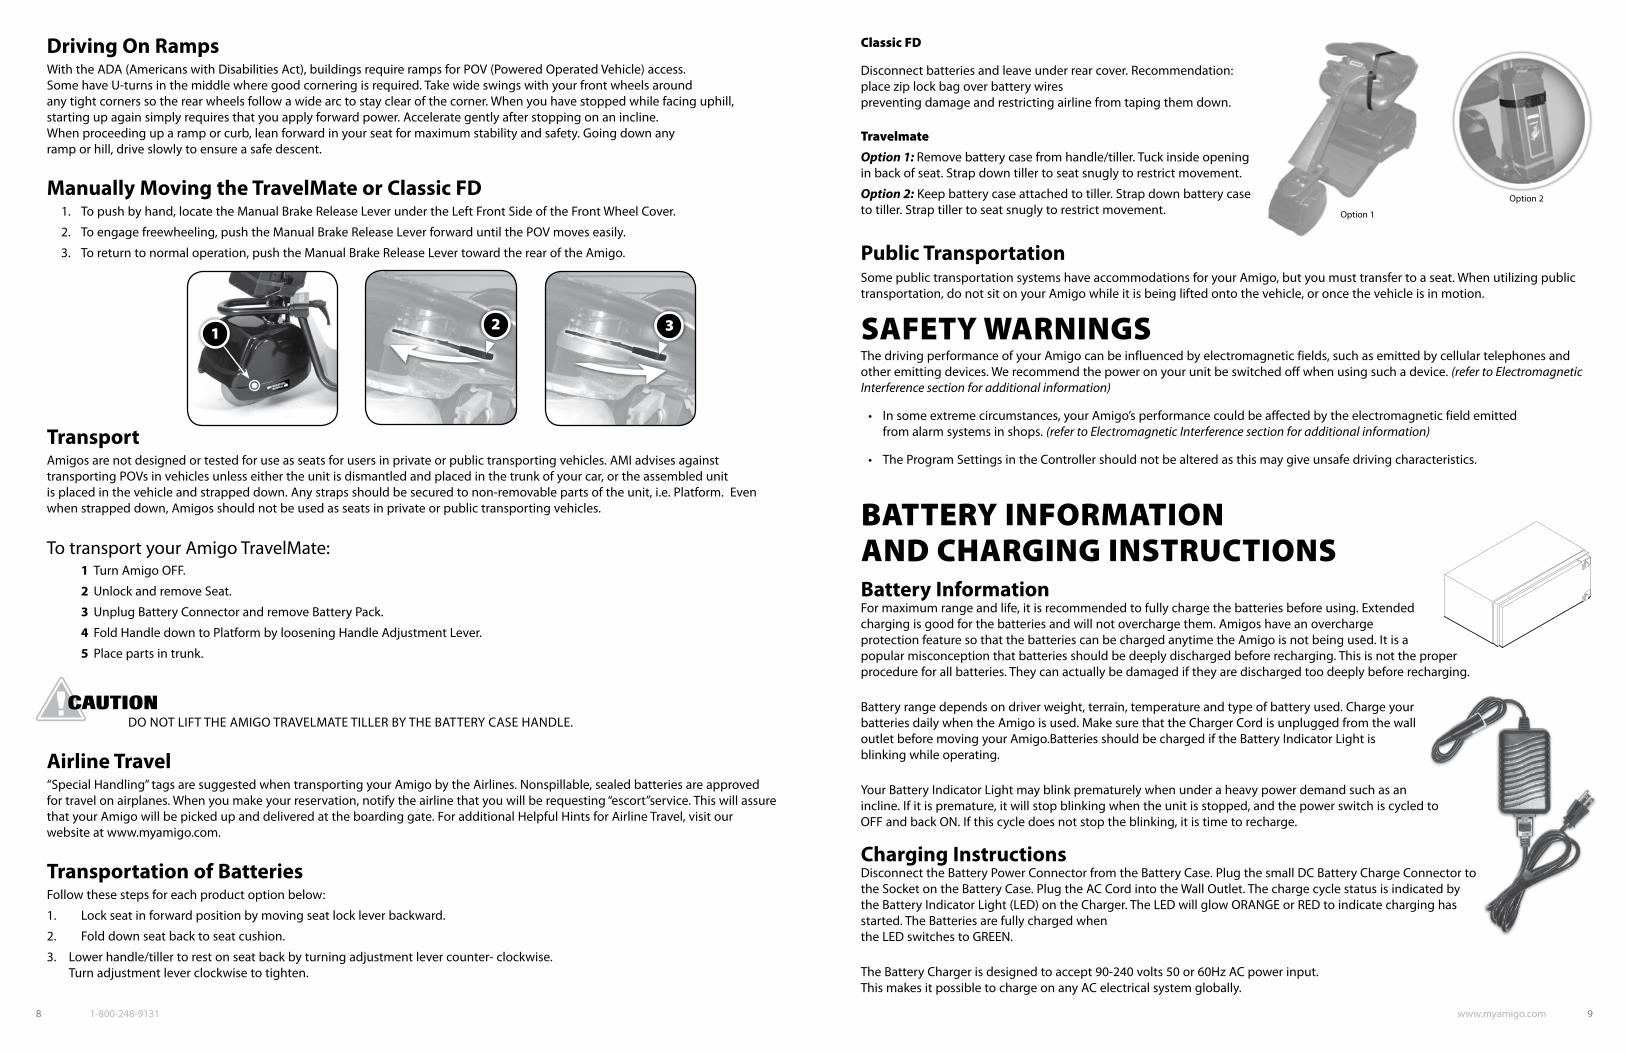
Driving On RampsWith the ada (americans with disabilities act), buildings require ramps for pov (powered operated vehicle) access. SomehaveU-turnsinthemiddlewheregoodcorneringisrequired.Takewideswingswithyourfrontwheelsaround any tight corners so the rear wheels follow a wide arc to stay clear of the corner. When you have stopped while facing uphill, starting up again simply requires that you apply forward power. accelerate gently after stopping on an incline. Whenproceedinguparamporcurb,leanforwardinyourseatformaximumstabilityandsafety.Goingdownany ramp or hill, drive slowly to ensure a safe descent.
Manually Moving the TravelMate or Classic FD1. Topushbyhand,locatetheManualBrakeReleaseLeverundertheLeftFrontSideoftheFrontWheelCover.
2. Toengagefreewheeling,pushtheManualBrakeReleaseLeverforwarduntilthePOVmoveseasily.
3. Toreturntonormaloperation,pushtheManualBrakeReleaseLevertowardtherearoftheAmigo.
Transportamigos are not designed or tested for use as seats for users in private or public transporting vehicles. ami advises against transportingPOVsinvehiclesunlesseithertheunitisdismantledandplacedinthetrunkofyourcar,ortheassembledunit is placed in the vehicle and strapped down. any straps should be secured to non-removable parts of the unit, i.e. platform. even when strapped down, amigos should not be used as seats in private or public transporting vehicles.
to transport your amigo travelmate: 1 turn amigo oFF.
2 UnlockandremoveSeat.
3 UnplugBatteryConnectorandremoveBatteryPack.
4 Fold handle down to platform by loosening handle adjustment lever.
5 Placepartsintrunk.
do not liFt the amigo travelmate tiller by the battery case handle.
airline Travel“special handling” tags are suggested when transporting your amigo by the airlines. nonspillable, sealed batteries are approved fortravelonairplanes.Whenyoumakeyourreservation,notifytheairlinethatyouwillberequesting“escort”service.ThiswillassurethatyourAmigowillbepickedupanddeliveredattheboardinggate.ForadditionalHelpfulHintsforAirlineTravel,visitourwebsite at www.myamigo.com.
Transportation of batteriesFollow these steps for each product option below:
1. Lockseatinforwardpositionbymovingseatlockleverbackward.
2. Folddownseatbacktoseatcushion.
3. Lowerhandle/tillertorestonseatbackbyturningadjustmentlevercounter-clockwise. Turnadjustmentleverclockwisetotighten.
classic fd
disconnect batteries and leave under rear cover. recommendation: placeziplockbagoverbatterywires preventing damage and restricting airline from taping them down.
travelmate
Option 1: Removebatterycasefromhandle/tiller.Tuckinsideopening inbackofseat.Strapdowntillertoseatsnuglytorestrictmovement.
Option 2:Keepbatterycaseattachedtotiller.Strapdownbatterycase to tiller. strap tiller to seat snugly to restrict movement.
Public TransportationSomepublictransportationsystemshaveaccommodationsforyourAmigo,butyoumusttransfertoaseat.Whenutilizingpublictransportation, do not sit on your amigo while it is being lifted onto the vehicle, or once the vehicle is in motion.
sAfety WArninGsthe driving performance of your amigo can be influenced by electromagnetic fields, such as emitted by cellular telephones and other emitting devices. We recommend the power on your unit be switched off when using such a device. (refer to Electromagnetic Interference section for additional information)
• Insomeextremecircumstances,yourAmigo’sperformancecouldbeaffectedbytheelectromagneticfieldemitted from alarm systems in shops. (refer to Electromagnetic Interference section for additional information)
• TheProgramSettingsintheControllershouldnotbealteredasthismaygiveunsafedrivingcharacteristics.
BAttery inforMAtion And chArGinG instructionsbattery Information Formaximumrangeandlife,itisrecommendedtofullychargethebatteriesbeforeusing.Extendedcharging is good for the batteries and will not overcharge them. amigos have an overcharge protection feature so that the batteries can be charged anytime the amigo is not being used. it is a popular misconception that batteries should be deeply discharged before recharging. this is not the proper procedure for all batteries. they can actually be damaged if they are discharged too deeply before recharging.
battery range depends on driver weight, terrain, temperature and type of battery used. charge your batteriesdailywhentheAmigoisused.MakesurethattheChargerCordisunpluggedfromthewalloutlet before moving your amigo.batteries should be charged if the battery indicator light is blinkingwhileoperating.
YourBatteryIndicatorLightmayblinkprematurelywhenunderaheavypowerdemandsuchasanincline.Ifitispremature,itwillstopblinkingwhentheunitisstopped,andthepowerswitchiscycledtoOFFandbackON.Ifthiscycledoesnotstoptheblinking,itistimetorecharge.
Charging Instructions disconnect the battery power connector from the battery case. plug the small dc battery charge connector to theSocketontheBatteryCase.PlugtheACCordintotheWallOutlet.Thechargecyclestatusisindicatedbythe battery indicator light (led) on the charger. the led will glow orange or red to indicate charging has started. the batteries are fully charged when the led switches to green.
TheBatteryChargerisdesignedtoaccept90-240volts50or60HzACpowerinput. ThismakesitpossibletochargeonanyACelectricalsystemglobally.
www.myamigo.com 9 8 1-800-248-9131
option 2
321
Option1
Charging Frequency • ChargebatteriesdailywhentheAmigoisused.
• Ifnotinuseforalongperiodoftime,chargefor24hours,every30days.
• Extendedchargingisgoodforthebatteriesandwillnotoverchargethem.
Charger Standard Precautions • Refertotheseinstructionsfrequently.
• Eachtimeyouuseyourcharger,readandfollowinstructionsexactly.Workinginthevicinityofabatteryisdangerous. Batteriesgenerateexplosivegasesduringnormalbatteryoperation.
• Neversmokeorallowanopenflameinthevicinityofthebattery.
• UsechargerforchargingaLeadAcidBatteryonly.Itisnotintendedtosupplypowertoanextra-low-voltage electrical system or to charge dry cell batteries.
• Donotoperatechargerinaclosed-inareaorrestrictventilationinanyway.
• Asparknearthebatterymaycauseexplosion.
To reduce risk of spark: • Prevent external damage to AC and DC cords.
• When connecting charger, connect DC charging cord to the battery charge plug before connecting Charger AC cord to electrical outlet.
• When disconnecting charger, always do so in reverse sequence of connecting procedure. Break first connection as far away from battery as possible.
• Beextracautiousnottodropametaltoolontothebattery(ies).
• Removejewelry.
Failure to FolloW these saFety instructions may result in personal injury or property damage.
IFYOURBATTERIESAREDAMAGEDANDALEAKISAPPARENT,CALLYOURAUTHORIzEDDEALERIMMEDIATELY. UNDERNOCIRCUMSTANCESSHOULDYOUTOUCHTHEBATTERIESIFTHEYARELEAKING.
battery Storage if you remove your batteries from the battery case, put them on a surface that cannot be damaged by acid fumes. Whenever a batteryischargedanddischargedthroughacycle,itbreathes.Thebreathingofthebatteryemitsacidfumesandmaymarksurfaces it rests on for long periods of time.
store batteries indoors in a dry environment, away from any open flames. temperature range is 0˚C (32˚F) to 40˚C(104˚F).
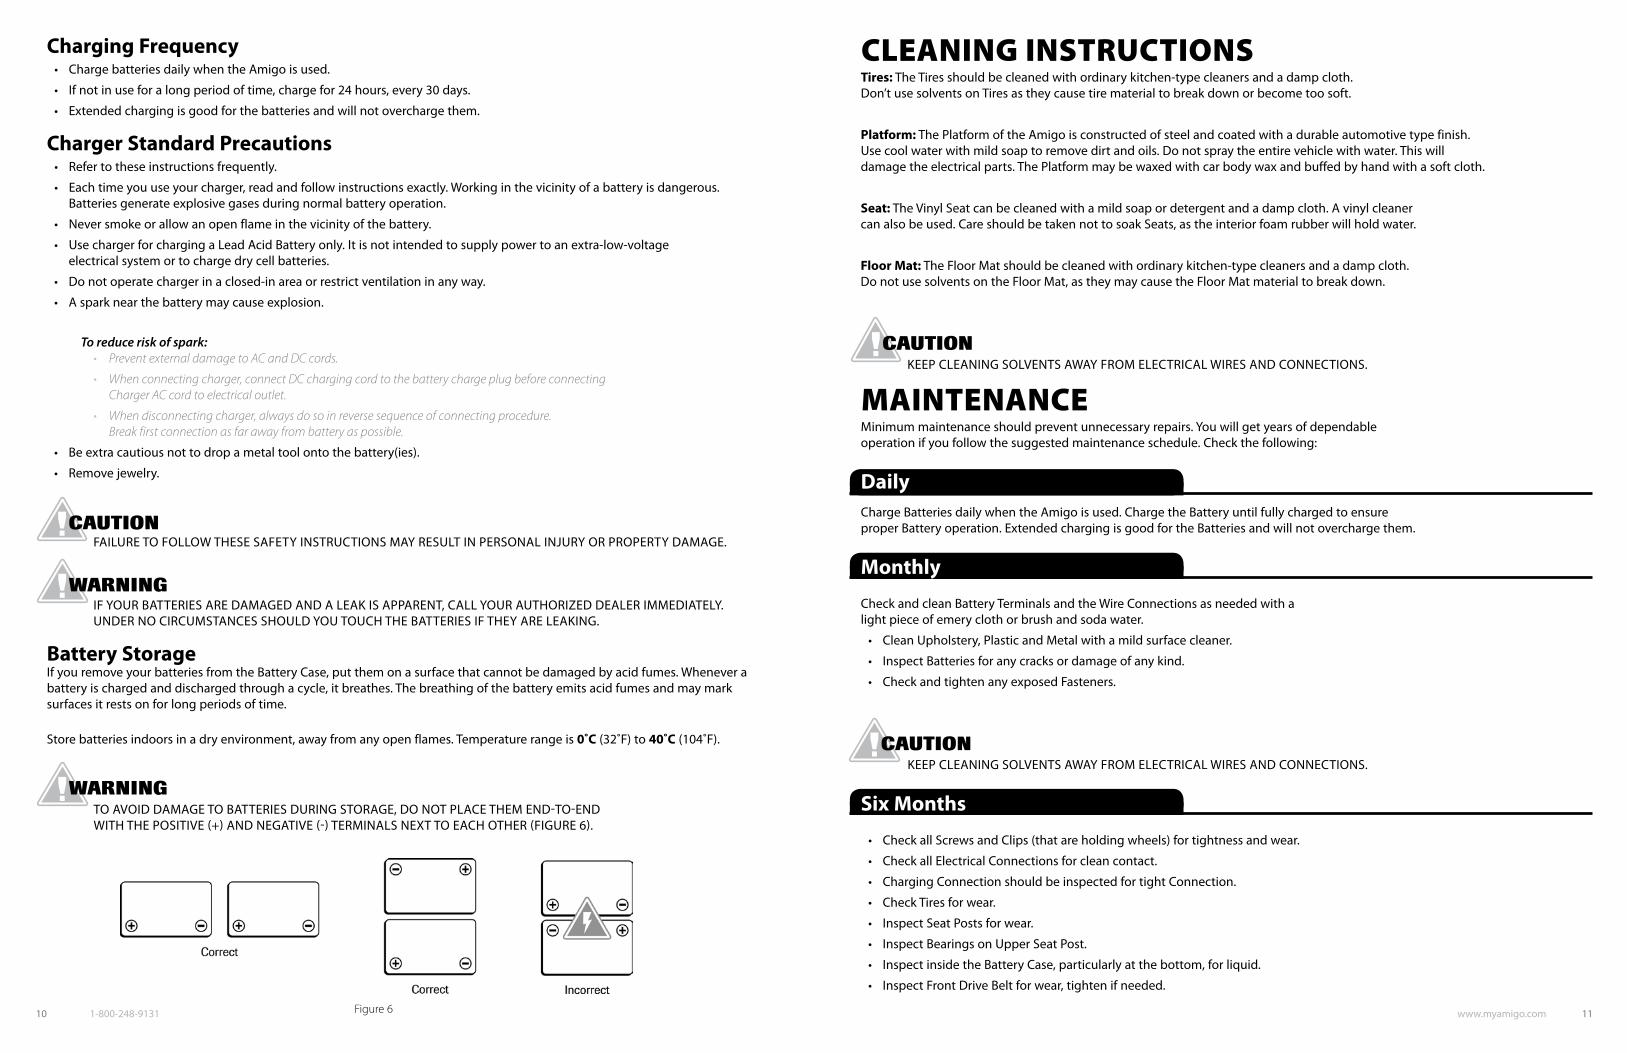
to avoid damage to batteries during storage, do not place them end-to-end WITHTHEPOSITIVE(+)ANDNEGATIVE(-)TERMINALSNExTTOEACHOTHER(FIGURE6).
cLeAninG instructionsTires:TheTiresshouldbecleanedwithordinarykitchen-typecleanersandadampcloth. Don’tusesolventsonTiresastheycausetirematerialtobreakdownorbecometoosoft.
Platform: the platform of the amigo is constructed of steel and coated with a durable automotive type finish. use cool water with mild soap to remove dirt and oils. do not spray the entire vehicle with water. this will damagetheelectricalparts.ThePlatformmaybewaxedwithcarbodywaxandbuffedbyhandwithasoftcloth.
Seat: the vinyl seat can be cleaned with a mild soap or detergent and a damp cloth. a vinyl cleaner canalsobeused.CareshouldbetakennottosoakSeats,astheinteriorfoamrubberwillholdwater.
Floor Mat:TheFloorMatshouldbecleanedwithordinarykitchen-typecleanersandadampcloth. DonotusesolventsontheFloorMat,astheymaycausetheFloorMatmaterialtobreakdown.
KEEPCLEANINGSOLVENTSAWAYFROMELECTRICALWIRESANDCONNECTIONS.
MAintenAnceminimum maintenance should prevent unnecessary repairs. you will get years of dependable operationifyoufollowthesuggestedmaintenanceschedule.Checkthefollowing:
Dailycharge batteries daily when the amigo is used. charge the battery until fully charged to ensure properBatteryoperation.ExtendedchargingisgoodfortheBatteriesandwillnotoverchargethem.
Monthly
CheckandcleanBatteryTerminalsandtheWireConnectionsasneededwitha light piece of emery cloth or brush and soda water.
• CleanUpholstery,PlasticandMetalwithamildsurfacecleaner.
• InspectBatteriesforanycracksordamageofanykind.
• CheckandtightenanyexposedFasteners.
KEEPCLEANINGSOLVENTSAWAYFROMELECTRICALWIRESANDCONNECTIONS.
Six Months
• CheckallScrewsandClips(thatareholdingwheels)fortightnessandwear.
• CheckallElectricalConnectionsforcleancontact.
• ChargingConnectionshouldbeinspectedfortightConnection.
• CheckTiresforwear.
• InspectSeatPostsforwear.
• InspectBearingsonUpperSeatPost.
• InspectinsidetheBatteryCase,particularlyatthebottom,forliquid.
• InspectFrontDriveBeltforwear,tightenifneeded.
Figure 6 www.myamigo.com 11 10 1-800-248-9131
Yearly • HaveyourAuthorizedServiceCentercheckyourAmigocompletely.
• GreaseandadjustFrontDriveChain.
• Checkseatlockforproperadjustments.
Battery Maintenancevrla (valve regulated lead acid) deep cycle batteries are used for operating your amigo. they are maintenance-free and are transportable on aircraft, buses, trains, etc. as there is no danger of spillage. ByfollowingtheChargerandBatteryprocedures,youcanexpectextendedbatterylife.
Fasteners ReplacementUseonlyGrade8(US)or12.9DIN(metric)inallapplications.Forserviceand replacementparts,werecommendAmigoauthorizedparts.
Microprocessor Controller (MPC)do not attempt to service the mpc or related electronic components, as this will void the warranty.
Fuse Replacement Instructionsan auto reset Fuse protects the wiring and battery in the event of a short circuit. if your amigo stops abruptly, wait10secondsforautomaticfusetoreset.Ifthefusedoesnotreset,checkforoverloadsorshortcircuits.
if you suspect the auto reset Fuse is defective, use a jumper wire between the two terminals of the fuse. if the amigo runs now, replace the auto reset Fuse.
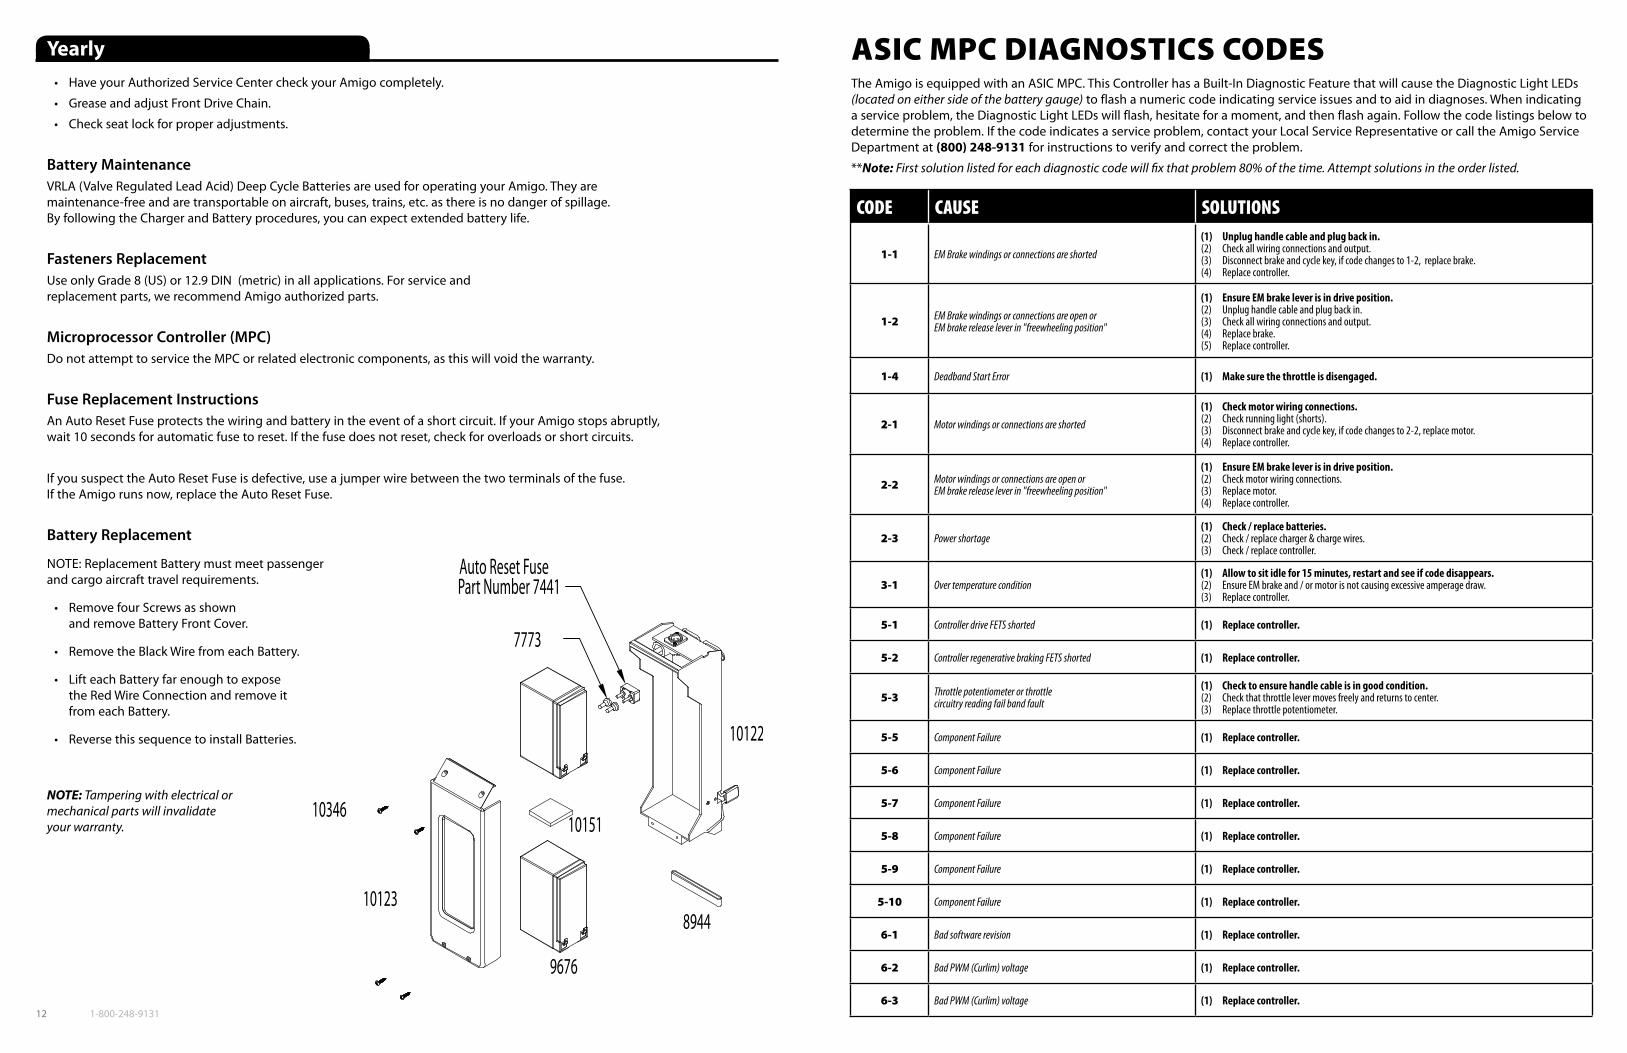
Battery Replacement
note: replacement battery must meet passenger and cargo aircraft travel requirements.
• RemovefourScrewsasshown and remove battery Front cover.
• RemovetheBlackWirefromeachBattery.
• LifteachBatteryfarenoughtoexpose the red Wire connection and remove it from each battery.
• ReversethissequencetoinstallBatteries.
NOTE: Tampering with electrical or mechanical parts will invalidate your warranty.
Asic MPc diAGnostics codesthe amigo is equipped with an asic mpc. this controller has a built-in diagnostic Feature that will cause the diagnostic light leds (located on either side of the battery gauge) to flash a numeric code indicating service issues and to aid in diagnoses. When indicating a service problem, the diagnostic light leds will flash, hesitate for a moment, and then flash again. Follow the code listings below to determine the problem. if the code indicates a service problem, contact your local service representative or call the amigo service department at (800) 248-9131 for instructions to verify and correct the problem.
**Note: First solution listed for each diagnostic code will fix that problem 80% of the time. Attempt solutions in the order listed.
12 1-800-248-9131
CODE CAUSE SOLUTIONS
1-1 EM Brake windings or connections are shorted
(1) Unplug handle cable and plug back in. (2) Check all wiring connections and output. (3) Disconnect brake and cycle key, if code changes to 1-2, replace brake. (4) Replace controller.
1-2 EM Brake windings or connections are open or EM brake release lever in "freewheeling position"
(1) Ensure EM brake lever is in drive position. (2) Unplug handle cable and plug back in. (3) Check all wiring connections and output. (4) Replace brake. (5) Replace controller.
1-4 Deadband Start Error (1) Make sure the throttle is disengaged.
2-1 Motor windings or connections are shorted
(1) Check motor wiring connections. (2) Check running light (shorts). (3) Disconnect brake and cycle key, if code changes to 2-2, replace motor. (4) Replace controller.
2-2 Motor windings or connections are open or EM brake release lever in "freewheeling position"
(1) Ensure EM brake lever is in drive position. (2) Check motor wiring connections. (3) Replace motor. (4) Replace controller.
2-3 Power shortage(1) Check / replace batteries. (2) Check / replace charger & charge wires. (3) Check / replace controller.
3-1 Over temperature condition(1) Allow to sit idle for 15 minutes, restart and see if code disappears. (2) Ensure EM brake and / or motor is not causing excessive amperage draw. (3) Replace controller.
5-1 Controller drive FETS shorted (1) Replace controller.
5-2 Controller regenerative braking FETS shorted (1) Replace controller.
5-3 Throttle potentiometer or throttle circuitry reading fail band fault
(1) Check to ensure handle cable is in good condition. (2) Check that throttle lever moves freely and returns to center. (3) Replace throttle potentiometer.
5-5 Component Failure (1) Replace controller.
5-6 Component Failure (1) Replace controller.
5-7 Component Failure (1) Replace controller.
5-8 Component Failure (1) Replace controller.
5-9 Component Failure (1) Replace controller.
5-10 Component Failure (1) Replace controller.
6-1 Bad software revision (1) Replace controller.
6-2 Bad PWM (Curlim) voltage (1) Replace controller.
6-3 Bad PWM (Curlim) voltage (1) Replace controller.
WirinG diAGrAMseLectroMAGnetic interference
radio Wave sources may aFFect poWered mobile vehicle control.
electromagnetic Interference (eMI) From Radio Wave Sourcespowered vehicles may be susceptible to electromagnetic interference (emi), which is interfering electromagnetic energy (emi) emitted from sources such as radio stations, tv stations, amateur radio (ham) transmitters, two-way radios and cellularphones.Theinterference(fromradiowavesources)cancausethepoweredvehicletoreleaseitsbrakes, movebyitself,ormoveinunintendeddirections.Itcanalsopermanentlydamagethepoweredvehicle’scontrolsystem. the intensity of the interfering emi energy can be measured in volts per meter (v/m). each powered vehicle can resist emi up to a certain intensity. this is called its “immunity level.” the higher the immunity level, the greater the protection. at this time, current technology is capable of achieving at least a 20 v/m immunity level, which would provide useful protection fromthemorecommonsourcesofradiatedEMI.Theimmunitylevelofthispoweredvehicleisnotknown.
there are a number of sources of relatively intense electromagnetic fields in the everyday environment. Someofthesesourcesareobviousandeasytoavoid.Othersarenotapparentandexposureisunavoidable. However,webelievethatbyfollowingthewarningslistedbelow,yourrisktoEMIwillbeminimized.
The sources of radiated eMI can be broadly classified into three types:1. handheld portable transceivers (transmitters-receivers) with antenna mounted directly on the transmitting unit. Examplesinclude:citizensband(CB)radios,“walkietalkie,”security,fireandpolicetransceivers, cellular telephones and other personal communication devices.
Note: Some cellular telephones and similar devices transmit signals while they are ON, even when not being used.
2. Medium-rangemobiletransceivers,suchasthoseusedinpolicecars,firetrucks,ambulancesandtaxis. these usually have the antenna mounted on the outside of the vehicle; and
3. long-range transmitters and transceivers, such as commercial broadcast transmitters (radio and tv broadcast antenna towers) and amateur (ham) radios.
Note: Other types of handheld devices, such as cordless phones, laptop computers, AM/FM radios, TV sets, CD players and cassette players and small appliances such as electric shavers and hair dryers, so far as we know, are not likely to cause EMI problems to your powered vehicle.
Powered Vehicle electromagnetic Interference (eMI)because emi energy rapidly becomes more intense as one moves closer to the transmitting antenna (source), the emi fields from handheld radio wave sources (transceivers) are of special concern. it is possible to unintentionally bring high levels of emi energy veryclosetothepoweredvehicle’scontrolsystemwhileusingthesedevices.Thiscanaffectpoweredvehiclemovementandbraking.Therefore,thewarningslistedbelowarerecommendedtopreventpossibleinterferencewiththecontrolsystem of the powered vehicle.
Warningselectromagnetic interference (emi) from sources such as radio stations, tv stations, amateur radio (ham) transmitters, two-way radios and cellular phones, can affect electric vehicles. Following the warnings listed below should reduce the chanceofunintendedbrakereleaseormobilevehiclemovement,whichcouldresultinseriousinjury.
1. DONOToperateorturnONhandheldpersonalcommunicationdevices,suchasCitizensBand(CB)radios and cellular phones while the vehicle is turned on.
2. be aware of nearby transmitters, such as radio or tv stations and try to avoid coming close to them.
3. Ifunintendedmovementorbrakereleaseoccurs,turnthevehicleoffassoonasitissafe.
4. Beawarethataddingaccessoriesorcomponentsormodifyingthevehiclemaymakeitmore susceptible to interference from radio wave sources.
Note: There is no easy way to evaluate their effect on the overall immunity of the vehicle.
5. Reportallincidentsofunintendedmovementorbrakereleasetothemobilevehiclemanufacturer, and note whether there is a source of emi nearby.
Important Information1. 20 volts per meter (v/m) is a generally achievable and useful immunity level against emi (asofMay1994).Thehigherthelevel,thegreatertheprotection.
2. Theimmunitylevelofthisproductisnotknown.
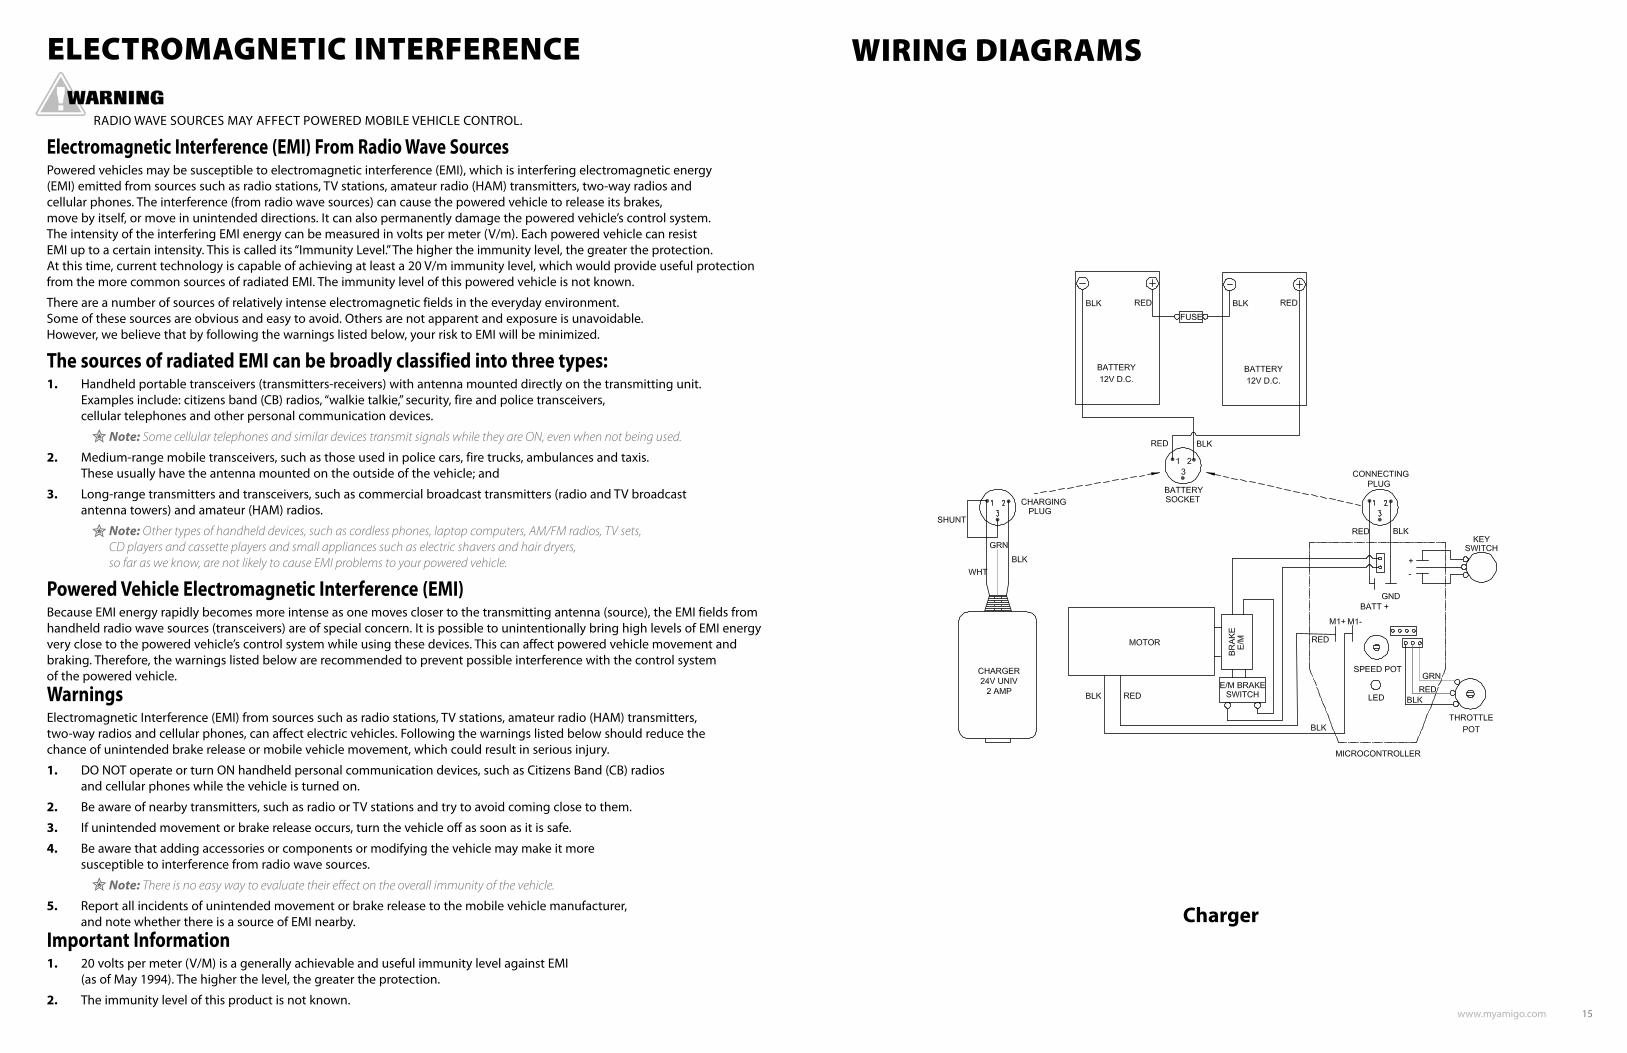
Charger
www.myamigo.com 15
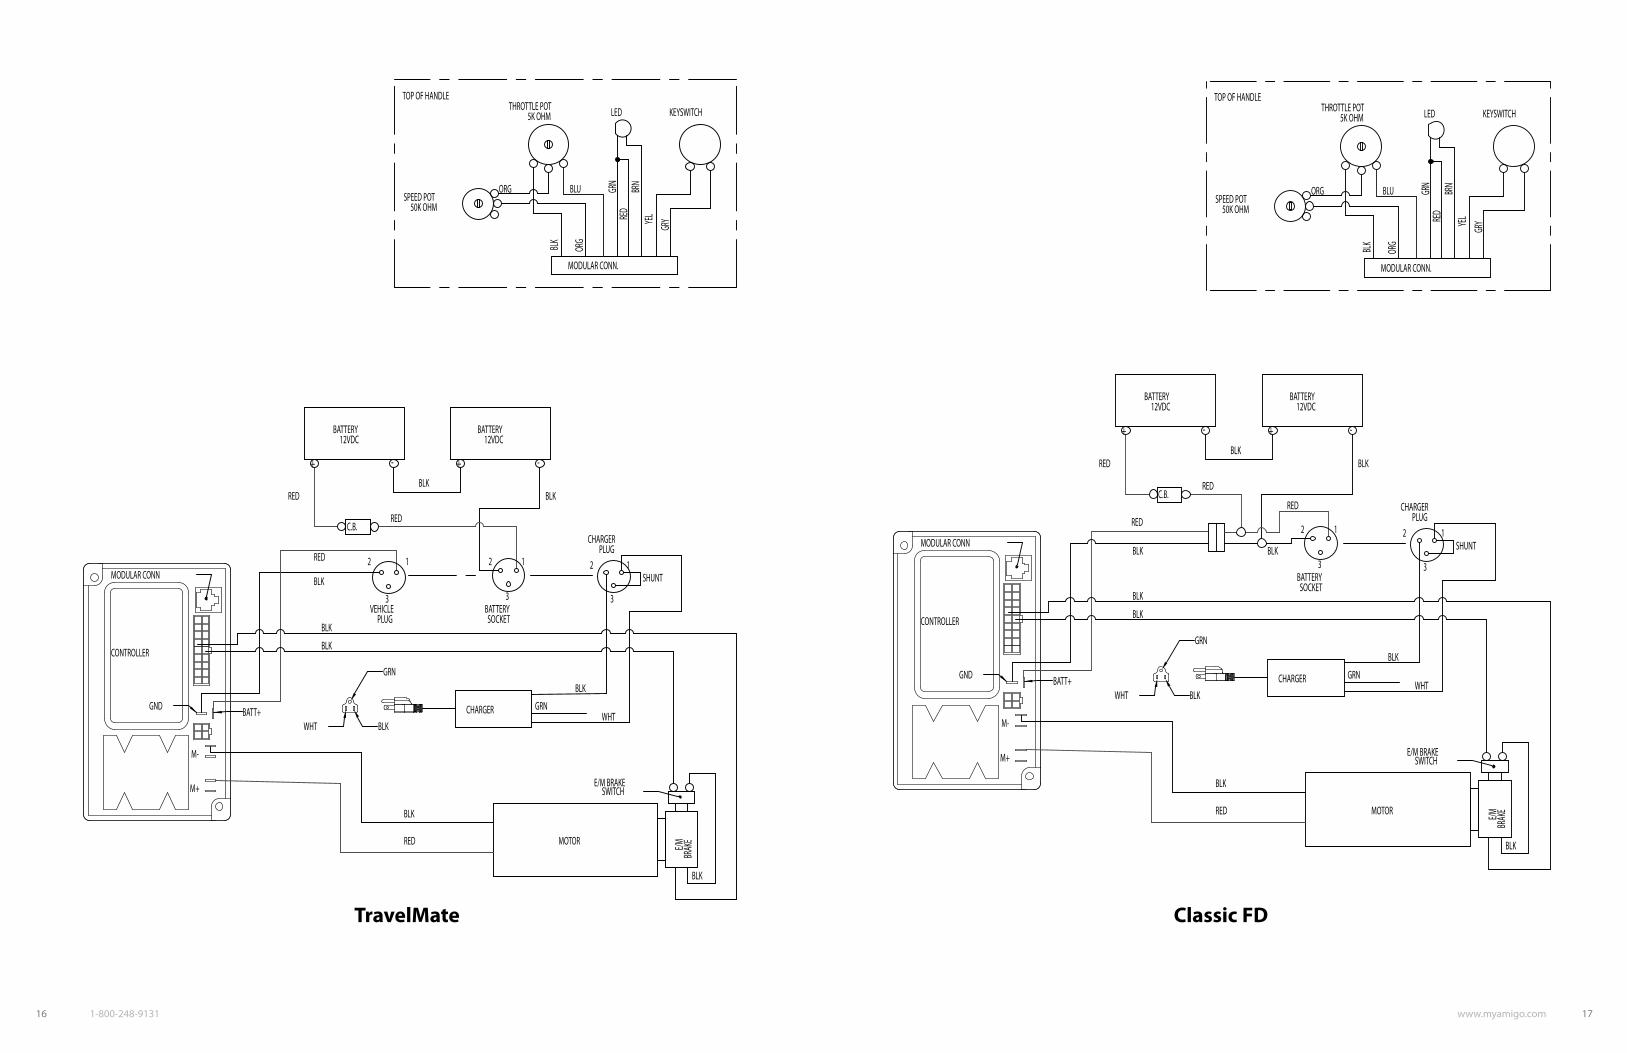
TravelMate Classic FD
www.myamigo.com 17 16 1-800-248-9131
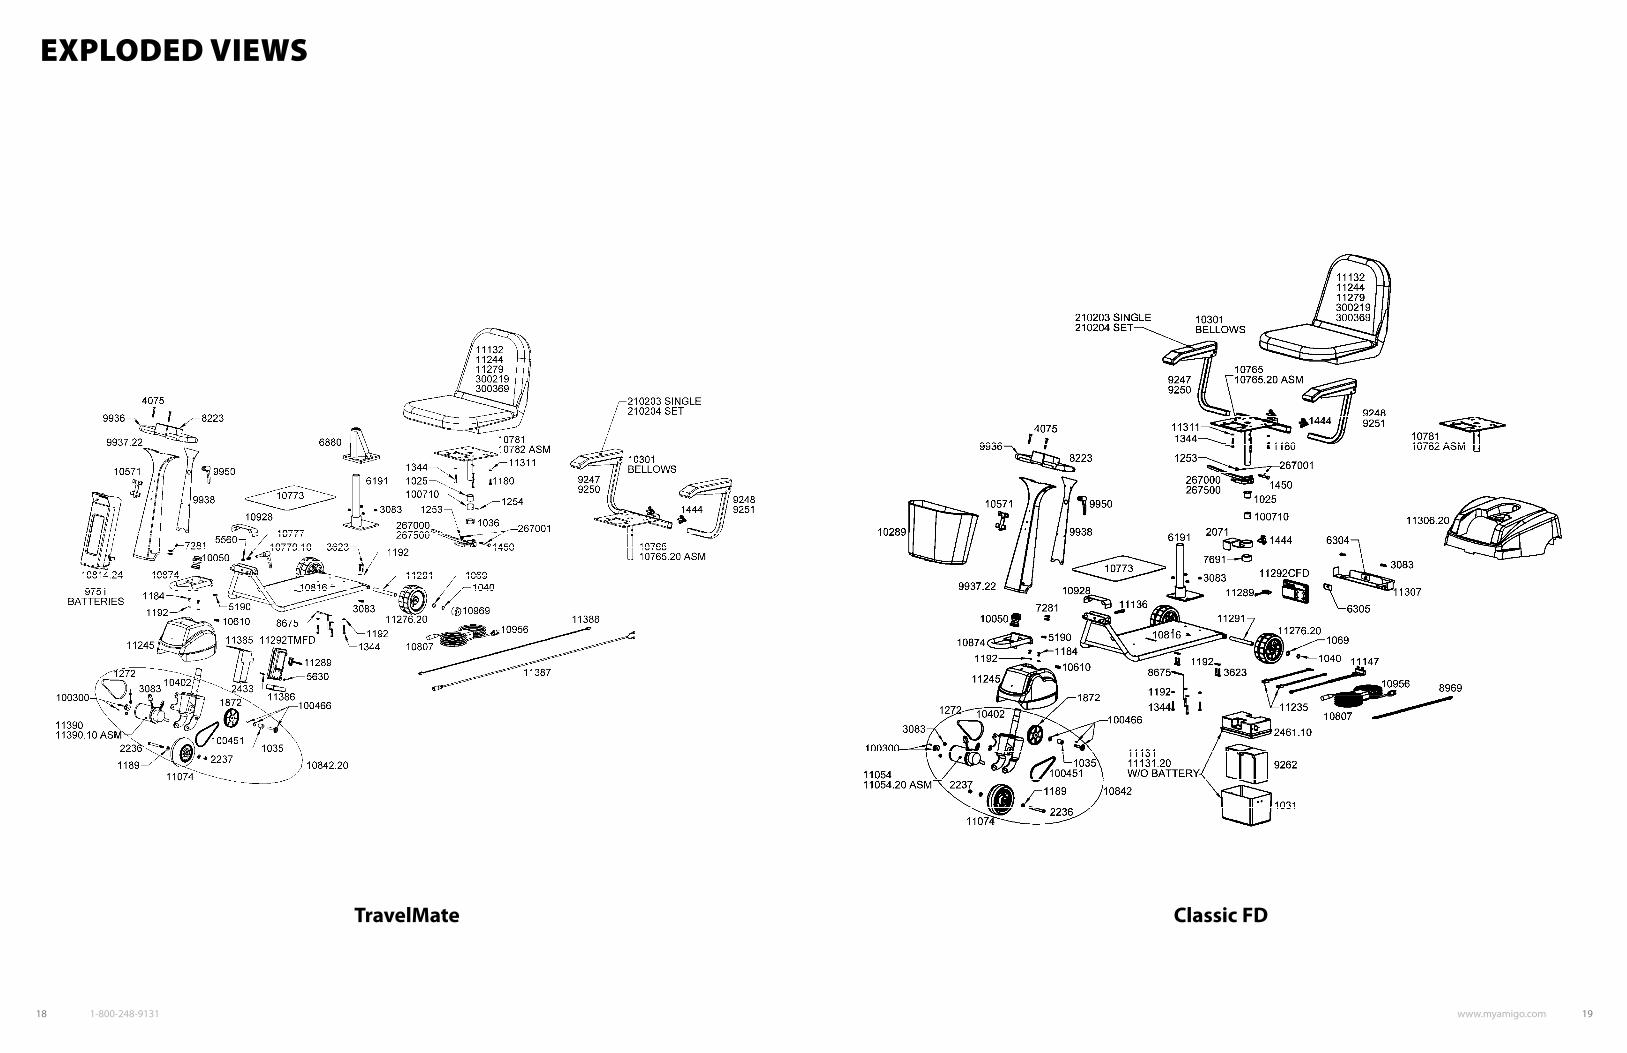
exPLoded vieWs
TRAVELMATE #580001 (EXPLODED VIEW) NOVEMBER 15, 2009 – PRESENT
CLASSIC FD #113001 (EXPLODED VIEW) OCTOBER 12, 2009 – PRESENT
AMI0114436 - PRESENT
TravelMate Classic FD
www.myamigo.com 19 18 1-800-248-9131

PArts Lists
TRAVELMATE #580001 PARTS LIST – NOVEMBER 15, 2009 – PRESENT
Part # Description Qty/unit Part # Description Qty/unit1025 Bushing w/ Shoulder 1 3/16 OD x 1 1/16 Lg 1 10610 Grommet 7/8" Groove Dia 5/8" ID 1 1035 Bushing, Jackshaft 1 10765 Seat Post, Upper w/ Arms 1 1036 Collar Stem 1 10765.20 Seat Post Asm, Upper w/ Accessory Adapter 1 1040 Retainer Snap Ring 2 10773 Mat, Standard 1 1069 Washer, Shim, 7/8 OD x .016 Thick 4 10777 Spring, 1/2 OD x 1 1/4 Lg 1 1180 Screw, Hex Head, 1/4-20 x 1 Lg 2 10779.10 Lever, Platform Detachment 3/8-16 x 2 Lg 1 1184 Screw, Truss Head, 1/4-20 x 1/2 Lg 2 10781 Post Upper Seat w/o Arms 1 1189 Washer, Cone Lock, 3/4 OD x 3/8 ID 2 10782 Post Asm Upper Seat w/o Arms 1 1192 Washer, Flat, 5/8 OD x 9/32 ID x .06 Thick 10 10807 Charger 1.5 Amp 24V Soneil 1 1253 Nut, Hex Head, Keps, 5/16-18 1 10814.24 Battery Case Asm 24V 1 1254 Pin, Roll, 1/8 OD x 1 1/8 Lg 1 10816 Platform Asm Travel Mate FD 1 1272 Belt, Gear Type 1 10842.20 Drive Head 13 Tooth 1 1344 Screw, Hex Head, 1/4-20 x 1.5 Lg 6 10874 Weldment Front Platform 1 1444 Knob, Arm Adjustment (Arms Only) 2 10928 Cover Connection 1 1450 Screw, Hex Head, 5/16-18 X 2.5 Lg 1 10956 AC Cord 1 1872 Pulley, Driven, 60 Tooth 1 10969 Cap, Wheel 2 2236 Screw, Hex Head, 3/8-24 x 1.5 Lg 1 11074 Wheel Asm, Front 6" 1 2237 Nut, Hex Head, 3/8-24 1 11132 Seat Black/Grey Travel 1 2433 Screw, Phillips, #8-32 x 1 1/4 Lg 1 11244 Seat Asm, Travel, Yellow & Black 1 3083 Nut, Hex Serrated Flange, 1/4-20 10 11245 Wheelhousing Black 1 3623 Screw, Hex Head, 1/4-20 x 1 1/4 Lg 4 11276.20 Wheel Asm, Rear 6" x 2.5" 2 4075 Screw, Flat Head Cap, 1/4-20 x 2 Lg 2 11279 Seat Asm, Travel, Red & Black 1 5190 Screw, Socket Head Cap, 1/4-28 x 3/4 Lg 1 11289 Wire Asm Interface, Controller 1 5560 Nut, Hex Head Nylon Insert 3/8-16 1 11291 Axle 2 5630 Nut, Hex Head, Keps, #8-32 1 11292TMFD Controller CS1108S-1 Standard 1 6191 Seat Post Weldment, Lower 1 11311 Washer, Lock, 1/4 OD 4 6880 Boot, Lower Seat Post 1 11385 Bracket, Controller 1 7281 Screw, Socket Head Cap, 1/4-20 x 7/8 Lg 2 11386 Cover, Controller Shield 1 8223 Enclosure, Hi/Lo 1 11387 Wire Asm Battery Pack to Controller 1 8675 Ground Wire Asm 1 11388 Cable, MPC Handle Control 1 9247 Arm Asm, Right, Removeable 1 11390 Motor w/ Brake 1 9248 Arm Asm, Left, Removeable 1 11390.10 Motor/Pulley Asm 1 9250 Arm Asm 2" Higher, Right, Removeable 1 100300 Pulley and Roll Pin 1 9251 Arm Asm 2" Higher, Left, Removeable 1 100451 Chain, Drive 1 9751 Battery, 12 Volt, 7.5 Ahr 2 100466 Jackshaft, Key, and Washer 1 9855 Arm Asm Set Flip-Up Adjustable Standard 1 100710 Bushing 1 3/16 OD x 1 Lg 1 9936 Handle, Upper 1 210203 Arm Pad Single Molded 2
9937.22 Handle Asm, Black Ez Tilt 1 210204 Arm Pad Pair Molded 1 9938 Back Plate Standard Ez Tilt 1 267000 Seat Lock Asm, RH 1 9950 Lever, Handle Adjustment 1 267001 Stem Collar Screw & Nut 1
10050 Bearing Set 1 267500 Seat Lock Asm, LH 1 10301 Bellows, Cover, Arm Rest 2 300219 Seat Asm, Premier I Grey 1 10402 Fork Weldment FD 1 300369 Seat Asm, Premier I Black 1 10571 Basket, Bracket 1
November 2009
CLASSIC FD #113001 PARTS LIST – OCTOBER 12, 2009 – PRESENT
Part # Description Qty/unit Part # Description Qty/unit1025 Bushing w/ Shoulder 1 3/16 OD x 1 1/16 Lg 1 10402 Fork Weldment Classic FD 1 1031 Battery Case Bottom 1 10571 Basket, Bracket 1 1035 Bushing, Jackshaft 1 10610 Grommet 7/8" Groove Dia 5/8" ID 1 1040 Retainer Snap Ring 2 10765 Seat Post, Upper w/ Arms 1 1069 Washer, Shim, 7/8 OD x .016 Thick 4 10765.20 Seat Post Asm, Upper w/ Accessory Adapter 1 1180 Screw, Hex Head, 1/4-20 x 1 Lg 2 10773 Mat, Standard 1 1184 Screw, Truss Head, 1/4-20 x 1/2 Lg 2 10781 Post Upper Seat w/o Arms 1 1189 Washer, Cone Lock, 3/4 OD x 3/8 ID 2 10782 Post Asm Upper Seat Classic w/o Arms 1 1192 Washer, Flat, 5/8 OD x 9/32 ID x .06 Thick 10 10807 Charger 1.5 Amp 24V Soneil 1 1253 Nut, Hex Head, Keps, 5/16-18 1 10816 Platform Asm Classic FD 1 1272 Belt, Gear Type 1 10842 Drive Head 13 Tooth 1 1344 Screw, Hex Head, 1/4-20 x 1.5 Lg 6 10874 Weldment Front Platform Classic 1 1444 Knob, Arm Adjustment (3 w/ Arms) 1 10928 Cover Classic Connection 1 1450 Screw, Hex Head, 5/16-18 X 2.5 Lg 1 10956 AC Cord 1 1872 Pulley, Driven, 60 Tooth 1 11054 Motor w/ Brake 1 2071 Bracket Battery Hold Down PSL 1 11054.20 Motor/Pulley Asm 1 2236 Screw, Hex Head, 3/8-24 x 1.5 Lg 1 11074 Wheel Asm, Front 6" 1 2237 Nut, Hex Head, 3/8-24 1 11131 Battery Case Asm 24V 1
2461.10 Battery Case Top w/ Neutrik Plug 1 11131.20 Battery Case w/o Batteries 1 3083 Nut, Hex Serrated Flange, 1/4-20 10 11132 Seat Black/Grey Travel 1 3623 Screw, Hex Head, 1/4-20 x 1 1/4 Lg 4 11136 Screw, Socket Head Cap, 3/8-16 x 2 Lg 1 4075 Screw, Flat Head Cap, 1/4-20 x 2 Lg 2 11147 Wire Asm Battery Pack to Controller 1 5190 Screw, Socket Head Cap, 1/4-28 x 3/4 Lg 1 11235 Wire Asm, Brake/Motor to Controller 1 6191 Seat Post Weldment, Lower 1 11244 Seat Asm, Travel, Yellow & Black 1 6304 Velcro Dual Lock 400/In 1 11245 Wheelhousing Black 1 6305 Velcro Dual Lock 170/In 1 11276.20 Wheel Asm, Rear 6" x 2.5" 2 6898 Tie Rip-Black (#L6-001) 1 11279 Seat Asm, Travel, Red & Black 1 7281 Screw, Socket Head Cap, 1/4-20 x 7/8 Lg 2 11289 Wire Asm Interface, Controller 1 7691 Insert PSL To Std Holding Bracket 1 11291 Axle 2 8223 Enclosure, Hi/Lo 1 11292CFD Controller CS1108S-1 Standard 1 8675 Ground Wire Asm 1 11306.20 Cover, Rear, Classic FD 1 8969 Cable, MPC Handle Control 1 11307 Handle, Classic FD 1 9247 Arm Asm, Right, Removeable 1 11311 Washer, Lock, 1/4 OD 4 9248 Arm Asm, Left, Removeable 1 100300 Pulley and Roll Pin 1 9250 Arm Asm 2" Higher, Right, Removeable 1 100466 Jackshaft, Key, and Washer 1 9251 Arm Asm 2" Higher, Left, Removeable 1 100451 Chain, Drive 1 9262 Battery, 12 Volt, 11 AH 2 100710 Bushing 1 3/16 OD x 1 Lg 1 9855 Arm Asm Set Flip-Up Adjustable Standard 1 210203 Arm Pad Single Molded 2 9936 Handle, Upper 1 210204 Arm Pad Pair Molded 1
9937.22 Handle Asm, Black Ez Tilt 1 267000 Seat Lock Asm, RH 1 9938 Back Plate Standard Ez Tilt 1 267001 Stem Collar Screw & Nut 1 9950 Lever, Handle Adjustment 1 267500 Seat Lock Asm, LH 1 10050 Bearing Set 1 300219 Seat Asm, Premier I Grey 1 10289 Basket, Front 1 300369 Seat Asm, Premier I Black 1 10301 Bellows, Cover, Arm Rest 2
October 2009
TravelMate #580001 – November 15, 2009 to Present Classic FD #113001 – October 12, 2009 to Present
www.myamigo.com 21 20 1-800-248-9131

notesdate remark
date remark
date remark
date remark
date remark
date remark
date remark
WArrAntyamigo® brand product Warranty Effective July 9, 2003
amigo mobility international, inc. (ami) warranties the original completed unit it manufactures to the original purchaser.
1. Structuralcomponentsincludingplatform,frameandseatpost,havealifetimewarranty againstdefectsinmaterialsandworkmanship.
2. Transaxle,motor,controllerandbatterycharger,arewarrantedagainstdefectsinmaterials andworkmanshipfortwo(2)years.
3. Seatsandothercomponentshaveaone(1)yearwarrantyagainstdefectsinmaterialsandworkmanship. cuts and tears in seats are not covered by warranty.
4. ami warranties batteries supplied from its factory. ami factory-supplied batteries carry amigo brand labels. Aone(1)yearbatterywarrantyfromthedateofpurchaseappliesagainstthebatterymanufacturer'sdefects inworkmanshipormaterials(freightnotincludedaftersixmonths).Damagecausedbybatterymoisture, spillage,orleakageisexclusiveofwarranty.Whenremovingabattery,alwayssetoncardboard or newspapers to avoid damage.
5. WeightRestrictions:Useofaproductbypersonsexceedingthespecifiedloadcapacity for that model is not recommended and voids warranty.
6. Aftersixty(60)days,laborwillbechargedonwarrantyrepairs,exceptwherelawprohibits.
7. Itemsreplacedunderwarranty,arecoveredbytheoriginalwarranty. (Warrantyreplacementdoesnotextendthewarrantyperiod.)
8. ami is obligated to repair or replace products or parts returned by the purchaser, and found to be defective under warranty at its headquarters in bridgeport, michigan.
9. Forunitandparts,thiswarrantydoesnotcoveraccidentaldamage,misuse,normalwearandtear, such as led lights, electrical and mechanical switches, wires, belts, chains and resistors, or use of products for other than personal purposes. damage during shipment is not covered by the warranty.
10. Ifinspectiondeterminesthatareturnedpartorunitisfullyfunctional,itwillbereturnedatthe expenseoftheowner.Openingsealedcomponentswillvoidthewarranty.
11. Accessoriesandpartsthatarenotapartoftheoriginalcompletedunit,orrebuiltunits, willhaveaone(1)yearwarrantyagainstdefectsinmaterialsandworkmanship.
Thiswarrantybeginswhentheunitissoldtotheoriginalowner.Ifwarrantyinformation,suchasowner’sname,serialnumber or date of purchase is not available, then ami will use the production date of the unit as the effective warranty date.
Thiswarrantysupersedesandisinlieuofallotherwarranties,expressedorimplied,andnoperson,agentordealeris authorizedtogiveanywarrantiesonbehalfofAMI,nortoassumeforAMIanyotherliabilityconcerninganyofits productsunlessmadeinwritingandsignedbyanofficialofAMI.Anyunauthorizedrepairormodificationwill void this warranty and release ami from any liability.
this warranty gives you specific rights, with the possibility of other rights, which vary depending upon your locality.
22 1-800-248-9131

AMiGo MoBiLity internAtionAL, inc.6693DixieHighway,Bridgeport,MI48722-9725
Phone(800)248-9131•Fax(800)334-7274•www.myamigo.com
©2010AmigoMobilityInternational,Inc.Amigo®isatrademarkofAmigoMobilityInternational,Inc•M1980-10