active sky 2012 user’s guide - · pdf fileactive sky 2012 user’s guide ......
TRANSCRIPT

User’s Guide

ACTIVE SKY 2012 USER’S GUIDE
© 2011 HiFi Technologies, Inc. 1
Active Sky 2012 is designed and created by Damian Clark. Active Sky 2012 Graphics Content is created
by Chris Willis. © 2011 HiFi Technologies, Inc. All Rights Reserved.
No portion of this document may be modified, reproduced or redistributed without prior written
consent of HiFi Technologies, Inc.
Please refer to the accompanying LICENSE.RTF file which includes the End User License Agreement for
this product. Installation and use of this product indicates acceptance of the End User License
Agreement.

ACTIVE SKY 2012 USER’S GUIDE
© 2011 HiFi Technologies, Inc. 2
Table of Contents
Introduction .................................................................................................................................................. 4
The Important Stuff .................................................................................................................................. 6
FSX Limitations ...................................................................................................................................... 6
Haze Layer Elimination .......................................................................................................................... 6
Fog Layers ............................................................................................................................................. 6
Winds Aloft ........................................................................................................................................... 7
Direct Weather Control ......................................................................................................................... 7
Depiction Modes ................................................................................................................................... 7
Visual Artifacts ...................................................................................................................................... 8
Interpolation ......................................................................................................................................... 8
FSUIPC ................................................................................................................................................... 8
S-Turns .................................................................................................................................................. 9
Getting Started ............................................................................................................................................ 10
Configuring Flight Simulator X ................................................................................................................ 10
Configuring FSUIPC (Optional) ................................................................................................................ 12
Using Active Sky 2012 ................................................................................................................................. 13
Startup Order Recommendations ........................................................................................................... 13
The Active Sky 2012 User Interface ........................................................................................................ 14
Program Controls ................................................................................................................................ 14
Main Status Indicators ........................................................................................................................ 15
Navigation Buttons and Screens ............................................................................................................. 16
Status .................................................................................................................................................. 16
Map ..................................................................................................................................................... 17
Flight Plan ............................................................................................................................................ 23
Graphics .............................................................................................................................................. 27
Snapshots ............................................................................................................................................ 39
Wx Report ........................................................................................................................................... 42
Met/Reps ............................................................................................................................................ 44
Historical ............................................................................................................................................. 46

ACTIVE SKY 2012 USER’S GUIDE
© 2011 HiFi Technologies, Inc. 3
Edit Wx ................................................................................................................................................ 48
Find Wx ............................................................................................................................................... 52
Wx Options .......................................................................................................................................... 54
Additional Navigation Buttons ................................................................................................................ 70
Save Wx, Open Wx .............................................................................................................................. 70
Refresh ................................................................................................................................................ 70
Help ..................................................................................................................................................... 70
Start FSX .............................................................................................................................................. 70
Voice Features......................................................................................................................................... 71
Creating Voice Sets ............................................................................................................................. 72
XGauge and XGauge Installation Wizard .................................................................................................... 74
METAR and TAF Coding ............................................................................................................................... 81
Technical Guides ......................................................................................................................................... 86
SimConnect Troubleshooting .................................................................................................................. 86
Networked Simulation Configuration ..................................................................................................... 88
Credits ......................................................................................................................................................... 93

ACTIVE SKY 2012 USER’S GUIDE
© 2011 HiFi Technologies, Inc. 4
Introduction
Welcome to Active Sky 2012!
Active Sky 2012 was built for flight simulation enthusiasts who value realism. From the very conception
of the Active Sky Weather Engine in 2001, Realism has been our number one focus. Throughout the
years we have expanded the product from simple weather generation to full-fledged interactive
weather environment simulation including planning, mapping, graphics enhancements and advanced air
effects. Active Sky 2012 represents the latest culmination of our developments and brings several
brand new features we are proud to introduce:
Over 16GB of High-Definition Graphics Texture Enhancements (uncompressed size)
User-Recoloring capability for all Clouds, Water, and Sky textures
Enhanced Flight Planning with Integrated Mapping, Auto Route Building, Graphical Waypoint
Editing and Plan Export capability
Updated and Enhanced Weather Engine
New Stratocumulus Simulation
Improved Thunderstorm and Hurricane Depiction
Improved Fog Layer Simulation and Low-Visibility Depiction
New User Interface Design
XGauge In-Flight Radar and Weather Display System
Universal Graphics Add-on Integration with Weather-Influenced Support
Active Sky 2012 includes all the major functionality and features of previous Active Sky versions:
Exclusive Snapshot System with Auto Generation
Advanced weather engine and depiction system for Flight Simulator X
Accurate global winds aloft simulation with 60x60 nm forecast data resolution
Direct Weather Control system for accurate winds aloft, smoothing and local ambient weather
depiction
Dedicated Private Server System
Online real-time or offline usage
Historical Weather Access (for the past 3 years)
Hurricane Simulation
Visual Mapping System
Included XGauge in-flight weather display gauge
Included XGauge Wizard gauge installation tool
Advanced air effects including Wake Turbulence, Thermals and Up/Down Drafts
Editable Station Databases
Voice ATIS and FlightWatch weather reports

ACTIVE SKY 2012 USER’S GUIDE
© 2011 HiFi Technologies, Inc. 5
Comprehensive Flight and Weather Planning, Route Briefing and .PLN Import Support
Manual Weather Configuration Utility
Weather Finder tool to locate any kind of weather conditions
Universal Graphics add-on compatibility
Much, much more!

ACTIVE SKY 2012 USER’S GUIDE
© 2011 HiFi Technologies, Inc. 6
The Important Stuff
If you’re not inclined to read this User Guide in its entirety, please do at least take the time to read
through this chapter for very important information regarding Active Sky 2012.
FSX Limitations
FSX has a few limitations and bugs in its weather depiction and interpolation processes. These
limitations should be understood, so that your results given certain options or processes become more
expected, and so that you can better tune FSX and AS2012 for the best experience possible given your
individual needs. These limitations are discussed in the following categories:
Haze Layer Elimination
The haze layer in FSX, by default, is an effect which places a view of a semi-opaque cirrus overcast
texture near the surface. The lower the visibility, the more opaque the layer is shown, but only up to a
fairly-thin maximum. At the outer edges of your scenery view, at approximately 50 miles, the effect is
“rounded” around your location, so that this layer appears as a “ring” of haze which follows the aircraft.
Many users find this effect undesirable, and in AS2012 we have automatically removed the haze layer In
all integrated Cirrus cloud graphics. This automatic removal of the haze layer provides a more
consistent experience and prevents problems when using other graphics add-ons in conjunction with
AS2012.
Fog Layers
Since the haze layer is removed, there is no external depiction of low visibility automatically provided
(you will not see haze when looking down from above). Instead, Fog Layer Generation is provided
(option), which has been enhanced for AS2012. This injects an automatic cloud layer near the surface
when the visibility is reported less than 3SM, providing a visual representation of “fog” when viewed
from above. New options in AS2012 include “Use Stratus for Fog Layer Generation”, which can
customize the appearance of these generated fog cloud layers. When checked, stratus clouds will be
used (instead of cumulus), which provides better coverage in most circumstances.

ACTIVE SKY 2012 USER’S GUIDE
© 2011 HiFi Technologies, Inc. 7
Winds Aloft
FSX’s internal wind interpolation processes are known to be problematic. Wind directions can instantly
shift and depict incorrect values up to 180 degrees off. Through much effort of research and trial and
error, we have found a means of providing accurate directions and preventing most shifts. This solution
for winds aloft, when coupled with the realistic global forecast winds data in AS2012, provides the most
realistic experience for high-altitude flight, and is the only known way to achieve accurate planning and
depiction of winds aloft. This solution, however, does have some specific considerations. Direct
Weather Control, as we call it, provides a “full force” of FSX’s ambient weather conditions defined by
AS2012. This requires using the “global” weather mode of FSX’s internal weather engine, and using
proprietary techniques to inject correct ambient wind, visibility, temperature and barometric pressure
along with a semi-station-based cloud depiction. Direct Weather Control is turned on by default.
Direct Weather Control
There are important considerations when using Direct Weather Control, since this mode controls global
ambient weather conditions at all times. The first consideration is that FS ATIS (and the FSX wx screens)
will be reporting a single global ambient set of conditions that exist at your aircraft’s position and
altitude. This includes your high-speed winds aloft. FS ATIS will not report the actual surface conditions
that will be depicted. In order to receive actual surface conditions, the AS2012 ATIS/Flightwatch Voice
features should be used, by setting your COM radio to 122.00 or 122.02. Second, your cloud depiction
will be mostly “generalized” for the current given set of conditions (i.e. you may not see a cloud buildup
out in the distance if it is clear at your position, until you are close to the cloud buildup). We’ve
provided some semi-station-based cloud depiction techniques to depict closer-range variation in clouds
as much as possible. In addition, it should be known that the conditions you are flying over are
“remembered”, so even if you fly into new conditions, if you look back, you will see your old conditions
in the distance similar to station-based depiction modes.
Depiction Modes
Direct Weather Control is one of three depiction modes available in AS2012. Each one has certain
advantages and drawbacks. It is recommended to read the relevant information (in the Using AS2012’s
Options Screen section of this User’s Guide). Using Standard Depiction mode provides results similar to
FSX-default live weather. Smooth Cloud transitions provides results similar to past Active Sky products
including ASX and ASA. The default mode is Direct Weather Control, and provides the most accurate
overall depiction possible along with smoothing for all ambient weather parameters.

ACTIVE SKY 2012 USER’S GUIDE
© 2011 HiFi Technologies, Inc. 8
Visual Artifacts
Certain visual artifacts or unwanted effects can be experienced within FSX in certain modes of
operation. When using Standard depiction mode, each station updated (which occurs every few
minutes regardless of download update rate) will result in a very quick “flicker” of the upper
atmosphere. Other depiction modes do not exhibit this behavior. With certain video cards and driver
versions, Thermals and Updrafts/Downdrafts can cause a flicker of certain cloud sprites within the
visible cloud scenery. Disabling thermals and up/downdrafts prevents this.
Interpolation
AS2012 implements Advanced Interpolation, using closest station data in all directions around any
station or location which does not provide actual data. This provides a realistic transition between
actual-data areas. When you view weather reports in AS2012, you may see “RMK ADVANCED
INTERPOLATION” appended to the METAR string. This indicates that either FULL or PARTIAL
interpolation was performed to provide the data for that location. In the case of partial interpolation,
certain elements may be missing from the original METAR (such as altimeter or visibility) and the
conditions will instead be interpolated from other nearby data points, but using a heavy influence
(weight) from the data that IS valid for that station. Please note that Advanced Interpolation uses the
closest station in 4 quadrants of directions from the location. In some areas, the closest station in a
given quadrant may be far away. In this case, the influence (weight) from that station’s data will be very
minimal in the calculation, while the influence from nearby stations will be great. This provides realistic
yet variable and unpredictable interpolated conditions, similar to the real world (where real locations
without data are rarely linearly average compared to their closest valid data).
FSUIPC
FSUIPC is not used by Active Sky 2012 (we use SimConnect). However, we realize FSUIPC is installed on
a wide range of systems and generally works great along side Active Sky 2012. Certain options/features
of FSUIPC may conflict with AS2012 usage, however. It is recommended that the “Disable all weather
settings” button be used to disable weather options. Registered FSUIPC users should enable wind
smoothing (for further smoothing of winds and prevention of S-turns in certain aircraft), but should
leave other items off (such as visibility graduation/smoothing).

ACTIVE SKY 2012 USER’S GUIDE
© 2011 HiFi Technologies, Inc. 9
S-Turns
Certain aircraft (such as PMDG 737NGX) are sensitive to turbulence and can exhibit autopilot s-turn
issues with winds aloft. To prevent s-turns, reducing certain turbulence effects are required. Please see
the included README.rtf (located in your AS2012 installation folder) for specific recommendations.
ACTIVE SKY 2012 USER’S GUIDE
© 2011 HiFi Technologies, Inc. 10
Getting Started
After installing Active Sky 2012, you can find the Active Sky 2012 shortcut on your desktop or within
your Start/Programs Menu. Double-clicking the desktop shortcut will launch Active Sky 2012.
You may optionally install the XGauge weather gauge into your aircraft panels by using the XGauge
Wizard Installation utility (Start/Programs/HiFi/Active Sky 2012 Menu). This can be done at any time
while Flight Simulator X is closed.
If you have a networked installation, where FSX runs on a different computer than Active Sky 2012,
please read the Networking Configuration chapter to ensure proper configuration.
If you are using any other add-ons which provide weather depiction, such as SquawkBox, IVAO, etc, you
should disable weather within those add-ons to avoid conflicts.
Configuring Flight Simulator X
FSX will need to be configured for the best balance of graphics and performance. Essentially, any
settings that you normally use in FSX with default weather should work fine. Do realize however that
Active Sky 2012 can increase the complexity of weather scenarios and cause a further hit on
performance when conditions dictate.
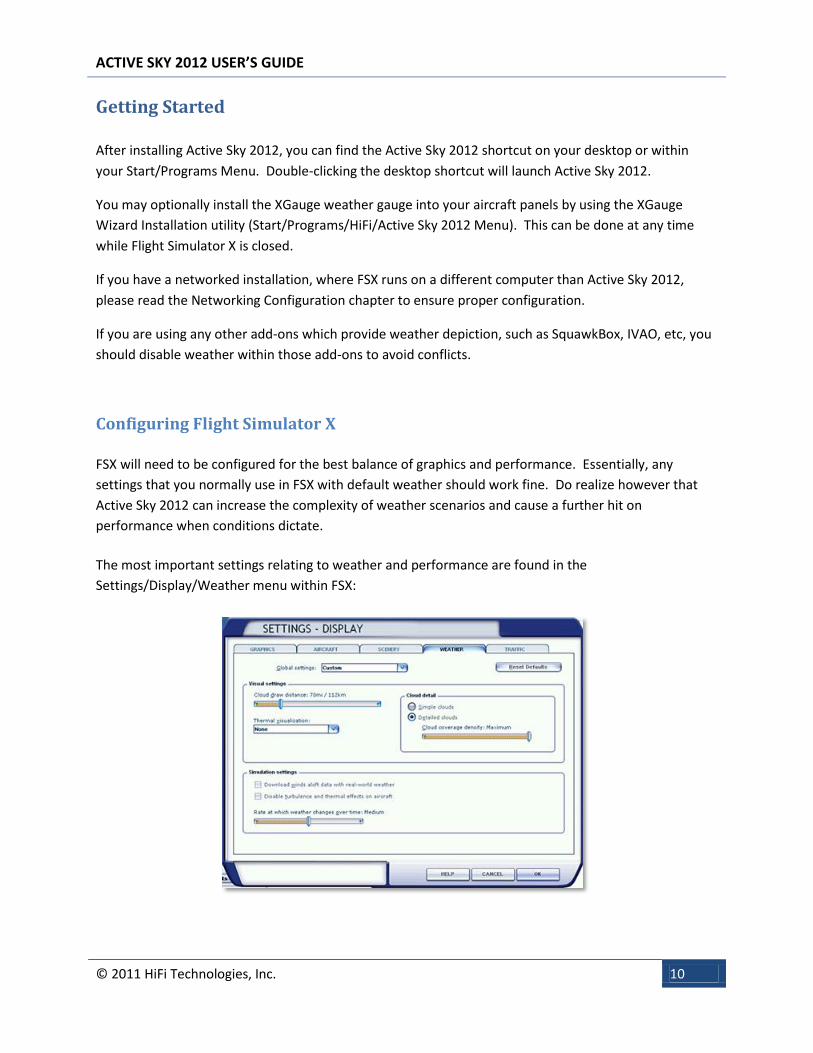
The most important settings relating to weather and performance are found in the
Settings/Display/Weather menu within FSX:

ACTIVE SKY 2012 USER’S GUIDE
© 2011 HiFi Technologies, Inc. 11
Cloud draw distance: Controls the maximum distance at which you will see cloud formations. The further the distance, the slower the performance (we recommend 60-70 miles on most systems, perhaps higher on very high-end systems).
Thermal visualization: We recommend the most-realistic "None" setting here, but you may wish to enable visual cues to help you identify thermals. See the FSX documentation for more information.
Cloud detail: Detailed clouds are highly recommended on all but the lowest-end systems. Cloud coverage density: We recommend the Maximum setting on all but the lowest-end
systems. Lowering this setting will increase performance but at the cost of losing cloud density.
Download winds aloft data with real-world weather: This setting does not affect Active Sky 2012 operation.
Disable turbulence and thermal effects on aircraft: Check this option to disable all turbulence and thermal effects from FSX itself (may help with high-fidelity add-on aircraft autopilot s-turn issues).
Rate at which weather changes over time: This controls how fast weather can "drift" from one set of conditions to the next, and also controls how fast clouds will form/dissipate within the area. Active Sky 2012 has an option which automatically controls this setting (defaults at 0%), so it is irrelevant what option you choose here.
Another important area for configuration is Settings/Display/Scenery:
Every setting here can have a dramatic effect on both quality and performance of your FSX experience.
We recommend experimentation here to find the best balance for you.
The “Water effects” setting should be on Max 2.0 (all the way to the right) in order to see all the water
effects and animations including waves. This results in a light/moderate performance hit compared to
lower settings, but is highly recommended if your machine can handle it.

ACTIVE SKY 2012 USER’S GUIDE
© 2011 HiFi Technologies, Inc. 12
Configuring FSUIPC (Optional)
If you are using FSUIPC v.4 for FSX, we recommend using the “Weather Settings Off” button in the main
Modules/FSUIPC menu within FSX.
You should consider disabling/minimizing FSX turbulence effects on aircraft which can cause problems
(S-Turns) when using certain high-fidelity add-on aircraft. Active Sky 2012’s own air effects will replace
FSX’s turbulence effects. The recommended settings are:
FSUIPC.ini settings:
TurbulenceRate=0.5,2.5
TubulenceDivisor=40,40,80,80
FSX.cfg settings:
[Weather]
TurbulenceScale=0.500000
FSX Settings:
Disable All Turbulence Effects on Aircraft – Checked (Weather Settings)

ACTIVE SKY 2012 USER’S GUIDE
© 2011 HiFi Technologies, Inc. 13
Using Active Sky 2012
Once you are configured and ready to go, bring up Active Sky 2012 and FSX, in any order, and weather
depiction will automatically start.
By default, Active Sky 2012 is in real-time live weather mode and will automatically download and depict
the latest weather information every 10 minutes. There is nothing more you need to do in order to have
realistic weather depicted at all times in all locations within FSX.
However, many features exist beyond the basic weather system that you should acquaint yourself with
in order to get the best experience possible.
Startup Order Recommendations
While Active Sky 2012 and FSX can be started in any order for weather depiction, we recommend a
specific startup sequence in order to obtain maximum realism and take advantage of all Graphics and
Flight Planning features:
1) Ensure FSX is closed
2) Start Active Sky 2012
3) View the Map and Weather Report Screens while you plan your flight
4) Configure your Flight Plan, using the Map and Flight Plan Screens - You can also have Active Sky
2012 automatically build your route, or import a flight plan from another flight planning solution
using the .pln FS9 or FSX flight plan format
5) Answer “Yes” when asked if you wish to install weather-influenced textures based on your
average route weather conditions - you may alternatively install external “Snapshot” graphics at
this time, or skip weather-influenced texture selections and manually install textures yourself
6) If you are not using weather-influenced texture selections, use the “Graphics” screen to select
and install your desired graphics
7) Once your flight plan is loaded and ready, and graphics are installed into FSX, you are ready to
fly
8) Start FSX and begin your flight!
9) Use Active Sky 2012’s integrated planning, briefing, XGauge and visual mapping tools as you fly,
enabling realistic weather avoidance and in-depth situational awareness

ACTIVE SKY 2012 USER’S GUIDE
© 2011 HiFi Technologies, Inc. 14
The Active Sky 2012 User Interface
Program Controls
You can move the Active Sky 2012 interface screen by clicking and dragging the top left (Active Sky 2012)
portion.
At the top right, the three control buttons are:
Send to System Tray
Minimize
Close
Some users may notice an increase in simulator performance when running Active Sky 2012 in the
system tray, where the user interface itself does not need to be running.

ACTIVE SKY 2012 USER’S GUIDE
© 2011 HiFi Technologies, Inc. 15
Main Status Indicators
Your FS Connection Status is shown at the top left just to the right of the Active Sky 2012 logo. Active
Sky 2012 automatically attempts connection every few seconds until a connection is made, and will
automatically re-connect if the connection is broken or reset.
The Active Date and Time is shown at the top middle area of the interface. This shows you the currently
active time used within Active Sky 2012. This may be the current time (in real-time mode), your
simulator time, or a historical time.
You can use the "GMT / Local" selector to choose which format to show your active time in. GMT time
(also known as UTC or Zulu time) is what aviators use to have a standardized time regardless of current
local time zone.
When "Force to Real Time" is checked, your time will always be synchronized to real/live time.
When “Force to Sim Time” is checked, your time will always be forced to the time set in FS (minimum
date January 1, 2007).
All weather engine processes depend on the currently active date/time. Please make sure you are
aware of your settings here to get the results expected. Normally, Force to Real Time is recommended.
There are 3 Activity Indicators at the very bottom of the program that indicate the activity for the 3
main repeating processes within Active Sky 2012:
Synthesis: Process which takes raw weather data and synthesizes it into usable weather
parameters
Depiction: Process which sends weather data from Active Sky 2012 and injects it into
FS9/FSX – This indicator will be lit at most times as Active Sky 2012 constantly
communicates with FS and controls the weather environment
Download: Process which downloads new weather from the HiFi DataNet X Weather
Servers
These are visible when each process is active. When the processes are inactive the indicators are not
visible.

ACTIVE SKY 2012 USER’S GUIDE
© 2011 HiFi Technologies, Inc. 16
Navigation Buttons and Screens
Click on the blue navigation buttons along the left side of the interface to bring up the various screens of
Active Sky 2012.
Status
The Status screen shows your current server connection status and system news. New version
availability and other important and useful information is listed here. Basic log information is shown at
the bottom, indicating what the weather engine is doing at all times.

ACTIVE SKY 2012 USER’S GUIDE
© 2011 HiFi Technologies, Inc. 17
Map
The Map Screen is where you can view all your weather and route information in a graphical format.
You can also enter, import or build a flight plan, in addition to adding or removing waypoints.
Waypoints can also be clicked and dragged from the Map to the Route window (if a flight plan is
loaded), or clicked and dragged to a new location within the map itself. Finally, you can configure preset
weather by dragging and dropping it right on the map.
This should be your first stop when exploring Active Sky 2012, and is the preferred starting point in flight
and weather planning. For example, you may want to look at your planned departure and destination
areas, and look for weather hazards along your route of flight. Then configure your flight plan and make
changes as necessary.
At the top left is your route display, and shows all your waypoints and important details like distance,
heading to fly and estimated time enroute. Press “New Plan” to manually enter, import or
automatically build a flight plan. Highlight a waypoint and press “Ins to insert a new waypoint above the
current position. Highlight a waypoint and press “Delete” to remove that waypoint. You cannot add a
waypoint above your departure or remove a departure/destination/TOC/TOD waypoint. To edit the
departure and/or destination, use the “New Plan” button. Press “Details” to view your full flight plan
and route briefing information in the Flight Plan Screen.

ACTIVE SKY 2012 USER’S GUIDE
© 2011 HiFi Technologies, Inc. 18
Within the route list, you can click on a waypoint item and the map will automatically center on it.
Double-clicking an item will bring it up in the Wx Report Screen.
You can drag waypoints directly into your flight plan route window. Simply find the station or point you
want to add, and click and drag it into the desired position in the route list. If you are adding an Airport,
NDB or VOR the station details will be used. If adding a custom point, the waypoint will be created and
named “AS” with a 3-digit number suffix that increments for your flight plan (i.e. AS000, AS001, etc.). All
changes to your flight plan will occur immediately and you’ll see the results directly in the route list and
the map itself.
If you’d like to move a waypoint, for example to traverse a safer path around a line of thunderstorm
cells, you can simply drag it to the new location directly within the map window.
Departure, Destination, Alternate and TOC/TOD waypoints cannot be moved or deleted. Click the “New
Plan” button and clear your plan to change these items.
The above window will be shown when you click “New Plan”. Simply enter the desired Departure and
Destination airports using valid ICAO airport identifiers (i.e. KLAX = Los Angeles International). To import
a flight plan, click the “Import” button. FSX and FS9 flight plan files are supported (.pln).
The additional flight parameters including Alternate, Cruise Altitude, Cruise Speed, Climb Rate and
Descent Rate are optional, but will result in increased accuracy of flight plan calculations, especially if
using TOC/TOD waypoints.
Active Sky 2012 will automatically build your route if you change the “Routing Type” to “VOR to VOR”
or “VOR and NDB”. Use “Direct GPS” for simple Departure to Destination direct routes. “Existing

ACTIVE SKY 2012 USER’S GUIDE
© 2011 HiFi Technologies, Inc. 19
Waypoints” will be forced when importing a plan or when making changes to an existing plan. Use the
“Clear” button to enter a new plan including new Departure and Destination IDs and routing type.
Please keep in mind that the automatic routing will not perform well in certain situations including polar
routes or routes that skirt ocean and land boundaries for long distances. If using automatic routing, you
always have the option of reviewing and modifying your waypoints, which is very easy within the Map or
Flight Plan screens.
Check the “Calculate TOC/TOD Waypoints” box to have Active Sky 2012 create “pseudo” waypoints
representing the top of climb and top of descent. The accuracy of the calculations depends on entering
the proper altitudes, speeds and climb/descent rates, and then matching those parameters during your
flight.
You can change a previous loaded Flight Plan at any time by using the “Flight Plan” button from the
main menu or “Details” from the Map Screen. Changes permitted include Cruise Speed, Climb Rate,
Descent Rate and Cruise Altitude. To change Departure, Destination, Alternate or Plan Type, you must
“Clear” your plan and enter a new one. You can cancel any changes with the “Close” button.
When you’re ready, hit the “Process” button and your flight plan will be processed.
After processing, Active Sky 2012 will ask if you wish to install weather-Influenced Graphics textures for
your computed “Route Average” weather conditions. Weather-influenced graphics are automatically
selected variants that have been identified as appropriate for your current weather. FSX must be closed
during Installation in order to update the related graphics files.
You can install AS2012 Integrated Graphics, which will be specially built with applied imaging for your
weather conditions, install Snapshot graphics, or choose to install nothing by pressing the “Cancel”
button. Press “OK” after making your selection if you wish to install graphics.
Clicking ‘OK’ will instruct Active Sky 2012 to make these wx-influenced selections and install them into
FSX automatically.
Under the Route details, the Drag and Drop Wx area allows you to drag and drop your custom weather
files onto the map. Above the list of preset weather items there is the range control consisting of a “+”

ACTIVE SKY 2012 USER’S GUIDE
© 2011 HiFi Technologies, Inc. 20
and “-“ button which will increment or decrement the range that the weather will be applied to from
the location of the drop. The range will be displayed in the textbox between the buttons and will range
from 5nm to 5000nm, any range greater than 5000nm will be considered as global weather.
Simply click and hold down the left mouse button on the weather file you wish to use, drag the file
across to the location on the map where you wish the weather to be centered - then release the button.
This will drop the weather onto the location you selected. The weather from the preset will now be
applied to all stations within the range specified.
Note: The greater the range selected the longer it will take for the processing of the selected weather.
You can create your own weather preset files using the Edit Wx screen.
The “Map Gamma” slider allows you to adjust to amount of general brightness of your map image.
Slide to the left to decrease brightness, and to the right to increase brightness.
Above the Map window, The "Seek" field and button is used to find any ICAO station (Airport, Weather
Station, NDB or VOR). Type in the station, hit the button and the map will center on that item (if it is
found). In the case of multiple VOR or NDB stations, only the first one found matching that ID will be
recalled.
The "Legends" button brings up a helpful legend indicating what each graphical overlay icon represents.
The main map view is shown on the right with the map controls and available along the top, bottom and
sides. Left-Click directly on the map to re-center the map on that position. Left-Click on any reporting
station twice to bring up the Report screen for that station. While editing your Flight Plan / Route, you

ACTIVE SKY 2012 USER’S GUIDE
© 2011 HiFi Technologies, Inc. 21
can select a route waypoint and then Right-Click a station on the map to insert that station above the
current route position.
Along every edge and corner is a directional button that allows you to “Pan” the map in the direction
specified.
"Lock to aircraft position" keeps the map centered and locked on your current aircraft position (if FS
Connected).
At the right side of the Map window are the "Zoom" controls. Zoom in and out with the “+” (zoom in)
and “-“ (zoom out) buttons. You can also use the slider, with the top being “zoomed” all the way in, and
the bottom being “zoomed” all the way out. The current visible Range is shown at the top right of the
map window. There is a 5nm minimum and 5000nm maximum zoom range, with most overlay graphics
having a maximum display range of 3000nm.
The round button in the bottom right area of the map screen (under the East “Pan” button) is used to
center the map on the current aircraft position. This will not “lock” to the aircraft position.
“Winds”, located in the lower left area of the map window, allows you to adjust which altitude level is
shown for the Winds overlay. Click the “+” button to increase the altitude level, and the “-“ button to
decrease the altitude level. Shown in hundreds of feet (i.e. 300 = 30,000ft).
Below the map view are the Overlay Toggle Buttons which turn on and off certain visual elements of the
map. You may need to use these when zooming in or out to different zoom levels if the display becomes
too “cluttered”.
Stations: Shows all weather stations (not airports). Weather stations are the locations that actually
report weather information or have interpolated weather information provided.
Airports: Shows all airports (not stations). Airports can have weather stations located at or adjacent to
airports, but this is not always the case.
VOR/NDBs: Shows all VORs and NDBs. When you hover your mouse over each station a popup will
appear giving you information about the station such as Frequency, Latitude and Longitude, elevation
(in feet) and Station name. This will be invaluable as it will mean you do not have to leave the screen to
obtain this information for your flight planning.
Route: Graphically shows your route based on the flight plan specified (use the Flight Plan Screen to
specify a flight plan).
Clouds: Shows a graphical indication of cloud coverage.
Precipitation: Shows precipitation including rain and snow.
Visibility: This will show areas with less than 9SM visibility with color-coded circles.
Winds: Shows the wind direction via arrow icons for the currently specified Winds Level.

ACTIVE SKY 2012 USER’S GUIDE
© 2011 HiFi Technologies, Inc. 22
Met/Reps: Displays graphical boundaries of current Sigmet and Airmet reports available at the current
time. You will also be able to see any Pireps current within the map range selected.
Hovering over any station, airport, VOR, NDB, Airmet or Sigmet will bring up a pop-up display window
showing the item’s name, description, current conditions and other relevant information.
NOTE: If multiple layers/items are shown on the map, the top-most item is displayed in the popup.
Map Window Mouse Commands Recap:
Clicking on any station on the map will center it and select it. Clicking it again will bring it up in
the weather report screen.
When you have a flight plan loaded, you can simply click and drag new waypoints into your
route at the desired location. Waypoints are inserted above the chosen line item.
You can also move an existing waypoint by clicking on waypoint icon within the map window,
and dragging it to any new location on the map.
Right-clicking on any station will automatically insert that station as a waypoint, inserting it
above the currently selected waypoint.
Departure, Destination, Alternate and TOC/TOD Waypoints cannot be moved. Use the “New
Plan” button to change these items.

ACTIVE SKY 2012 USER’S GUIDE
© 2011 HiFi Technologies, Inc. 23
Flight Plan
Here in the Flight Plan Screen you can specify your flight plan and view the weather-related route details
on a waypoint-by-waypoint basis. There is also a textual “Dispatch” weather report given. Before you
fly, you can print out your full briefing, print a concise navigation log, and/or or use the integrated
planning and mapping features to get updated route details and the latest weather information at all
times.
Starting at the top, the currently specified flight plan details are shown. Click the “Enter Plan” button in
order to manually specify, edit, import or build a flight plan.
ACTIVE SKY 2012 USER’S GUIDE
© 2011 HiFi Technologies, Inc. 24
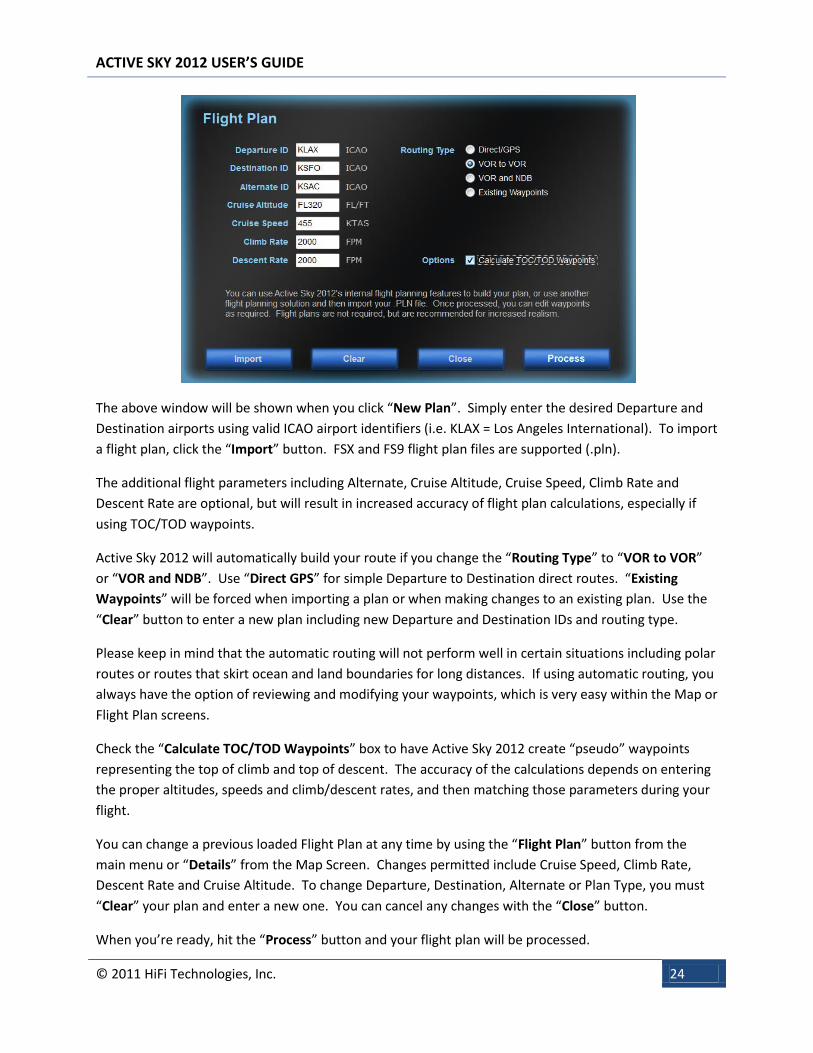
The above window will be shown when you click “New Plan”. Simply enter the desired Departure and
Destination airports using valid ICAO airport identifiers (i.e. KLAX = Los Angeles International). To import
a flight plan, click the “Import” button. FSX and FS9 flight plan files are supported (.pln).
The additional flight parameters including Alternate, Cruise Altitude, Cruise Speed, Climb Rate and
Descent Rate are optional, but will result in increased accuracy of flight plan calculations, especially if
using TOC/TOD waypoints.
Active Sky 2012 will automatically build your route if you change the “Routing Type” to “VOR to VOR”
or “VOR and NDB”. Use “Direct GPS” for simple Departure to Destination direct routes. “Existing
Waypoints” will be forced when importing a plan or when making changes to an existing plan. Use the
“Clear” button to enter a new plan including new Departure and Destination IDs and routing type.
Please keep in mind that the automatic routing will not perform well in certain situations including polar
routes or routes that skirt ocean and land boundaries for long distances. If using automatic routing, you
always have the option of reviewing and modifying your waypoints, which is very easy within the Map or
Flight Plan screens.
Check the “Calculate TOC/TOD Waypoints” box to have Active Sky 2012 create “pseudo” waypoints
representing the top of climb and top of descent. The accuracy of the calculations depends on entering
the proper altitudes, speeds and climb/descent rates, and then matching those parameters during your
flight.
You can change a previous loaded Flight Plan at any time by using the “Flight Plan” button from the
main menu or “Details” from the Map Screen. Changes permitted include Cruise Speed, Climb Rate,
Descent Rate and Cruise Altitude. To change Departure, Destination, Alternate or Plan Type, you must
“Clear” your plan and enter a new one. You can cancel any changes with the “Close” button.
When you’re ready, hit the “Process” button and your flight plan will be processed.

ACTIVE SKY 2012 USER’S GUIDE
© 2011 HiFi Technologies, Inc. 25
After processing, Active Sky 2012 will ask if you wish to install weather-Influenced Graphics textures for
your computed “Route Average” weather conditions. Weather-influenced graphics are automatically
selected variants that have been identified as appropriate for your current weather. FSX must be closed
during Installation in order to update the related graphics files.
You can install AS2012 Integrated Graphics, which will be specially built with applied imaging for your
weather conditions, install Snapshot graphics, or choose to install nothing by pressing the “Cancel”
button. Press “OK” after making your selection if you wish to install graphics.
Clicking ‘OK’ will instruct Active Sky 2012 to make these wx-influenced selections and install them into
FSX automatically.
“Add Waypoint” will allow you to add a new waypoint, inserting it just above the currently selected
waypoint in the data grid. Simply click on any waypoint (except departure) and then click on “Add
Waypoint”. You’ll be asked the ID and the waypoint will be automatically added and the flight plan will
be refreshed.
“Delete Waypoint” will delete the currently selected waypoint. You cannot delete departure or
destination waypoints. To change departure or destination, use the “Enter Plan” button.
Press the “Refresh AI Aircraft” button to update the current weather for all AI aircraft. This ensures that
the AI aircraft conform to the current weather conditions supplied by Active Sky 2012 and land and
depart on the expected runway.
“Refresh Plan” will update the information based on a new specified route or updated weather
conditions.
“Print All” will print all the information shown on this screen
“Print Log” will print just the log information (Nav Log) shown on this screen.
“Export Plan” will save your current plan as an FSX .PLN file that can be read by FSX or any other flight
planner. Please note that the startup location in these .PLN files, that FSX will use if you choose to

ACTIVE SKY 2012 USER’S GUIDE
© 2011 HiFi Technologies, Inc. 26
“Move your aircraft to the Departure location”, may not be correct. We recommend manually setting
your parking spot or runway within FSX with AS2012-generated plans.
“Map” will bring up the Map Screen focused on your departure location and showing your route of
flight. You can easily modify your route waypoints in a visual format with the Map screen.
“Show Surface Wind Information for Dep, Dest and Alt (Vs Aloft)” - Check this box if you would prefer
to view the surface wind information for your Departure, Destination and Alternative airports rather
than the aloft wind information. Note that this checkbox also will influence TOC/TOD calculations. We
recommend leaving this checked in most cases.

ACTIVE SKY 2012 USER’S GUIDE
© 2011 HiFi Technologies, Inc. 27
Graphics
The Graphics Screen is where you manage all of Active Sky 2012’s graphic enhancement features
including:
Creating a Theme
Selecting an existing Theme
Browsing available Categories and Texture Variants
Selecting a Texture Variant to use in a Theme
Recoloring Texture Variants
Installing a Theme into FSX
Randomly Selecting Texture Variants
Selecting Textures based on Wx Influence
Configuring Graphics Settings
Using the Graphics features of Active Sky 2012 is easy. Simply enter the graphics screen, browse the
available categories, sub-categories and texture variants and make your selections. When you are
finished, press the “Install” button to install these textures into FSX.

ACTIVE SKY 2012 USER’S GUIDE
© 2011 HiFi Technologies, Inc. 28
Graphics Screen Items
The “Home” Screen is accessed at any time by pressing the Home button at the top right of the Graphics
screen.
Pressing “Randomize” will randomly select texture variants automatically.
Pressing “Settings” will bring up the Graphics Settings screen, which is described in detail below.
Pressing “Wx Influenced” will automatically select textures based on your current location and current
weather conditions, then install these textures into FSX instantly. FSX must be closed during Installation
in order to update the related graphics files.
Selecting a “Theme” will automatically load that theme’s texture variants. The last theme loaded is
automatically selected at startup. From this point, any changes you make such as making selections,
randomizing, or choosing wx-influenced selections, will be temporarily recorded but not saved until you
press the “Save” button. The “Default” theme cannot be overwritten.
The “New” button will allow you to create a new theme using the existing texture variant selections.
“Delete” will delete the existing Theme. You cannot delete the default theme.
“Save” will save/update the existing theme with any new texture variant selections you’ve made.
The “Install” button finally installs all the texture variants currently selected directly into FSX. It can take
several minutes to install a theme, especially when using higher-resolution settings, as the graphics files
being copied and manipulated are extremely large. FSX must be closed during Installation in order to
update the related graphics files.

ACTIVE SKY 2012 USER’S GUIDE
© 2011 HiFi Technologies, Inc. 29
Clicking on any shown Category, Sub-Category or Variant in the main Graphics screen will “drill down”
into that item. Here we have clicked on Sky and then Dusk:
ACTIVE SKY 2012 USER’S GUIDE
© 2011 HiFi Technologies, Inc. 30
Graphics - Build Colors
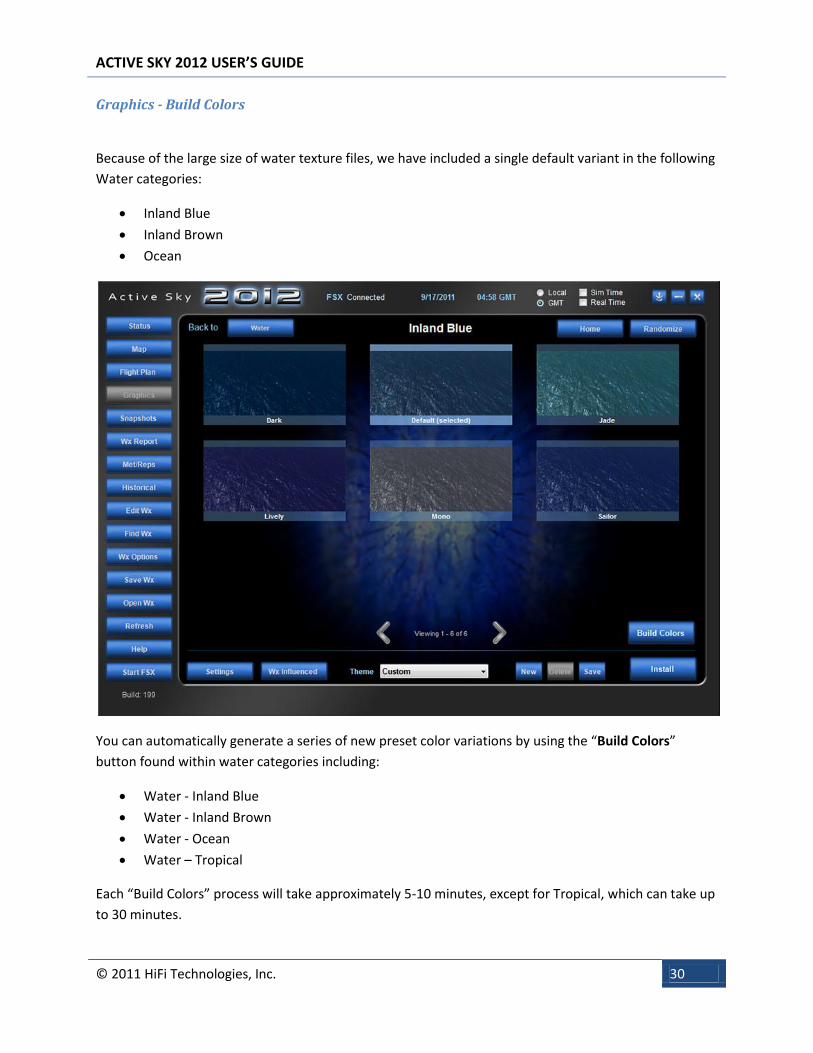
Because of the large size of water texture files, we have included a single default variant in the following
Water categories:
Inland Blue
Inland Brown
Ocean
You can automatically generate a series of new preset color variations by using the “Build Colors”
button found within water categories including:
Water - Inland Blue
Water - Inland Brown
Water - Ocean
Water – Tropical
Each “Build Colors” process will take approximately 5-10 minutes, except for Tropical, which can take up
to 30 minutes.

ACTIVE SKY 2012 USER’S GUIDE
© 2011 HiFi Technologies, Inc. 31
It takes anywhere from 1-10 minutes to generate the new variations depending on the category. These
are extremely large files that take time to process.
We recommend building these preset color variations in each of available Build Colors categories as well
as creating your own new custom variations with the “Recolor” button. Once you have created new
variations, you can assign “Influence” values used for wx-influenced selections. For example, you might
create a dark and muddy water color that you want to be used in stormy/rainy conditions. Please see
the Influence section for more information.

ACTIVE SKY 2012 USER’S GUIDE
© 2011 HiFi Technologies, Inc. 32
Graphics - Texture Variant Detail Screen
When you select a texture variant within a Category or Sub-Category, the detail screen will be shown.
The available items within this screen are:
The “Back to” button will send you back to the previous Category or Sub-Category.
The “<” button will display the previous texture variant within that Category.
The “>” button will display the next texture variant within that Category.
The “Recolor” button brings up the Recolor Screen which allows users to recolor certain graphics types.
The “Influence” buttons bring up the Influence Screen, where you can customize the values used to
make this item more likely to be chosen in specific weather conditions.
“Delete” is available when viewing a user-recolored variant. Click this button to delete that item
(cannot be undone).

ACTIVE SKY 2012 USER’S GUIDE
© 2011 HiFi Technologies, Inc. 33
The “Save Shot” button is also available when viewing a user-recolored variant. Before using it, take a
screenshot using your clipboard within FSX by pressing Alt-PrtScn. Then press this button and the
screenshot will automatically be formatted and saved, replacing the old screenshot!
“Preview Sound” is shown when viewing Sound Category items. Click this button to start/stop the audio
preview of that sound set.
Use the “Select” button to select this variant for your current Theme. The “selected” item within each
Category or Sub-Category is shown in yellow with the (selected) suffix shown.

ACTIVE SKY 2012 USER’S GUIDE
© 2011 HiFi Technologies, Inc. 34
Graphics - Recolor Screen
From the Texture Variant Detail Screen, “Recolor” will bring up the Recolor Screen which enables you to
recolor the existing texture variant and save it as a new variant. Recolor is available for the following
items: All Clouds, Water and Sky textures. The Recolor screen is described in detail below.
To use the Recoloring Screen, simply move the “Hue”, “Saturation”, and “Brightness” sliders to get the
look that you want. For you convenience, the effect of your recoloring is shown in the “New” window
by recoloring the screenshot for that item, with the original non-recolored screenshot shown next to it
under “Original”. Focus on the the color of the item you are recoloring. The background of the
screenshot will also change (i.e. Sky, Terrain), simulating the altered lighting, but your adjustments are
applied only to the category you are recoloring in.
Once you are satisfied with the look, enter a “Name” for your new item and press the “Apply Recolor”
button. It can take anywhere from a few seconds to several minutes to process your recolor, with
Tropical Water textures taking the longest. Once the recolor process is complete, your new item will be
available.

ACTIVE SKY 2012 USER’S GUIDE
© 2011 HiFi Technologies, Inc. 35
Graphics - Influence Screen
Back on the Texture Variant Detail Screen, the “Influence” button brings up the weather-influenced
values used to make selection determination when installing wx-influenced textures.
As the screen text indicates, the values used indicate when this item will be chosen as a “possibility”
amongst all your textures.
As an example, if you have a texture item that would be best for “smoggy” conditions, these conditions
can be identified with LOW Visibility and LOW Surface Wind speeds. Therefore, you would want to set
the Average Visibility to “3” and Average Surface Wind to “2”. The other values should be left at “5” so
that they have a neutral influence. In this example, when visibility is on the “3” side of the “1-10” scale,
or approximately 4-5 miles visibility, this texture will be a likely candidate for selection, pertaining to
visibility.
When Active Sky 2012 makes wx-influenced selections, each Influence value in each Texture Variant is
independently analyzed and compared to the weather conditions. A list of likely candidates is generated
and then randomly selected. This provides influence as well as random variation.
ACTIVE SKY 2012 USER’S GUIDE
© 2011 HiFi Technologies, Inc. 36
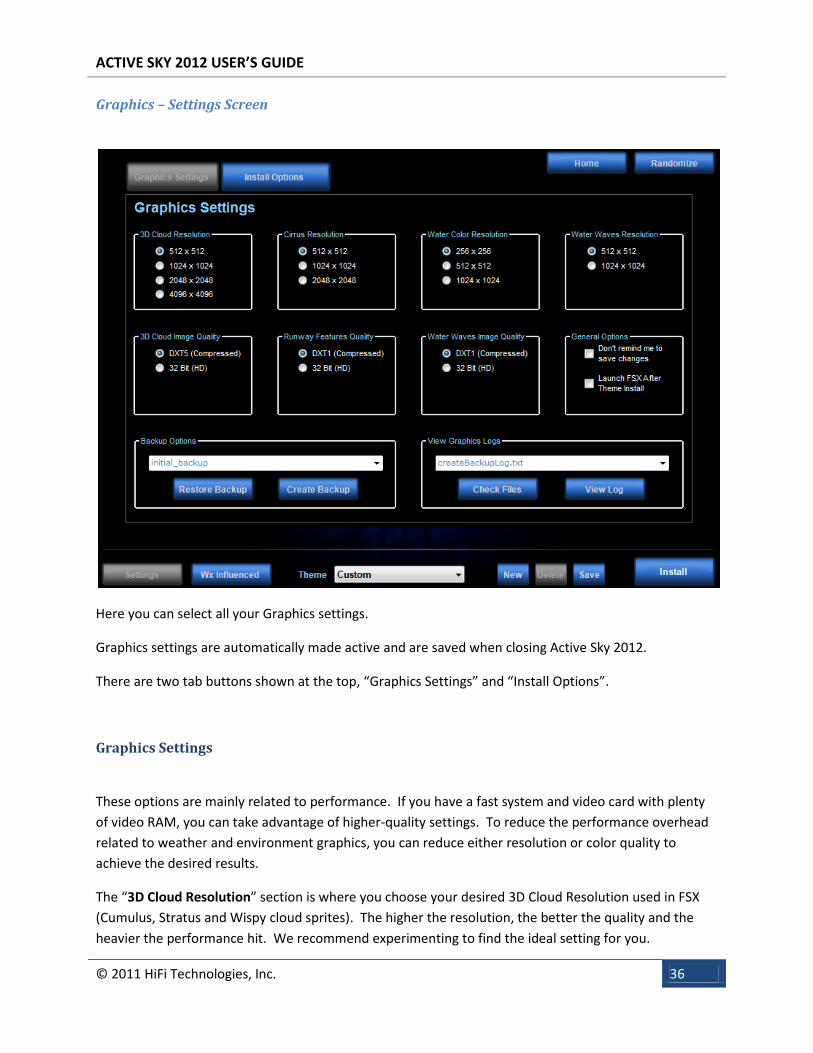
Graphics – Settings Screen
Here you can select all your Graphics settings.
Graphics settings are automatically made active and are saved when closing Active Sky 2012.
There are two tab buttons shown at the top, “Graphics Settings” and “Install Options”.
Graphics Settings
These options are mainly related to performance. If you have a fast system and video card with plenty
of video RAM, you can take advantage of higher-quality settings. To reduce the performance overhead
related to weather and environment graphics, you can reduce either resolution or color quality to
achieve the desired results.
The “3D Cloud Resolution” section is where you choose your desired 3D Cloud Resolution used in FSX
(Cumulus, Stratus and Wispy cloud sprites). The higher the resolution, the better the quality and the
heavier the performance hit. We recommend experimenting to find the ideal setting for you.

ACTIVE SKY 2012 USER’S GUIDE
© 2011 HiFi Technologies, Inc. 37
“3D Cloud Image Quality” can be 32 Bit or DXT5. Choose 32 Bit for higher quality and DXT5 for higher
performance.
“Cirrus Resolution” sets the resolution for all Cirrus clouds. The higher the resolution, the better the
quality and the heavier the performance hit.
“Runway Features Quality” can be 32 Bit or DXT5. Choose 32 Bit for higher quality and DXT5 for higher
performance.
“Water Color Resolution” sets the resolution for all Water color (Inland Blue, Inland Brown, Ocean and
Tropical). The higher the resolution, the better the quality and the heavier the performance hit.
In “Water Waves Image Quality”, choose between 32 Bit or DXT1 Format. 32 Bit is higher quality while
DXT1 is higher performance.
“Water Waves Resolution” sets the resolution for Waves. The higher the resolution, the better the
quality and the heavier the performance hit.
“General Options” has two checkboxes. “Don’t remind me to save changes”, when checked, stops
asking you to save theme changes before overwriting them, i.e. when loading a new theme. “Launch
FSX After Theme Install” will load FSX as soon as all textures have been installed, after pressing the
“Install” button.
In “Backup Options” you can select and restore any texture backup, or create a new one. On first run of
Active Sky 2012 your existing FSX textures are backed up into a backup called “initial_backup”.
“View Graphics Logs” allows you to see particular log files associated with Active Sky 2012 Graphics
operations.
The “Check Files” button scans all Active Sky 2012 graphics content files to ensure nothing is missing our
corrupt.

ACTIVE SKY 2012 USER’S GUIDE
© 2011 HiFi Technologies, Inc. 38
Install Options
Here you can turn ON or OFF any texture item. When an item is UNCHECKED, it WILL NOT be installed
into FSX. This is a handy way to allow multiple graphics add-ons to work together. I.e. an Add-on can
provide Cloud and Water Textures, and Active Sky 2012 can provide everything else. In this case, you
would uncheck the Cloud and Water items, so that they are not overwritten when Active Sky 2012
installs its graphics.
If you find a particular texture variant that you especially enjoy and always prefer it over anything else,
you can also use the install options to speed up the install process by excluding update of those items.
For example, you could choose your favorite “Tropical Water” item, install it, and then uncheck the
“Water Color – Tropical” install option. Now the Tropical Water textures will no longer be updated, and
the installation process will take significantly less time.

ACTIVE SKY 2012 USER’S GUIDE
© 2011 HiFi Technologies, Inc. 39
Snapshots
Active Sky 2012 includes universal graphics add-on integration with an exclusive Snapshot system.
Configure FSX graphics any way you’d like, using any add-on or combination of add-ons, then preserve
the entire graphics state in Snapshots that can be installed directly through Active Sky 2012 in manual or
weather-influenced mode!
“Screenshot” applies a capture screenshot from FSX in your clipboard to the current Snapshot item
selected. First take a screen shot in FSX with the Alt-PrtScn key combination and then press this button
to save it.
“Reassign” changes the currently selected Snapshot’s wx-influenced category. The category chosen
influences when this Snapshot will be selected during automatic Weather-Influenced installations.
“Delete” deletes the current Snapshot. Cannot be undone!
“Create New” creates a new Snapshot using the current graphics state of FSX.

ACTIVE SKY 2012 USER’S GUIDE
© 2011 HiFi Technologies, Inc. 40
“Auto Generate” will bring up the Auto Generate screen and allows you to automatically create various
wx-influenced themes from Active Sky 2012’s Graphics system and then capture them, according to
configurable wx-influenced categories and the amount to generate.
“Install” installs the selected Snapshot into FSX.
You will be able to have route-based weather averages applied in an automatic wx-influenced texture
installation by entering a flight plan in the “Flight Plan”, “Enter Plan” screen.

ACTIVE SKY 2012 USER’S GUIDE
© 2011 HiFi Technologies, Inc. 41
Auto Generate Screen
The “Auto Generate” button in the Snapshots screen brings up the Auto Generate Screen and allows you
to automate the process of creating snapshots from Active Sky 2012’s integrated graphics. By creating
these snapshots, you will be able to quickly and easily have your favorite graphics recalled within
seconds. Snapshots are also available for automatic wx-influenced install during Flight Plan entry.
This process also supports the possibility of combining other graphics elements from other add-ons, by
customizing your graphics installation options to exclude certain items from Active Sky 2012. Those
excluded items will be left in the state last installed by other the other add-on(s), and only the items
marked for installation will be updated and generated with Active Sky 2012’s graphics.
To Auto Generate graphics, simply enter the number of sets to generate, and which category to assign
them to. You can assign them to “all” categories or a specific single category. When ready, press the
“Start” button. The process will begin and is completely automated. You’ll be notified when the process
finishes, and your new Snapshots will be available in the Snapshot screen.
Note that creating sets can take some time, up to 5-10 minutes per set depending on your graphics
settings including Cloud Resolution. During the processing, Active Sky 2012 is specifying weather
conditions which match the category(s), selecting and building graphics according to those conditions,
capturing a snapshot of all graphics, and finally assigning the appropriate wx-influenced category. The
process repeats for the total number of items requested. These automatically-generated sets are
named “AutoSnapshot” with a number suffix, incrementing for each set.

ACTIVE SKY 2012 USER’S GUIDE
© 2011 HiFi Technologies, Inc. 42
Wx Report
The Report Screen shows you a collection of various items of weather information for the
station/airport you are interested in.
At the very top the checkbox "Lock to closest", when checked, will force this screen to always show the
closest available station/airport's weather information.
The "ID" field allows you to specify any valid 4-letter ICAO weather station/airport code. Simply type
the code into this field and the weather information will automatically update appropriately. Once a
station is selected, its location, range and other information will be displayed.
Below this you'll find weather icons and specific weather conditions. This includes wind direction and
speed, visibility, clouds, precipitation, temperature, pressure and winds aloft.
Further below, the METAR, TAF and Decoded Textual weather information is shown.
Press the “Interpolation” button to see interpolation details for any interpolated station (where actual
weather data has not been provided).

ACTIVE SKY 2012 USER’S GUIDE
© 2011 HiFi Technologies, Inc. 43
Press the “Refresh AI Aircraft” button to update the current weather for all AI aircraft. This ensures that
the AI aircraft conform to the current weather conditions supplied by Active Sky 2012 and land and
depart on the expected runway.

ACTIVE SKY 2012 USER’S GUIDE
© 2011 HiFi Technologies, Inc. 44
Met/Reps
The Met/Reps screen will display a list of the current Sigmets, Airmets and Pireps.
Sigmets and Airmets are weather advisories that may include areas of icing, turbulence, severe
thunderstorms and more. Pireps are Pilot reports are made by actual Active Sky users indicating the
conditions experienced at a given location. As part of proper flight planning, these Met/Reps should
always be reviewed and considered for your planned route of flight.
Hovering over each cell will display a popup of the full information in that cell. You can double click on a
cell and Active Sky 2012 will take you to the Map Screen to view the location of that item.

ACTIVE SKY 2012 USER’S GUIDE
© 2011 HiFi Technologies, Inc. 45
Press the “Make Pilot Report” to file a Pirep.
You should check the entered location and then enter the details required such as aircraft type (C172 for
instance) and the report that you wish to make such as “Moderate Turbulence below 10,000ft. This
pirep will then be filed and all users of Active Sky 2012 will be able to see this report. These reports are
displayed on the map screen and on XGauge. Pireps are valid for 6 hours from time of submission.
Pireps are encouraged! It helps other pilots get a picture of the actual weather conditions experienced
at specific locations so please use this facility to keep others informed of actual conditions you are
experiencing. The more Pireps filed by Active Sky users, the better the coverage for all to benefit from.
Note that you can only make a Pirep when Active Sky 2012 is Connected to FSX.

ACTIVE SKY 2012 USER’S GUIDE
© 2011 HiFi Technologies, Inc. 46
Historical
Historical Data with correct time synchronization and dynamic updates is available in online mode.
Simply select your desired historical date and time (since 2007) and press the ‘Apply’ button. Your
current season will activate in online mode based on this date/time.
The Historical Screen also provides a way to download historical weather for Offline mode. Weather can
be downloaded for any date/hour since January 1, 2007.
Select the date types required using the Radio buttons at the top left of the screen.
Now add the number of rows required to cover the dates and times you wish to download using the
“Add Row” button.
Single Date: will allow just one download. You will only be able to add one row for this selection.
Multiple Dates: will allow as many individual downloads as you require. NOTE: The more you add the
longer the download time.
Any dates that are in the future will be set to current date and previous hour.

ACTIVE SKY 2012 USER’S GUIDE
© 2011 HiFi Technologies, Inc. 47
For selection you can either edit the date value directly or click to open a calendar popup.
Click Download to complete the process. The weather will automatically be saved and activated, and
Automatic Weather Downloads (if enabled) will be temporarily disabled (to prevent updates from
overwriting your desired historical weather).

ACTIVE SKY 2012 USER’S GUIDE
© 2011 HiFi Technologies, Inc. 48
Edit Wx
The Edit Wx Screen is the place to load, save and manually edit weather conditions.
Main Items
Selected Station ID: Enter the desired ICAO identifier for the station you wish modify.
Date: Enter the valid METAR date which is the day number for the current month.
Hour: Enter the GMT/UTC(Z) Time for this weather.
Reload Current: Click to load and reset the wx conditions shown for the selected station
ID.

ACTIVE SKY 2012 USER’S GUIDE
© 2011 HiFi Technologies, Inc. 49
Wind and Temperature
Altitude MSL: Choose the existing layer (base, feet, above sea level).
Direction: Choose the wind direction (degrees, true).
Speed: Choose the wind speed (knots).
Temp C: Choose the temperature (Celsius).
Turbulence: Choose the level of turbulence for this layer.
Shear: Choose how quick the wind direction or speed will change between layers.
Dew C: Choose the dew point (temperature at which air condenses and clouds/fog
form).
Add Layer: Add a new wind/temperature layer.
Edit Layer: Edit the currently selected layer.

ACTIVE SKY 2012 USER’S GUIDE
© 2011 HiFi Technologies, Inc. 50
Clouds
Altitude AGL: Choose the existing layer (base, feet, above ground level).
Thickness: Choose the cloud layer thickness (Note that FSX currently does not support
modifying thickness externally and will automatically apply an appropriate thickness to each
layer. Future revisions of FSX may support manual thickness specification).
Coverage: Choose how dense the cloud layer will be. Can be one of: Few, Scattered, Broken
or Overcast.
Type: Select one of: Cirrus, Stratus, Cumulus or Cumulonimbus.
Turbulence: Choose the level of turbulence to be experienced within this cloud layer.
Shear: Choose how quick the wind direction or speed will change within this cloud layer.
Icing: Choose the level of airframe/induction icing while within this cloud layer.
Add Layer: Add a new cloud layer.
Edit Layer: Edit the currently selected layer.
Delete Layer: Delete the currently selected layer.
Precipitation
Type: Select Rain or Snow.
Strength: Choose the overall intensity of the precipitation.
Visibility
Range SM: Select the desired surface visibility for this area (statute miles).
Altimeter
Pressure: Select the desired pressure (millibars) for this area.
Encoded METAR

ACTIVE SKY 2012 USER’S GUIDE
© 2011 HiFi Technologies, Inc. 51
METAR String: You can directly edit this METAR text area which will automatically update
the specific weather conditions. Any manual entry here will result in existing conditions to
be reset per the strict METAR code (thicknesses and cloud types, for example, will be lost).
If you wish to specify extended information such as thicknesses and cloud types, edit the
METAR first THEN edit the specific information using the interface.
Load / Save Preset: You can load a pre-existing set of weather conditions based on a METAR
string by pressing the “Load Preset” button and choosing the desired “.wx” file. Save the
existing indicated conditions/METAR string with the “Save Preset” button.
View Summary: This previews the current weather specified in the Report Screen.
Cancel Changes: This cancels all changes made.
Parse METAR: If you have manually edited the METAR string, this button will decode the
string and set all weather parameters accordingly.
Application Range
Select the desired range (statute miles) around this station to apply the weather. Any station
within the range specified will inherit the specified conditions. Choose “global” to apply world-
wide.
Apply Now
Click to actually apply the specified weather and make active. It may take time for the weather
to update and show within the simulator.
Units
Click on your desired Visibility and Pressure units (SM or Meters for Visibility, Inches or Millibars
for Pressure).

ACTIVE SKY 2012 USER’S GUIDE
© 2011 HiFi Technologies, Inc. 52
Find Wx
The Find Wx screen allows you to search for weather conditions that you would like to fly in. You can
quickly select a general condition such as Rain or IMC etc by clicking one of the buttons on the left of the
screen.
You can select more detailed conditions by using the “Advanced Find” combo boxes in the center of the
screen to drill down to specific conditions you require.
You can further filter the results by limiting the ICAO prefix up to, and including, a full single ICAO by
entering a partial or complete ICAO code in the “Limit to ID Prefix” text box. You can also limit the
number of results by entering a number value in the ‘Maximum Results’ text box, by default this is set
at 25 results.
Once you have filled in this information click on the ‘Find Now’ button and the results will be displayed
in the list view at the bottom of the screen. There will also be an indication of the total results found
displayed below this list.

ACTIVE SKY 2012 USER’S GUIDE
© 2011 HiFi Technologies, Inc. 53
You can then double click on a list item which will then take you to the map screen at the ICAO of the
METAR selected.
To clear the search criteria click on the “Reset” button.

ACTIVE SKY 2012 USER’S GUIDE
© 2011 HiFi Technologies, Inc. 54
Wx Options
Many options exist within Active Sky 2012 which can increase your overall experience. By default, a
recommended “generic” option set is provided, which should provide good results for most users. It is
recommended to become familiar with all the available options and tweak them based on your
requirements and expectations.
Note that “Graphics Settings” are available in the Graphics Screen (Settings button).
There are several tabs along to top of the Wx Options screen which bring up each individual option
category. The tabs are: General Options, Cloud Options, Wind Options, Visibility Options, Edit Station
Data and Thermals. General Options is opened by default.

ACTIVE SKY 2012 USER’S GUIDE
© 2011 HiFi Technologies, Inc. 55
At the bottom of the Wx Options screen are four buttons:
Export Logs: Saves all your log files and combines them into a single log file, useful for reporting
errors or when contacting Technical Support. Note that this only saves the current session’s logs
and does not contain information from the previous session.
Load Defaults: Loads the “factory” default settings for Active Sky 2012.
Cancel Changes: Cancels all changes made.
Save and Apply: Saves and activates your changes.

ACTIVE SKY 2012 USER’S GUIDE
© 2011 HiFi Technologies, Inc. 56
General Options
The following options are available on the General Options tab:
Application Sounds: Selecting this option plays the thunder sound as Active Sky 2012 starts up
and enables sound effects including the “shutter” sound when making graphics selections and
recoloring variants.
Show in-sim text messages: Selecting this options allows Active Sky 2012 to display scrolling
messages in FS.
Voice ATIS/Flightwatch: Selecting this option plays the ATIS and Flightwatch messages when
you select the assigned frequency in FS (122.00).
Force Destination Wx Zone: Selecting this option instructs Active Sky 2012 to force all weather
stations to your present destination conditions when you are within 128nm. Using this feature,
you can start to see your final weather earlier and provides for less surprise on final approach,
where conditions might have normally been much different. This will also help stabilize AI traffic
for the proper landing/departing runway. You must have a flight plan loaded for this feature to
activate.
ATC Wind Lock: When enabled, surface winds will not change, and ATC runway assignment
conflicts should be avoided. The locked wind will be “reset” when you cross the 128nm

ACTIVE SKY 2012 USER’S GUIDE
© 2011 HiFi Technologies, Inc. 57
threshold to your destination, if using a flight plan, or within 3000ft AGL of the surface
otherwise, in order to allow the wind to update to the latest conditions before arrival.
Force High Priority Processes: Selecting this option allows Active Sky 2012 to set itself as the
high priority application for processing requests on your computer. This may result in faster
MAP redraws, weather synthesis and other processes, but may also reduce your frame rate.
Post-Plan Graphics Install Prompt: Select this to have Active Sky 2012 prompt you to
automatically install Graphics (integrated or via Snapshots) after loading/processing a new flight
plan.
Automatic Downloads: Selecting this option tells Active Sky 2012 to automatically download
and update weather data using the interval selected on the download interval slider.
VATSIM Online Weather: Selecting this option instructs Active Sky 2012 to use VATSIM as the
weather data source for weather updates of your current and destination weather. A flight plan
must be in use.
Download Interval: Moving this slider adjusts the time period between weather updates.
Works in conjunction with the Automatic Downloads checkbox.
Depiction Mode: Selects between the 3 available depiction modes for FSX.
Each mode has certain advantages and disadvantages. The user should look at the
recommendations below and perhaps try all three modes before decided on the best
one for their needs.
Standard
Standard weather depiction mode uses normal SimConnect station-based weather
writes and supports Range Suppression to reduce visual cloud changes (shifts) within
your local view range. Recommended for best accuracy and consistency of SURFACE
weather depiction. May result in simulation stutters/pauses during weather writes
(supports write suppression ceiling to prevent updates below a certain altitude).
Supports Local Range Suppression to prevent changes of weather in the local area,
which could cause visual cloud shifting.
Smooth Cloud Transitions
Smooth Cloud Transitions depiction mode uses enhanced SimConnect weather writes
that supports transitional cloud depictions that change over a period of 30 seconds.
May result in inconsistent weather parameters at locations other than departure area
and in winds aloft. Recommended for short-range and local flights or where visual cloud
smoothness is preferred over accuracy.
Direct Weather Control
Uses unique method of directly controlling ambient weather parameters resulting in the
best balance of accuracy and smoothness of all weather especially aloft winds.
Recommended for longer-range and airliner-style flights where winds aloft accuracy is
important. Includes full real-time Wind, Visibility and Barometric Pressure Smoothing.
Please note that in Direct Weather Control mode, the conditions are global ambient,

ACTIVE SKY 2012 USER’S GUIDE
© 2011 HiFi Technologies, Inc. 58
meaning they are the same (wind, temp, pressure) for all altitudes and all locations,
based on the aircraft position. FS ATIS for any airport/station will give improper surface
details. For this reason, AS2012’s Voice ATIS/Flightwatch feature (122.00 or 122.02 on
COM radios) should be used as an ATIS replacement when using DWC.
When changing depiction modes, make sure you Apply/Save your option changes,
followed by restarting Active Sky 2012, to see new weather depiction modes properly
take effect.
Depict Hurricanes: Selecting this option tells Active Sky 2012 to depict hurricanes using
specialized hurricane simulation when Active Sky 2012 detects hurricane strength wind data
from weather stations. This option is only available in FSX at the present time.
Create additional stations: Select this option to instruct Active Sky 2012 to create additional
weather stations between reporting stations. Active Sky 2012 will interpolate weather data
between the stations to allow smoother transition of weather changes between stations. This
function is not relevant to operation in DWC mode.
Enhance Route Coverage: Select this option to instruct Active Sky 2012 to create an enhanced
corridor of additional stations along the route of your flight. A flight plan needs to have been
entered for Active Sky 2012 to calculate your route enhancement. This function is not relevant
to operation in DWC mode.
Dynamic Rate of Change: Moving this slider adjusts the dynamic rate of change of weather
conditions in FSX. For most users, a setting of ZERO is highly recommended in order to avoid
depiction issues.
Use Local Range Suppression: Select this option to suppress weather updates inside a certain
range of the aircraft. This option is only available in Standard Depiction Mode, and prevents
graphical cloud shifts during updates. The weather you fly into is updated, but the weather
around your visible area is kept the same.
Suppress On Ground: When using Local Range Suppression, select this option to suppress
weather updates when the aircraft is on the ground. Normally, when suppression is enabled,
ground updates are allowed to continue.
Suppression Ceiling: When using Standard Depiction Mode, this value (in Feet MSL) is used to
determine when to prevent weather writes. Since weather writes can occasionally cause
increased overhead and stutters, this can prevent such occurrence in critical situations such as
departure and approach phases of flight. A value of 10000 is recommended for high altitude
flights (Commercial and Airliner), and a value of 4000 is recommended for lower altitude flights
(GA). Maximum is 20000. Warning: ALL WEATHER UPDATES WILL BE PREVENTED when
airborne below this configured altitude. This should always be set LOWER than your planned
cruise altitude, otherwise weather will not properly update!
Local Suppression Range: Moving slider adjusts the range in which weather updates are
suppressed. Anything outside this range will continue to update, and anything inside this range
(while airborne) will be kept the same. 100-200nm is recommended. Used with the Local Range
Suppression feature.

ACTIVE SKY 2012 USER’S GUIDE
© 2011 HiFi Technologies, Inc. 59

ACTIVE SKY 2012 USER’S GUIDE
© 2011 HiFi Technologies, Inc. 60
Cloud Options
The following options are available on the Cloud Options tab:
Maximum Cloud Layers: Moving this slider will adjust the maximum number of cloud layers
depicted. The more layers selected the more of a load will be placed on FS, and the slower
potential performance.
Minimum Cloud Turbulence: Moving this slider adjusts the minimum % of turbulence
experienced when in cloud layers.
Maximum Cloud Turbulence: Moving this slider adjusts the maximum % of turbulence
experienced when in cloud layers.
Minimum Cloud Icing: Moving this slider adjusts the minimum % of icing experienced within
cloud layers.
Maximum Cloud Icing: Moving this slider adjusts the maximum % of icing experienced within
cloud layers.
CAVOK Cloud Generation: Moving this slider adjusts the % of chance that cloud layers will be
generated when conditions are reported as CAVOK (Clouds And Visibility OK). Any generated
layers will generally be at least 5000ft and of FEW or SCT type.

ACTIVE SKY 2012 USER’S GUIDE
© 2011 HiFi Technologies, Inc. 61
No Data Cloud Generation: Moving this slider adjusts the % of cloud layers generated when
stations are not reporting cloud data.
Cirrus Cloud Generation: Moving this slider adjusts the % level of high (cirrus) cloud layer
generation (usually not reported in METARs).
Stratus Cloud Occurrence: Moving this slider adjusts the % of Stratus cloud layers versus
Cumulus layers. Stratus layers are generally flat in appearance, while cumulus are puffy and
more dramatic. Air stability calculations will also influence the stratus cloud occurrence rate
(less stability means more chance for cumulus).
Prevent Cloud Redraws (DWC Mode): Check this option to prevent cloud redraws when you
have DWC mode selected. This aids the prevention cloud popping.
Prevent Thunderstorms When CB Reported: Check to Prevent Thunderstorms with CB reports.
USA tends to report CB when Thunderstorm activity is imminent while in other countries it may
be routinely used for more normal (not significantly-convective) conditions.
Enable Stratocumulus Simulation: When enabled, traditional stratus and cirrus clouds will not
be depicted, but will instead be replaced with dramatic Stratocumulus-style clouds. These
clouds are fairly thin and layered but also lumpy with hints of cumulus. In order to provide the
effect, the clouds are defined in FSX as Cirrus, but act as both Stratus and Cirrus layers. You
must select a Stratocumulus-style Cirrus variant within Active Sky 2012’s Integrated Graphics in
order to take advantage of this feature. Your “Stratus Cloud Occurrence” setting will affect the
lower-altitude probability of these types of clouds, while your “Cirrus Cloud Generation” setting
will affect the higher-altitude probability. This feature supports weather-influenced selections.

ACTIVE SKY 2012 USER’S GUIDE
© 2011 HiFi Technologies, Inc. 62
Wind Options
The following options are available on the Wind Options tab:
Disable Winds Aloft: Selecting this option will disable wind generation above the surface wind
layer.
Wake Turbulence Strength: Moving this slider adjusts the % of wake turbulence strength during
the wake turbulence simulation by Active Sky 2012.
Maximum Surface Wind: Moving this slider adjusts the maximum wind strength in knots
depicted by Active Sky 2012.
Minimum Wind Turbulence: Moving this slider adjusts the minimum % of wind turbulence
experienced.
Maximum Wind Turbulence: Moving this slider adjusts the maximum % of wind turbulence
experienced.
Minimum Wind Shear: Moving this slider adjusts the minimum % of wind shear experienced.
Maximum Wind Shear: Moving this slider adjusts the maximum % of wind shear experienced.
Automatic Thermal Generation: Moving this slider adjusts the % of thermals generated by
Active Sky 2012.

ACTIVE SKY 2012 USER’S GUIDE
© 2011 HiFi Technologies, Inc. 63
Terrain Based Up and Downdraft Generation: Moving this slider adjusts the % of up and
downdrafts generated by terrain features.
Maximum Downdraft Rate: Moving this slider adjusts the maximum downdraft rate, in fpm,
experienced when entering a downdraft.
Maximum Updraft Rate: Moving this slider adjusts the maximum updraft rate, in fpm,
experienced when entering an updraft.

ACTIVE SKY 2012 USER’S GUIDE
© 2011 HiFi Technologies, Inc. 64
Visibility Options
The following options are available on the Visibility Options tab:
Fog Layer Generation: Selecting this option will instruct Active Sky 2012 to depict a fog layer
whenever Fog is stated as obscuration in the station weather report or visibility is under 3 miles.
Fog layers are injected overcast cloud layers just above the surface to approximately 2000ft.
Their type depends on the next option.
Use Stratus for Fog: When checked, Stratus will be used for fog layer generation instead of
cumulus. Stratus gives a thinner, less full cloud but may be more realistic as a simulation to fog.
Enable Visibility Graduation and Smoothing: Selecting this option will instruct Active Sky 2012
to smooth/graduate the visibility differences between surrounding stations and also vertically as
you climb/descend. When used with FSX, Direct Weather Control depiction mode must be
enabled to use this feature.
Graduation Ceiling: When Visibility Graduation and Smoothing is enabled, this value controls
the altitude (in feet AGL) that the Maximum Upper Visibility should be depicted. For example,
at 27000ft AGL, visibility will slowly increase from the surface to the maximum at 27000ft. A
minimum of 5000 and maximum of 90000 is acceptable.

ACTIVE SKY 2012 USER’S GUIDE
© 2011 HiFi Technologies, Inc. 65
Minimum Surface Visibility: Moving this slider adjusts the minimum surface visibility, in nm,
depicted in FS.
Maximum Surface Visibility: Moving this slider adjusts the maximum surface visibility, in nm,
depicted in FS. FS sight radius/maximum visibility settings can also influence maximum visibility
depicted.
Maximum Upper Visibility: Moving this slider adjusts the maximum visibility, in nm, above the
surface layer depicted in FS. FS sight radius/maximum visibility settings can also influence
maximum visibility depicted
Note: The option to “Disable FS Haze Layer” that was available in previous Active Sky versions has been
eliminated. The haze layer is now automatically disabled in all cases and required for proper results of
our new high-definition graphics and enhanced weather depiction routines.

ACTIVE SKY 2012 USER’S GUIDE
© 2011 HiFi Technologies, Inc. 66
Edit Station Data
This screen allows you edit the following data:
Airports.
Data Stations
VORs
NDBs
Physical Stations
As you can see the center of the screen contains the full list of stations in the currently selected file. The
data displayed varies according to the file.
Active Sky 2012 creates a backup of the original file to enable you to revert at any time to that file. The
file that is being edited is a temporary file with extra data stating whether the values for the data have
been edit or whether the item in that file is disabled.

ACTIVE SKY 2012 USER’S GUIDE
© 2011 HiFi Technologies, Inc. 67
You can change any value in the list by selecting the cell and then amending the value selected. Once
you have edited the value the ‘Edited?’ value will change to true giving you a visual clue to the stations
where you have changed data. You can also disable the station entirely by checking the ‘Disabled’
checkbox. You can also add new stations by scrolling to the bottom of the list and entering the data in
the blank row at the bottom.
Once you have completed your changes you can click the ‘Save’ button which will save all your changes.
You can cancel any changes you have made prior to saving by clicking on the ‘Cancel Edit’ button.
If you wish to refresh the data from the current in-use edit file click on the ‘Reload File’ button.
If you wish to refresh the currently selected file with data from our servers click the ‘Update File’
button. Active Sky 2012 will download the latest file from our servers and merge the data using the
rules you have specified on the ‘Overwrite User Edited Data On Update’ radio buttons. Active Sky 2012
will then go through the data item by item and update each station as necessary. Any stations that have
not been flagged as edited by the user will be updated.
The options available are:
Ask: Any station data that differs from the file on your pc and has been flagged as user edited
will require confirmation before Active Sky 2012 updates that station.
All: All station data, including any user edited data, will be updated with no intervention
required by you.
None: All station data that is not flagged as user edited will be updated. User edited data will
not be updated and will keep your changes.
All station files can be updated from the server with the exception of the wxmapping.bin file which is a
FS file and cannot be updated by our servers.
If you find that the data you have changed is incorrect or cannot remember the original values you can
delete the Edit file and start with fresh data. Click the ‘Delete Edit File’ and this file will be deleted then
recreated by Active Sky 2012 from one of two options. A message box will appear asking the following
question.
”Do you wish to download a fresh [Selected Edit File] from the server?
If you select no then we will reload data from the current data file.”
Select ‘Yes’ to allow Active Sky 2012 to download the latest data file from the server or select ‘No’ for
Active Sky 2012 to use the current file stored on your PC.

ACTIVE SKY 2012 USER’S GUIDE
© 2011 HiFi Technologies, Inc. 68
Thermals
This screen allows you to add custom thermals in FSX. Thermals can be “positive” or “negative”,
meaning they can provide a lifting force or a descending force.
There is a main data grid where you can view the thermal data you have created, showing:
Latitude: Latitude of thermal. If FSX is running at the time of creation then the latitude will
value will be the latitude of the aircraft.
Longitude: Longitude of thermal. If FSX is running at the time of creation then the latitude will
value will be the longitude of the aircraft.
Base Alt: The altitude at which the thermal will commence.
Upper Alt: The altitude at which the thermal will finish.
Decay: The factor by which the thermal will decay as it ascends (1.0 default)
Fpm: The feet per minute rate at which the air ascends or descends (use negative values for
downdraft)
Range: The effect range from the center of the lat and long that the thermal can be
experienced.
All these values can be edited directly in the grid.

ACTIVE SKY 2012 USER’S GUIDE
© 2011 HiFi Technologies, Inc. 69
To create a new thermal, press the “New” button and edit the details directly in the data grid. If FS is
connected, your current position will automatically be pre-filled in the data grid. When finished, press
the “Apply” button. Make sure that you have Thermals enabled in the Wind Options tab in order to
have them depicted!

ACTIVE SKY 2012 USER’S GUIDE
© 2011 HiFi Technologies, Inc. 70
Additional Navigation Buttons
Save Wx, Open Wx
These buttons allow you to save and open global pre-saved weather. Simply select the file to save (or
open) in the dialog window that opens and press “OK”.
Refresh
The Refresh button will refresh all weather and internal parameters, including downloading new
weather (if Automatic Downloads are enabled). It may take a few minutes for all refresh process to
complete.
Help
This brings up the documentation that you are now viewing.
Start FSX
Launches FSX.

ACTIVE SKY 2012 USER’S GUIDE
© 2011 HiFi Technologies, Inc. 71
Voice Features
Active Sky 2012 includes a voice ATIS and FlightWatch feature, which plays audio messages similar to
real ATIS broadcasts and Flightwatch weather updates.
To use these Voice features, make sure AS2012 is running and tune to 122.00 on any COMM radio in FSX
(must be activated and audio panel selected for that radio) and you will receive an ATIS voice message
for the closest weather station. Tuning to 122.02, when a flight plan is specified, plays back a destination
Flightwatch weather report.
When using Direct Weather Control depiction mode, these Voice features should be used as an
alternative to FSX ATIS in order to get correct station weather details. FS ATIS will report the current
ambient weather conditions (at your aircraft’s position and altitude), which will differ from the actual
station weather details. For example, in DWC mode flying at 33,000 feet above KLAX, FS KLAX ATIS will
report winds at your altitude, which will usually be much different than the surface winds. Active Sky
2012’s ATIS report should be used instead, which will provide the correct station surface information.

ACTIVE SKY 2012 USER’S GUIDE
© 2011 HiFi Technologies, Inc. 72
Creating Voice Sets
You can create custom voice file sets using your own voice. To do this, you will need to specify a new
voice folder and record several voice files. You can use the standard sound recorder included with
windows, or any other application that allows voice recording to .wav files. It is recommended to use
EQ and effects to simulate standard radio acoustics, but this is not required.
To create the new set, create a new folder in the Program Files\HiFi\AS2012\Voice\ base folder (i.e.
Voice4). It is recommended to copy an existing folder (i.e. Voice1) into the new one and rename it to
the new folder name so you have a reference to work with. The folder name must be one of Voice1
through Voice10.
You can use the below list to guide you in recording new voice phrases:
File Name Phrase
0.wav Zero 1.wav One 2.wav Two 3.wav Three 4.wav Four 5.wav Five 6.wav Six 7.wav Seven 8.wav Eight 9.wav Niner hundred.wav Hundred thousand.wav Thousand a.wav Alpha b.wav Bravo c.wav Charlie d.wav Delta e.wav Echo f.wav Foxtrot g.wav Golf h.wav Hotel i.wav India j.wav Juliet k.wav Kilo l.wav Lima m.wav Mike n.wav November o.wav Oscar p.wav Papa q.wav Quebec r.wav Romeo s.wav Sierra

ACTIVE SKY 2012 USER’S GUIDE
© 2011 HiFi Technologies, Inc. 73
t.wav Tango u.wav Uniform v.wav Victor w.wav Whiskey x.wav X-Ray y.wav Yankee z.wav Zulu information.wav Information weather.wav Weather wind.wav Wind calm.wav Calm gusting.wav Gusting to at.wav At vis.wav Visibility sky.wav Sky Condition clear.wav Sky Clear ceiling.wav Ceiling few.wav Few Clouds at scattered.wav Scattered broken.wav Broken overcast.wav Overcast temp.wav Temperature dewpoint.wav Dewpoint minus.wav Minus altimeter.wav Altimeter qnh.wav QNH rain.wav Rain snow.wav Snow thunderstorms.wav Thunderstorms in the vicinity light.wav Light moderate.wav Moderate heavy.wav Heavy advise.wav Advise on initial contact you have information.... flightwatch.wav FlightWatch Radio on 122.0. Current weather for.. goodday.wav Pilot reports requested on 122.0. Good-day. viszero.wav Less than 1/8th vis18.wav One Eigth vis14.wav One Quarter vis12.wav One Half vis34.wav Three Quarters vis114.wav One and a Quarter vis112.wav One and a Half vis134.wav One and Three Quarters vis214.wav Two and a Quarter vis212.wav Two and a Half

ACTIVE SKY 2012 USER’S GUIDE
© 2011 HiFi Technologies, Inc. 74
XGauge and XGauge Installation Wizard
XGauge is Gauge that runs within FSX itself and is installed to aircraft directly. XGauge loads the
imagery provided by Active Sky, displays it, and allows you to change the range, toggles and winds level
settings, similar to using the Map Screen.
XGauge must be installed into your aircraft to be used, so we have included a simple "XGauge
Installation Wizard" program to handle this task. With a few clicks it will easily install the required files
and the gauge itself into all aircraft.

ACTIVE SKY 2012 USER’S GUIDE
© 2011 HiFi Technologies, Inc. 75
To run XGauge Installation Wizard, use your windows START, Programs, HiFi, Active Sky 2012 program
menu and click on XGauge Installation Wizard. You simply follow the prompts to complete the gauge
installation.
During the installation wizard process, you will be asked if you wish to apply to all aircraft or only the
aircraft you choose. This is done by checking or un-checking the “Apply to All Aircraft” checkbox at the
bottom left in this screen.
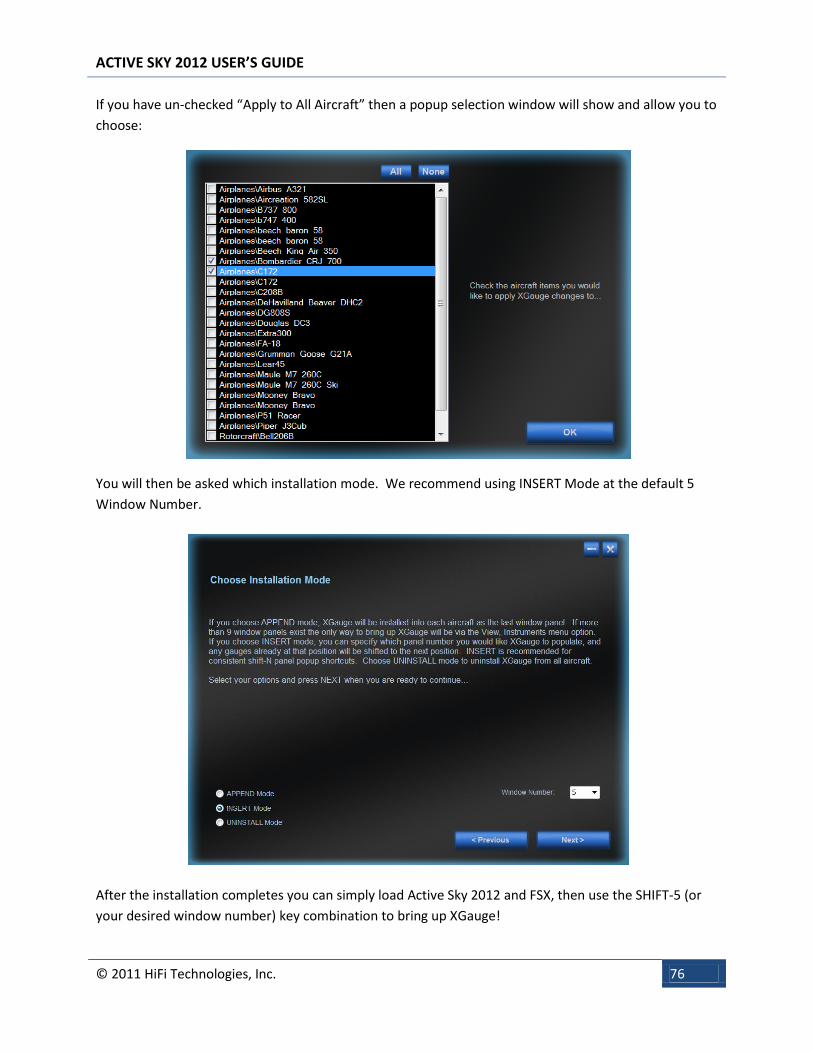
ACTIVE SKY 2012 USER’S GUIDE
© 2011 HiFi Technologies, Inc. 76
If you have un-checked “Apply to All Aircraft” then a popup selection window will show and allow you to
choose:
You will then be asked which installation mode. We recommend using INSERT Mode at the default 5
Window Number.
After the installation completes you can simply load Active Sky 2012 and FSX, then use the SHIFT-5 (or
your desired window number) key combination to bring up XGauge!

ACTIVE SKY 2012 USER’S GUIDE
© 2011 HiFi Technologies, Inc. 77
Note: Certain 3rd party aircraft panels may not be able to be edited by the wizard. If this occurs, you will
see a warning message indicating which aircraft/panel failed, and normal installation will continue. You
will be able to manually edit this panel and insert XGauge appropriately. Please see the existing XGauge-
installed panels and the Flight Simulator Panels and Gauges SDK for more information
(www.fsinsider.com).
Note: You can uninstall XGauge and restore your panel files to their original state by using the
UNINSTALL mode of XGauge Wizard. Please use caution restoring panel files that have been modified
after backup (backup occurs during installation of the gauge).
IMPORTANT: If you are coming from an older version of Active Sky with an older XGauge, you need to
UNINSTALL XGauge (via XGauge Wizard), then REINSTALL XGAUGE. This must be done in order to
update important gauge files.
When you first run FSX after the installation you may get 2 warnings. The first is the Microsoft warning
asking you to allow the software to run. Please select Run to allow X Gauge to complete its processes.
This does not apply to FS9.
The second warning is from FSX itself asking you to allow the XGauge.dll to be entered into the trusted
software list. If you select yes then you will not see this message again. If you select no then the XGauge
will only be loaded for the current session and each time you open FSX this message will appear.

ACTIVE SKY 2012 USER’S GUIDE
© 2011 HiFi Technologies, Inc. 78
The buttons on the left and right-hand side control the map view. The toggle controls are exactly the
same as per the Map Screen. You can also undock this gauge and move it to another position (use right-
click, undock).
XGauge buttons
STA = Station toggle
AIR = Airport toggle
RTE = Route toggle
VOR = VOR/NDB Toggle
REP = Sigmet/Airmet toggle
CLD = Cloud toggle
PRE = Precipitation toggle
VIS = Visibility toggle
WND = Winds toggle
MET = Display the closest station (or custom defined station in Report Screen) decoded
weather. Press this button again to turn off the decoded weather display.
DST = Display the destination station (if flight plan loaded) decoded weather. Press this button
again to turn off the decoded weather display.
W + = View the next higher wind altitude level (indicated by WLevel value in top-right of gauge
display window). WND toggle must be active.

ACTIVE SKY 2012 USER’S GUIDE
© 2011 HiFi Technologies, Inc. 79
W - = View the next lower wind altitude level (indicated by WLevel value in top-right of gauge
display window). WND toggle must be active.
R + = Zoom in (Range is indicated in the top right corner of the gauge display window).
R - = Zoom out (Range is indicated in the top right corner of the gauge display window).
PWR = Turns the unit on and off. Electric power must be available in your aircraft.

ACTIVE SKY 2012 USER’S GUIDE
© 2011 HiFi Technologies, Inc. 80
Notes
The imagery provided is a basic representation of weather conditions and not exact to the
depiction that will be experienced in the simulator. Boundaries of precipitation zones, for
example, may be different.
When using XGauge, the toggle and zoom controls will override any settings on the Map
Screen. If the Map Screen is used, toggle controls from XGauge may lose synchronization. If this
occurs simply click any toggle to re-establish control from either XGauge or the Map Screen.
XGauge may be overlaid onto Virtual Cockpit panels if an existing texture surface (such as an
existing MFD-style gauge or other available area). Modifying the panel configuration files is
required and not all aircraft are compatible with this method. For information on gauges and
virtual cockpits, please see the Microsoft Flight Simulator X SDK at http://www.fsinsider.com.
When uninstalling XGauge from your panels using XGauge Wizard, the previous backup of any XGauge
version will be restored, overwriting any recent changes that have been made. The panel files are
automatically backed up before XGauge Wizard modifies panels, and are available in the aircraft panel
folders.
Some inconstancies can result with 3rd-party aircraft panels, and some panels may fail to process. If this
happens, an error for that aircraft/panel will be shown. You will be able to manually edit the panel file
and include XGauge. Please see the modified XGauge panels and the Microsoft Flight Simulator SDK for
more information.

ACTIVE SKY 2012 USER’S GUIDE
© 2011 HiFi Technologies, Inc. 81
METAR and TAF Coding
METAR code is a standardized textual format for describing weather conditions at wx stations and
airports. To decode items, use the table below (applies to METAR and TAF items):
METAR
KPIT 091955Z COR 22015G25KT 3/4SM R28L/2600FT TSRA OVC010CB 18/16 A2992 RMK SLP045 T01820159
TAF
KPIT 091730Z 091818 15005KT 5SM HZ FEW020 WS010/31022KT FM1930 30015G25KT 3SM SHRA OVC015
TEMPO 2022 1/2SM +TSRA OVC008CB FM0100 27008KT 5SM SHRA BKN020 0VC040 PROB40 0407 1SM -RA
BR FM1015 18005KT 6SM -SHRA OVC020 BECMG 1315 P6SM NSW SKC
Forecast Explanation Report
TAF
Message type:
TAF -routine or TAF AMD-
amended forecast, METAR-
hourly, SPECI-special or TESTM-
non-commissioned ASOS report.
METAR
KPIT ICAO location indicator KPIT
091730Z
Issuance time:
ALL times in UTC "Z", 2-digit
date, 4-digit time
091955Z
091818 Valid period:
2-digit date, 2-digit beginning, 2-digit ending times
In U.S. METAR:
CORrected ob; or AUTOmated ob for
automated report with no human intervention;
omitted when observer logs on
COR

ACTIVE SKY 2012 USER’S GUIDE
© 2011 HiFi Technologies, Inc. 82
15005KT
Wind:
3 digit true-north direction,
nearest 10 degrees (or VaRiaBle);
next 2-3 digits for speed and
unit, KT (KMH or MPS); as
needed, Gust and maximum
speed; 00000KT for calm;
for METAR, if direction varies 60
degrees or more, Variability
appended, e.g. 180V260
22015G25KT
5SM
Prevailing visibility: in U.S.,
Statute Miles & fractions; above
6 miles in TAF Plus 6SM. (Or, 4-
digit minimum visibility in meters
and as required, lowest value
with direction)
3/4SM
Runway Visual Range:
R; 2-digit runway designator Left, Center, or Right as
needed; "/"; Minus or Plus in U.S, 4-digit value,
FeeT in U.S. (usually meters elsewhere); 4-digit
value Varialbility 4-digit value (and tendency Down,
Up or No change)
R28L/2600FT
HZ Significant present, forecast and recent weather:
see table (below) TSRA
FEW020
Cloud amount, height and type:
SKy Clear 0/8,
FEW 0/8-2/8,
SCaTtered 3/8-4/8,
BroKeN 5/8-7/8,
OVerCast 8/8;
3-digit height in hundreds of ft;
Towering CUmulus or CumulonimBus in METAR; in
TAF, only CB. Vertical Visibility for obscured sky and
height "VV004". More than 1 layer may be reported
OVC010CB

ACTIVE SKY 2012 USER’S GUIDE
© 2011 HiFi Technologies, Inc. 83
or forecast. In automated METAR reports only,
CLeaR for "clear below 12,000 feet"
Temperature:
degrees Celsius; first 2 digits, temperature "/" last 2 digits, dew-point temperature;
Minus for below zero, e.g., M06 18/16
Altimeter setting:
indicator and 4 digits; in U.S., A-inches and
hundredths; (Q -hectoPascals, e.g. Q1013)
A2992
WS010/31022KT
In U.S. TAF, non-convective low-level (<=2,000 ft) Wind Shear; 3-digit height
(hundreds of ft); "/" , 3-digit wind direction and 2-3 digit wind speed above the
indicated height, and unit, KT
In METAR, ReMarK indicator & remarks. For
example:
Sea-Level Pressure in hectoPascals & tenths, as
shown: 1004.5 hPa;
Temp/dew-point in tenths °C, as shown: temp
18.2°C, dew-point 15.9°C
RMK
SLP045
T01820159
FM1930
FroM and 2-digit hour and 2-digit
minute beginning time: indicates significant change.
Each FM starts on a new line, indented 5 spaces.
TEMPO 2022 TEMPOrary: changes expected for < 1 hour and in total, < half of 2-digit
hour beginning and 2-digit hour ending time period
PROB40 0407 PROBability and 2-digit percent (30 or 40): probable condition during 2-

ACTIVE SKY 2012 USER’S GUIDE
© 2011 HiFi Technologies, Inc. 84
digit hour beginning and 2-digit hour ending time period
BECMG 1315 BECoMinG: change expected during 2-digit hour beginning and 2-digit
hour ending time period
Table of Significant Present, Forecast and Recent Weather - Grouped in categories and used in the order
listed below; or as needed in TAF, No Significant Weather.

ACTIVE SKY 2012 USER’S GUIDE
© 2011 HiFi Technologies, Inc. 85
QUALIFIER
Intensity or Proximity:
- Light "no sign" Moderate + Heavy
VC Vicinity: but not at aerodrome; in U.S. METAR, between 5 and 10SM of the point(s) of observation; in U.S. TAF,
5 to 10SM from center of runway complex (elsewhere within 8000m)
Descriptor: Precipitation:
MI Shallow
BC Patches
PR Partial
TS Thunderstorm
BL Blowing
SH Showers
DR Drifting
FZ Freezing
DZ Drizzle
RA Rain
SN Snow
SG Snow grains
IC Ice crystals
PL Ice pellets
GR Hail
GS Small hail/snow pellets
UP Unknown precipitation in automated
observations
Obscuration: Other:
BR Mist(>= 5/8SM)
FG Fog(< 5/8SM)
FU Smoke
VA Volcanic Ash
SA Sand
HZ Haze
PY Spray
DU Widespread dust
SQ Squall
SS Sandstorm
DS Duststorm
PO Well developed
FC Funnel cloud
+FC tornado/waterspout dust/sand whirls

ACTIVE SKY 2012 USER’S GUIDE
© 2011 HiFi Technologies, Inc. 86
Technical Guides
SimConnect Troubleshooting
If you are unable to get things working properly with FSX and Simconnect, please check for the following
common issues:
Standard networking not properly configured between computers
SimConnect.xml, SimConnect.ini and/or SimConnect.cfg not properly existing or configured
properly and in the proper locations
Port not enabled via software firewalls
Improper computer name or ip address set in the Address fields of the .xml and .cfg files
Protocol not set for IPv4 in .xml and/or .cfg files
SimConnect.msi installer not run on client machine
SimConnect not found error
Some users may experience trouble with SimConnect installation preventing proper operation of Active
Sky 2012 or other SimConnect add-ons. You may a message during Active Sky 2012 startup similar to:
Simconnect SP1 or SP2 not found and must be installed for proper operation.
Reinstalling the FSX update(s) (recommended procedure)
The first step in attempting to repair your SimConnect installation is to uninstall/reinstall FSX’s SP1 or
SP2 update. Removal is done in add/remove programs, making sure to check the "Show updates" box to
see the SP1, SP2 or Acceleration/SP2 update entry (if XP) or choosing the "View installed updates"
option in (Vista/7).
The majority of potential installation issues will be solved with this method.
Manual deletion and reinstallation (if recommended reinstall procedure does not fix the problem)
Warning! Modifying your GAC or Windows SxS files can cause improper configuration of the
SimConnect modules, and is not recommended for most users. Complete re-installation of FSX may be
required.
If further problems are experienced, the actual SimConnect installation may be damaged/corrupt and
the normal reinstall procedure may not work to correct the situation. If the described reinstall does not
work, please follow these instructions to force a manual reinstallation:

ACTIVE SKY 2012 USER’S GUIDE
© 2011 HiFi Technologies, Inc. 87
If you have FSX Deluxe:
Install the SDK from the DVD (if not already installed). Update to SP1A or SP2 SDK from www.fsinsider.com (if not already updated). You will need the simconnect.msi file located in your SDK folder's Core Utilities\SimConnect
SDK\lib subfolder. Run this .msi file (double click) and the appropriate SimConnect files will be installed. A complete uninstall and reinstall of FSX may be required if none of these methods work. You
can also contact Microsoft Technical Support for your FSX product.
If you do not have FSX Deluxe:
Uninstall/remove the SP1, SP2 or Acceleration update(s) as described above in the recommended procedure
Using Windows Explorer, locate the folder: C:\Windows\winsxs\ for XP or C:\Windows\assembies(your Windows folder may be different if you chose to install it into another location. C:\Windows is the normal default)
In this folder will be one or more entries for x86_microsoft.flightsimulator.simconnect. Backup these entries! Copy and paste it to another location i.e. C:\Backup
Delete all version entries v 10.0.61242 AND LATER by highlighting it and pressing the DELETE key on your keyboard (confirm YES to delete) - DO NOT DELETE ANY OTHER ENTRIES!!! DO NOT DELETE v 10.0.60905!
Reinstall the FSX update(s) in order as desired If the SimConnect files were not properly installed (which can occur in some situations), you
may need to restore your backed-up entries A complete uninstall and reinstall of FSX may be required if none of these methods work. You
can also contact Microsoft Technical Support for your FSX product.

ACTIVE SKY 2012 USER’S GUIDE
© 2011 HiFi Technologies, Inc. 88
Networked Simulation Configuration
Active Sky 2012 can be used in a networked configuration where FSX runs on a different computer (FSX
Deluxe version is required).
Allowing this to work requires proper networking and security configuration on both computers.
SimConnect will be used in networked client/server mode to facilitate the weather communications
functions. Networked file access will be used to pass data between Active Sky 2012, XGauge and FSX
station databases.
Sharing Folders
To properly use Active Sky 2012 in a networked configuration, you must have three folders shared on
your FSX pc. If you are not familiar with how to share folders please search the internet as there are
many helpful resources.
Folders to share
C:\Program Files\Microsoft Games\Flight Simulator X (or your FSX installation folder) C:\Documents and Settings\[username]\Application Data\Microsoft\FSX (or if on Vista/7,
C:\Users\[username]\AppData\Roaming\Microsoft\FSX) C:\Documents and Settings\[username]\My Documents\Flight Simulator X Files (or if on
Vista/7, C:\Users\[username]\Documents\Flight Simulator X Files)
These folders should be shared with write permissions (Allow networked users to change my files).
If you are unable to locate these folders, you may need to enable "Show hidden and system files" in
your VIEW options within Windows Explorer.
We recommend using the default share names for simplicity.
To confirm that you have sharing setup properly, attempt to access these shared from your
remote/client computer. You should be able to view the content of these folders through Windows
Explorer (via the Network/[computername]/[sharename] path)
Important requirements for networked configuration:
FSX Deluxe version ONLY (standard does not include the SDK or required simconnect client installation files)
FSX Service Pack 1 (or later) update applied (http://www.fsinsider.com) FSX SDK installed from FSX Deluxe Disk 1 (\SDK folder setup.exe) FSX SDK SP1A (or later) update applied (http://www.fsinsider.com)

ACTIVE SKY 2012 USER’S GUIDE
© 2011 HiFi Technologies, Inc. 89
The computer to run FSX (hereby named SERVER) and the computer(s) to run SimConnect add-ons (hereby named CLIENT(s)) must be appropriately configured for normal IP networking
Firewall software must be configured to allow SimConnect communications on the port you set (we suggest port 500) – This includes windows firewall – and applies to all computers, both SERVER and CLIENT(s)
Shared Folders must be properly configured.
Step 1: Verify requirements Look through the above requirements and ensure everything is setup properly and all FSX SDK &
update installations have been run.
Step 2: Configure SERVER There are two files which must be configured on the server. They are:
[ApplicationDataFolder]\Microsoft\FSX\SimConnect.xml [MyDocumentsFolder]\Flight Simulator X Files\SimConnect.ini
ApplicationDataFolder is:
For Windows XP: C:\Documents and Settings\[USERNAME]\Application Data\
For Vista/7: C:\Users\[USERNAME]\AppData\Roaming\
MyDocumentsFolder is:
For Windows XP: C:\Documents and Settings\[USERNAME]\My Documents\
For Vista/7: C:\Users\[USERNAME]\Documents\.
There are example files located in your FSX SDK installation folder (normally C:\Program
Files\Microsoft\Games\Flight Simulator X SDK\SDK\Core Utilities\SimConnect SDK\config). We suggest
copying these files to the appropriate locations and then modifying as follows:
SimConnect.xml:
The values for Protocol, Address and Port must be modified. The other values should be left default.
For Protocol,
IPv4 should be used.
Example: <Protocol>IPv4</Protocol>
For Address,
use either the computer name or the physical IP address of this SERVER.
Example: <Address>192.168.1.102</Address>
For Port,
use any port you wish to enable for SimConnect communications. We suggest port 500. This port will

ACTIVE SKY 2012 USER’S GUIDE
© 2011 HiFi Technologies, Inc. 90
need to be enabled in any software firewall programs you are running (including windows firewall).
Example: <Port>500</Port>
Note: If you are using FSUIPC v4 with FSX, you may need to perform the following steps for proper
networked operation:
1. First set the SimConnect.xml as described above.
2. Next set the <Scope> variable to global instead of local (<Scope>global</Scope>).
3. Run FSUIPC install (again if already installed). Your SimConnect.xml will then be properly
configured.
SimConnect.ini:
The configuration values here are less important, however it is extremely helpful to have the debug
console activated (console=1) to be able to see when SimConnect is appropriately making a connection
and talking to the client applications.
We suggest the default values:
Change console to 0 (console=0) to disable to debug console.
Step 3: Installing SimConnect client on CLIENT(s) There is a simconnect.msi installation file located in the SDK installation folder\SDK\Core Utilities
Kit\SimConnect SDK\lib. This file should be copied to each CLIENT machine and run in order to install
the appropriate SimConnect client files. Remember to update your SDK to SP1A (or latest) before doing
this.
Step 4: Configure CLIENT(s) There is a single configuration file needed on all clients:
[MyDocumentsFolder]\SimConnect.cfg
MyDocumentsFolder is:
For Windows XP: C:\Documents and Settings\[USERNAME]\My Documents\.
For Vista/7: C:\Users\[USERNAME]\Documents\.
There is an example file located in your FSX SDK installation folder (normally C:\Program
Files\Microsoft\Games\Flight Simulator X SDK\SDK\Core Utilities\SimConnect SDK\config). We suggest copying
this file to the appropriate location and then modifying as follows:
The values for Protocol, Address and Port must be configured exactly the same as you have configured for the
server’s SimConnect.xml file. We recommend the other values be left default.
Here is an example SimConnect.cfg file:
[SimConnect]
Protocol=IPv4
Address=192.168.1.102
Port=500

ACTIVE SKY 2012 USER’S GUIDE
© 2011 HiFi Technologies, Inc. 91
MaxReceiveSize=4096
DisableNagle=0
The SimConnect.cfg file needs to be set for all client computers that will be running addons that need to connect
to FSX on the server.
Step 5: Test the configuration Using the samples provided in the SDK, you can easily test for proper networked simconnect
configuration. The AI Traffic.exe example program (located in the SDK Installation folder\SDK\Core
Utilities Kit\SimConnect SDK\Samples\AI Traffic) should be run after the SERVER’s FSX has been started.
If successful, the AI Traffic program will bring up a console window indicating “Connected to Flight
Simulator!”. If unsuccessful, the program will run and end immediately without any “Connected”
message shown. If you have the debug console enabled on server (console=1 in the SimConnect.ini file)
then you’ll see some messages indicating connection and communication with the client.
Step 6: Configuring Active Sky 2012 Once you have the shares and SimConnect configuration complete, you can configure Active Sky 2012 to
properly work in networked configuration.
Active Sky 2012 needs to know the location of the main Flight Simulator X installation path as well as the
FSX Appdata path. In addition, you may want to load FSX flight plans on the FSX computer into Active
Sky 2012 on the client. Since your shares are already configured you simply need to point Active Sky
2012 to these locations. To do this, simply run Active Sky 2012. Active Sky 2012 will identify that FSX is
not installed on the client machine and automatically ask for and save the correct network share
locations.
If you need to manually specify these locations, you can edit the registry key values (on the client
machine) as follows:
HKEY_CURRENT_USER\Software\HiFi\AS2012\FSXMyDocsPath: Set this to your desired flight plan folder, which should be shared on the FSX computer as \\fsxcomputername\Flight Simulator X Files
HKEY_CURRENT_USER\Software\HiFi\AS2012\FSXPath: Set this to your desired Flight Simulator X installation path, which should be shared on the FSX computer as \\fsxcomputername\Flight Simulator X
HKEY_CURRENT_USER\Software\HiFi\AS2012\FSXAppDataPath: Set this to your desired FSX AppData Path, which should be shared on the FSX computer as \\fsxcomputername\FSX

ACTIVE SKY 2012 USER’S GUIDE
© 2011 HiFi Technologies, Inc. 92
Step 7: Configuring X Gauge XGauge needs to be installed into the FSX installation. To do this, you can run the XGauge Installation
Wizard and point it to the proper shared locations.
Alternatively, you can copy the entire XGaugeWizard folder (located in your Active Sky 2012 installation
folder i.e. C:\Program Files\HiFi\AS2012\XGaugeWizard) to the FSX machine (any location) and run the
XGaugeWizard.exe file inside there. The files will be appropriately copied into FSX and the gauge will be
installed into the aircraft.
Active Sky 2012, when running, will automatically update the imagery as requested by XGauge, even
when on the other computer.
NOTE: Client and Server Usage Warning
If you are using WideFs or SimConnect over a network and Active Sky 2012 is installed as a client and
you also have an instance of FSX installed on the client PC (that you do not intent to use) you must
ensure that the path(s) in the Active Sky 2012 registry setting for FSX point to your server version, not
the client version. This does not affect most users.
WARNING: Edit the registry at your own risk. Modifying improper registry keys can result in computer
problems.
The registry settings that need adding if you are having an issue with Active Sky 2012 locating your
server version are:
HKEY_CURRENT_USER\Software\HiFi\AS2012\FSXPath
HKEY_CURRENT_USER\Software\HiFi\AS2012\FSXAppDataPath
These paths must point to your server versions i.e. (Examples only, enter your correct paths not the
values below).
\\VISTA-DESKTOP\Flight Simulator X\ for the FSX installation path
\\Vista-desktop\fsx\ for the FSX appdata path

ACTIVE SKY 2012 USER’S GUIDE
© 2011 HiFi Technologies, Inc. 93
Credits
We’d like to thank everyone for their support of our continued development of weather simulation
products. Without your purchase and support, we would not be able to work on Active Sky. Thank YOU
for enabling us to do what we love to do!
We’d also like to thank a few organizations and individuals who have been critical to our success and to
that of the entire Flight Simulation Community: AVSIM, Peter Dowson, SimFlight, SimMarket, and
VATSIM. Thank you!
Additionally, HiFi would like to say thanks to our Beta Team who helped contribute to make Active Sky
what it is today. We have members on the “Core” Initial Beta Team who’ve been with us from the
beginning, and continue to work just as hard today as they did 10 years ago to help guide us and help
put the final touches on our software . Our recently recruited Quality Assurance Team provides pre-
release review and testing before it gets labeled “RTM”. They work hard to make sure the software
works solidly and as intended on a wide range of configurations, and greatly contribute to the overall
quality of the product. Our Beta Team members are instrumental and without them we’d never be able
to achieve the level of fidelity and quality in our products that we strive for. To the entire Beta Team,
Thank you!
Finally, HiFi must thank its own Development and Support team members, who have tirelessly pursued
innovation, integrity and quality to help bring out and support what we think is the most sophisticated
weather engine ever produced. When called to duty, they have delivered above and beyond, and
without them we’d just be another software company. Thank You!

ACTIVE SKY 2012 USER’S GUIDE
© 2011 HiFi Technologies, Inc. 94
Active Sky 2012
Produced by
HiFi Technologies, Inc.
Design and Programming by
Damian Clark
Graphical Texture Content by
Chris Willis
HiFi Beta Team
Core Beta Team
Victor Baron Devin Pollock Simon Illingworth Peter Zaehringer Hans van Wijhe Karl-Heinz Wichmann Stephen Chappel Patrick Maeyens Tim Hughes
Andrew Baker Dave Opper
Quality Assurance Team
Nikos Aslanakis Tomasz Link Kevin Conlon Michel Clavier Neal Howard Kimmo Leskinen
Glyn Jones Robert Halmich Angel Francisco Wayne Klockner Dave Vollmer Al Jordan Dave Jennings Bernhard Rems Günter Steiner
Sheldon Paprota Fred Solli David Jones Frank Ryan