acura nsx abs/alb modulator rebuild...
TRANSCRIPT

1
ACURA NSX ABS/ALB Modulator Rebuild Procedure
Version 06
I rebuilt my 1991 ABS/ALB modulator using this procedure. Please note that this will
not guarantee that your ABS/ALB system issues will be resolved by this procedure, but it
will get your modulator in a functioning state which is 90% of the issues with the Acura
NSX early model ABS/ALB systems.
The ABS system is made up from several pieces. Modulator, Accumulator, ABS pump,
brain-control assembly and Gear pulser on each wheel. This document is for the rebuild
of the Modulator assembly only.
You need to sure this kit is for you. Basically if you have 1991 or 1992 NSX this will
work. If your car is newer than 1992, then you need to reference the picture below:
Picture source: NSXCB UserID: Kaz
The modulator on the right is from a 1991 NSX. Please take note to the shape of the
reservoir. If your modulator has a reservoir shape like the unit on the left. STOP HERE.
I cannot guarantee the o-rings will fit modulators that look like the unit on the left. You
can use this document to reference the disassembly, and reassembly, but again, my o-ring
kit may not fit.
2
You can also reference the other pictures in this document to ensure you have the
modulator that can have the o-rings replaced with my kit.
This is a live document. Versions will be updated as edited. The latest version is always
available here: http://www3.telus.net/public/warshan/Cars/NSX/ABS/
If you find any mistakes or want to suggest helpful hints, please let me know with a
private message at: http://www.nsxprime.com
Symptoms:
Please pay close attention to this. If your modulator does not fit the following, it
may be beyond repair. Only use this document if you experience the ALB/ABS
pump running for less than 30 seconds and you get bubbles or foam in the reservoir
after exercising the solenoids as per the Danoland procedure:
http://www.danoland.com/nsxgarage/brakes/abs/abs.htm
ABS/ALB pump runs every time you start out once you reach 10km/hr and runs
for less than 30 seconds. (This is probably the modulator at fault.) You should be
able to resolve the issue with this procedure.
ABS/ALB pump runs all the time, never stops. (This may be a leak or bad
accumulator) This procedure will not help this symptom.
ABS/ALB pump never runs. (bad pump; someone else disabled it, or jumpered
out the accumulator pressure switch (orange plug on the accumulator)) More
work is to be done, than just this rebuild of the modulator.
If you notice bubbles in the ALB/ABS reservoir after the pump has run for less than 30
seconds, you probably have a modulator that is in need of attention. Exercising the
modulator solenoids can sometimes clear the constant pump running every time you start
out, but the problem will return if the system is contaminated. This can be fixed…
Contamination: What is the issue?
I found that the ALB/ABS system gets contaminated with particles that stop the system
from sealing and prevents the solenoids from doing their job.
Contaminated with what?
The cap on the reservoir is vented. It is vented on the underside of the cap. The radiator
fan on the NSX is right in line with the bottom side of this cap. The Fan and the reservoir
are really in a bad place in relation to each other. I found a lot of contamination, mostly
bug pieces, guts. Brake fluid preserves these bugs quite well. No doubt about it, bug
pieces get in the way of the solenoids doing their job. I cannot think how else
contamination like this can get in the system, but you will see contamination in the
attached pictures and you can make your own decision on what it is and how it gets in the
system.
What needs to be done?

3
Remove the ALB/ABS modulator, disassemble, clean, replace all o-rings, reassemble,
pressure test for leaks.
This could be done in the car, but I recommend your remove the modulator, to fix and
flush it properly. Once reinstalled, a test drive for ABS functionality is recommended.
A Warning about brake fluid.
Brake fluid will bubble and peel paint just like paint stripper so be careful. If brake fluid
gets on paint, it can be washed with soap and water. It has stripped clean the paint from
the bracket that the ALB-ABS pump is mounted to. Don’t let this happen to any painted
surface. This is another reason to remove the modulator and replace once rebuilt. I
suggest you cover the fender and bumper just in case.
The modulator, Accumulator assembly:

4
The Modulator alone out of the car
Removal of the Modulator:
Ensure that the pressure is relieved from the system. The accumulator can have in excess
of 3000lbs of pressure and this will spray and leak brake fluid everywhere. Not to
mention the hazards of high pressure brake fluid. Release the pressure at the bleeding
screw using the Honda bleeding tool or a 9mm square socket to fit.

5
See: Danoland NSX DYI for info on releasing the accumulator pressure and flushing the
ABS-ALB system: http://www.danoland.com/nsxgarage/brakes/abs/abs.htm
More brake fluid to remove:
Using a turkey baster, remove as much as possible from the ALB/ABS reservoir. Then,
put a good quality lint free shop towel in the reservoir to absorb the rest. (Put the lid back
on)
Remove the system from the car.
Remove the four connectors that lead to the solenoids, disconnect the pump and
the pressure switch connector on the accumulator.
Remove 6 brake lines, two from the master cylinder and four from the brake
callipers.
Remove three 14 mm bolts that hold the system to the fender.
The system should be able to be removed at this point. To make the assembly
smaller, to make it a bit easier, you could remove the spare tire protective bracket
by removing four 10mm bolts.

6
You should now be looking at this out of the car:
Disassemble the modulator form the rest of the system. Remove two hoses, accumulator
brake line, and three bolts from the underside of the modulator.
Time to disassemble this…..
Tools required:
6mm Alan, Hex key, (you will need a 3/8 6mm Hex socket to get this apart as it is
very tight.
10mm socket and/or wrench (spanner)
12mm socket and/or wrench (spanner)
14mm socket and/or wrench (spanner)
Flat blade screwdriver
Philips screwdriver
Rubber Hammer

7
A good quality pant saver car mat to set this unit on and catch the brake fluid
while you work on it.
The modulator has two sides: The solenoid side and valve / piston side.
Start on the solenoid side.
Remove the reservoir by removing the two Philips screws
Remove the other Philips screw on top of the modulator.
Remove the reservoir keeping the two o-rings at the bottom side of reservoir.
That top assembly is now held on only by tight fitting o-rings. A couple of easy taps with
a rubber mallet near one end will loosen up the assembly and then you can rock it from
end to end to remove the top assembly. Then carefully remove the plastic housing
without losing the four black rubber keepers that protect the solenoid wires and two
springs that mount on top of the screws.
It should now look like this.

8
Continuing to work on the solenoid side, you will notice that there are eight 6mm hex
head bolts. These are extremely tight. Remove them all. I recommend a 6mm hex
socket. I placed my modulator in a vice in order to get these lose.
Once the hex bolts are out, you should be able to remove all four solenoids together. You
can turn each solenoid one at a time to the key opening to remove a solenoid as an
assembly.
Careful not to lose the springs in the bottom of the modulator for each solenoid
Two large o-rings on each solenoid, 6 small o-rings in total.
Notice the contamination? It looks like bug guts to me. There are actually body and
wing parts!

9
You can now see why flushing the system cannot get everything out of the ALB/ABS
modulator. This modulator has only had 39,000 miles on it.
Clean this entire assembly and solenoids so they are clear of any contamination. Good
quality disposable shop towels, Q-tips and Kim Wipe towels will work. I used brake
fluid to ensure that everything was clear. Remove the springs and ensure it is clear down
in the spring holder as well. There are drain holes in the bottom. These actually are the
portals for the fluid to move through to the valve / piston side. Ensure that fluid can flow
by filling the assembly and waiting for the fluid to empty.
It is best now to disassemble the valve / piston side of the modulator. This will ensure
you can clean the entire system and get rid of all contaminants.
On the valve / piston side there are six bolts (four 12mm and two 14mm) to be removed.
Each chamber is a separate head that house the springs for one front and one rear wheel.
You will notice in the picture below that the springs are different. You cannot
reassemble these wrong. Everything only fits one way. However try and keep the valve /
pistons in the same position they came out of. The valve / pistons will fit in another hole
in the assembly.

10
Spring difference:
Remove the springs and then the valve / piston are below each spring. This is what
pulses the fluid.
Disassembled valve / piston side:

11
Valve / pistons: two different size o-rings:
This side of the modulator will not have as much contamination. Fluid has to flow from
the solenoid side to get here and there are screens on the solenoid side to catch most of
the debris. The passage is small at the bottom of the modulator assembly; ensure you
have it flushed completely.
Time to replace o-rings and reassemble…
When replacing o-rings ensure you grease them first. It takes special grease that will
stand up to break fluid. I used Castrol Red Rubber Break Grease for Calliper Fluid. (Red
in Colour shown below) This is the grease that is used when rebuilding brake callipers.
Available at UK brake shops and eBay. This grease is only available through Castrol
UK. Not the grease for calliper pad replacement. Two very different grease compounds.
12
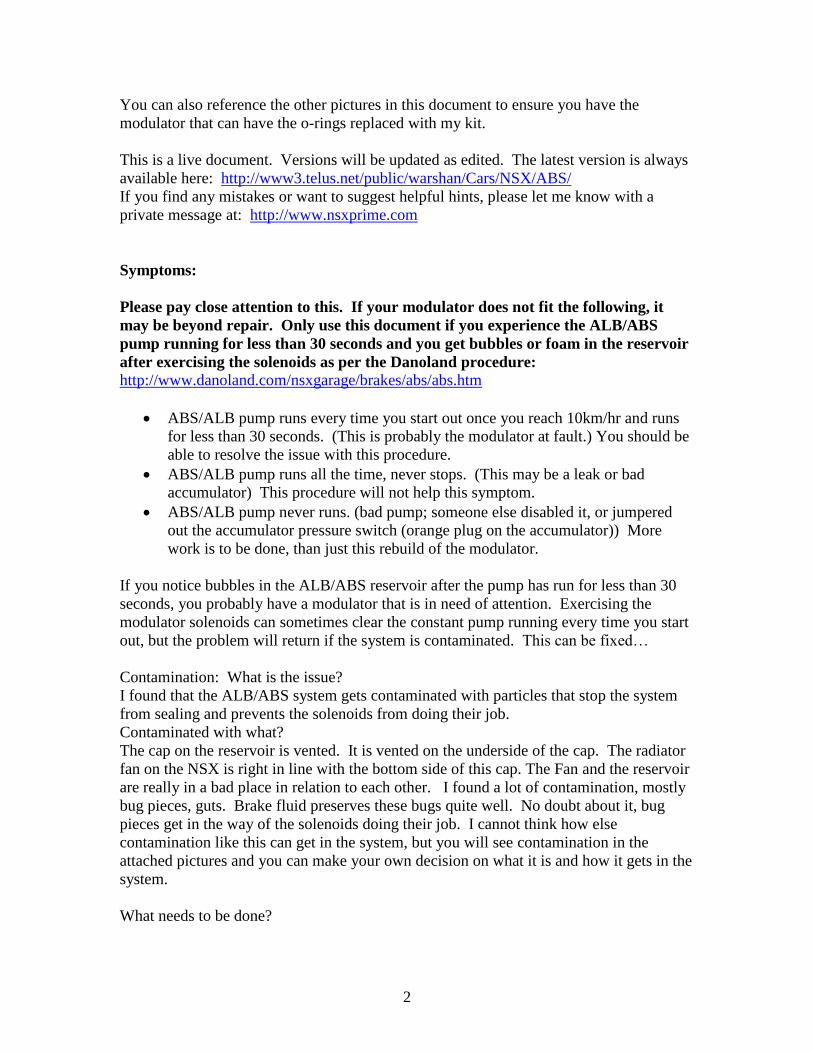
Grease on the valve / pistons before o-ring install:
My modulator came out of my 1991 with only 39,000 miles. It appeared in good
physical shape. The o-rings looked fine (brand new), but I replaced them anyways.
There are five different sizes of o-rings. I took each to Daemar Inc. and told them I need
these quantities and they need to be able to survive brake fluid. It took them a month to
get me replacements. They measured the sizes and provided me with the following part
numbers. O-rings that can tolerate brake fluid are hard to source. If you cannot find
exact replacements, then just clean re-grease and reassemble. You will not be able to get
this modulator together without the grease and some brake fluid for lubrication.
Everything fits very tight.

13
Daemar Inc. o-ring replacements (Daemar part numbers):
7-2mm EPDM Metric p/n 43162 Solenoid qty 6
29-2mm EPDM Metric p/n 58332 Reservoir qty 2; Solenoid qty 8
25-2mm EPDM Metric p/n 45404 Valve / piston qty 4
24.5-2mm EPDM Metric p/n 58164 Valve / piston qty 4
31-2mm EPDM Metric p/n 52019 Valve / piston head qty 4
I worked with Daemar to ensure that the the o-rings had the the abilty to work with brake
fluid. Not all rubber is compatatble with brake fluid. Brake fluid will break down most
rubbers, but not EPDM rubber (ethylene propylene diene monomer (M-class) rubber). All
the o-rings are made of EPDM rubber.
http://en.wikipedia.org/wiki/EPDM_rubber
http://www.daemar.com/
The red rubber grease is a special grease for use with brake fluid. It is a vegetable base
that will not affect brake fluid. The grease I selected is Castrol red rubber grease and is an
industry standard for brake hydraulics. I had to import this stuff from the UK as it doesn't
seem to be available in North America.
http://www.redrubbergrease.com/ http://www.bp.com/assets/bp_internet...Grease_TDS.pdf

14
A breakdown of all the modulator parts: (Honda UK site)
http://www.lingshondaparts.com/honda_car_parts_selection_pfk.php?block_01=17SL00
1&block_02=B__2411&block_03=21668
Source: NSXCB UserID: Kaz

15
Some cleaning to ensure a good seal was necessary as shown below. Nothing too fancy
to clean this aluminum face. Burgundy Scotch Brite pads will do the trick.

16
Reassembly of valve / piston side:

17
Tricky part of reassembly is the solenoid side: The plastic cover has a couple of small
springs that fit on the screws of the plate that holds the solenoids in place. (Number 19 in
the diagram) These two screws and the small black rubber keepers (number 18) that
protect the solenoid wires are somewhat difficult to fit into place.
For the most part reassembly is the reverse of assembly. Parts cost me ~$100.00 for o-
rings and grease. Daemar was not that great to deal with, but with persistence, I was able
to get the parts and get this to work
Be sure to completely flush your brakes after getting this back together and installed in
your car. It may take a couple of brake flushings to get all the air out of the system.
Check for leaks and enjoy your ALB/ABS like it was new again.

18
Acknowledgements:
Without NSXPRIME this would not be necessary or possible. Thanks PRIME for
giving us this forum to share ideas and experiences with our NSX.
Thanks to Brad (OLDMNSX) for his help on some of this. His knowledge of the
ALB/ABS system was very valuable when I was doing this.
Danoland NSX DYI http://www.danoland.com
NSXCB (NSX Club of Britain) http://www.nsxcb.co.uk. Thanks to Kaz for his
knowledge and experience
http://www.lingshondaparts.com Full parts breakdown of 1st generation modulator