adamson mass rigging manual
DESCRIPTION
User ManualTRANSCRIPT

M15 - MASS Rigging Manual p. 1
The M15 optional accessories include the MASS™ (Multi Angle
Suspension System) which features several different methods of
flying the cabinet.
The M15 is designed to receive a multi-purpose rigging plate, which
is the base for the following rigging methods covered in the manual.
MASS™ is designed for a single or a pair of M15’s.
MASS™ is perfect for installation applications and is available upon
request.
MASS™ can only be used with the M15 of the M Series monitors.

M15 - MASS Rigging Manual p. 2
When mounting the M15 with MASS™, ensure the boxes are securely fastened and mounted properly. Suspended speakers should always be reinforced with steel safety cable and inspected by an experienced crew member. When pole mounted, verify the stand is placed on a level surface, the tripod legs are fully extended and do not present a trip hazard. in adverse outdoor conditions it may be necessary to support the base of the stand with additional weight. It is good practice to regularly inspect any cabinets housings for signs of wear, and load bearing bolts in mounting devices. MASS™ is intended for use with the M15 only.

M15 - MASS Rigging Manual p. 3
For placing the Multi-Purpose plate in place for all MASS™ rigging
methods
1. Take the multi-purpose plate
2. Allign with the top of the box and
fit the locking hub into place
3. Pull the retaining pin up and slide
it in.
2.
3.
1.

M15 - MASS Rigging Manual p. 4
Option1: Pole Mount - Rigging
Parts needed:
(1) Multi-Purpose plate
(1) Polemounting attachment
(Part not included. Can be ordered from
Koenig & Meyer part number - 195/8 Mounting Adapter)

M15 - MASS Rigging Manual p. 5
1. Screw the polemounting piece horinzontally to the multipurpose
plate. (1/4’ 20 machine screw, 1/2” long.
2. Fasten the plate to the M15 as on page 3.
3. In the event that you have the “flytrack” installed onto the
multipurpose plate and do not want to uninstall it, you can
screw the pole mounting piece verticallly. This will cover a part
of the protractor, and therefore we suggest using a horizontal
pole mount placement whenever possible.
Note- In this position the cabinet is not gravity centered, therefore
ensure the tripod legs are fully extended and reinforced as
required.
Option1: Pole Mount - Rigging

M15 - MASS Rigging Manual p. 6
Parts needed:
(1) Multi-purpose plate
(1) C-clamp
Option2: C-clamp - Rigging

M15 - MASS Rigging Manual p. 7
1. Screw the C-Clamp into the Multi-purpose rigging plate.
2. Fasten securely with a nut
3. Slide the Multi-Purpose plate to place as on page 3.
4. Be sure the bolt head’s height is not greater than the 1/4”
countersink allows, to avoid cosmetic damage to the box.
Option2: C-clamp - Rigging

M15 - MASS Rigging Manual p. 8
Parts Needed:
(1) Multi-pupose plate
(2) Flytrack rigging pieces
(2) Suspension Hardware (not included)
Option 3:Fly-Track Rigging
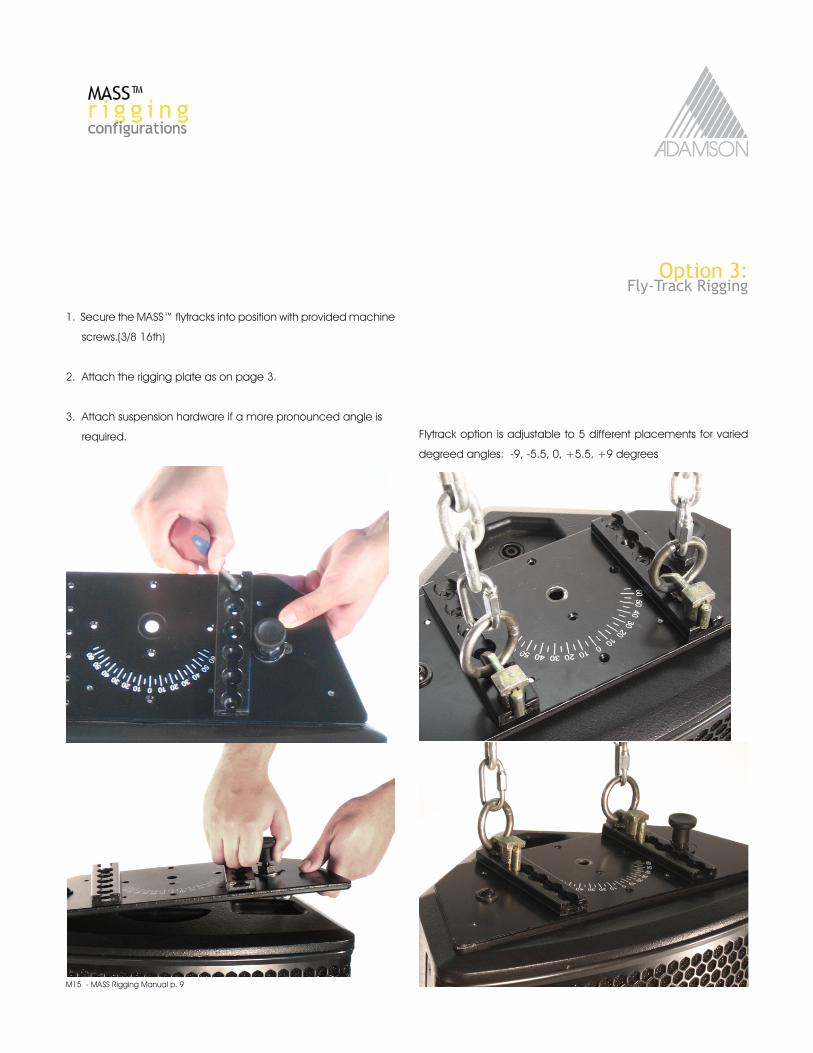
M15 - MASS Rigging Manual p. 9
1. Secure the MASS™ flytracks into position with provided machine
screws.(3/8 16th)
2. Attach the rigging plate as on page 3.
3. Attach suspension hardware if a more pronounced angle is
required. Flytrack option is adjustable to 5 different placements for varied
degreed angles: -9, -5.5, 0, +5.5, +9 degrees
Option 3:Fly-Track Rigging

M15 - MASS Rigging Manual p. 10
A.
B.
D.
C.
B.
E.
F.
Option 4:Single Axis Rigging
Parts needed:
(2) Multi Purpose
Plates x 2 (A.)
(2) Protractor
Discs (B.)
(1) U-bar (C.)
(1) C-Clamp (D)
Option 5:Dual Axis Rigging
For Dual Axis Rigging (with a single box, you will also need:
(2) Protractor Discs (B.)
(1) Swing Assembly (E.)
(1) L-bar (F)

M15 - MASS Rigging Manual p. 11
Detailed parts list
1. U-bar
2. L-bar
3. U-Disc
4. Spacer Disc
5. L-Disc
6. Lever Screws
7. Multi Purpose plate
8. Protractor Disc
Note that parts 4-6 (top photo) as well as
parts 6 & 8 (bottom photo) come already
assembled.
Additional tools needed:
- Phillips Head screwdriver
1.
2.
3.4. 5.
6.
6.
7.
8.

M15 - MASS Rigging Manual p. 12
1. Attach the Protractor Disc to the Multi Purpose
Plate with attached lever pins. ( x2 ) Attach the
Multi Purpose Plates to the M15 as on p.3
2-3. Slide the U-bar into the Protractor Disc, and
insert the quick release push-pins on both sides.
4. Attach C-Clamp to the U-bar. (If rigging as Dual
Axis skip this step and continue through steps 7-12.)
5. Screw the U-Disc on to the U-bar.
6. Screw the L disc to the L bar.
(7. Place the Spacer Disc on top of the U-Disc,
(the Spacer Disc is usually permanently attached
to the L-Disc.)
8-10. Place the L-Disc on the U-Disc, insert the
Machine Bolt and fasten it from underneath. Then
attach the leaver screws on the top side.
11. Attach C-Clampto the U-bar and Inspect
attachments to be certain they are secure.
5.
7.
8.
9.
10.
11.
6.
Option 4:Single Axis Rigging
Option 5:Dual Axis Rigging
1.
3.
2.
4.

M15 - MASS Rigging Manual p. 13
Dual Axis Rigging of a pair of M15’s
3. Slide the U-bar into the Protractor Discs on both sides and fasten
with the attached Lever Screws.
4. Inspect attachments to be certain they are secure.
1. The Top and Bottom Twin Plates (A and B) are installed on top of
the multipurpose plates at respective ends of the cabinets with six
set screws per side.
2. The Dual Protractor Disc (C) is attached to the Twin Plate in exactly
the same way as to the Multi Purpose Plate, but part (C) is only
used for dual cabinet rigging. Plate (B) with the fastening toggles
attached is installed on the bottom of the array (when in an upright
position.) Plate (A) is attached to the top of the array.
3. In the picture (left) part C. Is already attached to the bottom Twin
plate B.
(Below:) Three Set Screws are fastened on each side of the Twin
Plates. (Both Top and Bottom.) The Twin Plates screw into designated
holes on the Multi Purpose Plates to ensure secure rigging.
A. B.
C.
Additional parts
(2) Twin Plates (Top A.) (Bottom B.)
(12) Set Screws (6 x top, 6 x bottom)
