adapter for clarify crm user guide - ibm · adapter for clarify crm user guide ... which is visible...
TRANSCRIPT

IBM WebSphere Business Integration Adapters
Adapter for Clarify CRM User GuideAdapter Version 4.5.x
���


IBM WebSphere Business Integration Adapters
Adapter for Clarify CRM User GuideAdapter Version 4.5.x
���

Note!Before using this information and the product it supports, read the information in “Notices” on page 95.
14March2003
This edition of this document applies to connector version 4.5.x and to all subsequent releases and modificationsuntil otherwise indicated in new editions.
To send us your comments about this document, email [email protected]. We look forward to hearingfrom you.
When you send information to IBM, you grant IBM a nonexclusive right to use or distribute the information in anyway it believes appropriate without incurring any obligation to you.
© Copyright International Business Machines Corporation 1997, 2003. All rights reserved.US Government Users Restricted Rights – Use, duplication or disclosure restricted by GSA ADP Schedule Contractwith IBM Corp.

Integration broker compatibility
Supported on IBM WebSphere Business Integration Adapter Framework version2.2.0, IBM WebSphere InterChange Server versions 4.1.1 and 4.2 (if theenvironment uses ISO Latin-1 data only), WebSphere MQ Integrator version 2.1.0,and WebSphere MQ Integrator Broker, version 2.1.0. See Release Notes for anyexceptions.
© Copyright IBM Corp. 1997, 2003 iii

iv IBM WebSphere Business Integration Adapters: Adapter for Clarify CRM User Guide
Contents
Integration broker compatibility . . . . . . . . . . . . . . . . . . . . . . . . . iii
About this document . . . . . . . . . . . . . . . . . . . . . . . . . . . . . viiAudience . . . . . . . . . . . . . . . . . . . . . . . . . . . . . . . . . . . . viiRelated documents . . . . . . . . . . . . . . . . . . . . . . . . . . . . . . . . . viiTypographic conventions . . . . . . . . . . . . . . . . . . . . . . . . . . . . . . . vii
New in this release. . . . . . . . . . . . . . . . . . . . . . . . . . . . . . . ixNew in release 4.5.x. . . . . . . . . . . . . . . . . . . . . . . . . . . . . . . . . ixNew in release 4.4.x. . . . . . . . . . . . . . . . . . . . . . . . . . . . . . . . . ixNew in release 4.3.x. . . . . . . . . . . . . . . . . . . . . . . . . . . . . . . . . ix
Chapter 1. Overview of the connector . . . . . . . . . . . . . . . . . . . . . . . 1The connector for Clarify CRM . . . . . . . . . . . . . . . . . . . . . . . . . . . . . 1How the connector works . . . . . . . . . . . . . . . . . . . . . . . . . . . . . . . 2
Chapter 2. Installing and configuring the connector . . . . . . . . . . . . . . . . . 7Prerequisites . . . . . . . . . . . . . . . . . . . . . . . . . . . . . . . . . . . 7Installing the connector . . . . . . . . . . . . . . . . . . . . . . . . . . . . . . . . 8Enabling the Clarify CRM application for the connector . . . . . . . . . . . . . . . . . . . . 10Configuring the connector . . . . . . . . . . . . . . . . . . . . . . . . . . . . . . 15Starting and stopping the connector . . . . . . . . . . . . . . . . . . . . . . . . . . . 18
Chapter 3. Developing business objects for the connector . . . . . . . . . . . . . 19Meta-data-driven connector design . . . . . . . . . . . . . . . . . . . . . . . . . . . 19Business object structure . . . . . . . . . . . . . . . . . . . . . . . . . . . . . . . 20Business object attribute properties . . . . . . . . . . . . . . . . . . . . . . . . . . . 22Attribute and database types . . . . . . . . . . . . . . . . . . . . . . . . . . . . . 26Business object application-specific text . . . . . . . . . . . . . . . . . . . . . . . . . . 27
Chapter 4. Troubleshooting . . . . . . . . . . . . . . . . . . . . . . . . . . . 47Start-up problems . . . . . . . . . . . . . . . . . . . . . . . . . . . . . . . . . 47Event processing . . . . . . . . . . . . . . . . . . . . . . . . . . . . . . . . . 47Verifying DB_NAME during startup . . . . . . . . . . . . . . . . . . . . . . . . . . . 47Mapping (ICS Integration Broker only) . . . . . . . . . . . . . . . . . . . . . . . . . . 47Problems with date in business objects (ICS Integration Broker only) . . . . . . . . . . . . . . . . 47Problems with business objects named Clarify_Site . . . . . . . . . . . . . . . . . . . . . . 47Combining preprocessing and use of relationship. . . . . . . . . . . . . . . . . . . . . . . 48Loss of connection to the application . . . . . . . . . . . . . . . . . . . . . . . . . . . 48
Appendix A. Standard configuration properties for connectors . . . . . . . . . . . 49New and deleted properties . . . . . . . . . . . . . . . . . . . . . . . . . . . . . . 49Configuring Standard Connector Properties for WebSphere InterChange Server. . . . . . . . . . . . . 50Configuring Standard Connector Properties for WebSphere MQ Integrator . . . . . . . . . . . . . . 62
Appendix B. Connector Configurator . . . . . . . . . . . . . . . . . . . . . . . 71Using Connector Configurator in an internationalized environment. . . . . . . . . . . . . . . . . 71Starting Connector Configurator . . . . . . . . . . . . . . . . . . . . . . . . . . . . 72Choosing your broker . . . . . . . . . . . . . . . . . . . . . . . . . . . . . . . . 73Using a connector-specific property template . . . . . . . . . . . . . . . . . . . . . . . . 74Using Connector Configurator with ICS as the broker . . . . . . . . . . . . . . . . . . . . . 77Setting the configuration file properties (ICS) . . . . . . . . . . . . . . . . . . . . . . . . 79Setting the configuration file properties (WebSphere MQ Integrator Broker) . . . . . . . . . . . . . . 84
© Copyright IBM Corp. 1997, 2003 v

Using standard and connector-specific properties with Connector Configurator. . . . . . . . . . . . . 87Completing the configuration . . . . . . . . . . . . . . . . . . . . . . . . . . . . . 88
Appendix C. Connector feature list . . . . . . . . . . . . . . . . . . . . . . . 89Business object request handling features . . . . . . . . . . . . . . . . . . . . . . . . . 89Event notification features . . . . . . . . . . . . . . . . . . . . . . . . . . . . . . 90General features . . . . . . . . . . . . . . . . . . . . . . . . . . . . . . . . . . 92
Notices . . . . . . . . . . . . . . . . . . . . . . . . . . . . . . . . . . . 95Programming interface information . . . . . . . . . . . . . . . . . . . . . . . . . . . 96Trademarks and service marks . . . . . . . . . . . . . . . . . . . . . . . . . . . . . 96
vi IBM WebSphere Business Integration Adapters: Adapter for Clarify CRM User Guide
About this document
IBM(R) WebSphere(R) Business Integration Adapters supply integrationconnectivity for leading e-business technologies and enterprise applications.
This document describes the installation, configuration, and business objectdevelopment for the adapter for Clarify CRM.
AudienceThis document is for WebSphere Business Integration Adapter consultants andcustomers. Users of this document should be familiar with the WebSphere BusinessIntegration Adapter system, with business object and collaboration development,and with the Clarify CRM application.
Related documentsThe WebSphere business integration system documentation describes the featuresand components common to all installations, and includes reference material onspecific collaborations and connectors.
This document contains many references to two other documents: the SystemInstallation Guide for Windows or for UNIX and the System Implementation Guide forWebSphere InterChange Server. If you choose to print this document, you may wantto print these documents as well.
To access the documentation, go to the directory where you installed the productand open the documentation subdirectory. If a welcome.html file is present, open itfor hyperlinked access to all documentation. If no documentation is present, youcan install it or read it directly online at one of the following sites:v If you are using WebSphere MQ Integrator Broker as your integration broker:
http://www.ibm.com/websphere/integration/wbiadapters/infocenterv If you are using InterChange Server as your integration broker:
http://www.ibm.com/websphere/integration/wicserver/infocenter
The documentation set consists primarily of Portable Document Format (PDF) files,with some additional files in HTML format. To read it, you need an HTMLbrowser such as Netscape Navigator or Internet Explorer, and Adobe AcrobatReader 4.0.5 or higher. For the latest version of Adobe Acrobat Reader for yourplatform, go to the Adobe website (www.adobe.com).
Typographic conventionsThis document uses the following conventions:
courier font Indicates a literal value, such as a command name, filename, information that you type, or information that thesystem prints on the screen.
bold Indicates a new term the first time that it appears.italic, italic Indicates a variable name or a cross-reference.
© Copyright IBM Corp. 1997, 2003 vii

blue text Blue text, which is visible only when you view the manualonline, indicates a cross-reference hyperlink. Click any bluetext to jump to the object of the reference.
ProductDir Product family is WBIA: Represents the directory where theIBM WebSphere Business Integration Adapters product isinstalled. The CROSSWORLDS environment variablecontains the ProductDir directory path, which isIBM\WebSphereAdapters by default.
viii IBM WebSphere Business Integration Adapters: Adapter for Clarify CRM User Guide

New in this release
New in release 4.5.xUpdated in March, 2003. The “CrossWorlds” name is no longer used to describe anentire system or to modify the names of components or tools, which are otherwisemostly the same as before. For example “CrossWorlds System Manager” is now“System Manager,” and “CrossWorlds InterChange Server” is now “WebSphereInterChange Server.”
The IBM WebSphere Business Integration Adapter for Clarify CRM is beingreleased with the same functionality as in previous releases.
New in release 4.4.xThe IBM WebSphere Business Integration Adapter for Clarify CRM is beingreleased with the same functionality as in previous releases.
New in release 4.3.xThe IBM WebSphere Business Integration Adapter for Clarify CRM includes theconnector for Clarify CRM. This adapter supports two integration brokers:InterChange Server (ICS) and WebSphere MQIntegrator. An integration broker isan application that performs integration of heterogeneous sets of applications; itprovides services such as data routing.
The IBM WebSphere Business Integration Adapter for Clarify CRM includes thefollowing:v An application component specific to Clarify CRMv A sample business object (located in the \connectors\Clarify\Samples directory)v IBM WebSphere Adapter Framework, which consists of the following:
– Connector Framework– Development tools (including Business Object Designer and Connector
Configurator)– APIs (including ODK, JCDK, and CDK)
This manual provides information about using the adapter with both the ICS andWebSphere MQIntegrator integration brokers.
Important: Because the connector has not been internationalized, do not run itagainst InterChange Server version 4.1.1 if you cannot guarantee thatonly ISO Latin-1 data will be processed.
© Copyright IBM Corp. 1997, 2003 ix

x IBM WebSphere Business Integration Adapters: Adapter for Clarify CRM User Guide

Chapter 1. Overview of the connector
Connectors consist of two parts: the connector framework and theapplication-specific component. The connector framework, whose code is commonto all connectors, acts as an intermediary between the integration broker and theapplication-specific component. The application-specific component contains codetailored to a particular application or technology (in this case, Clarify CRM). Theconnector framework provides the following services between the integrationbroker and the application-specific component:v Receives and sends business objectsv Manages the exchange of startup and administrative messages
For more information about the relationship of the integration broker to theconnector, see the IBM WebSphere InterChange Server System Administration Guide orthe IBM WebSphere Business Integration Implementation Guide for WebSphere MQIntegrator Broker.
This chapter describes the connector component of the IBM WebSphere BusinessIntegration Adapter for Clarify CRM. Note that this document contains informationabout both the connector framework and the application-specific component. Itrefers to both of these as the connector. It contains the following sections:v “The connector for Clarify CRM”v “How the connector works” on page 2
The connector for Clarify CRMThe adapter for Clarify CRM allows the integration broker to exchange businessobjects with Clarify 8.0, 8.5, 9.0, 10.0 (version 10 is only available on UNIX), 10.1,10.2, 11.1, and 11.2 applications. The connector supports Clarify eFrontOffice 8.0(CeFO8) and Clarify eFrontOffice 9.0 (CeFO9) on Microsoft SQL Server or Oracle.
The connector implements business object handling, event polling, and eventnotification. The application-specific component of the connector generatesbusiness objects that it sends to the integration broker; it also responds to businessobject requests from the integration broker. It generates logging and tracingmessages that it writes to a file or the connector console, or sends to theintegration broker.
Along with event notification and business object request processing, the connectorallows you to specify the following functionality:v Specify the type of transactionality for a business object. The connector can wrap
an entire business object request in a single transaction, and if a failure isdetected during the transaction, the entire transaction is rolled back. Alternately,for hierarchical business objects, the connector can commit changes to each childobject as a set of incremental transactions. This ensures that child businessobjects are processed in the intended order.
v Specify that the connector preprocess an attribute to obtain its value beforeexecuting a business object request.
v Specify whether a connector responds to a Retrieve request by retrieving thebusiness object’s entire hierarchy (a deep retrieve) or by retrieving only thetop-level business object (a shallow retrieve).
© Copyright IBM Corp. 1997, 2003 1

v Specify whether a Retrieve operation succeeds for a hierarchical business objectif one or more child objects are missing.
v Perform a Retrieve operation based on the keys of a record or based on non-keyvalues. A retrieve using non-key values is also called RetrieveByContent. ARetrieveBy Content operation can use one or more designated attributes toquery for a record.
v Specify how a Clarify CRM ID is created on a Create operation. A connectorproperty can be set to specify that either Clarify CRM create the ID or that theconnector pass in the ID to Clarify CRM in the business object.
v Specify on a Update operation that the connector keep existing relations betweentables as well as create relations for new child business objects.
Figure 1 shows the connector components and their relationships within theWebSphere Business Integration Adapter system. In this figure, InterChange Serveris used as the integration broker.
How the connector worksThe following sections describe how the connector processes business objectrequests and event notifications.
Business object processingWhen the connector receives a request to perform an application operation, itcommunicates with the application using the API Toolkit. The connector uses themeta-data in the business object definition and the values in the business objectinstance to generate functions calls that access the Clarify CRM applicationdatabase tables. These function calls perform the required operations in the ClarifyCRM database for the business object and verb that the connector is processing.
Generic services (C++)
Eventnotification
Internal Java component
Connector agent
Connector ControllerClarify CRM application
Database
Application tables
Eventtable
Archivetable
Businessobject
requests
ClarifyAPI
toolkitfunctions
GlobalfunctionsDatabase triggers
Figure 1. Architecture of the connector
2 IBM WebSphere Business Integration Adapters: Adapter for Clarify CRM User Guide

Figure 2 illustrates business object request processing. (In this figure, InterChangeServer is used as the integration broker.) When a business object is sent to theconnector’s business object handler, the handler generates an API call that modifiesthe data in the appropriate database table.
Delete processingFor Delete operations, the Clarify CRM application performs logical deletes ratherthan physical deletes. In logical deletes, rows in the database are marked asinactive rather than being physically deleted.
Because logical deletes are handled as Update operations, the connector respondsto business objects with a Delete verb by converting the verb to Update. Note,however, that verb conversion in the connector may be deprecated. If ICS is usedas the integration broker, use native mapping to convert Delete verbs to Updateverbs for the connector.
Logical delete operations: The connector deletes a non-hierarchical businessobject by marking it as inactive. When the connector receives a request to delete ahierarchical business object, it logically deletes only the top-level business objectbut not the children.
The recommended way to logically delete a record in Clarify CRM is to change avalue in a status field to an inactive value. In some tables, Clarify CRM provides astatus field, and a business object can use that field to specify logical deletes.However, when a Clarify CRM table does not provide a status field but the field isneeded for delete operations, you must customize the table to add a status field. Ifyou add delete functionality to an existing business object, you will also need toedit the business object to provide a status attribute and the correct inactive value.See the Clarify CRM documentation for information on customizing Clarify CRMtables.
Eventnotification
Internal Java component
Connector agent
Clarify CRM application
Application database
Application tables
Database triggers
Eventtable
Archivetable Business
objecthandler
ClarifyAPI
toolkitfunctions
Globalfunctions
Connector controller
InterChange Server
Figure 2. Business object request architecture
Chapter 1. Overview of the connector 3
Physical delete operations: Neither the Clarify CRM application nor theconnector performs physical deletes. If your site needs to physically delete recordsfrom a table in response to business object requests, you can add update triggers toClarify CRM tables. As an example, the update trigger might perform a physicaldelete when it detects an update of a specific field to a specific value by theconnector. However, keep referential integrity in mind when doing physical deleteson existing Clarify CRM tables.
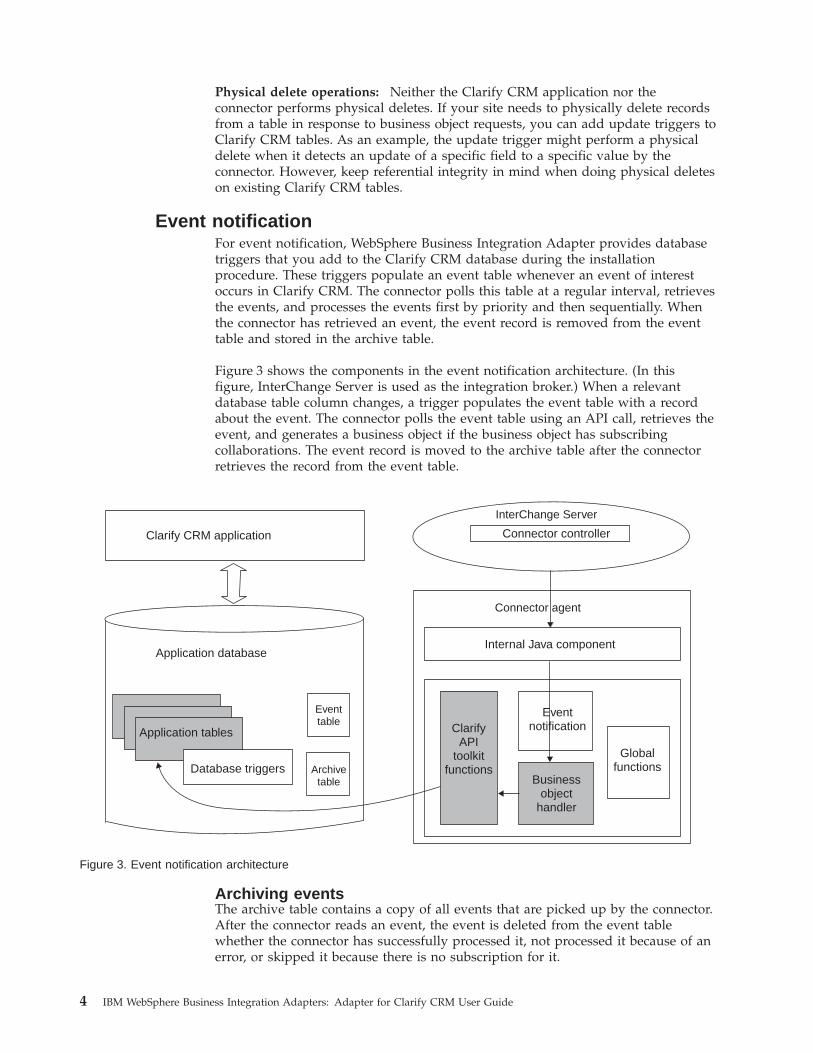
Event notificationFor event notification, WebSphere Business Integration Adapter provides databasetriggers that you add to the Clarify CRM database during the installationprocedure. These triggers populate an event table whenever an event of interestoccurs in Clarify CRM. The connector polls this table at a regular interval, retrievesthe events, and processes the events first by priority and then sequentially. Whenthe connector has retrieved an event, the event record is removed from the eventtable and stored in the archive table.
Figure 3 shows the components in the event notification architecture. (In thisfigure, InterChange Server is used as the integration broker.) When a relevantdatabase table column changes, a trigger populates the event table with a recordabout the event. The connector polls the event table using an API call, retrieves theevent, and generates a business object if the business object has subscribingcollaborations. The event record is moved to the archive table after the connectorretrieves the record from the event table.
Archiving eventsThe archive table contains a copy of all events that are picked up by the connector.After the connector reads an event, the event is deleted from the event tablewhether the connector has successfully processed it, not processed it because of anerror, or skipped it because there is no subscription for it.
Eventnotification
Internal Java component
Connector agent
Clarify CRM application
Application database
Application tables
Database triggers
Eventtable
Archivetable Business
objecthandler
ClarifyAPI
toolkitfunctions
Globalfunctions
Connector controller
InterChange Server
Figure 3. Event notification architecture
4 IBM WebSphere Business Integration Adapters: Adapter for Clarify CRM User Guide

When an event is deleted from the event table, the connector automatically insertsa copy of the event into the archive table with a status of Error. When theconnector processes the event successfully, the status field is updated to Success. Ifthe connector determines that there is no subscription for the event, the status fieldis updated to Skipped.
Delete processing in the event notification mechanismThe connector has been designed to respond to Delete and Physical Delete verbs inthe event table. If your Clarify CRM application has been customized to performphysical delete operations, you can modify the Delete trigger script so that itcreates business objects with separate Delete and Physical Delete verbs.
The Delete verb indicates a soft delete, which means that a record was marked fordelete (inactive) but still remains in the database. If a Delete event occurs, theconnector attempts to retrieve and return the entire record for the deleted entity.
The Physical Delete verb indicates a hard delete; in other words, the record wasactually removed from the database. If the connector detects a Physical Deleteevent, it populates a business object with the values contained in the event tablebut does not attempt to retrieve the deleted entity’s entire record.
To take advantage of this feature, you must set up Delete triggers so that theygenerate the appropriate verbs. Soft delete events should generate a Delete verb inthe event table, while hard delete events should generate a Physical Delete verb inthe event table. See “Installing database triggers for event notifications” on page 13for information on the database triggers provided with the connector.
Chapter 1. Overview of the connector 5

6 IBM WebSphere Business Integration Adapters: Adapter for Clarify CRM User Guide
Chapter 2. Installing and configuring the connector
This chapter describes how to install and configure the connector and how toconfigure the Clarify CRM application to work with the connector. It contains thefollowing sections:v “Prerequisites”v “Installing the connector” on page 8v “Enabling the Clarify CRM application for the connector” on page 10v “Configuring the connector” on page 15v “Starting and stopping the connector” on page 18
Note: Before beginning the installation, determine whether the application hasbeen customized. Existing application customization may affect how youenable the application for the connector. In addition, since the connectorsetup requires the installation of triggers on database tables, determinewhether the relevant tables have existing triggers, and make sure thatWebSphere Business Integration Adapter-specific triggers do not overwritethe existing triggers.
Prerequisites
Prerequisite software for the Microsoft SQL ServerIf you are running the Clarify CRM application on the MicroSoft SQL Serverdatabase, you need to install the MS SQL Server tools and utilities before runningthe connector.
Setting up a user account in Clarify CRMYou must create a user account in the Clarify CRM application for the connector.The account can have any valid Clarify CRM username and password. It musthave the privileges to retrieve, insert, update, and delete data from the ClarifyCRM database.
To set up a user account, follow these steps:1. Bring up the Clarify CRM application and log in with system administrator
privileges. A typical example of a system administrator login name is ″sa″.2. Click on the Policies and Customers icon.3. Click New—>Employee.4. Fill in the login name, password, first name, and last name fields on the
Employee form with the name of the connector user account. Because thedatabase triggers for the event mechanism are coded with the user name “cw”,the name ″cw″ is recommended for all four fields.If you use a different user name, you will need to edit the database triggers toreflect the user name. For information, see “Installing database triggers forevent notifications” on page 13.Note that the name for the Clarify CRM user account is the same name thatyou should enter for the ApplicationUserName connector configurationparameter. For information on setting the configuration properties for theconnector, see “Configuring the connector” on page 15.
© Copyright IBM Corp. 1997, 2003 7

5. Fill in the following required fields in the Employee form:v Privileges - Set to system administrator.v Workgroup - Set to administration.v Site Name - Select any name from the list.v Email Address - Enter an email address for the user account.
6. Click Add—>Done.
Checking Windows date and time formatThe Clarify CRM application uses the date format specified in the Windows shortdate style that appears under Regional Settings, Date in the Control Panel. IfInterChange Server is used as the integration broker, the date format mustcorrespond to the date format used in the maps for the business objects for ClarifyCRM. WebSphere Business Integration Adapter native maps assume that theWindows short date style is MM/dd/yyyy. If the short date style is MM/dd/yy orany other format, you must change the map rules for the Clarify CRM maps toreflect the new date format and recompile the maps.
Installing the connectorThe following subsections describe how to install the connector on a Windows orUNIX system.
After your WebSphere Business Integration Adapter system is installed, you caninstall additional connectors from the WebSphere Business Integration Adapter CDat any time. To do this, insert the product CD, run the installation program, andchoose the connectors that you want to install.
Note: Unless otherwise indicated, the remaining sections in this chapter apply toboth Windows and UNIX installations of the connector.
Installing on a Windows systemTo install the connector on a Windows system, run the Installer for IBM WebSphereBusiness Integration Adapter and select the IBM WebSphere Business IntegrationAdapter for Clarify CRM. All standard files associated with the connector areinstalled. Table 1 describes the file structure used by the connector.
Table 1. Installed Windows file structure for the connector
Subdirectory of %ProductDir% Description
connectors\Clarify Subdirectories containing various versions ofthe Clarify CRM DLL.Note: For the connector to start, all Clarifydependent dlls (Ex: mny*.dll, tls *.dll andlibdb_d.dll) must be copied into thisdirectory.
connectors\Clarify\dependencies Files containing the triggers for eventnotification and the scripts for event andarchive tables.
connectors\messages Contains the ClarifyConnector.txt file.
Installer adds an icon for the connector file to the IBM WebSphere BusinessIntegration Adapter menu. For a fast way to start the connector, create a shortcutto this file on the desktop.
8 IBM WebSphere Business Integration Adapters: Adapter for Clarify CRM User Guide

For more information on installing the connector component, refer to one of thefollowing guides, depending on the integration broker you are using:v System Installation Guide for Windows (when ICS is used as the integration broker)v WebSphere Business Integration Adapters Implementation Guide for MQ Integrator
Broker (when WebSphere MQ Integrator Broker is used as the integration broker)
Installing on a UNIX systemTo install the connector on a UNIX system, run the Installer for IBM WebSphereBusiness Integration Adapter and select the IBM WebSphere Business IntegrationAdapter for Clarify CRM.
Note: Only versions 8 and 10 of the connector for Clarify CRM are supported onthe UNIX system.
For more information on installing the connector component, refer to one of thefollowing guides, depending on the integration broker you are using:v System Installation Guide for UNIX (when ICS is used as the integration broker)v WebSphere Business Integration Adapters Implementation Guide for MQ Integrator
Broker (when WebSphere MQ Integrator Broker is used as the integration broker)
For the connector, the Installer installs the file structure shown in Table 2.
Table 2. Installed UNIX file structure for the connector
Subdirectory of $ProductDir Description
connectors/Clarify Subdirectories containing variousversions of the Clarify CRM sharedlibrary
connectors/Clarify/dependencies Files containing the triggers for eventnotification and the scripts for event andarchive tables
connectors/messages Contains the ClarifyConnector.txt file.
connectors/Clarify/start_Clarify.sh The start_Clarify.sh file is a systemstartup script for the connector. It iscalled from the generic connectormanager script. When you click Installfrom Connector Configurator (WebSphereMQ Integrator Broker as the integrationbroker) or the Connector Configurationscreen of System Manager (ICS as theintegration broker), the installer creates acustomized wrapper for this connectormanager script. When the connectorworks with ICS, use this customizedwrapper to start and stop the connector.When the connector works withWebSphere MQ Integrator Broker, usethis customized wrapper only to start theconnector. Use themqsiremotestopadapter command to stopthe connector.
Before you can use the connector, you must:1. Use the Connector Configuration Tool to generate the customized Clarify CRM
wrapper (connector_manager_Clarify) required to start the connector. Refer to
Chapter 2. Installing and configuring the connector 9

the System Installation Guide for UNIX or the WebSphere Business IntegrationAdapters Implementation Guide for MQ Integrator Broker for more information.
2. In the start_Clarify.sh file, modify the ORACLE_HOME environmentvariable.For the connector to run, the ORACLE_HOME environment variable must beset to the location of the Oracle Server software on your system.
3. Copy one Clarify CRM shared library from the version-specific subdirectoryinto the $ProductDir/connectors/Clarify directory.For example, if you are using the Clarify 8.5 connector with Oracle Server, copythe libclarify.so from the Clarify8.5-oracle subdirectory into the$ProductDir/connectors/Clarify directory.
Enabling the Clarify CRM application for the connectorBefore you can use the connector to process application events and send eventnotification business objects to the integration broker, you must set up the eventnotification mechanism in the Clarify CRM application. To do this, complete thefollowing tasks:1. Create the event and archive tables in Clarify CRM.2. Install database triggers on Clarify CRM tables to support the business objects
needed by the collaborations running at your site.
The event table is used to queue events for pickup by the connector. The eventtable contains enough information so that the connector can determine the nameand verb of the business object instance that it will create to represent an event.
The sections that follow provide information on these tasks.
Creating the event and archive tablesTo set up event processing, you create an event table in Clarify CRM. An eventtable is required; you must create this table even if the connector will not poll forevents. An archive table is optional; however, if the connector is polling for eventsand there is no archive table, all events are lost once the connector retrieves them,whether or not they were successfully processed.
Table 3 shows the Clarify CRM information for the event and archive tables.
Table 3. Connector schema information
Table type Schema file Default table name
Event Table xrdsevts.txt
xrdsevts10.txt (Clarify version 10)
table_xrds_events
Archive Table xrdsarch.txt
xrdsarch10.txt (Clarify version 10)
table_xrds_archive
Table 4 on page 11 shows the location of the schema files (xrdsevts.txt,xrdsevts10.txt, xrdsarch.txt, and xrdsarch10.txt) based on the operatingsystem.
10 IBM WebSphere Business Integration Adapters: Adapter for Clarify CRM User Guide

Table 4. Schema file locations
Operating system Schem file location
Windows %ProductDir%\connectors\Clarify\dependencies\ddcompUNIX $ProductDir/connectors/Clarify/dependencies/ddcomp
To install the event and archive tables, follow these steps:1. Make sure that type IDs for the event and archive tables are available.2. Execute the ddcomp command to create the tables.3. Confirm that the event and archive tables were created.
These tasks are described in greater detail in the following sections.
Note: If your site will not archive events into an archive table, be sure to removethe value for the connector’s ArchiveTableName configuration parameterusing System Manager.
Type IDs for the event and archive tablesBy default, the type IDs of the event and archive tables are 501 and 502. Followthese steps to determine the type IDs for your site.1. Log into the Data Dictionary Editor and determine whether the type IDs 501
and 502 are available. If these IDs are available, you can skip to the nextsection. If the IDs are already in use, continue with the next step in thisprocedure.
2. If type IDs 501 and 502 are not available, choose new type IDs. The range ofnumbers reserved for customer use is from 480 to 512 and from 2000 to 4999.Select type IDs within these ranges.
3. Once you have chosen new type IDs, change the type IDs in the xrdsevts.txtand xrdsarch.txt scripts. To do this, open the xrdsevts.txt (xrdsevts10.txtfor Clarify version 10)and xrdsarch.txt (xrdsarch10.txt for Clarifyversion 10)files in the directory appropriate for your operating system (seeTable 4 on page 11).
OBJECT xrds_events 501
toOBJECT xrds_events new_id
When you have type IDs, continue with the next section.
Creating the event and archive tablesTo create the event table and archive table, run the ddcomp command to execute thexrdsevts.txt (xrdsevts10.txt for Clarify version 10)and xrdsarch.txt(xrdsarch10.txt for Clarify version 10)scripts. The ddcomp utility creates thedatabase schema and populates the Clarify CRM data dictionary with theinformation contained in the scripts. Typically, WebSphere Business IntegrationAdapter uses the ddcomp utility to create tables, such as the event table, or views asrequired by some Clarify CRM application-specific business objects.
Note that if you want to change the name of the event table, you can do this bychanging the name in the xrdsevts.txt (xrdsevts10.txt for Clarify version10)script before you run the ddcomp command. In this case, you will also need toset the EventTableName connector configuration parameter to the new name. Tochange the name of the archive table, change the name in the xrdsarch.txt
Chapter 2. Installing and configuring the connector 11

(xrdsarch10.txt for Clarify version 10)script before running the ddcompcommand, and set the ArchiveTableName configuration parameter to the newname.
Running the ddcomp command: You can execute the ddcomp command from thedbadmin directory and point to the schema-file directory (see Table 4 on page 11).Alternatively, you can put the path for the directory containing the ddcompexecutable in your PATH and run the ddcomp command from the schema-filedirectory.
Running ddcomp on SQL Server on Windows:: For Microsoft SQL Server onWindows, the syntax for the ddcomp command is:ddcomp db_name db_server user_name password filename
where:
db_name is the name of the Clarify CRM database.
db_server is the name of the Clarify CRM database server.
user_name is the Clarify CRM system administrator login name.
password is the Clarify CRM system administrator password.
filename is the name of the event table or archive table script.
Running ddcomp on Oracle on Windows or Unix:: For Oracle, the syntax for theddcomp command is:ddcomp oracle_database oracle_alias user_name password filename
where:
oracle_database is the name of the Clarify CRM database.
oracle_alias is a relation that ties a physical machine name to an Oracle SID.An Oracle SID is a system identifier that points to the database. Itcan be thought of as the name of a database instance. ClarifyCRM treats the oracle_alias as a server name. Whenever theClarify CRM application asks for a server name, the oracle_aliascan usually be substituted.
user_name is the Clarify CRM system administrator login name.
password is the Clarify CRM system administrator password.
filename is the name of the event table or archive table script.
On Oracle, the ddcomp and ddedit utilities also require you to build a publicsynonym for an object table before you can access that table using the Clarify CRMclient or API. For the WebSphere Business Integration Adapter event and archivetables, execute the following SQL statements to create the public synonyms. UseSQL Plus to execute the statements.create public synonym TABLE_XRDS_EVENTS for sa.TABLE_XRDS_EVENTS;create public synonym TABLE_XRDS_ARCHIVE for sa.TABLE_XRDS_ARCHIVE;
Confirming the event and archive tablesTo confirm that the tables were created, use the Clarify CRM Data DictionaryEditor. Log into the Data Dictionary Editor and check for the existence of objectswith type ID of 501 and 502, or for objects with the type IDs that you havesubstituted for those IDs.
12 IBM WebSphere Business Integration Adapters: Adapter for Clarify CRM User Guide

Descriptions of table schemaThe event table contains the following columns:
objid Internal identifier
object_name Description of the object
object_verb Verb associated with the event
object_key Primary key for the object
event_priority Event priority. Defined as 0-1, where 0 is the highest priority.
event_time Time of the event
event_status Status of the transaction associated with the event; 0 = OK, 1 =ERROR
event_description Description of the event or error string
The archive table contains the following columns:
objid Internal identifier
event_id Value of objid for the event when the event was in the eventtable
object_name Description of the object
object_verb Verb associated with the event
object_key Primary key for the object
event_priority Event priority
event_time Time of the event
event_status Status of the transaction associated with the event. Status canbe Success, Error, or Skipped.
event_description Description of the event or error string
Installing database triggers for event notificationsYou install database triggers in Clarify CRM to support the business objects usedby the collaborations running at your site. The database triggers are implementedso that a row is generated to the event table whenever an application object iscreated, updated, or deleted.
You also install a database trigger that deletes events from the event table. If anarchive table is available, the event record is moved to the archive table; otherwise,it is lost. Table 5 shows the name of the event table deletion trigger based on thedatabase server for the Clarify CRM database.
Table 5. SQL script names for event table deletion triggers
Database server Event table deletion trigger
MSSQL MSSQL_event_delete_trigger.sqlOracle Oracle_event_delete_trigger.sql
Oracle_event_delete_trigger10.sql (Clarify version 10)
The files in Table 5 are located in the directory:v On a Windows system:
%ProductDir%\connectors\Clarify\dependencies
Chapter 2. Installing and configuring the connector 13

v On a UNIX system:$ProductDir/connectors/Clarify/dependencies
Note: Before you can execute the trigger scripts, you must have a user account inClarify CRM. For information on creating a user account, see “Prerequisites”on page 7.
To execute the event table deletion SQL script and install the database trigger,follow these steps:1. Open a query window.2. Connect to the server that hosts the Clarify CRM database.3. Open the Clarify CRM database.4. Execute the script for the event table delete trigger. See Table 5 on page 13 for
the name of the script.5. Execute the following commands in your SQL processor:
grant all on table_xrds_events to usernamegrant all on table_xrds_archive to username
For SQL Server, use isql_w or a similar tool.
If the script executes with no errors, a message indicates that no data wasreturned.
You might also need to execute scripts for triggers for the business objects requiredby your business processes. WebSphere Business Integration Adapter providessample business objects. You can use these business objects or create your owncustomized business objects. To execute triggers for your business objects, performthe following steps:1. Identify the WebSphere Business Integration Adapter triggers for the business
objects required by your business processes.2. Connect to the database server and open the Clarify CRM database.
Follow Steps 1 through 3 on page 14 in the previous list of steps.3. If the connector user name is the default ″cw″, skip to the next step. If the user
name is not ″cw″, update the scripts with the correct connector user namebefore executing them. Setting the user name correctly prevents the triggerfrom generating an event for an application change that resulted from abusiness object request.To update the scripts, follow these steps:a. Edit each script to replace ″cw″ with the correct user name. Change the line:
if (@user <> "cw")
to read:if (@user <> "<username>")
b. Recompile the scripts.
Note that the ApplicationUserName connector configuration property shouldbe set to the name for the Clarify CRM user account.
4. Execute the scripts for the business object triggers. You must be the databaseowner to execute the scripts.
14 IBM WebSphere Business Integration Adapters: Adapter for Clarify CRM User Guide

Configuring the connectorYou must set the connector’s standard and connector-specific configurationproperties before you can run it. Use one of the following tools to set a connector’sconfiguration properties:v Connector Configurator (if ICS is the integration broker)--Access this tool from
the System Manager.v Connector Configurator (if WebSphere MQ Integrator Broker is the integration
broker)--Access this tool from the IBM WebSphere Business Integration Adapterprogram folder. For more information about Connector Configurator, seeAppendix B, “Connector Configurator”, on page 71
Standard connector propertiesStandard configuration properties provide information that all connectors use. SeeAppendix A, “Standard configuration properties for connectors”, on page 49fordetailed information about these properties.
Note: This connector is single threaded. It cannot use the AgentConnectionsproperty.
ImportantBecause the connector for Clarify CRM supports both the ICS and WebSphereMQ Integrator Broker, configuration properties for both brokers are relevantto the connector.
Connector-specific propertiesConnector-specific configuration properties provide information needed by theconnector at runtime. Connector-specific properties also provide a way of changingstatic information or logic within the connector without having to recode andrebuild it.
Table 6 on page 16 lists the connector-specific configuration properties for theconnector. See the sections that follow for explanations of the properties.
Chapter 2. Installing and configuring the connector 15
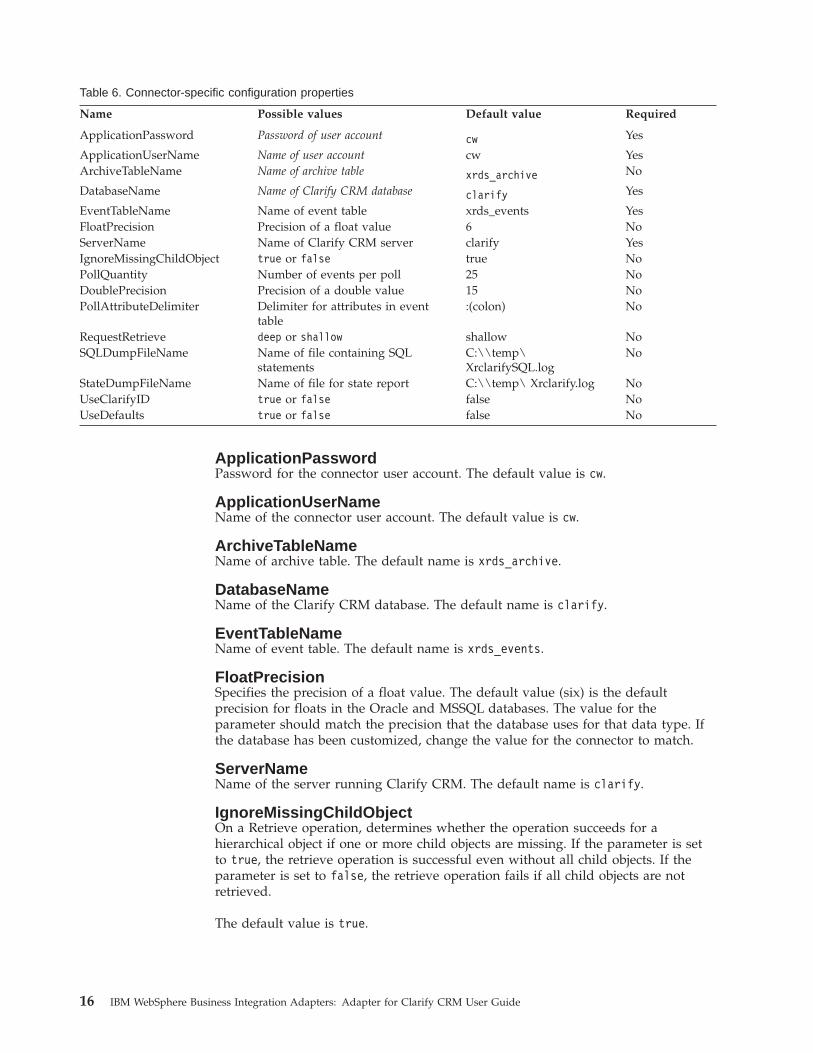
Table 6. Connector-specific configuration properties
Name Possible values Default value Required
ApplicationPassword Password of user account cw Yes
ApplicationUserName Name of user account cw YesArchiveTableName Name of archive table xrds_archive No
DatabaseName Name of Clarify CRM database clarify Yes
EventTableName Name of event table xrds_events YesFloatPrecision Precision of a float value 6 NoServerName Name of Clarify CRM server clarify YesIgnoreMissingChildObject true or false true NoPollQuantity Number of events per poll 25 NoDoublePrecision Precision of a double value 15 NoPollAttributeDelimiter Delimiter for attributes in event
table:(colon) No
RequestRetrieve deep or shallow shallow NoSQLDumpFileName Name of file containing SQL
statementsC:\\temp\XrclarifySQL.log
No
StateDumpFileName Name of file for state report C:\\temp\ Xrclarify.log NoUseClarifyID true or false false NoUseDefaults true or false false No
ApplicationPasswordPassword for the connector user account. The default value is cw.
ApplicationUserNameName of the connector user account. The default value is cw.
ArchiveTableNameName of archive table. The default name is xrds_archive.
DatabaseNameName of the Clarify CRM database. The default name is clarify.
EventTableNameName of event table. The default name is xrds_events.
FloatPrecisionSpecifies the precision of a float value. The default value (six) is the defaultprecision for floats in the Oracle and MSSQL databases. The value for theparameter should match the precision that the database uses for that data type. Ifthe database has been customized, change the value for the connector to match.
ServerNameName of the server running Clarify CRM. The default name is clarify.
IgnoreMissingChildObjectOn a Retrieve operation, determines whether the operation succeeds for ahierarchical object if one or more child objects are missing. If the parameter is setto true, the retrieve operation is successful even without all child objects. If theparameter is set to false, the retrieve operation fails if all child objects are notretrieved.
The default value is true.
16 IBM WebSphere Business Integration Adapters: Adapter for Clarify CRM User Guide

PollQuantityNumber of events to process per poll. The connector poll method retrieves thespecified number of event records and processes them in a single poll. Processingmultiple events per poll can improve performance when the application generateslarge numbers of events. However, since integration broker requests are blockedwhile the poll method is processing events, be sure not to set the number of eventstoo high.
As a general guide, set PollQuantity to be ten percent of the average number ofevents you expect to have in the event table at one time.
There is a relationship between PollQuantity and PollFrequency values. The largerthe PollQuantity value, the larger the PollFrequency value should be. As a generalguide, set the PollFrequency to 60 Milliseconds * the PollQuantity value.
The default value is 25.
DoublePrecisionSpecifies the precision of a double value. The default value, 15, is the defaultprecision for doubles in the Oracle and MSSQL databases. The value for theparameter should match the precision that the database uses for that data type. Ifthe database has been customized, change the value for the connector to match.
The default value is 15.
PollAttributeDelimiterSpecifies the delimiter for multiple attributes in the object name column of theevent table. If the Clarify CRM objid is not used as the key field and the key fieldmay contain a colon (:), set this configuration property to a single character thatwill not be part of the key field.
The default value is a colon (:).
RequestRetrieveSpecifies whether a connector responds to a Retrieve request by retrieving thebusiness object’s entire hierarchy (a deep retrieve) or by retrieving only thetop-level business object (a shallow retrieve). The possible values are Deep andShallow.
Note that the connector also supports the RetrieveAll verb. If the value ofRequestRetrieve is set to Deep, the business object must have support for theRetrieveAll verb.
The default is shallow.
SQLDumpFileNameName of the file containing the SQL statements executed by the Clarify API.Information is appended, so the file may need to be truncated periodically.
In Windows, the default file is C:\\temp\XrclarifySQL.logIn UNIX, the default fileis $/ProductDir/XrclarifySQL.log
StateDumpFileNameName of the file in which the Clarify API reports its state when accessing differentobjects. Information is appended, so the file may need to be truncated periodically.
Chapter 2. Installing and configuring the connector 17

In Windows, the default file is C:\\temp\Xrclarify.log. In UNIX, the default file is$/ProductDir/Xrclarify.log
UseClarifyIDOn a Create operation, determines how the Clarify ID is created. If the parameteris set to true, Clarify CRM creates the ID. If the parameter is set to false, theconnector passes in an ID to Clarify CRM.
The default value is false.
UseDefaultsIf UseDefaults is set to true or not set, the connector checks whether a valid valueor a default value is provided for each Required business object attribute. If avalue is provided, the Create succeeds; otherwise, it fails.
If the parameter is set to false, the connector checks only for valid values; theCreate operation fails if valid values are not provided.
The default value is false.
Starting and stopping the connectorFor information on starting and stopping a connector, see one of the followingdocuments, depending on the integration broker you are using:v IBM WebSphere Business Integration Implementation Guide for WebSphere MQ
Integrator Broker (IBM WebSphere MQ Integrator Broker as the integrationbroker)
v IBM WebSphere InterChange Server System Administration Guide (ICS as theintegration broker)
18 IBM WebSphere Business Integration Adapters: Adapter for Clarify CRM User Guide

Chapter 3. Developing business objects for the connector
This chapter describes how the connector processes business objects and describesthe assumptions the connector makes. You can use this information as a guide tomodifying existing business objects for Clarify CRM or as suggestions forimplementing new business objects. It contains the following sections:v “Meta-data-driven connector design”v “Business object structure” on page 20v “Business object attribute properties” on page 22v “Attribute and database types” on page 26v “Business object application-specific text” on page 27
Note: In this chapter, the term hierarchical business object is used to refer to acomplete business object, including all the contained child business objectsat any level. The term individual business object is used to refer to a singlebusiness object without reference to any contained child business objects.
Meta-data-driven connector designThe connector is a meta-data-driven connector. In WebSphere Business IntegrationAdapter business objects, meta-data is data about the application that is stored in abusiness object and that assists the connector to interact with an application. Ameta-data-driven connector handles each business object that it supports based onmeta-data encoded in the business object definition rather than on instructionshardcoded in the connector.
Business object meta-data includes the structure of a business object, the settings ofits attribute properties, and the content of its application-specific text. Because theconnector is meta-data driven, it can handle new or modified business objectswithout requiring modifications to the connector code.
When processing business objects, the connector makes assumptions about the:v Structure of business objectsv Relationship between parent and child business objectsv Format of the application-specific textv Database representation of a business object
Therefore, when you create or modify a business object for Clarify CRM, yourmodifications must conform to the rules the connector is designed to follow, or theconnector will not be able to process new or modified business objects correctly.
The following sections provide information on implementing business objects forClarify CRM.
© Copyright IBM Corp. 1997, 2003 19
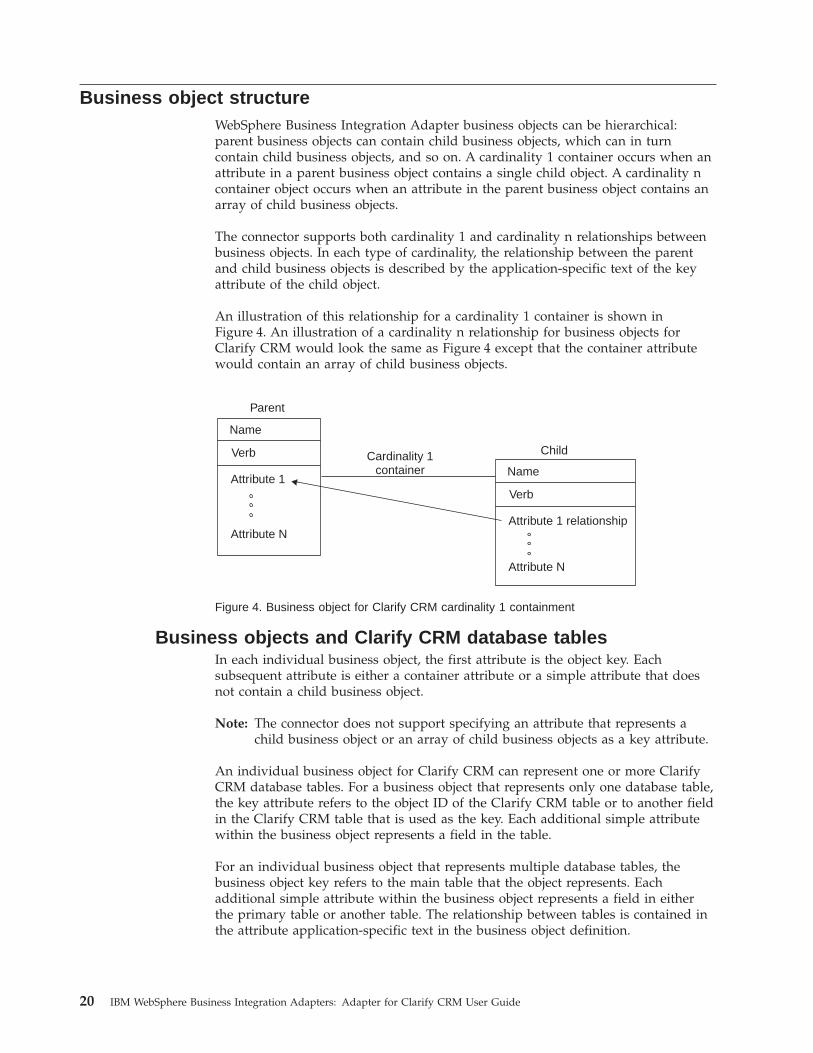
Business object structureWebSphere Business Integration Adapter business objects can be hierarchical:parent business objects can contain child business objects, which can in turncontain child business objects, and so on. A cardinality 1 container occurs when anattribute in a parent business object contains a single child object. A cardinality ncontainer object occurs when an attribute in the parent business object contains anarray of child business objects.
The connector supports both cardinality 1 and cardinality n relationships betweenbusiness objects. In each type of cardinality, the relationship between the parentand child business objects is described by the application-specific text of the keyattribute of the child object.
An illustration of this relationship for a cardinality 1 container is shown inFigure 4. An illustration of a cardinality n relationship for business objects forClarify CRM would look the same as Figure 4 except that the container attributewould contain an array of child business objects.
Business objects and Clarify CRM database tablesIn each individual business object, the first attribute is the object key. Eachsubsequent attribute is either a container attribute or a simple attribute that doesnot contain a child business object.
Note: The connector does not support specifying an attribute that represents achild business object or an array of child business objects as a key attribute.
An individual business object for Clarify CRM can represent one or more ClarifyCRM database tables. For a business object that represents only one database table,the key attribute refers to the object ID of the Clarify CRM table or to another fieldin the Clarify CRM table that is used as the key. Each additional simple attributewithin the business object represents a field in the table.
For an individual business object that represents multiple database tables, thebusiness object key refers to the main table that the object represents. Eachadditional simple attribute within the business object represents a field in eitherthe primary table or another table. The relationship between tables is contained inthe attribute application-specific text in the business object definition.
Name
Attribute 1
Verb
Attribute N
Name
Attribute 1 relationship
Verb
Attribute N
Cardinality 1container
Parent
Child
Figure 4. Business object for Clarify CRM cardinality 1 containment
20 IBM WebSphere Business Integration Adapters: Adapter for Clarify CRM User Guide

Business object implementation of relationships betweenClarify CRM tables
In Clarify CRM, relationships between database tables are contained in namedrelations. Named relations are defined by Clarify CRM and are implemented ascolumns in the database tables. Clarify CRM application-specific business objectsuse named relations to provide the connector with information about how thebusiness object relationships correspond to Clarify CRM tables.
WebSphere Business Integration Adapter business objects for Clarify CRM can usenamed relations in two ways:v An individual business object definition can include attributes that reference one
or more related database tables using named relations specified in attributeapplication-specific text. Once an attribute has established a relationship betweentwo tables, additional attributes can reference the new table without redefiningthe relationship. Figure 5 illustrates a business object with attributes thatrepresent related tables and use named relations.
v A parent business object definition that represents one table can have one ormore child business object definitions that represent other tables. The parent andeach child business object can also reference other tables by means of namedrelations specified in attribute application-specific text.
When one or more relations are specified, the connector creates the relationsbetween objects as part of Create or Update operations. For specific information oncombining preprocessing and use of a relationship, see Chapter 4,“Troubleshooting”, on page 47.
Application-specific text can use either named relations or inverse relations to jointables. An inverse relation is typically used in a child business object to point backto the parent business object.
Note: Each individual business object can contain only one join to a table. Forexample, if a top-level business object represents the site table, an error willoccur if an attribute in the business object attempts links to the site table asecond time using a named relation such as child_site2site. To preventthis, you can create a child business object that contains an attribute linkingback to the parent business object. Or you can add a column to the sitetable, make the column a field rather than a relationship, and copy theattribute value into the field with a trigger.
Tips on designing business objects for Clarify CRMWhen designing a business object definition that references multiple Clarify CRMtables, you should make a design decision about the structure and purpose of thebusiness object. For example, if a business object definition for a table includes afew attributes for another table, defining a single business object for the two tablesmay be sufficient. However, if a business object definition includes many importantattributes from another table, you may want to create a child business objectdefinition for the second table rather than locating attributes for both tables in thesame business object definition. In addition, if the business object alreadyreferences other child business objects, creating another child business object torepresent a new table makes the business object structure consistent.
If you are creating a business object that will be used primarily for Createoperations, organizing attributes for different tables into child business objects maybe a logical approach. However, if the business object will be used primarily for
Chapter 3. Developing business objects for the connector 21
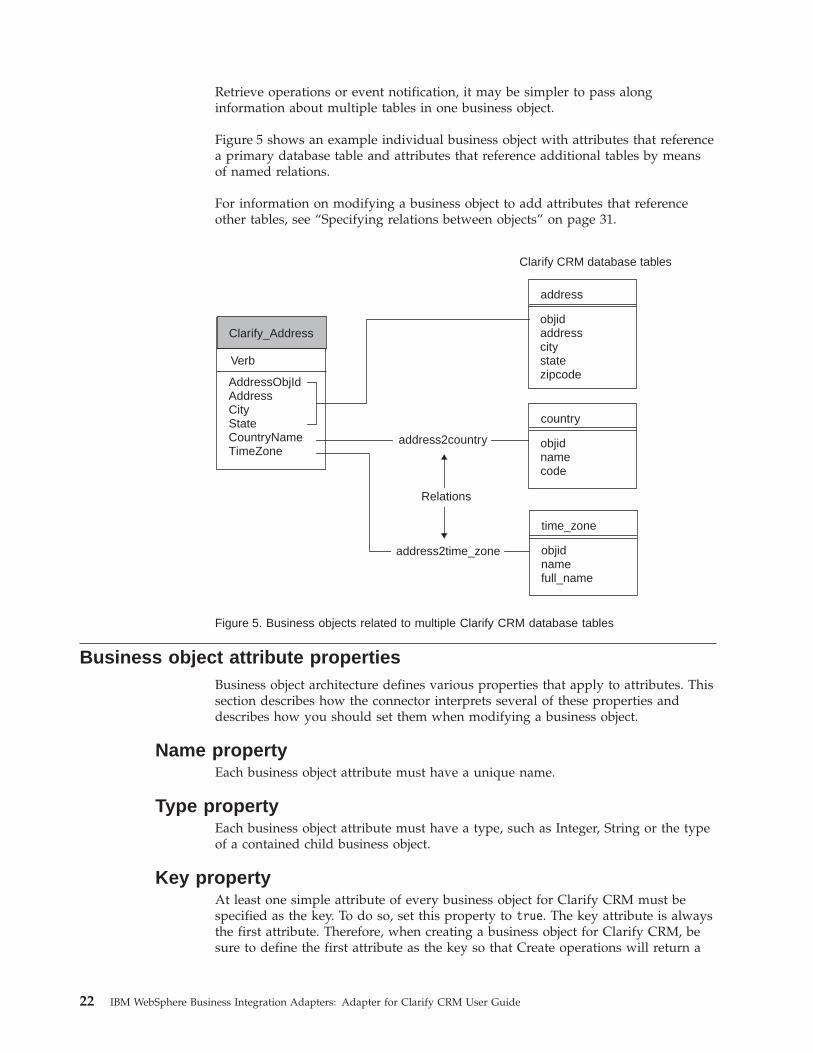
Retrieve operations or event notification, it may be simpler to pass alonginformation about multiple tables in one business object.
Figure 5 shows an example individual business object with attributes that referencea primary database table and attributes that reference additional tables by meansof named relations.
For information on modifying a business object to add attributes that referenceother tables, see “Specifying relations between objects” on page 31.
Business object attribute propertiesBusiness object architecture defines various properties that apply to attributes. Thissection describes how the connector interprets several of these properties anddescribes how you should set them when modifying a business object.
Name propertyEach business object attribute must have a unique name.
Type propertyEach business object attribute must have a type, such as Integer, String or the typeof a contained child business object.
Key propertyAt least one simple attribute of every business object for Clarify CRM must bespecified as the key. To do so, set this property to true. The key attribute is alwaysthe first attribute. Therefore, when creating a business object for Clarify CRM, besure to define the first attribute as the key so that Create operations will return a
Verb
AddressObjIdAddressCityStateCountryNameTimeZone
address
objidaddresscitystate
country
objidnamecode
time_zone
objidnamefull_name
zipcode
address2country
address2time_zone
Clarify CRM database tables
Clarify_Address
Relations
Figure 5. Business objects related to multiple Clarify CRM database tables
22 IBM WebSphere Business Integration Adapters: Adapter for Clarify CRM User Guide

value for the new key and Retrieve operations will return the correct record fromthe table that the business object represents.
Note: The connector does not support specifying an attribute that represents achild business object or an array of child business objects as a key attribute.
Note that the connector ignores multiple keys and only uses the first key, except inRetrieve operations when the application-specific text in the business objectdefinition specifies multiple key retrieve; for information on multiple key retrieve,see “Specifying multiple key attributes for retrieve operations” on page 29.
The key property is processed slightly differently in top-level business objects andchild business objects.
Key property in top-level business objectsFor Create operations, the connector processes key attributes as follows:v If the key represents the value stored in the objid field in a Clarify CRM table,
and the value for the key is null, Clarify CRM generates a value for the key, andthe connector returns the value in the business object.If the key represents the objid field in a Clarify CRM table, but the value for thekey is not null, the connector attempts to create a record with a new key value.Depending on the Clarify CRM schema and indexes, one of the followingbehaviors will occur:– A unique index violation will occur.– A record will be created successfully with a new objid. However, in this case
you may have duplicate information in the database.
On Create and Update operations, the Clarify CRM application is designed togenerate its own objid values. For this reason, it is strongly recommended thatyou not design business objects to pass in values for objid fields unless youknow how the Clarify CRM application will behave.
v On a Create operation, if the key does not represent the value in the objid fieldbut represents another field in the table, such as the part number in the part_numtable, and the value of the attribute is not null, the connector stores the attributevalue in the database. Note that if the record already exists, one of the followingbehaviors will occur:– A unique index violation will occur.– A record will be created successfully. However, in this case you may have
duplicate information in the database.v On a Create operation, if the key is not the objid field, and the attribute
application-specific text specifies SchemeName=Value for automatic generation of avalue for the key, and the value of the key attribute is null, the connectorgenerates the next sequential number in Clarify CRM and uses that value tocreate the record. The connector returns the generated value in the businessobject.For information on automatically generated values for attributes, see“Generating attribute values automatically” on page 41.
In all cases, on a successful completion of a Create operation, the connector willreturn a populated key in the business object, whether the value was the objidvalue, a value for a non-objid field, or an automatically generated value.
For a Retrieve operation, if the attribute is a key, its value is used to retrieve theother values for the business object, but the key value itself is not retrieved from
Chapter 3. Developing business objects for the connector 23

the database. If the verb is Retrieve and the key value is CxMissingId, theconnector will return a failure because it cannot retrieve the object.
Key property in child business objectsIf the verb is Create or Update and the value of the key is unknown for a childbusiness object, use the string CxMissingId for the key attribute value. When thekey value of a child business object is set to CxMissingId, the connector willperform a Create for a child object without first checking whether the recordalready exists.
However, because the query parameters are not constrained when there is morethan one child object, there is a possibility of orphan data in the Clarify CRMdatabase. To eliminate this possibility, cross reference child keys.
Foreign key propertyRelationships between tables in the Clarify CRM application are defined by namedrelations rather than by foreign keys. As an example, information on a businessorganization is stored in Clarify CRM in the bus_org table. This table includesrelations to the site and address tables, which store information on theorganization’s site and primary address. The relations are implemented as columnsin the bus_org table.
WebSphere Business Integration Adapter business objects for Clarify CRM useClarify CRM named relations to represent relationships between tables. Eachindividual business object can reference multiple tables by including attributeswhose application-specific text specify the relations. When several attributesreference the same foreign table, the relation is specified in the first attribute thatreferences the table.
Because relationships are contained in named relations, the Foreign Key property isnot used in business objects for Clarify CRM to explicitly specify that an attributerepresents a foreign key. Instead, this property is used to define how the connectorprocesses attributes with relations.
The rules for connector processing of Foreign Key attributes for Create and Updateoperations are shown in Table 7. Note that the Foreign Key property is onlychecked for attributes that have named relations in their application-specific text.
Table 7. Connector processing of foreign key property
Foreign key propertysetting
Attribute value Description of connector processing
true Not null If the attribute application-specific text includes a named relation,the connector checks for the existence of the record in theapplication database using the value of the Foreign Key attribute. Ifthe record exists, the connector creates the relation between theentities. If the record does not exist, the connector returns BON_FAIL.
true or false Null The connector evaluates whether the foreign key attribute isrequired (the Required property is set to true). If the attribute isrequired, the connector returns BON_FAIL. If the attribute is notrequired, the connector skips the attribute.
false Not null If the attribute application-specific text includes a named relation,the connector checks for the existence of the record in theapplication database using the value of the Foreign Key attribute. Ifthe record exists, the connector creates the relation between theentities. If the record does not exist, the connector creates the recordand creates the relation.
24 IBM WebSphere Business Integration Adapters: Adapter for Clarify CRM User Guide

As shown in Table 7 on page 24, the Foreign Key property is overloaded inbusiness objects for Clarify CRM to specify what kind of foreign key lookup theconnector will perform. If Foreign Key is set to false, the connector performs adynamic lookup of the related record, creating the relation if the record exists andcreating both the record and relation if the record does not exist. If Foreign Key isset to true, the connector simply creates the relation if the record exists and failsthe operation if it does not exist.
As an example, suppose that the AddressState_prov attribute in theClarify_SiteAddress business object specifies a state in the Clarify state_prov table.If the state_prov table already contains all state names, you can set Foreign Key totrue so that the connector will find an existing state name or fail. This limits thespellings of state names to those in the table. If the spelling of state names is notimportant, you can set Foreign Key to false so that the connector will insert anyspelling of state names.
In summary, when modifying business objects for Clarify CRM, use the ForeignKey property to specify what kind of lookup the connector should perform.
Required propertyThe Required property specifies whether an attribute must contain a value. If aparticular attribute in a business object that you are modifying must contain avalue, set the Required property to true.
If the verb is Create and Required is true, the connector will cause the Createoperation to fail if the business object does not have a valid value or a defaultvalue for a Required attribute.
The connector does not check the Required property for verbs other than Create.
Max length propertyThe connector does not currently use the Max Length property. It is good practice,however, to set the value of this property to the number of bytes the attribute cancontain. At a minimum, set the value of Max Length to 8 so that the attributevalue can be CxIgnore.
UseDefaults propertyThis property specifies a default value for the attribute that will be used if there isno runtime value for the attribute in the business object. If the following criteriaare met, the UseDefaults configuration property is enabled:v UseDefaults = truev Business object verb = Createv Business object attribute = Requiredv Default value is populated for the attribute that is marked Required
If the UseDefaults property is enabled the following will occur:v If the business object verb is Create and the value of an attribute is null, the
connector will populate the field with the value in the attribute Default Valueproperty.
v If the attribute is Required and there is no default value in the business objectdefinition and the value of the attribute is null, the connector will fail.
Chapter 3. Developing business objects for the connector 25

Attribute and database typesThe connector supports the data types shown in Table 8. When you add a businessobject attribute, set the attribute data type according to the data type of the field inthe Clarify CRM table.
Table 8. Business object attribute and database types
Clarify CRM data types WebSphere Business Integration Adapter attribute data types
int, tinyint, smallint integer
real float
varchar, text string
decimal string
datetime string
Important notes on attributes that reference Clarify fields oftype text
The connector supports Clarify CRM text fields of types varchar and text.WebSphere Business Integration Adapter business objects for Clarify CRM caninclude attributes with a data type of string that reference fields in Clarify CRMwith the data type of text.
Note, however, that an attribute that references a field of type text cannot have arelation in its business object application-specific text. To work around this, youcan add a preceding attribute that represents the object ID of the table, put therelation between the tables in the application-specific text of that attribute, andthen reference the table in the application-specific text of the attribute representingthe text field.
For example, suppose that you have a business object named Clarify_Case thatrepresents the Clarify CRM case table. You want to add a relation to the notes_logtable so that you can include an attribute for the text of a note related to a case.
To do this, you add an attribute in the Clarify_Case business object for the objectID of the notes_log table, and, in the application-specific text for this attribute,include the relation between the tables. Then add an attribute for the text of thenote. In this example, the attribute you want to reference isnotes_log:description, which is a field of type text. Figure 6 illustrates theseattributes in the example Clarify_Case business object.
26 IBM WebSphere Business Integration Adapters: Adapter for Clarify CRM User Guide

If the connector attempts to select or update a text field in Clarify CRM, and thebusiness object attribute with the text data type does not refer to the attributerepresenting the table object ID, the following errors may result:v Execution of the SQL command failed due to unexpected problems.v TEXT and IMAGE data types may not be used in the WHERE or HAVING clause, except
with the LIKE predicate and the IS NULL predicate.
Note that although ObjId is necessary for text fields, it is not necessary forvarchar fields.
Business object application-specific textApplication-specific text in business object definitions provides the connector withapplication-dependent instructions on how to process business objects. Thismeta-data is used in conjunction with a business object’s attribute properties andstructure. If you extend or modify Clarify CRM application-specific businessobjects, you must make sure that the application-specific information in thebusiness object definition matches the syntax that the connector expects.
This section provides information on the object, attribute, and verbapplication-specific text format for business objects for Clarify CRM. Table 9provides an overview of the functionality available in business objectapplication-specific text for Clarify CRM.
Table 9. Overview of application-specific text in business objects for Clarify CRM
Scope of application-specifictext
Types of functionality
Entire business object Define the scope of transactions in the connector Specify thatthe connector perform retrieves using multiple keys
Simple attributes [Required] Specify table name, field name, and data type foran attribute Specify one or more relations between attributesin the primary table and one or more foreign tables Specifyhow retrieve queries are constructed Specify automaticgeneration of attribute values Specify preprocessing forattributes Specify that Retrieve operations use non-keyvalues
Name = CaseObjid
AppSpecificInfo = case:objid::1:Type = Integer
Clarify_Case
...
Name = CaseNotes
AppSpecificInfo = notes_log:objid:case_notes2notes_log::1:Type = Integer
Name = NoteDescription
AppSpecificInfo = notes_log:description::3:Type = String
Create relationbetween tables
Refer to textattribute inrelatedtable
...
Figure 6. Referencing attributes of type text
Chapter 3. Developing business objects for the connector 27

Table 9. Overview of application-specific text in business objects for Clarify CRM (continued)
Scope of application-specifictext
Types of functionality
Container attributes Specify whether existing relations are kept for child businessobjects on Update operations
Business object verb Specify that the connector retrieve only the parent businessobject in a hierarchical object. Specify that the connectorfollow a retrieve by non-key values with a regular retrieveoperation.
Using business object application-specific textThe business object for Clarify CRM includes application-specific text at thebusiness object level that:v Defines the scope of business object transactionsv Specifies multiple key retrieve operations
The sections that follow provide information on these types of application-specifictext.
Defining the scope of business object transactionsWhen the connector is processing a request to change data in the Clarify CRMdatabase, it can process business object transactions in two ways:v It can make all changes at once and commit the entire transaction.v For a hierarchical business object, it can commit changes to each child object as a
set of incremental transactions.
By default, the connector commits an entire business object at once. You can usethe object application-specific text to specify that the connector execute a commitafter each business object.
Transactionality is set by specifying Transactionality=Partial orTransactionality=Full in the application-specific text. If Transactionality is set toPartial, the connector executes a commit after processing each business object. Thismeans that if there is a parent object and several contained child objects, theconnector will execute a commit after updating the parent object, a commit afterupdating the first child object, and so on. If Transactionality is set to Full or notset, the connector will wrap the whole transaction in one commit.
For example, to specify that the connector execute a commit after each businessobject, use the following text:AppSpecificInfo = Transactionality=Partial
For every business object, it is recommended that transactionality initially be set toFull. However, due to a known problem in the Clarify API, the connector cannotrely on the sequence of the SQL statements that the API generates. In certain cases,the API may perform an action in a different order than the connector requested.
To force the Clarify API to execute the statements in the order specified, setTransactionality to Partial. Note, however, that if transactional support is set toPartial, a hierarchical business object is not committed in one transaction, and afailure only partially rolls back transactions for a hierarchical business object.
28 IBM WebSphere Business Integration Adapters: Adapter for Clarify CRM User Guide

To view the set of actions that the API has performed, examine the SQL log thatthe connector has generated. This file contains the actual SQL scripts executed bythe connector. The name of this log is set by the connector configuration propertySQLDumpFileName; the default file is C:\\temp\XrclarifySQL.log.
Note: If the entire WebSphere Business Integration Adapter business object iscommitted in one transaction, the transaction log of the Clarify CRMdatabase may need to be significantly increased. For example, if aClarify_Contract business object includes 900 line items, the log must belarge enough to handle this object in one transaction. Consult your databaseadministrator for information.
Specifying multiple key attributes for retrieve operationsBy default, when the connector performs a Retrieve operation, it uses the value ofthe first key attribute, which must be the first attribute, as the key to the record inClarify CRM. You can also use the business object application-specific text tospecify that the connector retrieve a business object using the value of severalattributes designated as keys.
The use of more than one key attribute creates a compound key for the purpose ofquerying Clarify CRM. Because multikey retrieve is set at the parent businessobject level, this application-specific text enables multikey retrieve for all businessobjects of a particular type.
To allow multikey retrieve, edit the business object application-specific informationto specify MultiKeyRetrieve=True. The format is:AppSpecificInfo = MultiKeyRetrieve=True
The default is false; that is, only the first key attribute value is used. Note thefollowing restrictions:v All attributes used in the retrieve operation must have non-null values. Any
attribute whose value is null is ignored.v The first attribute in the business object determines the Clarify CRM table from
which all other attributes are retrieved. Only key values that reference that tableare used.
Attribute application-specific textThe application-specific text for attributes differs depending on whether theattribute is a simple attribute or a container attribute. For information onapplication-specific text for container attributes, see “Application-specific text forcontainer attributes” on page 43.
Format of application-specific text for simple attributesFor simple attributes, application-specific text format consists of eight positionalparameters separated by colon (:) delimiters. The positional parameters can bepreceded by one or more name-value pairs. The name-value pairs are optional andcan be specified in any order. Semi-colons are used as field delimiters betweenname-value pairs. If any name-value pairs are present, they are separated from thepositional parameters by a vertical bar (|). Therefore, reserve the colon, semi-colon,and vertical bar characters as delimiters.
The format of attribute application-specific text is shown below. Note that only thetable name, field name, and data type parameters are required; bracketed fields inthe syntax example are optional.
Chapter 3. Developing business objects for the connector 29

[SchemeName = Value;PP=Value;RBC=Value| ]tablename:fieldname:[relation[,...]]:datatype:[ParentIndex]:[RelateToAttribute[,...]]:[AttrNameToLookFor:FieldNameToRetrieve]
Table 10 describes the meaning of each positional parameter. Table 11 brieflydescribes the name-value pairs. Examples of the use of these parameters areprovided in the sections that follow.
Table 10. Positional parameters in attribute application-specific text
Field Description
tablename The name of the Clarify CRM database table for thisattribute.
fieldname The name of the column in the Clarify CRM database table.
relation[, ...] A list of Clarify CRM relations used to relate this attributeto the attributes in the RelateToAttribute list describedbelow.
datatype An integer value indicating the type of data. Supportedtypes are: 1 = integer data (int, tinyint), 2 = floating pointdata (real), 3 = string data (varchar, text, datetime), 4 =decimal data (corresponding to the Clarify CRM decimaltype introduced in Clarify 5.0)
ParentIndex The index of the parent object in a query.
RelateToAttribute[, ...] A list of attributes to be related to this attribute using therelations specified in the relation list described above. Aleading .. (two dots) points to an attribute in this object’sparent object, and a leading ... (three dots) points to anattribute in this object’s grandparent object.
AttrNameToLookFor The name of an attribute in this business object whose tablename should be used, along with the field name specifiedin Field Name To Retrieve parameter, to assign to thetablename and fieldname parameters for this attribute.
Field Name To Retrieve Field name to use to assign to the tablename/fieldnameparameters for this attribute. Used with theAttrNameToLookFor parameter.
Table 11. Name-value pairs in attribute application-specific text
Name-value pair Description
SchemeName=Value The constant SchemeName and its value as definedby the value in the name column of the Clarify CRMtable_num_scheme table. This name-value pair is usedto specify the automatic generation of one or moreattribute values.
PP=viewOrTable:column:condition:location[...]
Specifies preprocessing of an attribute
RBC=tablename:fieldname Specifies each attribute that is to be used in aRetrieveByContent operation.
Specifying the clarify table name and field name for an attributeAttribute application-specific text must specify the tablename, fieldname, anddatatype parameters for all attributes. These parameters enable the connector tocreate a new record in a table for a Create operation or locate a record in a tablefor a Retrieve operation or an Update operation. All other application-specific textfields are optional.
30 IBM WebSphere Business Integration Adapters: Adapter for Clarify CRM User Guide

When you modify or add business object attributes, be sure to specify the name ofthe table, name of the field, and the data type for the attribute in the Clarify CRMdatabase.
Example: Simple create operations: The following example shows a businessobject named Clarify_PartnerSite and its key attribute SiteObjid. In theapplication-specific text for the SiteObjid attribute, the business object designercoded the location for the attribute value as the objid field in the Clarify CRMsite table. The data type of the field is integer.Name = SiteObjidIsKey = trueAppSpecificInfo = site:objid::1:
The connector can use the application-specific text to create a new record in thesite table. Figure 7 shows an example Clarify CRM site table and an examplebusiness object definition for a Clarify_PartnerSite business object.
Note: Do not name a Clarify CRM application-specific business object Clarify_Site.The business object Clarify_Site is obsolete, and the use of this name willtrigger obsolete processing in the connector that may result in a user codeexception.
Specifying relations between objectsIf an attribute references a Clarify CRM table other than the primary table, theattribute application-specific text must specify the relation and RelateToAttributeparameters. These parameters enable the connector to create a new record in theassociated table for a Create operation or find a record in an associated table for aRetrieve operation.
The relation parameter must be included in the application-specific text of thefirst attribute that references the table. Subsequent attributes that reference thetable cannot include a relation.
The RelateToAttribute parameter specifies the attribute that is to be related to thisattribute by the relation. This parameter can point to an attribute in the currentbusiness object, the parent business object, or the grandparent business object usingthe following syntax:v RelateToAttribute points to the current objectv ..RelateToAttribute points to the parent object
Clarify site table
objid site_id name
2123 75300 Jones Mfg.
Clarify_PartnerSite business object definition
Name = SiteObjid
AppSpecificInfo = site:objid::1:IsKey = true
Clarify_PartnerSite
Name = SiteID
AppSpecificInfo = site:site_id::3:IsKey = false
Name = SiteName
AppSpecificInfo = site:name::3:IsKey = false
Figure 7. Attribute application-specific text specifying table name, field name, and data type
Chapter 3. Developing business objects for the connector 31
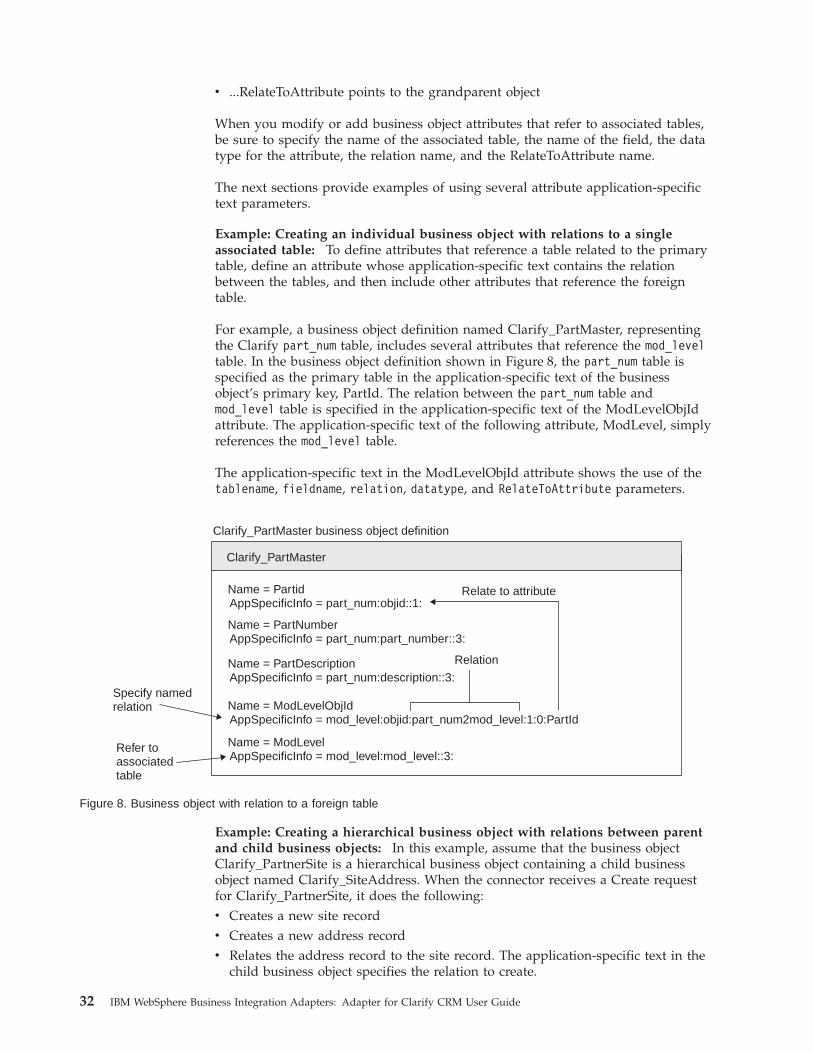
v ...RelateToAttribute points to the grandparent object
When you modify or add business object attributes that refer to associated tables,be sure to specify the name of the associated table, the name of the field, the datatype for the attribute, the relation name, and the RelateToAttribute name.
The next sections provide examples of using several attribute application-specifictext parameters.
Example: Creating an individual business object with relations to a singleassociated table: To define attributes that reference a table related to the primarytable, define an attribute whose application-specific text contains the relationbetween the tables, and then include other attributes that reference the foreigntable.
For example, a business object definition named Clarify_PartMaster, representingthe Clarify part_num table, includes several attributes that reference the mod_leveltable. In the business object definition shown in Figure 8, the part_num table isspecified as the primary table in the application-specific text of the businessobject’s primary key, PartId. The relation between the part_num table andmod_level table is specified in the application-specific text of the ModLevelObjIdattribute. The application-specific text of the following attribute, ModLevel, simplyreferences the mod_level table.
The application-specific text in the ModLevelObjId attribute shows the use of thetablename, fieldname, relation, datatype, and RelateToAttribute parameters.
Example: Creating a hierarchical business object with relations between parentand child business objects: In this example, assume that the business objectClarify_PartnerSite is a hierarchical business object containing a child businessobject named Clarify_SiteAddress. When the connector receives a Create requestfor Clarify_PartnerSite, it does the following:v Creates a new site recordv Creates a new address recordv Relates the address record to the site record. The application-specific text in the
child business object specifies the relation to create.
Name = PartidAppSpecificInfo = part_num:objid::1:
Clarify_PartMaster
Clarify_PartMaster business object definition
Name = PartNumberAppSpecificInfo = part_num:part_number::3:
Name = PartDescriptionAppSpecificInfo = part_num:description::3:
Name = ModLevelObjIdAppSpecificInfo = mod_level:objid:part_num2mod_level:1:0:PartId
Name = ModLevelAppSpecificInfo = mod_level:mod_level::3:
Specify namedrelation
Refer toassociatedtable
Relation
Relate to attribute
Figure 8. Business object with relation to a foreign table
32 IBM WebSphere Business Integration Adapters: Adapter for Clarify CRM User Guide

The Clarify_PartnerSite and Clarify_SiteAddress business object definitions areillustrated in Figure 9. The application-specific text in the primary key attribute ofthe child business object shows the use of the tablename, fieldname, relation,datatype, and RelateToAttribute parameters. The RelateToAttribute parameterspecifies the SiteObjid attribute in the parent business object.
The connector uses the application-specific text shown in the business objectsabove to process the business objects. The connector follows these general steps:1. The connector creates a new site record in the site table. The value in the objid
key becomes the value for the SiteObjid attribute in the parentClarify_PartnerSite business object. The data type of the field is string.
2. The connector creates a new record in the address table. The value of the objidkey becomes the value for the AddressObjId attribute in the childClarify_SiteAddress business object. The data type of the field is integer.
3. From the child Clarify_SiteAddress object, the connector locates the site tableusing the ..SiteObjid parameter in the application-specific text. This parameterpoints to the SiteObjid attribute in the parent business object. The SiteObjidattribute in the parent business object provides the reference to the businessobject’s primary table and primary key.
4. The connector relates the address record to the site table by populating thecust_primaddr2address relation field of the site table with the value ofaddress.objid of the address record. The connector uses the inverse relationcust_primaddr2address.
Figure 10 shows the Clarify CRM site table and address table and thecorresponding WebSphere Business Integration Adapter business object definitions.
Name = SiteIDAppSpecificInfo = site:site_id::3:
Clarify_PartnerSite
Name = AddressObjId
AppSpecificInfo = address:objid:cust_primaddr2address:1:0:..SiteObjid
...
Clarify_SiteAddressChildobject
Parentobject
Clarify_PartnerSite business object definition
Clarify_SiteAddress business object definition
RelateTo attribute parameterrelates to AddressObjId to SiteObjid
Relation
Name = SiteObjidAppSpecificInfo = site:objid::1:
Figure 9. Creating relations within a hierarchical business object
Chapter 3. Developing business objects for the connector 33
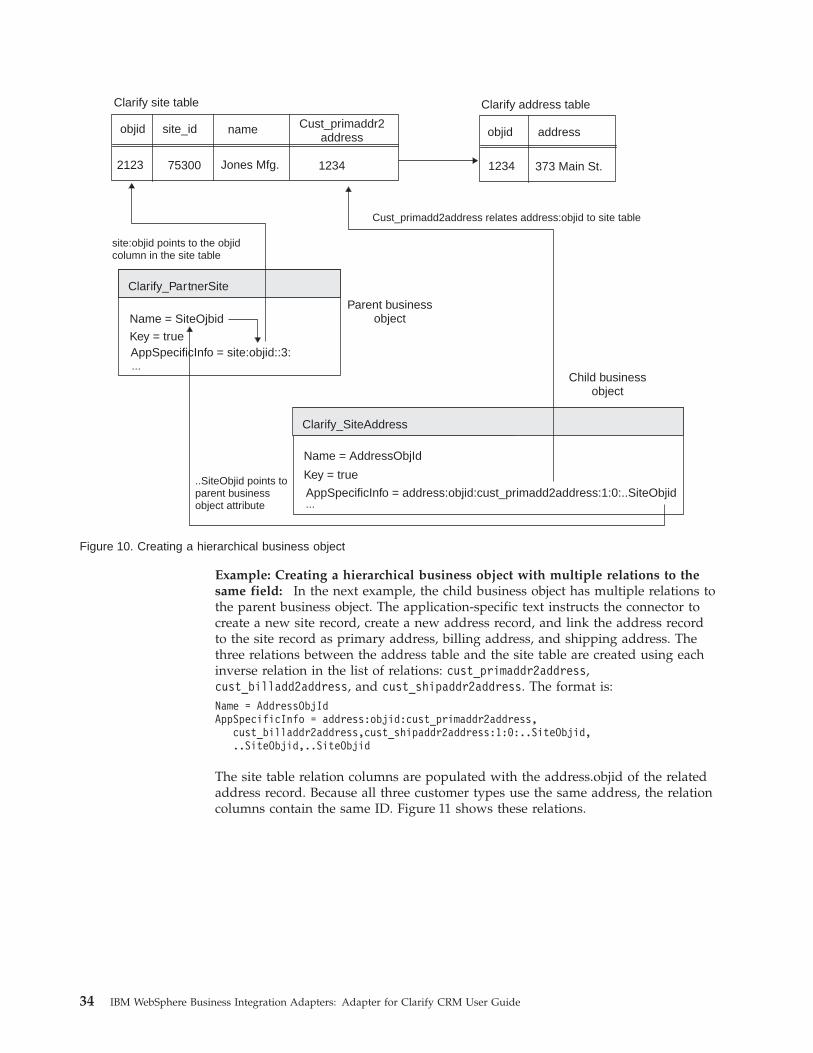
Example: Creating a hierarchical business object with multiple relations to thesame field: In the next example, the child business object has multiple relations tothe parent business object. The application-specific text instructs the connector tocreate a new site record, create a new address record, and link the address recordto the site record as primary address, billing address, and shipping address. Thethree relations between the address table and the site table are created using eachinverse relation in the list of relations: cust_primaddr2address,cust_billadd2address, and cust_shipaddr2address. The format is:Name = AddressObjIdAppSpecificInfo = address:objid:cust_primaddr2address,
cust_billaddr2address,cust_shipaddr2address:1:0:..SiteObjid,..SiteObjid,..SiteObjid
The site table relation columns are populated with the address.objid of the relatedaddress record. Because all three customer types use the same address, the relationcolumns contain the same ID. Figure 11 shows these relations.
Clarify site table
objid site_id name
2123 75300 Jones Mfg.
Cust_primaddr2address
1234
Clarify address table
objid address
1234 373 Main St.
Name = SiteOjbid
AppSpecificInfo = site:objid::3:...
Clarify_PartnerSite
Name = AddressObjId
AppSpecificInfo = address:objid:cust_primadd2address:1:0:..SiteObjid...
Clarify_SiteAddress
Key = true
Key = true
site:objid points to the objidcolumn in the site table
..SiteObjid points toparent businessobject attribute
Cust_primadd2address relates address:objid to site table
Parent businessobject
Child businessobject
Figure 10. Creating a hierarchical business object
34 IBM WebSphere Business Integration Adapters: Adapter for Clarify CRM User Guide
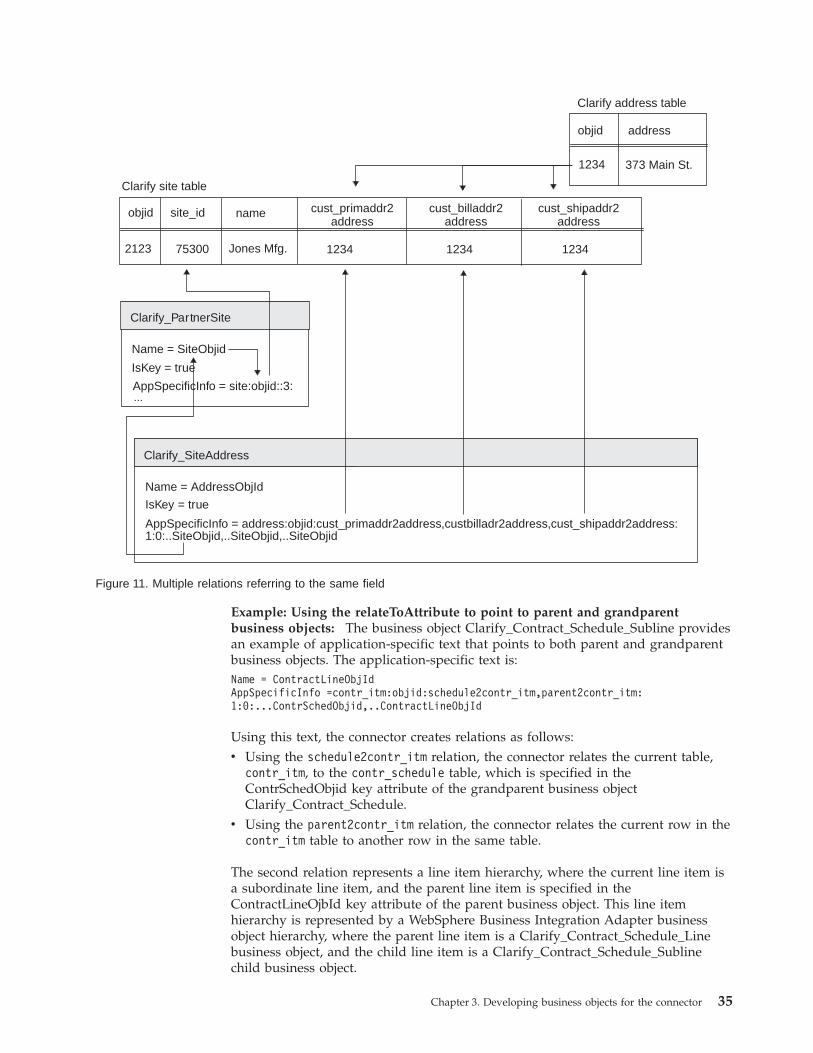
Example: Using the relateToAttribute to point to parent and grandparentbusiness objects: The business object Clarify_Contract_Schedule_Subline providesan example of application-specific text that points to both parent and grandparentbusiness objects. The application-specific text is:Name = ContractLineObjIdAppSpecificInfo =contr_itm:objid:schedule2contr_itm,parent2contr_itm:1:0:...ContrSchedObjid,..ContractLineObjId
Using this text, the connector creates relations as follows:v Using the schedule2contr_itm relation, the connector relates the current table,
contr_itm, to the contr_schedule table, which is specified in theContrSchedObjid key attribute of the grandparent business objectClarify_Contract_Schedule.
v Using the parent2contr_itm relation, the connector relates the current row in thecontr_itm table to another row in the same table.
The second relation represents a line item hierarchy, where the current line item isa subordinate line item, and the parent line item is specified in theContractLineOjbId key attribute of the parent business object. This line itemhierarchy is represented by a WebSphere Business Integration Adapter businessobject hierarchy, where the parent line item is a Clarify_Contract_Schedule_Linebusiness object, and the child line item is a Clarify_Contract_Schedule_Sublinechild business object.
Clarify site table
objid site_id name
2123 75300 Jones Mfg.
cust_primaddr2address
1234
cust_billaddr2address
1234
cust_shipaddr2address
1234
Name = AddressObjId
AppSpecificInfo = address:objid:cust_primaddr2address,custbilladr2address,cust_shipaddr2address:
Clarify_SiteAddress
IsKey = true
1:0:..SiteObjid,..SiteObjid,..SiteObjid
Clarify address table
objid address
1234 373 Main St.
Name = SiteObjid
AppSpecificInfo = site:objid::3:...
Clarify_PartnerSite
IsKey = true
Figure 11. Multiple relations referring to the same field
Chapter 3. Developing business objects for the connector 35

Specifying the parentIndex parameter for retrieve operationsTo retrieve data from the Clarify CRM database, the connector defines a query or aset of queries that selects the specified data. The connector determines the type ofquery based on whether the business object uses relations to join tables.
The connector builds queries as follows:v For an individual business object whose attributes represent a single Clarify
CRM table, the connector builds a single query to retrieve data from thespecified fields.
v For an individual business object some of whose attributes use relations to jointables, the connector builds an array of queries.
v For a hierarchical business object some of whose attributes contain childbusiness objects, the connector builds an array of queries.
To enable the connector to build an array of queries, the application-specific textmust contain two index numbers: an index number in the ParentIndex parameterand the query index, which is generated by the connector. The connector usesthese index numbers to define the query.
For an individual business object that uses relations to join tables, the connectorgenerates the query index by indexing the first business object attribute as 0 andincrementing the index for each subsequent attribute that refers to a relation. Foran attribute that refers to a relation, the application-specific informationParentIndex parameter specifies the query index number for the attribute thatcontains the other key for the join.
Figure 12 illustrates a sample business object and shows how the business objectdesigner would index the attributes in the business object for a Retrieve operation.The illustration also shows the application-specific information for each attribute.
36 IBM WebSphere Business Integration Adapters: Adapter for Clarify CRM User Guide
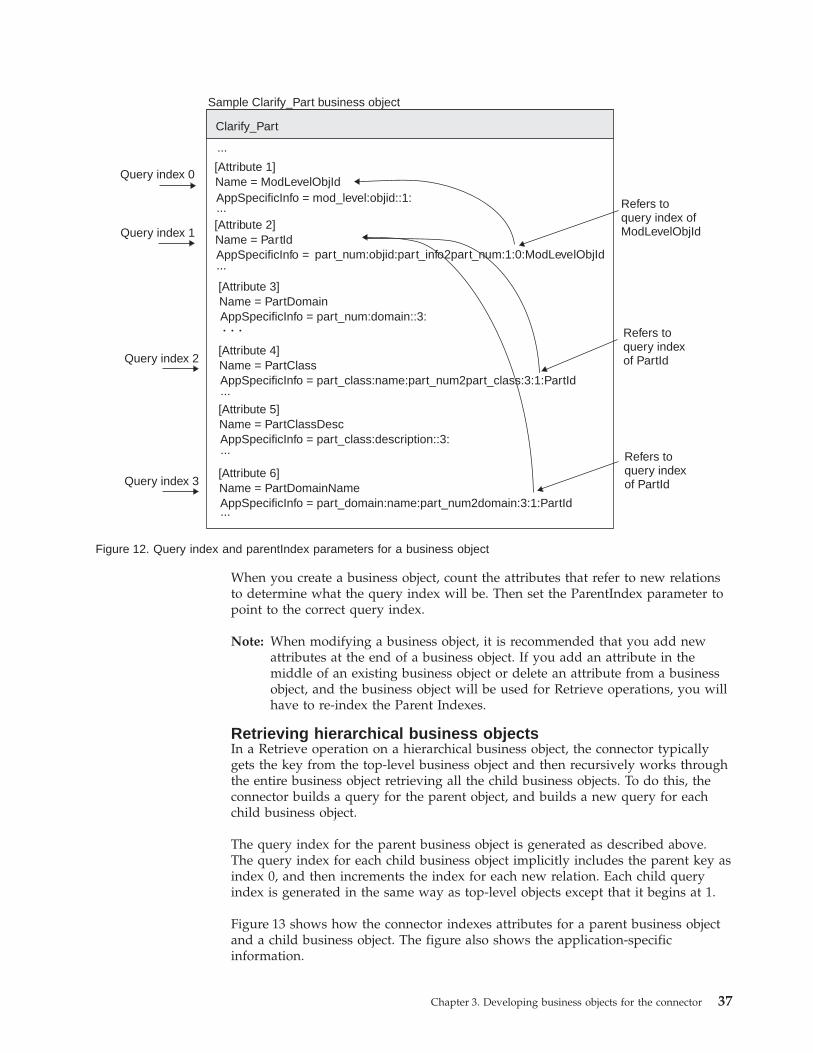
When you create a business object, count the attributes that refer to new relationsto determine what the query index will be. Then set the ParentIndex parameter topoint to the correct query index.
Note: When modifying a business object, it is recommended that you add newattributes at the end of a business object. If you add an attribute in themiddle of an existing business object or delete an attribute from a businessobject, and the business object will be used for Retrieve operations, you willhave to re-index the Parent Indexes.
Retrieving hierarchical business objectsIn a Retrieve operation on a hierarchical business object, the connector typicallygets the key from the top-level business object and then recursively works throughthe entire business object retrieving all the child business objects. To do this, theconnector builds a query for the parent object, and builds a new query for eachchild business object.
The query index for the parent business object is generated as described above.The query index for each child business object implicitly includes the parent key asindex 0, and then increments the index for each new relation. Each child queryindex is generated in the same way as top-level objects except that it begins at 1.
Figure 13 shows how the connector indexes attributes for a parent business objectand a child business object. The figure also shows the application-specificinformation.
Sample Clarify_Part business object
Name = ModLevelObjIdAppSpecificInfo = mod_level:objid::1:
[Attribute 1]
...
Name = PartIdAppSpecificInfo = part_num:objid:part_info2part_num:1:0:ModLevelObjId...
...
Clarify_Part
[Attribute 2]
Query index 0
Query index 1
Name = PartClassAppSpecificInfo = part_class:name:part_num2part_class:3:1:PartId...
[Attribute 4]Query index 2
Name = PartDomainAppSpecificInfo = part_num:domain::3:...
[Attribute 3]
Refers toquery index ofModLevelObjId
Refers toquery indexof PartId
Name = PartDomainNameAppSpecificInfo = part_domain:name:part_num2domain:3:1:PartId...
[Attribute 6]Query index 3
Refers toquery indexof PartId
Name = PartClassDescAppSpecificInfo = part_class:description::3:...
[Attribute 5]
Figure 12. Query index and parentIndex parameters for a business object
Chapter 3. Developing business objects for the connector 37
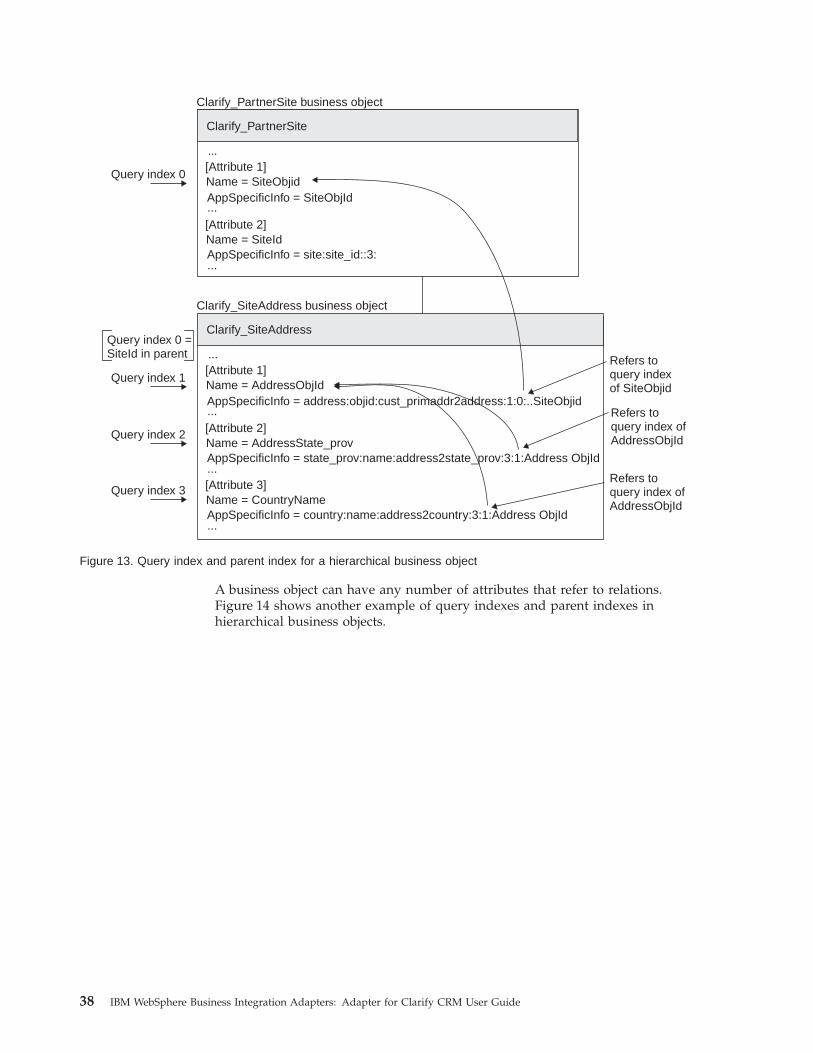
A business object can have any number of attributes that refer to relations.Figure 14 shows another example of query indexes and parent indexes inhierarchical business objects.
Clarify_PartnerSite business object
Name = SiteObjidAppSpecificInfo = SiteObjId
[Attribute 1]...
Name = SiteIdAppSpecificInfo = site:site_id::3:...
...
Clarify_PartnerSite
[Attribute 2]
Query index 0
Refers toquery indexof SiteObjid
Clarify_SiteAddress business object
Name = AddressObjIdAppSpecificInfo = address:objid:cust_primaddr2address:1:0:..SiteObjid
[Attribute 1]...
Name = AddressState_provAppSpecificInfo = state_prov:name:address2state_prov:3:1:Address ObjId...
...
Clarify_SiteAddress
[Attribute 2]
Query index 1
Name = CountryNameAppSpecificInfo = country:name:address2country:3:1:Address ObjId...
[Attribute 3]
Query index 2
Query index 3
Refers toquery index ofAddressObjId
Refers toquery index ofAddressObjId
Query index 0 =SiteId in parent
Figure 13. Query index and parent index for a hierarchical business object
38 IBM WebSphere Business Integration Adapters: Adapter for Clarify CRM User Guide
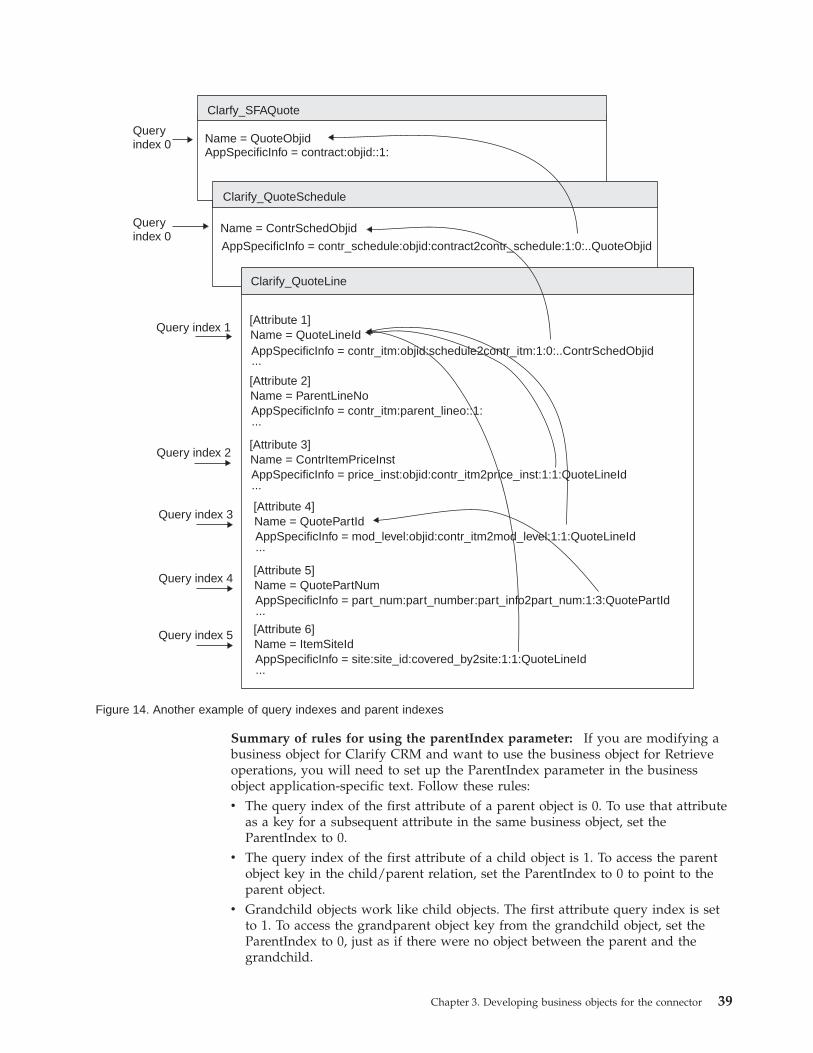
Summary of rules for using the parentIndex parameter: If you are modifying abusiness object for Clarify CRM and want to use the business object for Retrieveoperations, you will need to set up the ParentIndex parameter in the businessobject application-specific text. Follow these rules:v The query index of the first attribute of a parent object is 0. To use that attribute
as a key for a subsequent attribute in the same business object, set theParentIndex to 0.
v The query index of the first attribute of a child object is 1. To access the parentobject key in the child/parent relation, set the ParentIndex to 0 to point to theparent object.
v Grandchild objects work like child objects. The first attribute query index is setto 1. To access the grandparent object key from the grandchild object, set theParentIndex to 0, just as if there were no object between the parent and thegrandchild.
Name = QuoteLineIdAppSpecificInfo = contr_itm:objid:schedule2contr_itm:1:0:..ContrSchedObjid
[Attribute 1]
Name = ContrItemPriceInstAppSpecificInfo = price_inst:objid:contr_itm2price_inst:1:1:QuoteLineId...
...
Clarify_QuoteLine
[Attribute 3]
Query index 1
Query index 2
Name = QuotePartNumAppSpecificInfo = part_num:part_number:part_info2part_num:1:3:QuotePartId...
[Attribute 5]
Query index 3Name = QuotePartIdAppSpecificInfo = mod_level:objid:contr_itm2mod_level:1:1:QuoteLineId...
[Attribute 4]
Query index 4
Name = ItemSiteIdAppSpecificInfo = site:site_id:covered_by2site:1:1:QuoteLineId...
[Attribute 6]Query index 5
Name = ContrSchedObjid
Name = ParentLineNoAppSpecificInfo = contr_itm:parent_lineo::1:...
[Attribute 2]
Name = QuoteObjid
Clarfy_SFAQuote
Queryindex 0
AppSpecificInfo = contract:objid::1:
AppSpecificInfo = contr_schedule:objid:contract2contr_schedule:1:0:..QuoteObjid
Clarify_QuoteSchedule
Queryindex 0
Figure 14. Another example of query indexes and parent indexes
Chapter 3. Developing business objects for the connector 39
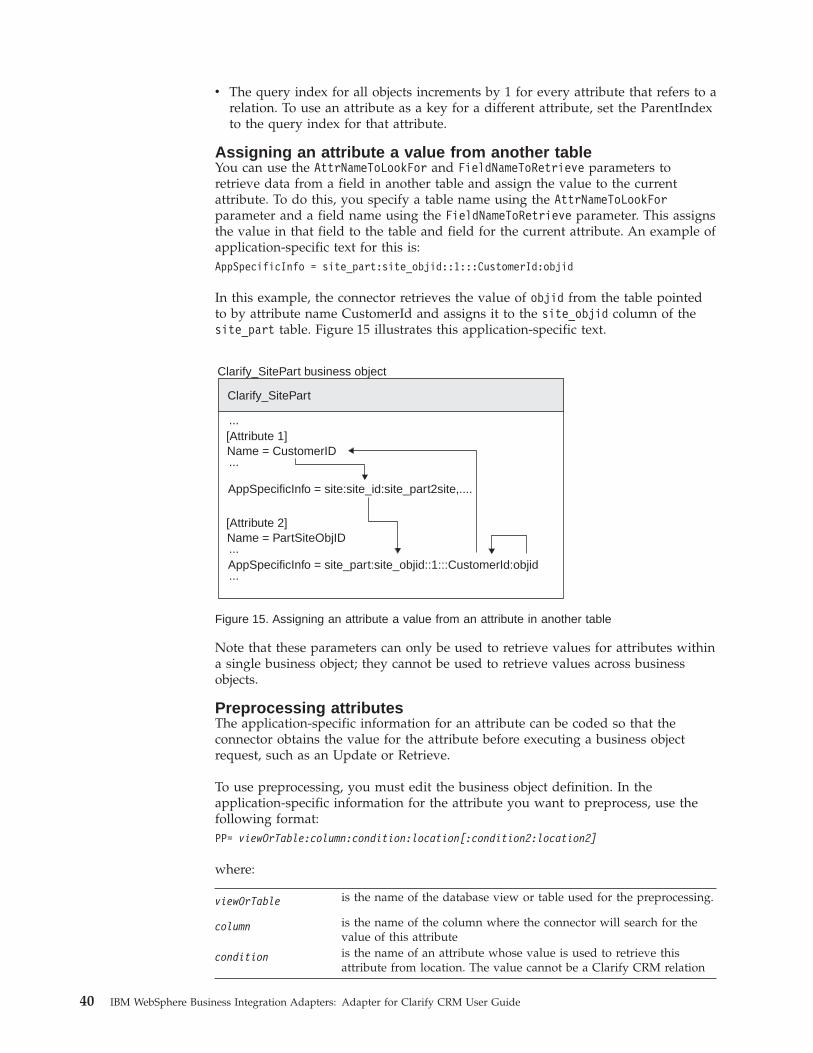
v The query index for all objects increments by 1 for every attribute that refers to arelation. To use an attribute as a key for a different attribute, set the ParentIndexto the query index for that attribute.
Assigning an attribute a value from another tableYou can use the AttrNameToLookFor and FieldNameToRetrieve parameters toretrieve data from a field in another table and assign the value to the currentattribute. To do this, you specify a table name using the AttrNameToLookForparameter and a field name using the FieldNameToRetrieve parameter. This assignsthe value in that field to the table and field for the current attribute. An example ofapplication-specific text for this is:AppSpecificInfo = site_part:site_objid::1:::CustomerId:objid
In this example, the connector retrieves the value of objid from the table pointedto by attribute name CustomerId and assigns it to the site_objid column of thesite_part table. Figure 15 illustrates this application-specific text.
Note that these parameters can only be used to retrieve values for attributes withina single business object; they cannot be used to retrieve values across businessobjects.
Preprocessing attributesThe application-specific information for an attribute can be coded so that theconnector obtains the value for the attribute before executing a business objectrequest, such as an Update or Retrieve.
To use preprocessing, you must edit the business object definition. In theapplication-specific information for the attribute you want to preprocess, use thefollowing format:PP= viewOrTable:column:condition:location[:condition2:location2]
where:
viewOrTable is the name of the database view or table used for the preprocessing.
column is the name of the column where the connector will search for thevalue of this attribute
condition is the name of an attribute whose value is used to retrieve thisattribute from location. The value cannot be a Clarify CRM relation
Clarify_SitePart business object
Name = CustomerID
AppSpecificInfo = site:site_id:site_part2site,....
[Attribute 1]...
...
Name = PartSiteObjID
AppSpecificInfo = site_part:site_objid::1:::CustomerId:objid...
...
Clarify_SitePart
[Attribute 2]
Figure 15. Assigning an attribute a value from an attribute in another table
40 IBM WebSphere Business Integration Adapters: Adapter for Clarify CRM User Guide
location is the name of the column where the connector searches for thecondition value
condition2 is the name of the optional second attribute whose value is used toretrieve this attribute. The value cannot be a Clarify CRM relation.
location2 is the name of the column where the connector searches for thecondition2 value
condition3 is the name of the optional third attribute whose value is used toretrieve this attribute. The value cannot be a Clarify CRM relation.
location3 is the name of the column where the connector searches for thecondition3 value
Add the information to the application-specific information as follows:v If there is no vertical bar (|) separating items in the application-specific
information, add this information to the left of the existing positionalparameters, and add a vertical bar after it.
v If there is already a name-value pair and a vertical bar in the application-specificinformation, add this parameter to the list of name-value pairs. The order ofname-value pairs is not significant. Separate sets of name-value pairs withsemi-colons.
Example: Preprocessing attributes: View x_mp has three fields: modlevel_objid,modlevel_name, and part_id. The connector can retrieve the value of theModLevelObjId attribute using the values of the attributes ModLevel and ItemId.
The ModLevelObjId attribute’s application-specific text is:PP=x_mp:modlevel_objid:ModLevel:modlevel_name:ItemId:part_id|...
The connector obtains the values of the conditions and uses them to obtain thevalue of the attribute whose preprocessing this represents. The connector could usethe following SQL statement when preprocessing the ModLevelObjid attribute, ifthe value found in the modlevel_name column is x, and the value found in theItemID column is y.Select modlevel_objid from table_x_mp where modlevel_name = x and part_id = y
Generating attribute values automaticallyYou can use application-specific text for an attribute to automatically generatevalues for attributes such as IDs. This application-specific text uses the ClarifyCRM table table_num_scheme, which contains all the ID fields for Clarify CRMtables. If you want to add IDs to this table, see the Clarify CRM documentation forinformation.
You can automatically generate the value of one or more attributes in a singlebusiness object. To automatically generate values for an attribute, you must edit itsapplication-specific information. In the application-specific information, use thefollowing format:AppSpecificInfo = SchemeName=Value
where Value specifies the name of the scheme from the name column of thetable_num_scheme table.
Add the name-value pair to the application-specific information as follows:v If there is no vertical bar (|) separating items in the application-specific
information, add this information to the left of the existing positionalparameters, and add a vertical bar after it.
Chapter 3. Developing business objects for the connector 41
v If there is already a name-value pair and a vertical bar in the application-specificinformation, add this parameter to the list of name-value pairs. The order ofname-value pairs is not significant. Separate name-value pairs with a semi-colon.
Note the following rules:v The attribute must not contain a value. If the business object contains a value for
the attribute, the value is used even if the application-specific text is set toSchemeName=Value.
v The connector-specific configuration property UseClarifyID must be set to True.
Example: Generating ID values for an attribute: For example, to generatesequential ID values for the SiteID attribute in the example Clarify_PartnerSitebusiness object, use the following text:AppSpecificInfo = SchemeName=Site ID|site:site_id::3:
Retrieving by non-key valuesA business process might need to retrieve a business object for which it has a set ofattribute values without having the one key attribute that uniquely identifies anapplication record. Such a retrieve is called ″retrieve by non-key values″ or″retrieve by content.″
The connector allows retrieval by non-key values if the following conditions aremet:v The business object sent as a request must have the verb RetrieveByContent.v Each attribute that can contain a value used in the Retrieve operation or receive
a value as a result of the operation is designated in the application-specific textin the business object definition.
When the connector receives a request for a RetrieveByContent operation, itqueries Clarify CRM for the appropriate record by using all the non-null values forattributes designated as RetrieveByContent (RBC). When the connector gets aresponse, it fills in values for the designated attributes that were previously null.
The connector can return the business object with all designated attributes filled inor follow-up with a subsequent Retrieve operation to get the entire business object.However, the connector does a subsequent Retrieve only if the application-specificbusiness object definition specifies that it should.
Setting up a business object for retrieving by non-key values: To define abusiness object for retrieving by non-key values, do the following:v Specify the attributes to be used for the retrieve.v Specify whether to follow up the non-key retrieve with a subsequent retrieve.
Specifying the attributes: Each attribute that will supply a value to the Retrieveoperation or receive a value from the retrieve must be defined by adding thefollowing parameter to the attribute’s application-specific information:RBC=tableName:fieldName
The tableName argument is the name of a view or table in the database. This valuemust be the same for all attributes used in a non-key retrieve. The use of a viewlets you include values from different tables.
The first attribute of the business object must always be coded for non-key retrievein order for any attribute to be used. This ensures that the key value will be filledin as a result of the operation.
42 IBM WebSphere Business Integration Adapters: Adapter for Clarify CRM User Guide

Add the information to the application-specific information as follows:v If there is no vertical bar (|) separating items in the application-specific
information, add this information to the left of the existing positionalparameters, and add a vertical bar after it.
v If there is already a name-value pair and a vertical bar in the application-specificinformation, add this parameter to the list of name-value pairs. The order ofname-value pairs is not significant. Separate name-value pairs with a semi-colon.
Specifying subsequent retrieve: To define a business object to follow a Retrieveby non-key values operation with a subsequent regular Retrieve operation, placethe following property in the application-specific information for theRetrieveByContent verb:SubsequentRetrieve=true
The default value for this property is false. The connector performs a deep orshallow retrieve based on the value of the RequestRetrieve configurationparameter.
Application-specific text for container attributesFor Update operations, you can edit the application-specific text for attributes thatcontain child business objects to specify that the connector keep any existingrelations between tables and add new relations required by new child businessobjects. The format for this application-specific text is:AppSpecificInfo = keeprelations
Case is ignored in checking for this application-specific text.
If this parameter is not specified, the connector deletes existing relations betweenthe parent business object and child business object tables and then adds any newrelations required by new child business objects.
Note: If the parent business object is non-existent, the update fails.
As an example, if an existing contract is associated with an existing site, such asNew York, and the connector receives an Update Contract business object with achild business object representing a new site, such as San Francisco, and thecontainer attribute application-specific text has the value keeprelations, thecontract will be associated with both New York and San Francisco. Ifkeeprelations is not specified, the contract will be associated only with SanFrancisco.
Figure 16 shows how the keeprelations value is set in the System Manager for theContract business object to associate a new ContractLine with an existing Contract.
Chapter 3. Developing business objects for the connector 43

Note: If updating data in a child object when there are multiple child objects, youmust provide the child object ID (not CxIgnore) in order to preserverelations to the other children even when keeprelations is used. This isdifferent from using CxMissingID, which would add a new child object (andkeep relations to the existing children) instead of updating the data for anexisting child. The child ID is required since the connector needs to knowwhich child to update and will delete relations to all children except the firstif it does not know the child ID to be updated.
The connector uses verb application-specific text to specify the following types ofRetrieve operations:v Retrieve only the parent business object in a hierarchical business objectv Perform a retrieve operation after a retrieve by non-key values
For other verbs, the application-specific property is not used and should be leftblank or omitted when creating business object definitions.
Retrieve verbThe default action for a Retrieve verb is to retrieve the parent business object andall related child objects. You can edit the application-specific text for the Retrieveverb to specify that the connector retrieve only the parent business object in ahierarchical object. This feature is used for event processing only.
The application-specific text to retrieve only the parent object is RetrieveAll=False.This text is associated with the Retrieve verb, but it applies to all verbs. Anexample of a Retrieve verb with this text is:[Verb]Name = RetrieveAppSpecificInfo = RetrieveAll=False
Specifying a retrieve following a retrieve by non-key valuesThe RetrieveByContent verb specifies a set of attribute values other than the keyattribute for the connector to use when building a Retrieve query. In aRetrieveByContent operation, the connector returns values for the business objectkey and for other designated attributes. You can edit the application-specific text
Figure 16. Example of the keeprelations value in the contract business object
44 IBM WebSphere Business Integration Adapters: Adapter for Clarify CRM User Guide

for the RetrieveByContent verb to specify that the connector follow aRetrieveByContent operation with a subsequent Retrieve operation to retrieve theentire business object.
To specify that the connector follow a RetrieveByContent operation with a Retrieveoperation, place the following property in the application-specific text for theRetrieveByContent verb:AppSpecificInfo = SubsequentRetrieve=true
The default value for this property is false.
Chapter 3. Developing business objects for the connector 45

46 IBM WebSphere Business Integration Adapters: Adapter for Clarify CRM User Guide
Chapter 4. Troubleshooting
The chapter describes problems that you may encounter when starting up orrunning the connector.
Start-up problemsIf you encounter difficulties when trying to start the connector, check to make surethat the integration broker is up and running.
The second parameter after the start_connector command should contain theintegration broker name.
Event processingIf there are events in the event table, and they are not being processed while theconnector is running, check to make sure the relevant business process is running.
Verifying DB_NAME during startupThe Clarify connector verifies the column “DB_NAME” within the tableadp_db_header during startup. This entry must match the value which is set forthe property database_name in the ClarifyConnector properties or a failure occurs.
Mapping (ICS Integration Broker only)If the business objects are not being mapped or mapping is not being invoked,check to make sure the maps have been installed in the correct directory.
Problems with date in business objects (ICS Integration Broker only)If the date is wrong in business objects, check the Windows short date style underRegional Settings, Date in the Control Panel. The date format must correspond tothe date format used in maps for the business objects for Clarify CRM. Note thatWebSphere Business Integration Adapter native maps assume that the Windowsshort date style is MM/dd/yyyy. If the short date style is MM/dd/yy or any otherformat, change the map rules to reflect the new date format and recompile themaps.
Problems with business objects named Clarify_SiteUsing the name Clarify_Site for a Clarify CRM application-specific business objectwill cause errors. The business object Clarify_Site is obsolete, and the use of thisname will trigger obsolete processing in the connector that may result in a usercode exception. Therefore, do not name a Clarify CRM application-specific businessobject Clarify_Site.
© Copyright IBM Corp. 1997, 2003 47

Combining preprocessing and use of relationshipWhen the relationship points to a Clarify View, combining preprocessing and useof a relationship leads to wrong data. To resolve this issue, implement thefollowing: 1) Use preprocessing to get the value from the view. 2) Use therelationship to a Clarify table and not to a view.
Loss of connection to the applicationIf the connector determines that the connection with the application has been lost,the connector terminates and returns an application response status to theintegration broker.
48 IBM WebSphere Business Integration Adapters: Adapter for Clarify CRM User Guide

Appendix A. Standard configuration properties for connectors
Connectors have two types of configuration properties:v Standard configuration propertiesv Connector-specific configuration properties
This chapter describes standard configuration properties, applicable to allconnectors. For information about properties specific to the connector, see theinstalling and configuring chapter of its adapter guide.
The connector uses the following order to determine a property’s value (where thehighest numbers override the value of those that precede):1. Default2. Repository (relevant only if InterChange Server is the integration broker)3. Local configuration file4. Command line
Note: In this document backslashes (\) are used as the convention for directorypaths. For UNIX installations, substitute slashes (/) for backslashes and obeythe appropriate operating system-specific conventions.
New and deleted propertiesThe following are the standard properties that have been either added or deletedin the 2.2 release of the adapters.v New properties
CharacterEncodingLocalJVMMinHeapSizeJVMMaxHeapSizeJVMMaxStackSizeWireFormatMaxEventCapacityDuplicateEventEliminationjms.NumConcurrentRequestsContainerManagedEventsjms.Messagebrokername (replaces jms.BrokerName)
v Deleted properties
RequestTransportPingFrequencyTraceLevelAgentProxyTypeMaxThreadPoolSizeAnonymous ConnectionsGW NameAgent URL
© Copyright IBM Corp. 1997, 2003 49

Listener PortCertificate LocationLogFileNameTraceFileNamejms.BrokerName
Configuring Standard Connector Properties for WebSphereInterChange Server
This section describes standard configuration properties applicable to connectorswhose integration broker is WebSphere InterChange Server (ICS). Standardconfiguration properties provide information that is used by a configurablecomponent of InterChange Server called the connector controller. Like theconnector framework, the code for the connector controller is common to allconnectors. However, you configure a separate instance of the controller for eachconnector.
A connector, which consists of the connector framework and theapplication-specific component, has been referred to historically as the connectoragent. When a standard configuration property refers to the agent, it is referring toboth the connector framework and the application-specific component.
For general information about how connectors work with InterChange Server, seethe Technical Introduction to IBM WebSphere InterChange Server.
Important: Not all properties are applicable to all connectors that use InterChangeServer. For information specific to an connector, see its adapter guide.
You configure connector properties from Connector Configurator, which you accessfrom System Manager.
Note: Connector Configurator and System Manager run only on the Windowssystem. Even if you are running the connector on a UNIX system, you muststill have a Windows machine with these tools installed. Therefore, to setconnector properties for a connector that runs on UNIX, you must start upSystem Manager on the Windows machine, connect to the UNIXInterChange Server, and bring up Connector Configurator for the connector.
A connector obtains its configuration values at startup. If you change the value ofone or more connector properties during a runtime session, the property’s updatesemantics determine how and when the change takes effect. There are fourdifferent types of update semantics for standard connector properties:v Dynamic—The change takes effect immediately after it is saved.v Component restart—The change takes effect only after the connector is stopped
and then restarted in System Manager. This does not require stopping andrestarting the application-specific component or InterChange Server.
v Server restart—The change takes effect only after you stop and restart theapplication-specific component and InterChange Server.
v Agent restart—The change takes effect only after you stop and restart theapplication-specific component.
50 IBM WebSphere Business Integration Adapters: Adapter for Clarify CRM User Guide

To determine the update semantics for a specific property, refer to the UpdateMethod column in the Connector Configurator window, or see the Update Methodcolumn of the table below.
The following table provides a quick reference to the standard connectorconfiguration properties. You must set the values of some of these propertiesbefore running the connector. See the sections that follow for explanations of theproperties.
Property Name PossibleValues
DefaultValue
UpdateMethod
Notes
AdminInQueue valid JMS queue name CONNECTORNAME /ADMININQUEUE
AdminOutQueue valid JMS queue name CONNECTORNAME/ADMINOUTQUEUE
AgentConnections 1-4 1 server restart multi-threadedconnector only
AgentTraceLevel 0-5 0 dynamic
ApplicationName application name the value that is specified for theconnector name
componentrestart
value required
BrokerType ICS, WMQI ICS is requiredif your brokeris ICS
CharacterEncoding ascii7, ascii8, SJIS,Cp949, GBK, Big5,Cp297,Cp273,Cp280,Cp284,Cp037, Cp437
ascii7 componentrestart
ConcurrentEventTriggeredFlows 1 to 32,767 no value componentrestart
ContainerManagedEvents JMS or no value JMS guaranteedevent delivery
ControllerStoreAndForwardMode true or false true dynamicControllerTraceLevel 0-5 0 dynamicDeliveryQueue CONNECTORNAME/DELIVERYQUEUE component
restartJMS transportonly
DeliveryTransport MQ, IDL, or JMS IDL componentrestart
FaultQueue CONNECTORNAME/FAULTQUEUE componentrestart
DuplicateEventElimination True/False False componentrestart
JMS transportonly,ContainerManagedEventsmust be<NONE>
JvmMaxHeapSize heap size in megabytes 128m componentrestart
JvmMaxNativeHeapSize size of stack in kilobytes 128k componentrestart
JvmMinHeapSize heap size in megabytes 1m componentrestart
jms.MessageBrokerName If FactoryClassName isIBM, usecrossworlds.queue.manager.If FactoryClassName isSonic, uselocalhost:2506.
crossworlds.queue.manager server restart JMS transportonly
jms.FactoryClassName CxCommon.Messaging.jms.IBMMQSeriesFactoryor CxCommon.Messaging.jms.SonicMQFactory orany Java class name
CxCommon.Messaging.jms.IBMMQSeriesFactory
server restart JMS transportonly
jms.NumConcurrentRequests positive integer 10 componentrestart
JMS transportonly
Appendix A. Standard configuration properties for connectors 51

Property Name PossibleValues
DefaultValue
UpdateMethod
Notes
jms.Password Any valid password server restart JMS transportonly
jms.UserName Any valid name server restart JMS transportonly
Locale en_US , ja_JP, ko_KR,zh_C, zh_T, fr_F, de_D,it_I, es_E, pt_BRNote: These are only asubset of supportedlocales.
en_US componentrestart
LogAtInterchangeEnd true or false false componentrestart
MaxEventCapacity 1-2147483647 2147483647 dynamic RepositoryDirectoryvalue must be<REMOTE>
MessageFileName path/filename Connectorname.txt orInterchangeSystem.txt
componentrestart
MonitorQueue any valid queue name CONNECTORNAME/MONITORQUEUE componentrestart
JMS transportonly,DuplicateEventEliminationmust be True
OADAutoRestartAgent true or false false dynamicOADMaxNumRetry a positive number 1000 dynamicOADRetryTimeInterval a positive number in
minutes10 dynamic
PollEndTime HH:MM HH:MM componentrestart
PollFrequency a positive integer inmilliseconds
no (to disable polling)key (to poll only whenthe letter p is entered inthe connector’sCommand Promptwindow)
10000 dynamic
PollQuantity 1-500 1 componentrestart
Number ofitems to pollfromapplication
PollStartTime HH:MM(HH is 0-23, MM is0-59)
HH:MM componentrestart
RepositoryDirectory location whererepository is located
<REMOTE> componentrestart
<REMOTE>for ICS broker
RequestQueue valid JMS queue name CONNECTORNAME/REQUESTQUEUE componentrestart
ResponseQueue valid JMS queue name CONNECTORNAME/RESPONSEQUEUE componentrestart
RestartRetryCount 0-99 3 dynamicRestartRetryInterval a sensible positive value in
minutes1 dynamic
SourceQueue valid MQSeries queuename
CONNECTORNAME/SOURCEQUEUE componentrestart
Valid only ifdeliverytransport isJMS andContainerManagedEventsisspecified.
SynchronousRequestQueue CONNECTORNAME/SYNCHRONOUSREQUESTQUEUE
componentrestart
“SynchronousResponseQueue” onpage 68
CONNECTORNAME/SYNCHRONOUSRESPONSEQUEUE
componentrestart
52 IBM WebSphere Business Integration Adapters: Adapter for Clarify CRM User Guide

Property Name PossibleValues
DefaultValue
UpdateMethod
Notes
SynchronousRequestTimeout 0 componentrestart
“WireFormat” on page 69 CwXML, CwBO cwxml agent restart CwXML fornon-ICSbroker; CwBOifRepositoryDirectoryis <REMOTE>
AdminInQueueThe queue that is used by the integration broker to send administrative messagesto the connector.
The default value is CONNECTORNAME/ADMININQUEUE.
AdminOutQueueThe queue that is used by the connector to send administrative messages to theintegration broker.
The default value is CONNECTORNAME/ADMINOUTQUEUE.
AgentConnectionsThe AgentConnections property controls the number of IIOP connections openedfor request transport between an application-specific component and its connectorcontroller. By default, the value of this property is set to 1, which causesInterChange Server to open a single IIOP connection.
This property enhances performance for a multi-threaded connector by allowingmultiple connections between the connector controller and application-specificcomponent. When there is a large request/response workload for a particularconnection, the IBM WebSphere administrator can increase this value to enhanceperformance. Recommended values are in the range of 2 to 4. Increasing the valueof this property increases the scalability of the Visigenic software, which establishesthe IIOP connections. You must restart the application-specific component and theserver for a change in property value to take effect.
Important: If a connector is single-threaded, it cannot take advantage of themultiple connections. Increasing the value of this property causes therequest transport to bottleneck at the application-specific component.To determine whether a specific connector is single- or multi-threaded,see the installing and configuring chapter of its adapter guide.
AgentTraceLevelLevel of trace messages for the application-specific component. The default is 0.The connector delivers all trace messages applicable at the tracing level set orlower.
ApplicationNameName that uniquely identifies the connector’s application. This name is used bythe system administrator to monitor the WebSphere business integration systemenvironment. This property must have a value before you can run the connector.
Appendix A. Standard configuration properties for connectors 53

BrokerTypeIdentifies the integration broker type that you are using. If you are using an ICSconnector, this setting must be ICS.
CharacterEncodingSpecifies the character code set used to map from a character (such as a letter ofthe alphabet, a numeric representation, or a punctuation mark) to a numeric value.
Note: Java-based connectors do not use this property. A C++ connector currentlyuses the value ASCII for this property. If you previously configured thevalue of this property to ascii7 or ascii8, you must reconfigure theconnector to use either ASCII or one of the other supported values. Todetermine whether a specific connector is written in Java or C++, see theinstalling and configuring chapter of its adapter guide.
Important: By default only a subset of supported character encodings display inthe drop list. To add other supported values to the drop list, you mustmanually modify the \Data\Std\stdConnProps.xml file in the productdirectory. For more information, see the appendix on ConnectorConfigurator.
Attention: Do not run a non-internationalized connector against InterChangeServer version 4.1.1 if you cannot guarantee that only ISO Latin-1 data will beprocessed.
The default value is ascii.
ConcurrentEventTriggeredFlowsDetermines how many business objects can be concurrently processed by theconnector controller for event delivery. Set the value of this attribute to the numberof business objects you want concurrently mapped and delivered. For example, setthe value of this property to 5 to cause five business objects to be concurrentlyprocessed. The default value is 1.
Setting this property to a value greater than 1 allows a connector controller for asource application to simultaneously map multiple event business objects, and tosimultaneously deliver them to multiple collaboration instances. Setting thisproperty to enable concurrent mapping of multiple business objects can speeddelivery of business objects to a collaboration, particularly if the business objectsuse complex maps. Increasing the arrival rate of business objects to collaborationscan improve overall performance in the system.
Note: To implement concurrent processing for an entire flow (from a sourceapplication to a destination application) also requires that the collaborationbe configured to use multiple threads and that the destination application’sapplication-specific component be able to process requests concurrently. Toconfigure the collaboration, set its Maximum number of concurrent eventsproperty high enough to use multiple threads. For an application-specificcomponent to process requests concurrently, it must be eithermulti-threaded, or be capable of using Connector Agent Parallelism and beconfigured for multiple processes (setting the Parallel Process Degreeconfiguration property greater than 1).
54 IBM WebSphere Business Integration Adapters: Adapter for Clarify CRM User Guide

Important: To determine whether a specific connector is single- or multi-threaded,see the installing and configuring chapter of its adapter guide.
The ConcurrentEventTriggeredFlows property has no effect on connector polling,which is single-threaded and performed serially.
ContainerManagedEventsSetting this property to JMS allows a JMS-enabled connector with a JMS eventstore to provide guaranteed event delivery, in which an event is removed from thesource queue and placed on the destination queue as a single JMS transaction. Thisproperty can also be set to no value.
Notes:
1. When ContainerManagedEvents is set to JMS, you must also configure thefollowing properties to enable guaranteed event delivery: PollQuantity = 1 to500, SourceQueue = SOURCEQUEUE. In addition, you must configure a datahandler with the MimeType, DHClass, and DataHandlerConfigMOName(optional) properties. To set those values, use the Data Handler tab ofConnector Configurator. The fields for the values under the Data Handler tabwill be displayed only if you have set ContainerManagedEvents to JMS.
2. When ContainerManagedEvents is set to JMS, the connector does not call itspollForEvents() method, thereby disabling that method’s functionality.
The default value is JMS.
This property only appears if the DeliveryTransport property is set to the valueJMS.
ControllerStoreAndForwardModeSets the behavior of the connector controller after it detects that the destinationapplication-specific component is unavailable. If this property is set to true and thedestination application-specific component is unavailable when an event reachesInterChange Server, the connector controller blocks the request to theapplication-specific component. When the application-specific component becomesoperational, the controller forward the request to it.
Important: If the destination application’s application-specific component becomesunavailable after the connector controller forwards a service callrequest to it, the connector controller fails the request.
If this property is set to false, the connector controller begins failing all servicecall requests as soon as it detects that the destination application-specificcomponent is unavailable.
The default is true.
ControllerTraceLevelLevel of trace messages for the connector controller. The default is 0.
DeliveryQueueThe queue that is used by the connector to send business objects to the integrationbroker.
The default value is DELIVERYQUEUE.
Appendix A. Standard configuration properties for connectors 55

DeliveryTransportSpecifies the transport mechanism for the delivery of events. Possible values are MQfor WebSphere MQ, IDL for CORBA IIOP, or JMS for Java Messaging Service.
If ICS is the broker type, the value of the DeliveryTransport property can be MQ,IDL, or JMS, and the default is IDL.
If WMQI is the broker type, JMS is the only possible Delivery Transport value.
The connector sends service call requests and administrative messages overCORBA IIOP if the value configured for the DeliveryTransport property is MQ orIDL.
WebSphere MQ and IDLUse WebSphere MQ rather than IDL for event delivery transport, unless you havecompelling reasons not to license and maintain two separate products. WebSphereMQ offers the following advantages over IDL:v Asynchronous communication – WebSphere MQ allows the application-specific
component to poll and persistently store events even when the server is notavailable.
v Server side performance – WebSphere MQ provides faster performance on theserver side. In optimized mode, WebSphere MQ stores only the pointer to anevent in the repository database, while the actual event remains in theWebSphere MQ queue. This saves the overhead of having to write potentiallylarge events to the repository database.
v Agent side performance – WebSphere MQ provides faster performance on theapplication-specific component side. Using WebSphere MQ, the connector’spolling thread picks up an event, places it in the connector’s queue, then picksup the next event. This is faster than IDL, which requires the connector’s pollingthread to pick up an event, go over the network into the server process, storethe event persistently in the repository database, then pick up the next event.
JMSEnables communication between the connector controller and client connectorframework using Java Messaging Service (JMS).
If you select JMS as the delivery transport, additional JMS properties such as″jms.MessageBrokerName,″ ″jms.FactoryClassName,″ ″jms.Password,″ and″jms.UserName,″ display in Connector Configurator. The first two of theseproperties are required for this transport.
Important: There may be a memory limitation if you use the JMS transportmechanism for a connector in the following environment:
v AIX 5.0v WebSphere MQ 5.3.0.1v InterChange Server (ICS) as the Integration broker
In this environment, you may experience difficulty starting the both the connectorcontroller (on the server side) and the connector (on the client side) due to memoryuse within the WebSphere MQ client. If your installation uses less than 768M ofprocess heap size, IBM recommends that you set:v The LDR_CNTRL environment variable in the CWSharedEnv.sh script.
This script resides in the \bin directory below the product directory. With a texteditor, add the following line as the first line in the CWSharedEnv.sh script:
56 IBM WebSphere Business Integration Adapters: Adapter for Clarify CRM User Guide

export LDR_CNTRL=MAXDATA=0x30000000
This line restricts heap memory usage to a maximum of 768 MB (3 segments *256 MB). If the process memory grows more than this limit, page swapping canoccur, which can adversely affect the performance of your system.
v The IPCCBaseAddress property to a value of 11 or 12. For more information onthis property, see the System Installation Guide for UNIX.
Notes:
v If your installation uses more than 768M of process heap size, this resolutionwould adversely affect product performance.
v If you run on AIX 4.3.3, you do not need to set the LDR_CNTRL environmentvariable. However, you must set IPCCBaseAddress to a value of 11 or 12.
DuplicateEventEliminationSetting this property to true enables a JMS-enabled connector with a non-JMSevent store to ensure that duplicate events are not delivered to the delivery queue.To make use of this feature, during connector development a unique eventidentifier must be set as the business object’s ObjectEventId attribute in theapplication specific code.
This property can also be set to false.
Note: When DuplicateEventElimination is set to true, you must also configure theMonitorQueue property to enable guaranteed event delivery.
FaultQueueIf the connector experiences an error while processing a message then theconnector moves the message to the queue specified in this property, along with astatus indicator and a description of the problem.
The default value is CONNECTORNAME/FAULTQUEUE.
JvmMaxHeapSizeThe maximum heap size for the agent (in megabytes). This property is applicableonly if the RepositoryDirectory value is <REMOTE>.
The default value is 128m.
JvmMaxNativeStackSizeThe maximum native stack size for the agent (in kilobytes). This property isapplicable only if the RepositoryDirectory value is <REMOTE>.
The default value is 128k.
JvmMinHeapSizeThe minimum heap size for the agent (in megabytes). This property is applicableonly if the RepositoryDirectory value is <REMOTE>.
The default value is 1m.
Appendix A. Standard configuration properties for connectors 57

jms.FactoryClassNameSpecifies the class name to instantiate for a JMS provider. You must set thisconnector property when you choose JMS as your delivery transport mechanism(DeliveryTransport).
The default is CxCommon.Messaging.jms.IBMMQSeriesFactory.
jms.MessageBrokerNameSpecifies the broker name to use for the JMS provider. You must set this connectorproperty when you choose JMS as your delivery transport mechanism(DeliveryTransport).
The default is crossworlds.queue.manager.
jms.NumConcurrentRequestsSpecifies the maximum number of concurrent service call requests that can be sentto a connector at the same time. Once that maximum is reached, new service callsblock and wait for another request to complete before proceeding.
The default value is 10.
jms.PasswordSpecifies the password for the JMS provider. A value for this property is optional.
There is no default.
jms.UserNameSpecifies the user name for the JMS provider. A value for this property is optional.
There is no default.
LocaleSpecifies the language code, country or territory, and, optionally, the associatedcharacter code set. The value of this property determines such cultural conventionsas collation and sort order of data, date and time formats, and the symbols used inmonetary specifications. For more information, see the overview chapter of theconnector guide for an internationalized connector.
A locale name has the following format:ll_TT.codeset
where:
ll a two-character language code (usually in lowercase)
TT a two-letter country or territory code (usually inupper case)
codeset the name of the associated character code set; thisportion of the name is often optional.
The default is en_US.
58 IBM WebSphere Business Integration Adapters: Adapter for Clarify CRM User Guide

Important: By default only a subset of supported locales display in the drop list.To add other supported values to the drop list, you must manuallymodify the \Data\Std\stdConnProps.xml file in the product directory.For more information, see the appendix on Connector Configurator.
Attention: If the connector has not been internationalized, the only valid valuefor this property is en_US. Do not run a non-internationalized C++ connectoragainst InterChange Server version 4.1.1 if you cannot guarantee that only ISOLatin-1 data will be processed. To determine whether a specific connector has beeninternationalized, see the installing and configuring chapter of its connector guide.
LogAtInterchangeEndSpecifies whether to log errors to InterChange Server’s log destination, in additionto the location specified in the LogFileName property. Logging to the server’s logdestination also turns on email notification, which generates email messages forthe MESSAGE_RECIPIENT specified in the InterchangeSystem.cfg file when errors orfatal errors occur. As an example, when a connector loses its connection to itsapplication, if LogAtInterChangeEnd is set to true, an email message is sent to thespecified message recipient. The default is false.
MaxEventCapacityThe maximum number of events in the controller buffer. This property is used byflow control and is applicable only if the value of the RepositoryDirectory propertyis <REMOTE>.
The value can be a positive integer between 1 and 2147483647. The default value is2147483647.
MessageFileNameThe name of the connector message file. The standard location for the message fileis \connectors\messages. Specify the message filename in an absolute path if themessage file is not located in the standard location.
If a connector message file does not exist, the connector usesInterchangeSystem.txt as the message file. This file is located in the productdirectory.
Important: To determine whether a specific connector has its own message file, seethe installing and configuring chapter of its adapter guide.
OADAutoRestartAgentSpecifies whether the Object Activation Daemon (OAD) automatically attempts torestart the application-specific component after an abnormal shutdown. Theproperties “OADMaxNumRetry” and “OADRetryTimeInterval” on page 60 arerelated to this property. This property is required for automatic restart.
The default value is false.
OADMaxNumRetrySpecifies the maximum number of times that the OAD automatically attempts torestart the application-specific component after an abnormal shutdown.
The default value is 1000.
Appendix A. Standard configuration properties for connectors 59

OADRetryTimeIntervalSpecifies the number of minutes of the retry time interval that the OADautomatically attempts to restart the application-specific component after anabnormal shutdown. If the application-specific component does not start within thespecified interval, the OAD repeats the attempt as many times as specified in“OADMaxNumRetry” on page 59.
The default is 10.
PollEndTimeTime to stop polling the event queue. The format is HH:MM, where HH represents0-23 hours, and MM represents 0-59 seconds.
You must provide a valid value for this property. The default value is HH:MM, butmust be changed.
PollFrequencyThe amount of time between polling actions. Set PollFrequency to one of thefollowing values:v The number of milliseconds between polling actions.v The word key, which causes the connector to poll only when you type the letter
p in the connector’s Command Prompt window. Enter the word in lowercase.v The word no, which causes the connector not to poll. Enter the word in
lowercase.
The default is 10000.
Important: Some connectors have restrictions on the use of this property. Todetermine whether a specific connector does, see the installing andconfiguring chapter of its adapter guide.
PollStartTimeThe time to start polling the event queue. The format is HH:MM, where HH represents0-23 hours, and MM represents 0-59 seconds.
You must provide a valid value for this property. The default value is HH:MM, butmust be changed.
RequestQueueThe queue that is used by the integration broker to send business objects to theconnector.
The default value is REQUESTQUEUE.
RepositoryDirectoryThe location of the repository from which the connector reads the XML schemadocuments that store the meta-data of business object definitions.
When the integration broker is ICS, this value must be set to <REMOTE> becausethe connector uses the InterChange Server repository to obtain itsconnector-definition information
60 IBM WebSphere Business Integration Adapters: Adapter for Clarify CRM User Guide

ResponseQueueDesignates the JMS response queue, which delivers a response message from theconnector framework to the integration broker. When the integration broker isInterChange Server, InterChange Server sends the request and waits for a responsemessage in the JMS response queue.
RestartRetryCountSpecifies the number of times the connector attempts to restart itself. When usedfor a parallel connector, specifies the number of times the master connectorapplication-specific component attempts to restart the slave connectorapplication-specific component.
The default is 3.
RestartRetryIntervalSpecifies the interval in minutes at which the connector attempts to restart itself.When used for a parallel connector, specifies the interval at which the masterconnector application-specific component attempts to restart the slave connectorapplication-specific component.
The default is 1.
SourceQueueDesignates the JMS source queue for the connector framework in support ofguaranteed event delivery for JMS-enabled connectors that use a JMS event store.For further information, see “ContainerManagedEvents” on page 55.
The default value is SOURCEQUEUE.
SynchronousRequestQueueDelivers request messages that require a synchronous response from the connectorframework to the broker. This queue is necessary only if the connector usessynchronous execution. With synchronous execution, the connector frameworksends a message to the SynchronousRequestQueue and waits for a response backfrom the broker on the SynchronousResponseQueue. The response message sent tothe connector bears a correlation ID that matches the ID of the original message.
SynchronousResponseQueueDelivers response messages sent in reply to a synchronous request from the brokerto the connector framework. This queue is necessary only if the connector usessynchronous execution.
SynchronousRequestTimeoutSpecifies the time in minutes that the connector waits for a response to asynchronous request. If the response is not received within the specified time thenthe connector moves the original synchronous request message into the fault queuealong with an error message.
The default value is 0.
Appendix A. Standard configuration properties for connectors 61

TraceFileNameThe name of the file where the application-specific component writes tracemessages. Specify the filename in an absolute path. The default is STDOUT.
WireFormatMessage format on the transport.
Possible values are:v CwXMLif the broker is not ICS.v CwBOif the value of RepositoryDirectory is <REMOTE>.
Configuring Standard Connector Properties for WebSphere MQIntegrator
This section describes standard configuration properties applicable to adapterswhose integration broker is WebSphere MQ Integrator Broker. For information onusing WebSphere Integrator Broker, see the Implementation Guide for WebSphere MQIntegrator Broker.
Important: Not all properties are applicable to all connectors that use WebSphereMQ Integrator Broker. For information specific to a connector, see itsadapter user guide.
You configure connector properties from Connector Configurator.
Note: Connector Configurator runs only on the Windows system. Even if you arerunning the connector on a UNIX system, you must still have a Windowsmachine with this tool installed. Therefore, to set connector properties for aconnector that runs on UNIX, you must run Connector Configurator on theWindows computer and copy the configuration files to the UNIX computerusing FTP or some other file transfer mechanism. For more informationabout Connector Configurator, see Appendix B, ″Connector Configurator.″
A connector obtains its configuration values at startup. If you change the value ofone or more connector properties during a runtime session, you must restart theconnector. Standard configuration properties provide information that is used bythe adapter framework and connector framework, and is common to allconnectors.
Standard Connector PropertiesThe following table provides a quick reference for standard connectorconfiguration properties. See the sections that follow for explanations of theproperties.
Name Possible Values Default Value
AdminInQueue valid JMS queue name CONNECTORNAME/ADMININQUEUEAdminOutQueue valid WebSphere MQ
queue nameCONNECTORNAME/ADMINOUTQUEUE
AgentTraceLevel 0-5 0ApplicationName application name AppNameConnectorBrokerType WMQI WMQI
62 IBM WebSphere Business Integration Adapters: Adapter for Clarify CRM User Guide

Name Possible Values Default Value
CharacterEncoding ASCII, SJIS, Cp949, GBK,Big5, Cp297, Cp273,Cp280, Cp284, Cp037,Cp437Note: These are only asubset of supportedvalues.
ASCII
ContainerManagedEvents JMS or no value JMSDeliveryQueue valid WebSphere MQ
queue nameCONNECTORNAME/DELIVERYQUEUE
DeliveryTransport JMS JMSDuplicateEventElimination true, falseFaultQueue valid WebSphere MQ
queue nameCONNECTORNAME/FAULTQUEUE
jms.FactoryClassName CxCommon.Messaging.jms.IBMMQSeriesFactoryjms.MessageBrokerName If FactoryClassName is
IBM, usecrossworlds.queue.manager.If FactoryClassName isSonic, uselocalhost:2506.
crossworlds.queue.manager
jms.NumConcurrentRequests 10jms.Passwordjms.UserNameLocale en_US , ja_JP, ko_KR,
zh_C, zh_T, fr_F, de_D,it_I, es_E, pt_BRNote: These are only asubset of supportedlocales.
en_US
MessageFileName path/filename InterchangeSystem.txtPollEndTime HH:MM HH:MMPollFrequency milliseconds/key/no 10000PollStartTime HH:MM HH:MMRepositoryDirectory path/directory name Note:
Typically you mustchange this value fromthe default to whateverpath and directory namewas actually used whenyou installed the theconnector files.
C:\crossworlds\Repository
RequestQueue valid WebSphere MQqueue name
CONNECTORNAME/REQUESTQUEUE
ResponseQueue RESPONSEQUEUERestartRetryCount 0-99 3RestartRetryInterval an appropriate integer
indicating the number ofminutes between restartattempts
1
SourceQueue valid WebSphere MQqueue name
CONNECTORNAME/SOURCEQUEUE
SynchronousRequestQueue valid WebSphere MQqueue name
SynchronousResponseQueue valid WebSphere MQqueue name
Appendix A. Standard configuration properties for connectors 63
Name Possible Values Default Value
SynchronousTimeout an appropriate integerindicating the number ofminutes the connectorwaits for a response to asynchronous request
0
WireFormat CwXML CwXML
AdminInQueueThe queue that is used by the integration broker to send administrative messagesto the connector.
The default value is CONNECTORNAME/ADMININQUEUE.
AdminOutQueueThe queue that is used by the connector to send administrative messages to theintegration broker.
AgentTraceLevelLevel of trace messages for the connector’s application-specific component. Thedefault is 0. The connector delivers all trace messages applicable at the tracinglevel set or lower.
ApplicationNameName that uniquely identifies the connection to the application. This name is usedby the system administrator to monitor the connector’s environment. When youcreate a new connector definition, this property defaults to the name of theconnector; when you work with the definition for an IBM WebSphere-deliveredconnector, the property is also likely to be set to the name of the connector. Set theproperty to a value that suggests the program with which the connector isinterfacing, such as the name of an application, or something that identifies a filesystem or website in the case of technology connectors.
BrokerTypeThis property is set to the value WMQI for connectors that are configured to useWebSphere MQ Integrator Broker as the integration broker.
CharacterEncodingSpecifies the character code set used to map from a character (such as a letter ofthe alphabet, a numeric representation, or a punctuation mark) to a numeric value.
Note: Java-based connectors do not use this property. A C++ connector currentlyuses the value ASCII for this property. If you previously configured thevalue of this property to ascii7 or ascii8, you must reconfigure theconnector to use either ASCII or one of the other supported values. Todetermine whether a specific connector is written in Java or C++, see theinstalling and configuring chapter of its adapter guide.
Important: By default only a subset of supported character encodings display inthe drop list. To add other supported values to the drop list, you mustmanually modify the \Data\Std\stdConnProps.xml file in the productdirectory. For more information, see the appendix on ConnectorConfigurator.
64 IBM WebSphere Business Integration Adapters: Adapter for Clarify CRM User Guide

Attention: Do not run a non-internationalized connector against InterChangeServer version 4.1.1 if you cannot guarantee that only ISO Latin-1 data will beprocessed.
The default value is ascii.
ContainerManagedEventsSetting this property to JMS enables a JMS-enabled connector with a JMS eventstore to provide guaranteed event delivery, in which an event is removed from thesource queue and placed on the destination queue as a single JMS transaction. Thisproperty can also be set to no value.
Notes:
1. When ContainerManagedEvents is set to JMS, you must also configure thefollowing properties to enable guaranteed event delivery: PollQuantity = 1 to500, SourceQueue = SOURCEQUEUE. In addition, you must configure a datahandler with the MimeType, DHClass, and DataHandlerConfigMOName(optional) properties.
2. When ContainerManagedEvents is set to JMS, the connector does not call itspollForEvents() method, thereby disabling that method’s functionality.
The default value is JMS.
DeliveryQueueThe queue that is used by the connector to send business objects to the integrationbroker.
The default value is CONNECTORNAME/DELIVERYQUEUE.
DeliveryTransportSpecifies the transport mechanism for the delivery of events. The property defaultsto the value JMS, indicating that the Java Messaging Service (JMS) is used forcommunication with WebSphere MQ Integrator. This property must be set to JMSwhen WebSphere MQ Integrator Broker is the integration broker. Otherwise, theconnector cannot start.
DuplicateEventEliminationSetting this property to true enables a JMS-enabled connector with a non-JMSevent store to ensure that duplicate events are not delivered to the delivery queue.To make use of this feature, during connector development a unique eventidentifier must be set as the business object’s ObjectEventId attribute in theapplication specific code.
This property can also be set to false.
Note: When DuplicateEventElimination is set to true, you must also configure theMonitorQueue property to enable guaranteed event delivery.
FaultQueueIf the connector experiences an error while processing a message then theconnector moves the message to the queue specified in this property, along with astatus indicator and a description of the problem.
The default value is CONNECTORNAME/FAULTQUEUE.
Appendix A. Standard configuration properties for connectors 65

jms.FactoryClassNameSpecifies the class name to instantiate for a JMS provider.
The default is CxCommon.Messaging.jms.IBMMQSeriesFactory.
jms.MessageBrokerNameSpecifies the broker name to use for the JMS provider.
The default is crossworlds.queue.manager.
jms.NumConcurrentRequestsSpecifies the maximum number of concurrent service call requests that can be sentto a connector at the same time. Once that maximum is reached, new service callsblock and wait for another request to complete before proceeding.
The default value is 10.
jms.PasswordSpecifies the password for the JMS provider. A value for this property is optional.
There is no default.
jms.UserNameSpecifies the user name for the JMS provider. A value for this property is optional.
There is no default.
LocaleSpecifies the language code, country or territory, and, optionally, the associatedcharacter code set. The value of this property determines such cultural conventionsas collation and sort order of data, date and time formats, and the symbols used inmonetary specifications. For more information, see the overview chapter of theconnector guide for an internationalized connector.
A locale name has the following format:ll_TT.codeset
where:
ll a two-character language code (usually in lowercase)
TT a two-letter country or territory code (usually inupper case)
codeset the name of the associated character code set; thisportion of the name is often optional.
The default is en_US.
Important: By default only a subset of supported locales display in the drop list.To add other supported values to the drop list, you must manuallymodify the \Data\Std\stdConnProps.xml file in the product directory.
66 IBM WebSphere Business Integration Adapters: Adapter for Clarify CRM User Guide

Attention:
v WebSphere MQ Integrator supports only one locale at a time. Ensure that everycomponent of the installation (for example, all adapters, applications, and theintegration broker itself) is set to the same locale.
v If the connector has not been internationalized, the only valid value for thisproperty is en_US. Do not run a non-internationalized C++ connector againstInterChange Server version 4.1.1 if you cannot guarantee that only ISO Latin-1data will be processed. To determine whether a specific connector has beeninternationalized, see the installing and configuring chapter of its connectorguide.
MessageFileNameThe name of the connector message file. The standard location for the message fileis \connectors\messages. Specify the message filename in an absolute path if themessage file is not located in the standard location. This property defaults to thevalue InterchangeSystem.txt for new connector definitions and should be changedto the name of the message file for the specific connector.
PollEndTimeTime to stop polling the event queue. The format is HH:MM, where HH represents0-23 hours, and MM represents 0-59 seconds.
You must provide a valid value for this property. The default value is HH:MM, butmust be changed.
PollFrequencyThe amount of time between polling actions. Set the PollFrequency to one of thefollowing values:v The number of milliseconds between polling actions.v The word key, which causes the connector to poll only when you type the letter
p in the connector’s Command Prompt window. Enter the word in lowercase.v The word no, which causes the connector not to poll. Enter the word in
lowercase.
The default is 10000.
Important: Some connectors have restrictions on the use of this property. Todetermine whether a specific connector does, see the installing andconfiguring chapter of its adapter guide.
PollStartTimeThe time to start polling the event queue. The format is HH:MM, where HH represents0-23 hours, and MM represents 0-59 seconds.
You must provide a valid value for this property. The default value is HH:MM, butmust be changed.
RepositoryDirectoryThe path and name of the directory from which the connector reads the XMLschema documents that store the meta-data of business object definitions.
The default value is C:\crossworlds\repository. You must change this to thedirectory path that you are using for the \repository directory for your connector.Typically that path is established when you install the adapter product; for
Appendix A. Standard configuration properties for connectors 67

example, C:\WebSphereAdapters\repository. The value must be a directory path.Do not use <REMOTE> as the RepositoryDirectory value for a connector that isnot using ICS as the broker.
RequestQueueThe queue that is used by the integration broker to send business objects to theconnector.
The default value is CONNECTORNAME/REQUESTQUEUE.
ResponseQueueDesignates the JMS response queue, which delivers a response message from theconnector framework to the integration broker.
RestartRetryCountSpecifies the number of times the connector attempts to restart itself. The defaultvalue is 3, indicating that the connector tries to restart 3 times. For instance, if aconnector is unable to log in to an application it fails to start, but with thisproperty set to the value 3 the connector tries a total of three times to start. Whenused in conjunction with the “RestartRetryInterval” property, this behavior enablesa connector to make several attempts at communicating with an application thatmight not reliably have a connection available all the time.
RestartRetryIntervalSpecifies the interval in minutes at which the connector attempts to restart itself.The default value is 1, indicating that the connector waits 1 minute in between itsrestart attempts.
SourceQueueDesignates the JMS source queue for the connector framework in support ofguaranteed event delivery for JMS-enabled connectors that use a JMS event store.For further information, see “ContainerManagedEvents” on page 55.
The default is CONNECTORNAME/SOURCEQUEUE.
SynchronousRequestQueueDelivers request messages that require a synchronous response from the connectorframework to WebSphere MQ Integrator Broker. This queue is necessary only if theconnector uses synchronous execution. With synchronous execution, the connectorframework sends a message to the SynchronousRequestQueue and waits for aresponse back from WebSphere MQ Integrator Broker on theSynchronousResponseQueue. The response message sent to the connector bears acorrelation ID that matches the ID of the original message.
SynchronousResponseQueueDelivers response messages sent in reply to a synchronous request fromWebSphere MQ Integrator Broker to the connector framework. This queue isnecessary only if the connector uses synchronous execution.
SynchronousTimeoutSpecifies the time in minutes that the connector waits for a response to asynchronous request. If the response is not received within the specified time thenthe connector moves the original synchronous request message into the fault queuealong with an error message.
The default value is 0.
68 IBM WebSphere Business Integration Adapters: Adapter for Clarify CRM User Guide

WireFormatThe data format for messages exchanged by the connector. The default value CwXMLis the only valid value, and directs the connector to compose the messages in XML.
Appendix A. Standard configuration properties for connectors 69

70 IBM WebSphere Business Integration Adapters: Adapter for Clarify CRM User Guide

Appendix B. Connector Configurator
Before you can use a connector, you must create a connector configuration file thatsets the properties for the connector, designates the business objects and anymeta-objects that it supports, and sets logging and tracing values that theconnector will use at runtime. The configuration file may also contain propertiesfor the use of messaging and data handlers required by your connector.
Use Connector Configurator to create and modify the configuration file for yourconnector. If a configuration file has previously been created for your connector,you can use Connector Configurator to open the file and modify its settings. If noconfiguration file has yet been created for your connector, you can use ConnectorConfigurator to both create the file and set its properties.
When you complete a connector configuration file, the file is saved as an XMLdocument. You will save the XML document either as a project in System Manager(if ICS is your broker) or as a file with a *.cfg extension in a directory folder (ifWebSphere MQ Integrator Broker is your broker, or if you are using the file as alocal configuration file for ICS).
This appendix describes how to use Connector Configurator to:v Create a connector-specific property template for configuring your connectorv Create a configuration filev Set properties in a configuration file
Connector Configurator runs only in a Windows environment. If you are runningthe connector itself in a UNIX environment, use Connector Configurator in theWindows system in the network to modify the configuration file. Then copy thefile to your UNIX environment.
Note: Some properties in the connector configuration file use directory paths, andthese paths default to the Windows convention for directory paths. If youuse the connector configuration file in a UNIX environment, revise anydirectory path constructs in the configuration properties to match the UNIXconvention for directory paths.
Using Connector Configurator in an internationalized environmentConnector Configurator is internationalized and handles character conversionbetween the configuration file and the integration broker. Connector Configuratoruses native encoding. When it writes to the configuration file, it uses UTF-8encoding.
Connector Configurator supports non-English characters in:v All value fieldsv Log file and trace file path (specified in the Trace/Log files tab)
The drop list for the CharacterEncoding and Locale standard configurationproperties displays only a subset of supported values. To add other values to thedrop list, you must manually modify the \Data\Std\stdConnProps.xml file in theproduct directory.
© Copyright IBM Corp. 1997, 2003 71

For example, to add the locale en_GB to the list of values for the Locale property,open the stdConnProps.xml file and add the line in boldface type below:<Property name="Locale" isRequired="true" updateMethod="component restart">
<ValidType>String</ValidType><ValidValues>
<Value>ja_JP</Value><Value>ko_KR</Value><Value>zh_CN</Value><Value>zh_TW</Value><Value>fr_FR</Value><Value>de_DE</Value><Value>it_IT</Value><Value>es_ES</Value><Value>pt_BR</Value><Value>en_US</Value><Value>en_GB</Value>
<DefaultValue>en_US</DefaultValue></ValidValues>
</Property>
Starting Connector ConfiguratorConnector Configurator can be started and run in either of two modes:v Launched from System Managerv Independent of System Manager (stand-alone mode)
Running Configurator from System ManagerWhen you run Connector Configurator in conjunction with System Manager, youcanv Save connector configuration files (XML documents with the extension *.cfg) to a
directory that you specify, andv Save connector configuration files as components of System Manager projects. If
you are using ICS as your broker, this is a mandatory step before you deployyour configuration into the ICS.
Note: When you save a configuration file as a component of a System Managerproject, the file is stored in the designated project as an XML document filewith the extension *.con. It is not advisable to open the *.con file and edit itdirectly; instead, make any changes by opening the component in SystemManager.
To run Connector Configurator with System Manager, do any of the following:v In System Manager, right-click on the Connector folder of the Integration
Components Library (to create a new configuration), or right-click on aconnector configuration component within the Connector folder (to edit anexisting configuration), or
v From the System Manager menu, choose Tools>Connector Configurator, orv With System Manager already running, from Start>Programs choose IBM
WebSphere InterChange Server>IBM WebSphere Business IntegrationToolset>Development>Connector Configurator.
For details about using projects in System Manager and deploying to InterChangeServer, see the Implementation Guide for WebSphere InterChange Server.
72 IBM WebSphere Business Integration Adapters: Adapter for Clarify CRM User Guide

Running Configurator independently of System ManagerWhen you run Connector Configurator without connecting to System Manager,you can save a connector configuration file (an XML document with the extension*.cfg) to a directory that you specify, but you cannot save or open a SystemManager project.
When you are creating a connector for use with a broker other than ICS, you donot need to connect to System Manager at any point in order to use the file. If youare creating a connector configuration for use with ICS as the broker, you may stillfind it useful on occasion to run Connector Configurator independently, and thenconnect to System Manager when you are ready to save the configuration file as acomponent of a System Manager project.
Choosing your brokerConnector Configurator can be used to configure connectors either for use withICS as the broker, or with WebSphere MQ Integrator Broker (also referred to asWMQI) as the broker.
Before you begin to configure the connector, you must choose the mode ofConnector Configurator that is appropriate for your broker. The mode that youchoose determines the properties that Connector Configurator will include in theconfiguration file. Choosing a broker is a mandatory step when you begin theprocess of creating a completely new configuration file. After a configuration filehas been created, you can optionally change the designated broker mode, using astandard configuration property. (This makes it possible to use an existingconfiguration file as a starting point for creating a configuration file that will beused with a different broker. However, be aware that revising a configuration filefor use with a different broker typically involves changing other configurationproperties as well, and not just the broker mode property.)
To choose a broker when you create a new configuration file (mandatory):v In the Connector Configurator home menu, choose File>New>Connector
Configuration. The New Connector Dialog displays.v In the Integration Broker field, choose either WMQI connectivity (for WebSphere
Integrator Broker) or ICS connectivity, according to the broker you are using.v Complete the remaining fields of the New Connector dialog, as described later
in this chapter for your specific broker.
To change your broker selection within an existing configuration file (optional):v Open the existing configuration file in Connector Configurator.v Select the Standard Properties tab.v In the Broker Type field of the Standard Properties tab, choose the value that is
appropriate for your broker. If you change the existing value, the available tabsand field selections of the properties screen will immediately refresh, to showonly those tabs and fields that appropriate for a configuration using the brokeryou have selected.
After you have chosen your broker type, you can complete the remainingConnector Configurator tasks for configuring your connector. When you save theconnector configuration file, Connector Configurator will save it in the brokermode that you have already selected. The title bar of Connector Configuratoralways displays the broker mode (such as ICS or WMQI) that ConnectorConfigurator is currently using.
Appendix B. Connector Configurator 73

After you have completed the configuration file and set its properties, it will needto be deployed to the appropriate location for your connector.v If you are using ICS as your broker, save the configuration in a System Manager
project, and use System Manager to load the file into InterChange Server.v If you are using WebSphere MQ Integrator Broker as your broker, manually
copy the configuration file to its appropriate location, which must match exactlythe configuration file location specified in the startup file for your connector.
For further information about deployment, see the Implementation Guide forWebSphere InterChange Server (for using the connector with ICS as the broker), orthe Implementation Guide for WebSphere MQ Integrator Broker (for using the connectorwith MQ Integrator as the broker).
Using a connector-specific property templateTo create a configuration file for your connector, you can start with a previouslycreated connector configuration file (*.cfg), a connector definition file (*.txt) or arepository file (*.in or *.out), if any of these already exists for your connector. Forinstructions on using such existing files, see “Using an existing file” on page 78.
If none of those files exist, or if they are too dissimilar to the configurationrequirements of your connector, you can start instead by creating a template forthe connector-specific properties of your connector. You’ll create properties in thetemplate, define general characteristics and values for those properties, and specifyany dependencies between the properties. Then you’ll save the template and use itas the base for creating a new connector configuration file.
Creating a template of connector-specific propertiesTo create a template:1. Choose File>New>Connector-Specific Property Template.2. The Connector-Specific Property Template dialog appears, with the following
fieldsv Name
Enter a unique name that identifies the connector, or type of connector, forwhich this template will be used. You will see this name again when youopen the dialog for creating a new configuration file from a template.
v Find Template, and Template NameThe names of all currently available templates are displayed in the TemplateName display. Look for an existing template that would make a goodstarting point for your new connector template (such as a template whoseproperty definitions are a subset of the properties used by your connector).To see the connector-specific property definitions that are contained in anytemplate, select that template’s name in the Template Name display. A list ofthe property definitions contained in that template will appear in theTemplate Preview display.If you do not see any template that displays the connector-specific propertiesthat are used by your connector, you will need to create one. ConnectorConfigurator provides a template named None, containing no propertydefinitions, as a default choice.Choose a template from the Template Name display, enter that templatename in the Find Name field (or highlight your choice in Template Name),and choose Next.
74 IBM WebSphere Business Integration Adapters: Adapter for Clarify CRM User Guide

Specifying general characteristicsThe Properties - Connector-Specific Property Template dialog appears. The dialoghas tabs for General characteristics of the defined properties and for Valuerestrictions. The General display has the following fields:v Edit properties
Use the buttons provided (or right-click within the Edit properties display) toadd a new property to the template, to edit or delete an existing property, or toadd a child property to an existing property.A child property is a property that is an attribute of another property--the″parent″ property. The parent property can obtain values, or child properties, orboth. These property relationships are commonly referred to as ″hierarchical″properties. Later, when you create a configuration file from these properties,Connector Configurator will identify hierarchical property sets with a plus signin a box at the left of any parent property.
v Property typeChoose one of these property types: Boolean, String, Integer, or Time.
v FlagsYou can set Standard Flags (IsRequired, IsDepracated, IsOverridden) or CustomFlags (for Boolean operators) to apply to this property
After you have made selections for the general characteristics of the property,choose the Value tab.
Specifying valuesThe Value tab enables you to set the maximum length, the maximum multiplevalues, a default value, or a value range for the property. To do so:1. Choose the Value tab. The display panel for Value replaces the display panel
for General.2. Select the name of the property in the Edit properties display.3. In the fields for Max Length and Max Multiple Values, make any necessary
changes. Note that the changes will not be accepted until and unless you alsoopen the Property Value dialog for the property, described in the next step.
4. Right-click the box in the left-hand corner of the Value display panel. AProperty Value dialog displays. Depending on the type of the property, thedialog allows you to enter either a value, or both a value and range. Enter theappropriate value or range, and click OK.
5. The Value panel refreshes to display any changes you made in Max Length andMax Multiple Values, and it displays a table with three columns:The Value column shows the value that you entered in the Property Valuedialog, and any previous values that you created.The Default Value column allows you to designate any of the values as thedefault.The Value Range shows the range that you entered in the Property Valuedialog.After a value has been created and appears in the grid, it can be edited fromwithin the table display. To make a change in an existing value in the table,select an entire row by clicking on the row number. Then right-click in theValue field and choose EditValue.
Appendix B. Connector Configurator 75

Setting dependenciesAfter you have finished making changes in both the General and the Value tabs,choose Next. The Dependencies dialog appears.
A dependent property is a property that is included in the template and used inthe configuration file only if the value of another property meets a specificcondition. To designate a property as being dependent and set the condition uponwhich it depends, do this:1. In the Available Properties display, select the property that will be made
dependent.2. In the Select Property field, use the drop-down menu to select the property that
will hold the conditional value.3. In the Condition Operator field, choose one of the following:
== (equal to)/= (not equal to)> (greater than)< (less than)>= (greater than or equal to)<=(less than or equal to)
4. In the Conditional Value field, enter the value that is required in order for thedependent property to be included in the template.
5. With the dependent property highlighted in the Available Properties display,click an arrow to move it to the Dependent Property display.
6. Click Finish. Connector Configurator stores the information you have enteredas an XML document, under \data\app in the\bin directory where you haveinstalled Connector Configurator.
Creating a configuration file from a connector-specifictemplate
After a connector-specific template has been created, you can use it to create aconfiguration file:1. Choose File > New>Connector Configuration.2. The New Connector dialog appears, with the following fields:
v NameEnter the name of the connector. Names are case-sensitive. The name youenter must be unique, must end with the word “connector”, and must beconsistent with the file name for a connector that is installed on the system;for example, enter PeopleSoftConnector if the connector file name isPeopleSoft.jar.
Important: Connector Configurator does not check the spelling of the namethat you enter. You must ensure that the name is correct.
v System ConnectivityChoose ICS or choose WMQI (for WebSphere MQ Integrator Broker)connectivity.
v Select Connector-Specific Property TemplateType the name of the template that has been designed for your connector.The names of all available templates are displayed in the Template Name
76 IBM WebSphere Business Integration Adapters: Adapter for Clarify CRM User Guide

display. When you select a name in the Template Name display, the PropertyTemplate Preview display shows the connector-specific properties that havebeen defined in that template.After you have chosen the template you want to use, choose OK.
3. A configuration screen will display for the connector that you are configuring.The title bar of the configuration screen shows the broker that you are usingand the name that you have given to the connector. You can fill in all the fieldvalues to complete the definition now, or you can save the file and completethe fields later.When you are using the configuration screen, you can, if you wish, addadditional connector-specific properties, as described under “Settingapplication-configuration properties (ICS)” on page 80. Any such additionsbecome part of the configuration file that you are creating, but do not affect thetemplate that you used in creating the file.
4. To save the file, choose File > Save > to File or File > Save > Save to the project.To save to a project, you must be using ICS as the broker, and System Managermust be running. If you save as a file, the Save File Connector dialog displays.Choose *.cfg as the file type, verify in the File Name field that the name isspelled correctly and has the correct case, navigate to the directory where youwant to locate the file, and choose Save. The status display in the messagepanel of Connector Configurator indicates that the configuration file wassuccessfully created.
Important: The directory path and name that you establish here must matchthe connector configuration file path and name that you supply inthe startup file for the connector.
5. To complete the connector definition, enter values in the fields for each of thetabs of the Connector Configurator window, as described for your broker laterin this chapter.
Using Connector Configurator with ICS as the brokerTo use Connector Configurator to configure a connector that will be used with ICS,first select ICS as the broker mode in which you are running ConnectorConfigurator, as described under“Choosing your broker” on page 73.
In a typical ICS implementation, the configuration file that you create withConnector Configurator is not put into use until after you have deployed it to theICS server. You will perform that deployment (described in the ImplementationGuide for WebSphere InterChange Server) after you have finished using ConnectorConfigurator to complete the connector configuration file.
Completing a configuration fileThis topic assumes that you already have a starting point for your connectorconfiguration, either from an existing file (a connector definitions file, a repositoryfile, or a *.cfg file) or from an existing project in System Manager. If you do not,see “Creating a template of connector-specific properties” on page 74.
When you open a configuration file or a connector from a project, the ConnectorConfigurator window displays the configuration screen, with the attributes andvalues that Connector Configurator finds in the connector definition file.
The title of the configuration screen displays the type of the broker and the nameof the connector as specified in the file. Make sure the title indicates the
Appendix B. Connector Configurator 77

appropriate type for your broker--either ICS or WebSphere MQ Integrator Broker(for WMQI). If it does not, change the broker value before you configure theconnector. To do so:1. Under the Standard Properties tab, select the value field for the BrokerType
property. In the drop-down menu, select the value WMQI or ICS.2. The Standard Properties tab refreshes to display properties associated with the
selected broker. When you save the file, you retain this broker selection. Youcan save the file now or proceed to complete the remaining configurationfields, as described in “Setting the configuration file properties (WebSphere MQIntegrator Broker)” on page 84.
3. When you have finished making entries in the configuration fields, chooseFile>Save>To Project or File>Save>To File.If you are saving to file, choose *.cfg as the extension, choose the correctlocation for the file and choose Save.If multiple connector configurations are open, choose Save All to File to save allof the configurations to file, or choose Save All to Project to save all ICSconnector configurations to a System Manager project.Before it saves the file, Connector Configurator validates that values have beenset for all required Standard properties. If a required Standard property ismissing a value, Connector Configurator displays a message that the validationfailed. You must supply a value for the property in order to save theconfiguration file.
Using an existing fileYou may have an existing file available in one or more of the following formats:v A connector definition file. This is a text file that lists properties and applicable
default values for a specific connector. Some connectors include such a file in a\repository directory in their delivery package (the file typically has theextension .txt; for example, CN_XML.txt for the XML connector).
v An ICS repository file. Definitions used in a previous ICS implementation of theconnector may be available to you in a repository file that was used in theconfiguration of that connector. Such a file typically has the extension .in or.out.
v A previous configuration file for the connector. Such a file typically has theextension *.cfg.
Although any of these file sources may contain most or all of the connector-specificproperties for your connector, the connector configuration file will not be completeuntil you have opened the file and set properties, as described later in this chapter.
To use an existing file to configure a connector, you must open the file inConnector Configurator, revise the configuration, and then save the file as aconfiguration file (*.cfg file).
Follow these steps to open a *.txt, *.cfg, or *.in file from a directory:1. In Connector Configurator, choose File > Open > From File.2. In the Open File Connector dialog, choose one of the following file types to see
the available files:v Configuration (*.cfg)v ICS Repository (*.in, *.out)
Choose this option if a repository file was used to configure the connector inan ICS environment. A repository file may include multiple connectordefinitions, all of which will display when you open the file.
78 IBM WebSphere Business Integration Adapters: Adapter for Clarify CRM User Guide

v All files (*.*)Choose this option if a *.txt file was delivered in the adapter package forthe connector, or if a definition file is available under another extension.
3. In the directory display, navigate to the appropriate connector definition file,select it, and choose Open.
Using an existing System Manager projectFollow these steps to open a connector configuration from a System Managerproject:1. Start System Manager. A configuration can be opened from or saved to System
Manager only if System Manager has been started.2. Start Connector Configurator.3. Choose File > Open > From Project.
Setting the configuration file properties (ICS)The topics in this section apply if you are using InterChange Server as theintegration broker. If you are using WebSphere MQ Integrator Broker as theintegration broker, see “Setting the configuration file properties (WebSphere MQIntegrator Broker)” on page 84. When you create and name a new connectorconfiguration file, or when you open an existing connector configuration file,Connector Configurator displays a configuration screen with tabs for the categoriesof required configuration values.
Connector Configurator requires values for properties in all of these categories:1. Standard Properties2. Connector-Specific Properties3. Supported Business Objects4. Associated Maps5. Resources6. Trace/Log File values7. Messaging (where applicable)8. Data handlers (applicable for connectors that use JMS messaging with
guaranteed event delivery)
Note: For connectors that use JMS messaging, an additional category may display,for configuration of data handlers that convert the data to business objects.
Important: Connector Configurator accepts property values in either English ornon-English character sets. However, the names of both standard andconnector-specific properties, and the names of supported businessobjects, must use the English character set only.
Standard properties differ from connector-specific properties as follows:v Standard properties of a connector are shared by both the application-specific
component of a connector and its broker component. All connectors have thesame set of standard properties. These properties are described in Appendix A ofeach adapter guide. You can change some but not all of these values.
v Application-configuration (application-specific) properties apply only to theapplication-specific component of a connector, that is, the component thatinteracts directly with the application. Each connector has application-specificproperties that are unique to its application. Some of these properties provide
Appendix B. Connector Configurator 79

default values and some do not; you can modify some of the default values. Theinstallation and configuration chapter of each adapter guide describes theapplication-specific properties and the recommended values.
The fields for Standard Properties and Connector-Specific Properties arecolor-coded to show which are configurable:v A field with a grey background indicates a standard property. You can change
the value but cannot change the name or remove the property.v A field with a white background indicates an application-specific property. These
properties vary according to specific needs of the application or connector. Youcan change the value and delete these properties.
v Value fields are configurable.v The Update Method field is informational and not configurable. This field
specifies the action required to activate a property whose value has changed.
Setting standard connector properties (ICS)To change the value of a standard property:1. Click in the field whose value you want to set.2. Either enter a value, or choose from the drop-down menu if one appears.3. After entering all values for the standard properties, you can do one of the
following:v To discard the changes, preserve the original values, and exit Connector
Configurator, choose File > Exit (or close the window), and choose No whenprompted to save changes.
v To enter values for other categories in Connector Configurator, choose the tabfor the category. The values you enter for Standard Properties (or othercategory) are retained when you move to the next category; when you closethe window, you are prompted to either save or discard the values that youentered in all of the categories as a whole.
v To save the revised values, choose File > Exit (or close the window) andchoose Yes when prompted to save changes. Alternatively, choose Save > ToFile from either the File menu or the toolbar.
Setting application-configuration properties (ICS)For application-specific configuration properties, you can add or change propertynames, configure values, delete a property, and encrypt a property:1. Right click in the top-left portion of the grid. A pop-up menu bar will appear.
Select Add to add a property or Add Child to add a child property for aproperty.
2. Enter a value for the property or child property.3. To encrypt a property, click the Encrypt box.4. Choose to save or discard changes, as described for Setting Standard Connector
Properties.
The Update Method displayed for each property indicates whether a component oragent restart is necessary to activate changed values.
Important: Changing a preset application-specific connector property name maycause a connector to fail. Certain property names may be needed bythe connector to connect to an application or to run properly.
80 IBM WebSphere Business Integration Adapters: Adapter for Clarify CRM User Guide

Encryption for connector properties (ICS)Application-specific properties can be encrypted by clicking the Encrypt check boxin the Edit Property window. To decrypt a value, click to clear the Encrypt checkbox, enter the correct value in the Verification dialog box, and choose OK. If theentered value is correct, the value is decrypted and displays. The adapter guide foreach connector contains a list and description of each property and its defaultvalue.
If a property has multiple values, the Encrypt check box will appear for the firstvalue of the property. When you click the Encrypt check box, all values of theproperty will encrypted. To decrypt multiple values of a property, click to clear theEncrypt check box of the first value of the property, and then enter the correctvalue of the first value in the Verification dialog box. If the input value is a match,all multiple values will decrypt.
Update method (ICS)When WebSphere MQ Integrator Broker is the integration broker, connectorproperties are static. The Update Method is always Connector Restart. In otherwords, for changes to take effect, you must restart the connector after saving therevised connector configuration file.
Specifying supported business object definitions (ICS)This topic assumes that you have already created or acquired the intendedbusiness objects, created or acquired maps for them, and have saved both thebusiness object definitions and map definitions into System Manager projects.
Before you can make use of a connector (and before you can bind the connectorwith a collaboration’s ports), you must make selections under the SupportedBusiness Objects tab to specify the business objects that the connector will use. Youmust specify both generic business objects and corresponding application-specificbusiness objects, and you must specify associations for the maps between thebusiness objects.
Note: Some connectors require that certain business objects be specified assupported in order to perform event notification or additional configuration(using meta-objects) with their applications. For more information, see theConnector Development Guide for C++ or the Connector Development Guide forJava.
To specify that a business object definition is supported by the connector, or tochange the support settings for an existing business object definition, choose theSupported Business Objects tab and use the following fields:
Business object nameThese instructions assume that you started Business Object Designer with SystemManager running.
To designate that a business object definition is supported by the connector:1. Click in an empty field of the Business Object Name list. A drop-down list
displays, showing all the business object definitions that exist in the SystemManager project.
2. Click on a business object to add it.3. Set the Agent Support (described below) for the business object.
Appendix B. Connector Configurator 81

4. In the File menu of the Connector Configurator window, choose Save to Project.The revised connector definition, including designated support for the addedbusiness object definition, is saved to the project in System Manager.
To delete a business object from the supported list:1. To select a business object field, click the number to the left of the business
object2. From the Edit menu of the Connector Configurator window, choose Delete
Row. The business object is removed from the list display.3. From the File menu, choose Save to Project.
Note that deleting a business object from the supported list does not affect thecode of the connector, nor does it remove the business object definition itself fromSystem Manager. It does, however, change the connector definition and make thedeleted business object unavailable for use in this implementation of thisconnector.
Agent supportIndicating Agent Support for a business object means that the system will attemptto use that business object for delivering data to an application via the connectoragent.
Typically, application-specific business objects for a connector are supported bythat connector’s agent, but generic business objects are not.
To indicate that the business object is supported by the connector agent, put acheck in the Agent Support box. Note that the Connector Configurator windowdoes not validate your Agent Support selections.
Maximum transaction levelThe maximum transaction level for a connector is the highest transaction level thatthe connector supports.
For most connectors Best Effort is the only possible choice, because mostapplication APIs do not support the Stringent level.
You must restart the server for changes in transaction level to take effect.
Note: For this release, maximum transaction level of a connector is always BestEffort.
Associated maps (ICS)Each connector supports a list of business object definitions and their associatedmaps that are currently active in InterChange Server. This list displays when youselect the Associated Maps tab.
The list of business objects contains the application-specific business object whichthe agent supports and the corresponding generic object that the controller sendsto the subscribing collaboration. The association of a map determines which mapwill be used to transform the application-specific business object to the genericbusiness object or the generic business object to the application-specific businessobject.
82 IBM WebSphere Business Integration Adapters: Adapter for Clarify CRM User Guide

If you are using maps that are uniquely defined for specific source and destinationbusiness objects, the maps will already be associated with their appropriatebusiness objects when you open the display, and you will not need (or be able) tochange them.
If more than one map is available for use by a supported business object, you willneed to explicitly bind the business object with the map that it should use.
The Associated Maps tab displays the following fields:v Business Object Name
These are the business objects supported by this connector, as designated in theSupported Business Objects tab. If you designate additional business objectsunder the Supported Business Objects tab, they will be reflected in this list afteryou save the changes by choosing Save to Project from the File menu of theConnector Configurator window.
v Associated MapsThe display shows all the maps that have been installed to the system for usewith the supported business objects of the connector. The source business objectfor each map is shown to the left of the map name, in the Business Object Namedisplay.
v ExplicitIn some cases, you may need to explicitly bind an associated map.Explicit binding is required only when more than one map exists for a particularsupported business object. When InterChange Server boots, it tries toautomatically bind a map to each supported business object for each connector.If more than one map takes as its input the same business object, the serverattempts to locate and bind one map that is the superset of the others. If there isnot a map that is the superset of the others, the server will not be able to bindthe business object to a single map, and you will need to set the bindingexplicitly.To explicitly bind a map:1. In the Explicit column, place a check in the check box for the map you want
to bind.2. Select the map that you intend to associate with the business object3. In the File menu of the Connector Configurator window, choose Save to
Project.4. Deploy the project to InterChange Server.5. Reboot the InterChange Server for the changes to take effect.
Resources (ICS)The Resource tab allows you to set a value that determines whether and to whatextent the connector agent will handle multiple processes concurrently usingconnector agent parallelism. Not all connectors support this feature, and use of thisfeature is not usually advised for connector agents that were designed in Java to bemulti-threaded, since it is usually more efficient to use multiple threads thanmultiple processes.
Setting trace/log file values (ICS)When you open a connector configuration file or a connector definition file,Connector Configurator uses the logging and tracing values of that file as defaultvalues. You can change those values in Connector Configurator.
Appendix B. Connector Configurator 83

To change the logging and tracing values:1. Choose the Trace/Log Files tab.2. For either logging or tracing, you can choose to write messages to one or both
of the following:v To console (STDOUT): Writes logging or tracing messages to the STDOUT
display.v To File: Writes logging or tracing messages to a file that you specify. To
specify the file, choose the directory button (ellipsis), navigate to thepreferred location, provide a file name, and choose Save. Logging or tracingmessage are written to the file and location that you specify.
Note: Both logging and tracing files are simple text files. You can use the fileextension that you prefer when you set their file names. For tracingfiles, however, it is advisable to use the extension .trace rather than.trc, to avoid confusion with other files that might reside on thesystem. For logging files, .log and .txt are typical file extensions.
Configuring messagingThe messaging properties are available only if you have set MQ as the value of theDeliveryTransport standard property and ICS as the broker type. These propertiesaffect how your connector will use queues.
Data handlersThe data handlers section is available for configuration only if you have designateda value of JMS for DeliveryTransport and a value of JMS forContainerManagedEvents. See the descriptions under ContainerManagedEvents inAppendix A, Standard Properties, for values to use for these properties. Foradditional details, see the Connector Development Guide for C++or the ConnectorDevelopment Guide for Java.
Setting the configuration file properties (WebSphere MQ IntegratorBroker)
The topics in this section apply if you are using WebSphere MQ Integrator (alsoreferred to as WMQI) as the integration broker.
When you create and name a new connector configuration file, or when you openan existing connector configuration file, Connector Configurator displays aconfiguration screen with tabs for the categories of required configuration values.
Connector Configurator requires values for properties in all of these categories:1. Standard Properties2. Connector-Specific Properties3. Supported Business Objects4. Trace/Log File values5. Data Handlers (where applicable)
Note: For connectors that use JMS messaging, an additional category may display,for configuration of data handlers that convert the data to business objects.For information about the values to use in the Data Handlers category, seethe Connector Development Guide for C++ or the Connector Development Guidefor Java.
84 IBM WebSphere Business Integration Adapters: Adapter for Clarify CRM User Guide

Important: Connector Configurator accepts property values in either English ornon-English character sets. However, the names of both standard andconnector-specific properties, and the names of supported businessobjects, must use the English character set only.
Standard properties differ from connector-specific properties as follows:v Standard properties of a connector are shared by both the application-specific
component of a connector and its broker component. All connectors have thesame set of standard properties. These properties are described in Appendix A ofeach adapter guide. You can change some but not all of these values.
v Application-configuration (application-specific) properties apply only to theapplication-specific component of a connector, that is, the component thatinteracts directly with the application. Each connector has application-specificproperties that are unique to its application. Some of these properties providedefault values and some do not; you can modify some of the default values. Theinstallation and configuration chapter of each adapter guide describes theapplication-specific properties and the recommended values.
The fields for Standard Properties and Connector-Specific Properties arecolor-coded to show which are configurable:v A field with a grey background indicates a standard property. You can change
the value but cannot change the name or remove the property.v A field with a white background indicates an application-specific property. These
properties vary according to specific needs of the application or connector. Youcan change the value and delete these properties.
v Value fields are configurable.v The Update Method field is informational and not configurable. This field
specifies the action required to activate a property whose value has changed.
Setting standard connector propertiesTo change the value of a standard property:1. Click in the field whose value you want to set.2. Either enter a value, or choose from the drop-down menu if one appears.3. After entering all values for the standard properties, you can do one of the
following:v To discard the changes, preserve the original values, and exit Connector
Configurator, choose File > Exit (or close the window), and choose No whenprompted to save changes.
v To enter values for other categories in Connector Configurator, choose the tabfor the category. The values you enter for Standard Properties (or othercategory) are retained when you move to the next category; when you closethe window, you are prompted to either save or discard the values that youentered in all of the categories as a whole.
v To save the revised values, choose File > Exit (or close the window) andchoose Yes when prompted to save changes. Alternatively, choose Save > ToFile from either the File menu or the toolbar.
Setting application-configuration propertiesFor application-specific configuration properties, you can add or change propertynames, configure values, delete a property, and encrypt a property:1. Click in the field whose name or value you want to set.
Appendix B. Connector Configurator 85

2. Enter a name or value.3. To encrypt a property, click the Encrypt box.4. Choose to save or discard changes, as described for Setting Standard Connector
Properties.
The Update Method displayed for each property indicates whether a component oragent restart is necessary to activatechanged values.
Important: Changing a preset application-specific connector property name maycause a connector to fail. Certain property names may be needed bythe connector to connect to an application or to run properly.
Encryption for connector propertiesApplication-specific properties can be encrypted by clicking the Encrypt check boxin the Edit Property window. To decrypt a value, click to clear the Encrypt checkbox, enter the correct value in the Verification dialog box, and choose OK. If theentered value is correct, the value is decrypted and displays. The adapter guide foreach connector contains a list and description of each property and its defaultvalue.
Update methodWhen WebSphere MQ Integrator Broker is the integration broker, connectorproperties are static. The Update Method is always Agent Restart. In other words,for changes to take effect, you must restart the connector agent after saving therevised connector configuration file.
Specifying supported business object definitionsThe procedures in this section assume that you have already created:v Business object definitionsv MQ message set files (*.set files)
The *.set files contain message set IDs that Connector Configurator requires fordesignating the connector’s supported business objects. See the ImplementationGuide for WebSphere MQ Integrator Broker for information about creating the MQmessage set files.
Each time that you add business object definitions to the system, you must useConnector Configurator to designate those business objects as supported by theconnector.
Important: If the connector requires meta-objects, you must create message set filesfor each of them and load them into Connector Configurator, in thesame manner as for business objects.
To specify supported business objects:1. Select the Supported Business Objects tab and choose Load. The Open Message
Set ID File(s) dialog displays.2. Navigate to the directory where you have placed the message set file for the
connector and select the appropriate message set file (*.set) or files.3. Choose Open. The Business Object Name field displays the business object
names contained in the *.set file; the numeric message set ID for each businessobject is listed in its corresponding Message Set ID field. Do not change themessage set IDs. These names and numeric IDs are saved when you save theconfiguration file.
86 IBM WebSphere Business Integration Adapters: Adapter for Clarify CRM User Guide

4. When you add business objects to the configuration, you must load theirmessage set files. If you attempt to load a message set that contains a businessobject name that already exists in the configuration, or if you attempt to load amessage set file that contains a duplicate business object name, ConnectorConfigurator detects the duplicate and displays the Load Results dialog. Thedialog shows the business object name or names for which there are duplicates.For each duplicate name shown, click in the Message Set ID field, and choosethe Message Set ID that you wish to use.
Setting trace/log file valuesWhen you open a connector configuration file or a connector definition file,Connector Configurator uses the logging and tracing values of that file as defaultvalues. You can change those values in Connector Configurator.
To change the logging and tracing values:1. Choose the Trace/Log Files tab.2. For either logging or tracing, you can choose to write messages to one or both
of the following:v To console (STDOUT): Writes logging or tracing messages to the STDOUT
display.v To File: Writes logging or tracing messages to a file that you specify. To
specify the file, choose the directory button (ellipsis), navigate to thepreferred location, provide a file name, and choose Save. Logging or tracingmessage are written to the file and location that you specify.
Note: Both logging and tracing files are simple text files. You can use the fileextension that you prefer when you set their file names. For tracingfiles, however, it is advisable to use the extension .trace rather than.trc, to avoid confusion with other files that might reside on thesystem. For logging files, .log and .txt are typical file extensions.
Configuring data handlersThe data handlers section is available for configuration only if you have designateda value of JMS for DeliveryTransport and a value of JMS forContainerManagedEvents. See the descriptions under ContainerManagedEvents inAppendix A, Standard Properties, for values to use for these properties. Foradditional details, see the Connector Development Guide for C++ or the ConnectorDevelopment Guide for Java
Using standard and connector-specific properties with ConnectorConfigurator
Connector configuration properties include both standard configuration properties(the properties that all connectors have) and connector-specific properties(properties that are needed by the connector for a specific application ortechnology).
Because standard properties are used by all connectors, you do not need to definethose properties within your configuration file; Connector Configurator already hasthose definitions, and it incorporates them into your configuration file as soon asyou create the file. For standard properties, your only task is to use ConnectorConfigurator to set the values of the properties.
Appendix B. Connector Configurator 87

For connector-specific properties, however, you will need to both define theproperties and set their values. Connector Configurator provides the interface forperforming both of these tasks.
Completing the configurationAfter you have created a configuration file for a connector and modified it, makesure that the connector can locate the configuration file when the connector startsup. To do so, open the startup file used for the connector, and verify that thelocation and file name used for the connector configuration file match exactly thename you have given the file and the directory or path where you have placed it.
88 IBM WebSphere Business Integration Adapters: Adapter for Clarify CRM User Guide

Appendix C. Connector feature list
This appendix details the features supported by the Connector. For descriptions ofthese features, see “Appendix A: Connector Feature Checklist” in the ConnectorDevelopment Guide.
Business object request handling featuresTable 12 details the business object request handling features supported by theconnector.
Table 12. Business object request handling features
Category Feature Support Notes
Create Create verb Full
Delete Delete verb Partial Clarify CRMsupports deletes bytransforming them toupdates. Physicaldeletes are notsupported.
Logical delete Partial The connectortransforms the Deleteverb into the Updateverb. Thisfunctionality will bedeprecated in afuture release.
Exist Exist verb Partial The Exist verb issupported; however,the connector returnsthe whole top-levelobject.
Misc Attribute names Full
Business objectnames
Full An old object,Clarify_Site, has aspecific meaning andshould not be used.
Retrieve Ignore missing childobject
Full
© Copyright IBM Corp. 1997, 2003 89

Table 12. Business object request handling features (continued)
Category Feature Support Notes
RetrieveByContent Ignore missing childobject
Full
Multiple results No
RetrieveByContentverb
Partial The connector forClarify CRMsupportsRetrieveByContent;however, it has somelimitations: * Allattributes must bemarked asRetrieveByContent. *All marked attributesmust be from thesame table. See thedocumentation formore detail.
Update After-image support Full
Delta support No
KeepRelations Full
Verbs Retrieve verb Full
Subverb support Full
Verb stability Full
Event notification featuresTable 13 details the event notification features supported by the connector.
Table 13. Event notification features
Category Feature Support Notes
Connector properties Event distribution No
PollQuantity Full Currently it is notpossible to limit thenumber of rowsreturned, so we selectall rows, then onlyprocess PollQuantityof them.
Event table Event status values Full
Object key Full
Object name Partial Clarify_ is prependedto the Object_Namein the event table.
Priority Full
90 IBM WebSphere Business Integration Adapters: Adapter for Clarify CRM User Guide

Table 13. Event notification features (continued)
Category Feature Support Notes
Misc. Archiving Full
CDK methodgotApplEvent
Full
Delta eventnotification
No
Event sequence Full
Future eventprocessing
No
In-Progress eventrecovery
No
Physical delete event Full
RetrieveAll Full The connector fullysupports this feature,in addition it can beconfigured at thebusiness object levelto only retrieve thetop level object (seedocumentation of theRetrieveAllApplication specificinformation on theRetrieve verb.)
Smart filtering No
Verb stability Partial The connectorunderstands thePhysicalDelete verb,and it transforms thisto the Delete verbbefore sending it tothe integrationbroker.
Appendix C. Connector feature list 91

General featuresTable 14 details the general features supported by the connector.
Table 14. General features
Category Feature Support Notes
Business objectattributes
Foreign key Full Clarify CRM makesfull use of ForeignKey.
Foreign Key attributeproperty
Partial The connector forClarify CRM uses acomplicated set ofrules when dealingwith the foreign Keyproperty, please seethe Section BusinessObject AttributeProperties, subsection Foreign KeyProperty, in theconnectordocumentation.
Key Full The first attributemust be marked Keyin Clarify CRM.
Max Length No Clarify CRM ignoresthis field. However, ifthe size of a fieldpassed into theconnector is largerthan the field inClarify CRM, thedata is automaticallytruncated.
Meta-data-drivendesign
Full
Required Full Clarify CRM uses theRequired field withthe Foreign Key field.
Connection lost Connection lost onpoll
Full
Connection lost onrequest processing
Full
Connection lost whileidle
No
Connector properties ApplicationPassword Full
ApplicationUserName Full
UseDefaults Full
92 IBM WebSphere Business Integration Adapters: Adapter for Clarify CRM User Guide

Table 14. General features (continued)
Category Feature Support Notes
Message tracing General messaging Partial Tracing is supported;however, compliancewith this standardneeds to be reviewed.
generateMsg() No Clarify CRM usesgenerateMsg() for alltracing.
Trace level 0 Full
Trace level 1 Full
Trace level 2 Partial
Trace level 3 Partial
Trace level 4 Partial
Trace level 5 Partial
Misc. CDK methodLogMsg
Full
Java Package Names N/A
Logging messages Full
NT servicecompliance
Full
Transaction support Full
Special value CxBlank processing Full
CxIgnore processing Full
Appendix C. Connector feature list 93

94 IBM WebSphere Business Integration Adapters: Adapter for Clarify CRM User Guide

Notices
IBM may not offer the products, services, or features discussed in this document inall countries. Consult your local IBM representative for information on theproducts and services currently available in your area. Any reference to an IBMproduct, program, or service is not intended to state or imply that only that IBMproduct, program, or service may be used. Any functionally equivalent product,program, or service that does not infringe any IBM intellectual property right maybe used instead. However, it is the user’s responsibility to evaluate and verify theoperation of any non-IBM product, program, or service.
IBM may have patents or pending patent applications covering subject matterdescribed in this document. The furnishing of this document does not give youany license to these patents. You can send license inquiries, in writing, to:
IBM Director of LicensingIBM CorporationNorth Castle DriveArmonk, NY 10504-1785U.S.A.
The following paragraph does not apply to the United Kingdom or any othercountry where such provisions are inconsistent with local law:
INTERNATIONAL BUSINESS MACHINES CORPORATION PROVIDES THISPUBLICATION “AS IS” WITHOUT WARRANTY OF ANY KIND, EITHEREXPRESS OR IMPLIED, INCLUDING, BUT NOT LIMITED TO, THE IMPLIEDWARRANTIES OF NON-INFRINGEMENT, MERCHANTABILITY OR FITNESSFOR A PARTICULAR PURPOSE. Some states do not allow disclaimer of express orimplied warranties in certain transactions, therefore, this statement may not applyto you.
This information could include technical inaccuracies or typographical errors.Changes are periodically made to the information herein; these changes will beincorporated in new editions of the publication. IBM may make improvementsand/or changes in the product(s) and/or program(s) described in this publicationat any time without notice.
Any references in this information to non-IBM Web sites are provided forconvenience only and do not in any manner serve as an endorsement of those Websites. The materials at those Web sites are not part of the materials for this IBMproduct and use of those Web sites is at your own risk.
IBM may use or distribute any of the information you supply in any way itbelieves appropriate without incurring any obligation to you.
Licensees of this program who wish to have information about it for the purposeof enabling: (i) the exchange of information between independently createdprograms and other programs (including this one) and (ii) the mutual use of theinformation which has been exchanged, should contact:
IBM RTP Laboratory3039 Cornwallis RoadP.O. BOX 12195
© Copyright IBM Corp. 1997, 2003 95

Raleigh, NC 27709-2195U.S.A
Such information may be available, subject to appropriate terms and conditions,including in some cases, payment of a fee.
The licensed program described in this document and all licensed materialavailable for it are provided by IBM under terms of the IBM Customer Agreement,IBM International Program License Agreement, or any equivalent agreementbetween us.
Any performance data contained herein was determined in a controlledenvironment. Therefore, the results obtained in other operating environments mayvary significantly. Some measurements may have been made on development-levelsystems and there is no guarantee that these measurements will be the same ongenerally available systems. Furthermore, some measurement may have beenestimated through extrapolation. Actual results may vary. Users of this documentshould verify the applicable data for their specific environment.
Information concerning non-IBM products was obtained from the suppliers ofthose products, their published announcements or other publicly available sources.IBM has not necessarily tested those products and cannot confirm the accuracy ofperformance, compatibility or any other claims related to non-IBM products.Questions on the capabilities of non-IBM products should be addressed to thesuppliers of those products.
This information may contain examples of data and reports used in daily businessoperations. To illustrate them as completely as possible, the examples may includethe names of individuals, companies, brands, and products. All of these names arefictitious and any similarity to the names and addresses used by an actual businessenterprise is entirely coincidental.
All statements regarding IBM’s future direction or intent are subject to change orwithdrawal without notice, and represent goals and objectives only.
Programming interface informationProgramming interface information, if provided, is intended to help you createapplication software using this program.
General-use programming interfaces allow you to write application software thatobtain the services of this program’s tools.
However, this information may also contain diagnosis, modification, and tuninginformation. Diagnosis, modification and tuning information is provided to helpyou debug your application software.
Warning: Do not use this diagnosis, modification, and tuning information as aprogramming interface because it is subject to change.
Trademarks and service marksThe following terms are trademarks or registered trademarks of InternationalBusiness Machines Corporation in the United States or other countries, or both:
96 IBM WebSphere Business Integration Adapters: Adapter for Clarify CRM User Guide

IBMthe IBM logoAIXCrossWorldsDB2DB2 Universal DatabaseMQIntegratorMQSeriesTivoliWebSphere
Lotus, Domino, Lotus Notes, and Notes Mail are trademarks of the LotusDevelopment Corporation in the United States, other countries, or both.Microsoft,Windows, Windows NT, and the Windows logo are trademarks of MicrosoftCorporation in the United States, other countries, or both.
MMX, Pentium, and ProShare are trademarks or registered trademarks of IntelCorporation in the United States, other countries, or both.
Java and all Java-based trademarks are trademarks of Sun Microsystems, Inc. in theUnited States, other countries, or both.
Other company, product or service names may be trademarks or service marks ofothers.
Notices 97

98 IBM WebSphere Business Integration Adapters: Adapter for Clarify CRM User Guide


����
Printed in U.S.A.