add-on for microsoft fsx & fs9 - friendlypanelsfriendlypanels.com/manuales/l45fp.pdf• fmc that...
TRANSCRIPT

1
FriendlyPanels Software
FMC manual is in a separate document
Add-on for Microsoft ® FSX & FS9
© 2008 FriendlyPanels. All right reserved

2
Table of Contents
1. Introduction 2. Requirements 3. Installing the panel 4. Learjet 45 Gauges
4.1 PFD 4.2 EICAS 4.3 MCP 4.4 AUTOPILOT 4.5 RADIOS 4.6 CHRONOMETER
5. Aliasing the panel 6. Technical support
3
1. Introduction Thank you for purchasing this add-on. Here you will find the description and user instructions of the FriendlyPanels gauges for Bombardier Learjet 45 Aircraft. Main features of this panel are:
• FMC that can manage flight plans created with Microsoft Flight Simulator FS9 or FSX, or any add-on which can export flight plans in the FS format. We have eliminated the complex way in what you have to plan your flight in current commercial FMCs implemented in some of the commercial airliners existing for Microsoft Flight Simulator but keeping the feeling of a real FMC-CDU. See separate manual for details.
• New MCP, much more realistic, allows see different navigation screens in PFD, including flight plan route, and active lateral navigation.
• New AP including VNAV button. • Vertical navigation implemented via FMC. • New EICAS gauge, with multiples screens. • New chronometer. • New radio with stand by ADF frequency. • ALL GAUGES, except for FMC, visible and clearly readable in main
window, saving you the task of being opening and closing windows during critical phases of flight.
• 2D Panel landing in FSX version. • ALL NEW GAUGES of this panel have been perfectly adapted to
Learjet 45 FS9 and FSX virtual cockpit and they are fully functional as they are in the 2D Panel.
Please, read this document entirely.
---oOo---
2. Requirements
This panel requires Windows XP with at least SP1 or Vista, .Net Framework 1.1, FS9 (for FS9 version) and FSX SP1 (for FSX version). A screen resolution of 1024 x 768 or higher (1240 x 1024 recommended). Default B737 FS9 aircraft must be installed.
---oOo---

4
3. Installing the panel
1.- Run the installation program and follow the indicated steps. 2..- The panel will be installed in: "Your FS2004\Aircraft\lear45_fp" (if FS9) or "Your FSX\SimObjects\Airplanes\ lear45_fp" (if FSX) 3. When finish installation , please, read this manual for instructions. 4. Run FS9 (FS9 version). You'll find your new panel as the variation FP for Bombardier Learjet 45. Go to Aircraft menu, Select Aircraft, Aircraft manufacturer: Bombardier, Aircraft model: Learjet 45, Variation: the ones preceded by FP.
5
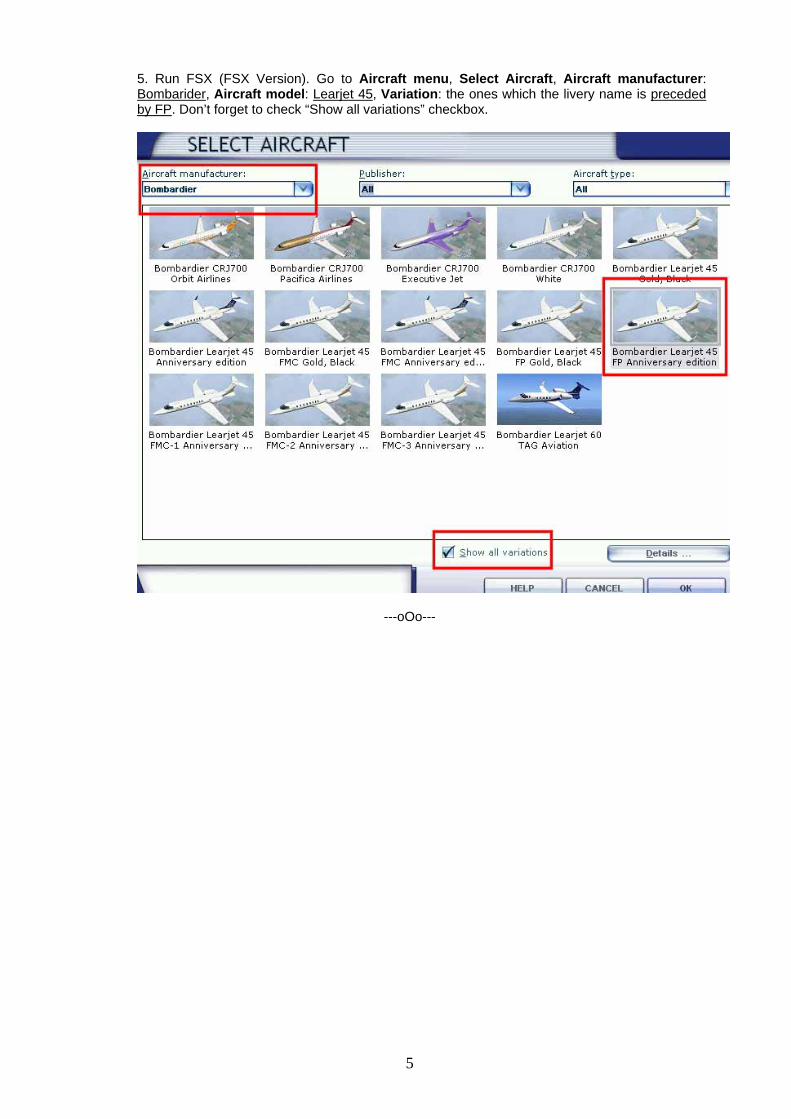
5. Run FSX (FSX Version). Go to Aircraft menu, Select Aircraft, Aircraft manufacturer: Bombarider, Aircraft model: Learjet 45, Variation: the ones which the livery name is preceded by FP. Don’t forget to check “Show all variations” checkbox.
---oOo---

6
4. Learjet 45 Gauges This section shows, explains and describe (when necessary) the new FP gauges features included in this panel. Only in the FSX version, clicking in the area marked below will swap between normal panel and panel landing.
4.1. PFD
PFD
MCP
1. IAS/MACH selected with Autopilot. 2. Wing velocity and direction. 3. Altitude selected with Autopilot 4. Baro pressure 5. Vertical speed 6. Current vertical speed readout 7. Ground speed 8. Set baro press 9. Set baro press to standard 10. Swap showing baro press in Hg inches or mbar.

7
11. If MCP is in HIS mode it will change decision height, if is in FPA mode, changes map range.
12. VOR2 data name and distance 13. What is driving blue(20) and white(18) needles, selected in MCP by knobs 1
and 6 14. VOR1 data name and distance 15. Heading selected with autopilot 16. Current heading 17. Decision height 18. White needle driving by what you select in MCP with knob 2 19. CDI 20. Blue needle driving by what you select in MCP with knob 2 21. IAS tape 22. Altitude tape 23. Radio height 24. IAS trend indicator 25. Flight plan route, displayed when is selected in MCP button 2
Note.- Needles are not visible when FPA mode is selected in MCP.

8
4.2. EICAS The EICAS has four display modes in its lower part, selected with the lower buttons 6, 7, 8 and 9. It can display control surfaces position, hydraulic and electric data and other information.
1. Engines parameters 2. Warnings 3. Fuel 4. What is displayed depends on lower buttons 5. What is displayed depends on lower buttons 6. Display EICAS 7. Display MAP mode 8. Display hydraulic data 9. Display control surfaces 10. Display electric data 11. Adjust map range, when MAP RNG is visible above in the screen.

9
4.3. MCP
Knobs 1 and 6 select what is driving blue and white needles in PFD. The option selected is shown in the PFD lower display:
Buttons 2 and 3 change the lower PFD display:
Buttons 4 and 5 change between FMC(4) navigation and normal(5) navigation. To follow FMC navigation (flight plan) you have to activate LNAV button in autopilot too.

10
4.4. AUTOPILOT The clicking areas are shown below, buttons are self explained.
Please, note that the VNAV button only works if FMC-CDU has been properly activated.
1. Clicking on the centre of the CRS1 knob will center the CDI. 2. Clicking on the centre of the HDG knob will set the heading bug in the current
heading 3. Clicking on the centre of the SPD knob will swap between IAS and MACH (FSX
version only).
4.5. RADIOS
• Buttons 1, 4 and 6 swap COM, NAV and ADF frequencies. • Buttons 2, 3, 5 and 7 select what frequency can be tuned by white knob. • Button ½ swaps between COM1 – NAV1 and COM2 – NAV2. • The clicking areas are indicated in picture above.

11
4.6. CHRONOMETER
The SEL button(1) selects what is to be displayed, and the CTL button(2) controls the timers. Pressing SEL sequentially selects to display Local Time, GMT, Flight Time, Elapsed Time, and back to Local Time. In the bottom segment of the display a dot(3) points to the selected display LT, GMT, FT or ET. FT starts counting when a valid groundspeed was first greater than 30 knots (typically during takeoff) and it will stops when that speed come down to less than 30 knots. ET starts counting when you click on control butoon while ET is selected (the red dot is above ET) When FT is being displaying ((the red dot is above FT) clicking twice the CTL button resets Flight Time, FT, back to zero. One more click will start it again. The CTL button also stops, resets and starts again Elapsed Time when clicked sequentially, if ET is selected.
Flight Time and Elapsed Time counts up to 59 minutes, 59 seconds, and then switches to hours and minutes. 4.7. FMC – CDU The FMC is in a separate document you can find in FriendlyPanels folder in the main FS installation folder.

12
5. Aliasing the panel
Of course, you can use this panel with any aircraft. To do this, go to
[your FS9 install folder]\Aircraft\[name of your aircraft]\panel or
[your FSX install folder]\SimObjects\Airplanes\[name of your aircraft]\panel Make a backup of the panel.cfg file, open windows notepad and write:
[fltsim] alias=lear45_fp \panel
save this file as plain text as panel.cfg. When you load the plane it will load the FriendlyPanels Learjet 45 panel.
6. Virtual cockpit remarks
All new gauges of this panel have been perfectly adapted to Learjet 45 FS9 and FSX virtual cockpit and they are fully functional as they are in the 2D Panel.
7. Technical support
If you have any question, please contact FrienlyPanels at:
[email protected] Web page:
www.friendlypanels.net