add on installation guide - sap gold partnerachieveits.com/assets/whitepapers/resolv 9.2 hana - add...
TRANSCRIPT

Add On Installation Guide Version 9.2 for HANA
PRESENTED BY
ACHIEVE IT SOLUTIONS

Copyright 2016 by Achieve IT Solutions
These materials are subject to change without notice. These materials are provided by Achieve
IT Solutions for informational purposes only, without representation or warranty of any kind,
and Achieve IT Solutions shall not be liable for errors or omissions with respect to the materials.
The use and copying of this document and the associated computer software is subject to
Achieve IT Solutions customer registration agreement. Any other use is prohibited.
Resolv is a trademark of Achieve IT Solutions
SAP Business One is a trademark of SAP AG.
The Resolv Suite, including these installation procedures, has been certified by SAP as
conforming to SAP’s standards for Business One add-on solutions.
Achieve IT Solutions
640 Belle Terre Road
Building B
Port Jefferson, New York 11777
631-543-3200

RESOLV
ADD ON INSTALLATION GUIDE
Table of Contents
Resolv Installation ........................................................................................................... 1
Installation of SAP Add On........................................................................................... 1
Installing Licenses ...................................................................................................... 13
Importing Licenses .................................................................................................. 13
Manual Licenses ..................................................................................................... 16
Module Initialization ................................................................................................ 21
System Features ........................................................................................................... 23
Additional Options on the Module Setup Screen ........................................................ 23
Menu Position ......................................................................................................... 23
Use Multi Language Support for English ................................................................ 23
Stopping Programs ................................................................................................. 24
Authorizations ......................................................................................................... 25
Resolv HANA Processor ............................................................................................... 27
Installation .................................................................................................................. 28
Windows Services ...................................................................................................... 30
Processor Configuration ............................................................................................ 34

1 | P a g e R e s o l v A d d O n I n s t a l l a t i o n G u i d e
Resolv Installation
The Resolv add-on for 9.2 HANA is a lightweight add-on and needs to be installed a bit
differently than previous versions of SAP.
Installation of SAP Add On
Administration > Add-Ons > Add-On Administration
Navigate to the Add-on Administration screen, and click on the “Manage Extensions for
Lightweight Deployment” link on the bottom right.

2 | P a g e R e s o l v A d d O n I n s t a l l a t i o n G u i d e
That will launch your SAP Extension Manager website. Log in using your B1SiteUser credentials.
Once logged in, it should bring you to the Extension Manager main page, and the Extensions
tab.
First we need to import the add-on file, so at the top, click on the Import button.

3 | P a g e R e s o l v A d d O n I n s t a l l a t i o n G u i d e
That will open up the Extension Import Wizard. Once in there, click on the Browse button and
find your add-on .zip file.
Once you browse and select your add-on .zip file, you can click on the Upload button.
4 | P a g e R e s o l v A d d O n I n s t a l l a t i o n G u i d e
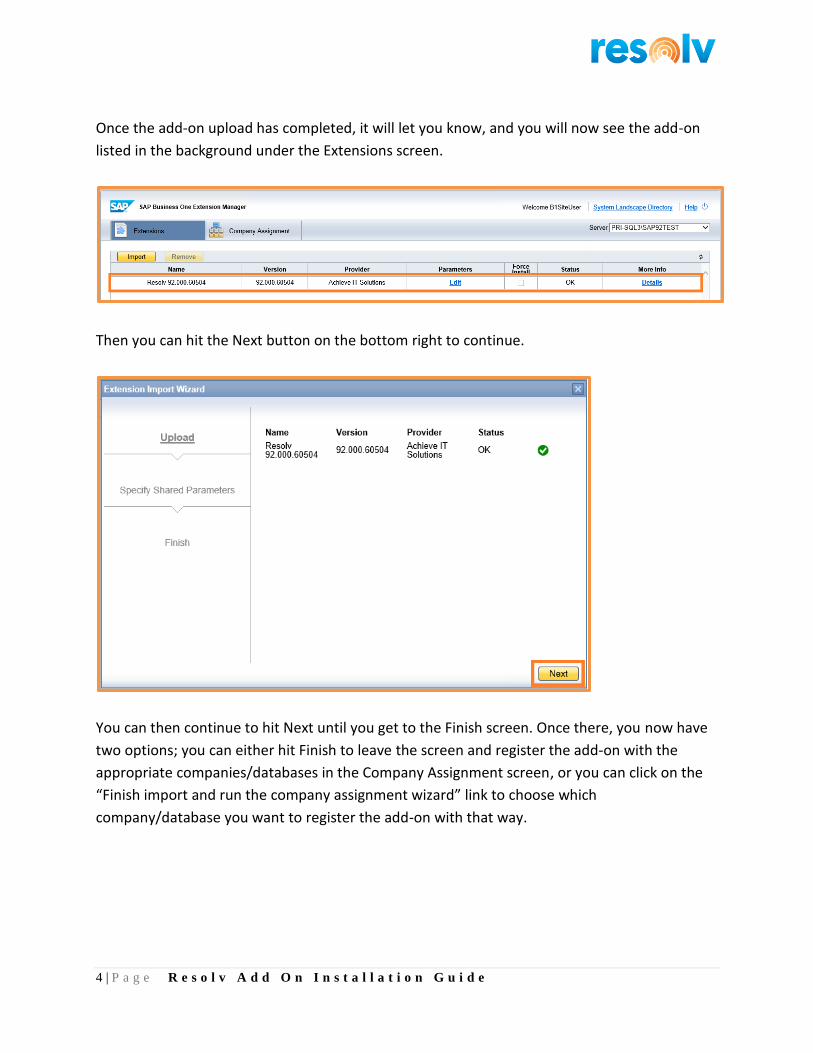
Once the add-on upload has completed, it will let you know, and you will now see the add-on
listed in the background under the Extensions screen.
Then you can hit the Next button on the bottom right to continue.
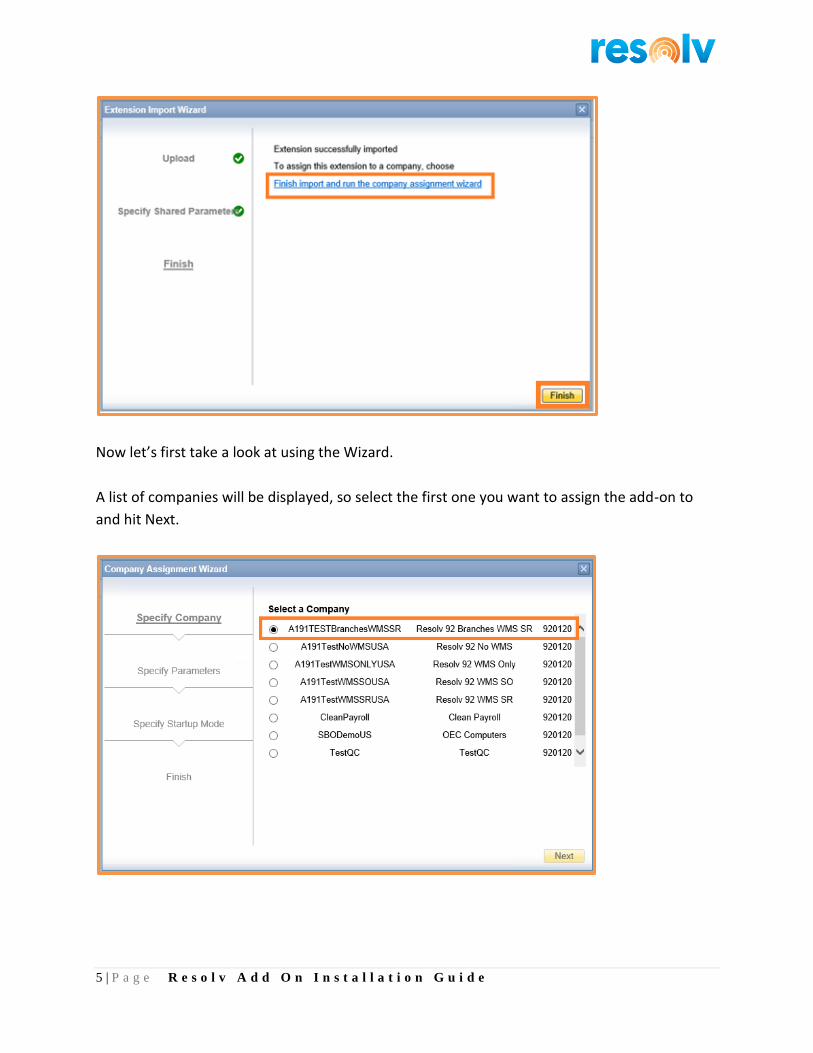
You can then continue to hit Next until you get to the Finish screen. Once there, you now have
two options; you can either hit Finish to leave the screen and register the add-on with the
appropriate companies/databases in the Company Assignment screen, or you can click on the
“Finish import and run the company assignment wizard” link to choose which
company/database you want to register the add-on with that way.
5 | P a g e R e s o l v A d d O n I n s t a l l a t i o n G u i d e
Now let’s first take a look at using the Wizard.
A list of companies will be displayed, so select the first one you want to assign the add-on to
and hit Next.

6 | P a g e R e s o l v A d d O n I n s t a l l a t i o n G u i d e
Continue to hit Next until you get to the Specify Startup Mode screen. Once there, you can
choose the default start up mode for all users and then specify Startup Modes for individual
users as well if you so choose. Once you are done, hit Next.
That will bring you to the Finish screen. If you are done registering companies, you can hit
Finish, otherwise you can click on the “Run the company assignment wizard again” link and
register another company following the steps that we just laid out.

7 | P a g e R e s o l v A d d O n I n s t a l l a t i o n G u i d e
Now let’s take a look at how to register the add-on using the Company Assignment screen. To
start, click on the Company assignment tab on the top of the screen.

8 | P a g e R e s o l v A d d O n I n s t a l l a t i o n G u i d e
On the left side you will see a list of all your companies/databases. Click on the one you want to
register and then click on the Assign button.
That will open up the Extension Assignment Wizard and ask you to choose which add-ons you
want to register for this company. Select the one you want and click Next.
Continue to hit Next until you get to the Specify Startup Mode screen. Once there, you can
choose the default start up mode for all users and then specify Startup Modes for individual
users as well if you so choose. Once you are done, hit Next.

9 | P a g e R e s o l v A d d O n I n s t a l l a t i o n G u i d e
That will bring you to the Finish screen. If you are done registering companies, you can hit
Finish, otherwise you can click on the “Run the extension assignment wizard again” link and
register another add-on for this company if need be using the steps that we just laid out.

10 | P a g e R e s o l v A d d O n I n s t a l l a t i o n G u i d e
Once back on the Company Assignment screen, you will see the add-ons you registered listed.
Now that your companies are registered, it is time to log into SAP and install the add-on. Right-
click on your SAP icon and choose Run As Administrator.

11 | P a g e R e s o l v A d d O n I n s t a l l a t i o n G u i d e
Then log into SAP with a user that is a SuperUser and has a Professional License. The installation
of the Resolv Add-On will commence but it will not open up any windows installation screens, it
will just install in the background and let you know that is was completed with a system
message.
The first time you start the add-on it will prompt you to define a HANA user for the add-on. You
will have 2 options.
The first is to have Resolv create the user (AISAddon) for you. To do that, enter in your HANA
Administrator name (usually SYSTEM) and password and select the Create Addon HANA User
button on the bottom left.
The second option is if you have already created your own HANA user for Resolv beforehand. If
this is ths case then you can enter in that user name and password and instead click on the Use
HANA Administrator button on the bottom right. This will NOT create a new user, but instead
use the one you specify.

12 | P a g e R e s o l v A d d O n I n s t a l l a t i o n G u i d e
Note: If you enter the info incorrectly, do not worry; it will prompt you again the next time
you start the add-on.

13 | P a g e R e s o l v A d d O n I n s t a l l a t i o n G u i d e
Installing Licenses
Administration > Resolv Setup > Module Setup > Resolv Configuration
Now that the installation has completed we will proceed with licensing your Resolv modules.
Once inside the screen you will see all modules as stopped and un-licensed.
Importing Licenses
There are two ways to install your licenses. The first and easiest way is to import them from our
License Server. To do that, just click on the Import Licenses button at the bottom of the screen.

14 | P a g e R e s o l v A d d O n I n s t a l l a t i o n G u i d e
That will connect you to our license server and pull back all licenses that match your SAP
installation number. Once it is done, it will let you know that it completed and that you need to
restart SAP for the licensing to take effect.
You can double check that the licenses imported by just closing and re-opening the Resolv
Configuration screen before you restart SAP. If it worked correctly, you will that the licensed
column says YES and there will be expiration dates as well.
15 | P a g e R e s o l v A d d O n I n s t a l l a t i o n G u i d e
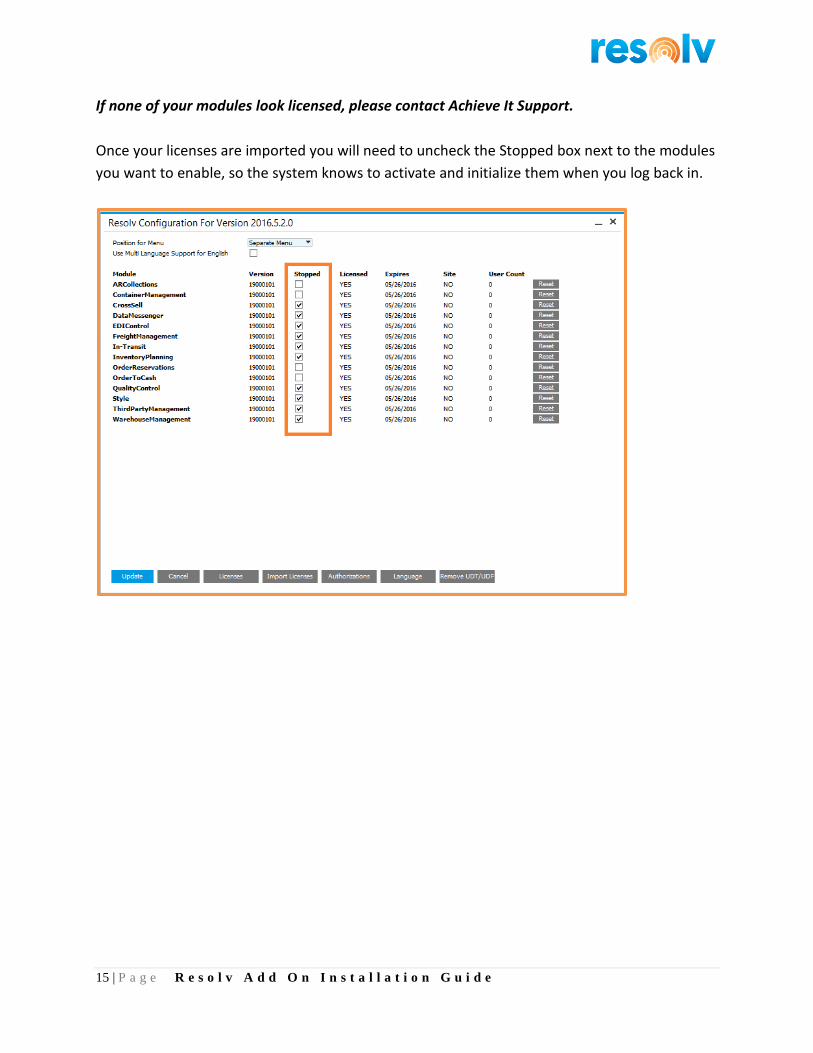
If none of your modules look licensed, please contact Achieve It Support.
Once your licenses are imported you will need to uncheck the Stopped box next to the modules
you want to enable, so the system knows to activate and initialize them when you log back in.

16 | P a g e R e s o l v A d d O n I n s t a l l a t i o n G u i d e
Manual Licenses
The second way is much more manual and should only really be necessary if our License Server
connection is down.
Before you can start you must have already been sent your license keys. If you have not, please
contact Achieve It Support for help.
To begin, click on the Licenses button on the bottom of the Resolv Configuration screen.
17 | P a g e R e s o l v A d d O n I n s t a l l a t i o n G u i d e
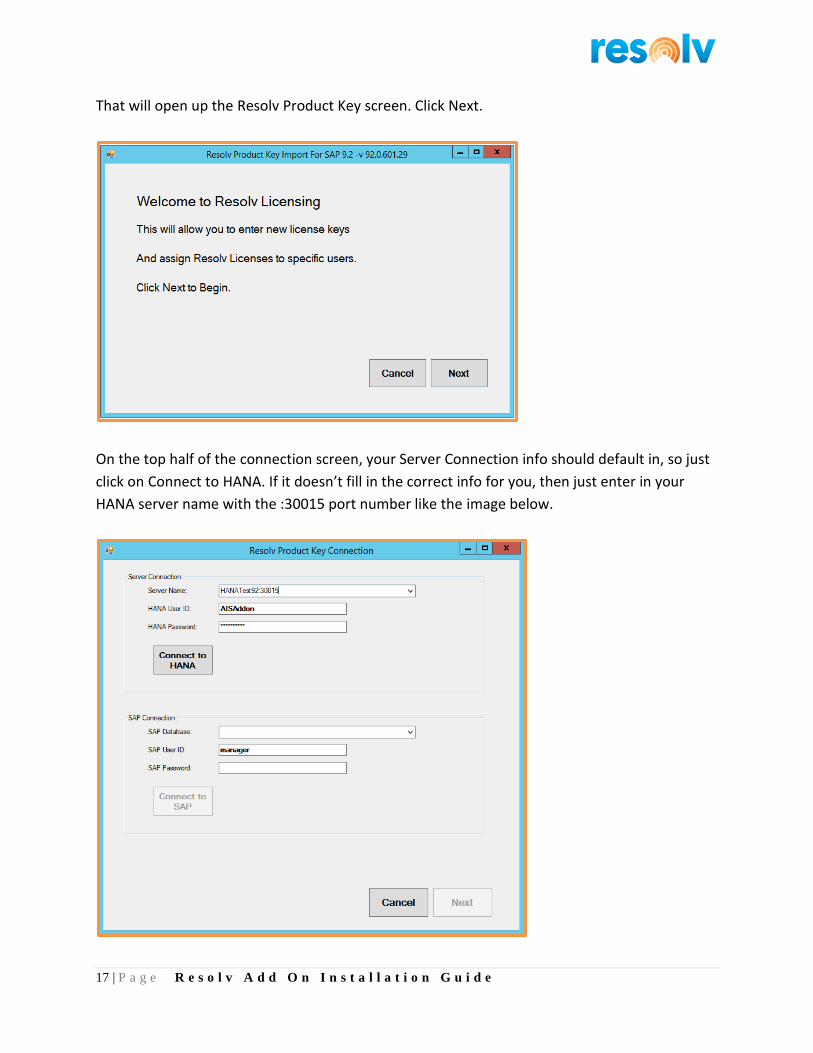
That will open up the Resolv Product Key screen. Click Next.
On the top half of the connection screen, your Server Connection info should default in, so just
click on Connect to HANA. If it doesn’t fill in the correct info for you, then just enter in your
HANA server name with the :30015 port number like the image below.

18 | P a g e R e s o l v A d d O n I n s t a l l a t i o n G u i d e
Once HANA is connected, the bottom half is where you will choose which SAP database you
want to license, enter in your SAP credentials, and click Connect to SAP.
Once SAP is connected you will be able to click on Next.
On the next screen, copy and paste in the first License Product Key you received from Achieve It
Solutions and click ‘Import’. Repeat until all Product Keys have been ‘Imported’. Once all
License Product Keys have been imported, click ‘Next’

19 | P a g e R e s o l v A d d O n I n s t a l l a t i o n G u i d e
20 | P a g e R e s o l v A d d O n I n s t a l l a t i o n G u i d e
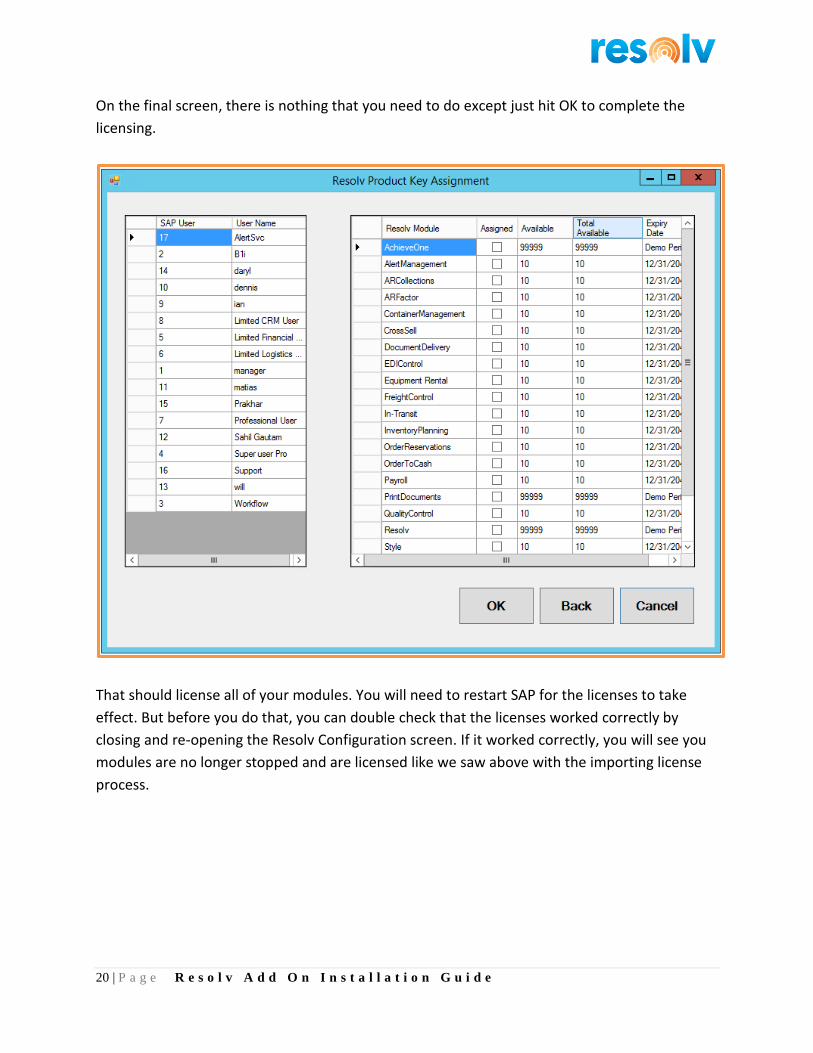
On the final screen, there is nothing that you need to do except just hit OK to complete the
licensing.
That should license all of your modules. You will need to restart SAP for the licenses to take
effect. But before you do that, you can double check that the licenses worked correctly by
closing and re-opening the Resolv Configuration screen. If it worked correctly, you will see you
modules are no longer stopped and are licensed like we saw above with the importing license
process.

21 | P a g e R e s o l v A d d O n I n s t a l l a t i o n G u i d e
Module Initialization
Now that our modules are licensed we need to initialize them. To do that all we just need to
restart SAP. Once SAP comes back up and the Resolv add-on is started, the modules will begin
to initialize and create any data base elements that are needed to function.
During the initialization you may see messages letting you know which module is be worked on;
just hit OK if prompted.
You will also see several system messages letting you know that the database structure is being
modified. For these you do not have to do anything. Just let the system continue initializing.
Once all the module initialize you will see the Resolv menu appear on the bottom of the main
menu.

22 | P a g e R e s o l v A d d O n I n s t a l l a t i o n G u i d e
Note: If your system includes Resolv Equipment Rental or Resolv Mobile, additional
installation procedures may be required. Please see the corresponding user guides for
instructions regarding these modules.

23 | P a g e R e s o l v A d d O n I n s t a l l a t i o n G u i d e
System Features
The Resolv suite contains several important features that are available on all installations,
regardless of which modules are licensed. This section describes those features.
Additional Options on the Module Setup Screen
Administration > Resolv Setup > Module Setup > Resolv Configuration
In addition to the licensing function described above, there are other features on the Module
Setup screen which may be useful.
Menu Position
You may choose to have the Resolv programs appear in a separate menu, at the bottom of the
Business One Main Menu, or within the standard menus for each module, as appropriate. You
may also select to have the programs appear in both menu locations.
Use Multi Language Support for English
If this option is checked, then English is translated and the end user can override the Resolv Form Labels using the SAP Language Support for Language #3 (English). If nothing is found in the Language Support for a specific label, the original English is used.

24 | P a g e R e s o l v A d d O n I n s t a l l a t i o n G u i d e
Stopping Programs
The Module Setup screen includes checkboxes for each module, with the heading “Stopped”. If
a module is not licensed, it will automatically be checked. However, you may choose to stop a
module if you do not wish to use it at the current time.
Note: This will affect all users on the system.
If a module is stopped, none of its options will appear on the menus, and related tabs and
functionality will not be available. Any user-defined fields that have been created will still exist,
with all of their current entries. However, any functionality that would normally result from
these fields will not occur.
After checking or unchecking any of the modules, you must log out and restart the program for
the change to take effect.

25 | P a g e R e s o l v A d d O n I n s t a l l a t i o n G u i d e
Authorizations
Resolv allows you to create user authorizations for your licensed modules. You may then assign
authorizations to individual users for various screens within the modules just as you do for the
standard Business One features.
Note: Creating user authorizations is optional and that authorizations for each module may
be created or removed at any time. If no authorizations are created, then all licensed users
have full authorization for all screens within the Resolv modules.
To start, click on the Authorizations button on the bottom of the screen.

26 | P a g e R e s o l v A d d O n I n s t a l l a t i o n G u i d e
That will open up a window that lists all the modules you are licensed for. Check the Selected
box for the modules that you want to create authorizations for, and then click on “Create”.
Note: You can also remove authorizations from this same screen using the ‘Remove’ button.
A window will open up confirming that you want to create authorizations for the selected
modules.
Click on “Yes” to proceed. When the process is complete, a window will open up letting you
know the authorizations were created.

27 | P a g e R e s o l v A d d O n I n s t a l l a t i o n G u i d e
Then another will open up letting you know you have to restart SAP before the changes will
take effect.
To set the new authorizations for your users restart SAP, then go to the standard SAP
authorizations screen; Administration > System Initialization > Authorizations > General
Authorizations. By default all non-SuperUsers will start with No Authorization.
Select a user, and open the section called “User Authorization”. Each Resolv module that you
selected will have a section listing the various entry screens and reports. Make changes as
desired for each licensed user, and update the screen.
Resolv HANA Processor

28 | P a g e R e s o l v A d d O n I n s t a l l a t i o n G u i d e
Many of the Resolv Modules require you to install additional Windows services to perform
certain functions. To install, configure, and run those services you will need the Resolv HANA
Processor.
Installation
Once you have the installation setup.exe file on your server, you can right-click on it and choose
Run as administrator to begin the installation.
The installation wizard will open and you can click on Next to begin.
It will then go though its installation process and when it has completed you can hit Finish.

29 | P a g e R e s o l v A d d O n I n s t a l l a t i o n G u i d e
Once it is done it will add an icon to your Start menu.

30 | P a g e R e s o l v A d d O n I n s t a l l a t i o n G u i d e
Windows Services
Next you will need to install the services themselves. To do this we need to locate the .BAT files
which by default should be located in the C:\Program Files\Achieve IT Solutions\Resolv Hana
Processor 9_2 folder.
Find the Install files for your module’s services and right-click to Run as administrator.
That will open up a command prompt window and install the service for you. When it is done it
will tell you to press any key to close the window.

31 | P a g e R e s o l v A d d O n I n s t a l l a t i o n G u i d e
Continue this until all of the services you need are installed.
After you install them head to the Windows Services screen. You will see that they created with
a Startup Type of Disabled. This is because we first need to configure them before we enable
them.
First we need to right click on each of the ones you are going to use and set their properties.

32 | P a g e R e s o l v A d d O n I n s t a l l a t i o n G u i d e
Once in the properties window we need to make 3 changes. The first, is to go to the Log On tab
and change the account that will run the service from a Local System Account to some sort of
domain administrator account. This will ensure the service has full permissions to perform its
functions.
Second we need to go to the recovery tab and change all the failure settings to Restart the
Service.

33 | P a g e R e s o l v A d d O n I n s t a l l a t i o n G u i d e
And last, we need to change the Startup Type to Manual for now, so it is no longer disabled and
can run. After we configure the services in the next steps we can come back here to change the
Startup Type to Automatic, so that they start automatically going forward.
Once that is done for all of the services we can leave and head to the actual Processor
configuration.

34 | P a g e R e s o l v A d d O n I n s t a l l a t i o n G u i d e
Processor Configuration
Now that the services are setup we can open the actual Processor Service Manager to configure
the processor to work with the modules and database we want.
To get to the Service Manager first open the processor itself from the start menu. Once you
open it, you will see the Resolv icon appear on the bottom right task bar. To get to the
service manager, right click on it and select the option.
That will open up the Resolv HANA Processor screen.

35 | P a g e R e s o l v A d d O n I n s t a l l a t i o n G u i d e
Once inside the screen you will first need to enter in your database server address and then
click on the Get Database button to connect and pull up a list of your databases.
Next you will need to enter in your license server address.

36 | P a g e R e s o l v A d d O n I n s t a l l a t i o n G u i d e
Once that is in, the next step is to choose which Service(s) you want to set up. The drop down
list will only show you services for modules you have licensed and running.
Once you select the service to configure you can check the “Start when operation system
starts” box to have the service be set to automatic.
Now you can go to the bottom half of the screen to select which databases you want the
service to run for. You will need to check the box in the first column and then enter in an SAP
user (one that has full authorizations and a professional license) and password for each
database. You will also need to enter in you HANA admin user and password.

37 | P a g e R e s o l v A d d O n I n s t a l l a t i o n G u i d e
Once you have entered in all of your information you can hit the Save button on the bottom
right.

38 | P a g e R e s o l v A d d O n I n s t a l l a t i o n G u i d e
A window will open up to let you know that your settings were saved.
Also you will see that the icons will now be available to Start, Pause, or Stop the
current service. When you are ready to have the service start, just click on the green play
button.
In the taskbar, it will let you know that the service is starting.
Once the service is started for the first time, you will now be able to Start, Pause, or Stop it just
by right clicking the icon on the taskbar. Note, you may need to run the processor as
administrator to get this to work.
If you go into the Windows services screen, you will also see that the service Startup Type will
no longer be Disabled; it will either be Automatic if you checked the appropriate box we saw
earlier, or it will be Manual so you can run it on your own.

39 | P a g e R e s o l v A d d O n I n s t a l l a t i o n G u i d e
Continue the above process until all of your module services are configured and saved, and
then you can hit the Close button to leave the screen.
The processor and services are now configured and ready to work. You can now go back into
the service properties and change the Startup Type to Automatic like we mentioned earlier.
The only thing left to do is set up the schedule for the processor to run the services. To set that
up please see the Scheduler section in the corresponding Resolv module documentation.

40 | P a g e R e s o l v A d d O n I n s t a l l a t i o n G u i d e
Note, if you ever want to reset the processor configuration and start over, just click on the
Reset button on the top of the screen.

41 | P a g e R e s o l v A d d O n I n s t a l l a t i o n G u i d e
Log File
The HANA Processor creates a log file that will show you when your services are running and if
it encountered any errors. To open it, right click on the processor icon in the task bar and click
on Display Log File Contents.