add waterproof veneer to exterior walls - madcad.com · add waterproof veneer to exterior walls...
TRANSCRIPT

Add Waterproof Veneer to
Exterior Walls PROTECTING YOUR PROPERTY FROM FLOODING
Add Waterproof Veneer to Exterior Walls April 2008 Page 1of 2
Even in areas where flood waters are less than 2
feet deep, a structure can be severely damaged if
water reaches the interior. The damage to walls
and floors can be expensive to repair, and the
structure may be uninhabitable while repairs are
underway.
One way to protect your property from shallow
flooding is to add a waterproof veneer to the
exterior walls and seal all openings, including
doors, to prevent the entry of water. As shown in
the figure, the veneer can consist of a layer of
brick backed by a waterproof membrane. Before
the veneer is applied, the siding is removed and
replaced with exterior grade plywood sheathing. If
necessary, the existing foundation footing is
extended to support the brick. Because the wall
may be exposed to flood water, changes are also
made to the interior walls to resist moisture
damage. In the area below the flood level,
standard batt insulation is replaced with washable
closed-cell foam insulation, and any wood
blocking added inside the wall cavity is made of
exterior grade lumber.
BENEFITS OF UTILIZING THIS MITIGATION STRATEGY
Helps to prevent flood water from entering a building, which could result in the structure being uninhabitable while undergoing repairs
TIPS
Keep these points in mind if you plan to have a waterproof veneer added to the exterior walls:
Adding a waterproof veneer is appropriate in areas where the flood depth is less than 2 feet. When flood depths exceed 2 feet, the pressure on waterproofed walls increases greatly, usually beyond the strength of the walls. If greater flood depths are expected, consult with a licensed civil or structural engineer before using this method.
Changes to the foundation must be done by a licensed contractor, who will ensure that the work is done correctly and according to all applicable codes. This is important for your safety.
Add Waterproof Veneer to Exterior Walls April 2008 Page 2of 2
If your property is being remodeled or repaired, consider having the veneer added as part of the remodeling or repair work. It will probably be less expensive to combine these projects than to have them done separately.
If your property has brick walls, you can still use this method. The new brick veneer and waterproof membrane are added over the existing brick.
If your property is flooded by groundwater entering through the floor, a waterproof veneer will not be effective.
ESTIMATED COST
If you have a contractor add a waterproof brick veneer, you can expect to pay about $10 per square foot of
exterior wall. For example, a 3-foot high brick veneer on a structure measuring 60 feet by 30 feet would cover
about 540 square feet and would cost approximately $5,400. This figure does not include the cost of sealing
doors and other openings or extending the foundation.
OTHER SOURCES OF INFORMATION
FEMA 259, Engineering Principles and Practices for Retrofitting Flood Prone Residential Buildings, January
1995, http://www.fema.gov/library/viewRecord.do?id=1645.
FEMA 549, Hurricane Katrina in the Gulf Coast: Mitigation Assessment Team Report, Building Performance
Observations, Recommendations, and Technical Guidance, July 2006,
http://www.fema.gov/library/viewRecord.do?id=1857.
FEMA 549, Hurricane Katrina in the Gulf Coast: Mitigation Assessment Team Report, Building Performance
Observations, Recommendations, and Technical Guidance, Recovery Advisory “Designing for Flood Levels
Above the BFE,” July 2006, http://www.fema.gov/library/viewRecord.do?id=2633.
To obtain copies of FEMA documents, call the FEMA Publications Warehouse at 1-800-480-2520 or visit
FEMA’s Library online at http://www.fema.gov/library.

Raise Electrical System
Components PROTECTING YOUR PROPERTY FROM FLOODING
Raise Electrical System Components April 2008 Page 1 of 2
Electrical system components, including service
panels (fuse and circuit breaker boxes), meters,
switches, and outlets, are easily damaged by
flood water. If they are inundated for even short
periods, they will probably have to be replaced.
Another serious problem is the potential for fires
caused by short circuits in flooded systems.
Raising electrical system components helps you
avoid those problems. Also, having an
undamaged, operating electrical system after a
flood will help you clean up, make repairs, and
return to your property with fewer delays.
As shown in the figure, all components of the
electrical system, including the wiring, should be
raised at least 1 foot above the 100-year flood
level. In an existing structure this work will require
the removal of some interior wall sheathing
(drywall, for example). If you are repairing a
flood-damaged structure or building a new
structure, elevating the electrical system will be easier.
BENEFITS OF UTILIZING THIS MITIGATION STRATEGY
Helps to prevent damage to electrical system components, resulting in faster cleanup and repairs
Helps to prevent fires
TIPS
Keep these points in mind when you have your electrical system components raised:
Electrical system modifications must be done by a licensed contractor who will ensure that the work is done correctly and according to all applicable codes. This is important for your safety.
Your contractor should check with the local power company about the maximum height to which the electric meter can be raised.
If your property is equipped with an old-style fuse box or low-amperage service, you may want to consider upgrading to a modern circuit breaker system and higher-amperage service, especially if you have large appliances or other electrical equipment that draws a lot of power.

Raise Electrical System Components April 2008 Page 2 of 2
ESTIMATED COST
Raising the electrical service panel, meter, and all of the outlets, switches, and wiring in a 1,000-square-foot,
single-floor structure will cost about $1,500 to $2,000. If this work is performed during the repair of a damaged
structure or construction of a new structure, the cost may be much lower.
OTHER SOURCES OF INFORMATION
FEMA 348, Protecting Building Utilities from Flood Damage, Chapter 3, November 1999,
http://www.fema.gov/library/viewRecord.do?id=1750.
FEMA 499, Home Builder's Guide to Coastal Construction, Technical Fact Sheet No.29, August 2005,
http://www.fema.gov/library/viewRecord.do?id=1570.
To obtain copies of FEMA documents, call the FEMA Publications Warehouse at 1-800-480-2520 or visit
FEMA’s Library online at http://www.fema.gov/library.

Anchor Fuel Tanks
PROTECTING YOUR PROPERTY FROM FLOODING
Anchor Fuel Tanks April 2008 Page 1 of 3
Unanchored fuel tanks can be easily moved by flood waters, posing serious threats not only to you, others, and your property, but also to public safety and the environment. An unanchored tank outside your property can be driven into your walls by flood waters, or it can be swept downstream, damaging other houses. When an unanchored tank in your basement is moved by flood waters, the supply line can tear free and your basement can be contaminated by oil. Even a buried tank can be pushed to the surface by the buoyant effect of soil saturated by water.
As shown in the first figure, one way to anchor a
fuel tank is to attach it to a large concrete slab
whose weight is great enough to resist the force
of flood waters. This method can be used for all
tanks above ground, both inside and outside your
property. You can also anchor an outside tank by
running straps over it and attaching them to the
concrete slab by using turnbuckles.
Propane is stored in pressurized vessels as
liquefied petroleum gas (LPG), which can be
extremely volatile and potentially explosive if the
tank is ruptured and the escaping LPG is ignited
by a spark. As shown in the second figure (next
page), an inexpensive way to secure a horizontal
outside propane tank is to install four ground
anchors connected across the top of the tank with
metal straps. Secure a vertical tank (120-gallon,
420 lb. size) with two ground anchors. Set each
anchor on opposite sides of vertical tank. Attach
a strap from each anchor to the collar secured
around top of the tank. Attach another metal
strap connected from one anchor to the other through tank base. The ground anchors and straps described
below are the same products that are required by building codes to tie down mobile homes. These products
are available from suppliers and installers that service the manufactured housing industry. Similar products can
be used to anchor an outside heating oil tank. As is illustrated in the third figure (next page), one way to secure
the oil tank is by running straps over it and attaching them to ground anchors.
Anchoring a fuel tank.

Anchor Fuel Tanks April 2008 Page 2 of 3
Anchoring an outside propane tank.
Anchoring an outside heating oil tank.

Anchor Fuel Tanks April 2008 Page 3 of 3
BENEFITS OF UTILIZING THIS MITIGATION STRATEGY
Helps to prevent damage and contamination to a structure and neighboring structures
Helps to protect public health and safety, as well as those of the structure’s occupants, in addition to protecting the environment
TIPS
Keep these points in mind when you anchor a fuel tank:
If you prefer not to do this work yourself, you can have a handyman or contractor anchor your tank.
Extend all filling and ventilation tubes above the 100-year flood level so that flood waters cannot enter the tank.
Close all connections when flood warnings are issued.
ESTIMATED COST
Anchoring a 1,000-gallon fuel tank to a concrete base will cost approximately $300 to $500.
OTHER SOURCES OF INFORMATION
FEMA 259, Engineering Principles and Practices for Retrofitting Flood Prone Residential Buildings, January
1995, http://www.fema.gov/library/viewRecord.do?id=1645.
FEMA 348, Protecting Building Utilities from Flood Damage, Chapter 3, November 1999,
http://www.fema.gov/library/viewRecord.do?id=1750.
FEMA 481, Anchoring Home Fuel Tanks (DVD), http://www.fema.gov/library/viewRecord.do?id=2021.
To obtain copies of FEMA documents, call the FEMA Publications Warehouse at 1-800-480-2520 or visit
FEMA’s Library online at http://www.fema.gov/library.


Raise or Floodproof HVAC
Equipment PROTECTING YOUR PROPERTY FROM FLOODING
Raise or Floodproof HVAC Equipment April 2008 Page 1 of 2
Heating, ventilation, and cooling (HVAC)
equipment, such as a furnace or hot water
heater, can be damaged extensively if it is
inundated by flood waters. The amount of
damage will depend partly on the depth of
flooding and the amount of time the equipment
remains under water. Often, the damage is so
great that the only solution is replacement.
In floodprone structures, a good way to protect
HVAC equipment is to move it from the basement
or lower level of the structure to an upper floor or
even to the attic. This can involve plumbing and
electrical changes throughout the structure. A
less desirable method is to leave the equipment
where it is and build a concrete or masonry block
floodwall around it. The floodwalls must be
adequately designed and constructed so that
they are strong enough and high enough to
provide the necessary level of protection. Both of
these methods require the skills of a professional
contractor.
BENEFITS OF UTILIZING THIS MITIGATION STRATEGY
Helps to prevent damage to a structure’s HVAC equipment
TIPS
Keep these points in mind when you have your HVAC equipment raised or floodproofed:
Changes to the plumbing, electrical system, and ventilating ductwork in your property must be done by a licensed contractor, who will ensure that the work is done correctly and according to all applicable codes. This is important for your safety.
If you are having your existing furnace or hot water heater repaired or replaced, consider having it relocated at the same time. It will probably be less expensive to combine these projects than to carry them out separately.
Similarly, if you have decided to raise your HVAC equipment, consider upgrading to a more energy-efficient unit at the same time. Upgrading can not only save you money on your heating and cooling bills but may also make you eligible for a rebate from your utility companies.
Raise or Floodproof HVAC Equipment April 2008 Page 2 of 2
If you decide to protect your HVAC equipment with a floodwall, remember that you will need enough space in the enclosed area for system repairs and routine maintenance. Also, depending on its height, the wall may have to be equipped with an opening that provides access to the enclosed area. Any opening will have to be equipped with a gate that can be closed to prevent flood waters from entering.
ESTIMATED COST
Having your furnace and hot water heater moved to a higher floor or to the attic will cost about $1,500. The
cost of a floodwall will depend partly on its height and length. A 3-foot-high wall with a perimeter length of 35
feet would cost approximately $2,500.
OTHER SOURCES OF INFORMATION
FEMA 348, Protecting Building Utilities from Flood Damage, Chapter 3, November 1999,
http://www.fema.gov/library/viewRecord.do?id=1750.
FEMA 499, Home Builder's Guide to Coastal Construction, Technical Fact Sheet No. 29, August 2005,
http://www.fema.gov/library/viewRecord.do?id=1570.
To obtain copies of FEMA documents, call the FEMA Publications Warehouse at 1-800-480-2520 or visit
FEMA’s Library online at http://www.fema.gov/library.

Install Sewer Backflow Valves
PROTECTING YOUR PROPERTY FROM FLOODING
Install Sewer Backflow Valves April 2008 Page 1 of 2
In some floodprone areas, flooding can cause
sewage from sanitary sewer lines to back up
through drain pipes. These backups not only
cause damage that is difficult to repair but also
create health hazards.
A good way to protect your property from sewage
backups is to install backflow valves, which are
designed to block drain pipes temporarily and
prevent return flow. Backflow valves are available
in a variety of designs that range from the simple
to the complex. The figure shows a gate valve,
one of the more complex designs. It provides a
strong seal, but must be operated by hand. The
effectiveness of a gate valve will depend on how
much warning you have of impending flooding.
Among the simpler valves are flap or check
valves, which open to allow flow out of the
structure but close when the flow reverses. These
check valves operate automatically but do not
provide as strong a seal as a gate valve.
BENEFITS OF UTILIZING THIS MITIGATION STRATEGY
Helps to prevent damage to a structure
Helps to protect the health and safety of the structure’s occupants
TIPS
Keep these points in mind if you have backflow valves installed:
Changes to the plumbing in your property must be done by a licensed plumber or contractor, who will ensure that the work is done correctly and according to all applicable codes. This is important for your safety.
Some valves incorporate the advantages of both flap and gate valves into a single design. Your plumber or contractor can advise you on the relative advantages and disadvantages of the various types of backflow valves.
Valves should be installed on all pipes that leave the structure or that are connected to equipment that is below the potential flood level. Therefore, valves may be needed on washing machine drain lines, laundry sinks, fuel oil lines, rain downspouts, and sump pumps, as well as sewer/septic connections.

Install Sewer Backflow Valves April 2008 Page 2 of 2
If you have a sump pump, it may be connected to underground drain lines, which may be difficult to seal off.
ESTIMATED COST
Having a plumber or contractor install one backflow valve will cost approximately $1,400 for a combined
gate/flap valve or about $600 for a flap valve. These figures include the cost of excavation and backfilling.
OTHER SOURCES OF INFORMATION
FEMA 348, Protecting Building Utilities from Flood Damage, November 1999,
http://www.fema.gov/library/viewRecord.do?id=1750.
FEMA 499, Home Builder's Guide to Coastal Construction, Technical Fact Sheet No. 29, August 2005,
http://www.fema.gov/library/viewRecord.do?id=1570.
To obtain copies of FEMA documents, call the FEMA Publications Warehouse at 1-800-480-2520 or visit
FEMA’s Library online at http://www.fema.gov/library.
Dry Floodproof Your
Building PROTECTING YOUR PROPERTY FROM FLOODING
Dry Floodproof Your Building April 2008 Page 1 of 2
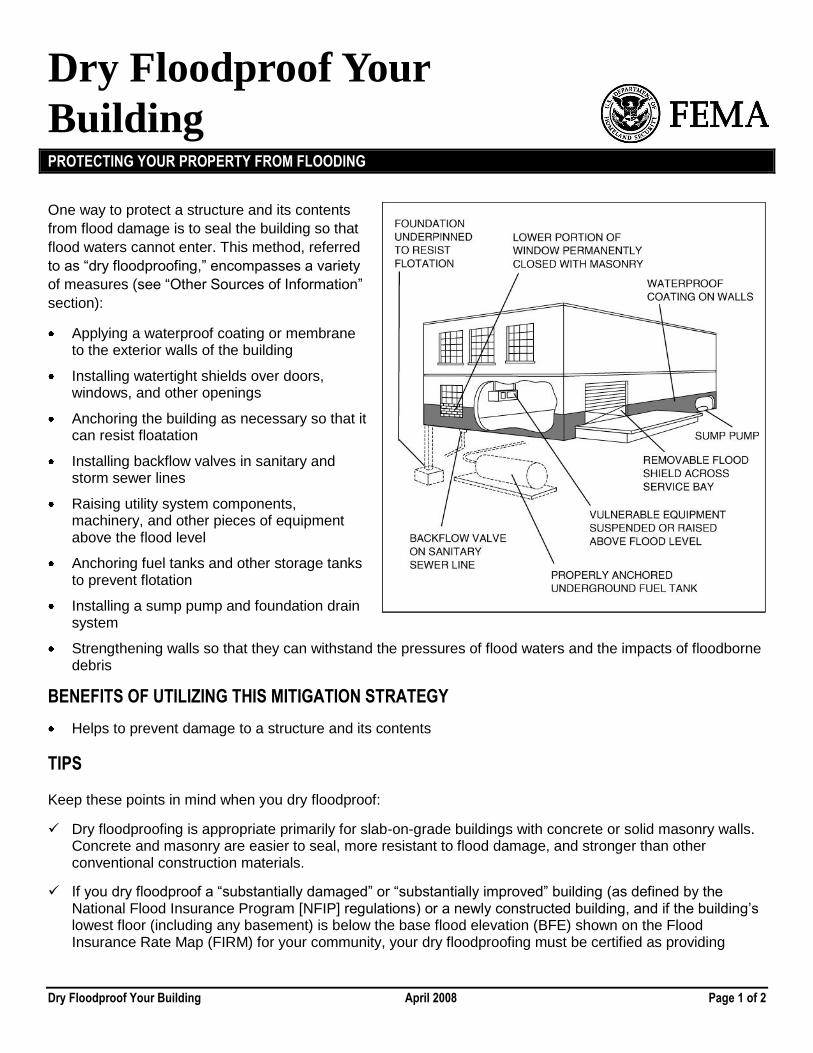
One way to protect a structure and its contents
from flood damage is to seal the building so that
flood waters cannot enter. This method, referred
to as “dry floodproofing,” encompasses a variety
of measures (see “Other Sources of Information”
section):
Applying a waterproof coating or membrane to the exterior walls of the building
Installing watertight shields over doors, windows, and other openings
Anchoring the building as necessary so that it can resist floatation
Installing backflow valves in sanitary and storm sewer lines
Raising utility system components, machinery, and other pieces of equipment above the flood level
Anchoring fuel tanks and other storage tanks to prevent flotation
Installing a sump pump and foundation drain system
Strengthening walls so that they can withstand the pressures of flood waters and the impacts of floodborne debris
BENEFITS OF UTILIZING THIS MITIGATION STRATEGY
Helps to prevent damage to a structure and its contents
TIPS
Keep these points in mind when you dry floodproof:
Dry floodproofing is appropriate primarily for slab-on-grade buildings with concrete or solid masonry walls. Concrete and masonry are easier to seal, more resistant to flood damage, and stronger than other conventional construction materials.
If you dry floodproof a “substantially damaged” or “substantially improved” building (as defined by the National Flood Insurance Program [NFIP] regulations) or a newly constructed building, and if the building’s lowest floor (including any basement) is below the base flood elevation (BFE) shown on the Flood Insurance Rate Map (FIRM) for your community, your dry floodproofing must be certified as providing
Dry Floodproof Your Building April 2008 Page 2 of 2
protection from the BFE. To obtain this certification, you must floodproof your building to a height at least 1 foot above the BFE. Check with your local floodplain manager or building official for more information.
The height of your dry floodproofing should not exceed 3 feet. The pressures exerted by deeper water can cause walls to buckle or collapse. Before you use dry floodproofing to protect against greater flood depths, have a structural engineer evaluate the strength of your walls.
If your dry floodproofing measures require human intervention before flood waters arrive, such as placing shields over doors and windows, you should have an operations and maintenance plan that describes all the actions that must be taken and lists the persons who are responsible. It must also include a schedule of periodic maintenance that states how often the dry floodproofing measures will be inspected and who will perform the inspections.
ESTIMATED COST
The cost of individual dry floodproofing measures will vary with the size, condition, and use of your building; the
dry floodproofing height; and the extent to which you use contractors and engineers.
OTHER SOURCES OF INFORMATION
Anchor Fuel Tanks fact sheet, FEMA, April 2008, http://www.fema.gov/plan/prevent/howto/index.shtm.
FEMA 102, Floodproofing for Non-Residential Structures, 1986,
http://www.fema.gov/library/viewRecord.do?id=1413.
FEMA 499, Home Builder's Guide to Coastal Construction, Technical Fact Sheets No. 4 and No. 9, August
2005, http://www.fema.gov/library/viewRecord.do?id=1570.
FEMA Technical Bulletin 3-93, Non-Residential Floodproofing – Requirements and Certification for Buildings
Located in Special Flood Hazard Areas, April 1993, http://www.fema.gov/library/viewRecord.do?id=1716.
Install Sewer Backflow Valves fact sheet, FEMA, April 2008,
http://www.fema.gov/plan/prevent/howto/index.shtm.
To obtain copies of FEMA documents, call the FEMA Publications Warehouse at 1-800-480-2520 or visit
FEMA’s Library online at http://www.fema.gov/library.

Build with Flood Damage
Resistant Materials PROTECTING YOUR PROPERTY FROM FLOODING
Build with Flood Damage Resistant Materials April 2008 Page 1 of 2
If your property is in a flood hazard area, you can
reduce the damage caused by flood waters and
make cleanup easier by using flood damage
resistant building materials. Building materials are
considered flood resistant if they can withstand
direct contact with flood waters for at least 72
hours without being significantly damaged.
“Significant damage” means any damage that
requires more than low cost, cosmetic repair
(such as painting). As shown in the figure, flood
damage resistant materials should be used for
walls, floors, and other parts of a building that are
below the base flood elevation (BFE). Both FEMA
and the U.S. Army Corps of Engineers have
published lists of these materials (see “Other
Sources of Information” section). Commonly
available flood damage resistant materials
include the following:
Flooring Materials
concrete, concrete tile, and pre-cast concrete
latex or bituminous, ceramic, clay, terrazzo, vinyl, and rubber sheets and tiles
pressure-treated (PT) or decay resistant lumber
PT wood and cold-formed steel
Wall and Ceiling Materials
brick, metal, concrete, concrete block, porcelain, slate, glass block, stone, and ceramic and clay tile
cement board, cold-formed steel, and reinforced concrete
polyester epoxy paint
PT and decay resistant lumber
PT and marine grade plywood
foam and closed-cell insulation
decay resistant wood
Other
hollow metal doors, cabinets, foam or closed-cell insulation
Build with Flood Damage Resistant Materials April 2008 Page 2 of 2
BENEFITS OF UTILIZING THIS MITIGATION STRATEGY
Helps to prevent damage to a structure and make cleanup easier
TIPS
Keep these points in mind when you build with flood damage resistant materials:
Remember that as long as your structure remains exposed to flooding, it will likely be damaged, even when you use flood damage resistant materials. Some amount of cleanup and cosmetic repair will usually be necessary. Although using flood damage resistant materials can reduce the amount and severity of water damage, it does not protect your buildings from other flood hazards, such as the impact of floodborne debris.
All hardware used in areas below the flood level should be made of stainless or galvanized steel.
Flood insurance will not pay a claim for damaged finishing materials below the BFE, even if those materials are considered flood damage resistant.
If your property is in a coastal flood hazard area, installing flood damage resistant materials in areas below the BFE may create an obstruction, in violation of National Flood Insurance Program (NFIP) regulations. Check with your local building official or floodplain manager before making any modifications to your buildings.
Areas of a structure that are below the BFE should be used only for parking, storage, and access.
Flood damage resistant materials are also required by the International Building Code (IBC). See your local building code official for additional information.
ESTIMATED COST
The cost of using flood damage resistant materials will vary, depending on the size of the project you
undertake. Your local building official and contractors can provide cost estimates for materials and installation.
OTHER SOURCES OF INFORMATION
FEMA Technical Bulletin 2-93, Flood-Resistant Materials Requirements for Buildings Located in Special Flood Hazard Areas, April 1993, http://www.fema.gov/library/viewRecord.do?id=1580. (New TB-2 will be available in Spring 2008.)
FEMA Technical Bulletin 3-93, Non-Residential Floodproofing - Requirements and Certification for Buildings Located in Special Flood Hazard Areas, April 1993, http://www.fema.gov/library/viewRecord.do?id=1716.
Flood Resistant Design and Construction, ASCE/SEI 24-05, American Society of Civil Engineers (ASCE), https://www.asce.org/bookstore/book.cfm?book=5661 or http://pubs.asce.org/books/standards.
Floodproofing Regulations, EP 1165-2-314, U.S. Army Corps of Engineers, December 15, 1995, http://www.usace.army.mil/publications/eng-pamphlets/ep1165-2-314/toc.htm.
International Residential Code® (IRC®), Chapter 5, “Floors”; Chapter 6, “Wall Construction,” 2006.
To obtain copies of FEMA documents, call the FEMA Publications Warehouse at 1-800-480-2520 or visit FEMA’s Library online at http://www.fema.gov/library.

Protect Wells From
Contamination by Flooding PROTECTING YOUR PROPERTY FROM FLOODING
Protect Wells From Contamination by Flooding April 2008 Page 1 of 2
Flood waters often carry hazardous and toxic materials,
including raw sewage, animal wastes, oil, gasoline,
solvents, and chemicals such as pesticides and fertilizer.
Flood water that enters a well can contaminate the
groundwater and make the well water unsafe to drink or
use. The effects may last long after the flood waters
have receded.
Proper well construction will help protect your well
against contamination. A licensed well-drilling contractor
can inspect your well and suggest improvements, such
as the following (see figure):
Extending the well casing at least 2 feet above the highest known flood elevation
Installing a sanitary seal or cover on the casing
Curbing the casing at ground level by surrounding it with a watertight seal that is at least 4 inches thick and extends at least 2 feet in all directions
Placing grout between the casing and the sides of the bore hole to a depth of at least 10 feet
Installing a backflow valve in the water line
Protecting electrical controls from flood water
Drilling a new well on higher ground, above expected flood levels and known sources of pollution
BENEFITS OF UTILIZING THIS MITIGATION STRATEGY
Helps to prevent contamination of drinking water or water for other uses
TIPS
Keep these points in mind when you improve your well to protect it from flooding:
Many state and local agencies regulate the construction and modification of wells. Check with your local health department or building officials for more information.
Power outages often occur during floods, so you should consider providing a backup power supply to ensure the continued operation of your well. (See fact sheet “Install a Generator for Emergency Power.”)
The vulnerability of a well to contamination by flood waters depends partly on the well’s age and depth. Wells over 50 years old and less than 50 feet deep are more likely to be contaminated by flood waters.

Protect Wells From Contamination by Flooding April 2008 Page 2 of 2
Do not store potential contaminants within 100 feet of the well. Potential contaminants include fuels, solvents, and dry and liquid chemicals.
Have your water tested annually for the most common contaminants, including coliform bacteria.
ESTIMATED COST
The cost of most improvements to an existing well will vary, depending on the condition of the well. Having a
plumber or contractor install a backflow valve in the water line will cost approximately $500. This figure
includes the cost of excavation and backfilling. Because geological conditions and groundwater yields vary
from site to site, you should contact a local licensed well driller regarding the costs of other well improvements
and new wells.
OTHER SOURCES OF INFORMATION
American Water Works Association Standards for Water Wells, AWWA, A100-06, 2006,
http://www.awwa.org/Bookstore/productDetail.cfm?ItemNumber=4223.
FEMA 348, Protecting Building Utilities from Flood Damage, Chapter 3, November 1999,
http://www.fema.gov/library/viewRecord.do?id=1750.
Install a Generator for Emergency Power, FEMA, April 2008,
http://www.fema.gov/plan/prevent/howto/index.shtm.
Wellhead Protection for Private Domestic Wells, A. Tyson, University of Georgia College of Agricultural &
Environmental Sciences, 1993, http://www.engr.uga.edu/service/extension/publications/c819-12c.html.
To obtain copies of FEMA documents, call the FEMA Publications Warehouse at 1-800-480-2520 or visit
FEMA’s Library online at http://www.fema.gov/library.