admin guide epos manager
TRANSCRIPT

EPOS ManagerADMIN GUIDE
ON PREMISES


1. Introduction 5
1.1 Product overview 51.2 Attributes of EPOS Manager 51.3 Scope of the document 51.4 Intended audience of this document 51.5 EPOS Manager Workflow 5
2. System Requirement 6
2.1 Overview of system requirement 62.2 Hardware requirement 62.3 Software requirement 62.3.1 Installing Docker Desktop 62.4 Operating system requirement 6
3. Installing EPOS Manager 7
3.1 Prerequisites 73.2 Installation steps 73.2.1 SQL Permissions 73.2.2 Configuring .env file 83.2.2.1 Configuring databases 83.2.2.2 Configuring Keys 83.2.2.3 Configuring local storage URL 93.2.2.4 Configuring CName 93.2.2.5 Configuring Certificate 93.2.3 Configuring custom ports and secure protocol
for EPOS Manager 93.2.3.1 Configuring EPOS Manager for HTTP 103.2.3.2 Configuring EPOS Manager for HTTPS 113.2.3.2.1 Configuring SSL certificate to be used
for HTTPS communication 123.2.4 Hosting the EPOS Manager (On-Premises) Server 123.3 Upgrade from EPOS Manager v5.x.x (Exe installers)
to v6.1.0 and higher 123.3.1 Configuring .env file 123.3.2 Configuring custom ports and secure protocol
for EPOS Manager 123.3.3 Uninstalling EPOS Manager (older version) 133.3.3.1 Uninstall EPOS Manager 133.3.3.2 Uninstall EPOS Manager API 133.3.4 Hosting the EPOS Manager (On-Premises) Server 133.3.5 Migrating firmware/software files from WIX to Docker 133.4 Upgrading to future EPOS Manager versions 143.5 Offline installation 143.5.1 Download docker images 153.5.2 Save images to local file storage 153.5.3 Move files to offline server 153.5.4 Load images into offline Docker repository 153.5.5 Install EPOS Manager 15
4. Getting started 16
4.1 Pre-Registration 164.2 Registration 174.2.1 On Premise SignUp 174.2.2 Logging in 174.2.3 Forgot Password 174.3 Deployment of the EPOS Connect 184.3.1 Retrieving client client files for the first time 184.3.2 Installing the client manually for the first time 194.4 EPOS Manager Layout 194.4.1 Login information 194.4.1.1 Settings (General & Data privacy) 204.4.1.2 Administration 214.4.1.2.1 View Admins 224.4.1.2.2 Add/Edit Admin 224.4.1.3 Client config 234.4.1.4 Change Password 234.4.1.5 Help 234.4.1.6 About 234.4.1.7 Logout 234.4.2 Grid settings 234.4.2.1 Row count 244.4.2.2 Display sections 244.4.2.3 Column display order 244.4.3 Search 244.4.4 Information fields 244.4.5 Page navigation 244.4.6 Application menu 24
5. Dashboard 25
5.1 Active device 255.2 Firmware version 255.3 Software version 255.4 Call activity 255.5 Your assets 265.5.1 Devices 265.5.2 Softphones 265.6 Deployments 26
6. Manage user 27
6.1 Users 276.2 Manual group 286.3 AD group 296.4 Inactive users 296.5 Deleted users 30
7. Manage devices 31
7.1 All devices 317.2 Devices in Use 327.3 Inactive Devices 337.4 Removed Devices 337.5 On Stock 34
Content

8. Manage updates 35
8.1 Firmware updates 358.2 Software updates 368.3 Upload updates 368.4 Deployment status 378.5 Deployment details 37
9. Configuration 39
9.1 Configuration Overview 399.2 Device Repository 399.2.1 Duplicate configuration package 409.2.2 Edit configuration package 409.2.3 Deployment configuration 409.3 Software repository 409.4 Upload Configuration 409.5 Deployment Status 40
10. Reports 41
10.1 User 4110.1.1 User Overview 4110.1.2 Client versions 4110.1.3 Monthly Overview 4110.2 Device 4210.2.1 Device Overview 4210.2.2 Other devices 4210.2.3 Device adoption 4210.2.4 Headsets per User 4310.2.5 Update Overview 4310.3 Call Activity 4310.3.1 Call Overview 4310.3.2 Call Duration – Device 4410.3.3 Call Duration – Softphone 4410.4 Softphone 4510.4.1 Softphone Adoption 45
11. Uninstalling EPOS Manager 46
Content

IT AdminUsers
EPOS ManagerCloud or On-Premises
EPOS Connect
1. Introduction
1.1 Product overview EPOS Manager is a cloud-based or on-premises multi-tenant server application used for managing and supporting EPOS devices in Enterprise environments.
Companies signing up for a tenant (company) account will gain access to an easy to manage system, from where enrolled EPOS Connect clients (End-users) in the organization can be managed.
The IT administrator can easily track EPOS devices in the environment from any machine, push configurations and quickly deploy software and firmware updates to a vast number of end-users.
EPOS Manager: Administering devices, end-users and associated client application.
EPOS Connect: End-user client application, providing local update, configuration and support for interface with a range of softphones via the embedded drivers for connected devices.
1.2 Attributes of EPOS Manager EPOS Manager enables a tenant administrator in an organization to:
– Manage assets by providing full status overview
– Locate devices and fetch device details from anywhere.
– Identify devices in the organization having an outdated version of firmware
– Accomplish uniform attributes throughout the environment by deploying firmware/ software updates
– Read and set settings on EPOS audio devices from anywhere.
– Identify underutilized devices to fully use the inventory, hence optimizing the benefit of the device investment.
1.3 Scope of the document This document contains an overview of EPOS Manager features and how to perform tenant administrative tasks using the EPOS Manager.
1.4 Intended audience of this document This document is intended for the selected Tenant Administrator. The tenant administrator will be able to manage deployed EPOS devices.
1.5 EPOS Manager Workflow The following diagram shows the basic workflow of the EPOS Manager (used by Tenant Administrator) and EPOS Connect (used by end-users) applications.
5 EPOS MANAGER – ON PREMISES

2. System Requirement
2.1 Overview of system requirement Administrators can manage several phases of firmware or software deployment, including preparation, distribution and upgrades in different phases, depending on their infrastructure and requirements:
– SQL server and EPOS Manager hosted on the same machine
– SQL server deployed on one system, EPOS Manager hosted on another system
2.2 Hardware requirement The following hardware is required for the EPOS Manager to install and run successfully on a system:
– Processor: 2 GHz processor
– RAM: 4 GB RAM
– Storage: 50 GB available
– Network card (Gigabit (10/100/1000baseT) Ethernet adapter)
– Desired Configuration: RAID 1 ( recommend for SQL server)
2.3 Software requirement The following minimal software is required for the EPOS Manager to install and run success-fully on a system:
– Supported Database Edition: SQL 2017 Standard/Express Edition 64 bit or higher
– Docker Desktop version 3.1 or later
– PowerShell version 5.0 or later version
2.3.1 Installing Docker Desktop Linux Docker hosting environment is required for EPOS Manager. You can install the Docker Desktop with WSL 2 backend software on Windows by following the instructions here https://docs.docker.com/docker-for-windows/install/
2.4 Operating system requirement The desired operating system for EPOS Manager is Windows Server 2019 with Virtualization enabled, 64 Bit or higher.
6 EPOS MANAGER – ON PREMISES

3 Installing EPOS Manager
3.1 Prerequisites The customer has to login to EPOS Manager at https://enterprise.eposaudio.com by providing cloud Tenant login credentials.
Navigate to Manage Updates layout using “Manage Updates” menu. The steps of downloading EPOS Manager are:
1. Go to the tab “Pending Updates” to check for new releases from EPOS. Locate and approve applicable release by clicking on the approve icon.
2. Go to the tab “Software Updates”. Locate release to be downloaded and click the download icon in the ‘Action’ column.
Once downloaded, extract the package and it contains files required for the installation of EPOS Manager.
The following files should be available:
– ChangeDefaultPartner.ps1
– GetResetPasswordURL.ps1
– MigrateLocalFolders.ps1
– CreateKeysForDockerCompose.ps1
– docker-compose-https.yml
– docker-compose-http.yml
– .env
3.2 Installation steps
3.2.1 SQL Permissions EPOS Manager uses 3 databases to manage its applications – Web API, Identity, Tenant (Organizations can provide any name for these databases and map these names in the .env file)
EPOS Manager requires that the SQL user provided as part of the .env file has a minimum permission of db_owner. If the SQL user provided has db_creator access, these databases would be auto created as part of the installation during docker-compose up. Alternatively, organizations can create these databases upfront and only provide the db_owner access to the SQL user configured.
7 EPOS MANAGER – ON PREMISES

It is recommended that the below size is allocated for each database at the minimum:
– Web API – 5 GB
– Identity – 1 GB
– Tenant – 1 GB
3.2.2 Configuring .env file EPOS Manager installation can be configured on multiple parameters. The subsequent sections explain on how the configuration is done in the environment file (.env) available in the downloaded package. Open the .env in notepad or a suitable editor and the file should be in the same folder level of the docker-compose files
3.2.2.1 Configuring databases Identity_ConnectionString - to specify the Identity Database connection string in .env file
UCMP_ConnectionString - to specify the Tenant Database connection string in .env file
WebTool_ConnectionString - to specify the Web API Database connection string in .env file
If SQL server is running on same server (host.docker.internal alias for local server ip) the below configuration should be done depending on the type of authentication:
SQL Authentication: “Server=host.docker.internal,1433;Database=<dbname>;uid=<user>;-password=<pwd>;”
Windows Authentication: “Server=host.docker.internal,1433;Database=<dbname>;Integrat-ed Security=True;”
If SQL server is running on a different server specify the IP/hostname of the server de-pending on the type of authentication:
SQL Authentication: “Server=<IP/hostname>,1433;Database=<dbname>;uid=<user>;pass-word=<pwd>;”
Windows Authentication: “Server=<IP/hostname>,1433;Database=<dbname>;Integrated Security=True;”
Note: 1433 is the default port of the SQL server. If SQL server is configured to run on a different port need to specify the same port here. To find which port SQL server is running on you could run the following command in the master database of the SQL server
xp_readerrorlog 0, 1, N’Server is listening on’
3.2.2.2 Configuring Keys EPOS Manager requires strong keys to be configured so that the microservices can talk to each other. One can manually create strong keys or add from existing installation. Keys can be generated and replaced in the .env file.
To generate strong keys, you can run the CreateKeysForDockerCompose.ps1 powershell script or navigate to the base folder where the script is available through powershell editor and execute the following command
.\CreateKeysForDockerCompose.ps1 -EnvFile “.env”
Once it is executed it will auto-generate the strong keys and update the .env file. These keys will then be used by EPOS Manager for the internal communication. Admin can choose to use the same keys for future releases or generate new keys for every release.
8 EPOS MANAGER – ON PREMISES

The following keys will be modified:
– OnPremiseClientKey
– ManagerApiGatewayKey
– TenantApiKey
– Video_ClientKey
– SennCommServicesKey
3.2.2.3 Configuring local storage URL LocalStorageUrl – this to specify the location where the FW/SW updates will be stored and shared with the EPOS Connect clients.
The storage should be on the same machine where the Docker Desktop is installed. As this URL should be accessible by EPOS Connect clients it is recommended that you use an ip-address/hostname/cname. The default value provided in .env file is http://localhost:10000/devstoreaccount1
Admin can change the protocol, port, and server name in the LocalStorageUrl.
Note: Port configured in the LocalStorageUrl should be opened through firewall. Chang-ing the port and protocol would require updating the docker-compose files as de-scribed in section 3.2.3.
3.2.2.4 Configuring CName CName – this is to specify the CName by which EPOS Manager is accessible within the organization.
Default value for CName would be localhost, if the organization has a valid certificate and domain name then that domain URL could be provided in the CName.
If domain name is not available, it is recommended to provide the hostname / IP address.
3.2.2.5 Configuring Certificate EPOS Manager can be configured to use secure communication protocol. This requires the admin to provide the certificate to be used for secure communication and its pass-word. This is covered in section 3.2.3.2.1.
3.2.3 Configuring custom ports and secure protocol for EPOS Manager Configuring the ports is done through the docker-compose file. Docker compose is a tool for defining and running multi-container docker applications. With docker compose, you use a YML file to configure your application’s services. Then, with a single command, you create and start all the services from your configuration.
In the docker-compose file, the exposed ports are mapped to the internal ports. Inside docker, the services can communicate by simply specifying URLs as http://<servicename>. To access the service from outside the docker instance, it must be exposed through one or more ports.
The downloaded package contains 2 docker compose files:
– docker-compose-http
– docker-compose-https
9 EPOS MANAGER – ON PREMISES

3.2.3.1 Configuring EPOS Manager for HTTP docker-compose-http is configured by default to run EPOS Manager in http and the following ports are used for each of the microservice / functions.
Site Name Port Number
epos_manager_ui 80
epos_manager_webapi 8080
epos_manager_identity 25801
epos_manager_api 8082
epos_manager_agent 8083
epos_manager_report 8084
epos_manager_update 8085
epos_manager_tenant 8086
epos_manager_video 25802
epos_manager_reportfunctions 35117
Azurite 10000
If any of the ports needs to be customized, then the following sections of the docker-compose-http.yml file should be modified accordingly.
Site Name References
epos_manager_identity ASPNETCORE_HTTP_PORT, ports
epos_manager_api ASPNETCORE_HTTP_PORT, ports
epos_manager_agent ASPNETCORE_HTTP_PORT, ports
epos_manager_webapi ASPNETCORE_HTTP_PORT, ports, LocalStorageDatabaseUrlsHandlerCnameBackend
epos_manager_report ASPNETCORE_HTTP_PORT, ports
epos_manager_update ASPNETCORE_HTTP_PORT, ports
epos_manager_ui
ASPNETCORE_HTTP_PORT, ports
WebApiUrl (port number of the epos_manager_webapi)
epos_manager_tenant
ASPNETCORE_HTTP_PORT, ports WebApiCnameUrl (port number of the epos_manager_webapi)
epos_manager_video ASPNETCORE_HTTP_PORT, ports
epos_manager_reportfunctions Ports
Azurite Ports
Note: HTTP ports configured in the docker-compose-http file should be opened through firewall.
10 EPOS MANAGER – ON PREMISES
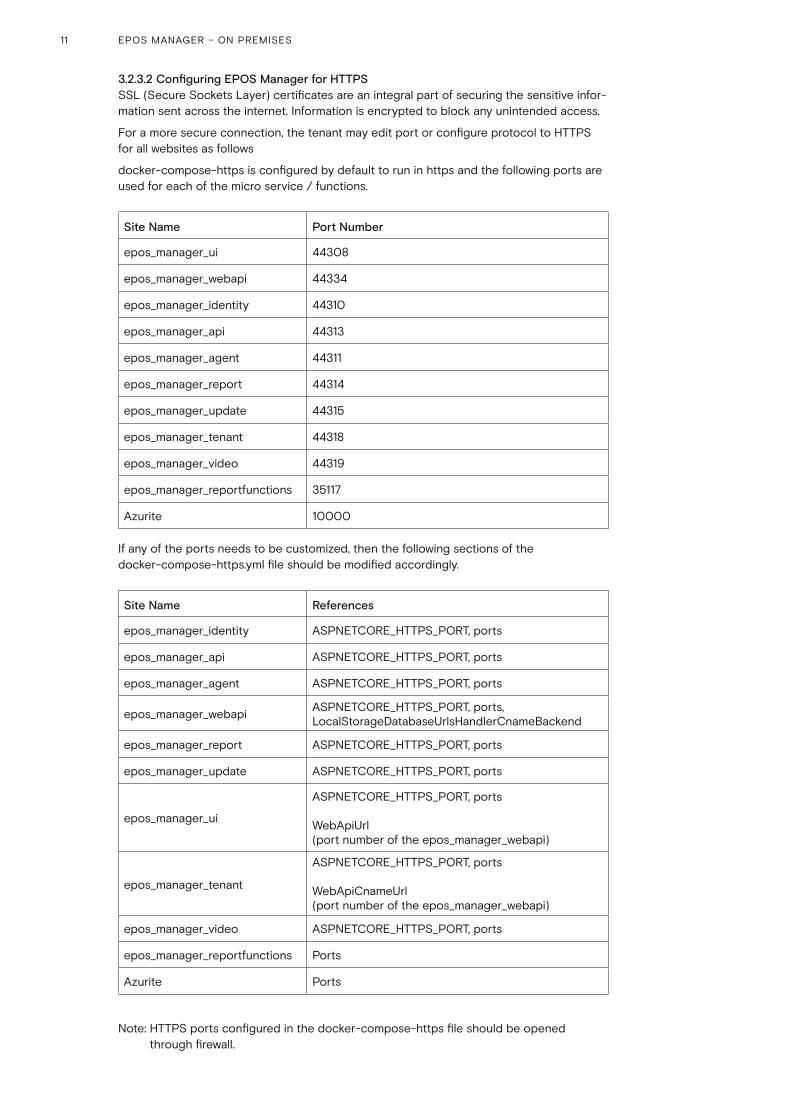
3.2.3.2 Configuring EPOS Manager for HTTPS SSL (Secure Sockets Layer) certificates are an integral part of securing the sensitive infor-mation sent across the internet. Information is encrypted to block any unintended access.
For a more secure connection, the tenant may edit port or configure protocol to HTTPS for all websites as follows
docker-compose-https is configured by default to run in https and the following ports are used for each of the micro service / functions.
Site Name Port Number
epos_manager_ui 44308
epos_manager_webapi 44334
epos_manager_identity 44310
epos_manager_api 44313
epos_manager_agent 44311
epos_manager_report 44314
epos_manager_update 44315
epos_manager_tenant 44318
epos_manager_video 44319
epos_manager_reportfunctions 35117
Azurite 10000
If any of the ports needs to be customized, then the following sections of the docker-compose-https.yml file should be modified accordingly.
Site Name References
epos_manager_identity ASPNETCORE_HTTPS_PORT, ports
epos_manager_api ASPNETCORE_HTTPS_PORT, ports
epos_manager_agent ASPNETCORE_HTTPS_PORT, ports
epos_manager_webapi ASPNETCORE_HTTPS_PORT, ports, LocalStorageDatabaseUrlsHandlerCnameBackend
epos_manager_report ASPNETCORE_HTTPS_PORT, ports
epos_manager_update ASPNETCORE_HTTPS_PORT, ports
epos_manager_ui
ASPNETCORE_HTTPS_PORT, ports
WebApiUrl (port number of the epos_manager_webapi)
epos_manager_tenant
ASPNETCORE_HTTPS_PORT, ports
WebApiCnameUrl (port number of the epos_manager_webapi)
epos_manager_video ASPNETCORE_HTTPS_PORT, ports
epos_manager_reportfunctions Ports
Azurite Ports
Note: HTTPS ports configured in the docker-compose-https file should be opened through firewall.
11 EPOS MANAGER – ON PREMISES

3.2.3.2.1 Configuring SSL certificate to be used for HTTPS communication A SSL certificate is required if EPOS Manager needs to be configured for HTTPS commu-nication. Organizations can use existing domain certificates or procure a new one. The cer-tificate should be placed in a folder named “Certs” which must be at the same level as the docker-compose-https.yml file.
Place the Personal Information Exchange (.pfx) file inside the Certs folder. If the certificate is protected with a passphrase, then this needs to be set as well. Following certificate de-tails has to be added as part of the .env file
– CertificatePath - /root/ucmpcerts/<certificate_filename>.pfx
– CertificatePassword - <certificate_password>
3.2.4 Hosting the EPOS Manager (On-Premises) Server To host the EPOS Manager (On-Premises) server open powershell and navigate to the folder where the docker compose files are available and then execute the following com-mand
Starting EPOS Manager
– For HTTP: docker-compose -f docker-compose-http.yml up
– For HTTPS: docker-compose -f docker-compose-https.yml up
The script will pull the docker container images of EPOS Manager from Docker Hub (https://hub.docker.com/) and start the docker instance.
Stopping EPOS Manager
– For HTTP: docker-compose -f docker-compose-http.yml down
– For HTTPS: docker-compose -f docker-compose-https.yml down
The script will stop the docker instance of EPOS Manager.
3.3 Upgrade from EPOS Manager v5.x.x (Exe installers) to v6.1.0 and higher EPOS Manager v5.0.0 – v6.0.0 is based on Wix installers. EPOS Manager latest versions are based on docker and need to follow the below steps for upgrade.
3.3.1 Configuring .env file Follow the steps as described in section 3.2.2 for configuring the .env file. The below database names should be used in the connection string so that the same database is referred.
– Identity_ConnectionString – SennComm_Identity
– UCMP_ConnectionString - SennComm_Ucmp
– WebTool_ConnectionString – Database name configured during the installation of previous EPOS Manager.
3.3.2 Configuring custom ports and secure protocol for EPOS Manager Follow the steps described in section 3.2.3. If HTTP is used in previous installation and no ports are changed then the default docker-compose-http.yml can be used without any changes.
12 EPOS MANAGER – ON PREMISES

3.3.3 Uninstalling EPOS Manager (older version) To Uninstall EPOS Manager from the system, follow the steps below:
Step 1: Open Control Panel.
Step 2: Select Programs.
Step 3: Click Uninstall a Program from Programs and Features.
Locate the following two files to successfully uninstall the application:
– EPOS Manager.
– EPOS Manager API.
Note: When uninstalling the application always uninstall EPOS Manager and then uninstall EPOS Manager API.
3.3.3.1 Uninstall EPOS Manager To uninstall EPOS Manager from the system, follow the steps sequentially.
Right click on the “Installed EPOS Manager” and select “Uninstall”. In the Programs and Features dialogue box click “Yes”. Click “OK” in the “Uninstall EPOS Manager” UI box. A progress bar will track the uninstalling of the application.
3.3.3.2 Uninstall EPOS Manager API To uninstall EPOS Manager API from the system, follow the steps below:
Right click on the Installed EPOS Manager API and select “Uninstall”. In the Programs and Features dialogue box click “Yes”. A progress bar will track the uninstalling of the application.
Note: Do not delete manually any folders in the below location until the migration is complete.
[IISInstalledDrive]\inetpub\wwwroot
3.3.4 Hosting the EPOS Manager (On-Premises) Server Follow the steps described in section 3.2.4.
Note: If there are any changes done to the ports or protocol of epos_manager_webapi from the previous version, download the latest tenantconfiguration.dat from EPOS Manager UI and circulate to all users.
3.3.5 Migrating firmware/software files from WIX to Docker After hosting EPOS Manager, the firmware / software updates uploaded in the previous version need to be migrated to the new system.
As part of the downloaded package MigrateLocalFolders.ps1 script will be available. Run the MigrateLocalFolders.ps1 file using the below command and the files will be copied to the Azure storage
.\MigrateLocalFolders.ps1 -FirmwareUpdatesFolderPath “C:\inetpub\wwwroot\UpdateAPI\FirmwareUpdates” `
– SoftwareUpdatesFolderPath “C:\inetpub\wwwroot\UpdateAPI\SoftwareUpdates” `
– VoicePromptsFolderPath “C:\inetpub\wwwroot\UpdateAPI\VoicePrompts” `
– StandAloneVPsFolderPath “C:\inetpub\wwwroot\UpdateAPI\StandAloneVPs” `
– AzuriteUrl http://<CName Url>:10000
Note: The default location of IIS is in root of C:\ drive, but if not, please adjust folder paths accordingly.
AzuriteUrl should be updated to the one configured in Section 3.3.1.
13 EPOS MANAGER – ON PREMISES
3.4 Upgrading to future EPOS Manager versions Download the EPOS Manager package from the cloud.
Navigate to the folder where the existing EPOS Manager docker instance is running.
Stop the existing instance using the below command:
– For HTTP: docker-compose -f docker-compose-http.yml down
– For HTTPS: docker-compose -f docker-compose-https.yml down
Configure the environment file and docker compose file from the new package.
Start the new EPOS Manager docker instance using the below command
– For HTTP: docker-compose -f docker-compose-http.yml up
– For HTTPS: docker-compose -f docker-compose-https.yml up
Note: If there are any changes done to the ports or protocol of epos_manager_webapi from the previous version, download the latest tenantconfiguration.dat from EPOS Manager UI and circulate to all users.
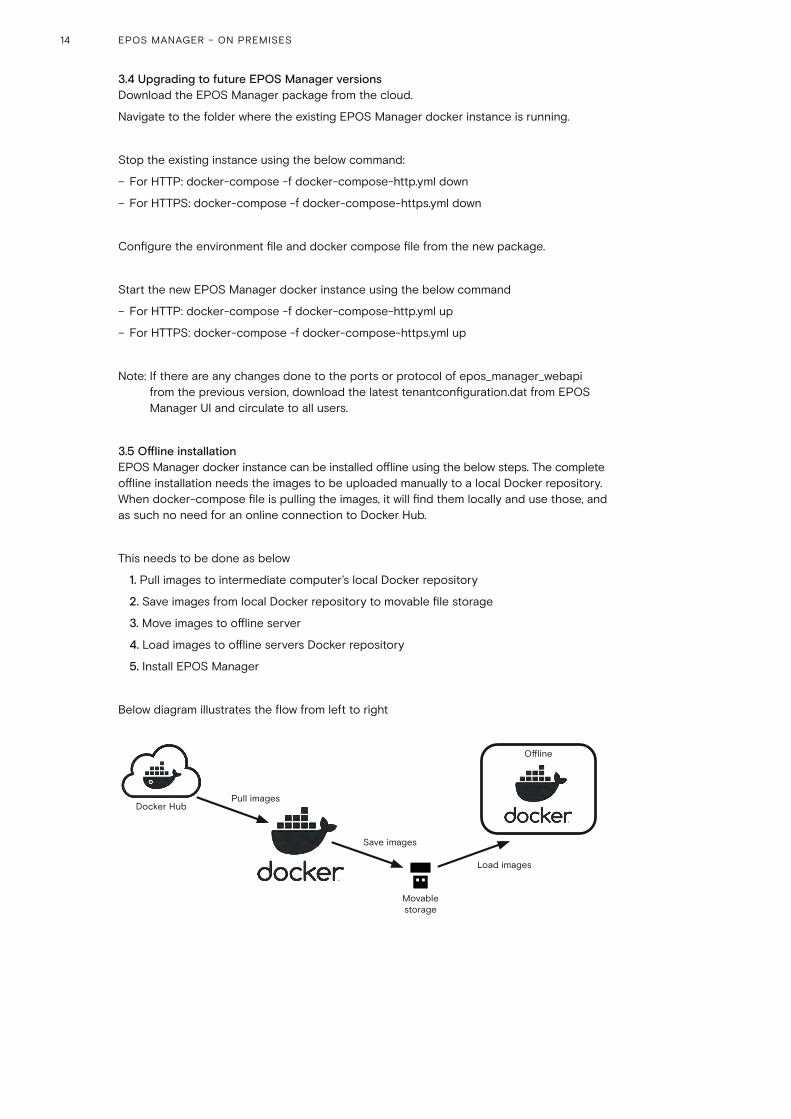
3.5 Offline installation EPOS Manager docker instance can be installed offline using the below steps. The complete offline installation needs the images to be uploaded manually to a local Docker repository. When docker-compose file is pulling the images, it will find them locally and use those, and as such no need for an online connection to Docker Hub.
This needs to be done as below
1. Pull images to intermediate computer’s local Docker repository
2. Save images from local Docker repository to movable file storage
3. Move images to offline server
4. Load images to offline servers Docker repository
5. Install EPOS Manager
Below diagram illustrates the flow from left to right
Docker HubPull images
Save images
Load images
Offline
Movable storage
14 EPOS MANAGER – ON PREMISES

3.5.1 Download docker images On an intermediate computer, Docker for Desktop needs to be installed. Use the docker-compose files from the package to download the images to local docker repository.
You can use any of the below commands to pull the epos manager docker container images.
– docker-compose -f .\docker-compose-http.yml pull
– docker-compose -f .\docker-compose-https.yml pull
3.5.2 Save images to local file storage The images from a docker repo must be exported to .tar format. This needs to be done with exporting based on repo reference and tag, to preserve tags. This is important for docker compose, so there is no need to change the image references.
Open powershell and run the below command to generate the .tar file
docker images ` | ConvertFrom-String ` | select -skip 1 ` | ForEach-Object { ` docker save “$($_.P1):$($_.P2)” -o ` “$($_.P1.Replace(‘eposaudio/’,’’).Replace(‘mcr.microsoft.com/az-ure-storage/’,’’)).tar” ` }
Once this command is executed the .tar files will be available in the folder from where the command was run.
3.5.3 Move files to offline server The .tar files and the EPOS Manager package downloaded needs to be moved to the offline server, by using an external hard drive or similar. The .tar files should be placed in the same folder as the docker-compose files of EPOS Manager.
3.5.4 Load images into offline Docker repository When the exported images are moved to the offline server, the .tar files of the images needs to be uploaded into the local Docker repository.
Open powershell and navigate to the folder where the .tar files are available and run the following command to load the images
Get-ChildItem -Path .\ -Filter *.tar -Recurse -File ` | ForEach-Object { docker load --input $_ }
3.5.5 Install EPOS Manager Follow the installation steps from section 3.2 to do the installation of EPOS Manager.
15 EPOS MANAGER – ON PREMISES

4. Getting Started
4.1 Pre-Registration Once you installed EPOS Manager On-premise, a default partner will be created automatically. It is recommended to change your default partner details after you install the On-premise solution first time as below steps. You can always use the partner details to reset your password.
Default Partner details:
– Partner Name: Default Partner
– PartnerId: 9E8F4402-943A-4D92-8DE2-D29615E68D0D
– PartnerKey : bZxBAeK8)vWqDA7x74j!Xf)EqOyiCnJdMjuxEIQ2
To change the default partner details, you can execute the poweshell script ChangeDefaultPartner.ps1 available in the downloaded package.
The script will ask for the below input parameters:
– Identityendpoint: The URL of epos_manager_identity. For example http://localhost:8081
– PartnerId: Current PartnerId. If it is the default one, refer to above details.
– PartnerKey: Current PartnerKey. If it is the default one, refer to above details.
– ParnerName: Tenant Admin to enter the new Partner name which you wish to put.
– Ucmpendpoint: The URL of epos_manager_api. For example http://localhost:8082
The output of the script will be the updated Partner name, PartnerId, PartnerKey. Please save these details as it is required to reset the password for Tenant Admin.
16 EPOS MANAGER – ON PREMISES
4.2 Registration
4.2.1 On Premises SignUp You can sign up on EPOS Manager On-Premise Solution at http://<UI URL>/#/signup
UI URL – the hostname/IP address of the system where the EPOS Manager is installed.
For the signing up in the network, following company information is required:
– Company Name
– Tenant Name
– Admin First Name
– Admin Last Name
– Admin Email ID
– Region
– Country
– Time Zone
– Enter Password
– Re-enter Password
– Show Password
Click Submit button to finish signing up in the on premise environment.
4.2.2 Logging in Post registration, you can login by using your Email ID as the username and the password set during registration.
For connecting to EPOS Manager, following browsers are recommended:
– Google Chrome
– Microsoft Edge
– Internet Explorer (IE) 11
– Mozilla Firefox.
For connecting to EPOS Manager from a Mac OS, Safari browser is recommended.
Login to EPOS Manager at: http://<UI URL>
UI URL – the hostname/IP address of the system where the EPOS Manager is installed.
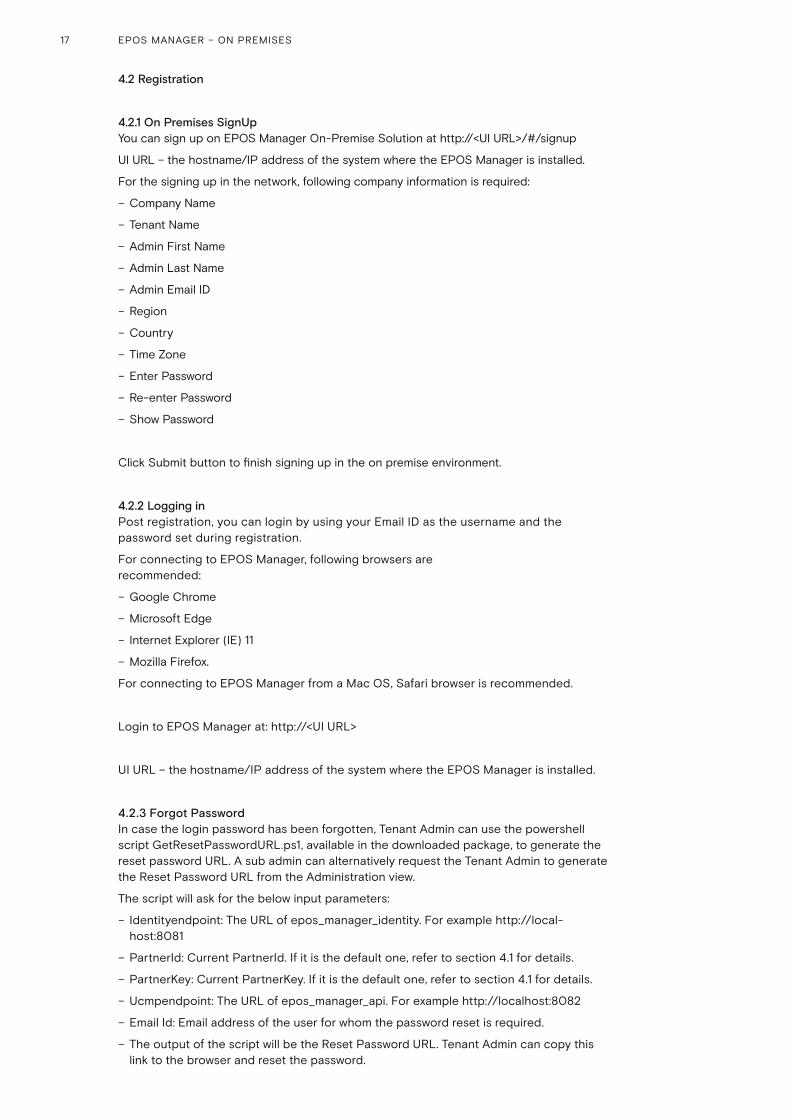
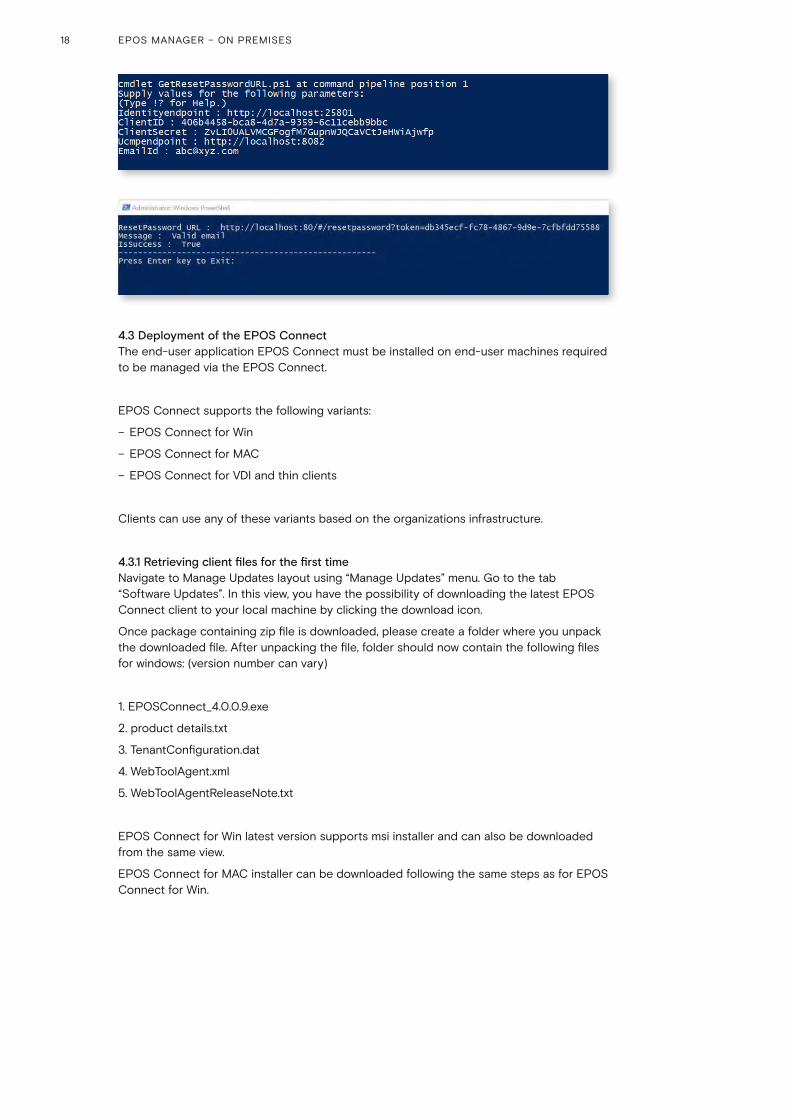
4.2.3 Forgot Password In case the login password has been forgotten, Tenant Admin can use the powershell script GetResetPasswordURL.ps1, available in the downloaded package, to generate the reset password URL. A sub admin can alternatively request the Tenant Admin to generate the Reset Password URL from the Administration view.
The script will ask for the below input parameters:
– Identityendpoint: The URL of epos_manager_identity. For example http://local-host:8081
– PartnerId: Current PartnerId. If it is the default one, refer to section 4.1 for details.
– PartnerKey: Current PartnerKey. If it is the default one, refer to section 4.1 for details.
– Ucmpendpoint: The URL of epos_manager_api. For example http://localhost:8082
– Email Id: Email address of the user for whom the password reset is required.
– The output of the script will be the Reset Password URL. Tenant Admin can copy this link to the browser and reset the password.
17 EPOS MANAGER – ON PREMISES
4.3 Deployment of the EPOS Connect The end-user application EPOS Connect must be installed on end-user machines required to be managed via the EPOS Connect.
EPOS Connect supports the following variants:
– EPOS Connect for Win
– EPOS Connect for MAC
– EPOS Connect for VDI and thin clients
Clients can use any of these variants based on the organizations infrastructure.
4.3.1 Retrieving client files for the first time Navigate to Manage Updates layout using “Manage Updates” menu. Go to the tab “Software Updates”. In this view, you have the possibility of downloading the latest EPOS Connect client to your local machine by clicking the download icon.
Once package containing zip file is downloaded, please create a folder where you unpack the downloaded file. After unpacking the file, folder should now contain the following files for windows: (version number can vary)
1. EPOSConnect_4.0.0.9.exe
2. product details.txt
3. TenantConfiguration.dat
4. WebToolAgent.xml
5. WebToolAgentReleaseNote.txt
EPOS Connect for Win latest version supports msi installer and can also be downloaded from the same view.
EPOS Connect for MAC installer can be downloaded following the same steps as for EPOS Connect for Win.
18 EPOS MANAGER – ON PREMISES
4.3.2 Installing the client manually for the first time From the installation folder containing the installation files and the Tenant Configuration.dat file, run the exe/pkg file. (Administration rights to the machine are required.)
Follow the guide and complete installation. Start the application by clicking the EPOS Connect shortcut on the desktop – or find it by typing EPOS Connect in the search program under the Windows menu. On MAC you can start the application by typing EPOS Connect in the AppFinder and launching it.
Please leave time for the product to initialize and negotiate with the cloud service. Usually it takes a few minutes, but in a few cases it can take up to 5 minutes.
Log in to your web portal and click on the Manage User menu item. Your user automatically gets added to the system after the negotiation has taken place.
Mass Deployment The ability to distribute software to a number of users or computers from a centralized location has become a requirement for many administrators.
The software is installed without the administrator physically visiting each machine. An administrator can use system management software to control a user’s environment.
EPOS Connect installation supports silent installation and uninstallation.
Windows: The command line arguments used for the silent installation of the EPOS Connect is: EPOSConnect.exe/S /v/qn
For silent uninstalling EPOS Connect Application, the command line arguments are: EPOSConnect.exe -silent -uninstall
Note: The silent installation does not trigger the application to start, so a restart of the PC is required to start up application. If an administrator wishes to start the application after silent installation he should launch the below exe after installation. 32 bit OS: C:\Program Files\EPOS\EPOS Connect\ECLaunch.exe 64 bit OS: C:\Program Files (x86)\EPOS\EPOS Connect\ECLaunch.exe
MAC: The command line arguments used for silent installation of the EPOS Connect: installer -pkg EPOSConnect.pkg -target /
For silent removal of EPOS Connect Application it is recommend that you use the uninstall script as part of EPOS Connect Application. Open the terminal and run the below command: /Library/Application Support/EPOS/EPOS Connect/uninstall.sh
Product Code (Windows Only) The Product details.txt files contain the Product Code. This is used for detection validation.
4.4 EPOS Manager Layout The layout of EPOS Manager is divided into sections as described below.
4.4.1 Login information The login information will give the administrator access to settings, download the account unique “TenantConfiguration.dat” file, change credentials and terminate the current session.
In the dropdown menu, select the option that corresponds to the required function to be performed.
Please note that changes made in settings will be applicable for all users
19 EPOS MANAGER – ON PREMISES

4.4.1.1 Settings (General & Data privacy) System settings are displayed here.
General settings: “Time Zone Preference” Can be set according to relevant location
“ Updates End Point address” – Server address to EPOS Manager Update API. Configurable.
“ Partner” - choose the partner who will get access to your EPOS Manager tenant for device management and data insights. Configurable.
Client settings:
Name Description Configurable (Able to be changed by Tenant Admin)
Back End Point Server address of EPOS Manager API to which the EPOS Connect will be connecting to.
Configurable
Tenant ID Tenant specific system ID to uniquely identify the tenant.
Non configurable
Heart Beat Interval in seconds for client poll-ing EPOS Manager for updates.
Configurable
Update mode Enable option for Update from file on clients. This is by default disabled so end-user will not have the option to select upgrade from file.
Configurable
Allow Downgrade Enable option for Allow Downgrade of the firmware. This is by default disabled as EPOS always recommend to run on the latest firmware version.
Configurable
Collect Personal Data:
Collect Personal Data
Collect Personal Data is selected by default as EPOS always recommend to collect user records. Deselecting this option can cause hard delete of all the users related to that tenant.
Configurable
Anonymize with AD If IT admin switches to anonymize with AD then admin can use AD groups to push the update and EPOS Connect will not send the user information to the EPOS Manager.
Configurable
Anonymize without AD
If IT admin switches to anonymize without AD then admin cannot able to push the updates to AD group. EPOS Connect should never talk to AD and send the data back to the server. Also, in ‘Manage User’ section ‘AD Group’ tab will be hidden.
Configurable
Note: Not applicable for EPOS Connect for MAC and EPOS Connect for VDI and thin clients as Update from File is not supported.
Note: Admin can customize what personal information can be collected with Anonymize with AD and Anonymize without AD options. Not supported for EPOS Connect for VDI and thin clients.
20 EPOS MANAGER – ON PREMISES

Collect Reports:
Call Statistics By default call statistics settings is set to collect and agent should consider the setting of call statistics for sending data. If the IT admin unchecks this option, delete all the table data related to the call activity and stop generating the Call Activity Reports for that ten-ant. Also, ‘Call Activity’ related data shown in ‘Dashboard’ section will be displaying lock-icon.
Configurable
Softphone Statistics
By default softphone statistics settings is set to collect and agent should send the softphone list to the server after receiving the changes in the heartbeat. If the IT admin unchecks this option, delete all softphone related informa-tion from the database and stop generating the Softphone Reports for that tenant. Also, ‘Softphone’ statistics table will be hidden from ‘Dashboard’ section.
Configurable
Note: Not applicable for EPOS Connect for MAC and EPOS Connect for VDI and thin clients as reports feature is not supported.
Custom message for EPOS Connect end users based on device support status:
Not Support devices
Select default or custom message. If Admin selects custom option, he/she can enter the custom mes-sage up to 250 characters.
Configurable
Conditional Support devices
Select default or custom message. If Admin selects custom option, he/she can enter the custom mes-sage up to 250 characters.
Configurable
4.4.1.2 Administration EPOS Manager enables the possibility to create more admin users with different roles and privileges to manage this application.
Note: Only the administrator created on signup can create more admin users.
21 EPOS MANAGER – ON PREMISES
4.4.1.2.1 View Admins The tab ‘View Admins’ is in the main view of the ‘Manage Admin’ layout, showing all the admins information.
The following details can be found in the view:
– Admin Name
– Role
– Email ID
– Contact
– Country
– Region
– Created On
– Created By
You can edit or permanently delete a specific admin from the database using the icon buttons available in the grid ‘Action’ column.
To create a new admin, click ‘Add Admin’ button available in the ‘Manage Admin’ layout and fill in the required information
Tenant Admin can generate Reset Password URL for sub admins from the View Admins Grid by clicking the Reset Password icon in the Action column for the sub admins . When clicked on this it will generate the reset password URL and show as pop up. Admin can share this link to the sub admin to reset the password.
4.4.1.2.2 Add/Edit Admin To create new admin or update admin, following information is required:
– Admin First Name
– Admin Last Name
– Admin Email ID
– Admin Contact Number
– Region
– Country
– Time Zone
– Role
After filling in all the required details, click on ‘Add’ button to submit the details. Once details submitted successfully, Tenant Admin can use the Reset Password URL from View Admins Grid and share it to the sub admin to reset the password.
Three different roles are supported:
– Power User(Provides full permissions for all the features except access to ‘Administration’ feature)
– Internal User(Provides read-only permission for all the features except access to ‘Administration’ feature)
– Tenant Admin(Logged-In Tenant details will be displayed in View-Admin grid and Edit/Delete action will be hidden for the same)
22 EPOS MANAGER – ON PREMISES

4.4.1.3 Client config A Tenant account specific Token (TenantConfiguration.dat) can be downloaded here, for deploying to end-user installations.
1. The token must be deployed to end-user machines when installing the EPOS Connect.
2. The token ensures that the clients are allowed to connect to the tenant-specific account on the EPOS Manager system.
3. The token is required for clients to be managed and to receive updates from the IT administrator.
The token (TenantConfiguration.dat) contains Tenant account specific information, ensuring a secure connection between the end-user application and the tenant-specific account.Once downloaded, the TenantConfiguration.dat file is encrypted and cannot be read.
1. Backend Endpoint (server address of EPOS Manager API with which the EPOS Connect will communicate)
2. Initial Heartbeat Time (The value set in “Heart Beat” indicates the duration in seconds after which the EPOS Connect will contact the server and check for available FW and SW updates).
3. Tenant specific ID
4.4.1.4 Change Password The administrator can change the account password at any time. Go to the tenant dropdown menu and select “Change Password”
4.4.1.5 Help Documentation and user guides for the system can be accessed by selecting “Help”.
4.4.1.6 About Select “About” to learn about system information.
The following system info will be shown:
– Version
– Build
– Date of the application.
4.4.1.7 Logout To secure account details and eliminate misuse of the system, select Logout after finishing tasks in the system
4.4.2 Grid settings In Grid Settings, the listed column view can be arranged.
A user can customize the field columns by changing the following settings:
– Column properties
– Display selections
– Column display order
The changes made in the grid will be valid only for that specific machine and specific browser until that specific browser’s application data is cleared.
23 EPOS MANAGER – ON PREMISES

4.4.2.1 Row count “Number of rows” per page to be viewed can be set by clicking the dropdown button.
4.4.2.2 Display selections Including, excluding and order of displayed fields can be set in the grid settings view.
Add to the Selected Column from the Available Column.
Remove from the Selected Column to the Available Column.
Add all fields to the Selected Column from the Available Column.
Remove all fields from the Selected Column to the Available Column.
4.4.2.3 Column display order The column display order in the Selected Columns box determines the display order in the final view. Top to bottom order in the list box makes the change in reference to left to right order in the display. Once the column selection is highlighted in the Selected Columns, the column display order can be changed using the following functions.
Moves the selected column up in the list box (left in the final display).
Moves the selected column down in the list box (right in the final display).
To get the default settings, click “Restore Default Settings”.
4.4.3 Search Use the Search bar to quickly search for a specific attribute in the current view.
4.4.4 Information fields The information field shows the result of the chosen main menu and associated tabs. The listed order can be sorted alphabetically and numerically in ascending or descending order.
To change the order of sorting, click on the field name to change the displayed order.
4.4.5 Page navigation Navigating multiple pages in EPOS Manager is easily accessed at the bottom of the displayed view.
4.4.6 Application menu The main menu contains associated selectable tabs, which will display subject specific information:
– Dashboard
– Manage Device
– Manage Updates
– Manage User
– Configuration
– Reports
The selected menu will always be highlighted.
24 EPOS MANAGER – ON PREMISES

5. Dashboard
Dashboard gives the overall analysis of active devices, version updates, call Activity, Assets, and Deployments etc.
The dashboard contains the following categories
– Active Device
– Firmware Version
– Software Version
– Call Activity
– Your Assets
– Deployments
5.1 Active Device
This chart gives the information about the total count of active devices to the total number of devices. On click of Overview button, the site will navigate to the ‘Device’ tab of ‘Reports’, selecting ‘Device Overview’ from sub-category.
5.2 Firmware Version
This chart gives the information about the total count of firmware versions up to date to the total number of firmware versions available. On click of Overview button, the site will navigate to the ‘Device’ tab of ‘Reports’, selecting ‘Update Overview’ from sub-category.
5.3 Software Version
This chart gives the information about the total count of software versions up to date to the total number of software versions available. On click of Overview button, the site will navigate to the ‘User’ tab of ‘Reports’, selecting ‘Client Versions’ from sub-category.
5.4 Call Activity
Call Activity gives the total number of calls and Total call time. On click of Details button, the site will navigate to the ‘Call Activity’ tab of ‘Reports’, selecting ‘Call Overview’ from sub-category.
Note: Not Supported by EPOS Connect for MAC and EPOS Connect for VDI and thin clients.
25 EPOS MANAGER – ON PREMISES

5.5 Your Assets
Total Devices: This shows the total number of devices. On click of ‘Total Devices’ count, user is redirected to “All Devices” tab of “Manage Device” section.
Devices on stock: This shows the total number of devices which are on stock. On click of ‘Devices on Stock’ count, user is redirected to “On Stock” tab of “Manage Device” section.
5.5.1 Devices
This section contains the summary of Devices in a tabular view with the following columns.
– Device
– Type
– Percentage
– Quantity
5.5.2 Softphones
This section contains the summary of Softphones in a tabular view with the following columns.
– Softphone
– Type
– Percentage
– Quantity
Note: Not Supported by EPOS Connect for MAC and EPOS Connect for VDI and thin clients.
The total number of users, Users without devices, Total Admins count is shown at the bottom of the table. On Click of ‘Total Users’ count and ‘Users without Device’, user is redirected to “Users” tab of “Manage User”. And on click of ‘Total Admins’, user is redirected to ‘View Admins’ tab of ‘Manage Admin’.
5.6 Deployments
This section gives the deployment status of the updates and configurations. The following details are present in tabular view.
– Type : Download icon indicates update and settings icon indicates configuration
– Date
– Device
– Group
– Update Status
26 EPOS MANAGER – ON PREMISES

6. Manage user
Manage user menu is for managing users having the client application EPOS Connect installed on their local machine.
The user are automatically created in the system the first time the EPOS Connect is started on the end-user machine.
6.1 Users For the user to be created in the system, the information FirstName, LastName and Email address needs to be available. This will happen automatically by the client querying the AD. If this information is not available or empty, the user will be created using the PC login name as firstname, domain name as lastname and email address as a combination of login name and domain name, which is also applicable for EPOS Connect for MAC and EPOS Connect for VDI and thin clients. Information such as Office, Country and City will also be queried. If no information is available the user information will stay blank.
The Administrator can manually add this information to the user if desired by clicking the edit icon on every user.
User have an option to export the data by clicking on the excel icon on the top right corner.
The users screen view will have the following details
– User (User information is the combination of First Name and Last Name)
– E-mail – Client Version – Client Type – No of Device(s) (Will have the number of devices associated with the user)
– Last seen – Action (Have options to edit or delete the user)
For much more information, Tenant or IT Admin can click on user name link to view Detail(s), Device(s) & Machine(s).
The Details tab view contains the following details
– First Name
– Last Name
– Client Version
– Client Type
– Last seen
– Country
– Office
– City
The Devices tab view contains the following details
– Device Name
– FW Version
– Registered User
– Current User (Gives info if the current user using that device)
– Last Seen
27 EPOS MANAGER – ON PREMISES

The Machines tab view contains the following details
– Machine Name
– Operating System
– OS Version
– Model
– System Type
– Client Version
– Client Type
On expanding the ‘Machine Name’, details of the softphone installed in that machine will be displayed.
6.2 Manual group When deploying a FW or SW update, this must be done to a group.
(In case just one user is to receive an update, add the user to an empty group)
The Manual Group tab allows the tenant administrator to organize users into groups. In case a more detailed grouping of users is desired based on member criteria, sub-groups to an existing group can be created.
Example: A tenant administrator can choose to create groups for indicating departments, locations, floors, etc. having attached sub-groups containing members based on user/device profile.
For creating a new group or sub-group, click “Create New Group”.
Select New Group from group type and fill in the group name and group description fields.
For a sub-group, select new sub-group from group type and fill in the following details:
– Parent group
– Sub-group name
– Description
Add relevant users to a group by selecting users enrolled into the system and transfer to the group member list.
To quickly identify a specific user in the system, use the search bar located above the users list to search for the user to be added to the group.
To remove user(s) from a group, click the “x” icon in the action column inside the group member list.
Once group information and users have been added, click “Save” to save the created group.
Select all users checkbox can be used if all users are to be registered in the system to receive the updates, including users added in the future. Enabling this checkbox will overrule any other selections made and will disable the grids for manual selection.
In the manual group list, a “+” sign next to a group name indicates that the group contains sub-groups. Click the “+” sign to expand the structure to view the sub-groups connected.
Clicking “–” next to an expanded group structure will collapse the group view.
You can edit, hide or permanently delete a specific group. To edit the parameters for a group or sub-group, click the edit icon.
When a change to group parameters has been performed, click “Save” to apply changes.
28 EPOS MANAGER – ON PREMISES
6.3 AD group Adding users to EPOS Manager AD Group Active Directory (AD) provides options to create groups and is used by EPOS Connect to determine if the end-user belongs to the group or not and also to handle large number of users. The data in the Active Directory is stored in a hierarchical and extensible form. The AD group tab enables the tenant to create, view and edit an AD group.
The following details can be viewed:
– AD group name
– Creator
– Date and time
You can edit, hide or permanently delete a specific AD group from the database.
To create a new AD group, select the Create AD Group button. Fill in the AD group name (according the syntax AD_*) and AD search string. Click Add to create the new AD group.
Note: As an example, the below stated information is required to be filled in the “Create AD Group” window to create an AD Group under the name GroupIdentifier.
AD Group name: AD_GroupIdentifier
AD search string: LDAP://LocalDomain/CN=GroupIdentifier,OU=Group,OU=Depart-ment,OU=Organization,OU=Operating region,DC= Root domain,DC=com
Where
CN = Common name
OU = Organizational unit Name
DC = Domain component.
To edit an AD Group, click the edit button and make the desired changes for the AD Group name and AD search string.
Click “Save” to apply the changes.
Note: It is not possible to edit an AD Group if there are active deployments using the group. It is required to stop deployments, edit and then resend the deployment.
Note: EPOS Connect for MAC and EPOS Connect for VDI and thin clients do not support AD Groups.
6.4 Inactive users It helps to manage the inactive users in the system for a certain span of time period and an option is provided to filter inactive users based on different time period.
Following are the different time periods:
– 1 Month
– 3 Months (Default)
– 6 Months
– 1 Year
User have an option to export the data by clicking on the excel icon on the top right corner
Delete option is provided in the layout to delete the users.
29 EPOS MANAGER – ON PREMISES

6.5 Deleted users Users deleted from the “Manage User” list will be placed under the “Deleted User” tab.
A tenant administrator can choose to either permanently delete a user from the system, or to restore the user.
If a user resides in the “Deleted users” list, the EPOS Connect client belonging to the user will no longer be able to receive updates.
If a user is permanently removed from the “Deleted Users” tab, all user specific information and historical data about usage is deleted.
User have an option to export the data by clicking on the excel icon on the top right corner
Select the “Restore User” button to move the user from the deleted users tab list to the Users tab list and the user will be able to receive updates again.
Select the “Delete User” button to permanently delete the user from the system.
30 EPOS MANAGER – ON PREMISES

7. Manage device
The Manage Device menu is for managing the assets deployed in the organization. The devices can be registered manually. You can view the details such as firmware version and configuration settings by selecting an asset.
7.1 All devices The tab “All Devices” is the main view, showing all EPOS devices, as well as competitor products.
– The following details can be found in the view:
– Device name
– Vendor (competitor devices will be recognized and displayed, but the update/detail info possibility is limited)
– Type of device
– Device ID
– Firmware version installed on the device (update symbol is shown when a new update is available)
– Current user
– Last seen
– Status
– If a device is registered (no symbol) or not registered (symbol).
For even more detailed information about a device, click on the device name and find the following information about the device.
– Device name
– Status of device
– Registered/Not registered
– Type
– Device ID
– Firmware version installed
– Update available (shown when a new update is available)
– Voice Prompt Version
– Voice Prompt Language
– Registered user
– First seen
– Last used date
– Last user
– Country
– Office
– City
– Description
– First Contact FW Version
– First Contact IP Address
– Last Contact IP Address
31 EPOS MANAGER – ON PREMISES

The second TAB in the details page shows list of configuration/settings applied to the device.
The third TAB in the details page shows which products are connected to each other with an easy way to navigate between the products by clicking the hyperlink of the product in the “connected to” list.
A device can be registered to a user, or have a registered user removed from device “ownership.”
To change the registration status, select the devices in the adjacent box of the same row and click the desired action button.
– “Registered device” - is when a user is set as a registered user (“owner”) of a device.
– “Unregistered device” - indicates that no specific owner has been assigned.
– “Current User” - shows the name of a user last seen using the device
A device can be removed (set inactive in EPOS Manager) by selecting the device in the “View Device” list. Click the “Remove Device” button. A pop-up information box appears, a remove device window appears and the following details will be displayed:
– Status of device Active or inactive
– Device Name Product Name
– Device ID Product specific ID
– Vendor
– Reason Add comment about why the device is removed from active devices
Select “Remove” to remove the device from the “View device” tab. The removed device can be viewed by clicking the tab “Removed device”.
Click cancel to close the window without removing any device.
7.2 Devices in Use
The details of registered and unregistered devices are shown under devices in use tab
“Registered device” – is when a user is set as a registered user (“owner”) of a device.
“Unregistered devices” – are not tagged to a particular user. However, in the column “Current user”, the name of the latest user of the device can be seen, no matter if the device is registered or not. A device can be restored and then registered to a user by selecting it from the “Devices in use” list
The view includes the following details:
– Device Name
– Registered User
– Vendor
– Type
– Device Id
– FW Version
– Voice Prompt Version
– Current User
– Last Seen
– Status
32 EPOS MANAGER – ON PREMISES
7.3 Inactive devices
It helps to manage the inactive devices in the system for a certain span of time period and an option is provided to filter inactive devices based on different time period.
Following are the different time periods:
– 1 Month
– 3 Months (Default)
– 6 Months
– 1 Year
Remove option is provided in the layout to remove inactive devices
The view includes the following details:
– Device Name
– Registered User
– Vendor
– Type
– Device ID
– FW Version
– Voice Prompt version
– Current User
– Last Seen
– Status
7.4 Removed device Devices taken out for maintenance, or discarded can be removed from the system by using the “Removed device” tab. Once a device is removed from the “View device” tab, the device is moved to the “Removed device” tab. A removed device can be set active again by clicking “Put On Stock” action button. Details will then be updated when device is being used.
The view includes the following details:
– Device Name
– Device ID
– Firmware Version
– Current User
– Type of the device
– Last used time and date
– Reason for removal
– Voice prompt version
To perform any of the actions, select the checkbox for the device/devices being targeted for the same action.
– Select “Delete device” to remove a device from the system.
– Select “Restore device” to restore a device to the View device List.
33 EPOS MANAGER – ON PREMISES
7.5 On Stock Under the TAB “On stock” devices that have no current user, not registered to a user are listed. If the admini strator gets back a device, he/she can find the device in the overview by searching for user or device and click the “Put to stock” button to place the device in stock. All user information is cleared from the device. The device can be removed from stock by clicking the “Register button” to assign the device to a new user.
Note: If the system detects a device being connected, the device will be moved from the “on stock” list to the “Unregistered” list. (See definition of an unregistered device above).
You can create a new device by Selecting “Create New” in on-stock tab. A “Create New Device” window appears and the following details have to be entered.
– Device ID
– Device Type
– Device Name
User has to input the 16 characters alphanumeric device ID, which will let the, system identify the device family and device name and auto-fill the information.
The Device ID can be found on the box.
For adding analog devices, the option analog must be selected. In this case the form is not auto filled and ID’s are not allowed. Analog headsets are not detectable by the EPOS Connect and usage information is not updated by the system.
Tenant Administrator is now able to add multiple devices to EPOS Manager by clicking on “Import devices” button and uploading a csv file.
34 EPOS MANAGER – ON PREMISES
8. Manage updates
The “Manage Updates” menu can be used for managing software updates of application and firmware /voice prompt updates of the assets (headsets) deployed in the organization. You can choose to schedule updates to take place at specific time of the day. You can choose to deploy a “Mandatory” update to a device, to ensure that an important update of that device will be performed mandatorily.
You can choose to deploy a “Silent” update to a device, to ensure that an update happens silently, without any user interaction or when the user is logged off from the machine, in the defined Update Window. Silent update is only applicable for firmware updates. Silent update is not supported in EPOS Connect for MAC. After the end date, the “Silent Update” will behave as a mandatory update for the end user.
You can select the type of update from the drop down menu.
– You can choose specific user group for the update by clicking on the drop down menu and selecting the boxes adjacent to the desired user group. ”Select all” will select all the user groups. ”Deselect all” will clear all the selections in the list. To ease the selection, type the name of the user group in the search box and perform the desired action.
– For scheduling date and time, click in the box and select date and time as required.
– To select date, click on the specific day in the month of the year.
To return to the date selection, click the calendar button.
– It is possible to download the software or a firmware locally by clicking the download icon.
– To discard any version of the software or firmware, click on the reject button.
8.1 Firmware updates Under the tab “Firmware Updates” new device-specific firmware/voice prompt releases from EPOS will be available for deployment in the organization.
To benefit from device firmware improvements and enhanced functionality released via updates from EPOS, it is highly recommended to keep devices in the organization updated.
User can filter the data using the versions dropdown which has two options.
– Show Latest: gives the highest Firmware version list.
– Show All: will display all the records
The following details about the release can be viewed:
– Device name of the device to be upgraded
– Type of the device which can be firmware/voice prompt
– Latest version of the firmware/voice prompt in the device
– Release notes by clicking on the associated icon
– Date and time of receiving the update notification
– Source from where the update is sent.
From the column “Action” you can deploy, download or delete the software released from EPOS.
Deploy multiple Firmware updates to multiple user groups by selecting the check box(s) against each Firmware and then click on the Deploy button which is above the grid and next to versions.
35 EPOS MANAGER – ON PREMISES
8.2 Software updates Under the tab “Software Update” new versions of the end-user software
“EPOS Connect” will be available for deployment in your organization.
User can filter the data using the versions dropdown which has two options.
– Show Latest : gives the highest Software version list.
– Show All: will display all the records
The following details can be viewed:
– Release notes
– Date and time of receiving the update notification.
– Source from where the update has been sent.
From the column “Action,” you can deploy, download or delete the software released from EPOS. EPOS Connect for Win latest version supports msi installer and can be downloaded.
Deploy multiple Software updates to multiple user groups by selecting the check box(s) against each Software and then click on the Deploy button which is above the grid and next to versions.
Note: When deploying a software update of the client a warning will be presented.
This is because the EPOS Connect software requires administrative rights for installation. This has the following impact.
For users without administrative rights on their machine, they will be prompted to enter user credentials and password for a user with the right permissions.
For user with administrative rights the user can still be prompted with a “Do you want allow the following program to make changes to this computer” message box. This is default windows behaviour caused by the UAC settings. This can be removed by changing the UAC settings to never notify, but this is not recommended. The user has to click yes for the software to install.
The recommended way of updating the software is to use a mass deployment tool such as SCCM / Jamf Pro.
8.3 Upload updates EPOS will be sending out notifications whenever there is a new firmware or software release to the Tenant Admin who has signed up for EPOS Manager.
IT admin can download the update from the cloud server and upload it to local EPOS Manager so that they are available to be deployed with in the organization.
The Administrator can select radio button for either software or firmware update.
Note: The following three priorities can be selected by the administrator.
– Critical Update
– Recommended Update
– Minor Update
For software, firmware or voice prompt update select the priority .Click in the box to browse or drag the file in the box to attach the file. Select Upload to deploy it later.
36 EPOS MANAGER – ON PREMISES
8.4 Deployment Status
All active deployment jobs are listed in this view.
The following information is presented here:
– Job Created : Time stamp the job was created.
– Type: The job type. (Currently only Update)
– Device: The device, software or voice prompt targeted with this job.
– Group name: The name of the group the update is sent to.
– Version: Version of the software, firmware or voice prompt that was deployed.
– Devices Reached: KPI of the distribution.
– Update success: KPI of update being completed.
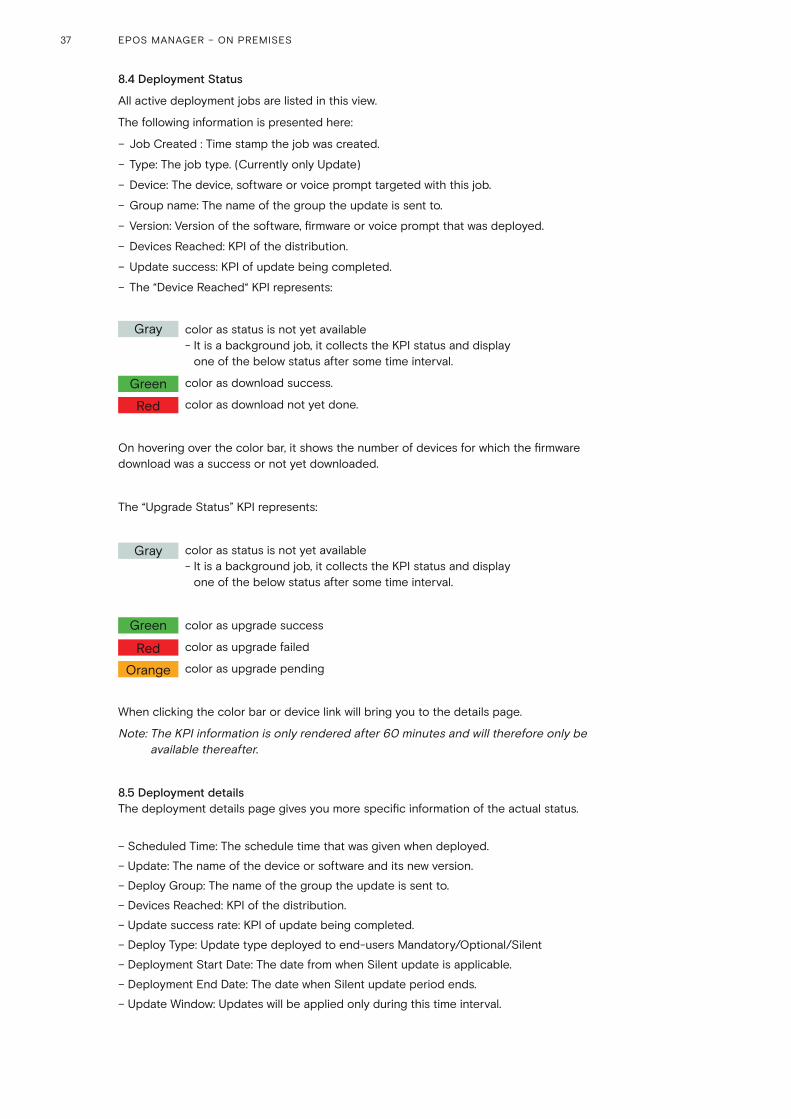
– The “Device Reached“ KPI represents:
Gray color as status is not yet available - It is a background job, it collects the KPI status and display
one of the below status after some time interval.
Green color as download success.
Red color as download not yet done.
On hovering over the color bar, it shows the number of devices for which the firmware download was a success or not yet downloaded.
The “Upgrade Status” KPI represents:
Gray color as status is not yet available - It is a background job, it collects the KPI status and display
one of the below status after some time interval.
Green color as upgrade success
Red color as upgrade failed
Orange color as upgrade pending
When clicking the color bar or device link will bring you to the details page.
Note: The KPI information is only rendered after 60 minutes and will therefore only be available thereafter.
8.5 Deployment details The deployment details page gives you more specific information of the actual status.
– Scheduled Time: The schedule time that was given when deployed.
– Update: The name of the device or software and its new version.
– Deploy Group: The name of the group the update is sent to.
– Devices Reached: KPI of the distribution.
– Update success rate: KPI of update being completed.
– Deploy Type: Update type deployed to end-users Mandatory/Optional/Silent
– Deployment Start Date: The date from when Silent update is applicable.
– Deployment End Date: The date when Silent update period ends.
– Update Window: Updates will be applied only during this time interval.
37 EPOS MANAGER – ON PREMISES
The “Device reached “ KPI represents:
Gray color as status is not yet available
- It is a background job, it collects the KPI status and display one of the below status after some time interval.
Green color as download success
Red color as download not yet done
On hovering over the color bar, it shows the number of devices for which the firmware download was a success or not yet downloaded.
The “Upgrade Status” KPI represents:
Gray color as status is not yet available
- It is a background job, it collects the KPI status and display one of the below status after some time interval.
Green color as upgrade success
Red color as upgrade failed
Orange color as upgrade pending
“Update Success” tab displays the devices for which deployment succeeded.
“Update failure” tab displays the devices for which deployment failed. (Update was downloaded and the update attempt was done)
“Update pending” tab displays the devices for which update is pending. Download had been done but update has not yet started.)
Device not Reached tab displays the devices which have not yet downloaded the update.
38 EPOS MANAGER – ON PREMISES
9 Configuration
EPOS Manager enables the possibility to read the settings of the connected devices and softphone settings of EPOS Connect.
Using the tool, a user is able to push configurations and lock specific settings on the end users devices by pushing a configuration package.
In the current example we will be pushing a regulatory compliance setting to a group. The flow is very similar to a firmware update so the prerequisites are the same.
Before the configuration please ensure that the devices are updated with the latest firmware update.
9.1 Configuration Overview The configuration overview page is designed to act as a dashboard to view and easily compare configuration settings. The page lists all devices that are applicable for a configuration and gather all the settings in one place.
In Configuration overview layout, implemented ‘Device Type’ filter and currently this filter supports to filter on below device types
– Wireless DECT
– Wired USB
– Wireless BT
– Speakerphone
– EPOS Connect
By default, ‘Wireless DECT’ filter will be applied
In this view all configurable devices are listed and you can do a global search to filter on either devices, users or deployed configuration package..
The deployed pack column shows if and what configuration package has been pushed to the specific device.
The version column gives the information about the release versions of the uploaded pack.
Shows the number of configuration parameters available on the product. Clicking it will open up a view of all the configurations and their value on the product.
If the number shows 0 it means that the device does not support any configuration. Most likely because the firmware version is not supporting it. Suggestion is to update to latest firmware.
For comparing a single value, it is possible to click the drop down on the title bar to select 1 of the available configurations. The grid now changes to only show the selected configuration and value. This provides an easy way to compare many devices quickly just by viewing them.
9.2 Device Repository The Device Repository TAB contains a list of all raw device packages uploaded. These packages will be read only when uploaded and all values will be empty.
User can filter the data using the versions dropdown which has two options.
– Show Latest: Will show highest version followed by the latest timestamp of the received On / Uploaded On column.
– Show All: will display all the records
39 EPOS MANAGER – ON PREMISES

9.2.1 Duplicate configuration package For editing the package and choosing the values of the configuration it is required to create a copy of the package. This is done by clicking the “Copy” icon on the line, providing a new pack name and clicking “Save”.
A new package is then added and an “Edit” icon is shown on the line.
9.2.2 Edit configuration package Once the package is duplicated, it is now editable and a small edit icon will appear.
Configuration repository screenshot highlighting edit icon
Package can now be duplicated again, deployed, edited or deleted.
Clicking the edit button opens the package to allow setting the values.
The values can be selected by opening the drop down. When a selection has been made a graphical representation is shown for the device MMI where available. When selecting a value and deploying it, the given value will be locked on the end user device and the user will not be able to change the value themselves, not even by changing the physical switch. To release the setting again (to enable the user to alter the settings), the blank value needs to be chosen and the package needs to be redeployed.
The settings can be saved by clicking the “Save” button.
9.2.3 Deploying Configuration Once the package is ready, it can be deployed to a user group. This is done by clicking the “Deploy” icon.
A user group needs to be selected to deploy a package. To send the package click the “Deploy” Now button. The configuration will happen silently on the end user device on the next heartbeat.
Deploy multiple Device configurations to multiple user groups by selecting the check box(s) against each Device configuration and then click on the Deploy button which is above the grid and next to versions.
9.3 Software repository The Software Configuration TAB contains a list of all raw EPOS Connect softphone configuration packages uploaded. These packages will be read only when uploaded and all values will be empty.
User can filter the data using the versions dropdown which has two options.
– Show Latest: Will show the highest version followed by the latest timestamp of the received On / Uploaded On column.
– Show All: will display all the records
All grid action use cases like duplicating, editing and deploying the packages are similar to the ‘Device Repository’ TAB grid action use cases. (Referring to the section 9.2.1 to 9.2.3)
9.4 Upload Configuration EPOS will be sending out notifications whenever there is a configuration update to the Tenant Admin who has signed up for EPOS Manager.
IT admin can download the configuration from the cloud server and upload it to local EPOS Manager so that they are available to be deployed within the organization
The Tenant Administrator can then upload a configuration package as a zip file and the package will be uploaded.
9.5 Deployment Status Very similar to the firmware deployment, it is possible to follow the status of the configuration package deployment (Referring to the section 8.4).
40 EPOS MANAGER – ON PREMISES

10. Reports
Reports offer an in-depth analysis of the existing device conditions in an organization.
The reports have two sub-menus showing the details of the following:
– User
– Device
– Call activity
– Softphone
A chart being viewed can be downloaded or printed by clicking the icon shown at the right top corner of the chart’s interactive region.
To select the desired output format, click the icon and select the relevant option.
The below stated options are available to the tenant:
1. PNG image
2. JPEG image
3. PDF document
4. SVG vector image
Click the legends to show or hide the values in the existing chart.
An active user for a monthly statistics is defined as:
“Someone who has used the EPOS Connect at least once during the month”
An active user for daily statistics is defined as:
“Someone who has used the EPOS Connect at least once during the day”
Note: All the data for the reports is with reference to the Greenwich Mean Time (GMT).
10.1 User The total number of active and inactive users will display an index with a standard goal and help to identify inactive devices. A status summary of deployed EPOS Connect client software compared to available versions is also available.
10.1.1 User Overview “User overview” will show the daily statistics summary of the total number of active users in a week.
The pointer can be placed over any section of the day column for the exact key values.
10.1.2 Client versions The Client share pie chart will show the share of EPOS Connect variants.
The Client version share pie chart shows the version of the EPOS Connect being used based on the Client Type filter selected..
10.1.3 Monthly Overview The overview will show the monthly statistics summary of the total number of users and active users in a year. To view the exact numeric value, position the pointer over any section.
This graph can be used to verify that the installations correspond to the number of users/employees.
41 EPOS MANAGER – ON PREMISES
10.2 Device Evaluating the statistics of the devices used by the end-user reflects the device usage in an organization.
The device menu also provides an overview of the competitor products (including distribution) in the organization.
10.2.1 Device Overview
An overview shows a clear synopsis of the total number of devices (active/inactive) with the following active devices of the series.
The following active vs. inactive devices under series are shown in the chart.
Wired ED headsets (analog headsets)
Wireless DECT headsets
Wireless BT headsets (Bluetooth products)
Wired USB headsets
Speakerphones
There are different types of devices used by the end-users. “Device overview” help to find out the usability index of the active devices on a daily basis.
– Wired ED headsets (analog headsets)
– Wireless DECT headsets
– Wireless BT headsets (Bluetooth products)
– Wired USB headsets
– Speakerphones
The trend of the active devices can be seen on a weekly basis.
10.2.2 Other devices The “Other Devices” menu shows the usage of EPOS products as well as devices from competitors.
Click on a segment to explode that segment for a better understanding of the comparison.
10.2.3 Device adoption An overview shows a clear synopsis of the total number of devices (active/inactive) with the following active devices of the series.
The following active vs. inactive devices under series are shown in the chart.
- Wired ED headsets (analog headsets)
- Wireless DECT headsets
- Wireless BT headsets (Bluetooth products)
- Wired USB headsets
- Speakerphones
The chart identifies the number of devices that have not been connected in three different time ranges. The following selections are available:
Monthly : the chart shows a full calendar month.
Half yearly : the chart shows six calendar months.
Yearly : the chart shows a full calendar year.
We can switch to a detailed view by clicking on any of the device family types.
42 EPOS MANAGER – ON PREMISES
10.2.4 Headsets per User This report overview shows the user count based on the number of headsets being used.
10.2.5 Update Overview The overview will show the percentage of the devices which are having the latest version to the ones which are yet to be updated. The firmware version approved by the tenant is taken as reference to calculate the percentage. When clicking the report, the user can view the detailed report for each device model which shows the count of the devices with different firmware version currently used.
10.3 Call Activity Evaluating the statistics of the call activity of the end-user reflects the call activity statistics by the company.
The Call activity menu does an analysis based on the call type and call duration of softphones and devices.
Note: Not Supported by EPOS Connect for MAC and EPOS Connect for VDI and thin clients.
10.3.1 Call Overview Call overview gives the analysis about the number of incoming and outgoing calls attended during the specified period.
Following are the different time period filters can be applied on the chart
– Last week: the chart shows the number of calls attended daily basis for the last seven days
– Last Month: the chart shows number of calls attended daily basis for the last month i.e. last thirty days.
– Monthly: the chart shows the number of calls attended monthly basis for the last one year
– Half Yearly: the chart shows the number of calls attended half yearly basis for the last one year
– Yearly: the chart shows the number of calls attended yearly basis for last one year
By clicking on a specific series/bar in the chart, more details of the call for the corresponding time period will be displayed in the table view.
The following details can be found in the table view.
– User Name
– Softphone Name
– Softphone Version
– Device
– Type
– Start Time
– End Time
– Duration
The user has an option to export the data to an excel sheet by clicking the excel icon present on the top right side
43 EPOS MANAGER – ON PREMISES
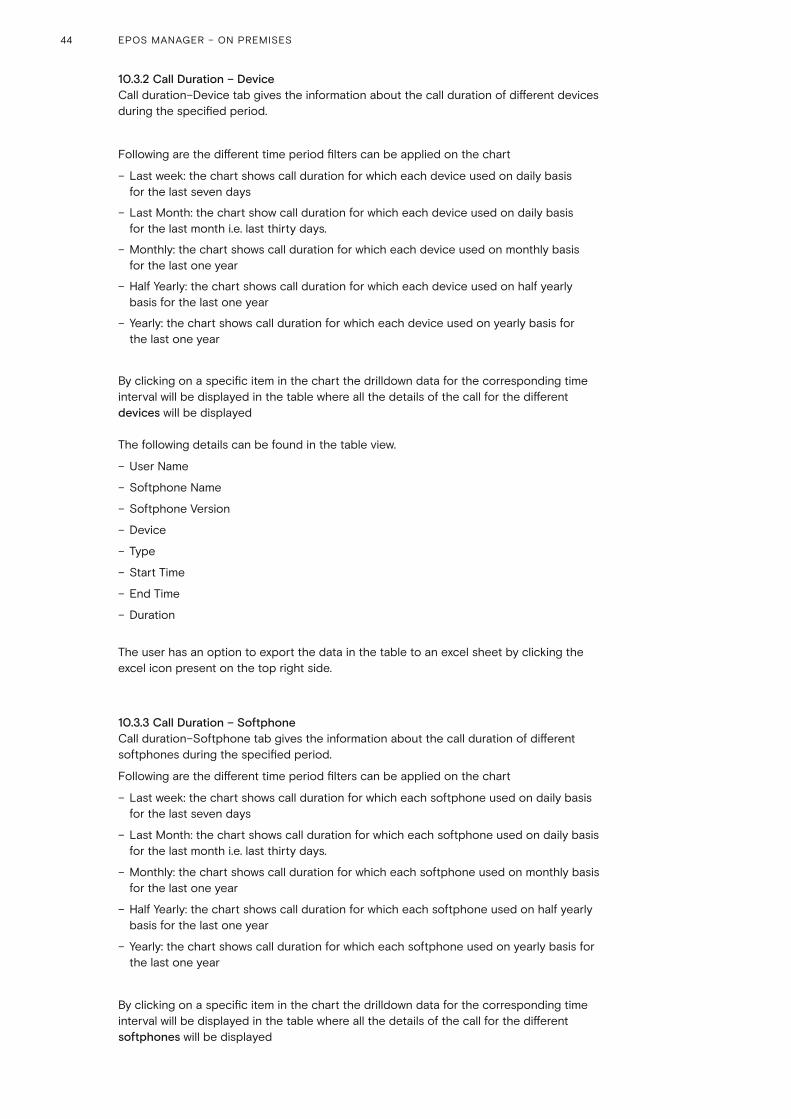
10.3.2 Call Duration – Device Call duration–Device tab gives the information about the call duration of different devices during the specified period.
Following are the different time period filters can be applied on the chart
– Last week: the chart shows call duration for which each device used on daily basis for the last seven days
– Last Month: the chart show call duration for which each device used on daily basis for the last month i.e. last thirty days.
– Monthly: the chart shows call duration for which each device used on monthly basis for the last one year
– Half Yearly: the chart shows call duration for which each device used on half yearly basis for the last one year
– Yearly: the chart shows call duration for which each device used on yearly basis for the last one year
By clicking on a specific item in the chart the drilldown data for the corresponding time interval will be displayed in the table where all the details of the call for the different devices will be displayed
The following details can be found in the table view.
– User Name
– Softphone Name
– Softphone Version
– Device
– Type
– Start Time
– End Time
– Duration
The user has an option to export the data in the table to an excel sheet by clicking the excel icon present on the top right side.
10.3.3 Call Duration – Softphone Call duration–Softphone tab gives the information about the call duration of different softphones during the specified period.
Following are the different time period filters can be applied on the chart
– Last week: the chart shows call duration for which each softphone used on daily basis for the last seven days
– Last Month: the chart shows call duration for which each softphone used on daily basis for the last month i.e. last thirty days.
– Monthly: the chart shows call duration for which each softphone used on monthly basis for the last one year
– Half Yearly: the chart shows call duration for which each softphone used on half yearly basis for the last one year
– Yearly: the chart shows call duration for which each softphone used on yearly basis for the last one year
By clicking on a specific item in the chart the drilldown data for the corresponding time interval will be displayed in the table where all the details of the call for the different softphones will be displayed
44 EPOS MANAGER – ON PREMISES

The following details can be found in the view.
– User Name
– Softphone Name
– Softphone Version
– Device
– Type
– Start Time
– End Time
– Duration
The user has an option to export the data in the table to an excel sheet by clicking the excel icon present on the top right side.
10.4 Softphone Softphone Adoption overview shows the statistics of the different Softphones usage spread across the company.
Note: Not Supported by EPOS Connect for MAC and EPOS Connect for VDI and thin clients.
10.4.1 Softphone Adoption Softphone adoption gives the analysis of the clients using the different softphones of different brands. This section has three charts.
SOFTPHONE BRAND SHARE: This report gives the information about percentage of total softphones of different brands.
SOFTPHONE SHARE: This report gives the information about the percentage of total users using different softphones for a given brand.
Filter option is available to change the brand and filter the specific data for the selected brand.
SOFTPHONE VERSION: The report gives the information about the number of users using a specific version softphone used.
Filter option is available to change the softphone and filter the specific data for the selected softphone.
By clicking on a specific chart series/bar in the above charts, more details will be displayed in table view.
The following details will be included in the table view.
– User Name
– Softphone
– Version
– Host Name
– Model
– Operating system
– OS Version
– Platform
Three filter options in the table view, to filter based on Brand, Softphone and Version. The user has an option to export the filtered data to an excel sheet by clicking the excel icon present on the top right side.
45 EPOS MANAGER – ON PREMISES

11. Uninstalling EPOS Manager
To Uninstall EPOS Manager from the system, follow the below steps
1. Stop the EPOS Manager docker instance
For HTTP: docker-compose -f docker-compose-http.yml down
For HTTPS: docker-compose -f docker-compose-https.yml down
2. Delete the EPOS Manager docker container images from Docker Desktop.
a. Open Docker desktop
b. Go to Images
c. Click on Clean up button
d. Select all images of eposaudio and click on remove button.
46 EPOS MANAGER – ON PREMISES

EPOS Group A/SIndustriparken 27, DK-2750 Ballerup, DenmarkEposaudio.com
Contact information
Support Portal: Eposaudio.com/enterprise-support
E-mail: [email protected]
Phone: Find your local support phone number and opening hours here below.
ASIA-PACIFICAustraliaT +61 2 9910 67008:00 – 17:00
ChinaT +86 10573196669:00 – 18:00
Hong Kong S.A.R., ChinaT +85 2341284009:00 – 18:00
IndiaT 1 800 200 36329:00 – 18:00
JapanT +81 364 068 9199:00 – 18:00
New ZealandT +64 (9) 580 04898:00 – 17:00
SingaporeT +65 6408 51439:00 – 18:00
South KoreaT +82 1544 169910:00 – 18:00
EUROPEAustriaT +43 7208808578:00 – 17:00
BelgiumT +32 280807848:00 – 17:00
DenmarkT +45 898828418:00 – 17:00
FinlandT +358 9424503528:00 – 17:00
FranceT +33 1706103868:00 – 17:00
GermanyT +49 30308080458:00 – 17:00
HungaryT +36 140880568:00 – 17:00
IcelandT +353 152625728:00 – 17:00
IrelandT +353 152625728:00 – 17:00
LuxembourgT +352 278602348:00 – 17:00
NetherlandsT +31 20-80809568:00 – 17:00
NorwayT +47 239610528:00 – 17:00
RussiaT 8800-10085578:00 – 17:00
SpainT +34 9112380858:00 – 17:00
SwedenT +46 8446808958:00 – 17:00
SwitzerlandT +41 3152811328:00 – 17:00
United KingdomT +44 20351440728:00 – 17:00
LATIN AMERICABrazilT +55 11438075568:00 – 17:00
MexicoT +52 55535024018:00 – 17:00
NORTH AMERICACanadaT 1-800-895-74128:00 – 17:00
United StatesT 1-800-895-74128:00 – 17:00
MIDDLE EAST/AFRICAUnited Arab EmiratesT 800 0357038448:00 – 17:00