administering rational clearquest - circe -...
TRANSCRIPT

IMPORTANT NOTICE
COPYRIGHT NOTICEClearQuest, copyright 1997–1999 Rational Software Corporation. All rights reserved.
THIS DOCUMENT IS PROTECTED BY COPYRIGHT AND CONTAINS INFORMATION PROPRIETARY TO RATIONAL. ANY COPYING, ADAPTATION, DISTRIBUTION, OR PUBLIC DISPLAY OF THIS DOCUMENT WITHOUT THE EXPRESS WRITTEN CONSENT OF RATIONAL IS STRICTLY PROHIBITED. THE RECEIPT OR POSSESSION OF THIS DOCUMENT DOES NOT CONVEY ANY RIGHTS TO REPRODUCE OR DISTRIBUTE ITS CONTENTS, OR TO MANUFACTURE, USE, OR SELL ANYTHING THAT IT MAY DESCRIBE, IN WHOLE OR IN PART, WITHOUT THE SPECIFIC WRITTEN CONSENT OF RATIONAL.
U.S. GOVERMENT RIGHTS NOTICEU.S. GOVERMENT RIGHTS. Use, duplication, or disclosure by the U.S. Government is subject to restrictions set forth in the applicable Rational License Agreement and in DFARS 227.7202-1(a) and 227.7202-3(a) (1995), DFARS 252.227-7013(c)(1)(ii) (Oct 1988), FAR 12.212(a) 1995, FAR 52.227-19, or FAR 52.227-14, as applicable.
TRADEMARK NOTICERational, the Rational logo, ClearQuest, ClearCase, Purify, PureCoverage, and Quantify are trademarks or registered trademarks of Rational Software Corporation in the United States and in other countries.
Visual Basic, Windows NT, and Microsoft are trademarks or registered trademarks of the Microsoft Corporation. All other names are used for identification purposes only and are trademarks or registered trademarks of their respective companies.
U.S. PATENT NOTICEU.S. Registered Patent Nos. 5,193,180 and 5,335,344 and 5,535,329. Licensed under Sun Microsystems Inc.’s U.S. Pat. No. 5,404,499. Other U.S. and foreign patents pending.
Printed in the U.S.A.
Part number: 800-012833-000
A D M I N I S T E R I N G R A T I O N A L C L E A R Q U E S T
Contents
1 Before you begin
Other ClearQuest documentation . . . . . . . . . . . . . . . . . . . . . . . . . . . 9
Contacting Rational Software . . . . . . . . . . . . . . . . . . . . . . . . . . . . . 10
2 Understanding ClearQuest administration
Overview of ClearQuest architecture . . . . . . . . . . . . . . . . . . . . . . . 12
Overview of administrator tasks . . . . . . . . . . . . . . . . . . . . . . . . . . . 14
Understanding ClearQuest schemas and databases . . . . . . . . . . . 15
Defining your change request management process . . . . . . . . . . . 16
Record types, states, and actions . . . . . . . . . . . . . . . . . . . . . . . . 16
State model . . . . . . . . . . . . . . . . . . . . . . . . . . . . . . . . . . . . . . . . . 16
Refining your process . . . . . . . . . . . . . . . . . . . . . . . . . . . . . . . . . 17
Before you begin customizing . . . . . . . . . . . . . . . . . . . . . . . . . . . 17
Basic tasks to get your ClearQuest users started . . . . . . . . . . . . . 18
3 Managing databases
Understanding ClearQuest databases . . . . . . . . . . . . . . . . . . . . . . 22
Types of databases . . . . . . . . . . . . . . . . . . . . . . . . . . . . . . . . . . . 22
Where to keep ClearQuest databases . . . . . . . . . . . . . . . . . . . . 23
Choosing a database vendor . . . . . . . . . . . . . . . . . . . . . . . . . . . . . 24
Creating new databases . . . . . . . . . . . . . . . . . . . . . . . . . . . . . . . . . 25
Understanding database maintenance . . . . . . . . . . . . . . . . . . . . . . 26
Understanding database integrity . . . . . . . . . . . . . . . . . . . . . . . . 26
Backing up your data . . . . . . . . . . . . . . . . . . . . . . . . . . . . . . . . . . 28
Changing your database vendor . . . . . . . . . . . . . . . . . . . . . . . . . . 29
Moving a schema repository . . . . . . . . . . . . . . . . . . . . . . . . . . . . 29
Moving a user database . . . . . . . . . . . . . . . . . . . . . . . . . . . . . . . 31
3
Moving a database to a new location . . . . . . . . . . . . . . . . . . . . . . . 34
Moving a database to another schema . . . . . . . . . . . . . . . . . . . . . 35
Using the ClearQuest Export Tool . . . . . . . . . . . . . . . . . . . . . . . . 37
Deleting user databases . . . . . . . . . . . . . . . . . . . . . . . . . . . . . . . . . 41
Undeleting a user database . . . . . . . . . . . . . . . . . . . . . . . . . . . . . . 42
4 Working with ClearQuest schemas
Basic procedures for working with schemas . . . . . . . . . . . . . . . . . . 44
Setting up a test database . . . . . . . . . . . . . . . . . . . . . . . . . . . . . . 45
Checking out a schema . . . . . . . . . . . . . . . . . . . . . . . . . . . . . . . . 46
Choosing a scripting language . . . . . . . . . . . . . . . . . . . . . . . . . . 47
Validating schema changes . . . . . . . . . . . . . . . . . . . . . . . . . . . . 47
Saving work in progress . . . . . . . . . . . . . . . . . . . . . . . . . . . . . . . 48
Testing a schema . . . . . . . . . . . . . . . . . . . . . . . . . . . . . . . . . . . . 49
Checking in a schema . . . . . . . . . . . . . . . . . . . . . . . . . . . . . . . . . 49
Undoing a schema checkout . . . . . . . . . . . . . . . . . . . . . . . . . . . . 50
Upgrading a user database . . . . . . . . . . . . . . . . . . . . . . . . . . . . . 51
Deleting a schema . . . . . . . . . . . . . . . . . . . . . . . . . . . . . . . . . . . . 51
Selecting a ClearQuest schema . . . . . . . . . . . . . . . . . . . . . . . . . . . 52
Adding packages . . . . . . . . . . . . . . . . . . . . . . . . . . . . . . . . . . . . . . 54
5 Customizing a schema
Planning your schema customizations . . . . . . . . . . . . . . . . . . . . . . 58
Working with record types . . . . . . . . . . . . . . . . . . . . . . . . . . . . . . . 61
State-based records . . . . . . . . . . . . . . . . . . . . . . . . . . . . . . . . . . 61
Stateless records . . . . . . . . . . . . . . . . . . . . . . . . . . . . . . . . . . . . . 61
Record type families . . . . . . . . . . . . . . . . . . . . . . . . . . . . . . . . . . 62
Adding and creating record types . . . . . . . . . . . . . . . . . . . . . . . . 62
Renaming a record type . . . . . . . . . . . . . . . . . . . . . . . . . . . . . . . 63
Deleting a record type . . . . . . . . . . . . . . . . . . . . . . . . . . . . . . . . . 63
4 Administering Rational ClearQuest
Working with fields . . . . . . . . . . . . . . . . . . . . . . . . . . . . . . . . . . . . .65
Adding and modifying fields . . . . . . . . . . . . . . . . . . . . . . . . . . . . .65
Deleting a field . . . . . . . . . . . . . . . . . . . . . . . . . . . . . . . . . . . . . . .67
Defining field behavior . . . . . . . . . . . . . . . . . . . . . . . . . . . . . . . . .68
Using fields to link records . . . . . . . . . . . . . . . . . . . . . . . . . . . . . .70
Adding field hooks . . . . . . . . . . . . . . . . . . . . . . . . . . . . . . . . . . . .74
Creating dependent fields . . . . . . . . . . . . . . . . . . . . . . . . . . . . . .75
Enabling dependent fields for ClearQuest Web . . . . . . . . . . . . . .76
Defining your state model . . . . . . . . . . . . . . . . . . . . . . . . . . . . . . . .77
Using the State Transition Matrix . . . . . . . . . . . . . . . . . . . . . . . . .77
Listing the states you need . . . . . . . . . . . . . . . . . . . . . . . . . . . . .78
Adding a new state . . . . . . . . . . . . . . . . . . . . . . . . . . . . . . . . . . . .79
Changing the name of a state . . . . . . . . . . . . . . . . . . . . . . . . . . .79
Mapping state types . . . . . . . . . . . . . . . . . . . . . . . . . . . . . . . . . .80
Working with actions and action types . . . . . . . . . . . . . . . . . . . . .81
Adding and modifying actions . . . . . . . . . . . . . . . . . . . . . . . . . . .83
Creating a state transition . . . . . . . . . . . . . . . . . . . . . . . . . . . . . .83
Adding action hooks . . . . . . . . . . . . . . . . . . . . . . . . . . . . . . . . . . .85
Using default actions . . . . . . . . . . . . . . . . . . . . . . . . . . . . . . . . . .87
Working with record forms . . . . . . . . . . . . . . . . . . . . . . . . . . . . . . . .88
Creating forms . . . . . . . . . . . . . . . . . . . . . . . . . . . . . . . . . . . . . . .88
Re-using forms . . . . . . . . . . . . . . . . . . . . . . . . . . . . . . . . . . . . . . .89
Deleting forms . . . . . . . . . . . . . . . . . . . . . . . . . . . . . . . . . . . . . . .90
Editing forms . . . . . . . . . . . . . . . . . . . . . . . . . . . . . . . . . . . . . . . .90
Adding a field to a form . . . . . . . . . . . . . . . . . . . . . . . . . . . . . . . .91
Editing field properties . . . . . . . . . . . . . . . . . . . . . . . . . . . . . . . . .93
Creating forms for multiple platforms . . . . . . . . . . . . . . . . . . . . . .93
6 Administering users
Planning . . . . . . . . . . . . . . . . . . . . . . . . . . . . . . . . . . . . . . . . . . . . .96
Understanding database privileges . . . . . . . . . . . . . . . . . . . . . . . . .97
5
Adding users . . . . . . . . . . . . . . . . . . . . . . . . . . . . . . . . . . . . . . . . . . 98
Modifying user profiles . . . . . . . . . . . . . . . . . . . . . . . . . . . . . . . . 99
Changing user information . . . . . . . . . . . . . . . . . . . . . . . . . . . . . 99
Subscribing users to databases . . . . . . . . . . . . . . . . . . . . . . . . . 99
Making users inactive . . . . . . . . . . . . . . . . . . . . . . . . . . . . . . . . . 99
Creating groups . . . . . . . . . . . . . . . . . . . . . . . . . . . . . . . . . . . . . . 101
Subscribing groups to databases . . . . . . . . . . . . . . . . . . . . . . . 101
Making groups inactive . . . . . . . . . . . . . . . . . . . . . . . . . . . . . . . 101
Controlling user access to actions . . . . . . . . . . . . . . . . . . . . . . . . 102
Transferring between schema repositories . . . . . . . . . . . . . . . . . . 103
7 Using hooks to customize your workflow
Understanding hooks . . . . . . . . . . . . . . . . . . . . . . . . . . . . . . . . . . 106
Choosing a scripting language . . . . . . . . . . . . . . . . . . . . . . . . . 106
Planning hooks for your process . . . . . . . . . . . . . . . . . . . . . . . . 107
Understanding field and action hooks . . . . . . . . . . . . . . . . . . . . . 109
Field hooks . . . . . . . . . . . . . . . . . . . . . . . . . . . . . . . . . . . . . . . . 109
Understanding choice lists . . . . . . . . . . . . . . . . . . . . . . . . . . . . 110
Action hooks . . . . . . . . . . . . . . . . . . . . . . . . . . . . . . . . . . . . . . . 111
Execution order of field and action hooks . . . . . . . . . . . . . . . . . . . 113
When an action begins . . . . . . . . . . . . . . . . . . . . . . . . . . . . . . . 113
When a field’s value is set . . . . . . . . . . . . . . . . . . . . . . . . . . . . . 114
When the record is validated . . . . . . . . . . . . . . . . . . . . . . . . . . . 115
When the record is committed . . . . . . . . . . . . . . . . . . . . . . . . . . 115
Understanding record scripts . . . . . . . . . . . . . . . . . . . . . . . . . . . . 116
Understanding global scripts . . . . . . . . . . . . . . . . . . . . . . . . . . . . 117
Writing external applications . . . . . . . . . . . . . . . . . . . . . . . . . . . . . 118
Understanding the ClearQuest API . . . . . . . . . . . . . . . . . . . . . . . 119
Working with sessions . . . . . . . . . . . . . . . . . . . . . . . . . . . . . . . . 119
Working with queries . . . . . . . . . . . . . . . . . . . . . . . . . . . . . . . . . 119
Working with records . . . . . . . . . . . . . . . . . . . . . . . . . . . . . . . . . 120
6 Administering Rational ClearQuest
Common API calls . . . . . . . . . . . . . . . . . . . . . . . . . . . . . . . . . . . . .121
Examples of common hooks . . . . . . . . . . . . . . . . . . . . . . . . . . . . .123
Creating a dependent list . . . . . . . . . . . . . . . . . . . . . . . . . . . . . .123
Field choice list hook to display user information . . . . . . . . . . . .125
Action initialization hook for a field value . . . . . . . . . . . . . . . . . .127
Action hook for setting the value of a parent record . . . . . . . . . .128
8 Administering ClearQuest Web
Understanding ClearQuest Web customizations . . . . . . . . . . . . . .134
ClearQuest Web feature differences . . . . . . . . . . . . . . . . . . . . .134
Configuring display settings . . . . . . . . . . . . . . . . . . . . . . . . . . . . .135
Setting up limited access for users and groups . . . . . . . . . . . . . . .136
Using hooks in ClearQuest Web . . . . . . . . . . . . . . . . . . . . . . . . . .137
Using dependent fields on ClearQuest Web . . . . . . . . . . . . . . .138
Displaying messages on ClearQuest Web . . . . . . . . . . . . . . . . .138
Adjusting functionality by detecting a web session . . . . . . . . . .139
9 Administering ClearQuest E-mail
Setting up e-mail rules . . . . . . . . . . . . . . . . . . . . . . . . . . . . . . . . . .142
Configuring ClearQuest clients to send e-mail . . . . . . . . . . . . . . .143
Sending records via e-mail . . . . . . . . . . . . . . . . . . . . . . . . . . . . . .144
Formatting e-mail for submission . . . . . . . . . . . . . . . . . . . . . . . .145
Using “roundtrip” e-mail . . . . . . . . . . . . . . . . . . . . . . . . . . . . . . . . .147
10 Importing data into ClearQuest
Understanding the import process . . . . . . . . . . . . . . . . . . . . . . . .150
Ensuring a successful data import . . . . . . . . . . . . . . . . . . . . . . . .151
Analyzing your data . . . . . . . . . . . . . . . . . . . . . . . . . . . . . . . . . .151
Creating a schema . . . . . . . . . . . . . . . . . . . . . . . . . . . . . . . . . . .151
Creating a database . . . . . . . . . . . . . . . . . . . . . . . . . . . . . . . . . .152
Testing the conversion . . . . . . . . . . . . . . . . . . . . . . . . . . . . . . . .152
7
Exporting data . . . . . . . . . . . . . . . . . . . . . . . . . . . . . . . . . . . . . . . 153
Understanding the record import file format . . . . . . . . . . . . . . . 153
Understanding the history import file format . . . . . . . . . . . . . . . 155
Understanding the attachment import file format . . . . . . . . . . . 155
Performing the import for records . . . . . . . . . . . . . . . . . . . . . . . . . 157
Importing records from the Error file . . . . . . . . . . . . . . . . . . . . . 161
Importing history . . . . . . . . . . . . . . . . . . . . . . . . . . . . . . . . . . . . 162
Importing attachments . . . . . . . . . . . . . . . . . . . . . . . . . . . . . . . . 163
Importing duplicate records . . . . . . . . . . . . . . . . . . . . . . . . . . . . 164
Upgrading existing records . . . . . . . . . . . . . . . . . . . . . . . . . . . . 165
11 ClearQuest schemas and packages
ClearQuest predefined schemas . . . . . . . . . . . . . . . . . . . . . . . . . 168
Packages included in ClearQuest schemas . . . . . . . . . . . . . . . . . 170
State model for defect record type . . . . . . . . . . . . . . . . . . . . . . . . 176
State model for Enhancement Request record type . . . . . . . . . . . 177
State type models for packages . . . . . . . . . . . . . . . . . . . . . . . . . . 178
UnifiedChangeManagement package state type model . . . . . . 179
Resolution package state type model . . . . . . . . . . . . . . . . . . . . 180
12 Enabling ClearQuest for Unified Change Management
Adding UCM functionality to a schema . . . . . . . . . . . . . . . . . . . . . 182
Setting default actions for the UCM package . . . . . . . . . . . . . . . . 184
Index
8 Administering Rational ClearQuest
A D M I N I S T E R I N G R A T I O N A L C L E A R Q U E S T
1
Before you beginThis guide is for Rational ClearQuest administrators. It assumes that you have read Introducing Rational ClearQuest, have experience with administering relational databases, and know how to write scripts in VBScript or Perl.
This guide provides the concepts and initial steps required to begin administering ClearQuest. For specific step-by-step instructions, see the ClearQuest Designer online Help. Select Help > Contents and Index. A good place to begin is with the ClearQuest Designer Tutorial; select Rational ClearQuest Designer Tutorial from the Start menu.
Other ClearQuest documentation
In addition to this guide, ClearQuest includes the following printed documentation:
■ Introducing Rational ClearQuest: Provides an overview of how to use ClearQuest, and a brief example of how the ClearQuest administrator can customize ClearQuest to fit your workflow.
■ Installing Rational ClearQuest: Explains how to install ClearQuest, ClearQuest Designer, vendor databases, and related tools.
and the following online documentation:
■ Release notes■ ClearQuest Help: Online Help for ClearQuest. ■ ClearQuest Designer Help: Online Help for ClearQuest Designer. ■ ClearQuest Designer Tutorial: Introduces the key features of
ClearQuest Designer.
9
■ ClearQuest API Reference Guide: Online reference guide explaining the syntax for writing hooks and external applications.
■ ClearQuest Web Help: Online Help for the ClearQuest web-based client.
■ ClearQuest Maintenance Tool Help: Online Help for the ClearQuest Maintenance Tool.
■ ClearQuest Import Tool Help: Online Help for the ClearQuest Import Tool.
Contacting Rational Software
If you have a technical problem and you cannot find the solution in this guide or in the online Help, contact Rational Software Technical Support. Select Reference > Contacting Technical Support in the ClearQuest Help for addresses and phone numbers of technical support centers.
Before contacting technical support, note the sequence of events that led to the problem and any program messages you see. If possible, have the product running on your computer when you call.
For technical information about ClearQuest, answers to common questions, and information about other Rational Software products, visit the Rational Software World Wide Web site at http://www.rational.com. To contact technical support directly, use http://www.rational.com/support.
10 Administering Rational ClearQuest

A D M I N I S T E R I N G R A T I O N A L C L E A R Q U E S T
2
Understanding ClearQuest administrationAs the ClearQuest administrator, your job is to set up, customize, and maintain ClearQuest for your end users. This chapter provides essential ClearQuest concepts to help you understand your role and to use this guide effectively.
Topics covered include:
■ Overview of ClearQuest architecture ■ Overview of administrator tasks■ Understanding ClearQuest schemas and databases ■ Defining your change request management process■ Basic tasks to get your ClearQuest users started
11
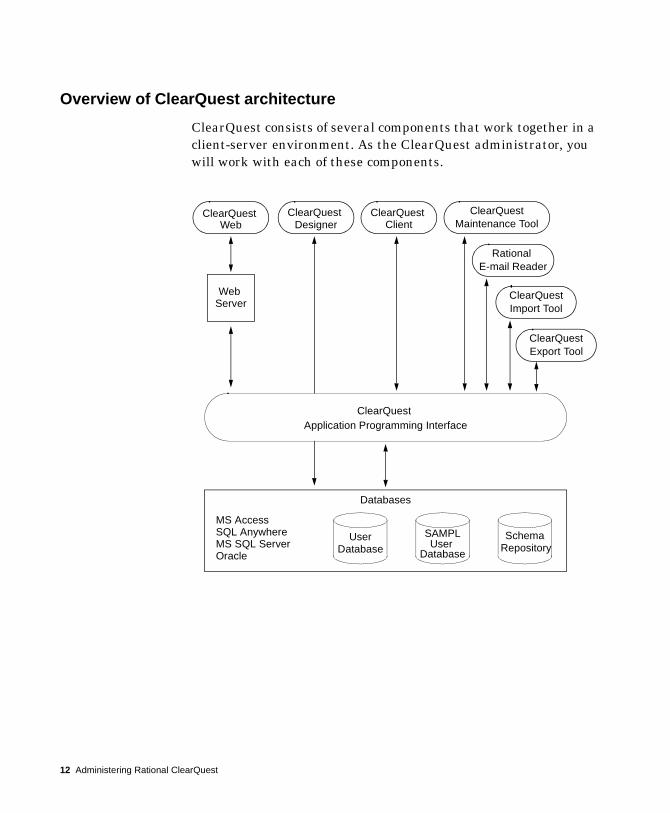
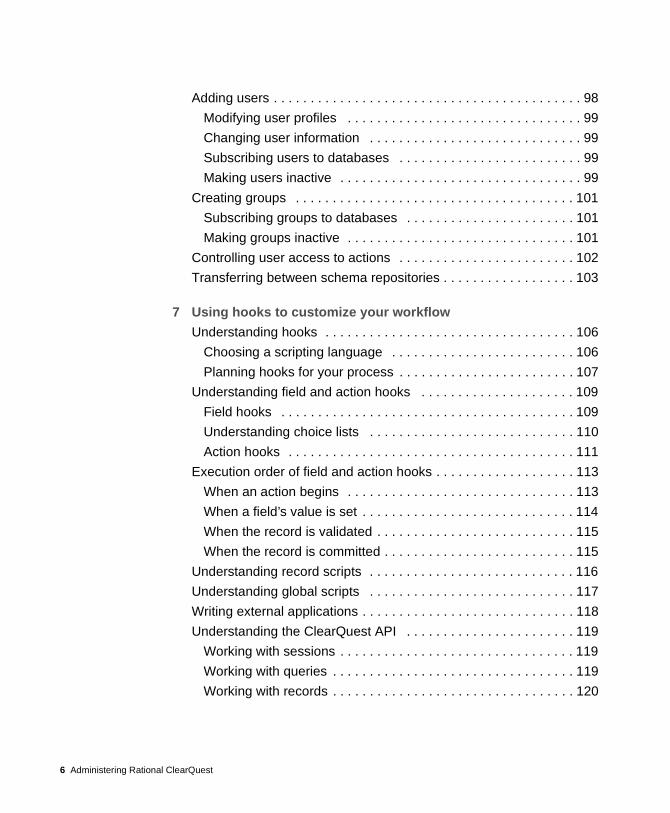
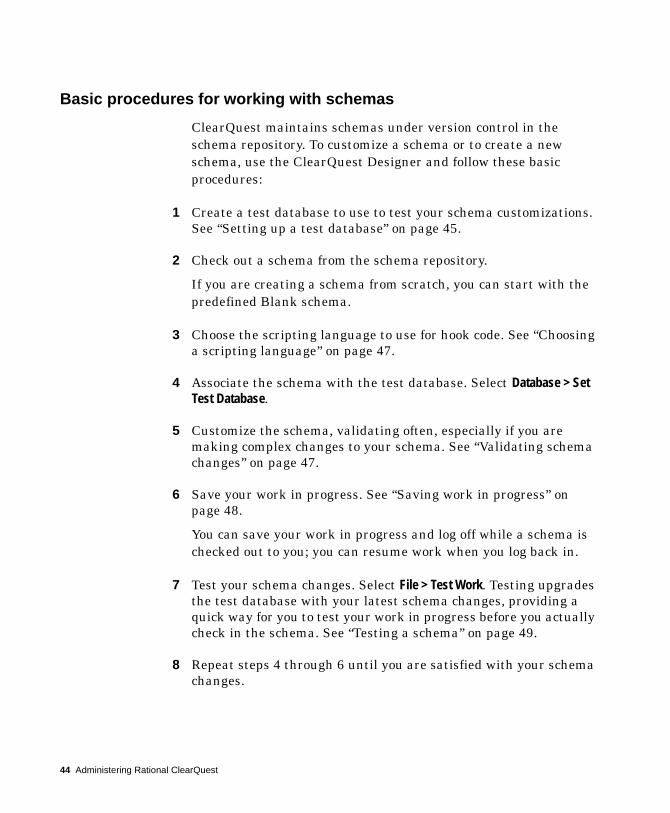
Overview of ClearQuest architecture
ClearQuest consists of several components that work together in a client-server environment. As the ClearQuest administrator, you will work with each of these components.
ClearQuest ClearQuest Designer
ClearQuest Web
Rational E-mail Reader
Client
User
MS AccessSQL AnywhereMS SQL ServerOracle
SAMPL Schema RepositoryDatabaseDatabase
Databases
Web Server
ClearQuestImport Tool
ClearQuestMaintenance Tool
User
ClearQuestExport Tool
ClearQuest Application Programming Interface
12 Administering Rational ClearQuest
Here’s how you use ClearQuest components.
Component Used by Use to
ClearQuest Everyone Submit, modify, and track change requests, and to analyze project progress by running queries, charts, and reports.
ClearQuest Web Everyone Access ClearQuest across multiple platforms through Netscape Navigator® or Microsoft’s Internet Explorer.® You can submit change requests and run queries, charts, and reports.
ClearQuest Designer
ClearQuest Administrator
Customize ClearQuest, manage ClearQuest schemas and databases, and administer users and user groups.
ClearQuest Import Tool
ClearQuest Administrator
Import data including records, history, and attachments from other change request systems.
ClearQuest
Export Tool
ClearQuest Administrator
Export ClearQuest data from one ClearQuest user database to another user database that uses a different schema.
ClearQuest Maintenance Tool
Everyone Set up and connect to the schema repository during installation and when you upgrade to a new ClearQuest version.
Rational E-mail Reader
ClearQuest Administrator
Configure your e-mail settings to enable ClearQuest users to submit and modify records by e-mail.
See Chapter 9, “Administering ClearQuest E-mail.”
Understanding ClearQuest administration 13
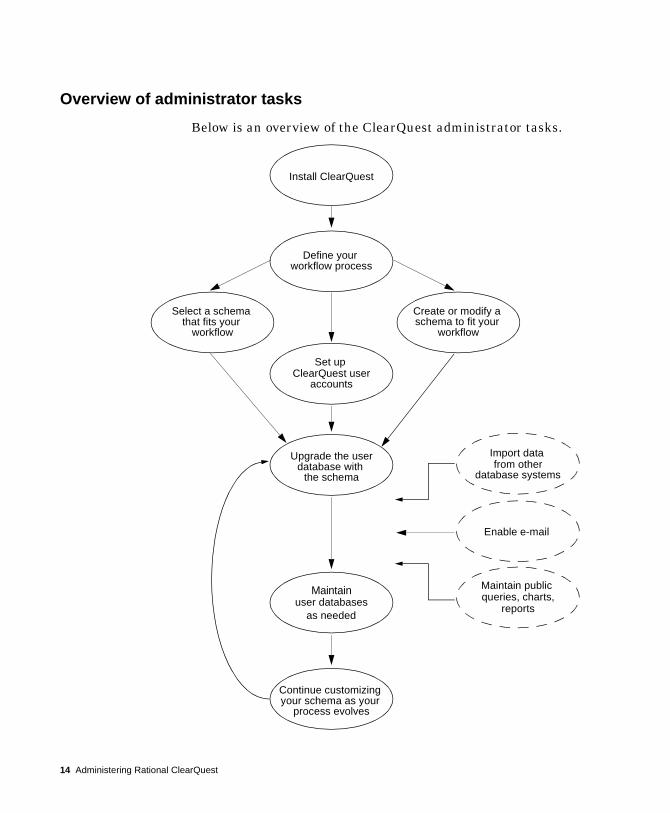
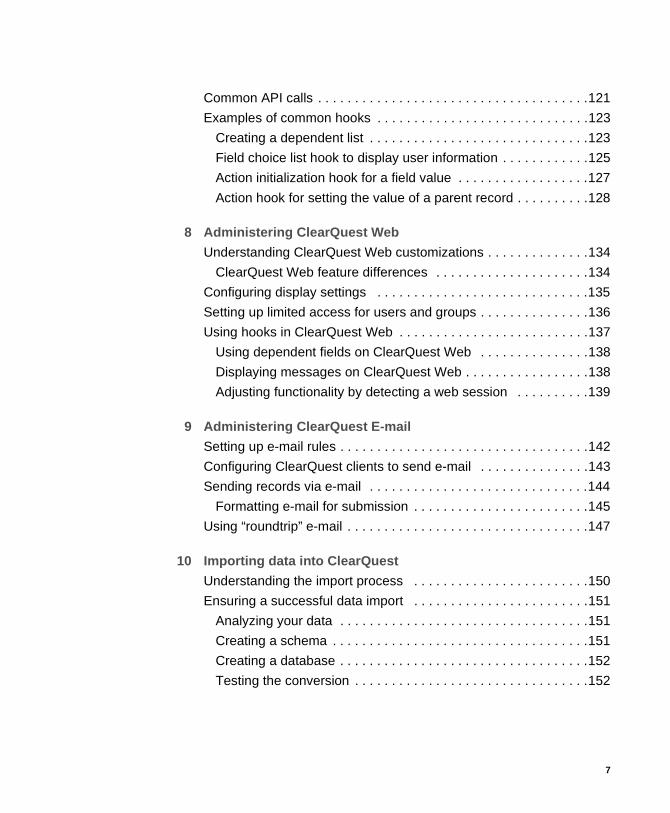
Overview of administrator tasks
Below is an overview of the ClearQuest administrator tasks.
Install ClearQuest
Select a schema that fits your
workflow process
Create or modify a schema to fit your
Continue customizing your schema as your
process evolves
workflow workflow
Set up ClearQuest user
Define your
Enable e-mail
Maintainuser databases
accounts
Maintain public queries, charts,
reports
Import data from other
database systems
Upgrade the userdatabase with
the schema
as needed
14 Administering Rational ClearQuest
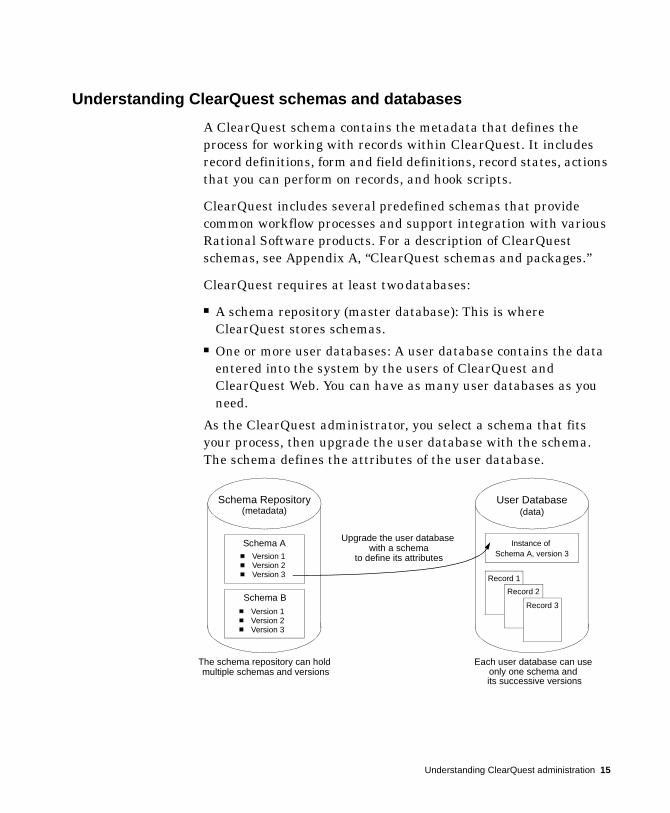
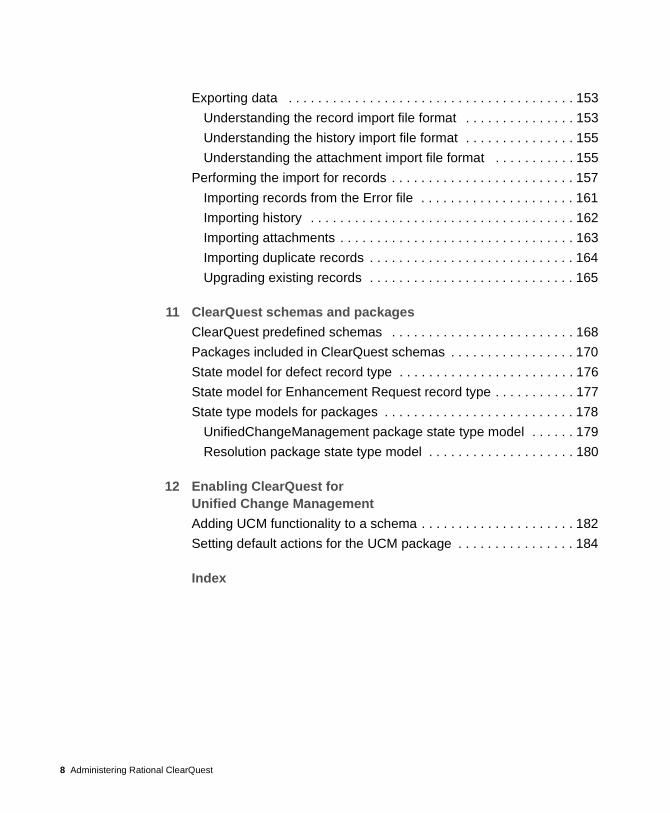
Understanding ClearQuest schemas and databases
A ClearQuest schema contains the metadata that defines the process for working with records within ClearQuest. It includes record definitions, form and field definitions, record states, actions that you can perform on records, and hook scripts.
ClearQuest includes several predefined schemas that provide common workflow processes and support integration with various Rational Software products. For a description of ClearQuest schemas, see Appendix A, “ClearQuest schemas and packages.”
ClearQuest requires at least two databases:
■ A schema repository (master database): This is where ClearQuest stores schemas.
■ One or more user databases: A user database contains the data entered into the system by the users of ClearQuest and ClearQuest Web. You can have as many user databases as you need.
As the ClearQuest administrator, you select a schema that fits your process, then upgrade the user database with the schema. The schema defines the attributes of the user database.
Schema Repository
Schema A
Schema B
Version 1Version 2Version 3
Version 1Version 2Version 3
(metadata)
Each user database can use
its successive versions
The schema repository can hold multiple schemas and versions only one schema and
Upgrade the user database with a schema
to define its attributes
Instance of Schema A, version 3
Record 1
Record 2
Record 3
User Database(data)
Understanding ClearQuest administration 15
Defining your change request management process
Your most important task as the ClearQuest administrator is to define your process for working with records and then select the ClearQuest schema that best suits your process or customize a schema to fit your process.
This section describes basic concepts that will help you understand how to define your process and to customize a ClearQuest schema to fit that process.
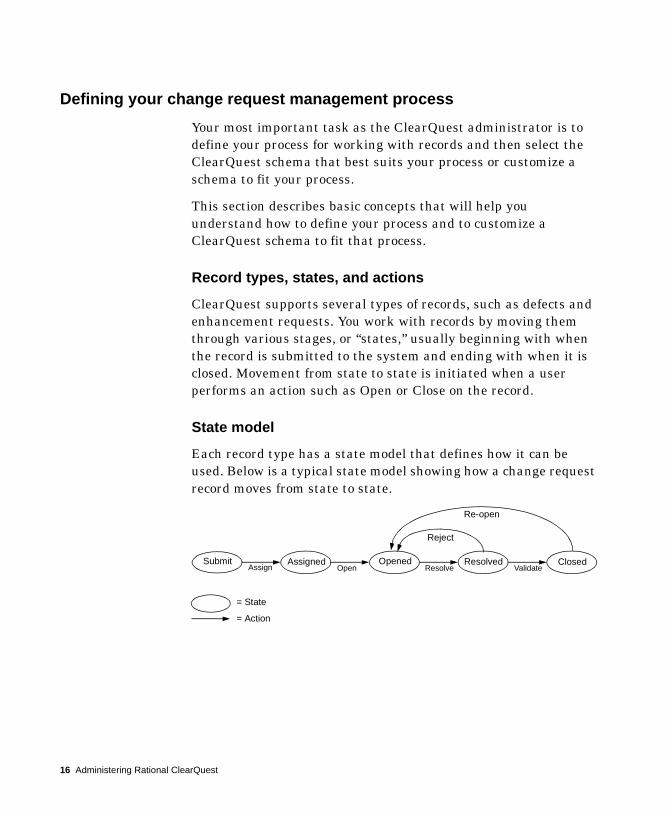
Record types, states, and actions
ClearQuest supports several types of records, such as defects and enhancement requests. You work with records by moving them through various stages, or “states,” usually beginning with when the record is submitted to the system and ending with when it is closed. Movement from state to state is initiated when a user performs an action such as Open or Close on the record.
State model
Each record type has a state model that defines how it can be used. Below is a typical state model showing how a change request record moves from state to state.
Opened ResolvedValidate
ClosedResolve
= State
= Action
SubmitOpen
Reject
Re-open
AssignedAssign
16 Administering Rational ClearQuest
Refining your process
You can refine your state model by adding rules and permissions that support your workflow process. You do this by using the predefined hook code and controls that are included in ClearQuest. You can also use the ClearQuest application programming interface (API) to write your own hook code or to write external applications that reinforce your process. You can:
■ Control the type of data you collect by customizing the fields you use and how they behave.
■ Define access controls that determine who can perform actions and when those actions can be performed.
■ Define what happens when an action is performed. Actions can trigger other events, such as sending automatic e-mail notifications when a specific action is performed.
For example, you can restrict actions to specific users or user groups. You might allow everyone on the team to resolve a change request, but allow only a quality assurance engineer to validate the resolution and close the record. You can also designate a person responsible for supplying data before the request can move to the next state.
Before you begin customizing
Before you begin customizing ClearQuest, be sure to read the following:
■ Chapter 4, “Working with ClearQuest schemas,” to find out how to check schemas in and out of the schema repository, how to test your work, and how to upgrade a user database with a new schema version.
■ “Planning your schema customizations” on page 58. ■ Appendix A, “ClearQuest schemas and packages,” for a complete
list of ClearQuest’s predefined schemas and schema packages.
Understanding ClearQuest administration 17
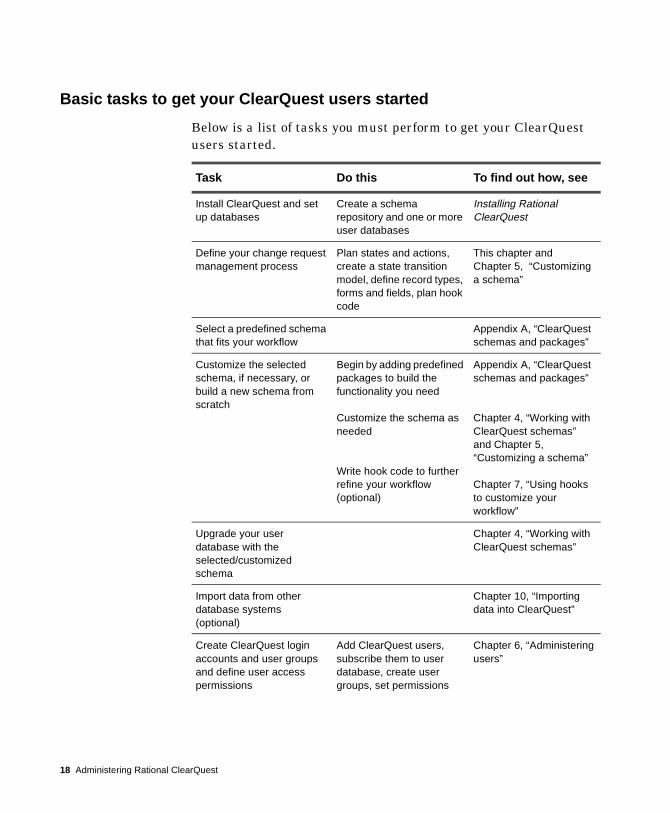
Basic tasks to get your ClearQuest users started
Below is a list of tasks you must perform to get your ClearQuest users started.
Task Do this To find out how, see
Install ClearQuest and set up databases
Create a schema repository and one or more user databases
Installing Rational ClearQuest
Define your change request management process
Plan states and actions, create a state transition model, define record types, forms and fields, plan hook code
This chapter and Chapter 5, “Customizing a schema”
Select a predefined schema that fits your workflow
Appendix A, “ClearQuest schemas and packages”
Customize the selected schema, if necessary, or build a new schema from scratch
Begin by adding predefined packages to build the functionality you need
Customize the schema as needed
Write hook code to further refine your workflow (optional)
Appendix A, “ClearQuest schemas and packages”
Chapter 4, “Working with ClearQuest schemas” and Chapter 5, “Customizing a schema”
Chapter 7, “Using hooks to customize your workflow”
Upgrade your user database with the selected/customized schema
Chapter 4, “Working with ClearQuest schemas”
Import data from other database systems (optional)
Chapter 10, “Importing data into ClearQuest”
Create ClearQuest login accounts and user groups and define user access permissions
Add ClearQuest users, subscribe them to user database, create user groups, set permissions
Chapter 6, “Administering users”
18 Administering Rational ClearQuest
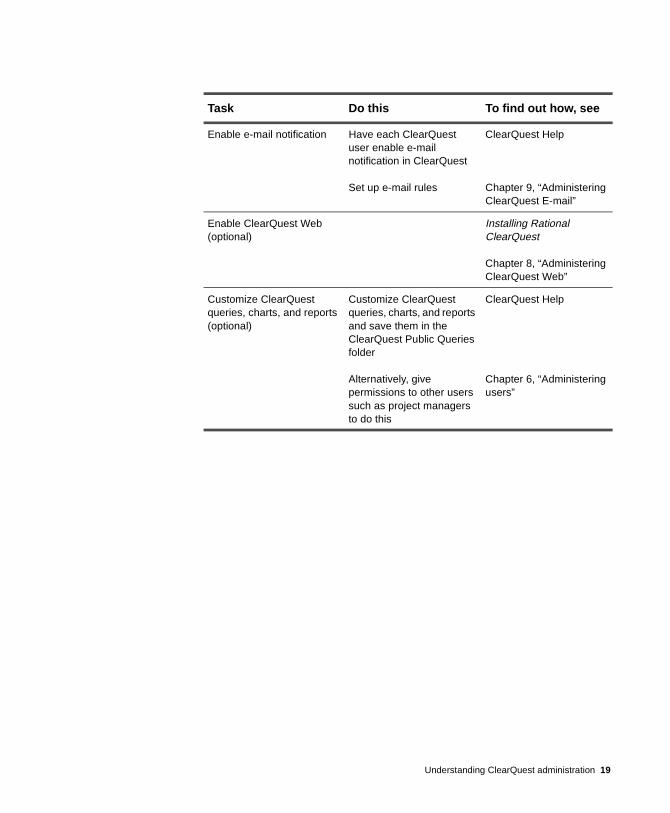
Enable e-mail notification Have each ClearQuest user enable e-mail notification in ClearQuest
Set up e-mail rules
ClearQuest Help
Chapter 9, “Administering ClearQuest E-mail”
Enable ClearQuest Web(optional)
Installing Rational ClearQuest
Chapter 8, “Administering ClearQuest Web”
Customize ClearQuest queries, charts, and reports (optional)
Customize ClearQuest queries, charts, and reports and save them in the ClearQuest Public Queries folder
Alternatively, give permissions to other users such as project managers to do this
ClearQuest Help
Chapter 6, “Administering users”
Task Do this To find out how, see
Understanding ClearQuest administration 19

20 Administering Rational ClearQuest
A D M I N I S T E R I N G R A T I O N A L C L E A R Q U E S T
3
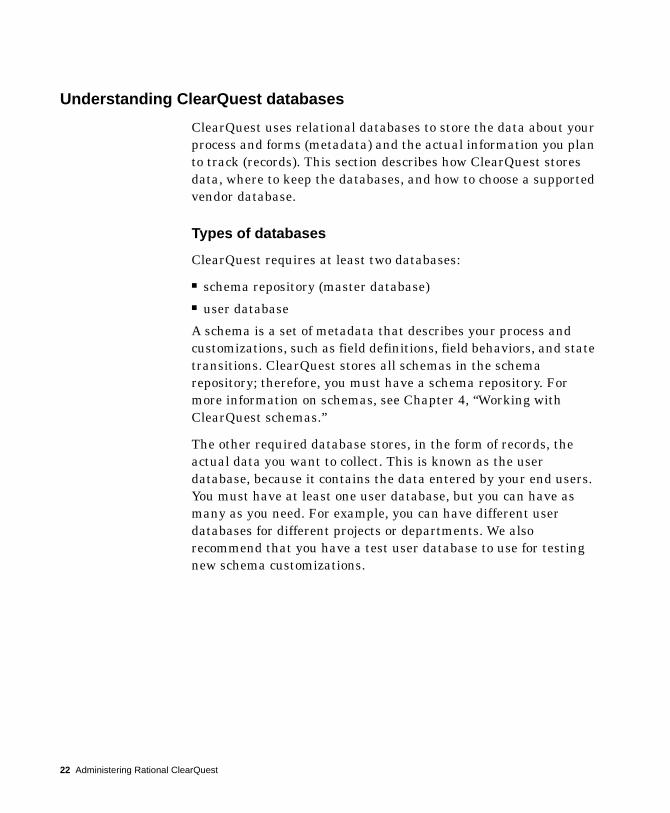
Managing databasesThis chapter describes the ClearQuest databases, their setup, and how to maintain them. Use this chapter to understand how ClearQuest uses databases, how to choose a vendor database, and how to perform various maintenance activities.
Topics covered include:
■ Understanding ClearQuest databases■ Choosing a database vendor■ Creating new databases■ Understanding database maintenance■ Changing your database vendor■ Moving a database to a new location■ Moving a database to another schema■ Deleting user databases■ Undeleting a user database
21
Understanding ClearQuest databases
ClearQuest uses relational databases to store the data about your process and forms (metadata) and the actual information you plan to track (records). This section describes how ClearQuest stores data, where to keep the databases, and how to choose a supported vendor database.
Types of databases
ClearQuest requires at least two databases:
■ schema repository (master database)■ user database
A schema is a set of metadata that describes your process and customizations, such as field definitions, field behaviors, and state transitions. ClearQuest stores all schemas in the schema repository; therefore, you must have a schema repository. For more information on schemas, see Chapter 4, “Working with ClearQuest schemas.”
The other required database stores, in the form of records, the actual data you want to collect. This is known as the user database, because it contains the data entered by your end users. You must have at least one user database, but you can have as many as you need. For example, you can have different user databases for different projects or departments. We also recommend that you have a test user database to use for testing new schema customizations.
22 Administering Rational ClearQuest
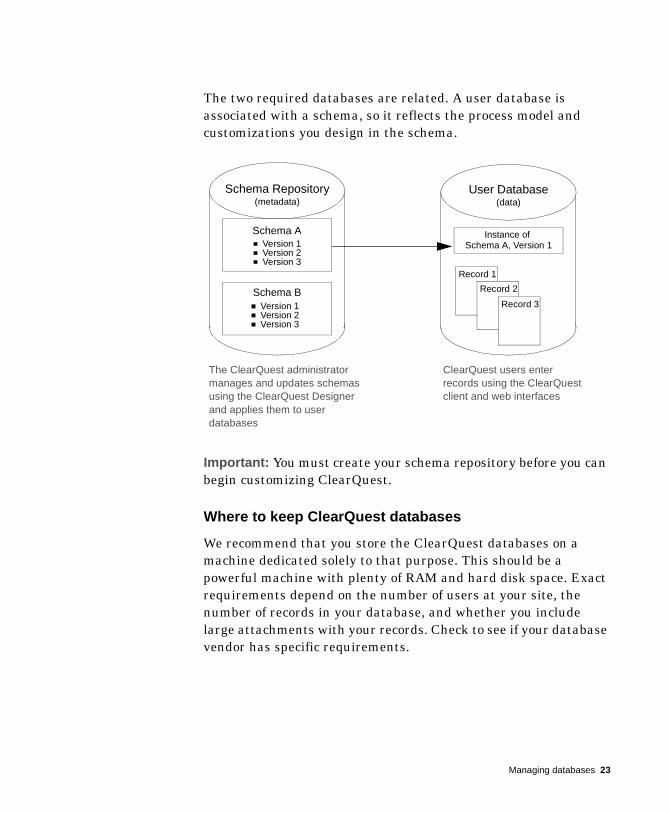
The two required databases are related. A user database is associated with a schema, so it reflects the process model and customizations you design in the schema.
Important: You must create your schema repository before you can begin customizing ClearQuest.
Where to keep ClearQuest databases
We recommend that you store the ClearQuest databases on a machine dedicated solely to that purpose. This should be a powerful machine with plenty of RAM and hard disk space. Exact requirements depend on the number of users at your site, the number of records in your database, and whether you include large attachments with your records. Check to see if your database vendor has specific requirements.
Schema Repository
Schema A
User Database
Schema B
Instance of Schema A, Version 1
Record 1
Record 2
Record 3
Version 1Version 2Version 3
Version 1Version 2Version 3
The ClearQuest administrator manages and updates schemas using the ClearQuest Designer and applies them to user databases
ClearQuest users enter records using the ClearQuest client and web interfaces
(metadata) (data)
Managing databases 23

Choosing a database vendor
You must decide which database vendor you want to use to create the ClearQuest databases. ClearQuest supports the following databases:
Entry-level database■ Microsoft Access (supplied with ClearQuest)
Mid-level database■ Sybase SQL Anywhere (supplied with ClearQuest)
High-end databases■ Microsoft SQL Server■ Oracle (NT and UNIX)
For the specific versions that ClearQuest supports, see the Release Notes.
To decide which vendor best suits your needs, you must determine how many simultaneous users you expect to have. You can use the following general guidelines to help you:
■ For initial testing and evaluation or for small groups (less than five users), you can use the entry-level database.
■ For small to medium size groups (five to twenty users) you can use the mid-level database.
■ For larger groups (over twenty users), large amounts of data, or to achieve better performance, use one of the high-end databases.
Note: You can use different database vendors for different ClearQuest databases. For example, your production database and schema repository may be high-end databases, while your test database is an entry- or mid-level database.
24 Administering Rational ClearQuest
Creating new databases
Once you have selected a dedicated machine to use as the ClearQuest database server and determined the database vendor you want to use, you are ready to create the required ClearQuest databases (schema repository and user databases). Once the databases are set up, you can begin using and customizing ClearQuest.
For specific steps on creating new databases, see the Installing Rational ClearQuest guide. The steps for installing databases assume that the vendor software is already installed. When the databases are created, you can proceed to Chapter 4, “Working with ClearQuest schemas”.
Managing databases 25
Understanding database maintenance
This section describes how to maintain your ClearQuest databases and perform some special activities.
Understanding database integrity
ClearQuest stores data using relational database functionality. However, the methods for storing and locating information in tables and for joining that information for presentation in the interface are specific to ClearQuest.
Important: To preserve your data integrity, we strongly recommend that you do not use your database vendor tools to directly manipulate ClearQuest data or tables. If your data becomes corrupted, it will be extremely difficult to recover. For this reason, once you create the databases you should use only ClearQuest tools to manipulate data.
26 Administering Rational ClearQuest
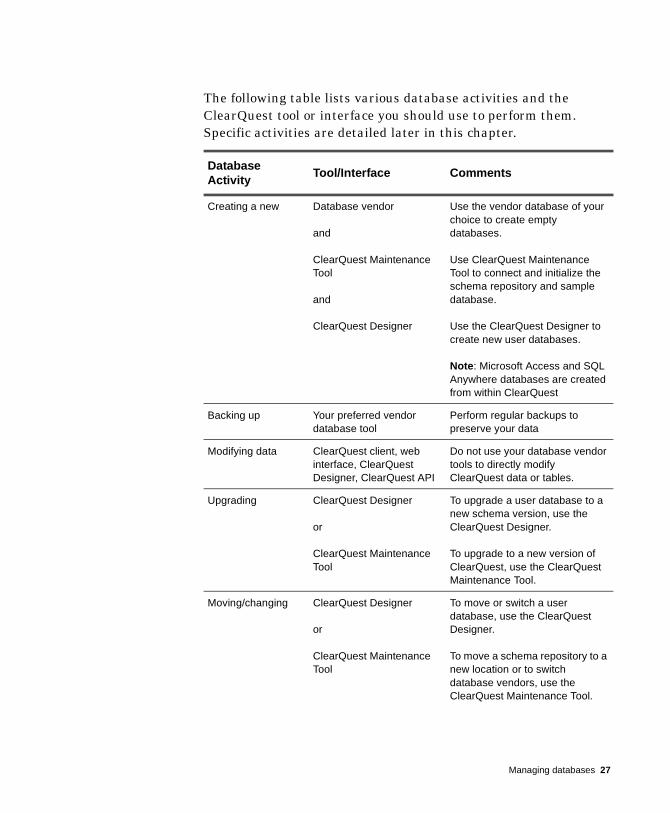
The following table lists various database activities and the ClearQuest tool or interface you should use to perform them. Specific activities are detailed later in this chapter.
Database Activity
Tool/Interface Comments
Creating a new Database vendor
and
ClearQuest Maintenance Tool
and
ClearQuest Designer
Use the vendor database of your choice to create empty databases.
Use ClearQuest Maintenance Tool to connect and initialize the schema repository and sample database.
Use the ClearQuest Designer to create new user databases.
Note: Microsoft Access and SQL Anywhere databases are created from within ClearQuest
Backing up Your preferred vendor database tool
Perform regular backups to preserve your data
Modifying data ClearQuest client, web interface, ClearQuest Designer, ClearQuest API
Do not use your database vendor tools to directly modify ClearQuest data or tables.
Upgrading ClearQuest Designer
or
ClearQuest Maintenance Tool
To upgrade a user database to a new schema version, use the ClearQuest Designer.
To upgrade to a new version of ClearQuest, use the ClearQuest Maintenance Tool.
Moving/changing ClearQuest Designer
or
ClearQuest Maintenance Tool
To move or switch a user database, use the ClearQuest Designer.
To move a schema repository to a new location or to switch database vendors, use the ClearQuest Maintenance Tool.
Managing databases 27
Backing up your data
You never know when an equipment failure or software problems will occur that can cause data loss. Regular backups are the only way to ensure the safety of your ClearQuest data.
We recommend developing a strategy for performing regular database backups. Back up your user databases and your schema repository at the same time. This preserves both your data and customizations.
You can use whichever tool you choose for performing backups. Most high-end databases come with a tool you can use to establish regular backups.
Moving to a new schema
ClearQuest Export Tool
and
ClearQuest Import Tool
To switch to a different schema, export data from a user database with the ClearQuest Export Tool
To import data into a user database associated with a new schema, use the ClearQuest Import Tool.
Deleting/undeleting a user database
ClearQuest Designer The ClearQuest Designer removes the link between the schema repository and the database, but does not delete the physical database.
To delete the physical database, use your database vendor tools.
Database Activity
Tool/Interface Comments
28 Administering Rational ClearQuest
Changing your database vendor
You can use ClearQuest to change (move) a database from one vendor to another. The following examples show how to move a sample schema repository using the ClearQuest Maintenance Tool, and a sample user database using the ClearQuest Designer.
These examples show how to move a database from Microsoft Access to Microsoft SQL Server, but the same steps apply for converting from any supported database to another.
Note: Your schema repository and user databases are stored in different databases, so you must convert them separately.
Moving a schema repository
This example shows how to move a schema repository (called “CQ master” in our example) to a new database vendor using the ClearQuest Maintenance Tool.
1 Install and configure the new vendor database software.
2 Create a new empty database with your vendor tool (exception: Microsoft Access and SQL Anywhere databases can be created from within ClearQuest).
Note: See the Installing Rational ClearQuest guide for information on creating new databases.
3 Notify all users to log off from ClearQuest.
ClearQuest prevents new users from accessing the databases during the process, but it cannot detect or log off users who are still logged in when the procedure begins.
Note: Some high-end databases give the administrator a tool for logging users off from the database. Check your database vendor to see if it has such a tool.
Managing databases 29
4 Back up all your databases.
Warning: Always make a backup of your database before changing database vendors. The conversion process locks the original databases during conversion.
5 Run the ClearQuest Maintenance Tool from the Start menu.
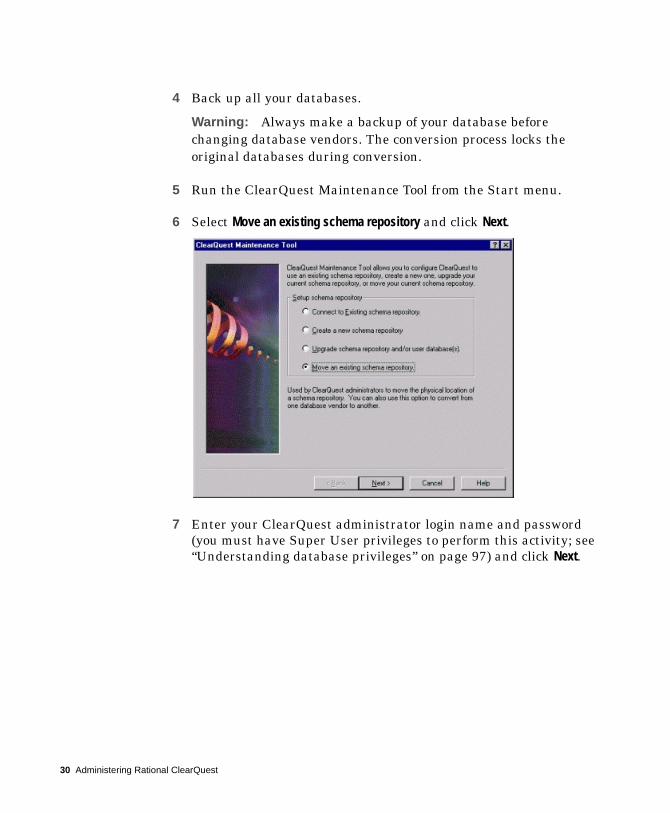
6 Select Move an existing schema repository and click Next.
7 Enter your ClearQuest administrator login name and password (you must have Super User privileges to perform this activity; see “Understanding database privileges” on page 97) and click Next.
30 Administering Rational ClearQuest

8 Provide the new schema repository properties, then click Next.
9 When the conversion is complete, exit the ClearQuest Maintenance Tool.
10 Have all users run the ClearQuest Maintenance Tool to connect to the new schema repository. Be sure to provide them with the information they need to connect. See “Installing ClearQuest for end-users” in the Installing Rational ClearQuest guide for details on the information needed to connect.
Moving a user database
This example shows how to move a user database (called “SAMPL” in our example) to a new database vendor using the ClearQuest Designer.
1 Install and configure the new vendor database software.
2 Create a new empty database with your vendor tool (exception: Microsoft Access and SQL Anywhere databases can be created from within ClearQuest).
Managing databases 31
Note: See the Installing Rational ClearQuest guide for information on creating new databases.
3 Notify all users to log off from ClearQuest.
ClearQuest prevents new users from accessing the databases during the process, but it cannot detect or log off users who are still logged in when the procedure begins.
Note: Some high-end databases give the administrator a tool for logging users off from the database. Check your database vendor to see if it has such a tool.
4 Back up your databases.
Warning: Always make a backup of your database before changing database vendors. The conversion process locks the original databases during the conversion process.
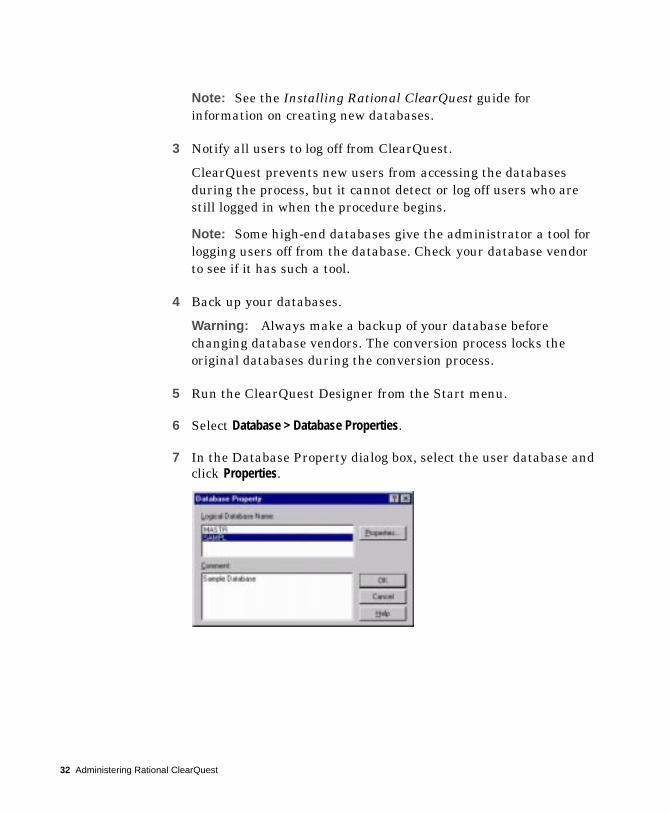
5 Run the ClearQuest Designer from the Start menu.
6 Select Database > Database Properties.
7 In the Database Property dialog box, select the user database and click Properties.
32 Administering Rational ClearQuest
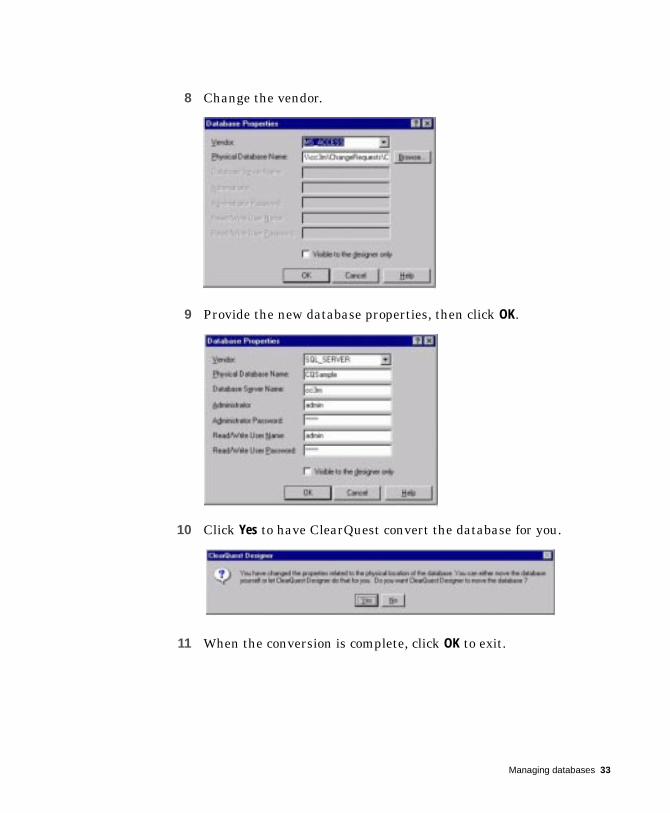
8 Change the vendor.
9 Provide the new database properties, then click OK.
10 Click Yes to have ClearQuest convert the database for you.
11 When the conversion is complete, click OK to exit.
Managing databases 33
Moving a database to a new location
To move a database to a new location, follow the same procedure for switching database vendors, with the following exceptions:
■ Since you are using the same database vendor, you do not need to reinstall any database software unless you are moving to a completely different machine.
■ When entering database properties, enter the new location or server information (the vendor remains the same).
34 Administering Rational ClearQuest
Moving a database to another schema
Once a user database is associated with a schema, you can upgrade that database with new versions of that schema, but you cannot apply an entirely different schema to the database.
For example, if you have a user database using version 1 of the Defect Tracking schema, you can upgrade that database to version 2 of the DefectTracking schema. If you want to start using the Enterprise schema instead, you cannot apply it to the database already associated to the DefectTracking schema.
The only way to switch to a new schema is to move the data out of the old user database into a new user database that is using the new schema. ClearQuest provides the tools you need to export and import the data.
Specifically, switching schemas involves the following tasks:
1 Create or modify the schema you want to start using.
See Chapter 4, “Working with ClearQuest schemas” and Chapter 5, “Customizing a schema” for information on creating and modifying schemas.
2 Create a new user database based on the new schema.
Use the ClearQuest Designer to create a new user database.
3 Export the data from your current user database.
Use the ClearQuest Export Tool to export the data from your current user database. See “Using the ClearQuest Export Tool” on page 37.
4 Import the data into the new database.
Use the ClearQuest Import Tool to import the data into your new database. See Chapter 10, “Importing data into ClearQuest” for information on using the Import Tool.
Managing databases 35

Consider the following issues when switching to a new schema:
■ After creating a new schema, we recommend that you test it with a test database before upgrading your new user database. You can import a small subset of your data and test the schema to be sure all aspects of the process and workflow function correctly.
■ If your new schema has dynamic lists, be sure to populate those lists before importing your data (see “Understanding choice lists” on page 110).
■ If you have dependencies for reference or reference_list fields within your data, you should import your data in the proper order. For example, you may need to import your project record type first, then your main data record type, then attachments, and finally history.
■ If you are not only switching schemas, but also schema repositories, you must import user information first. Use the ClearQuest Designer User Administration tool to export the user information and move it to the new schema repository before moving any data.
■ If the new schema uses different state names from the old schema, you must edit the export file to correct the old state names. For example, suppose the old schema used the state name submitted, but the new schema calls that state new. After exporting your data, you must edit the export file and replace submitted with new before importing that data into the new schema.
■ The ClearQuest Export Tool exports the record ID into the display_name field for history and attachments stateless record types; see “Working with record types” on page 61. Remember to map the display_name field to the original “old” ID field when importing data into the new schema.
36 Administering Rational ClearQuest
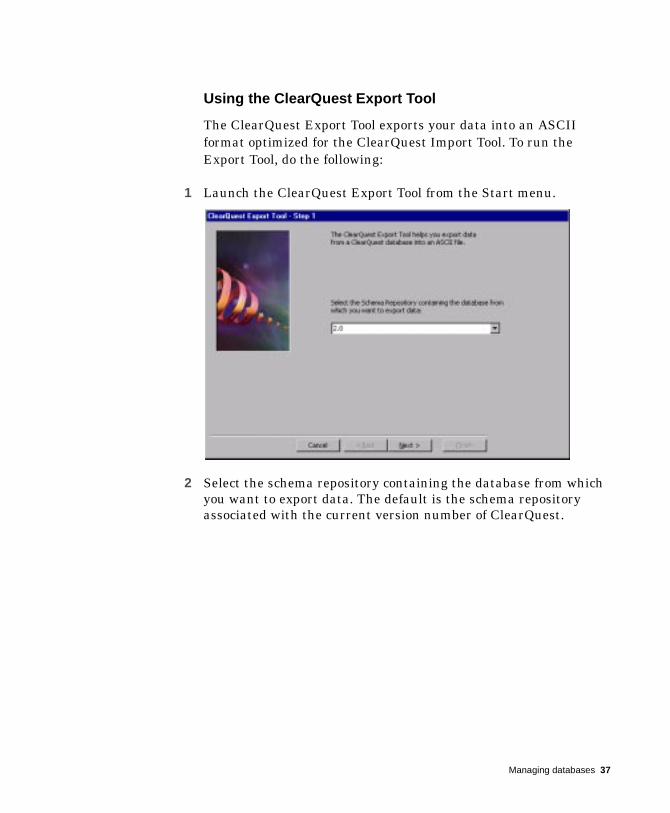
Using the ClearQuest Export Tool
The ClearQuest Export Tool exports your data into an ASCII format optimized for the ClearQuest Import Tool. To run the Export Tool, do the following:
1 Launch the ClearQuest Export Tool from the Start menu.
2 Select the schema repository containing the database from which you want to export data. The default is the schema repository associated with the current version number of ClearQuest.
Managing databases 37
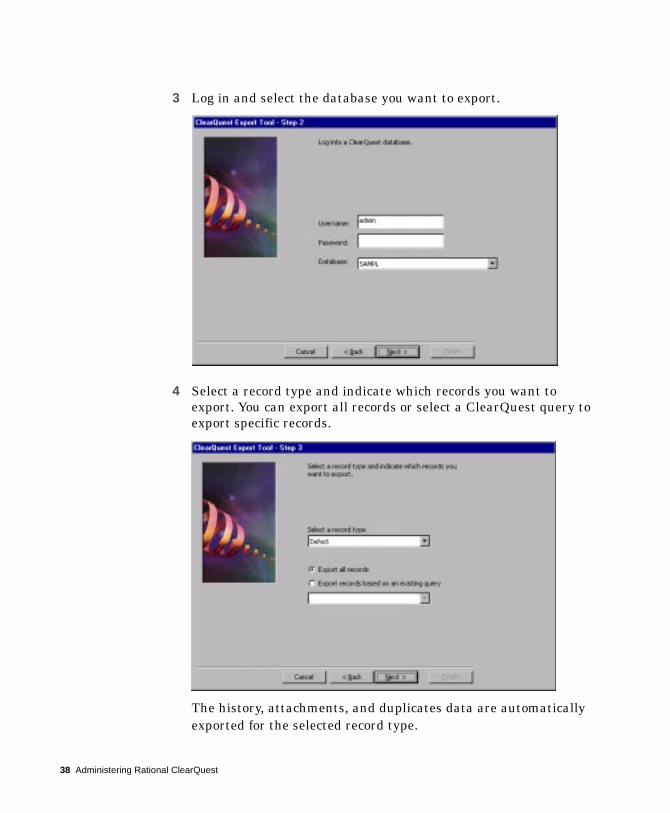
3 Log in and select the database you want to export.
4 Select a record type and indicate which records you want to export. You can export all records or select a ClearQuest query to export specific records.
The history, attachments, and duplicates data are automatically exported for the selected record type.
38 Administering Rational ClearQuest
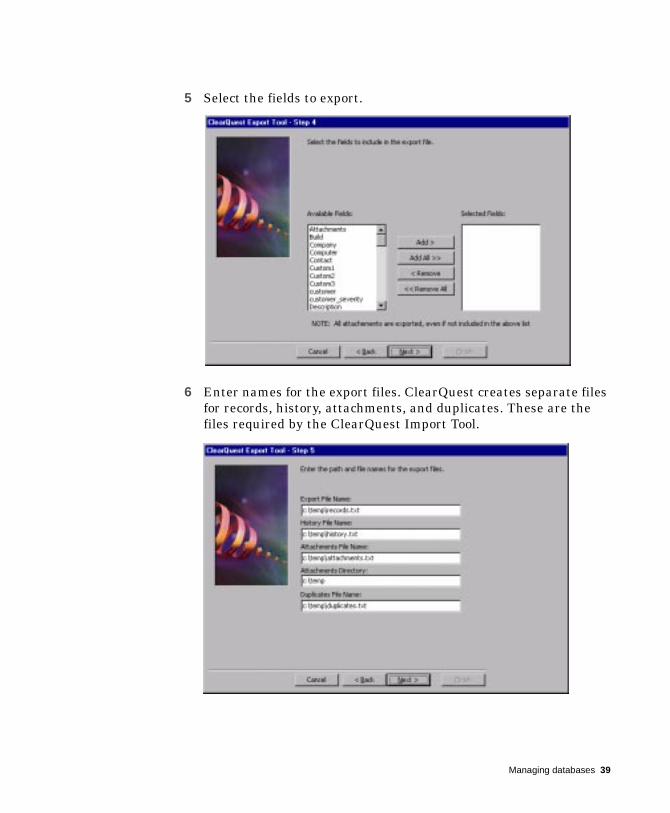
5 Select the fields to export.
6 Enter names for the export files. ClearQuest creates separate files for records, history, attachments, and duplicates. These are the files required by the ClearQuest Import Tool.
Managing databases 39

7 Enter the final export parameters.
■ You can choose to include all records in one file or enter the number of records you want per file.
■ Select the field delimiter for the export files. The most common format is comma-delimited, but you can also use colons, semi-colons, pipes, or tabs.
■ Enter the path and name for the Error log.
8 Click Finish to begin the export. ClearQuest displays a dialog box when the export is complete and lists any detected errors.
40 Administering Rational ClearQuest
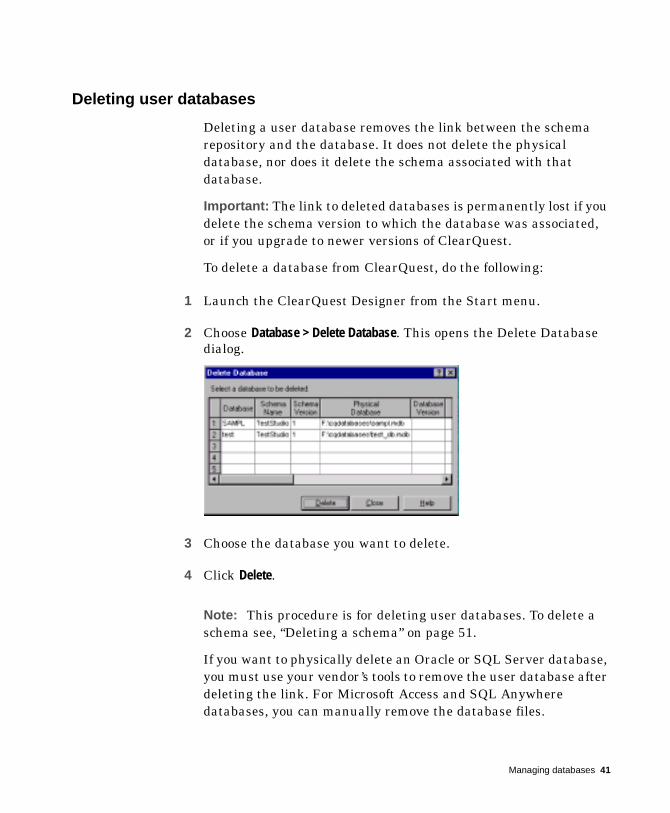
Deleting user databases
Deleting a user database removes the link between the schema repository and the database. It does not delete the physical database, nor does it delete the schema associated with that database.
Important: The link to deleted databases is permanently lost if you delete the schema version to which the database was associated, or if you upgrade to newer versions of ClearQuest.
To delete a database from ClearQuest, do the following:
1 Launch the ClearQuest Designer from the Start menu.
2 Choose Database > Delete Database. This opens the Delete Database dialog.
3 Choose the database you want to delete.
4 Click Delete.
Note: This procedure is for deleting user databases. To delete a schema see, “Deleting a schema” on page 51.
If you want to physically delete an Oracle or SQL Server database, you must use your vendor’s tools to remove the user database after deleting the link. For Microsoft Access and SQL Anywhere databases, you can manually remove the database files.
Managing databases 41
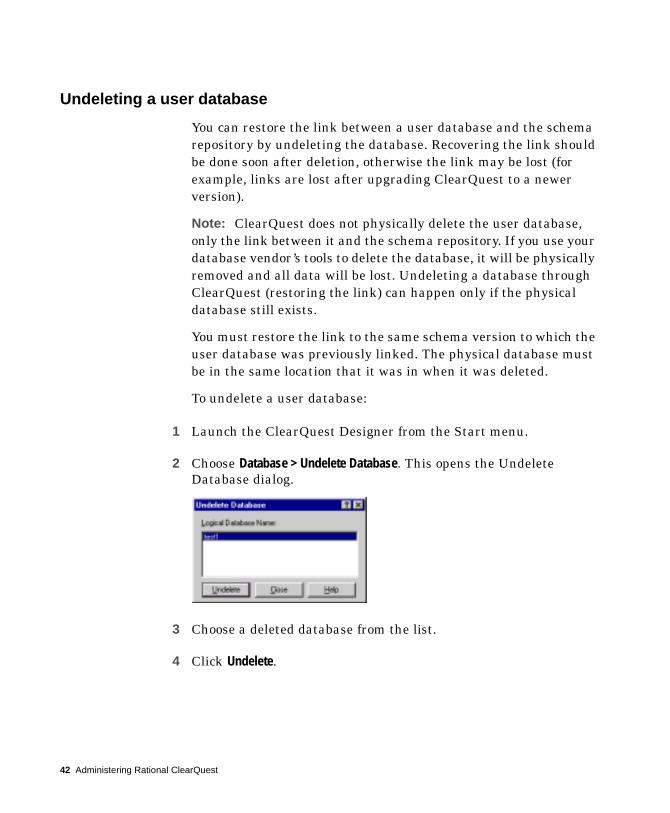
Undeleting a user database
You can restore the link between a user database and the schema repository by undeleting the database. Recovering the link should be done soon after deletion, otherwise the link may be lost (for example, links are lost after upgrading ClearQuest to a newer version).
Note: ClearQuest does not physically delete the user database, only the link between it and the schema repository. If you use your database vendor’s tools to delete the database, it will be physically removed and all data will be lost. Undeleting a database through ClearQuest (restoring the link) can happen only if the physical database still exists.
You must restore the link to the same schema version to which the user database was previously linked. The physical database must be in the same location that it was in when it was deleted.
To undelete a user database:
1 Launch the ClearQuest Designer from the Start menu.
2 Choose Database > Undelete Database. This opens the Undelete Database dialog.
3 Choose a deleted database from the list.
4 Click Undelete.
42 Administering Rational ClearQuest
A D M I N I S T E R I N G R A T I O N A L C L E A R Q U E S T
4
Working with ClearQuest schemasA ClearQuest schema contains the metadata (the record types, fields, forms, and so on) that define how you work with records in ClearQuest. ClearQuest includes several predefined schemas that provide common workflow models.
Predefined schemas are made up of schema packages that add specific functionality to the schema. A quick way to customize a schema is to start with a predefined schema and add various packages to get the functionality you need.
To work with schemas, you use the ClearQuest Designer. This chapter covers the basic procedures you need to use when working with all schemas, whether you are modifying an existing schema or creating a schema from scratch.
Topics covered include:
■ Basic procedures for working with schemas■ Selecting a ClearQuest schema■ Adding packages
To work with schemas, you need Schema Designer or Super User privileges. For more information, see Chapter 6, “Administering users.”
More information? For a complete list of predefined schemas and packages, see Appendix A, “ClearQuest schemas and packages.” For information on how to customize an individual schema, see Chapter 5, “Customizing a schema.”
43
Basic procedures for working with schemas
ClearQuest maintains schemas under version control in the schema repository. To customize a schema or to create a new schema, use the ClearQuest Designer and follow these basic procedures:
1 Create a test database to use to test your schema customizations. See “Setting up a test database” on page 45.
2 Check out a schema from the schema repository.
If you are creating a schema from scratch, you can start with the predefined Blank schema.
3 Choose the scripting language to use for hook code. See “Choosing a scripting language” on page 47.
4 Associate the schema with the test database. Select Database > Set Test Database.
5 Customize the schema, validating often, especially if you are making complex changes to your schema. See “Validating schema changes” on page 47.
6 Save your work in progress. See “Saving work in progress” on page 48.
You can save your work in progress and log off while a schema is checked out to you; you can resume work when you log back in.
7 Test your schema changes. Select File > Test Work. Testing upgrades the test database with your latest schema changes, providing a quick way for you to test your work in progress before you actually check in the schema. See “Testing a schema” on page 49.
8 Repeat steps 4 through 6 until you are satisfied with your schema changes.
44 Administering Rational ClearQuest
9 Check the schema into the schema repository. ClearQuest creates a new version of the schema when you check it in. See “Checking in a schema” on page 49.
Note: Checking in a schema revision does not affect any databases, it just makes the new revision available so that you can use it to upgrade an existing database or to apply to a new database. ClearQuest keeps a history of each revision, so you can view a prior revision and use it in a new database. Checking in a schema also forces the validation of the schema.
10 Make sure that everyone is logged off the user database. Back up the user database and the schema repository.
11 Upgrade the user database to the new schema revision. Select Database > Upgrade Database and select the user database. See “Upgrading a user database” on page 51.
Setting up a test database
Before you check out a schema to customize, you should create a test database to use for testing your schema changes. Using a test database provides a quick way for you to test your work in progress without actually checking in the schema and updating the user database.
Try creating some sample records to test various aspects of your schema. You can use the ClearQuest Import Tool to import data to test complex schema customizations.
To set up a test database:
1 Create a test database by selecting Database > New Database.
2 Check out a schema to customize it and associate it with the test database. Select Database > Set Test Database and select the test database.
3 Test your work before you check in a schema by selecting File > Test Work.
Working with ClearQuest schemas 45
More information? Look up test databases, setting in the ClearQuest Designer Help index.
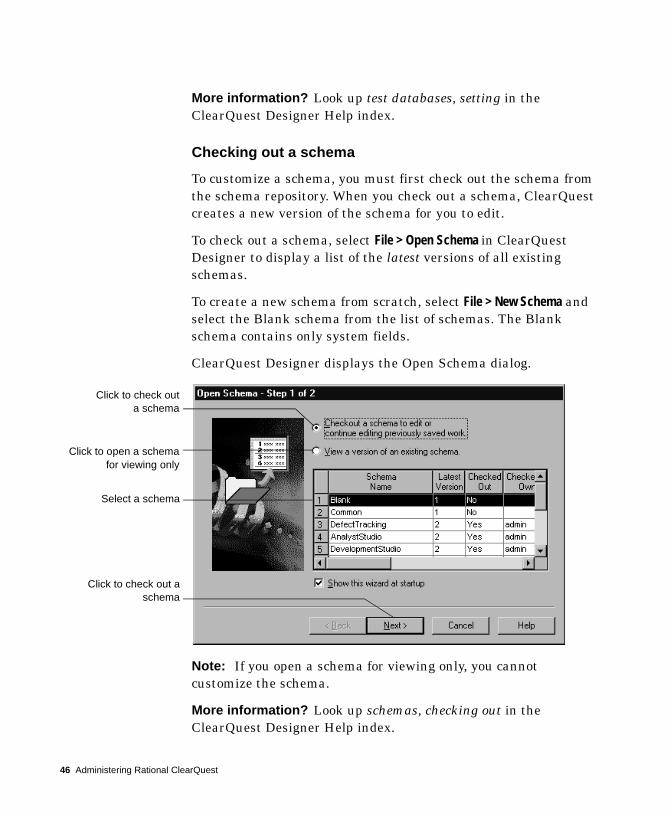
Checking out a schema
To customize a schema, you must first check out the schema from the schema repository. When you check out a schema, ClearQuest creates a new version of the schema for you to edit.
To check out a schema, select File > Open Schema in ClearQuest Designer to display a list of the latest versions of all existing schemas.
To create a new schema from scratch, select File > New Schema and select the Blank schema from the list of schemas. The Blank schema contains only system fields.
ClearQuest Designer displays the Open Schema dialog.
Note: If you open a schema for viewing only, you cannot customize the schema.
More information? Look up schemas, checking out in the ClearQuest Designer Help index.
Select a schema
Click to check outa schema
Click to check out aschema
Click to open a schemafor viewing only
46 Administering Rational ClearQuest
Choosing a scripting language
Hooks are triggers for pieces of code that ClearQuest executes at specified times to more fully implement your process. You can write hooks in VBScript and/or Perl. For documentation on either language, see the following resources on the internet:
■ http://msdn.microsoft.com/scripting/ ■ http://www.perl.com/
ClearQuest runs your hooks in VBScript or Perl, but not both at the same time. After checking out a schema, double-click Schema Properties in the Workspace to set the ClearQuest schema properties for the one scripting language that corresponds to the set of scripts that you currently want ClearQuest to run (look up schemas, setting up in the ClearQuest Designer Help index).
More information? See Chapter 7, “Using hooks to customize your workflow.”
Validating schema changes
When you attempt to check in a schema, ClearQuest automatically validates your schema to ensure that it does not contain any errors. If you are making a lot of changes to a schema, you can also check for errors by validating your schema manually as you go.
Working with ClearQuest schemas 47
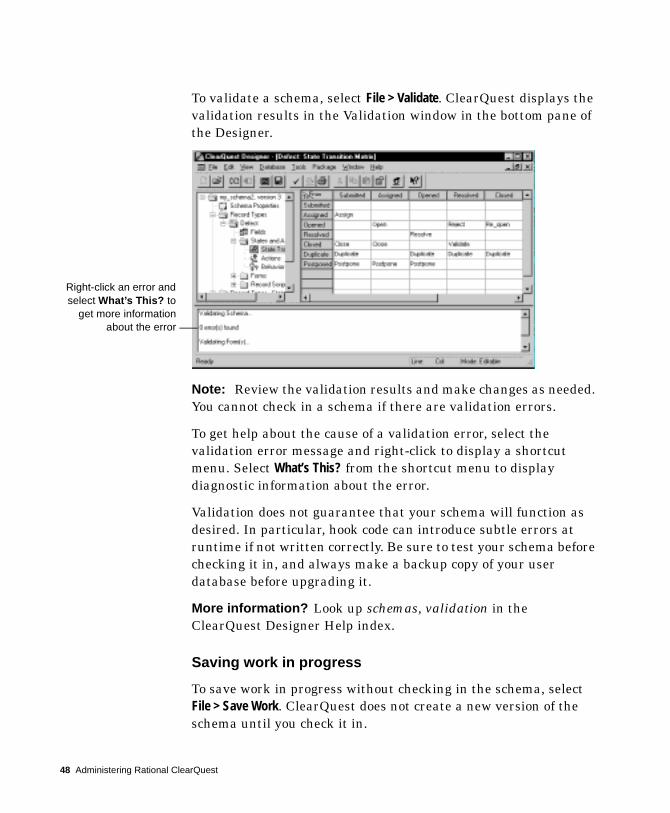
To validate a schema, select File > Validate. ClearQuest displays the validation results in the Validation window in the bottom pane of the Designer.
Note: Review the validation results and make changes as needed. You cannot check in a schema if there are validation errors.
To get help about the cause of a validation error, select the validation error message and right-click to display a shortcut menu. Select What’s This? from the shortcut menu to display diagnostic information about the error.
Validation does not guarantee that your schema will function as desired. In particular, hook code can introduce subtle errors at runtime if not written correctly. Be sure to test your schema before checking it in, and always make a backup copy of your user database before upgrading it.
More information? Look up schemas, validation in the ClearQuest Designer Help index.
Saving work in progress
To save work in progress without checking in the schema, select File > Save Work. ClearQuest does not create a new version of the schema until you check it in.
Right-click an error andselect What’s This? to
get more informationabout the error
48 Administering Rational ClearQuest
It’s a good idea to validate and save often as you work. See “Validating schema changes” on page 47.
Testing a schema
You should test your work before you check in a schema to ensure that the test database remains up to date with the latest schema version (see “Setting up a test database” on page 45).
To test a schema, select File > Test Work. This automatically upgrades the test database with your current schema changes and starts the ClearQuest client so you can test your work.
ClearQuest also validates the schema and displays any validation errors in the Validation pane at the bottom of the ClearQuest Designer window.
Note: If you skip testing your work for a schema revision, you must create a new test database.
More information? See “Setting up a test database” on page 45. Look up schemas, testing in the ClearQuest Designer Help index.
Checking in a schema
Note: You cannot check in a schema if there are validation errors. See “Validating schema changes” on page 47.
When you finish editing a schema, you should check it in to save your changes. When you check in a schema, ClearQuest increments the version number of the schema in the schema repository.
You must check in a schema before you can use it with any of your user databases. Checking in a schema does not affect the user database until you upgrade the user database with the new schema version.
To check in a schema, select File > Check In. ClearQuest validates the schema. Any errors are displayed in the Validation pane on the bottom of the Workspace.
Working with ClearQuest schemas 49
Review the validation results and change the schema as needed to correct any validation errors. For help on any of the validation messages, right-click an error message and choose What’s This? from the shortcut menu.
If you cannot validate all of your schema changes, you can save your schema changes and continue editing at a later time. You can also undo your checkout and revert the schema to its previous version. See “Saving work in progress” on page 48.
Undoing a schema checkout
You can return a schema to its previous version, even if you have made changes and saved them. To revert to the last checked-in version of a schema, select File > Undo Check Out.
Undoing a checkout removes any changes made to the schema since it was checked out. This includes removing changes that may have been made over multiple sessions and saved without checking in the schema.
Note: If you tested your work by selecting File > Test Work, your test database was upgraded to your current work. Once you undo the schema checkout, the test database will no longer be valid. You must delete the test database and re-create it.
50 Administering Rational ClearQuest
Upgrading a user database
After checking in a schema, you must upgrade the user database with the new schema version so that users have access to the latest changes. In ClearQuest Designer, select Database > Upgrade Database.
Keep in mind the following restrictions when you upgrade a user database:
■ Once a user database is associated with a schema version, it can only be upgraded to newer versions of that schema. It cannot be upgraded to an earlier version or to a different schema.
■ Before upgrading a user database, make sure that no users are connected to it. ClearQuest prevents new users from connecting to a database while you are upgrading it, but it does not disconnect users who are connected before you upgrade.
More information? Look up databases, upgrading in the ClearQuest Designer Help index. Also see Chapter 3, “Managing databases.”
Deleting a schema
Note: Schema deletions are final. You cannot retrieve a deleted schema.
You can delete a schema or a version of a schema if it has more than one version.
■ To delete a version of a schema from the schema repository, select File > Delete Schema Version and select the schema version you want to delete.
■ To delete all versions of a schema from the schema repository, select File > Delete Schema and select the schema you want to delete.
Working with ClearQuest schemas 51
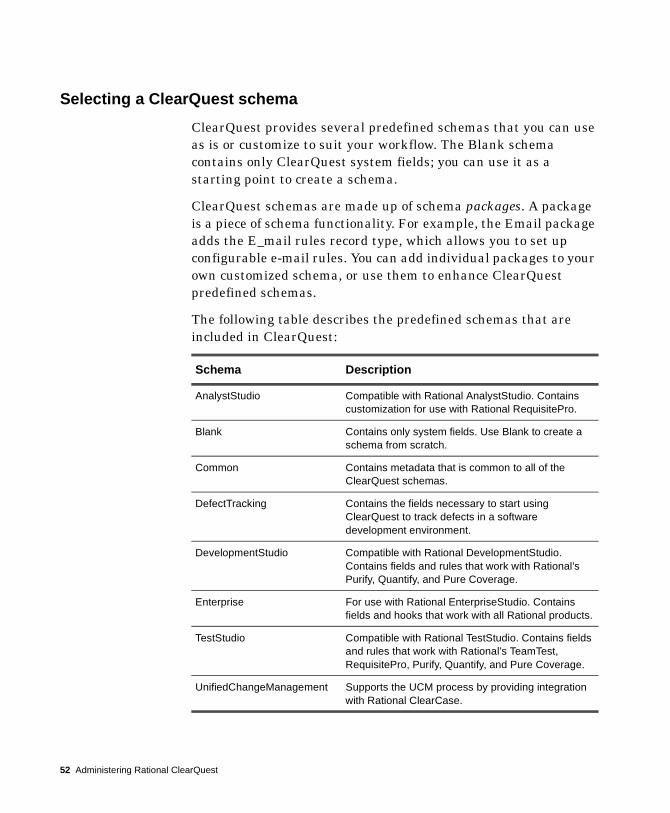
Selecting a ClearQuest schema
ClearQuest provides several predefined schemas that you can use as is or customize to suit your workflow. The Blank schema contains only ClearQuest system fields; you can use it as a starting point to create a schema.
ClearQuest schemas are made up of schema packages. A package is a piece of schema functionality. For example, the Email package adds the E_mail rules record type, which allows you to set up configurable e-mail rules. You can add individual packages to your own customized schema, or use them to enhance ClearQuest predefined schemas.
The following table describes the predefined schemas that are included in ClearQuest:
Schema Description
AnalystStudio Compatible with Rational AnalystStudio. Contains customization for use with Rational RequisitePro.
Blank Contains only system fields. Use Blank to create a schema from scratch.
Common Contains metadata that is common to all of the ClearQuest schemas.
DefectTracking Contains the fields necessary to start using ClearQuest to track defects in a software development environment.
DevelopmentStudio Compatible with Rational DevelopmentStudio. Contains fields and rules that work with Rational’s Purify, Quantify, and Pure Coverage.
Enterprise For use with Rational EnterpriseStudio. Contains fields and hooks that work with all Rational products.
TestStudio Compatible with Rational TestStudio. Contains fields and rules that work with Rational’s TeamTest, RequisitePro, Purify, Quantify, and Pure Coverage.
UnifiedChangeManagement Supports the UCM process by providing integration with Rational ClearCase.
52 Administering Rational ClearQuest
More information? See Appendix A, “Working with ClearQuest schemas,” for a complete description of ClearQuest schemas and packages.
To learn about the UnifiedChangeManagement schema and package, see Enabling ClearQuest for Unified Change Management on page 181.
Working with ClearQuest schemas 53
Adding packages
ClearQuest’s schema packages contain metadata, such as records, fields, and forms, that define specific functionality. Installing a package into a schema provides a way to quickly add that functionality to the schema.
A package might contain one or more new record types and might modify one or more record types that already exist in your schema. For example, the Email package provides functionality that allows the ClearQuest user to send an e-mail notification to a designated person. When installed into a schema, the Email package adds the new stateless Email_Rule record type to the schema and adds the Send_Email_Notif action to an existing record type in the schema.
For a complete list of packages and the record types and fields they modify, see “Packages included in ClearQuest schemas” on page 170.
Keep in mind the following when you add a package:
■ You can add one or more packages to any schema.■ Your schema must not already contain the metadata that the
package adds. For example, if you attempt to install a package containing a Project record type into a schema that already contains a Project record type, the installation fails.
■ Packages replace the add-ins used in previous versions of ClearQuest. If you are upgrading from a previous version of ClearQuest and your schemas use add-ins, install the upgrade version of the package(s). Upgrade packages contain the word “upgrade” in their version string. Your schema must already contain metadata for the upgrade package to modify. For example, an attempt to install a package that modifies the Email_Rule record type only succeeds with a schema that already includes this record type.
54 Administering Rational ClearQuest
Note: You cannot create your own packages to use with the Package Wizard. However, you can export schemas or schema versions and then import them to another schema repository using the CQLOAD command line utility. For more information, look up cqload in the ClearQuest Designer Help index.
There are four parts to adding a package to a schema:
1 Add the package.
Select Package > Package Wizard and select a package to install. Packages that are already part of your current schema do not appear in the list of packages.
2 Enable record types.
Some packages include modifications to record types that already exist in your schema. You decide whether or not the package should modify an existing record type. For details of each package, see “Packages included in ClearQuest schemas” on page 170.
More information? Look up record types, setting up for a package in the ClearQuest Designer Help index.
3 Map the states in your schema to valid state types.
When you add a package that uses state types, you are prompted to map each of your existing states to a state type for that package. You can map more than one state to a state type, but each state type requires at least one state.
Just as your schema uses a state model, state types themselves also follow a specific model. State type models are listed in “State type models for packages” on page 178. To learn how to map state types, see “Mapping state types” on page 80.
More information? Look up state types, setting up for a package in the ClearQuest Designer Help index. For step-by-step instructions on adding packages, look up packages, installing.
Working with ClearQuest schemas 55

4 Create default actions if you are using the UCM package. See “Using default actions” on page 87.
56 Administering Rational ClearQuest
A D M I N I S T E R I N G R A T I O N A L C L E A R Q U E S T
5
Customizing a schemaThis chapter describes how to use ClearQuest Designer to customize a schema. Topics covered include:
■ Planning your schema customizations■ Working with record types■ Working with fields■ Defining your state model■ Working with record forms
ClearQuest includes several predefined schemas. If one of these schemas meets your business needs, you can use it without modification. For a complete list of ClearQuest predefined schemas and packages, see Appendix A, “Customizing a schema.”
Before you can customize a schema, you must check the schema out of the schema repository. For complete instructions on how to work with schemas, see Chapter 4, “Working with ClearQuest schemas.”
To customize a schema, you need Schema Designer or Super User privileges. For more information, see Chapter 6, “Administering users.”
57
Planning your schema customizations
Customizing a schema is a multi-step process involving these basic procedures:
1 Define your data.
To define the data you want to collect and manage in ClearQuest, you work with record types and fields. To define your data:
■ Decide what type of records you need. You may want to define separate record types for hardware defects and software defects, each of which would define its own set of fields. See “Working with record types” on page 61.
■ List the fields you need on each record form.■ You can further customize your record type through field data
types and hooks.
Note: A quick way to add record types and fields to a schema is to add one or more ClearQuest predefined packages to your schema. Before you add packages to a schema, read “Adding packages” on page 54.
2 Define your state model.
See “Defining your state model” on page 77.
Each record type has its own state model. A state model consists of states, state types, actions, and field behaviors. To define your state model:
■ List the record states that you need and the actions that can be performed on the record in each state.
■ Draw a state model showing how records will move through your system. Define the possible states in which a record can exist. For example, a simple defect tracking system might define submitted, opened, fixed, and verified states.
■ Create the actions you want to use to modify records and to move them from one state to the next.
58 Administering Rational ClearQuest
■ Group each field with a specific state. Define the legal values for each field, including whether to provide choice lists, and whether the field is required or optional. See “Working with fields” on page 65.
■ You can further customize your process by adding action hooks. See “Adding action hooks” on page 85.
■ You can also customize your schema by adding one or mode packages. Certain packages can involve your working with state types. A state type is a label some ClearQuest schema and packages use to define a state’s role in your state model. For example, the UnifiedChangeManagement package and the Resolution package require that each state in your state model be assigned or mapped to a specific state type. When you add a new state to a schema that uses state types, you must map the new state to a state type. For more information, see “Mapping state types” on page 80.
3 Build your forms. See “Working with record forms” on page 88.
■ Create the forms your users will use to submit new records and view existing records. Design the layout of your forms. Decide where to locate each field on the form.
■ For the web interface, decide how fields should be grouped and the order they should appear in on the web pages.
4 Add hooks.
■ Define the relationships between fields. Determine whether the value in one field affects the values in other fields. These relationships can help you decide where to add hooks and what types of hooks to add. See “Adding field hooks” on page 74.
■ Plan additional controls, hook code, or permissions that will enhance how your record form is used. For example, decide who should be notified when a record is submitted or changed, who can perform certain actions, and which fields are required in each state. See “Adding action hooks” on page 85.
Customizing a schema 59

For more information about hooks, see Chapter 7, “Using hooks to customize your workflow.”
More information? Select Working with schemas, Creating a new schema in the ClearQuest Designer Help.
60 Administering Rational ClearQuest
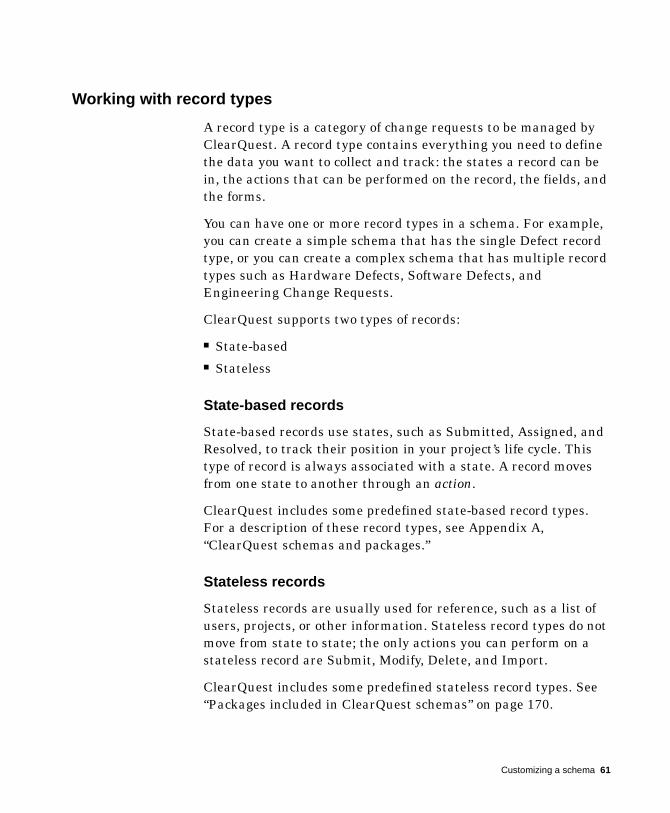
Working with record types
A record type is a category of change requests to be managed by ClearQuest. A record type contains everything you need to define the data you want to collect and track: the states a record can be in, the actions that can be performed on the record, the fields, and the forms.
You can have one or more record types in a schema. For example, you can create a simple schema that has the single Defect record type, or you can create a complex schema that has multiple record types such as Hardware Defects, Software Defects, and Engineering Change Requests.
ClearQuest supports two types of records:
■ State-based■ Stateless
State-based records
State-based records use states, such as Submitted, Assigned, and Resolved, to track their position in your project’s life cycle. This type of record is always associated with a state. A record moves from one state to another through an action.
ClearQuest includes some predefined state-based record types. For a description of these record types, see Appendix A, “ClearQuest schemas and packages.”
Stateless records
Stateless records are usually used for reference, such as a list of users, projects, or other information. Stateless record types do not move from state to state; the only actions you can perform on a stateless record are Submit, Modify, Delete, and Import.
ClearQuest includes some predefined stateless record types. See “Packages included in ClearQuest schemas” on page 170.
Customizing a schema 61
Record type families
You can group two or more state-based record types as a record type family to allow ClearQuest users to query across multiple record types.
To create a record type family, follow the instructions in “Adding and creating record types” below. Keep in mind the following:
■ The record types in a family must have one or more common fields. These fields are also used to query the record type family.
Open the Fields grid for each record type in the family and add the common field(s). Make sure the information in the Field Name and Type columns is the same for the record type family and for the individual record types. You can ignore the columns with hooks.
■ Since record types and record type families appear in the same window when ClearQuest users select Query > New Query, make sure you use a naming convention that will help users distinguish individual record types from record type families.
Adding and creating record types
You can add new record types to your schema. You must create record types as either state-based or stateless; once you create the record type, you cannot change whether it is stateless or state-based.
To create a record type select Edit > Add Record Type/Family in ClearQuest Designer. Click State, Stateless, or Family and type a name for the record type or family.
Note: When you create a stateless record type, you must select one or more of its fields to be the unique key. ClearQuest uses the unique key to differentiate among stateless records of a given type. For more information, select Defining record types > Assigning a unique key to a stateless record type in the ClearQuest Designer Help.
More information? Select Defining record types > Adding a record type in the ClearQuest Designer Help.
62 Administering Rational ClearQuest

Selecting the default record type
When you add new record types to a schema, you must choose which record type should be used as the default. Default record types can be state-based or stateless.
Each schema must have a default record type. ClearQuest uses the default record type to create a shortcut button in the ClearQuest client that can be used for submitting records of that type. ClearQuest also uses the default record type in situations where no other record type is explicitly specified.
To make a record type the default, right-click the record type in the Workspace and select Default Record Type from the shortcut menu.
Using ClearQuest packages to add record types
You can use ClearQuest predefined packages to add functionality to a schema. Packages can add record types or enhance existing record types by adding fields, hooks, forms, and states.
More information? See “Adding packages” on page 54.
Renaming a record type
To rename a record type or family, select Edit > Rename Record Type/Family and type a new name.
Note: When you change the name of a record type, you must edit any hooks in the record type to reflect the new name. If you do not edit your hooks, your scripts will not work.
More information? Select Defining record types > Renaming record types in the ClearQuest Designer Help.
Deleting a record type
To delete a record type, select Edit > Delete Record Type/Family and select a record type or family to delete.
Customizing a schema 63
The following restrictions apply to deleting record types:
■ ClearQuest maintains four stateless system record types: History, Attachments, Groups, and Users. You cannot delete system record types.
■ You cannot delete the default record type. You must first assign another record type to be the default.
■ If you have explicitly referred to the name of a record type in a hook, you must modify your script code to remove any references to that name.
■ Record types added by read-only packages cannot be deleted.
64 Administering Rational ClearQuest
Working with fields
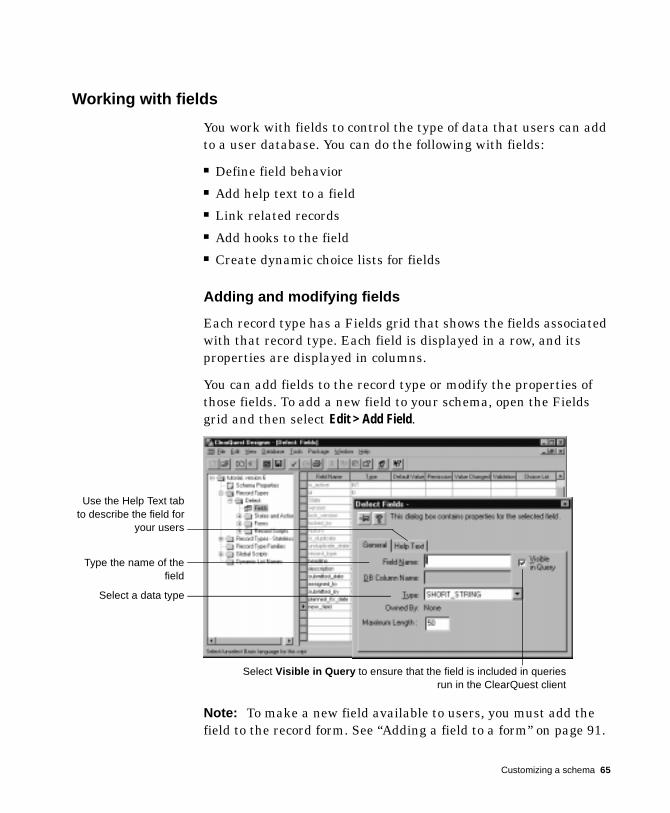
You work with fields to control the type of data that users can add to a user database. You can do the following with fields:
■ Define field behavior ■ Add help text to a field■ Link related records■ Add hooks to the field■ Create dynamic choice lists for fields
Adding and modifying fields
Each record type has a Fields grid that shows the fields associated with that record type. Each field is displayed in a row, and its properties are displayed in columns.
You can add fields to the record type or modify the properties of those fields. To add a new field to your schema, open the Fields grid and then select Edit > Add Field.
Note: To make a new field available to users, you must add the field to the record form. See “Adding a field to a form” on page 91.
Type the name of thefield
Select a data type
Use the Help Text tabto describe the field for
your users
Select Visible in Query to ensure that the field is included in queriesrun in the ClearQuest client
Customizing a schema 65
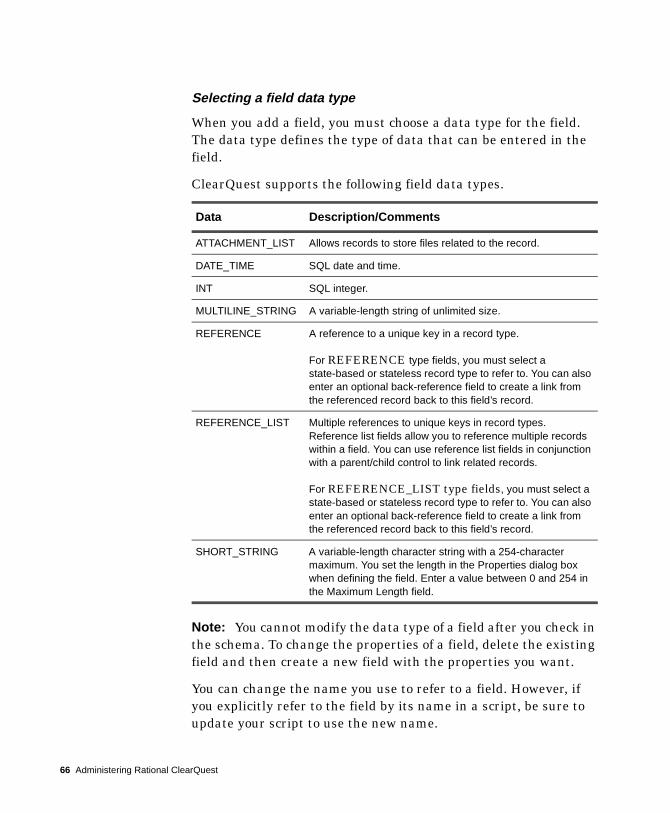
Selecting a field data type
When you add a field, you must choose a data type for the field. The data type defines the type of data that can be entered in the field.
ClearQuest supports the following field data types.
Note: You cannot modify the data type of a field after you check in the schema. To change the properties of a field, delete the existing field and then create a new field with the properties you want.
You can change the name you use to refer to a field. However, if you explicitly refer to the field by its name in a script, be sure to update your script to use the new name.
Data Description/Comments
ATTACHMENT_LIST Allows records to store files related to the record.
DATE_TIME SQL date and time.
INT SQL integer.
MULTILINE_STRING A variable-length string of unlimited size.
REFERENCE A reference to a unique key in a record type.
For REFERENCE type fields, you must select a state-based or stateless record type to refer to. You can also enter an optional back-reference field to create a link from the referenced record back to this field’s record.
REFERENCE_LIST Multiple references to unique keys in record types. Reference list fields allow you to reference multiple records within a field. You can use reference list fields in conjunction with a parent/child control to link related records.
For REFERENCE_LIST type fields, you must select a state-based or stateless record type to refer to. You can also enter an optional back-reference field to create a link from the referenced record back to this field’s record.
SHORT_STRING A variable-length character string with a 254-character maximum. You set the length in the Properties dialog box when defining the field. Enter a value between 0 and 254 in the Maximum Length field.
66 Administering Rational ClearQuest

Adding Help text to the field
Use the Help Text tab to enter a description of the field. This is the help text your users will see when they ask for help about that field. The Help Text limit is 254 characters, approximately two-thirds of the space available on the Help Text tab.
More information? Look up fields, overview in the ClearQuest Designer Help index.
Deleting a field
To delete a field, open the Fields grid. Select the row that contains the field that you want to delete and then select Edit > Delete Field.
The following restrictions apply to deleting fields:
■ To delete a field, you must also delete the field from the record form. See “Editing forms” on page 90.
■ You cannot delete, rename, or modify a system field.
Each ClearQuest record type includes system fields. These fields are required for every record of that type. System fields appear dimmed in the Fields grid.
■ You cannot reuse the field name. A deleted field remains in the database, but is unavailable to users.
■ If you have explicitly referred to the name of a field in script code, you need to remove any references to the field from your script.
■ In the ClearQuest client, any queries that use this field will become invalid.
Customizing a schema 67
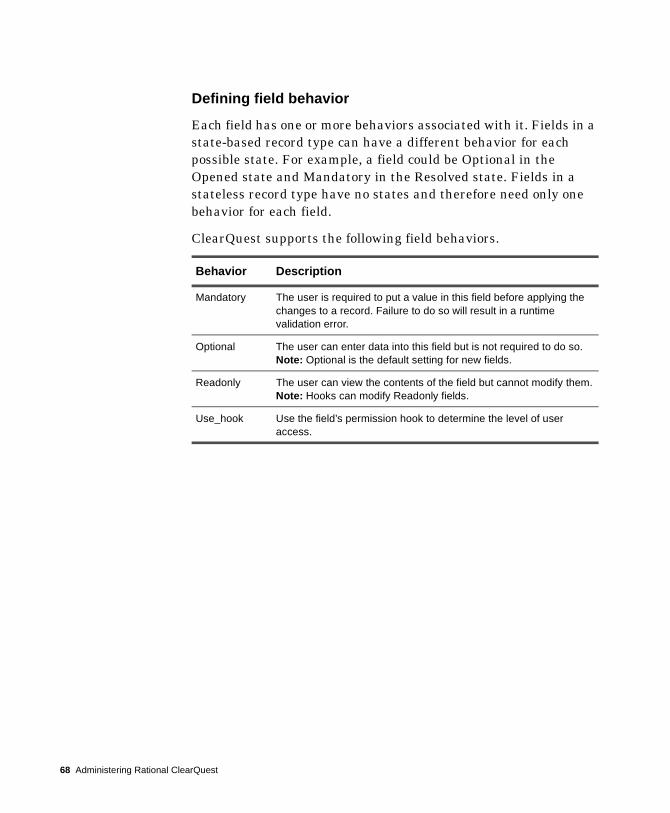
Defining field behavior
Each field has one or more behaviors associated with it. Fields in a state-based record type can have a different behavior for each possible state. For example, a field could be Optional in the Opened state and Mandatory in the Resolved state. Fields in a stateless record type have no states and therefore need only one behavior for each field.
ClearQuest supports the following field behaviors.
Behavior Description
Mandatory The user is required to put a value in this field before applying the changes to a record. Failure to do so will result in a runtime validation error.
Optional The user can enter data into this field but is not required to do so. Note: Optional is the default setting for new fields.
Readonly The user can view the contents of the field but cannot modify them. Note: Hooks can modify Readonly fields.
Use_hook Use the field’s permission hook to determine the level of user access.
68 Administering Rational ClearQuest

To set the behavior for a field, open the Behaviors grid. In the Workspace, select Record Types > Defect > States and Actions > Behaviors.
You can use the Default Behavior column to set a default behavior for a field. The default behavior applies to the field in every state. When you add a new state, the default behavior will automatically be applied to the field in the new state.
Note: You can also set the behavior of a field by using a hook. Hooks operate using Super User privileges and therefore can modify any field, even if the field behavior is Readonly.
More information? Look up fields, behaviors in the ClearQuest Designer Help index.
Right-click the cell youwant to modify and select
the new behavior fromthe shortcut menu
Customizing a schema 69
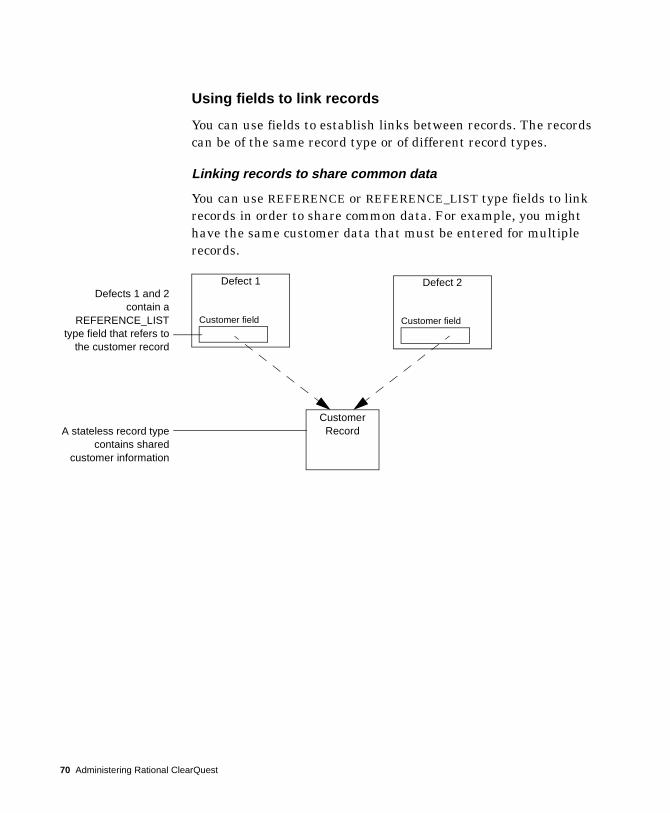
Using fields to link records
You can use fields to establish links between records. The records can be of the same record type or of different record types.
Linking records to share common data
You can use REFERENCE or REFERENCE_LIST type fields to link records in order to share common data. For example, you might have the same customer data that must be entered for multiple records.
Defect 1 Defect 2
Customer Record
Customer field Customer field
A stateless record typecontains shared
customer information
Defects 1 and 2contain a
REFERENCE_LISTtype field that refers to
the customer record
70 Administering Rational ClearQuest
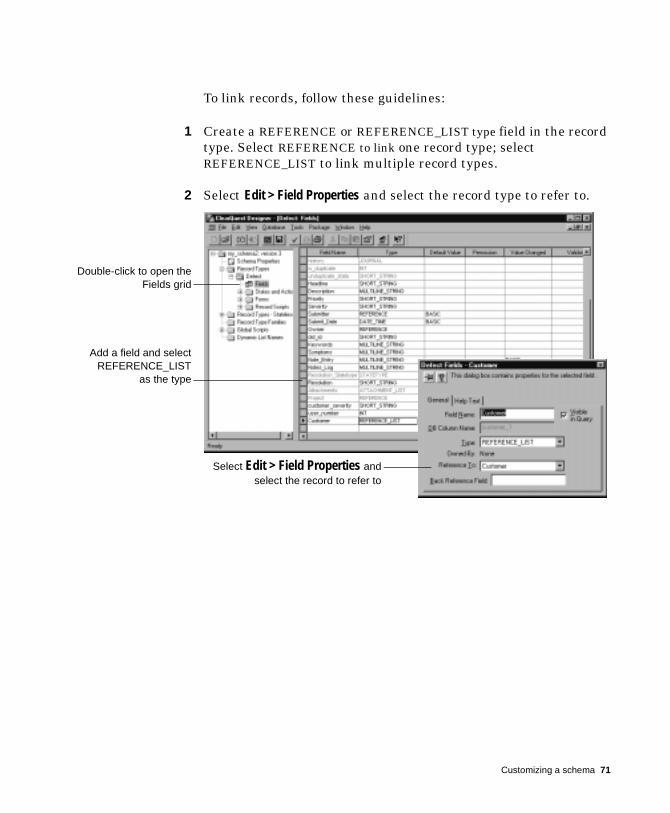
To link records, follow these guidelines:
1 Create a REFERENCE or REFERENCE_LIST type field in the record type. Select REFERENCE to link one record type; select REFERENCE_LIST to link multiple record types.
2 Select Edit > Field Properties and select the record type to refer to.
Double-click to open theFields grid
Add a field and selectREFERENCE_LIST
as the type
Select Edit > Field Properties andselect the record to refer to
Customizing a schema 71
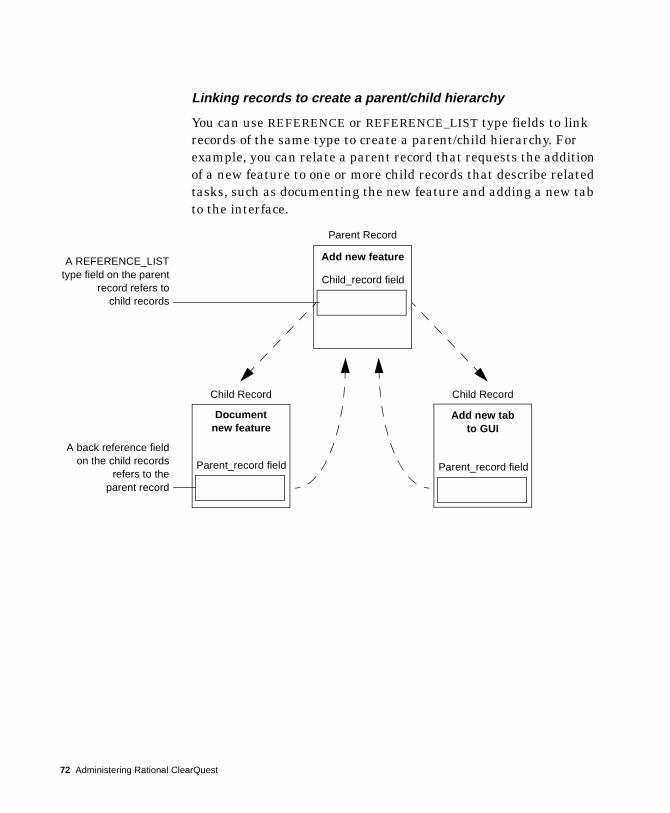
Linking records to create a parent/child hierarchy
You can use REFERENCE or REFERENCE_LIST type fields to link records of the same type to create a parent/child hierarchy. For example, you can relate a parent record that requests the addition of a new feature to one or more child records that describe related tasks, such as documenting the new feature and adding a new tab to the interface.
Parent Record
A back reference fieldon the child records
refers to theparent record
A REFERENCE_LISTtype field on the parent
record refers tochild records
Add new feature
Document new feature
Add new tab to GUI
Child RecordChild Record
Child_record field
Parent_record fieldParent_record field
72 Administering Rational ClearQuest
Follow these guidelines to create a parent/child hierarchy:
1 Add a REFERENCE_LIST or REFERENCE type field to the parent record.
2 Select the field and select Edit > Field Properties.
3 Optionally, you can enter a name for a Back Reference field. This allows you to view the link from the child record point of view. This field is automatically added to the fields of the child record.
4 Add the new fields to the forms as you normally would. You must use a parent/child control with a REFERENCE_LIST field type. See “Adding a field to a form” on page 91.
Note: Back reference fields are read only.
More information? Look up records, linking related and data types, supported in ClearQuest Designer Help index. See also “Action hook for setting the value of a parent record” on page 128.
Add a field and selectREFERENCE_LIST
as the type.
Select the record type to refer to.
Type a name for the Back Reference Field.Notice that the Back Reference Field name now
appears grayed out in the Fields List.
Customizing a schema 73
Adding field hooks
ClearQuest allows you to customize your schema by adding hooks to your fields. ClearQuest triggers your hooks at predetermined times during the execution of an action. For example, you can customize the schema so that field default values are assigned whenever someone submits a new record.
ClearQuest includes the following predefined field hooks.
You can use the ClearQuest API to write custom field hooks. See Chapter 7, “Using hooks to customize your workflow,” for information about field hooks and dependent fields.
More information? Look up fields, hooks for in the ClearQuest Designer Help index.
Field hook Use/Comments
Choice List Returns a list of valid field values. Use this hook with fields that are displayed using a list-type control, such as a list box or combo box.
Default Value Sets the initial value of the field. This hook is called at the beginning of a Submit action.
Permission Returns one of the BehaviorType constants indicating the user’s access to the field. If you add a Permission hook to a field, you must modify the Behaviors grid so that at least one of the field’s behaviors is set to USE_HOOK. Failure to do this will result in a validation error.
Value Changed Validates the contents of the field. This hook is called immediately after the Value-Changed hook so that you can provide the user with immediate feedback regarding the validity of the field’s contents. ClearQuest also calls it before committing the record to the database.
Validation Responds to changes in the field’s value. You can use this hook to trigger updates for other fields.
74 Administering Rational ClearQuest

Creating dependent fields
ClearQuest allows you to create a dependency between two fields so that when the value of the parent field changes, the value of the child field (the dependent field) also changes.
Note: Consider field dependencies very carefully when planning your schema. Creating dependent fields requires the use of script hooks, which can introduce runtime errors if not written correctly. Be sure to test script hooks thoroughly before making them available to your users.
To create a dependency between two fields, you must add a VALUE_CHANGED hook to the parent field. Follow these steps:
1 Open the Fields grid.
2 In the Fields grid, click the Value Changed cell of the parent field and select BASIC or Perl from the drop-down list.
If Instant Edit Mode is enabled, ClearQuest Designer automatically opens the Script editor. To enable or disable instant editing, select Edit > Instant Edit Mode.
Double-click the cell to open the Script editor, if it does not automatically appear.
Customizing a schema 75

3 In the Script editor, write a script that gets the value of the parent field and uses it to set the value of the child field. When you finish editing your script, select Hooks > Compile to check the syntax of your script code (see “Action hook for setting the value of a parent record” on page 128).
Enabling dependent fields for ClearQuest Web
If you want dependent fields to be enabled in ClearQuest Web, you must also specify the field on which the dependency is based. You do this in the Web Dependent Fields tab of the Control Properties sheet.
Only three types of controls support web dependency:
■ the pull-down list box■ the drop-down combo box■ the combo box
More information? See Chapter 8, “Administering ClearQuest Web.”
76 Administering Rational ClearQuest

Defining your state model
Each record type has a state model, which shows the states a record can be in and the actions that can be performed on the record in each state.
A state identifies a record’s status in your system’s life cycle. Some default ClearQuest states are Opened, Resolved, and Closed. An action is a change, such as Submit, Modify, and Resolve, that takes place to a record.
The state model below shows how the EnhancementRequest record type (included in several predefined schemas) moves from one state to another as the result of an action.
You can also see this information in the EnhancementRequest record type’s State Transition Matrix.
Using the State Transition Matrix
The movement of a record from one state to another is called a state transition. A state transition consists of a source state(s), a destination state, and the action necessary to complete the transition. A record’s current state is the source state; the state it changes to is the destination state.
ClosedClose
OpenedSubmittedOpen
Duplicate
Close
Duplicate
Re-open
CloseKey
= State
= Action
Customizing a schema 77
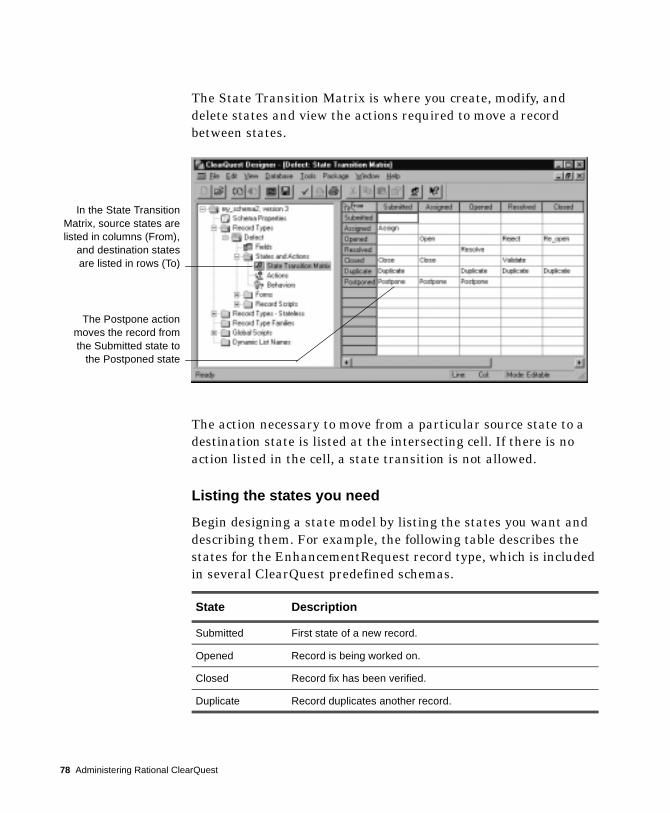
The State Transition Matrix is where you create, modify, and delete states and view the actions required to move a record between states.
The action necessary to move from a particular source state to a destination state is listed at the intersecting cell. If there is no action listed in the cell, a state transition is not allowed.
Listing the states you need
Begin designing a state model by listing the states you want and describing them. For example, the following table describes the states for the EnhancementRequest record type, which is included in several ClearQuest predefined schemas.
State Description
Submitted First state of a new record.
Opened Record is being worked on.
Closed Record fix has been verified.
Duplicate Record duplicates another record.
In the State TransitionMatrix, source states arelisted in columns (From),
and destination statesare listed in rows (To)
The Postpone actionmoves the record fromthe Submitted state to
the Postponed state
78 Administering Rational ClearQuest
Adding a new state
To add a new state, use the State Transition Matrix. Select Edit > Add State and type the name of a new state in the dialog. ClearQuest automatically adds the new state to the row and column headers.
Now that you have created a new state, you can create a new CHANGE_STATE action to transition records from other states to this new state. Alternatively, you can modify an existing CHANGE_STATE action to transition records to and from the state.
Note: If you define a state in your schema, you must use that state. It is a validation error to define a state that cannot be reached by one or more actions. Each CHANGE_STATE action must specify source and destination states. If none are defined, ClearQuest reports an error during validation.
More information? Look up states, adding to record type in the ClearQuest Designer Help index.
Note: If your schema uses state types and you add a new state, you must map it to a state type. See “Mapping state types” on page 80.
Changing the name of a state
You can modify the name of a state at any time. When you change the name of a state, ClearQuest automatically updates state name information in any actions that refer to that state.
To rename a state, use the State Transition Matrix. Select the row of the state that you want to rename and then select Edit > Rename State to open the Rename State dialog.
Note: If a hook refers to the name of a state explicitly, you must manually update the script code with the new name of the state.
Customizing a schema 79
Mapping state types
Certain packages, such as the UnifiedChangeManagement (UCM) Package and the Resolution package, modify schema business rules by adding hooks. To enable these packages to identify the states in which to fire their hooks, you edit certain properties of the states in your schema.
Just as your schema has a state model for its states, so a package can have a state type model for its state types. State types are part of a state type model that enables the hooks of certain packages to work with your schema.
To ensure a package with state types works properly with your schema, you need to map each state in each record type to an appropriate package state type. You can map more than one state to a state type, but each state type requires at least one state.
Using State Transition Matrix properties to map state types
You can modify the mappings of states to state types.
1 In the ClearQuest Designer workspace, open the State Transition Matrix, then right-click on a state and click Properties.
The properties dialog for that state displays the State Types tab.
2 To map the state type to the properties for that state, select from the Packages list the package that requires state type mapping, then select a state type.
80 Administering Rational ClearQuest

The following image shows mapping the Closed state to the UnifiedChangeManagement package Complete state type.
3 Select the next state in your state model and map it to one of the package state types.
4 Click the button in the top right corner to save your mappings and close the dialog box.
Note: If you are using the UCM schema or package, you must assign default actions for your states; see “Setting default actions for the UCM package” on page 184.
Working with actions and action types
After defining your states, determine the actions that move a record from one state to another. Actions are how you move records from state to state, modify or delete records, and submit new records to the database.
Actions can do the following:
■ Create a new record and add it to the database.■ Modify the information in the record. ■ Move a record from one state to another.
Record typeand State whose
properties display
Select the packagewith state types to map
Select a state typeto map it to the state
Customizing a schema 81
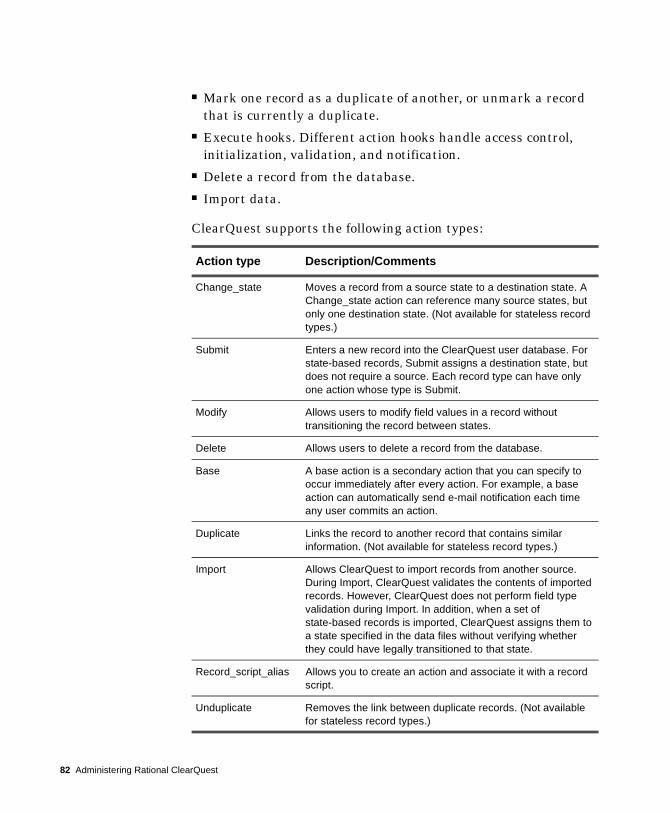
■ Mark one record as a duplicate of another, or unmark a record that is currently a duplicate.
■ Execute hooks. Different action hooks handle access control, initialization, validation, and notification.
■ Delete a record from the database.■ Import data.
ClearQuest supports the following action types:
Action type Description/Comments
Change_state Moves a record from a source state to a destination state. A Change_state action can reference many source states, but only one destination state. (Not available for stateless record types.)
Submit Enters a new record into the ClearQuest user database. For state-based records, Submit assigns a destination state, but does not require a source. Each record type can have only one action whose type is Submit.
Modify Allows users to modify field values in a record without transitioning the record between states.
Delete Allows users to delete a record from the database.
Base A base action is a secondary action that you can specify to occur immediately after every action. For example, a base action can automatically send e-mail notification each time any user commits an action.
Duplicate Links the record to another record that contains similar information. (Not available for stateless record types.)
Import Allows ClearQuest to import records from another source. During Import, ClearQuest validates the contents of imported records. However, ClearQuest does not perform field type validation during Import. In addition, when a set of state-based records is imported, ClearQuest assigns them to a state specified in the data files without verifying whether they could have legally transitioned to that state.
Record_script_alias Allows you to create an action and associate it with a record script.
Unduplicate Removes the link between duplicate records. (Not available for stateless record types.)
82 Administering Rational ClearQuest
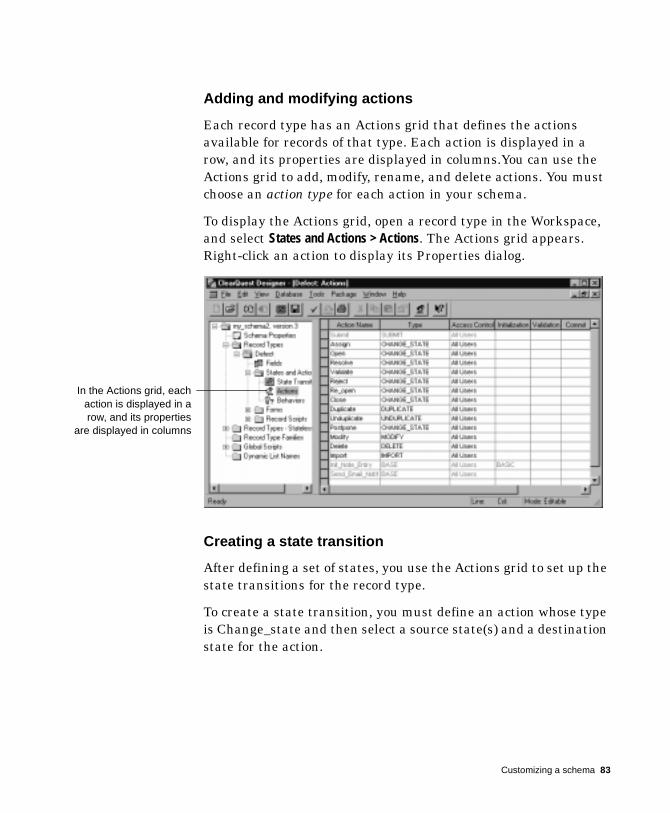
Adding and modifying actions
Each record type has an Actions grid that defines the actions available for records of that type. Each action is displayed in a row, and its properties are displayed in columns.You can use the Actions grid to add, modify, rename, and delete actions. You must choose an action type for each action in your schema.
To display the Actions grid, open a record type in the Workspace, and select States and Actions > Actions. The Actions grid appears. Right-click an action to display its Properties dialog.
Creating a state transition
After defining a set of states, you use the Actions grid to set up the state transitions for the record type.
To create a state transition, you must define an action whose type is Change_state and then select a source state(s) and a destination state for the action.
In the Actions grid, eachaction is displayed in arow, and its properties
are displayed in columns
Customizing a schema 83
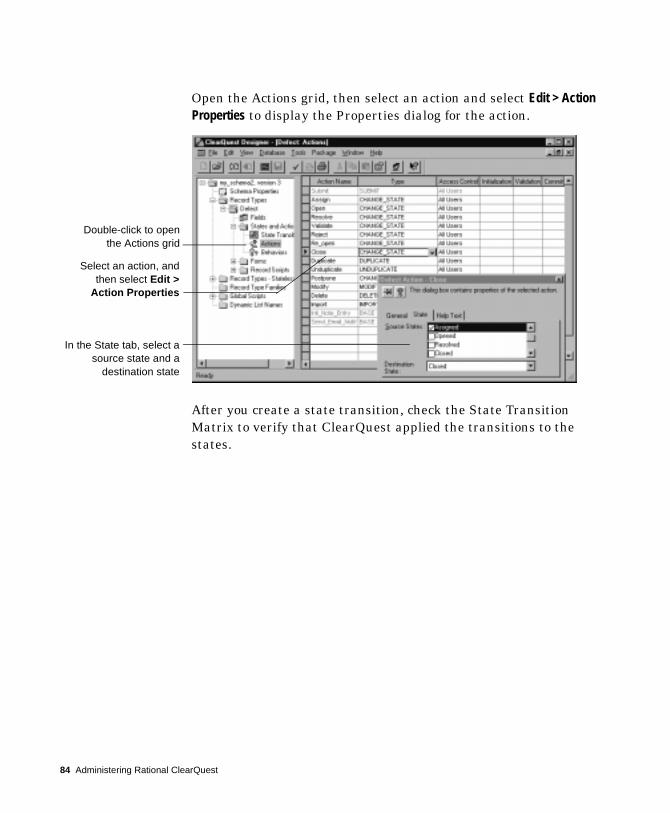
Open the Actions grid, then select an action and select Edit > Action Properties to display the Properties dialog for the action.
After you create a state transition, check the State Transition Matrix to verify that ClearQuest applied the transitions to the states.
Double-click to openthe Actions grid
Select an action, andthen select Edit >
Action Properties
In the State tab, select asource state and a
destination state
84 Administering Rational ClearQuest
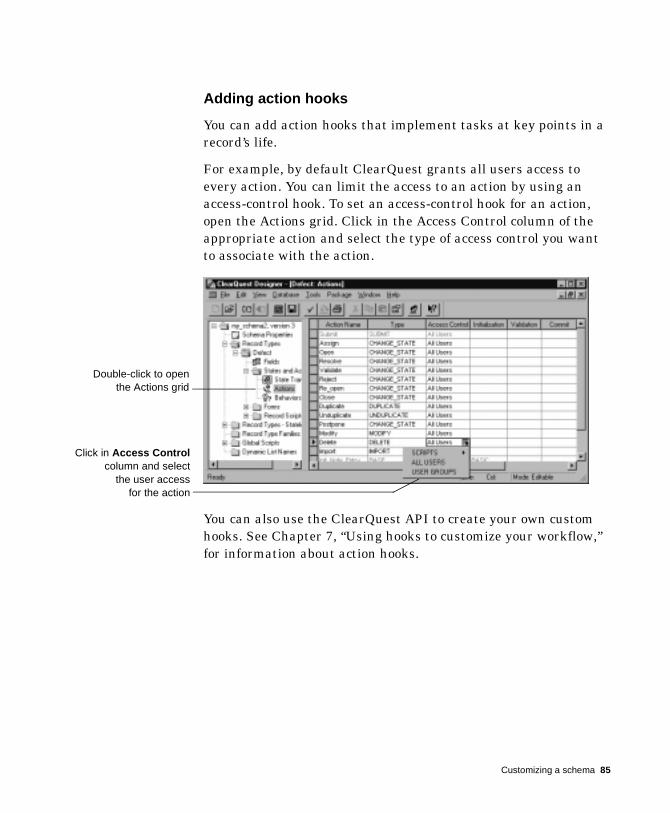
Adding action hooks
You can add action hooks that implement tasks at key points in a record’s life.
For example, by default ClearQuest grants all users access to every action. You can limit the access to an action by using an access-control hook. To set an access-control hook for an action, open the Actions grid. Click in the Access Control column of the appropriate action and select the type of access control you want to associate with the action.
You can also use the ClearQuest API to create your own custom hooks. See Chapter 7, “Using hooks to customize your workflow,” for information about action hooks.
Double-click to openthe Actions grid
Click in Access Controlcolumn and select
the user accessfor the action
Customizing a schema 85
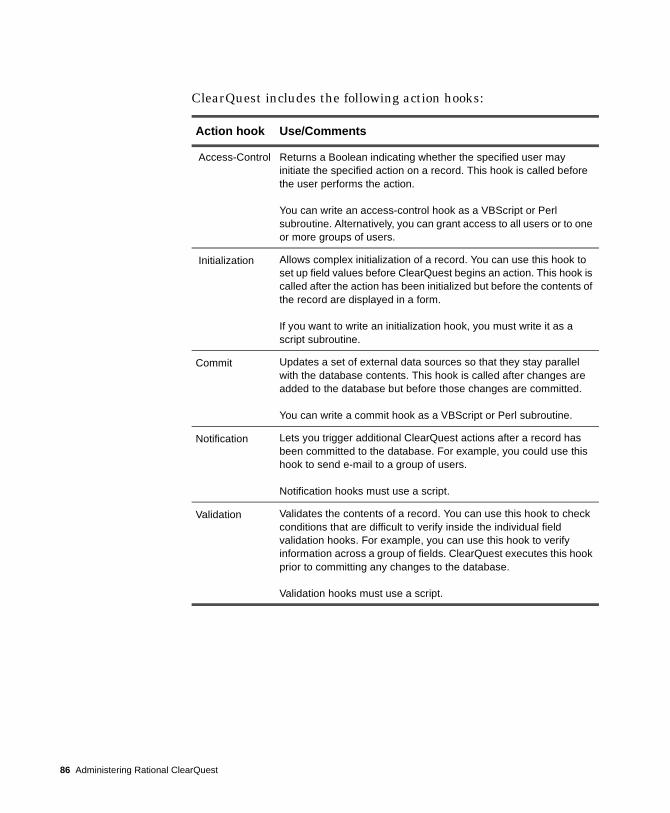
ClearQuest includes the following action hooks:
Action hook Use/Comments
Access-Control Returns a Boolean indicating whether the specified user may initiate the specified action on a record. This hook is called before the user performs the action.
You can write an access-control hook as a VBScript or Perl subroutine. Alternatively, you can grant access to all users or to one or more groups of users.
Initialization Allows complex initialization of a record. You can use this hook to set up field values before ClearQuest begins an action. This hook is called after the action has been initialized but before the contents of the record are displayed in a form.
If you want to write an initialization hook, you must write it as a script subroutine.
Commit Updates a set of external data sources so that they stay parallel with the database contents. This hook is called after changes are added to the database but before those changes are committed.
You can write a commit hook as a VBScript or Perl subroutine.
Notification Lets you trigger additional ClearQuest actions after a record has been committed to the database. For example, you could use this hook to send e-mail to a group of users.
Notification hooks must use a script.
Validation Validates the contents of a record. You can use this hook to check conditions that are difficult to verify inside the individual field validation hooks. For example, you can use this hook to verify information across a group of fields. ClearQuest executes this hook prior to committing any changes to the database.
Validation hooks must use a script.
86 Administering Rational ClearQuest
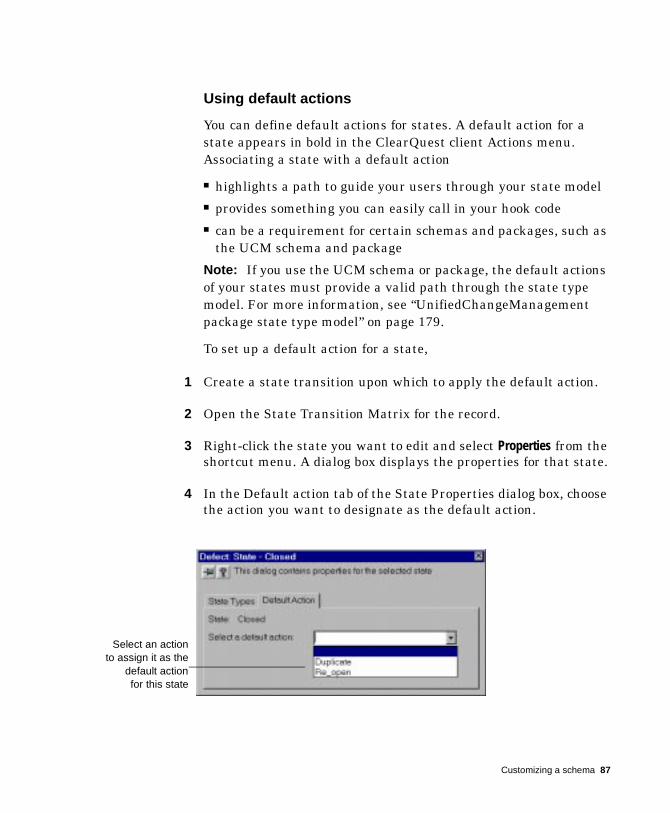
Using default actions
You can define default actions for states. A default action for a state appears in bold in the ClearQuest client Actions menu. Associating a state with a default action
■ highlights a path to guide your users through your state model■ provides something you can easily call in your hook code■ can be a requirement for certain schemas and packages, such as
the UCM schema and package
Note: If you use the UCM schema or package, the default actions of your states must provide a valid path through the state type model. For more information, see “UnifiedChangeManagement package state type model” on page 179.
To set up a default action for a state,
1 Create a state transition upon which to apply the default action.
2 Open the State Transition Matrix for the record.
3 Right-click the state you want to edit and select Properties from the shortcut menu. A dialog box displays the properties for that state.
4 In the Default action tab of the State Properties dialog box, choose the action you want to designate as the default action.
Select an actionto assign it as the
default actionfor this state
Customizing a schema 87

Working with record forms
Each record type can have two forms associated with it: a submit form and a record form. When a ClearQuest client user creates a new record, ClearQuest displays the submit form. When the user views the record later, ClearQuest uses the record form.
Every record type must have a record form, but a submit form is not required. If you do not create a submit form, ClearQuest uses the record form for both viewing and submitting records.
You use controls to display fields on the form. ClearQuest provides controls for text boxes, list boxes, check boxes, option buttons, and so on. For example, you can associate a field containing a string with a text-box control. Not all controls work with all field types. For example, a list view control or a parent/child control must be used with a reference-list field.
In addition to displaying the contents of fields, you can use some controls to perform special tasks. Controls such as push buttons and list boxes can be associated with record scripts. For example, in the TestStudio schema, a push button is associated with the Build_Properties record script, which allows users to view the properties of the build they’ve selected.
Creating forms
You use ClearQuest Designer to create forms. You must define at least one record form for each record type in your schema. You can also define a submit form for a record type if you want users to use a different form to submit records of that type.
To create a new form:
1 In the Workspace, expand the record type you want to modify.
2 Right-click the Forms folder and select Add from the shortcut menu. ClearQuest displays a new empty form and highlights the name of the form in the Workspace so that you can change it.
88 Administering Rational ClearQuest
3 In the Workspace, type a name for the new form.
4 Right-click on the form and choose either Submit Form or Record Form as appropriate for the type of form you want to create.
After creating a form, you can add controls to it. If the record that owns the form contains too many fields to display on one dialog tab, you can add additional dialog tabs as necessary. Every form must have at least one dialog tab.
ClearQuest automatically adds three controls to every form: an Apply button, a Revert button, and an Actions button. You cannot delete these buttons. ClearQuest uses them to initiate and manage actions.
Re-using forms
After creating a form, you can save time by reusing a form in other schemas. You can use it as is or modify it.
Right-click a form in the Forms folder and select Export Form from the popup menu. You can then import the form into other schemas.
You must import the form into a record type with a name identical to the record type that exported the form. Right-click a form in the Forms folder and select Import Form. You cannot export a form and then import it into a different record type within the same schema.
When importing a form, ClearQuest maps the fields associated with the form to the fields of the selected record type. ClearQuest maps fields based on their name and does not check to see if the fields have matching types. If a field in the form does not correspond to a field in the selected record type, you must reassign the corresponding control to a valid field (or delete the control altogether).
Customizing a schema 89

Deleting forms
If you no longer need a form, you can delete it. However, you must remember that every record type must have at least one form associated with it. If a record type has only one form left, that form must be a record form; ClearQuest will not let you delete the last form of a record type.
Editing forms
For step-by-step instructions on how to edit a form, select Working with record forms > Editing forms in the ClearQuest Designer Help. You can find out how to:
■ Change the size of a form■ Add and delete dialog tabs■ Add tab-level access■ Add and delete controls
90 Administering Rational ClearQuest
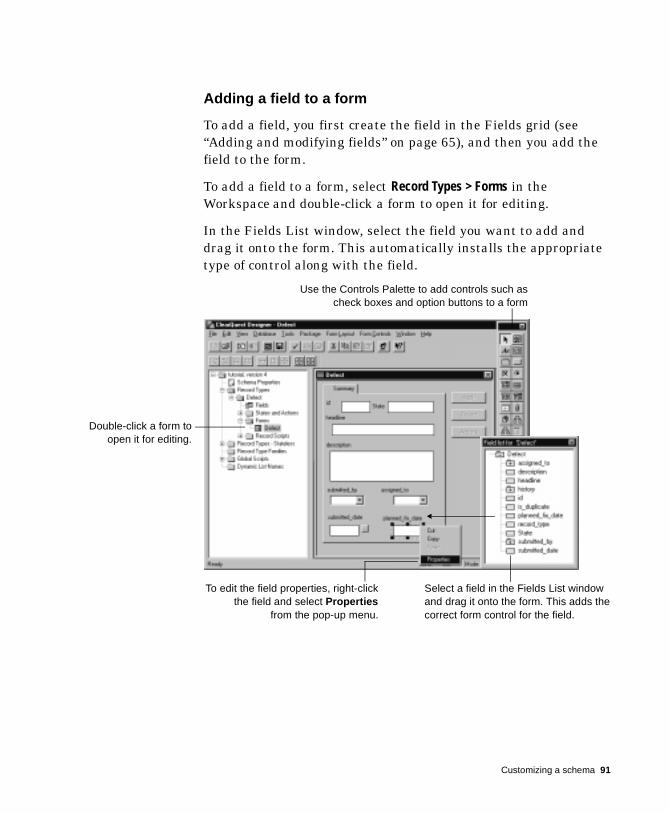
Adding a field to a form
To add a field, you first create the field in the Fields grid (see “Adding and modifying fields” on page 65), and then you add the field to the form.
To add a field to a form, select Record Types > Forms in the Workspace and double-click a form to open it for editing.
In the Fields List window, select the field you want to add and drag it onto the form. This automatically installs the appropriate type of control along with the field.
Select a field in the Fields List window and drag it onto the form. This adds the correct form control for the field.
Double-click a form toopen it for editing.
Use the Controls Palette to add controls such ascheck boxes and option buttons to a form
To edit the field properties, right-clickthe field and select Properties
from the pop-up menu.
Customizing a schema 91
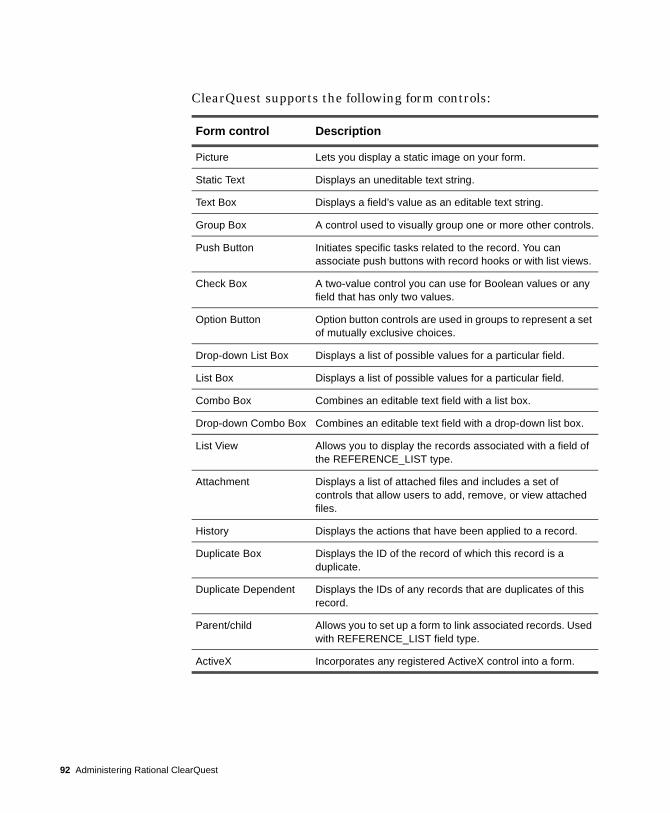
ClearQuest supports the following form controls:
Form control Description
Picture Lets you display a static image on your form.
Static Text Displays an uneditable text string.
Text Box Displays a field’s value as an editable text string.
Group Box A control used to visually group one or more other controls.
Push Button Initiates specific tasks related to the record. You can associate push buttons with record hooks or with list views.
Check Box A two-value control you can use for Boolean values or any field that has only two values.
Option Button Option button controls are used in groups to represent a set of mutually exclusive choices.
Drop-down List Box Displays a list of possible values for a particular field.
List Box Displays a list of possible values for a particular field.
Combo Box Combines an editable text field with a list box.
Drop-down Combo Box Combines an editable text field with a drop-down list box.
List View Allows you to display the records associated with a field of the REFERENCE_LIST type.
Attachment Displays a list of attached files and includes a set of controls that allow users to add, remove, or view attached files.
History Displays the actions that have been applied to a record.
Duplicate Box Displays the ID of the record of which this record is a duplicate.
Duplicate Dependent Displays the IDs of any records that are duplicates of this record.
Parent/child Allows you to set up a form to link associated records. Used with REFERENCE_LIST field type.
ActiveX Incorporates any registered ActiveX control into a form.
92 Administering Rational ClearQuest
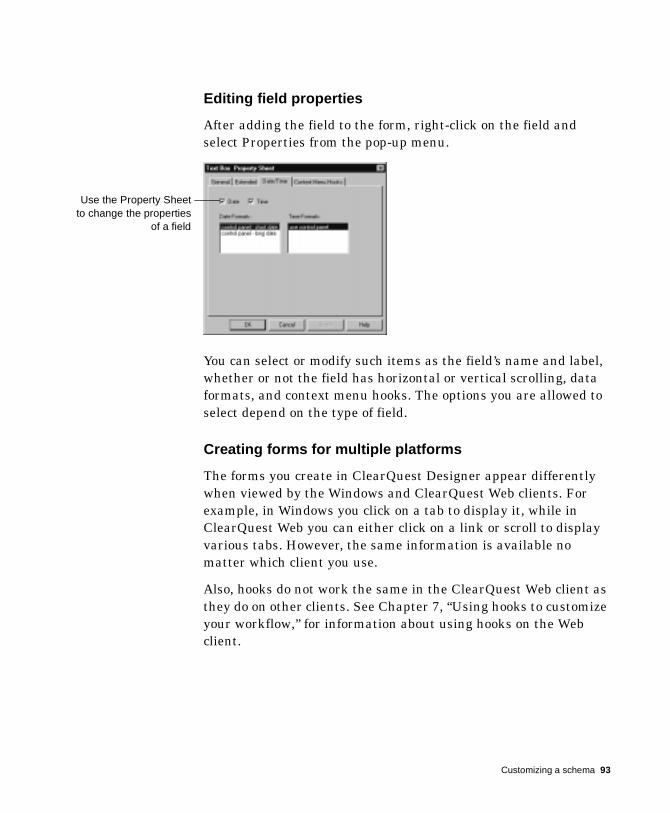
Editing field properties
After adding the field to the form, right-click on the field and select Properties from the pop-up menu.
You can select or modify such items as the field’s name and label, whether or not the field has horizontal or vertical scrolling, data formats, and context menu hooks. The options you are allowed to select depend on the type of field.
Creating forms for multiple platforms
The forms you create in ClearQuest Designer appear differently when viewed by the Windows and ClearQuest Web clients. For example, in Windows you click on a tab to display it, while in ClearQuest Web you can either click on a link or scroll to display various tabs. However, the same information is available no matter which client you use.
Also, hooks do not work the same in the ClearQuest Web client as they do on other clients. See Chapter 7, “Using hooks to customize your workflow,” for information about using hooks on the Web client.
Use the Property Sheetto change the properties
of a field
Customizing a schema 93

94 Administering Rational ClearQuest
A D M I N I S T E R I N G R A T I O N A L C L E A R Q U E S T
6
Administering usersAll ClearQuest users must be set up in the ClearQuest schema repository. This chapter describes how to set up individual users and groups, assign permission levels to individuals, and subscribe (give access to) individuals and groups to databases.
Topics covered include:
■ Planning■ Understanding database privileges■ Adding users■ Creating groups■ Transferring between schema repositories
Note: You must have Super User or User Administrator privileges to set up users and groups. See “Modifying user profiles” on page 99 for an explanation of these terms.
95
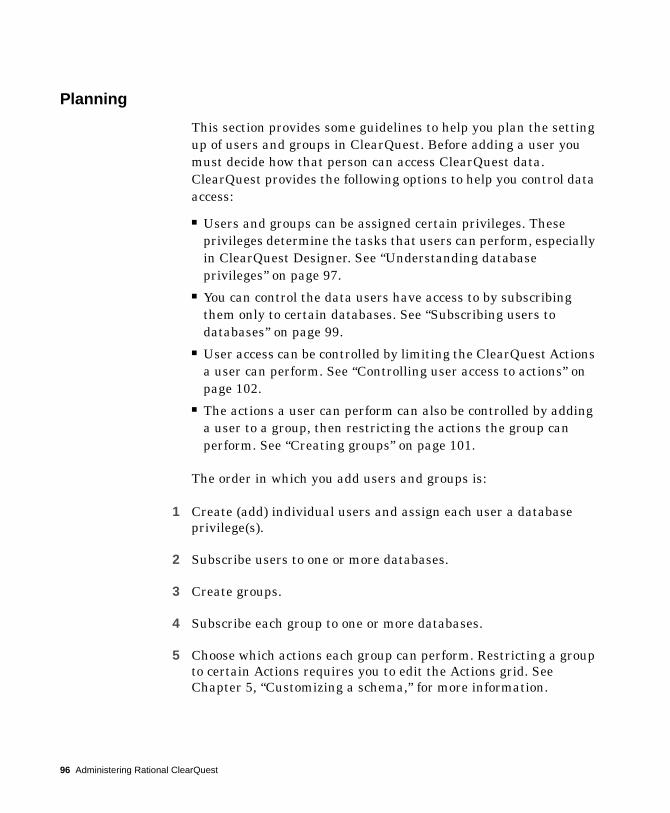
Planning
This section provides some guidelines to help you plan the setting up of users and groups in ClearQuest. Before adding a user you must decide how that person can access ClearQuest data. ClearQuest provides the following options to help you control data access:
■ Users and groups can be assigned certain privileges. These privileges determine the tasks that users can perform, especially in ClearQuest Designer. See “Understanding database privileges” on page 97.
■ You can control the data users have access to by subscribing them only to certain databases. See “Subscribing users to databases” on page 99.
■ User access can be controlled by limiting the ClearQuest Actions a user can perform. See “Controlling user access to actions” on page 102.
■ The actions a user can perform can also be controlled by adding a user to a group, then restricting the actions the group can perform. See “Creating groups” on page 101.
The order in which you add users and groups is:
1 Create (add) individual users and assign each user a database privilege(s).
2 Subscribe users to one or more databases.
3 Create groups.
4 Subscribe each group to one or more databases.
5 Choose which actions each group can perform. Restricting a group to certain Actions requires you to edit the Actions grid. See Chapter 5, “Customizing a schema,” for more information.
96 Administering Rational ClearQuest

Understanding database privileges
Depending on how you create your schema, your users may require privileges to perform an action or enter a value into a specific field. You may also want to let some users modify the schema, build forms, and assign access to other users. When you create a user you can assign one of the following privileges:
■ Active User is the most basic ClearQuest privilege. The Active User has permission to log in to subscribed databases and submit new records, modify existing records, and create, save, and modify personal queries, charts, and reports.
A user with Active User permission can also log in to ClearQuest Designer, but cannot edit schemas.
In addition to any other permissions granted, users must have this permission to log in to the database.
■ Schema Designer has permission to create and modify schemas in ClearQuest Designer. A Schema Designer cannot perform User Administrator tasks unless that option is also selected.
■ User Administrator has permission to create and modify user and group permissions using ClearQuest Designer. A User Administrator cannot perform the Schema Designer tasks unless that option is also selected.
■ Super User is the only type of user that has permission to create, modify, and delete databases and schemas, and to set up users and groups.
You assign a privileges when you add a new user. You can modify the privileges later if desired.
Note: The term Administrator used in this guide means any role with privileges above that of Active User.
More information? Look up access, privileges in the ClearQuest Designer Help index.
Administering users 97
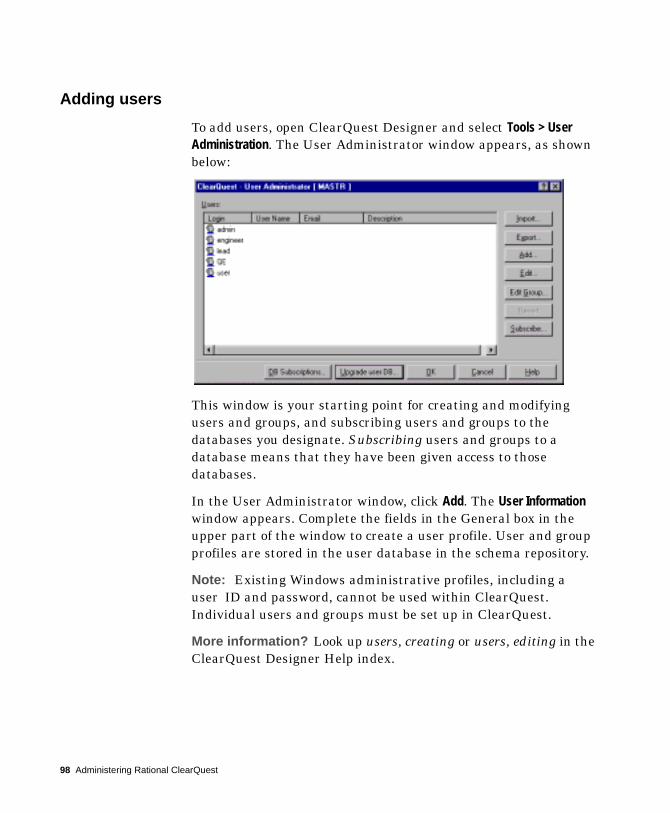
Adding users
To add users, open ClearQuest Designer and select Tools > User Administration. The User Administrator window appears, as shown below:
This window is your starting point for creating and modifying users and groups, and subscribing users and groups to the databases you designate. Subscribing users and groups to a database means that they have been given access to those databases.
In the User Administrator window, click Add. The User Information window appears. Complete the fields in the General box in the upper part of the window to create a user profile. User and group profiles are stored in the user database in the schema repository.
Note: Existing Windows administrative profiles, including a user ID and password, cannot be used within ClearQuest. Individual users and groups must be set up in ClearQuest.
More information? Look up users, creating or users, editing in the ClearQuest Designer Help index.
98 Administering Rational ClearQuest
Modifying user profiles
You can change the user profile, including the privileges. In the User Information window, click Edit to make your changes.
Changing user information
Individual users can change some of the information in their profile, including the name, e-mail address, password, and telephone number, from either ClearQuest Designer or the ClearQuest client. In the ClearQuest client, select View > Change user profile. When a user makes changes, the profile in the user database in the schema repository is updated. The changes apply to all databases the user is subscribed to.
Note: A user cannot change his or her database privileges.
Subscribing users to databases
After you create a user and assign permissions, determine the databases to which the user can be subscribed.
By default, ClearQuest gives new users access to all databases. If you want to limit a user’s access to only certain databases, click Subscribe in the User Administrator window and select the databases the user can access.
More information? Look up users, subscribing to a database in the ClearQuest Designer Help index.
Making users inactive
You cannot delete a user from ClearQuest because a user can be referenced in multiple record types. For example, a user is probably assigned to one or more defect reports.
However, you can make a user inactive, which means the user cannot log in to ClearQuest or be assigned any more defect records. To make a user inactive, select the user in the User
Administering users 99
Administrator window, click Subscribe, and unsubscribe the user from all databases.
For historical information and data integrity, an inactive user’s name is retained in the database to which the user was subscribed. The name will no longer appear on choice lists of users when modifying or submitting new records.
100 Administering Rational ClearQuest
Creating groups
After you create users, you can create groups and subscribe them to databases.
In the User Administrator window, click Edit Group. In the User Group window, click New Group. Name the group and move users into the group from the list on the left. To remove users, double-click the group to display a list of its members, highlight a user, and click Remove.
More information? Look up user groups, creating in the ClearQuest Designer Help index.
Subscribing groups to databases
To subscribe a group to databases, click the group name in the right column, click Group Subscription at the bottom of the window, and make your selections.
By default, ClearQuest gives new groups access to all databases. If you want to limit a group’s access to only certain databases, click Group Subscription in the User Group window and select the databases the group can access.
You can add and remove users from a group after it is created.
More information? Lookup user groups, subscribing to a database in the ClearQuest Designer Help index.
Making groups inactive
A new group is active by default. If you want to make a group inactive, open the User Group window, select a group, right-click, and deselect Active from the popup menu.
You can also make a group inactive by clicking Group Subscription in the User Group window, and unsubscribe the group from all databases.
Administering users 101

Controlling user access to actions
You can further focus the responsibility of a user by limiting the types of actions the user can perform. For example, you can limit access to perform the Assign action to certain individuals.
To limit user access to an action, open the record type, then select States and Actions > Actions. In the Actions grid, left-click in the Access Control field of an Action, click the down arrow, and select Scripts, All Users, or User Groups.
■ Select Scripts to create an access-control hook which will allow you to restrict access to this Action based on a specific set of criteria. For more information on access-control hooks see Chapter 7, “Using hooks to customize your workflow.”
■ Select All Users to allow any ClearQuest user to access the Action. This is the default setting.
■ Select User Groups to access a list of groups. Select the groups you want to have access to this Action.
More information? Look up access, granting to users in the ClearQuest Designer Help index.
102 Administering Rational ClearQuest
Transferring between schema repositories
You can use the Import and Export buttons in the User Administrator window to transfer a list of users and groups from one schema repository to another. When you export the list of users and groups, ClearQuest creates a text file you can import into another schema repository. The text file contains the profiles of each user and group.
Administering users 103

104 Administering Rational ClearQuest
A D M I N I S T E R I N G R A T I O N A L C L E A R Q U E S T
7
Using hooks to customize your workflowYou can adapt ClearQuest to serve the changing or advanced needs of your team by writing hooks (custom code) to be invoked from predefined points within ClearQuest, and writing external applications that run outside of ClearQuest. In both cases, you use the ClearQuest application programming interface (API) to access data.
Note: For more information on the ClearQuest API, select Rational ClearQuest API Reference from the Start menu. The Rational ClearQuest API Reference is an online reference guide for all ClearQuest API calls.
This chapter covers the following topics:
■ Understanding hooks■ Understanding field and action hooks■ Execution order of field and action hooks■ Understanding record scripts■ Understanding global scripts■ Writing external applications■ Understanding the ClearQuest API■ Common API calls■ Examples of common hooks
Note: To learn about using hooks in the web environment, see Chapter 8, “Administering ClearQuest Web.”
105
Understanding hooks
Hooks are entry points, like triggers, for pieces of code that ClearQuest executes at specified times to more fully customize the product. Hooks are used in a variety of ways:
■ Actions can have hooks for access control, initialization, notification, committal, and validation.
■ Fields can have hooks for specifying default values, choice lists, and permissions, and for handling tasks associated with the field when it is validated or its value changes.
■ Records can use record scripts that allow you to trigger actions that are specific to a record type.
■ Global scripts allow you write a subroutine, such as an e-mail notification, that can be called from any hook in any record type.
Choosing a scripting language
You can write hooks in VBScript and/or Perl. For documentation on either language, see the following resources on the internet:
■ http://msdn.microsoft.com/scripting/ ■ http://www.perl.com/
ClearQuest runs your hooks in VBScript or Perl, but not both at the same time. You set the ClearQuest schema properties for the one scripting language that corresponds to the set of scripts that you currently want ClearQuest to run (look up schemas, setting properties in the ClearQuest Designer Help index).
106 Administering Rational ClearQuest

Planning hooks for your process
Plan a set of hooks that work together to enforce your organization’s process. For example, the following state transition model shows how you can refine your process by combining field and action hooks, a global script, and an external application.
As you plan your set of hooks, consider the following.
■ Be aware that hooks run with Super User privileges and are not subject to the usual access control or field behavior restrictions. This means you can use hooks to set and reset values in fields that are normally read-only. (You cannot reset ClearQuest system fields that are read-only, such as the History field.) Required fields remain required.
■ Take advantage of outside code to extend capabilities. VBScript has access to COM objects (and Perl can gain access to COM objects through a third-party package). In addition, Perl can take advantage of many third-party packages. For example, a
Open ResolvedValidate
ClosedResolve
SubmitOpen
“
Postponed
When the fix is ready, the engineer clicks the “Send Fax to Customer” button, which uses a Record script to send the fax
External application transitions Postponed records into Open records after 30 days
Action Initializationhook inserts
submitter’s name
Global script checks to see if the current user belongs a specified group
Commit hook resolves duplicates
Field Value-Changed hook updates the OS version list to match the selected OS
Field Choice List hook lets the leader choose an engineer to fix the defect
Using hooks to customize your workflow 107
hook could interact with the user through dialog boxes or read from and write to external files. You are responsible for ensuring that the proper third-party objects are installed on the client machine.
■ Although it is possible to include SQL code in your scripts, we highly recommend that you use the ClearQuest API methods to run queries and retrieve data within script code. ClearQuest allows you to rename record types and fields, and this will be problematic in any SQL code that you include.
■ Pick the appropriate hooks to use. For example, rather than write a script hook to control access to an action, you can limit use of the action to a particular user group. See “Controlling user access to actions” on page 102.
■ If your users include web-based clients, take extra precautions to ensure that your hooks work in the web environment. See “Using hooks in ClearQuest Web” on page 137.
■ Test and debug your hook code so that you do not write incorrect values into your database or cause the program to hang while processing an infinite loop or waiting for nonexistent input. To view debugging information (the output of the OutputDebugString method), you can use dbwin32.exe, which ships with ClearQuest.
108 Administering Rational ClearQuest
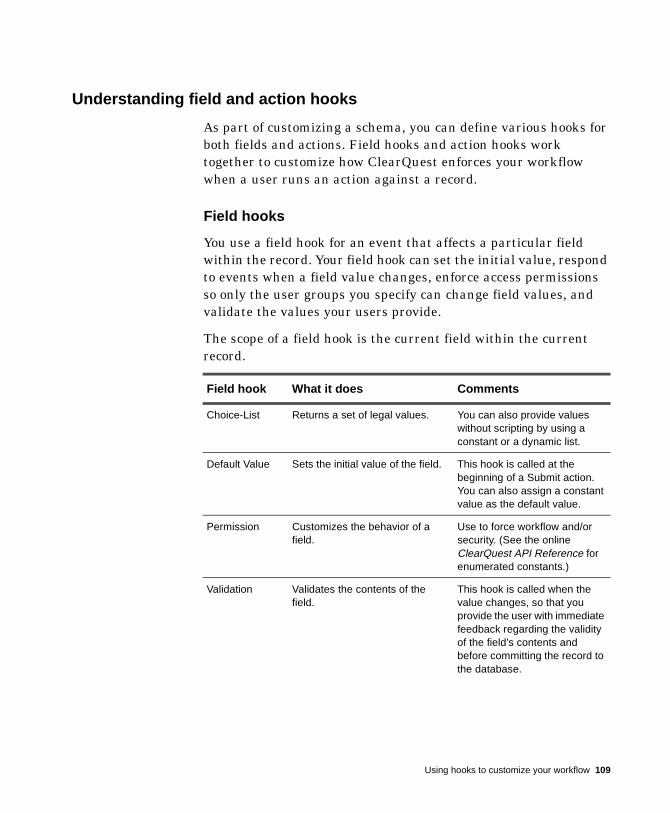
Understanding field and action hooks
As part of customizing a schema, you can define various hooks for both fields and actions. Field hooks and action hooks work together to customize how ClearQuest enforces your workflow when a user runs an action against a record.
Field hooks
You use a field hook for an event that affects a particular field within the record. Your field hook can set the initial value, respond to events when a field value changes, enforce access permissions so only the user groups you specify can change field values, and validate the values your users provide.
The scope of a field hook is the current field within the current record.
Field hook What it does Comments
Choice-List Returns a set of legal values. You can also provide values without scripting by using a constant or a dynamic list.
Default Value Sets the initial value of the field. This hook is called at the beginning of a Submit action. You can also assign a constant value as the default value.
Permission Customizes the behavior of a field.
Use to force workflow and/or security. (See the online ClearQuest API Reference for enumerated constants.)
Validation Validates the contents of the field.
This hook is called when the value changes, so that you provide the user with immediate feedback regarding the validity of the field’s contents and before committing the record to the database.
Using hooks to customize your workflow 109
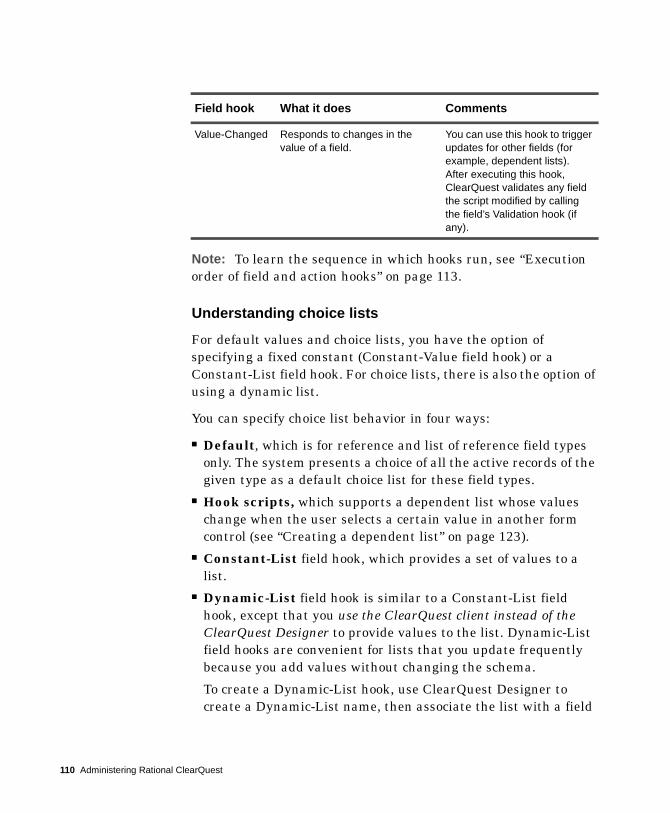
Note: To learn the sequence in which hooks run, see “Execution order of field and action hooks” on page 113.
Understanding choice lists
For default values and choice lists, you have the option of specifying a fixed constant (Constant-Value field hook) or a Constant-List field hook. For choice lists, there is also the option of using a dynamic list.
You can specify choice list behavior in four ways:
■ Default, which is for reference and list of reference field types only. The system presents a choice of all the active records of the given type as a default choice list for these field types.
■ Hook scripts, which supports a dependent list whose values change when the user selects a certain value in another form control (see “Creating a dependent list” on page 123).
■ Constant-List field hook, which provides a set of values to a list.
■ Dynamic-List field hook is similar to a Constant-List field hook, except that you use the ClearQuest client instead of the ClearQuest Designer to provide values to the list. Dynamic-List field hooks are convenient for lists that you update frequently because you add values without changing the schema.
To create a Dynamic-List hook, use ClearQuest Designer to create a Dynamic-List name, then associate the list with a field
Value-Changed Responds to changes in the value of a field.
You can use this hook to trigger updates for other fields (for example, dependent lists). After executing this hook, ClearQuest validates any field the script modified by calling the field’s Validation hook (if any).
Field hook What it does Comments
110 Administering Rational ClearQuest
that uses a choice list. Next, log into the client as the administrator to create the list under Edit > Named Lists.
Defining choice list behavior
You can prevent the user from entering values that are not in a choice list by choosing the Limit to List option. Any value not within the list fails validation. If you do not choose the Limit to List option, users can enter a value not in the choice list.
All three unscripted field hooks (Constant-Value, Constant-List, Dynamic-List) provide the Recalculate Choice List option. Choose this option to have ClearQuest reinitialize the list during runtime interaction if it depends on changes to another value. For a scripted choice list, this refresh operation might incur some performance overhead. If you do not choose the Recalculate Choice List option, ClearQuest only refreshes the values at the beginning of each action.
Action hooks
Action hooks can control who has permission to change record values and validate user entries before ClearQuest commits them to the database. Action hooks can also validate the entire record and send e-mail notification when the action is complete.
The scope of an action hook is the current record.
Action hook What it does When
Access-Control Determines if the current user has permission to invoke the current action.
When the action is about to start.
Initialization Sets initial field values (or any task you specify).
When the action starts.
Validation Validates the field values you specify. If the user types invalid data, ClearQuest prompts the user for valid data.
When the user commits the action.
Using hooks to customize your workflow 111
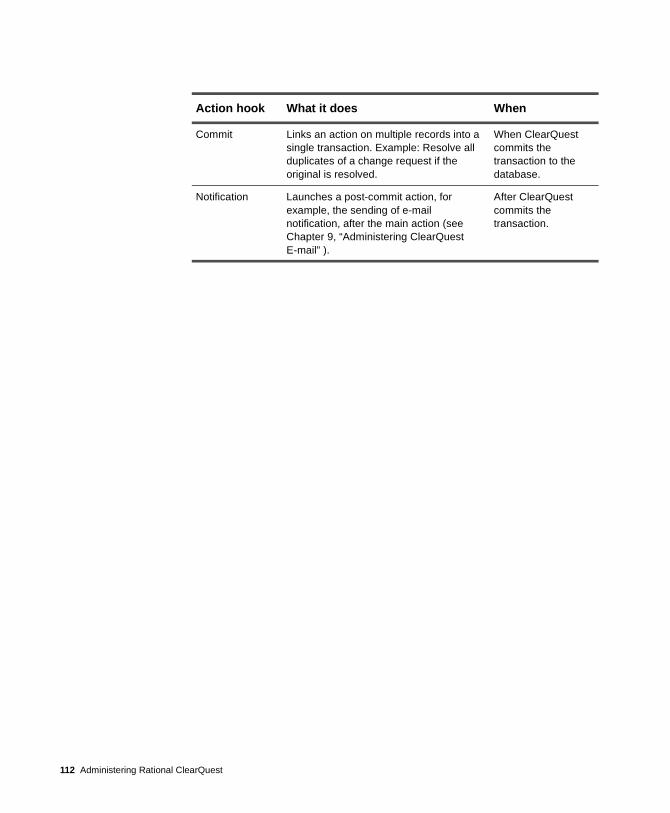
Commit Links an action on multiple records into a single transaction. Example: Resolve all duplicates of a change request if the original is resolved.
When ClearQuest commits the transaction to the database.
Notification Launches a post-commit action, for example, the sending of e-mail notification, after the main action (see Chapter 9, “Administering ClearQuest E-mail” ).
After ClearQuest commits the transaction.
Action hook What it does When
112 Administering Rational ClearQuest
Execution order of field and action hooks
ClearQuest executes field and action hooks at predetermined times and in a predetermined order. There are four hook execution points while a record is open.
■ When an action begins■ When a field value is set■ When the record is validated■ When the record is committed
When an action begins
When a ClearQuest user initiates an action, ClearQuest executes hooks in the following order.
1 The Action Access Control hook stops processing of the action if the user is not allowed to initiate the action. If this is the case, the remaining hooks do not execute.
2 The Field Permission hook determines whether each field is mandatory, optional, or read-only.
3 The Action Initialization hook performs initialization tasks, such as setting up field values before ClearQuest begins an action.
4 The Field Default Value hook sets the value for each field (for Submit actions only).
5 The Field Validation hook validates the contents of each field. During import actions, however, no validation occurs.
Field validation hooks cannot validate nonexistent values. For example, a field validation hook cannot validate a field if it is mandatory but the user has not yet entered a value, or if the user enters a value that is not a member of a choice list.
Using hooks to customize your workflow 113
6 The Field Choice List hook runs if there is a field choice.
If a Field Value Changed hook calls SetFieldValue to change the value of another field, ClearQuest executes the other field’s Field Value Changed and Validation hooks.
When a field’s value is set
When your users edit a record, they set or change the value in one or more fields. During the editing of a record, ClearQuest executes hooks in the following order:
1 The Field Value Changed hook runs for each field that changed.
If the Limit to List option is set and the user enters an illegal value, ClearQuest marks the field as invalid. Only when the user enters an legal value does the next hook run.
Note: If a Field Value Changed hook calls SetFieldValue to change the value of another field, ClearQuest executes the other field’s Field Value Changed hook immediately.
2 The Field Validation hook runs for each field.
3 The Field Choice List hook runs for each field that uses the Recalculate Choice List option.
If you use dependent fields with the Recalculate Choice List option, ClearQuest first runs the Field Validation hook and then the Field Choice List hook for each field, until all changed fields have been set and validated.
Note: In ClearQuest Web, field hooks run only when the user invokes the Submit action. See “Using hooks in ClearQuest Web” on page 137.
114 Administering Rational ClearQuest

When the record is validated
Before ClearQuest commits to the database the changes a user has made to a record, ClearQuest validates the record by executing the following hooks in order.
1 The Field Validation hook runs for each field in the record.
2 The Action Validation hook runs for the action that was performed.
When the record is committed
The Commit hook executes after the database has been updated with changes to the current record, but before the update transaction has been committed to the database. This means that you cannot use a Commit hook to do further modifications to the current record; such modifications are not applied to the record. Use a Commit hook only for side-effect actions against other records that you want to be part of the same database transaction as the main action. (For example, resolving a duplicate defect if the parent defect is ready to be resolved.)
After ClearQuest validates a record, it commits the record to the database by executing the following hooks in order.
1 The Action Commit hook runs.
2 ClearQuest commits the transaction to the database.
3 The Action Notification hook runs. For example, ClearQuest might send an e-mail message to worker’s supervisor if you have established one or more e-mail rules.
Using hooks to customize your workflow 115

Understanding record scripts
You can write a script that performs custom behavior in the context of a record. For example, a record script could send data about the current record to another system.
There are three ways to invoke a record script:
■ Associate the record script with a form control, either a button or a (right-click) shortcut menu. A record script subroutine is specific to one record type.
For example, within the TeamTest schema, the Build_Properties record script allows users to view the properties of the build they have selected. The script is associated with a push button which, when clicked, runs the script. The Build_Properties record script then retrieves the build information from the Rational Repository, and displays the information in a dialog box.
■ Make an action that invokes the record script. Create a RECORD_SCRIPT_ALIAS action and associate it with your record script. When the user selects the action, the record script is invoked immediately. To update the current record from within such a script, begin an action in the script using the EditEntity API.
■ Call the record script from within another script or hook by using the FireNamedHook API.
More information? Look up record scripts in the ClearQuest Designer Help index.
116 Administering Rational ClearQuest
Understanding global scripts
You can use global scripts to define common functions that you can call from any hook in your schema. In this sense, global scripts resemble a library of subroutines. ClearQuest does not invoke global scripts directly.
Global scripts are convenient when you have multiple record types that call the same hook code. This centralizes hook code maintenance, and you do not have to copy the hook code into multiple places. For example, a global script can format text strings for all records, whether they are enhancement requests or defects. Another example is ClearQuest’s Email package, which allows multiple actions to send notification by calling one global script.
More information? Look up global scripts in the ClearQuest Designer Help index.
Using hooks to customize your workflow 117
Writing external applications
You can write an external application in VBScript or Perl to perform tasks against a ClearQuest database. For example:
■ At midnight each day, execute a predefined set of queries and mail the results to your managers group
■ Each Sunday, find all defects that have been open for more than a month and escalate their status
An external application must begin by creating a session object and logging in to a ClearQuest database. Among the tasks you can then perform are: create a query, execute a saved query, create new records, and perform actions on existing records.
Note: ClearQuest ships its own version of Perl (CQPerl.exe, CQPerl.dll). When creating external applications using Perl, make sure you use the CQPerlExt package. See “Using the ClearQuest API” in the online ClearQuest API Reference.
118 Administering Rational ClearQuest
Understanding the ClearQuest API
The ClearQuest API enables you to take full advantage of the power of ClearQuest by writing custom solutions tailored to the development process of your organization. You can write hooks on your own, or you can customize the sample hooks this chapter provides.
More information? See the online ClearQuest API Reference for details of the objects, methods, properties, and constants you can use when you write hooks and/or external applications.
Working with sessions
The Session object represents the current database-access session and is the starting point of all operations. If you are writing hooks, ClearQuest provides access to the current Session object through the GetSession method of the Entity object. Because hooks always operate within the context of modifying a record (entity), you always have a corresponding Entity object from which to call GetSession.
If you are writing an external application to access ClearQuest’s databases, you must create a Session object and log in to the database. To work with an entity, you must then call the API that returns the entity object.
More information? See “Working with sessions” in the online ClearQuest API Reference.
Working with queries
You can run queries to fetch data from the ClearQuest database based on a set of search criteria that you provide. First, you build a query (QueryDef) to specify what data you want. Second, you create a result set object to hold the data. Third, you execute the query, which fetches the data in a result set. Finally, you access the data.
Using hooks to customize your workflow 119
More information? To learn how to build a query using objects, such as QueryDef and ResultSet, see “Working with Queries” in the online ClearQuest API Reference.
Working with records
When one of your users enters a change request, ClearQuest stores the data in a logical record called an entity. You can create, edit, and view a record’s data, as well as view data about the record’s entity type. The BuildEntity method enables you to create a new record; the EditEntity method enables you to edit an existing record. The ClearQuest API provides methods, as well, for you to validate your changes and commit the updated record to the database.
More information? See “Working with Records” in the online ClearQuest API Reference.
120 Administering Rational ClearQuest
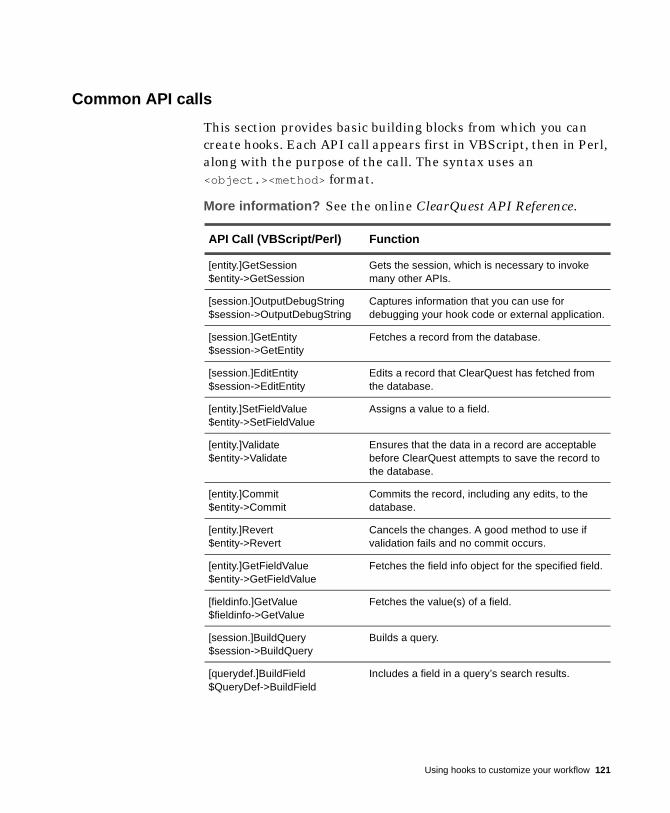
Common API calls
This section provides basic building blocks from which you can create hooks. Each API call appears first in VBScript, then in Perl, along with the purpose of the call. The syntax uses an <object.><method> format.
More information? See the online ClearQuest API Reference.
API Call (VBScript/Perl) Function
[entity.]GetSession$entity->GetSession
Gets the session, which is necessary to invoke many other APIs.
[session.]OutputDebugString$session->OutputDebugString
Captures information that you can use for debugging your hook code or external application.
[session.]GetEntity$session->GetEntity
Fetches a record from the database.
[session.]EditEntity$session->EditEntity
Edits a record that ClearQuest has fetched from the database.
[entity.]SetFieldValue$entity->SetFieldValue
Assigns a value to a field.
[entity.]Validate$entity->Validate
Ensures that the data in a record are acceptable before ClearQuest attempts to save the record to the database.
[entity.]Commit$entity->Commit
Commits the record, including any edits, to the database.
[entity.]Revert$entity->Revert
Cancels the changes. A good method to use if validation fails and no commit occurs.
[entity.]GetFieldValue$entity->GetFieldValue
Fetches the field info object for the specified field.
[fieldinfo.]GetValue$fieldinfo->GetValue
Fetches the value(s) of a field.
[session.]BuildQuery$session->BuildQuery
Builds a query.
[querydef.]BuildField$QueryDef->BuildField
Includes a field in a query’s search results.
Using hooks to customize your workflow 121
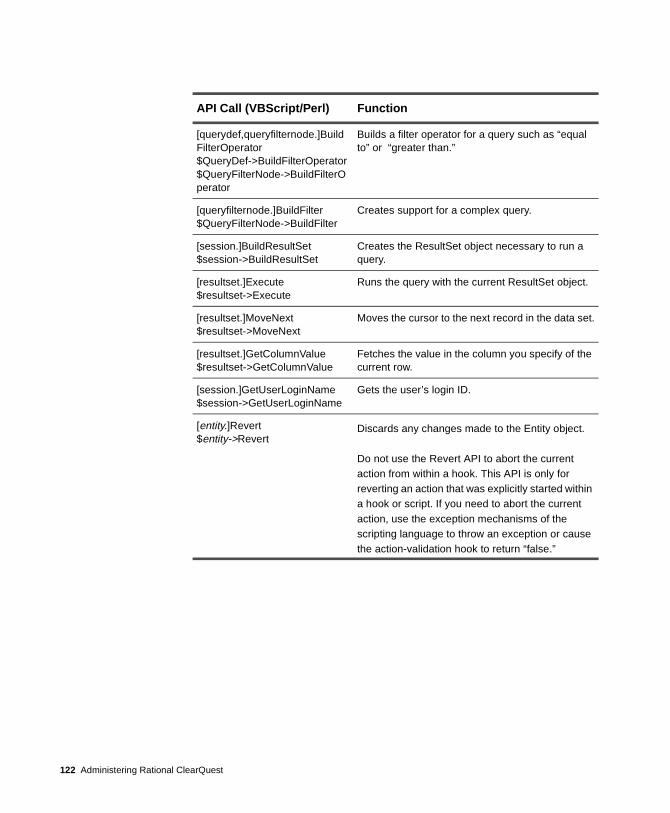
[querydef,queryfilternode.]BuildFilterOperator$QueryDef->BuildFilterOperator$QueryFilterNode->BuildFilterOperator
Builds a filter operator for a query such as “equal to” or “greater than.”
[queryfilternode.]BuildFilter$QueryFilterNode->BuildFilter
Creates support for a complex query.
[session.]BuildResultSet$session->BuildResultSet
Creates the ResultSet object necessary to run a query.
[resultset.]Execute$resultset->Execute
Runs the query with the current ResultSet object.
[resultset.]MoveNext$resultset->MoveNext
Moves the cursor to the next record in the data set.
[resultset.]GetColumnValue$resultset->GetColumnValue
Fetches the value in the column you specify of the current row.
[session.]GetUserLoginName$session->GetUserLoginName
Gets the user’s login ID.
[entity.]Revert$entity->Revert
Discards any changes made to the Entity object.
Do not use the Revert API to abort the current action from within a hook. This API is only for reverting an action that was explicitly started within a hook or script. If you need to abort the current action, use the exception mechanisms of the scripting language to throw an exception or cause the action-validation hook to return “false.”
API Call (VBScript/Perl) Function
122 Administering Rational ClearQuest
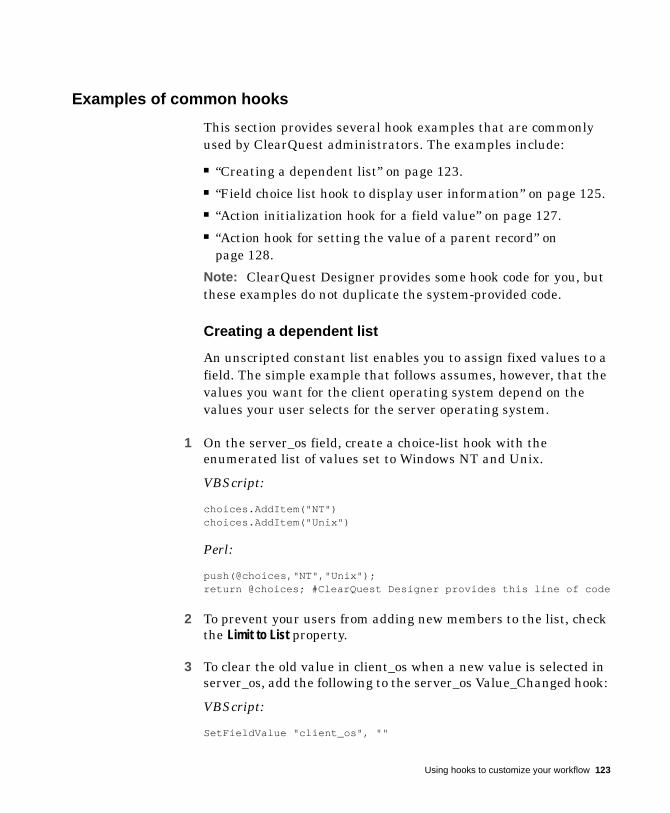
Examples of common hooks
This section provides several hook examples that are commonly used by ClearQuest administrators. The examples include:
■ “Creating a dependent list” on page 123.■ “Field choice list hook to display user information” on page 125.■ “Action initialization hook for a field value” on page 127.■ “Action hook for setting the value of a parent record” on
page 128.
Note: ClearQuest Designer provides some hook code for you, but these examples do not duplicate the system-provided code.
Creating a dependent list
An unscripted constant list enables you to assign fixed values to a field. The simple example that follows assumes, however, that the values you want for the client operating system depend on the values your user selects for the server operating system.
1 On the server_os field, create a choice-list hook with the enumerated list of values set to Windows NT and Unix.
VBScript:
choices.AddItem("NT")choices.AddItem("Unix")
Perl:
push(@choices,"NT","Unix");return @choices; #ClearQuest Designer provides this line of code
2 To prevent your users from adding new members to the list, check the Limit to List property.
3 To clear the old value in client_os when a new value is selected in server_os, add the following to the server_os Value_Changed hook:
VBScript:
SetFieldValue "client_os", ""
Using hooks to customize your workflow 123
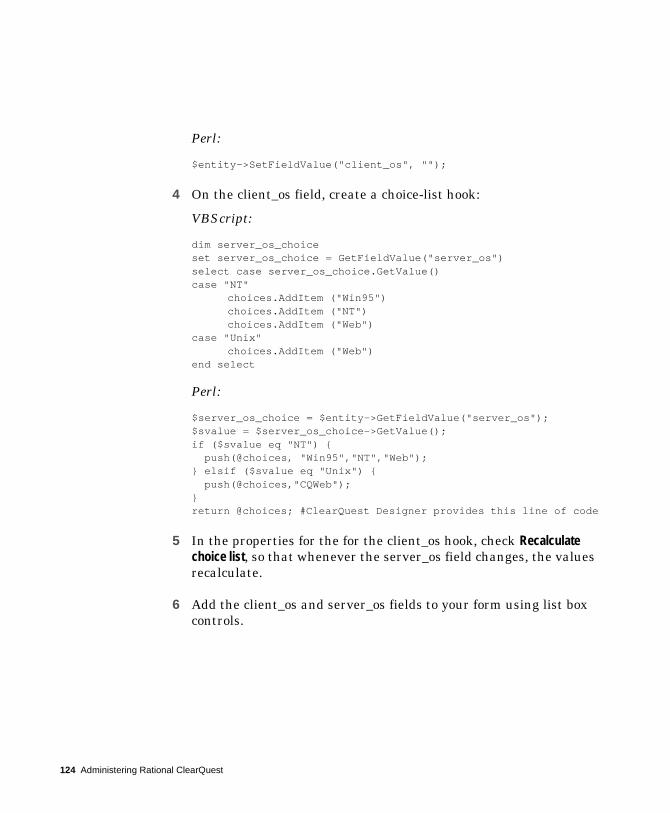
Perl:
$entity->SetFieldValue("client_os", "");
4 On the client_os field, create a choice-list hook:
VBScript:
dim server_os_choice set server_os_choice = GetFieldValue("server_os") select case server_os_choice.GetValue() case "NT"
choices.AddItem ("Win95") choices.AddItem ("NT") choices.AddItem ("Web")
case "Unix" choices.AddItem ("Web")
end select
Perl:
$server_os_choice = $entity->GetFieldValue("server_os"); $svalue = $server_os_choice->GetValue();if ($svalue eq "NT") { push(@choices, "Win95","NT","Web");} elsif ($svalue eq "Unix") { push(@choices,"CQWeb");}return @choices; #ClearQuest Designer provides this line of code
5 In the properties for the for the client_os hook, check Recalculate choice list, so that whenever the server_os field changes, the values recalculate.
6 Add the client_os and server_os fields to your form using list box controls.
124 Administering Rational ClearQuest

Field choice list hook to display user information
This hook provides values for the full name of users in a listview control you have created on your form.
VBScript:
Dim userList, userObj, newSession
set AdminSession = CreateObject("CLEARQUEST.AdminSession")AdminSession.Logon = "ADMIN_LOGIN", "ADMIN_PWD", "");
’ Get the list of usersset userList = AdminSession.Users n_users = userList.Count()For i=0 to $n_users -1 set userObj = userList.Item(i) userFullname = userObj.FullName
# If there is user information, get itif userFullname <> "" Choices.AddItem(userFullname)end ifNext
You can also fetch additional information:
■ userObj.Name gives the login name entered in the user admin tool for the user
■ userObj.Phone gives the phone number entered in the user admin tool for the user
■ userObj.EMail gives the e-mail address entered in the user admin tool for the user
■ userObj.MiscInfo gives the Description entered in the user admin tool for the user
Perl:
# Build an administrative session$AdminSession = CQAdminSession::Build();$AdminSession->Logon ("admin", "admin_password", "database");
# Get the list of users$userList = $AdminSession->GetUsers(); $n_users = $userList->Count();
Using hooks to customize your workflow 125
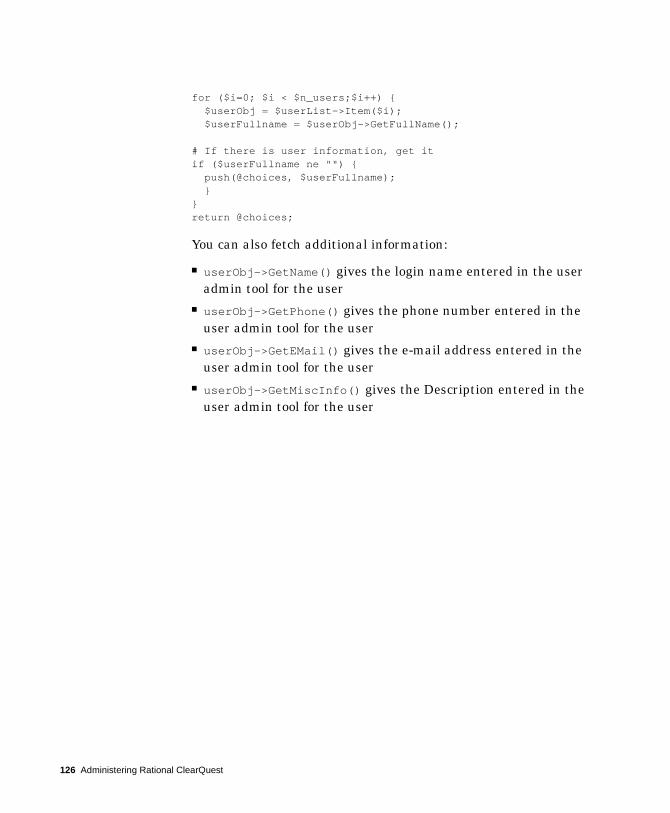
for ($i=0; $i < $n_users;$i++) { $userObj = $userList->Item($i); $userFullname = $userObj->GetFullName();
# If there is user information, get itif ($userFullname ne "") { push(@choices, $userFullname); }}return @choices;
You can also fetch additional information:
■ userObj->GetName() gives the login name entered in the user admin tool for the user
■ userObj->GetPhone() gives the phone number entered in the user admin tool for the user
■ userObj->GetEMail() gives the e-mail address entered in the user admin tool for the user
■ userObj->GetMiscInfo() gives the Description entered in the user admin tool for the user
126 Administering Rational ClearQuest
Action initialization hook for a field value
In this example, when the user invokes the SUBMIT action, the action hook initializes the problem_description field with the login name of the person who is submitting the record. That way, users know who created the original change request.
VBScript:
Dim session Dim login_name
‘ Get the sessionset session = GetSession
‘ Get the logon namelogin_name = session.GetUserLoginName SetFieldValue "problem_description", login_name
Perl:
# Get the session$session = $entity -> GetSession();
# Get the logon name$login_name = $session -> GetUserLoginName();$entity -> SetFieldValue("problem_description",$login_name);
Using hooks to customize your workflow 127
Action hook for setting the value of a parent record
Use the following action hook in conjunction with parent/child linking to create a state-based relationship between a parent record and its children. This hook allows you to automatically move the parent record to the next state if all the children are in that state (see “Using fields to link records” on page 70).
Note: This code assumes certain field names and record types. If you cut and paste, you will have to make some changes.
VBScript:
Dim parent_id ‘Dimension variables that hold objectsDim ParentObj Dim ChildRefList Dim ChildArray Dim ChildID Dim defectChildEntityObj Dim StateStatus Dim SameState Dim CurrentState Dim retvalue Dim ActionJustPerformed
set sessionObj = GetSession ThisID = GetDisplayName ActionJustPerformed = GetActionName sessionobj.outputdebugstring "action is: " & _ActionJustPerformed & vbCrLf StateStatus = "" SameState = 0
sessionobj.outputdebugstring "current db id is: " & ThisID _ & vbCrLf
parent_id = GetFieldValue("parent").GetValue() sessionobj.outputdebugstring "parent id is: " & parent_id _ & vbCrLf
if parent_id <> "" then set ParentObj=sessionobj.GetEntity("defect", parent_id) ChildRefList=ParentObj.GetFieldValue("parent").GetValue ChildArray=split (ChildRefList, vbLf)
For Each ChildID In ChildArray set defectChildEntityObj=sessionobj.GetEntity("Defect", _
128 Administering Rational ClearQuest

ChildID) CurrentState=defectChildEntityObj.GetFieldValue _ ("State").GetValue
sessionobj.outputdebugstring "StateStatus is: " & _ StateStatus & vbCrLf
sessionobj.outputdebugstring "CurrentState is: " & _ CurrentState & vbCrLf
sessionobj.outputdebugstring "SameState is: " & _ SameState & vbCrLf
if StateStatus = "" then StateStatus = CurrentState SameState = 1
sessionobj.outputdebugstring "coming to statestatus _ is null" & vbCrLf
elseif StateStatus = CurrentState then sessionobj.outputdebugstring "coming to same state" & _ vbCrLf SameState = 1
else sessionobj.outputdebugstring "states are different" & vbCrLf SameState = 0
end if
Next
if SameState = 1 then sessionobj.outputdebugstring "samestate = 1, setting _ parent state" & vbCrLf sessionobj.EditEntity ParentObj, ActionJustPerformed status = ParentObj.Validate
if (status <> "") then sessionobj.outputdebugstring "error when updating parent _ state: " & status & vbCrLf exit sub end if
ParentObj.Commit end if end if
Using hooks to customize your workflow 129

Perl:
$sessionObj=$entity->GetSession();$ThisID=$entity->GetDisplayName();$ActionJustPerformed->GetActionName();$parent_id=$entity->GetFieldValue("parent1")->GetValue();$StateStatus="";$SameState=0;
# ClearQuest has a message monitor to display # ClearQuest messages and your messages$sessionObj->OutputDebugMessage ("perl current db id is: $ThisID\n");$sessionObj->OutputDebugMessage ("perl parent id is: $parent_id\n");
if ($parent_id ne "") { $ParentObj = $sessionObj->GetEntity("defect", $parent_id); $ChildRefList=$ParentObj->GetFieldValue ("children1")->GetValue(); $sessionObj->OutputDebugMessage ("children are: $childreflist\n"); @ChildArray = split (/\n/,$ChildRefList);
foreach $ChildID (@ChildArray) {
$defectChildEntityObj = $sessionObj->GetEntity("defect", $ChildID); $CurrentState =$defectChildEntityObj-> GetFieldValue("State")->GetValue();
$sessionObj->OutputDebugMessage("perl StateStatus is: $StateStatus\n");
$sessionObj->OutputDebugMessage("perl Current Status is: $CurrentStatus\n");
$sessionObj->OutputDebugMessage("perl SameState is: $SameState\n");
if ($StateStatus eq "") {
$StateStatus = $CurrentState; $SameState = 1;
$sessionObj->OutputDebugMessage("coming to statestatus is null\n");
130 Administering Rational ClearQuest

} elsif ($StateStatus eq $CurrentState) {
sessionObj->OutputDebugMessage ("coming to same state\n"); $SameState = 1;
} else { $sessionObj->OutputDebugMessage("states are different\n"); $SameState = 0; } #nested if statements} #End foreach Loop
if ($SameState == 1) { $sessionObj->OutputDebugMessage("samestate = 1, setting parent state\n"); $sessionObj->EditEntity($ParentObj, $ActionJustPerformed); $status = $ParentObj->Validate();
if ($status ne "") { $sessionObj->OutputDebugMessage ("error when updating parent state: $status\n");
return -1; # Exit }
$ParentObj->Commit();} #end if for ($SameState == 1)} #end if for ($parent_id ne "")
Using hooks to customize your workflow 131

132 Administering Rational ClearQuest
A D M I N I S T E R I N G R A T I O N A L C L E A R Q U E S T
8
Administering ClearQuest WebClearQuest Web allows you to extend support to users through a web interface. With ClearQuest Web, users can access ClearQuest data from remote locations.
This chapter covers the following topics:
■ Understanding ClearQuest Web customizations■ Configuring display settings■ Setting up limited access for users and groups■ Using hooks in ClearQuest Web
Note: To prepare and set up web support for your users, see the Installing Rational ClearQuest guide.
133
Understanding ClearQuest Web customizations
ClearQuest Web supports many of the same features as the native Windows ClearQuest client, with some exceptions. Some features require additional customizations to make them work correctly on the web.
ClearQuest Web feature differences
ClearQuest Web differs from the native client in the following ways.
■ Users cannot drill down (query) on charts.■ Users can only use public charts and reports (they cannot create
their own).■ ClearQuest Web generates reports in HTML format. ■ Users should navigate with the ClearQuest Web buttons instead
of the web browser’s Back and Forward buttons. ■ Instead of a form with tabs, a column displays fields in groups
that correspond to the native ClearQuest tabs. See “Configuring display settings” on page 135.
■ ClearQuest Web can be set up to limit access by certain users and user groups to submit records and run a single query only. See “Setting up limited access for users and groups” on page 136.
■ Certain hooks must be modified to function correctly on the web, including those for creating dependent fields. See “Using hooks in ClearQuest Web” on page 137.
134 Administering Rational ClearQuest

Configuring display settings
You can customize how ClearQuest Web displays, including font and color usage. To do this, select the Edit Web Settings operation in ClearQuest Web. For a complete list of the settings you can customize, select Editing Web Settings in the ClearQuest Web Help.
Note: Only users with Super User or Schema Designer privileges can edit web settings.
In addition, forms and reports display differently on the web:
■ ClearQuest Web does not display forms in the same way as the native client. Instead of a form with tabs, a column displays fields in groups that correspond to the native ClearQuest tabs. You can control the order in which fields appear on the web by setting the field tab order when you create the form.
■ ClearQuest Web generates reports in HTML format. When you design report formats with Crystal Reports, test the output to HTML and not just the default RTF format.
More information? Select Working with record forms in the ClearQuest Designer Help and Working with reports in the ClearQuest (client) Help.
Administering ClearQuest Web 135
Setting up limited access for users and groups
You can limit web access by restricting users or user groups to the following activities:
■ Submit records■ Run a single query that you provide
This “web entry” version of ClearQuest Web provides another layer of user privileges.
For example, you can enable beta customers to provide feedback through a password-protected virtual “extranet.” First, you would create a ClearQuest user group (see “Administering users” on page 95) that consists of customers from which you want feedback, and then distribute the ClearQuest URL to that group. That group will only be able to submit records and query for the records you specify. The query results are read-only.
To configure ClearQuest Web to be a “web entry” client for a user or user group, you must have Schema Designer or Super User privileges. To do this, select the Edit Web Settings operation in ClearQuest Web.
More information? For more information, select Editing Web Settings in the ClearQuest Web Help.
136 Administering Rational ClearQuest
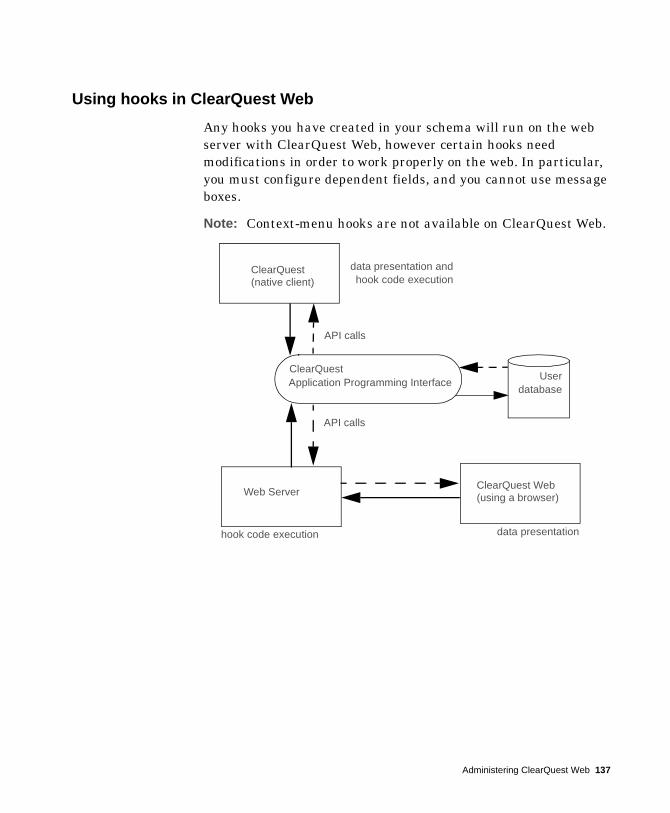
Using hooks in ClearQuest Web
Any hooks you have created in your schema will run on the web server with ClearQuest Web, however certain hooks need modifications in order to work properly on the web. In particular, you must configure dependent fields, and you cannot use message boxes.
Note: Context-menu hooks are not available on ClearQuest Web.
C learQuestClient Client
Userdatabase
Application Programming InterfaceClearQuest
ClearQuest
C Client
ClearQuest WebC learQuestClient
Web Server
data presentation andhook code execution
data presentation hook code execution
API calls
API calls
(using a browser)
(native client)
Administering ClearQuest Web 137
Using dependent fields on ClearQuest Web
ClearQuest Web is not aware of dependencies that exist between fields. To enable support for dependent fields, you must use specific controls when designing your record form, and follow the steps below.
1 Create the dependent field relationship with a value-changed field hook.
When running on ClearQuest Web, field hooks can set values of dependent fields, but they cannot reference field values other than their own.
2 Add the appropriate control. Both the field that creates the dependency and the dependent fields need to use one of the following controls. You can mix and match:
■ Drop-down list box■ Combo box■ Drop-down combo box
3 In the control’s property sheet, use the Web Dependent Fields tab to specify the fields that depend on the respective field’s value. Only the parent field of the dependency needs to be web-enabled.
Note: In order to update the choice list associated with the dependent field, you’ll need to mark Recalculate List when you create the choice list. This may decrease web performance.
Displaying messages on ClearQuest Web
Functions that call other Windows applications, such as a message box, cause the web client to freeze. For example, if a message box function runs on a web server, the message box pops up on the server’s screen. Since the user cannot click OK on the server, the client is left waiting. This requires you to reboot the web server.
However, if record script hooks return a string value, that string is displayed to the user.
138 Administering Rational ClearQuest
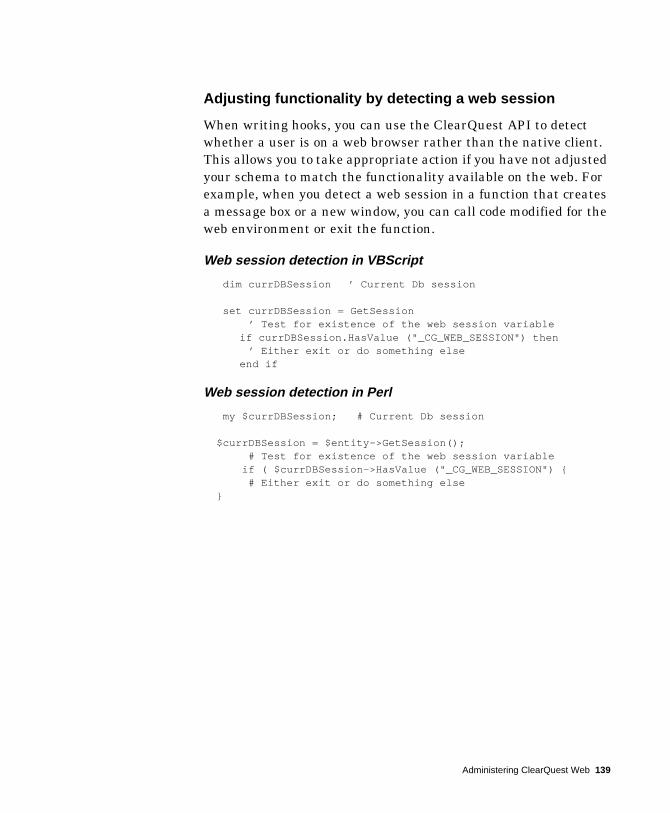
Adjusting functionality by detecting a web session
When writing hooks, you can use the ClearQuest API to detect whether a user is on a web browser rather than the native client. This allows you to take appropriate action if you have not adjusted your schema to match the functionality available on the web. For example, when you detect a web session in a function that creates a message box or a new window, you can call code modified for the web environment or exit the function.
Web session detection in VBScript
dim currDBSession ’ Current Db session
set currDBSession = GetSession ’ Test for existence of the web session variable
if currDBSession.HasValue ("_CG_WEB_SESSION") then ’ Either exit or do something else
end if
Web session detection in Perl
my $currDBSession; # Current Db session
$currDBSession = $entity->GetSession(); # Test for existence of the web session variable if ( $currDBSession->HasValue ("_CG_WEB_SESSION") { # Either exit or do something else }
Administering ClearQuest Web 139

140 Administering Rational ClearQuest

A D M I N I S T E R I N G R A T I O N A L C L E A R Q U E S T
9
Administering ClearQuest E-mailClearQuest takes advantage of e-mail in two ways.
■ ClearQuest can send e-mail notification to a user or a user group when a record meets the criteria you define. For example, you can send e-mail to your testing team as soon as a defect is fixed. To do this, you set up e-mail rules with ClearQuest.
■ ClearQuest users can submit and modify records via e-mail. For example, users can respond to an e-mail notification with notes that can be appended to a record in the ClearQuest database. To set up e-mail submission capability, you use the Rational E-mail Reader.
This chapter covers the following topics:
■ Configuring ClearQuest to send e-mail■ Setting up e-mail rules ■ Submitting records via e-mail ■ Understanding “roundtrip” e-mail
141
Setting up e-mail rules
E-mail rules are used to set up e-mail notification for ClearQuest users. For example, you can create an e-mail rule that sends e-mail to the quality assurance team when a defect has been resolved. You can set up the e-mail to include any of the fields of the resolved defect.
You create e-mail rules by submitting Email_Rule records from the ClearQuest client. To add or modify an e-mail rule, you must have Super User or Schema Designer privileges (see “Understanding database privileges” on page 97).
Use the Email_Rule record type to set up the parameters used to determine when e-mail is sent, under which conditions, to which users or user groups it is sent, and the content of the e-mail message.
Note: Most of ClearQuest’s predefined schemas include the E_mail rule record type. If the schema you are using does not, you can add this functionality by adding the Email package (see Appendix A, “ClearQuest schemas and packages”).
When you create an e-mail rule, you establish the criteria that triggers e-mail notification. You can send e-mail based on the following changes to a record:
■ A field’s value changes.■ A specific action is taken.■ A record shows up in a specific query.
If you want to send mail when a record meets multiple criteria, you can define a query and then send e-mail when the record meets that query’s criteria.
More information? When submitting an e-mail rule record, right-click a field and choose Help for more information. In addition, look up e-mail in ClearQuest Help index.
142 Administering Rational ClearQuest
Configuring ClearQuest clients to send e-mail
In order to send notification e-mail messages, ClearQuest users must configure their e-mail settings and enable e-mail notification. This allows individual client machines to use the ClearQuest e-mail rules you set up. Users set up their e-mail by choosing View > E-mail Options in ClearQuest.
To configure ClearQuest Web to send e-mail, see “Installing ClearQuest Web” in the Installing ClearQuest guide.
More information? Look up e-mail in the ClearQuest Help index.
Administering ClearQuest E-mail 143
Sending records via e-mail
To enable your users to submit and modify records via e-mail, you must configure the Rational E-mail Reader. The E-mail Reader is an e-mail processing tool that parses e-mail submissions and commits new records or changes to the database.
The E-mail Reader (mailreader.exe) is automatically installed in the \Rational\common directory. You can drag a copy of the mailreader.exe to the desktop to create a shortcut to it. Follow the instructions in the online Help (located in \Rational\common\mailreader.hlp) on how to set up the E-mail Reader.
Keep in mind the following when configuring the E-mail Reader:
■ The E-mail Reader requires a dedicated e-mail account that has been assigned for parsing records.
■ You must designate one machine to run the E-mail Reader. To ensure that e-mail services are always available, run the E-mail Reader on the same machine as your database server.
■ Any e-mail sent must be in the required format. See “Formatting e-mail for submission” on page 145.
■ You should set up defaults to be used. This allows users to quickly respond to e-mail notification without taking into account the required format.
■ Remember that field values submitted via e-mail overwrite the existing data. If you want to append existing data, you must specify a field that allows users to append data, such as the Notes Log (available in most predefined schemas).
144 Administering Rational ClearQuest
Formatting e-mail for submission
Any e-mail sent must conform to the following format. If it does not conform to the following format, the e-mail submission will fail and the e-mail will be deleted.
Subject:<record type> <action> <record ID>
Body: <fieldname: legal value><fieldname: legal value>{<multiline_fieldname: This is an example of a field valuefor a field whose data type is a multi-line text field. Itrequires curly braces>}
The Subject line follows these guidelines:
■ The record type is always required and is listed first. ■ The action name is listed after the record type. If you have set
up defaults, you can omit the action (see the example below). Users can override the defaults by specifying a different action. If you do not provide an action, and defaults have not been set up, the submission will be rejected.
■ The record ID is listed after the action, but is not necessary when submitting new records.
Note: You can configure the E-mail Reader to track errors and e-mail you when a record fails to be committed to the database.
The e-mail sender can be an external application.
E-mail format example
In this example, you have set up the default action as Modify and the default field to be Notes Log. The Subject line requires the record type and record ID, but because of the defaults, the action name is optional.
Subject:RE: defect SAMPL00000017
Body: {Today we posted a patch for this problem on the companyintranet. Please download the patch to solve yourcustomer’s problem.}
Administering ClearQuest E-mail 145
Guidelines for using the e-mail format
Keep in mind that your schema rules, such as required fields and legal values, apply when users submit or modify records with e-mail. For example, if the user specifies the Submit action, but fails to include all the required fields for the Submit state, the e-mail is sent back to the sender with an error message.
If you want to know about any failed e-mail messages, you can configure the E-mail Reader to keep a log or send e-mail to you whenever a submission fails.
Use the following guidelines when sending e-mail:
■ Use curly braces for a text field with multiple lines:
{description: my description here... multiple lines follow}
■ If legal values are not used, the Rational E-mail Reader sends an error message to the submitter.
■ E-mail submission does not support adding attachments.■ Fields can be included in any order.■ The e-mail must include values for any required fields.■ Include only fields that you want to overwrite. To avoid
overwriting updates made by other users, use a field that appends text and preserves earlier entries.
■ Do not supply a value for a read-only field (for example, defect ID), because ClearQuest does not change such fields.
■ ClearQuest’s own e-mail notification mail uses the required format automatically. Users can use this mail as a template for sending additional records or modifications via e-mail.
146 Administering Rational ClearQuest
Using “roundtrip” e-mail
Your team can use e-mail notification along with e-mail submission to update records. This combination is called “roundtrip” e-mail.
Here’s an example of a typical sequence of events:
1 A user submits a record via e-mail with the required format. ClearQuest assigns the new defect ID number PROD0000137.
2 An e-mail rule you established notifies the lead engineer of this defect.
3 The lead engineer reads the e-mail entitled “PROD0000137”, then responds by e-mail, including remarks in the description field, using the required format.
Important: The reply should only include fields you want to modify. Any field included in the message will overwrite existing data.
4 The Rational E-mail Reader processes the e-mail message and submits the modified record to the ClearQuest database.
Administering ClearQuest E-mail 147

148 Administering Rational ClearQuest
A D M I N I S T E R I N G R A T I O N A L C L E A R Q U E S T
10
Importing data into ClearQuestThis chapter describes how to import data from an existing change request management system into ClearQuest.
Topics covered include:
■ Understanding the import process■ Ensuring a successful data import■ Exporting data■ Performing the import for records
149
Understanding the import process
In general, importing data into ClearQuest from another system involves the following steps:
1 Plan your requirements: Know what fields, choice lists, record types, forms, and actions you need to manage data in ClearQuest.
2 Create a schema that contains all the fields, actions, and state transitions necessary to support your imported data. Map the states and fields in your existing process to states and fields in the ClearQuest schema.
3 Create or modify ClearQuest forms so users can view and modify the imported data.
4 Create a database to hold your imported data using the new schema.
5 Test the customizations you made to the database.
6 Export a small sample of data from your current system to a text file that uses the ClearQuest import format.
7 Use the ClearQuest Import Tool to move the test data into ClearQuest.
8 Manipulate the test data in ClearQuest.
9 Make any additional schema changes based on your test.
10 Perform the real conversion by exporting all the data from your current system to a text file that uses the ClearQuest import file format.
11 Run the ClearQuest Import tool to move the data into ClearQuest.
12 Repeat the import process for your history, attachments, and duplicates if applicable.
These steps are described in detail in the following sections.
150 Administering Rational ClearQuest
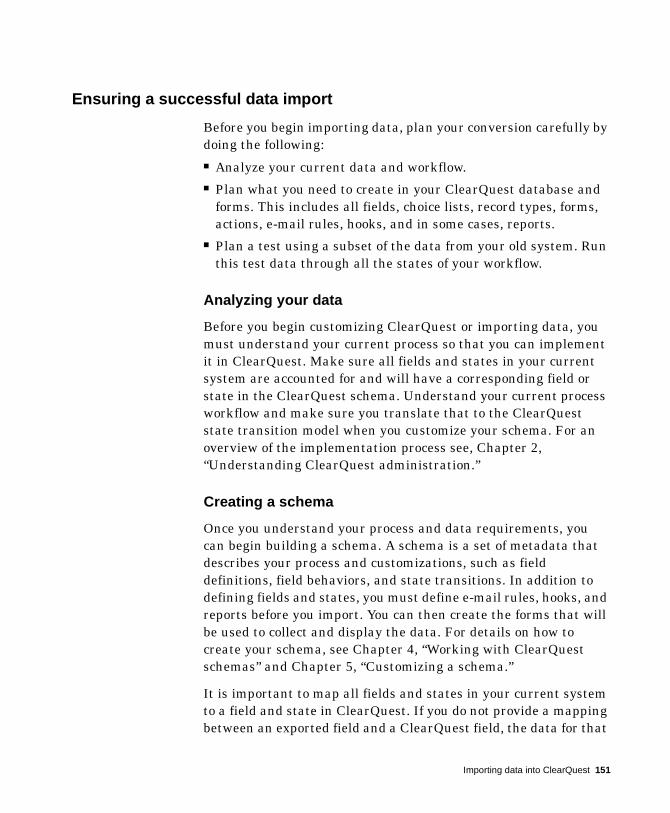
Ensuring a successful data import
Before you begin importing data, plan your conversion carefully by doing the following:■ Analyze your current data and workflow.■ Plan what you need to create in your ClearQuest database and
forms. This includes all fields, choice lists, record types, forms, actions, e-mail rules, hooks, and in some cases, reports.
■ Plan a test using a subset of the data from your old system. Run this test data through all the states of your workflow.
Analyzing your data
Before you begin customizing ClearQuest or importing data, you must understand your current process so that you can implement it in ClearQuest. Make sure all fields and states in your current system are accounted for and will have a corresponding field or state in the ClearQuest schema. Understand your current process workflow and make sure you translate that to the ClearQuest state transition model when you customize your schema. For an overview of the implementation process see, Chapter 2, “Understanding ClearQuest administration.”
Creating a schema
Once you understand your process and data requirements, you can begin building a schema. A schema is a set of metadata that describes your process and customizations, such as field definitions, field behaviors, and state transitions. In addition to defining fields and states, you must define e-mail rules, hooks, and reports before you import. You can then create the forms that will be used to collect and display the data. For details on how to create your schema, see Chapter 4, “Working with ClearQuest schemas” and Chapter 5, “Customizing a schema.”
It is important to map all fields and states in your current system to a field and state in ClearQuest. If you do not provide a mapping between an exported field and a ClearQuest field, the data for that
Importing data into ClearQuest 151
field is not imported. If the state field is not mapped, ClearQuest defaults all records to the Submitted state. This makes your state model ineffective and prevents you from creating accurate metrics.
Original record ID
ClearQuest assigns a new record ID to each imported record, so be sure that your schema has a field for the original (old) record ID. ClearQuest uses the original record ID when importing duplicates, history, and attachments. It is also useful for finding records based on the original record ID.
Note: If you used the ClearQuest Export Tool to export data from another ClearQuest database, the ID field in the export file should be mapped to the original record ID field.
Creating a database
You must create a user database to hold the imported data or upgrade an existing user database. This database is associated with the schema you customized so that it reflects the process model and customizations you designed into the schema. For information on creating and maintaining ClearQuest databases see Chapter 3, “Managing databases.”
Testing the conversion
We recommend that you first import a few test records into a test database. Make sure you read the following sections on exporting data and performing the conversion, then try the process with a subset of your data. After moving these test records into ClearQuest, make sure you can manipulate them from within the ClearQuest user interface. When you are satisfied that everything is working properly, go ahead and import all of your records.
Note: Consider importing all of the records in your system, even those that have been resolved. By including all records, you are able to access historical information about your projects and immediately generate useful management reports.
152 Administering Rational ClearQuest
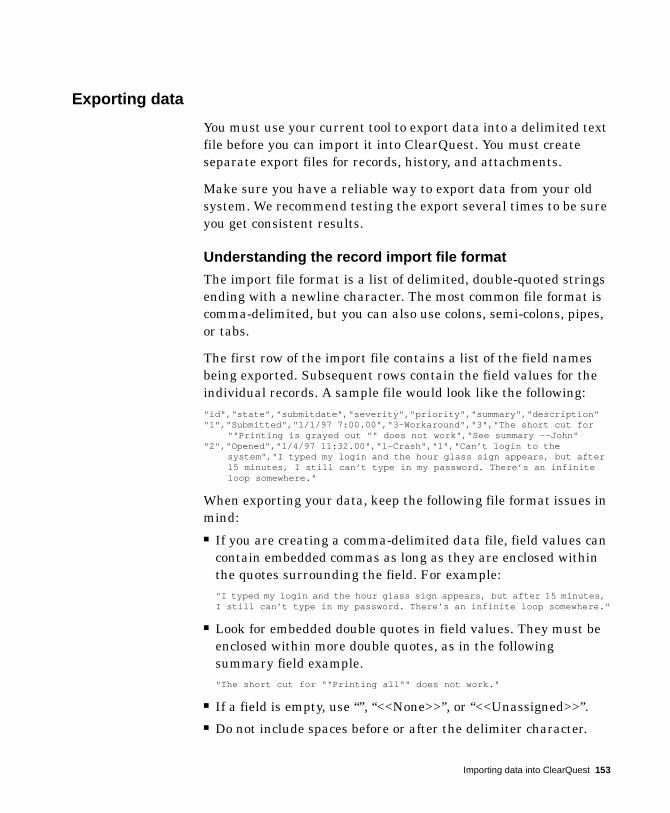
Exporting data
You must use your current tool to export data into a delimited text file before you can import it into ClearQuest. You must create separate export files for records, history, and attachments.
Make sure you have a reliable way to export data from your old system. We recommend testing the export several times to be sure you get consistent results.
Understanding the record import file format
The import file format is a list of delimited, double-quoted strings ending with a newline character. The most common file format is comma-delimited, but you can also use colons, semi-colons, pipes, or tabs.
The first row of the import file contains a list of the field names being exported. Subsequent rows contain the field values for the individual records. A sample file would look like the following:"id","state","submitdate","severity","priority","summary","description""1","Submitted","1/1/97 7:00.00","3-Workaround","3","The short cut for
""Printing is grayed out "" does not work","See summary --John""2","Opened","1/4/97 11:32.00","1-Crash","1","Can’t login to the
system","I typed my login and the hour glass sign appears, but after 15 minutes, I still can’t type in my password. There’s an infinite loop somewhere."
When exporting your data, keep the following file format issues in mind:■ If you are creating a comma-delimited data file, field values can
contain embedded commas as long as they are enclosed within the quotes surrounding the field. For example:"I typed my login and the hour glass sign appears, but after 15 minutes, I still can’t type in my password. There’s an infinite loop somewhere."
■ Look for embedded double quotes in field values. They must be enclosed within more double quotes, as in the following summary field example."The short cut for ""Printing all"" does not work."
■ If a field is empty, use “”, “<<None>>”, or “<<Unassigned>>”. ■ Do not include spaces before or after the delimiter character.
Importing data into ClearQuest 153
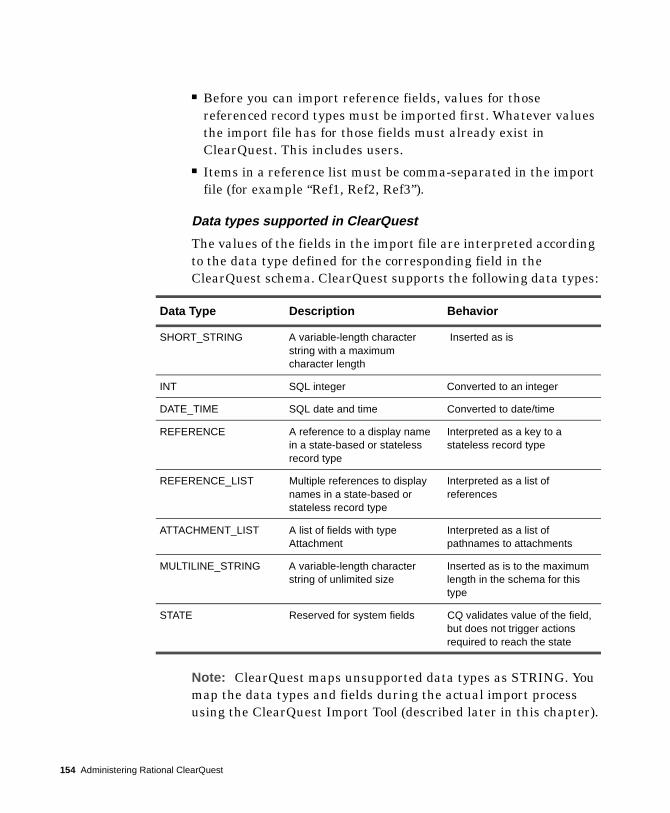
■ Before you can import reference fields, values for those referenced record types must be imported first. Whatever values the import file has for those fields must already exist in ClearQuest. This includes users.
■ Items in a reference list must be comma-separated in the import file (for example “Ref1, Ref2, Ref3”).
Data types supported in ClearQuest
The values of the fields in the import file are interpreted according to the data type defined for the corresponding field in the ClearQuest schema. ClearQuest supports the following data types:
Note: ClearQuest maps unsupported data types as STRING. You map the data types and fields during the actual import process using the ClearQuest Import Tool (described later in this chapter).
Data Type Description Behavior
SHORT_STRING A variable-length character string with a maximum character length
Inserted as is
INT SQL integer Converted to an integer
DATE_TIME SQL date and time Converted to date/time
REFERENCE A reference to a display name in a state-based or stateless record type
Interpreted as a key to a stateless record type
REFERENCE_LIST Multiple references to display names in a state-based or stateless record type
Interpreted as a list of references
ATTACHMENT_LIST A list of fields with type Attachment
Interpreted as a list of pathnames to attachments
MULTILINE_STRING A variable-length character string of unlimited size
Inserted as is to the maximum length in the schema for this type
STATE Reserved for system fields CQ validates value of the field, but does not trigger actions required to reach the state
154 Administering Rational ClearQuest
Understanding the history import file format
The import file format for history requires that each history be its own row, and that each entry have an original ID number identifying the record to which the history belongs. The remaining fields contain information on the action that was performed, and should include the following fields:
■ original record ID■ timestamp■ user name■ action performed■ old state■ new state
Note: If you used the ClearQuest Export Tool to export data from another ClearQuest database, the original record ID is stored in the “display_name” field.
An example import file looks like this:
"id","timestamp","user_name","action_name","old_state","new_state"
"1","Apr 6 1999 9:31AM","srahman","Fix_Log","verified","verified"
"2","Apr 6 1999 9:31AM","srahman","Fix_Log","verified","verified"
The date should always specify the full year regardless of the date format used. Acceptable date formats include:
■ “6 April 1999”■ “April 6, 1999 8:30:00”■ “8:30:00 Apr 6 1999”■ “4/6/1999 8:30:00PM”
Understanding the attachment import file format
The import file format for attachments requires that each entry have an original ID number identifying the record to which the attachments belong. The remainder of each entry lists the attached files associated with each attachment field of the record.
Importing data into ClearQuest 155

The pathnames for the attached files of a single attachment data type field are grouped together inside one set of quotation marks and separated by delimiter characters.
The following example associates three attached files with a record whose original ID is 101. The schema contains two attachment fields, attfield1 and attfield2.
Note: If you used the ClearQuest Export Tool to export data from another ClearQuest database, the original record ID is stored in the display_name field.
The import file looks like the following:
"id","attfield1","attfield2" "101","c:\temp\101_1.txt,c:\temp\101_2.txt","c:\temp\101_3.txt"
In this example, attfield1 has two attached files associated with it. A comma separates the pathnames for the files. ClearQuest stores the actual contents of the attachments, not just a reference to them, and uses the pathname to locate and read the file.
156 Administering Rational ClearQuest
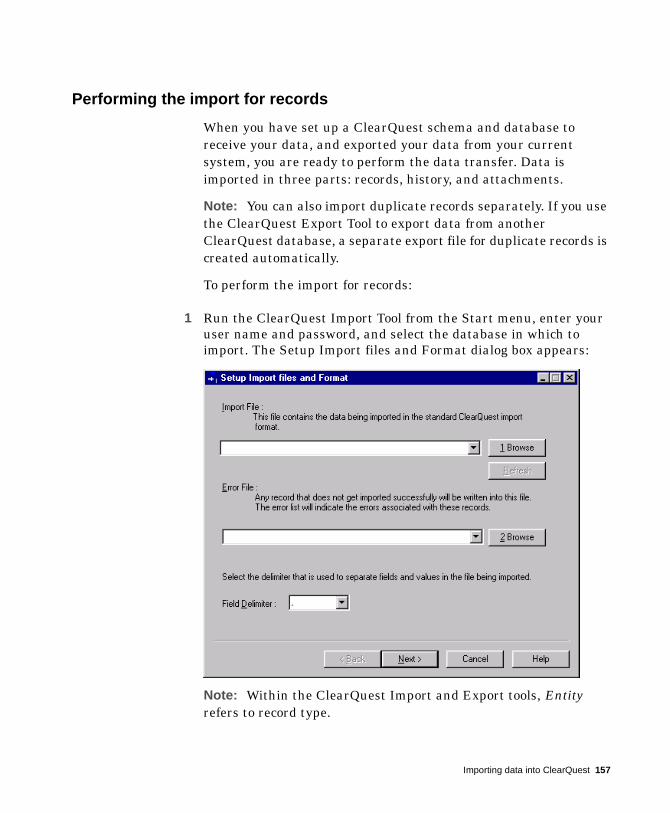
Performing the import for records
When you have set up a ClearQuest schema and database to receive your data, and exported your data from your current system, you are ready to perform the data transfer. Data is imported in three parts: records, history, and attachments.
Note: You can also import duplicate records separately. If you use the ClearQuest Export Tool to export data from another ClearQuest database, a separate export file for duplicate records is created automatically.
To perform the import for records:
1 Run the ClearQuest Import Tool from the Start menu, enter your user name and password, and select the database in which to import. The Setup Import files and Format dialog box appears:
Note: Within the ClearQuest Import and Export tools, Entity refers to record type.
Importing data into ClearQuest 157
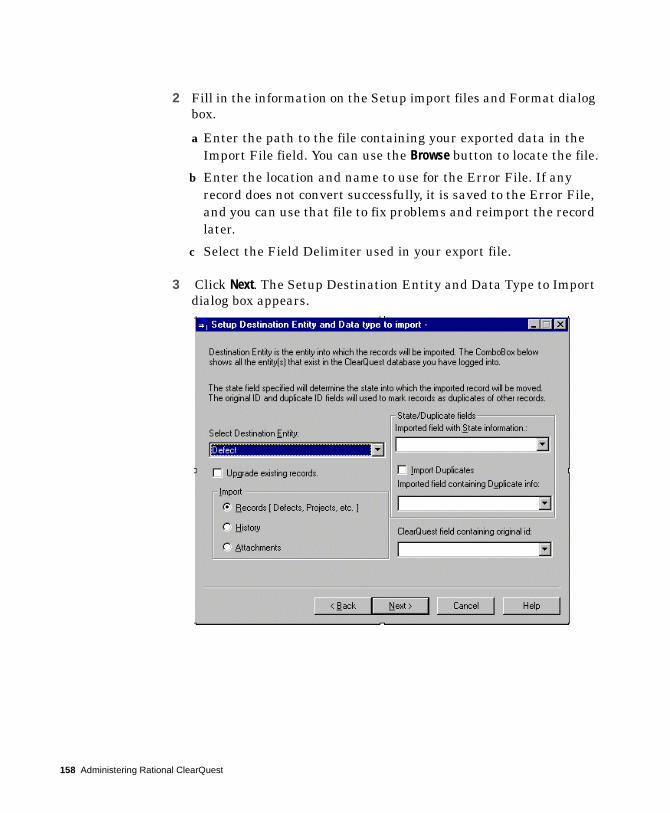
2 Fill in the information on the Setup import files and Format dialog box.
a Enter the path to the file containing your exported data in the Import File field. You can use the Browse button to locate the file.
b Enter the location and name to use for the Error File. If any record does not convert successfully, it is saved to the Error File, and you can use that file to fix problems and reimport the record later.
c Select the Field Delimiter used in your export file.
3 Click Next. The Setup Destination Entity and Data Type to Import dialog box appears.
158 Administering Rational ClearQuest
4 Select the entity and data type to import.
a Enter the Destination Entity. This is the record type into which the records are imported.
b Indicate the type of data you are importing: Records, History, or Attachments.
c If the entity has states, specify the exported field that maps to the state field you defined in your ClearQuest schema. The state field specified determines the state into which the record is imported. If this field is empty, ClearQuest defaults to the Submit state.
Note: The state names in your import file must match those you defined in your ClearQuest schema. If you want to use different state names, you must edit your import file to use the new names. For example, if your current application used the state name Submitted, but you called that state New in your ClearQuest template, you must edit your import file and replace Submitted with New.
d Indicate whether the imported records contain duplicates. If they do, enter the exported field name that contains the duplicate information. For more information on importing duplicates, see “Importing duplicate records” on page 164.
e Enter the name of the ClearQuest field that will contain the original record ID of the exported data. This field is important for importing history, attachments, and duplicate records.
Note: ClearQuest allows you to update records that you previously imported. If you are upgrading previously imported records, history, or attachments, click Upgrade existing records.
If you used the ClearQuest Export Tool to export duplicate record information separately, click Upgrade existing records and Import Duplicates. This adds the duplicate information to the existing records. If you are importing duplicate records from another application, see “Importing duplicate records” on page 164.
Importing data into ClearQuest 159

5 Click Next. The Setup Field Mapping dialog box appears.
6 Create a one-to-one mapping between the fields exported from your current system and the fields you created in the ClearQuest schema. The first column lists the field names of the ClearQuest fields, the second column lists the data type defined for the field in the ClearQuest schema, and the third column lists the original field names. If the exported field names are the same as the new ClearQuest field names, the mapping is done automatically.
■ You cannot map a field from the exported data file to more than one field in the ClearQuest schema.
■ If the time field is mapped to a date-time field in ClearQuest, today’s date is appended to the time. Also, if the date field is mapped to a date-time field in ClearQuest, the current time is appended to the date.
7 When you have completed the mappings, click Save to save the current mappings to a text file. This allows you to re-open the mapping file if you need to repeat the import process.
160 Administering Rational ClearQuest

8 Click Next. The Perform Import dialog box appears.
9 In the Terminate after error field, indicate how many errors can occur before the import process is terminated.
10 Click Import to begin the process. ClearQuest displays the number of errors and the number of records scanned during the import.
11 When the import is finished, click Exit to close the Import Tool.
Importing records from the Error file
If errors occur during the import, ClearQuest creates the following files:
■ error file: ClearQuest saves the unimported records to the error file whose name and location you defined in step 2 above.
■ errlog.txt: ClearQuest saves error messages to a text file in your system Temp directory.
Importing data into ClearQuest 161
To reimport these problem records:
1 Check the errlog.txt file and review the types of errors encountered.
2 Open the error file containing the unimported records.
3 Correct the errors in the records. Be sure the error file follows the import file format. See “Understanding the record import file format” on page 153.
4 Perform the import process again using the error file as the import file and specifying a new error file name.
Importing history
After importing your records, you are ready to import your history information. History information is important if you want historical and trend-analysis reports to work.
Before importing history information, be sure you have an import file containing the history fields. See “Understanding the history import file format” on page 155.
To import history, follow the procedure for “Performing the import for records” on page 157, with the following changes:
■ In step 2, filling in the information on the Setup import files and Format dialog box:■ Enter the path to the file containing your exported history
data in the Import File field. You can use the Browse button to locate the file.
■ Enter the location and name to use for the Error File. If you have an error file from importing records, be sure to give the error file for History a different name.
162 Administering Rational ClearQuest
■ In step 4, selecting the entity and data type to import:■ Indicate that History is the type of data you are importing.■ Enter the name of the ClearQuest field that contains the
original record ID of the exported data. ClearQuest must know the record to which the history information belongs.
■ In step 6, creating a one-to-one mapping, map your history fields to the corresponding fields in your ClearQuest schema, and save the map file.
All other steps are the same.
Importing attachments
After importing your records, you are ready to import your attachments. Before importing attachments, be sure you have an import file containing the attachment information. See “Understanding the attachment import file format” on page 155.
To import attachments, follow the procedure for “Performing the import for records” on page 157, with the following changes:
■ In step 2, filling in the information on the Setup import files and Format dialog box:■ Enter the path to the file containing your exported attachment
data in the Import File field. You can use the Browse button to locate the file.
■ Enter the location and name to use for the Error File. If you have an error file from importing records, be sure to give the error file for attachments a different name.
■ In step 4, selecting the entity and data type to import:■ Indicate that Attachments are the type of data you are
importing.■ Enter the name of the ClearQuest field that contains the
original record ID of the exported data. ClearQuest must know the record to which the attachment belongs.
Importing data into ClearQuest 163

■ In step 6, creating a one-to-one mapping, map your attachment fields to the corresponding fields in your ClearQuest schema, and save the map file.
All other steps are the same.
Importing duplicate records
You can import duplicate records when importing all of your records. To import duplicate records, considering the following requirements:
■ Imported duplicates must have a pointer to their original ID.■ You must indicate which ClearQuest field maps to the original
ID. ClearQuest uses the original record to locate the parent of the duplicate record.
■ Within ClearQuest, duplicate records are handled using a Duplicate state and action. Be sure your schema includes both.
To import duplicate records:
1 Follow the steps for “Performing the import for records” on page 157.
2 In step 4, check Import Duplicates and enter the field name containing the duplicate information.
3 Run the import. Any duplicate that cannot reference its parent record (because it was imported before the parent) is saved to the Error file.
4 When the import is completed, use the Error file to import the duplicates that did not successfully import the first time.
Importing duplicate records separately
Another method for importing duplicate records is to create a separate export file for duplicate records, just as you do for history and attachments. You can then import all of your other records (excluding the child records), and import the duplicates later.
164 Administering Rational ClearQuest
Upgrading existing records
You can also use the ClearQuest Import tool to update records that you previously imported. For example, if you modified records in your old system that have already been imported into ClearQuest, you can update the imported records with the new data.
Warning: Be sure you do not change the records in both locations. If you upgrade existing records that have already been modified in ClearQuest, you will lose your changes.
To upgrade existing records, follow the procedure for “Performing the import for records” on page 157. In step 4, “Selecting the entity and data type to import,” select Upgrade existing records. All other steps are the same.
Importing data into ClearQuest 165

166 Administering Rational ClearQuest
A D M I N I S T E R I N G R A T I O N A L C L E A R Q U E S T
A
ClearQuest schemas and packagesClearQuest ships with several predefined schemas. There’s a schema to coincide with each of Rational’s Windows suites. ClearQuest also comes with a “Blank” schema that contains only the minimally required system fields.
Each ClearQuest predefined schema consists of a number of schema packages. ClearQuest uses these packages to build a complete schema. A package consists of pieces of schema functionality. For example, the Email package adds the Email_rule record type, which allows administrators to set up configurable e-mail rules according to their process.
This appendix includes the following topics:
■ ClearQuest predefined schemas■ Packages included in ClearQuest schemas■ State models used by predefined record types■ State type models for packages
More information? For information on how to customize a schema, see Chapter 5, “Customizing a schema.”
167
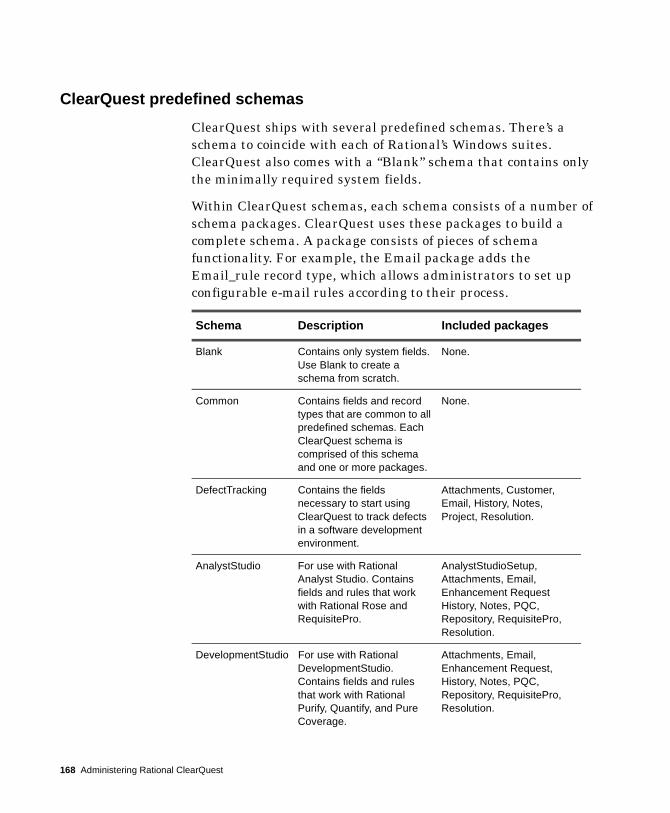
ClearQuest predefined schemas
ClearQuest ships with several predefined schemas. There’s a schema to coincide with each of Rational’s Windows suites. ClearQuest also comes with a “Blank” schema that contains only the minimally required system fields.
Within ClearQuest schemas, each schema consists of a number of schema packages. ClearQuest uses these packages to build a complete schema. A package consists of pieces of schema functionality. For example, the Email package adds the Email_rule record type, which allows administrators to set up configurable e-mail rules according to their process.
Schema Description Included packages
Blank Contains only system fields. Use Blank to create a schema from scratch.
None.
Common Contains fields and record types that are common to all predefined schemas. Each ClearQuest schema is comprised of this schema and one or more packages.
None.
DefectTracking Contains the fields necessary to start using ClearQuest to track defects in a software development environment.
Attachments, Customer, Email, History, Notes, Project, Resolution.
AnalystStudio For use with Rational Analyst Studio. Contains fields and rules that work with Rational Rose and RequisitePro.
AnalystStudioSetup, Attachments, Email, Enhancement Request History, Notes, PQC, Repository, RequisitePro, Resolution.
DevelopmentStudio For use with Rational DevelopmentStudio. Contains fields and rules that work with Rational Purify, Quantify, and Pure Coverage.
Attachments, Email, Enhancement Request, History, Notes, PQC, Repository, RequisitePro, Resolution.
168 Administering Rational ClearQuest
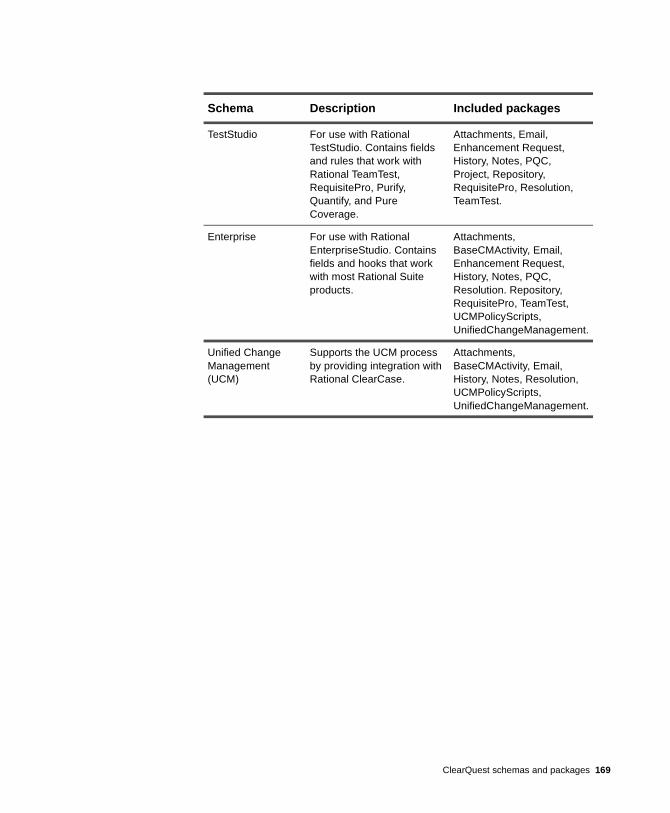
TestStudio For use with Rational TestStudio. Contains fields and rules that work with Rational TeamTest, RequisitePro, Purify, Quantify, and Pure Coverage.
Attachments, Email, Enhancement Request, History, Notes, PQC, Project, Repository, RequisitePro, Resolution, TeamTest.
Enterprise For use with Rational EnterpriseStudio. Contains fields and hooks that work with most Rational Suite products.
Attachments, BaseCMActivity, Email, Enhancement Request, History, Notes, PQC, Resolution. Repository, RequisitePro, TeamTest, UCMPolicyScripts, UnifiedChangeManagement.
Unified Change Management (UCM)
Supports the UCM process by providing integration with Rational ClearCase.
Attachments, BaseCMActivity, Email, History, Notes, Resolution, UCMPolicyScripts, UnifiedChangeManagement.
Schema Description Included packages
ClearQuest schemas and packages 169

Packages included in ClearQuest schemas
The following table lists the packages provided by ClearQuest. Some packages are read-only; their functionality cannot not be changed.
Package Description Record type(s) added/modified Field(s)
Attachments (read-only)
Allows you to add and remove attachments related to a record.
Adds an “Attachment” tab to the enabled record type.
Fields added to enabled record type:Attachments
BaseCMActivity Provides support for the BaseCMActivity record type. Included in the UCM schema and Enterprise schema as a lightweight activity record type. You can use this alternative to the defect record type as is, enable it for Unified Change Management (UCM), or develop it into a new record type.
For more information, see Managing Software Projects with ClearCase.
Adds the BaseCMActivity record type.
Fields added to BaseCMActivity record type:OwnerDescriptionHeadline
ClearCase (read-only)
Provides support for integration with Rational ClearCase.
For UCM integration, see UnifiedChangeMan-.
Adds the cc_change set and cc_vob_object record types
Adds the ClearCase tab to the enabled record type
Fields in cc_change_set record type:objects
Fields in cc_vob_object record type:NameObject_oidVob_Family_uuid
Fields added to enabled record type:cc_change_set
170 Administering Rational ClearQuest
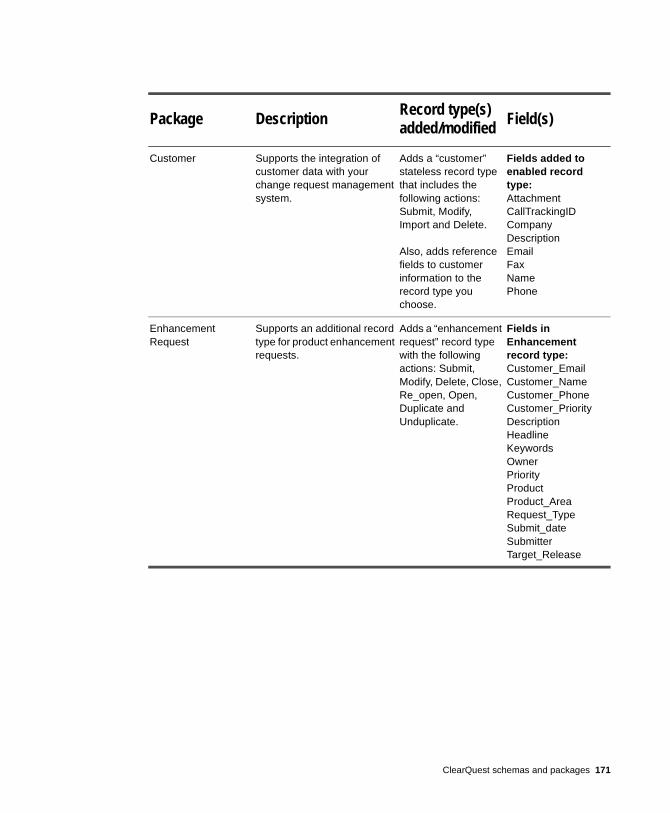
Customer Supports the integration of customer data with your change request management system.
Adds a “customer” stateless record type that includes the following actions: Submit, Modify, Import and Delete.
Also, adds reference fields to customer information to the record type you choose.
Fields added to enabled record type:AttachmentCallTrackingIDCompanyDescriptionEmailFaxNamePhone
Enhancement Request
Supports an additional record type for product enhancement requests.
Adds a “enhancement request” record type with the following actions: Submit, Modify, Delete, Close, Re_open, Open, Duplicate and Unduplicate.
Fields in Enhancement record type:Customer_EmailCustomer_NameCustomer_PhoneCustomer_PriorityDescriptionHeadlineKeywordsOwner Priority ProductProduct_AreaRequest_TypeSubmit_dateSubmitterTarget_Release
Package Description Record type(s) added/modified Field(s)
ClearQuest schemas and packages 171
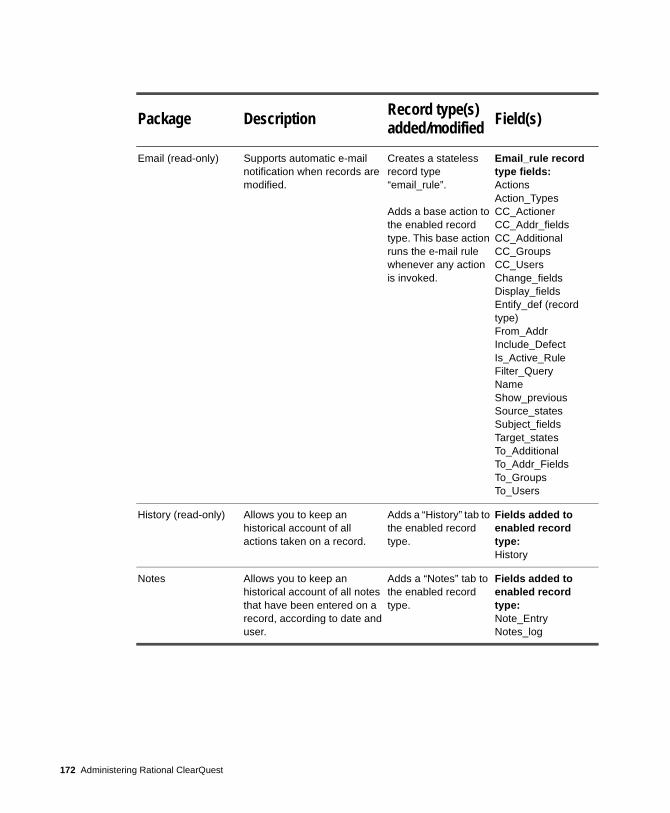
Email (read-only) Supports automatic e-mail notification when records are modified.
Creates a stateless record type “email_rule”.
Adds a base action to the enabled record type. This base action runs the e-mail rule whenever any action is invoked.
Email_rule record type fields:ActionsAction_TypesCC_ActionerCC_Addr_fieldsCC_AdditionalCC_GroupsCC_UsersChange_fieldsDisplay_fieldsEntify_def (record type)From_AddrInclude_DefectIs_Active_RuleFilter_QueryNameShow_previousSource_statesSubject_fieldsTarget_statesTo_AdditionalTo_Addr_FieldsTo_GroupsTo_Users
History (read-only) Allows you to keep an historical account of all actions taken on a record.
Adds a “History” tab to the enabled record type.
Fields added to enabled record type:History
Notes Allows you to keep an historical account of all notes that have been entered on a record, according to date and user.
Adds a “Notes” tab to the enabled record type.
Fields added to enabled record type:Note_EntryNotes_log
Package Description Record type(s) added/modified Field(s)
172 Administering Rational ClearQuest
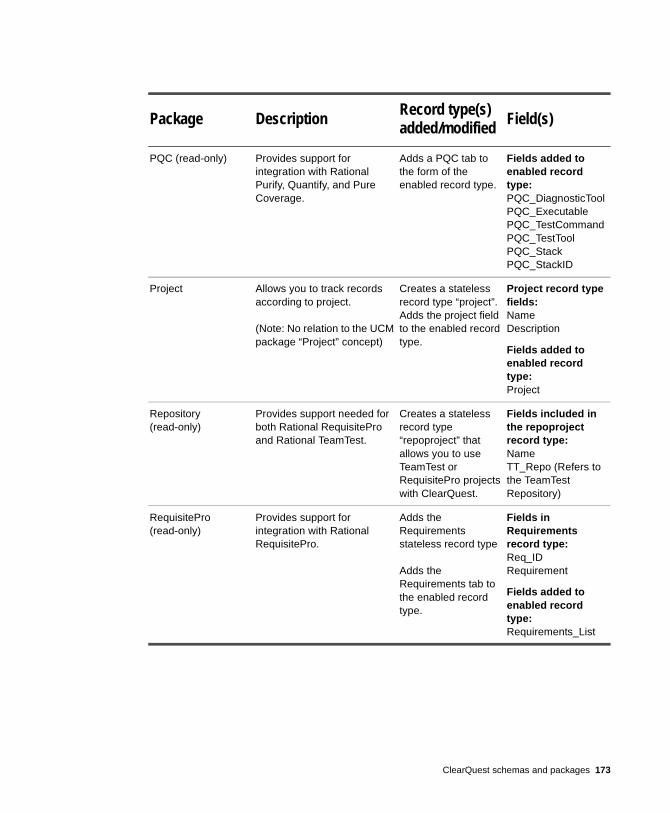
PQC (read-only) Provides support for integration with Rational Purify, Quantify, and Pure Coverage.
Adds a PQC tab to the form of the enabled record type.
Fields added to enabled record type:PQC_DiagnosticToolPQC_ExecutablePQC_TestCommandPQC_TestToolPQC_StackPQC_StackID
Project Allows you to track records according to project.
(Note: No relation to the UCM package “Project” concept)
Creates a stateless record type “project”.Adds the project field to the enabled record type.
Project record type fields:NameDescription
Fields added to enabled record type:Project
Repository (read-only)
Provides support needed for both Rational RequisitePro and Rational TeamTest.
Creates a stateless record type “repoproject” that allows you to use TeamTest or RequisitePro projects with ClearQuest.
Fields included in the repoproject record type:NameTT_Repo (Refers to the TeamTest Repository)
RequisitePro (read-only)
Provides support for integration with Rational RequisitePro.
Adds the Requirements stateless record type
Adds the Requirements tab to the enabled record type.
Fields in Requirements record type:Req_IDRequirement
Fields added to enabled record type:Requirements_List
Package Description Record type(s) added/modified Field(s)
ClearQuest schemas and packages 173
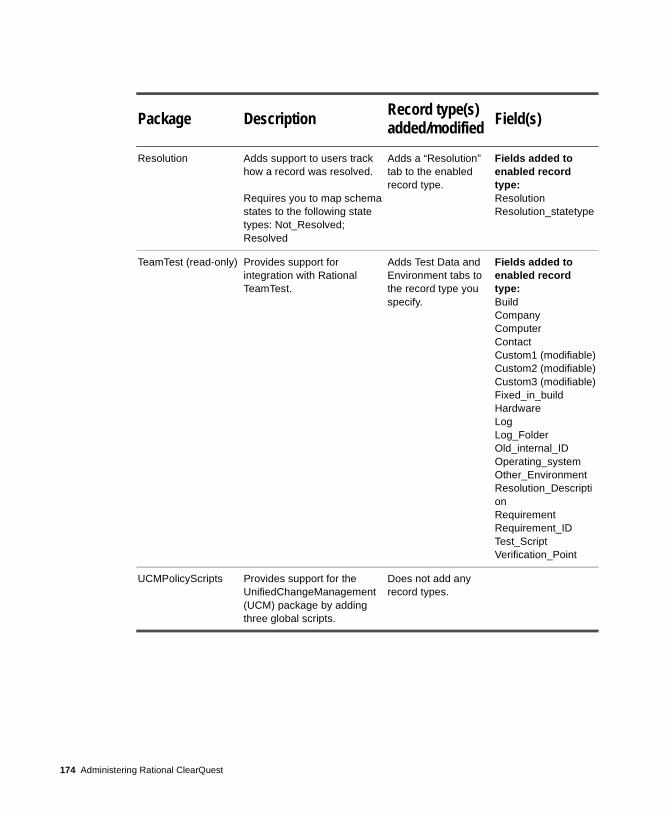
Resolution Adds support to users track how a record was resolved.
Requires you to map schema states to the following state types: Not_Resolved;Resolved
Adds a “Resolution” tab to the enabled record type.
Fields added to enabled record type:ResolutionResolution_statetype
TeamTest (read-only) Provides support for integration with Rational TeamTest.
Adds Test Data and Environment tabs to the record type you specify.
Fields added to enabled record type:BuildCompanyComputerContactCustom1 (modifiable)Custom2 (modifiable)Custom3 (modifiable)Fixed_in_buildHardwareLogLog_FolderOld_internal_IDOperating_systemOther_EnvironmentResolution_DescriptionRequirementRequirement_IDTest_ScriptVerification_Point
UCMPolicyScripts Provides support for the UnifiedChangeManagement (UCM) package by adding three global scripts.
Does not add any record types.
Package Description Record type(s) added/modified Field(s)
174 Administering Rational ClearQuest
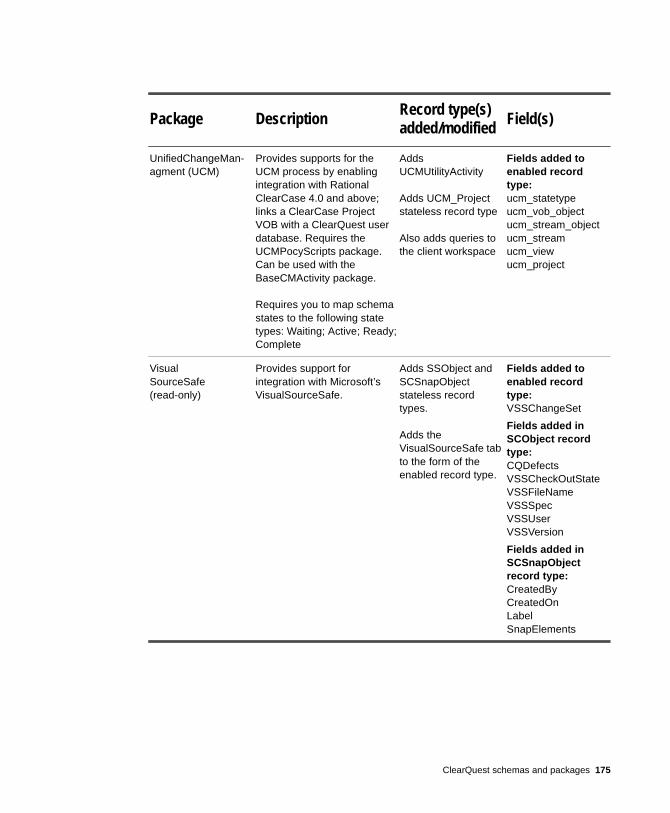
UnifiedChangeMan-agment (UCM)
Provides supports for the UCM process by enabling integration with Rational ClearCase 4.0 and above; links a ClearCase Project VOB with a ClearQuest user database. Requires the UCMPocyScripts package. Can be used with the BaseCMActivity package.
Requires you to map schema states to the following state types: Waiting; Active; Ready;Complete
Adds UCMUtilityActivity
Adds UCM_Project stateless record type
Also adds queries to the client workspace
Fields added to enabled record type: ucm_statetypeucm_vob_objectucm_stream_objectucm_streamucm_viewucm_project
VisualSourceSafe (read-only)
Provides support for integration with Microsoft’s VisualSourceSafe.
Adds SSObject and SCSnapObject stateless record types.
Adds the VisualSourceSafe tab to the form of the enabled record type.
Fields added to enabled record type:VSSChangeSet
Fields added in SCObject record type:CQDefectsVSSCheckOutStateVSSFileNameVSSSpecVSSUserVSSVersion
Fields added in SCSnapObject record type:CreatedByCreatedOnLabelSnapElements
Package Description Record type(s) added/modified Field(s)
ClearQuest schemas and packages 175
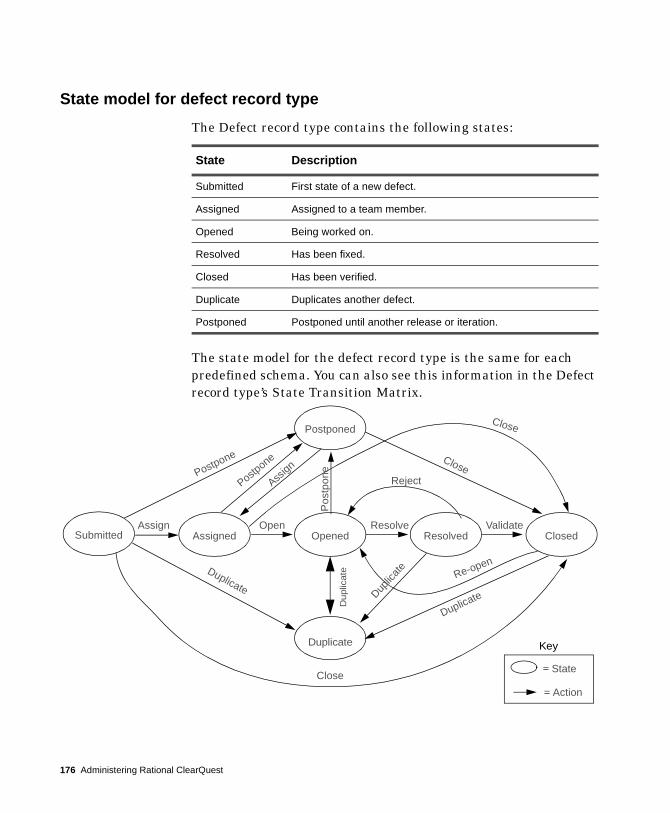
State model for defect record type
The Defect record type contains the following states:
The state model for the defect record type is the same for each predefined schema. You can also see this information in the Defect record type’s State Transition Matrix.
State Description
Submitted First state of a new defect.
Assigned Assigned to a team member.
Opened Being worked on.
Resolved Has been fixed.
Closed Has been verified.
Duplicate Duplicates another defect.
Postponed Postponed until another release or iteration.
Opened Resolved Closed
Duplicate
Open Resolve Validate
Re-open
Reject
Assigned
Postponed
Postpone
Assign
Pos
tpon
e
Close
Duplicate
Duplic
ate
Duplicate
Close
Postpone
Close
SubmittedAssign
Duplic
ate
Key
= State
= Action
176 Administering Rational ClearQuest

State model for Enhancement Request record type
The EnhancementRequest record type contains the following states.
The following state model diagram shows how the EnhancementRequest record type moves from one state to another as the result of an action. You can also see this information in the EnhancementRequest record type’s State Transition Matrix.
State Description
Submitted First state of a new enhancement request.
Opened Being worked on.
Closed Has been verified.
Duplicate Duplicates another enhancement request.
ClosedClose
OpenedSubmittedOpen
Duplicate
Close
Duplicate
Re-open
CloseKey
= State
= Action
ClearQuest schemas and packages 177
State type models for packages
A state type is a label that defines a state’s role in your state model. Some ClearQuest schemas and packages require that each state in your state model be assigned or mapped to a specific state type. For example, the UnifiedChangeManagement schema and package use state types to invoke certain ClearCase triggers. ClearQuest’s Resolution package uses state types to invoke certain ClearCase hooks when a record’s state transitions to a state mapped to the “resolved” state type.
When you add a new state to a schema that uses state types, you must map the new state to a state type.
For an overview of the UCM-ClearQuest integration, see Managing Software Projects with ClearCase. To learn about the UnifiedChangeManagement schema and package, see Enabling ClearQuest for Unified Change Management on page 181.
178 Administering Rational ClearQuest
UnifiedChangeManagement package state type model
The following table and diagram show the state types and a valid state mapping for the UCM package. The default actions of the states must provide a complete transition through the state type model.
State Type DescriptionMapped state inUCM schema
Waiting Record not yet assigned, triaged, or scheduled.
SubmittedPostponed
Ready Record appears in the assigned user’s To Do List query.
Assigned
Active User has started working on the record, which can now contain ClearCase element information.
Opened
Complete User has completed work on the record, which is now associated with a ClearCase project and its ClearCase elements.
ResolvedClosedDuplicate
Opened ResolvedValidate
ClosedResolve
= State
= Default Action
SubmitOpen
AssignedAssign
= State Type
WAITING READY ACTIVE COMPLETE
= Mapping
ClearQuest schemas and packages 179
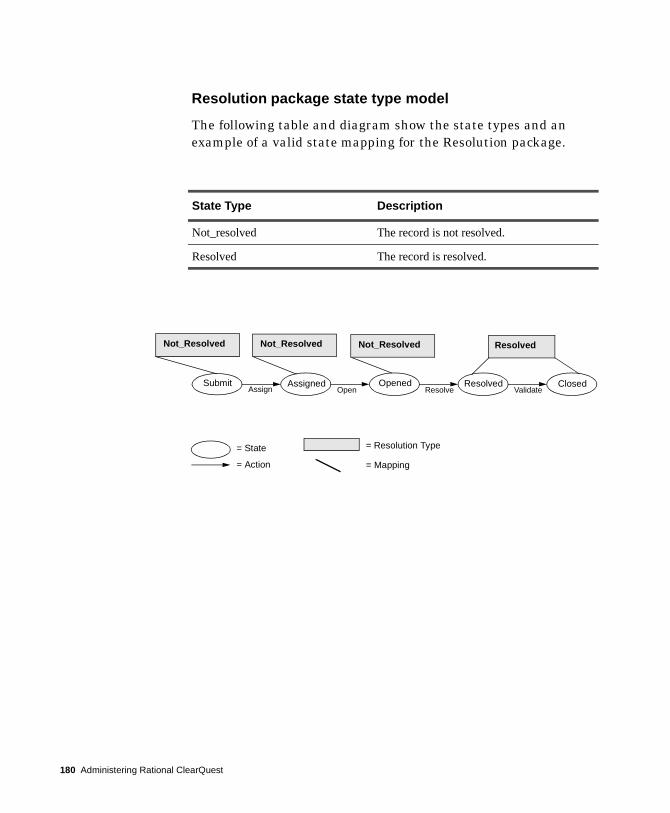
Resolution package state type model
The following table and diagram show the state types and an example of a valid state mapping for the Resolution package.
State Type Description
Not_resolved The record is not resolved.
Resolved The record is resolved.
Opened ResolvedValidate
ClosedResolve
= State
= Action
SubmitOpen
AssignedAssign
= Resolution Type
Not_Resolved
= Mapping
Not_Resolved Not_Resolved Resolved
180 Administering Rational ClearQuest
A D M I N I S T E R I N G R A T I O N A L C L E A R Q U E S T
B
Enabling ClearQuest for Unified Change ManagementThe ClearQuest/Unified Change Management (UCM) integration links all ClearCase UCM project activities to ClearQuest records. The integration requires the following:
■ A ClearQuest schema enabled for UCM■ ClearCase 4.x with a project enabled to work with ClearQuest
ClearQuest provides two predefined schemas that are UCM-enabled: the UnifiedChangeManagement and Enterprise schemas. The easiest way to implement UCM is to use one of the predefined schemas.
If you want to use the UCM integration with another schema, you need to add the following schema packages:
■ UCMPolicyScripts■ UnifiedChangeManagement
The next section describes how to install the packages. See Appendix A, “ClearQuest schemas and packages,” for detailed information on the content of these packages.
Note: The information provided here describes how to enable ClearQuest for UCM. For complete information on setting up and using the UCM integration, and understanding the UCM process, see the Managing Software Projects with ClearCase guide provided with ClearCase.
181
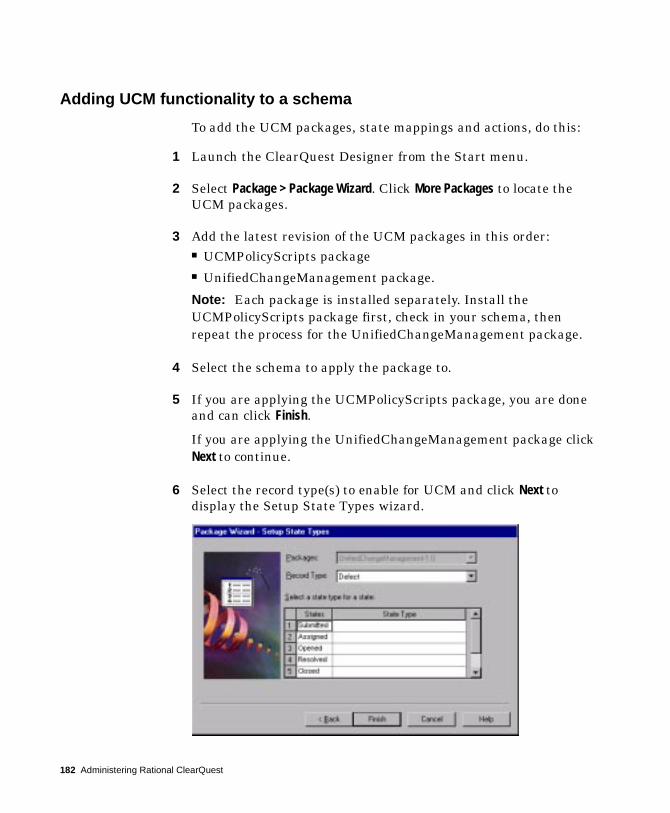
Adding UCM functionality to a schema
To add the UCM packages, state mappings and actions, do this:
1 Launch the ClearQuest Designer from the Start menu.
2 Select Package > Package Wizard. Click More Packages to locate the UCM packages.
3 Add the latest revision of the UCM packages in this order:■ UCMPolicyScripts package■ UnifiedChangeManagement package.
Note: Each package is installed separately. Install the UCMPolicyScripts package first, check in your schema, then repeat the process for the UnifiedChangeManagement package.
4 Select the schema to apply the package to.
5 If you are applying the UCMPolicyScripts package, you are done and can click Finish.
If you are applying the UnifiedChangeManagement package click Next to continue.
6 Select the record type(s) to enable for UCM and click Next to display the Setup State Types wizard.
182 Administering Rational ClearQuest
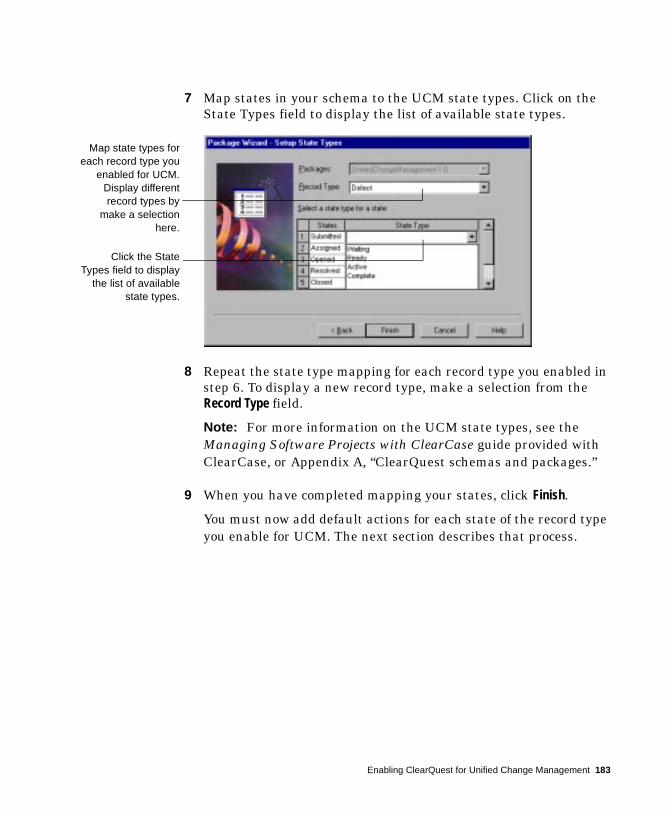
7 Map states in your schema to the UCM state types. Click on the State Types field to display the list of available state types.
8 Repeat the state type mapping for each record type you enabled in step 6. To display a new record type, make a selection from the Record Type field.
Note: For more information on the UCM state types, see the Managing Software Projects with ClearCase guide provided with ClearCase, or Appendix A, “ClearQuest schemas and packages.”
9 When you have completed mapping your states, click Finish.
You must now add default actions for each state of the record type you enable for UCM. The next section describes that process.
Click the StateTypes field to display
the list of availablestate types.
Map state types foreach record type you
enabled for UCM.Display differentrecord types by
make a selectionhere.
Enabling ClearQuest for Unified Change Management 183
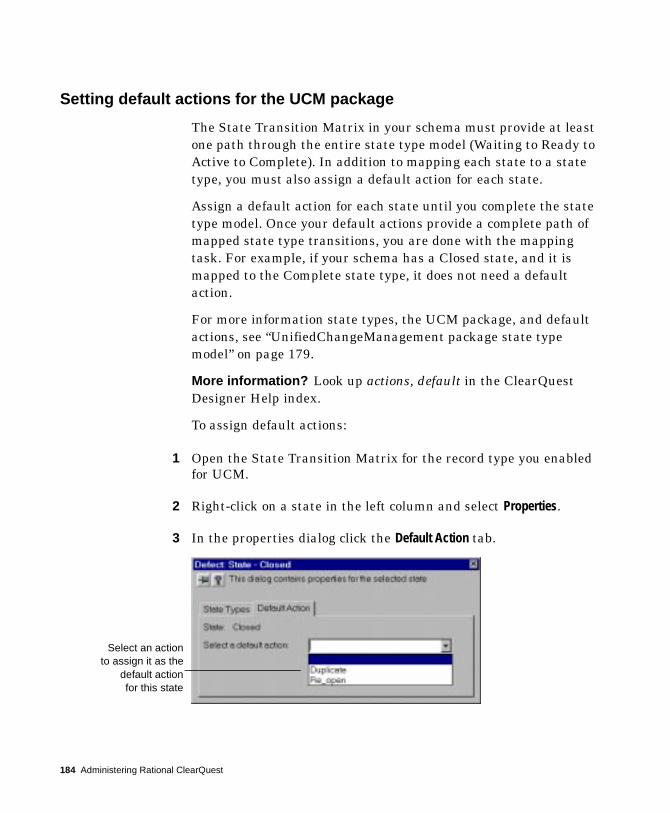
Setting default actions for the UCM package
The State Transition Matrix in your schema must provide at least one path through the entire state type model (Waiting to Ready to Active to Complete). In addition to mapping each state to a state type, you must also assign a default action for each state.
Assign a default action for each state until you complete the state type model. Once your default actions provide a complete path of mapped state type transitions, you are done with the mapping task. For example, if your schema has a Closed state, and it is mapped to the Complete state type, it does not need a default action.
For more information state types, the UCM package, and default actions, see “UnifiedChangeManagement package state type model” on page 179.
More information? Look up actions, default in the ClearQuest Designer Help index.
To assign default actions:
1 Open the State Transition Matrix for the record type you enabled for UCM.
2 Right-click on a state in the left column and select Properties.
3 In the properties dialog click the Default Action tab.
Select an actionto assign it as the
default actionfor this state
184 Administering Rational ClearQuest
4 Select a default action from the list. The choices on the list depend on the actions you have created for your state transitions in the State Transition Matrix.
For each state, select the action that brings the record to a state that is associated with the next state type in the model. For example, the Submitted state (Waiting) moves to the Assigned state (Ready) through the Assign default action. The Waiting to Ready to Active to Complete model must be traversed through the default actions. For an example of a complete model see, “UnifiedChangeManagement package state type model” on page 179.
For more information on state types and default actions, see Chapter 5, “Customizing a schema.” For complete information on setting up and using the UCM integration, and understanding the UCM process, see the Managing Software Projects with ClearCase guide provided with ClearCase.
Enabling ClearQuest for Unified Change Management 185

186 Administering Rational ClearQuest
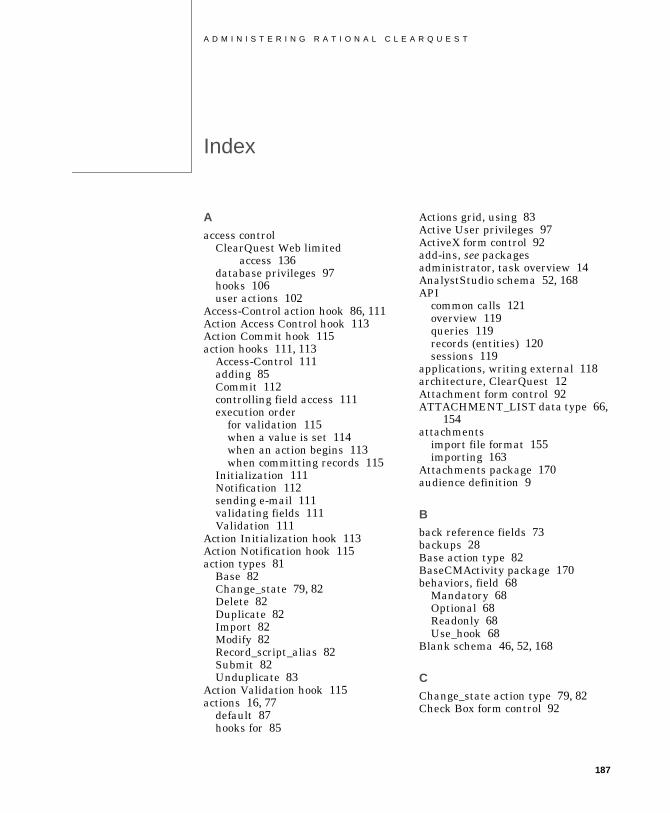
A D M I N I S T E R I N G R A T I O N A L C L E A R Q U E S T
Index
Aaccess control
ClearQuest Web limited access 136
database privileges 97hooks 106user actions 102
Access-Control action hook 86, 111Action Access Control hook 113Action Commit hook 115action hooks 111, 113
Access-Control 111adding 85Commit 112controlling field access 111execution order
for validation 115when a value is set 114when an action begins 113when committing records 115
Initialization 111Notification 112sending e-mail 111validating fields 111Validation 111
Action Initialization hook 113Action Notification hook 115action types 81
Base 82Change_state 79, 82Delete 82Duplicate 82Import 82Modify 82Record_script_alias 82Submit 82Unduplicate 83
Action Validation hook 115actions 16, 77
default 87hooks for 85
Actions grid, using 83Active User privileges 97ActiveX form control 92add-ins, see packagesadministrator, task overview 14AnalystStudio schema 52, 168API
common calls 121overview 119queries 119records (entities) 120sessions 119
applications, writing external 118architecture, ClearQuest 12Attachment form control 92ATTACHMENT_LIST data type 66,
154attachments
import file format 155importing 163
Attachments package 170audience definition 9
Bback reference fields 73backups 28Base action type 82BaseCMActivity package 170behaviors, field 68
Mandatory 68Optional 68Readonly 68Use_hook 68
Blank schema 46, 52, 168
CChange_state action type 79, 82Check Box form control 92
187

188
choice listsbehaviors 110limiting value options 111reinitializing 111
Choice-List field hook 74, 109ClearCase package 170ClearQuest
architecture 12client 13components 12Designer 13Designer tutorial 9documentation 9Export Tool 13Import Tool 157Maintenance Tool 13setup 18
ClearQuest Designer 13tutorial 9
ClearQuest Export Tool 13switching schemas 37
ClearQuest Import Tool, importing from another system 157
ClearQuest Maintenance Tool 13changing vendor database 29
ClearQuest Web 13, 135see also web client
Combo Box form control 92Commit action hook 86, 112Common schema 52, 168Constant-List field hook 110Constant-Value field hook 110controls, form 92
ActiveX 92Attachment 92Check Box 92Combo Box 92Drop-down Combo Box 92Drop-down List Box 92Duplicate Box 92Duplicate Dependent 92Group Box 92History 92List Box 92List View 92Option Button 92Parent/child 92Picture 92Push Button 92Static Text 92Text Box 92
conversion, to ClearQuest 149CQLOAD 55Customer package 171
Ddata
backing up 28exporting from other systems 153how stored 26manipulating 26
data import 149, 155attachments 163attachments file format 155delimiter 153, 158duplicate records 159, 164empty fields 153error file 158existing fields 159existing records 165exporting from other systems 153file format 153from the error file 161history file format 155history information 162mapping fields 160original (old) record ID 152performing the import 157reference fields 154supported data types 154unsupported data types 154
data types 66, 154mapping unsupported 154
database privileges 97database vendor, changing 29databases
associating with a schema 45, 51backing up 28changing vendors 29choosing a vendor 24creating 25deleting user databases 41location 23maintenance activities 27maintenance overview 26managing 21moving location 34moving schema repository 29moving user databases 31preserving integrity 26subscribing users 99

databases (continued)switching schemas 35test database 45types in ClearQuest 22undeleting user databases 42understanding 15upgrading user databases 51
date formats 155DATE_TIME data type 66, 154dates, format for importing 155default actions 87
setting for UCM 184default actions and UCM
package 80default record type 63Default Value field hook 74, 109Defect record type, state model 176DefectTracking schema 52, 168Delete action type 82delimiter, in import files 153, 158dependent fields
creating 75enabling for web client 76, 138
destination state 84DevelopmentStudio schema 52, 168display settings, in ClearQuest
Web 135display_name field 155, 156documentation, for ClearQuest 9double quotes, importing records
with 153Drop-down Combo Box form
control 92Drop-down List Box form control 92Duplicate action type 82Duplicate Box form control 92Duplicate Dependent form
control 92duplicate records, importing 159,
164Dynamic-List field hook 110
Ee-mail
configuring users 143Email_Rule record type 142fields to include 146format example 145format for submitting 145format guidelines 146
e-mail (continued)multi-line fields 146notification 142roundtrip 147submitting records via 144triggering notification 142
Email package 172E-mail Reader 144e-mail rules
access privileges 142creating 142setting up notification 142triggering notification 142
email, see e-mail or e-mail rulesEmail_Rule record type 142E-Mailreader tool 13empty fields, importing 153enabling ClearQuest for 181Enhancement Request package 171EnhancementRequest record type
state model 177Enterprise schema 52, 169entry-level databases 24error file 158
importing from 161execution order, for hooks 113existing records, upgrading previ-
ously imported 165Export tool 13exporting, data from other
systems 153external applications, writing 118
Ffield behaviors 68
default 69mandatory 68optional 68readonly 68use_hook 68
Field Choice List hook 114Field Default Value hook 113field hooks 109
adding 74Choice-List 74, 109Constant-List 110Constant-Value 110Default Value 74, 109Dynamic-List 110
189
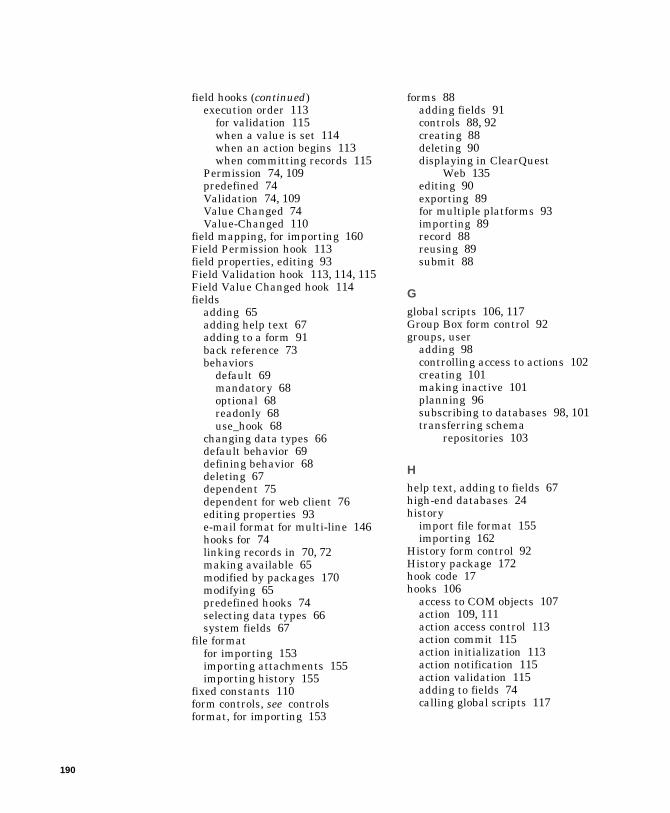
190
field hooks (continued)execution order 113
for validation 115when a value is set 114when an action begins 113when committing records 115
Permission 74, 109predefined 74Validation 74, 109Value Changed 74Value-Changed 110
field mapping, for importing 160Field Permission hook 113field properties, editing 93Field Validation hook 113, 114, 115Field Value Changed hook 114fields
adding 65adding help text 67adding to a form 91back reference 73behaviors
default 69mandatory 68optional 68readonly 68use_hook 68
changing data types 66default behavior 69defining behavior 68deleting 67dependent 75dependent for web client 76editing properties 93e-mail format for multi-line 146hooks for 74linking records in 70, 72making available 65modified by packages 170modifying 65predefined hooks 74selecting data types 66system fields 67
file formatfor importing 153importing attachments 155importing history 155
fixed constants 110form controls, see controlsformat, for importing 153
forms 88adding fields 91controls 88, 92creating 88deleting 90displaying in ClearQuest
Web 135editing 90exporting 89for multiple platforms 93importing 89record 88reusing 89submit 88
Gglobal scripts 106, 117Group Box form control 92groups, user
adding 98controlling access to actions 102creating 101making inactive 101planning 96subscribing to databases 98, 101transferring schema
repositories 103
Hhelp text, adding to fields 67high-end databases 24history
import file format 155importing 162
History form control 92History package 172hook code 17hooks 106
access to COM objects 107action 109, 111action access control 113action commit 115action initialization 113action notification 115action validation 115adding to fields 74calling global scripts 117

hooks (continued)execution order 113
for validation 115when a value is set 114when an action begins 113when committing records 115
field 109field choice list 114field default value 113field permission 113field validation 113, 114, 115field value changed 114for actions 85in the web client 137overview 106planning example 107planning to add 107predefined 74privileges 107scripting laguage 47, 106
HTML, for ClearQuest Web reports 135
IImport action type 82Import Tool, switching schemas 35importing
attachments 163attachments file format 155data into ClearQuest 149date formats 155delimiter 153, 158duplicate records 159, 164embedded double quotes 153empty fields 153error file 158existing fields 159file format 153from the error file 161history 162history file format 155mapping fields 160originial (old) record ID 152perfoming the import 157planning process 151process overview 150reference fields 154upgrading existing records 165
initialization 106
Initialization action hook 86, 111INT data type 66, 154integrations, with Unified Change
Management 181
Kkeys, assigning unique to sateless
record type 62
Llanguages, specifying for
scripting 47, 106List Box form control 92List View form control 92lists
choice 110, 111dynamic 109, 110
MMandatory field behavior 68mapping
fields for importing 160state types for UCM 183
master database, see schema reposi-tory
message boxes, in ClearQuest Web 138
metadata 15, 43Modify action type 82MULTILINE_STRING data
type 66, 154multi-platform forms 93
NNotes package 172notification
setting up e-mail rules 142triggering 142
Notification action hook 86, 112notification hooks 106
OOption Button form control 92Optional field behavior 68original (old) record ID 152
191
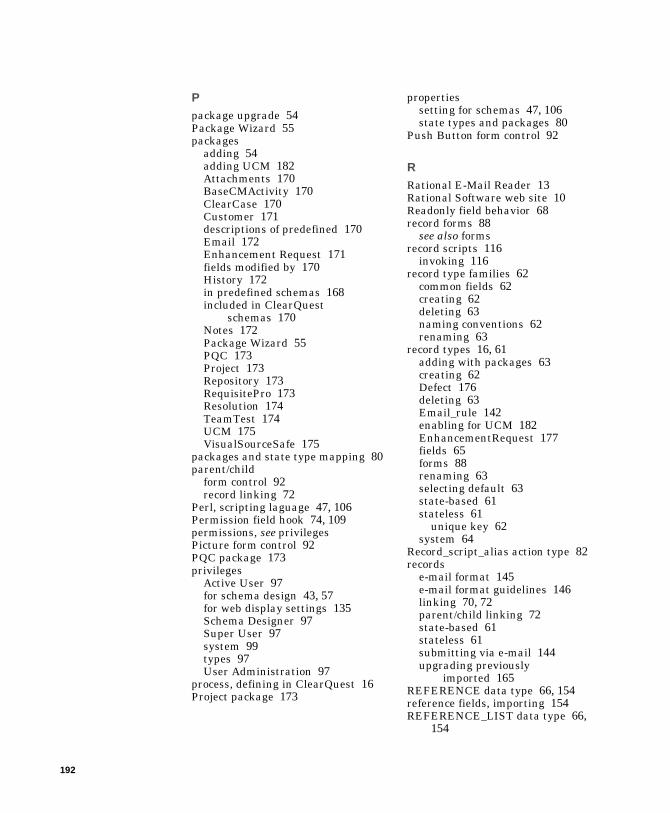
192
Ppackage upgrade 54Package Wizard 55packages
adding 54adding UCM 182Attachments 170BaseCMActivity 170ClearCase 170Customer 171descriptions of predefined 170Email 172Enhancement Request 171fields modified by 170History 172in predefined schemas 168included in ClearQuest
schemas 170Notes 172Package Wizard 55PQC 173Project 173Repository 173RequisitePro 173Resolution 174TeamTest 174UCM 175VisualSourceSafe 175
packages and state type mapping 80parent/child
form control 92record linking 72
Perl, scripting laguage 47, 106Permission field hook 74, 109permissions, see privilegesPicture form control 92PQC package 173privileges
Active User 97for schema design 43, 57for web display settings 135Schema Designer 97Super User 97system 99types 97User Administration 97
process, defining in ClearQuest 16Project package 173
propertiessetting for schemas 47, 106state types and packages 80
Push Button form control 92
RRational E-Mail Reader 13Rational Software web site 10Readonly field behavior 68record forms 88
see also formsrecord scripts 116
invoking 116record type families 62
common fields 62creating 62deleting 63naming conventions 62renaming 63
record types 16, 61adding with packages 63creating 62Defect 176deleting 63Email_rule 142enabling for UCM 182EnhancementRequest 177fields 65forms 88renaming 63selecting default 63state-based 61stateless 61
unique key 62system 64
Record_script_alias action type 82records
e-mail format 145e-mail format guidelines 146linking 70, 72parent/child linking 72state-based 61stateless 61submitting via e-mail 144upgrading previously
imported 165REFERENCE data type 66, 154reference fields, importing 154REFERENCE_LIST data type 66,
154
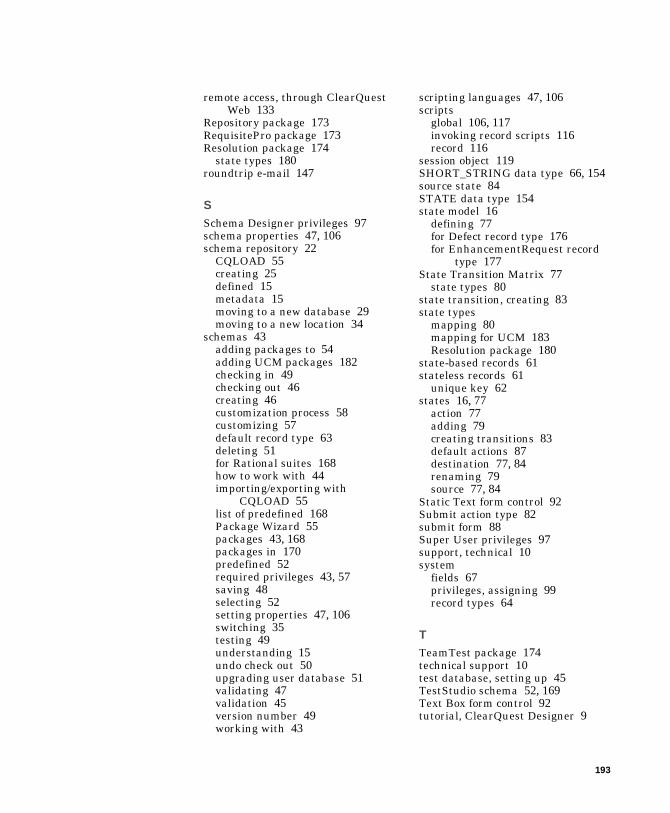
remote access, through ClearQuest Web 133
Repository package 173RequisitePro package 173Resolution package 174
state types 180roundtrip e-mail 147
SSchema Designer privileges 97schema properties 47, 106schema repository 22
CQLOAD 55creating 25defined 15metadata 15moving to a new database 29moving to a new location 34
schemas 43adding packages to 54adding UCM packages 182checking in 49checking out 46creating 46customization process 58customizing 57default record type 63deleting 51for Rational suites 168how to work with 44importing/exporting with
CQLOAD 55list of predefined 168Package Wizard 55packages 43, 168packages in 170predefined 52required privileges 43, 57saving 48selecting 52setting properties 47, 106switching 35testing 49understanding 15undo check out 50upgrading user database 51validating 47validation 45version number 49working with 43
scripting languages 47, 106scripts
global 106, 117invoking record scripts 116record 116
session object 119SHORT_STRING data type 66, 154source state 84STATE data type 154state model 16
defining 77for Defect record type 176for EnhancementRequest record
type 177State Transition Matrix 77
state types 80state transition, creating 83state types
mapping 80mapping for UCM 183Resolution package 180
state-based records 61stateless records 61
unique key 62states 16, 77
action 77adding 79creating transitions 83default actions 87destination 77, 84renaming 79source 77, 84
Static Text form control 92Submit action type 82submit form 88Super User privileges 97support, technical 10system
fields 67privileges, assigning 99record types 64
TTeamTest package 174technical support 10test database, setting up 45TestStudio schema 52, 169Text Box form control 92tutorial, ClearQuest Designer 9
193

194
UUnduplicate action type 83Unified Change Management
adding UCM to a schema 182and BaseCMActivity 170default actions 80enabling record types for 182mapping state types 183package 175package installation order 181,
182setting default actions 184UCM-enabled schemas 181
UnifiedChangeManagement schema 52, 169
unique key, for stateless record type 62
upgrade of packageadding to schemas 54
Use_hook field behavior 68user
privilegesActive user 97Schema Designer 97Super User 97
User Administrator privileges 97user databases 22
creating 25deleting 41moving to a new database 31moving to a new location 34switching schemas 35undeleting 42upgrading 51
user groupsadding 98assigning action access 102creating 101making inactive 101planning 96subscribing to databases 98, 101transferring schema
repositories 103users
adding 98assigning action access 102changing information 99configuring e-mail 143controlling access to actions 102editing personal information 99
users (continued)limiting ClearQuest Web
access 136making inactive 99modifying 99modifying profile 99planning 96privileges 97
User Administration 97privileges for setting up 95subscribing to databases 98, 99transferring between
repositories 103transferring schema
repositories 103Windows accounts 98
Vvalidation
hooks 106of a schema 45
Validation action hook 86, 111Validation field hook 74, 109Value-Changed field hook 74, 110VBScript, scripting language 47,
106VisualSourceSafe package 175
Wweb client 13
configuring display settings 135dependent fields for 76, 138detecting a web session 139different from native 135displaying messages 138for remote user access 133limiting access 136reports 135required privileges 135using hooks 137
web entry, ClearQuest Web access 136
web sessiondetecting 139Perl example 139VBScript example 139
web site, Rational Software 10